Westinghouse DWM55F1Y1 User Manual LCD TV Manuals And Guides 1403658L
User Manual: Westinghouse DWM55F1Y1 DWM55F1Y1 WESTINGHOUSE LCD TV - Manuals and Guides View the owners manual for your WESTINGHOUSE LCD TV #DWM55F1Y1. Home:Electronics Parts:Westinghouse Parts:Westinghouse LCD TV Manual
Open the PDF directly: View PDF ![]() .
.
Page Count: 35
@
USER'SMAN UAL
DWM55F1Y1
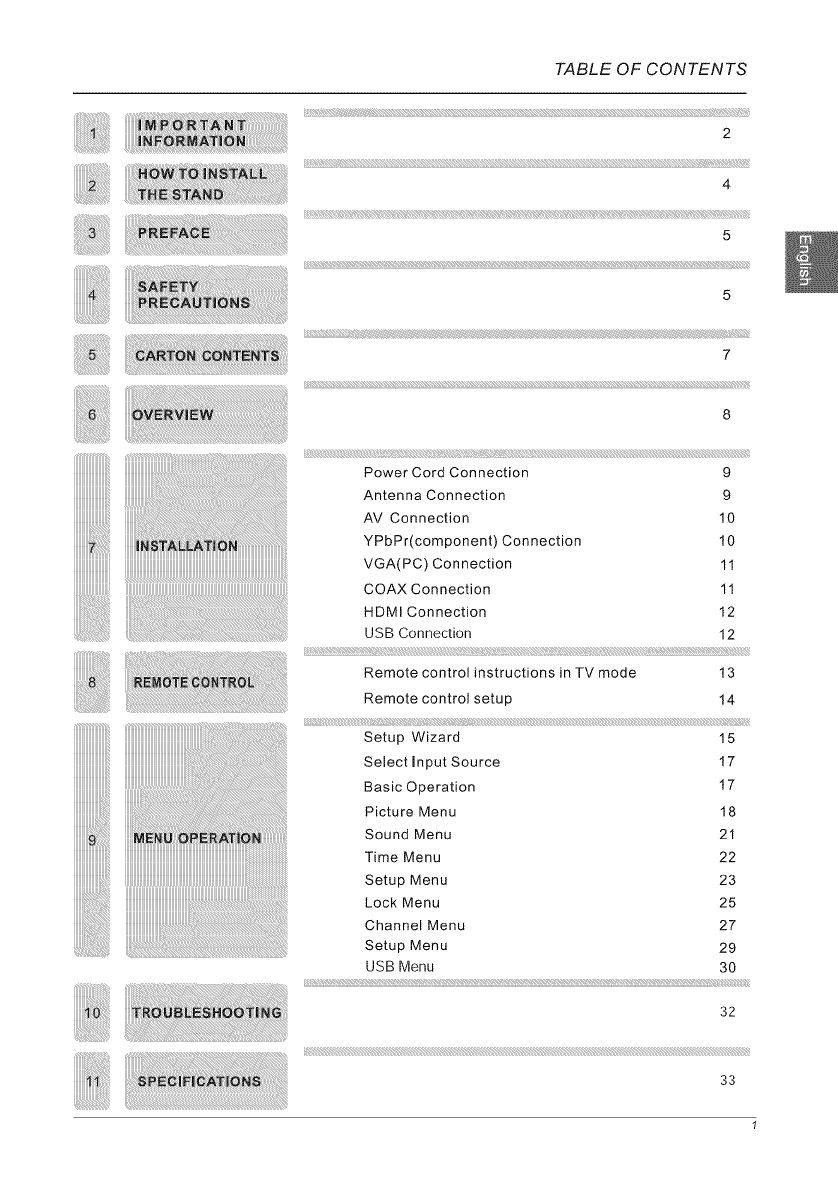
TABLE OF CONTENTS
2
4
5
5
7
Power Cord Connection 9
Antenna Connection 9
AV Connection 10
YPbPr(component) Connection 10
VGA(PC) Connection 11
COAX Connection 11
HDMI Connection 12
USB Connection 12
iiiiiliii_¸I¸i_iiiill¸iiiiiiiiiiiii¸iiiiiiii¸iiiiiiii¸iiiiiiii¸iiiiiiii¸I¸!:!!iiiiiii!iilii!!!!!!!!!!!!!!!!!!!!!!!!!!!!!!!!!!!!!!!!!!!!!iJ!!ii!il¸il!ill¸iii!:ii¸iiiSi¸iliili_!!iiiiiii¸iiiiiiiiiiiiiii¸ii¸iiiiliiliiiiiiiiiiliiiii¸iiiiiiiiiiiiiiiiiiiiiiiiii! !!i)i!_!i i!iii;iiii!iiiiiiiiiiiiiiiiiiiiiiiiiiiiiiiiiiiiiiiiii!i!i_!!!!!!!!!ii
Remote control instructions in TV mode 13
Remote control setup 14
Setup Wizard 15
Select Input Source 17
Basic Operation 17
Picture Menu 18
Sound Menu 21
Time Menu 22
Setup Menu 23
Lock Menu 25
Channel Menu 27
Setup Menu 29
USB Menu 30
32
33
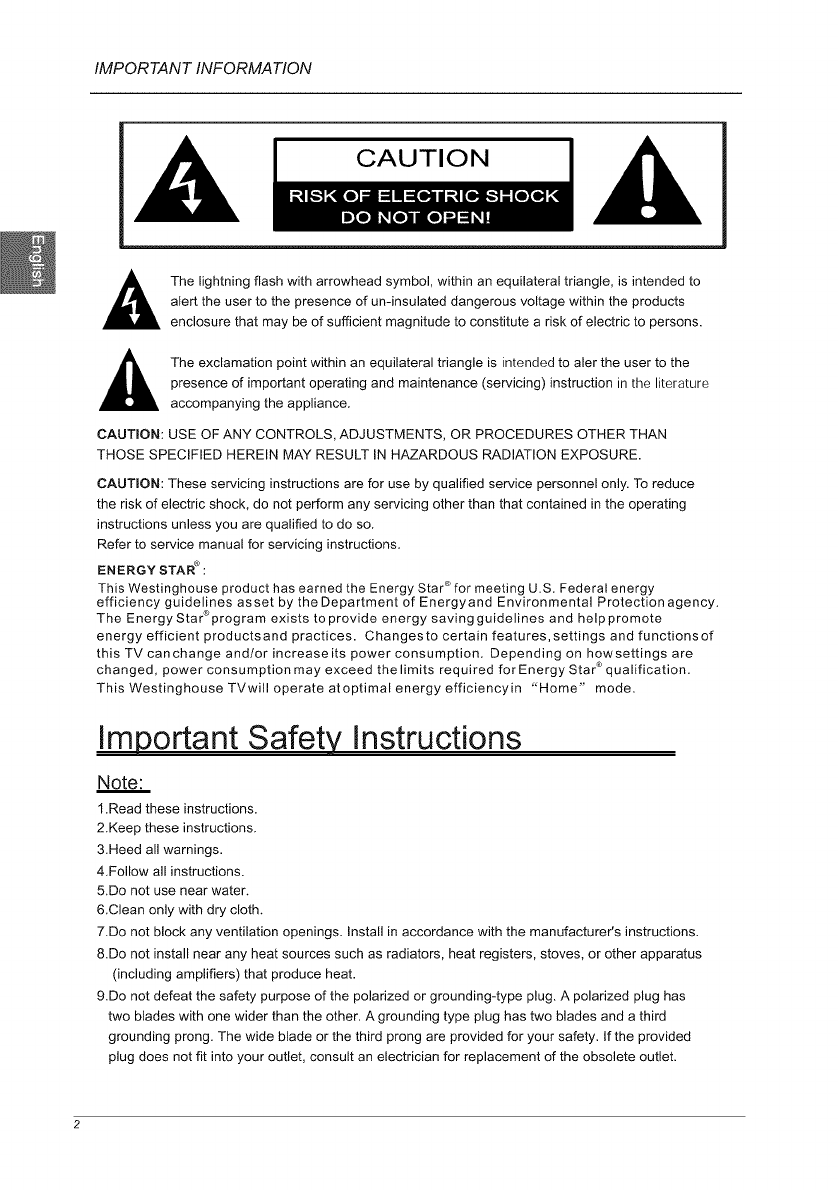
IMPORTANT INFORMATION
CAUTION
,_ The lightning flash with arrowhead symbol, within an equilateral triangle, is intended to
alert the user to the presence of un-insulated dangerous voltage within the products
enclosure that may be of sufficient magnitude to constitute a risk of electric to persons.
,_ The exclamation point within an equilateral triangle is intended to aler the user to the
presence of important operating and maintenance (servicing) instruction in the literature
accompanying the appliance.
CAUTION: USE OF ANY CONTROLS, ADJUSTMENTS, OR PROCEDURES OTHER THAN
THOSE SPECIFIED HEREIN MAY RESULT IN HAZARDOUS RADIATION EXPOSURE.
CAUTION: These servicing instructions are for use by qualified service personnel only. To reduce
the risk of electric shock, do not perform any servicing other than that contained in the operating
instructions unless you are qualified to do so.
Refer to service manual for servicing instructions.
ENERGY STAR®:
This Westinghouse product has earned the Energy Star ®for meeting U.S. Federal energy
efficiency guidelines as set by the Department of Energy and Environmental Protection agency.
The Energy Star®program exists to provide energy saving guidelines and help promote
energy efficient productsand practices. Changesto certain features,settings and functionsof
this TV canchange and/or increaseits power consumption. Depending on howsettings are
changed, power consumption may exceed the limits required for Energy Star ®qualification.
This Westinghouse TVwill operate atoptimal energy efficiencyin "Home" mode.
Important Safety Instructions
Note:
1.Read these instructions.
2.Keep these instructions.
3.Heed all warnings.
4.Follow all instructions.
5.Do not use near water.
6.Clean only with dry cloth.
7.Do not block any ventilation openings. Install in accordance with the manufacturer's instructions.
8.Do not install near any heat sources such as radiators, heat registers, stoves, or other apparatus
(including amplifiers) that produce heat.
9.Do not defeat the safety purpose of the polarized or grounding-type plug. A polarized plug has
two blades with one wider than the other. A grounding type plug has two blades and a third
grounding prong. The wide blade or the third prong are provided for your safety. If the provided
plug does not fit into your outlet, consult an electrician for replacement of the obsolete outlet.
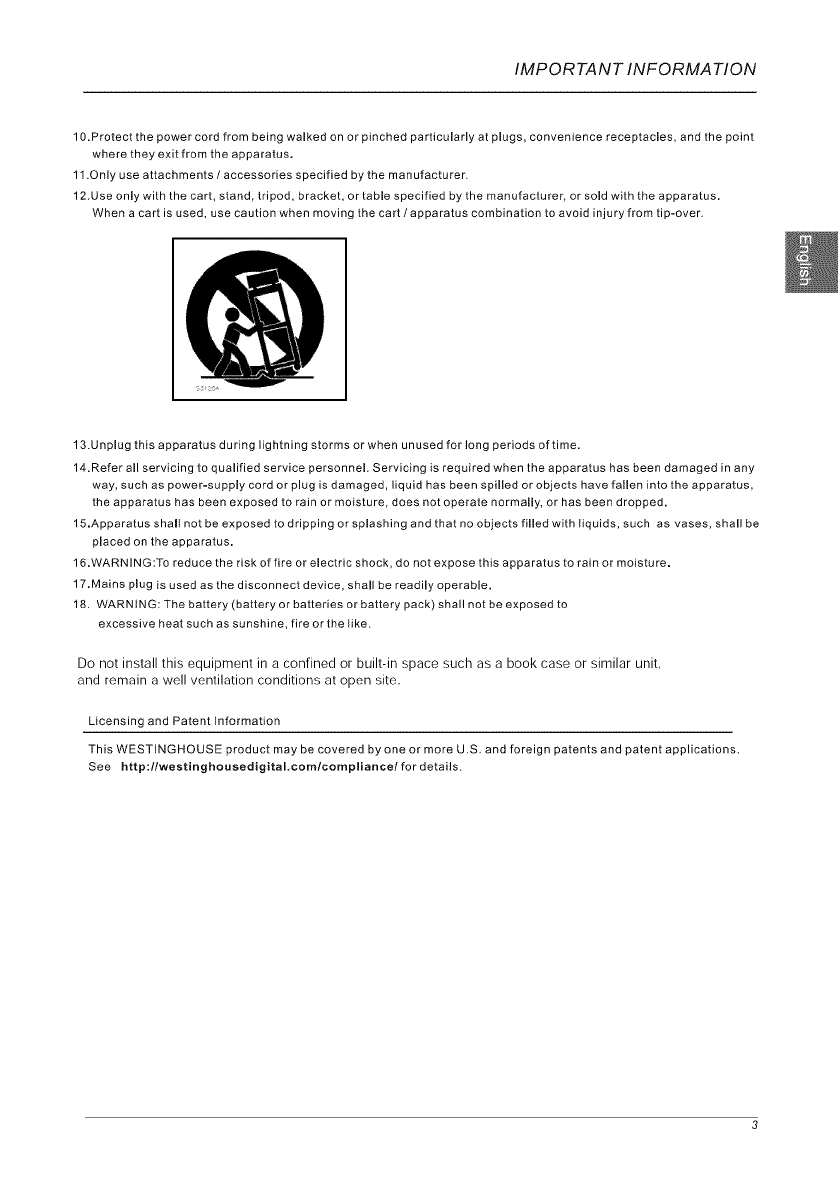
IMPORTANT INFORMATION
10.Protect the power cord from being walked on or pinched particularly at plugs, convenience receptacles, and the point
where they exit from the apparatus.
11 .Only use attachments /accessories specified by the manufacturer.
12.Use only with the cart, stand, tripod, bracket, or table specified by the manufacturer, or sold with the apparatus.
When a cart is used, use caution when moving the cart /apparatus combination to avoid injury from tip-over.
13.Unplug this apparatus during lightning storms or when unused for long periods of time.
14.Refer all servicing to qualified service personnel. Servicing is required when the apparatus has been damaged in any
way, such as power-supply cord or plug is damaged, liquid has been spilled or objects have fallen into the apparatus,
the apparatus has been exposed to rain or moisture, does not operate normally, or has been dropped.
15.Apparatus shall not be exposed to dripping or splashing and that no objects filled with liquids, such as vases, shall be
placed on the apparatus.
16.WARNING:To reduce the risk of fire or electric shock, do not expose this apparatus to rain or moisture.
17.Mains plug is used as the disconnect device, shall be readily operable.
18. WARNING: The battery (battery or batteries or battery pack) shall not be exposed to
excessive heat such as sunshine, fire or the like.
Do not install this equipment in a confined or built-in space such as a book case or similar unit,
and remain a well ventilation conditions at open site.
Licensing and Patent Information
This WESTINGHOUSE product may be covered by one or more U.S. and foreign patents and patent applications.
See http:llwestinghousedigital,cornlcompliancel for details.
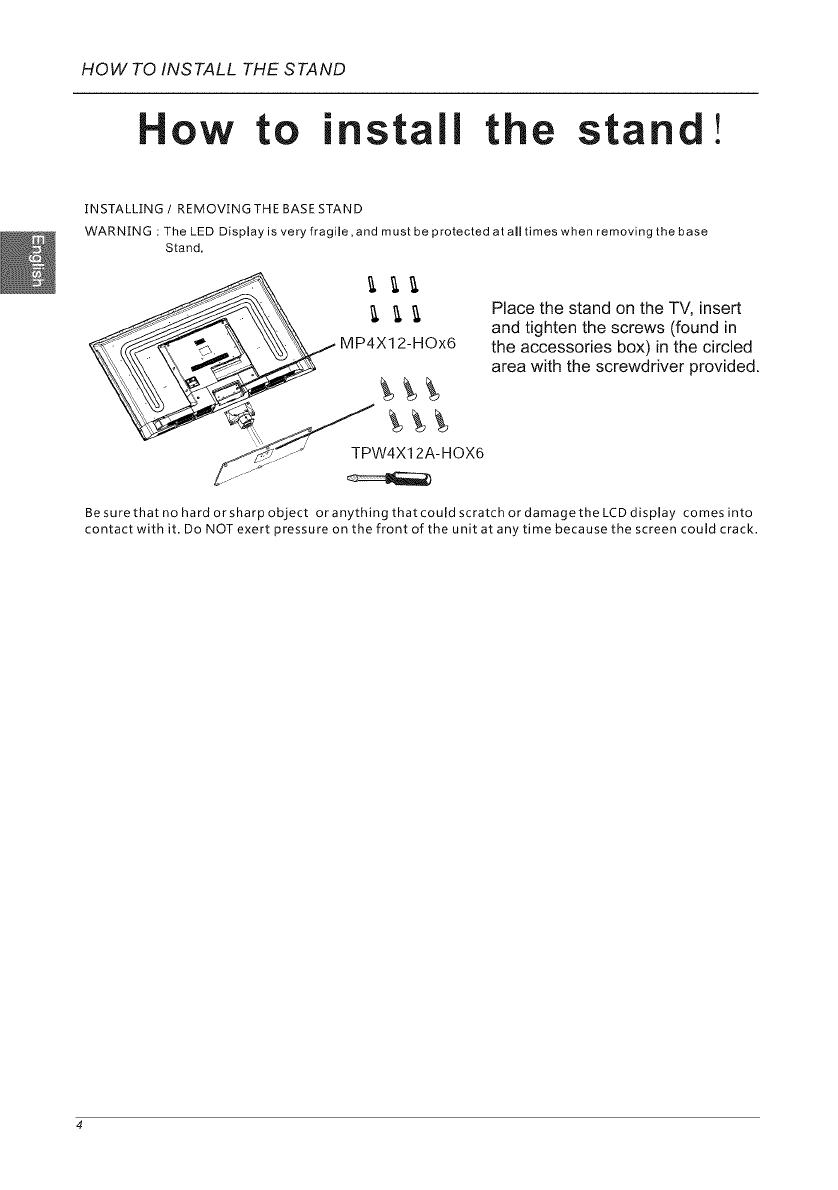
HOW TO INSTALL THE STAND
How to install the stand!
INSTALLING /REMOVING THE BASE STAND
WARNING : The LED Display is very fragile, and must be protected at all times when removing the base
Stand.
•Place the stand on the TV, insert
and tighten the screws (found in
the accessories box) in the circled
area with the screwdriver provided.
Besurethat no hard or sharp object oranythingthatcould scratch or damage the LCDdisplay comes into
contact with it. Do NOT exert pressure on the front of the unit at any time because the screen could crack.
PREFA CE
3, PREFACE
Thank you for buying this TV! Please read this manual thorougHy before operating the TV.
Make sure theTVwas not damaged in transit. If theTV is damaged, de not installit and
contact the Westinghouse Customer Service,
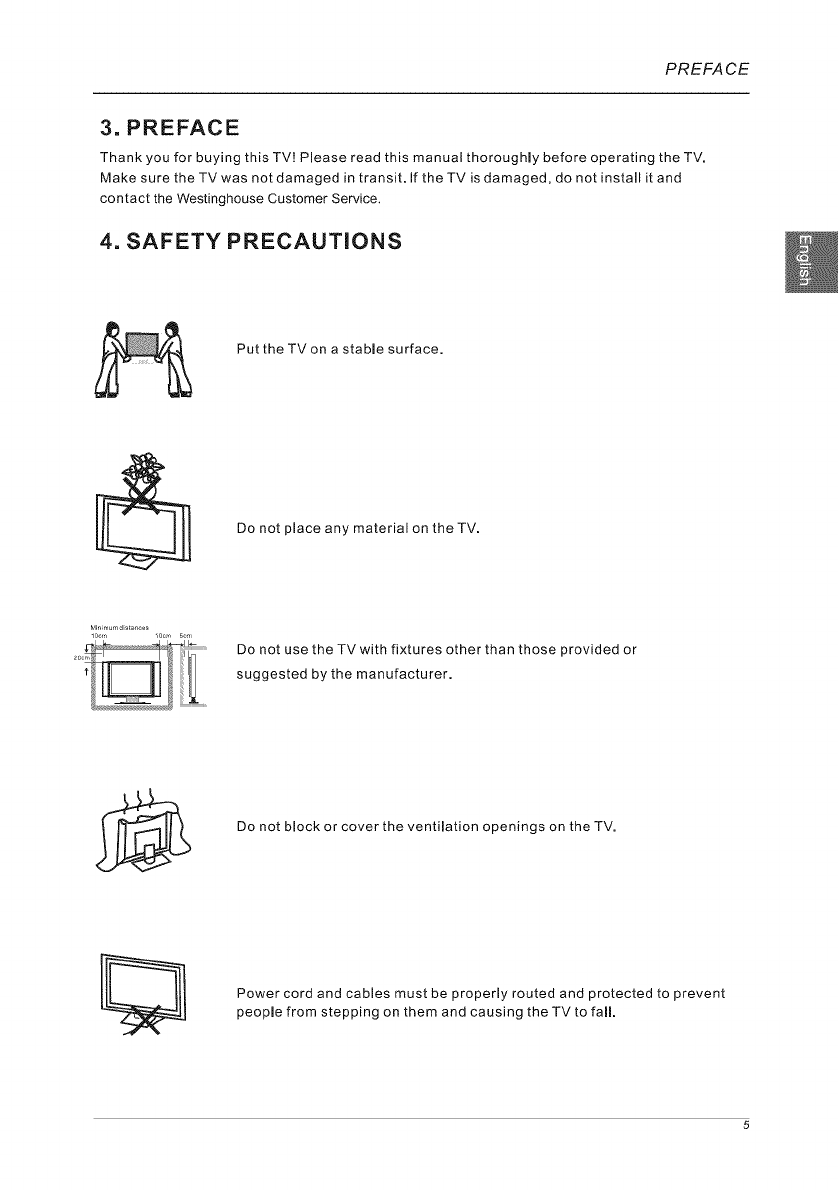
4. SAFETY PRECAUTIONS
Put the TVon a stable surface.
Do not place any material on the TV.
2°° ...........
Do not use the TVwith fixtures other than those provided or
suggested by the manufacturer.
Do not block or cover the ventilation openings on the TV.
Power cord and cables must be properly routed and protected to prevent
people from stepping on them and causing the TV to fall.
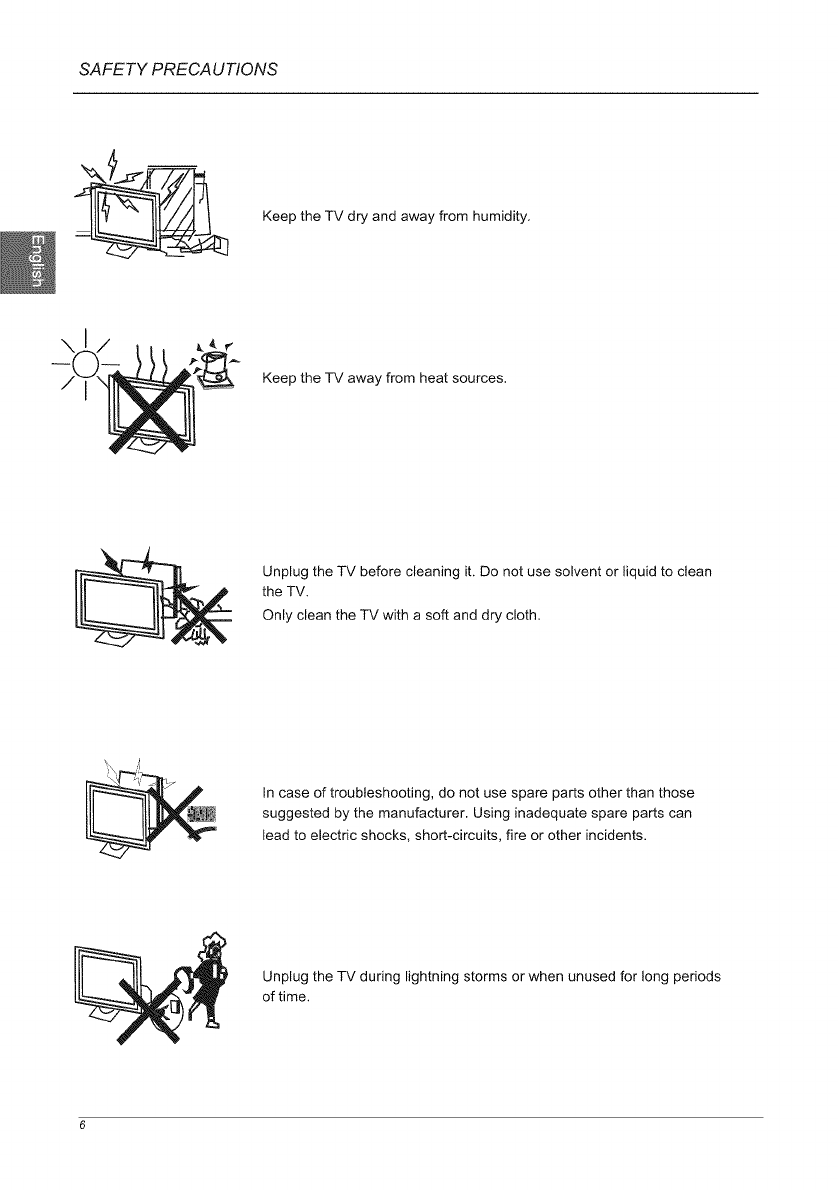
SAFETY PRECAUTIONS
Keep the TV dry and away from humidity.
Keep the TV away from heat sources.
Unplug the TV before cleaning it. Do not use solvent or liquid to clean
the TV.
Only clean the TV with a soft and dry cloth.
In case of troubleshooting, do not use spare parts other than those
suggested by the manufacturer. Using inadequate spare parts can
lead to electric shocks, short-circuits, fire or other incidents.
Unplug the TV during lightning storms or when unused for long periods
of time.
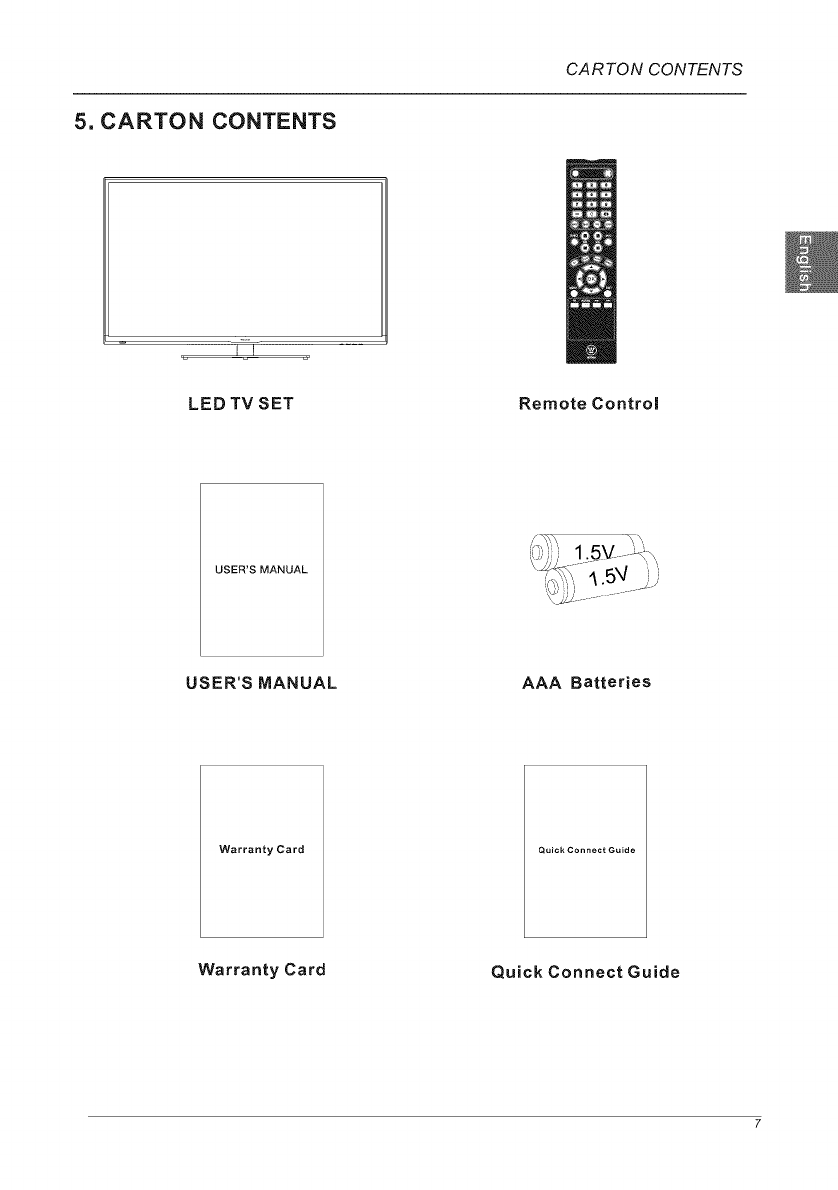
5. CARTON CONTENTS
CARTON CONTENTS
I I
LED TV SET Remote Control
USER'S MANUAL
USER'S MANUAL AAA Batteries
Warranty Card Quick Connect Guide
Warranty Card Quick Connect Guide
OVERVIEW
r I
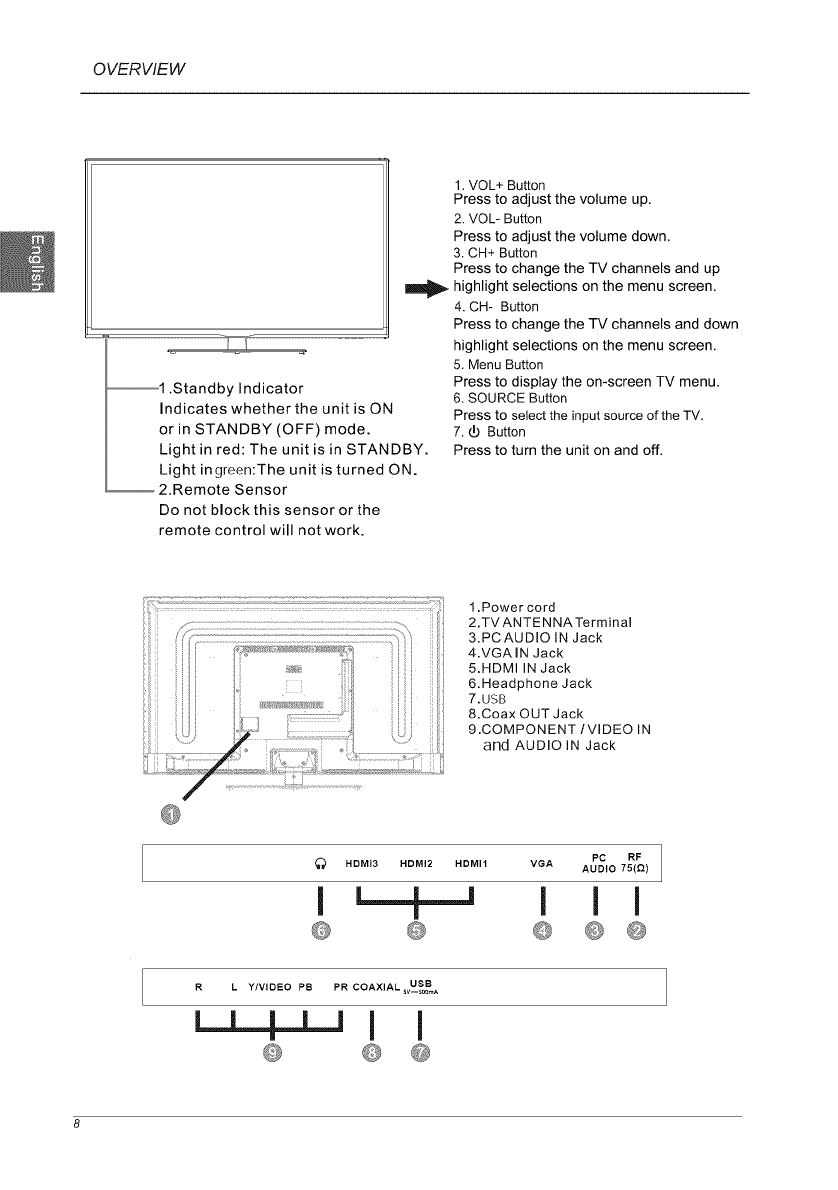
_1 .Standby Indicator
Indicates whether the unit is ON
or in STANDBY (OFF) mode.
Light in red: The unit is in STANDBY.
Light ingreen:The unit is turned ON.
2.Remote Sensor
Do not block this sensor or the
remote control will not work.
1. VOL+ Button
Press to adjust the volume up.
2. VOL- Button
Press to adjust the volume down.
3. CH+ Button
Press to change the TV channels and up
highlight selections on the menu screen.
4, CH- Button
Press to change the TV channels and down
highlight selections on the menu screen,
5, Menu Button
Press to display the on-screen TV menu.
6. SOURCE Button
Press to select the input source of the TV.
7, _ Button
Press to turn the unit on and off.
1.Power cord
2.TV ANTENNATerminal
3.PCAUDIO IN Jack
4.VGA IN Jack
5.HDMI IN Jack
6.Headphone Jack
7.USB
8.Coax OUT Jack
9.COMPONENT/VmDEO IN
and AUDIO IN Jack
HDMI3 HDMI2 HDMII VGA PC RF
AUDIO 75(Q)
I L--L-J I II
|
R L Y/VIDEO PB PR COAXIAL _vU_S_BA
I I
INSTALLATION
7. iNSTALLATiON
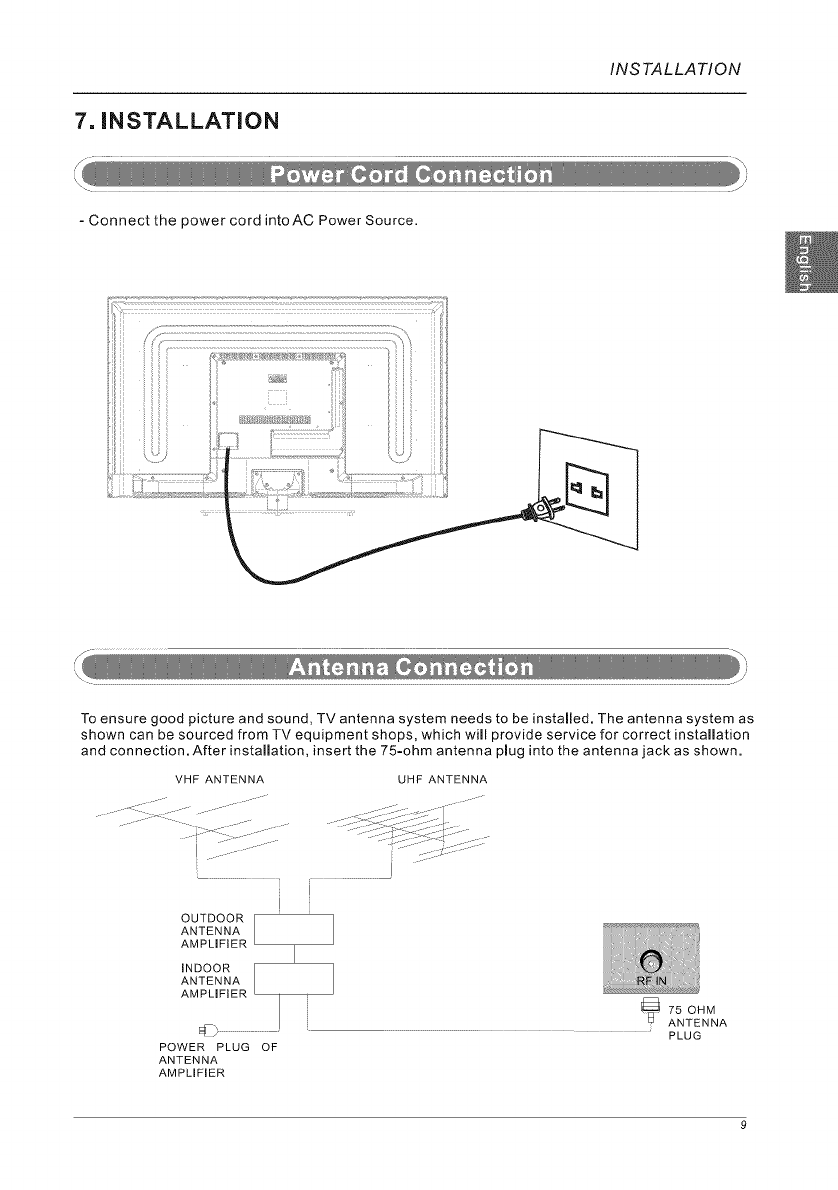
-Connect the power cord intoAC Power Source.
To ensure good picture and sound, TV antenna system needs to be installed. The antenna system as
shown can be sourced from TV equipment shops, which will provide service for correct installation
and connection. After installation, insert the 75=ohm antenna plug into the antenna jack as shown.
VHF ANTENNA UHF ANTENNA
I
OUTDOOR --
ANTENNA
AMPLIFIER
INDOOR
ANTENNA
AMPLIFIER
POWER PLUG OF
ANTENNA
AMPLIFIER
75 OHM
ANTENNA
PLUG
INSTALLATION
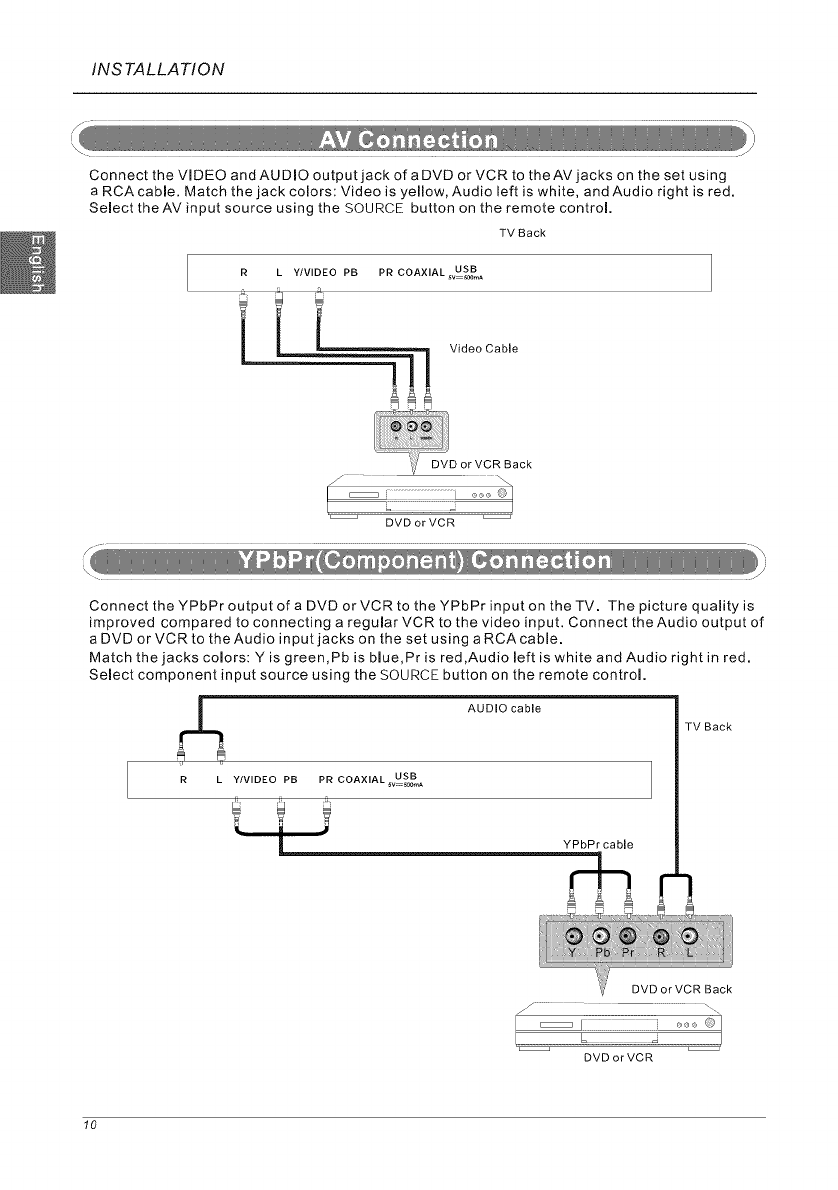
Connect the VIDEO andAUDIO output jack ofaDVD orVCRto theAVjacks on the set using
a RCA cable. Match the jack colors: Video is yellow, Audio left is white, and Audio right is red.
Select theAVinput source using the SOURCE button on the remote control.
TV Back
RL Y/VIDEO PB PR COAXIAL svUS_B A
DVD or VCR
Connect theYPbPr output of a DVD orVCR to theYPbPr input on the TV. The picture quality is
improved compared to connecting a regularVCR to the video input. Connect the Audio output of
a DVD or VCRto the Audio input jacks on the set using aRCAcable.
Match the jacks colors: Y is green,Pb is blue,Pr is red,Audio left is white and Audio right in red.
Select component input source using the SOURCE button on the remote control.
rk0
R L Y/VIDEO PB
|
AUDIO cable
PR COAXIAL wUsSooBA
YPbPr cable
TV Back
DVD or VCR Back
DVD or VCR
10
INSTALLATION
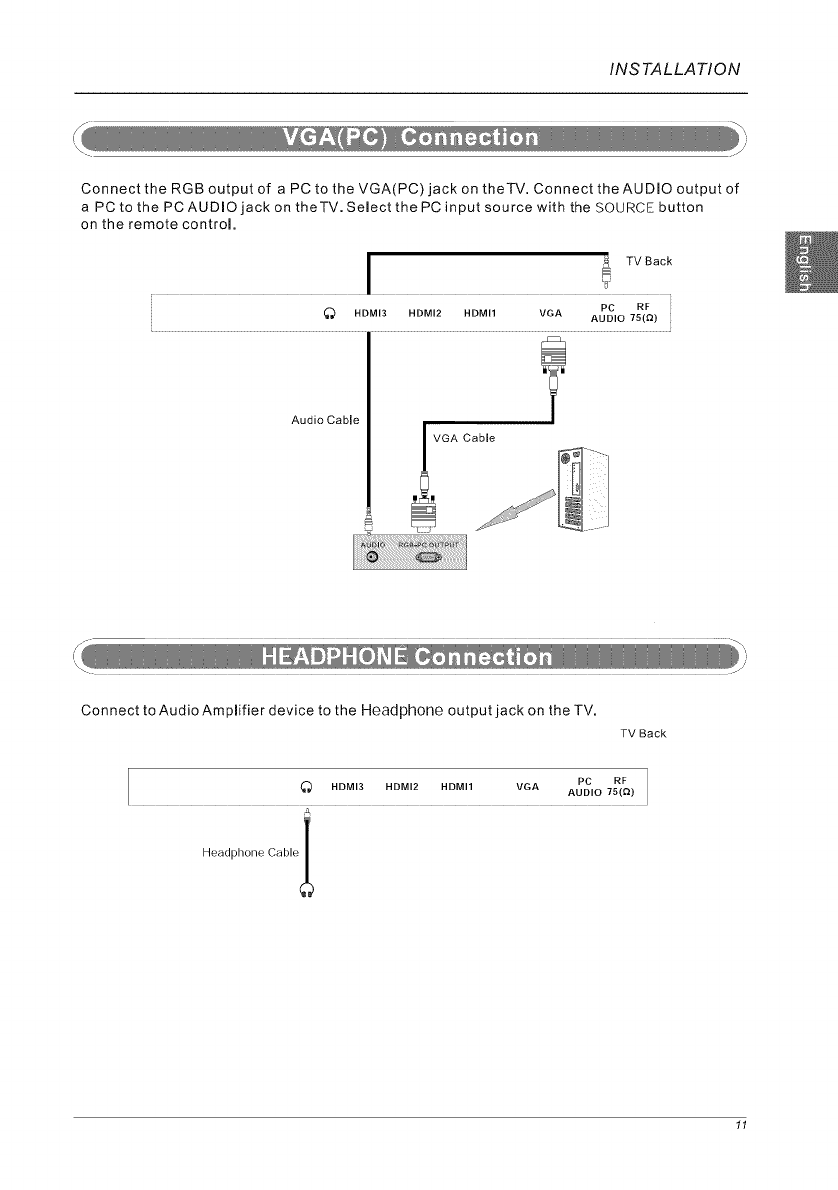
Connect the RGB output of a PC to the VGA(PC)jack on theTV. Connect theAUDIO output of
a PC to the PC AUDIO jack on theTV. Select the PC input source with the SOURCE button
on the remote control,
I l TV Back
_'_ HBMI3 HDMI2 HDMI1 VGA AuPClo 7R(_)
Audio Cable
Connect to Audio Amplifier device to the Headphone output jack on the TV.
TV Back
[ _ HDM'3 HDM'2 HDMI1 VGA AuPC, o 7R(_)]
A
Headphone Cable I
11
INSTALLATION
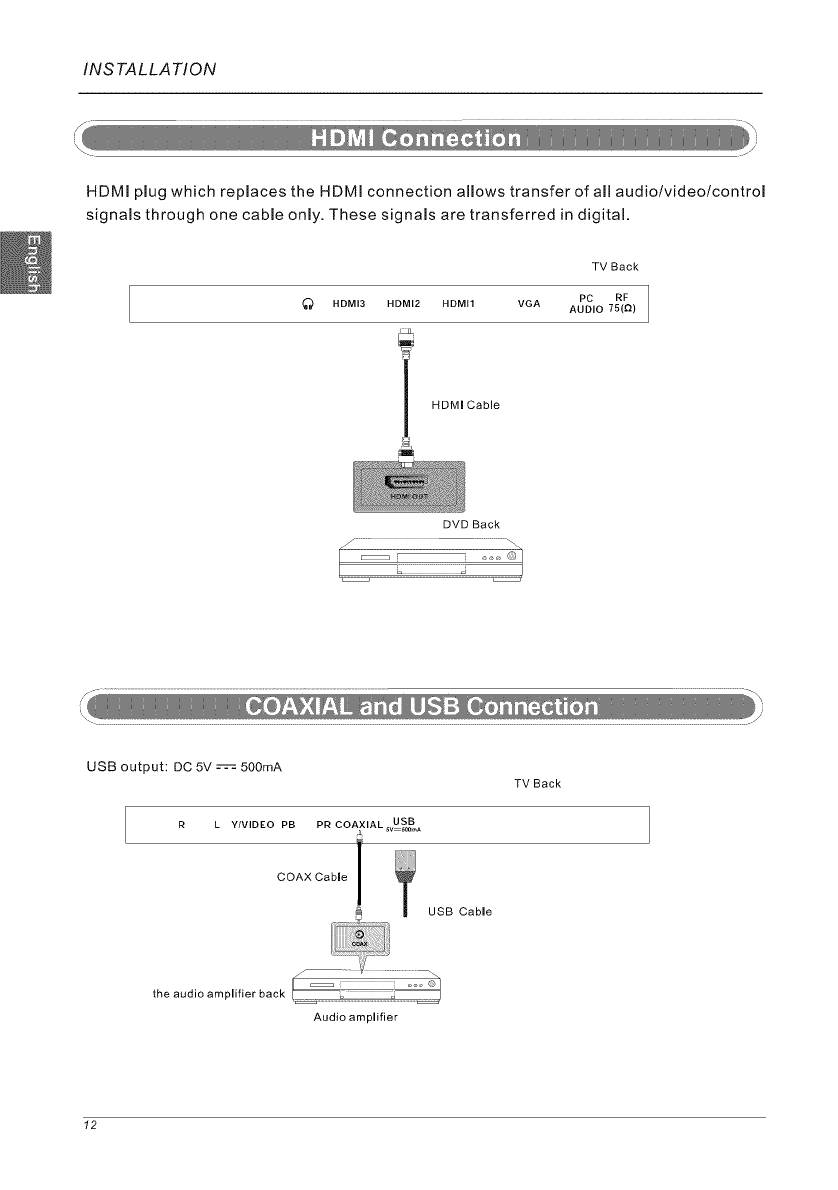
HDMI plug which replaces the HDMI connection allows transfer of all audio/video/control
signals through one cable only, These signals are transferred in digital,
TV Back
PC RF
HDMI3 HDMI2 HDMI1 VGA AUDIO 75(Q)
i HDMI Cable
,=
DVD Back
USB output: DC 5V --'-'-'-'-'-'-'-'--=:500mA
TV Back
R L Y/VIDEO PB PR COAXIAL svUS_B A
COAX Cable ! [_ USB Cable
/ \
the audio amplifier back
Audio amplifier
12
REMOTE CONTROL
8. REMOTE CONTROL
m
O=
1
®=
O--
-Q ®-
• 1.....
.__=lj._=__j
=0
=@
=0
_O
=0
=e
=0
=0
=0
=0
_0
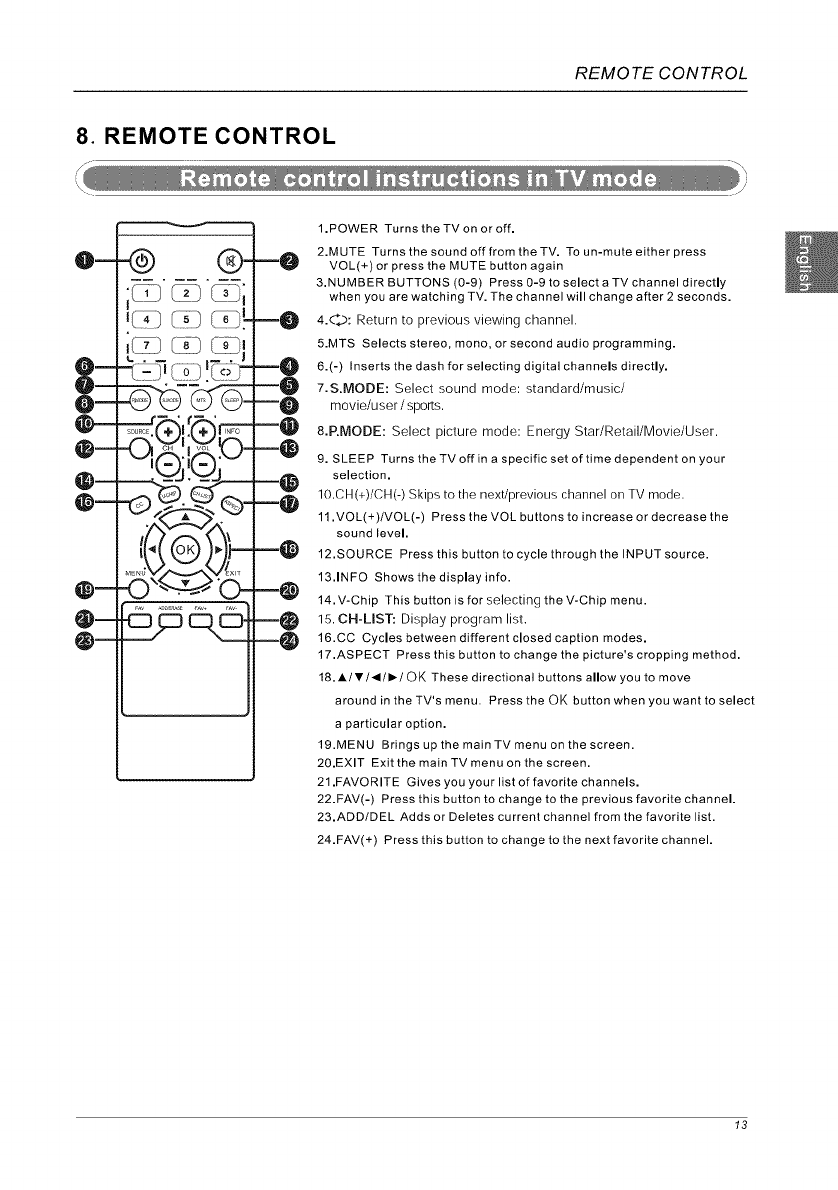
1.POWER Turns theTVon or off.
2,MUTE Turns the sound off from theTV, To un-mute either press
VOL(+) or press the MUTE button again
3,NUMBER BUTTONS (0-9) Press 0-9 to select a TV channel directly
when you are watching TV. The channel will change after 2 seconds.
4.d'.>: Return to previous viewing channel.
5.MTS Selects stereo, mono, or second audio programming.
6.(-) Inserts the dash for selecting digital channels directly,
7.S.MODE: Select sound mode: standard/music/
movie/user /sports.
8.P.MODE: Select picture mode: Energy Star/Retail/Movie/User.
9, SLEEP Turns theTVoffin a specific set of time dependent on your
selection,
10.CH(+)/CH(-) Skips to the next/previous channel on TV mode.
11. VOL(+)/VOL(-) Press the VOL buttons to increase or decrease the
sound level,
12,SOURCE Press this button to cycle through the INPUT source.
13,1NFO Shows the display info.
14. V-Chip This button is for selecting the V-Chip menu.
15. CH-LIST: Display program list,
16.CC Cycles between different closed caption modes.
17.ASPECT Press this button to change the picture's cropping method.
18. A/V/_/_-/OK These directional buttons allow you to move
around in the TV's menu, Press the OK button when you want to select
a particular option.
19.MENU Brings up the main TV menu on the screen.
2O.EXIT Exit the mainTV menu on the screen.
21 .FAVORITE Gives you your list of favorite channels.
22.FAV(-) Press this button to change to the previous favorite channel.
23.ADD/DEL Adds or Deletes current channel from the favorite list.
24.FAV(+) Press this button to change to the next favorite channel.
13
REMOTE CONTROL
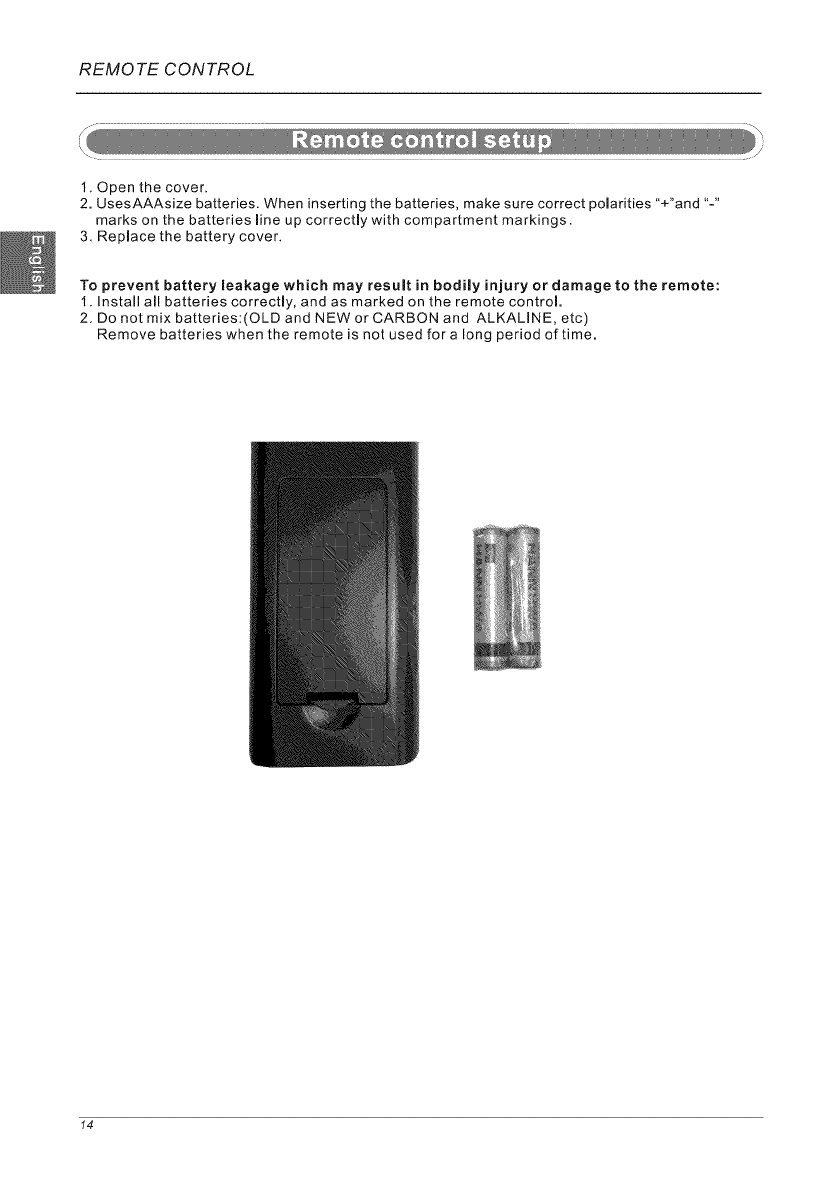
1. Open the cover.
2. UsesAAAsize batteries. When inserting the batteries, make sure correct polarities "+"and "-"
marks on the batteries line up correctly with compartment markings.
3. Replace the battery cover.
To prevent battery Leakage which may result in bodily injury or damage to the remote:
1. lnstaJl all batteries correctly, and as marked on the remote control.
2, Do not mix batteries:(OLD and NEW or CARBON and ALKALINE, etc)
Remove batteries when the remote is not used for a long period of time.
14
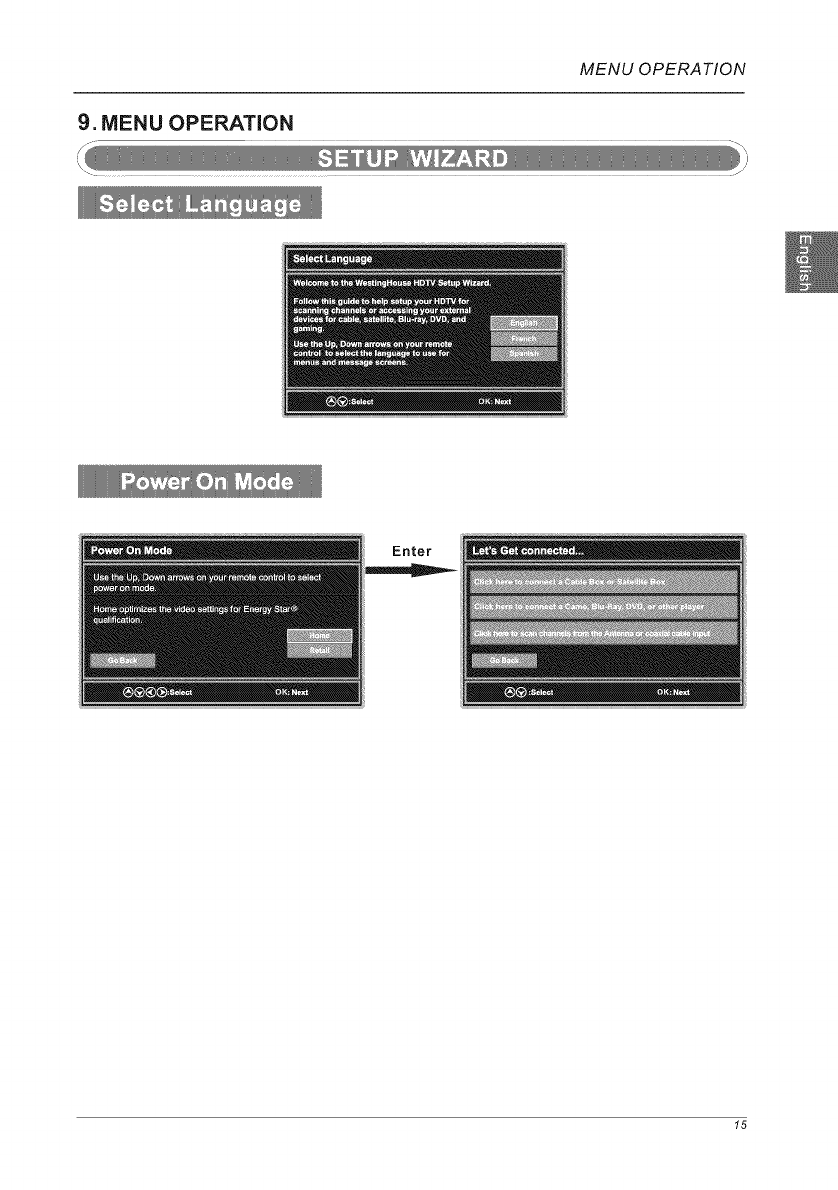
9. MENU OPERATION
MENU OPERATION
Enter
15
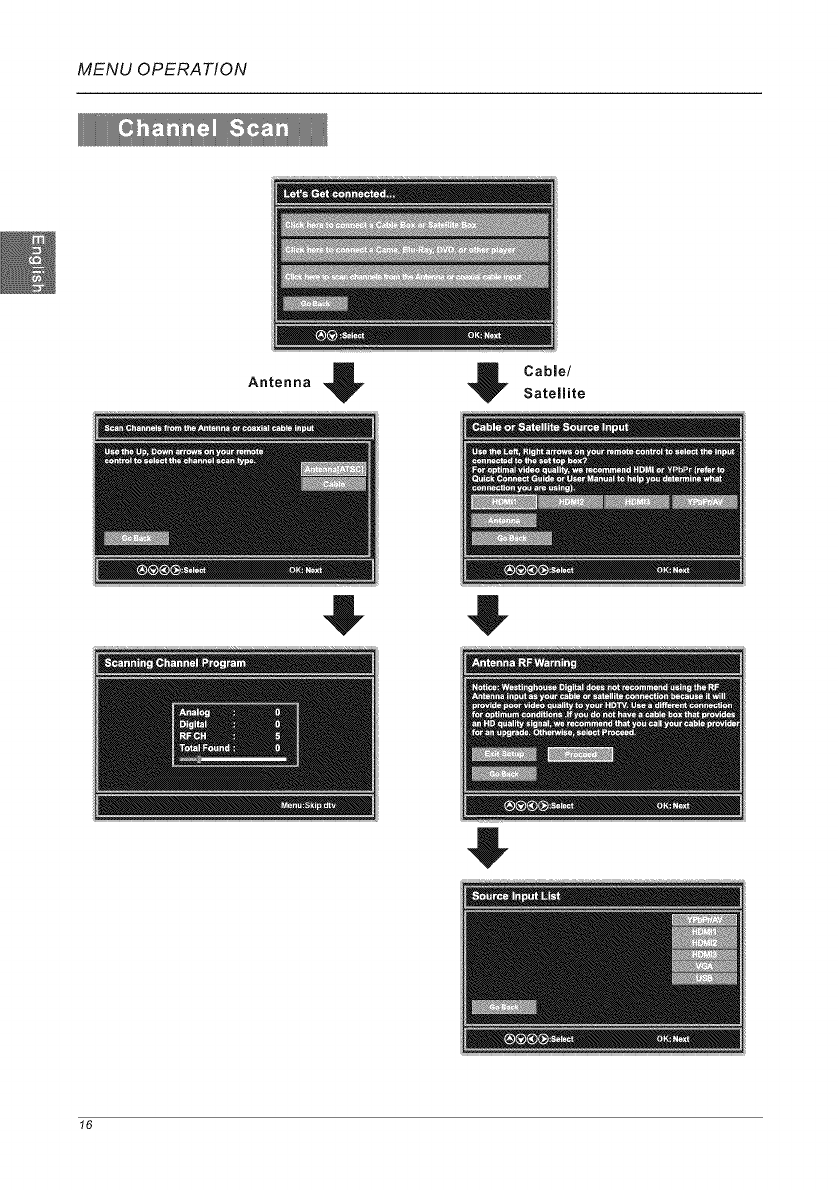
MENU OPERATION
Antenna _i V Cable/
Satellite
f6
MENU OPERATION
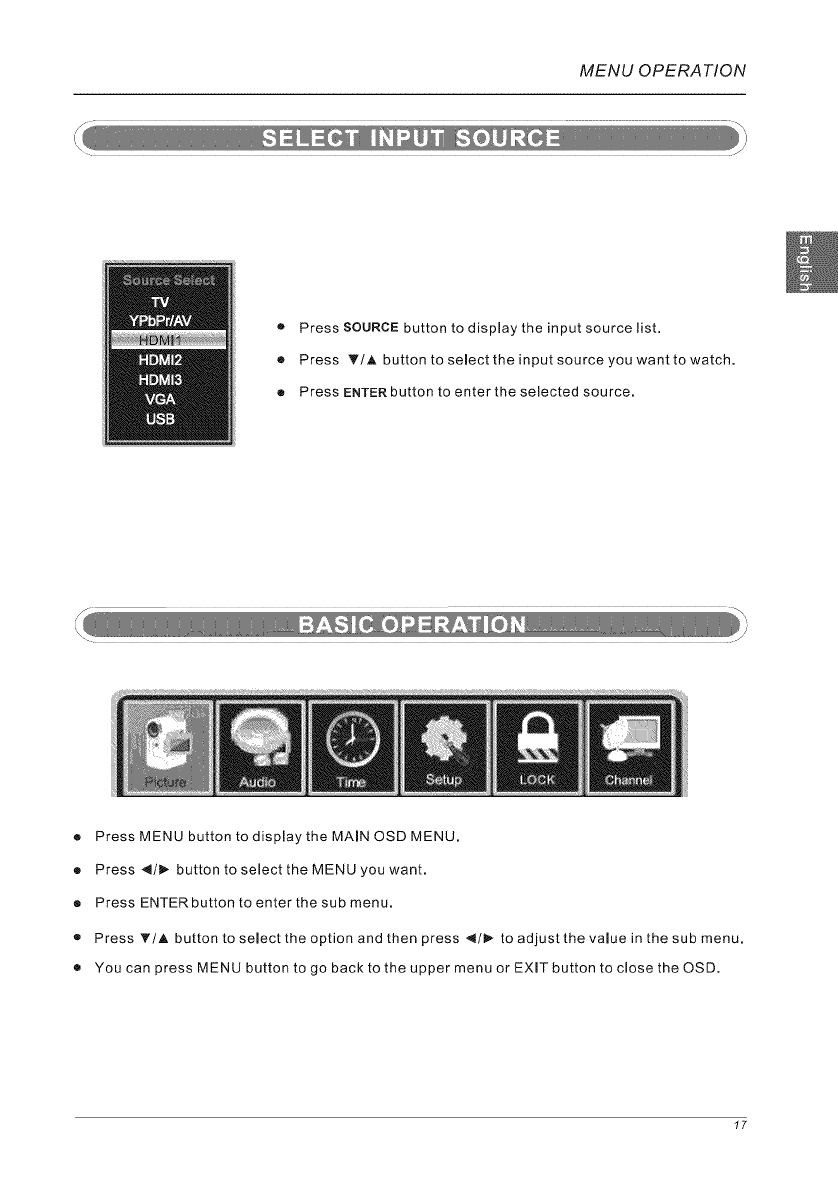
•Press SOURCE button to display the input source list.
® Press T/A button to select the input source you want to watch.
e Press ENTER button to enter the selected source.
® Press MENU button to display the MAIN OSD MENU.
• Press 4/1_ button to select the MENU you want.
® Press ENTER button to enter the sub menu.
• Press _'/A button to select the option and then press 4/1_ to adjust the value in the sub menu.
• You can press MENU button to go back to the upper menu or EXIT button to close the OSD.
17
MENU OPERATION
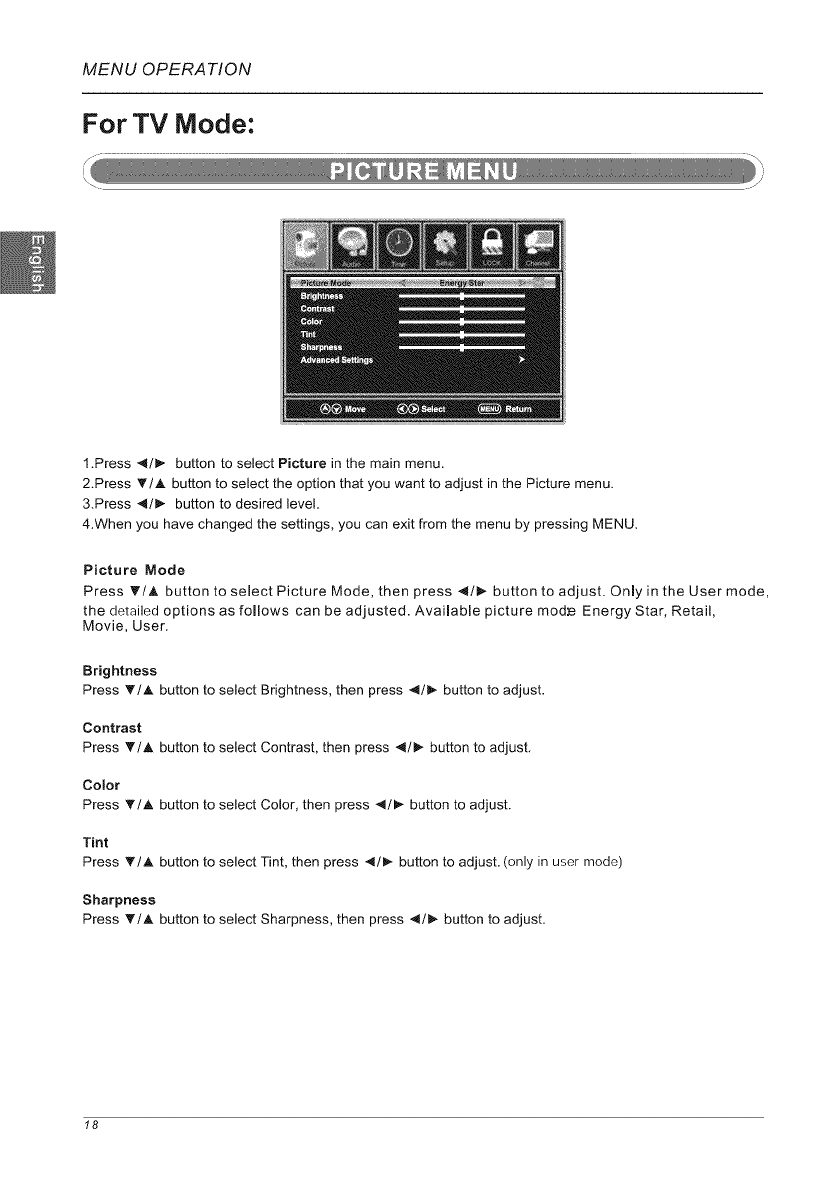
For TV Mode:
1.Press 4/_. button to select Picture in the main menu.
2.Press T/A button to select the option that you want to adjust in the Picture menu.
3.Press 4/_ button to desired level.
4.When you have changed the settings, you can exit from the menu by pressing MENU.
Picture Mode
Press _'/A button to select Picture Mode, then press 4/_ button to adjust. Only in the User mode,
the detailed options as follows can be adjusted. Available picture mod_e Energy Star, Retail,
Movie, User.
Brightness
Press _/,_ button to select Brightness, then press 4/1_ button to adjust.
Contrast
Press T/A button to select Contrast, then press 4/_ button to adjust.
Color
Press T/A button to select Color, then press -,4/_- button to adjust.
Tint
Press _'/A button to select Tint, then press 4/1I_ button to adjust. (only in user mode)
Sharpness
Press _'/A button to select Sharpness, then press _l/l_ button to adjust.
18
MENU OPERATION
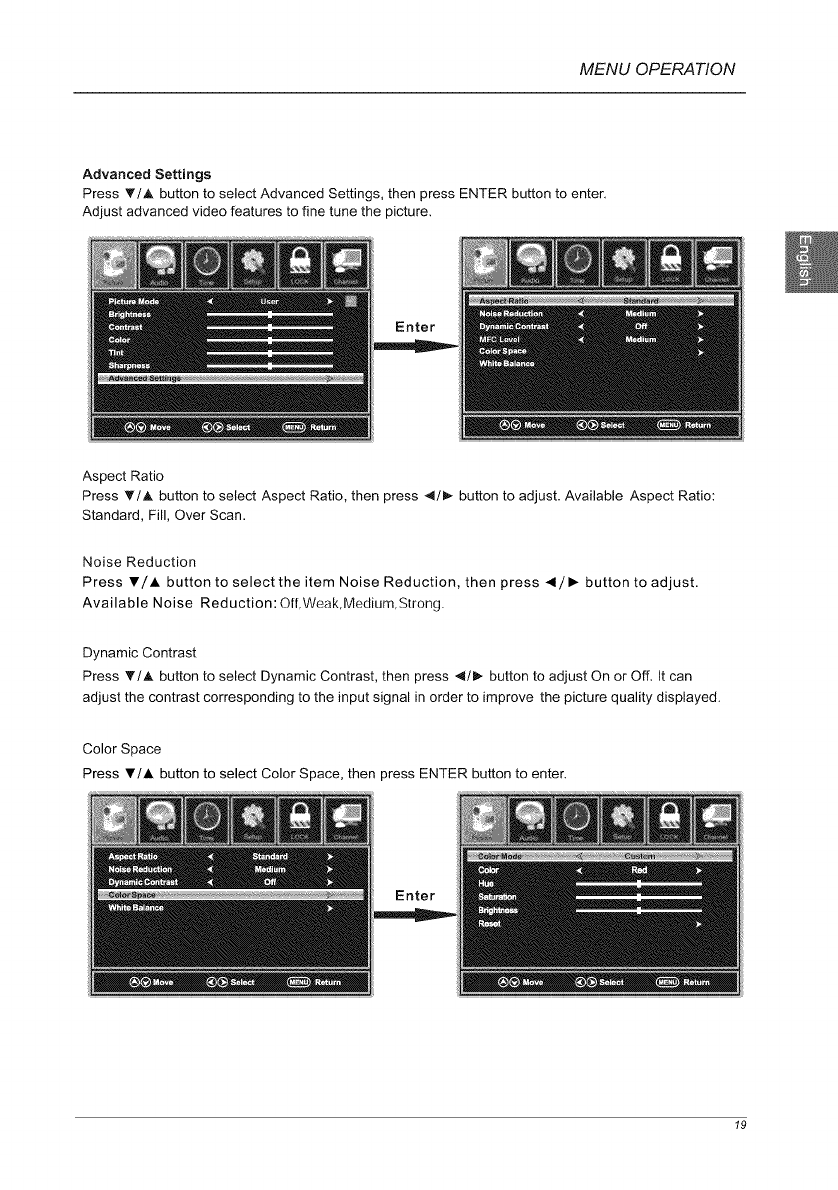
Advanced Settings
Press _'/A button to select Advanced Settings, then press ENTER button to enter,
Adjust advanced video features to fine tune the picture,
Enter
Aspect Ratio
Press _'/A button to select Aspect Ratio, then press _/• button to adjust. Available Aspect Ratio:
Standard, Fill, Over Scan.
Noise Reduction
Press V/A button to select the item Noise Reduction, then press _1/• button to adjust.
Available Noise Reduction: Otf,Weak,Medium,Strong.
Dynamic Contrast
Press T/A button to select Dynamic Contrast, then press _l/• button to adjust On or Off. It can
adjust the contrast corresponding to the input signal in order to improve the picture quality displayed.
Color Space
Press V/A button to select Color Space, then press ENTER button to enter.
19
MENU OPERATION
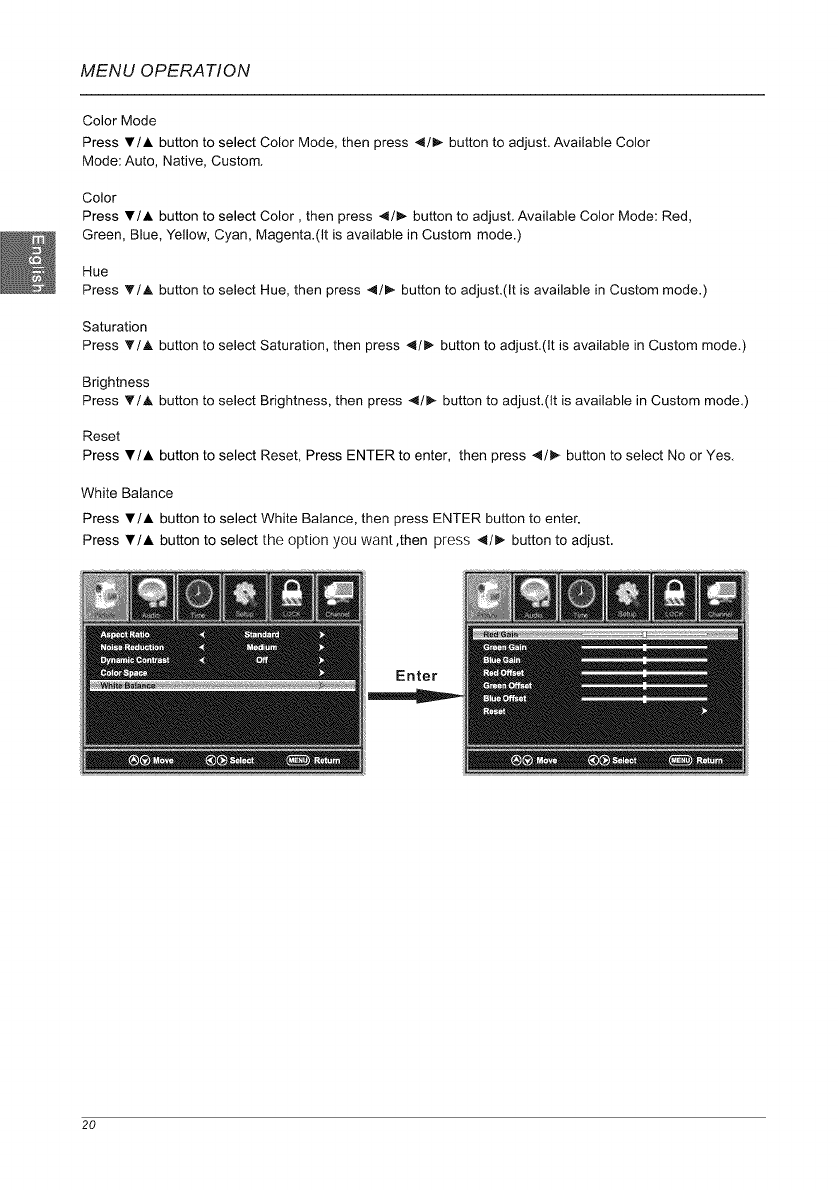
Color Mode
Press _'!A button to select Color Mode, then press 4/_ button to adjust. Available Color
Mode: Auto, Native, Custom.
Color
Press VIA button to select Color, then press 4/_,- button to adjust. Available Color Mode: Red,
Green, Blue, Yellow, Cyan, Magenta.(It is available in Custom mode.)
Hue
Press VIA button to select Hue, then press 4!_ button to adjust.(It is available in Custom mode.)
Saturation
Press T/A button to select Saturation, then press _1/1_ button to adjust.(It is available in Custom mode.)
Brightness
Press _'/A button to select Brightness, then press 4/!_ button to adjust.(It is available in Custom mode.)
Reset
Press VIA button to select Reset, Press ENTER to enter, then press 4/1_ button to select No or Yes.
White Balance
Press VIA button to select White Balance, then press ENTER button to enter.
Press VIA button to select the option you want,then press 4/_ button to adjust.
Enter
20
MENU OPERATION
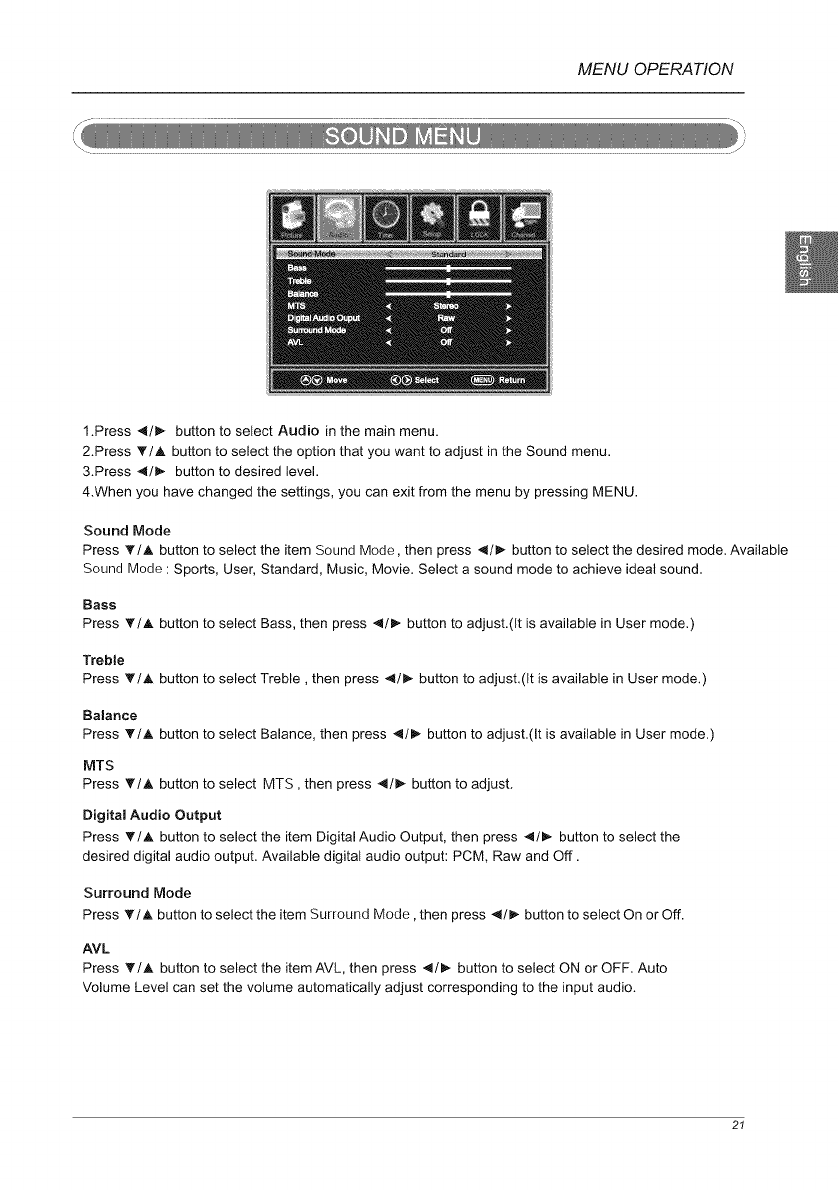
1.Press _/_ button to select Audio in the main menu.
2.Press T/A button to select the option that you want to adjust in the Sound menu.
3.Press _I/D,, button to desired level.
4.When you have changed the settings, you can exit from the menu by pressing MENU.
Sound Mode
Press T/A button to select the item Sound Mode, then press 4/_,- button to select the desired mode. Available
Sound Mode : Sports, User, Standard, Music, Movie. Select a sound mode to achieve ideal sound.
Bass
Press T/A button to select Bass, then press 41/l_ button to adjust.(It is available in User mode.)
Treble
Press T/A button to select Treble, then press 41/1,- button to adjust.(It is available in User mode.)
Balance
Press T/A button to select Balance, then press 4/1_ button to adjust.(It is available in User mode.)
MTS
Press VIA button to select MTS, then press 4I_ button to adjust.
Digital Audio Output
Press _/A button to select the item Digital Audio Output, then press _l/l_ button to select the
desired digital audio output. Available digital audio output: PCM, Raw and Off.
Surround Mode
Press _'/_. button to select the item Surround Mode, then press _/_ button to select On or Off.
AVL
Press _'/A button to select the item AVL, then press 4/_- button to select ON or OFF. Auto
Volume Level can set the volume automatically adjust corresponding to the input audio.
21
MENU OPERATION
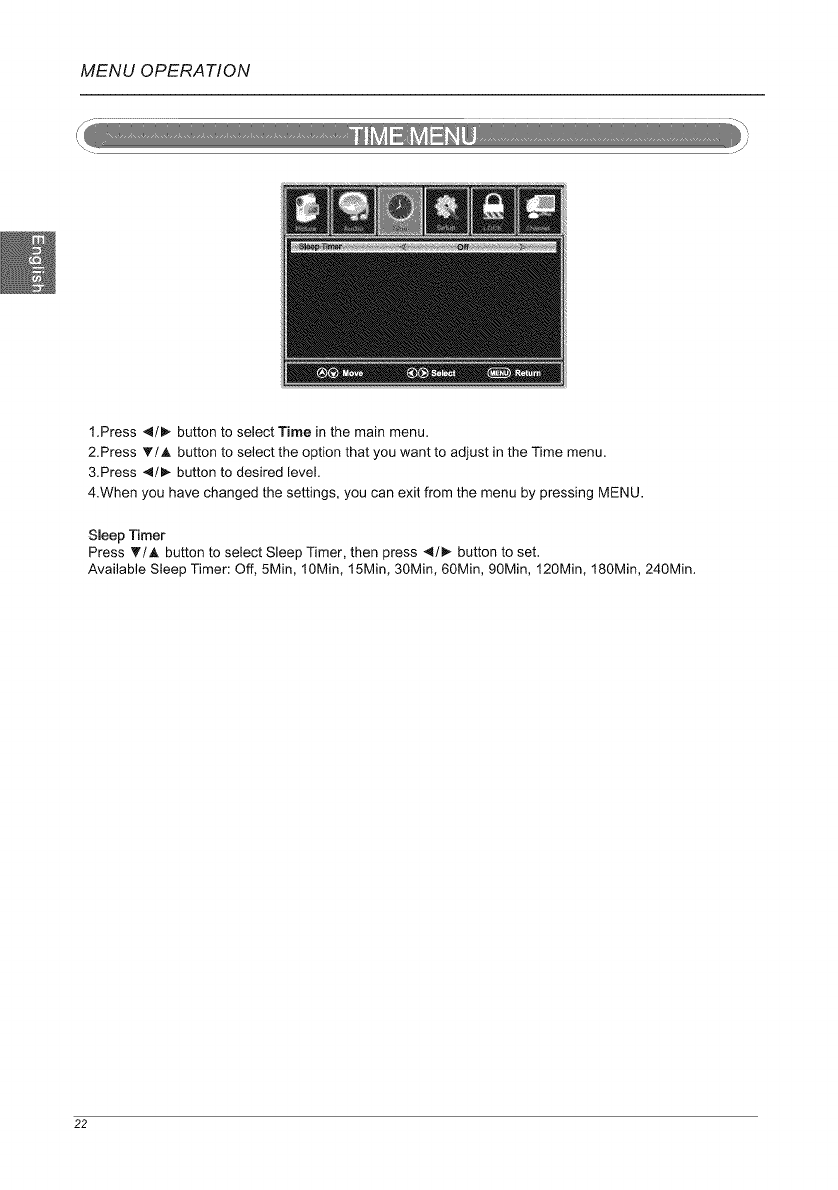
1.Press 41/1_ button to select Time in the main menu.
2.Press _'/J, button to select the option that you want to adjust in the Time menu.
3.Press _/_ button to desired level.
4.When you have changed the settings, you can exit from the menu by pressing MENU.
Sleep Timer
Press T/A button to select Sleep Timer, then press 4/_ button to set.
Available Sleep Timer: Off, 5Min, 10Min, 15Min, 30Min, 60Min, 90Min, 120Min, 180Min, 240Min.
22
MENU OPERATION
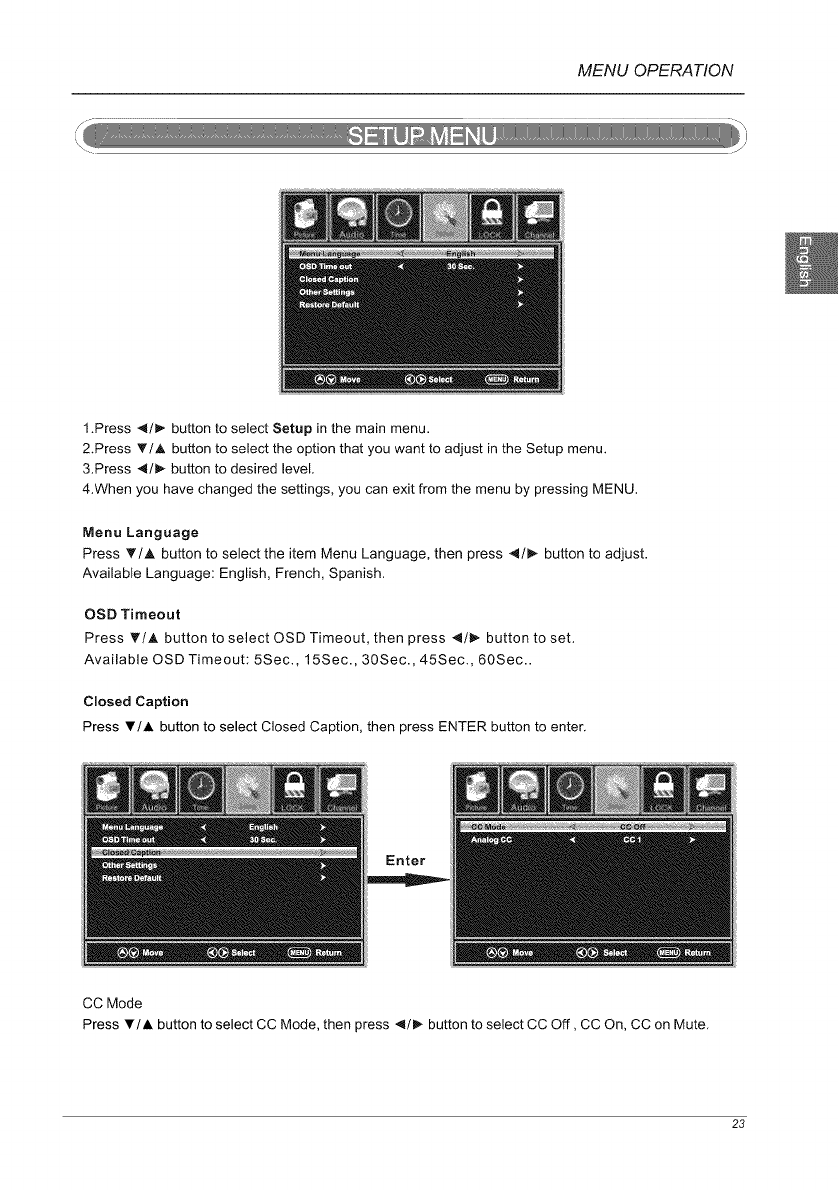
1.Press _1/1_ button to select Setup in the main menu.
2.Press _'/A button to select the option that you want to adjust in the Setup menu.
&Press 4/I_ button to desired level.
4.When you have changed the settings, you can exit from the menu by pressing MENU.
Menu Language
Press _'/A button to select the item Menu Language, then press 4/_- button to adjust.
Available Language: English, French, Spanish.
OSD Timeout
Press _'/A button to select OSD Timeout, then press _1/1_ button to set.
Available OSD Timeout: 5Sec., 15Sec., 30Sec., 45Sec., 60Sec..
Closed Caption
Press V/A button to select Closed Caption, then press ENTER button to enter.
Enter
CC Mode
Press T/A button to select CC Mode, then press _/1_ button to select CC Off, CC On, CC on Mute.
23
MENU OPERATION
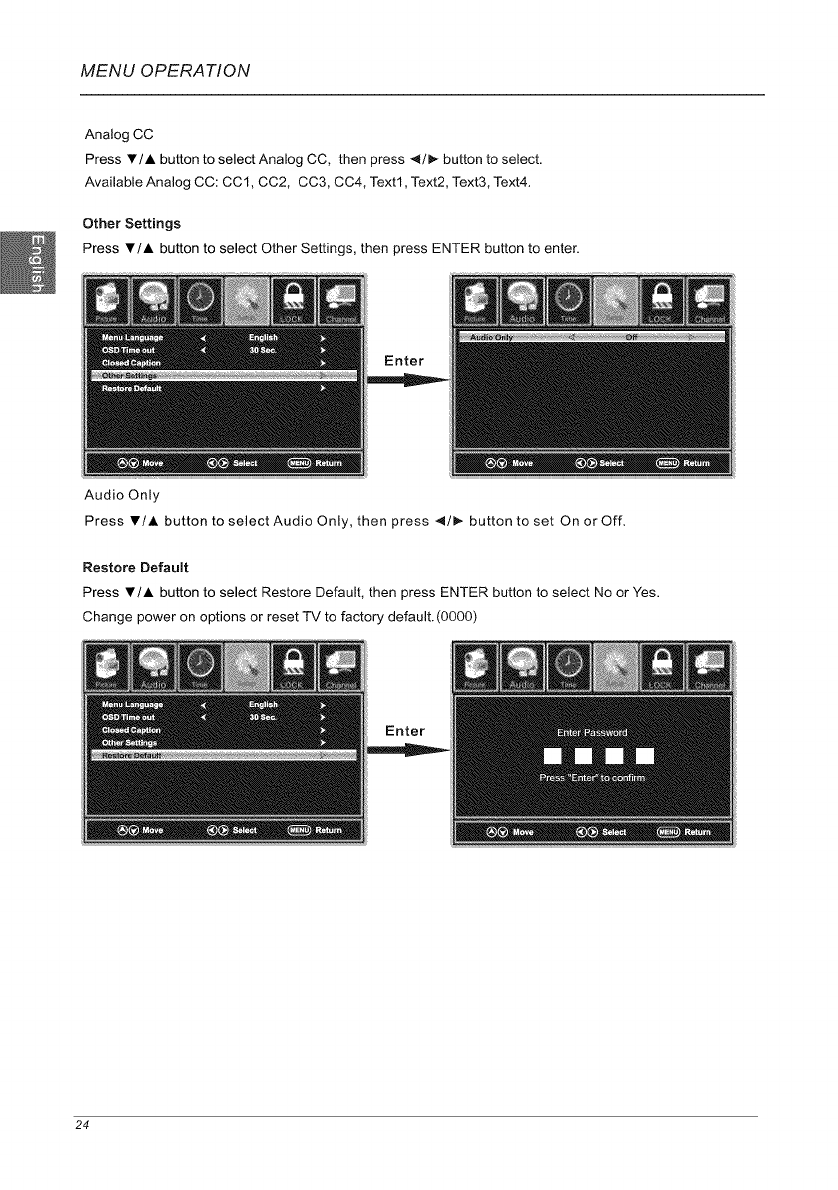
Analog CC
Press V/A button to select Analog CC, then press 4/_ button to select.
Available Analog CC: CC1, CC2, CC3, CC4, Text1, Text2, Text3, Text4.
Other Settings
Press V/A button to select Other Settings, then press ENTER button to enter.
Audio Only
Enter
Press V/A button to select Audio Only, then press _/1_ button to set On or Off.
Restore Default
Press _'/A button to select Restore Default, then press ENTER button to select No or Yes.
Change power on options or reset TV to factory default. (0000)
Enter
24
MENU OPERATION
Input password
is "0000"
Enter
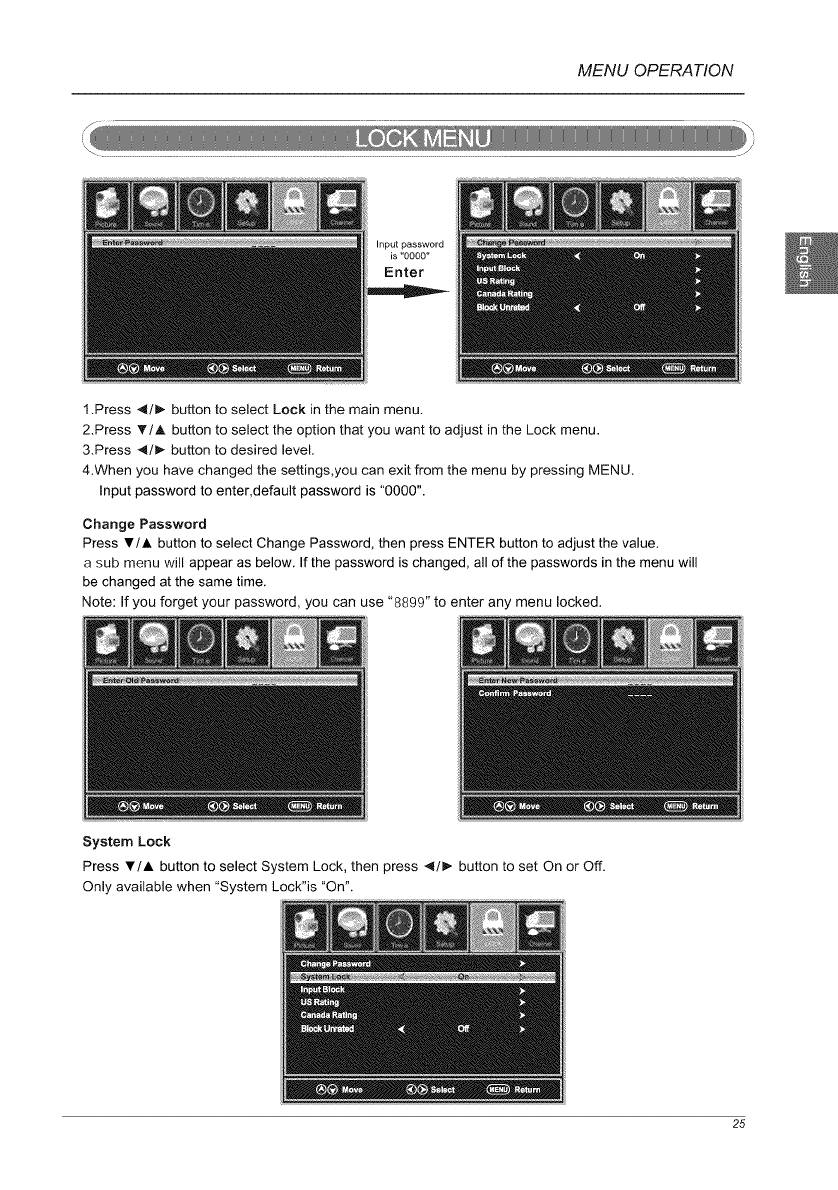
1.Press _1/_ button to select Lock in the main menu.
2.Press T/A button to select the option that you want to adjust in the Lock menu.
&Press _l/_ button to desired level.
4.When you have changed the settings,you can exit from the menu by pressing MENU.
Input password to enter,default password is "0000".
Change Password
Press V/A button to select Change Password, then press ENTER button to adjust the value.
a sub menu will appear as below. If the password is changed, all of the passwords in the menu will
be changed at the same time.
Note: If you forget your password, you can use "8899" to enter any menu locked.
System Lock
Press V/A button to select System Lock, then press 4/_. button to set On or Off.
Only available when "System Lock"is "On".
25
MENU OPERATION
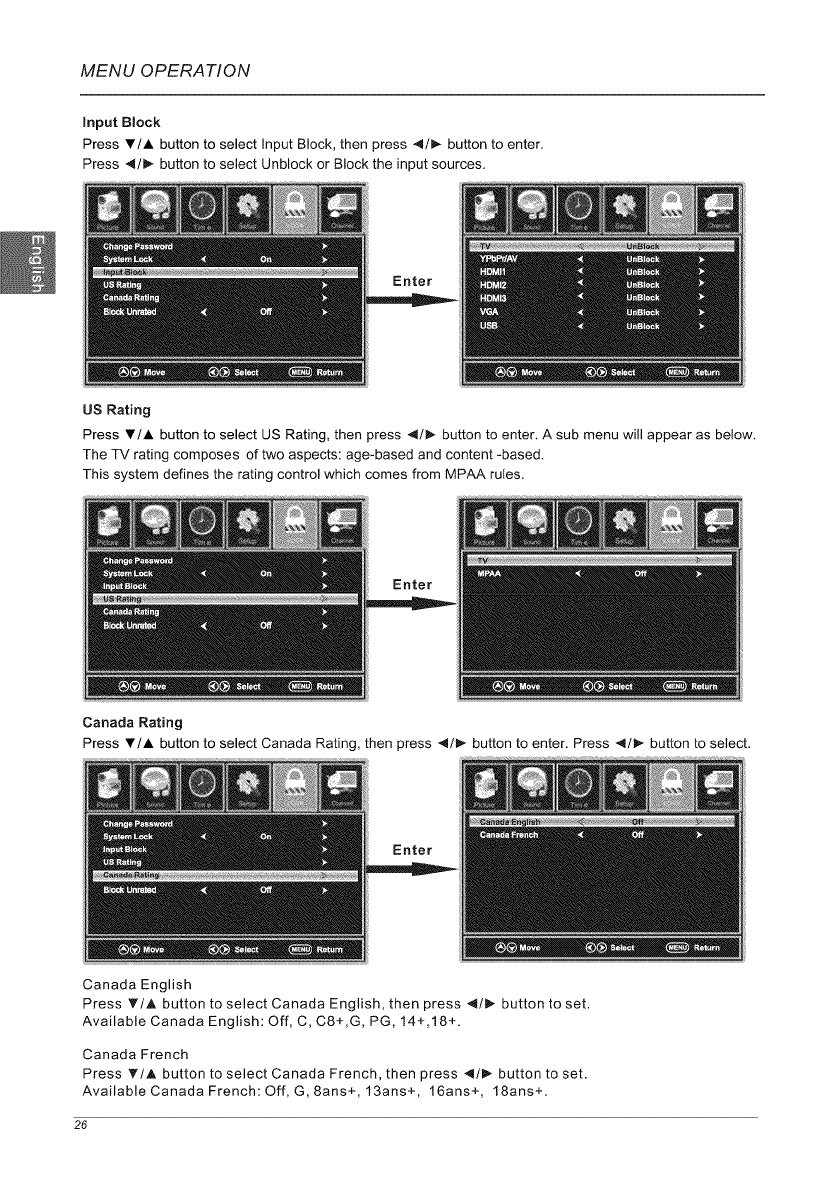
Input Block
Press V/A button to select Input Block, then press 4/_ button to enter,
Press 41/_ button to select Unblock or Block the input sources,
Enter
US Rating
Press V/A button to select US Rating, then press 4/_ button to enter, A sub menu will appear as below,
The TV rating composes of two aspects: age-based and content -based,
This system defines the rating control which comes from MPAA rules.
Enter
Canada Rating
Press _'/A button to select Canada Rating, then press 4/1_ button to enter. Press 4/_ button to select.
Enter
Canada English
Press _'/A button to select Canada English,then press 4/_ button to set.
Available Canada English: Off, C, C8+,G, PG, 14+,18+.
Canada French
Press _/A button to select Canada French, then press 4/_- button to set.
Available Canada French: Off, G,8ans+,13ans+, 16ans+, 18ans+
26
MENU OPERATION
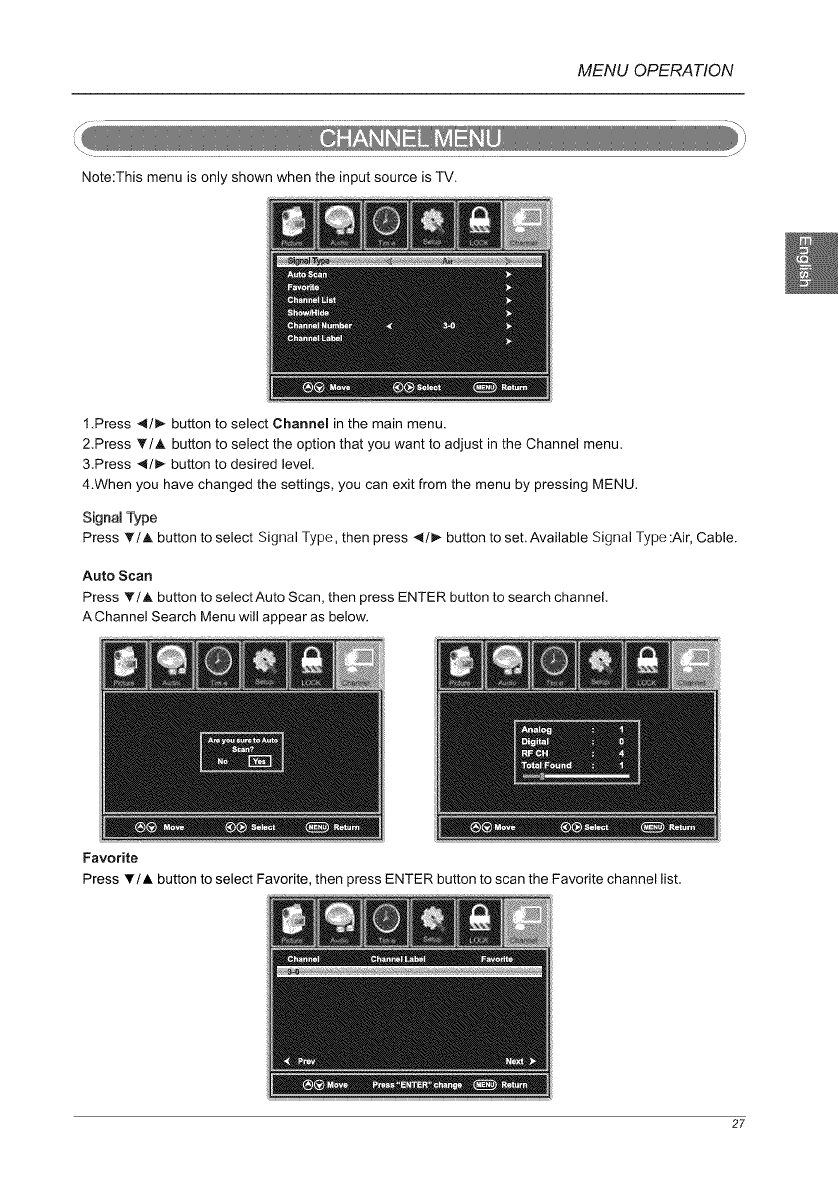
Note:This menu is only shown when the input source is TV.
1.Press _1/_ button to select Channel in the main menu.
2.Press _'/A button to select the option that you want to adjust in the Channel menu.
&Press -,_/1_ button to desired level.
4.When you have changed the settings, you can exit from the menu by pressing MENU.
Signal Type
Press T/A button to select Signal Type, then press 4/_- button to set.Available Signal Type:Air, Cable.
Auto Scan
Press T/_ button to select Auto Scan, then press ENTER button to search channel.
A Channel Search Menu will appear as below.
Favorite
Press _'/J, button to select Favorite, then press ENTER button to scan the Favorite channel list.
27
MENU OPERATION
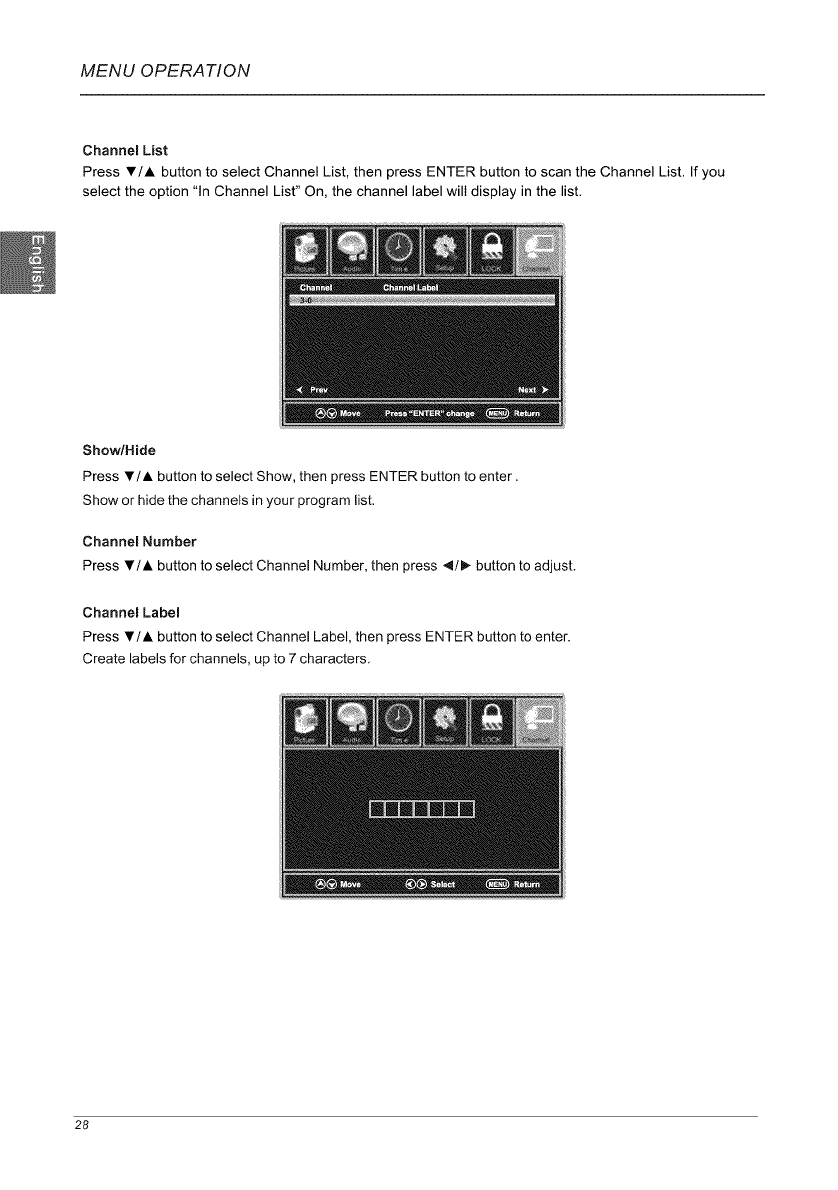
Channel List
Press V/A button to select Channel List, then press ENTER button to scan the Channel List. If you
select the option "In Channel List" On, the channel label will display in the list.
Show/Hide
Press V/A button to select Show, then press ENTER button to enter.
Show or hide the channels in your program list.
Channel Number
Press Y/A button to select Channel Number, then press 4/_ button to adjust.
Channem Label
Press T/A button to select Channel Label, then press ENTER button to enter.
Create labels for channels, up to 7 characters.
28
MENU OPERATION
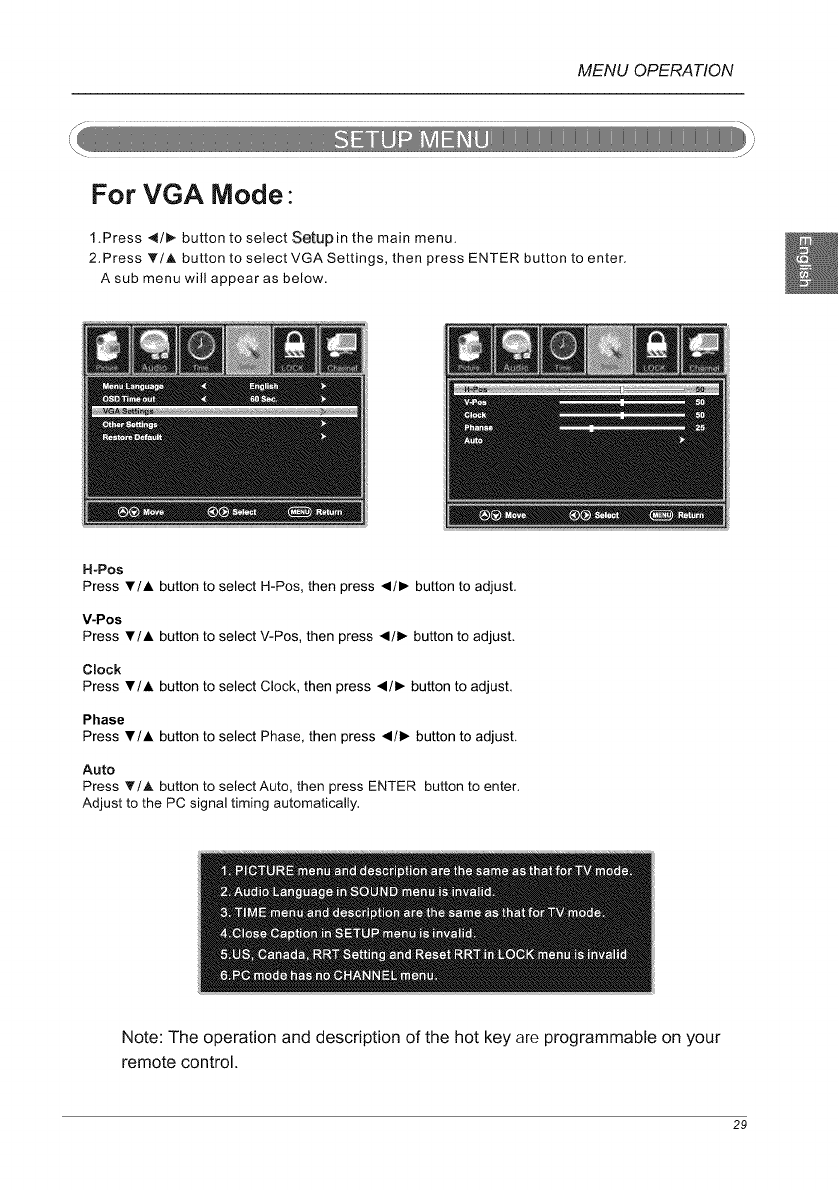
For VGA Mode-
1.Press 4/_- button to select Setup in the main menu.
2.Press _/A button to select VGA Settings, then press ENTER button to enter.
A sub menu will appear as below.
H-Pos
Press V/A button to select H-Pos, then press _1/1_ button to adjust.
V-Pos
Press V/A button to select V-Pos, then press _1/1_ button to adjust.
Clock
Press V/A button to select Clock, then press _1/1_ button to adjust.
Phase
Press V/A button to select Phase, then press _1/1_ button to adjust.
Auto
Press T/A button to select Auto, then press ENTER button to enter.
Adjust to the PC signal timing automatically.
Note: The operation and description of the hot key are programmable on your
remote control.
29
MENU OPERATION
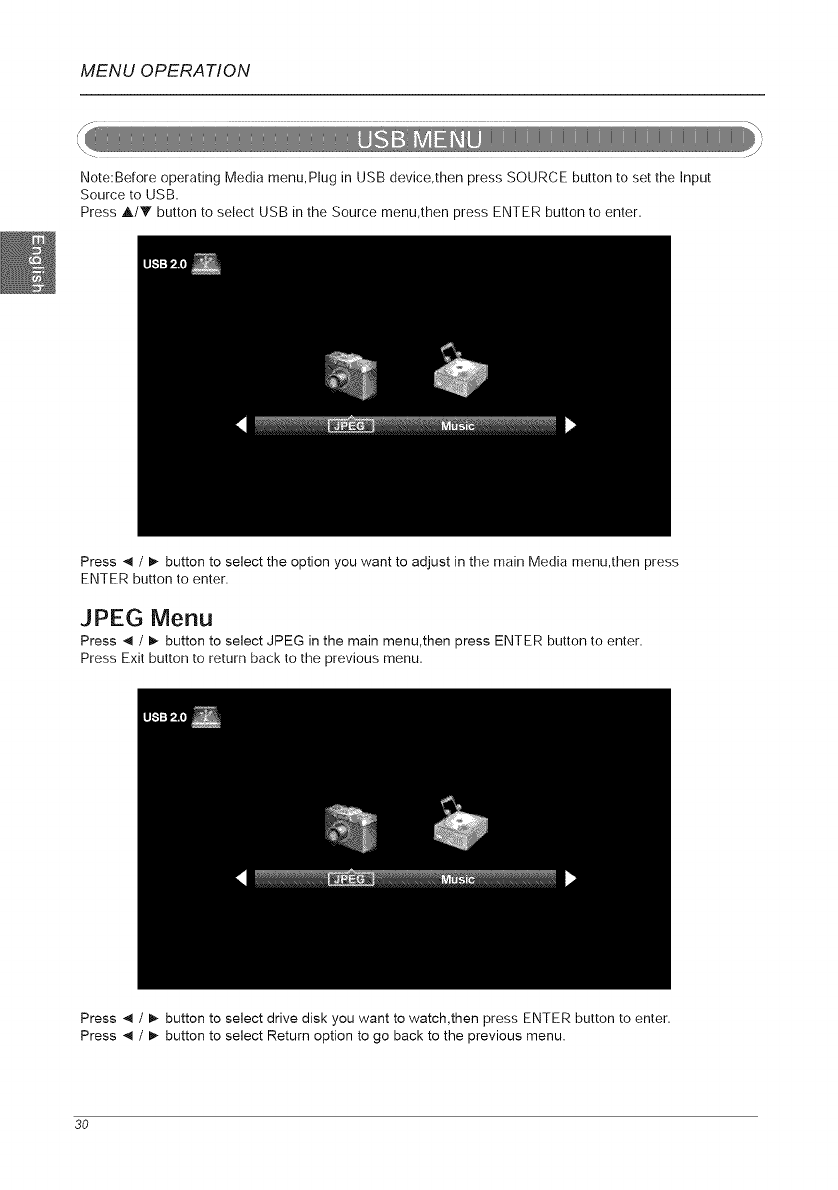
Note:Before operating Media menu,Plug in USB device,then press SOURCE button to set the Input
Source to USB.
Press A/V button to select USB in the Source menu,then press ENTER button to enter.
Press _1 /!_ button to select the option you want to adjust in the main Media menu,then press
ENTER button to enter.
JPEG Menu
Press _1 /!_ button to select JPEG in the main menu,then press ENTER button to enter.
Press Exit button to return back to the previous menu.
Press _1 /I,- button to select drive disk you want to watch,then press ENTER button to enter.
Press _1 /1_ button to select Return option to go back to the previous menu.
30
MENU OPERATION
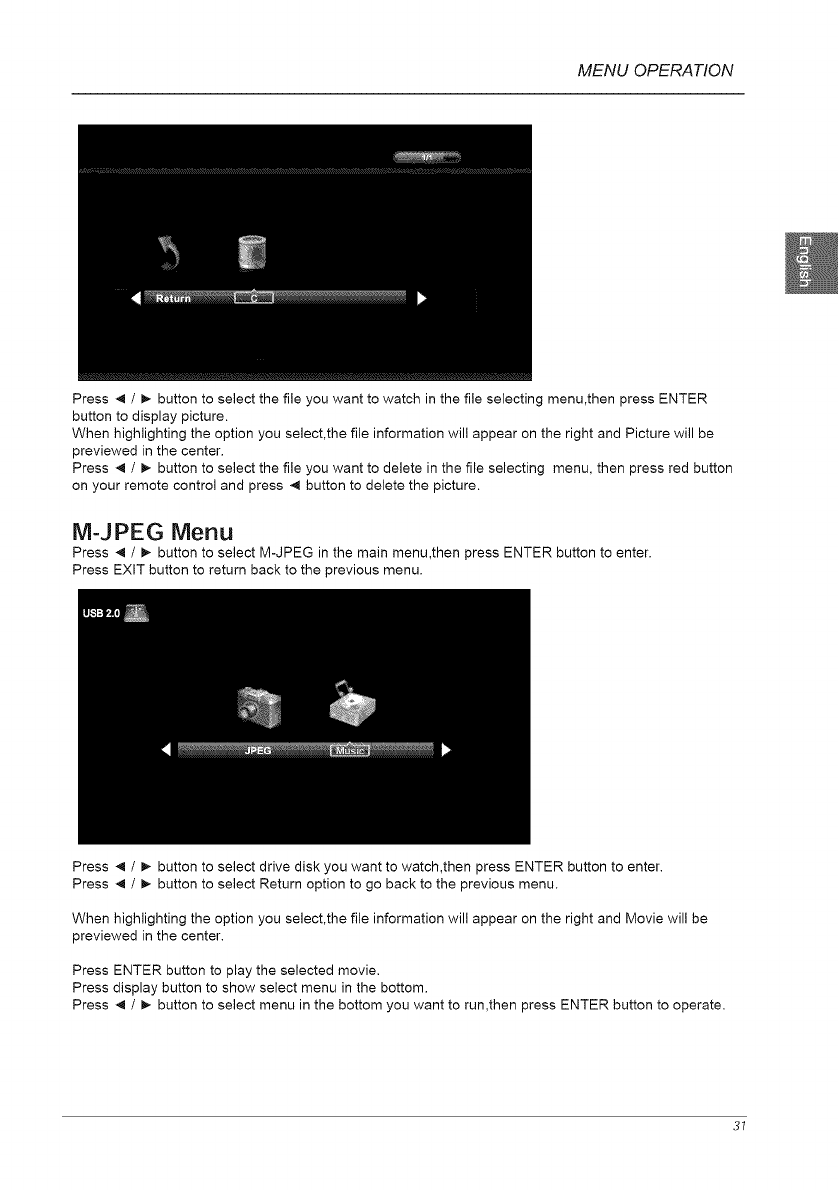
Press _1 /_- button to select the file you want to watch in the file selecting menu,then press ENTER
button to display picture.
When highlighting the option you select,the file information will appear on the right and Picture will be
previewed in the center.
Press _1 /!_ button to select the file you want to delete in the file selecting menu, then press red button
on your remote control and press 4 button to delete the picture.
M-JPEG Menu
Press _ /_ button to select M-JPEG in the main menu,then press ENTER button to enter.
Press EXIT button to return back to the previous menu.
Press _1 /I_ button to select drive disk you want to watch,then press ENTER button to enter.
Press _1 /_ button to select Return option to go back to the previous menu.
When highlighting the option you select,the file information will appear on the right and Movie will be
previewed in the center.
Press ENTER button to play the selected movie.
Press display button to show select menu in the bottom.
Press _1 /_ button to select menu in the bottom you want to run,then press ENTER button to operate.
TROUBLESHOOTING
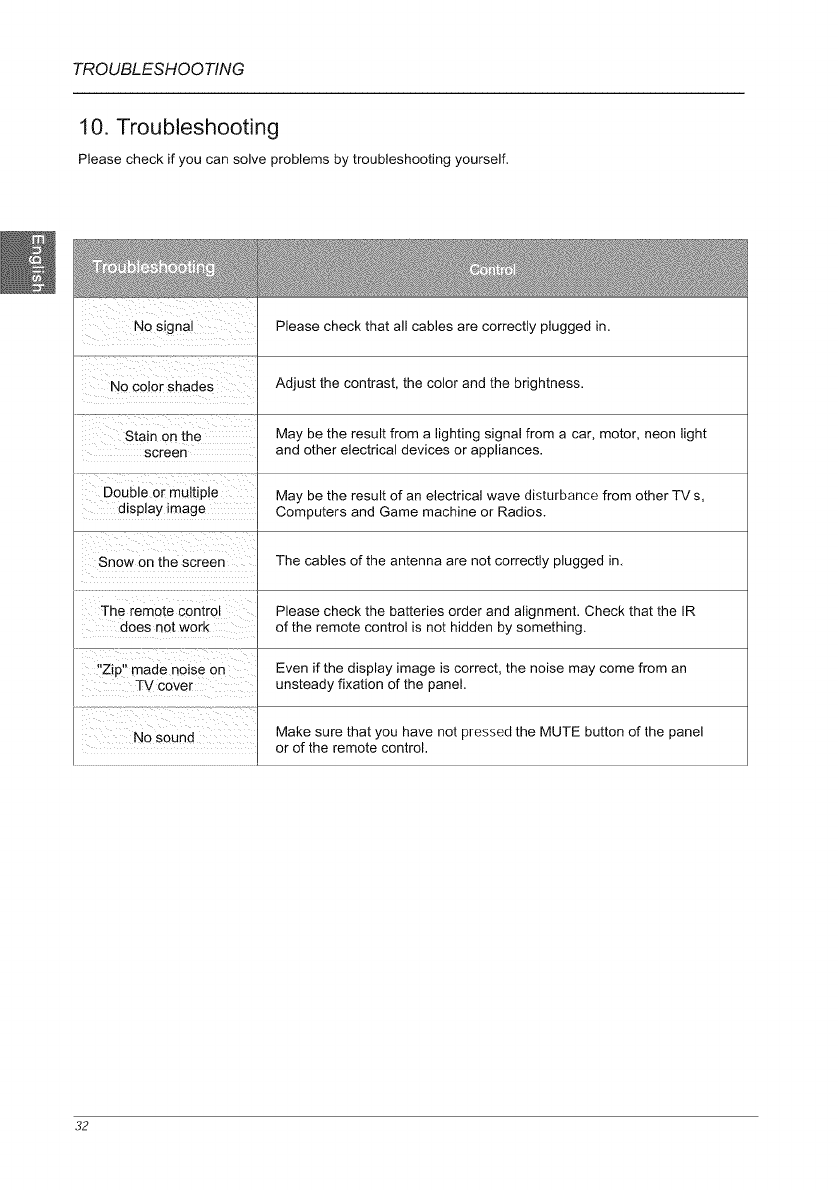
10. Troubleshooting
Please check if you can solve problems by troubleshooting yourself.
..... Stain on the
screen
display image
Snow on the screen
The remote control
does not work
"Zip" made noise on
TV cover
No sound
Please check that all cables are correctly plugged in.
Adjust the contrast, the color and the brightness.
May be the result from a lighting signal from a car, motor, neon light
and other electrical devices or appliances.
May be the result of an electrical wave disturbance from other TV s,
Computers and Game machine or Radios.
The cables of the antenna are not correctly plugged in.
Please check the batteries order and alignment. Check that the IR
of the remote control is not hidden by something.
Even if the display image is correct, the noise may come from an
unsteady fixation of the panel.
Make sure that you have not pressed the MUTE button of the panel
or of the remote control.
32
SPECIFICATIONS
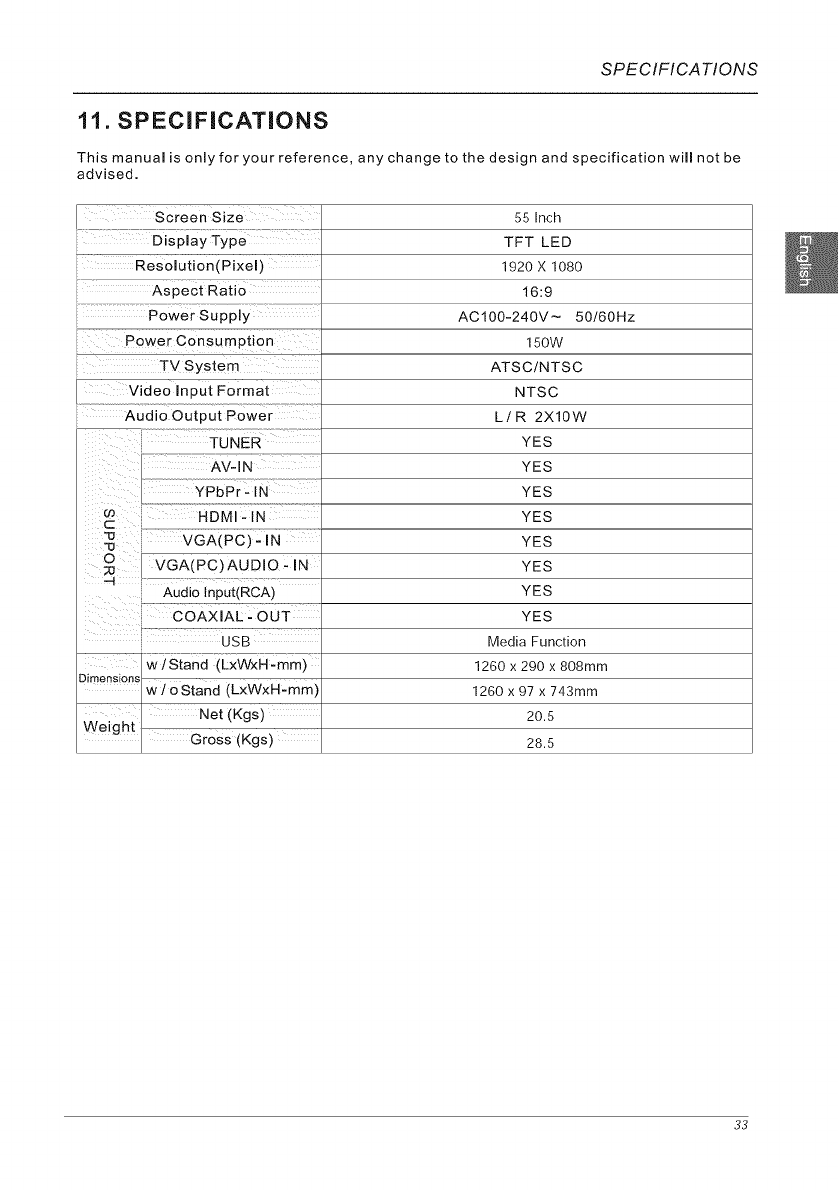
11. SPECiFiCATiONS
This manual is only for your reference, any change to the design and specification will not be
advised.
Screen Size
Display Type
Aspect Ratio
Power Consumption
ii TV System
Video Input Format
Audio Output Power .......
Audio lnput(RCA)
USB
_ w/stand (LxWxH-mmi
w/o Stand (LxWxH-mm)
Net (Kgs)
Weight ....
_ross (r,.gs )
55 Inch
TFT LED
1920 X 1080
16:9
AC100-240V~ 50/60Hz
150W
ATSC/NTSC
NTSC
L/R 2Xl0W
YES
YES
YES
YES
YES
YES
YES
YES
Media Function
1260 x 290 x 808mm
1260 x 97 x 743mm
20.5
28.5
33

www.westing hou sedigital.com
r
S/N:--
L
Westinghouse Digital, LLC
Orange, CA SE-UM-5501-1301
