Whirlpool Europe S r l COMBOJBL00 BUILT-IN MICROWAVE OVEN User Manual 5
Whirlpool Europe S.r.l. BUILT-IN MICROWAVE OVEN Users Manual 5
UserManual.wiki
>
Whirlpool Europe S r l
>
COMBOJBL00 User Manual
>
Users Manual 5
Contents
1.
Users Manual 1
2.
Users Manual 2
3.
Users Manual 3
4.
Users Manual 4
5.
Users Manual 5
Users Manual 5
Navigation menu
Upload a User Manual
Namespaces
Wiki Guide
HTML
PDF
Info
Views
User Manual
Discussion / Help
Navigation

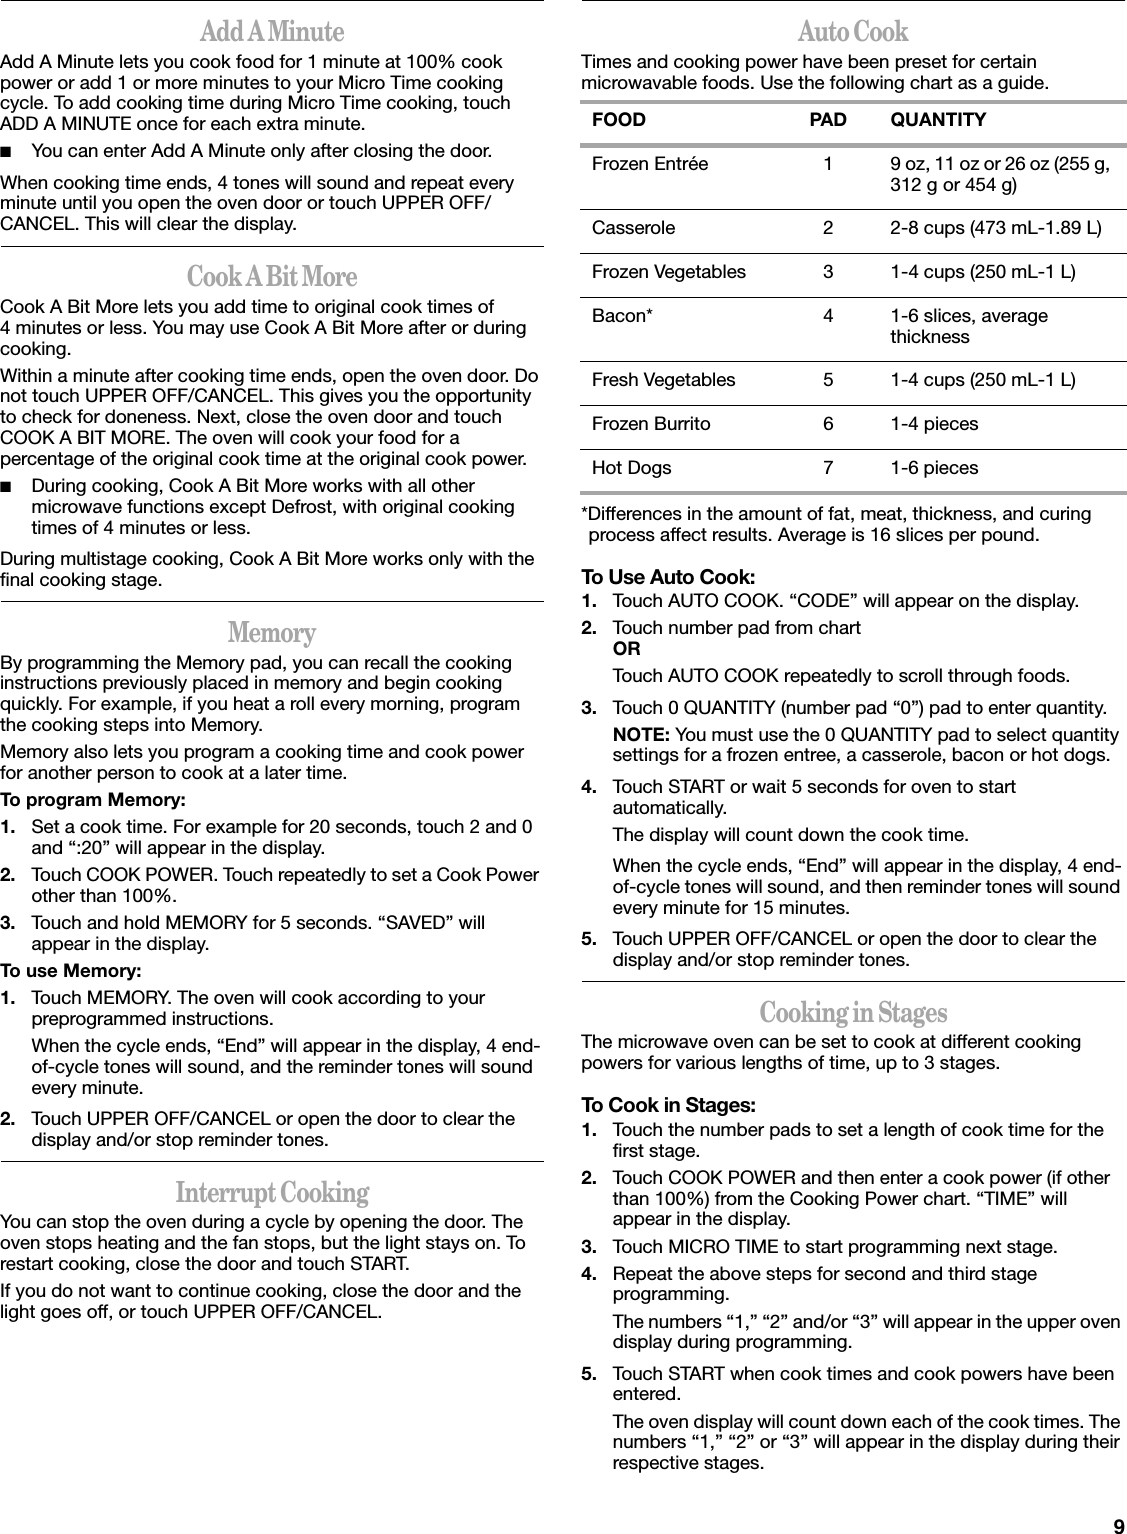
![8Cook PowerTo Use:1. Put food into oven and close door. 2. Touch number pads to set a length of time to cook. Oven automatically cooks at high cook power. 3. Touch COOK POWER to set a cooking power other than 100%. Each time you touch Cook Power, the cook power will decrease by 10%. Choose a cooking power using the Cooking Power chart.4. Touch START. The display will count down the cook time.NOTES:■If you want to add more time during or after cooking, use Add A Minute or Cook A Bit More.■To reset the cooking time after setting the Cook Power, you must type in 4 digits.■To change cooking time after cooking has started, first open and close the door. Then, enter the desired cooking time as described above, and touch START.■When cooking time ends, “End” will appear on the display, and 4 tones will sound.■For additional cooking and reheating information, see the following Microwave Cook Time Chart.MICROWAVE COOK TIME CHARTThese times are approximate and may need to be adjusted to suit individual taste.FOOD COOK TIME (in minutes and seconds) COOK POWERMeats, Poultry, Fish, SeafoodGround Beef for Casseroles (1 lb [0.45 kg]) 5:00-6:00 100%Ground Beef Patties (2)Ground Beef Patties (4) Side 1: 2:00, Side 2: 1:30-2:30Side 1: 2:30, Side 2: 2:00-3:00 100%100%Meat Loaf (1¹⁄₂ lbs [0.7 kg]) 20:00-25:00 70%Chicken Pieces (3-3.5 lbs [1.36-1.59 kg])Internal temperature should be 185ºF (85ºC) after standing. 15:00-28:00 100%Chicken Breast, Halvesskinless, boneless (four 1.5 lbs [0.68 kg] total weight)Internal temperature should be 185ºF (85ºC) after standing.5:30-7:30 100%Turkey Breast, WholeInternal temperature should be 185ºF (85ºC) after standing. 10:00, then30:00-40:00 100%,50%Fish Fillets, Unbreaded (1 lb [0.45 kg]) 4:30-7:00 100%Shrimp (1 lb [0.45 kg]) 5:00-8:00 100%Scallops (1.5 lbs [0.68 kg]) 6:00-9:00 100%OtherBaked Apples (4 large) 5:00-10:00 100%Chocolate (melt 1 square) 1:00-2:00 50%Eggs, Scrambled (2)Eggs, Scrambled (4) 1:15-1:452:00-3:00 100%100%Eggs, Poached (1-2) 1:00-1:30 50%Rice, Parboiled (1 cup [250 mL] uncooked) 5:00 then,13:00-15:00 100%50%Nachos (large plate) 1:30-3:00 50%Pie, reheated (1 slice)Pie, reheated (2 slices) 0:45-1:001:30-1:45 70%70%](https://usermanual.wiki/Whirlpool-Europe-S-r-l/COMBOJBL00.Users-Manual-5/User-Guide-760651-Page-8.png)