Whirlpool Microwave Development RED9019X Microwave Oven User Manual W11037926A v8 UCG WMHA9019EN for approbation
Whirlpool Microwave Products Development Limited. Microwave Oven W11037926A v8 UCG WMHA9019EN for approbation
UserManual.wiki
>
Whirlpool Microwave Development
>
RED9019X User Manual
Users Manual
Navigation menu
Upload a User Manual
Namespaces
Wiki Guide
HTML
PDF
Info
Views
User Manual
Discussion / Help
Navigation

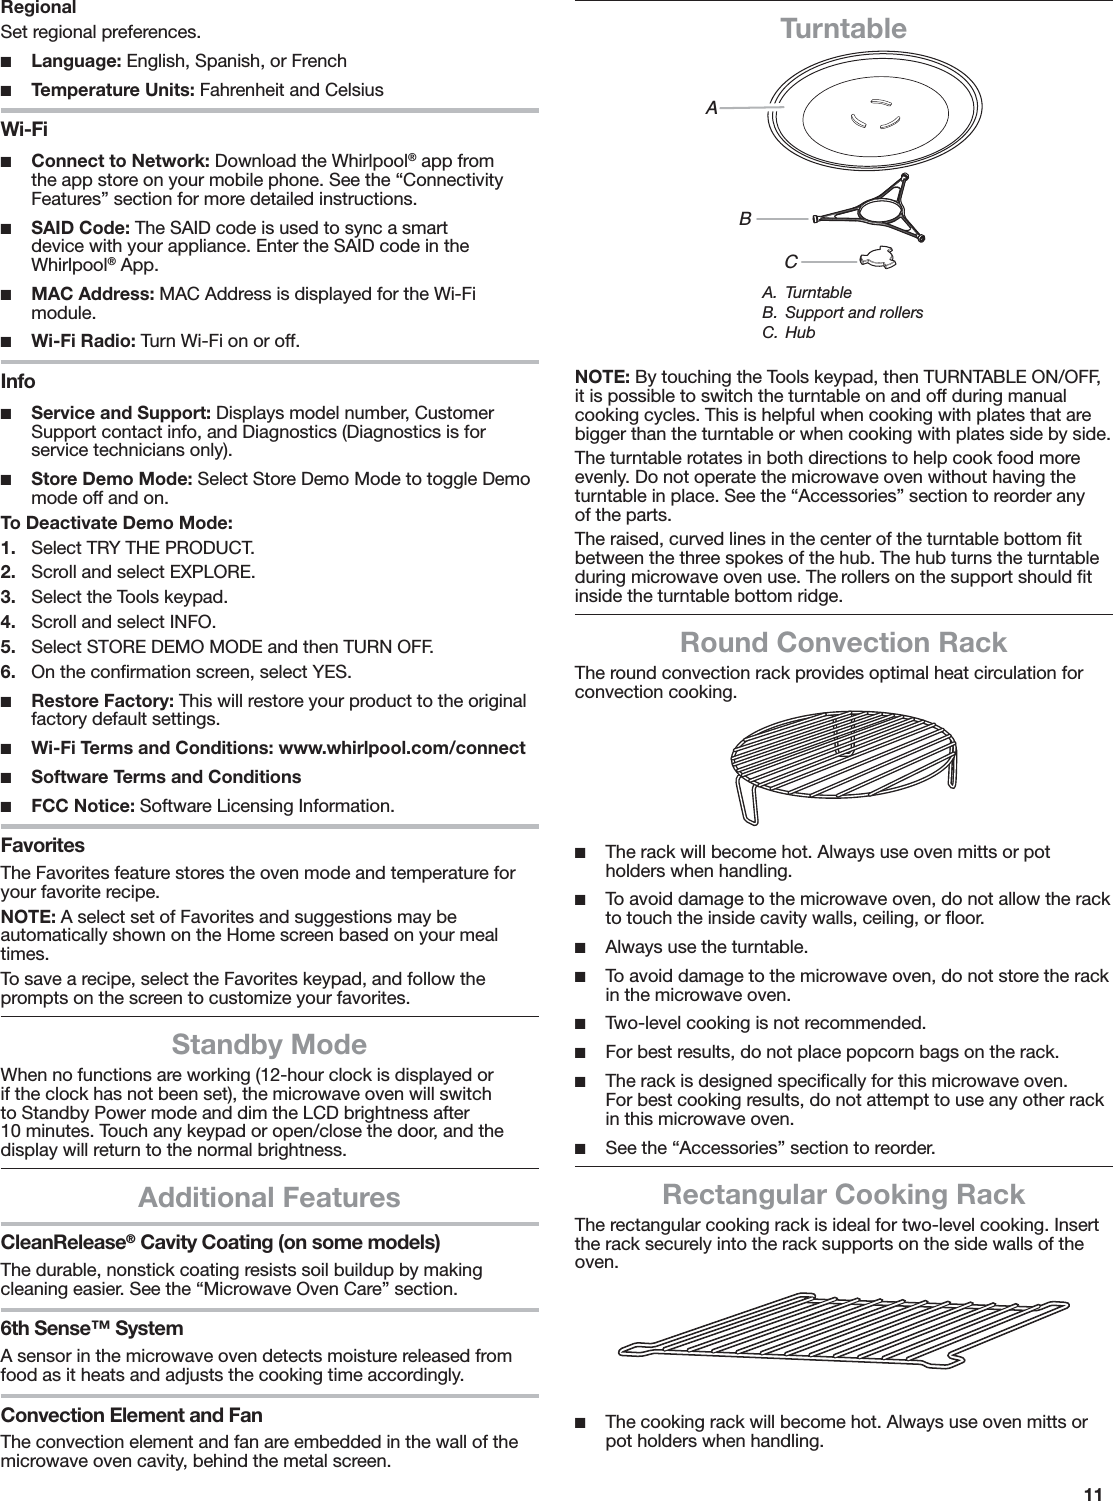
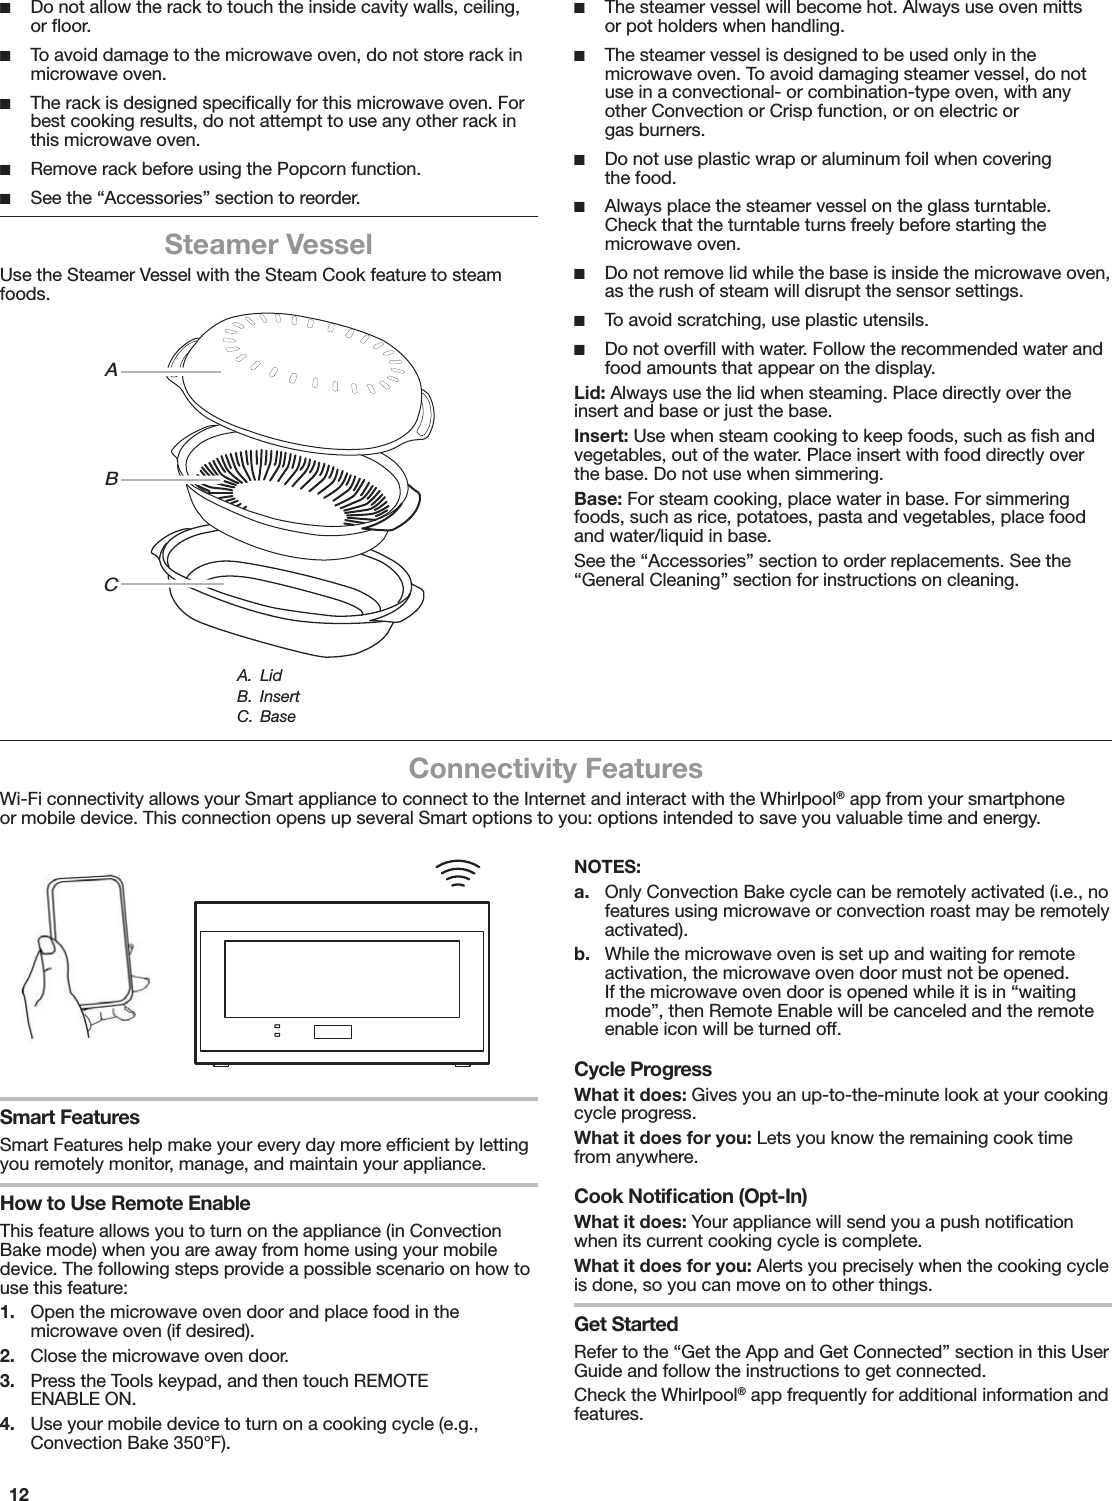
![10More ModesKosher Consumer-Friendly (KCF) ModeFor guidance on usage and a complete list of models with Kosher Consumer-Friendly (KCF) Mode, visit www.star-k.org.The KCF mode for this microwave oven is similar to the Sabbath Mode available on other appliances such as ovens, but with several important differences. KCF mode can be considered as a less-featured version of Sabbath mode. For example, in KCF mode, if the microwave oven is in cooking mode, then you should not open the microwave oven door as this will turn off the heating source.When KCF mode is activated, opening the microwave oven door will not turn on the microwave oven cavity light. All keypad presses will be ignored (except the Cancel and Power/Cancel keypads) and the display will remain static. When the microwave oven door is opened or closed, the microwave oven light will not turn on or off, but the heating elements will turn off immediately. You should wait until the cooking cycle is finished in KCF mode to open the door.To Enable KCF Mode (Sabbath or Holidays):1. If you want the cavity light to stay on, press the Light keypad once for High setting or twice for Low setting.2. If you want ventilation fan to be on (the ventilation fan will automatically turn off after 4 hours.):a. Touch the Tools keypad.b. Press the Hood Fan keypad once for the Maximum speed setting. You may press this keypad repeatedly and choose a different speed. There are five available speeds: Maximum, High, Medium, Medium-Low, and Low. Choose the desired speed.3. Open the microwave oven door and place your food in microwave oven. Close the microwave oven door. 4. Touch the Tools keypad, scroll down until you see “More Modes”.5. Touch MORE MODES.6. Touch KOSHER CONSUMER-FRIENDLY.7. Touch KCF MODE. 8. The display will ask, “Would you like to set a Convect Bake cycle?” Press YES.9. The display will show “Add A Cook Time” near bottom of display. Press in the area of “Add A Cook Time.”10. Press the number keypads to set the length of time in HH:MM:SS. For example, enter 02:30:45 for a cook time of 2 hours, 30 minutes, and 45 seconds.11. Press NEXT.12. Scroll to select the Convect Bake temperature. 325°F (163°C) is the default temperature.13. Touch START.The microwave oven is now cooking with cavity light and ventilation fan in chosen setting. The display will show the cook time counting down. While the microwave oven is cooking in KCF mode, do not open the microwave oven door, as this will shut off heat source immediately. When the cooking cycle ends, there will be no beeps and the oven light will stay off when you open the door to remove your food.NOTES: ■Do not open the microwave oven door while the microwave oven is cooking as this will cancel the cooking cycle. ■Do not use the Kitchen Timer in KCF mode. ■After a return from a power failure, the microwave oven will be in KCF mode, but the cooking cycle will not be on. The unit will be in KCF mode so you can open the oven door without turning on the oven light. ■If you press the Cancel or Power/Cancel keypads during cooking, this will cancel any cooking cycle. This is a safety requirement. ■Temperature change is not available in KCF mode.To Disable KCF Mode:Once cooking ends, the display will say, “Press and hold anywhere on the screen for 3 seconds to disable Kosher Consumer-Friendly mode.” Follow this direction: Press and hold the screen for 3 seconds and display should revert to clock.NOTE: Smartphone should be turned off before Sabbath/Holidays, because notifications will be displayed on your mobile device (if you opted in).Temperature CalibrationIMPORTANT: Do not use a thermometer to measure the oven temperature. Elements will cycle on and off as needed to maintain a consistent temperature but may run slightly hot or cool at any point in time due to this cycling. Opening the oven door will affect cycling of the elements and impact the temperature.The oven provides accurate temperatures and has been thoroughly tested at the factory. However, it may cook faster or slower than your previous oven, causing baking or browning differences. If necessary, the temperature calibration can be adjusted in either Fahrenheit or Celsius.A minus sign means the oven will be cooler by the displayed amount. The absence of a minus sign means the oven will be warmer by the displayed amount.NOTE: The oven display will continue to show the original set temperature and will not reflect the calibration offset. For example, if set to 350° (177°C) and calibrated to -20, the display will continue to show 350° (177°C).To Adjust Oven Temperature Calibration:1. Press the Tools keypad.2. Select MORE MODES.3. Select TEMPERATURE CALIBRATION.4. Press NEXT to apply an offset to the operating temperature.5. Scroll from left to right to increase or decrease the temperature.6. Press SAVE.PreferencesTimes and DatesSet time and date preferences.NOTE: If user is connected to Wi-Fi, time and date will be set automatically. ■Your Meal Times: Adjust when “Breakfast, Lunch, Or Dinner” is shown. ■Time ■Date ■Time Format (AM/PM vs. 24-Hour [Military Time])Sound VolumeSet sound volume preferences. ■Timers and Alerts ■Buttons and EffectsDisplay SettingsSet the screen brightness. ■Display Brightness ■Wake Up When I Get Near: Detects when people are near. ■Emphasize Info When I Am Far: Detects when people are standing far away.](https://usermanual.wiki/Whirlpool-Microwave-Development/RED9019X/User-Guide-3491820-Page-10.png)