White Sewing Machine 1599 Users Manual
1599 to the manual ac527db7-d411-4949-8617-886b67704157
2015-02-03
: White White-Sewing-Machine-1599-Users-Manual-479199 white-sewing-machine-1599-users-manual-479199 white pdf
Open the PDF directly: View PDF ![]() .
.
Page Count: 48

Blue
Jeans
‘
Machine
WHITE
BEWINQ
MACHINE

CONTENTS
1.
NAMES
OF
PARTS
2
2.
ACCESSORIES
3
3.
BEFORE
SEWING
4
Detaching
Extension
Table
4
Connecting
Foot
Controller
and
Power
Cord
5
Changing
Needle
6
Changing
Foot
7
Bobbin
Winding
8
Inserting
Bobbin
11
Adjusting
Lower
Tension
12
Drop
Feed
Lever
12
Threading
Upper Thread
13
Twin
Needle
Threading
14
Decorative
Tucks
or
Designs
14
Drawing
Up
Lower
Thread
15
Foot
Pressure
15
Fabric,
Thread and
Needle
Table
16
Pattern
Setting
17
4.
STRAIGHT
SEWING
18
Pattern
Selection
Dial
18
Stitch
Length
Dial
18
Starting
to
Sew
19
Double
Presser
Foot
Lifter
19
Cloth
Guide
20
Adjusting
Thread
Tension 20
Applications
of
Straight
Stitch
21
5.
ZIGZAG
SEWING
22
Zigzag
Width
Control
22
Thread
Tension
for
Zigzag
Stitch
22
6.
MAKING
BUTTONHOLES
23
Determine
Length
23
Determine
Width
23
Buttonhole
Density Adjustment
25
Cutting
Buttonholes
26
7.
SEWING
ON
BUTTONS
27
8.
OVERCASTING
28
9.
OVERLOCKING
29
Application
of
Rick-Rack
31
Application
of
Decorative
Fun
Patterns
32
10.
STRAIGHT
STRETCH
STITCH
30
Adjusting
Stretch
Stitch
Balance
30
11.
BLIND
HEM
STITCH
33
Elastic
Blind
Hem
Stitch
34
12.
STRETCH
SEAM
35
13.
ZIPPER
SEWING
36
14.
SHELL
STITCHING
15.
PIN
TUCKING
38
16.
QUILTING
39
17.
MENDING
40
Patching
40
Mending
a
Rip
40
18.
DARNING
41
19.
APPLIQUE
WORK
42
20.
MAINTENANCE
44
Cleaning
44
Oiling
21.
TROUBLE
CHART
Changing
Light
Bulb
47
0
CD
0)
*
M
01
N) N)
c.)
N)
N)
C..)
N)-.
0
I

1.
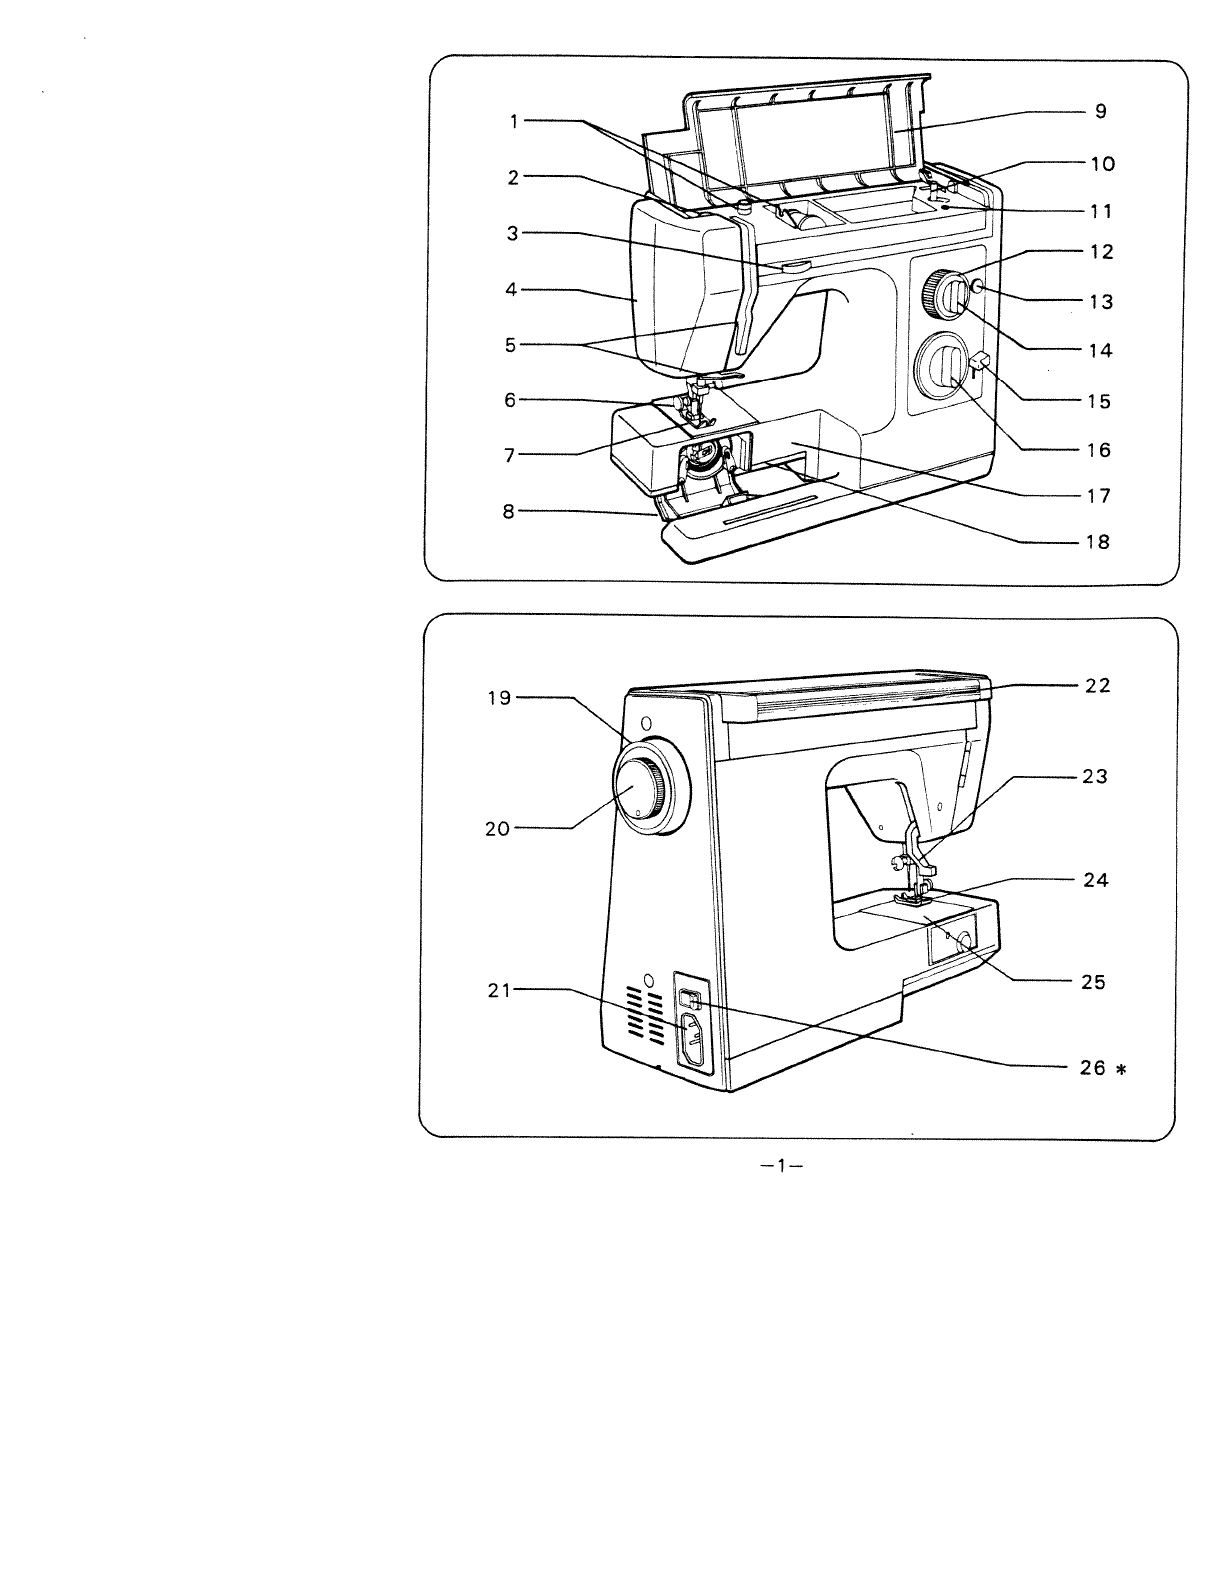
NAMES
OF
PARTS
1.
Thread guide
for
bobbin
winding
2.
Foot
pressure
regulator
3.
Upper
thread
tension
dial
4.
Face
cover
5.
Thread guide
for
upper
threading
6.
Presser
foot
thumb screw
7.
Presser
foot
8.
Shuttle cover
9.
Top
cover
10.
Bobbin
winding
spindle
11.
Screw
hole
for
extra
spool
pin
12.
Zigzag
width
control
13.
Special
buttonhole
adjustment
14.
Stitch
length
dial
15.
Reverse
sewing
lever
16.
Pattern
selection
dial
17.
Free
arm
18.
Drop
feed
lever
19.
Handwheel
20.
Stop
motion
knob
21.
Socket
22.
Handle
23.
Presser
foot
lifter
24.
Feed
dog
25.
Needle
plate
26.
Switch
*
*
Specifications
vary
from
country
to
country.
—2—
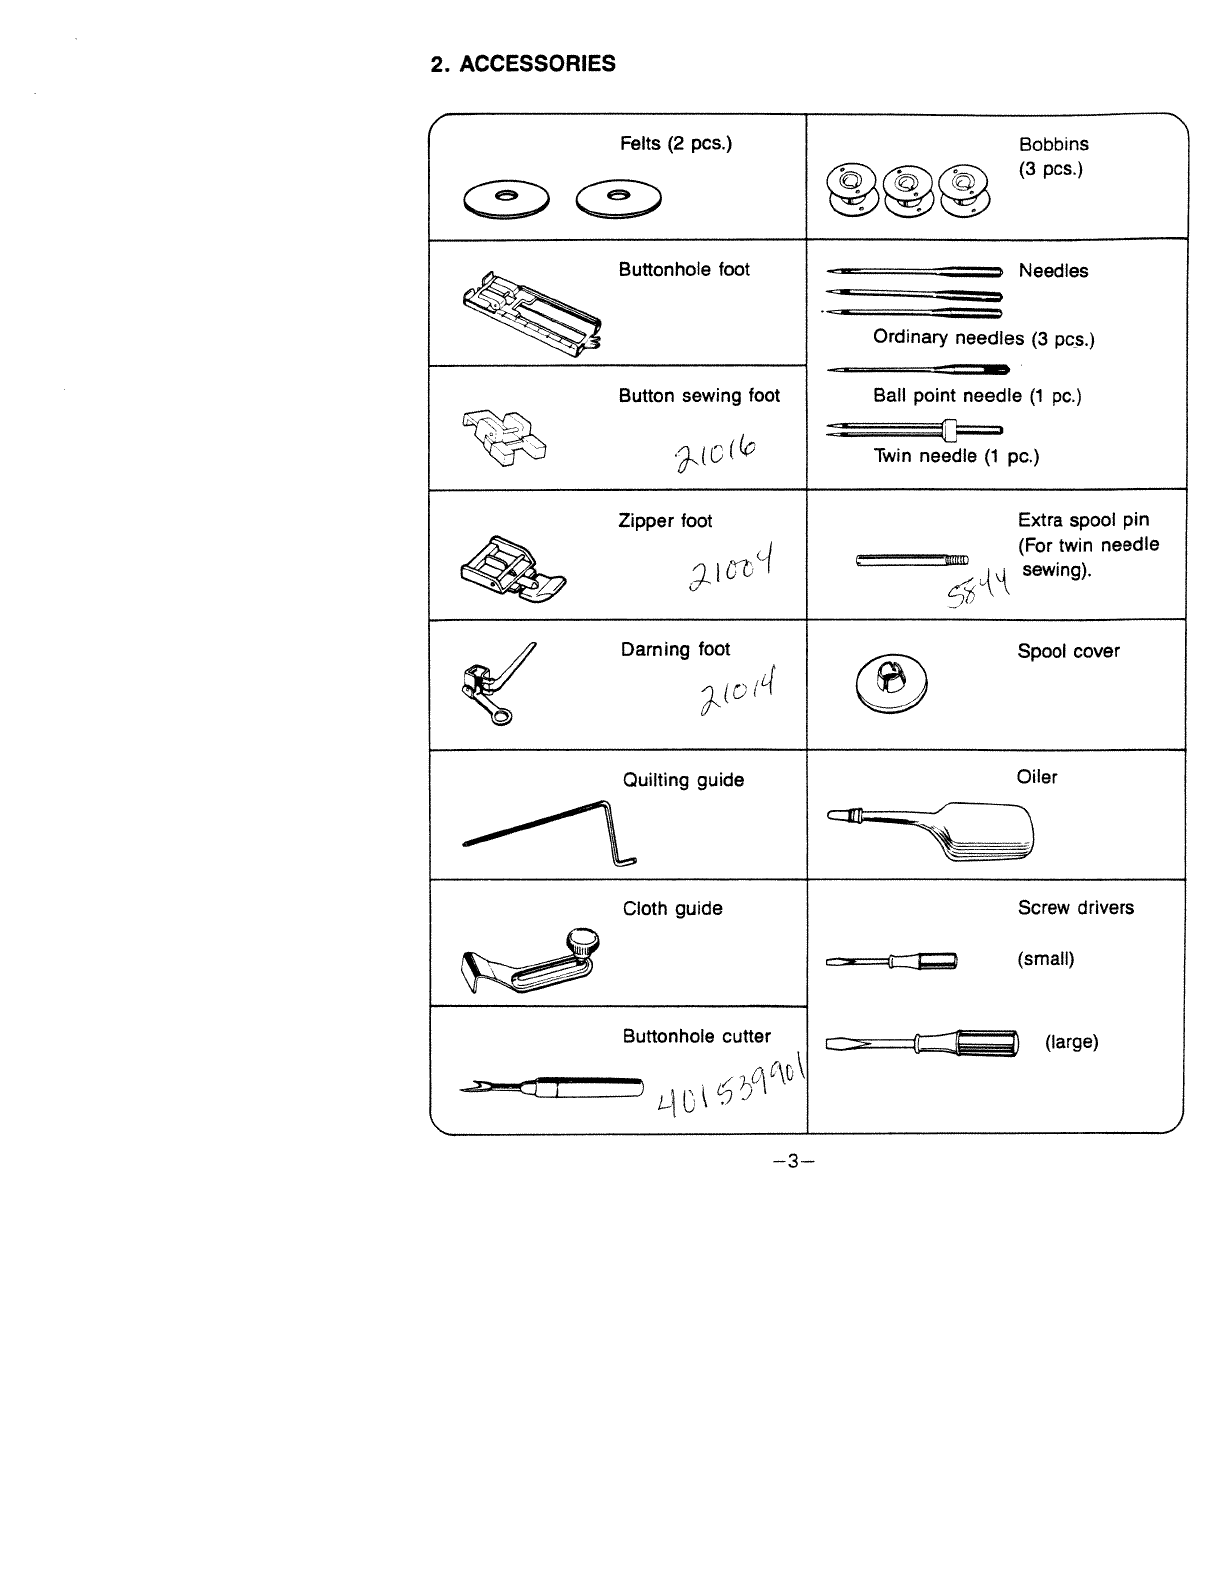
2.
ACCESSORIES
,—
Felts
(2
pcs.)
Bobbins
c
(3
Buttonhole
foot
Needles
Ordinary
needles
(3
pcs.)
Button
sewing
foot
Bail
point
needle
(1
pc.)
N
‘J
(
Twin
needle
(1
pc.)
Zipper
foot
Extra
spool
pin
(For
twin
needle
sewing).
Darning
foot
Spool
cover
(
Quilting
guide
Oiler
Cloth
guide
Screw
drivers
(small)
Buttonhole
cutter
(large)
—3—
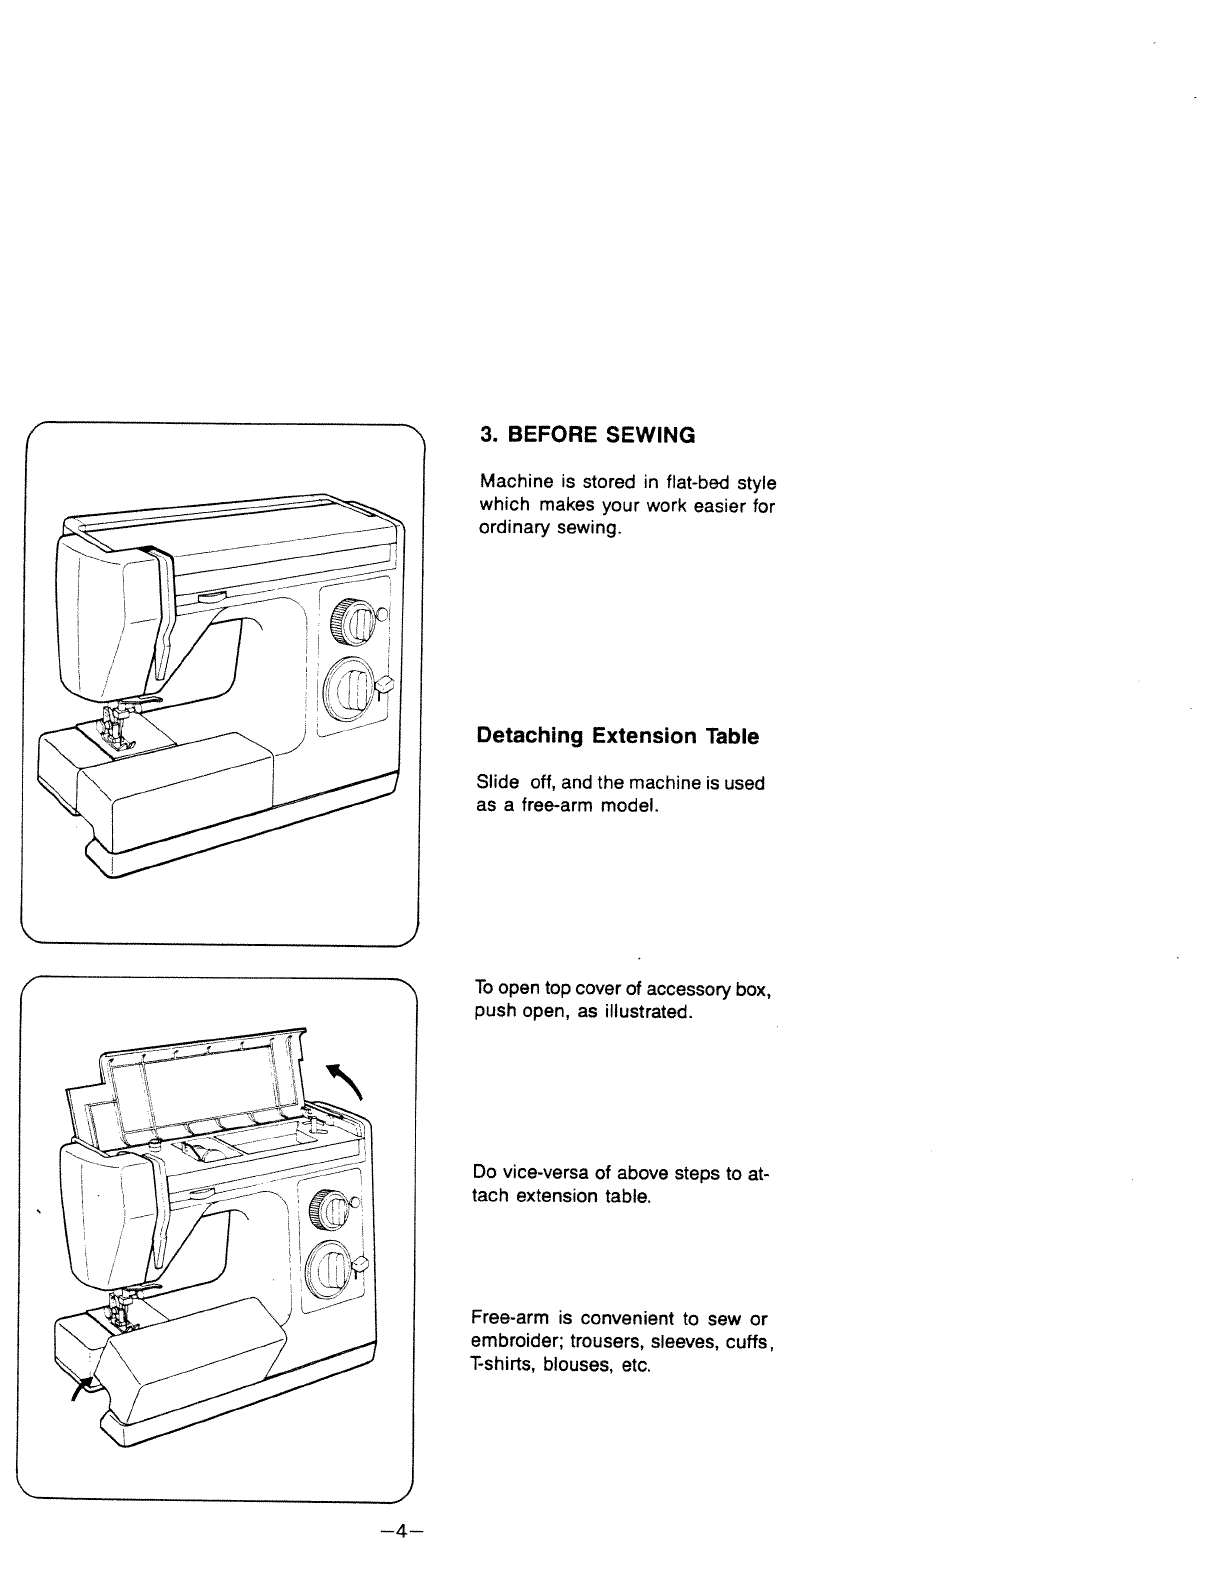
3.
BEFORE
SEWING
Machine
is
stored
in
flat-bed
style
which
makes
your
work
easier
for
ordinary sewing.
Detaching
Extension
Table
Slide
off,
and
the
machine
is
used
as
a
free-arm model.
To
open
top
cover
of
accessory
box,
push
open,
as
illustrated.
Do
vice-versa
of
above
steps
to
at
tach
extension
table.
Free-arm
is
convenient
to
sew
or
embroider;
trousers, sleeves,
cuffs,
T-shirts,
blouses,
etc.
J
I
—4—
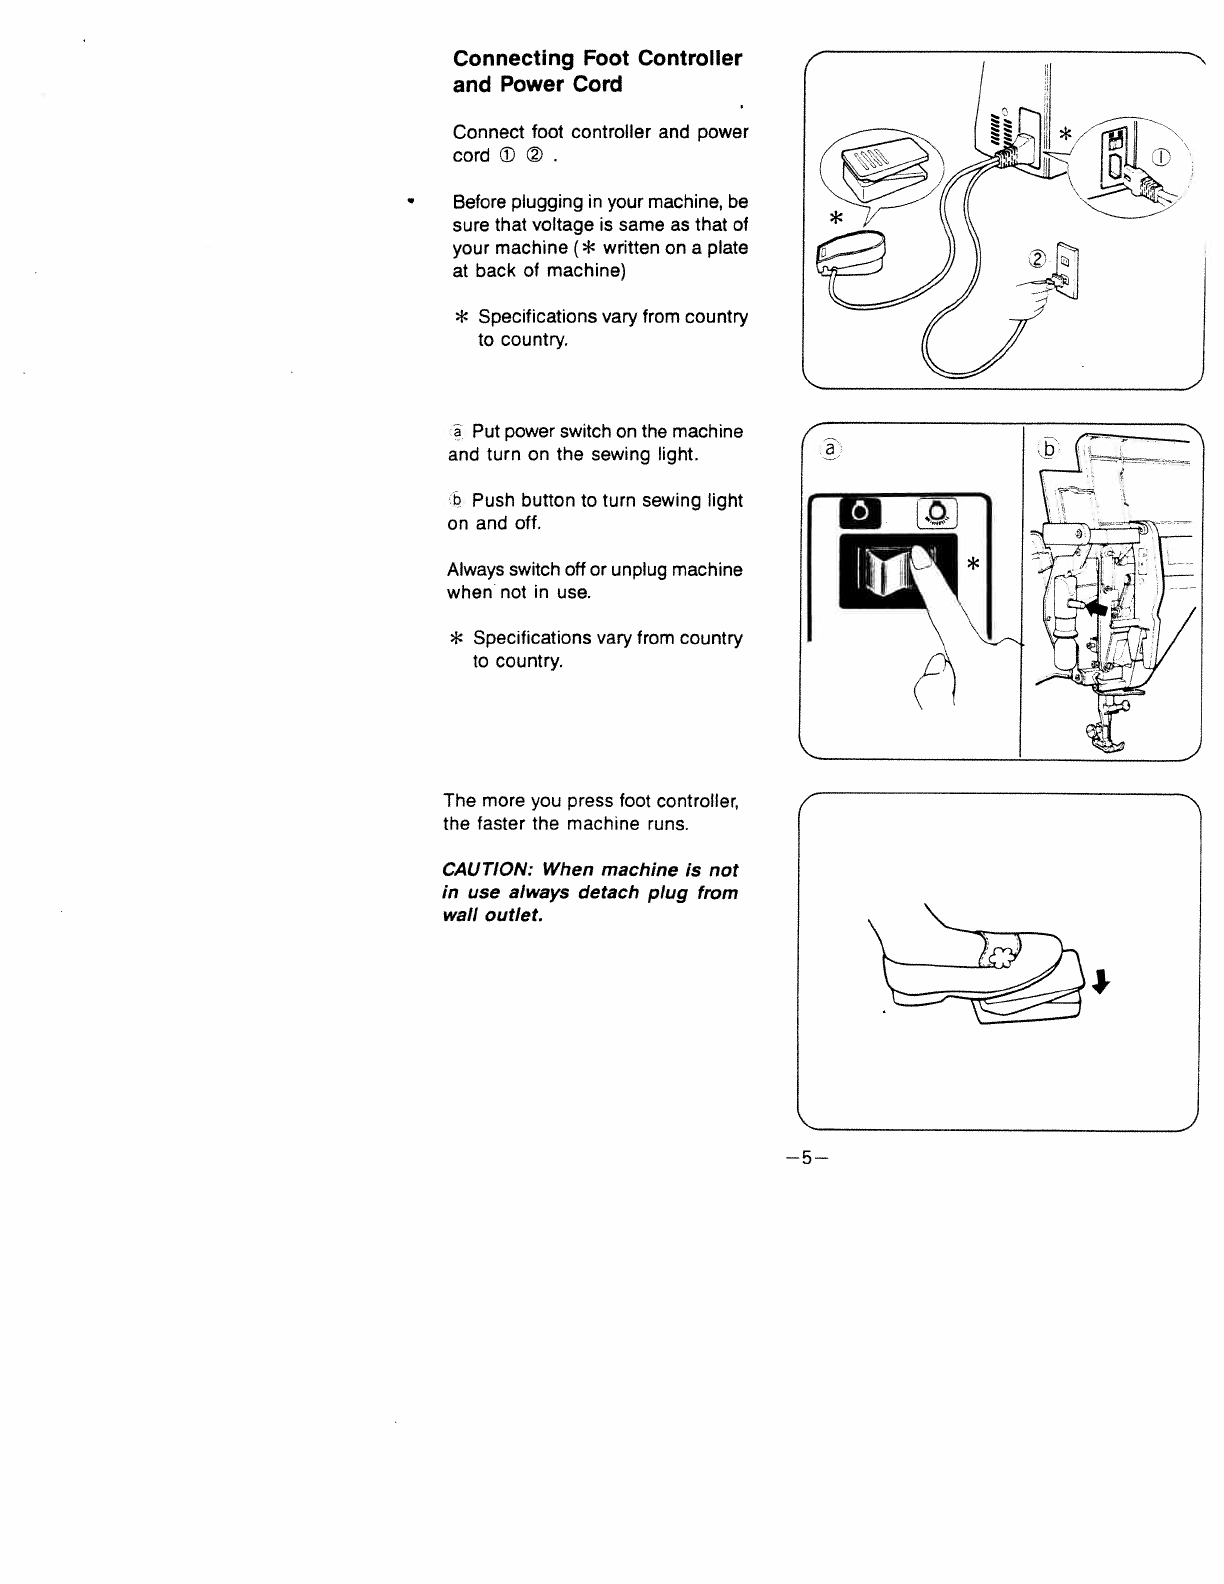
Connecting
Foot
Controller
and
Power
Cord
Connect
foot
controller
and
power
cord
CD
Before
plugging
in
your
machine,
be
sure
that
voltage
is
same
as
that
of
your
machine
(*
written
on
aplate
at
back
of
machine)
*
Specifications
vary
from
country
to
country.
Put
power
switch
on
the
machine
and
turn
on
the
sewing
light.
b
Push
button
to
turn
sewing
light
on
and
off.
Always
switch
off
or
unplug
machine
when
not
in
use.
*
Specifications
vary
from
country
to
country.
The
more
you
press
foot
controlle
the
faster
the machine
runs.
CAUTION:
When
machine
is
not
in
use
always
detach
plug
from
wall
outlet.
—5—
—I
—6—
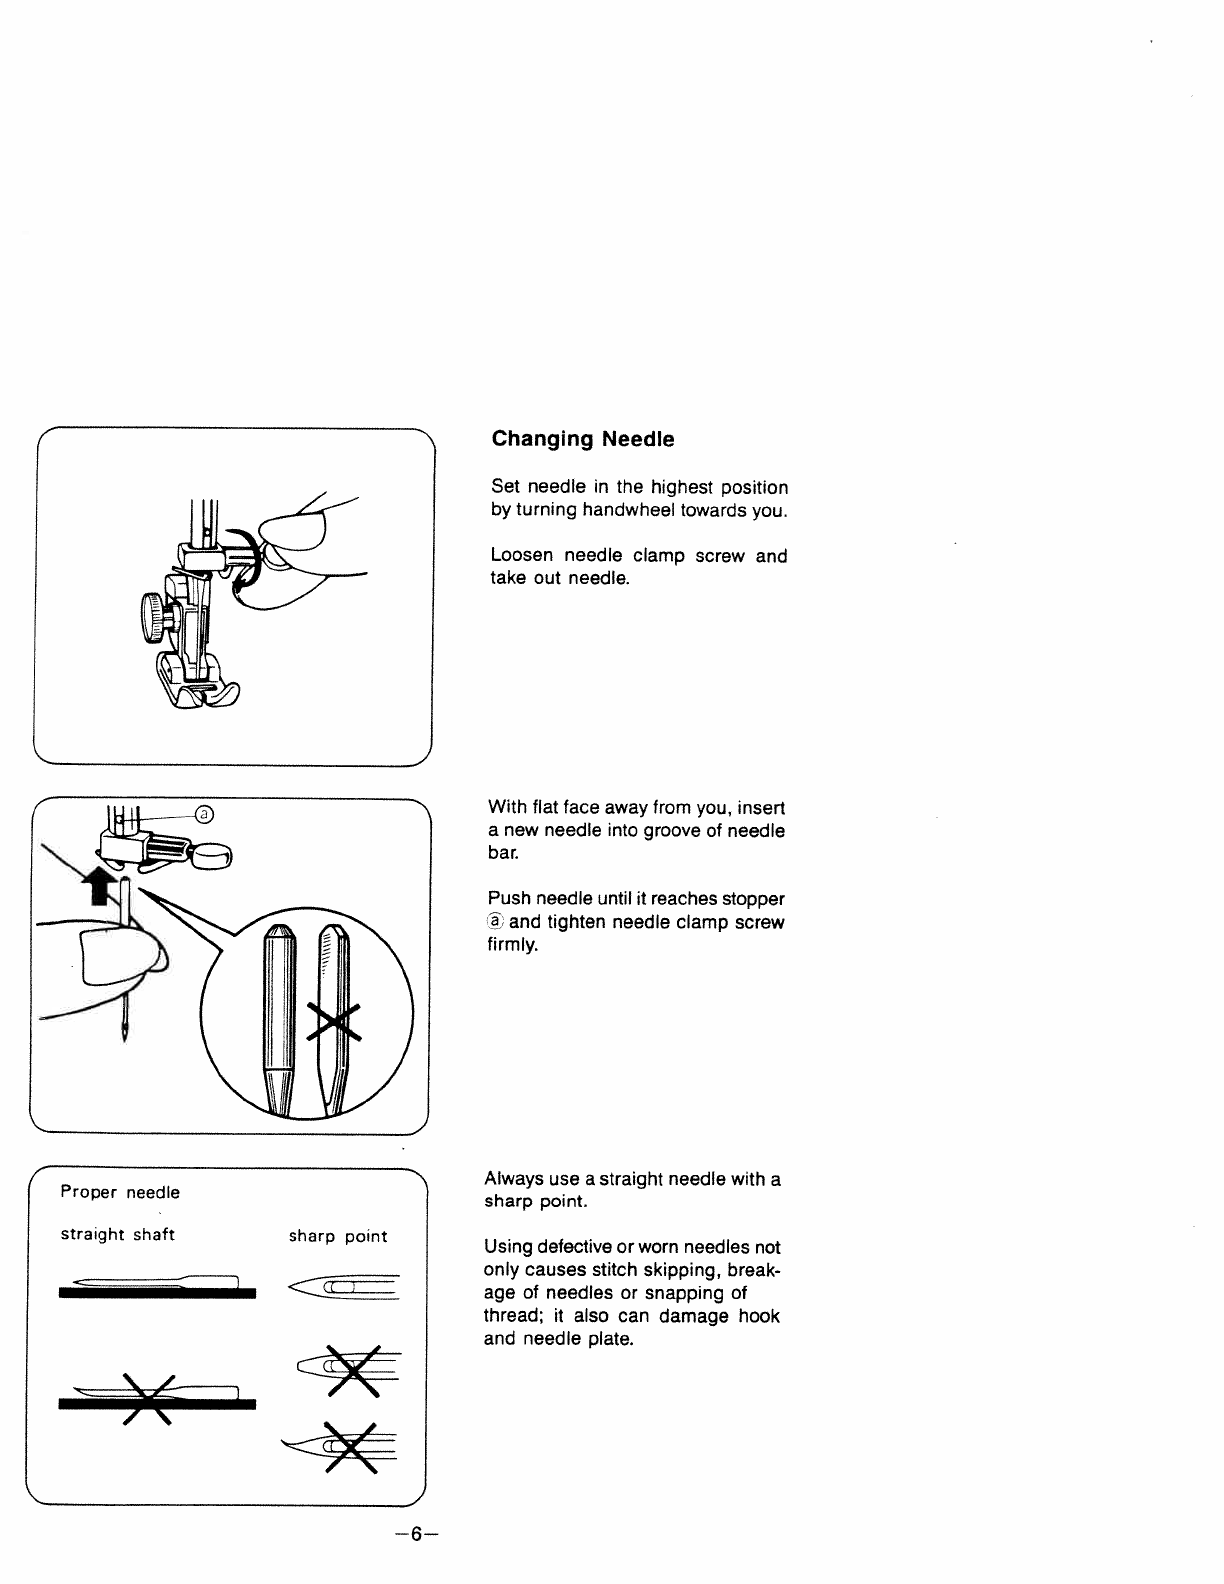
Changing
Needle
Set
needle
in
the highest
position
by
turning
handwheel
towards
you.
Loosen
needle
clamp
screw
and
take
out
needle.
With flat
face
away
from
you,
insert
a
new
needle
into
groove
of
needle
bar.
Push
needle
until
it
reaches
stopper
and
tighten
needle
clamp
screw
firmly.
Always
use
a
straight
needle
with
a
sharp
point.
Using
defective
or
worn
needles
not
only
causes
stitch
skipping,
break
age
of
needles
or
snapping
of
thread;
it
also
can
damage
hook
and
needle
plate.
Proper
needle
straight
shaft
sharp
point

Changing
Foot
Raise
presser
foot
lifter.
Set
needle
in
the
highest
position
by
turning haridwheel towards
you.
(1)
Push
button
of
holder towards
you
and
foot
will
come
off.
(2)
Position
anew
foot
by
aligning
holding
groove
of
shank
with
pin
of
foot.
(3)
Lower
presser
foot
lifter
so that
holder
catches
presser
foot.
Jr
—7—
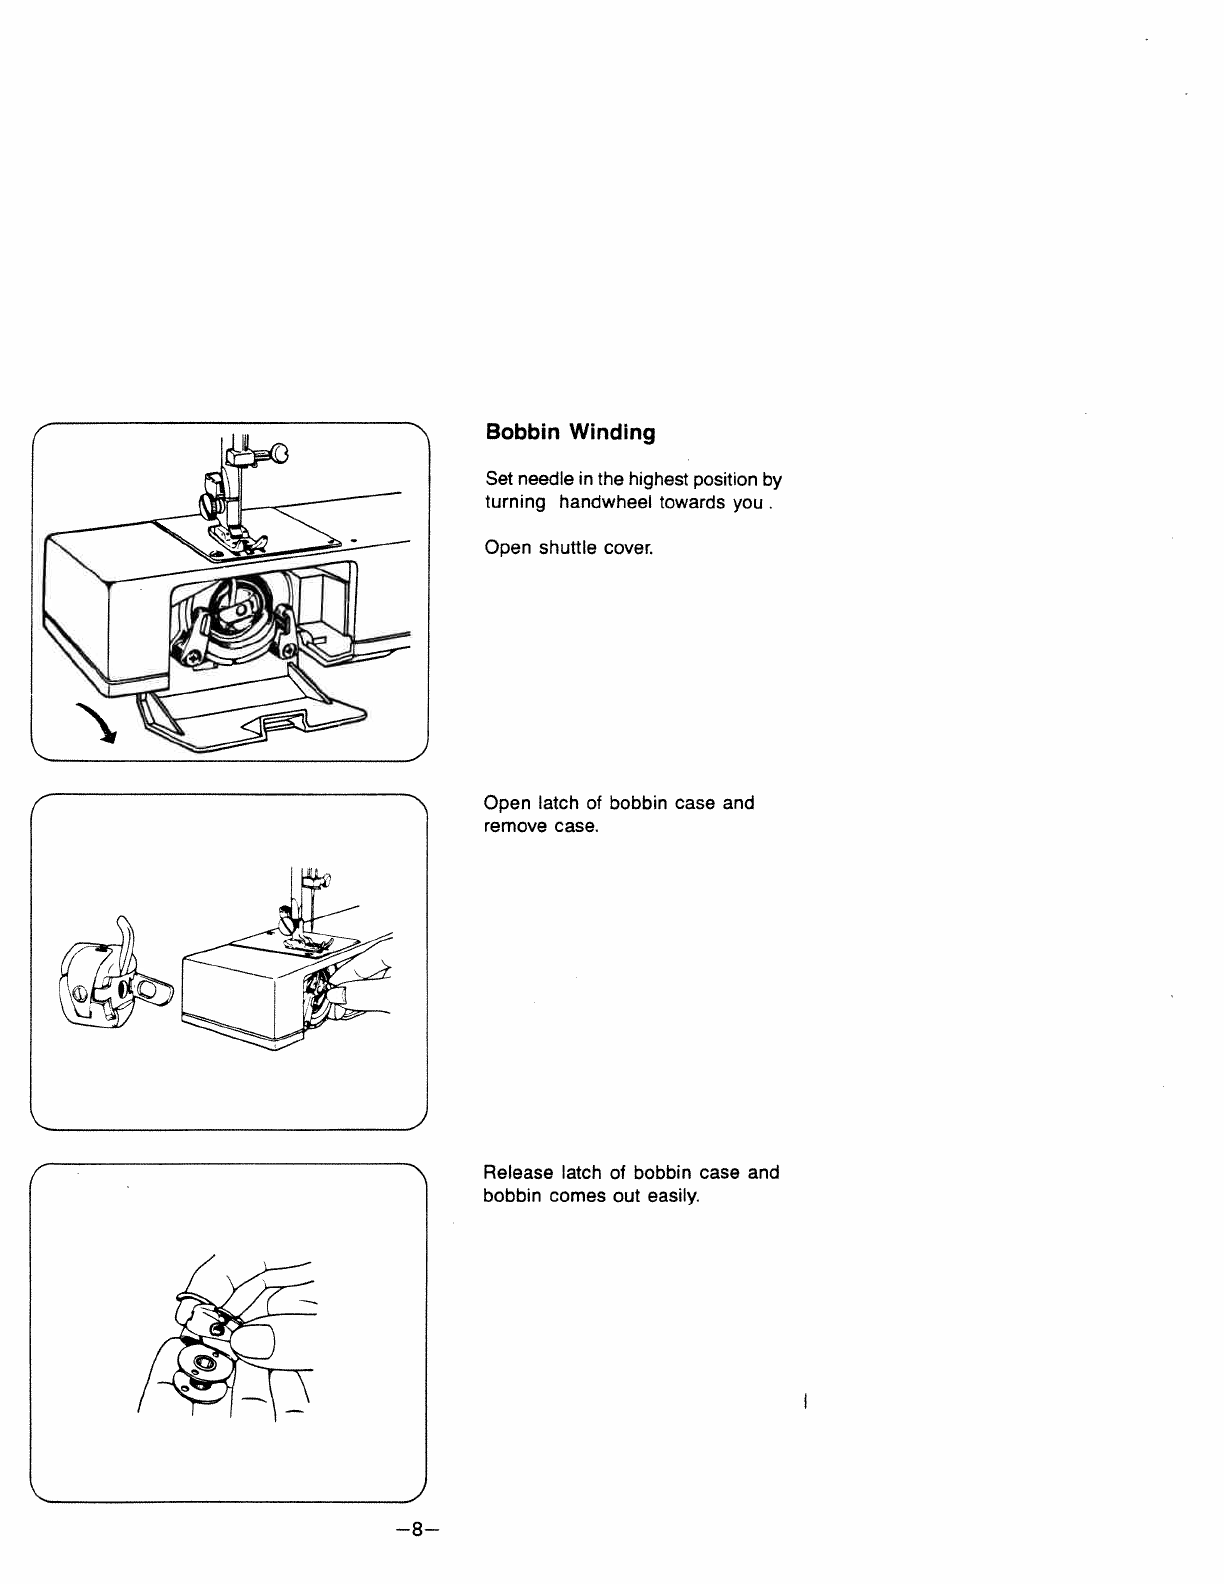
Bobbin
Winding
Set
needle
in
the
highest
position
by
turning
handwheel
towards
you.
Open shuttle
cover.
Open
latch
of
bobbin
case
and
remove
case.
Release
latch
of
bobbin
case
and
bobbin
comes
out
easily.
J
—8--
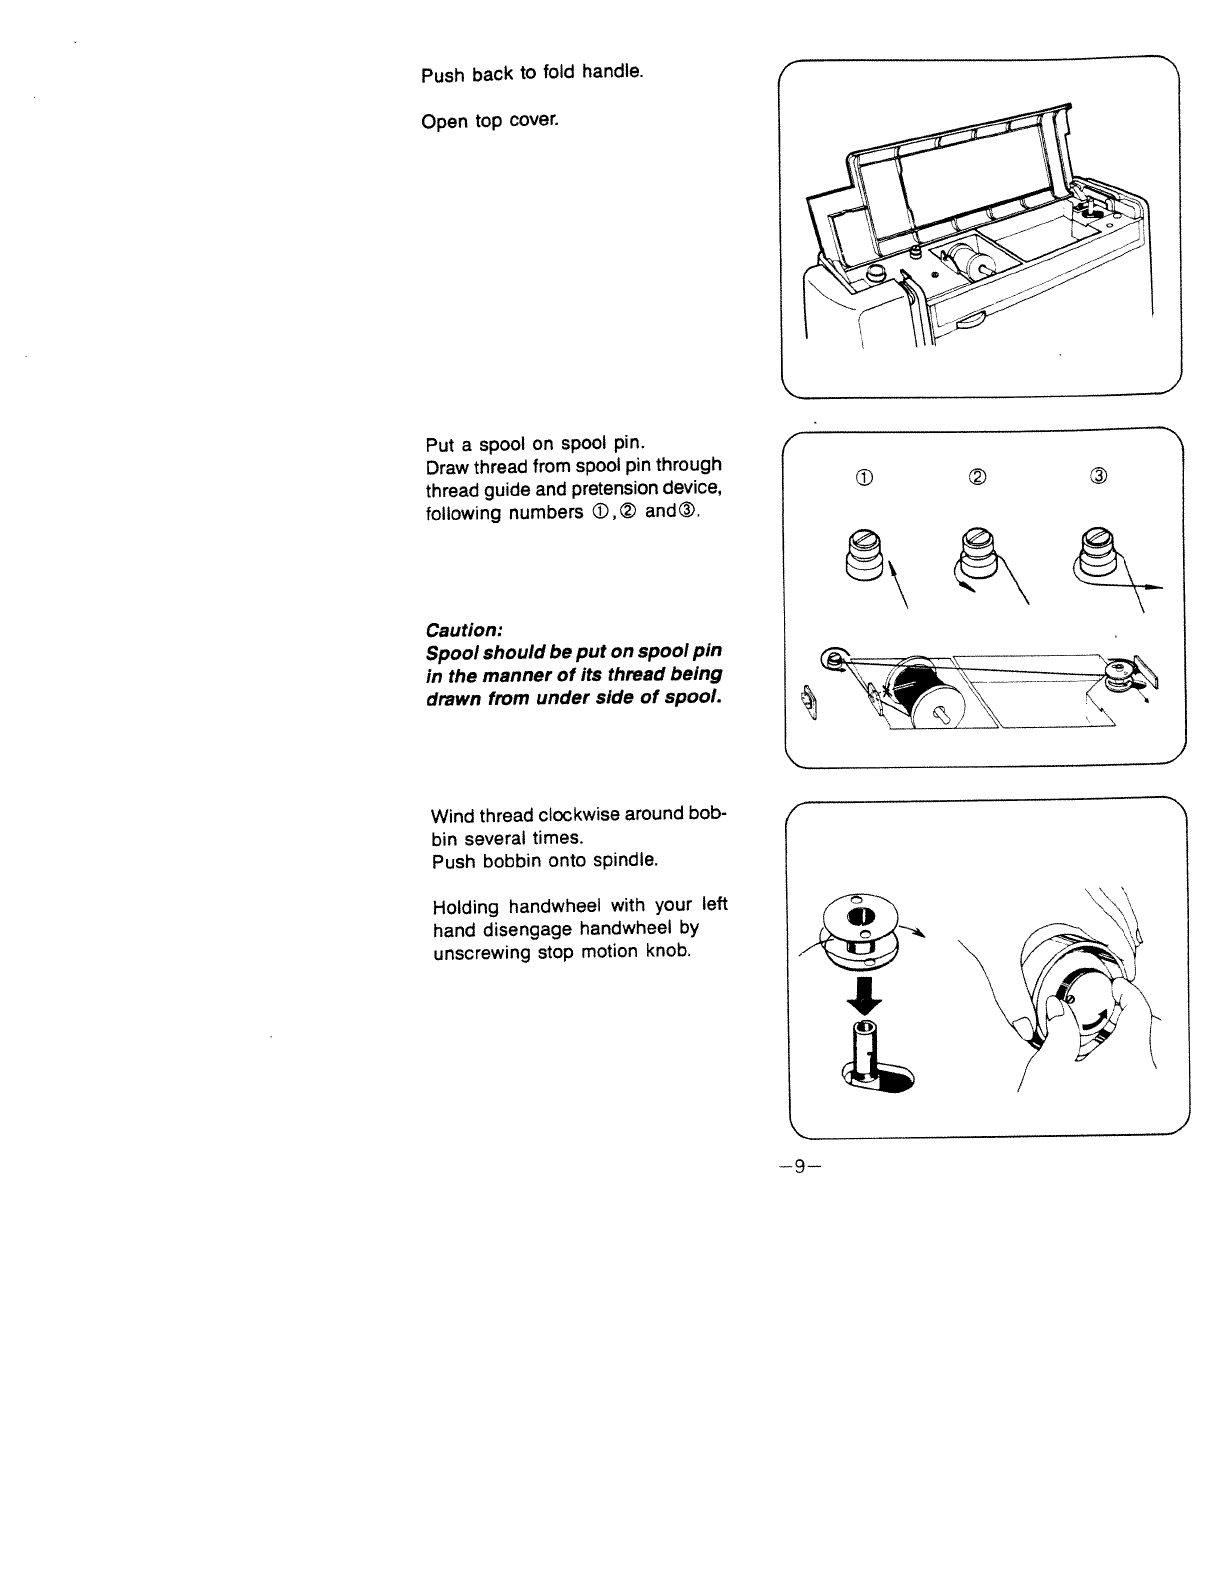
Push
back
to
fold
handle.
Open
top
cover.
Put a
spooi
on
spool
pin.
Draw
thread
from
spool
pin
through
thread
guide and
pretension
device,
following
numbers
and,
Caution:
Spool
should
be
put
on
spool
pin
in
the
manner
of
its
thread
being
drawn
from
under
side
of
spool.
Wind
thread
clockwise
around
bob
bin
several
times.
Push
bobbin onto
spindle.
Holding
handwheel
with
your
left
hand
disengage
handwheel
by
unscrewing
stop
motion
knob.
4
©©
—9—
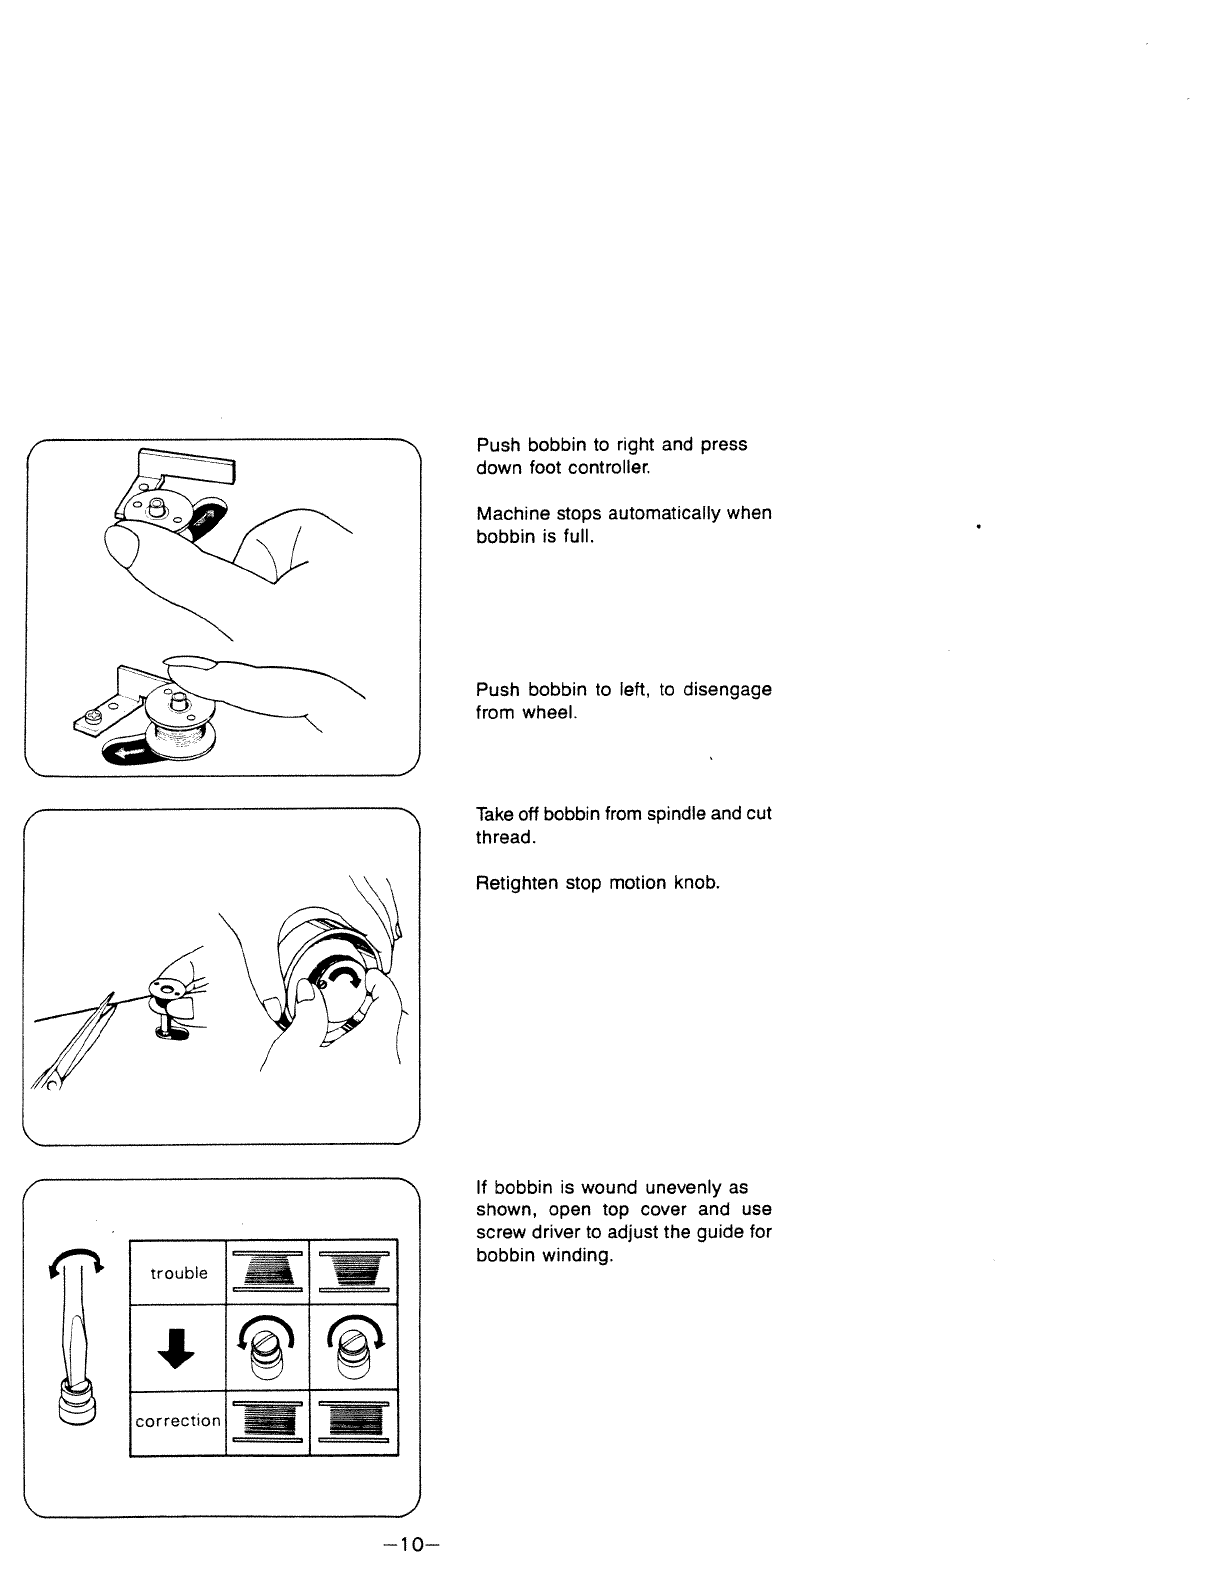
Push
bobbin
to
right
and
press
down
foot
controller.
Machine
stops
automatically
when
bobbin
is
full.
Push
bobbin
to
left, to
disengage
from
wheel.
Take
off
bobbin
from
spindle
and
cut
thread.
Retighten
stop
motion
knob.
,—
trouble
4c
correction
If
bobbin
is
wound
unevenly
as
shown,
open
top
cover
and
use
screw
driver
to
adjust the
guide
for
bobbin
winding.
1
—10—
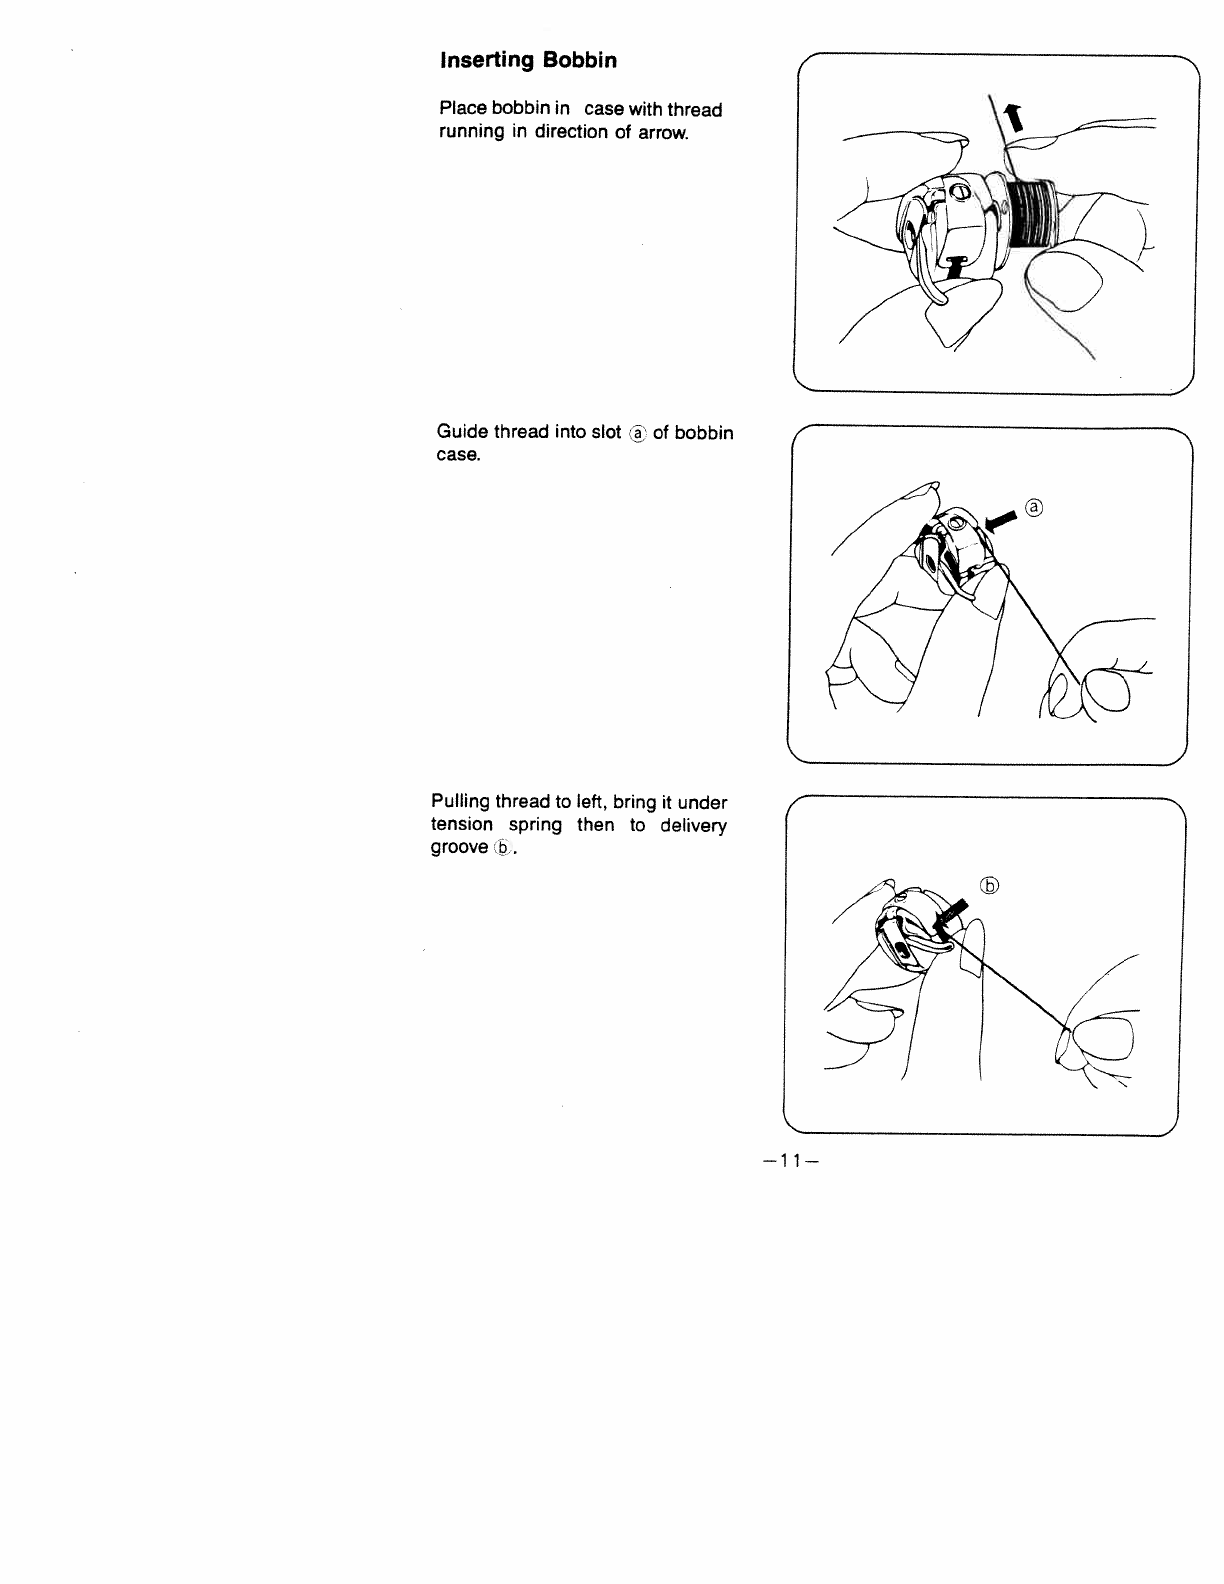
Inserting
Bobbin
Place
bobbin
in
case
with
thread
running
in
direction
of
arrow.
Guide
thread
into
slot
®
of
bobbin
case.
Pulling
thread
to
left,
bring
it
under
tension
spring
then
to
delivery
groove
)
—11—
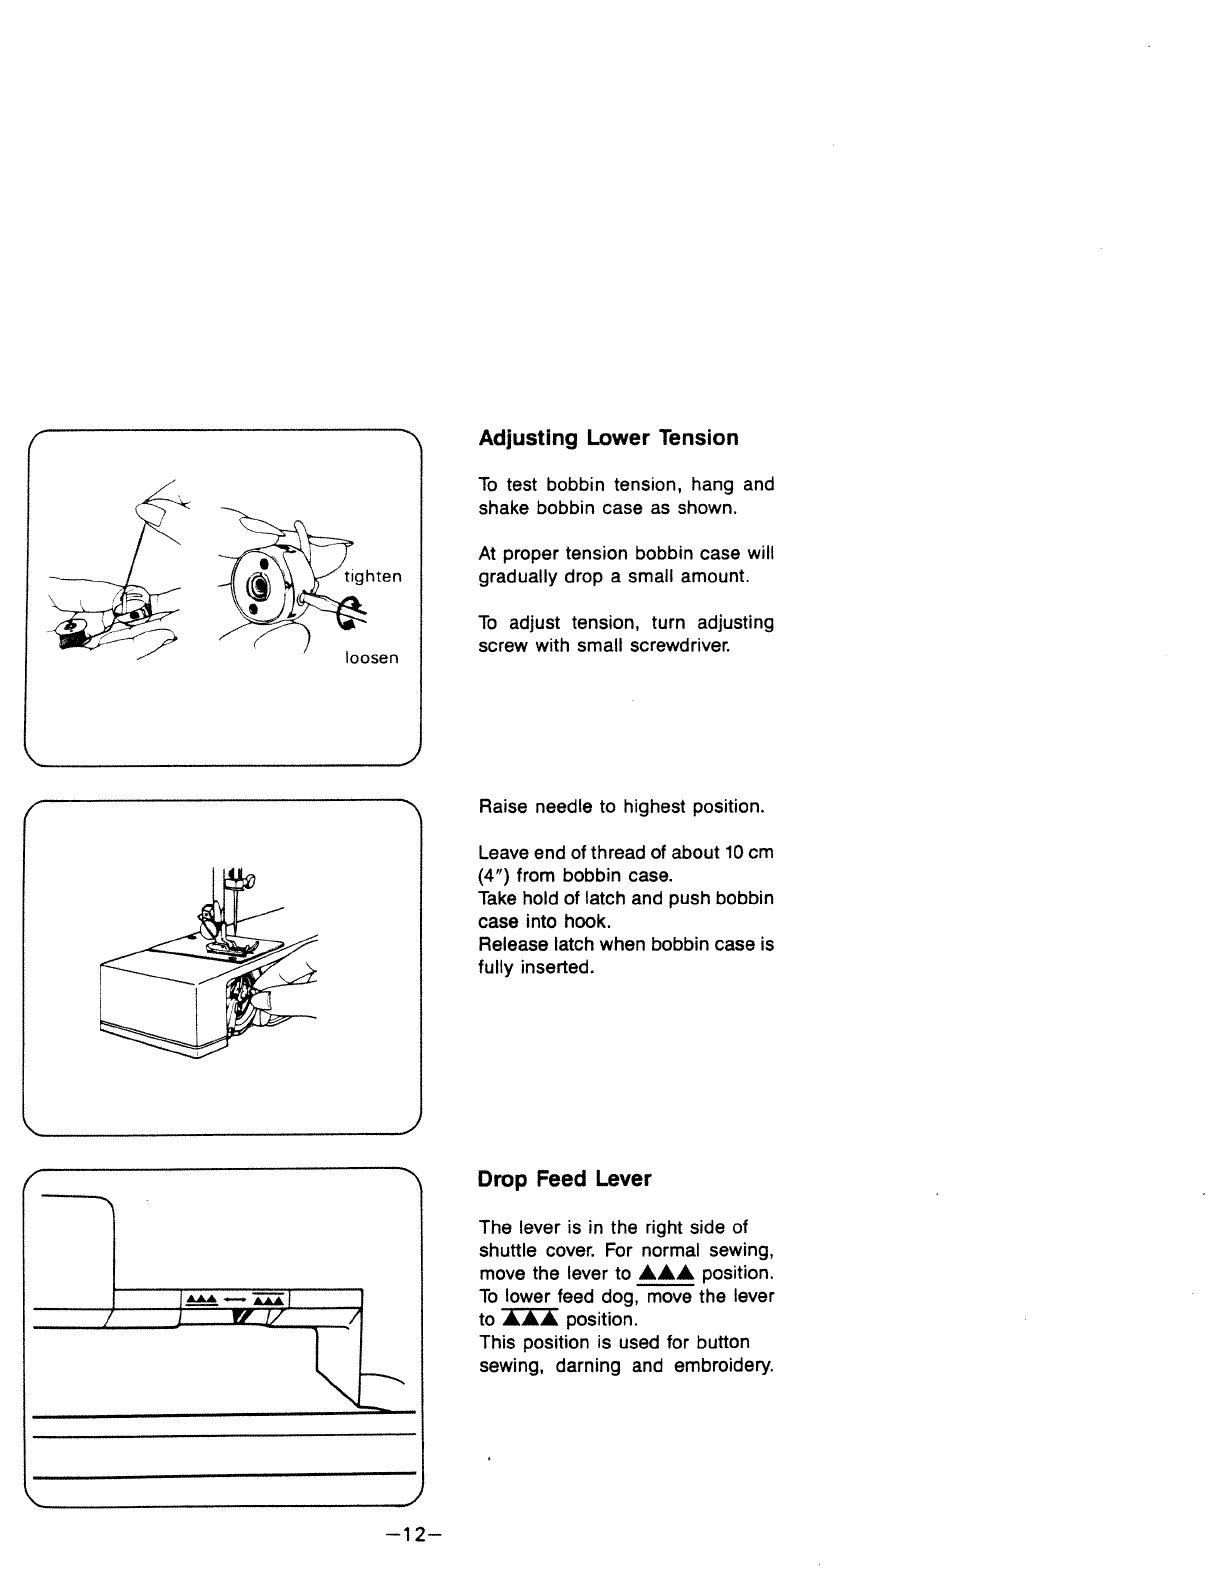
Adjusting
Lower
Tension
To
test
bobbin
tension,
hang
and
shake
bobbin
case
as
shown.
At
proper
tension
bobbin
case
will
gradually
drop
a
small
amount.
To
adjust
tension,
turn
adjusting
screw
with
small
screwdriver.
Raise
needle
to
highest
position.
Leave
end
of
thread
of
about
10
cm
(4”)
from
bobbin
case.
Take
hold
of
latch
and
push
bobbin
case
into
hook.
Release
latch
when
bobbin
case
is
fully
inserted.
r
__j
v:
1/
‘—
Drop
Feed
Lever
The
lever
is
in
the
right
side
of
shuttle
cover.
For
normal
sewing,
move
the
lever
to
AAA
position.
To
lower
feed
dog,
move
the
lever
to
II
position.
This
position
is
used
for
button
sewing,
darning
and
embroidery.
J
—12—
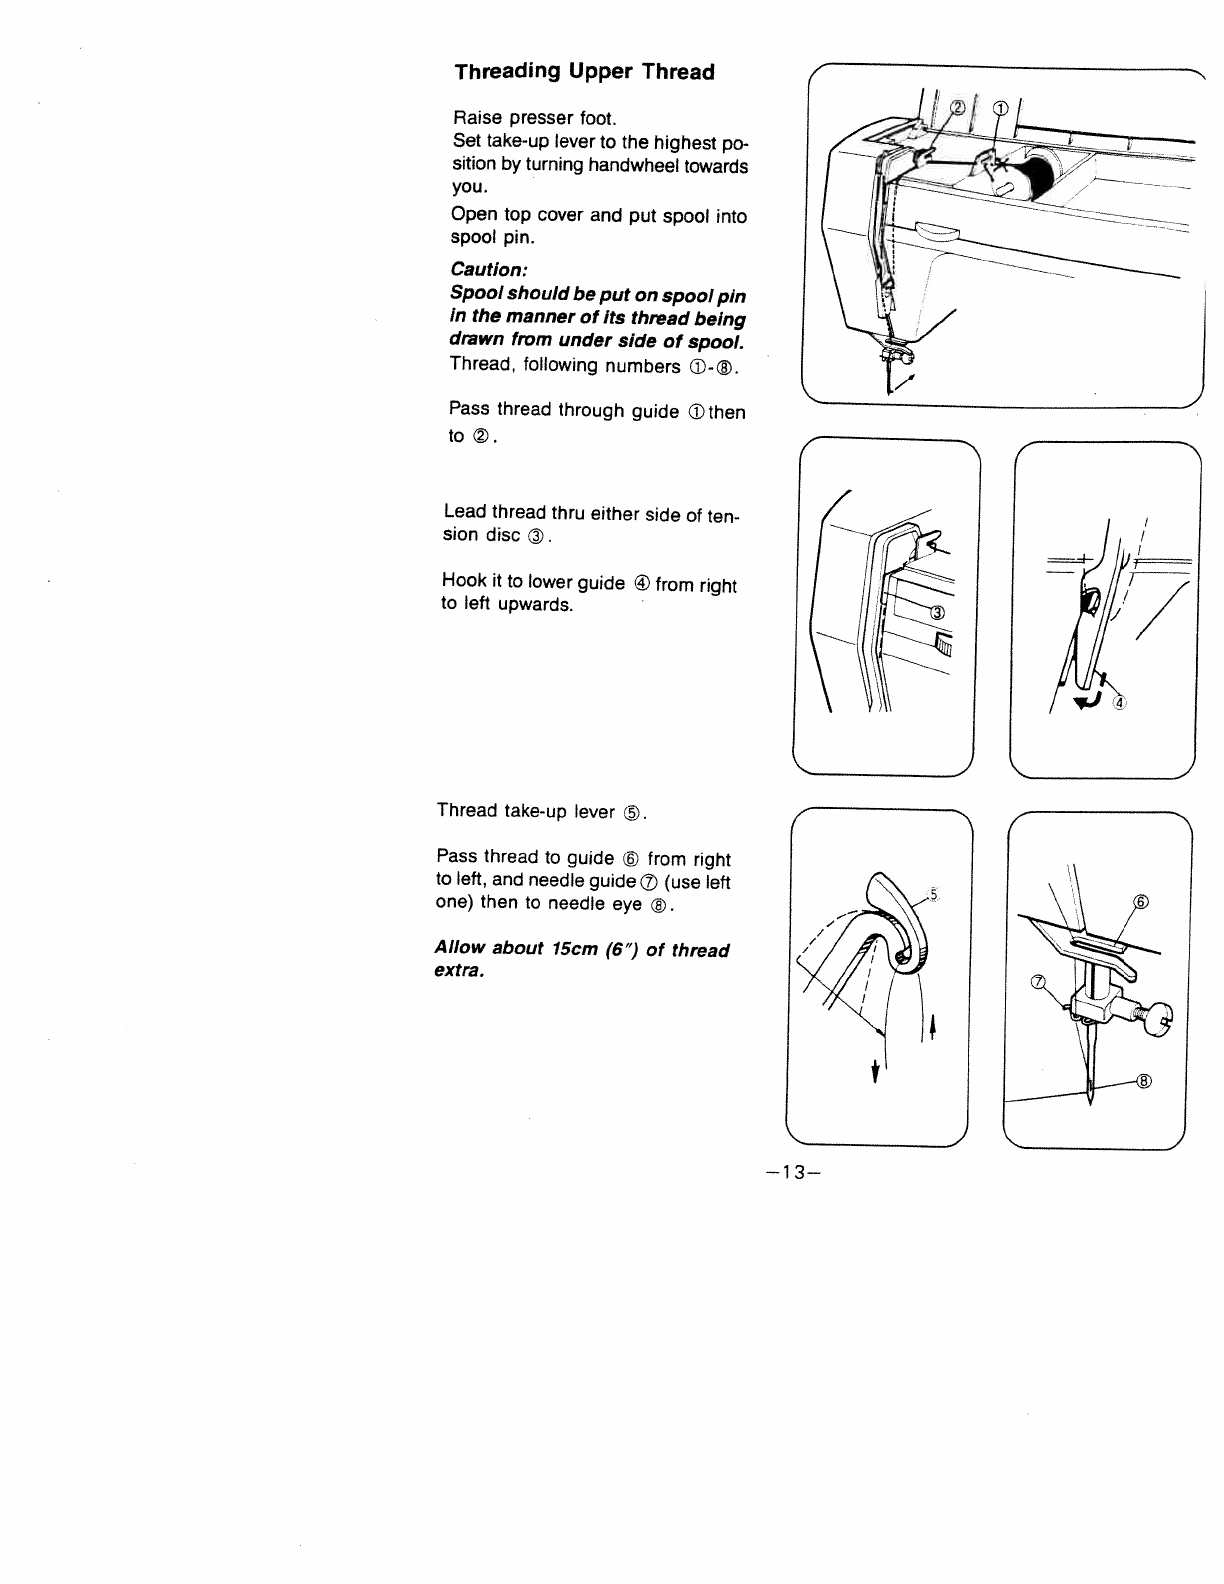
Threading
Upper
Thread
Raise
presser
foot.
Set
take-up
lever
to
the highest
po
sition
by
turning
handwheel
towards
you.
Open
top
cover
and
put
spool
into
spool
pin.
Caution:
Spool
should
be
put
on
spool
pin
in
the
manner
of its
thread
being
drawn
from
under
side
of
spool.
Thread,
following
numbers
-®.
Pass
thread
through
guide
Dthen
to®.
Lead
thread
thru
either
side
of
ten
sion
disc®.
Hook
it
to
lower
guide
from right
to
left
upwards.
Thread
take-up
lever
.
Pass
thread
to
guide
©
from right
to
left,
and
needle
guide
0
(use
left
one) then
to
needle
eye
®.
Allow
about
15cm
(6”)
of
thread
extra.
1
—13--
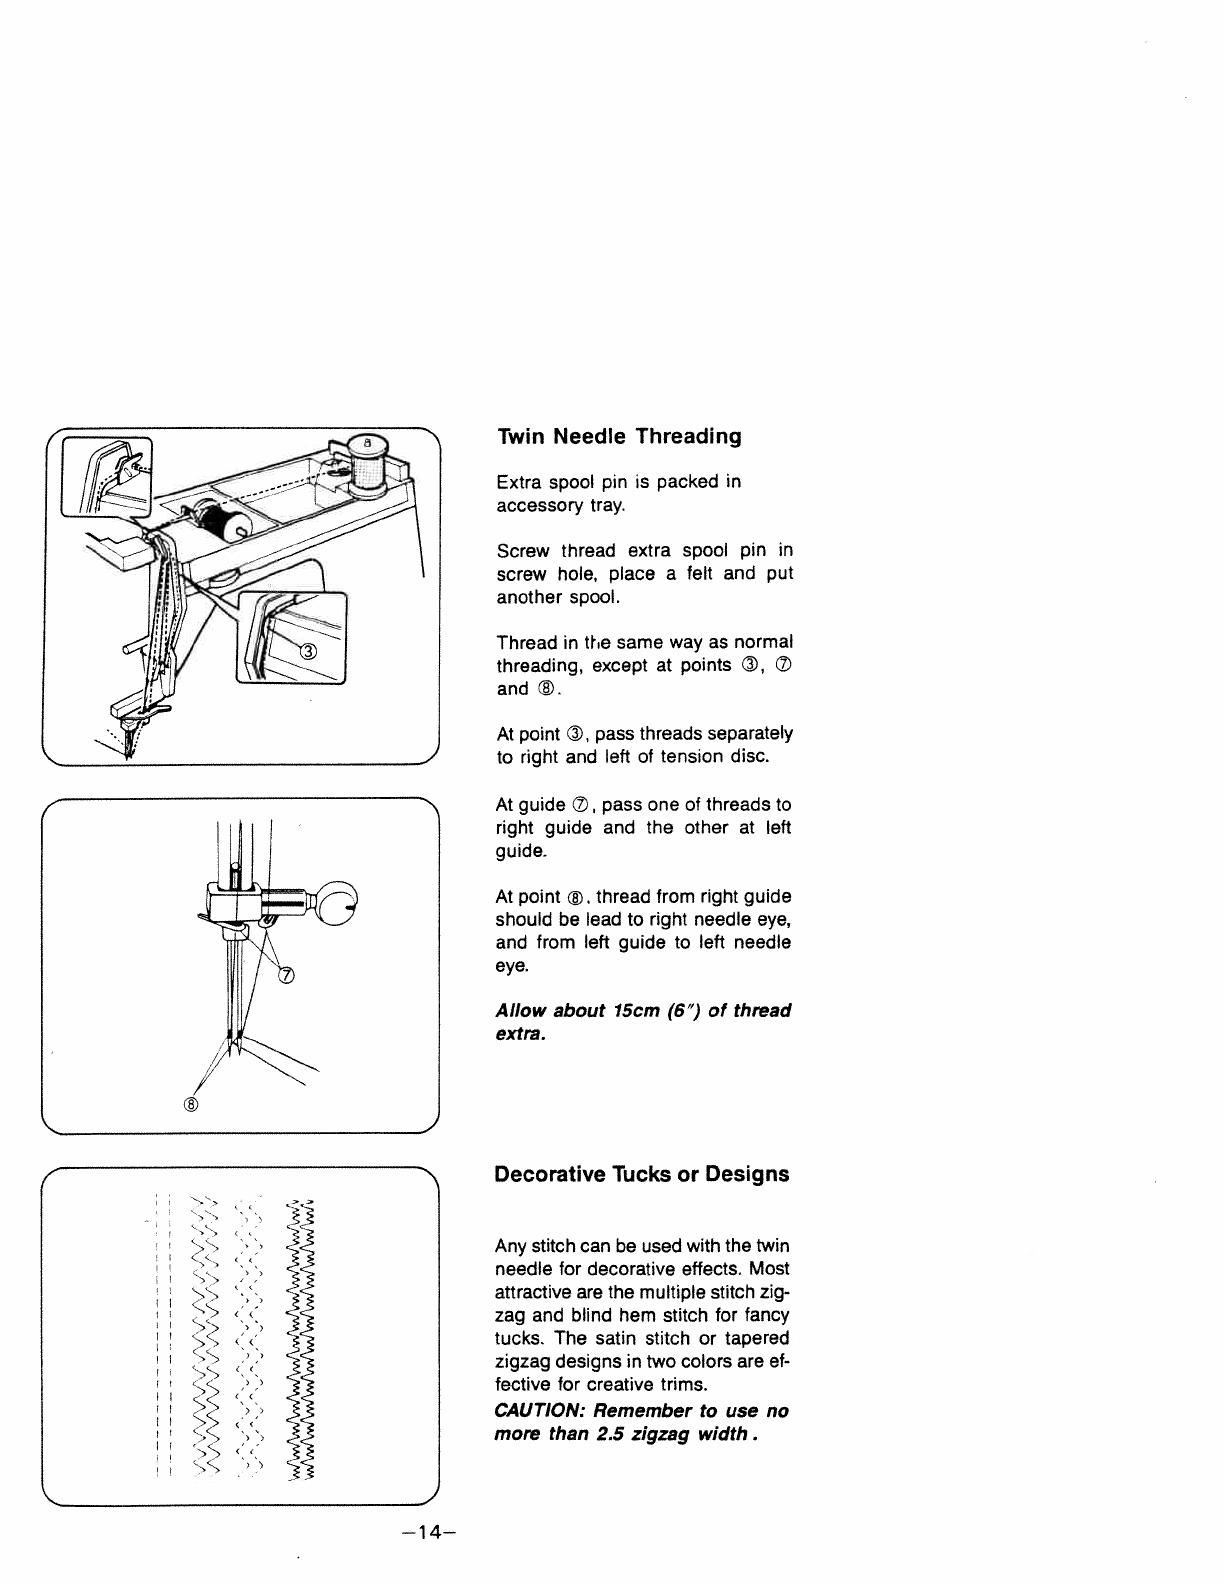
Twin
Needle
Threading
Extra spool
pin
is
packed
in
accessory
tray.
Screw
thread
extra
spool
pin
in
screw
hole,
place
a
felt
and
put
another
spool.
Thread
in
the
same
way
as
normal
threading,
except
at
points
®,
©
and
®.
At
point
©,
pass
threads
separately
to
right
and
left
of
tension
disc.
At
guide
,
pass
one
of
threads
to
right
guide and
the other
at
left
guide.
At
point
®.
thread
from
right
guide
should be
lead
to
right
needle
eye,
and
from
left
guide
to
left
needle
eye.
Allow
about
15cm
(6’)
of
thread
extra.
Decorative
Tucks
or
Designs
Any
stitch
can be
used
with
the
twin
needle
for
decorative
effects.
Most
attractive
are
the
multiple
stitch
zig
zag
and
blind
hem stitch
for
fancy
tucks. The
satin
stitch
or
tapered
zigzag
designs
in
two
colors
are
ef
fective
for
creative
trims.
CAUTION:
Remember
to
use
no
more
than
2.5
zigzag
width.
}
::
H
(C
C)
C
C
CC
C’
C>
CC
—14—
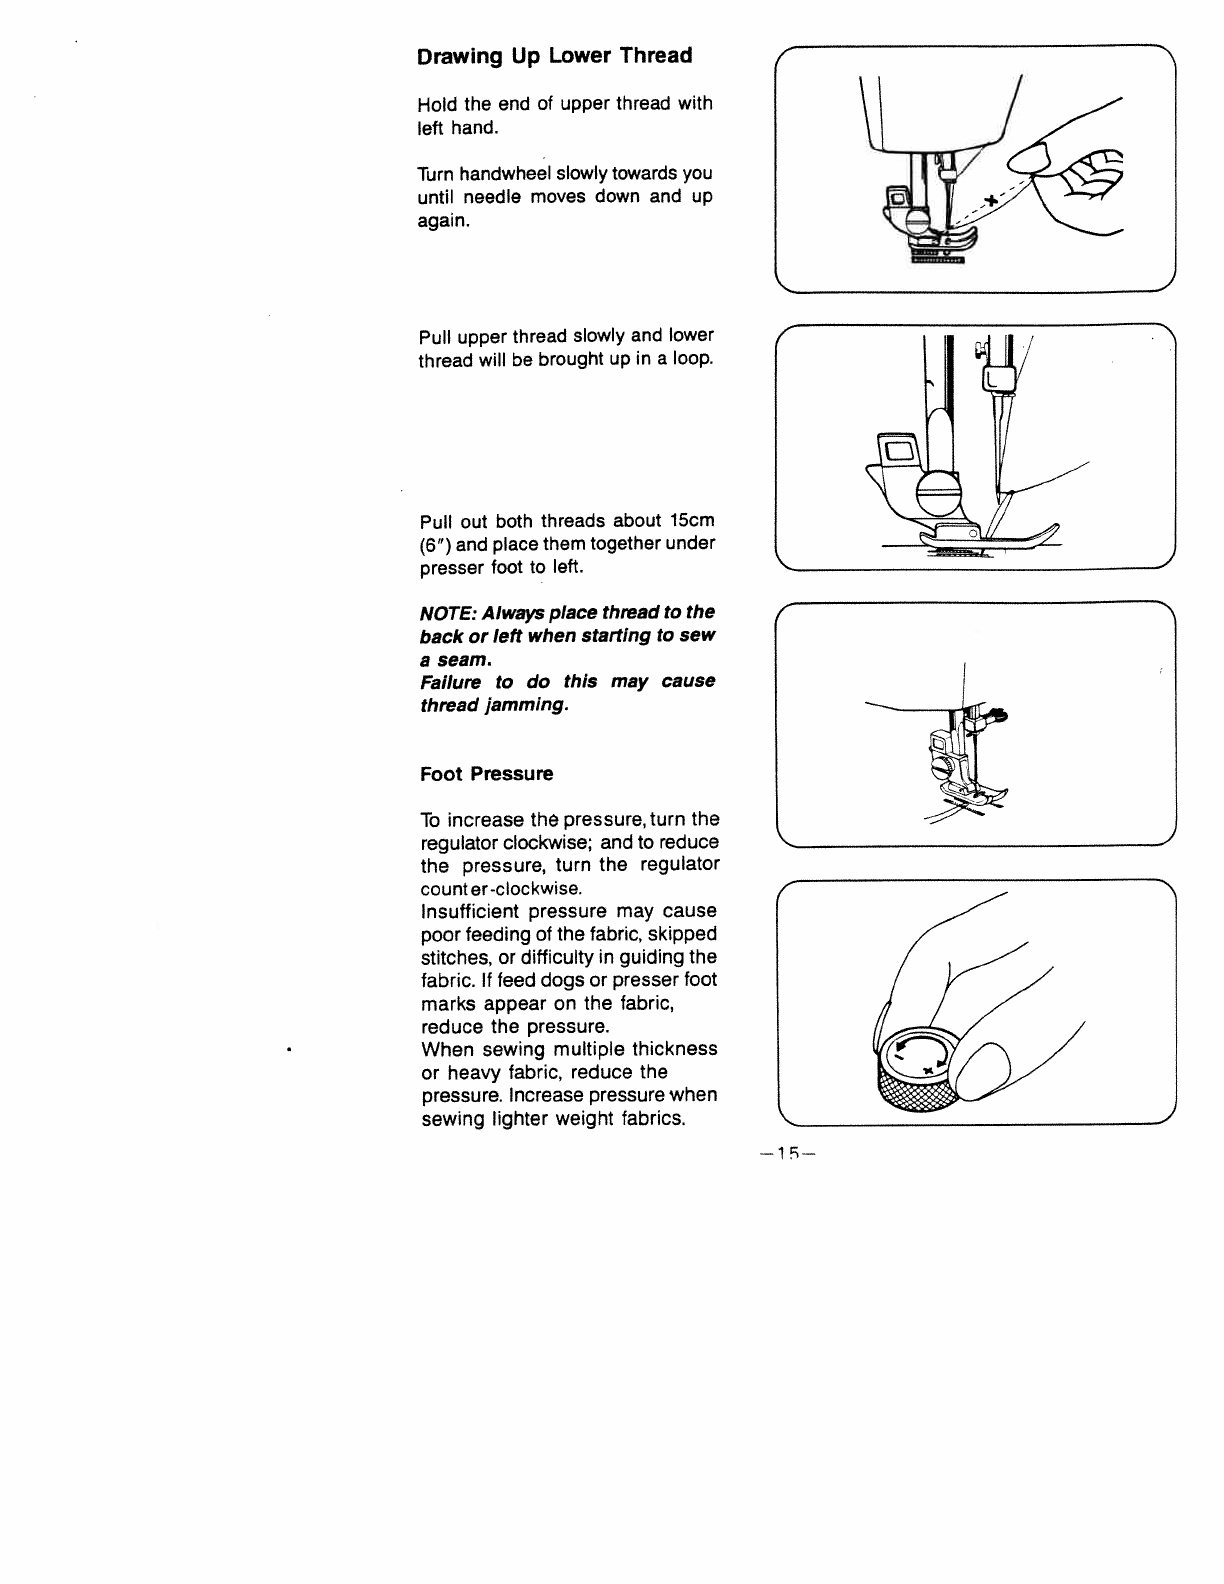
Drawing
Up
Lower
Thread
Hold
the
end
of
upper thread
with
left
hand.
Turn
handwheel
slowly
towards
you
until
needle
moves
down
and
up
again.
Pull
upper
thread
slowly
and
lower
thread
will
be
brought
up
in
a
loop.
Pull
out
both
threads
about
15cm
(6”)
and
place
them
together
under
presser
foot
to
left.
NOTE:
Always
place
thread
to
the
back or
left when
starting
to
sew
a
seam.
Failure
to
do
this
may
cause
thread
jamming.
Foot
Pressure
To
increase
the
pressure,
turn
the
regulator
clockwise;
and
to
reduce
the
pressure,
turn
the
regulator
count
er-clockwise.
Insufficient
pressure
may
cause
poor feeding
of
the
fabric,
skipped
stitches,
or
difficulty
in
guiding
the
fabric.
If
feed
dogs
or
presser
foot
marks
appear
on
the
fabric,
reduce
the
pressure.
When sewing
multiple
thickness
or
heavy
fabric,
reduce
the
pressure.
Increase
pressure
when
sewing
lighter weight fabrics.
E
E
r
—1
—
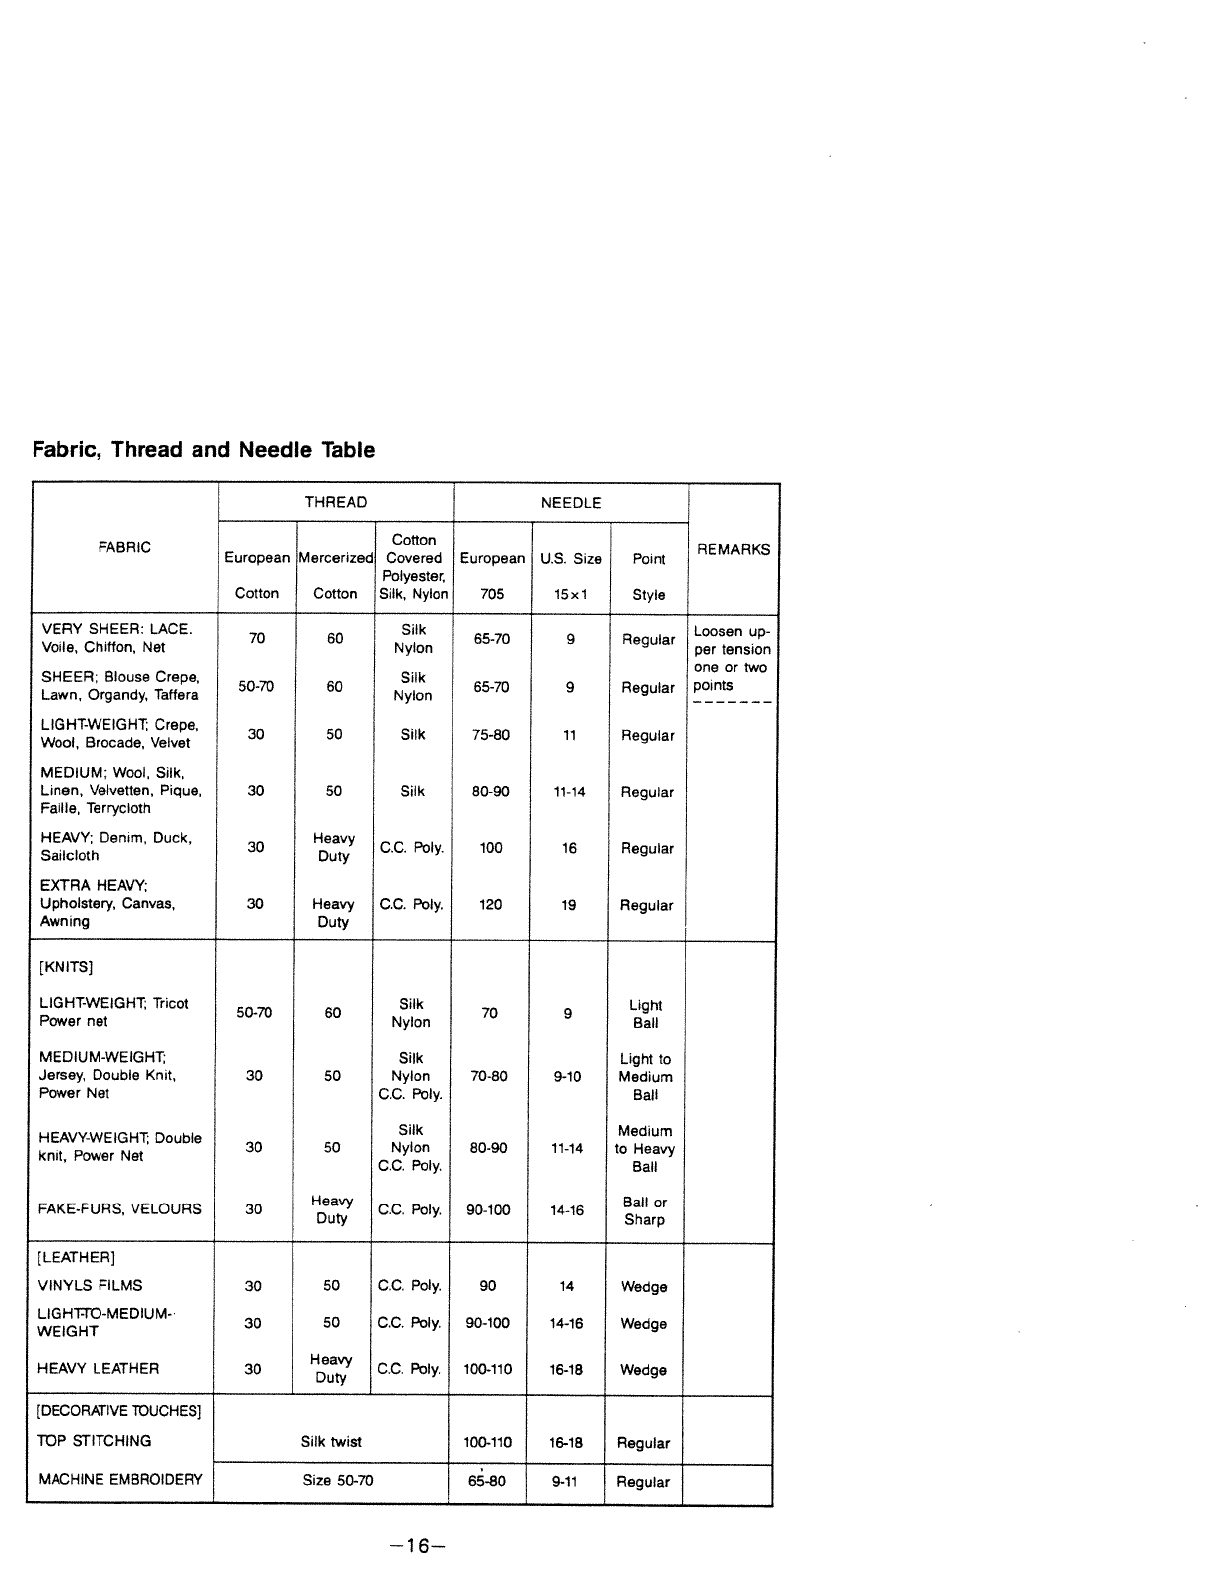
Fabric,
Thread
and Needle
Table
THREAD
NEEDLE
Cotton
FABRIC
REMARKS
European
Mercerized Covered
European
U.S.
Size
Point
Polyester
Cotton
Cotton
Silk,
Nylon
705
15x1 Style
VERY
SHEER:
LACE.
Silk
70
60
65-70
9
Regular
Loosen
up-
Voile,
Chiffon,
Net
Nylon
per
tension
one
or
two
SHEER;
Blouse
Crepe,
Silk
50-70
60
65-70
9
Regular
Points
Lawn,
Organdy,
Tatfera
Nylon
LlGHT-WElGHT
Crepe,
30
50
Silk
75-80
11
Regular
Wool,
Brocade,
Velvet
MEDIUM:
Wool, Silk,
Linen,
Velvetten,
Pique,
30
50
Silk
80-90
11-14
Regular
Faille,
Terrycloth
HEAVY,
Denim, Duck,
Heavy
CC.
Poly.
100
16
Regular
30
Sailcloth
Duty
EXTRA
HEAVY;
Upholstery,
Canvas,
30
Heavy
C.C.
Poly.
120
19
Regular
Awning
Duty
[KNITS]
LIGH]WEIGHT;
Tricot
Silk Light
50-70
60
70
9
Power
net
Nylon
Ball
MEDIUM-WEIGHT; Silk
Light
to
Jersey,
Double
Knit,
30
50 Nylon
70-80
9-10
Medium
Power
Net
C.C.
Poly. Ball
Silk
Medium
HEAVY-WEIGHT,
Double 30 50
Nylon
80-90
11-14
to
Heavy
knit,
Power
Net
C.C. Poly.
Ball
FAKE-FURS. VELOURS
30
Heavy
Ball
or
CC.
Poly.
90-100
14-16
Duty
Sharp
[LEATHER]
VINYLS
FILMS
30
50
C.C.
Poly.
90
14
Wedge
LIGH1TO-MEDIUM-
30
50
C.C.
Poly.
90-100
14-16
Wedge
WEIGHT
Heavy
HEAVY
LEATHER
30
C.C.
Poly.
100-110
16-18
Wedge
Duty
[DECORATIVE
TOUCHES]
TOP STITCHING
Silk
twist
100-110
16-18
Regular
MACHINE EMBROIDERY
Size
50-70
65-80
9-11
Regular
—16—
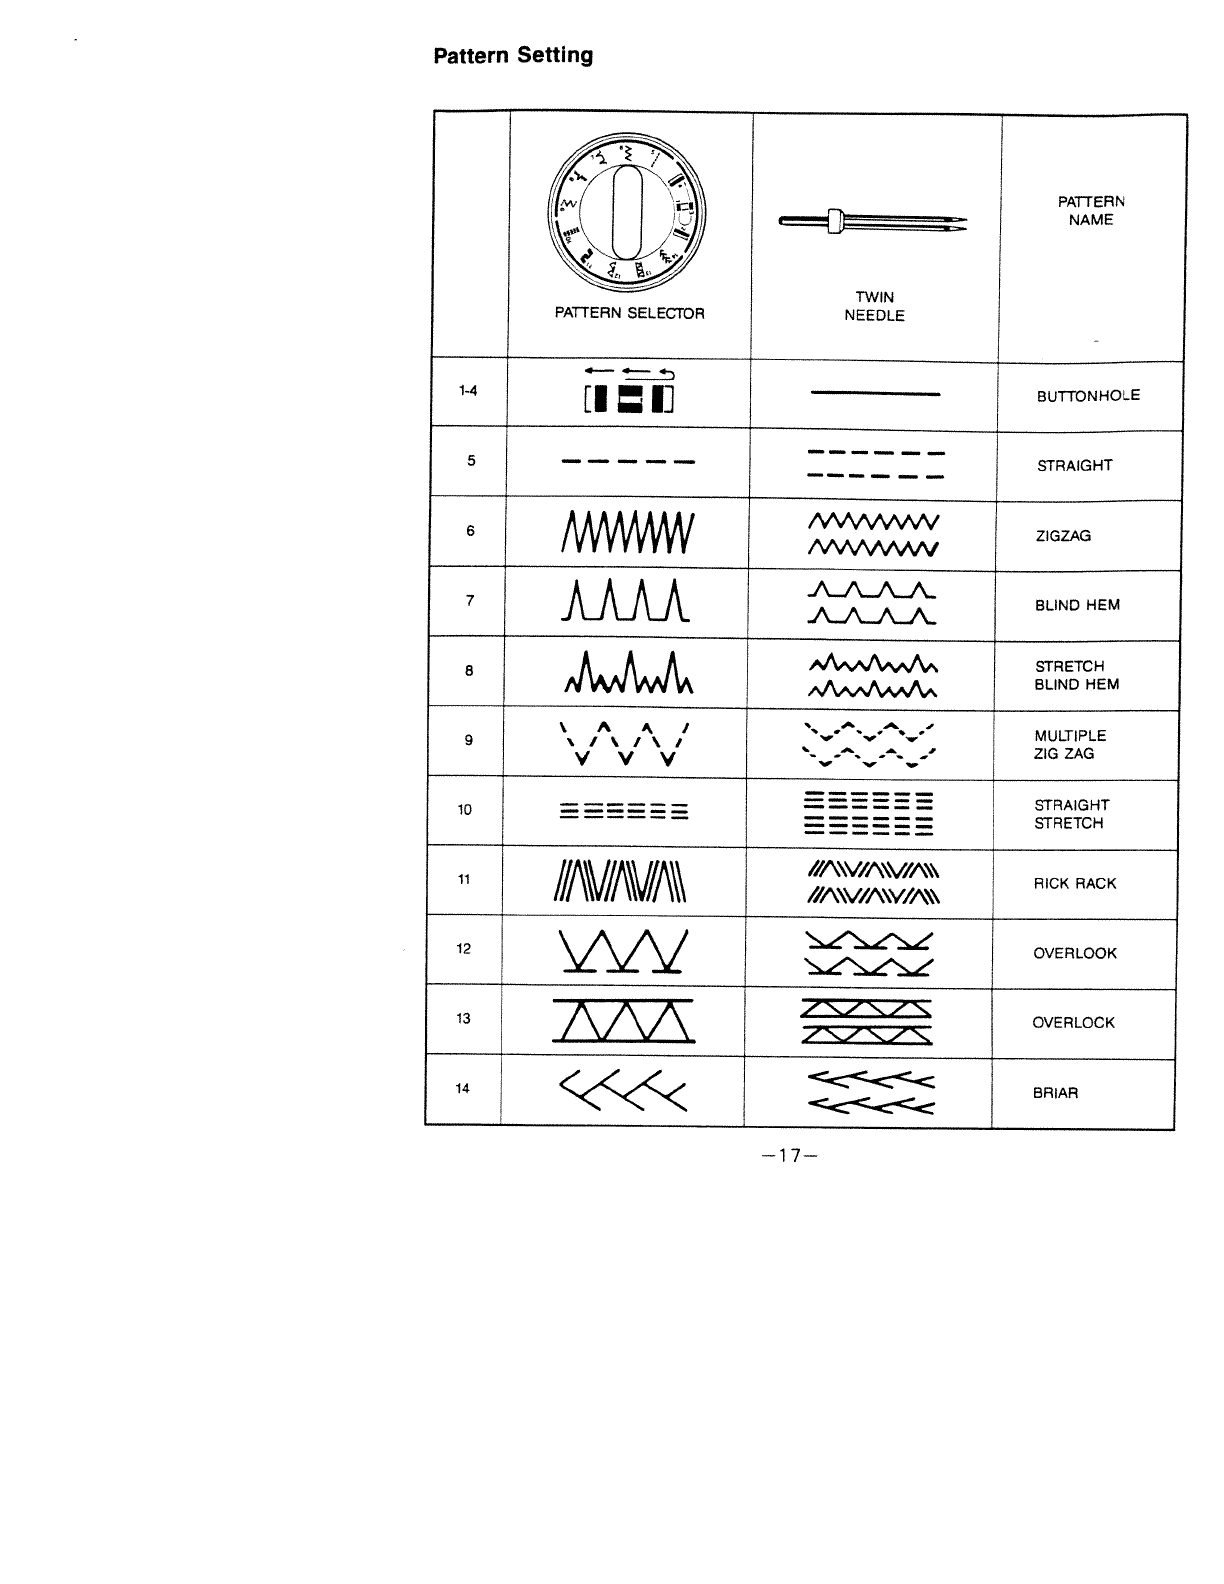
Pattern
Setting
PATTERN
NAME
—
—
STRAIGHT
6
MW
ZIGZAG
tvWWyW
7JAULAA
AAi
BLIND
HEM
AiAJ
8
STRETCH
BLIND
HEM
.
A
j
—
—
‘
MULTIPLE
9
ZIG
ZAG
V
V
V
10
STRAIGHT
STRETCH
//A\V/A\V/A\\
RICK RACK
11
IIA\V/A\V/A\\
OVERLOOK
12
OVERLOCK
13
BRIAR
14
L
PATTERN
SELECTOR
1-4
TWIN
NEEDLE
4-
[11]
BUTTONHOLE
—17—
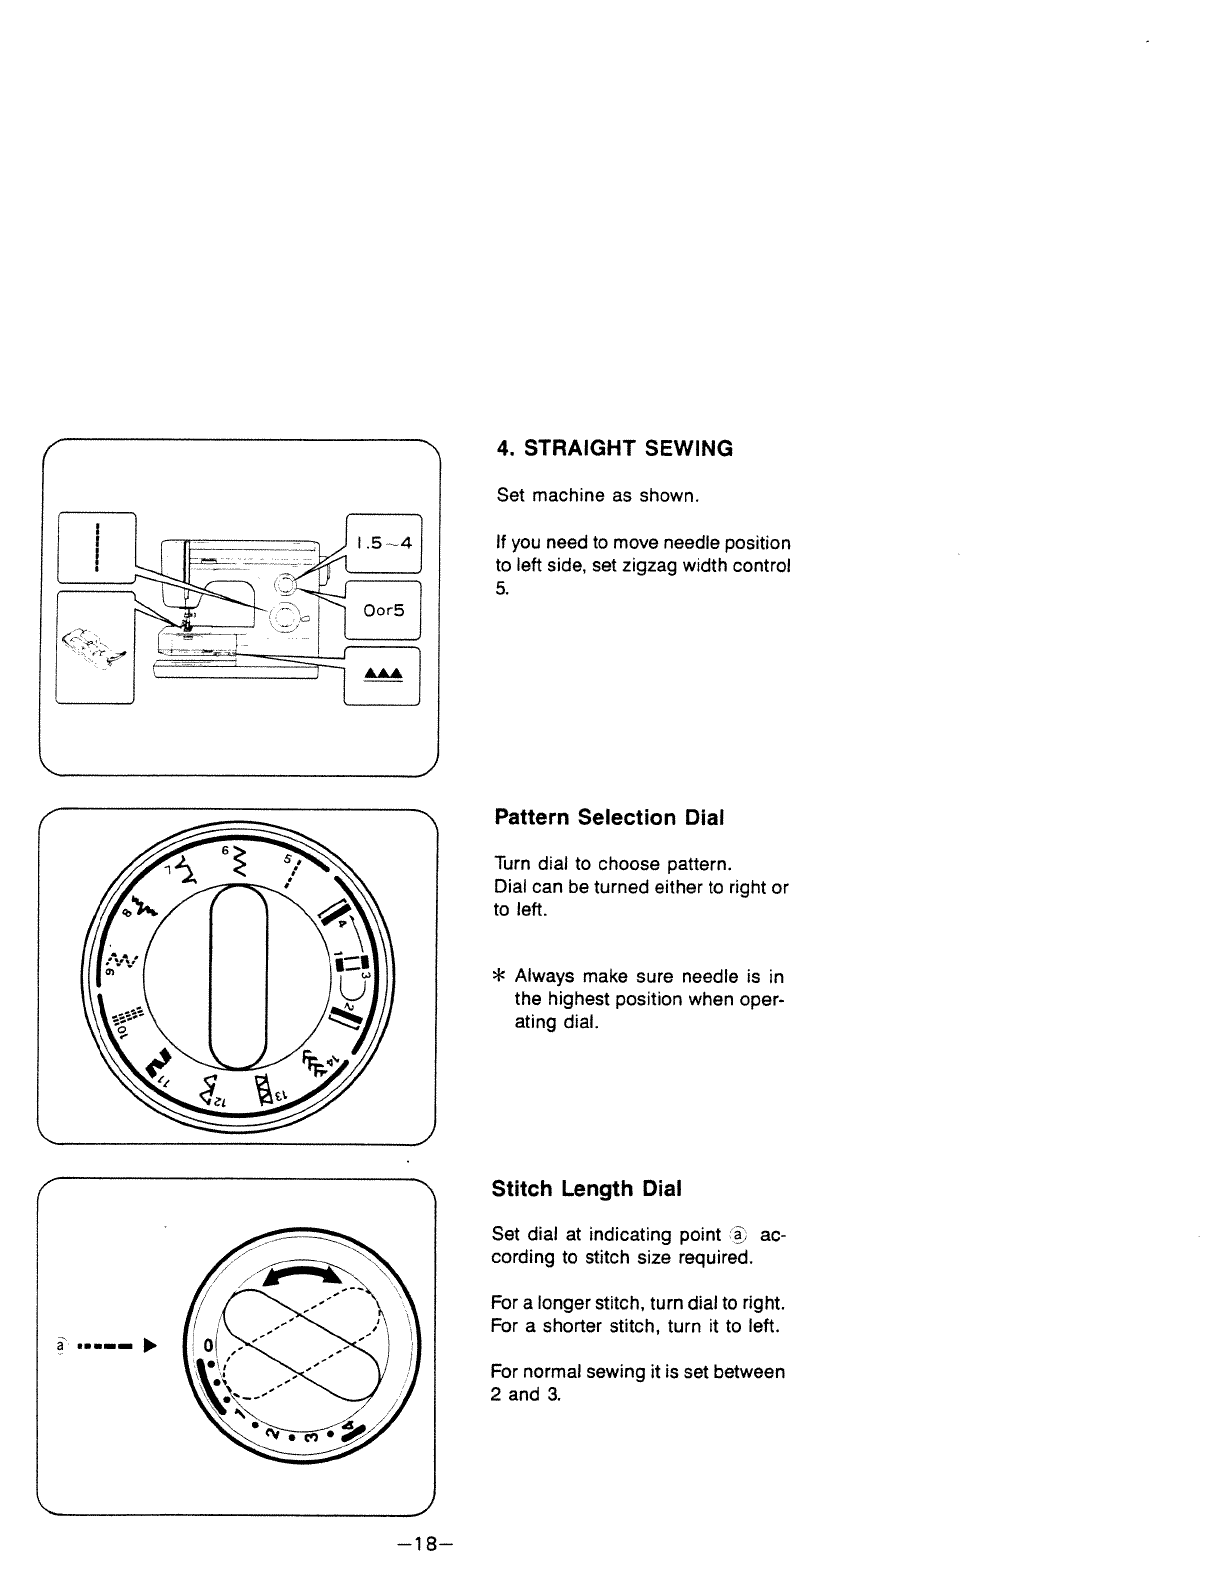
4.
STRAIGHT
SEWING
Set
machine
as
shown.
If
you
need
to
move
needle
position
to
left
side,
set
zigzag
width
control
5.
Pattern
Selection
Dial
Turn
dial to
choose
pattern.
Dial
can
be
turned either
to
right
or
to
left.
*
Always
make
sure
needle
is
in
the highest
position
when
oper
ating
dial.
Stitch
Length
Dial
Set
dial
at
indicating
point
(
ac
cording
to
stitch
size
required.
For
a
longer
stitch,
turn
dial
to
right.
For
a
shorter
stitch, turn
it
to
left.
For
normal
sewing
it
is
set
between
2
and
3.
a
—18—
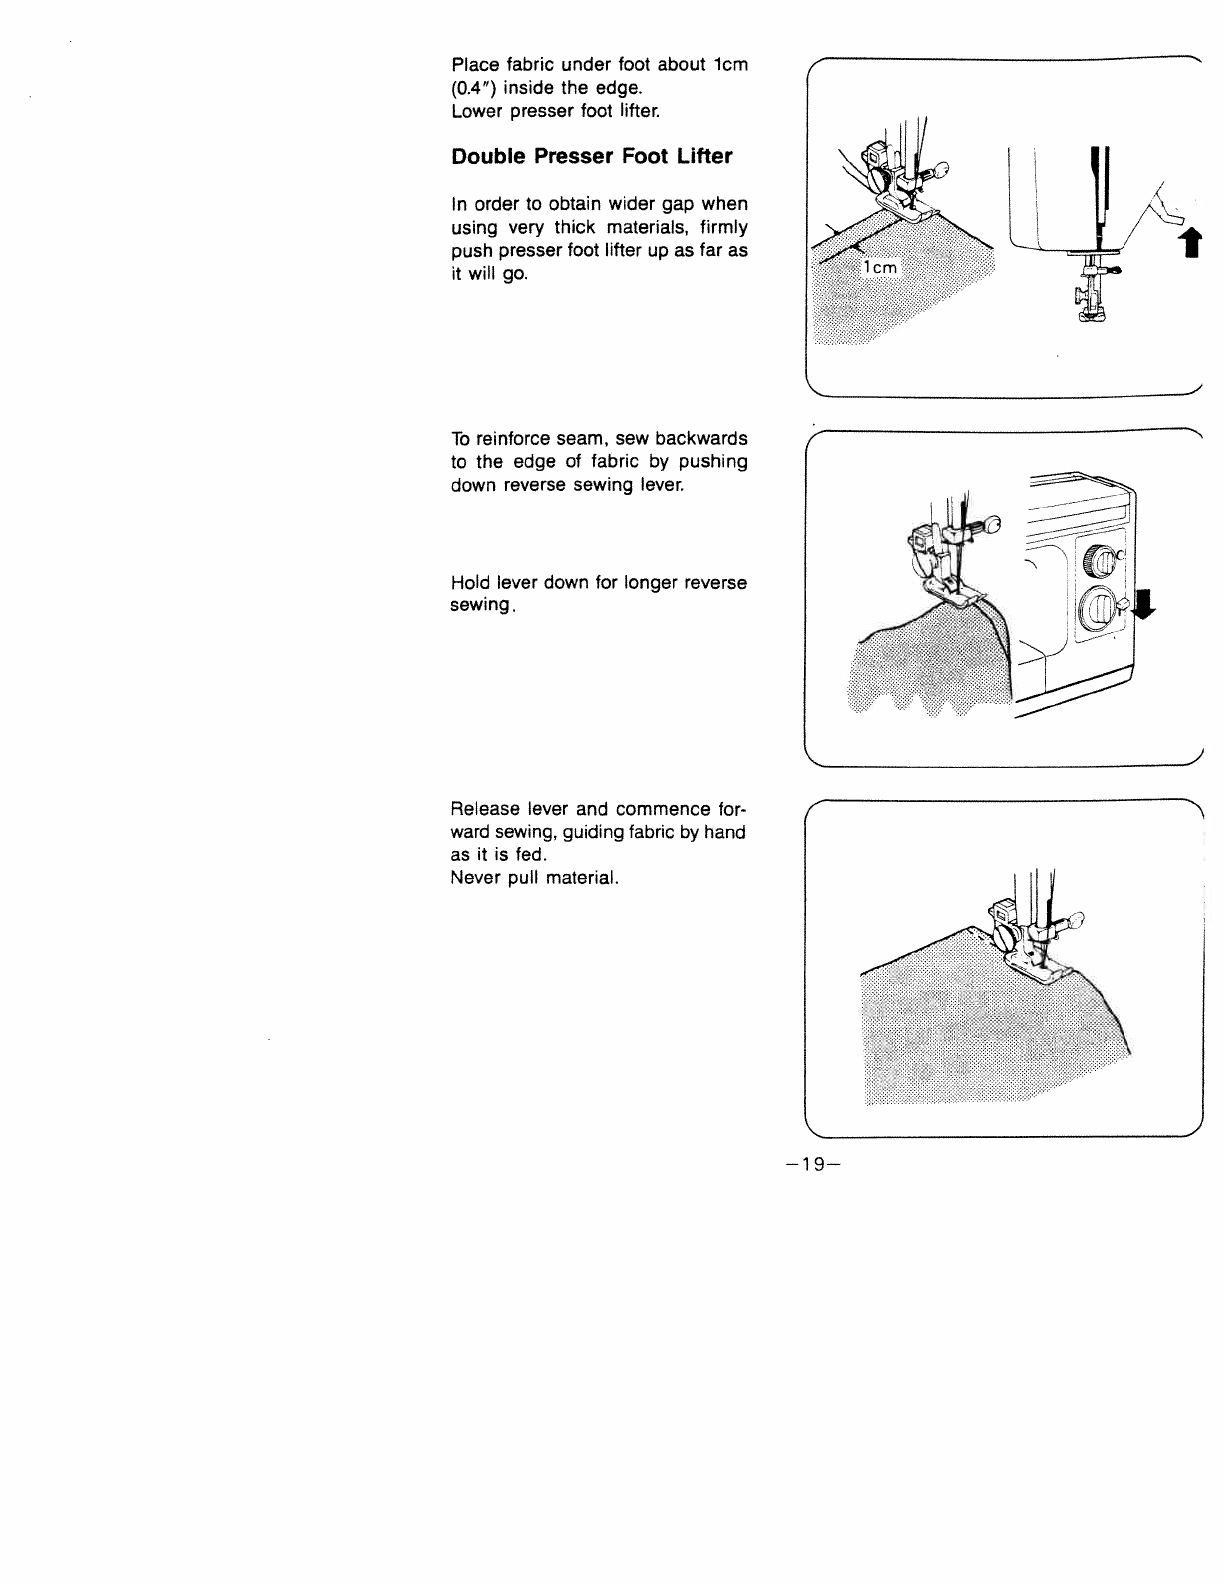
Piace
fabric
under
foot
about
1cm
(O.4) inside
the
edge.
Lower
presser
foot
lifter.
Double
Presser
Foot
Lifter
In
order
to
obtain
wider
gap
when
using
very
thick
materials,
firmly
push
presser
foot
lifter
up
as
far
as
it
will
go.
To
reinforce
seam,
sew
backwards
to
the
edge
of
fabric
by
pushing
down
reverse
sewing
lever.
Hold
lever down
for
longer
reverse
sewing.
Release
lever
and
commence
for
ward
sewing,
guiding
fabric
by
hand
as
it
is
fed.
Never
pull
material.
I
}
t
1>
—19—
—
.
+
—-;—:i—
i)
‘;
—
—
+
L
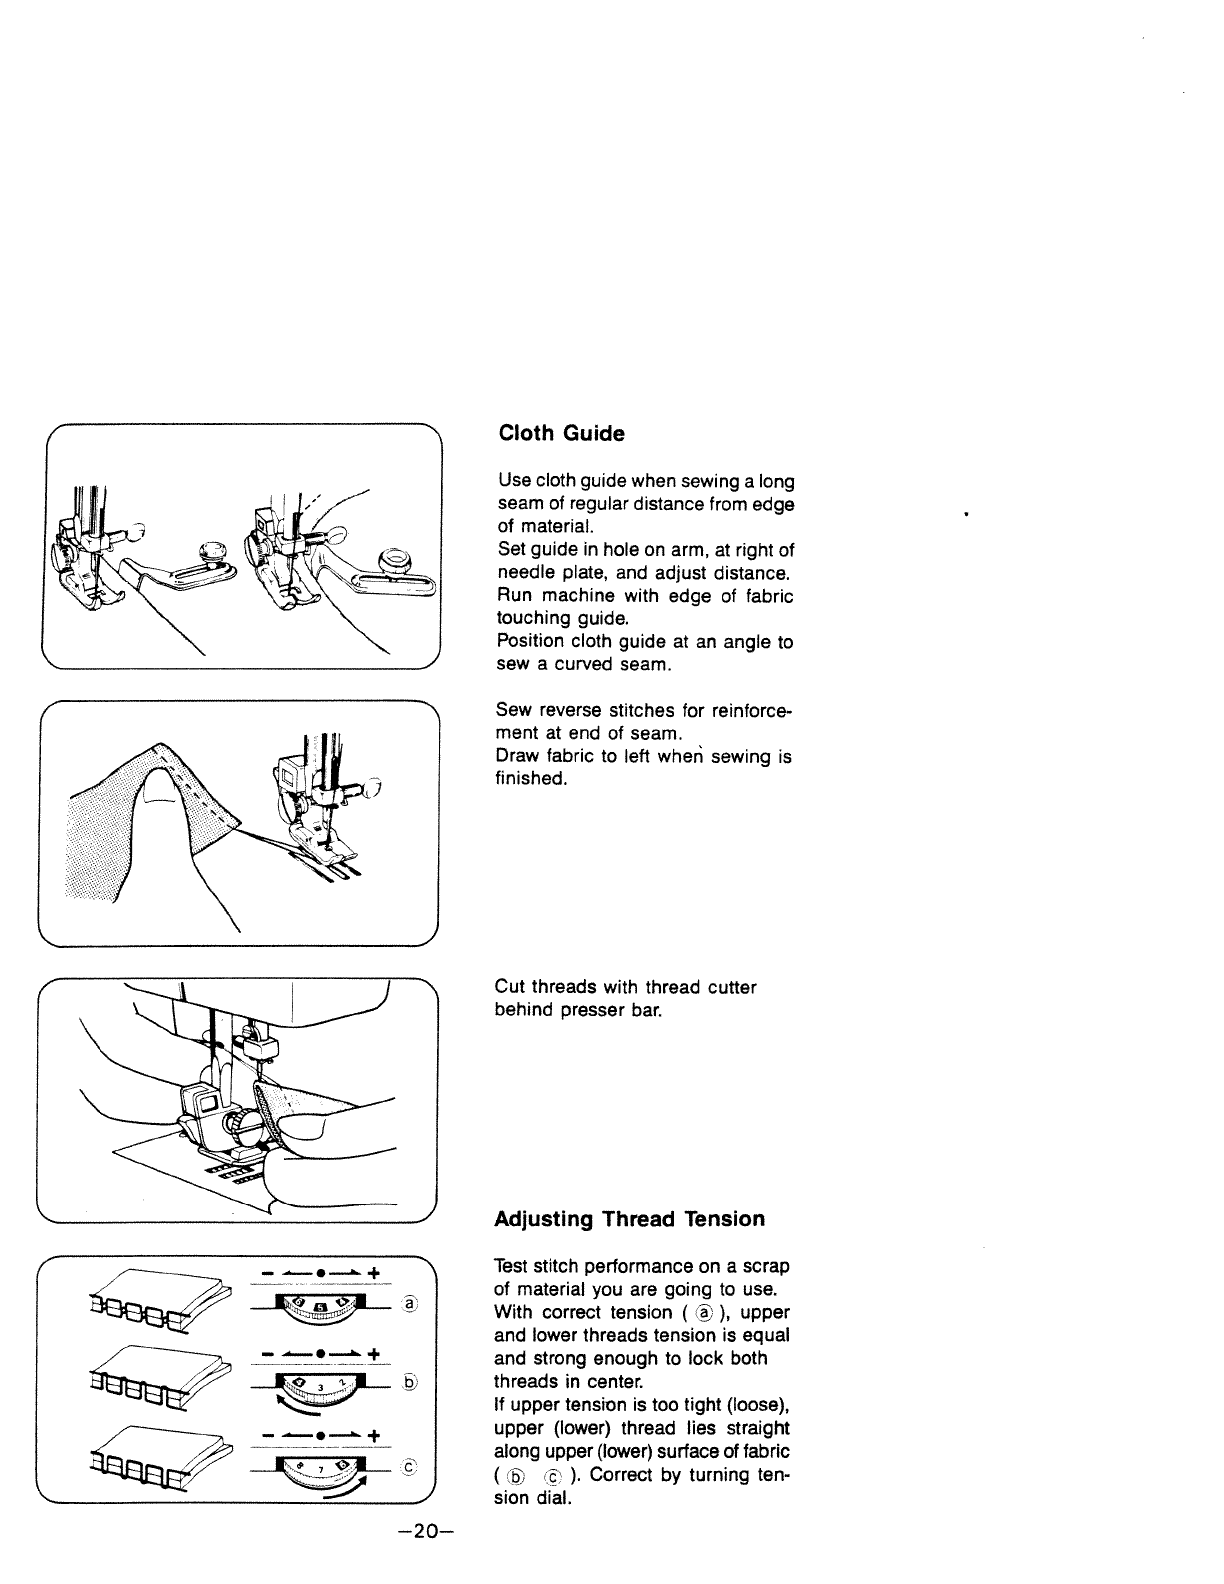
Cloth
Guide
Use
cloth
guide
when sewing
a
long
seam
of
regular
distance
from
edge
of
material.
Set guide
in
hole
on
arm,
at
right
of
needle
plate,
and
adjust
distance.
Run
machine
with
edge
of
fabric
touching
guide.
Position
cloth
guide
at
an
angle
to
sew
a curved
seam.
Sew
reverse
stitches
for
reinforce
ment
at
end
of
seam.
Draw
fabric
to
left
when
sewing
is
finished.
Cut
threads
with
thread
cutter
behind
presser
bar.
Adjusting
Thread
Tension
Test
stitch
performance
on a
scrap
of
material
you
are
going
to
use.
With
correct
tension
(®)
upper
and
lower
threads
tension
is
equal
and
strong
enough
to
lock
both
threads
in
center.
If
upper
tension
is
too
tight (loose),
upper
(lower)
thread
lies
straight
along
upper
(lower)
surface
of
fabric
((s)
).
Correct
by
turning
ten
sion
dial.
I
—20—

Applications
at
Straight
Stitch
A.
Seams
The
normal
stitch
length
for
most
fabrics
is
3,
but
the
length
chosen
should
depend
on
the
fabric
and
area
of
usage.
Usually,
heavier
fabrics require
longer
stitches,
and
lighter
weight
fabrics
require
shorter stitches.
For
curved
seams
and
bias
cut
areas
use
a
shorter
stitch
length
to
add
strength
and
elasticity
to
the
seam.
B.
Basting/Topstltching
Sewing
a
seam
with
a
longer
stitch
is
useful
for
temporary
seams
prior
to
fitting.
Basting
stitches
also
may
be
used
when
gathering
in
fullness.
Topstitching
can
be
done
very
effec
tively
with
the
long
straight
stitch.
For
a
bolder
stitch,
two
threads
of
the
same
type
can
be
threaded
through
one
needle
(size
14
or
16).
A
heavier
thread
such
as
buttonhole
twist
may be
used
for
topstitching,
but
be
sure
to
use
a
larger
needle
(size
16
or
18).
The
triple
stretch
straight
stitch may
be
uses,
but
caution
must
be
used
as
this
stitch
is
difficult to
remove.
—
zi
—21—

5.
ZIGZAG
SEWING
Set
machine
as
shown.
To
prevent
seam ends
unravelling,
set
machine
for
straight
stitch
and
sew
in
reverse
at
beginning
and
ending
of
seam.
Zigzag Width
Control
Set
control
at
required
number.
Larger
the
number, wider
the
stitch.
Set
it
at
0for
straight
sewing.
Make
sure
needle
is
in
upper
posi
tion
when
you
set
control,
and
extra
thread
is
placed
to
the
left
or
rear.
Thread
Tension
for Zigzag
Stitch
Better-looking
zigzag
stitching
requires
less
upper tension than
straight
stitching.
Loosen
upper
tension
slightly.
4-
wrong side
N
right
side
/
-}
—22--
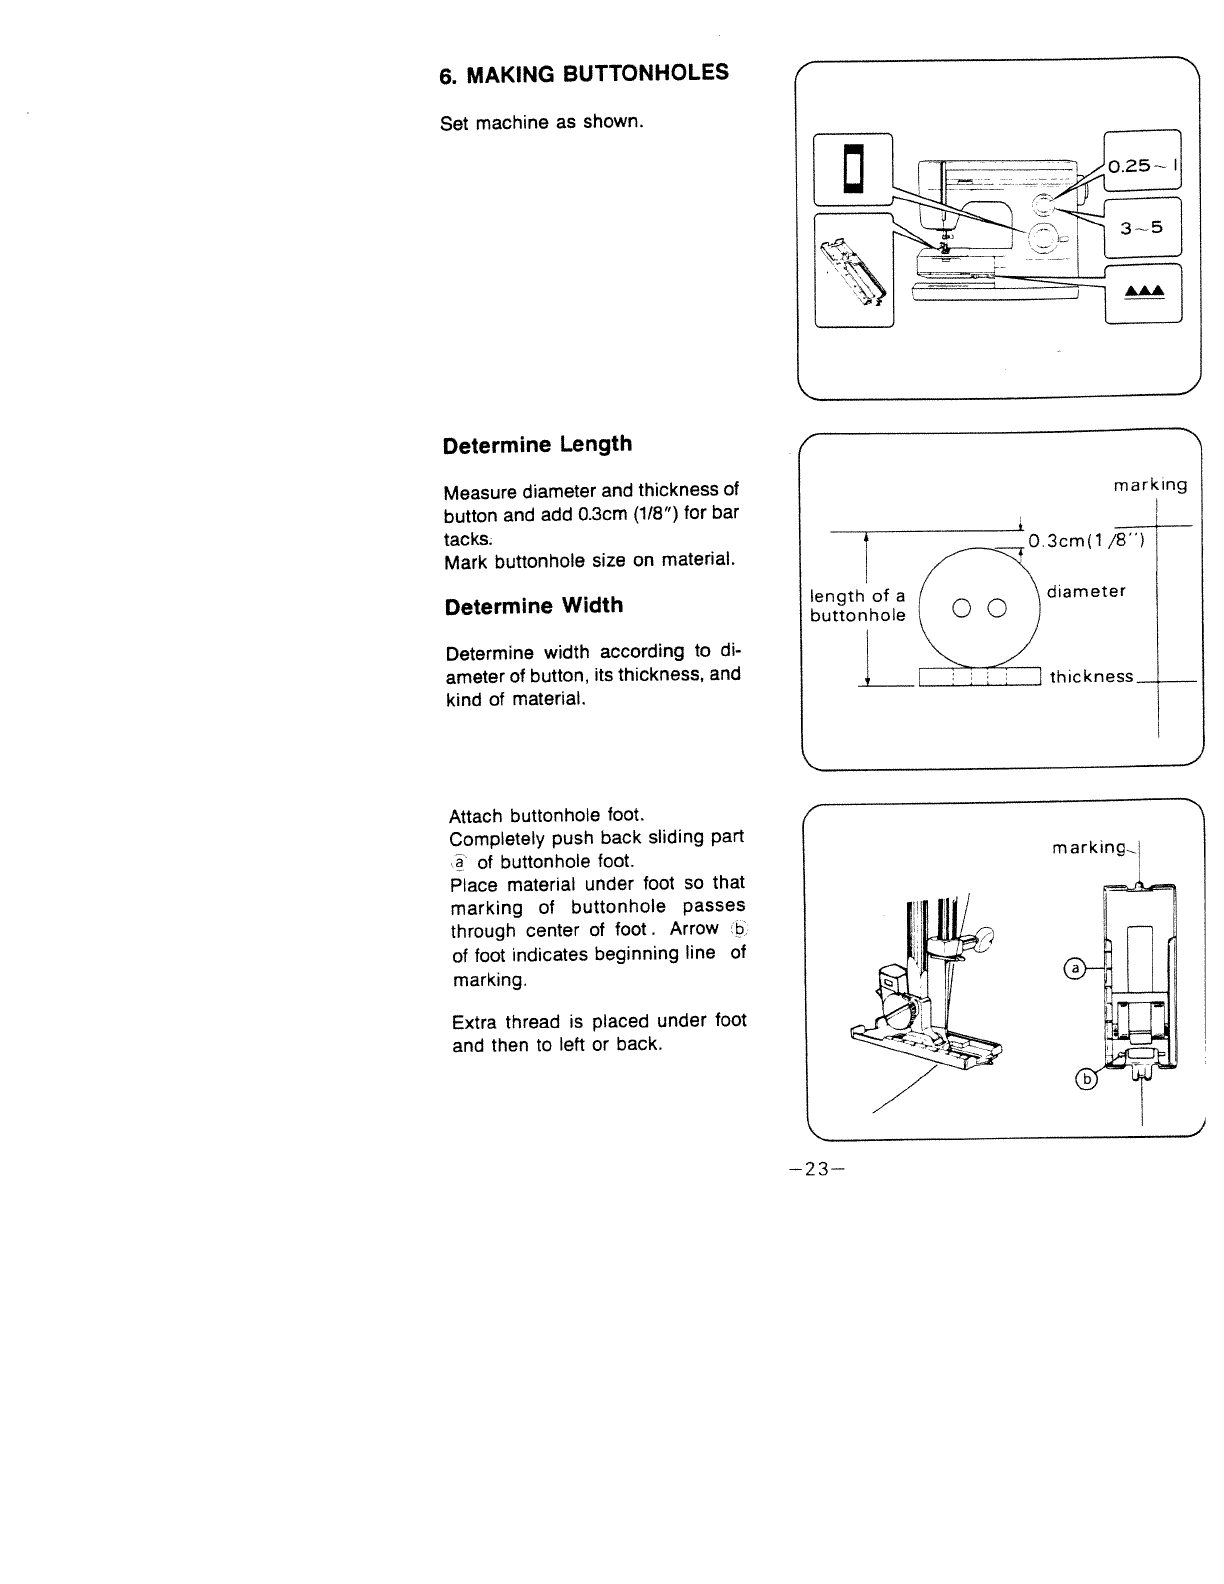
6.
MAKING
BUTTONHOLES
Set machine
as
shown.
Determine
Length
Measure diameter
and
thickness
of
button
and add
0.3cm
(1/8”)
for
bar
tacks.
Mark
buttonhole
size
on
material.
Determine
Width
Determine
width
according
to
di
ameter
of
button,
its
thickness,
and
kind
of
material.
Attach
buttonhole
foot.
Completely
push
back
sliding
part
a
of
buttonhole
foot.
Place
material
under
foot
so that
marking
of
buttonhole
passes
through
center
of
foot.
Arrow
b
of
foot
indicates
beginning
line
of
marking.
Extra
thread
is
placed under
foot
and
then
to
left
or
back.
I
/
I
mark
n
g
O.3cm(1/8)
tl:
diameter__
I
thickness
______
}
—23—
fl
r___
-h1
;-iL
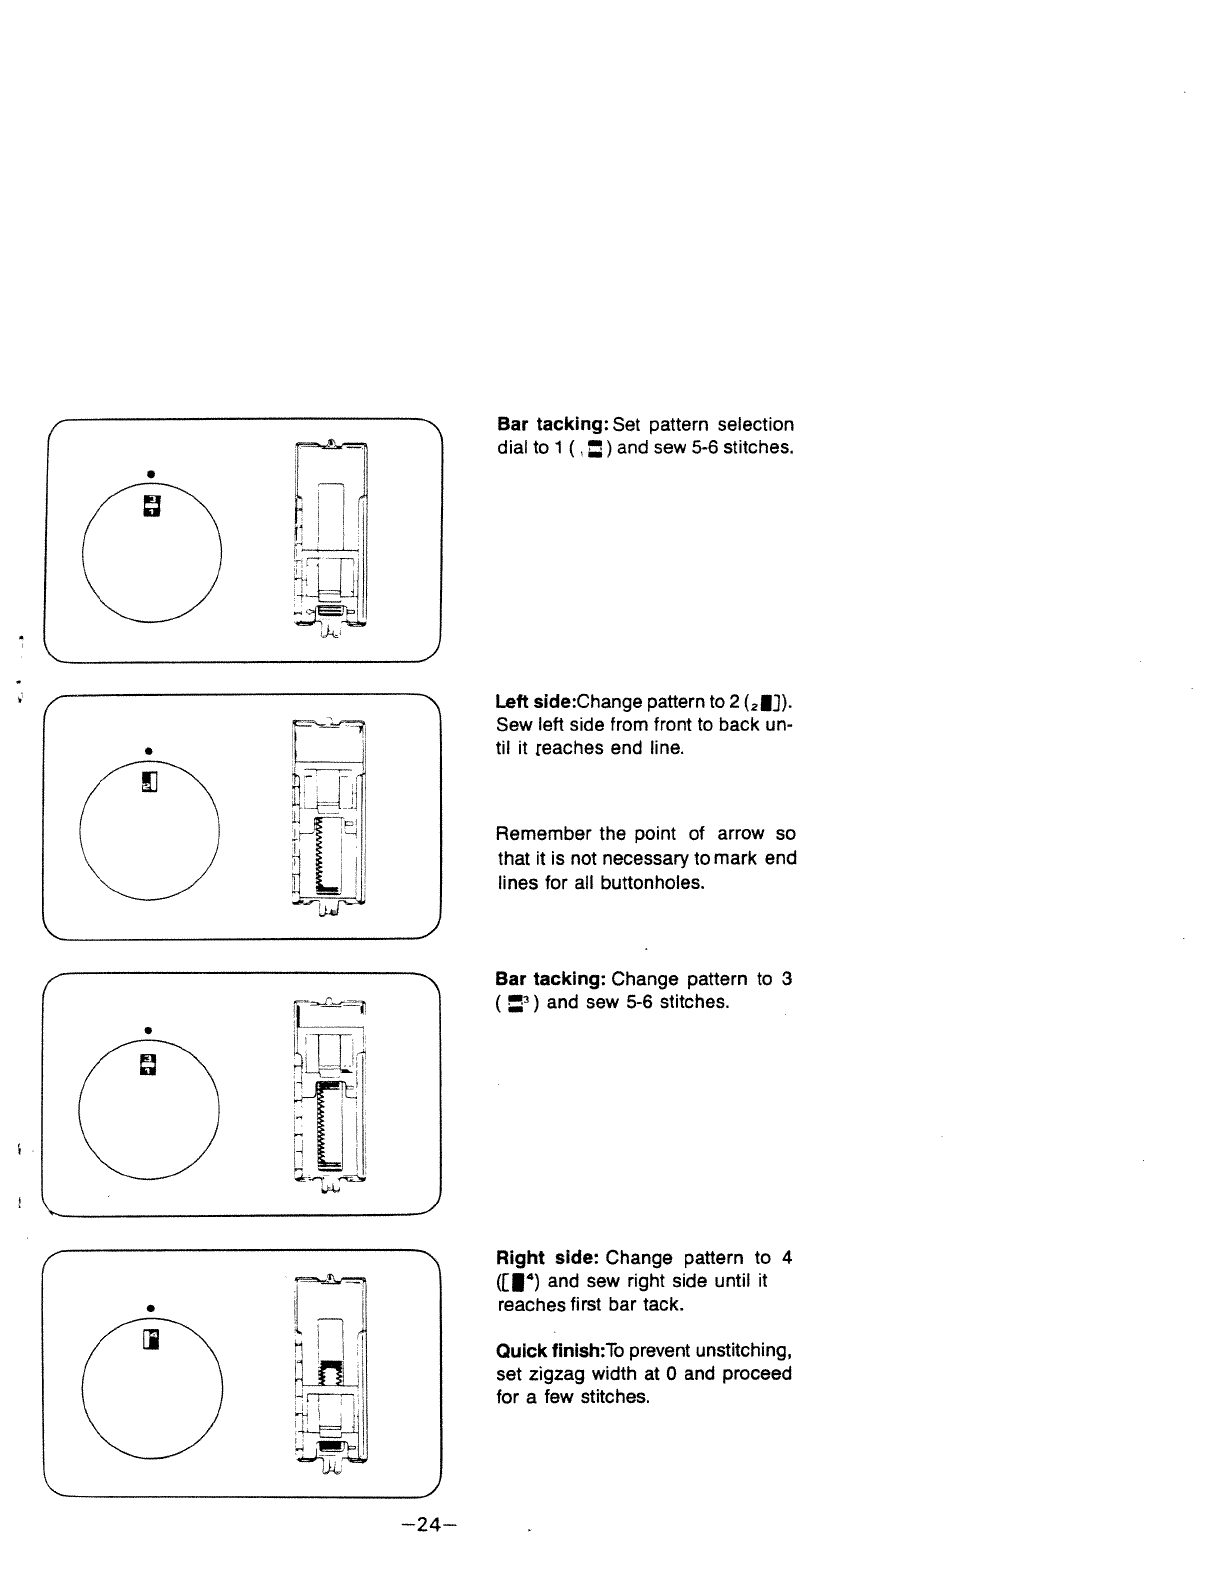
Bar
tacking:
Set
pattern
selection
dial
to
1
()
and
sew
5-6
stitches.
Left
side:Change
pattern
to
2(21]).
Sew
left
side
from
front
to
back
un
til
it
reaches
end
line.
Remember
the
point
of
arrow
so
that
it
is
not
necessary
to
mark
end
lines
for
all
buttonholes.
Bar
tacking:
Change
pattern
to 3
()
and
sew
5-6
stitches.
Right
side:
Change
pattern
to
4
([Ia)
and
sew
right
side
until
it
reaches
first
bar
tack.
Quick
tinish:To prevent
unstitching,
set
zigzag
width
at
0
and
proceed
for
a
few
stitches.
J
.
E
H
L
—24—
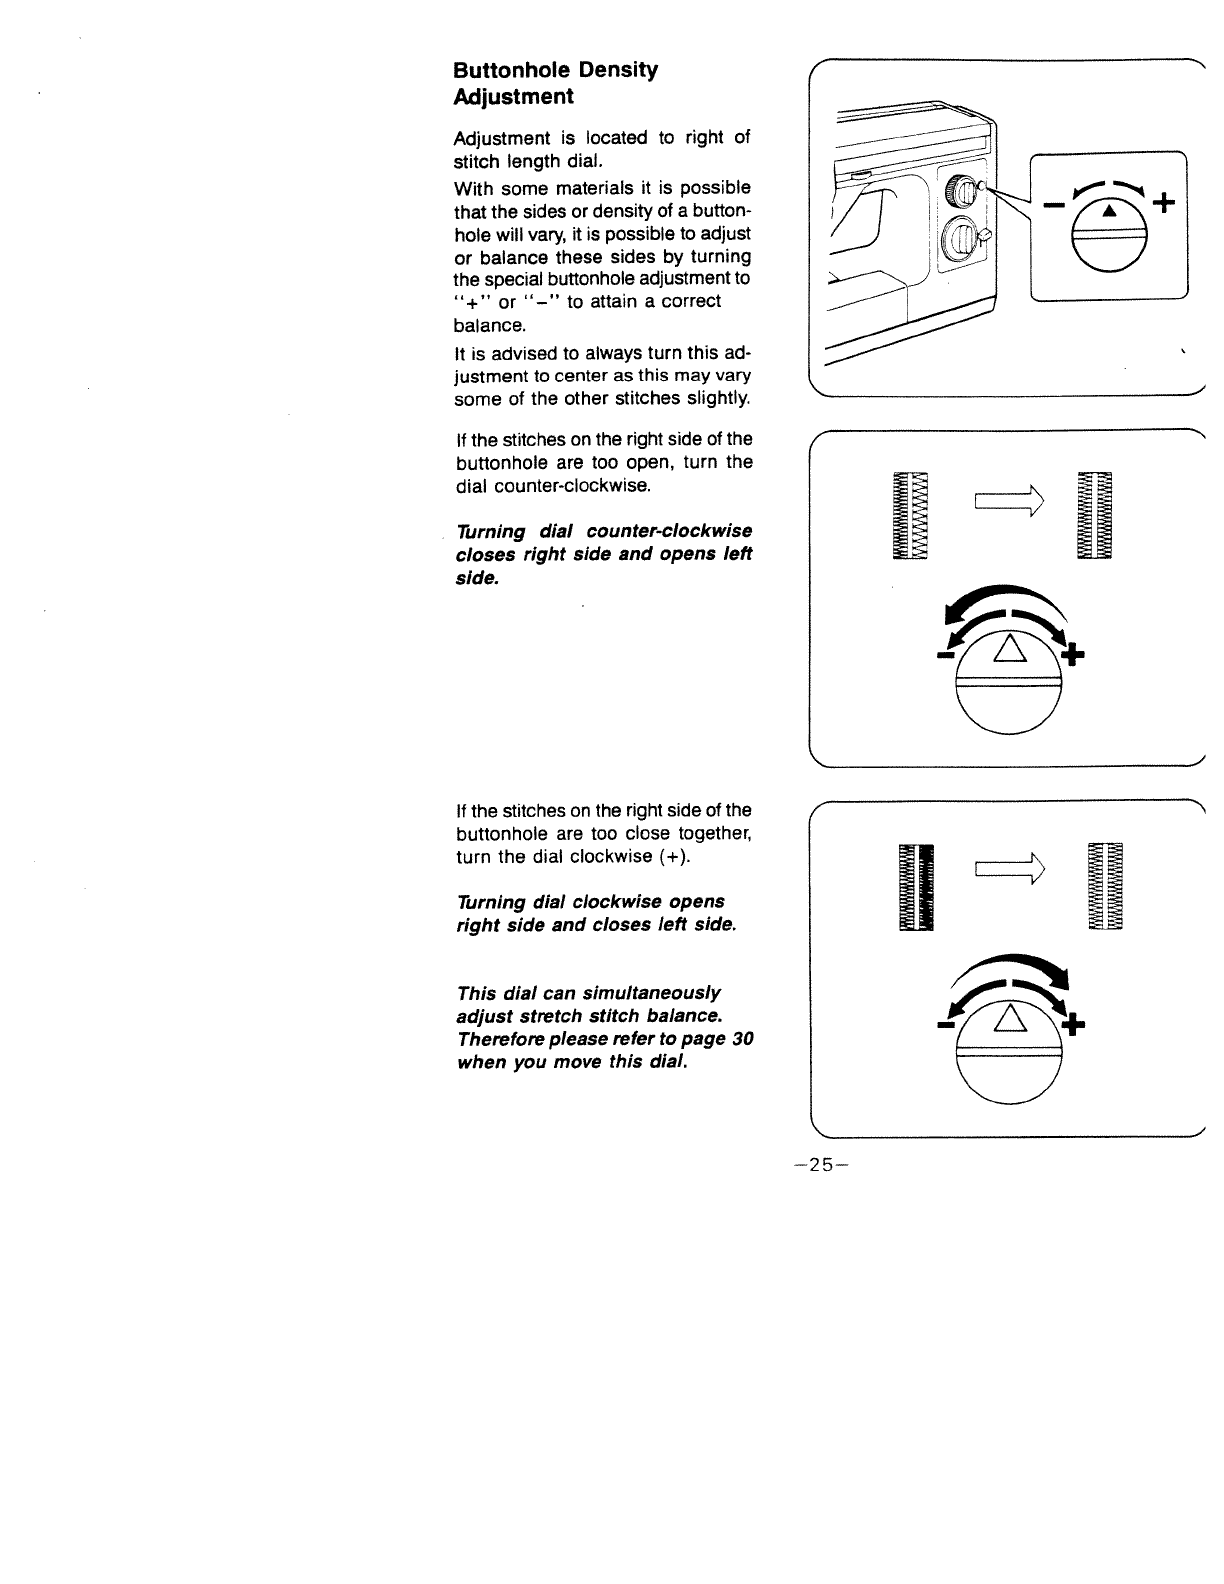
Buttonhole
Density
Adjustment
Adjustment
is
located
to
right
of
stitch
length
dial.
With
some
materials
it
is
possible
that the
sides
or
density
of
a
button
hole
will
vary,
it
is
possible
to
adjust
or
balance
these
sides
by
turning
the
special
buttonhole
adjustment
to
“+“
or
“—“
to
attain
a
correct
balance.
It
is
advised
to
always
turn
this
ad
justment
to
center as
this may
vary
some
of
the
other
stitches
slightly.
If
the
stitches
on
the
right
side
of
the
buttonhole
are
too
open,
turn
the
dial
counter-clockwise.
Turning
dial
counter-clockwise
closes
right
side
and
opens
left
side.
If
the
stitches
on
the
right
side
of
the
buttonhole
are
too
close
together,
turn
the
dial
clockwise
(+).
Turning
dial
clockwise
opens
right
side
and
closes
left
side.
This
dial
can
simultaneously
adjust
stretch
stitch
balance.
Therefore
please
refer
to
page
30
when
you
move
this
dial.
—25—
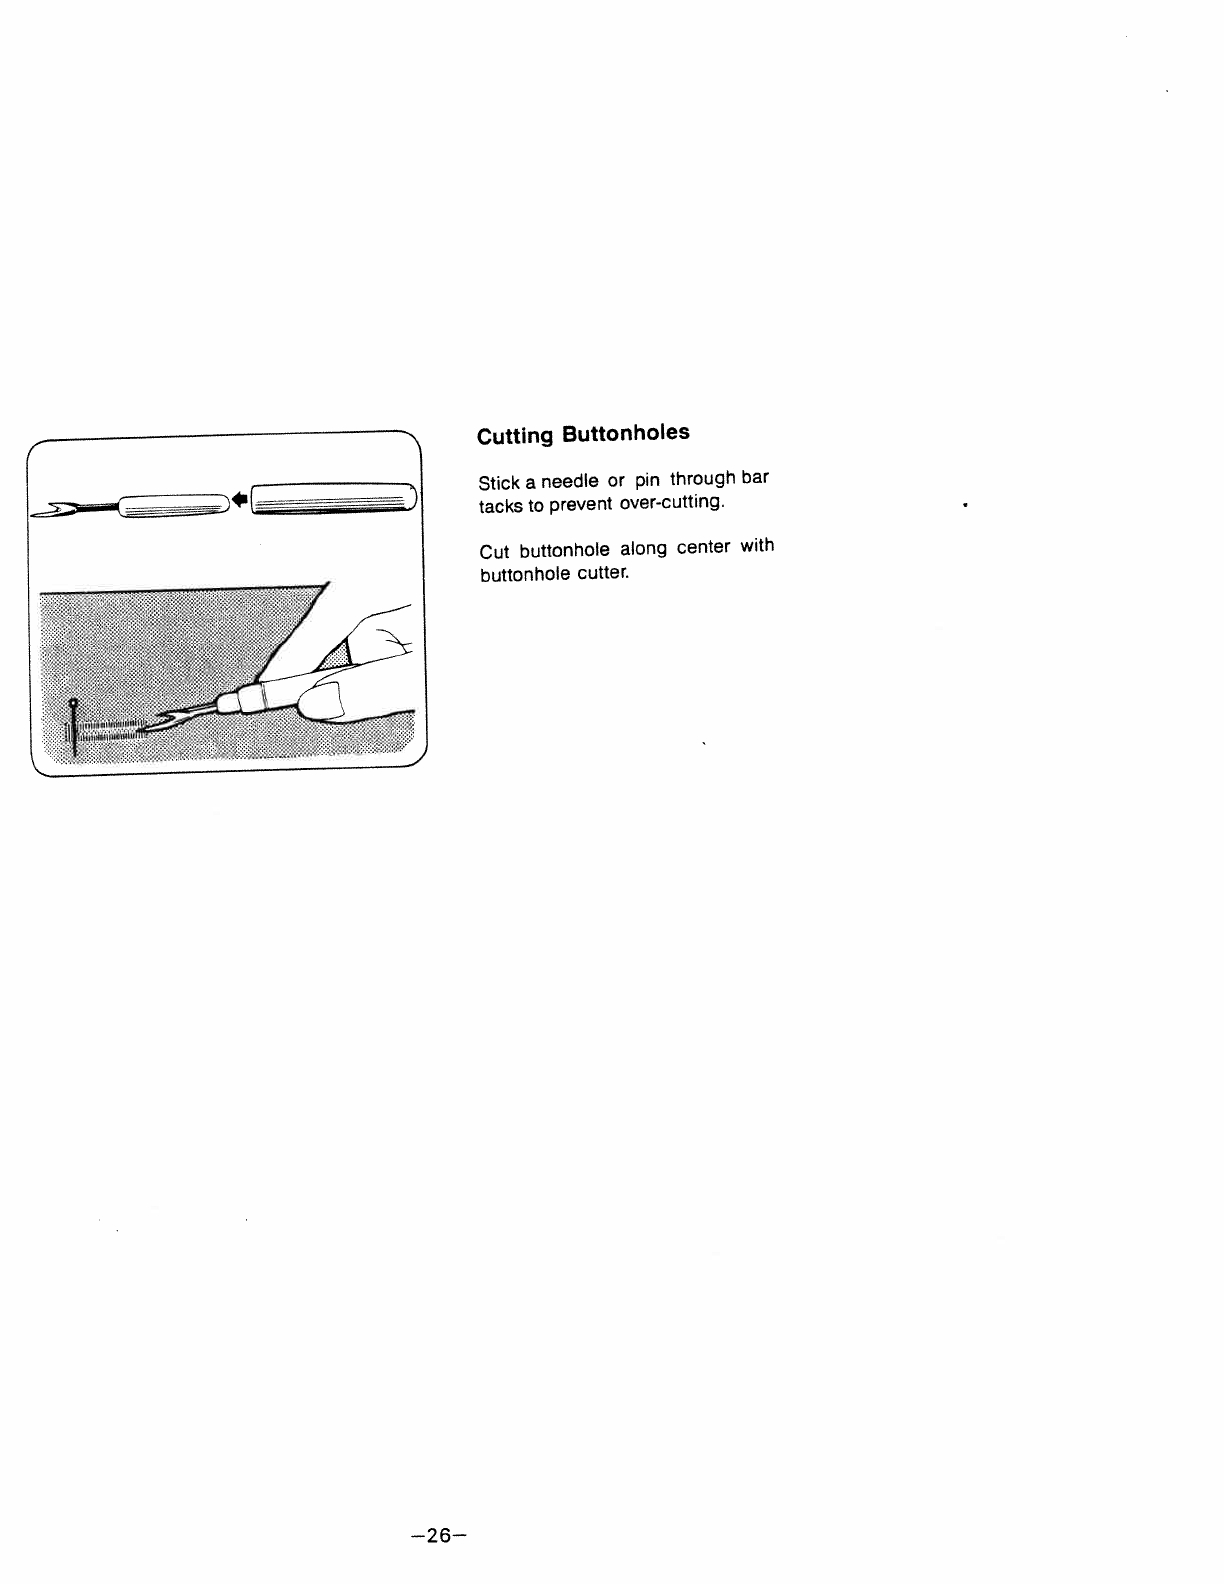
Cutting
Buttonholes
Stick
a
needle
or
pin
through
bar
tacks
to
prevent
over-cutting.
Cut
buttonhole
along
center
with
buttonhole
cutter.
—26—

7.
SEWING
ON
BUTTONS
Set
machine
as
shown.
Position
a
button
and material
un
der
foot.
When
needle
comes
to
left
side
of
stitch,
lower
foot.
Raise
needle
and
adjust
zigzag
width
so
that
needle
comes
to
right
hole
of
button.
Make
one
stitch
be
certain that
nee
dle
is
aligned
with
botton’s
holes.
Run
machine
at
medium
speed
and
sew
5-6
zigzag
stitches.
Stop
machine
when
needle
is
in
upper
position.
i
Set
zigzag
width
control
to
0,
align
needle
with
button’s hole
and
sew
3-4
stitches
to
prevent
stitches
from
unlocking.
OR
Remove
work
and
cut
off
threads.
Draw
thread
ends
through
to
wrong
side
and
tie
a
knot.
I
a.
b

8.
OVERCASTING
For
light
weight
material:
Set
machine
as
shown.
Overcasting prevents
edge
of
fabric
from
fraying
and
produces
neat
finish.
Sew
carefully
so
that
all
stitches
on
right
side
are
flush
with
edge
of
fabric.
For
thick
and
elastic
material:
Set
machine
as
shown.
Sew
in
the
same
way
above.
J
/
—28—
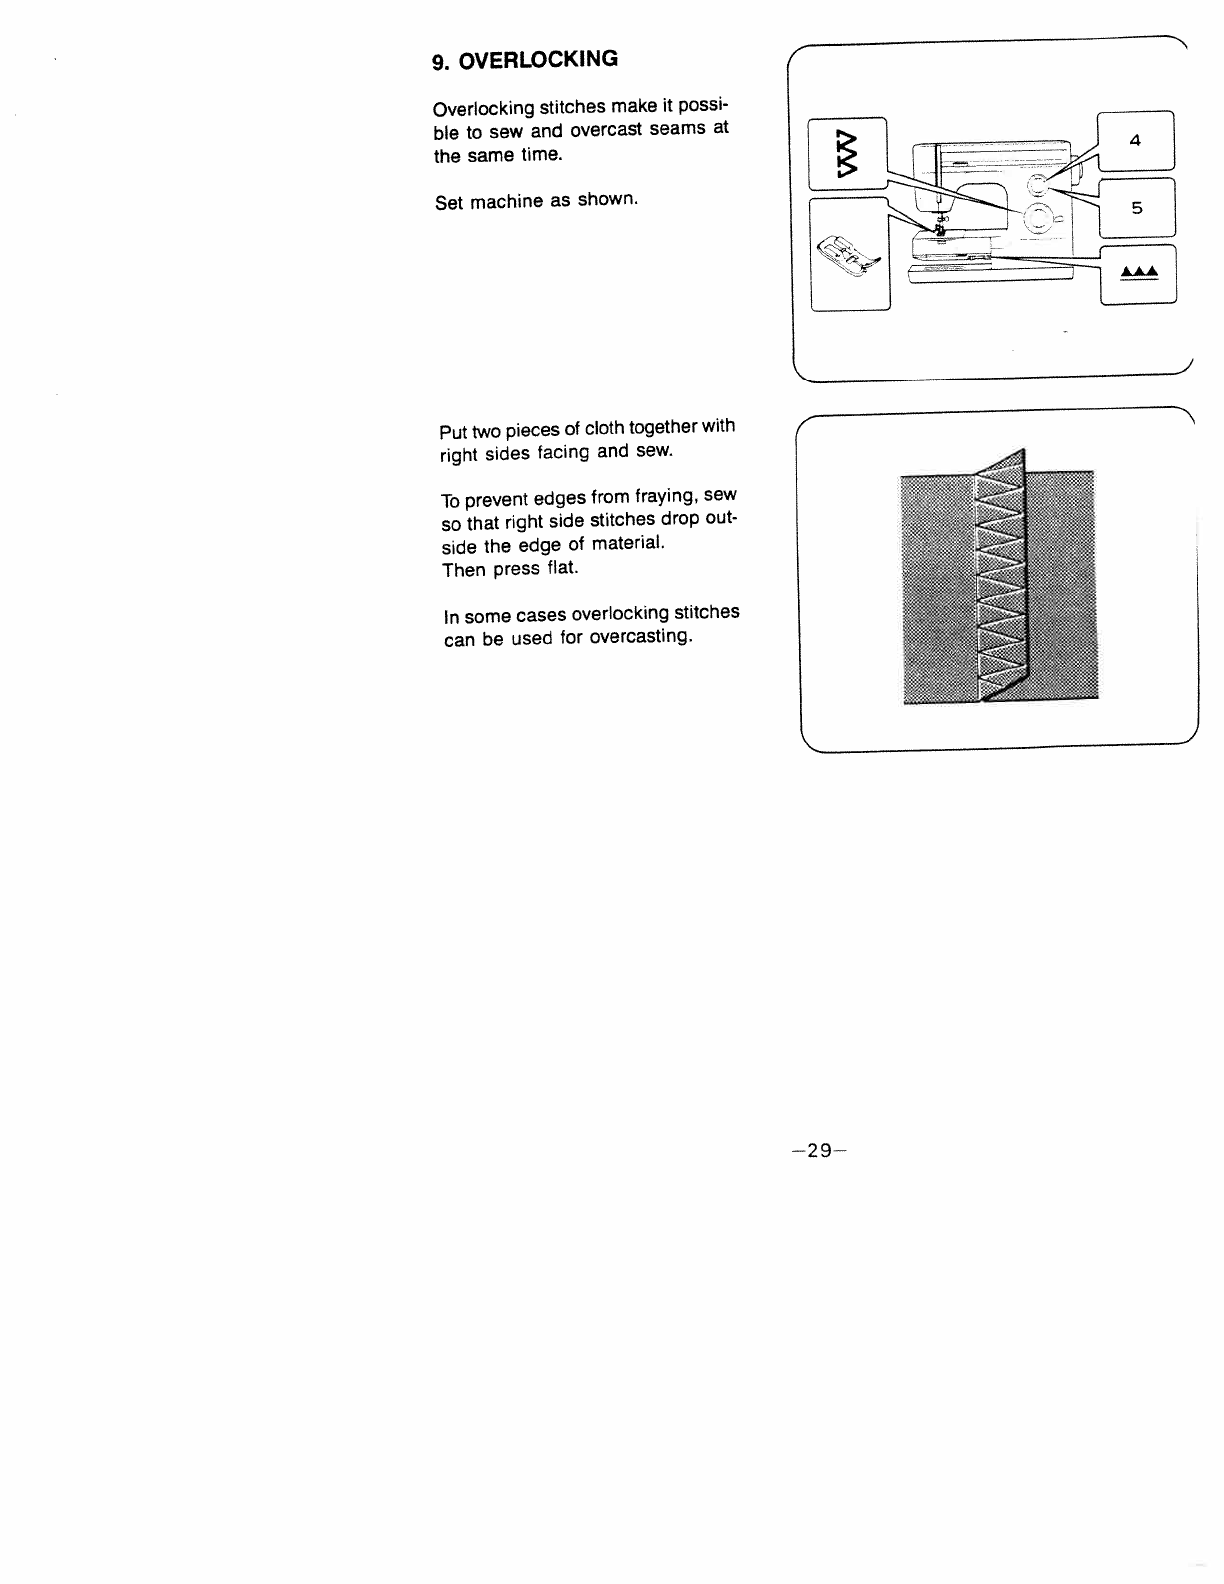
9. OVERLOCKING
Overlocking
stitches
make
it
possi
ble
to
sew
and
overcast
seams
at
the
same
time.
Set
machine
as
shown.
Put
two
pieces
of
cloth
together
with
right
sides
facing
and
sew.
To
prevent
edges
from
fraying,
sew
so
that
right
side
stitches
drop
out
side
the
edge
of
material.
Then
press
flat.
n
some
cases
overlocking
stitches
can
be
used
for
overcasting.
—29—
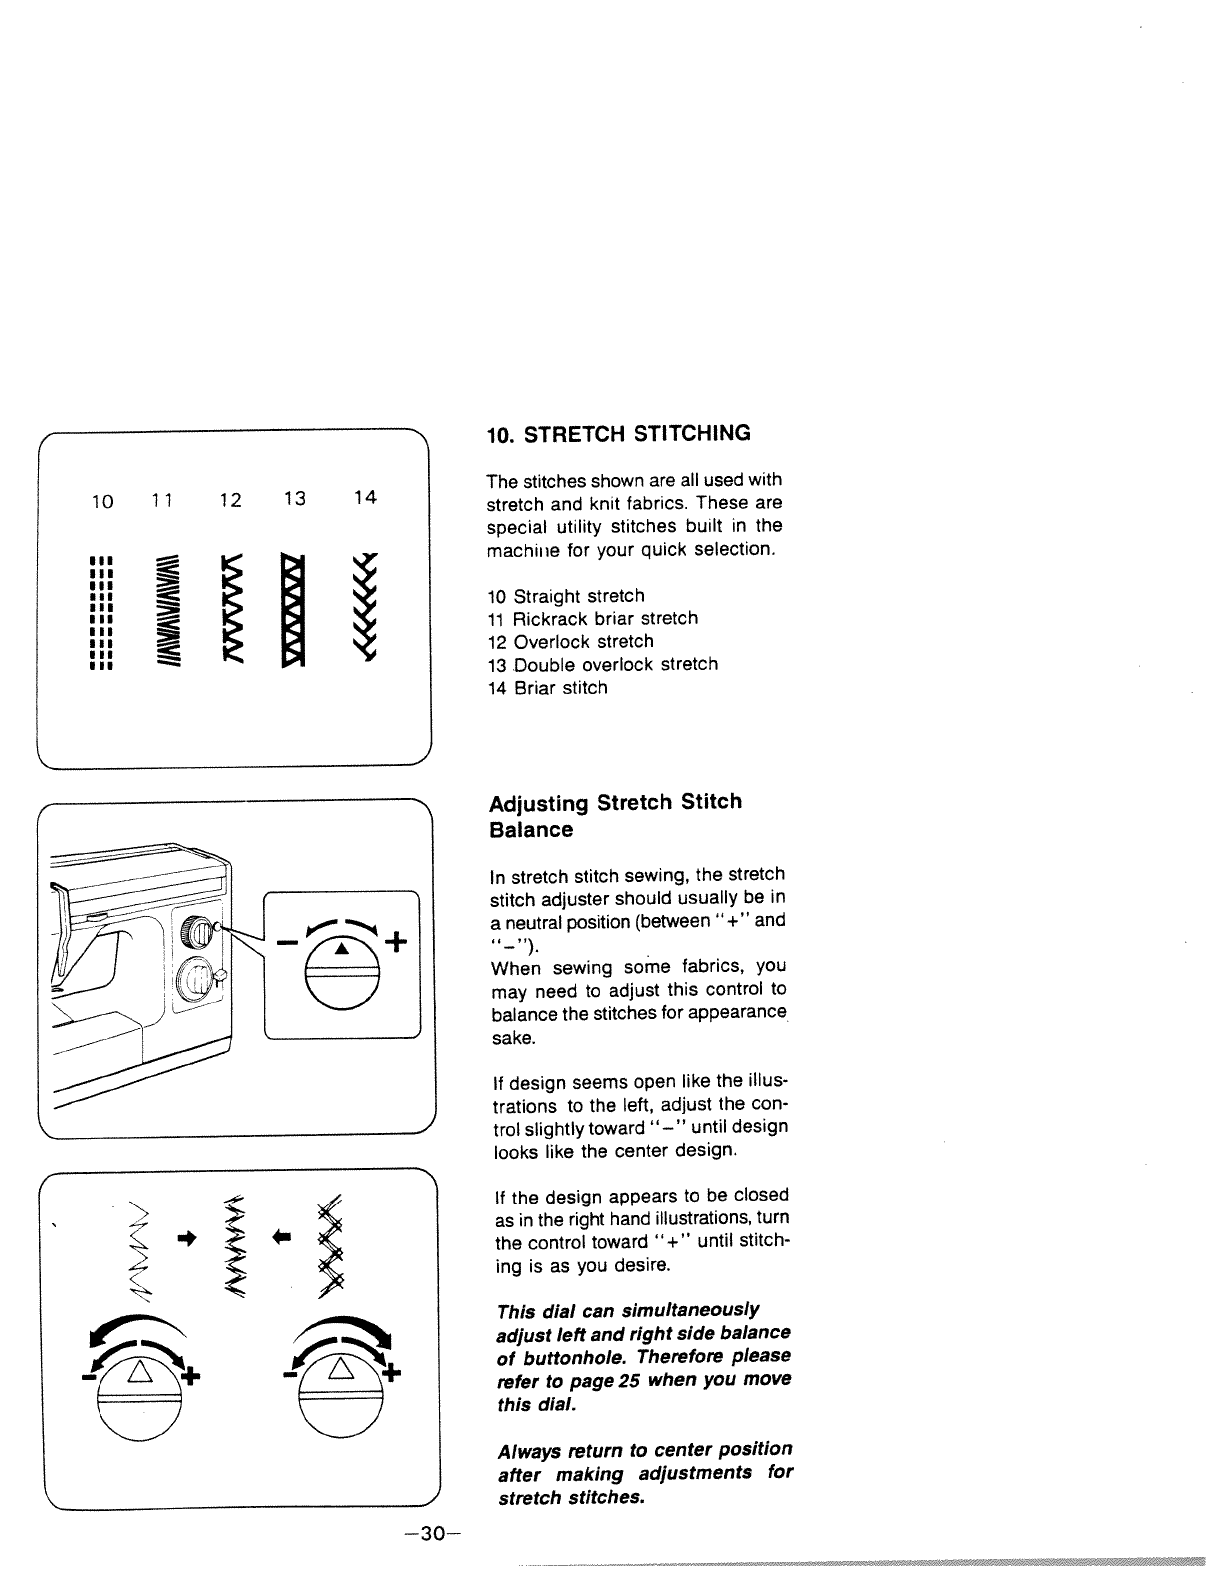
10.
STRETCH
STITCHING
The
stitches
shown
are
all
used
with
stretch
and
knit
fabrics.
These
are
special
utility
stitches
built
in
the
machine
for
your
quick
selection.
10
Straight
stretch
11
Rickrack briar
stretch
12
Overlock
stretch
13
Double
overlock
stretch
14
Briar
stitch
Adjusting
Stretch
Stitch
Balance
In
stretch
stitch
sewing,
the
stretch
stitch
adjuster
should
usually
be
in
a
neutral
position
(between
“+“
and
When
sewing
some
fabrics,
you
may
need
to
adjust
this
control
to
balance
the
stitches
for
appearance
sake.
If
design
seems
open
like
the
illus
trations
to
the
left,
adjust the
con
trol
slightly
toward
“—“
until
design
looks
like
the
center
design.
If
the
design
appears
to
be closed
as
in
the
right
hand
illustrations,
turn
the
control toward
“+“
until
stitch
ing
is
as
you
desire.
This
dial
can
simultaneously
adjust
left
and
right
side balance
of buttonhole.
Therefore
please
refer
to
page
25
when
you move
this
dial.
Always
return
to
center
position
after
making
adjustments
for
stretch stitches.
—30—
10
11
12 13
14
III
___
III
Is,
III
II)
III
I’’
III
Application
of
Rick-Rack
hit
\ViA
k
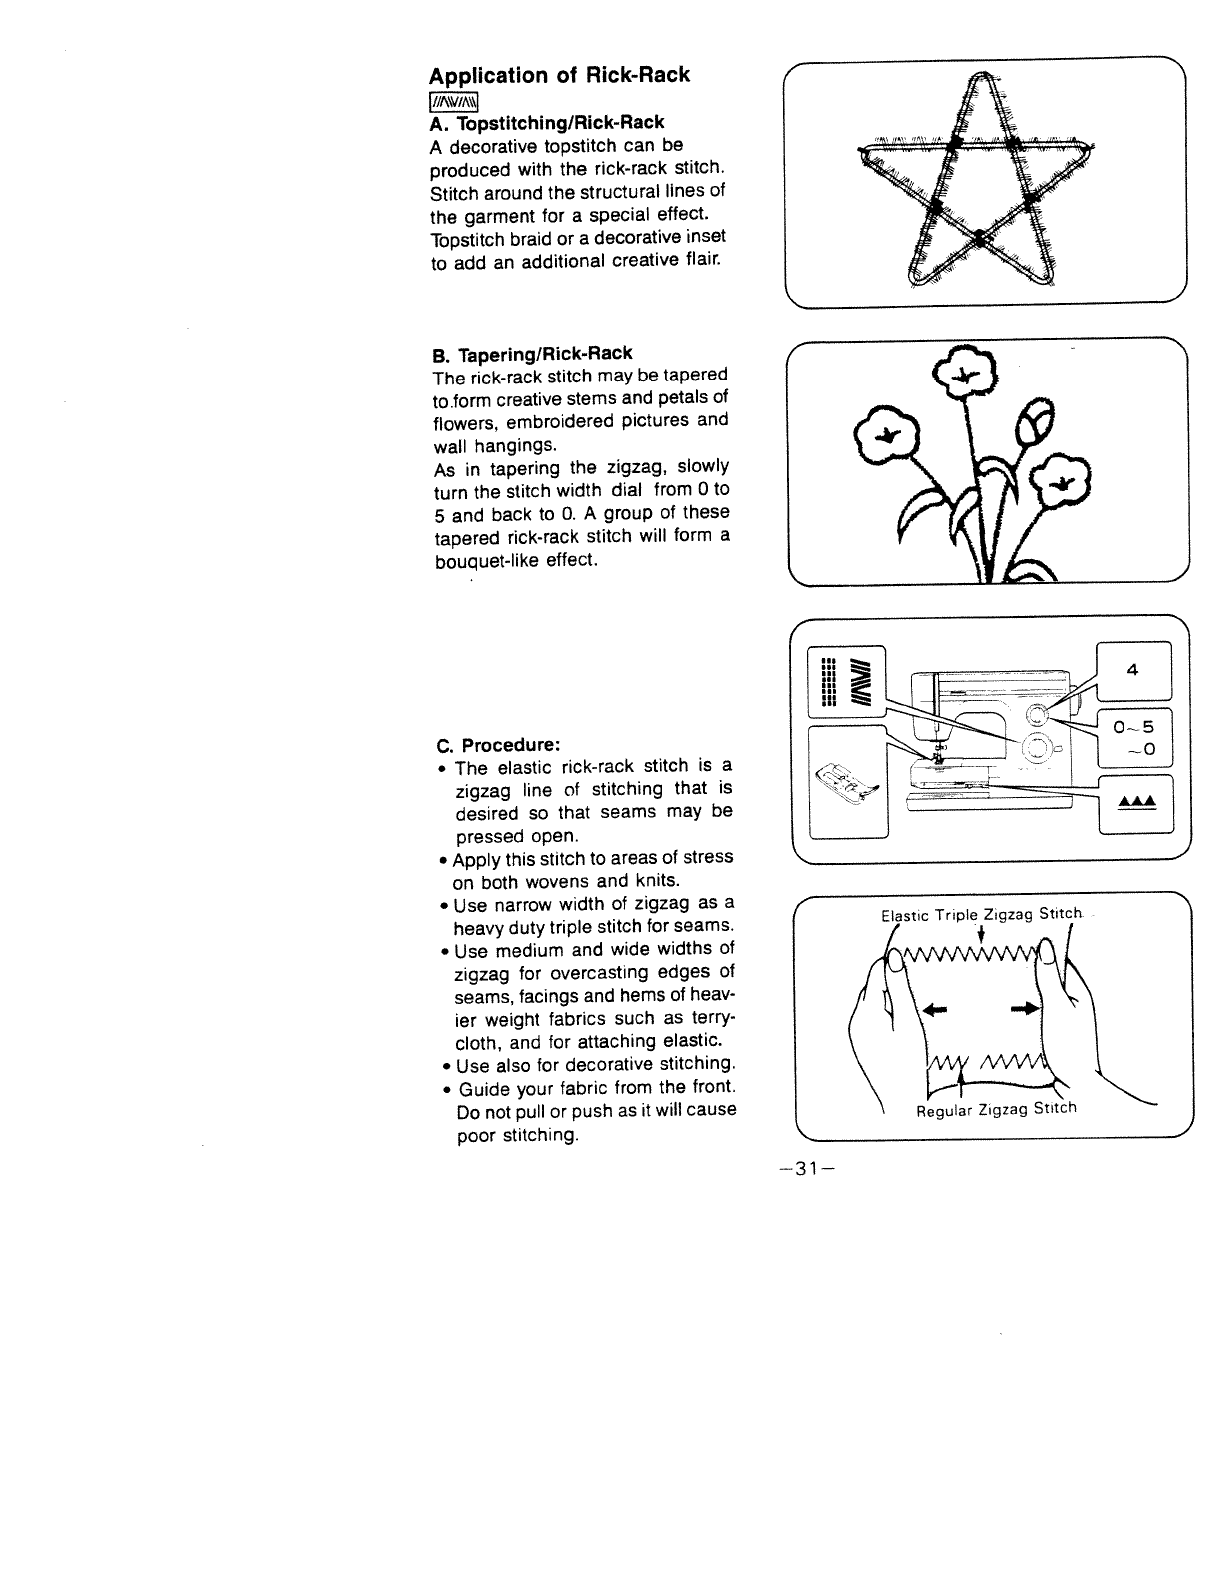
Topstltching/Rlck-Rack
A
decorative
topstitch
can
be
produced
with
the
rick-rack
stitch.
Stitch
around the structural
lines
of
the
garment
for
a
special
effect.
Topstitch
braid
or
a
decorative
inset
to
add
an
additional
creative
flair.
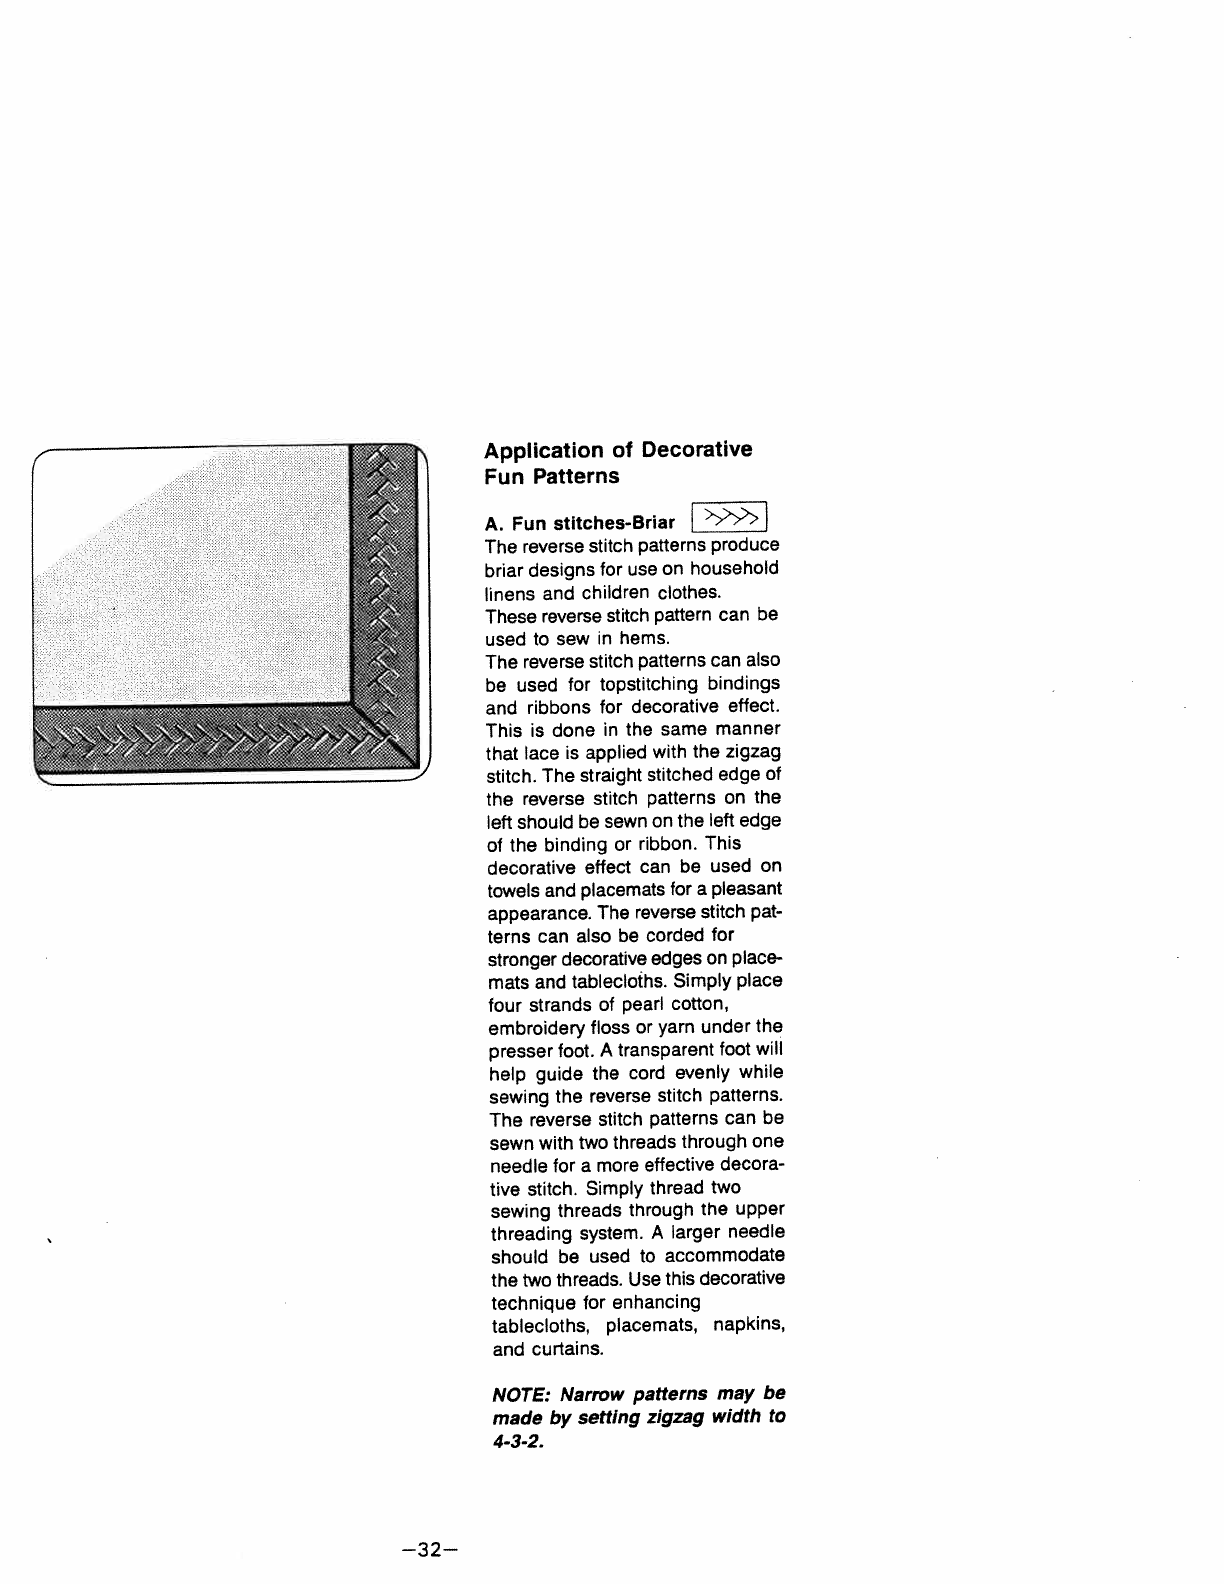
B.
Tapering/Rick-Rack
The
rick-rack
stitch
may
be
tapered
to.form
creative
stems
and
petals
of
flowers,
embroidered
pictures
and
wall
hangings.
As
in
tapering
the
zigzag,
slowly
turn
the
stitch
width
dial
from
0
to
5
and
back
to
0. A
group
of
these
tapered
rick-rack
stitch
will
form
a
bouquet-like
effect.
C.
Procedure:
•
The
elastic
rick-rack
stitch
is
a
zigzag
line
of
stitching
that
is
desired
so
that
seams
may be
pressed
open.
•
Apply
this stitch
to
areas
of
stress
on
both
wovens
and
knits.
•
Use
narrow
width
of
zigzag
as
a
heavy
duty
triple
stitch
for
seams.
•
Use medium
and
wide
widths
of
zigzag
for
overcasting
edges
of
seams,
facings and
hems
of
heav
ier
weight
fabrics
such
as
terry-
cloth,
and
for
attaching
elastic.
•
Use
also
for
decorative
stitching.
•
Guide
your
fabric
from
the
front.
Do
not
pull
or
push
as
it
will
cause
poor
stitching.
L
L
4J
__
I
____
—31—
Application
of
Decorative
Fun
Patterns
A.
Fun
stitches-Briar
I
>>>?EJ
The
reverse
stitch
patterns
produce
briar
designs
for
use
on
household
linens and
children
clothes.
These
reverse
stitch
pattern
can
be
used
to
sew
in
hems.
The
reverse
stitch
patterns
can
also
be
used
for
topstitching
bindings
and
ribbons
for
decorative
effect.
This
is
done
in
the
same
manner
that
lace
is
applied
with
the
zigzag
stitch.
The straight
stitched
edge
of
the
reverse
stitch
patterns
on
the
left
should
be
sewn
on
the
left
edge
of
the
binding
or
ribbon.
This
decorative
effect
can
be
used
on
towels
and
placemats
for
a
pleasant
appearance.
The
reverse
stitch
pat
terns
can
also
be
corded
for
stronger
decorative
edges
on
place-
mats
and tablecloths.
Simply
place
four
strands
of
pearl
cotton,
embroidery
floss
or
yarn
under the
presser
foot.
A
transparent
foot
will
help
guide the
cord
evenly
while
sewing
the reverse
stitch
patterns.
The
reverse
stitch
patterns
can
be
sewn
with
two
threads
through
one
needle
for
a
more
effective
decora
tive
stitch.
Simply
thread
two
sewing
threads
through
the upper
threading
system.
A
larger
needle
should be
used
to
accommodate
the
two
threads.
Use
this
decorative
technique
for
enhancing
tablecloths, placemats,
napkins,
and
curtains.
NOTE:
Narrow
patterns
may
be
made
by
setting
zigzag
width
to
4-3-2.
—32—
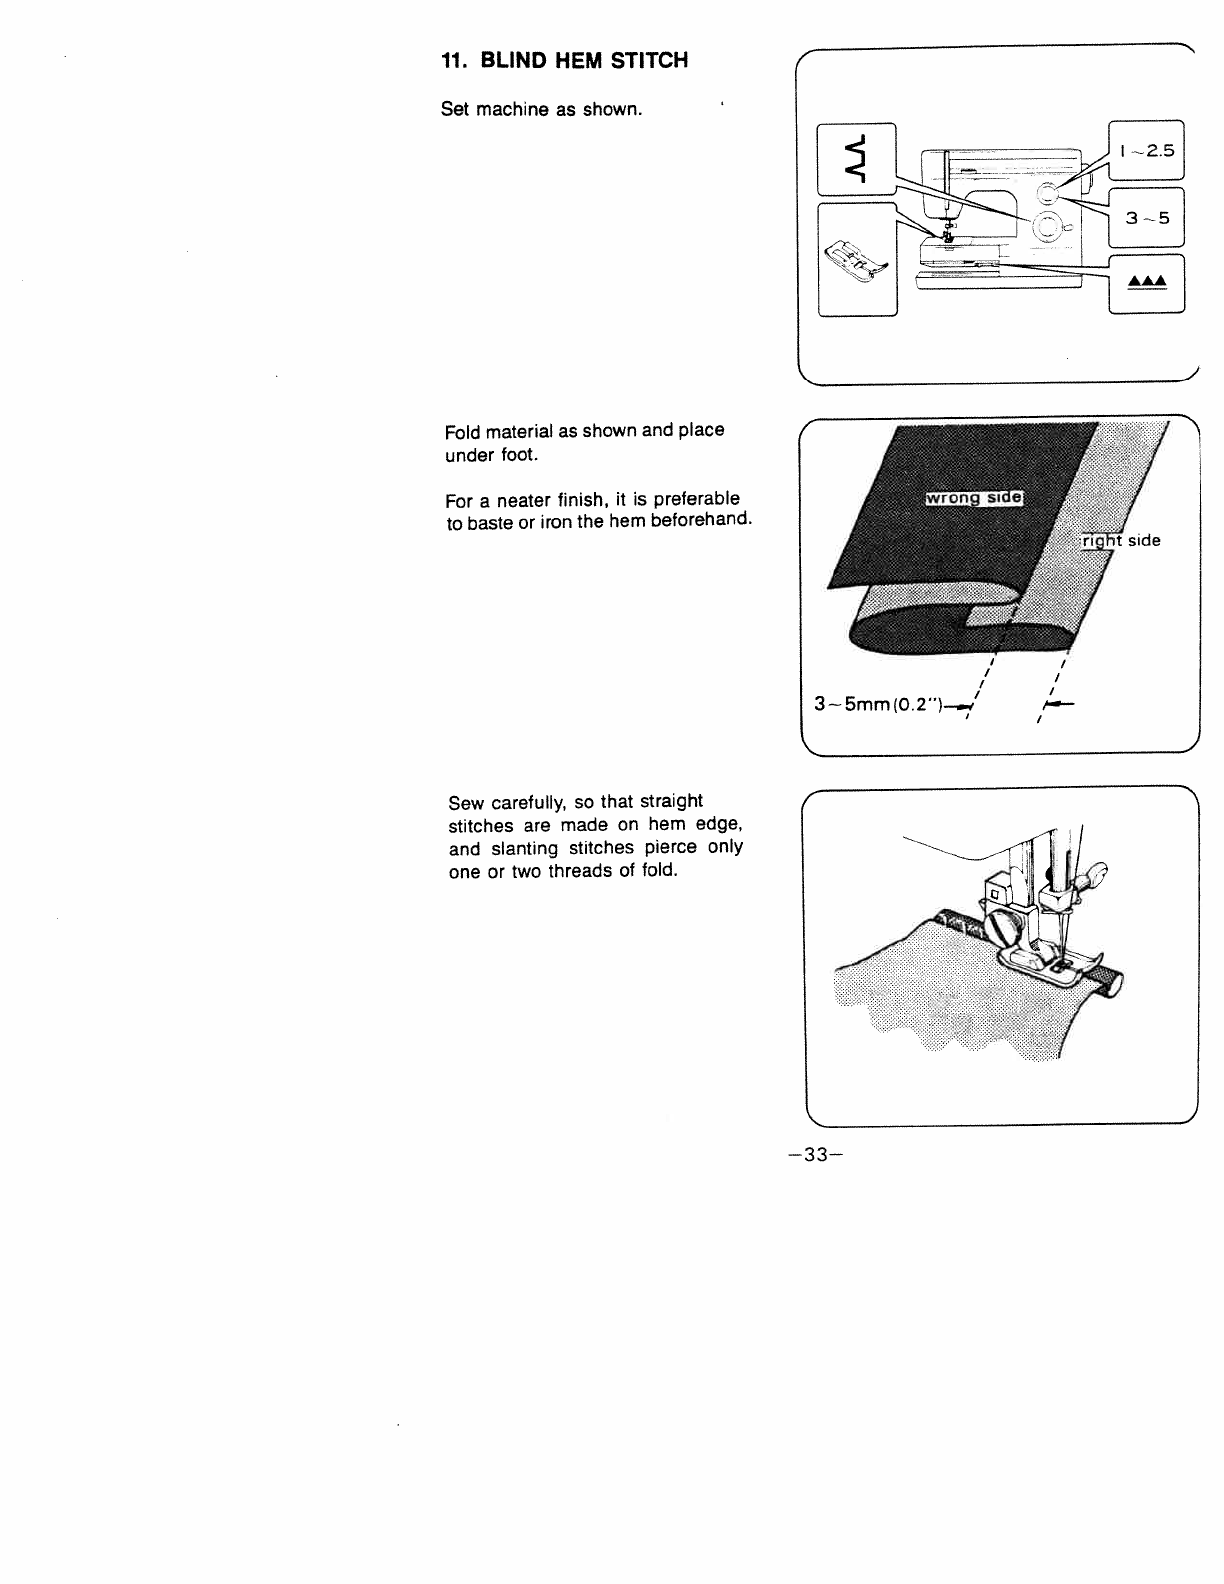
11.
BLIND
HEM
STITCH
Set machine
as
shown.
Fold
material
as
shown
and
place
under
foot.
For
a
neater
finish,
it
is
preferable
to
baste
or
iron
the
hem
beforehand.
Sew
carefully,
so
that straight
stitches
are
made
on
hem
edge,
and
slanting
stitches
pierce
only
one
or
two
threads
of
fold.
n
,-
—33—
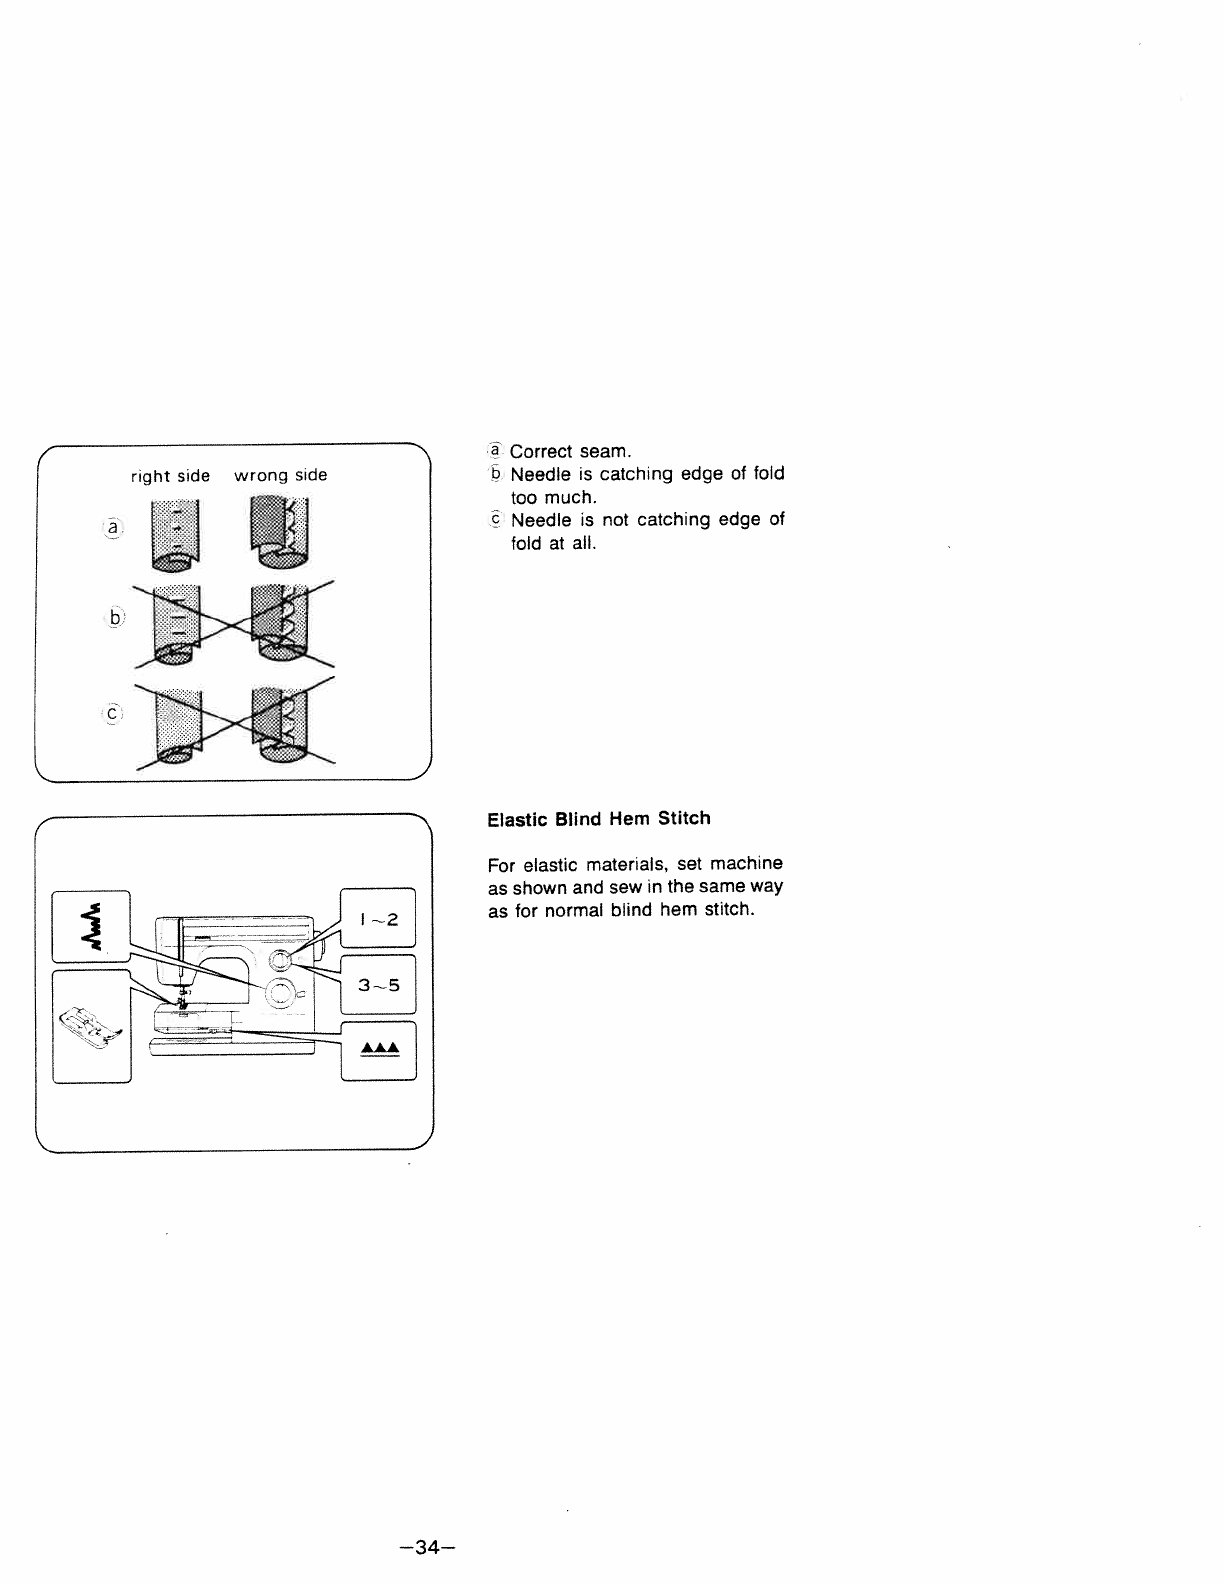
Correct
seam.
right
side
wrong
side
.
Needle
is
catching
edge
of
fold
too
much.
a
Needle
is
not
catching
edge
of
fold
at
all
b>4
Elastic
Blind Hem
Stitch
For
elastic
materials,
set
machine
::
:r
sew
in
the
same
way
—34—
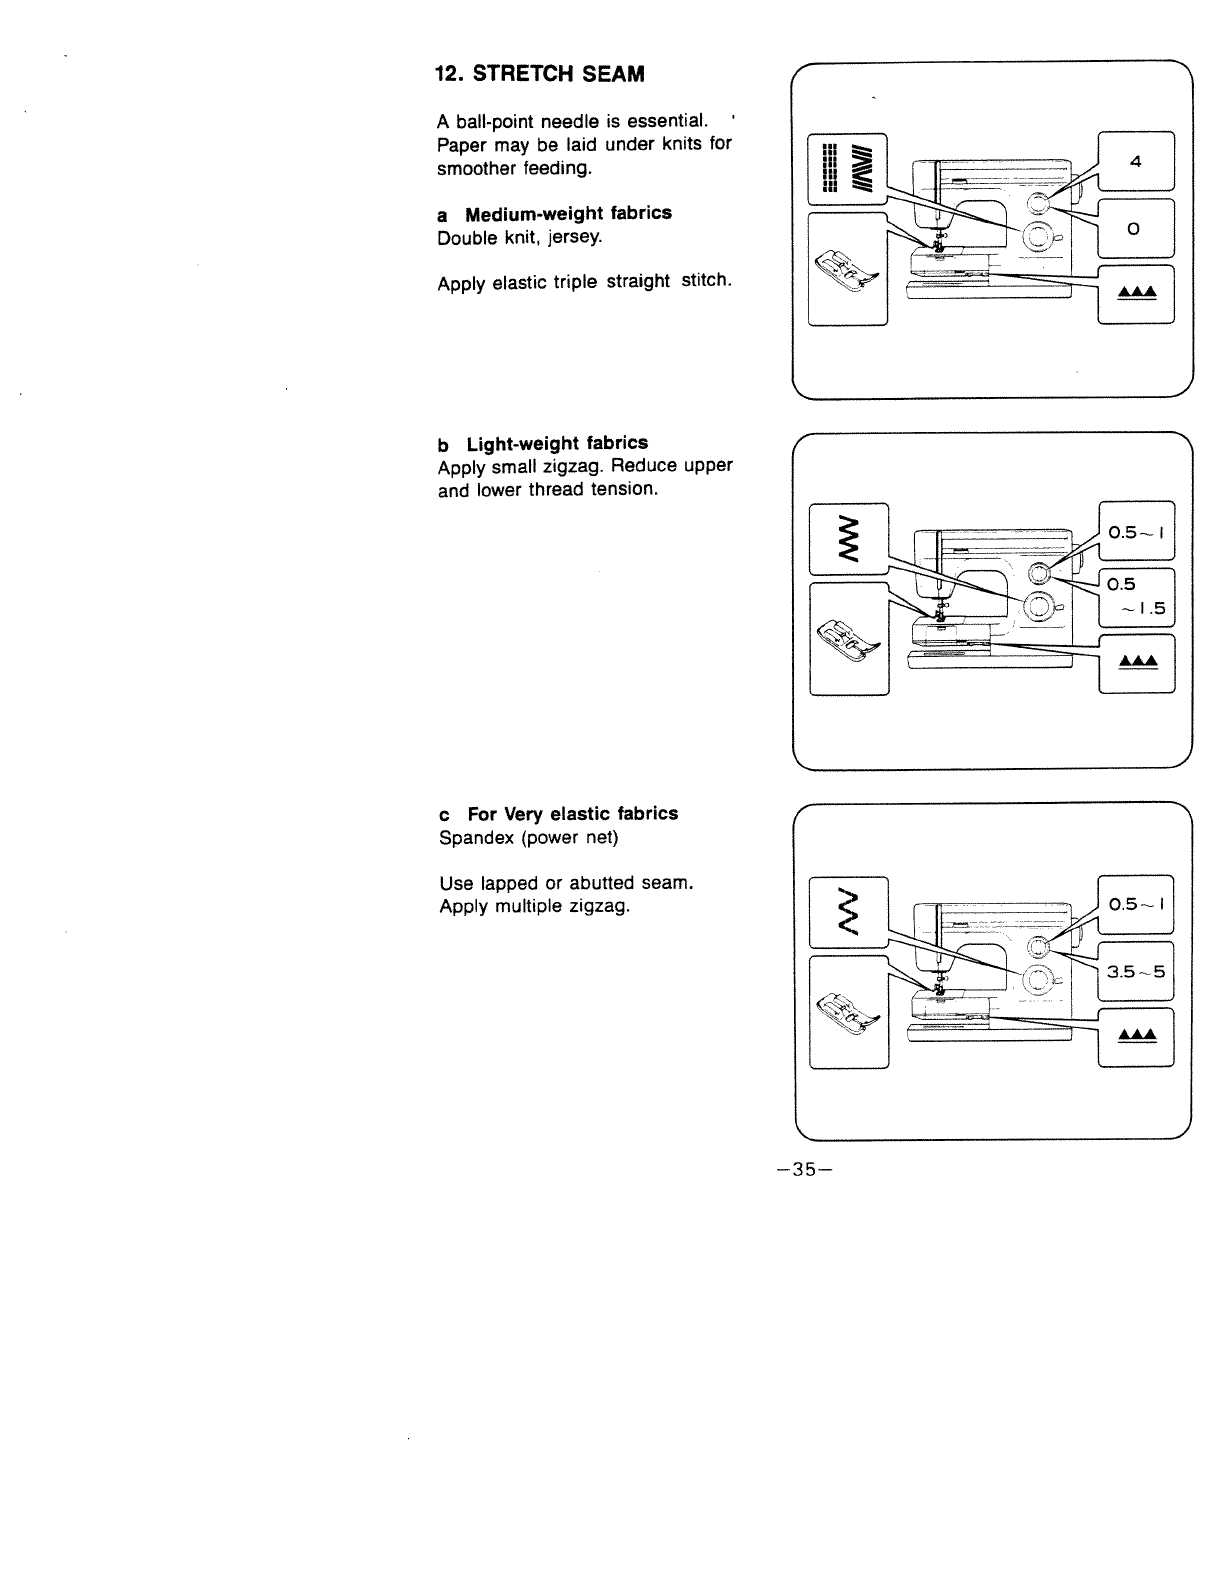
12.
STRETCH
SEAM
A
ball-point
needle
is
essential.
Paper
may
be
laid
under
knits
for
smoother
feeding.
a
Medium-weight
fabrics
Double
knit,
jersey.
Apply
elastic
triple
straight
stitch.
b
Light-weight
fabrics
Apply
small
zigzag.
Reduce
upper
and
lower
thread
tension.
c
For
Very
elastic
fabrics
Spandex
(power
net)
Use
lapped
or
abutted
seam.
Apply
multiple
zigzag.
I-
‘1
—35—
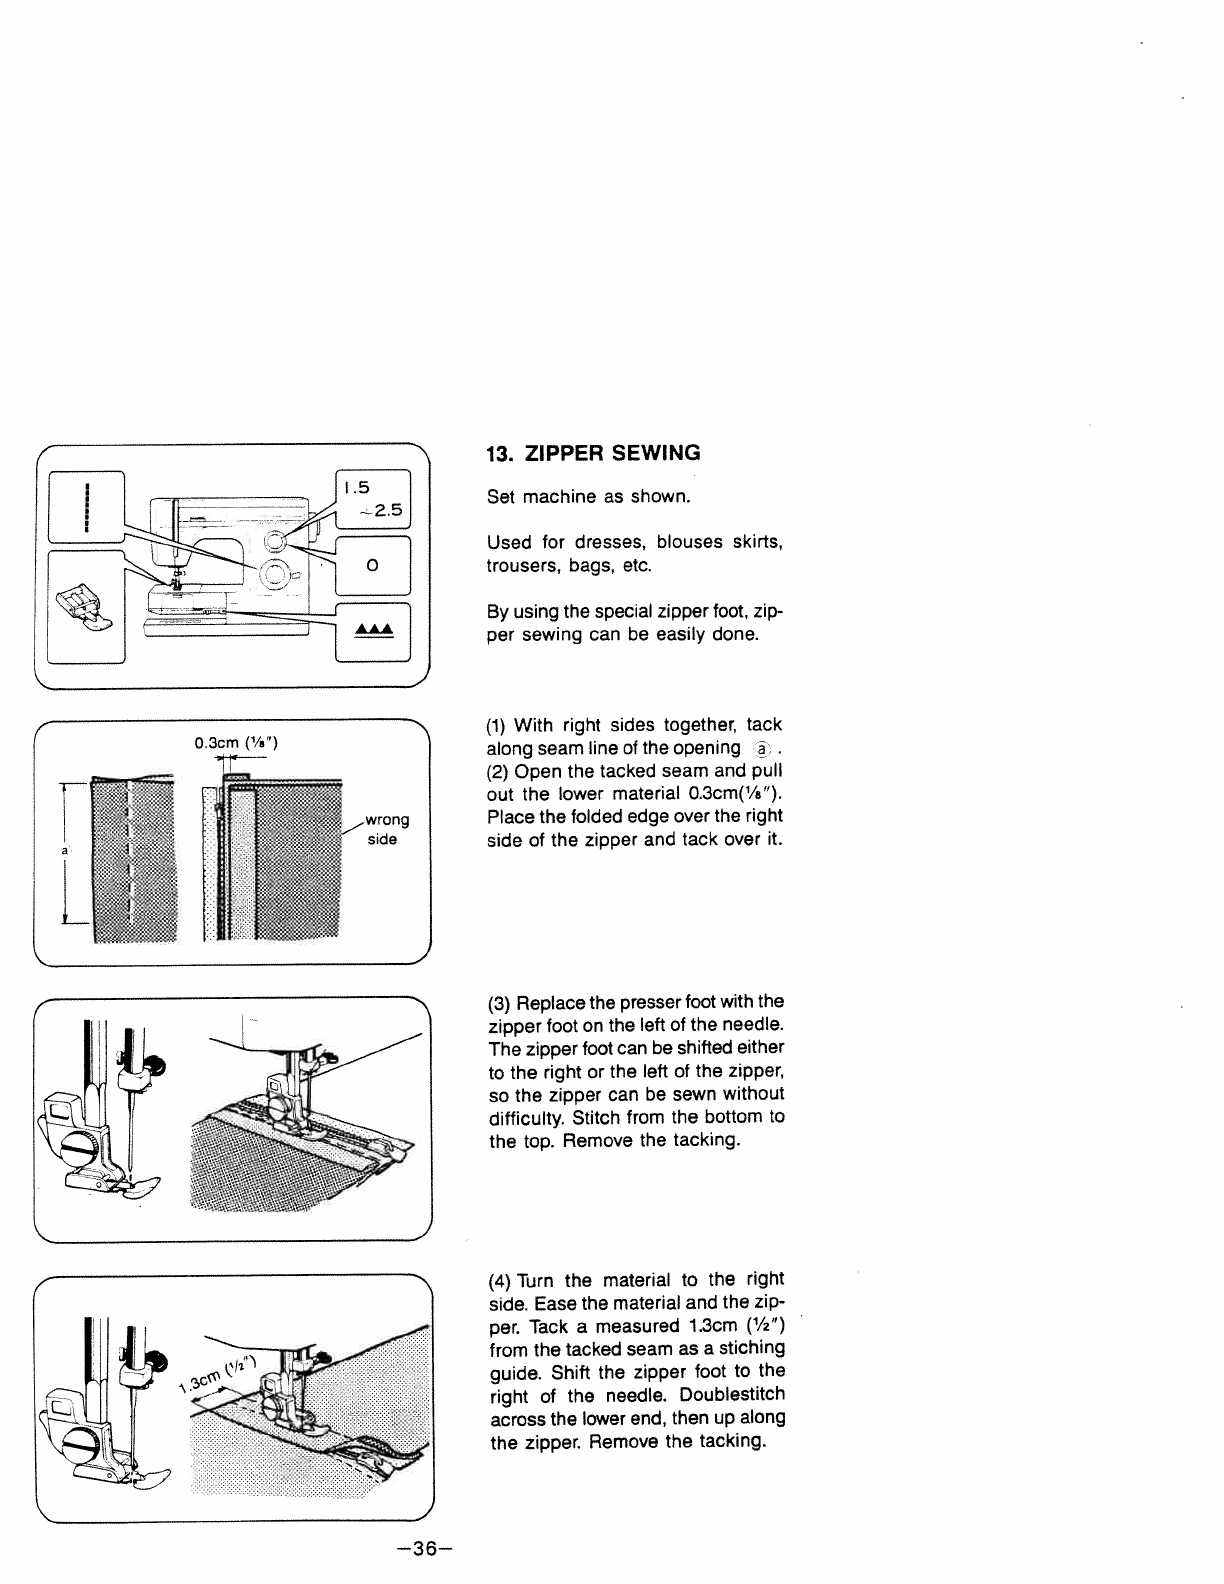
13.
ZIPPER
SEWING
Set
machine
as
shown.
Used
for
dresses,
blouses
skirts,
trousers,
bags,
etc.
By
using
the
special
zipper
foot,
zip
per
sewing
can
be easily
done.
(1)
With
right
sides
together, tack
along
seam
line
of
the opening
(2)
Open the
tacked
seam
and
pull
out
the
lower
material
O.3cm(½”).
Place
the
folded
edge
over
the
right
side
of
the
zipper
and
tack
over
it.
(3)
Replace
the
presser
foot
with
the
zipper
foot
on
the
left
of
the
needle.
The
zipper
foot
can
be shifted
either
to
the
right
or
the
left
of
the
zipper,
so
the
zipper
can
be
sewn
without
difficulty.
Stitch
from
the
bottom
to
the
top.
Remove
the
tacking.
(4)
Turn
the
material
to
the
nght
side.
Ease
the
material
and
the
zip
per.
Tack
a
measured
1.3cm
(1/2”)
from
the
tacked
seam
as
a
stiching
guide.
Shift
the
zipper
foot
to
the
right
of
the
needle.
Doublestitch
across
the
lower
end,
then
up
along
the
zipper.
Remove
the
tacking.
a
.1
L
i
r
O.3cm(’/a”)
wrong
side
—36—
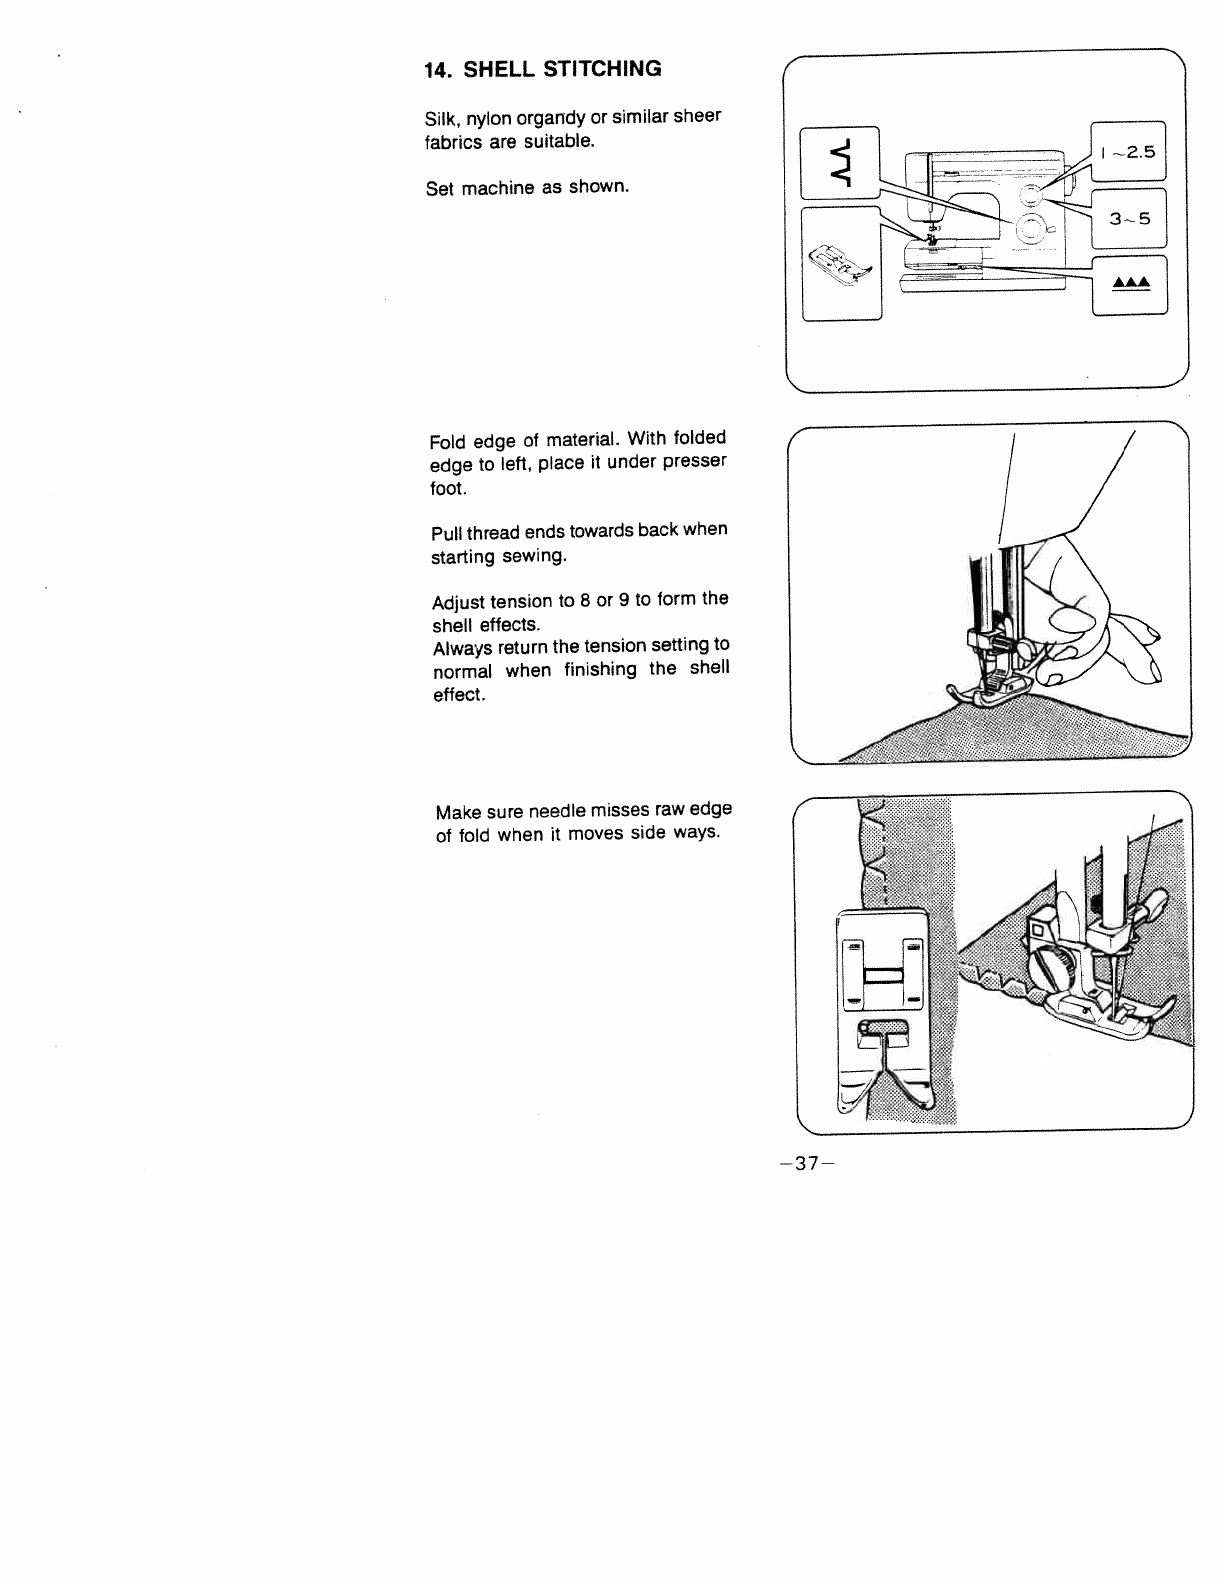
14.
SHELL
STITCHING
Silk,
nylon
organdy
or
similar
sheer
fabrics are
suitable.
Set
machine
as
shown.
Fold
edge
of
material.
With
folded
edge
to
left,
place
it
under
presser
foot.
Pull
thread
ends
towards
back
when
starting
sewing.
Adjust
tension
to
8
or
9
to form
the
shell effects.
Always
return
the tension
setting
to
normal
when
finishing
the
shell
effect.
Make
sure needle
misses
raw
edge
of
fold
when
it
moves
side
ways.
—37—

15. PIN
TUCKING
Set machine
as
shown.
For
better
appearance,
use
sheer
material
and
tighten
lower
thread
a
little.
For
twin
needle
threading
see
p.14.
Insert
the
quilting
guide under
the
spring
plate
on
the
holder.
Mark
first line
with
pencil
or
tailor’s
chalk,
and
sew.
From
second
line,
just
sew,
follow
ing
seam
of
first
line
using
guide.
Interval
between
seams
can
be
adjusted
by
moving
guide
in
direction
of
arrow.
—38—
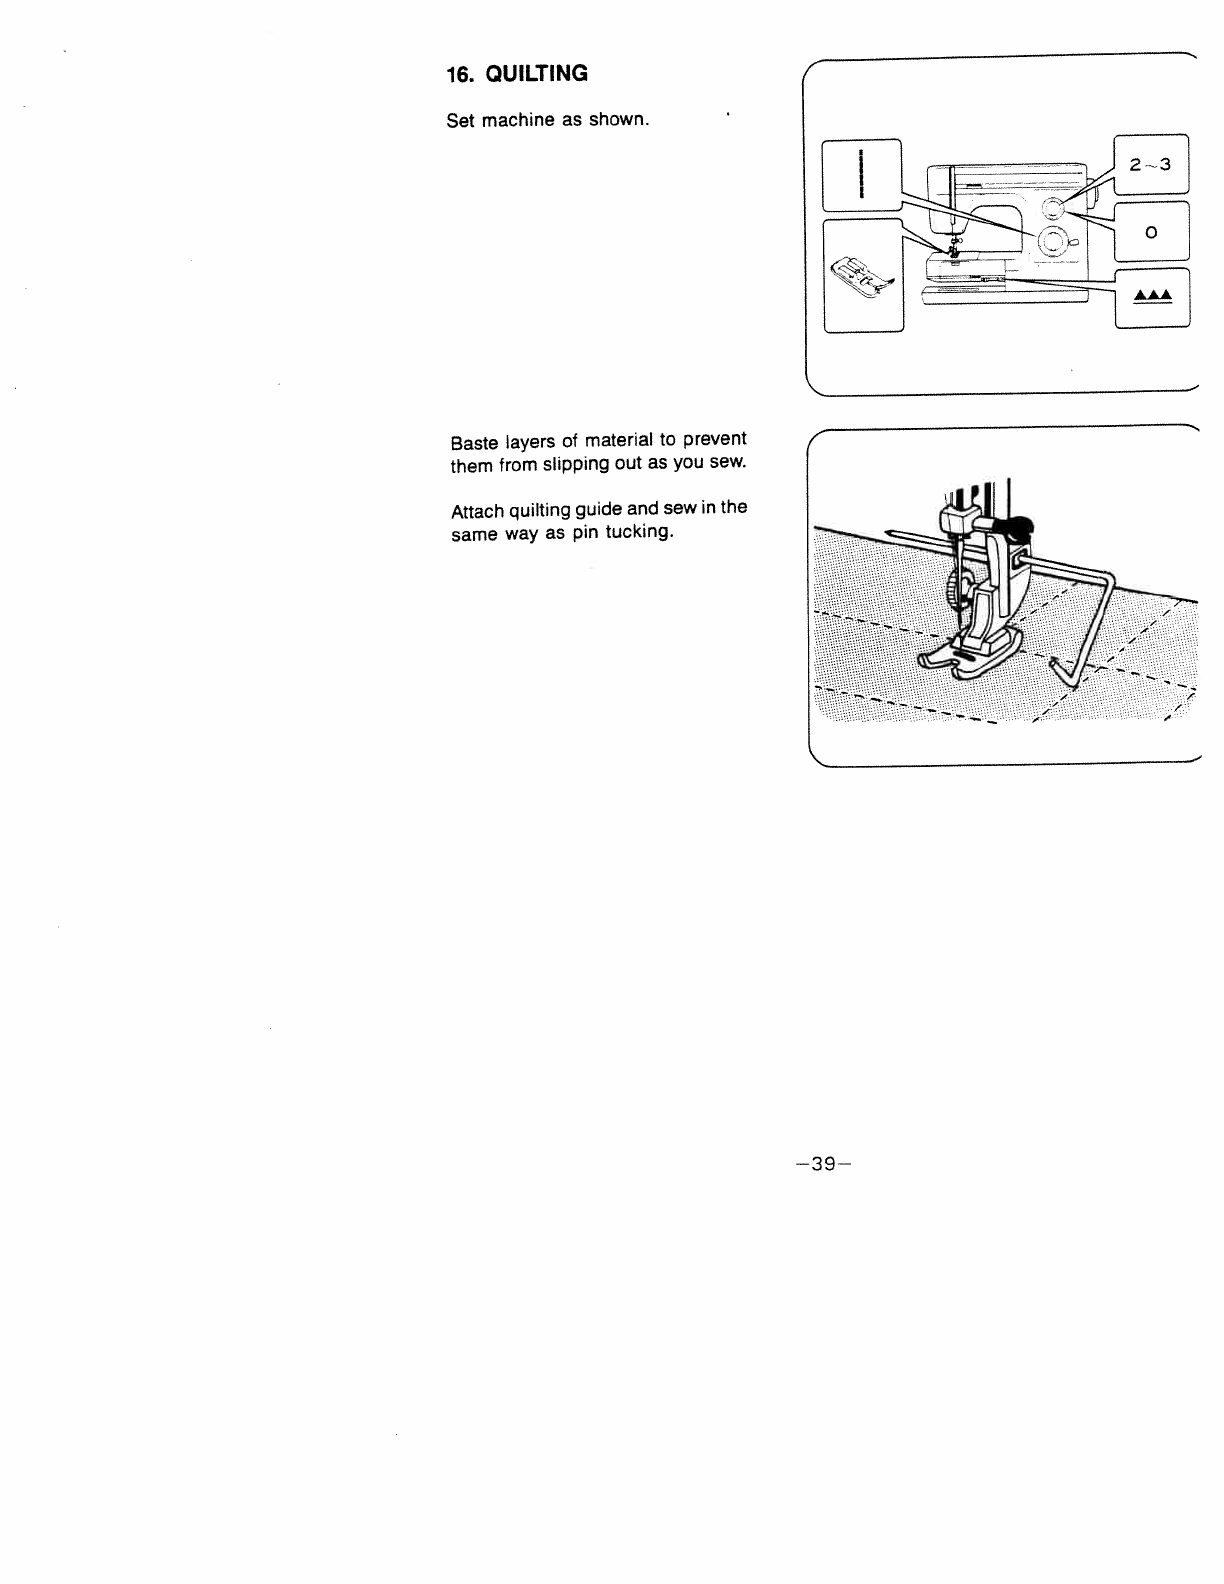
16
QUILTING
Set
machine
as
shown.
23
Baste
layers
of
material
to
prevent
them
from
slipping
out
as
you sew.
Attach quilting
guide
and
sew
in
the
same
way
as
pin
tucking
—39—

17.
MENDING
Patching
Set
machine
as
shown.
Place
the
patch
over
the
worn
part.
Pull
thread
ends
toward
back
or
left
when
starting
sewing.
Sew
along
the
edge
of
the
patch
on
the
right
side.
Trim
away
the
worn
part
close
to
the seam
on
back
side.
Mending
a
Rip
Set
machine
in
the
same
way
as
for
patching.
Sew
the
edges
of
tear
together
first.
Then
sew
two
more
seams
on
either
side.
A
piece
of
gauze
can
be placed
underneath
to
reinforce
the
rip.
AAA
y
A
A
A
A
A
A
c
fl+t)
L.
—40—
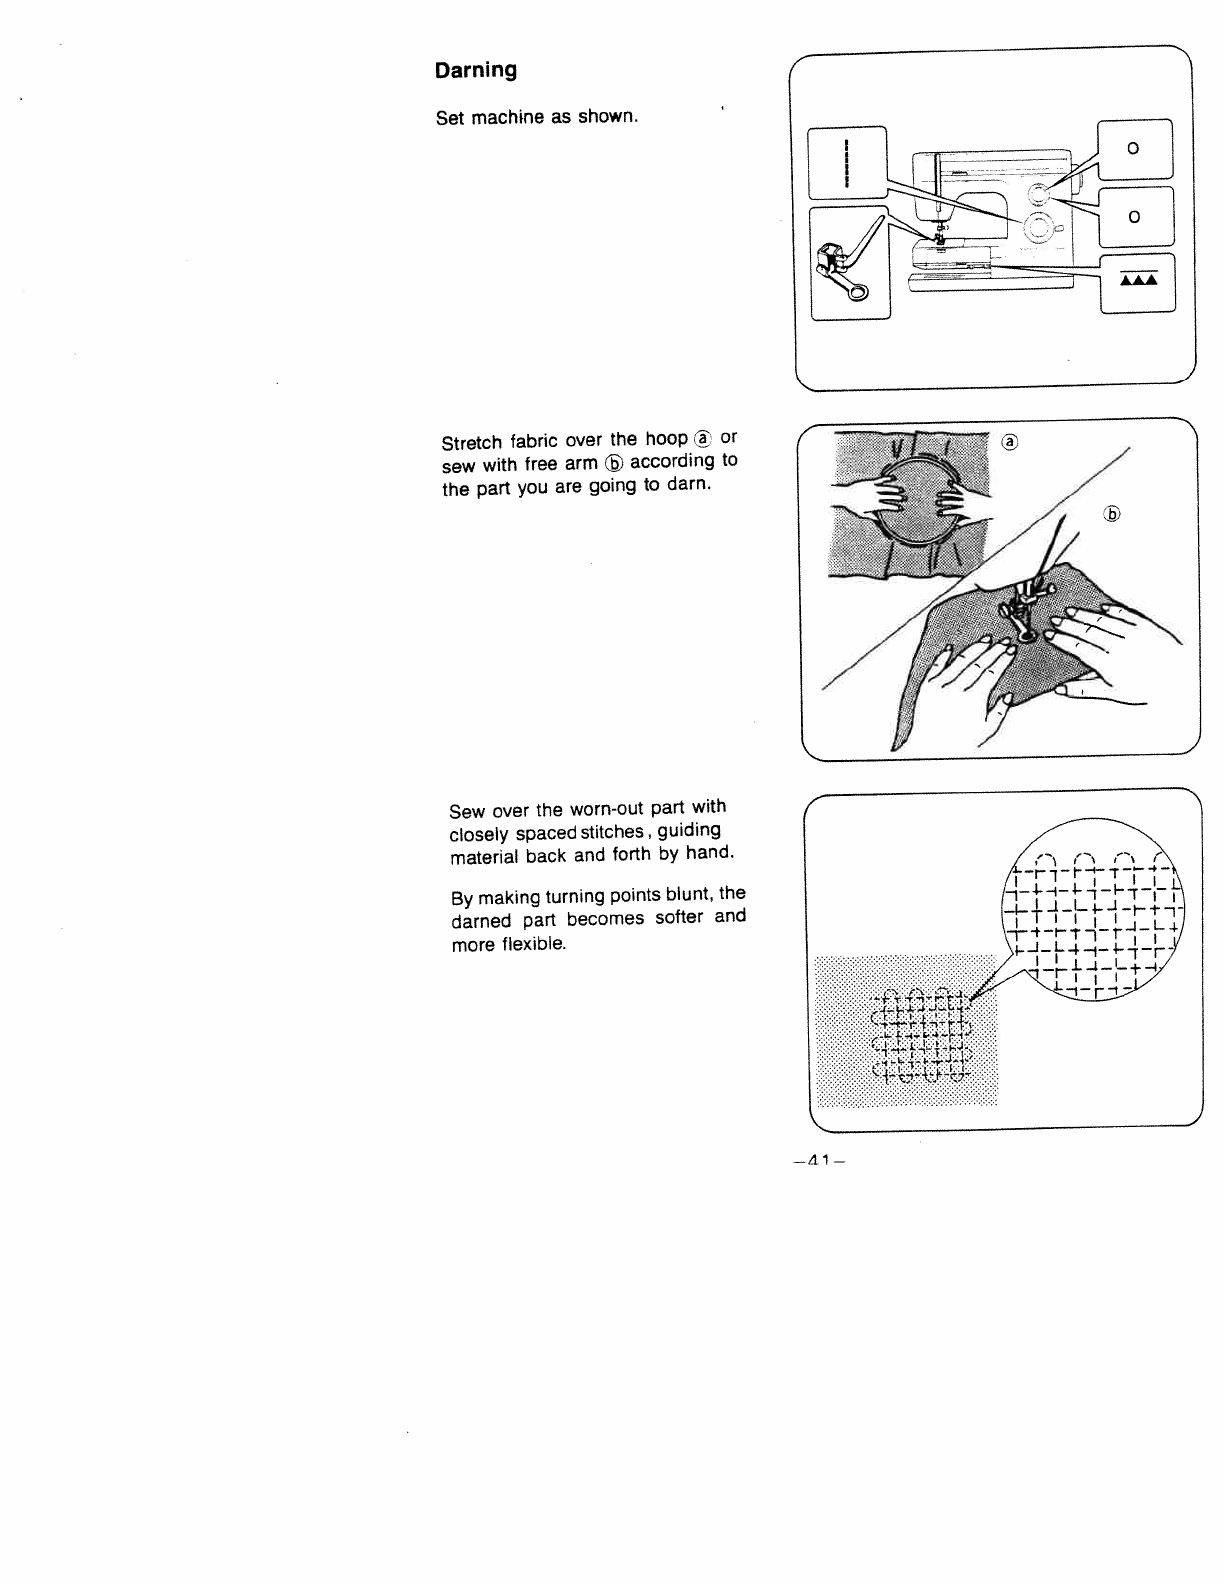
Darning
Set
machine
as
shown.
Stretch
fabric
over
the
hoop
or
sew
with
free arm
®
according
to
the
part
you
are
going
to
darn.
Sew
over
the
worn-out
part
with
closely
spaced
stitches,
guiding
material
back
and
forth
by
hand.
By
making turning points blunt,
the
darned
part
becomes
softer
and
more
flexible.
S.
j
—
1
—
I
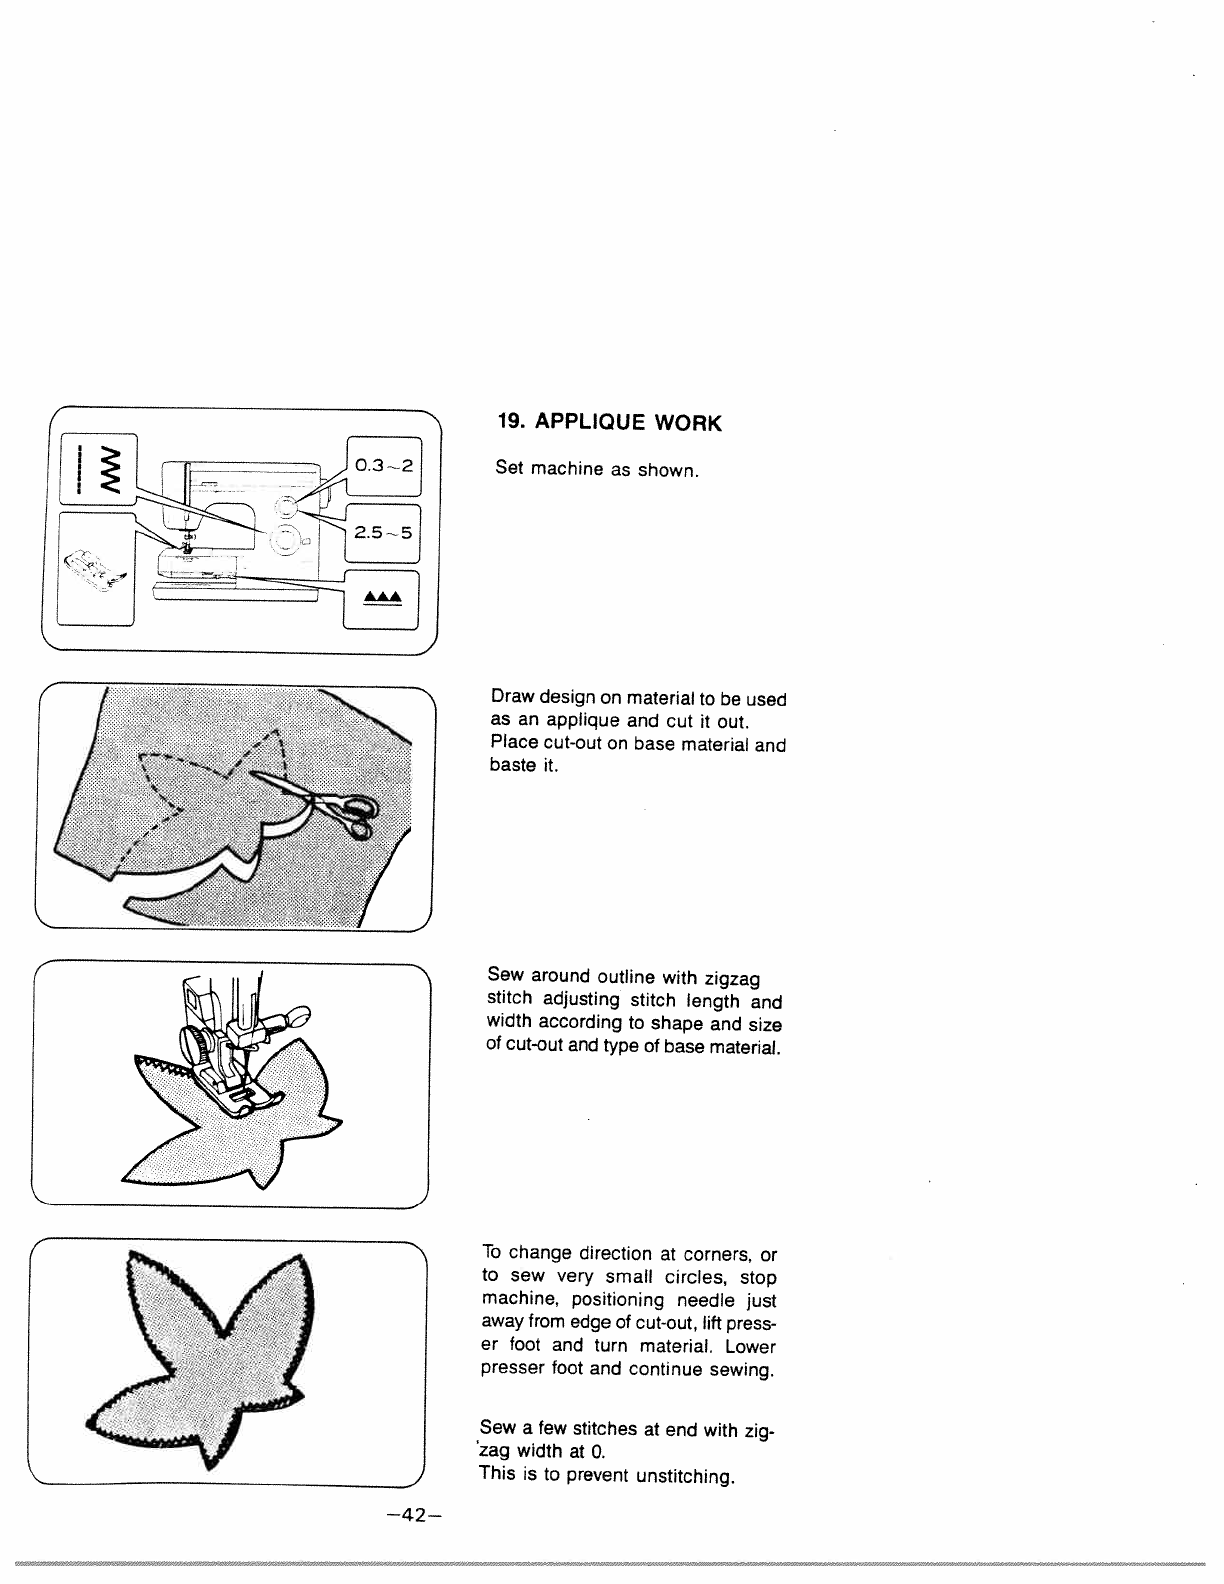
19.
APPLIQUE
WORK
Set machine
as
shown.
Draw
design
on
material
to
be
used
as
an
applique
and
cut
it
out.
Place
cut-out
on
base
material and
baste
it.
Sew
around
outline
with
zigzag
stitch
adjusting
stitch
length
and
width
according
to
shape
and
size
of
cut-out
and
type
of
base
material.
To
change
direction at
corners,
or
to
sew
very
small
circles,
stop
machine,
positioning
needle
just
away
from
edge
of
cut-out,
lift
press
er
foot
and
turn
material.
Lower
presser
foot
and
continue
sewing.
Sew
a
few
stitches
at
end
with
zig
‘zag
width
at
0.
This
is
to
prevent
unstitching.
—42—
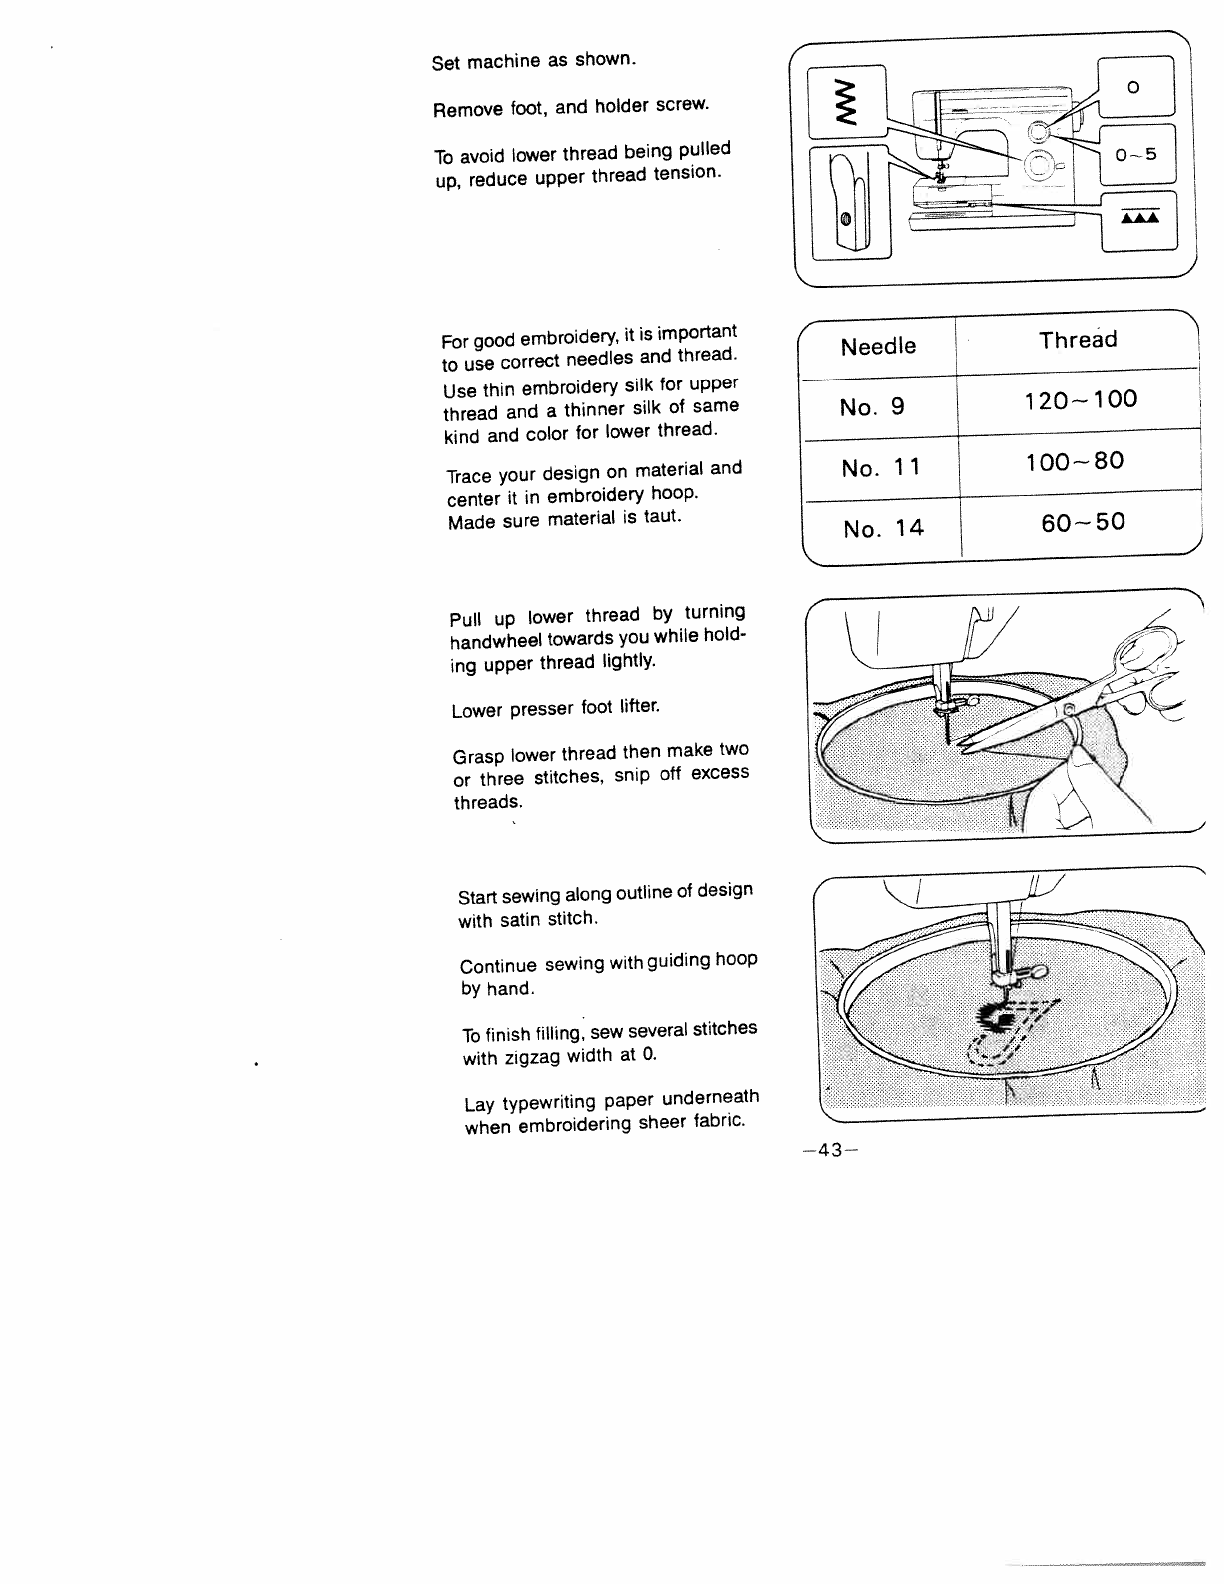
Set
machine
as
shown.
Remove
foot,
and
holder
screw.
To
avoid
lower
thread
being
pulled
up,
reduce
upper
thread
tension.
For
good
embroidery,
it
is
important
to
use
correct
needles
and
thread.
Use
thin
embroidery
silk
for
upper
thread
and a
thinner
silk
of
same
kind
and
color
for
lower
thread.
Trace
your
design
on
material
and
center
it
in
embroidery
hoop.
Made
sure
material
is
taut.
,—
Needle
Thread
No.
9
120—100
No.
11
100—80
No.
14
60—50
Pull
up
lower
thread
by
turning
handwheel
towards
you while
hold
ing
upper
thread
lightly.
Lower
presser
foot
lifter.
Grasp
lower
thread
then
make
two
or
three
stitches,
snip
off
excess
threads.
Start
sewing along
outline
of
design
with
satin
stitch.
Continue
sewing
with
guiding hoop
by
hand.
To
finish
filling:
sew
several
stitches
with
zigzag
width
at
0.
Lay
typewriting
paper
underneath
when
embroidering
sheer
fabric.
/
—43—
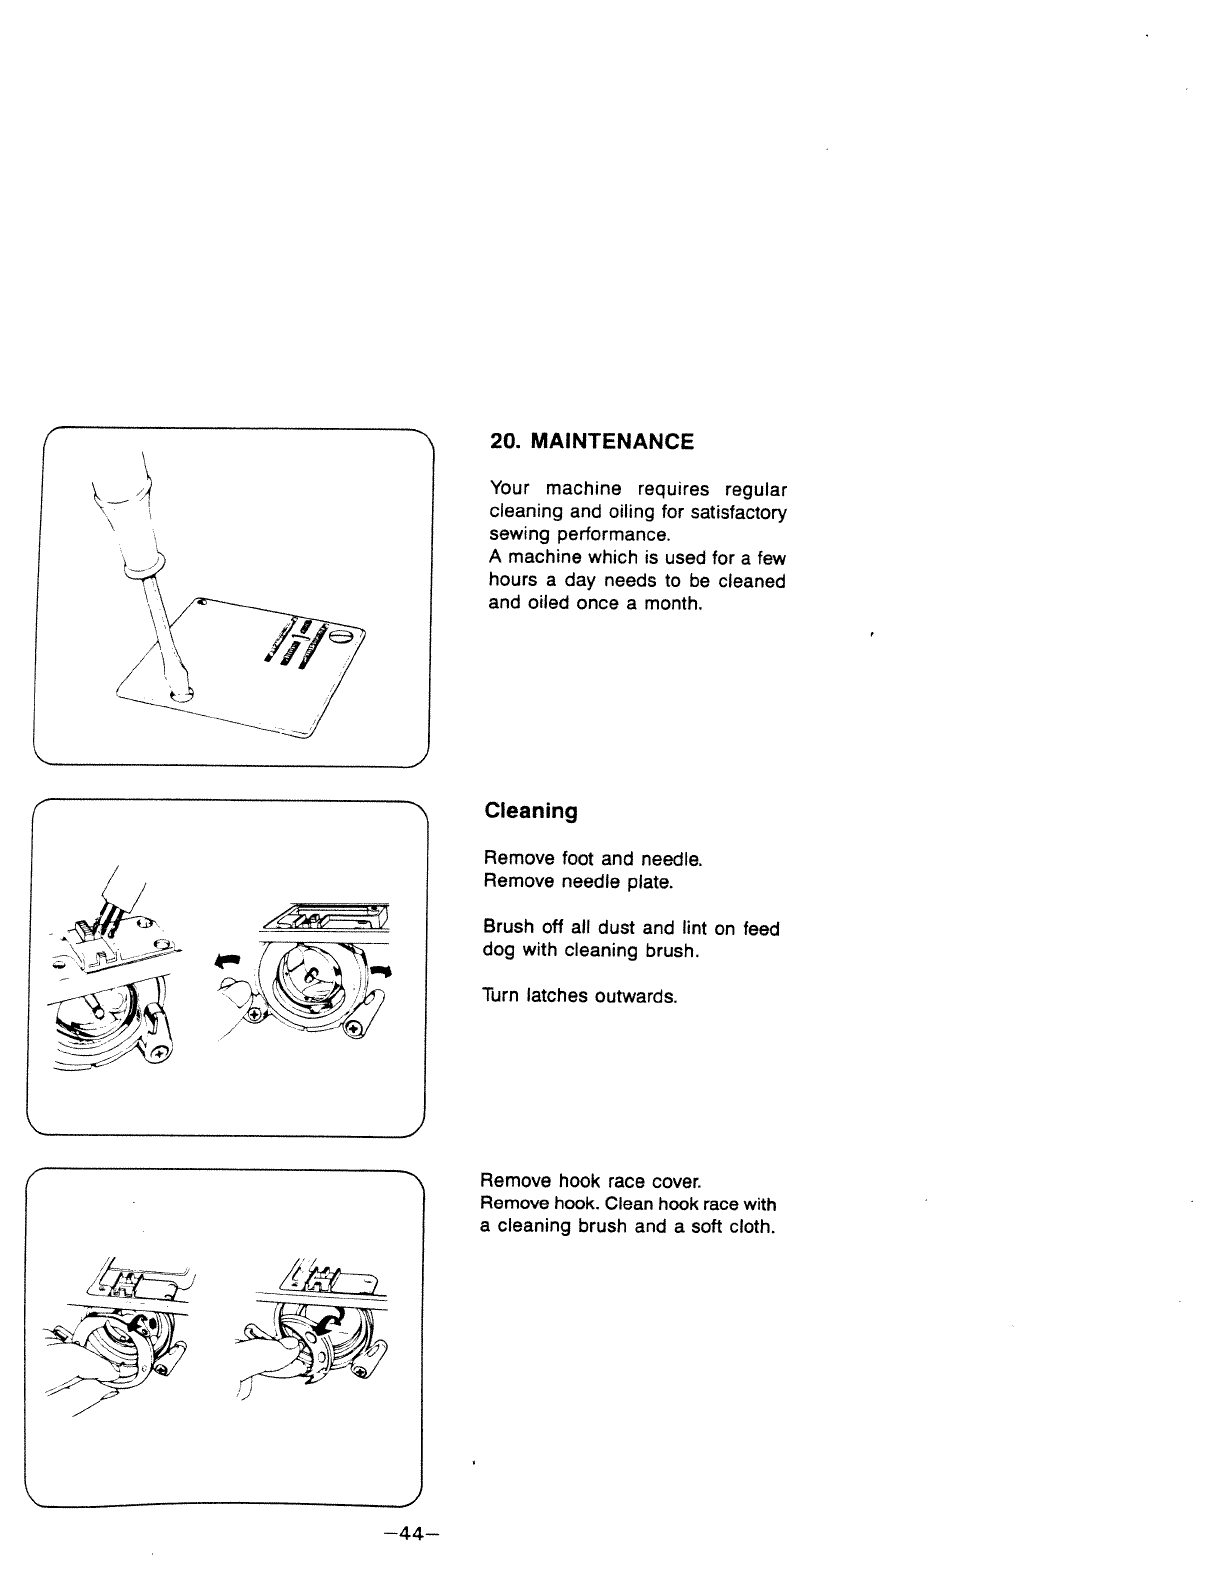
20.
MAINTENANCE
Your
machine
requires regular
cleaning
and
oiling
for
satisfactory
sewing
performance.
A
machine
which
is
used
for
a
few
hours
aday
needs
to
be
cleaned
and
oiled
once
a
month.
/
\
Cleaning
Remove
foot
and
needle.
“
_____
Remove
needle
plate.
Brush
off
all
dust
and
lint
on
feed
dog
with
cleaning
brush.
4
‘I.,’
Turn
latches
outwards.
-
Remove
hook
race
cover.
1
Remove
hook.
Clean
hook
race
with
a
cleaning
brush and
a
soft cloth.
—44—
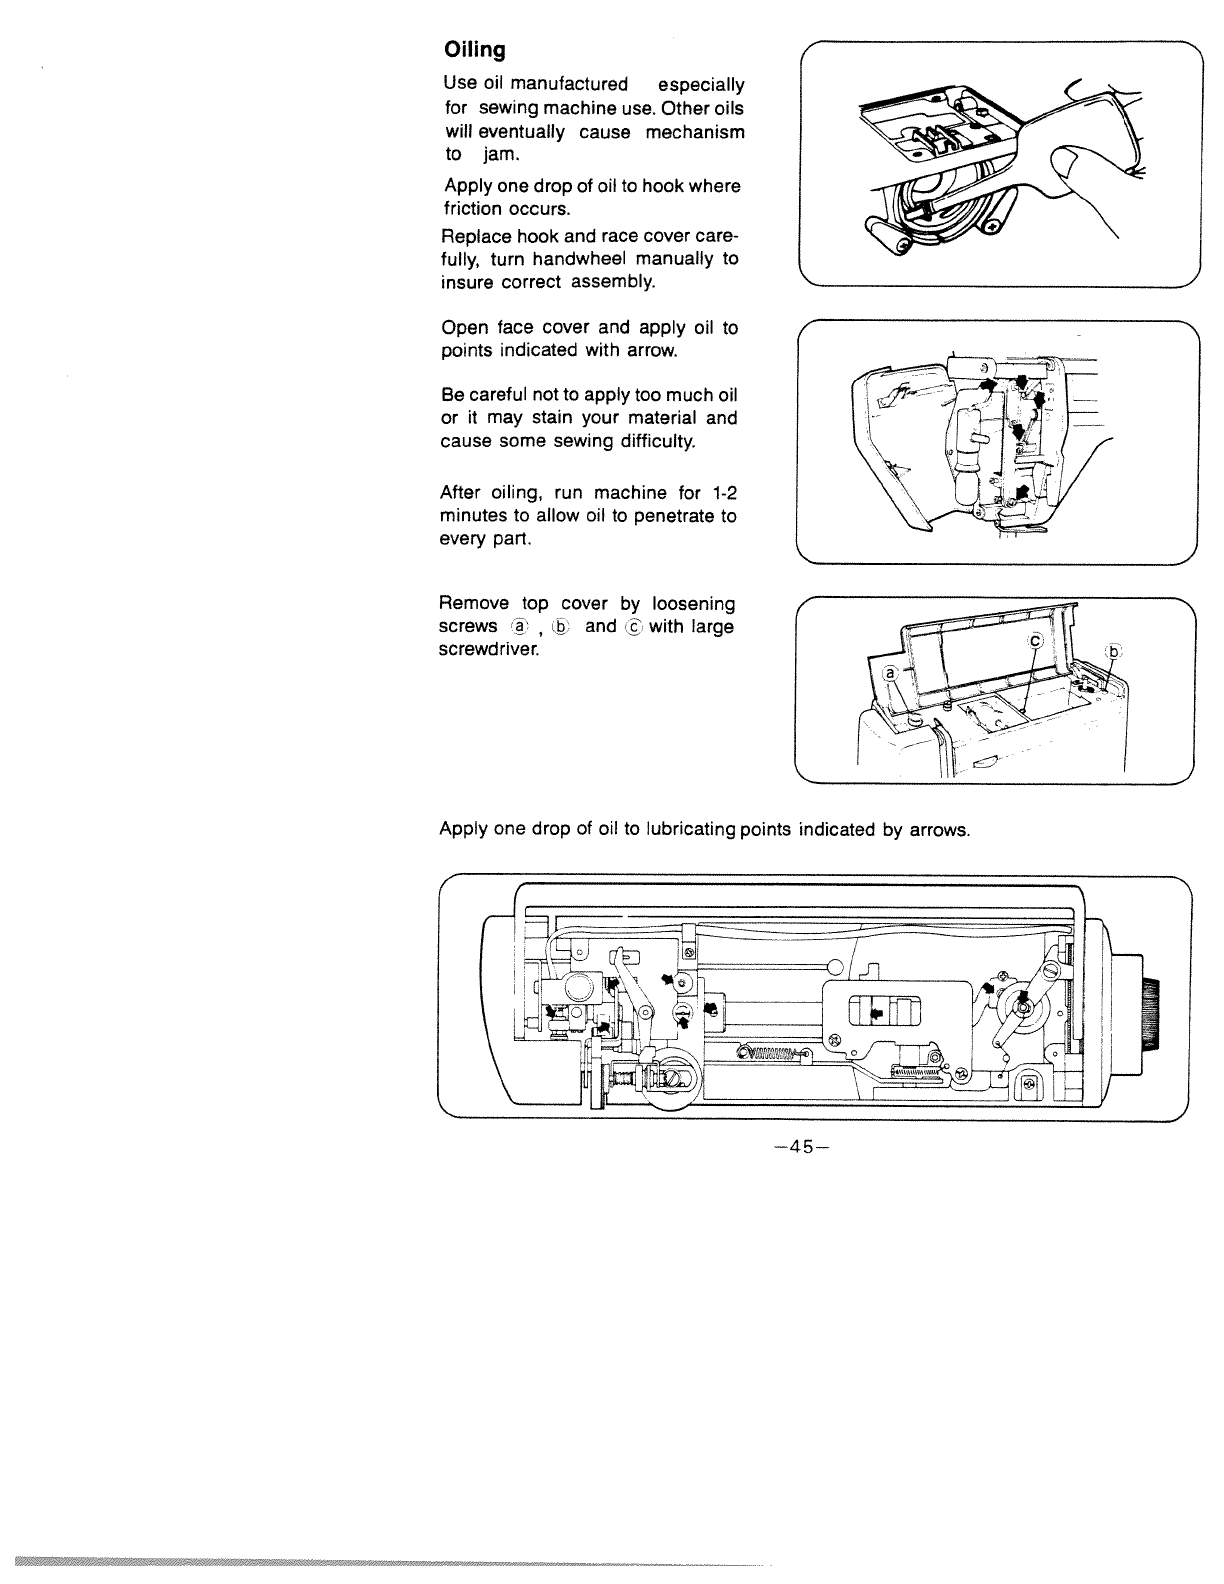
Oiling
Use
oil
manufactured
especially
for
sewing
machine
use.
Other
oils
will
eventually
cause
mechanism
to
jam.
Apply
one
drop
of
oil
to
hook
where
friction
occurs.
Replace
hook
and race
cover
care
fully,
turn
handwheel
manually
to
insure
correct assembly.
Open
face
cover and
apply
oil
to
points
indicated
with
arrow.
Be
careful
not
to
apply
too
much
oil
or
it
may
stain
your material
and
cause
some
sewing
difficulty.
After oiling,
run
machine
for
1-2
minutes
to
allow
oil
to
penetrate
to
every part.
Remove
top
cover
by
loosening
screws
,
and
with
large
screwdriver.
z
-
—
\__
Apply
one
drop
of oil
to
lubricating points
indicated
by
arrows.
—45—
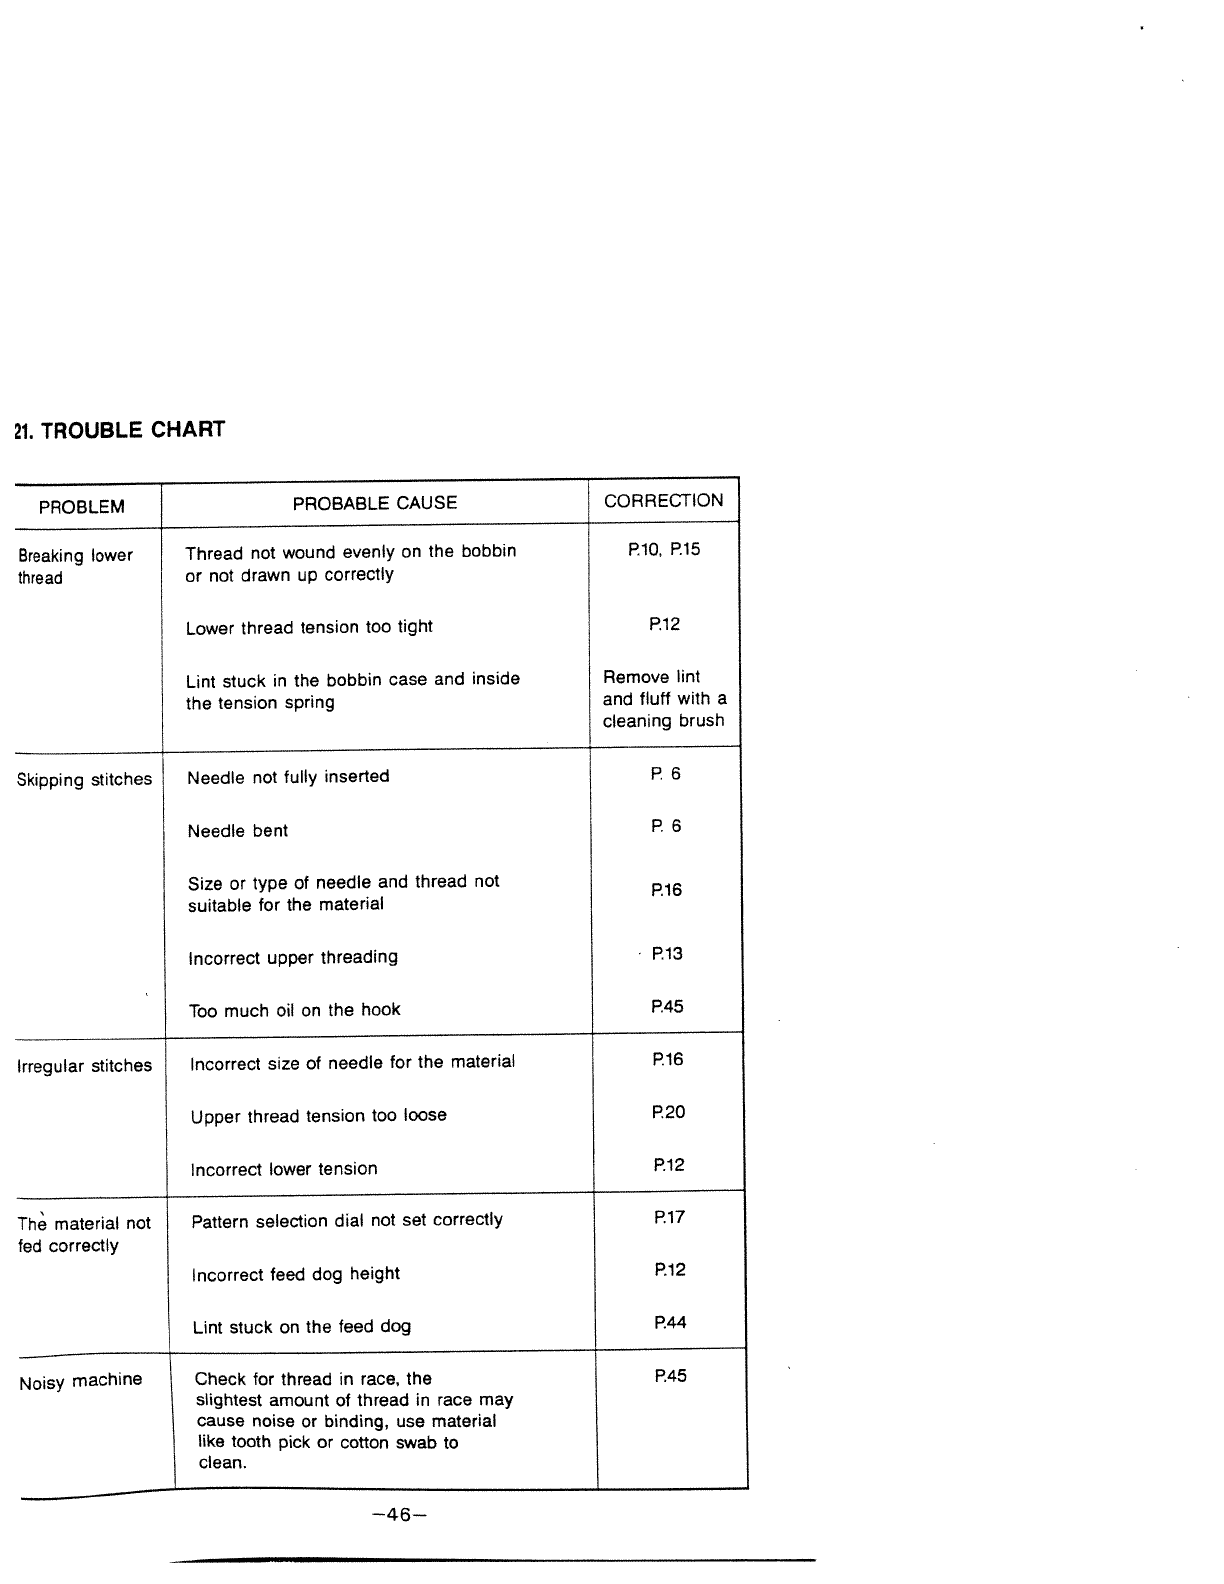
21.
TROUBLE
CHART
PROBLEM
PROBABLE CAUSE
CORRECTION
Breaking
lower
Thread
not
wound
evenly
on
the
bobbin
P10,
P15
thread
or not
drawn
up
correctly
Lower
thread
tension
too
tight P12
Lint
stuck
in
the
bobbin
case
and inside
Remove
lint
the tension
spring and
fluff
with
a
cleaning
brush
Skipping
stitches
Needle
not
fully
inserted
P
6
Needle bent
P
6
Size
or
type
of
needle
and
thread
not
P16
suitable
for
the
material
Incorrect
upper
threading
P13
Too
much
oil
on
the
hook
P45
Irregular
stitches
Incorrect
size
of
needle
for
the
material
P16
Upper
thread
tension
too
loose
P20
Incorrect
lower
tension
P12
Th
material
not
Pattern selection
dial not
set
correctly
P17
fed
correctly
Incorrect
feed
dog
height
P12
Lint
stuck
on
the feed
dog
P44
Noisy
machine
I
Check
for
thread
in
race,
the
P45
slightest
amount
of
thread
in
race
may
cause
noise
or
binding,
use
material
like
tooth
pick
or
cotton
swab
to
clean.
—46—
