manual

BlueConnect
Development Kit
User’s Guide
Document Number: BCDK-UG-012401-1200
Revision 1.7
________________________________________________
WIDCOMM, Inc.
Wireless Internet and Data Communication
© Copyright 2000-2001. All rights reserved.
9645 Scranton Road, Suite 205
San Diego, CA 92121
Voice: (858) 453-8400 Fax: (858) 453-5735
Email : info@WIDCOMM.com or support@WIDCOMM.com
FCC Statement
Widcomm Inc.
9645 Scranton Road, Suite 205
San Diego, CA 92121
858-453-8400
BlueConnect
WDC-WBC-1000
This device complies with part 15 of the FCC Rules. Operation is subject to the following two
conditions: (1) This device may not cause harmful interference, and, (2) This device must accept any
interference received including interference that may cause undesired operation.
Per CFR 47, PART 15, Paragraph 15.21: User changes or modifications not expressly approved by
the party responsible for compliance could void the users authority to operate the equipment.
© Copyright 2000 – 2001, WIDCOMM, Inc. (“WIDCOMM”). All rights reserved. This documentation may be printed and copied
solely in connection with developing products in accordance with the license agreement provided to you with this
documentation. Only two (2) copies of this documentation may be made for archival and backup purposes. Except for the
foregoing, no part of this documentation may be reproduced or transmitted in any form or by any means or used to make any
derivative work (such as translation, transformation or adaptation) without the express written consent of WIDCOMM.
WIDCOMM, the WIDCOMM logo, and BlueConnect are trademarks of WIDCOMM, Inc.
Bluetooth is a trademark owned by the Bluetooth SIG, Inc., and used by WIDCOMM under license.
Handspring and Visor are registered trademarks of Handspring, Inc. HotSync, Palm Computing, and Palm OS are registered
trademarks of Palm, Inc. Microsoft and Windows are registered trademarks of Microsoft Corporation.
Other brand and product names may be registered trademarks or trademarks of their respective holders.
Table of Contents
1 INTRODUCTION ............................................................................................................1
2 REQUIRED MATERIALS..............................................................................................2
3 INSTALLATION AND SETUP ......................................................................................2
3.1 INSERTING AND CONFIGURING THE BLUECONNECT MODULE .....................................2
3.2 CONNECTING TO A REMOTE DEVICE (INQUIRY AND DISCOVERY)................................4
3.2.1 Clients, Servers, and Services.............................................................................4
3.2.2 The Server Mode.................................................................................................5
3.2.3 The Client Mode..................................................................................................6
4 LAUNCHING APPLICATIONS ..................................................................................13
4.1 ON THE SERVER .........................................................................................................13
4.2 ON THE CLIENT..........................................................................................................13
5 CLOSING APPLICATIONS AND COMMUNICATIONS SHUTDOWN ..............14
6 TROUBLESHOOTING .................................................................................................15
6.1 ERROR MESSAGE: COULDN’T OPEN BLUETOOTH LIBRARY......................................15
6.2 BEHAVIOR: DEVICES NEVER CONNECT .....................................................................15
6.3 ERROR MESSAGE: (DURING DISCOVERY PROCESS) CONNECTION FAILED................15
6.4 BEHAVIOR: THE SERVER AND CLIENT DO NOT CONNECT...........................................15
6.5 BEHAVIOR: DISCOVER APPLICATION DOES NOT WORK .............................................15
6.6 BEHAVIOR: STALE ENTRIES ON “DEVICES” SCREEN ................................................17
6.7 BEHAVIOR: STALE ENTRIES ON “SERVICES” SCREEN ...............................................17
6.8 BEHAVIOR: FATAL ERROR WHEN THE REMOVING BLUECONNECT CARD .................18
6.9 BEHAVIOR: “UNABLE TO OPEN THE SERIAL COMMUNICATIONS LIBRARY”..............19

BlueConnect Development Kit User’s Guide
WIDCOMM, Inc. 1
1 Introduction
This document describes the basic procedures for proper use of the BlueConnect module for
the Handspring Visor. is a part of the BlueConnect Development Kit and it describes the
basic procedures for proper use of the BlueConnect module for the Handspring Visor. The
BlueConnect module comes with code libraries and some applications already burned into
ROM. The libraries are:
• Bluetooth – The WIDCOMM Bluetooth API libraries. These appear as Bluetooth
Library and Bluetooth Library 2 on the application info screen of your Visor.
• Discover – The libraries for supporting device discovery. These appear as Discover
Library and Discovery Database on the application info screen of your Visor.
These libraries are loaded into the Visor’s RAM from the BlueConnect module ROM once
the BlueConnect module is plugged into the Visor. Since these applications reside on the
BlueConnect card, they will only show up on the application info screen of your Visor
whenever the BlueConnect card is inserted. If you remove the BlueConnect card, your Visor
will reset and the libraries will vanish. In addition to these libraries, the module also holds the
following applications:
• Bluetooth – allows the user to select serial port and debug options.
• BT-Pong – an amusing game.
• Discover – lets you find other Bluetooth devices and discover services on them.
• WidChat – a sample chat application.
The applications residing on the BlueConnect module ROM can be identified by the fact that
their names have a square bullet icon next to them. An interesting example of this is the
Discover application. The BlueConnect card comes with a Discover application burned into
ROM. If you plug the card into your Visor, you will see an application with the following
icon:
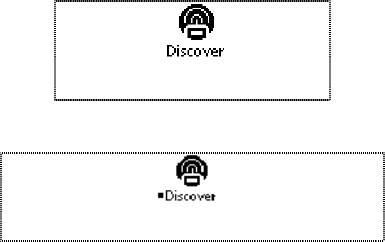
The BlueConnect ROM-based version of Discover
Notice the small square icon next to the word “Discover”. This indicates that the application
resides on the BlueConnect module.
The source code for the Discover application is also supplied in your BlueConnect
development kit. You can compile this application, HotSync it to your visor, and the previous
icon will be replaced by the following:
The RAM-based version of Discover
This does not mean that the application on the BlueConnect module ROM was erased. You
have merely overwritten the copy of Discover that resided in the Visor RAM. The fact that
there is no longer a box icon next to the word “Discover” indicates that this is an application
BlueConnect Development Kit User’s Guide
WIDCOMM, Inc. 2
that resides solely in Visor RAM. Applications that reside on Visor RAM take precedence
over the same applications that reside on the BlueConnect module’s ROM.
You could easily restore the ROM resident copy of Discover by deleting the RAM resident
copy using the Palm OS interface. Once the RAM resident application was removed, you
would once more be able to see the ROM based application on your visor screen:
.
Deleting the RAM-based Discover will restore this
2 Required Materials
The minimum requirements for use of the BlueConnect module are one BlueConnect module
with firmware version 2.2 or higher, one Handspring Visor with 120K of available memory,
and a second, suitable (Bluetooth enabled) device for remote connection.
3 Installation and Setup
3.1 Inserting and Configuring the BlueConnect Module
Insert the BlueConnect module into the Handspring Visor Springboard slot.
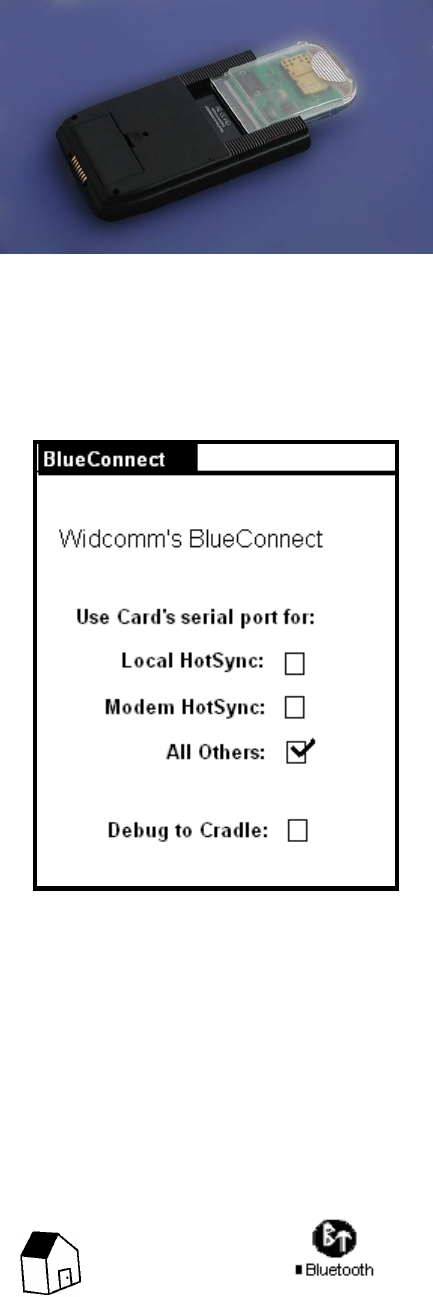
The BlueConnect card has two sides. The front of the card has two positioning ridges just
below the curved top of the card. When holding the Visor with the screen facing you, the
card must be inserted with Widcomm sticker facing you, and the beveled side away. The
card should be seated firmly with the bottom of the beveled edge of the card touching the top
of the Springboard expansion slot.
Front view of the
BlueConnect module
Positionin
g
rid
g
es
BlueConnect Development Kit User’s Guide
WIDCOMM, Inc. 3
Once the card is inserted, the applications and libraries that reside in the BlueConnect card’s
ROM will be loaded into the RAM, which resides on your Visor. The BlueConnect welcome
application will launch.
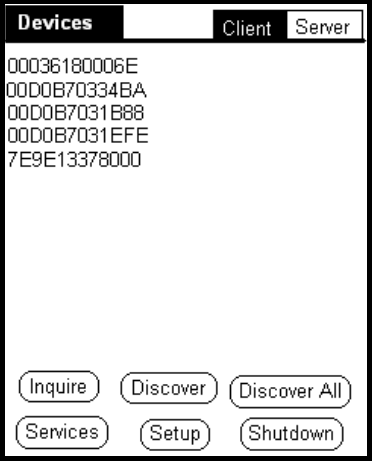
This application allows the user to select serial port and debug options. The application will
launch with the “All Others” option selected. This is the default and should be selected for
normal operation. The Local and Modem HotSync options are for HotSync over Bluetooth.
To HotSync the Visor to a PC using the Generic Serial service, select the Local HotSync
option.
To HotSync the Visor to a remote PC using the Dialup Networking service, select the Modem
HotSync option.
After selecting the desired options, tap the “Home” silkscreen to return to the Visor’s main
menu. To return to this application at any time, tap the “Bluetooth” icon as shown below:
The “Home” Silkscreen The “Bluetooth” Icon

BlueConnect Development Kit User’s Guide
WIDCOMM, Inc. 4
3.2 Connecting to a Remote Device (Inquiry and Discovery)
3.2.1 Clients, Servers, and Services
The term “Bluetooth wireless technology” refers to a standard for the wireless exchange of
data between two devices. In order to exchange data, two Bluetooth devices must establish a
connection to one another. There are two sides to every connection and two roles that every
device can fulfill.
Before a connection is established, one device must request the connection from another. It is
just like two people starting a conversation. One person must initiate the conversation and the
other person must respond. In the Bluetooth wireless technology world, the same rules apply.
One device begins by requesting a connection from another device. The other device can then
accept the connection or reject it. The device that initially requests a connection is known as
the client. The device that accepts or rejects the connection is known as the server. An easy
way to remember this is to think of a restaurant: the client comes in and requests services
from the server.
These roles are fundamental and important from an operational standpoint. A Bluetooth
wireless technology device can act as either a client or a server – it depends on whether the
device is prepared to take an active or passive role. By definition, the client takes an active
role in any exchange of data. In order to be a client, a Bluetooth device must run a software
program that will request a connection to another device as part of its normal operation. In
other words, a client device must “do something” before any connection can be established.
Becoming a client normally requires an active decision on the part of the device operator.
The role of server, however, is passive. Every Bluetooth wireless device must be prepared to
respond to connection requests at all times. As a result, there must be some kind of software
that is always running on each Bluetooth device that is prepared to respond to connection
requests from remote clients. The software that allows a device to act as a server is known as
a service. Services run as a background task.
To configure the Visor for use in a specified mode, tap the “Discover” icon.
Upon launching this application for the first time, the Bluetooth software will self-initialize.
This process will take about four seconds, after which the user will be presented with the
devices screen.
BlueConnect Development Kit User’s Guide
WIDCOMM, Inc. 5
3.2.2 The Server Mode
3.2.2.1 Bluetooth Device Addresses and Device Names
The designers of the Bluetooth standard had to create a way of telling one Bluetooth device
from another. In order to do this, they created a unique Bluetooth Device Address (BDA) that
could be assigned to every Bluetooth device. This address consists of a forty-eight-bit binary
value that is often displayed in hexadecimal format. This address is fixed when the device is
manufactured and cannot be changed by the user.
A valid BDA: 00D0B7032E9F
This is fine when one Bluetooth device is talking to another, but it is not easy for us (as
human beings) to relate to. Fortunately, the designers of the Bluetooth wireless technology
standard supplied an alternative. Each Bluetooth device can also be assigned a user-friendly
name that will distinguish it from the other Bluetooth devices in the vicinity. This name is
fully programmable and you can select any name for your device that you wish. Here are
some examples:
A valid user-friendly name: Bob’s PC
A valid user-friendly name: John Q. Public’s PDA
These names make it easy for you to recognize the PCs belonging to your friends,
acquaintances, and business associates. If you wanted to transfer a business card to an
associate named John Q. Public, you could easily locate them in the list shown above.
The “Setup” screen of the Discover application lets you set a valid-user friendly name for the
Visor and also lets you see the Visor’s BDA.
Tap the Discover icon to enter the discover application. Then tap the “Setup” button to enter
the configuration screen.
BlueConnect Development Kit User’s Guide
WIDCOMM, Inc. 6
Here, you can:
• View the module’s Bluetooth Device (BD) address. “00-D0-B7-03-24-55” in the
example shown above.
• Enter a device name—a human readable name to identify the device. “My
BlueConnect” in the example shown above.
• Set the connection mode (Client or Server). The selected connection mode is viewed
as white text on a black background. To change connection mode, tap within the
desired mode box.
If the device has been configured for server use, an alert will appear with the message “Visor
started successfully as server.” This alert may also appear when launching the Discover
application if the Visor was last used in Bluetooth Server mode. Clear the alert by tapping the
“OK” button.
Once your Visor has been configured as a server, no other action on your part is required.
Your BlueConnect device will advertise its available services to all other Bluetooth units that
are within range. These remote devices are then free to connect to the available services on
your Visor.
3.2.3 The Client Mode
If you receive the message “Visor started successfully as server” upon launching discover, the
device is currently in server mode. You must return the device to client mode before you can
attempt to initiate a connection to a remove device. Tap the “Setup” button and then tap
“Client.” And alert will appear with the message “Visor closed as server. Client services
only.” Clear the alert and tap the “Devices” button to return to the devices screen.
BlueConnect Development Kit User’s Guide
WIDCOMM, Inc. 7
3.2.3.1 Inquiry (Displaying Nearby Bluetooth Devices)
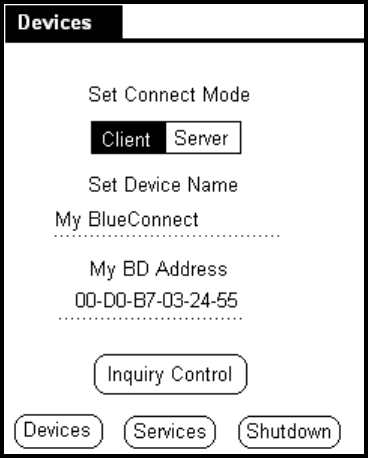
The devices screen displays a list of nearby Bluetooth devices that are within range of your
unit.
IMPORTANT NOTE: The Discover application stores the results of the last inquiry and
discovery process, and these results will appear on the devices screen. To make sure that only
currently available devices are displayed, tap the “Inquire” button. Depending on the number
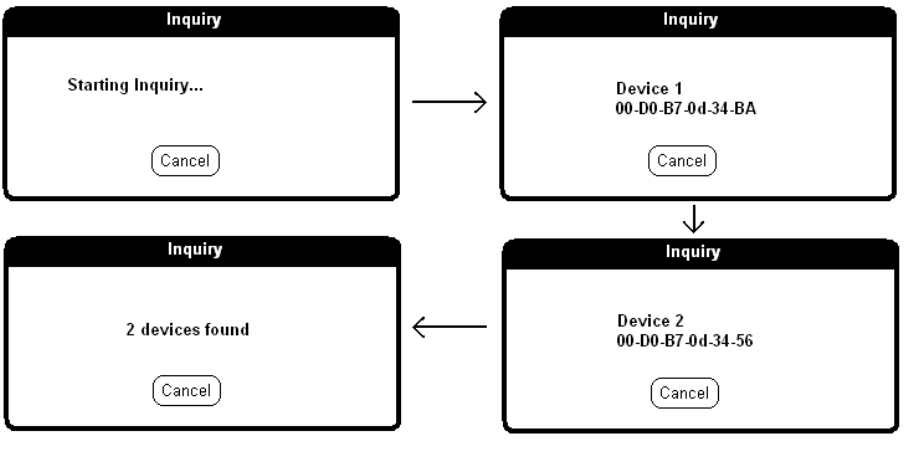
of available devices, a series of notices will appear showing the number of Bluetooth devices
found, as well as displaying their BD addresses as shown below:
After the inquiry process is complete, these addresses will be listed according to the order in
which they were found.
BlueConnect Development Kit User’s Guide
WIDCOMM, Inc. 8
3.2.3.2 Viewing devices by BD Address or Device Name
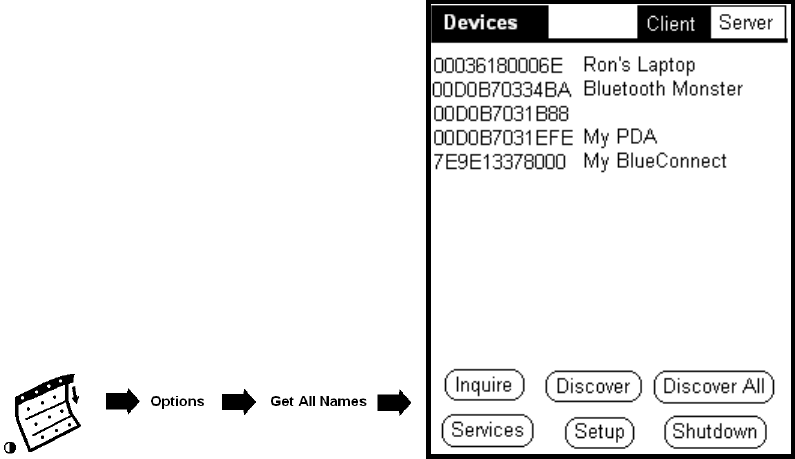
In the devices screen you can choose to view devices by the BD Address or by the device
name. To view the devices by their device names, tap on the “menu” silkscreen and from the
“Options” menu bar select the “Get Name” item (to retrieve the name of the currently selected
address) or the “Get All Names” item (to retrieve the device names of all of the devices on the
display).
The device names that correspond to the BD Addresses will be shown. If the device name
could not be retrieved then only the BD Address will be shown.
NOTE: These device names will be saved in the database and can be used when viewing
services (see Section 3.2.3.6: Viewing Services by BD Address or Device Name).
BlueConnect Development Kit User’s Guide
WIDCOMM, Inc. 9
3.2.3.3 Service Discovery
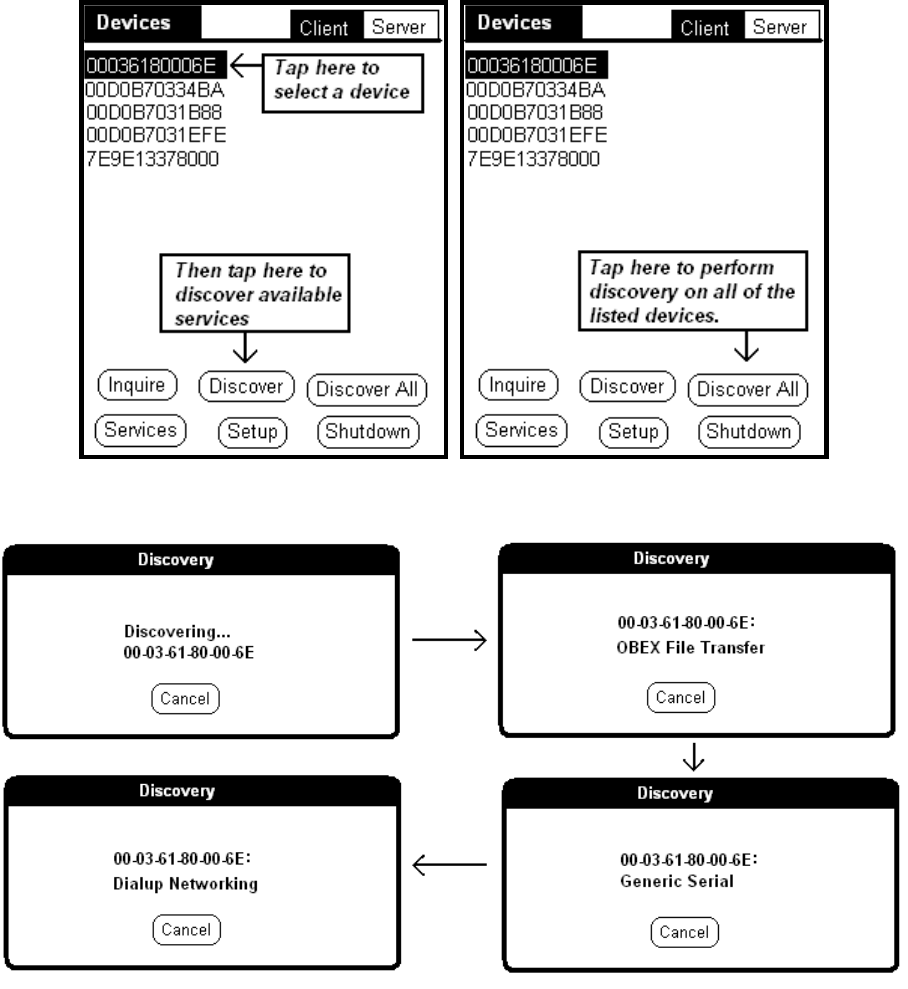
To discover the available services on a remote Bluetooth device, tap the desired device
address to highlight it, then tap “Discover.”
If the device is available for discovery, a series of notices will appear, briefly displaying the
names of available services.
When the discovery process is complete, the display will change to the services screen.
BlueConnect Development Kit User’s Guide
WIDCOMM, Inc. 10
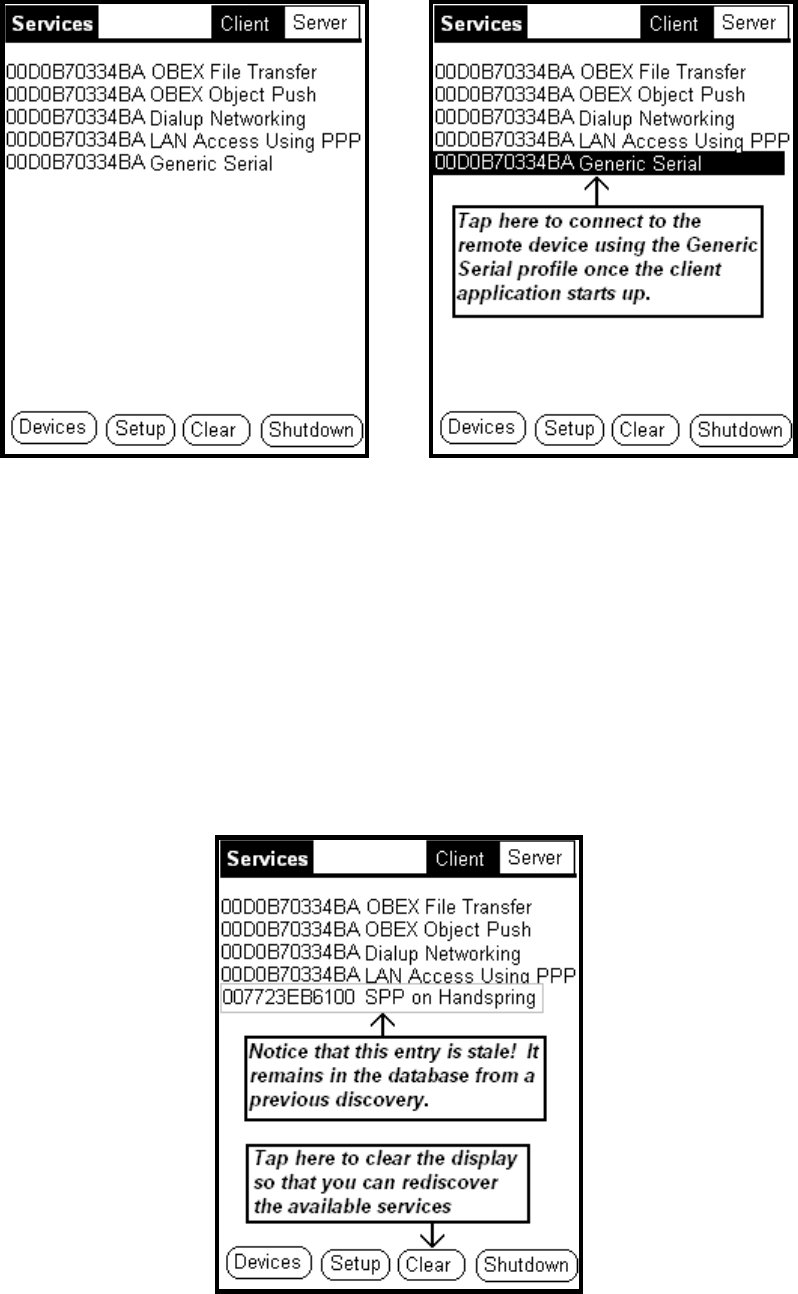
Tap the desired service to highlight it and the client configuration process is complete.
IMPORTANT NOTE: Selecting the remove service does not actually connect to the remote
device at this point. You will not connect until you leave the client setup and run an
application that attempts to access the remote unit using the generic serial service.
3.2.3.4 Clearing the Services Database
Services remain in the service discovery database until you tap the “Clear” key. If you see
services from devices other than the one that you originally selected, it would be wise to clear
the database and rediscover the device.
BlueConnect Development Kit User’s Guide
WIDCOMM, Inc. 11
3.2.3.5 Keeping Some Services While Clearing the Rest
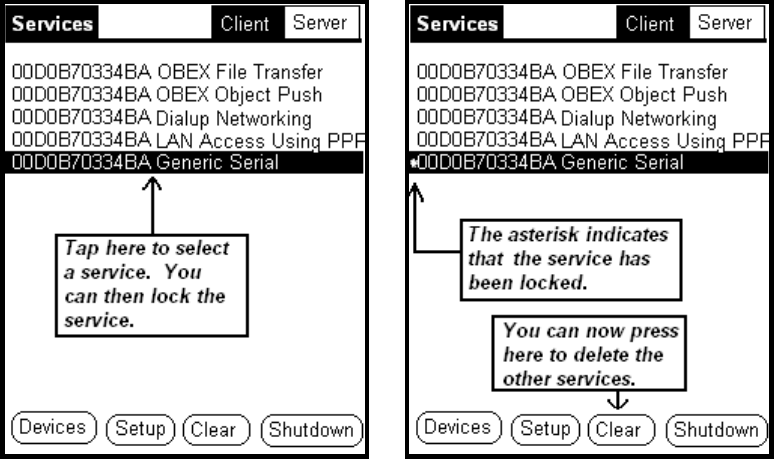
To keep the services that you want in the database, select the service and tap the menu
silkscreen while on the “Services” screen. From the “Options” menu bar select the “Lock
Service” menu. Locked services have a star, or asterik, (*) before the device name or device
address.
You can then press the “Clear” button. All services that are not locked are deleted from the
Discover database. Services that are locked will remain in the database. To unlock a service,
just select the service, tap the “menu” silkscreen and from the “Options” menu bar select the
“Unlock Service” item.
BlueConnect Development Kit User’s Guide
WIDCOMM, Inc. 12
3.2.3.6 Viewing Services by BD Address or Device Name
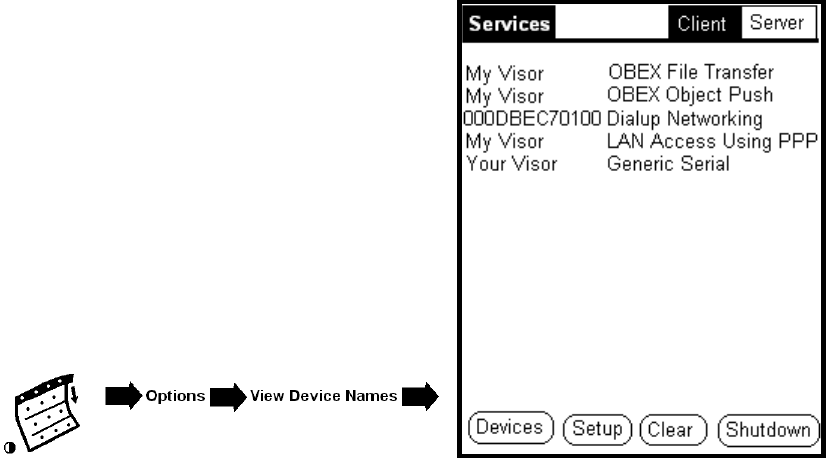
In the services screen you can choose to view devices that host a particular service either by
the device’s BD Address or by the device’s name. To view the devices by their device names,
tap on the “menu” silkscreen and from the “Options” menu bar select the “View Device
Names” menu. The device names that correspond to the BD Addresses will be shown if they
are in the database. If the database does not contain a corresponding device name then only
the BD Address will be shown. You can revert back to device addresses on the “Services”
screen by selecting the “View BD Addresses” menu.
In the example shown above, notice that some services are tagged with the device name and
some with the BD address.
IMPORTANT NOTE: The device names can only be displayed if they are currently stored
in the Visor discovery database. To load the discovery database, use the “Get All Names”
function from the “Devices” screen. See Section 3.2.3.2: Viewing devices by BD Address or
Device Name for information on how to do this.
BlueConnect Development Kit User’s Guide
WIDCOMM, Inc. 13
4 Launching Applications
BlueConnect on the Visor is designed to operate using the Generic Serial profile.
Applications which use the Handspring serial library to communicate through the default
serial port can transfer data between two Bluetooth wireless technology devices just as if they
where connected by a modem or other serial device. Any application that is capable of using
regular Handspring serial I/O library calls may be used to talk to another Bluetooth device in
this manner.
You can communicate using BlueConnect by using the following sequence.
4.1 On the Server
IMPORTANT NOTE: The Server device should start the application before the Client
device.
1) Using the Discover application, configure your unit to the role of Server.
2) Tap the “Home” silkscreen to return to the main menu
3) Tap the icon of the desired application.
For normal applications, a status window will appear with the message “Status: Waiting for
Connection” (or similar – this is application specific) followed by a spinning activity
character. At this point the client should try to connect.
4.2 On the Client
IMPORTANT NOTE: The Server device should start the application before the Client
device.
1) Using the Discover application, configure your unit to the role of client. Discover the
Generic Serial service on the remote unit and select it on the Services screen.
2) Start the application on the remote server device.
3) On your local device (the client), tap the “Home” silkscreen to return to the main
menu
4) Tap the icon of the desired application.
A status window will appear with the message “Status: Waiting for Connection” (or similar –
this is application specific) followed by a spinning activity character. At this point the two
applications should connect.
When the connection is established, the client device will emit a series of tones to signify a
successful connection. Both devices will then be available for use of the application. For an
example please refer to the BlueConnect Development Kit Quick Start Guide.

BlueConnect Development Kit User’s Guide
WIDCOMM, Inc. 14
5 Closing Applications and Communications Shutdown
The application may be terminated at any time by either device by tapping the “Home”
silkscreen.
The “Home” Silkscreen
When no further Bluetooth communications are needed, it is recommended that power be
removed from the device – since this powers down your BlueConnect card, it will preserve
battery life on your Visor. This may be done by either removing the module from the
Springboard slot or, if the module is to remain in the slot, by shutting down Bluetooth
services.
To shut down Bluetooth services, tap the “Discover” icon. Then tap the “Shutdown” button.
The application will perform necessary tasks to power down the BlueConnect module and
will then return to the main menu. This process takes approximately two seconds.
BlueConnect Development Kit User’s Guide
WIDCOMM, Inc. 15
6 Troubleshooting
6.1 Error Message: Couldn’t Open Bluetooth Library
Possible cause: A device has not been selected in the “Devices” screen of the Discover
application. Or a service has not been selected in the “Services” screen of the Discover
application.
Solution: In the Discover application, tap “Inquire.” This will refresh the list of available
devices. Select a device and tap “Discover.” Make sure a service is highlighted before
returning to the main menu.
6.2 Behavior: Devices never connect
Description: Both devices show “Status: Waiting for Connection” but never connect.
Possible cause: The client application started before the server application
Solution: Tap “Cancel” to end waiting (disregard the resulting serial library error) and retry.
Start the server application first, and then start the client application.
6.3 Error Message: (During Discovery process) Connection Failed
Possible causes: The remote Bluetooth device powered on but its Bluetooth software is not
enabled. The remote device may not be configured for server operation.
Solution: Make sure that remote Bluetooth device’s host computer has Bluetooth software
installed and enabled. You may need to check the remote device’s software documentation to
find out the correct procedure for installing and enabling Bluetooth software. Also, verify in
Discover application’s setup screen that the remote device is configured for server operation.
6.4 Behavior: The server and client do not connect
Possible causes: The incorrect service (or no service) is selected on the client
Solution: Make sure that the service that the client is trying to connect to has been selected in
the “Services” screen of the Discover application. Many devices may have the same service
on them. You have to make sure that the service that you have chosen is on the device that
you want to connect to.
6.5 Behavior: Discover Application does not work
Possible causes: The correct version of the Discover application is not loaded into Visor
RAM.
Solution: The correct version of the Discover application needs to be loaded onto the Visor.
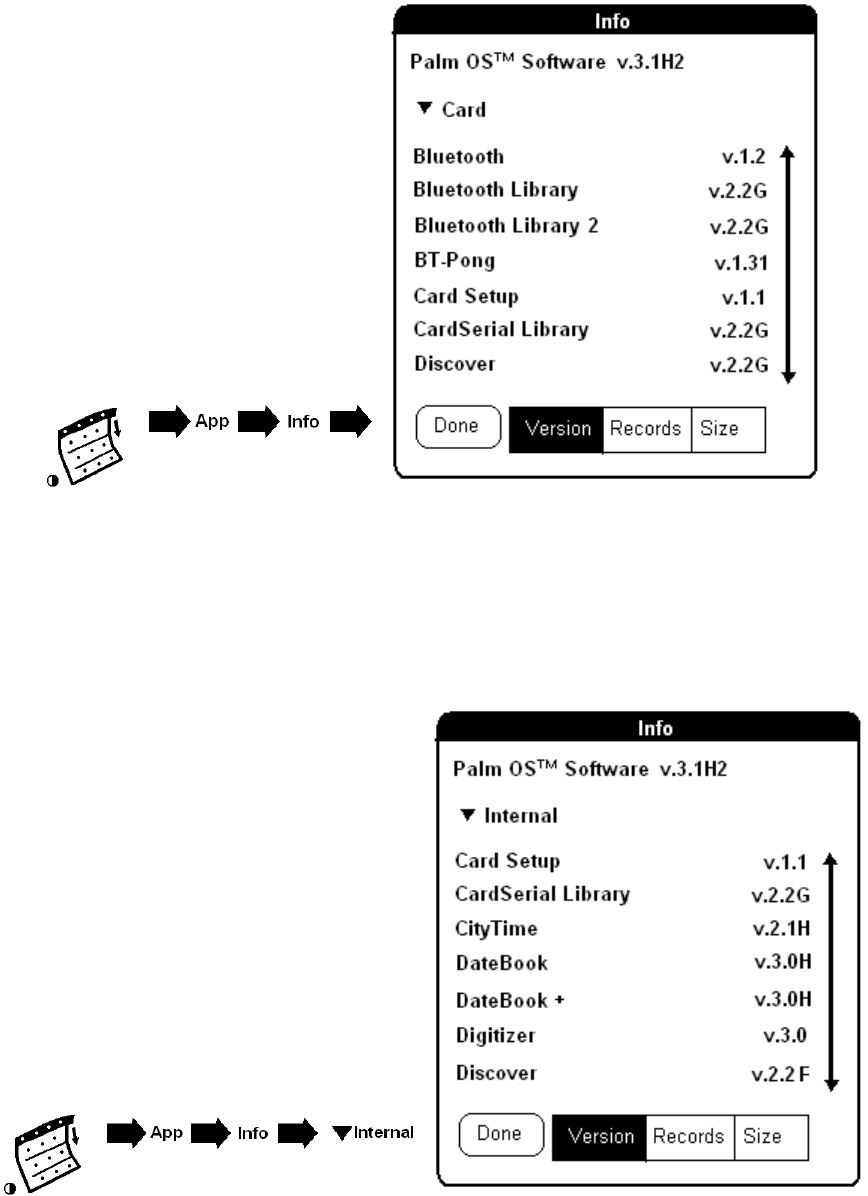
To read the version number of the ROM-based Discover application that resides on the
BlueConnect card, tap the “Menu” silkscreen in the main menu. In the “App” menu bar
choose the “Info” menu. This will take you to the “Info…” screen. Choose “Card” from the
pop - up trigger that by default shows “Internal”. Now, tap on the Version button to view the
version numbers of all the software on the BlueConnect module. Look for the “Discover”
entry.
BlueConnect Development Kit User’s Guide
WIDCOMM, Inc. 16
Reading the version number of the BlueConnect ROM-based Discover
To read the version number of the RAM-based Discover application that has been HotSynced
to the Visor (if any), tap the “Menu” silkscreen in the main menu. In the “App” menu bar
choose the “Info” menu. This will take you to the “Info…” screen. Choose “Internal” from the
pop-up trigger that by default shows “Internal”. Now, tap on the Version button to view the
version numbers of all the software on the BlueConnect module. Look for the “Discover”
entry.
Reading the version number of the Visor RAM-based Discover
You can delete a RAM resident Discover application and return to the version of Discover
that is already on the BlueConnect module ROM. To delete the application tap the “Menu”
silkscreen in the main menu. In the “App” menu bar choose the “Delete” menu. This will take
BlueConnect Development Kit User’s Guide
WIDCOMM, Inc. 17
you to the “Delete” screen. Select the Discover application and tap on the “Delete” button to
delete it.
An application that resides on Visor RAM takes precedence over the same application
residing on BlueConnect module ROM. You can tell whether the Discover application that
you are using has been HotSynced to the Visor is has been loaded from the BlueConnect
ROM by examining the application icon:
The RAM-based version of Discover
.
Deleting the RAM-based Discover will restore this
Notice the small square icon next to the word “Discover”. This indicates that the application
resides on the BlueConnect module.
6.6 Behavior: Stale Entries on “Devices” Screen
Description: The “Devices” screen of the Discover application shows Bluetooth wireless
technology devices that are no longer valid or no longer within range.
Solution: Tap the “Inquire” button. These device addresses are stored in a database in your
Visor and will not be cleared until you force the unit to re-inquire.
6.7 Behavior: Stale Entries on “Services” Screen
Description: The “Services” screen of the Discover application shows Bluetooth services
that are no longer valid or reside on devices other than the one that you performed the
discovery operation on.
Solution: Tap the “Clear” button. These services are stored in a database in your Visor. This
database should be cleared before you discover services on another device. Once the display
has been cleared, you can retry the discovery operation – this will result in a more accurate
list of available services.
BlueConnect Development Kit User’s Guide
WIDCOMM, Inc. 18
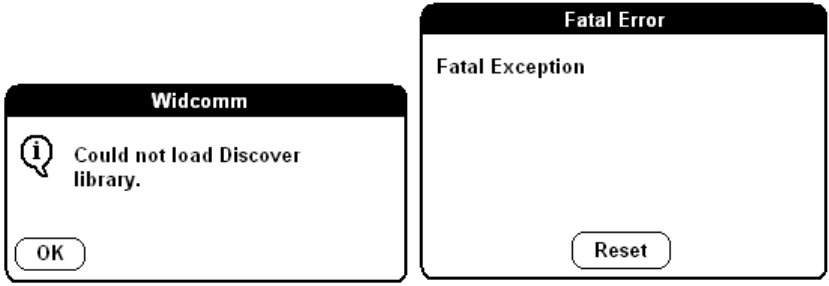
6.8 Behavior: Fatal Error when the Removing BlueConnect Card
Description: When you are running the Discover application and remove the BlueConnect
card from the slot, the Discover application generates a fatal run-time error. You see the
following two displays:
Cause: You are running the Discover sample application which you have HotSynced to your
Visor.
Reason: The Discovery and Inquiry routines have been extracted from the Discover
application and now reside in the Discover Library. This library resides on the BlueConnect
module ROM and is loaded into the Visor RAM when the card is inserted into the Visor. The
library is unloaded when the card is removed from the Visor.
In most cases, this behavior will not effect you. It does, however, have an effect when you
are running the Discover sample application. Normally, you will use the Discover application
that is loaded from the BlueConnect ROM. If you run this Discover application and pull the
BlueConnect card from the slot, the application will disappear and the unit will immediately
reset.
This is not true if you HotSync your compiled sample Discover application onto your Visor.
The sample application will override the version that is loaded from the BlueConnect ROM.
When you remove the BlueConnect card from the slot, the RAM resident Discover
application will not immediately disappear. Without access to the Discover Library that
resides in BlueConnect ROM, the sample application will generate a fatal run-time error.
This is an expected behavior and is not the result of a fault in your BlueConnect hardware or
software.
Solution: Delete the RAM resident copy of the Discover application. This will restore the
ROM-resident application from your BlueConnect card and will prevent this problem from
reoccurring.
BlueConnect Development Kit User’s Guide
WIDCOMM, Inc. 19
6.9 Behavior: “Unable to Open the Serial Communications
Library”
Description: Insert the BlueConnect card into the Visor and run the BT-Pong sample
application. The application hangs in the “Starting Pong” mode and then returns “BT-Pong
IO Error, Unable to Open the Serial Communications Library”.
Solution: You must run the “Discover” application must be run before using any of the
sample applications. For further information, see the BlueConnect Development Kit
Programmer’s Guide.