Widex A S C49 C4-9 Hearing Aid User Manual 9 514 0135 001 01 indd
Widex A/S C4-9 Hearing Aid 9 514 0135 001 01 indd
manual

User instrUctions
The clear™440 SerieS
c4-9
behind-the-ear
Contents
THANKYOU..........................................
THEHEARINGAID ......................................
RIGHTLEFTIDENTIFICATION . . . . . . . . . . . . . . . . . . . . . . . . . . . .
ACOUSTICINDICATORS .................................
THEBATTERY ..........................................
INSERTINGTHEBATTERY .............................
LOWBATTERYINDICATION...........................
TURNINGTHEHEARINGAIDONANDOFF. . . . . . . . . . . . . . . .
VOLUMEADJUSTMENT.................................
LOSTPARTNERALARM.................................
LISTENINGPROGRAMS.................................
SWITCHINGBETWEENTHELISTENINGPROGRAMS . . . . .
ZEN...............................................
USINGATELEPHONE ..................................
HEARINGAIDWITHANEARMOULD. . . . . . . . . . . . . . . . . . . . . .
POSITIONINGTHEHEARINGAIDANDEARMOULD . . . . . . . .
REMOVINGTHEHEARINGAIDANDEARMOULD . . . . . . . . . .
HEARINGAIDWITHANINSTANTEAR-TIP . . . . . . . . . . . . . . . .
RIGHTLEFTIDENTIFICATION . . . . . . . . . . . . . . . . . . . . . . . . . . .
POSITIONINGTHEHEARINGAIDANDINSTANTEAR-TIP . . .
THEANCHOR .........................................
REMOVINGTHEHEARINGAIDANDINSTANTEAR-TIP . . . . .
HEARINGAIDWITHACUSTOMEAR-TIP. . . . . . . . . . . . . . . . . .
RIGHTLEFTIDENTIFICATION . . . . . . . . . . . . . . . . . . . . . . . . . . .
POSITIONINGTHEHEARINGAIDANDCUSTOMEAR-TIP . . .
THEANCHOR .........................................
REMOVINGTHEHEARINGAIDANDCUSTOM
EAR-TIP...............................................
2 3
Your widex Clear™440
hearing aid
(To be filled out by the hearing care professional)
Date: ___________________________________
Battery size: _____________________________
Ear-set:
Earmould
Instant ear-tip
Custom ear-tip
Ear-tip size: Left _____ Right _____
Tubing size: Left _____ Right _____

CLEANING............................................
THEHEARINGAID .....................................
THEEAR-SET..........................................
THEEARMOULD ....................................
THEINSTANTANDCUSTOMEAR-TIPS . . . . . . . . . . . . . . . . .
ASSEMBLINGTHEEAR-SET-INSTANTEAR-TIP . . . . . . . . .
ASSEMBLINGTHEEAR-SET-CUSTOMEAR-TIP . . . . . . . . .
ACCESSORIES.........................................
INCASEOFMALFUNCTION .............................
CARINGFORYOURHEARINGAID. . . . . . . . . . . . . . . . . . . . . . . .
GOODADVICEANDWARNINGS . . . . . . . . . . . . . . . . . . . . . . . . .
REGULATORYINFORMATION............................
4 5
thank You...
...for choosing a Widex hearing aid.
Your hearing aid is designed with high-quality sound,
ease, comfort and freedom of choice in mind.
We hope you will be pleased with your new Widex
hearing aid.
IMPORTANT
This booklet contains important information and instructions.
Please read this booklet carefully before you start using the hear-
ing aid.
Your hearing aid, ear-set and accessories may not look exactly as
illustrated in this booklet. We also reserve the right to make any
changes considered necessary.
6 7
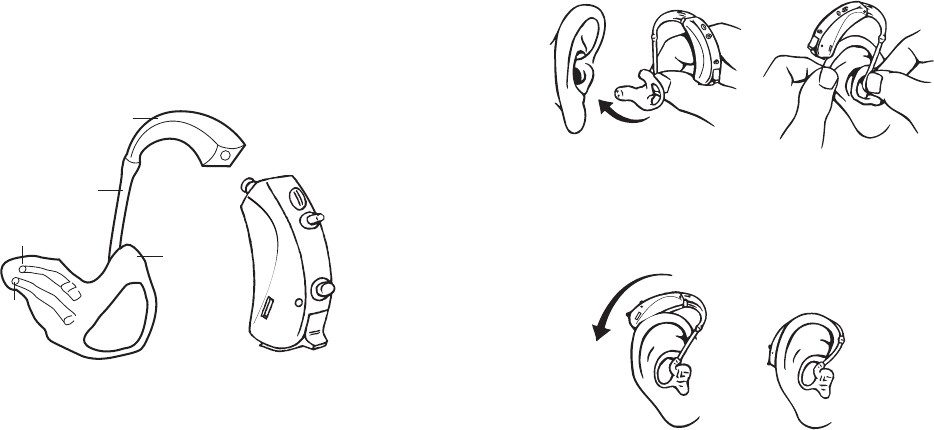
the hearing aid
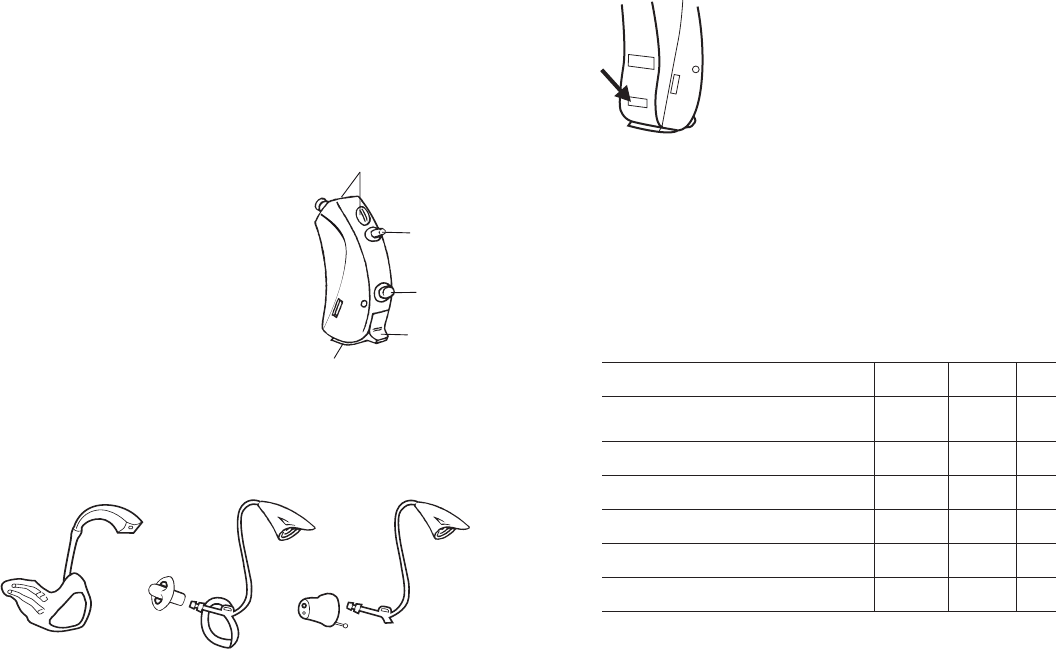
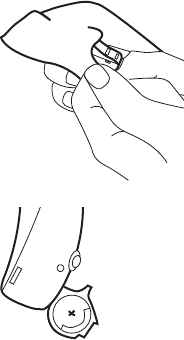
The illustration below shows the hearing aid without
the ear-set.
1. Microphone openings
2. Volume control (optional)
3. Program button
4. On/off switch
5. Battery drawer with nail grip
Below, your hearing care professional can tick the
ear-set solution chosen for you.
Earmould Instant ear-tip Custom ear-tip
RIGHT/LEFT IDENTIFICATION
The arrow shows the position of the
identification mark (red mark = right
and blue mark = left).
ACOUSTIC INDICATORS
The hearing aid may be set to produce a signal to in-
dicate the use of certain functions. The signal may be
a spoken message or tones adjusted by the hearing
care professional in consultation with you. The signal
can also be deactivated.
Adjusting volume Tone* Off
Confirming program button use Clicking
sound Off
Changing program Message Tones Off
Starting up the hearing aid Message Tone Off
Warning about low battery Message 4 tones Off
Warning about lost partner Message Off
Service reminder Message Off
* bold indicates standard setting
1
2
3
4
5
8 9
THE BATTERY
We recommend zinc-air batteries. Use a size 13 bat-
tery for the hearing aid.
To obtain replacement batteries, please consult your
hearing care professional. It is important to take note
of the expiry date and the recommendations regard-
ing disposal of used batteries on the battery pack.
INSERTING THE BATTERY
Before inserting a new battery into the
hearing aid, remember to remove the ad-
hesive tab. Once the tab has been re-
moved, the battery will start functioning
after a few seconds. Do not use batteries
on which there is a sticky residue from
the tab or other unwanted substance.
Use the nail grip to gently swing the
battery drawer open.
Place the battery in the drawer, so that the plus (+)
sign on the battery faces upward. You can use the
battery magnet provided to steer the battery into
place.
If the battery drawer does not close easily, the bat-
tery is incorrectly inserted.
When changing battery, it is a good idea to hold the
hearing aid over a table.
The hearing aid may be provided with a special bat-
tery drawer, helping to secure the battery in the
drawer. This type of drawer can be a good choice if
the hearing aid is worn by a child.
10 11
LOW BATTERY INDICATION
An acoustic indicator will sound when the battery is
nearly exhausted, unless this function has been disa-
bled (see page 7). We recommend that you always
have a spare battery with you.
Never leave an exhausted battery in the hearing aid.
Exhausted batteries may leak, damaging the hearing
aid.
IMPORTANT
Your hearing aid may stop functioning, for instance if the battery
is exhausted. You should be aware of this possibility, in particular
when you are in traffic or are otherwise dependent on warning
signals.
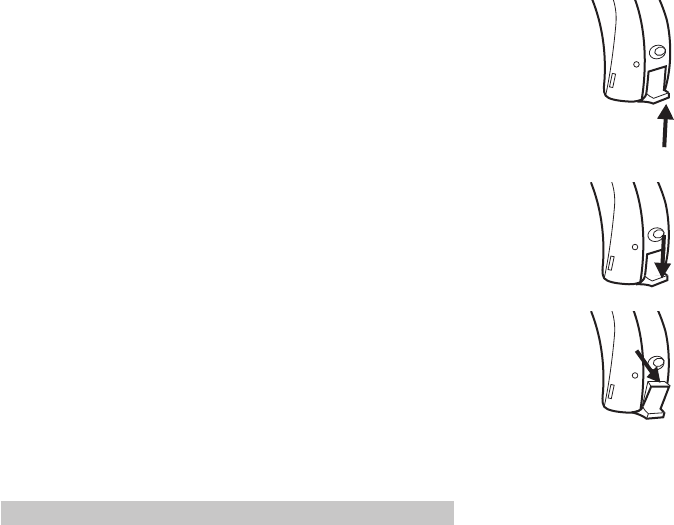
TURNING THE HEARING AID ON AND OFF
The battery drawer of the hearing aid also functions
as the on/off switch.
Push the switch upwards to turn on the
hearing aid. An acoustic indicator will
indicate that the hearing aid has been
switched on unless this function has
been disabled.
Push the switch downwards to turn off
the hearing aid.
The word “OFF” is clearly visible on the
switch when the hearing aid is turned
off.
Please remember to turn off the hearing aid when it
is not in use. Remove the battery if the hearing aid
will not be used for several days.
OFF
12 13
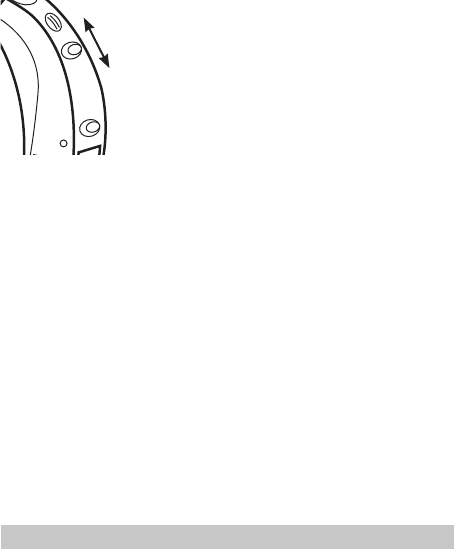
VOLUME ADJUSTMENT
The hearing aid volume is adjusted automatically in
accordance with your sound environment.
Your hearing aid may furthermore be
provided with a volume control,
shaped like a small lever.
Push the lever upward to gradually
raise the volume.
Push the lever downwards to gradu-
ally lower the volume.
In the default setting, any volume adjustment will
affect both hearing aids.
For any adjustment of the steps in which volume
increases or decreases, consult your hearing care
professional.
Each time you operate the volume control, you will
hear a beep-tone unless this function has been disa-
bled. When the maximum or minimum adjustment
level is reached, a steady tone will sound.
IMPORTANT
If the volume in the hearing aid is generally too loud or too weak,
or the reproduced sounds are distorted, or if you would like any
further information, consult your hearing care professional.
To turn off the sound completely
• Keep pressing the volume control lever downwards
after the steady tone has sounded
To turn the sound on again
• Press the lever upwards or
• Change listening program or
• Turn the hearing aid off and turn it on again.
If you wish to mute the hearing aid using a remote
control, keep pressing its volume down key after the
long beep-tone has sounded and until it stops. Press-
ing one of the volume keys briefly will bring back the
sound.
Any adjustment of the volume setting will be can-
celled when your hearing aid is turned off, or when
you change program.
If you wish to have the volume control disabled,
please consult your hearing care professional.

14 15
LOST PARTNER ALARM
(Note: Only applicable if this feature has been acti-
vated by your hearing care professional).
If one of your hearing aids falls off your ear, and/or
the battery is exhausted, a tone signal and a spoken
message will sound two times in the other hearing
aid.
LISTENING PROGRAMS
In addition to the default Master program, your hear-
ing aid may be provided with four of the following
programs, plus the special Zen program called Zen+.
Music For listening to music
TV For listening to the TV
Comfort Attenuates background noise
Reverse focus Focus on sounds from behind
Audibility Extender Makes high-frequency sounds audible
Phone For listening to the telephone
TIn this program you listen via the
telecoil (T) and not via the hearing
aid microphone (M). The telecoil is
used where a loop system is installed.
If you activate the telecoil program,
you listen to a specific sound source
and shut out surrounding sounds.
M+T In this program you listen via the
hearing aid microphone (M) and the
telecoil (T).
Zen Generates different kinds of tones.
Contains one style
Compound programs
The Master program in one ear and
Zen, Reverse focus, Audibility
Extender, T, MT or Phone in the other.
Zen+ Special Zen program with up to three
different Zen styles

16 17
If your needs change over time, the combination of
listening programs can be altered.
The Zen program may be used with amplification so
that both the surrounding sounds and the Zen tones
are heard together. Or, it may be used alone (without
amplification) in quiet when you are not required to
hear surrounding sounds.
The duration of the Zen play time can be set by your
hearing care professional according to your needs.
IMPORTANT
Use of the different Zen programs may interfere with hearing sur-
rounding sounds including speech. The programs should not be
used when hearing such sounds is important. Switch the hearing
aid to a non-Zen program in those situations.
SWITCHING BETWEEN THE
LISTENING PROGRAMS
Each time you switch to another
program, an acoustic indicator will
sound unless this function has been
disabled.
Program 1: Message or one short beep
Program 2: Message or two short beeps
Program 3: Message or three short beeps
Program 4: Message or one long and one short
beeps
Program 5: Message or one long and two short
beeps
Zen+: Message or tone
In the default setting, both your hearing aids will be
affected when you change programs.
18 19
USING A TELEPHONE
When using a telephone, we
recommend that you hold the
telephone against your head
at an angle above your ear,
rather than directly against the
ear. If the sound is not optimal,
try moving the telephone ear-
piece to a slightly different po-
sition.
ZEN+
This program is accessed via a long press (two sec.)
on the program button. A short press then allows
you to cycle through the available Zen styles.
You can exit Zen+ by pressing and holding the pro-
gram button for more than a second.
If you wish to have the program button disabled,
please consult your hearing care professional.
20 21
hearing aid with an earmould
The ear-set consists of the following parts:
1. Earhook
2. Tubing
3. Earmould
3a. Sound bore
3b. Vent
1.
3a.
3.
2.
3b.
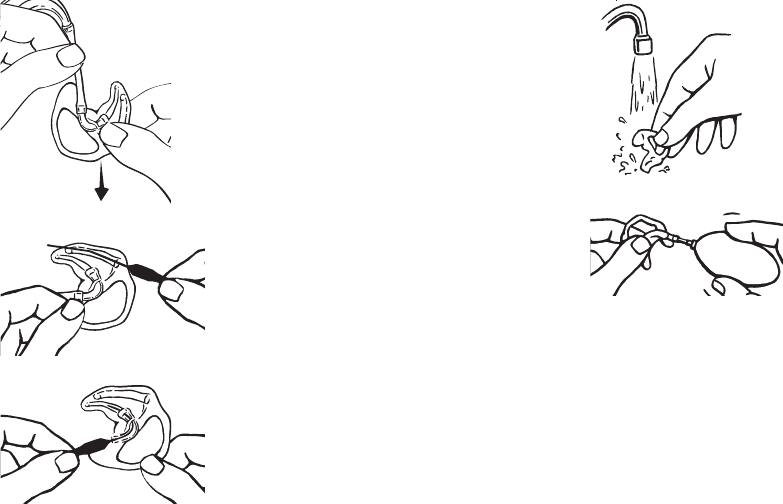
POSITIONING THE HEARING AID AND EARMOULD
Insert the earmould in the ear canal while holding the
lower part of the tubing. It may help to pull the outer
ear backwards and upwards with the opposite hand.
Place the hearing aid behind the ear, so that the ear-
hook rests comfortably on the ear, close to your
head.
22 23
REMOVING THE HEARING AID AND EARMOULD
Remove the hearing aid from its
position behind the ear.
Carefully pull the earmould out
of the ear canal, while holding
the lower part of the tubing.
hearing aid with an instant
ear-tip
The ear-set consists of the following parts:
1. Tubing with
1a. hook
1b. trimmed anchor
2. Instant ear-tip
1a
1
1b
2
24 25
RIGHT/LEFT IDENTIFICATION
The ear-set is available in differ-
ent lengths for the right and left
ear, respectively. The individual
size is printed on the tubing (see
arrow). Red print indicates that it
is for the right ear, and blue print
that it is for the left ear.
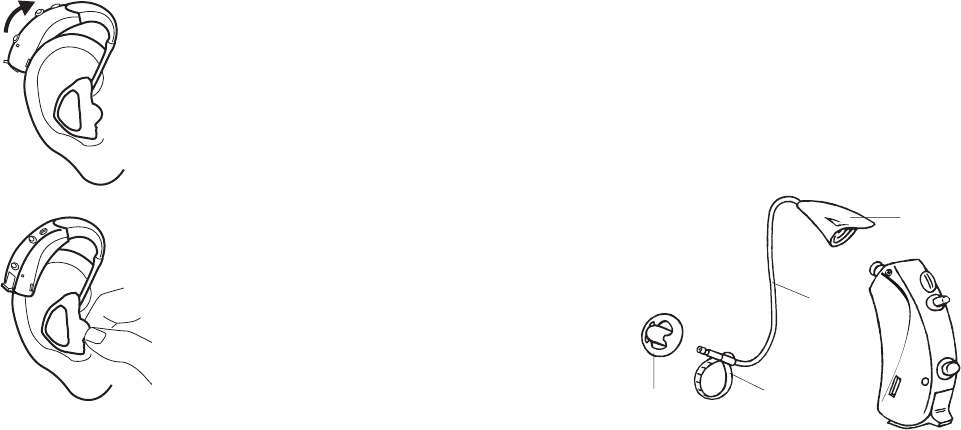
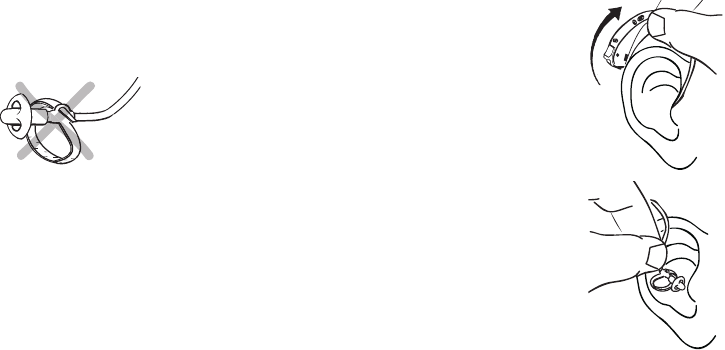
POSITIONING THE HEARING AID AND INSTANT
EAR-TIP
Place the hearing aid behind the
ear, so that the tubing rests
comfortably on the ear, close to
your head.
Insert the ear-tip into the ear ca-
nal while holding the lower part
of the tubing.
Make sure that the anchor is
positioned comfortably, secur-
ing the position of the ear-set.
26 27
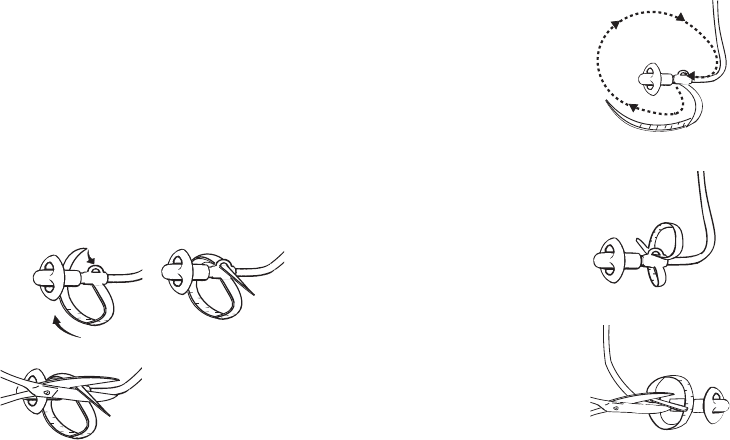
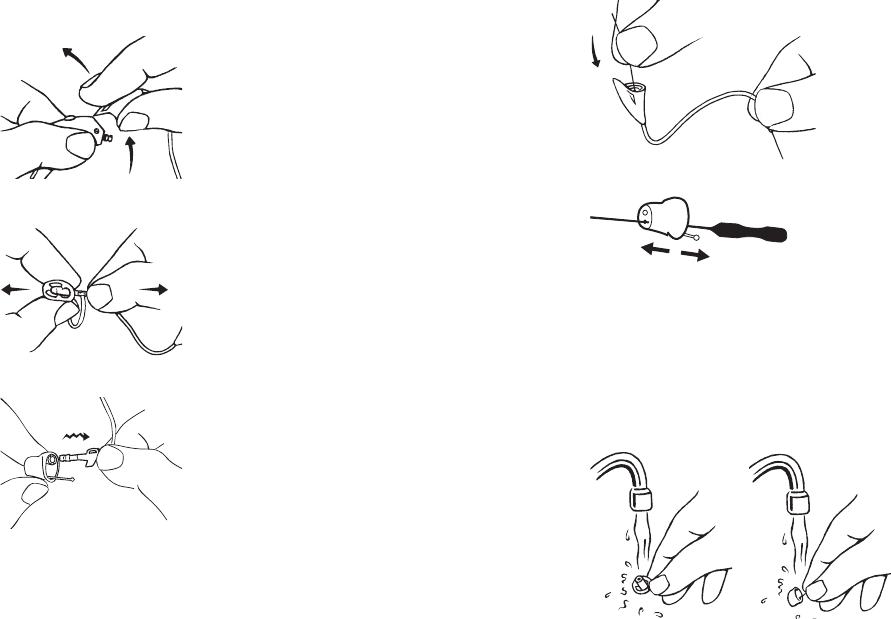
THE ANCHOR
The anchor for the instant ear-tip solution should be
trimmed to form an appropriately sized loop to en-
sure the comfortable retention of the ear-tip in the
ear canal. There are several ways of doing this:
EXAMPLE 1
Pull the tip of the anchor through the small hole on
the side of the tubing.
When the loop is the correct size,
cut off any excess with scissors or
similar.
EXAMPLE 2
Loop the anchor in the direction
indicated by the dotted line and
arrows.
Guide the tip of the anchor
through the small hole on the side
of the tubing as illustrated to form
a heart-shaped loop.
When the loop is the correct size,
turn the ear-set around and cut off
any excess with scissors or similar.
28 29
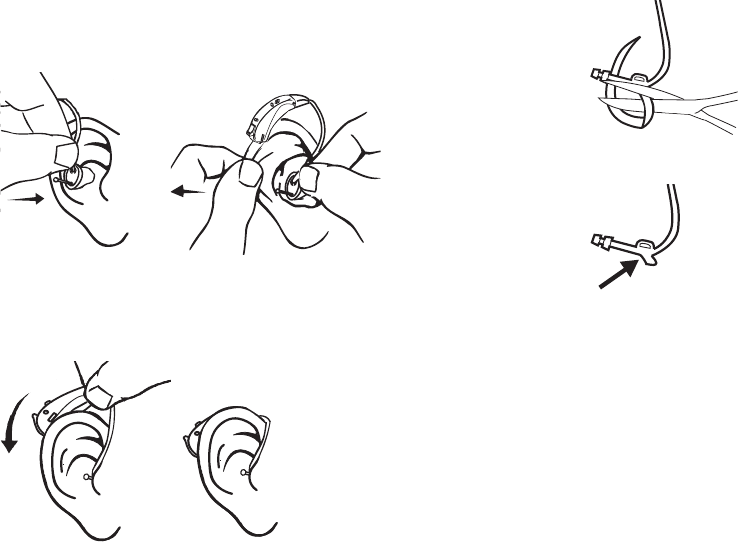
REMOVING THE HEARING AID AND INSTANT
EAR-TIP
Remove the hearing aid from its
position behind the ear.
Carefully pull the ear-tip out of the
ear canal, while holding the lower
part of the tubing.
GENERAL INFORMATION WHEN TRIMMING:
Make sure that the end of the anchor loop is flush
with the small hole and there are no sharp edges. Use
the tip of your finger to check for sharp edges.
If part of the anchor sticks out
through the hole, creating an un-
even surface, this may cause irri-
tation of the ear.

30 31
hearing aid with a Custom
ear-tip
The ear-set consists of the following parts:
1. Tubing with
1a. hook
1b. trimmed anchor
2. Custom ear-tip with
2a. extraction cord
2b. vent (optional)
1a
1b
1
2a.
2.
2b.
RIGHT/LEFT IDENTIFICATION
The ear-set tubing is available in
different lengths for the right
and left ear, respectively. The in-
dividual size is printed on the
tubing. Red print indicates that it
is for the right ear and blue print
that it is for the left ear.
The custom ear-tip has ”Widex” print-
ed on it. Red print indicates that the
ear-tip is for the right ear and blue
print that it is for the left ear.
32 33
POSITIONING THE HEARING AID AND CUSTOM
EAR-TIP
Insert the custom ear-tip into the ear canal while
holding the lower part of the tubing. It may also help
to pull the outer ear backwards and upwards with
the opposite hand.
Place the hearing aid behind the ear, so that the tub-
ing rests comfortably on the ear, close to your head.
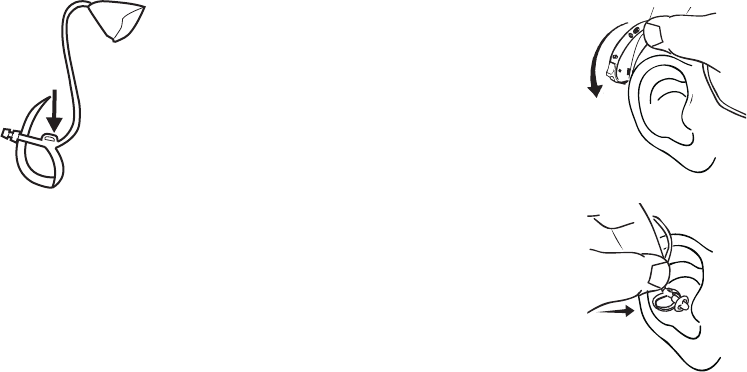
THE ANCHOR
With the custom ear-set solution only 2 mm of the
anchor is used.
Trim the anchor so there is ap-
proximately 2 mm left. It is im-
portant to leave the 2 mm intact
as it helps keep the custom ear-
tip correctly positioned.
The tubing should look like this when
you have trimmed the anchor.
34 35
REMOVING THE HEARING AID AND CUSTOM
EAR-TIP
Remove the hearing aid from its po-
sition behind the ear.
Take hold of the extraction cord
and carefully pull the custom ear-
tip out of the ear canal.
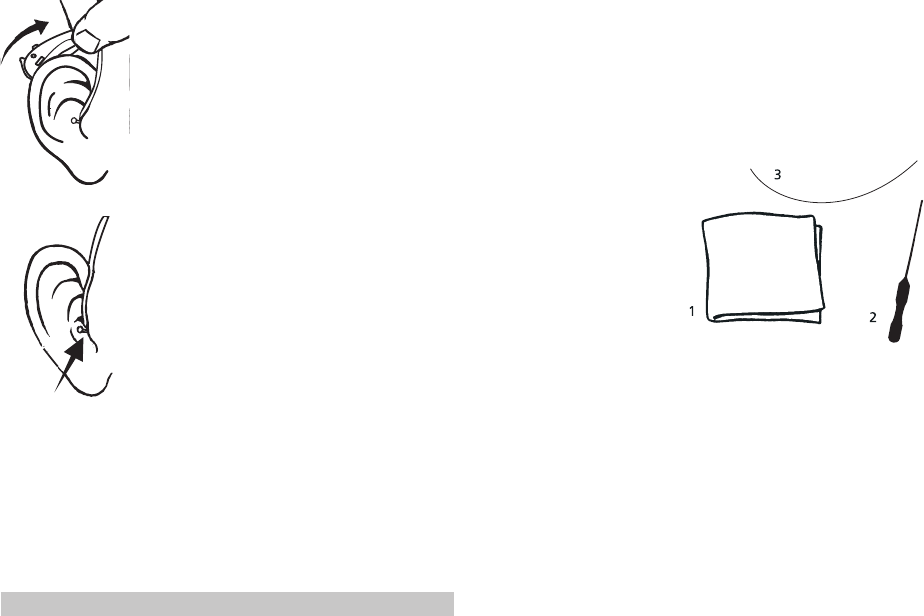
Cleaning
The following cleaning accessories are available for
the hearing aid and ear-set.*
1. Cloth
2. Wax removing tool
3. Cleaning thread
Contact your hearing care professional if you need
additional supplies of cleaning accessories.
* Selection depends on ear-set type.
IMPORTANT
Do not pull the tubing to remove your hearing aid. Use the ex-
traction cord.
36 37
THE HEARING AID
Clean the hearing aid with
the soft cloth after use.
Never use water or cleaning
solutions to clean the hear-
ing aid.
When the hearing aid is not in use, the
battery drawer should be left open, to
ventilate the hearing aid and allow it to
dry.
THE EAR-SET
Make sure that the entire ear-set is always clean and
free of earwax, moisture or the like.
Wipe the ear-set with the soft cloth at regular inter-
vals. Never use alcohol or other cleaning solutions to
clean the ear-set.
38 39
At least once a week or more of-
ten if required, disconnect the
earmould from the tubing and
rinse the earmould thoroughly in
lukewarm water. Allow it to dry
overnight.
If there is still moisture in
the earmould, use a blower
or similar to blow it dry be-
fore attaching the earmould
to the tubing.
The earmould tubing should be changed as required.
For further supplies of tubing, or if the earmould no
longer fits your ear, contact your hearing care pro-
fessional.
THE EARMOULD
Disconnect the earmould from
the tubing.
Clean the vent with the
wax removing tool.
Clean the sound bore with
the wax removing tool.
40 41
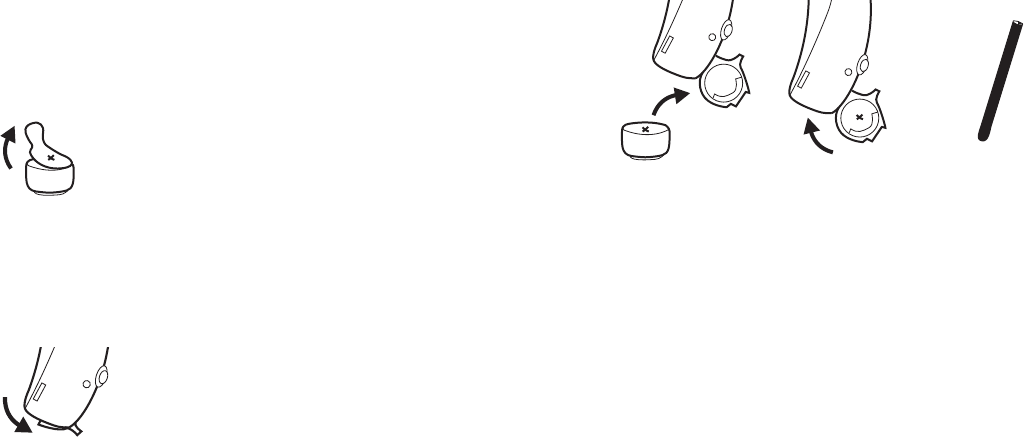
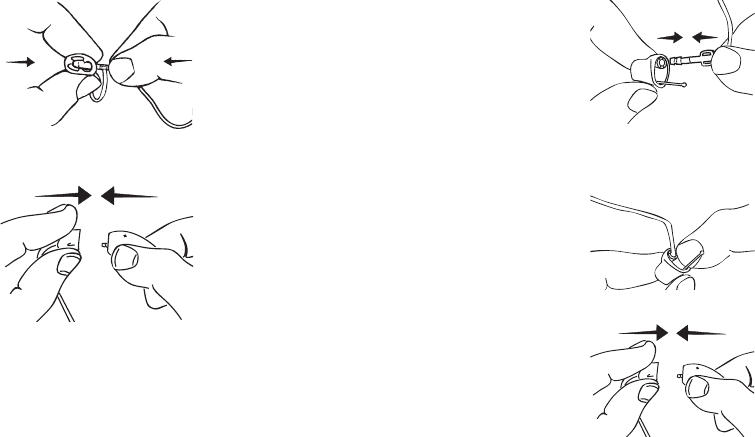
THE INSTANT AND CUSTOM EAR-TIPS
Cleaning a blocked tubing:
Lift the ear-set off the hear-
ing aid in a slanting, back-
ward movement, as shown.
Pull the instant ear-tip off the
tubing.
If you have a custom ear-tip,
carefully pull it off the tubing,
wriggling the tip of the tubing
gently.
Pass the cleaning thread
through the tubing. Pull
the thread out at the
other end.
If your custom ear-tip is
provided with a vent, use
the wax removing tool to
clean the vent.
If necessary, the ear-tip can be rinsed thoroughly in
lukewarm water when disassembled from the rest of
the ear-set.
Allow it to dry overnight.
42 43
ASSEMBLING THE EAR-SET - INSTANT EAR-TIP
Push the instant ear-tip onto
the tubing. It is very impor-
tant that the ear-tip is firmly
secured.
Click the ear-set onto the
top of the hearing aid as il-
lustrated.
The ear-set should be changed as required.
For further supplies of ear-sets or if the instant ear-
tip size no longer fits your ear, conctact your hearing
care professional.
ASSEMBLING THE EAR-SET - CUSTOM EAR-TIP
Hold the custom ear-tip be-
tween two fingers, with the ex-
traction cord downwards. Hold
the tubing with the other hand
as illustrated. Gently press the
tubing into place in the custom
ear-tip.
Use your fingernail to press the
tubing in as far as it will go so
that it is securely fastened.
Click the ear-set onto the top of
the hearing aid as illustrated.
The tubing should be changed as required.
For further supplies of tubing or if the custom ear-tip
no longer fits your ear, contact your hearing care
professional.
44 45
aCCessories
A variety of assistive listening devices are available
for your hearing aid.
For help in determining whether you could benefit
from a remote control or other accessories, please
consult your hearing care professional.
Audio input
The hearing aid can be furnished with an audio shoe.
This allows direct connection to different kinds of ac-
cessories (FM and CROS/Bi-CROS systems), as well
as external audio equipment (radio, TV, etc.). In this
way the sound from, for example, a radio or some-
one provided with an FM microphone can be sent di-
rectly into the hearing aid.
In the standard setting, the hearing aid automatically
switches to an audio program when an audio shoe is
attached. If you then wish to switch to one of the
other programs, you must use the program button
on the hearing aid. As soon as you remove the audio
shoe, the usual program order is re-established.
On the form on the next page, your hearing care pro-
fessional can make a note of the audio programs you
have access to and where they are located.
For more information on the use of audio input con-
sult your hearing care professional.
Program Program order with audio shoe
1
2
3
4
5
IMPORTANT
If the hearing aid is connected to equipment which is
connected to the electrical mains, this equipment
must meet the safety requirements stated in the in-
ternational standard IEC 60065.
Do not connect the hearing aid to sockets that are la-
belled with one or more of the following symbols:

46 47
FM systems
An FM system is an assistive listening device that can
be used as an accessory for the hearing aid.
The FM system from Widex is called SCOLA. The FM
system consists of a wireless microphone and a re-
ceiver clicked onto the hearing aid via an FM shoe.
The SCOLA FM system can be set according to your
needs. This may mean that the hearing aid program
button will work differently than when using an au-
dio shoe.
For help in determining whether you could benefit
from an FM system, please consult your hearing care
professional.
in Case of malfunCtion
Problem Possible cause Solution
The hearing
aid is
completely
silent
The hearing aid is
not turned on
Make sure the battery
drawer is pushed all the
way upwards
The battery does not
work
Insert a new battery in
the hearing aid
The sound outlet of
the earmould/ear-tip
is blocked
Earmould: Clean the
blocked sound bore
(see page 38)
Instant ear-tip: Replace
or clean the ear-tip (see
page 41)
Custom ear-tip: Clean
the ear-tip (see page 41)
The hearing
aid volume is
not powerful
enough
The battery is nearly
exhausted
Insert a new battery in
the hearing aid
The sound outlet of
the earmould/ear-tip
is blocked
Earmould: Clean the
blocked sound bore
(see page 38)
Instant ear-tip: Replace
or clean the ear-tip (see
page 41)
Custom ear-tip: Clean
the ear-tip (see page 41)
Your ear is blocked
by earwax
Contact your ENT
doctor/physician
Your hearing may
have changed
Contact your hearing
care professional
48 49
Problem Possible cause Solution
The hearing
aid whistles
continuously
Your ear is blocked
by earwax
Contact your ENT
doctor/physician
The tubing is yellow,
stiff or broken
Replace the tubing
The earmould/ear-
tip is not correctly
placed in your ear
canal
Take the earmould/
ear-tip out and reinsert
it
The earmould/ear-
tip fit is too loose
Contact your hearing
care professional
Earmould:
The tubing often
comes off the
earmould or hearing
aid hook
Replace the tubing
Earmould:
The hook is cracked
Contact your hearing
care professional
The hearing
aid func tions
intermit tently
The on/off switch is
dirty
Push the switch back
and forth a couple of
times
Your two
hearing aids
are not
working in
synchrony
The connection
between the hearing
aids is lost
Turn the hearing aids
off and on again
Caring for Your hearing aid
The hearing aid is a valuable object and should be
treated with care. Here are some things you can do
to prolong the life of your hearing aid:
• Turn off your hearing aid when it is not in use. Re-
move the battery if the hearing aid will not be used
for several days.
• When the hearing aid is not in use, keep it in its
case in a cool, dry location out of reach of children
and pets.
• Do not expose the hearing aid to extreme temper-
atures or high humidity.
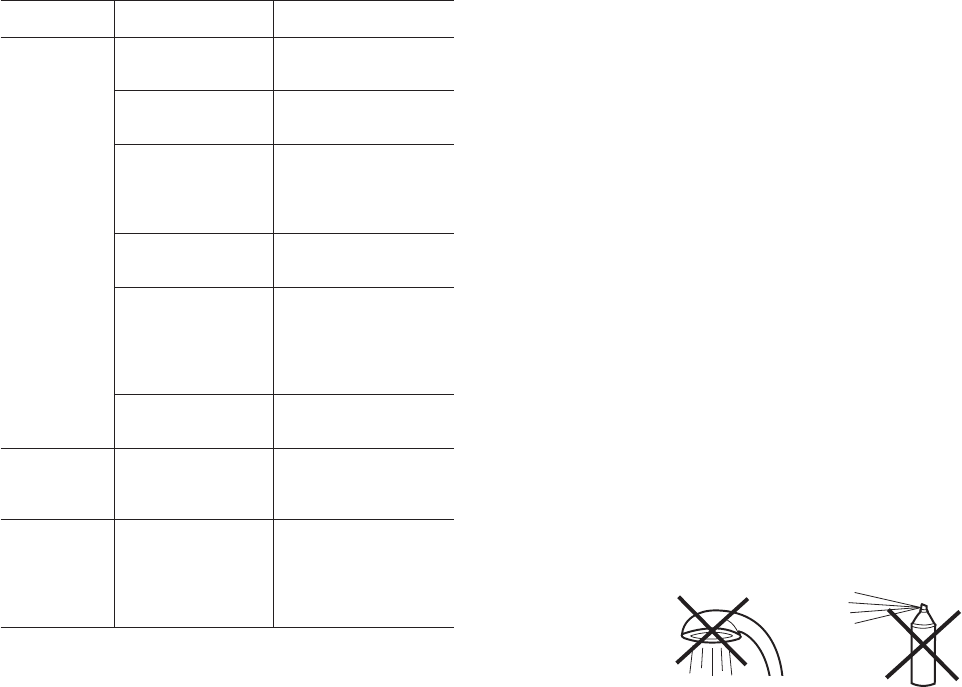
• Do not wear your hearing aid while in the shower
or swimming, or when using a hair dryer, perfume
or other sprays.
• In environments with high humidity, a Widex dry-
ing kit may be used daily to reduce the amount of
moisture inside the hearing aid. See the instruc-
tions enclosed with the Widex drying kit.

50 51
good adviCe and warnings
Hearing aids and batteries can be dangerous if swal-
lowed or used improperly. Swallowing or improper
use can result in severe injury or even fatalities.
In case of ingestion, contact a physician immediately.
• Keep hearing aids and their parts, accessories and
batteries out of reach of children and anyone else
who might swallow such items or otherwise cause
injury to themselves. Do not change batteries in
front of them and do not let them see where you
keep your battery supply. Discard used batteries
carefully.
• Batteries are very small and can easily be mistaken
for pills or the like. Never put a battery or hearing
aid in your mouth for any reason as you may risk
swallowing it.
• Never allow others to wear your hearing aid, as this
could cause permanent damage to their hear ing.
• The hearing aid will not restore normal hearing but
can help you to make the best possible use of your
remaining hearing ability. However, you should be
aware that it takes time to get used to a new hear-
ing aid and new sounds.
• When selecting a listening program, please re-
member that there are situations in which it is par-
ticularly important to be able to hear the surround-
ing sounds (e.g. traffic, warning signals).
• The use of hearing aids increases the risk of accu-
mulation of earwax. Contact your physician/ENT
doctor if you suspect that a plug of earwax has ac-
cumulated in your ear. Earwax may not only reduce
your own hearing but also the effect of the hearing
aid considerably. It is a good idea to ask your phy-
sician to clean your ears a couple of times a year.
• The hearing aid is made of modern non-allergenic
materials. Nonetheless, in rare cases skin irritation
may occur. If you notice skin irritation in or around
your ear or ear canal, contact your hearing care
professional.
CAUTION
Risk of explosion if battery is replaced by an incorrect type or re-
charged. Dispose of used batteries according to the instructions.
52 53
• Be aware that the use of any type of hearing aid
may involve a slightly increased risk of infection in
the ear canal. An infection can arise as a result of
inadequate ventilation of the ear. We therefore rec-
ommend that you remove the hearing aid and ear-
set from your ear at night to allow the ear canal to
be ventilated. Make sure that you clean and inspect
your hearing aid and ear-set as required. If an in-
fection occurs, you should seek medical attention
and contact your hearing care professional for ad-
vice on how to disinfect the various hearing aid
parts. Do not under any circumstances use alcohol,
chlorine or similar substances.
• Your hearing aid uses a built-in transceiver for co-
ordination between the hearing aids. The magnetic
field strength of the transceiver is very low.
• Your hearing aid has been tested for interference
according to international standards. Nevertheless,
it is possible that unforeseen interference may oc-
cur in the hearing aid due to electromagnetic radi-
ation from other products such as alarm systems
and mobile phones.
• Although your hearing aid has been designed to
comply with the most stringent international elec-
tromagnetic compatibility standards, the possibili-
ty cannot be excluded that it may cause interfer-
ence with other equipment, such as medical devic-
es.
• Never try to open or repair the hearing aid your-
self.
• Do not wear your hearing aid during X-rays, scans
or radiation treatments. Other types of radiation,
such as that in a microwave oven, can also damage
your hearing aid. Radiation from, for example,
room surveillance equipment, burglar alarms and
mobile phones is weaker and will not damage the
hearing aid.
• Widex hearing aids are not certified for use in
mines or other areas with explosive gases.

54 55
regulatorY information
Hereby, Widex A/S declares that this C4-9 is in com-
pliance with the essential requirements and other
relevant provisions of Directive 1999/5/EC.
A copy of the Declaration of Conformity can be found
at: http://www.widex.com
Federal Communications Commission and Industry
Canada Statement
FCC ID: TTY-C49
IC: 5676B-C49
This device complies with part 15 of the FCC Rules and
with RSS-210 of Industry Canada. Operation is subject to
the following two conditions:
(1) This device may not cause harmful interference, and
(2) this device must accept any interference received,
including interference that may cause undesired
operation.
NOTE:
This equipment has been tested and found to comply
with the limits for a Class B digital device, pursuant to
part 15 of the FCC Rules. These limits are designed to
provide reasonable protection against harmful
interference in a residential installation. This equipment
gene rates, uses and can radiate radio frequency energy
and, if not installed and used in accordance with the
instructions, may cause harmful interference to radio
communications. However, there is no guarantee that
interference will not occur in a particular installation. If
this equipment does cause harmful interference to radio
or television reception, which can be determined by
turning the equipment off and on, the user is encouraged
to try to correct the interference by one or more of the
following mea sures:

56 57
— Reorient or relocate the receiving antenna.
— Increase the separation between the equipment and
receiver.
— Connect the equipment into an outlet on a circuit
different from that to which the receiver is connected.
— Consult the dealer or an experienced radio/TV
technician for help.
NOTE:
This equipment complies with FCC radiation exposure
limits set forth for an uncontrolled environment. This
transmitter must not be co-located or operating in
conjunction with any other antenna or transmitter.
This equipment complies with the Industry Canada RF
radiation exposure limits set forth for an uncontrolled
environment as per IC RSS-102.
Changes or modifications to the equipment not expressly
approved by Widex could void the user’s authority to
operate the equipment.
Hearing aids, accessories and batteries
should not be disposed of with normal
household waste. Please consult your
national Widex distributor for advice on
how to dispose of these items.
58 59
¡9 514 0135 001q¤ Printed by HTO / 2010-06
9 514 0135 001 #01
¡#01v¤