Widex A S RC3 Remote Control Unit RC3 User Manual Part 2
Widex A/S Remote Control Unit RC3 Users Manual Part 2
Contents
- 1. Users Manual Part 1
- 2. Users Manual Part 2
Users Manual Part 2

RC3-2
User’s instructions
RC3-2 remote control

3
e remote control and any other parts shown in
these user’s instructions may not look the same as
the one(s) you have. We furthermore reserve the
right to make any changes considered necessary.
Hearing aids and their accessories should
not be disposed of with normal house-
hold waste. Please consult your national
Widex distributor for advice on how to
dispose of your hearing aid.
Federal Communications Commission
and Industry Canada Statement
is device complies with part 15 of the FCC Rules and RSS-210 of the Cana-
dian Rules. Operation is subject to the following two conditions:
(1) this device may not cause harmful interference, and (2) this device must ac-
cept any interference received, including interference that may cause undesired
operation.
NOTE: is equipment has been tested and found to comply with the limits
for a Class B digital device, pursuant to Part 15 of the FCC Rules. ese limits
are designed to provide reasonable protection against harmful interference in a
residential installation. is equipment generates, uses and can radiate radio fre-
quency energy and, if not installed and used in accordance with the instructions,
may cause harmful interference to radio communications. However, there is no
guarantee that interference will not occur in a particular installation. If this equip-
ment does cause harmful interference to radio or television reception, which can
be determined by turning the equipment off and on, the user is encouraged to try
to correct the interference by one or more of the following measures:
-- Reorient or relocate the receiving antenna.
-- Increase the separation between the equipment and receiver.
-- Connect the equipment into an outlet on a circuit different from that to which
the receiver is connected.
-- Consult the dealer or an experienced radio/TV technician for help.
NOTE:
Changes or modifications not expressly approved by the party responsible for
compliance could void the user’s authority to operate the equipment

4
5
Contents
Your new RC3-2 remote control . . . . . . . . . . . . . . . . . . . . . . 5
RC3-2 ..........................................7
e battery .......................................9
Battery type....................................9
Inserting the batteries . . . . . . . . . . . . . . . . . . . . . . . . . . . 10
Changing the batteries . . . . . . . . . . . . . . . . . . . . . . . . . . 10
Turning the remote control on and off . . . . . . . . . . . . . . . . . 11
Initial setting..................................11
e volume......................................12
Mute ........................................17
Listening programs................................21
Special situations .................................28
Alarm..........................................33
Caring for your remote control. . . . . . . . . . . . . . . . . . . . . . . 35
Good advice .....................................37
In case of malfunction .............................38
Accessories......................................39
Your new RC3-2 remote control
We hope you will be pleased with the remote con-
trol for your Widex hearing aid. We have included
these user’s instructions to explain how your remote
control should be operated. We recommend that
you read the entire booklet to get full satisfaction
from your new RC3-2 remote control.
6
7
Your RC3-2 remote control is an accessory for your
hearing aid. You can easily operate your hearing aid
without the remote control; it is just an alternative
way of operating your hearing aid. e advantages of
a Widex RC3-2 remote control are:
• Unlike the buttons on your hearing aid when it
is placed in/on the ear, you can easily see the keys
on the remote control.
• e larger keys on the remote control are easier to
manipulate than the small buttons on the hearing
aid.
• e remote control enables you to operate your
hearing aid discreetly, e.g. from your pocket or
handbag.
• You can adjust the volume and choose programs
for a CIC hearing aid.
• You can operate the right and the left hearing aid
separately, or simultaneously.
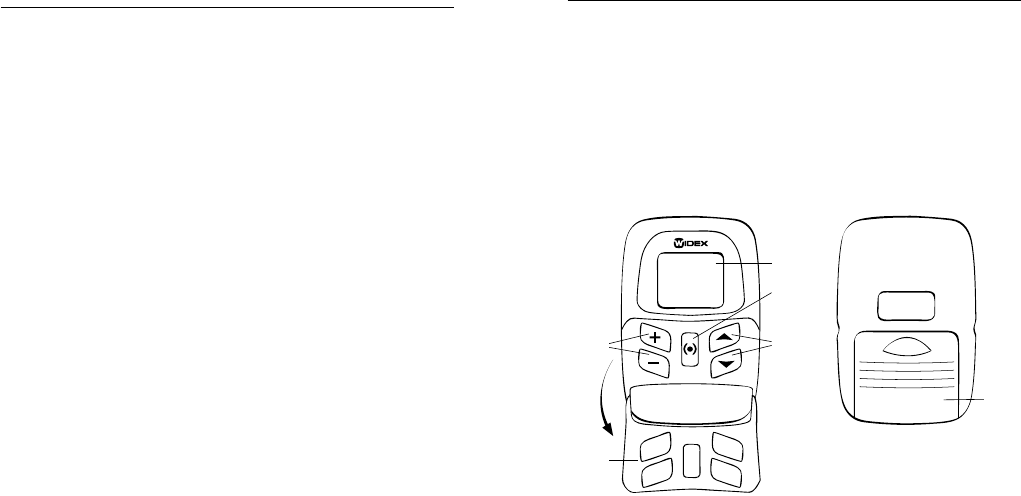
RC3-2
Your RC3-2 remote control is a small computer that
contains data for the different hearing aid settings.
It also contains a radio transmitter, which sends
messages to the hearing aid. e remote control and
hearing aid do not need to be in view of each other.
e operating range is approximately 1 meter.
1. Volume control. e [+] and [–] keys are used for
volume adjustment.
2. Program selection. e [] [] keys are used
for program selection. Your RC3-2 can operate a
maximum of five programs.
6.
1. 2.
4.
5.
3.+4.

8
9
3. On/off function. e [(•)] key is used to turn on
the remote control. e [(•)] key also sets the re-
mote control to the initial setting, P1 V9 (pro-
gram 1, volume 9), or switches between R (right
hearing aid) and L (left hearing aid) if you have
two hearing aids.
4. Display. is shows the currently selected pro-
gram (P), volume (V), the remote control’s bat-
tery level, alarm and right/left (R/L). e num-
bers in the left side of the display show the set-
tings for your left hearing aid, and the numbers in
the right side of the display show the settings for
your right hearing aid.
5. Transparent key guard. With the cover closed,
the risk of accidental key-presses is reduced. e
key guard can be flipped open to make the remote
control easier to hold. e keys are then higher
and easier to feel.
6. Battery cover.
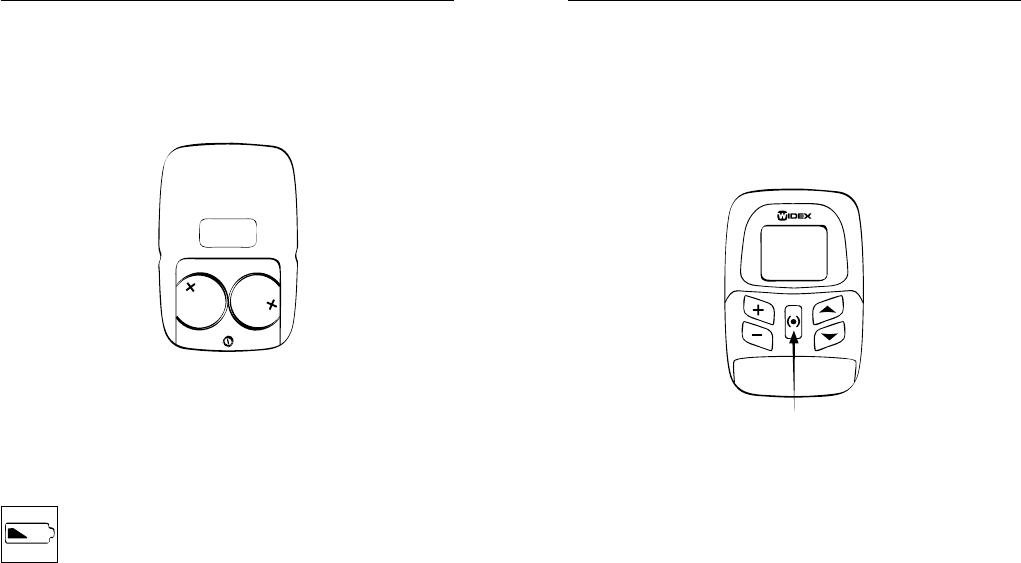
e battery
Battery type
e recommended battery type for your RC3-2 re-
mote control is:
Lithium CR 2032
Your RC3-2 uses two CR2032 batteries.
To obtain replacement batteries, please consult your
hearing care professional. Please note the expiration
date and the recommendations regarding disposal
of used batteries on the battery pack. e battery
life will depend on how much you use your remote
control.
10
11
Inserting the batteries
e plus (+) sign on the batteries for your RC3-2
must face upwards when placed in the battery com-
partment.
Changing the batteries
Always change both batteries at the same time. e
display shows the battery level of the remote con-
trol.
e batteries need to be changed when this
symbol is continuously displayed. It is rec-
ommended to change both batteries at the
same time.
Turning the remote control on and off
e RC3-2 remote control is turned on when the
[(•)] key is pressed for approximately ½ second. It
will automatically turn off after 10 seconds if not
being used. Your hearing care professional can help
you select another time-out setting, if required.
Initial setting
When your RC3-2 is turned on, you can set the
instrument to the initial setting, P1 V9 (program
1, volume 9), by pressing the [(•)] key for approxi-
mately 2 seconds.
12
13
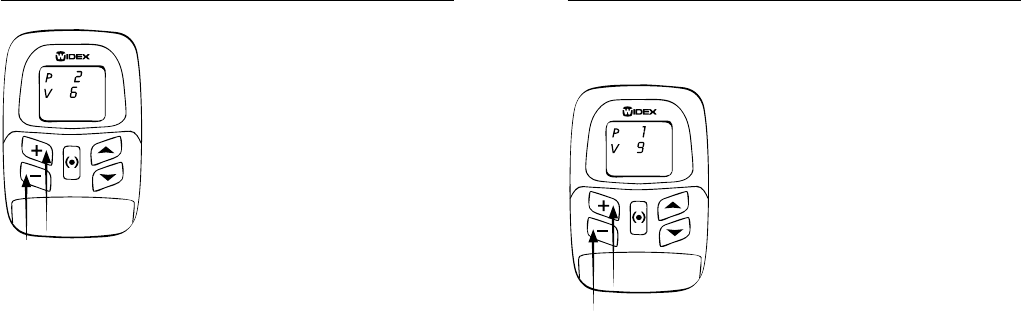
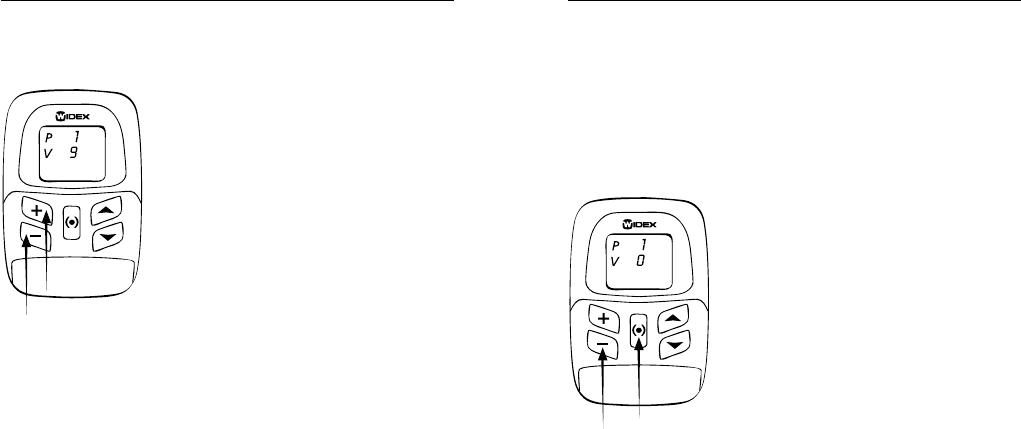
e volume
e [+] [–] keys allow you to ad-
just the volume in 13 steps. e
minimum level is 0, at which lev-
el the hearing aid is completely
silent, and the maximum level
is 13. e initial volume is set to
9 as standard, and this is always
the volume setting to which the
remote control reverts. If, for ex-
ample, you have selected listen-
ing program 2 and volume level 6, and then change
to another listening program, the volume level will
automatically change to 9.
You can adjust the volume one step at a time by sin-
gle key presses, or you can hold the [+] or [–] key
down until the required volume has been reached.
Adjusting the volume if you only have one hearing
aid
To start the remote control, press
the [(•)] key for approximately ½
second. e initial setting, P1 V9
(program 1, volume 9), should
now be displayed. Use the [+]
[–] keys to adjust the volume
as required. e remote control
automatically turns off after ap-
proximately 10 seconds.
Adjusting the volume if you have two hearing aids
that you want to set to different levels
You can only set your hearing aids to two different
volume levels if your remote control has been pro-
grammed with this option.
14
15
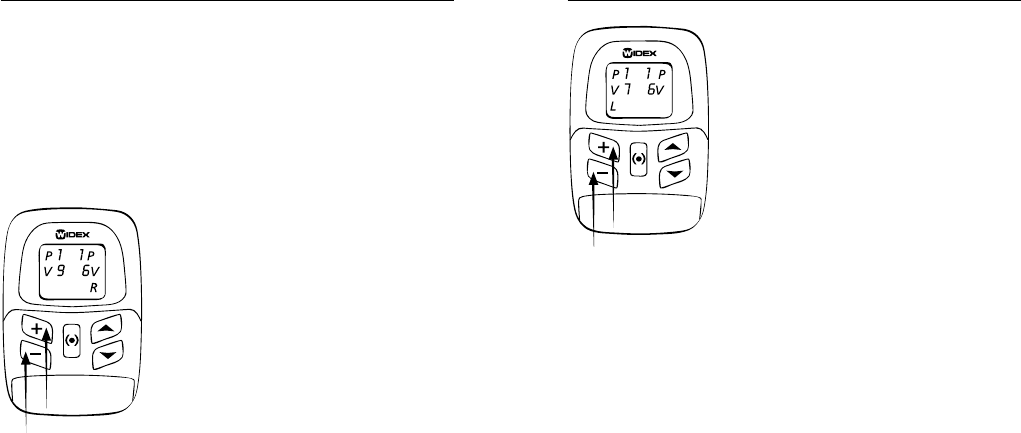
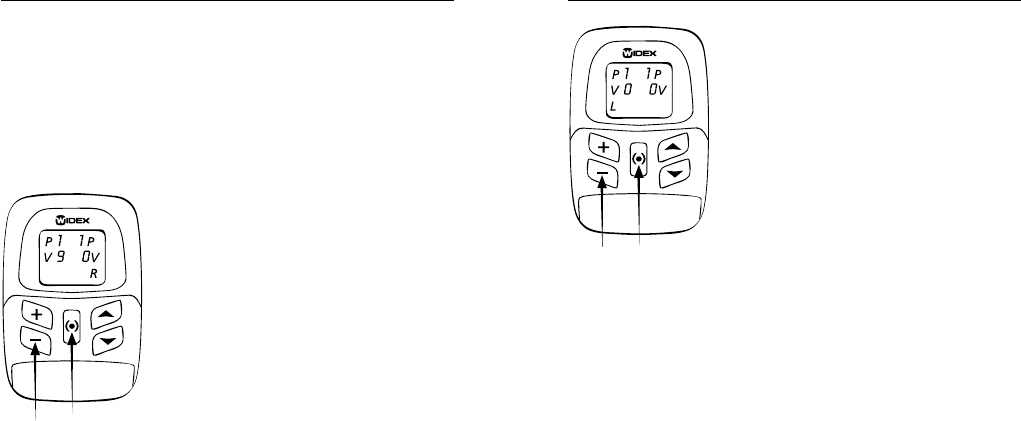
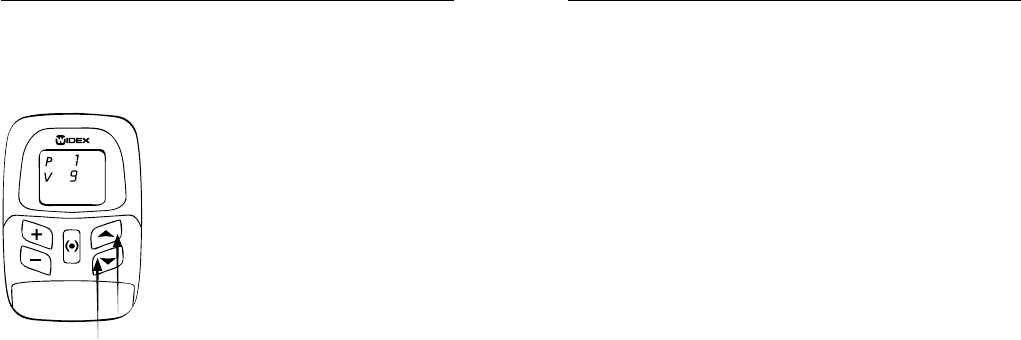
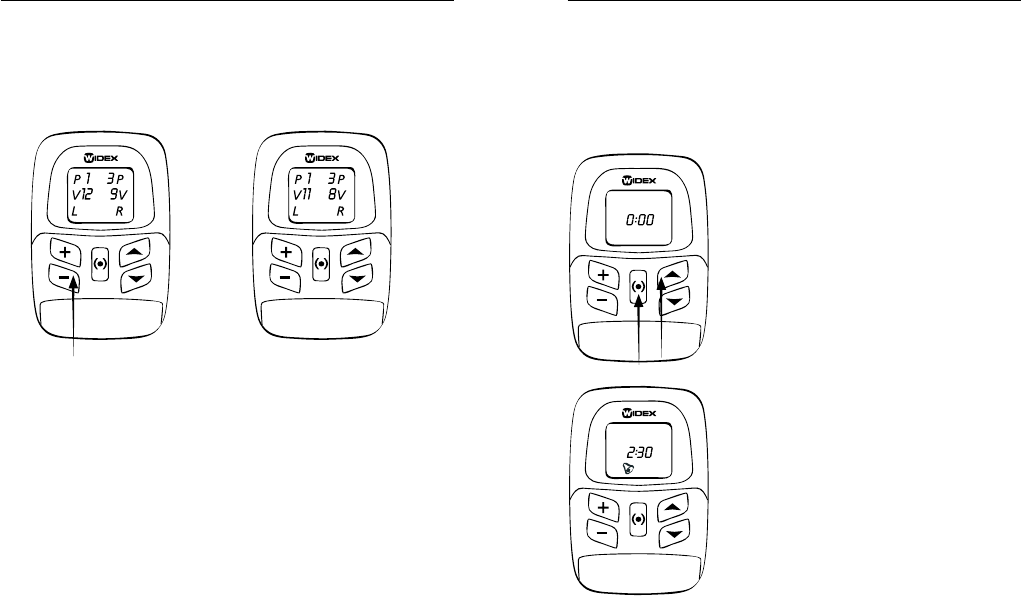
To start the remote control, press the [(•)] key for
approximately ½ second. e initial setting, P1 V9
(program 1, volume 9), should now be displayed.
Press the [(•)] key again. Two numbers are now
displayed next to V (volume); one for each hearing
aid.
e letter R is shown in the low-
er right corner, indicating that
you can now adjust the volume
for your right hearing aid using
the [+] [–] keys.
When this is done and you are
ready to adjust the volume for
your left hearing aid, press the
[(•)] key once. e letter L ap-
pears in the lower left corner, in-
dicating that you can now adjust
the volume for your left hearing
aid using the [+] [–] keys. e
remote control automatically
turns off after approximately 10
seconds.
16
17
Adjusting the volume if you have two hearing aids
that you want to set to the same level
To start the remote control, press
the [(•)] key for approximately ½
second. e initial setting, P1 V9
(program 1, volume 9), should
now be displayed. Use the [+]
[–] keys to adjust the volume as
required. Your choice will then
apply to both hearing aids. e
remote control automatically
turns off after approximately 10
seconds.
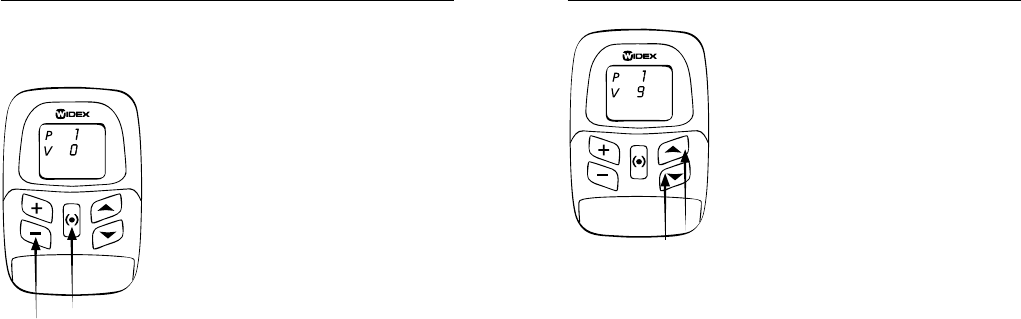
Mute
You can also use your RC3-2 to mute your hearing
aid completely.
Using the mute function if you only have one
hearing aid
To start the remote control, press
the [(•)] key for approximately ½
second. e initial setting, P1 V9
(program 1, volume 9), will be
displayed. en press and hold
down the [(•)] key while pressing
the [–] key. e number 0 will be
displayed next to V. To turn up
the volume again, press the [+]
key. is will reset the volume to
the initial setting (9).
18
19
Using the mute function if you have two hearing
aids and only want to mute one of them
You can only mute just one of your hearing aids if
your remote control has been programmed with
this option.
To start the remote control, press
the [(•)] key for approximately ½
second. e initial setting, P1 V9
(program 1, volume 9), should
now be displayed. Press the [(•)]
key again. Two numbers are dis-
played next to V (volume); one
for each hearing aid. e letter R
is shown in the lower right cor-
ner, indicating that you can now
mute your right hearing aid. To do so, hold the [(•)]
key down while pressing the [–] key. e number 0
is displayed next to V (volume) for your right hear-
ing aid.
If you want to mute your left
hearing aid, press the [(•)] key
once. e letter L appears in
the lower left corner, indicat-
ing that you can now mute your
left hearing aid. Hold the [(•)]
key down while pressing the [–]
key. e number 0 is displayed
next to V (volume) for your left
hearing aid. e remote control
automatically turns off after ap-
proximately 10 seconds.
20
21
Using the mute function if you have two hearing
aids and want to mute both of them
To start the remote control, press
the [(•)] key for approximately ½
second. e initial setting, P1 V9
(program 1, volume 9), should
now be displayed. en press and
hold down the [(•)] key while
pressing the [–] key. e number
0 is displayed next to V. is val-
ue applies to both hearing aids.
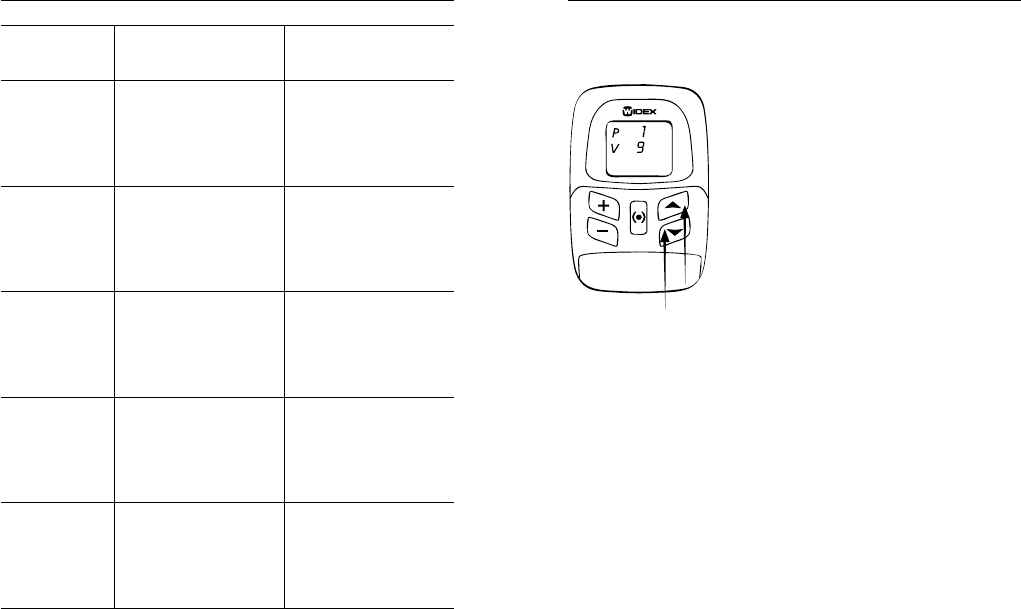
Listening programs
With your RC3-2 remote con-
trol, you can choose from up to
five listening programs. Togeth-
er with your hearing care profes-
sional you should have estab-
lished which programs are of use
to you. If your needs change over
time, the combination of listen-
ing programs can be changed.
You can switch between the listening programs by
using the [] [] keys. e number shown next to
P (program) in the display tells you which program
you have chosen. You will also hear beeps indicating
choice of program. e beeps indicate:
Program 1: One brief beep
Program 2: Two brief beeps
Program 3: ree brief beeps
Program 4: One long and one brief beep
Program 5: One long and two brief beeps.
e number of beeps depends on how many pro-
grams were chosen to have in your hearing aid. You
and your hearing care professional can make a note
of the programs you have chosen in the chart on the
following page.
22
23
Program Program name in
the hearing aid
Comments
1
2
3
4
5
Selecting a listening program if you only have one
hearing aid
To start the remote control, press
the [(•)] key for approximately ½
second. Select the listening pro-
gram you wish to apply using the
[] [] keys.
Selecting a listening program if you have two
hearing aids that you want to set to two different
programs
You can only set your hearing aids to two different
listening programs if your remote control has been
programmed with this option.
24
25
To start the remote control, press
the [(•)] key for approximately ½
second. e initial setting, P1 V9
(program 1, volume 9), should
now be displayed. Press the [(•)]
key again. Two numbers are di-
splayed next to P (program); one
for each hearing aid. e letter R
is shown in the lower right cor-
ner, indicating that you can now select a listening
program for your right hearing aid using the []
[] keys.
To set your left hearing aid, press
the [(•)] key once. e letter L
appears in the lower left cor-
ner, indicating that you can now
choose a listening program for
your left hearing aid using the
[] [] keys. e remote control
automatically turns off after ap-
proximately 10 seconds.
26
27
Selecting a listening program if you have two
hearing aids that you want to set to the same
program
To start the remote control, press
the [(•)] key for approximately ½
second. e initial setting, P1 V9
(program 1, volume 9), should
now be displayed. You can now
choose a listening program us-
ing the [] [] keys. Your choice
will then apply to both of your
hearing aids. e remote control
automatically turns off after ap-
proximately 10 seconds.
Important: Please note that if you alternate be-
tween using your remote control and the controls
on your hearing aid to adjust the volume and select
listening programs, the remote control may cancel
any adjustments that have been made manually on
your hearing aid.
28
29
Special situations
e examples below are only relevant for you if you
have two hearing aids and you have chosen different
programs and/or volume levels for them.
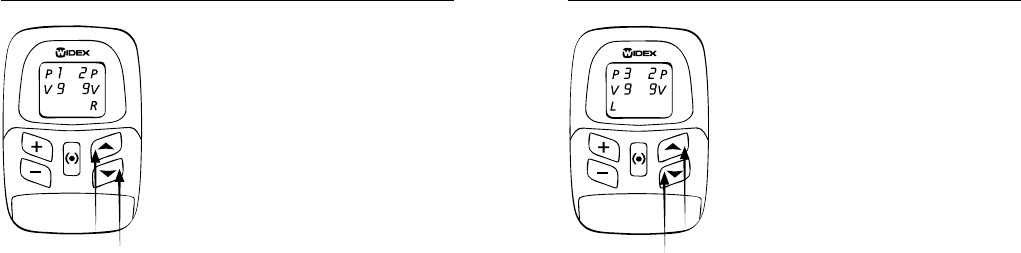
Example #1 Moving one program up (the [] key):
Example of initial setting: Result:
When both L and R are shown in the display, both
hearing aids can be adjusted. When you move one
program up, the remote control chooses the higher
program and its volume setting, to apply to both
hearing aids.
30
31
Example #2 Moving one program down (the []
key):
Example of initial setting: Result:
When both L and R are shown in the display, both
hearing aids can be adjusted. When you move one
program down, the remote control chooses the low-
er program and its volume setting, to apply to both
hearing aids.
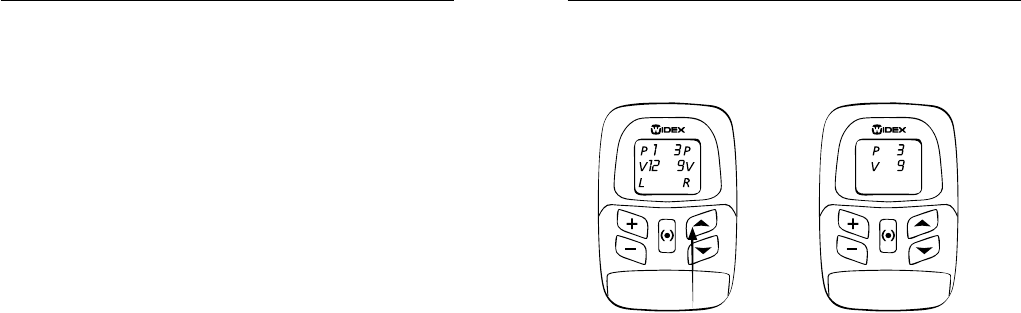
Example #3 Turning up the volume (the [+] key):
Example of initial setting: Result:
If your hearing aids are set to different volume lev-
els and you turn up the volume, the remote control
will raise the volume proportionally in both hearing
aids.
32
33
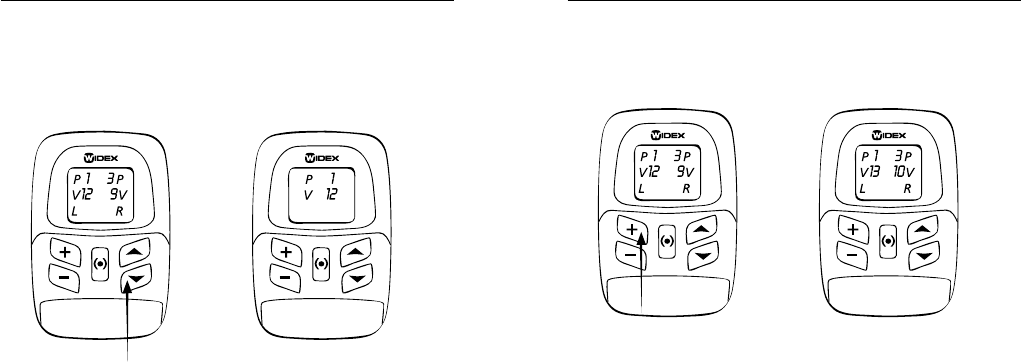
Example #4 Turning down the volume (the [–]
key):
Example of initial setting: Result:
If your hearing aids are set to different volume levels
and you turn down the volume, the remote control
will lower the volume proportionally in both hear-
ing aids.
Alarm
Your RC3-2 remote control may be equipped with
an alarm. You can set the alarm to go off after a giv-
en period of time. Example: setting the alarm to go
off in 2½ hours.
Press the [(•)] key for ½ second
to turn on the remote control.
Press the [(•)] key again and hold
it down while pressing []. 0:00
appears in the display.
Use the [+] [–] keys to choose
the number of hours, in this ex-
ample 2, and the [] [] keys
to set the number of minutes, in
this example 30. e time 2:30
should now be displayed. en
press [(•)].
34
35
A small bell appears in the display. If you
want to change the alarm setting, press [(•)].
e bell disappears and you can change the
setting using the [+] [–] and [] [] keys. To re-
activate the alarm (the small bell), press the [(•)] key.
If you want the display to show the program/volume
again, press the [(•)] key and hold it down while
pressing the [] key.
When the alarm starts, the letters AL and the small
bell will be displayed alternately, and the hearing
aid will beep. e beeps are repeated approximately
every ½ minute and the bell continues to blink until
you turn off the alarm.
To turn off the alarm, hold the [(•)] key down for
½ second.
Caring for your remote control
With proper care, your RC3-2 remote control will
give you a long life of reliable service. Here are some
things you can do to prolong the life of your remote
control:
• Treat your remote control with care. When it is
not in use, keep it in a cool, dry location where it
cannot be reached by children or pets.
• Do not expose it to extreme temperatures or high
humidity.
• Never try to open or repair your remote control
yourself.
• Clean the remote control with a soft cloth. Never
wash your remote control with water, cleaning
solutions or other liquids.

36
37
• Do not carry your remote control with you dur-
ing x-ray, MRI scans, CT scans, short-wave dia-
thermy, or similar radiation treatments and never
place your remote control in a microwave oven.
ese are some of the types of radiation that can
damage your remote control. Radiation from, for
example, room surveillance equipment, burglar
alarms and cellular telephones is weaker and will
not damage your remote control.
• e RC3-2 remote control is not certified for use
in mines or other areas with explosive gases.
Good advice
• Please be sure to keep your remote control and its
parts and accessories out of the reach of children,
who might place them in their mouths. Also keep
batteries out of children’s reach and discard used
batteries carefully. Do not change batteries in
front of children and do not let them see where
you keep your supply.
• Never put a battery in your mouth for any reason
as you may risk swallowing it. In case of inges-
tion, contact your physician immediately and e
National Button Battery Ingestion Hotline at:
(202) 625-3333.
38
39
In case of malfunction
e following pages include some quick advice to
follow if you experience problems. Before contact-
ing your hearing care professional, please follow the
advice below:
If your RC3-2 does not work, it could be because:
• You have not adequately pressed the keys. Flip
open the key guard to facilitate access to the
keys.
• e batteries have not been inserted correctly.
Remove both batteries and reinsert them with
the (+) facing you.
• e batteries are exhausted. Change the batter-
ies.
• e battery in your hearing aid is exhausted.
Change the battery.
• e connection between your hearing aid(s) and
remote control is unstable. Turn your hearing
aid(s) off and on.
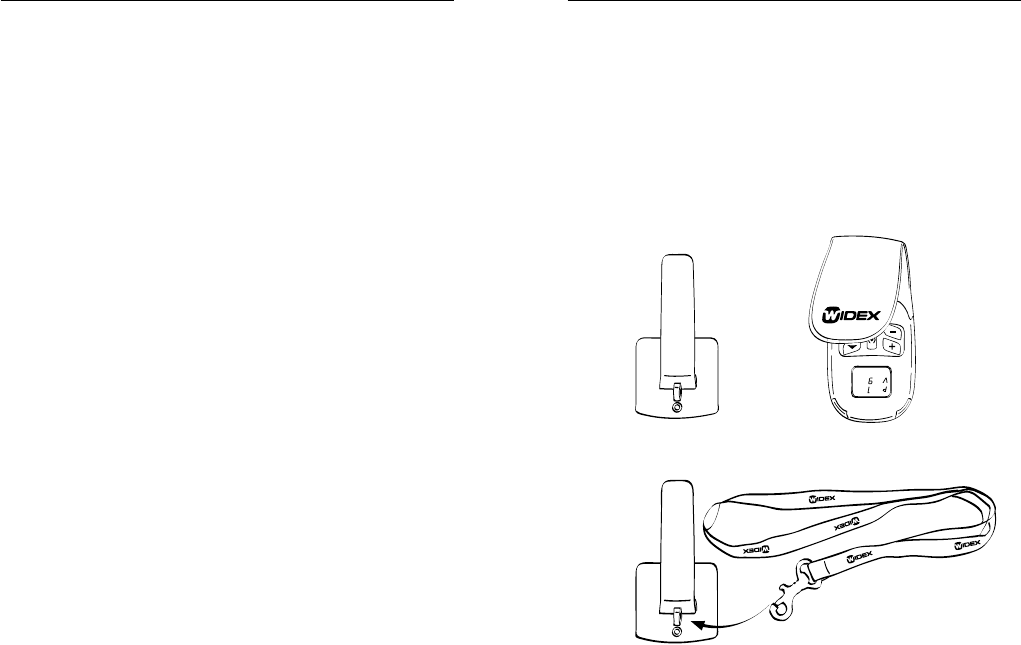
Accessories
e following accessories are available for your
RC3-2:
Clip version of the battery cover
Case for the remote control
Carrying strap for the clip version of the battery
cover
Clip version Case
Carrying strap
•
•
•
40
41
e clip version has a built-in clip for fastening the
RC3 to your belt or waistband, and an eye in which
you can fasten the carrying strap if you want to carry
the RC3 around your neck.
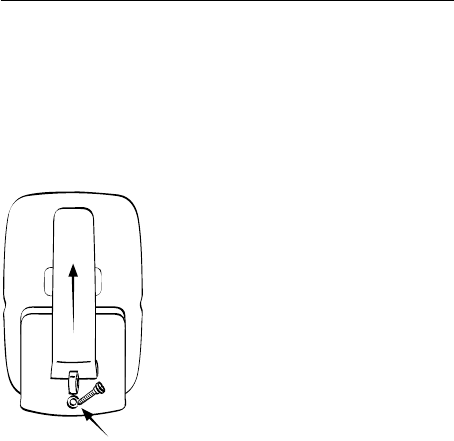
Changing the battery cover
If you want to replace the stan-
dard battery cover with the clip
version, you must also replace the
small screw below the battery
cover. Once the screw has been
removed, you can mount the clip
version battery cover using the
long screw (see illustration) sup-
plied with this cover.
Mount the battery cover by positioning it as illus-
trated. Now it is easy to push the cover into place.
42
43
Widex, DK-3500 Vaerloese
Denmark
•
www.widexusa.com
Printed by FB / 02-06
9 514 0066 041 #01
¡9 514 0066 041[¤ ¡#01v¤
Reorder # CIB90/0306