Widex A S USBL USB Link Programming Unit User Manual manual
Widex A/S USB Link Programming Unit manual
manual

1
Widex USB Link
User instrUctions
2
ContentS
INTRODUCTION. . . . . . . . . . . . . . . . . . . . . . . . . . . . . . . 3
WIRELESS FITTING – WHY? . . . . . . . . . . . . . . . . . . . . . . . . . . . 3
INSTALLING THE WIDEX USB LINK DRIVER UNDER WINDOWS XP SP2/
SP3 . . . . . . . . . . . . . . . . . . . . . . . . . . . . . . . . . . . . . . . . . . 4
CONNECTING THE WIDEX USB LINK TO THE COMPUTER . . . . . . . 9
USING THE WIDEX USB LINK . . . . . . . . . . . . . . . . . . . . . . . 10
ACTIVATING THE WIDEX USB LINK . . . . . . . . . . . . . . . . . . . . . . . 10
DETECTING THE HEARING AIDS . . . . . . . . . . . . . . . . . . . . . . . . 11
FITTING THE HEARING AIDS . . . . . . . . . . . . . . . . . . . . . . . . . . . 13
INTERRUPTING THE FITTING . . . . . . . . . . . . . . . . . . . . . . . 15
SYMBOLS . . . . . . . . . . . . . . . . . . . . . . . . . . . . . . . . . . 16
WHICH HEARING AIDS CAN BE PROGRAMMED WIRELESSLY
WITH THE WIDEX USB LINK? . . . . . . . . . . . . . . . . . . . . . . . . . . 17
CARING TIPS AND WARNINGS . . . . . . . . . . . . . . . . . . . . . . 18
TROUBLESHOOTING . . . . . . . . . . . . . . . . . . . . . . . . . . . . 19
REGULATORY INFORMATION . . . . . . . . . . . . . . . . . . . . . . . 20
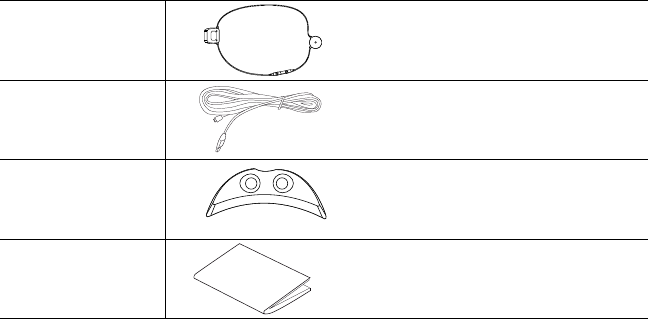
CONTENTS OF THE USB LINK PACKAGE
Widex USB Link
USB extension
cable (3.0 m)
Fixture for In-The-
Ear (ITE) hearing
instruments
User Instructions
3
introdUCtion
Wireless fitting means fitting without cables and shoes connected to the
hearing aid. The Widex USB Link allows direct connection to the fitting com-
puter, and supports the wireless fitting oered by Widex.
WIRELESS FITTING – WHY?
Over the years, hearing aid manufacturers have introduced more and more
cables to the clinic with the launch of new hearing aids. For the dispensers,
this has become a nuisance. It can be a real challenge to remember what
goes with what.
The Widex USB Link makes it possible to fit hearing aids using wireless tech-
nology, without the use of cables connected to the hearing aids.
4
INSTALLING THE WIDEX USB LINK DRIVER UNDER WINDOWS XP SP2/
SP3
Installing the driver is done in two steps. The first step is to install the driver
in Windows, and the second step is to connect the Widex USB Link. It is
recommended that Compass is closed during the installation.
Please do not connect the Widex USB Link to the computer before complet-
ing the driver installation.
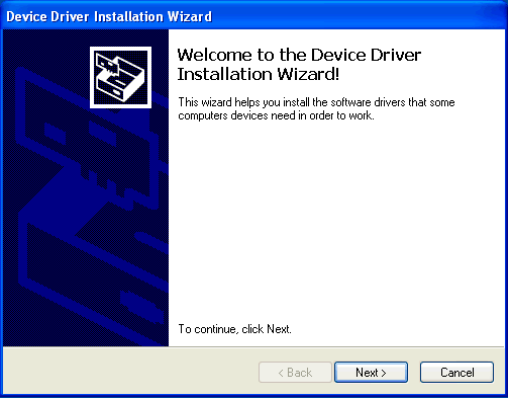
STEP 1: INSTALL THE DRIVER UNDER WINDOWS
1. The driver is installed from the Compass V5.1 CD (or a newer version).
2. Select ‘setup.exe’ in the folder Support\USB Link driver.
3. Click Next to start the installation.
5
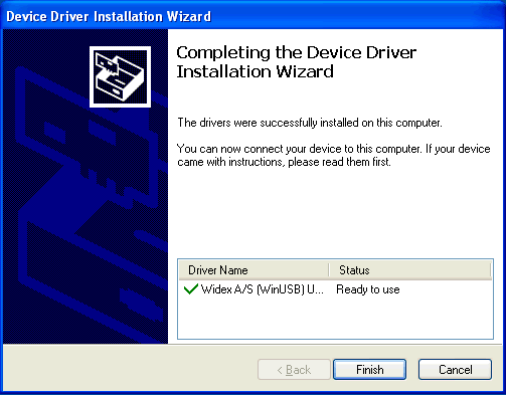
4. When the installation is completed, select Finish.
6
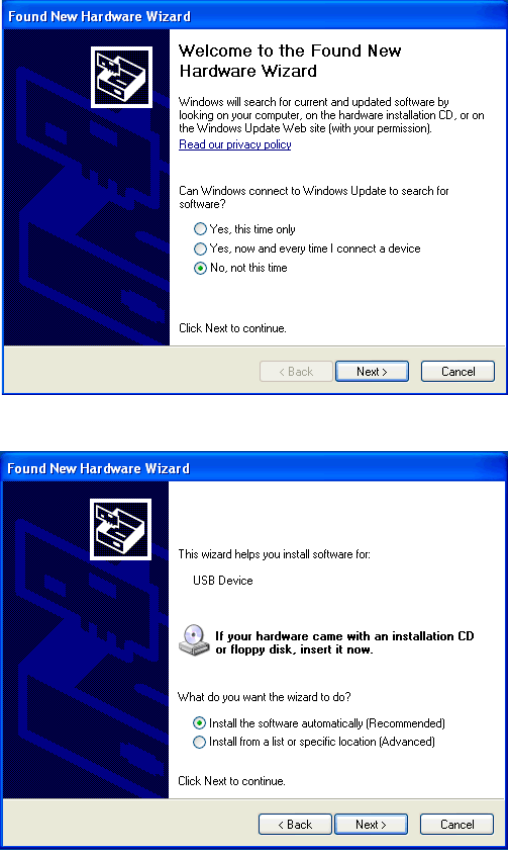
STEP 2: CONNECT THE WIDEX USB LINK
The “Found New Hardware” wizard starts.
1. Select ‘No, not this time’ and click Next.
2. Select ’Install the software automatically (Recommended)’ and click Next.
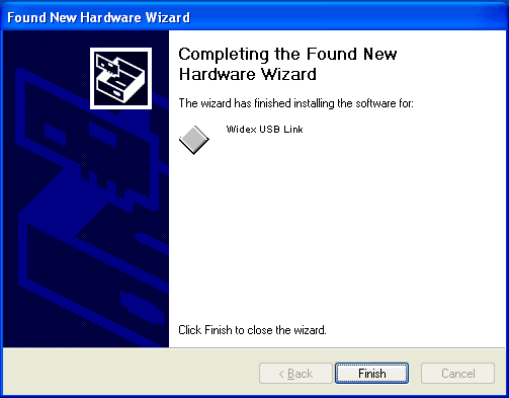
7
3. Select Finish, and the Widex USB Link is ready to be used.
8
Windows Vista SP2 32-bit Edition
When you install under a Windows Vista system, the steps are the same as
earlier described (see pages 4- 7), but when you connect the Widex USB
Link, Windows Vista automatically installs it.
You must use Windows Vista SP2 32-bit Edition or later. Windows Vista SP1
32-bit Edition is not supported.
Windows Vista 64-bit Edition is not supported.
Windows 7 32-bit Edition
When you install under a Windows Vista system, the steps are the same as
earlier described (see pages 4- 7), but when you connect the Widex USB
Link, you have to open the Windows Device Manager and activate ‘Scan for
New Hardware’.
Windows 7 64-bit Edition is not supported.
9
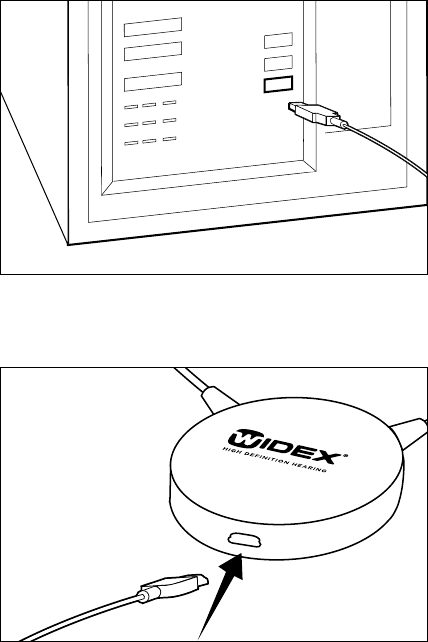
ConneCting the Widex UsB
Link to the compUter
1. Connect the Widex USB extension cable to the USB outlet on the compu-
ter as illustrated.
2. Connect the other end to the Widex USB Link.
3. To ensure safe data transmission from the computer to the Widex USB
Link, the USB extension cable must not exceed 5.0 m. For extension be-
yond 5.0 m, a USB cable repeater is needed.
10
USing the Widex USB Link
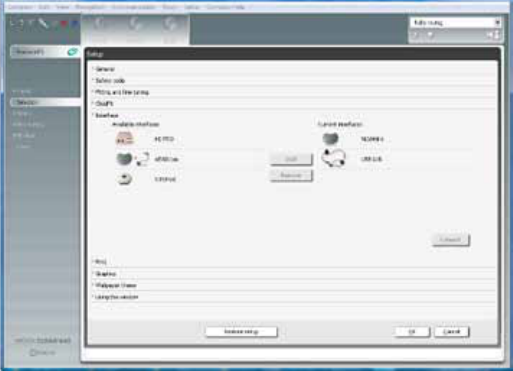
ACTIVATING THE WIDEX USB LINK
The first time you perform a wireless fitting, you must add the Widex USB
Link as the Interface in Compass, under Setup.
11
DETECTING THE HEARING AIDS
1. Insert fresh batteries in the hearing aids and turn on the hearing aids.
Colour mark the hearing aids as left and right.
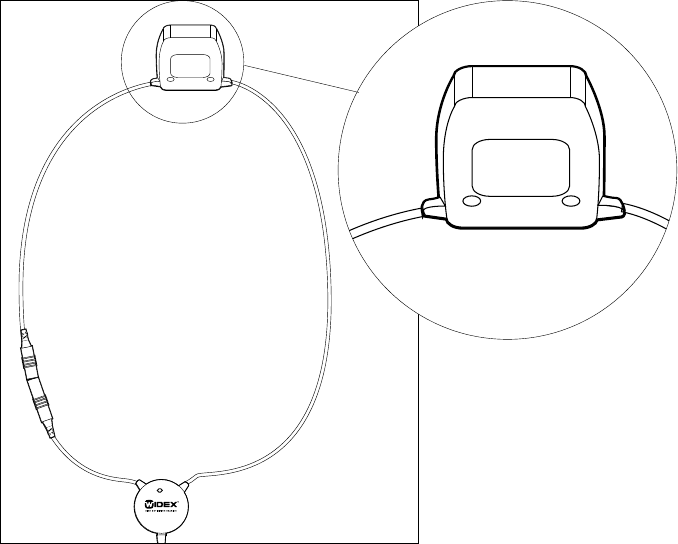
2. Place the Widex USB Link on the table. Note the position of the Widex
USB Link unit: see illustration.
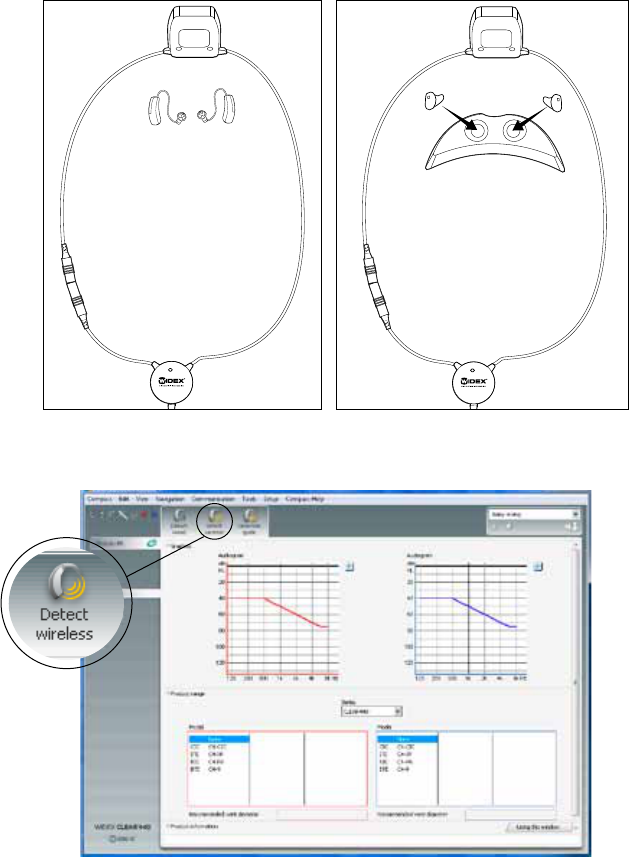
12
Place the hearing aids in the middle of the neck loop.
• Place BTE hearing aids directly on the table.
• Insert ITE/CIC in the holes in the instrument fixture included with the
USB Link, with the face plate facing upwards.
3. Click on the Detect wireless icon for wireless fitting in Compass.
13
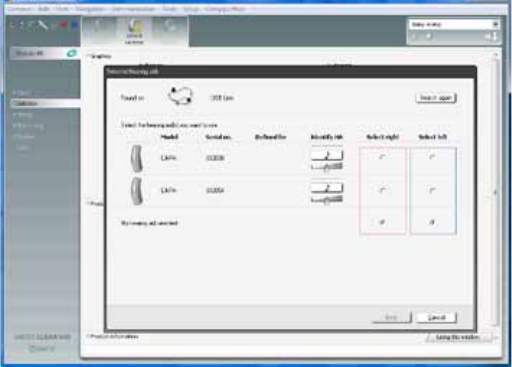
FITTING THE HEARING AIDS
CIC/ITE hearing aids which have never previously been fitted and all BTE
hearing aids must be assigned to the correct side in Compass: left and right.
Detect hearing aids as follows:
1. To identify hearing aids, make sure they are placed in the middle of the
Widex USB Link neck loop, and then use the Play buttons under Identify
HA. When you select a play button, the relevant hearing aid plays a sound
for 6 seconds, and in some models a light-emitting diode lights up.1
2. While this is happening, remove the hearing aid from the Widex USB Link
and listen to it.
3. In Compass, select whether the hearing aid is for the left or right ear.
4. Repeat the procedure if you are fitting two hearing aids.
5. Click Next to connect the hearing aids.
1. Only applicable to CLEAR440 PA and m models
14
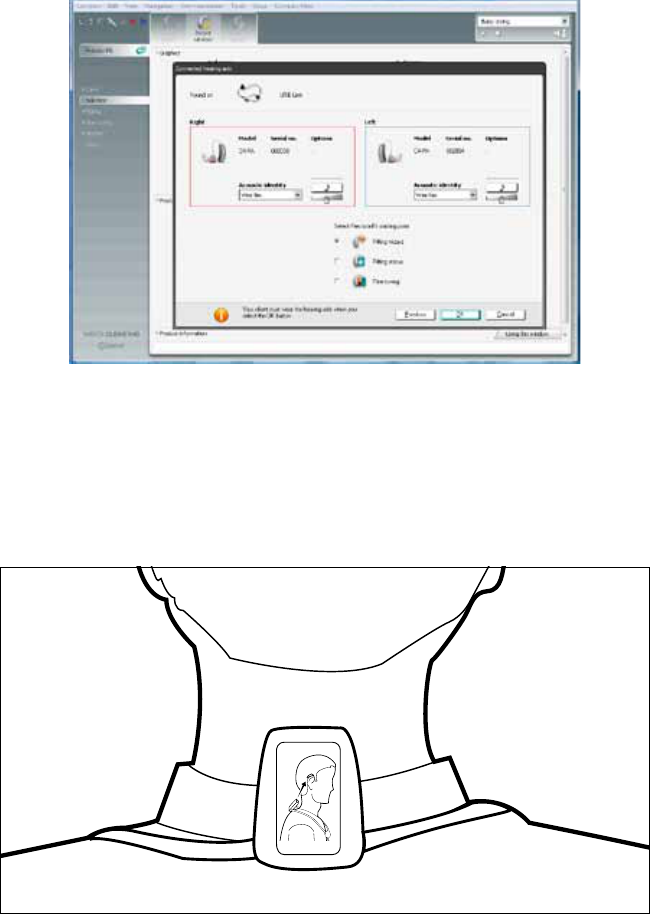
6. Select a starting point and make sure the acoustic identity is correct.
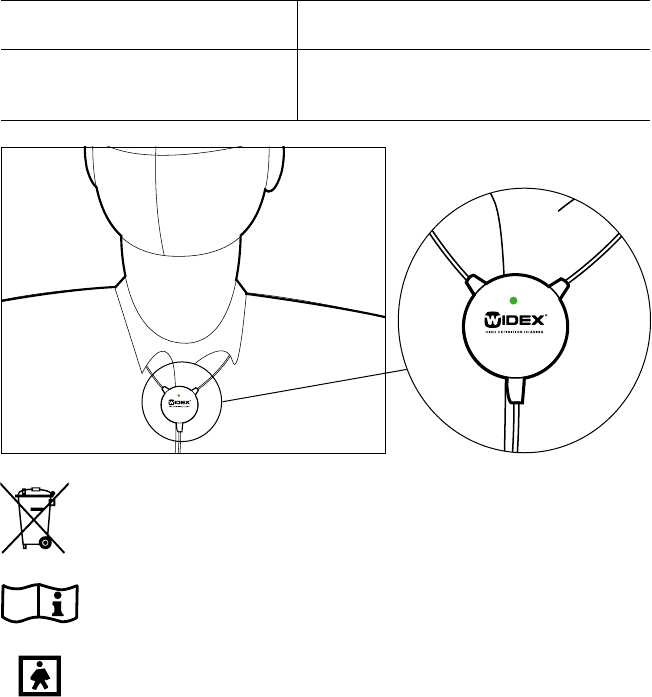
7. Position the hearing aids in the client’s ears. Place the Widex USB Link
around the neck of the client, if necessary using the neck loop locking
mechanism.
8. Make sure that the Widex USB Link unit is positioned correctly, as in the
illustration.
9. Click OK and proceed with the fitting.
15
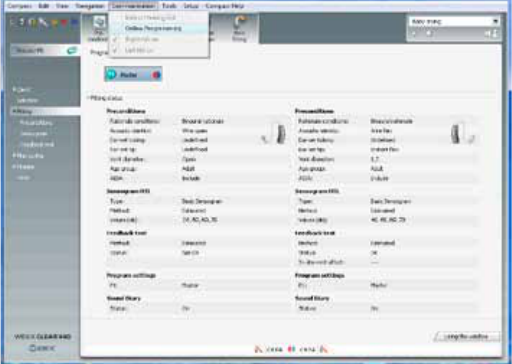
interrUpting the fitting
If it is necessary to interrupt the fitting in Compass, it is recommended that
you click on ‘Oine programming’ under Communication, and remove the
Widex USB Link by opening the neck loop locking mechanism.
To proceed with the fitting in Compass, click ‘Online programming’ under
Communication.
Do not interrupt the connection to the Widex USB Link by pulling the USB
plugs apart.
16
SymBoLS
The following shows the indicators, markings and symbols used in this
manual or on the device label.
Display Status
Flashing green light The Widex USB Link is communicating
with the instruments.
In Europe, do not dispose of in trash bins. Follow the local EU
WEEE regulations for the collection of electronic products.
See this user manual for information not included on the Widex
USB Link label.
Type BF-applied part.
17
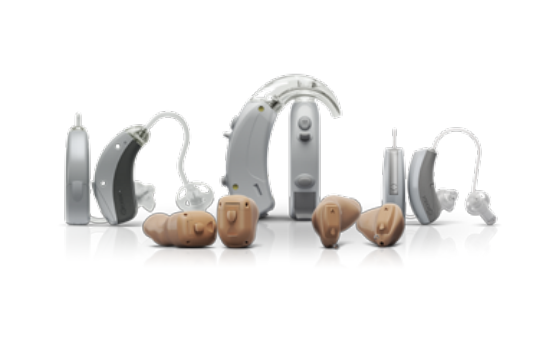
WHICH HEARING AIDS CAN BE PROGRAMMED WIRELESSLY
WITH THE WIDEX USB LINK?
All CLEAR440 and more recent hearing aids with wireless technology from
Widex can be fitted wirelessly with the Widex USB Link. Use Compass V5.1
or a later version.
18
Caring tiPS and WArnings
1. Clean the Widex USB Link with a soft cloth. Never wash your Widex USB
Link with water, cleaning solutions or other liquids.
2. Never try to open or repair the Widex USB Link yourself. (This should only
be done by authorised personnel.)
3. Do not disconnect the Widex USB Link during use.
4. Do not use defective units together with the hearing aids.
5. Although your USB Link has been designed to comply with the most
stringent international electromagnetic compatibility standards, the
possibility cannot be excluded that it may cause interference with other
equipment, such as medical devices.

19
troUBLeShooting
Problem Possible cause Solution
Widex USB Link LED
indicator does not
flash
The driver installation
has failed, or the
Widex USB Link has
been connected to
the computer before
completing the driver
installation.
Reinstall the driver by following
the description in this manual.
Do not connect the Widex
USB Link to the computer
before the driver installation is
complete.
The Widex USB
extension cable is
disconnected from
the computer or the
Widex USB Link.
Reconnect the Widex USB
extension cable. The Widex
USB Link is connected if the
LED flashes when you click on
‘Detect wireless’.
Wireless
programming not
working
The hearing aids are
not within the Widex
USB Link range.
Reposition the Widex USB
Link so that the USB Link
unit on the neck loop is in
close proximity to the hearing
aids. Place In-the-Ear hearing
instruments in the fixture.
The hearing aids
are not detected by
Compass.
Detect the hearing aids by
placing the hearing aids in the
middle of the neck loop on the
table. Ensure that the Widex
USB Link unit is positioned on
the table as illustrated in this
manual.
The hearing aids are
not working.
Insert fresh batteries in the
hearing aids and turn on the
hearing aids.

20
regULatory informAtion
Hearing aids, accessories and batteries should not be disposed of
with normal household waste. Please consult your national Widex
distributor for advice on how to dispose of these items.
Hereby, Widex A/S declares that this USB Link is in compliance with the es-
sential requirements and other relevant provisions of Directive 1999/5/EC.
A copy of the Declaration of Conformity can be found at: http://www.widex.
com
FEDERAL COMMUNICATIONS COMMISSION AND INDUSTRY CANADA
STATEMENT
FCC ID: TTY-USBL
IC: 5676B-USBL
This device complies with part 15 of the FCC Rules and with RSS-210 of
Industry Canada. Operation is subject to the following two conditions:
(1) This device may not cause harmful interference, and (2) this device must
accept any interference received, including interference that may cause
undesired operation.
21
NOTE:
This equipment has been tested and found to comply with the limits for a
Class B digital device, pursuant to part 15 of the FCC Rules. These limits are
designed to provide reasonable protection against harmful interference in
a residential installation. This equipment generates, uses and can radiate
radio frequency energy and, if not installed and used in accordance with
the instructions, may cause harmful interference to radio communications.
However, there is no guarantee that interference will not occur in a particular
installation. If this equipment does cause harmful interference to radio or
television reception, which can be determined by turning the equipment o
and on, the user is encouraged to try to correct the interference by one or
more of the following measures:
— Reorient or relocate the receiving antenna.
— Increase the separation between the equipment and receiver.
— Connect the equipment into an outlet on a circuit dierent from that to
which the receiver is connected.
— Consult the dealer or an experienced radio/TV technician for help.
NOTE:
This equipment complies with FCC radiation exposure limits set forth for an
uncontrolled environment. This transmitter must not be co-located or oper-
ating in conjunction with any other antenna or transmitter.
This equipment complies with the Industry Canada RF radiation exposure
limits set forth for an uncontrolled environment as per IC RSS-102 Issue 3.
Changes or modifications to the equipment not expressly approved by Wi-
dex could void the user’s authority to operate the equipment.
22
23

24

25
Printed by FB / 04-10
9 502 1810 001 #01