Wild Planet Entertainment FLIPPERFRENZY Flipper Frenzy User Manual
Wild Planet Entertainment, Inc. Flipper Frenzy
Users Manual

READY, SET, PLAY!
Listen to the shark’s clues. Pick up the right friend as fast
as you can! Get ready to scramble when the clues get
more challenging!
USING THE SHARK TAGGER
Step 1: Hold the shark tagger in your hand and press the big blue
button with your thumb to open the shark’s mouth. Pick up
the friends by placing the shark’s mouth over the friend and
releasing your thumb from the button.
Step 2: Shake the shark tagger to hear if
you found the right friend!
Step 3: Release the friend from the
shark’s mouth before finding
the next friend. (Fig. 1)
GETTING STARTED
1. Press the button on the shark
tagger to get started.
2. Choose a game. Press menu to hear the game choices.
Press when you hear the game you want to play.
Game #1: FLIPPER FRENZY
Game #2: GROUP FRENZY
Game #3: HIDE AND SEEK
(2 players)
Game #4: SHARKY SAYS
FLIPPER FRENZY
SETTING UP
1. Choose your level. Press menu to hear the levels. Press when
you hear the level you want to play.
Level 1: Get warmed up. Listen for the names of the friends.
Level 2: Not too tough. Friend names and colors!
Level 3: Getting tricky! Names, colors, and letters.
Level 4: Harder still! Animal descriptions are added to the mix.
2. Spread the four friends out on the floor: the turtle, seahorse,
octopus and fish. (Fig. 2)
PLAYING
1. Pick up any friend with the shark tagger to start.
2. Listen for the clues. If you hear the name “turtle,” pick up the turtle
with the shark tagger. If you hear “Who is yellow?”, find the seahorse.
Shake the shark tagger to hear if you tagged the right friend!
3. At the end of your turn, listen for your time. See if you can beat it the
next time you play!
In GROUP FRENZY, when you hear “Pass me!” the player holding the
shark tagger passes it to the next player.
BONUS GAME! HIDE AND SEEK
Hide the friends, then find them with the shark tagger!
SETTING UP
Player 2 hides the friends around the house.
PLAYING
• Player 1 counts with the shark tagger and closes his or her eyes.
• When you hear, “Ready or not, here we come,” find and tag the friend
that is called out. If you find a friend that wasn’t called out, don’t pick it
up. Just remember where it is so you can come back to it later.
• When you find all four friends, listen for your time. See if you can find
the friends even faster the next time you play! Now it’s your turn to
hide the friends for player 2.
Important: Please save this instruction sheet.
It contains valuable product information.
3+ 1–6 players
46111
Requires 3 AAA (LR03) batteries,
not included.
BONUS GAME! SHARKY SAYS
Listen carefully and find the friends ONLY when you hear “Sharky Says”!
SETTING UP
1. Choose your level. Press menu to hear the levels.
Press when you hear the level you want to play. The higher
the level, the more commands you will hear!
2. Spread the four friends out on the floor: the turtle, seahorse,
octopus and fish.
PLAYING
• Listen as the shark tagger calls out commands. If the shark tagger
says “Sharky says find the turtle!”, find the turtle, then shake the
shark tagger to hear if you found the right friend!
• If you hear a command that does NOT start with “Sharky says,” do
not pick up any of the friends. The shark tagger will call out the next
command in 8 seconds.
• At the end of your turn, listen for your time. See if you can beat it the
next time you play!
POWERING OFF THE SHARK TAGGER
To shut off the game, press and hold the button on the Shark
tagger for 5 seconds.
DO NOT PLAY WITH FLIPPER FRENZY IN WATER!
Do not play with the shark tagger or friends in water! This includes the
pool, bathtub, sink, sprinklers, etc.
you
hear
the
game
you
want
to
pl
ay.
PE
R F
REN
ZY
U
P FRENZY
A
ND
SEE
K
a
yers
)
R
KY
S
A
YS
Fig. 2
Fig. 1
mouth
over
the
friend
and
o
n.
2.
2.
PLA
PLA
1.
1.
2.
2.
3. 3.
g
.
1
FLIPPER FRENZY 46111-4000 PS 05/10
IF YOU HAVE ANY QUESTIONS, PLEASE CONTACT US AT
1-800-247-6570
WILDPLANET.COM/HELP
Wild Planet Entertainment, Inc., P.O. Box 194087
San Francisco, CA 94119-4087
© 2010 Wild Planet Entertainment, Inc.,
San Francisco, CA 94104,USA
All Rights Reserved. MADE IN CHINA.
Foreign patents pending.
Product specifications subject to change.
BATTERY SAFETY INFORMATION
• Requires 3 AAA (LR03) batteries.
• Only adults should install and replace batteries.
• Rechargeable batteries are to be removed from the
character before being charged.
• Rechargeable batteries are only to be charged under
adult supervision.
• Non-rechargeable batteries are not to be recharged.
• Remove dead or exhausted batteries.
• Insert batteries correctly. Match positive and
negative signs.
• The supply terminals are not to be short circuited.
• Do not mix different types of batteries.
• Do not mix old and new batteries.
• Only the batteries of the same or equivalent type
recommended to be used.
• Do not dispose batteries in a fire; they may explode.
• Dispose of batteries safely.
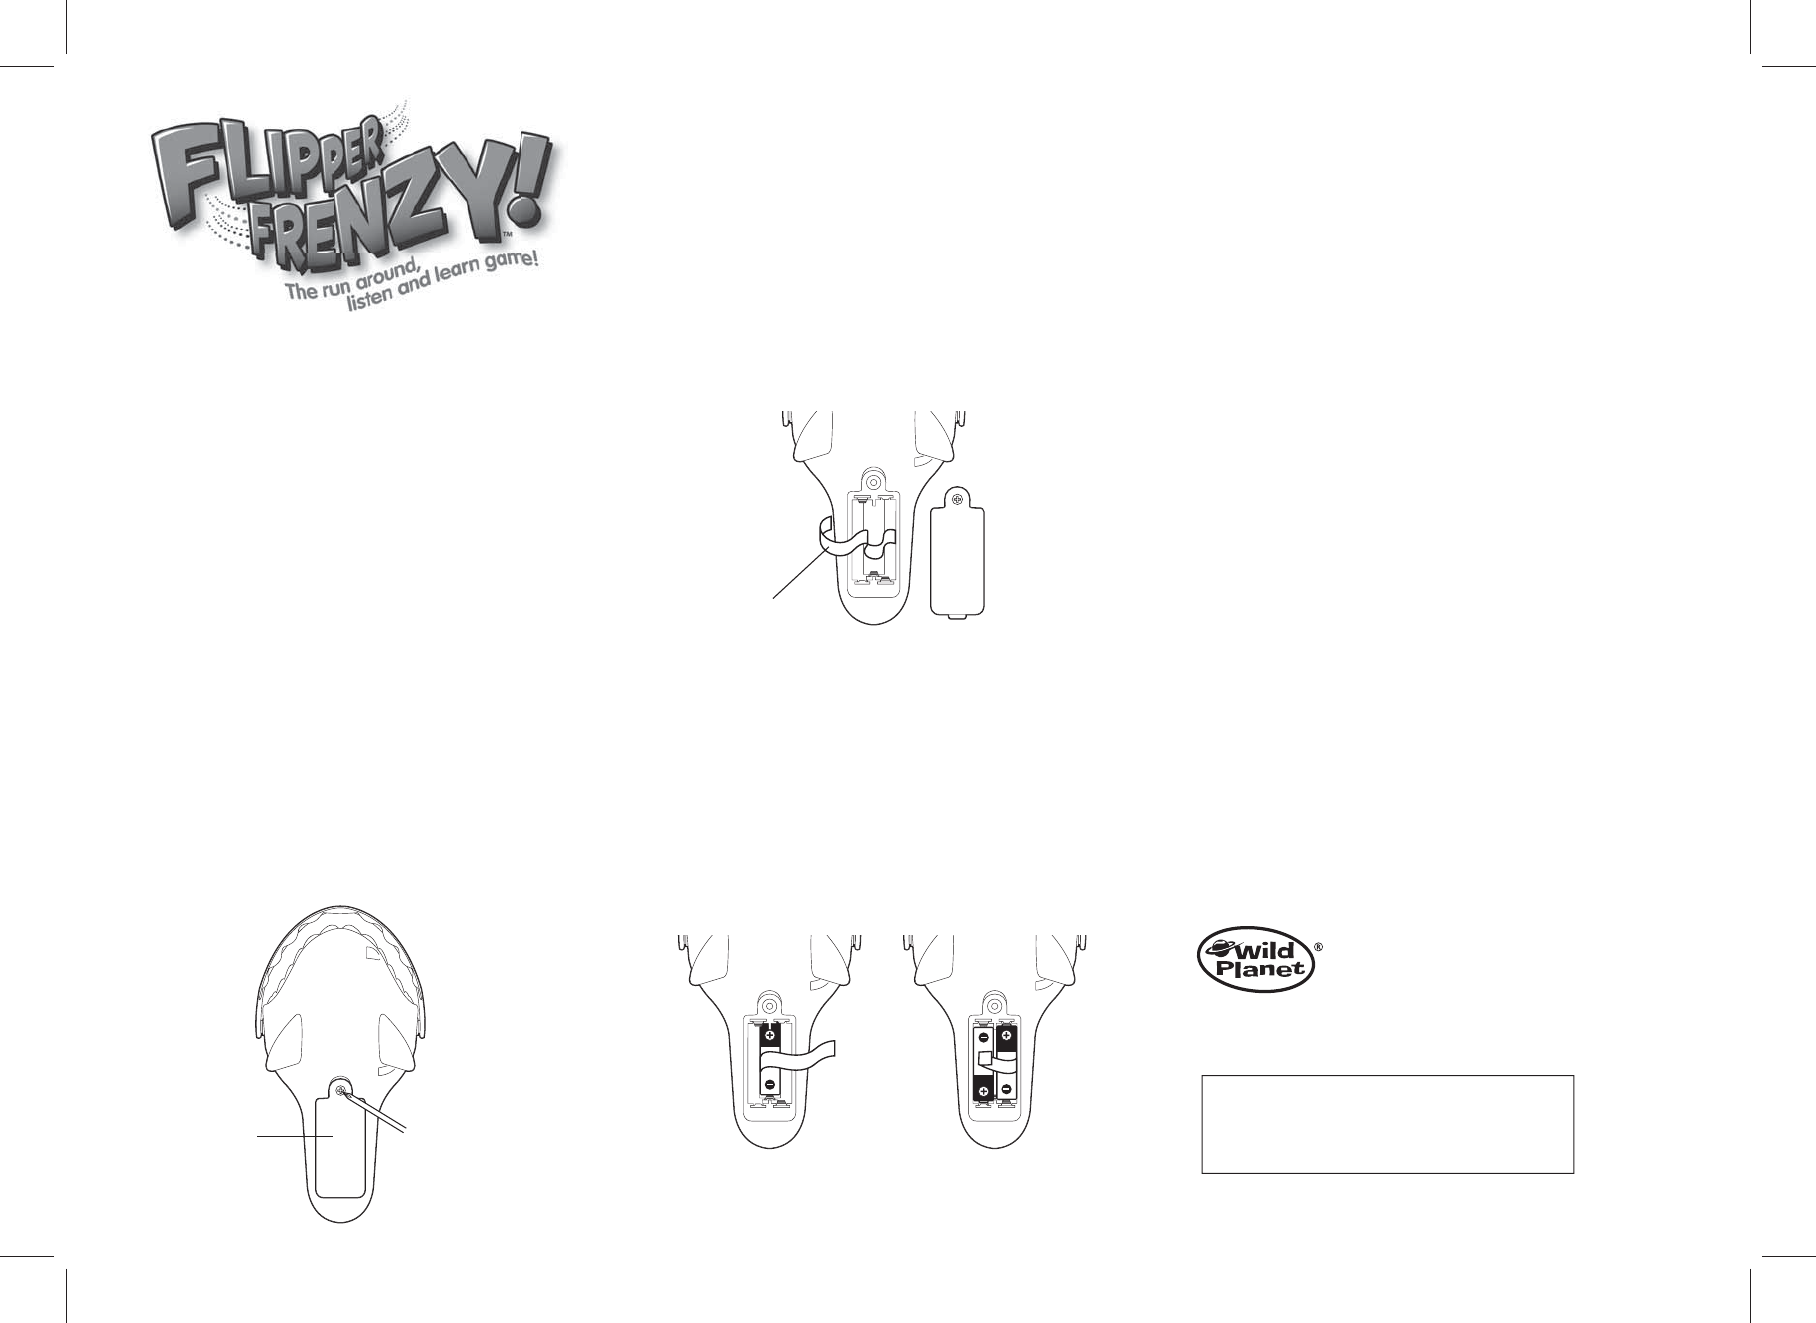
ATTENTION ADULTS: TO REPLACE BATTERIES
1. Use a small Phillips head screwdriver to loosen
the screw on the battery compartment (Fig. 1).
Remove BATTERY COVER.
2. Pull BATTERY RIBBON firmly to pop out all 3 exhausted
batteries.
FCC ID N3EFLIPPERFRENZY
This device complies with part 15 of the FCC Rules. Operation is
subject to the following two conditions: (1) This device may not cause
harmful interference, and (2) this device must accept any interference
received, including interference that may cause undesired operation.
Warning! Changes or modifications to this unit not expressly
approved by the party responsible for compliance could void the
user’s authority to operate the equipment.
NOTE: This unit has been tested and found to comply with the limits
for a Class B digital device, pursuant to Part 15 of the FCC Rules.
These limits are designed to provide reasonable protection against
harmful interference in a residential installation. This unit generates,
uses, and can radiate radio frequency energy and, if not installed
and used in accordance with the instructions, may cause harmful
interference to radio communications. However, there is no
guarantee that interference will not occur in a particular installation.
If this unit does cause harmful interference to radio or television
reception, which can be determined by turning the unit off and on,
the user is encouraged to try to correct the interference by one or
more of the following measures:
• Reorient or relocate the receiving antenna.
• Increase the separation between the unit and receiver.
• Connect the unit into an outlet on a circuit different from that to
which the receiver is connected.
• Consult the dealer or an experienced radio/TV technician for help.
3. Place battery ribbon across bottom of battery compartment as
shown (Fig. 2).
4. Place 1 fresh, new AAA battery in the bottom of the
compartment with the positive (+) end pointing down
as shown (Fig. 3). SNAP BATTERY IN FIRMLY.
5. Fold ribbon back over first battery as shown (Fig. 3).
6. Place 2 AAA batteries in the remaining 2 battery holders, on top of
ribbon, with each battery pointing in the direction shown (Fig. 4).
IMPORTANT: Observe battery polarity (+ and –)
7. Replace battery cover, making sure end of ribbon is tucked neatly
inside. Tighten screw.
Fig. 3 Fig. 4
Battery Ribbon
Fig. 2
Battery Cover
Fig. 1