Williams Sound DLT300 Portable Conference Transmitter User Manual
Williams Sound, LLC Portable Conference Transmitter
UserManual.wiki
>
Williams Sound
>
DLT300 User Manual
User Manual
Navigation menu
Upload a User Manual
Namespaces
Wiki Guide
HTML
PDF
Info
Views
User Manual
Discussion / Help
Navigation
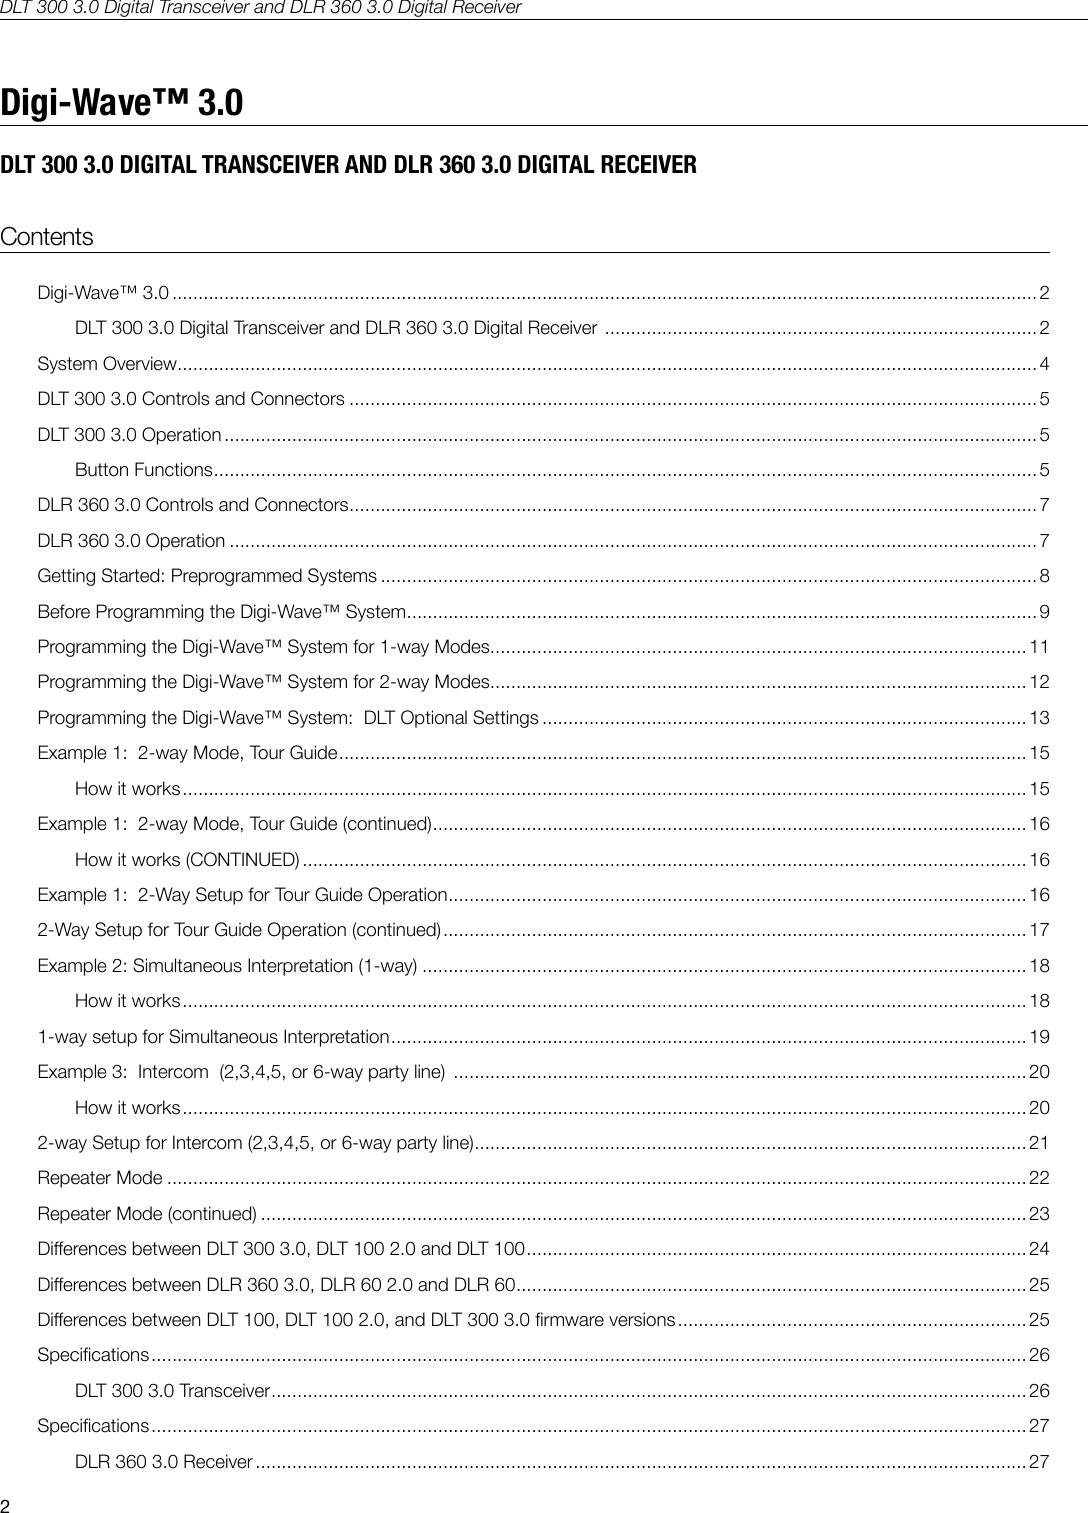
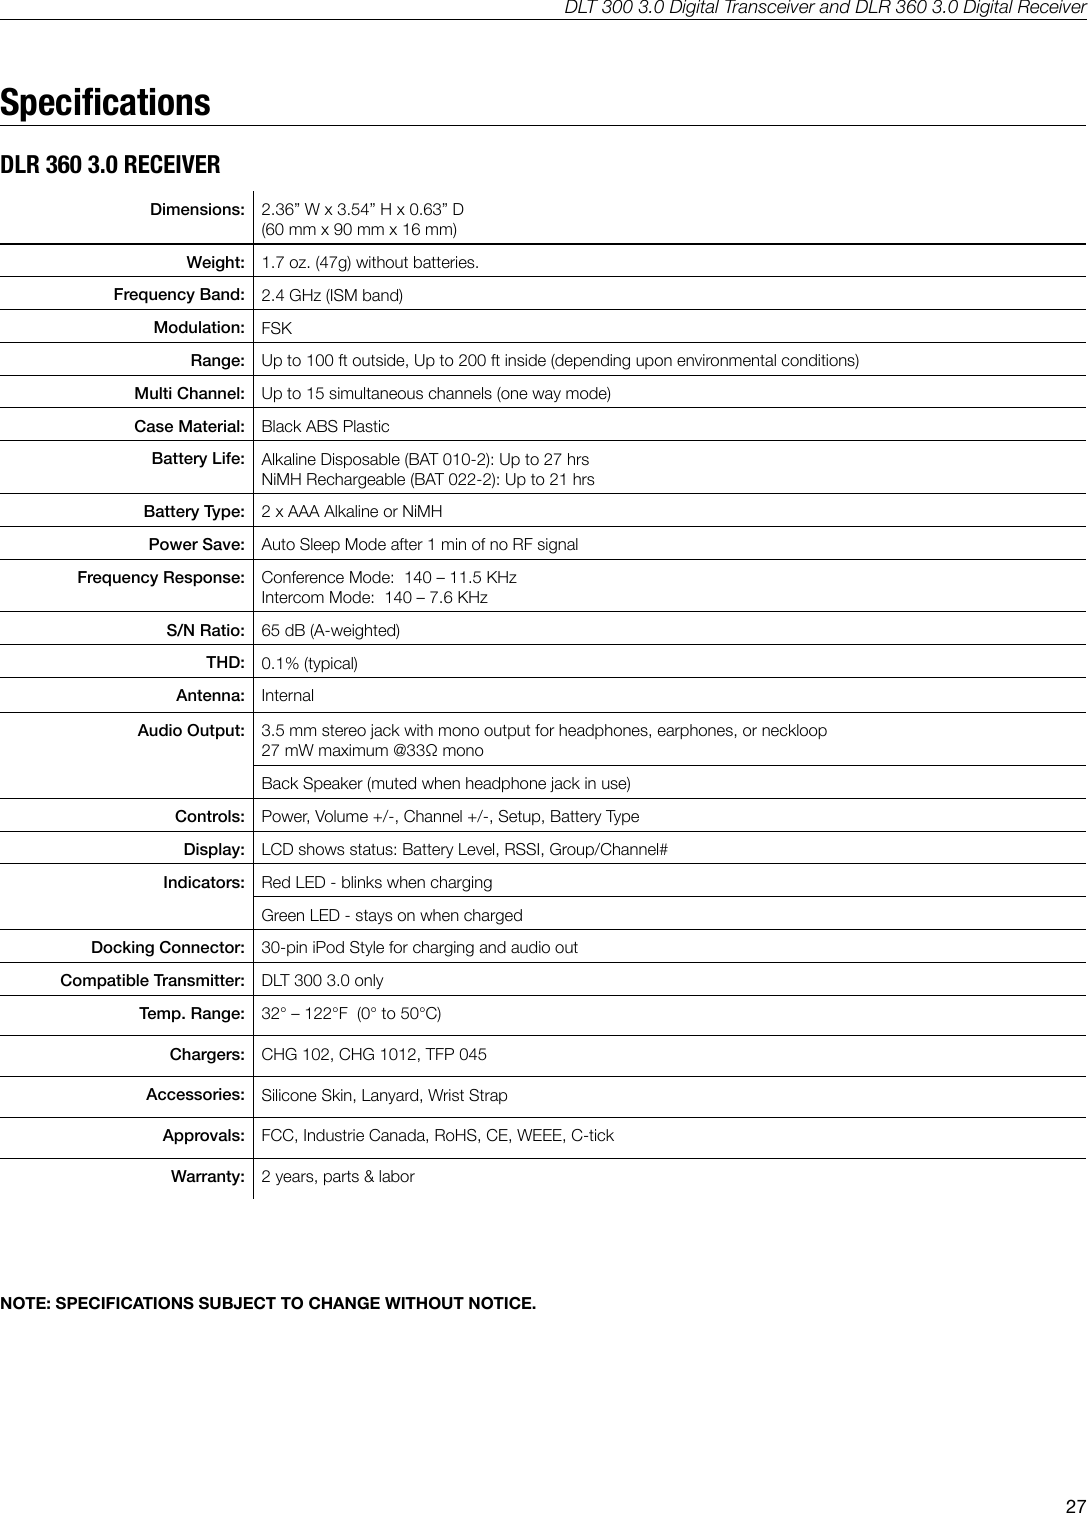
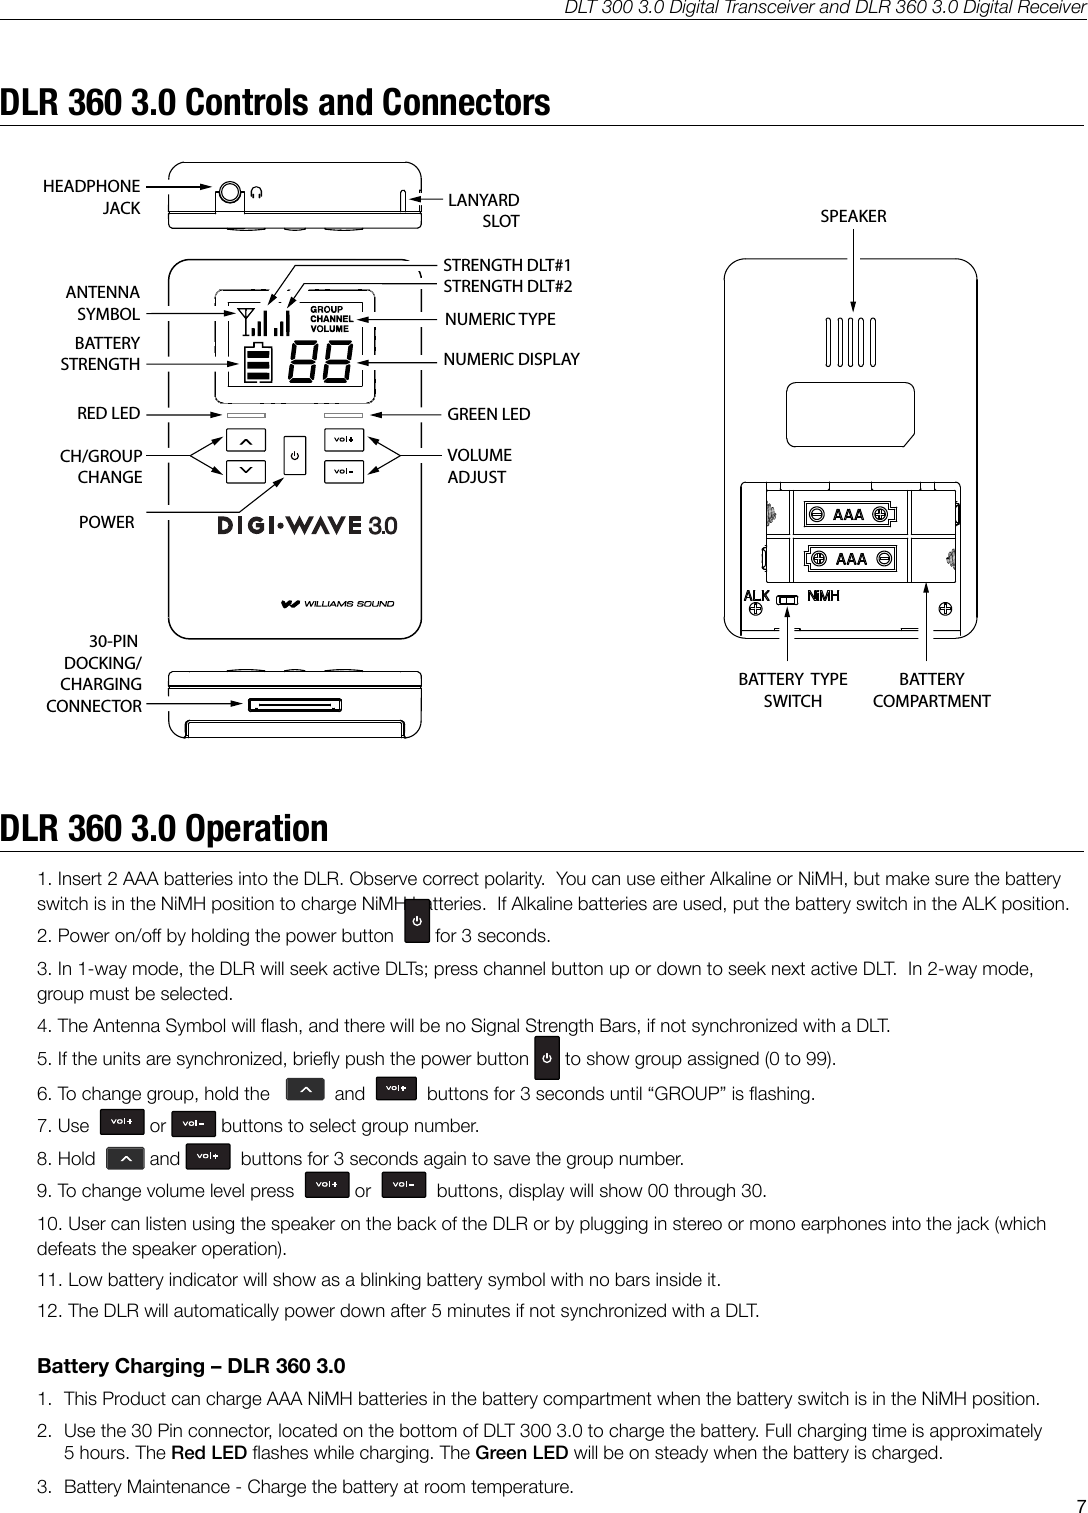
![DLT 300 3.0 Digital Transceiver and DLR 360 3.0 Digital Receiver6QUICK GROUP CHANGE / SETUP BUTTONS ·Press and hold and together for 3 seconds to enter or exit setup menu · Press and hold button for 3 seconds to enter quick group change mode. The GRP light will ash. Then use or to change groups. To exit, push again or just wait until the unit times out. · Use these buttons to select channels in simultaneous interpretation mode MICROPHONE LEVEL ADJUSTMENT · Hold the button for two seconds to enter mic level adjustment. For level adjustment use or VOLUME CONTROL / SELECT BUTTON ·Control / Volume ·Use to navigate selections in setup menu. ·Access and adjust tone control (0-53)TALK BUTTON · Press button momentarily once to activate the microphone. Press button once more to turn o the microphone · Press and hold the button for approximately 2 seconds to mute other DLT 300 3.0 Guest units. Only the M1 and M2 have this function. ([TALK] LED will blink on all units when in mute mode).Battery Charging – DLT 300 3.01. This Product uses an internal rechargeable Lithium Polymer battery.2. Use the 30 Pin connector, located on the bottom of DLT 300 3.0 to charge the battery. Full charging time is approximately 5 hours. The Red LED ashes while charging. The Green LED will be on steady when the battery is charged. 3. Battery Maintenance - Charge the battery at room temperature.](https://usermanual.wiki/Williams-Sound/DLT300/User-Guide-2451681-Page-6.png)
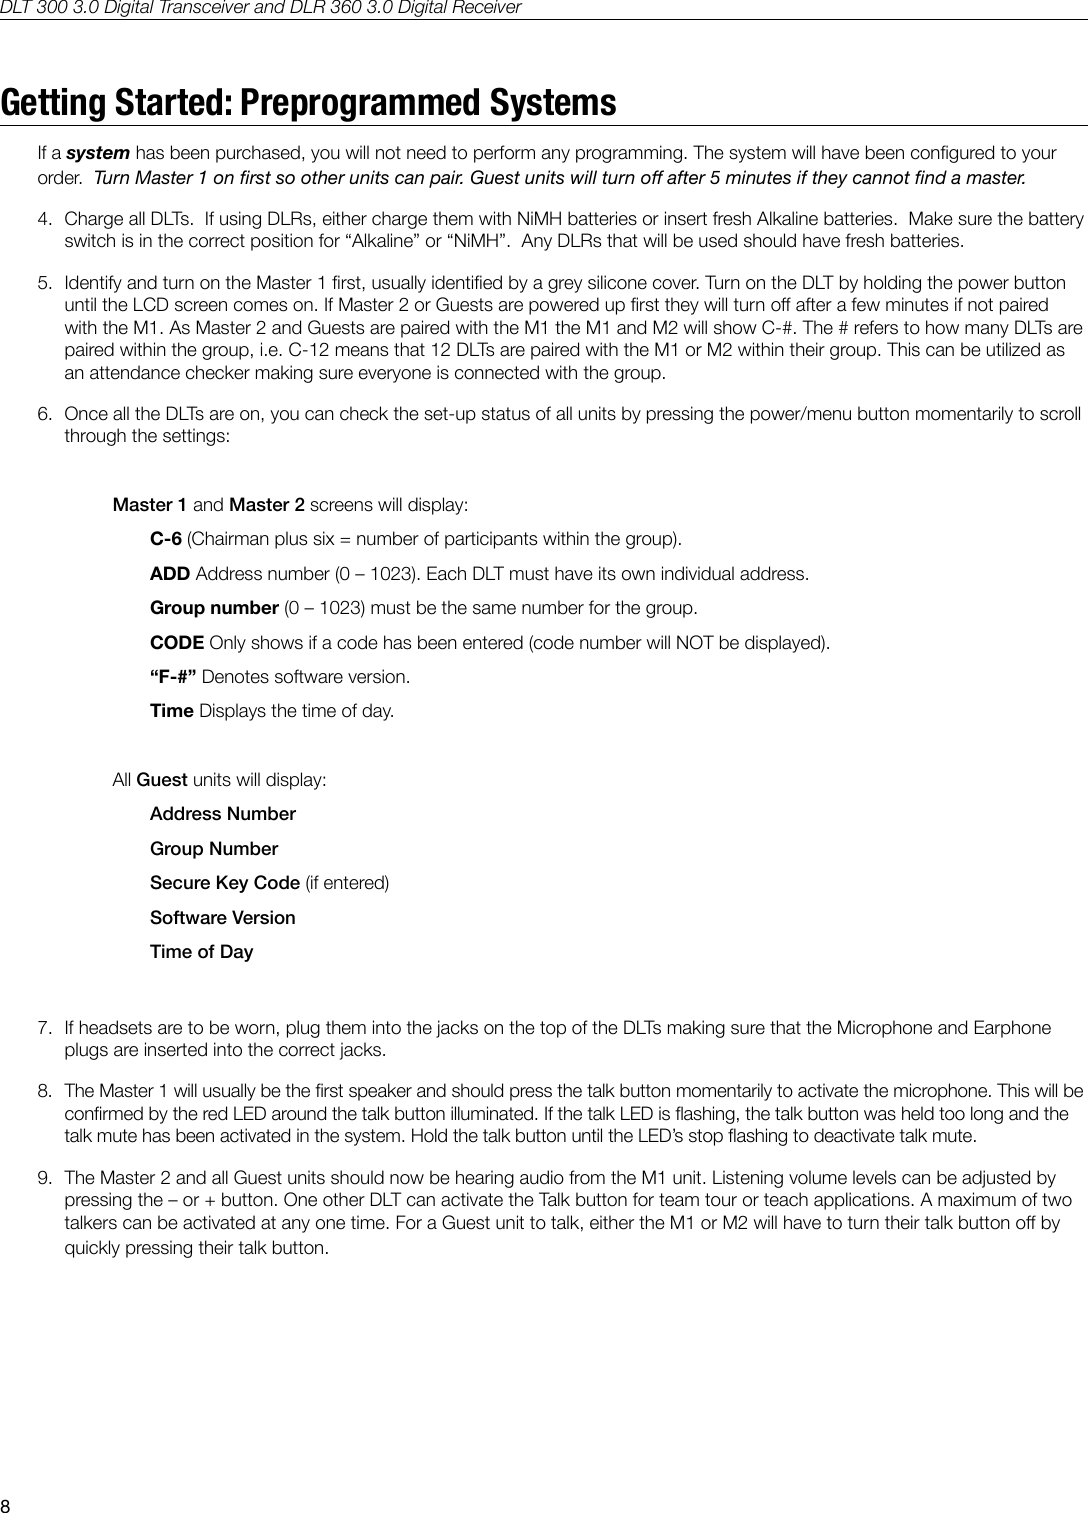

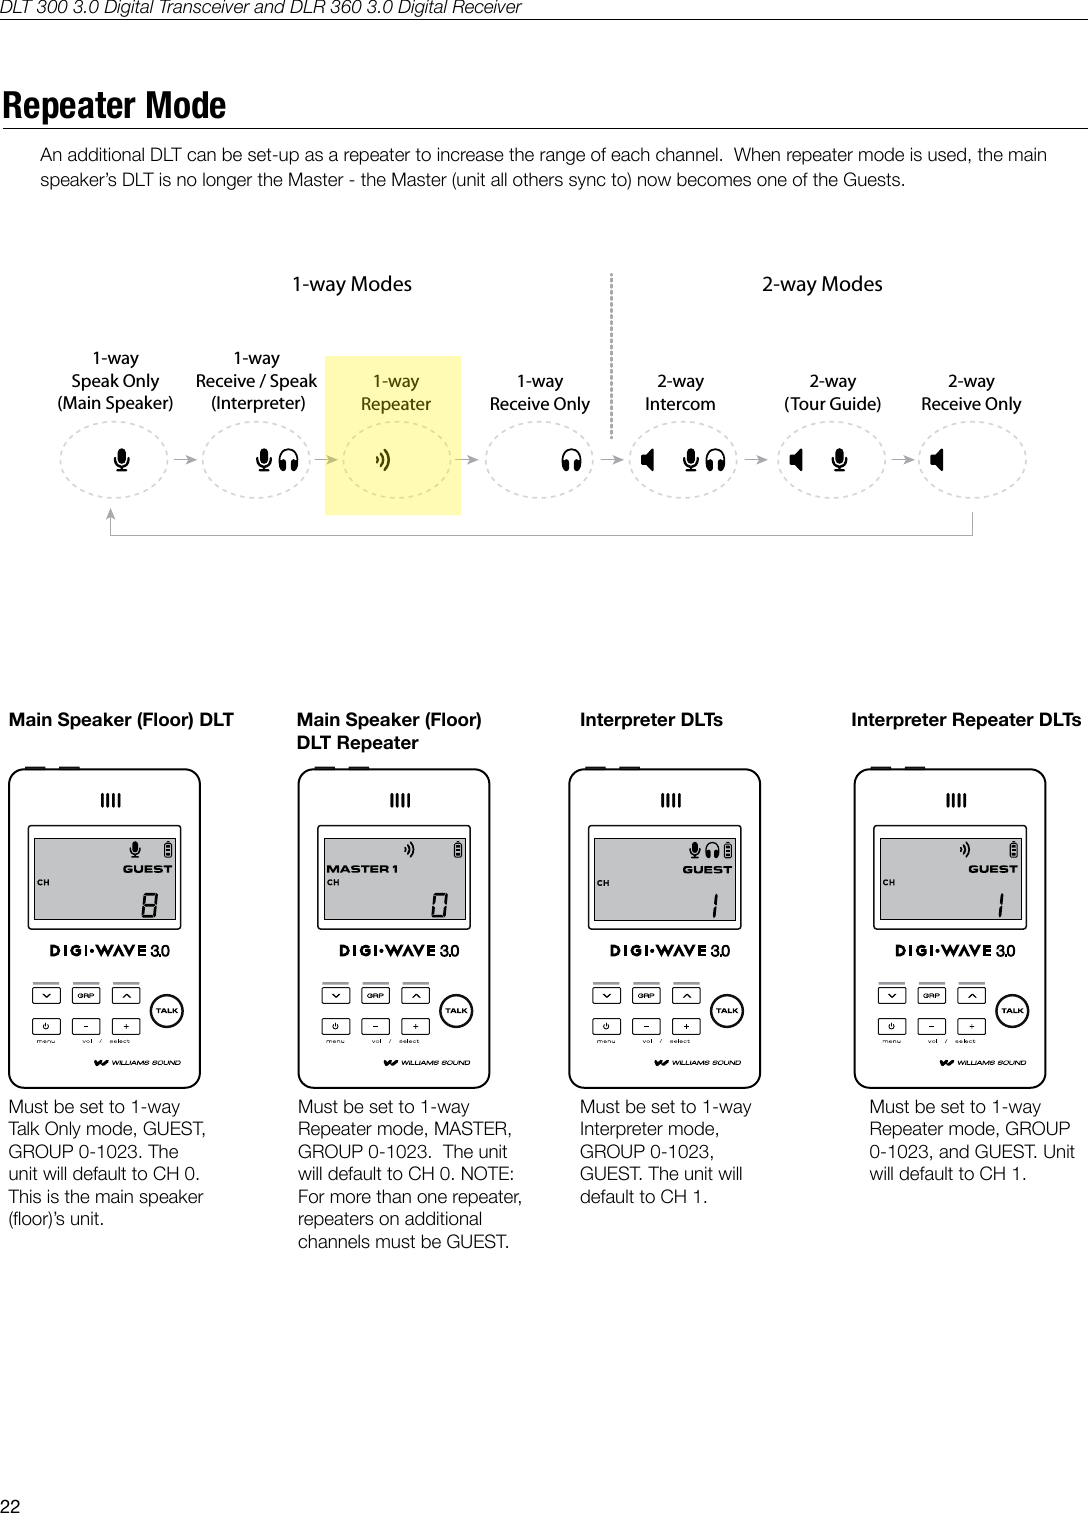
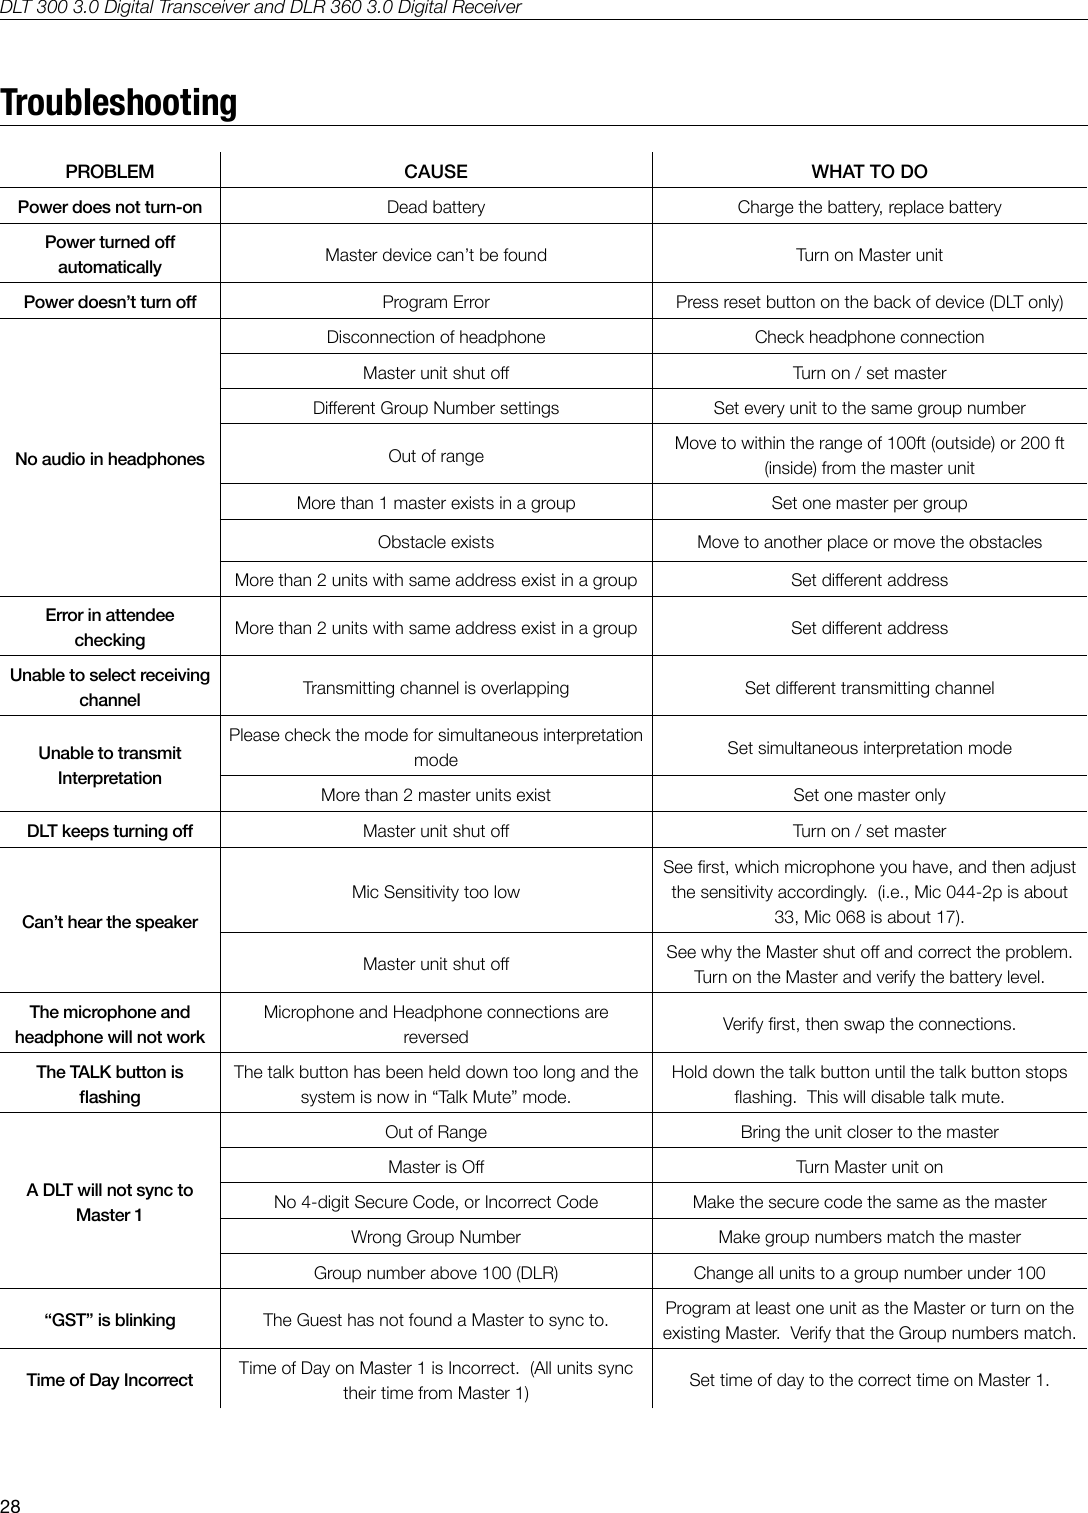
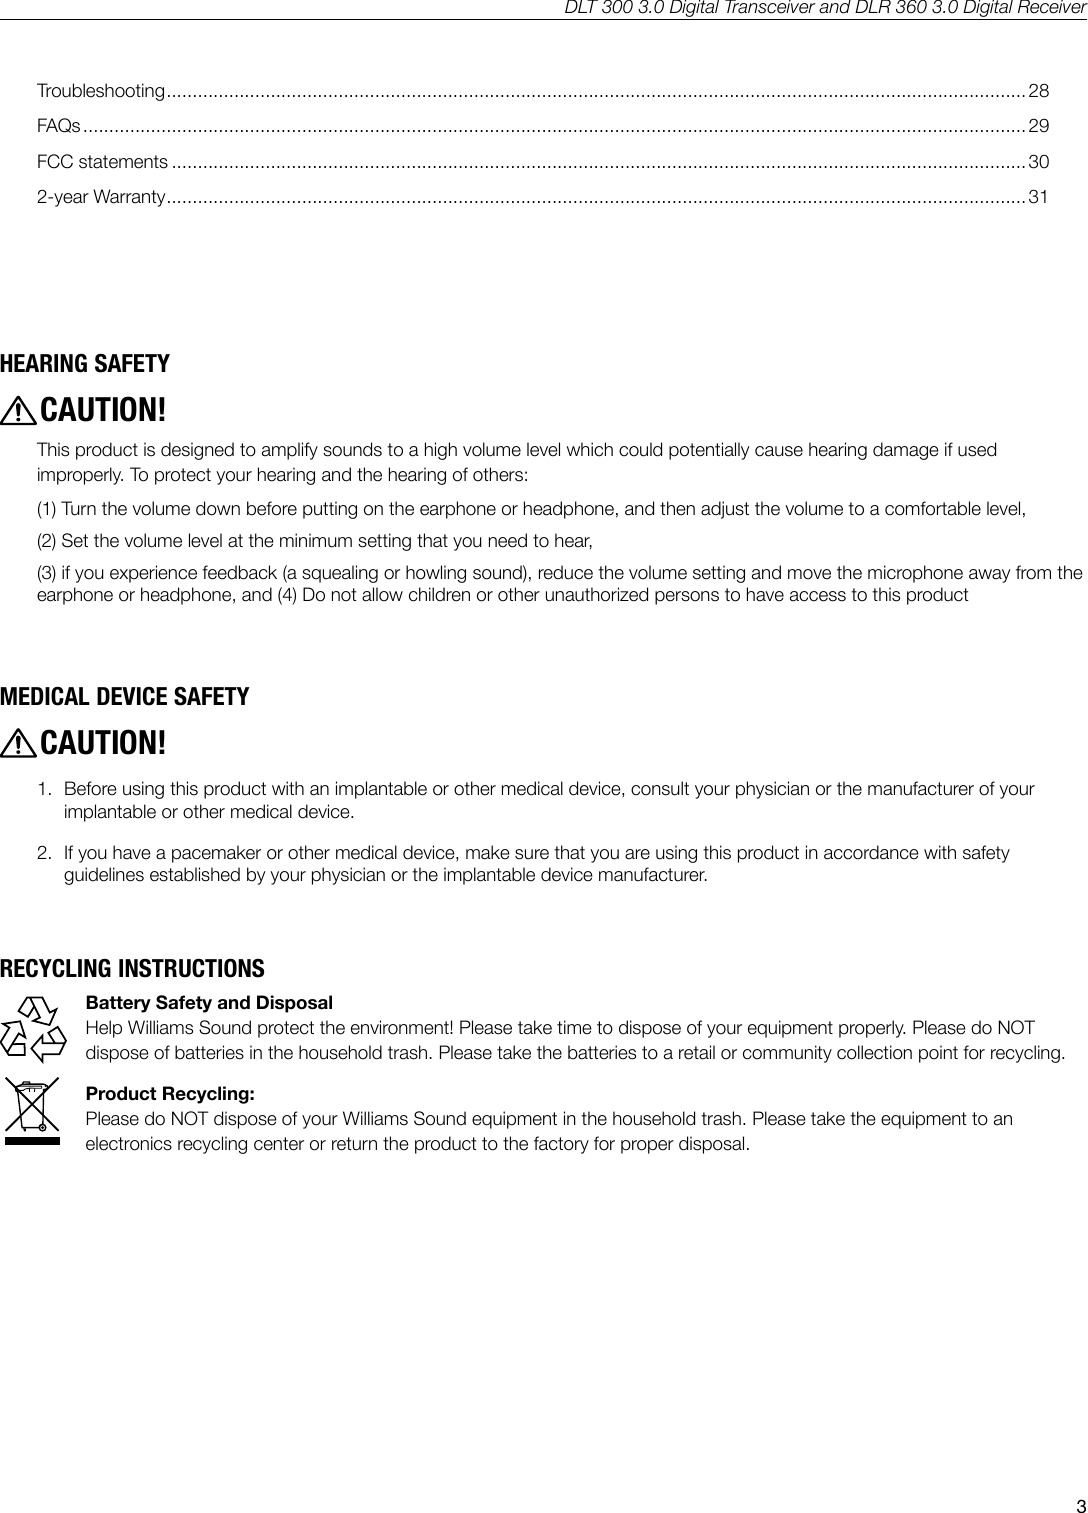
![DLT 300 3.0 Digital Transceiver and DLR 360 3.0 Digital Receiver23Repeater Mode (continued)Any DLT’s in 2-way Listen-only Mode, or DLR’s, must be in the same Group. Each Listener would select a desired channel/language. See below - when repeater mode is used, the main speaker is not the master unit - the master (that all other units sync to) is a Guest unit.Main speaker (floor)DLT 300 3.0’s FOR FLOOR AND INTERPRETERSCH 0CH 0CH 1 CH 2 CH 3... CH 14CH 1 CH 2 CH 3... CH 14MASTERGUEST REPEATERSGUESTCH 0 CH 1 CH 2 CH 3... CH 14DLT 300 3.0 [ LISTEN ONLY ] OR DLR 360 3.0DLT 300 3.0 [ LISTEN ONLY ] OR DLR 360 3.0 MUST BE ON THE SAME GROUP. EACH LISTENER WOULD SELECT A DESIRED CHANNEL / LANGUAGE.NOTE: WHEN REPEATERS ARE NOT REQUIRED, THE MAIN SPEAKER ( CH 0 ) WILL BE THE MASTER.A549ORIGINAL (SAVE)Note: When repeaters are not required, the Main Speaker (Ch. 0) will be the Master.](https://usermanual.wiki/Williams-Sound/DLT300/User-Guide-2451681-Page-23.png)
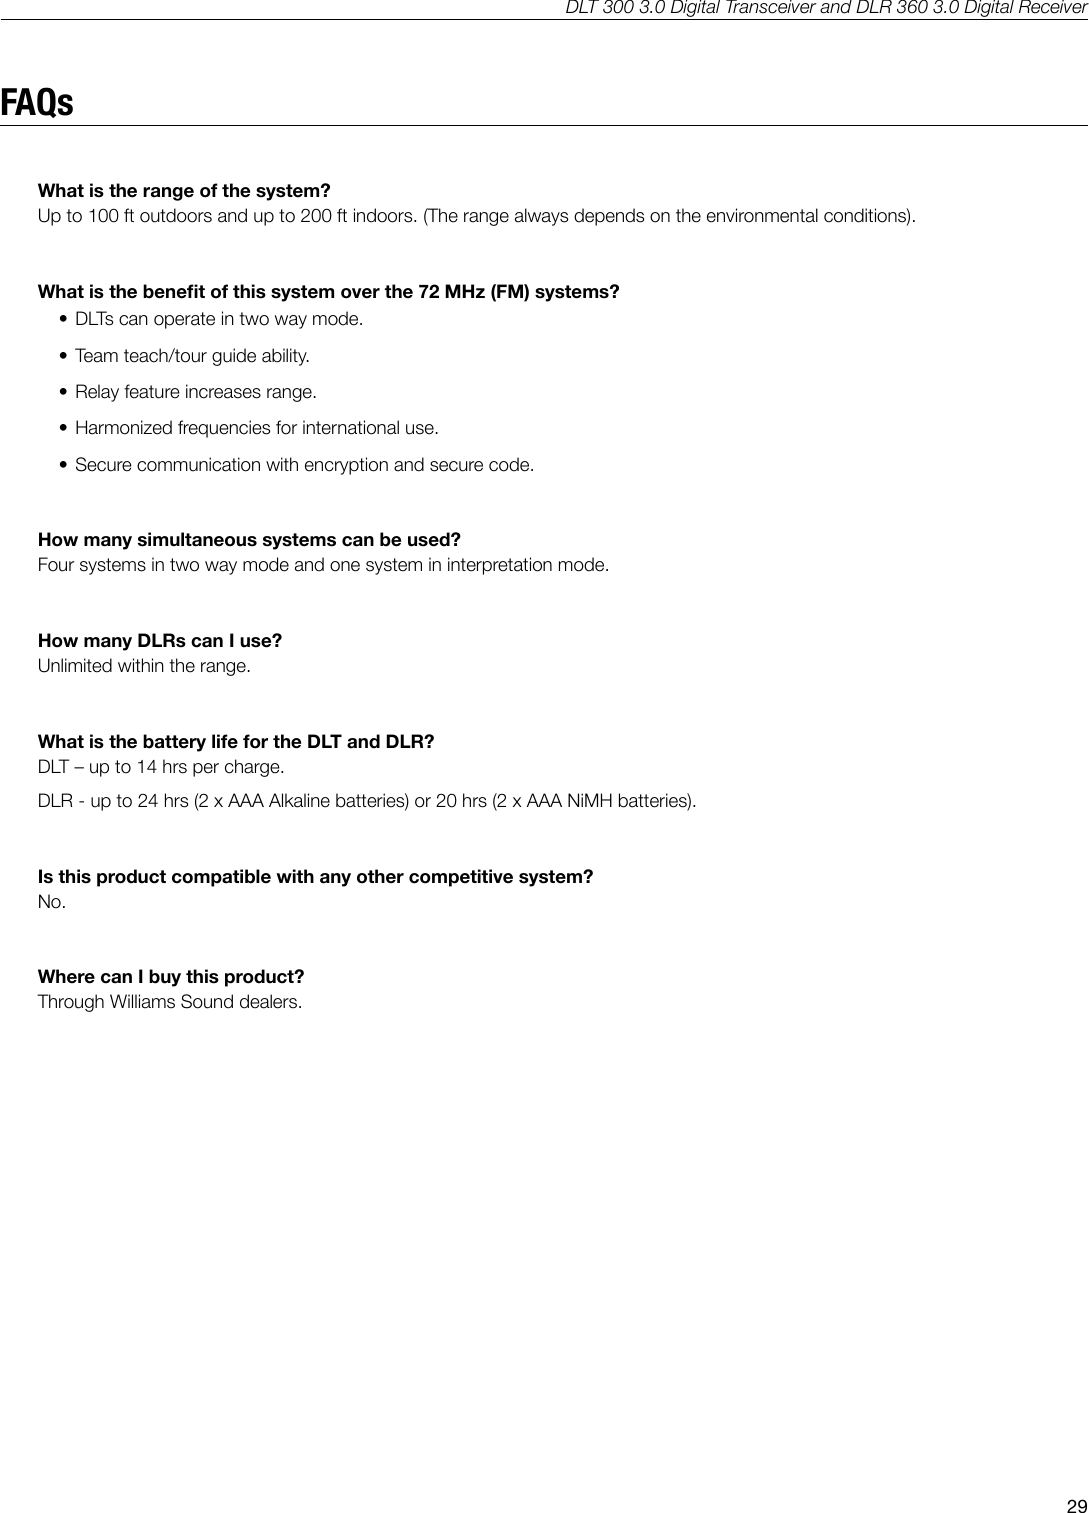
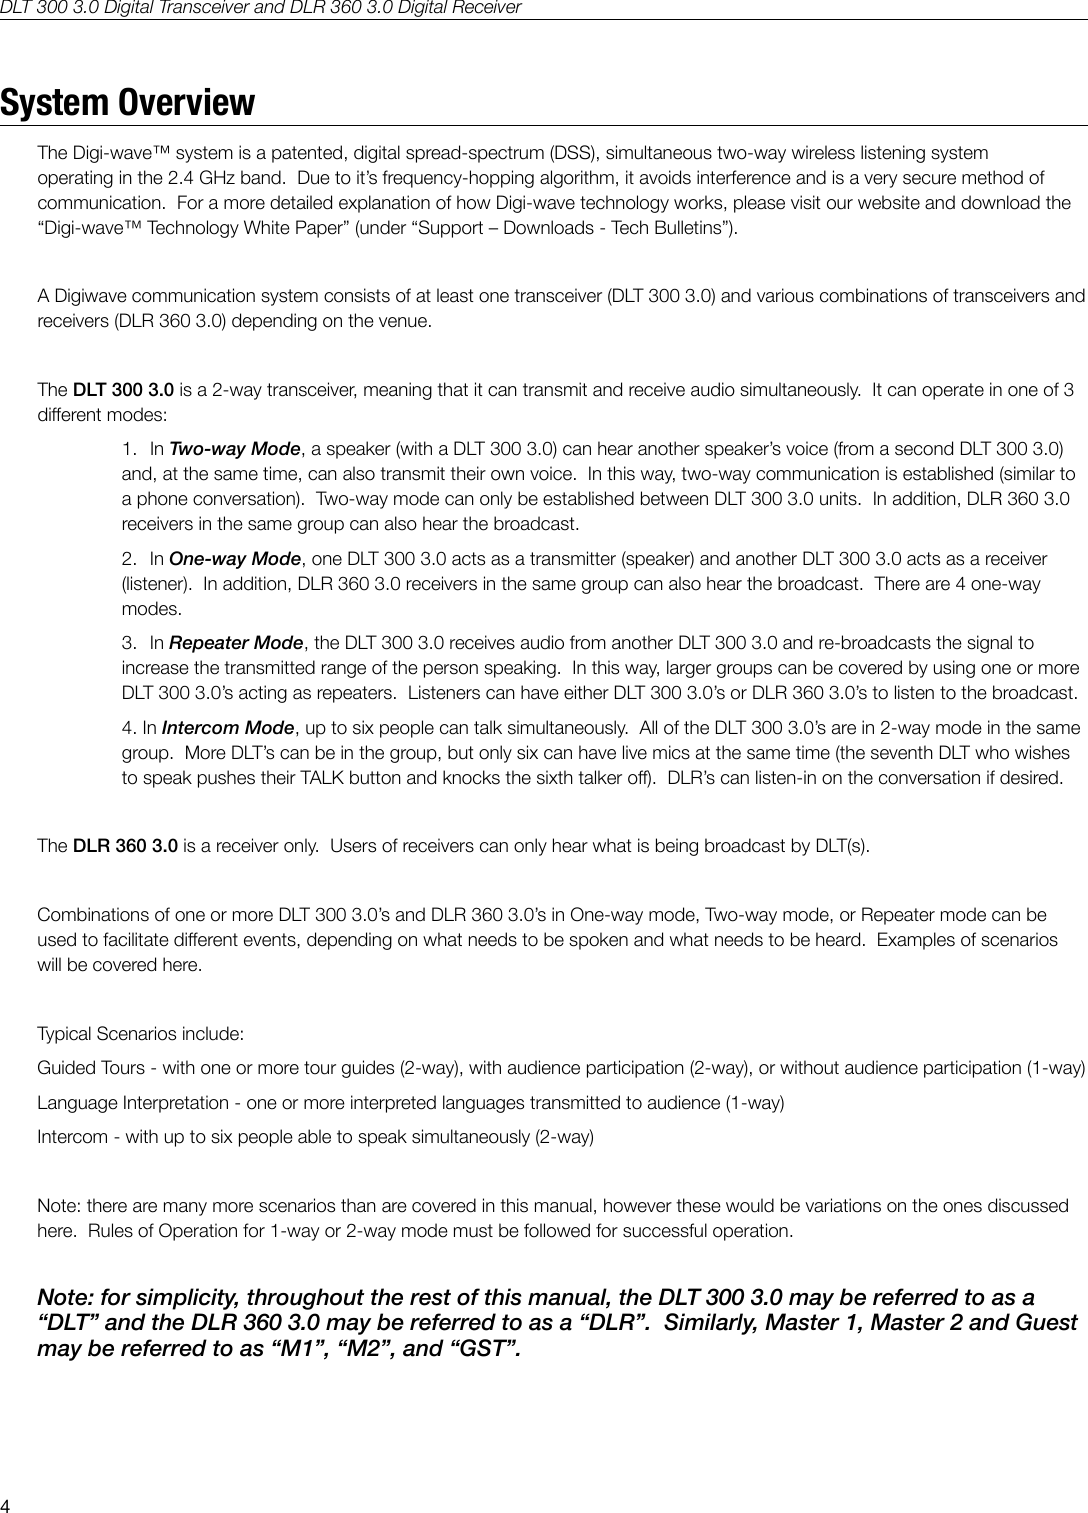
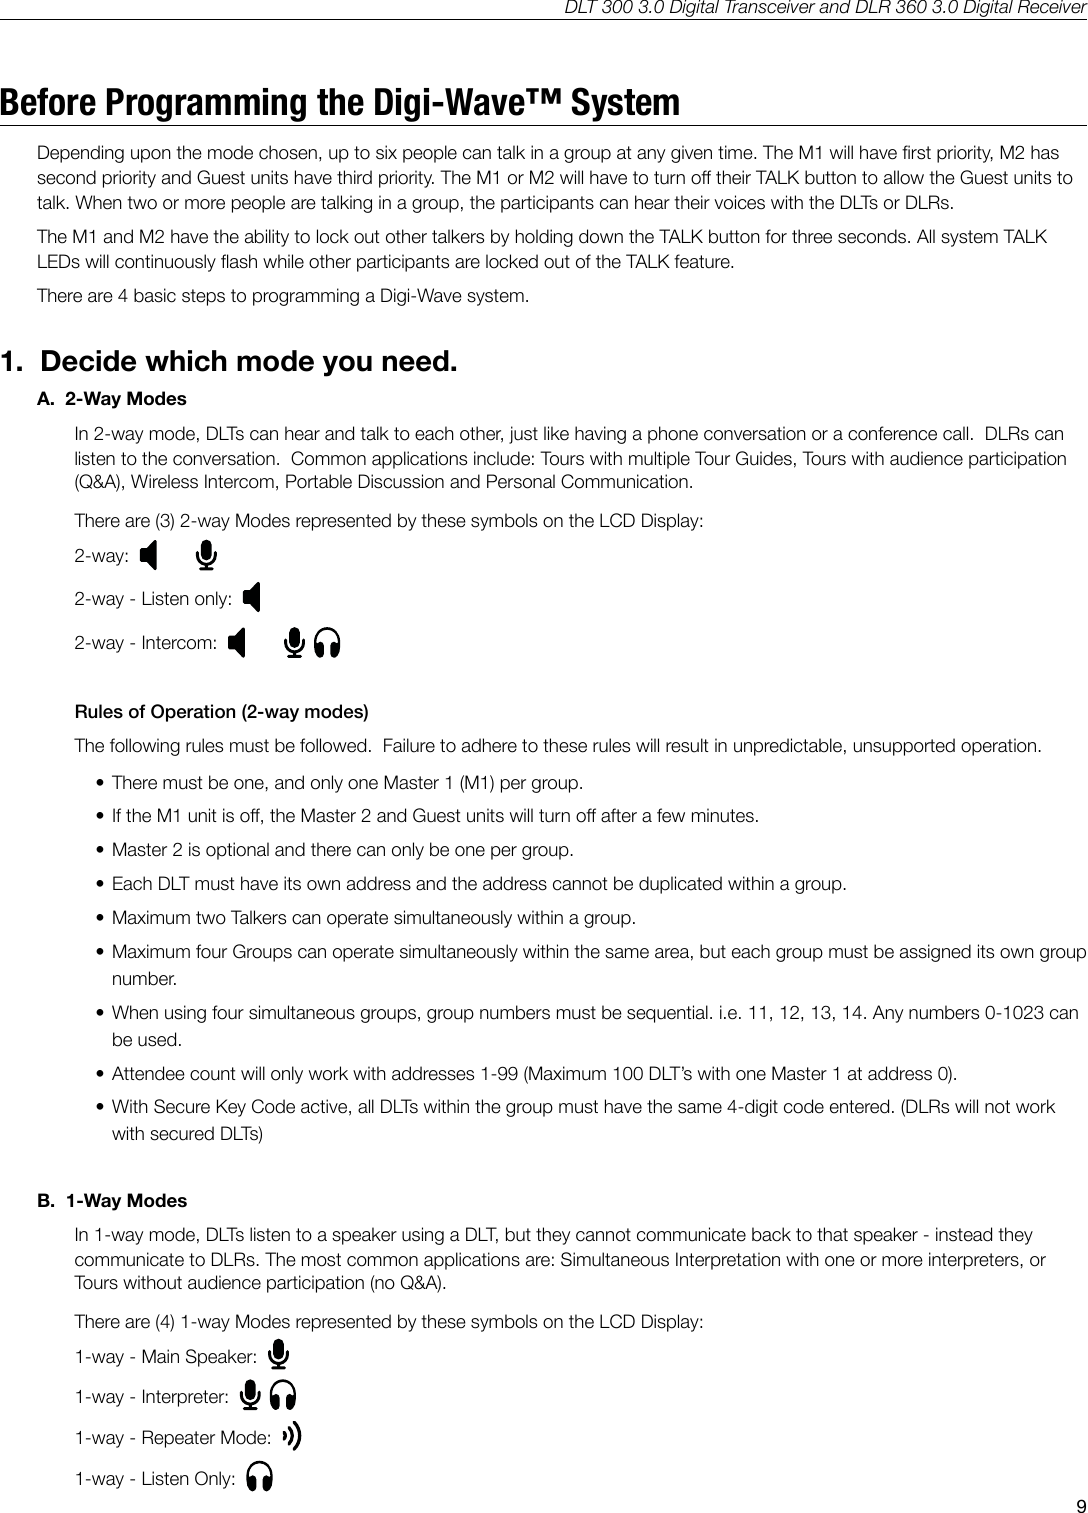
![DLT 300 3.0 Digital Transceiver and DLR 360 3.0 Digital Receiver26SpecicationsDLT 300 3.0 TRANSCEIVERDimensions 103.3 x 61.8 x 11.3 mm (4.07 x 2.43 x 0.44 inches) (H x W x D)Weight 82 g (2.9 oz) including batteryColor Black/Silver (Front/Back)Enclosure Shatter resistant PC/ABS plasticBattery type Lithium Polymer with smart charge built into transceiver; 2000 mAHBattery life Up to 14 hrs talk time per chargeCurrent consumption range: 36 mA @ idle to 89 mA w/1 Ch Tx and 3 Ch RxCharge time 5 hrs. TFP 045 with cable and international adaptersOptional Chargers: Two-bay CHG 102, or 12-bay CHG 1012Simultaneous Channels/Groups/TalkersUp to 15 simultaneous channels (Interpretation mode)Up to 4 simultaneous groups (2 way mode)Up to 6 simultaneous talkers (2-way mode)Operating frequencies 2.4 GHz (ISM band); 2402 – 2476 MHz FHSSAudio Frequency response(-3dB Knee Level)Conference Mode, Interpreter Mode: 140 – 11.5 KHzIntercom Mode: 140 – 7.6 KHzSNR 74 dB (A-weighted, Maximum output)THD 0.33 %Microphone input Internal microphone (disabled when MIC jack engaged) and 3.5 mm phone jack (tip/sleeve) with electret microphone bias, adjustable gain with 63dB range.Headphone output 3.5 mm phone jack; 33 Ω loadAudio output Max SSPL 90 111.8dB (EAR 013), 116.8dB (EAR 041) Internal speaker (disabled when ear jack engaged) <20mW @ 10% THD/RL = 33ΩRange Up to 100ft outdoors and 200ft indoors (depending upon environmental conditions)Modulation FSKRF output 14 dBm TypicalSecurity 87 bit encryption, Secure Key Code, Setup Lock (SLOC)Controls Front panel push buttons for volume up/down, group select, menu access and selection, voting, timer, time, MIC on/o, power on/o, tone control SLOC access and Secure Key access. System reset button (rear panel)Outputs 3.5 mm stereo/mono headphone jack;30 pin charging jack with audio out to base stationsSide tone -12 dB below volume, tone variation [ST:0 = O, ST:1 = -6 dB, ST:2 = -12 dB]Indicators LCD (Group, channel, volume level, battery status, mode, number of people with talk button on)LED’s (charge status) Red LED around talk button when enabled.Docking Connector 30-pin Connector for charging and audio in/outCompatible Receiver DLR 360 3.0 onlyApprovals FCC, Industrie Canada, CE, C-tick, RoHS, WEEEWarranty 2 years parts and labor (90 days on accessories); 6 months on internal battery NOTE: SPECIFICATIONS SUBJECT TO CHANGE WITHOUT NOTICE.](https://usermanual.wiki/Williams-Sound/DLT300/User-Guide-2451681-Page-26.png)