Win Accord 6210-7DWINCH Digital Photo Frame User Manual
WIN ACCORD LTD., Digital Photo Frame
user manual

2
Table of Contents............................................................................................2
Important Safety Precautions...........................................................................3
Cleaning the LCD Screen...........................................................................3
Cleaning the Digital Picture Frame..............................................................3
Introduction....................................................................................................4
What’s in the Box............................................................................................5
Identifying the Parts..................................................................................5
Replacing Remote Control Battery..............................................................6
Setting Up the Digital Picture Frame...........................................................7
Locating the Digital Picture Frame’s Features....................................................7
Setting Up the Slideshow.................................................................................8
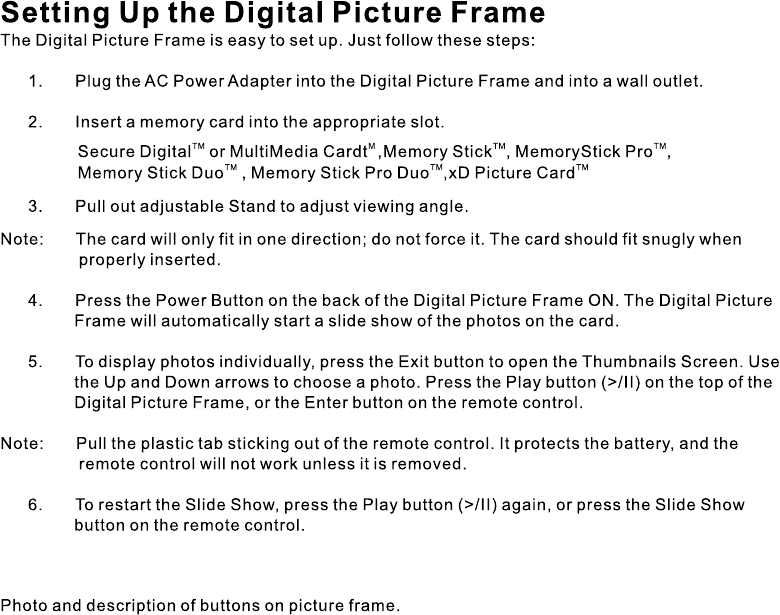
Card Selection Screen..............................................................................8
Connect a USB Flash Drive.......................................................................8
Mode Selection Screen.............................................................................9
Thumbnail Screen....................................................................................9
Displaying a Single Photo on the Full Screen.............................................10
Controlling the Slide Show and Photo..............................................................10
Rotate the Photo.....................................................................................10
Enlarge the Photo...................................................................................10
Copy/Delete Files...................................................................................10
Copy Files from Flash Card into Built-in Memory...................................10
Delete Files from Built-in Memory........................................................11
Slide Show Selected...............................................................................11
Adjust the LCD Color...............................................................................12
Add Music to the Slide Show....................................................................12
Setting Viewing Options...........................................................................12
Listening to Music...................................................................................14
Control the Volume............................................................................14
Watching a Video....................................................................................14
Advanced Operations....................................................................................15
Setting Clock and Calendar.....................................................................15
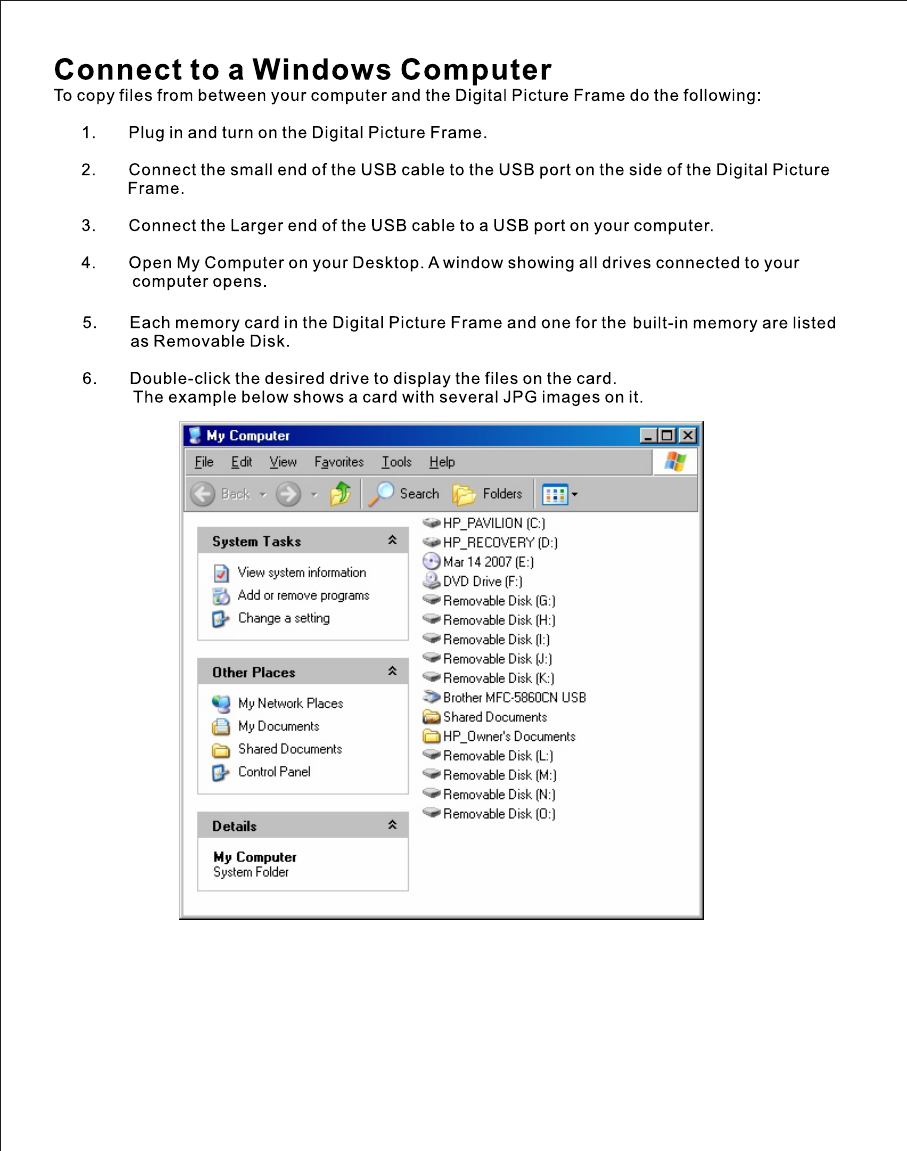
Connect to a Windows Computer.............................................................16
Disconnect the Digital Picture Frame from the Computer............................17
Frequently Asked Questions..........................................................................18
Technical Specifications................................................................................19
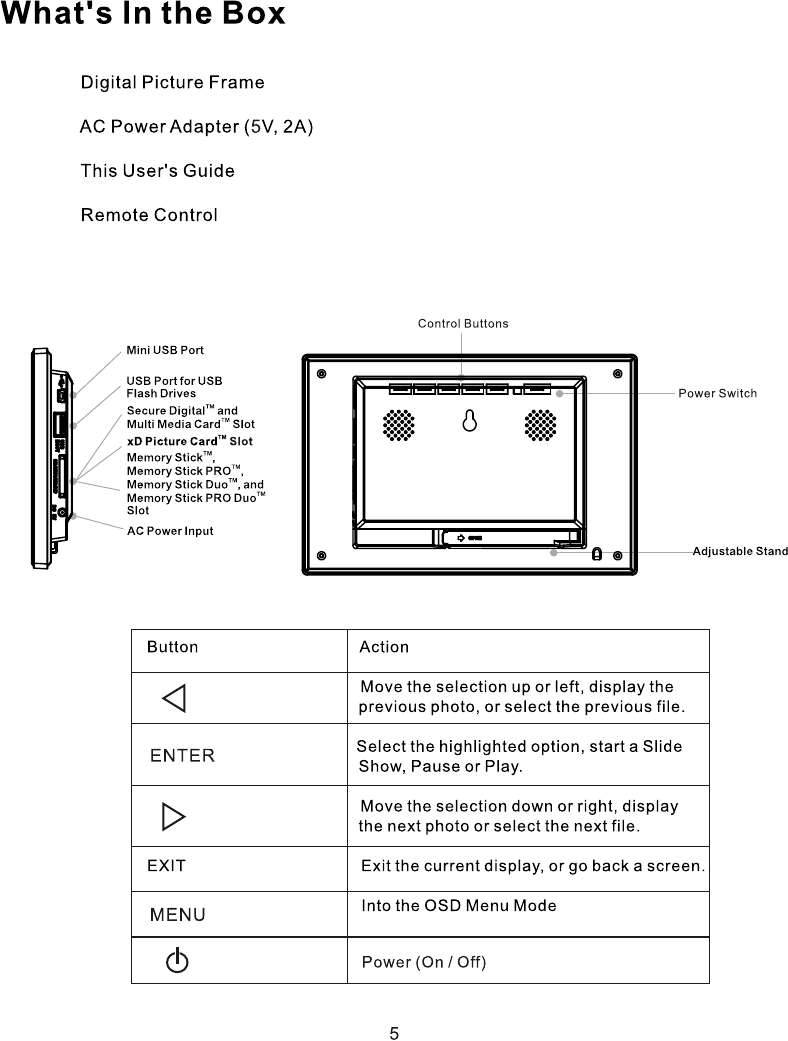
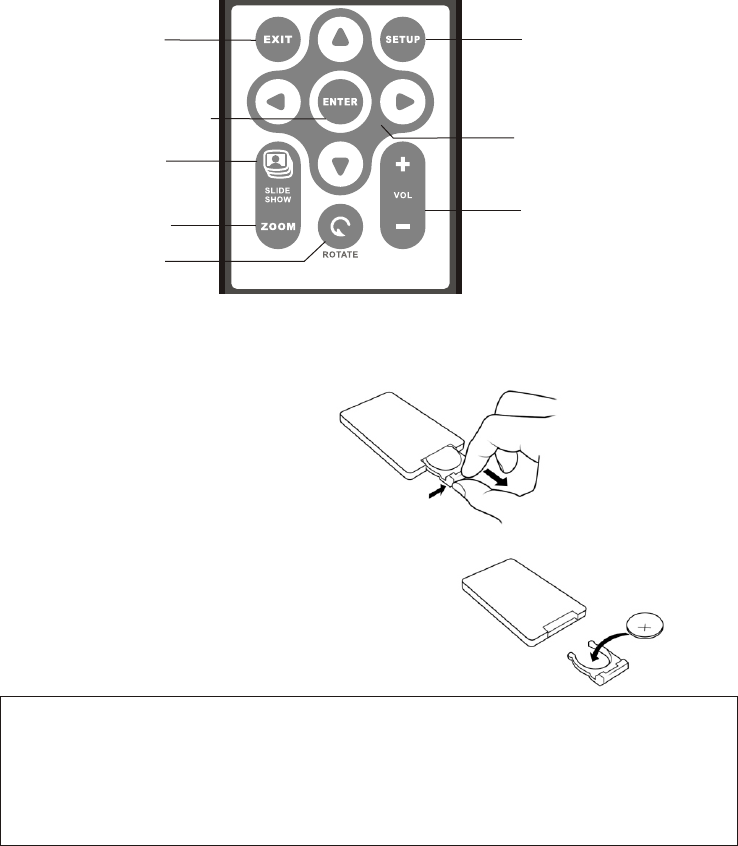
Identify the Parts
6
DIGITAL PICTURE FRAME
EXIT / Back
Zoom In
SETUP / Menu
Rotate
Volume
Play / Enter / Mute
Slide Show
Direction
Replacing remote control battery
If the remote control stops working, replace the battery (CR2025 lithium battery )
with a new one.
1. Pull out the battery holder.
2. Remove the old battery from the holder and then put a new battery.
* "+"should be facing up.
3. the battery holder back to the remote comtrol. Insert
WARNING
Battery may explode if recharge,
disassemble or dispose of in fire.
mistreated. Do not
Notes
• When the lithium battey becomes weak, the operating distance of the
Remote conrol may shorten, or the Remote control may not fumction
properly. In this case,replace the battery with a Sony CR2025 lithium
battery. Use of another battery may present a risk of fire or explosion.
• Dispose the used batteries as specified by the local authorities.
• Do not lesve the remote control in a very hot and humid place.
• Incorrect use of the battery may cause leaking and corrosion.
- When the remote control will not be used for a long perild of time,
remove the battery from the remote control to prevent leaking and corrosion.
- Incorrectly inserting, shorting, dismantling, or heating the battery, or
throwing it into a fire may cause the battery to rupture and lesk.
Locating the Digital Picture Frame's Features
7
You can also plug a USB Flash Drive into the USB port on your Digital Picture Frame, then follow
the same steps in Card Selection Screen, Your Digital Picture Frame will see a USB Flash Drive
the same way it sees memory cards.
8
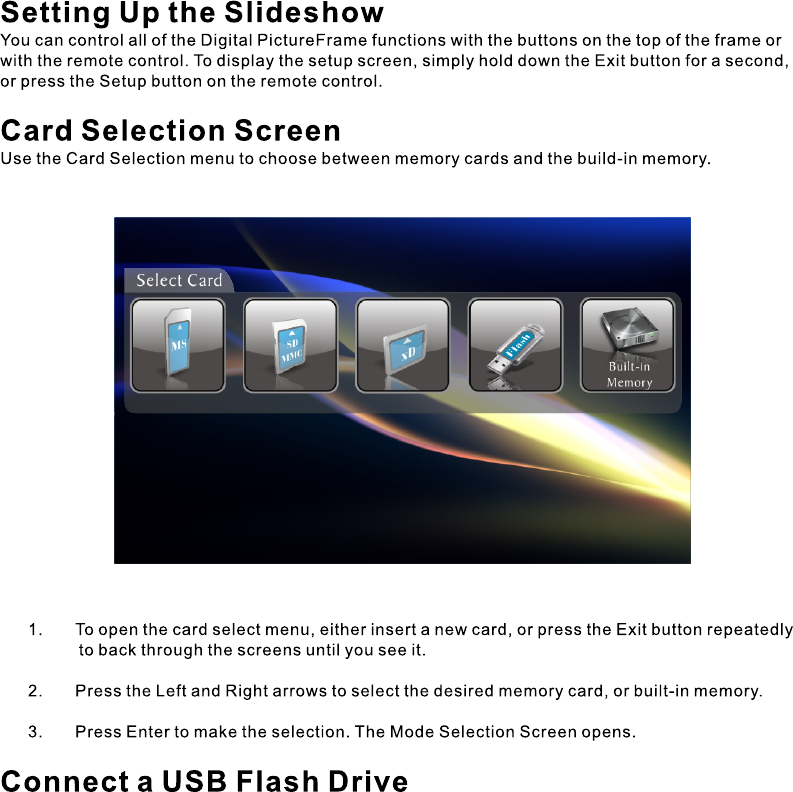
Mode Selection Screen
The Mode Selection Screen shows after you choose the memory source. Use it to
choose the type of files you wish to display.
File Show the file list
1. Press the Left and Right arrows on the remote control or the Digital Picture Frame to
select the mode.
2. Press Enter to make the selection. If you selected Photo, the thumbnail screen opens.
It is described below.
If you selected any of the other file types, a screen listing all of the files with the chosen
type. You can select one in the same manner as a photo.
3. To go back to the Mode Selection Screen, press Exit.
9
3. To pause the Slide Show, press Stop on the Remote Control.
4. To stop the Slide Show and return to the Thumbnail screen, press the Exit button.
4. To return to the Thumbnail screen, press the Exit button.
10
Copy/Delete Files
Copy Files from Flash Card into Built-in Memory
(1) When Displaying Photos from the Memory Card
a. Press the Setup button. A setup menu opens.
b. Press the Up/Down arrows to select Copy Photo.
c. Press Enter. A confirmation message is displayed and the photo is
copied to the built-in memory.
d. Press Exit to close the menu.
(2) In the Thumbnail Screen
a. Select pictures to be copied by Up/Down/Left/Right buttons.

11
b. Mark the pictures by Vol+ button, and you will see ˇ on the photo;
Unmark the pictures by Vol- button.
c. Press Setup button firstly, then select Copy Picture, and then Copy
Selected.
Other way: Press Setup button firstly, then select Copy Picture, and then Copy
All. In this way, all the pictures will be copied into the built-in memory.
(3) In the Music, Video, and File Mode
a. Select file by Up/Down button.
b. Mark the pictures by Right button, and you will see ˇon the Photo;
unmark the pictures by Left button.
c. Press Setup button firstly, then Copy File.
Delete Files from Built-in Memory
Use the Remote Control to delete a photo from the built-in memory
(1) Delete the Displayed Photo
a. Press the Setup button. A setup menu opens.
b. Press the Up/Down arrow to select Delete Photo.
c. Press Enter. A confirmation message is displayed.
Caution: The photo will be deleted immediately when Enter is pressed;
the deleted photos can’t be restored.
(2) In the Thumbnail
a. Press the Setup button. A setup menu opens.
b. Press the Up/Down arrows to select Copy Photo.
c. Press Setup button firstly, the select Delete, and then Delete All.
In this way, all the pictures will be deleted from the Built-in Memory.
(3) In the Music, Video, and File Mode
a. Select file by Up/Down button.
b. Mark the pictures by Right button, and you will see ˇon the Photo;
unmark the pictures by Left button.
c. Press Setup button firstly, then select Delete.
Slide Show Selected
In the Thumbnail
a. Select pictures by Up/Down/Left/Right buttons.
b. Mark by Vol+ button; unmark by Vol- button.
c. Press Setup button firstly, then select Slideshow, and then
Slideshow Selected.
1. To show the Setup menu, press Exit button until Select Mode or Select Card screen
shows, then press Setup button.
5. Press Enter to select the setting. The white square moves to the selected setting.
12
Add Music to the Slide Show
To play background music with a slideshow, copy audil files onto the same memory card as your
photos. The music will play as the slide show runs. See "Copying Files from a Computer" for
details on copying files.
You can also choose a music file to play without a Slideshow. Just select it from the Music screen.
7. When the adjustments are made, press Exit to close the menu.
Note: Music files must be standard Mp3 formats and not from licensed music download
services.

13
Display Option Settings Description
Language
Magic Window Off Display 4 pictures in Slide Show
Display Image Size Original/Optimal
The Di gi tal Pi cture Fr ame can op timize
you r phot os to di spl ay on the screen
Slide Show Transition
Slide Show Speed
Slide Show Music
Slide Show Shuffle
Video Playback Repeat
Audio Playback Repeat
Power Saving
Factory Default
Normal
Random
Fade
Curtain
Open_Door
Cross_Comb
Special effects shown to transition
from one photo to the next in a Slide
Show
Medium Determines how quickly the next
photo is displayed
On / Off Play background music
On / Off Display photos randomly
Repeat Single
Repeat All
No Repeat
Determines Video Playback repeat
mode
Repeat Single
Repeat All
No Repeat
Determines Audio Playback repeat
mode
2 Hours
4 Hours
8 Hours
No Power Saving
The Digital Photo Frame will turn
itself off after the specified period
of time
–
Immediate ly re st all sett ings to th e facto ry
defaults . There is no warn ing message.
Du t ch
English
German
French
Spanish
Portugal
Italian
Supports 7 languages
On
Fast
Slow

Listening to Music
If there are Music files on a memory card or in the built-in memory,you can play
them on the Digital Picture Frame.
1. Use the Remote Control to open the Select Mode screen (described above)
and select Music. A new screen opens listing all of the music files on the
selected card.
2. Use the up and down arrows on the remote control to choose a file.
3. Press the Enter or play button to play the file.
4. Press Stop once to pause; to resume, press Play or Enter button.
5. To stop the music, press Stop twice.
Control the Volume
Use the Remote Control to adjust the volume on the Digital Picture Frame when
playing Audil/Video files by VOL+/VOL- buttons.
Watching a Video
You can watch video files on your Digital Picture Frame as well.It supports the
Motion JPEG (AVI) video format used by most digital cameras.
14
To watch a video, there must be video files in the memory card or the built - in
memory.
1.
2. Use the Arrow keys to choose Video and press Enter. A screen listing all of
the video files opens.
3. Use the Arrow buttons to choose the desired file and press Enter.
The Digital Picture Frame plays the video.
4. Adjust the volume by using VOL+/VOL- buttons on the Remote Control.
In Select Mode, choose Video.
Setting Clock and Calendar
In Select Mode, choose Clock and press ENTER. You will see the calendar on the
left side and time on the right side of the screen.
Press SETUP button to open the Setup Menu: Set Clock, Set Alarm, Slideshow Photo.
1. Setup Clock:
Use UP/DOWN buttons to modify the date and the time; use LEFT/RIGHT
buttons to move between columns. When finished, press EXIT to close
the setup menu.
2. Setup Alarm:
Follow same steps to set the alarm. Here you can use the default tone or
the music. You can also set the alarm as Off, Once, or Daily,
3. Slideshow Photo:
The Slideshow in Clock Mode can only display Photos/Pictures in the
built-in memory.
Advanced Operations
In addition to the basic functions described previously, you can connect the
Digital Photo Frame to your computer to copy files to the built-in memory.
15
16

17
why does it not turn on ?
Please check if the adapter is properly plugged to the Picture Frame and the wall plug.
18
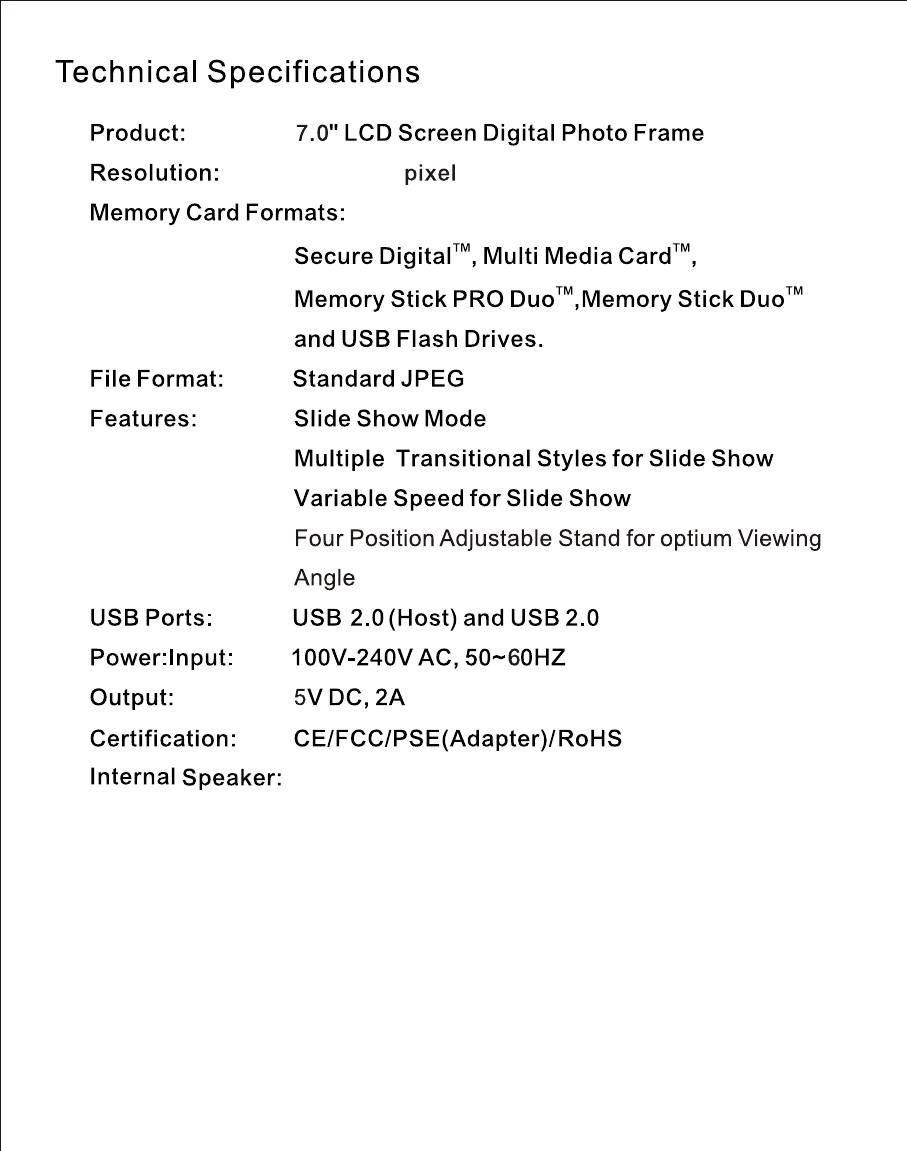
19
800X480
0.5WX2
Changes or modifications not expressly approved by the party responsible for
compliance could void the user's authority to operate the equipment.
This equipment has been tested and found to comply with the limits for a Class
B digital device, pursuant to Part 15 of the FCC Rules. These limits are
designed to provide reasonable protection against harmful interference in a
residential installation. This equipment generates uses and can radiate radio
frequency energy and, if not installed and used in accordance with the
instructions, may cause harmful interference to radio communications.
However, there is no guarantee that interference will not occur in a particular
installation. If this equipment does cause harmful interference to radio or
television reception, which can be determined by turning the equipment off and
on, the user is encouraged to try to correct the interference by one or more of
the following measures:
-- Reorient or relocate the receiving antenna.
-- Increase the separation between the equipment and receiver.
-- Connect the equipment into an outlet on a circuit different from that to which
the receiver is connected.
-- Consult the dealer or an experienced radio/TV technician for help