Win Accord PTT726A MOBILE INTERNET DEVICE-WIFI PORTION User Manual
Win Accord Ltd. MOBILE INTERNET DEVICE-WIFI PORTION Users Manual
Users Manual

- 1 -
winaccord
Personal Touch Tablet/MID
Preliminary Spec
2011-09-30

- 2 -
Table of content
- GETTING STARTED
Important Safety Precautions 3
Cleaning the Panel 3
Cleaning the Personal Touch Tablet 3
Introduction 4
Buttons Overview 5
Accessories 5
What’s in the Box 6
Charging the Battery 6
Power On/Off and Unlock Tablet 6
-FUNCTIONNING OF THE TABLET
Navigation 7
Home Screen 7
Application Launcher Screen 7
Status Bar 8
Onscreen Keyboard 9
- SETTINGS
Set Up Wi-Fi Connection 10
Set up 3G Function
Set Date and Time 11
Set Up Email 12
Set Up Calendar 13
Create Shortcuts on Home Screen 14
Create Widgets on Home Screen 14
Change Wallpapers 14
Install Third-Part Applications from micro SD 15
- CONNECTIONS
Browser 16
Wi-Fi 17
Bluetooth 17
PC Connection 18
Connect to TV set (optional) 19
- APPLICATIONS
Camera (optional) 20
Clock 21
Calculator 22
Downloads 23
Gallery 24
Music 25
Video Player 26
File Browser 27
- LICENCE NOTICE AND TRADEMARK ACKNOWLEDGEMENT 28
-PRODUCT SPECIFICATION 29

- 3 -
- GETTING STARTED
Important Safety Precautions
Always follow these basic safety precautions when using your Personal Touch Tablet.
This will reduce the risk of fire, electric shock and injury.
Warning: To reduce the risk of fire of shock hazard, do not expose this product to rain
or water.
Warning: To prevent the risk of electric shock, do not remove the cover. There are no
user-serviceable parts inside. Opening will void your warranty.
Unplug the Personal Touch Tablet before performing maintenance.
Keep your Personal Touch Tablet out of direct sunlight and heat sources.
Protect the power cord. Route power cords so that they are not likely to be walked on
or pinched by items placed on or against them. Pay particular attention to the point
where the power cord is attached to the Personal Touch Tablet.
Only use the AC adapter included with the Personal Touch Tablet. Using any other
power adapter will void your warranty.
Unplug the power cord from the outlet when the unit is not in charging condition.
Cleaning the Panel
Treat the screen gently. The screen is made of glass and can be scratched or broken.
To clean fingerprints or dust from the screen, it is recommended to use a soft,
non-abrasive cloth such as a camera lens cloth to clean the screen.
If you use a commercial Cleaning Kit, do not apply the cleaning liquid directly to the
screen. Clean the screen with cleaning cloth moistened with the liquid.
Cleaning the Personal Touch Tablet
Clean the outer surface of the Personal Touch Tablet (excluding the screen) with a soft
cloth dampened with water.

- 4 -
Introduction
Welcome to the Personal Touch Tablet! The Personal Touch Tablet includes these key
features:
Displays Alarm, AppInstaller, Browser, Calculator, Calendar, Camera, Clock, Email,
File Browser, Gallery, HDMI Switch, Music, Setting, Video Player and etc
Displays digital photos, Play Music and Video
Wi-Fi function to connect with your AP router for internet browsing
Micro Secure Digital™ (micro SD) slot for external storage
Capacitive touch screen for all user operations
4GB Internal Memory
USB2.0 OTG for connection to the PC or USB flash drive

- 5 -
Buttons Overview
Accessories
Power Adapter (depending on the regional requirement, the plug may look different)

- 6 -
USB Cable
What’s in the Box
Personal Touch Tablet
AC Power Adapter (5V/2A)
USB Cable
Quick Start Guide
Charging the Battery
Plug the AC power adapter into the Personal Touch Tablet and into a wall outlet.
Icon will be turn flashing with charging sign while the battery is charging.
When charging is completed, the battery icon will turn into a steady green.
* It is strongly recommended you fully charge the device for about 4-6 hours before use.
* When charging battery, the better indicator for a fully charged battery is a steady green
battery icon on the notification bar. A flashing battery icon means the battery is still
being charged, even when 100% has been displayed for battery level on the Settings
About deviceStatus screen.
Power on/off and Unlock Personal Touch Tablet
The Personal Touch Tablet is easy to set up. Just follow these steps:
1. To power on the device, press and hold Power button for 2 seconds to turn on tablet.
2. Wait until a screen with a lock and speaker icon show up, gently tap the “Lock” icon
and slide it toward the speaker icon to unlock tablet.
3. To power off the device, press and hold the Power button for 2 seconds until a MID
options message show up on screen where you can choose Power off option to power
off the device.
Note: The screen with the lock icon will time out in 10 seconds if you do not unlock it.
In case it happens, the Power button can be pressed briefly to make it show up
again.
- 7 -
- FUNCTIONNING OF THE TABLET
Navigation
Tablet has five home screens by default. You can tailor shortcuts or widgets to home
screen to fit your needs by using Add to Home screen function. For more information,
refer to “Create Shortcuts on Home Screen” on page 14.
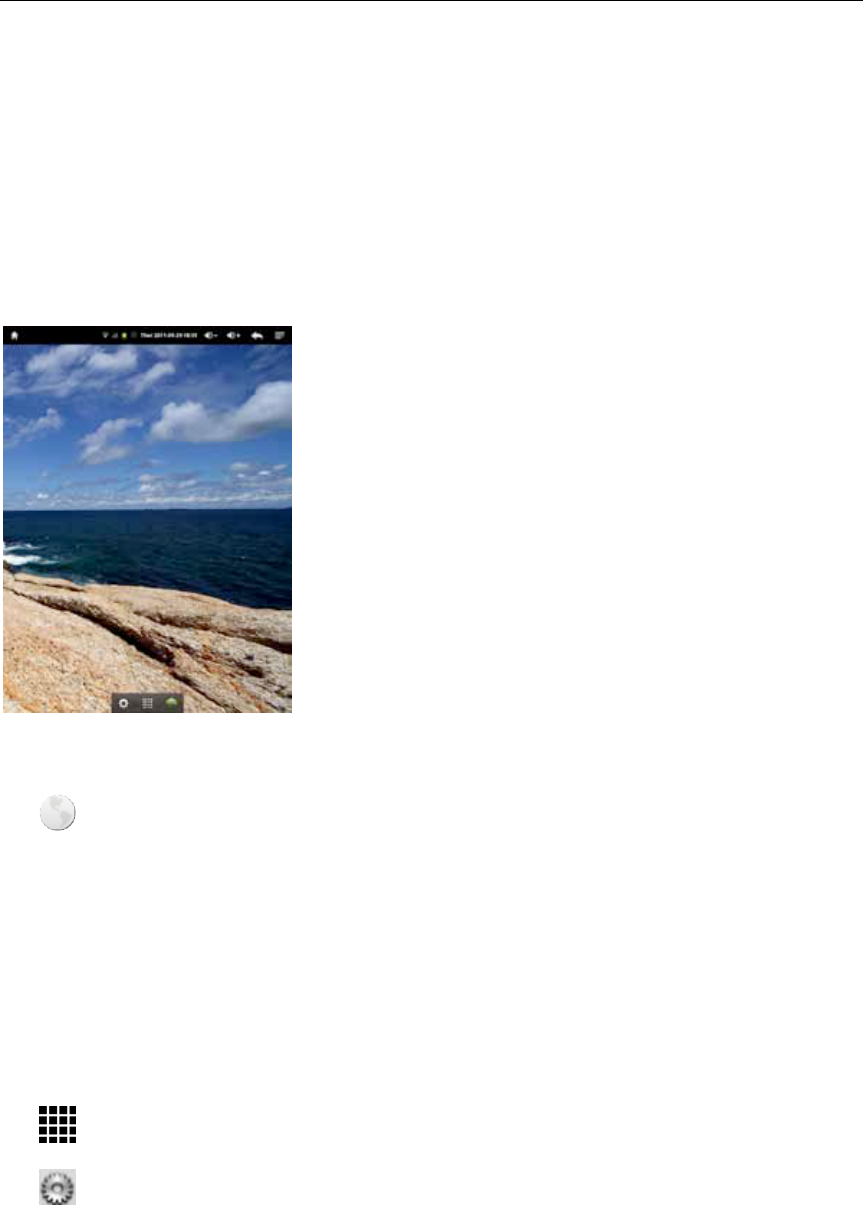
Home Screen
A typical Home screen with wallpaper, status bar, and few applications at the bottom.
* The background wallpaper may be different from model to model
A shortcut to browser
A shortcut to application Launcher screen.
A shortcut to system Settings
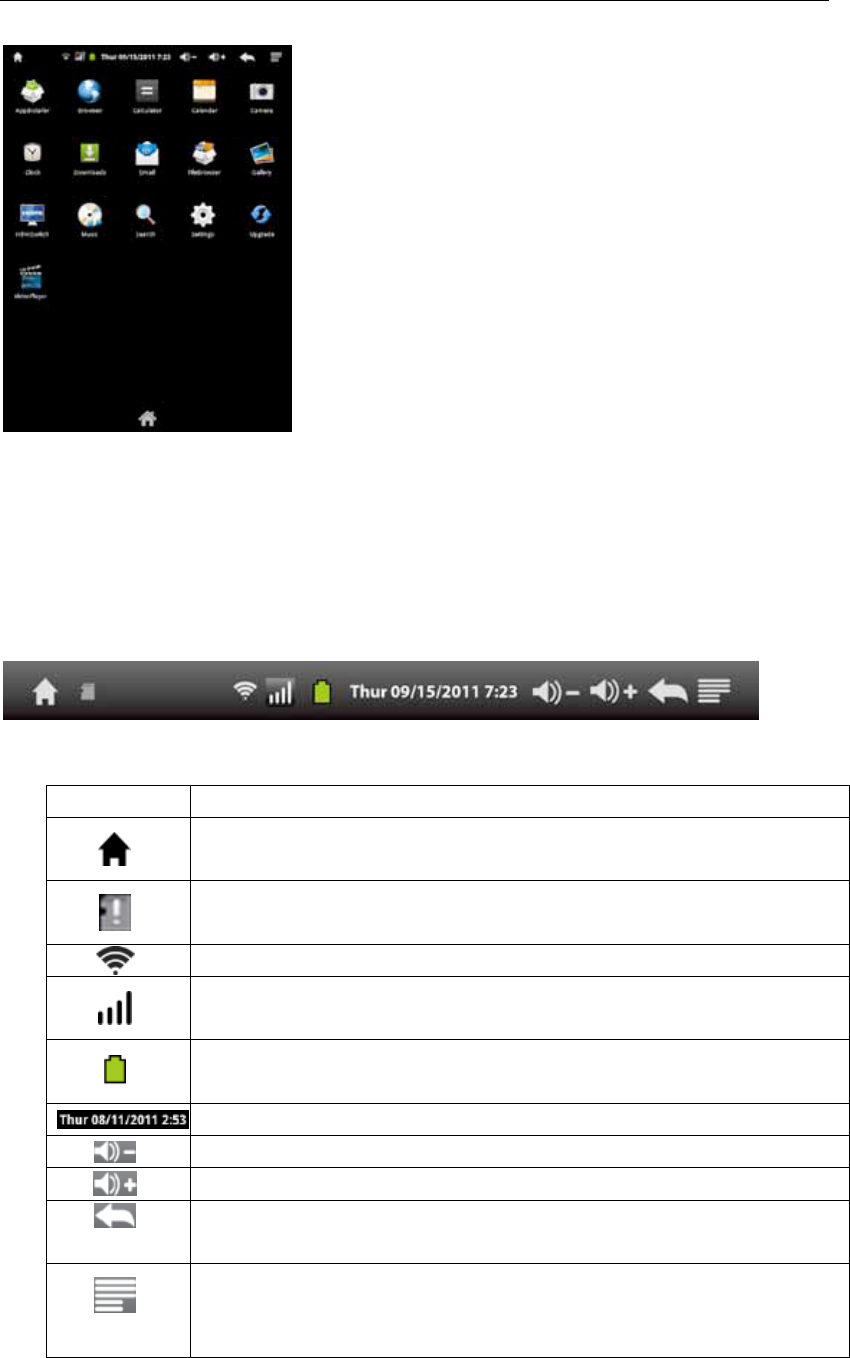
Application Launcher Screen
A typical application Launcher screen is shown below. One icon represents one
application which can be run by tapping on the icon.
- 8 -
*The screen icon may be different from model to model
Status Bar
On the top corner of the screen, the status bar mainly indicates Home icon, Wi-Fi
status, battery level, current time and volume, etc.
Icon Action
On any functional screen, tap this icon to go to Home screen
Shows the status of micro SD (this icon shows micro SD is
removed.)
Wi-Fi connection and signal strength
Shows 3G signal status (optional)
Battery level. Will turn orange when battery is low and turn red
when battery is very low.
Current time
Volume down
Volume up
On any functional screen, tap this icon to go back one screen or
exit application.
Tap this icon to open a contextual menu screen. The available
options will vary, depending on what application is running on
the screen.
- 9 -
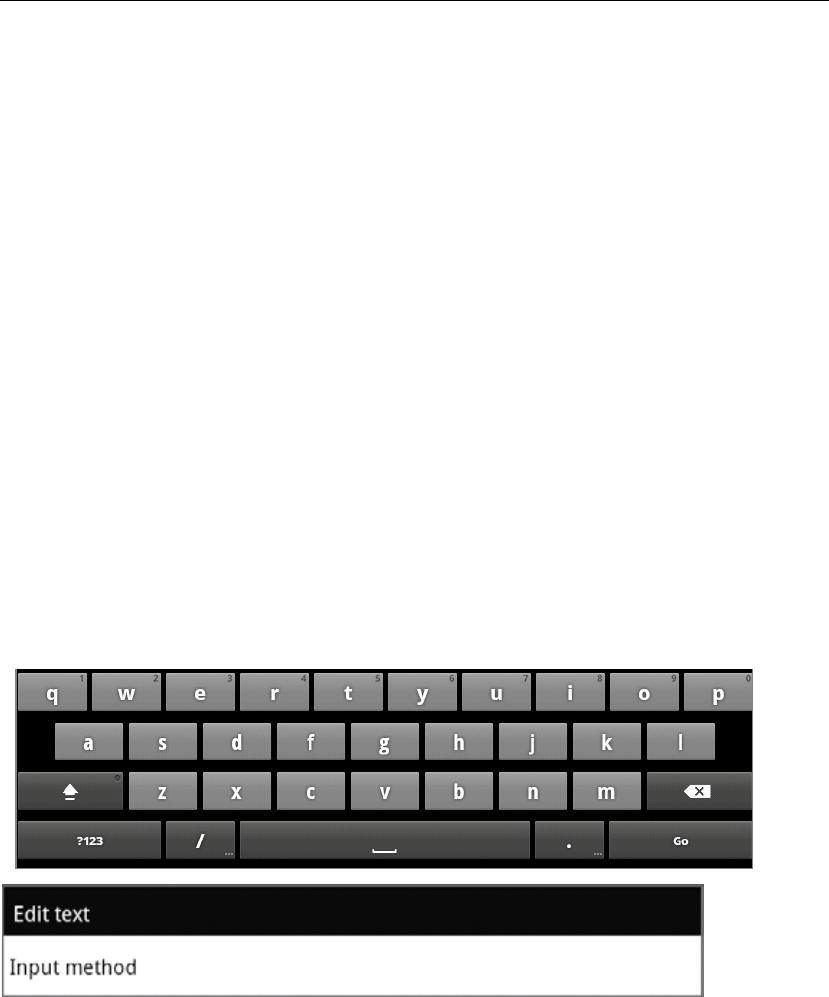
Onscreen Keyboard
The onscreen keyboard appears automatically anytime you tap on a text line for input.
While entering text with the onscreen keyboard, each character will be entered into
the position pointed by a vertical cursor. You can change the cursor position by
tapping with your finger on the position you want to enter the next character. To
select different language keyboard, touch and hold the text line. A pop menu will
show up to let you select the “Input Method”
*Setting up an International keyboard: see “Install Third-Part Applications from
micro SD” section.
- 10 -
- SETTINGS
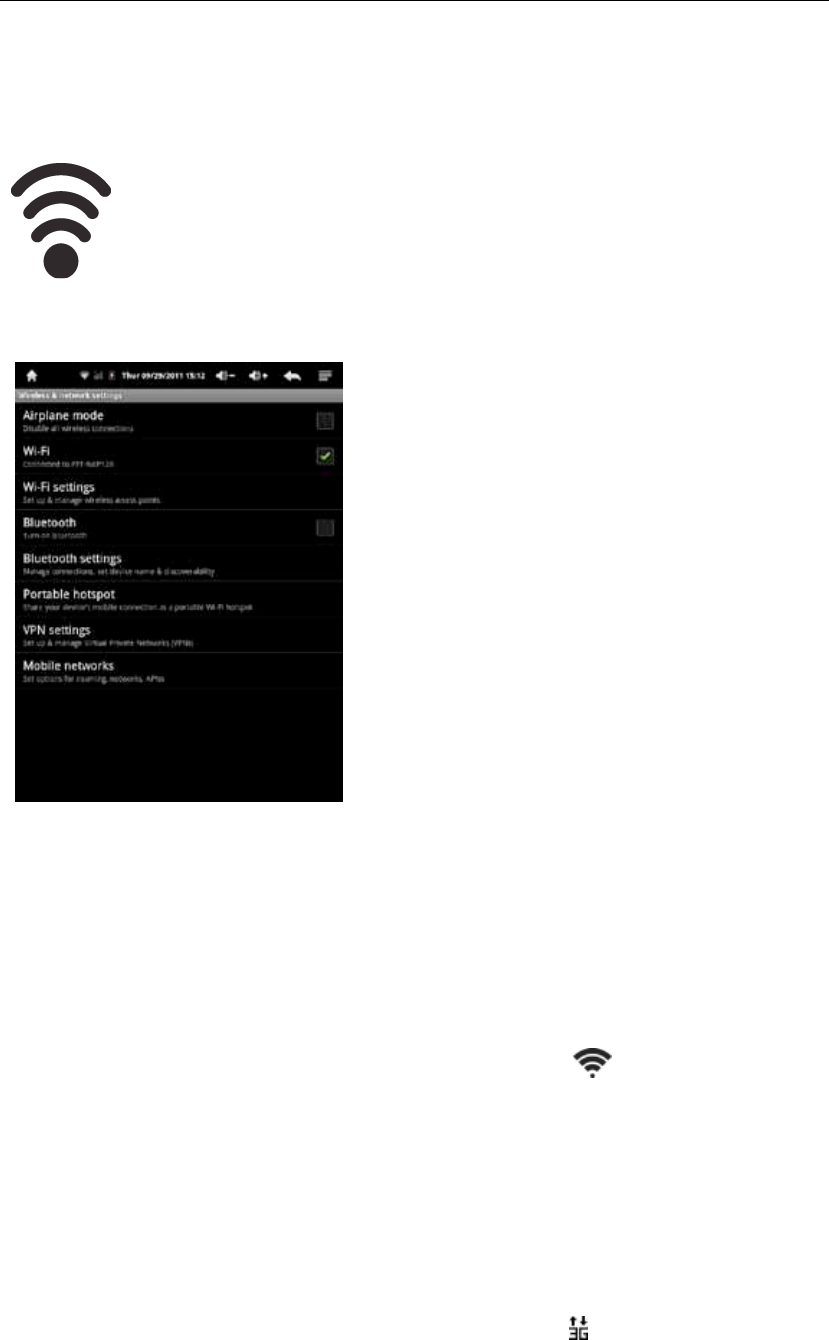
Set Up Wi-Fi Connection
Make Wi-Fi Connection In Settings ! Wireless & networks ! Wi-Fi
Settings, check on the Wi-Fi to turn on the Wi-Fi.
Normally, the device will automatically scan the available Wi-Fi Access Point (AP).
If this does not happen, press Menu (upper right corner icon in the Status bar) and
select Scan to scan for the available Wi-Fi APs. Then, tap on the desired AP to make
the connection. If it is a secured AP, system will prompt you for the password. Enter
it by tapping on the password entry line, and use the onscreen keyboard to enter the
password. Then, tap on the Connect to start connecting to that AP.
When connection is established, the Wi-Fi connected icon will show up on the
status bar.
Set up 3G Function (Optional)
1. In Mobile networks of Wireless & network settings, make sure the Date enabled is
checked on before you connect to the mobile network.
2. To enable 3G function of your Personal Touch Tablet, insert a SIM card to the
Personal Touch Tablet. After power on, it will search for 3G signal automatically.
3. When connection is established, the 3G connected icon will show up on the
status bar.
4. In Access Point Names, select your favor APN.

- 11 -
*Roaming date may incur significant roaming charge.
*3G Dongle is not available if built-in 3G Module was inserted.
- 12 -
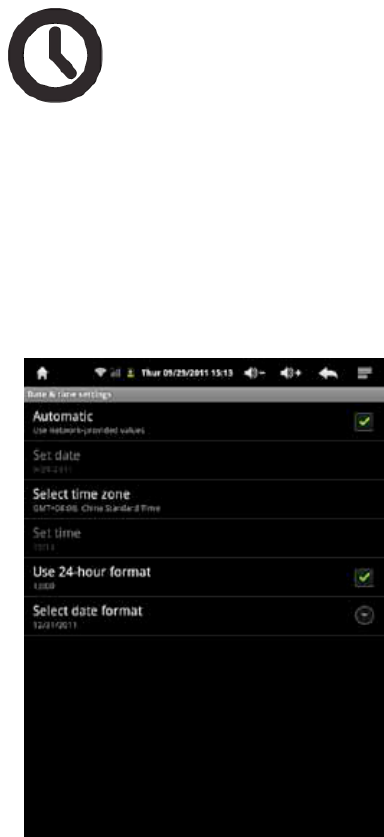
Set Date and Time
Use Settings ! Date & Time to open up the date/time setting screen as
shown below. Select the correct time zone. If the Wi-Fi is connected to Internet, check
on the Automatic to have time set up automatically. If Wi-Fi is not connected to
Internet, uncheck Automatic to temporarily set date and time. Then, check Automatic
again before leaving the screen. In the future, when the Wi-Fi is connected to internet,
date and time will be automatically adjusted.
- 13 -
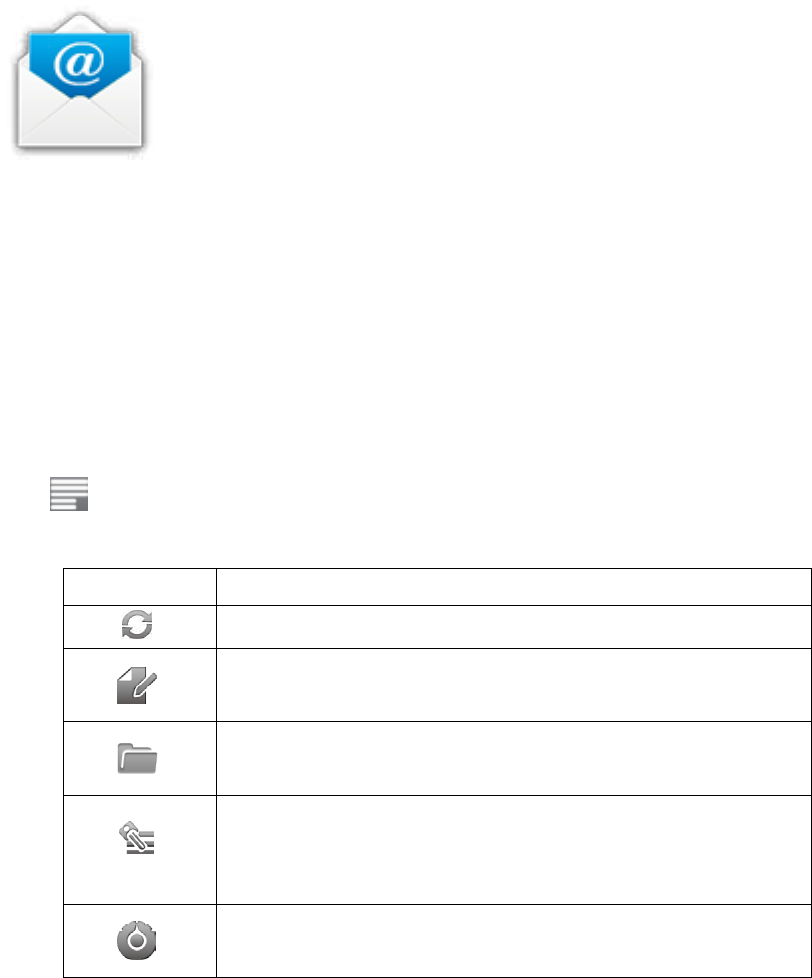
Set Up Email
You can configure Email for most accounts in just a few steps. For
many popular email services, tablet automatically enters most of the settings for you.
1. Make sure the Wi-Fi is connected.
2. Open the Email application and enter your Email address and password, then tap
“Next”
3. Give a name to your account then tap “Done”. Mail messages will be downloaded
automatically.
Tap to show function bar at the bottom of the screen
Icon Action
Refresh
Tap to enter E-mail compose interface
Tap to enter mailbox interface
Tap to enter your accounts viewing
To remove your account record in tablet, touch and hold
your account address Tap Remove account.
Account settings
- 14 -
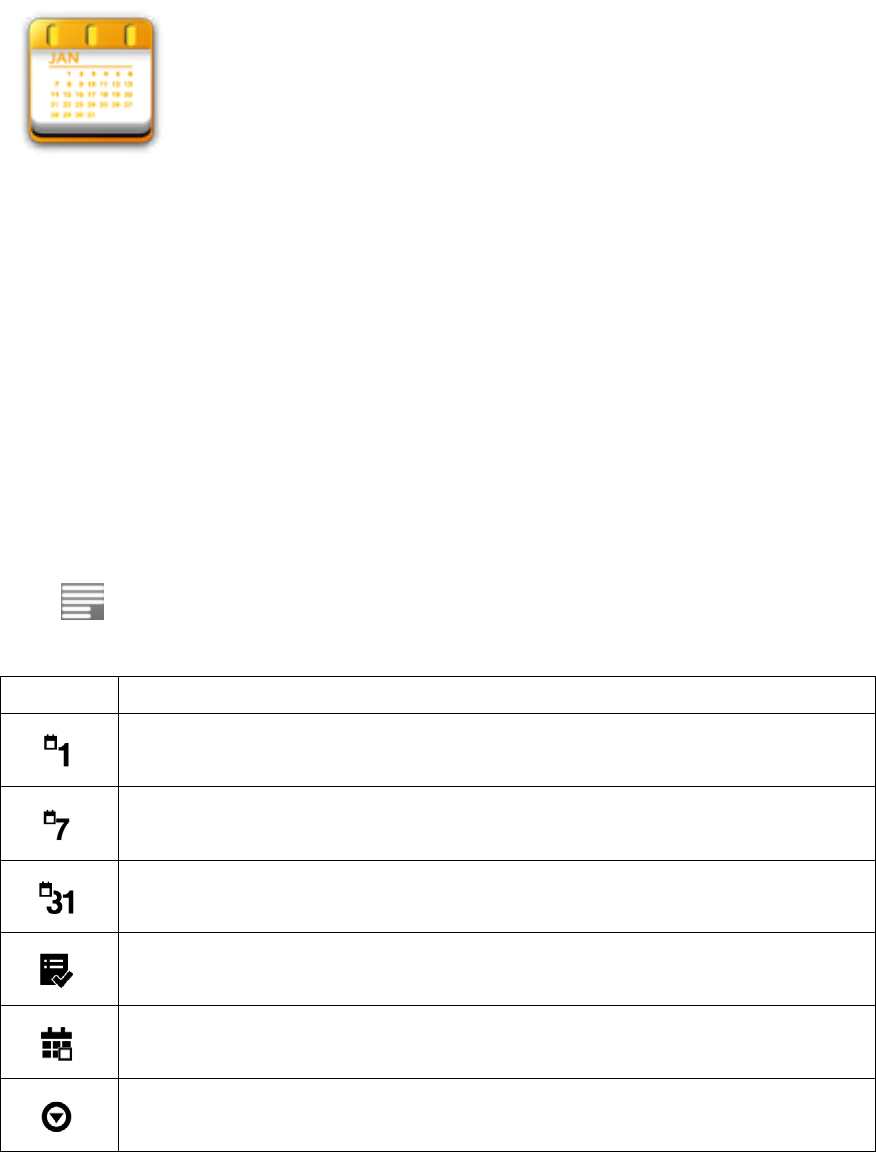
Set Up Calendar
Calendar makes you easy to stay on schedule. You can view your
schedule by day, week, and month.
When using calendar for the first time, there are some steps you shall follow:
1. Tap Calendar icon into Gmail entering interface, then enter your Gmail account and
password and tap Next.
2. Erase “\” icon in front of your Domain\Username.
3. Change the Serve “gmail.com” for m.google.com, then tap next step.
In Account options, you can adjust: Email checking frequency and Amount to
synchronize and so on.
Tap on the specific date to start using your personal calendar now.
Tap to show function bar at the bottom of the screen.
Icon Action
Show all schedules sorted by Day
Show all schedules sorted by Week
Show all schedules sorted by Month
Show all schedules sorted by specific Agenda
Show all schedules sorted by today
Show more options: New event \Calendars\ Settings
- 15 -
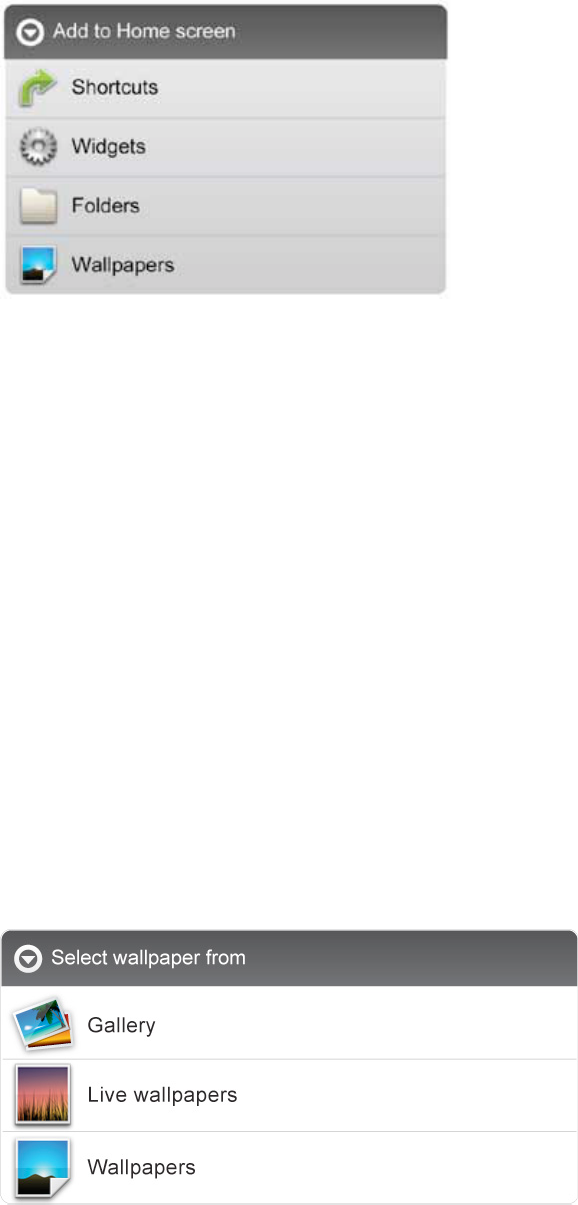
Create Shortcuts on Home Screen
In order to access to frequently used applications more quickly, you can create a short
cut to an application and place it on the Home screen. Therefore, you don’t need to
spend to look for it among the many applications on the Launcher screen.
There are two ways to make shortcuts:
1. Tap any blank space on Home screen and hold until a pop out menu shows up. Then,
you can select Shortcuts to add to the Home screen.
2. Press the application icon in the Launcher screen and hold until the icon is enlarged
and background has been changed to Home screen. Then, drag the enlarged icon to
an empty space on Home screen and release the finger.
Create Widgets on Home Screen
Widget is a small application. After being installed, it does not show up in the
Application Launcher screen. However, using the same method as creating shortcuts on
Home screen, widgets can be put on the Home screen, and be launched by tapping on
the widget icon.
Change Wallpapers
In Add to Home screen menu tap Wallpapers, then a submenu shows up. You can
select wallpaper from your Gallery/ Live wallpapers/ default Wallpapers.
- 16 -
Install Third-Part Applications from micro SD
AppInstaller can be used to install the application file (with
extension apk) into the system.
1. Change the Settings to allow third-party application installation. In Settings !
Applications ! Unknown sources, check the box to the right.
2. Prepare the application files in a micro SD card and insert the micro SD card.
3. Launch the AppInstaller application on the application launcher screen. The system
will scan for the installation files in the SD. Find the application you want to install
from the list and tap on it. The installation process will start. Follow the screen
instruction to complete the installation.
- 17 -
- CONNECTIONS
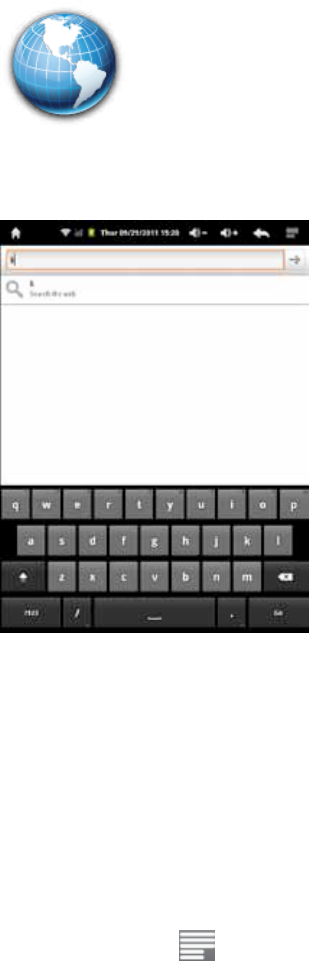
Browser
Browser is used for browsing the World Wide Web. With the web
browser plug-ins, you could browse websites to watch videos, download contents, and
listen to music etc.
1. Tap the address field (in the title bar) to bring up the onscreen keyboard, enter
website address, then tap Go.
2. Similar website previously browsed or key work previous searched will appear
beneath the address field. You can tap them to go to the web site listed or search the
key word.
3. Double tap on screen to zoom in and zoom out. Moving fingers across the screen
will pan the screen up, down, left or right.
Tap Menu button at the right-upper corner to display additional functions at the
bottom of the screen.
- 18 -
Wi-Fi
This tablet uses the 802.11b/g/n wireless specification to transmit and receive data. For
more information, refer to “Set up Wi-Fi Connection” on page 10.
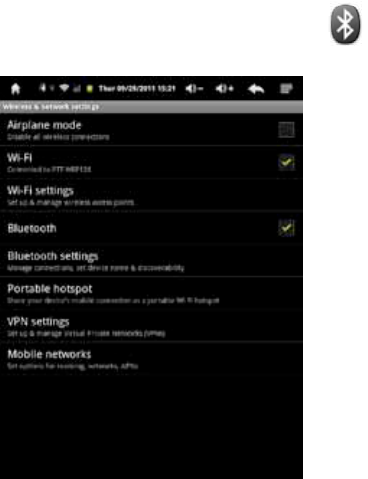
Bluetooth
Bluetooth is a short-range communications technology that enables you to link to other
devices for exchanging information without a physical connection.
Make Bluetooth Connection In Settings ! Wireless & networks ! Bluetooth, check
on the Bluetooth to turn it on. Icon will display when Bluetooth is active.
Setting up Bluetooth is similar to setting up Wi-Fi. Normally, the device will
automatically scan the available Bluetooth devices. If this does not happen, tap Scan
for devices for the available Bluetooth device. Then, tap on the desired device for a
while to show Pair & connect, and enter a PIN to pair with this Bluetooth to make the
connection. Tap on the OK to start connecting to that Bluetooth.
When connection is established, you may start exchanging information now.
*Insert a TF card before storing information.
- 19 -
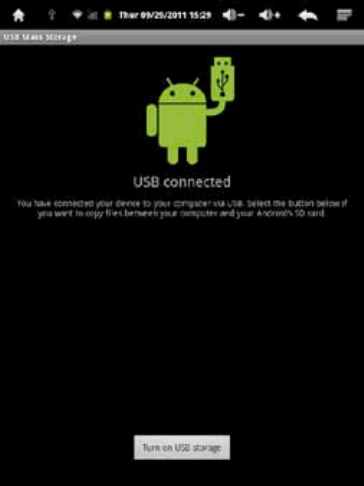
PC Connection
Connect your tablet to a PC via USB cable. By connecting tablet to PC, you can
synchronies files or transfer data directly.
1. Plug one end of a USB cable to a tablet and plug the other end to a PC, then you will
see a screen as below. Tap Turn on USB storage to connect to PC.
2. For a better use of your tablet, tap Turn off USB storage every time you unmount
USB storage.

- 20 -
Connect to TV set (optional, some models have no HDMI)
HDMI switch can switch your video display from tablet to a TV or
monitor with HDMI input. While the tablet screen is shown on TV or monitor, tablet
will become a touch pad for all operations, including switching video display back to
the tablet screen.
To switch the video display from the tablet screen to a TV or Monitor equipped with
HDMI input
1. Plug one end (larger end) of the HDMI cable into one of the TV/monitor HDMI
inputs, and plug the other end to tablet HDMI output.
2. Choose the correct input source setting on TV/monitor. Wait until the HDMI
icon shows up on the status bar, and indicates “HDMI connected”.
3. Open the HDMI Switch application. Tap on a compatible video format the
TV/monitor can accept. If you don’t know which one to use, the best guess is
to tap on the 720p (or 480p for older HD Ready TV).
4. Wait for a few seconds, the tablet video will show up on the TV/monitor screen.
5. Slide your finger on the tablet screen to move an arrow to the OK button, and
double tap the tablet screen to apply the selection.
6. From this moment on, until your use the HDMI Switch application to switch the
video back to tablet screen or disconnect the HDMI cable, you can use the
following gestures to perform all the operations.
• Finger move ---- move arrow cursor on the TV/monitor
• Double tap ---- select/open the item pointed by the arrow
• Double tap and quick move – slide the screen, scroll a list or move the tapped
icon.
• Double tap and hold -- equivalent to the long press of an item when video
display is on the tablet screen.
7. To switch back to the normal video on the tablet screen, simply unplug the
HDMI cable
- 21 -
-APPLICATIONS
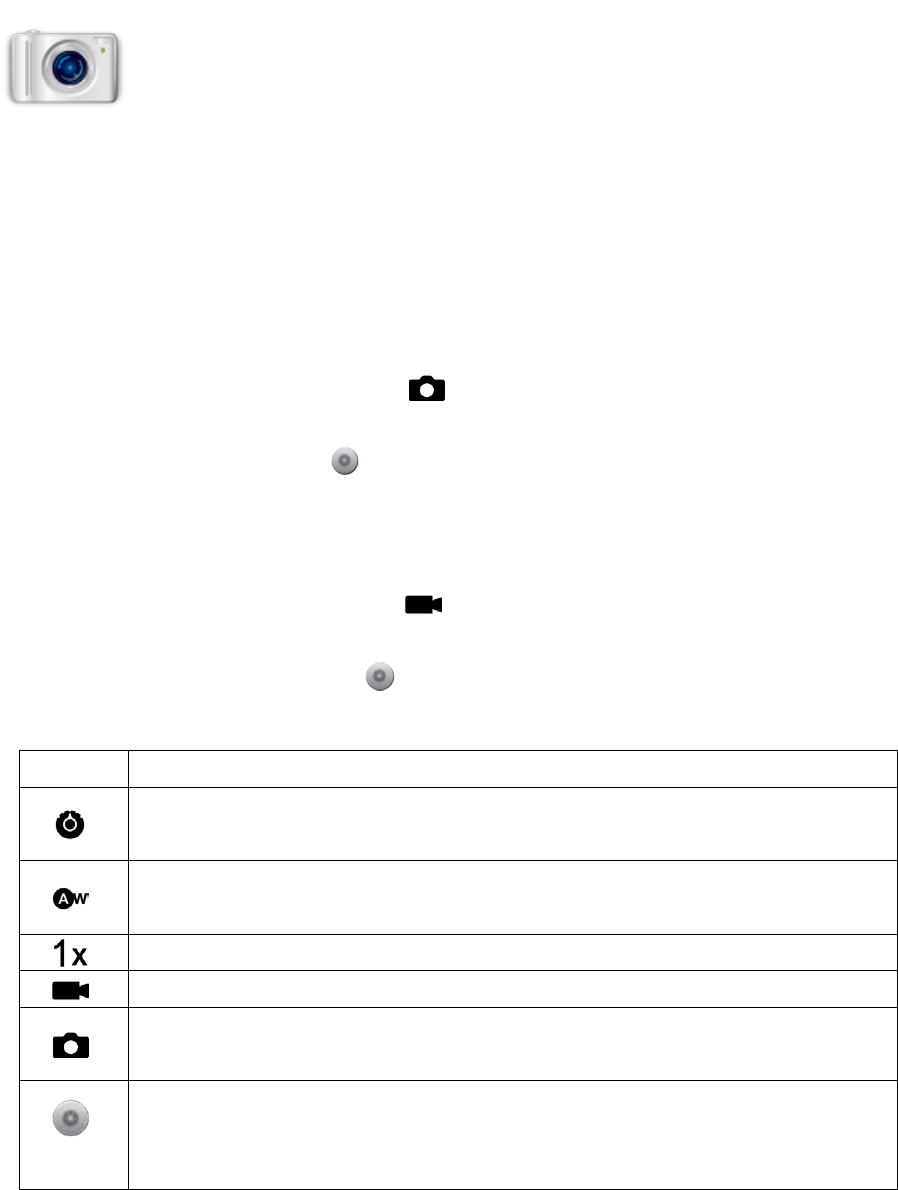
Camera (Optional, some models have no camera)
Tablet allows you to take photos and video through the front camera. You
can take photos at resolution up to 800 x 600 pixel (0.3 megapixels) and videos at
resolution up to 354 x 288 pixels. The application requires external micro SD card to
run. The picture taken and video recorded will be store in the external micro SD card.
Be sure to insert the micro SD before using this application.
To take picture:
Make sure mode switch is set to , the photo mode.
Tap on the shutter button to take a picture.
To record video:
Make sure mode switch is set to , the video recording mode.
Tap on the Recording button to start video recording.
Icon Action
Exposure \ Picture size \ Picture quality \ Color effect \ Camera settings
submenu
White balance submenu for different light environment
Zoom submenu
Video recording mode
Photo mode
Tap to take picture or start video recording. Photo or video will be saved in
the micro SD card automatically. After photo is taken or recording, tap the
square icon on upper-right corner of the screen to review.
- 22 -
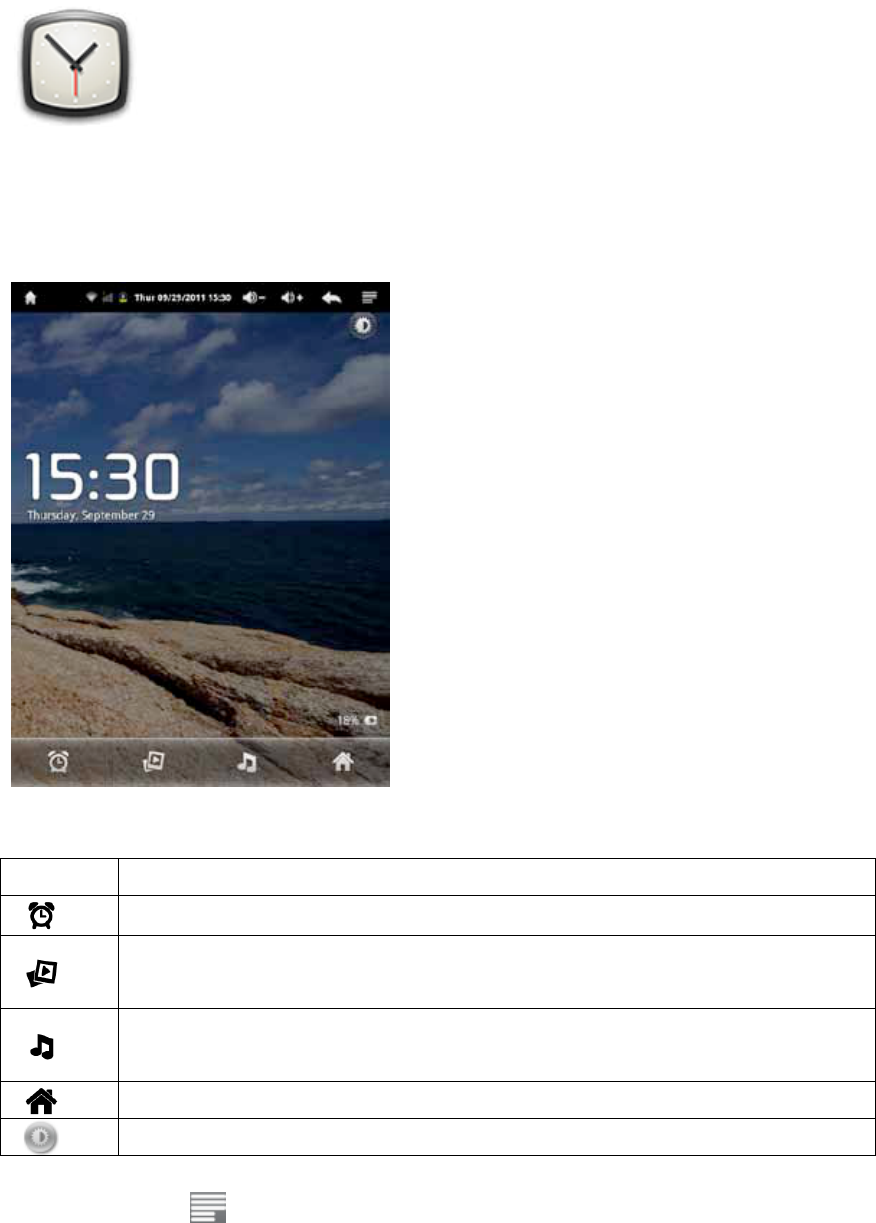
Clock
Tap on clock icon. The following screen will be shown. You can tap on
the icon at the bottom screen to adjust alarm settings, play photo slideshow, play music
or go back to Home screen.
The icon at the upper-right corner can be used to adjust the brightness of the panel.
Icon Action
Adjust alarm clock
Play photo slideshow of internet memory or micro SD
Play music
Exit to Home screen
Adjust panel brightness
Tap Menu button at the right-upper corner to display additional functions at the
bottom of the screen: Set alarms, Add alarm or Set the docking (not available now).
- 23 -
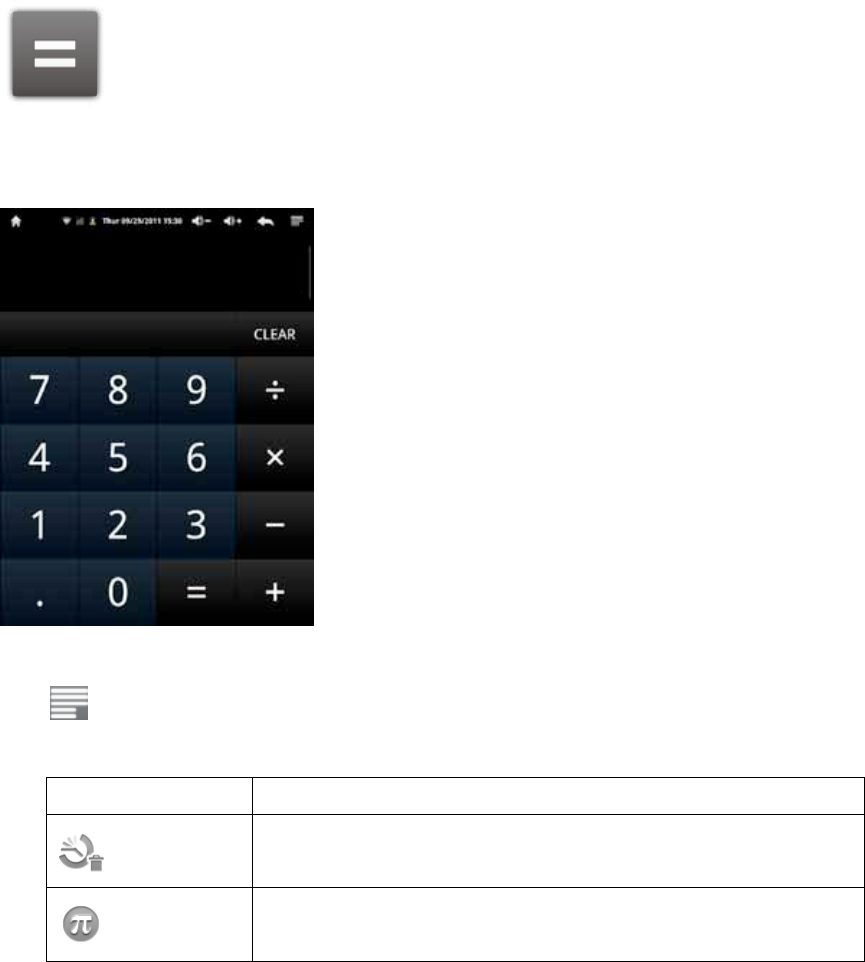
Calculator
To perform mathematical calculation directly on tablet by tap numbers and
symbols.
Tap to show function bar at the bottom of the screen
Icon Action
Clear history of calculation
Show advanced panel
Downloads

- 24 -
Files, applications and other items you download from Browser or Email
will be stored in your micro SD card. Use the Downloads application to view, reopen or
delete what you’ve downloaded.
1. Touch an item in Downloads can reopen it.
2. Check items you want to delete; then tap Delete. The item will be deleted from your
micro SD card.
Tap icon on upper right corner of the screen Tap Sort by size or Sort by time to
switch back and forth.
Gallery
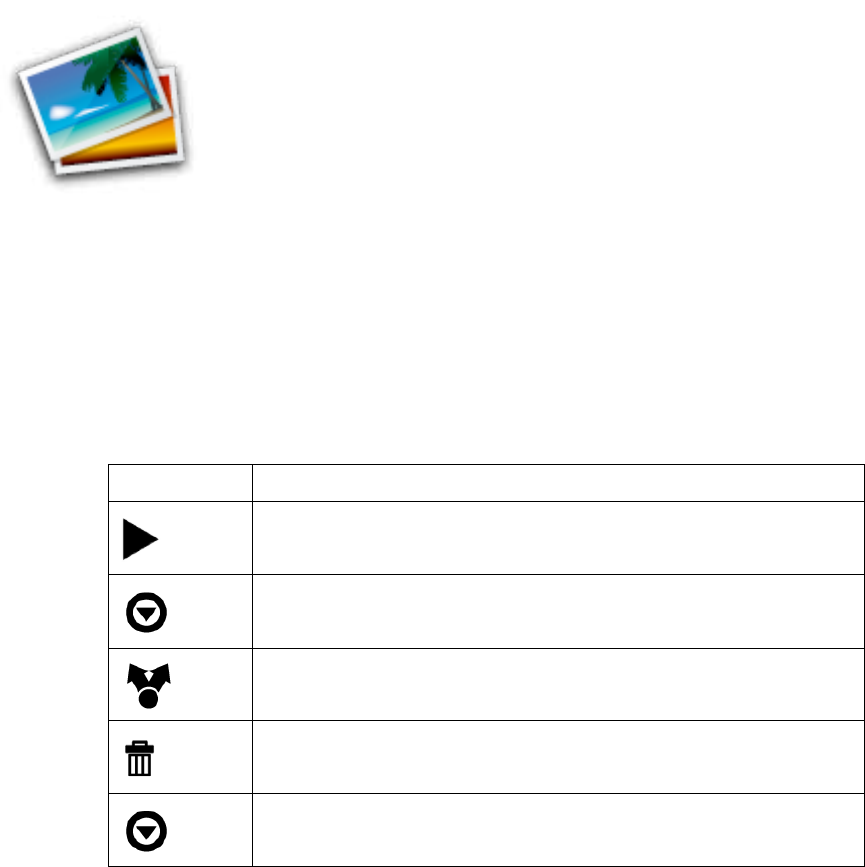
- 25 -
Tap on “Gallery” in Launcher screen to open the application.
1. The first screen shows all photos and subfolders located in the Pictures folder.
2. Tap Pictures folder into photo thumbnail mode. (Default view)
3. Tap a thumbnail into photo single view mode.
4. When in photo single view mode, tap anywhere on screen to show function bar on
screen.
Icon Action
Tap to start sliding photos
Go to more options
Share photos by Bluetooth or Email
Delete photo
Go to more options: Details of photo/ Set as wallpaper/
Crop photo/ Rotate option: Right/ Left
Music
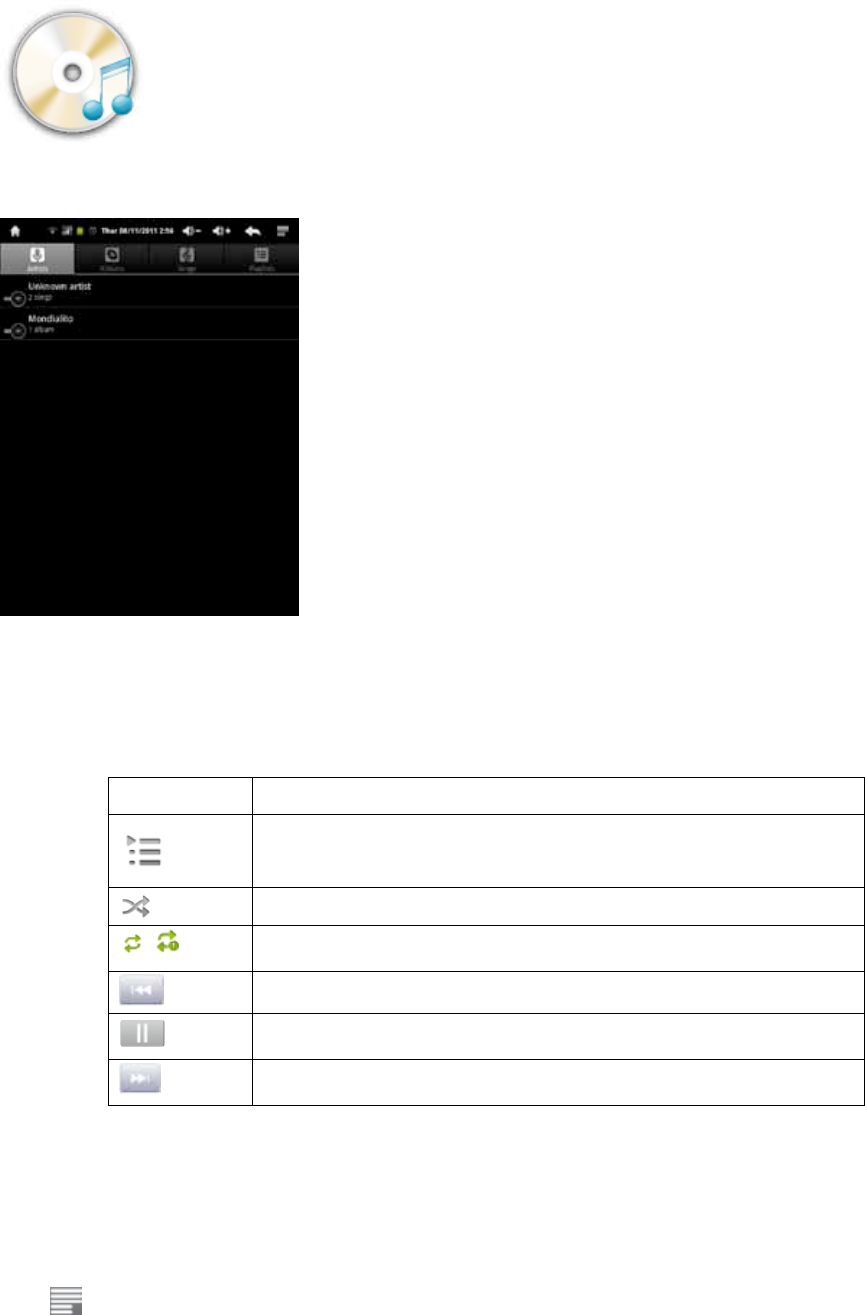
- 26 -
Tap “Music” in the application launcher screen to get to the song
screen as below:
Select the song, album, artist or playlist to play music. Use the onscreen icons to
configure how you want to play the songs.
Icon Action
Show playing list
Turn shuffle on/off function
/ Repeating all songs, current song or Off
Previous song
Pause/ Stop
Next song
Note: Song will keep playing as background music while you leave the music playback
screen. This function allows you to browse files, view photos and surf Internet
while listening to music. To stop playing songs, tap on Pause on the music
playing screen followed by the Back button
Tap on status bar to select other functions to play the song.
- 27 -
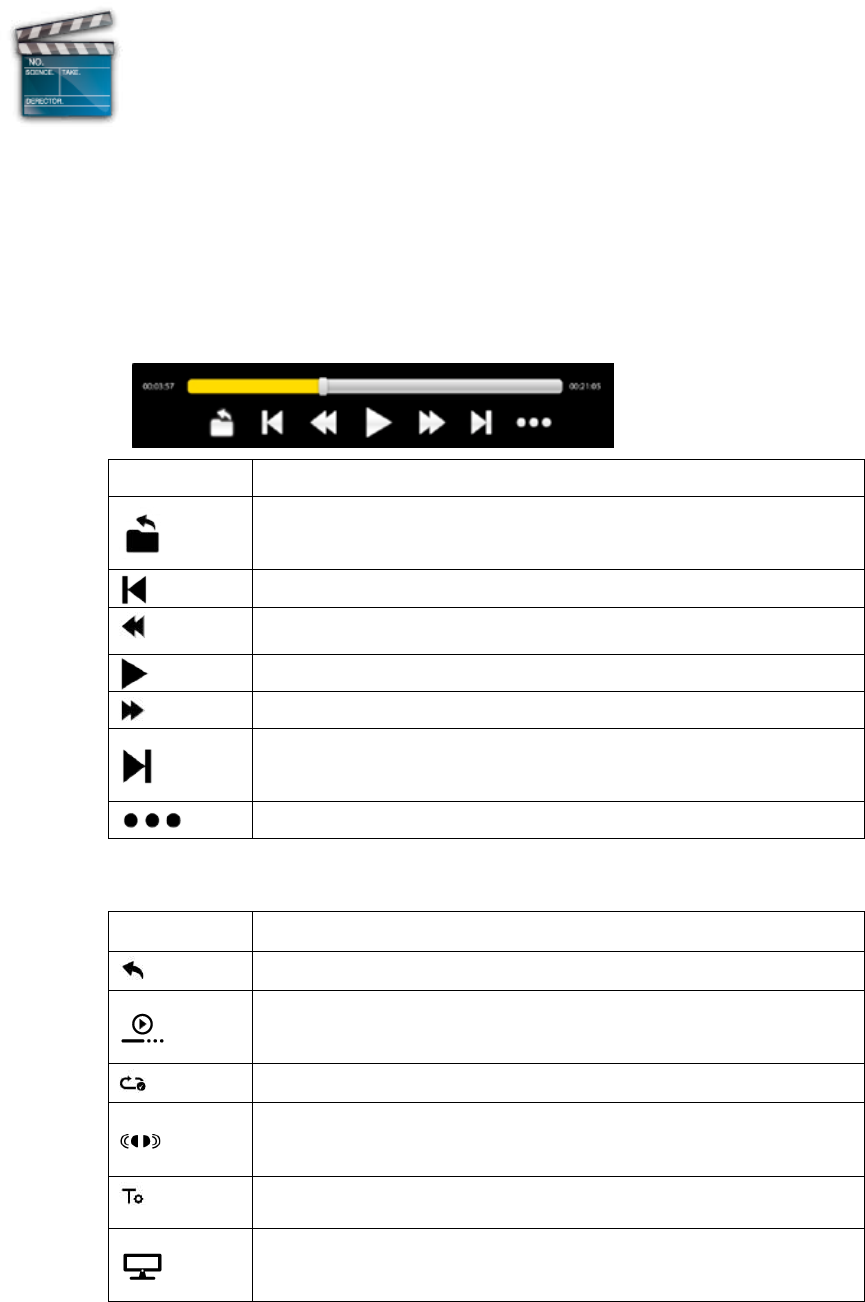
Video Player
1. Tap “Video Player” in the application launcher screen.
2. Browse the micro SD or internal memory to find the video file to play.
3. Tap video file to start playing video.
4. While playing video file, tap anywhere on screen to display the control bar as below.
Drag the yellow bar to fast forward or backward view video.
Icon Action
Back to previous menu
Move to previous video
Fast reverse
Play/Pause
Fast forward
Move to next video
Show more options
Additional options in the control bar are:
Icon Action
Back icon
Resume Mode
Repeat all or Repeat one
Audio Track
Subtitle
Adjust the size of screen display format: Normal/ Full
Screen/ 4:3 / 16:9
- 28 -
Adjust screen brightness 1/2/3/4
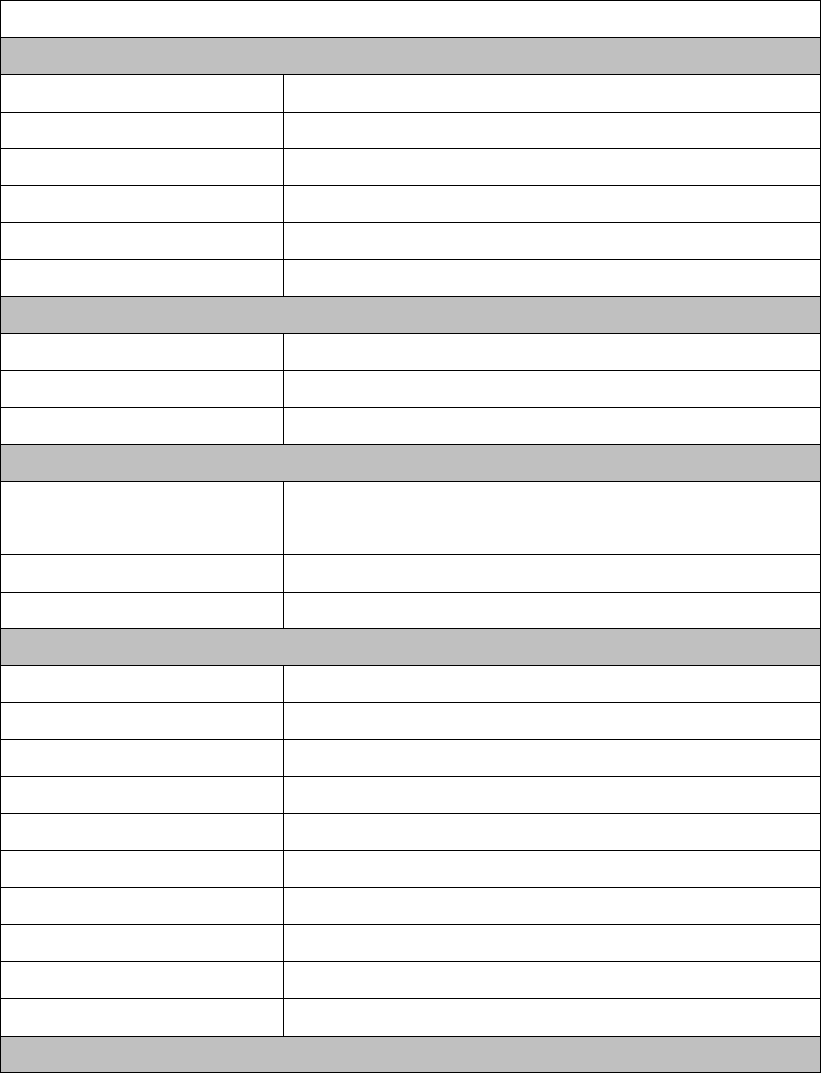
File Browser
In main screen, tap FileBrowser to choose your options first:
Internal Memory / SD Card.
Icons on FileBrowser
Back to Device List interface
Multiple select / open mode
Edit file: Cut/Copy/ Paste/Delete
Sort file: Sort by name/ Sort by date/ Sort by size
Back icon
Change between thumbnail mode and list mode interface
Help mode
Close FileBrowser
- 29 -
- LICENCE NOTICE AND TRADEMARK ACKNOWLEDGEMENT
Manufactured under license from Dolby Laboratories.
Dolby and the double-D symbol are trademarks of Dolby Laboratories.
- 30 -
- PRODUCT SPECIFICATION
Specifications:
General
Panel Size/Type
7" TFT capacitive touch panel
Aspect Ratio: 4:3
Resolution:
800 x 600
Brightness 300 nits (with touch lens)
CPU ARM Coretex-A9, 1GHz
OS Android 2.3.4
Storage
Internal memory 512MB DDR2
NAND Flash
4GB
External SD card Micro SD up to 32GB
Support Format
Video MPEG 1/2/4, H.264/VC-1 @1080P
RealVideo 8/9/10 @720P
Audio MIDI, MP3, WMA, AAC
Images JPEG, BMP, GIF, PNG
Connectivity
External 3G dongle Support (Optional)
3G Module Support (Optional)
WiFi 802.11 b/g/n
Bluetooth V2.1 + EDR class 2 compliant
Webcam 0.3 Mega pixel(Front) 2.0 Mega pixel( Back)
HDMI 1.3
USB OTG USB OTG 2.0 x 1
Stereo Speaker 0.5W x 2
Microphone Built-in
Earphone 3.5mm Stereo Jack
Sensor
- 31 -
G-sensor 3-axis
Light Sensor Support
Gyro Support
User Interface
Hardware Keys Power, Vol+, Vol-
Virtual Full Touch Screen /Virtual keyboard
Dimension/Weight/Condition
Dimension :
186 x 141 x 12.5 mm
Weight 420g
Operation Condition 040
Storage Condition -2055
Power
Battery :
Li-Polymer Rechargeable 3.7V/4000mAh
Standby time : Up to 150 hours
Video Playback : Up to 5.5 hours
AC/DC Adapter 100Vac~240Vac,0.5A, 50Hz-60Hz, 5V/2A
FCC RF Exposure Information and Statement
The SAR limit of USA (FCC) is 1.6 W/kg averaged over one gram of tissue.
Device types: PTT-726A(FCC ID:ZIG-PTT726A) has also been tested against this
SAR limit.
This device complies with part 15 of the FCC rules. Operation is subject to the
following two conditions: (1) this device may not cause harmful interference,
and (2) this device must accept any interference received, including
interference that may cause undesired operation.
NOTE: The manufacturer is not responsible for any radio or TV interference
caused by unauthorized modifications to this equipment. Such modifications
could void the user’s authority to operate the equipment.
NOTE: This equipment has been tested and found to comply with the limits for
a Class B digital device, pursuant to part 15 of the FCC Rules. These limits
are designed to provide reasonable protection against harmful interference in
a residential installation. This equipment generates uses and can radiate
radio frequency energy and, if not installed and used in accordance with the
instructions, may cause harmful interference to radio communications.
However, there is no guarantee that interference will not occur in a particular
installation.
If this equipment does cause harmful interference to radio or television
reception, which can be determined by turning the equipment off and on, the
user is encouraged to try to correct the interference by one or more of the
following measures:
- Reorient or relocate the receiving antenna.
- Increase the separation between the equipment and receiver.
-Connect the equipment into an outlet on a circuit different from that to which
the receiver is connected.
-Consult the dealer or an experienced radio/TV technician for help.