User Manual

Rugged PDA
C350T Series
User Manual (V1.0)
Notes:
All screens in this guide are simulated. Actual displays may be different.
Depend on the different software version on your C350T; you may get different screens with same
tasks.
Unless specified otherwise, all instructions to perform tasks in this guide assume that you are starting
from the home screen.
FEDERAL COMMUNICATIONS COMMISSION
This equipment has been tested and found to comply with the limits for a
Class B digital device, pursuant to Part 15 of the FCC Rules. These limits
are designed to provide reasonable protection against harmful
interference in a residential installation. This equipment generates, uses
and can radiate radio frequency energy and, if not installed and used in
accordance with the instructions, may cause harmful interference to radio
communications. However, there is no guarantee that interference will not
occur in a particular installation. If this equipment does cause harmful
interference to radio or television reception, which can be determined by
turning the equipment off and on, the user is encouraged to try to correct
the interference by one or more of the following measures:
– Reorient or relocate the receiving antenna.
– Increase the separation between the equipment and receiver.
– Connect the equipment into an outlet on a circuit different from that to
which the receiver is connected.
– Consult the dealer or an experienced radio/TV technician for help.
CAUTION:
Any changes or modifications not expressly approved by the party
responsible for compliance could void the user's authority to operate the
equipment.
This transmitter must not be co-located or operating in conjunction with any other
antenna or transmitter.
RF exposure warning
The equipment complies with FCC RF exposure limits set forth for an uncontrolled
environment.
The antenna(s) used for this transmitter must not be co-located or operating in
conjunction with any other antenna or transmitter.
RF exposure information (SAR)
This Rugged PDA meets the government's requirements for exposure to radio waves.
This Rugged PDA is designed and manufactured not to exceed the emission limits for
exposure to radio frequency (RF) energy set by the Federal Communications
Commission of the U.S. Government. The exposure standard for wireless Rugged
PDA employs a unit of measurement known as the Specific Absorption Rate, or SAR.
The SAR limit set by the FCC is 1.6 W/kg. Tests for SAR are conducted using
standard operating positions accepted by the FCC with the Rugged PDA transmitting
at its highest certified power level in all tested frequency bands. Although the SAR is
determined at the highest certified power level, the actual SAR level of the Rugged
PDA while operating can be well below the maximum value. This is because the
Rugged PDA is designed to operate at multiple power levels so as to use only the
poser required to reach the network. In general, the closer you are to a wireless base
station antenna, the lower the power output. The highest SAR value for US model
Rugged PDA as reported to the FCC when tested for use at the body, as described in
this user guide, is 0.713 W/kg.
I
Before starting to use C350T
1) Insert Micro SD / SIM card (Optional)
The built-in storage space of your C350T series PDA is mainly used for operation
system. To enable some functions need bigger storage space, such as camera or
other APP, please insert a Micro SD card before using.
2) Charge the Battery
The battery in your new C350T series device is not charged yet. Please charge with
the bundled USB cable before your first use.
Caution! Please don’t remove the battery pack or try to take this PDA apart
while the C350T is charging. These actions will result in some damages and may
invalidate your warranty.
3) Some tips for using and caring your PDA
Your C350T series PDA is designed to resist damages from certain rugged
conditions. However, to help care for your PDA, please avoid prolonged or extreme
exposure to those conditions.
To ensure the rugged design works and protects your PDA, please be sure
the USB connector cover is closed and the back cover is screwed properly.
Don’t leave your PDA near a heat source; this can damage the device.
Avoid dropping your PDA on a hard surface; this can potentially cause
damage to the device.
To clean your PDA, use a dry soft cloth. Don’t use alcohol or other cleaning
solutions.
Please don’t have your PDA contact with water when the cover is opened.
The water-proof design works only when the outer case is sealed properly.
Note: Certain apps and features may not be available in all countries.
II
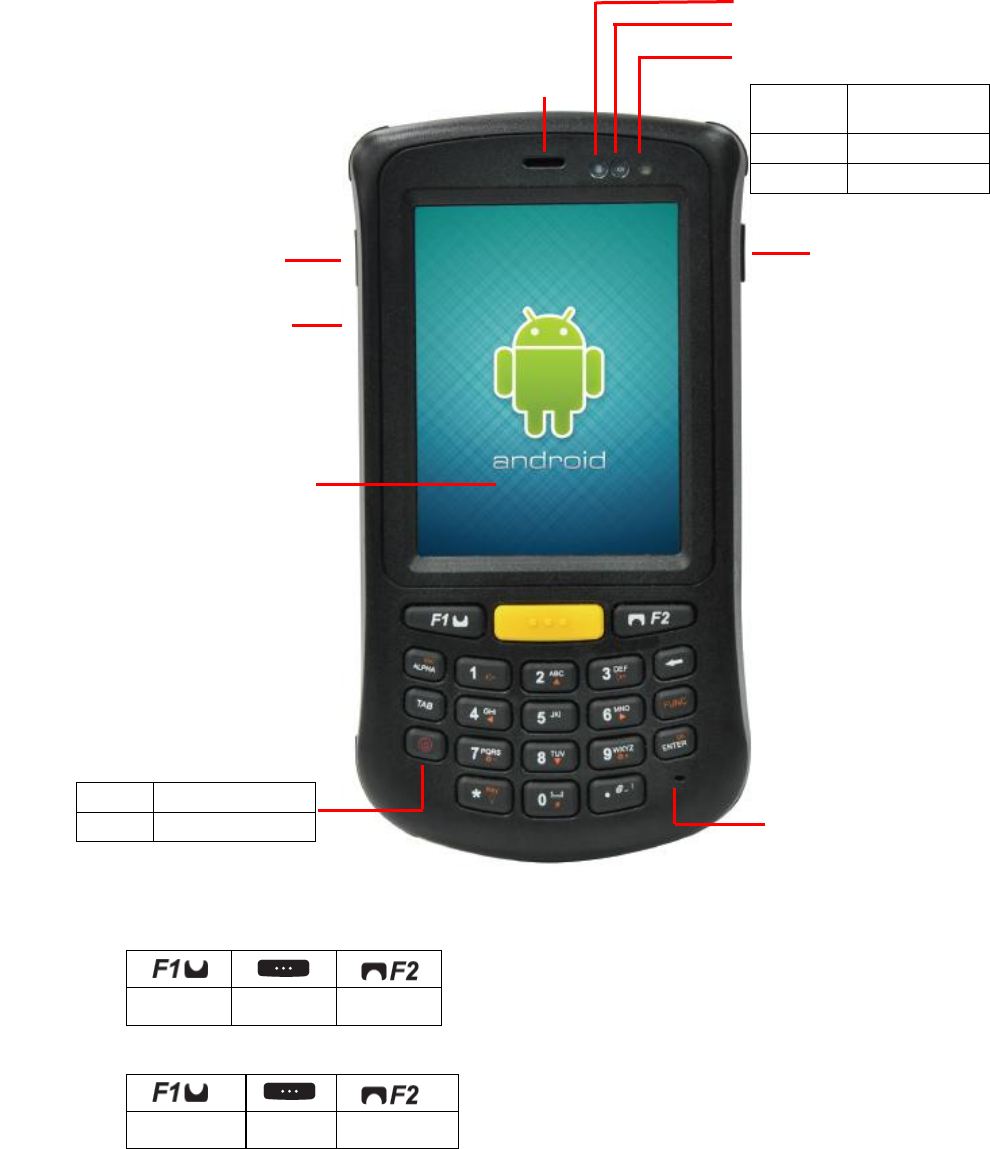
C350T Outlook
Front View (without Barcode / RFID Reader)
Function Button
+
Function Button
Proximity Sensor
Receiver
3.5” Touch Screen
Micro USB Port
(B type)
Microphone
Version for Android OS:
Menu
Home
Back
Version for Windows OS:
Function 1
Start
Function2
Power indicator
Flashing
Green
Power
On/Off
Amber
Charging
Red
Low power
Power Button
Press
Sleep
Hold
Power on / off
III
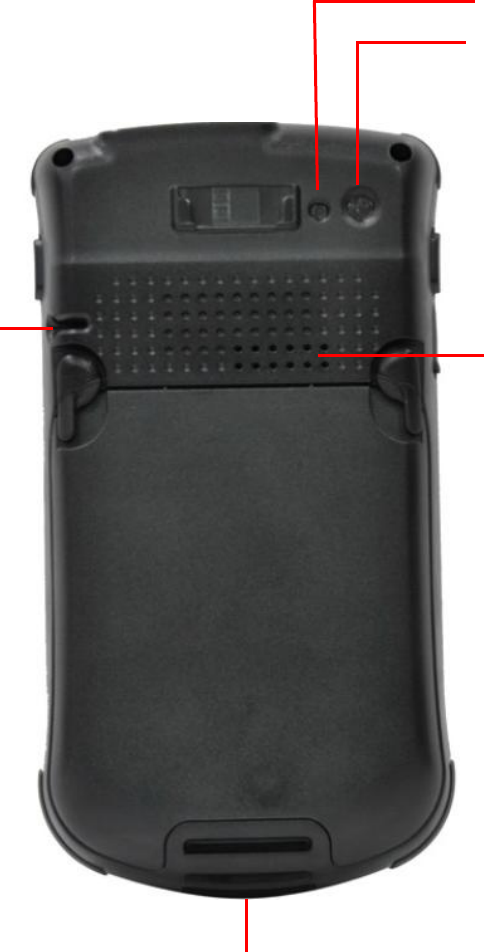
Back View (without Barcode / RFID Reader)
LED Flash Light
5M Pixel Camera
Speaker
Docking Connector
Stylus
IV
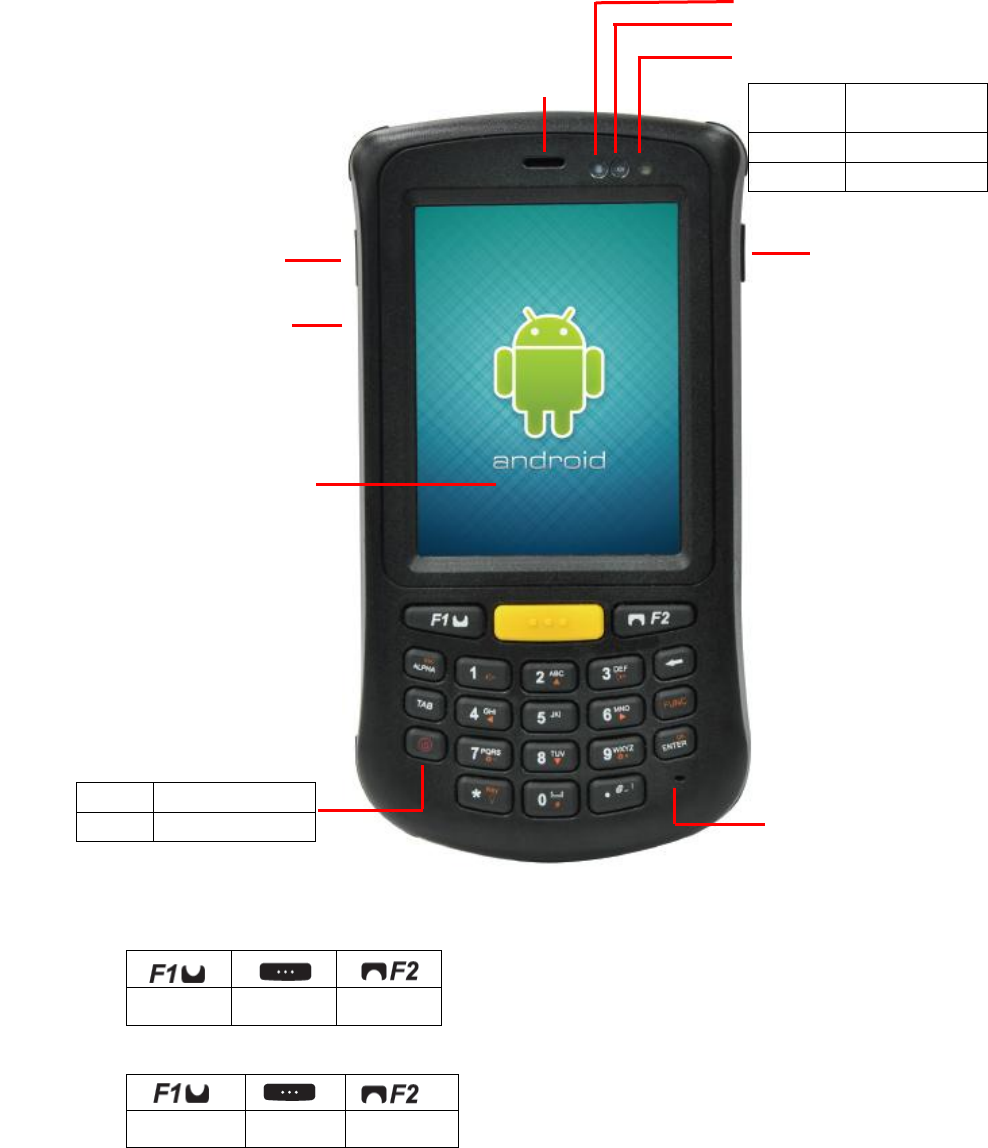
Front View (with Barcode Reader)
Function Button
+
Function Button
Proximity Sensor
Receiver
3.5” Touch Screen
Micro USB Port
(B type)
Microphone
Version for Android OS:
Menu
Home
Back
Version for Windows OS:
Function 1
Start
Function2
Power indicator
Flashing
Green
Power
On/Off
Amber
Charging
Red
Low power
Power Button
Press
Sleep
Hold
Power on / off
V
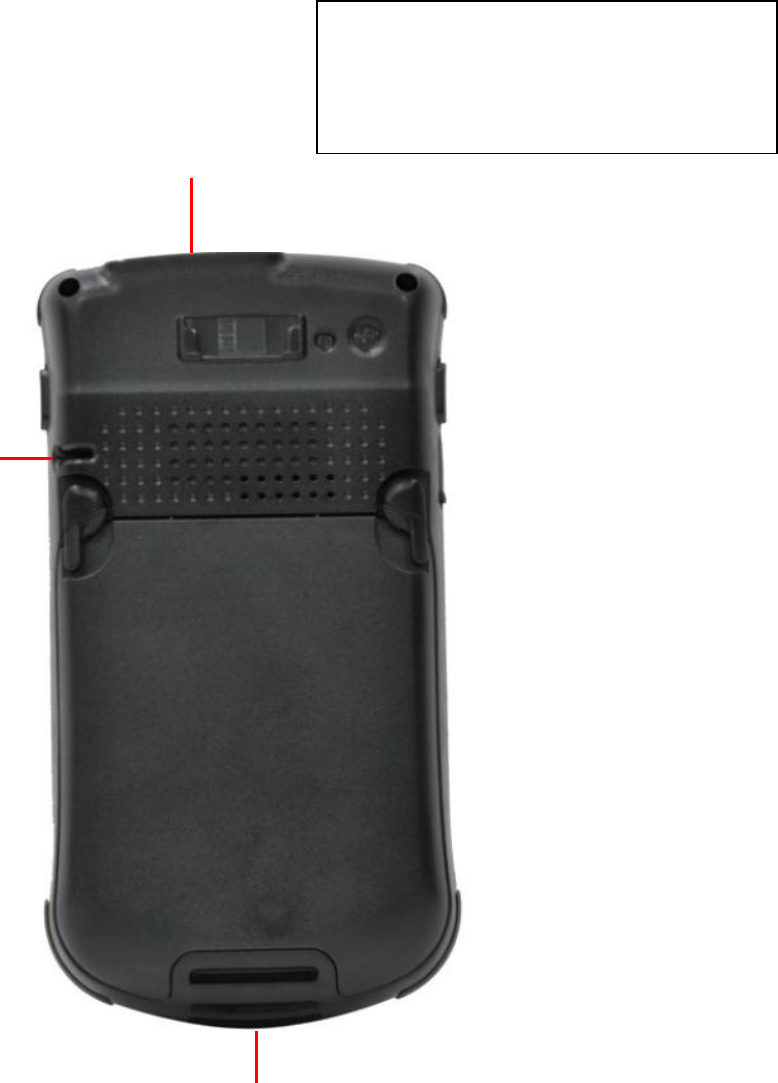
Back View (with Barcode Reader)
Bar Code Reader
Sensor
C350T-BR1 or C350T-BR2
= 1D/2D Barcode Reader
Stylus
Docking Connector
VI
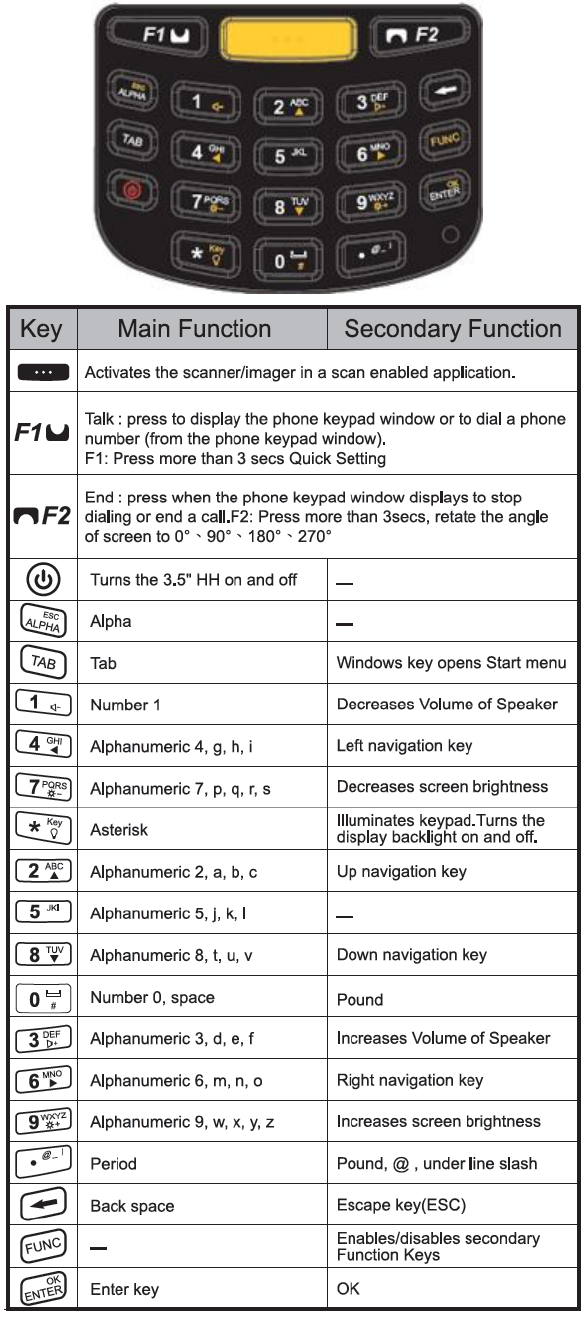
Key Pad Table:
CONTENTS INDEX
Set up & Go ............................................................................... 1
Power On/Off ............................................................................. 5
Touch Screen and keys ............................................................... 6
Home Screen & Status ............................................................. 12
Set up Language ...................................................................... 16
Set up Date & Time ................................................................. 16
Internet Connection ................................................................ 17
Bluetooth ................................................................................. 19
App Menu ................................................................................ 21
Software Update ...................................................................... 23
Text entry ................................................................................. 24
Messaging ................................................................................ 25
Camera .................................................................................... 26
Photo & Video ......................................................................... 29
1
SET UP & GO
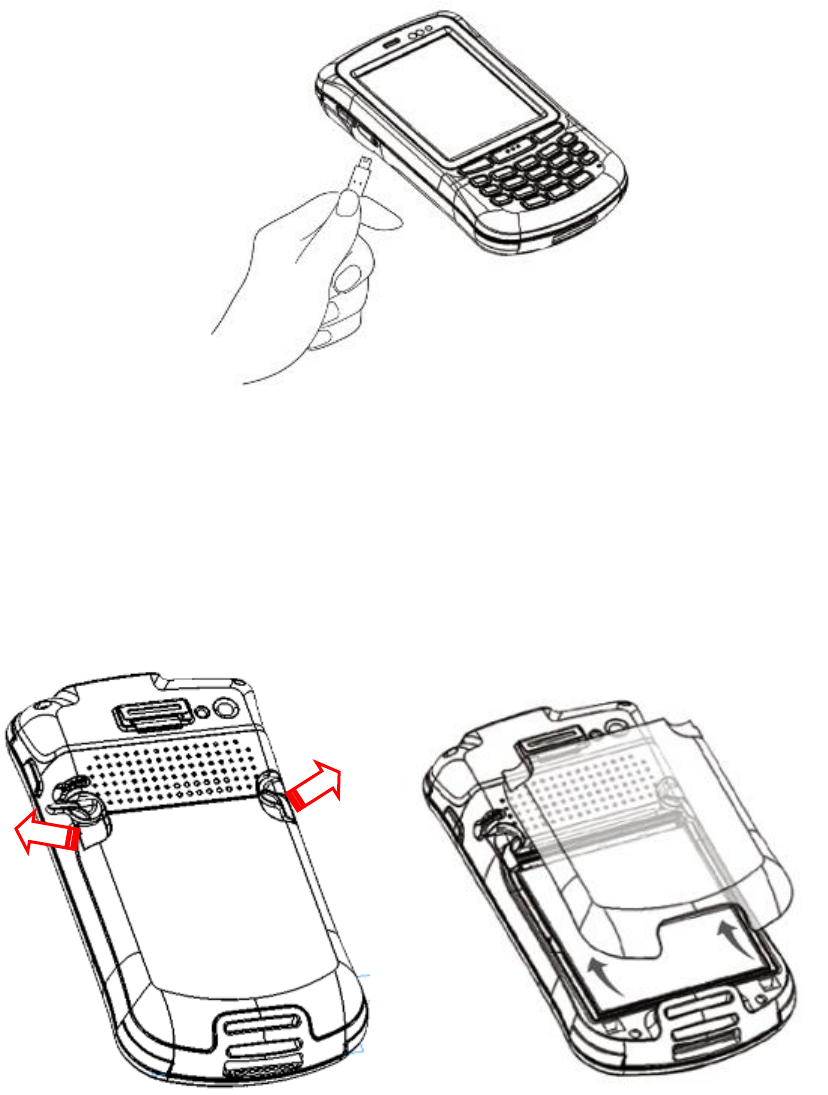
1. Turn Off the PDA
Make sure the PDA is powered off and the USB cable is un-connected before you
remove the back cover.
Note: Please refer to page 5 for the details scenarios about how to turn off
your C350T PDA under Android OS.
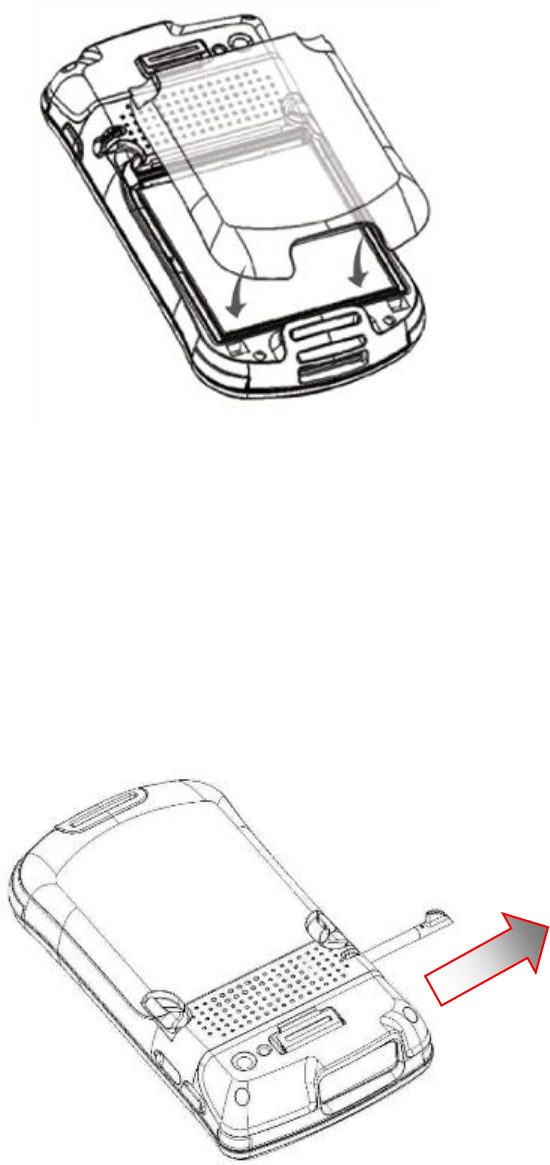
2. Open the Back Cover
Make the PDA facing down, and then unscrew the 2 buckle. Gently pull out the
back cover.
2
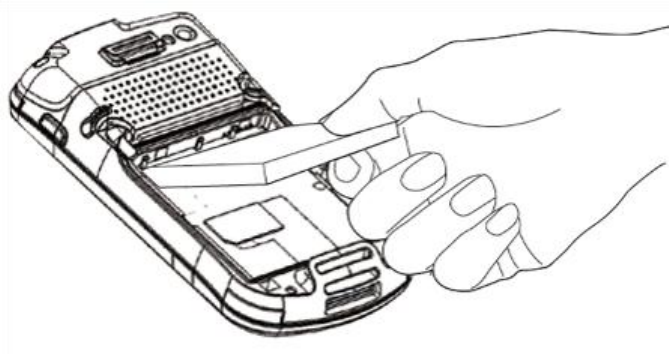
3. Remove the Battery
Pull the plastic strap on the battery, and then remove it.
3
4. Insert Micro SD Card
Open the SD card holder by pushing the metal cover backward and lift it. Put the
Micro SD card into the socket, close the metal cover, and push forward till it
lucked.
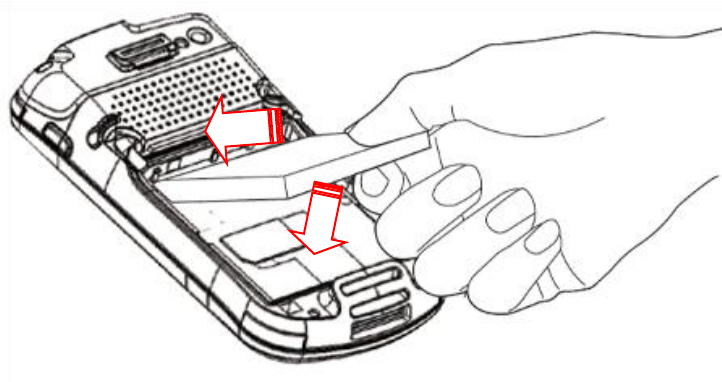
5. Put back the Battery
Reinsert the battery by latching the bottom first and then put it down.
1
2
4
6. Put back the Back Cover
Put back the back cover and make sure all the 2 buckles fit those on the device to
fix the back cover.
7. Using the Stylus
CAUTION! Never use anything other than the C350T stylus on the screen.
Otherwise this could cause a permanent damage.
(1) Remove the stylus from its holder.
(2) Hold the stylus as you hold a pencil.
(3) To make a choice from a menu, lightly tap the tip of the stylus on that choice.
(4) To write data into a field on a form, use the stylus to print the letters or numbers.
Using very light pressure.
5
POWER ON/OFF
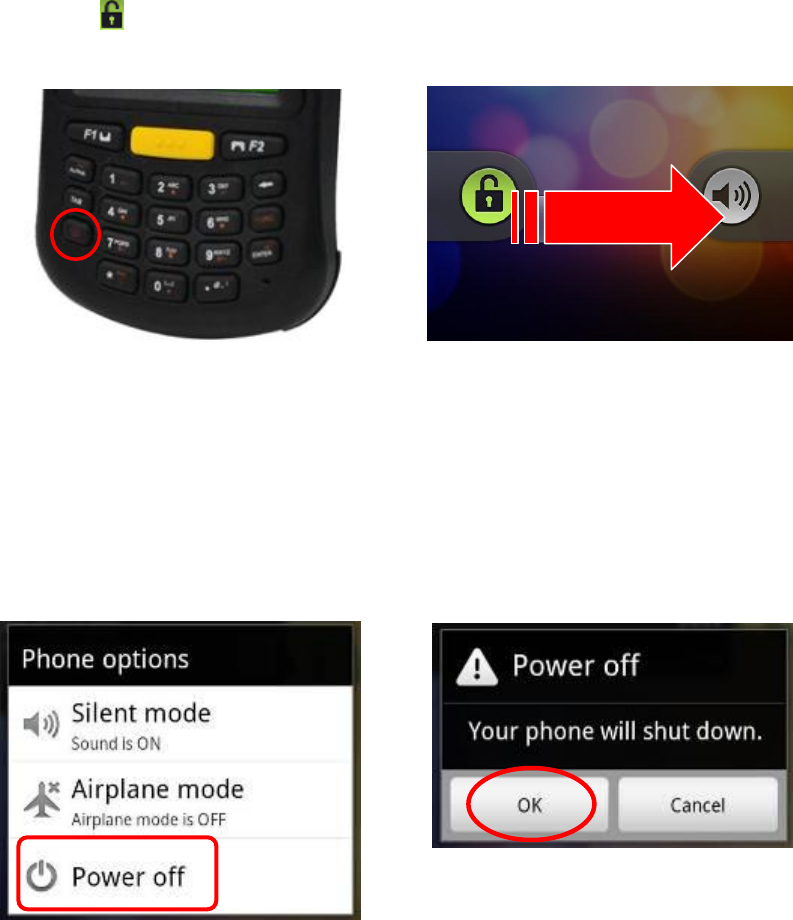
To turn on your C350T:
Press and hold Power button about 1 second. You can feel a slight vibration
when your C350T series PDA is turned on.
Drag from left to right to un-lock the screen.
To turn off your C350T:
Press and hold Power button till the following window show up.
Tap Power off, and then touch OK.
You can also force the system to shutdown anytime by holding the Power
button about 8 seconds.
6
TOUCH SCREEN
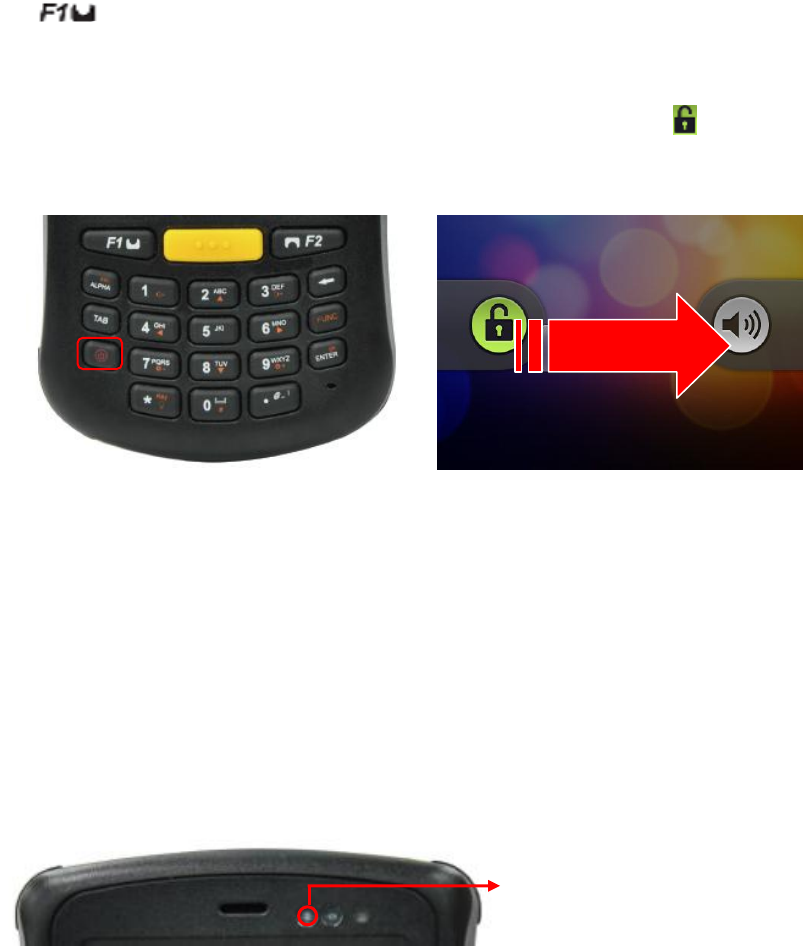
Display & Touch Screen On/Off
To save battery power, press the Power button to have the display & touch
screen off and to force your C350T enter sleep mode.
You can also have your C350T goes to sleep automatically by pressing:
> Settings > Display > Screen timeout.
To wake up your C350T, just press Power button again and drag from left to
right to unlock the screen.
Note:
When you hold C350T close to ear during voice transmit, the touch sensor
enters sleep mode automatically to prevent accidental touches.
Your touch screen might stay dark if the Proximity & Light sensor is covered.
Don't use covers or screen protectors (even clear ones) that cover this sensor.
Proximity & Light Sensor
7
Adjust Screen Brightness
Find it: > Settings > Display > Brightness
Here you can see a brightness adjustment bar.
Drag the slider to left to decrease or to right to increase the screen brightness.
Press OK to finish your settings.
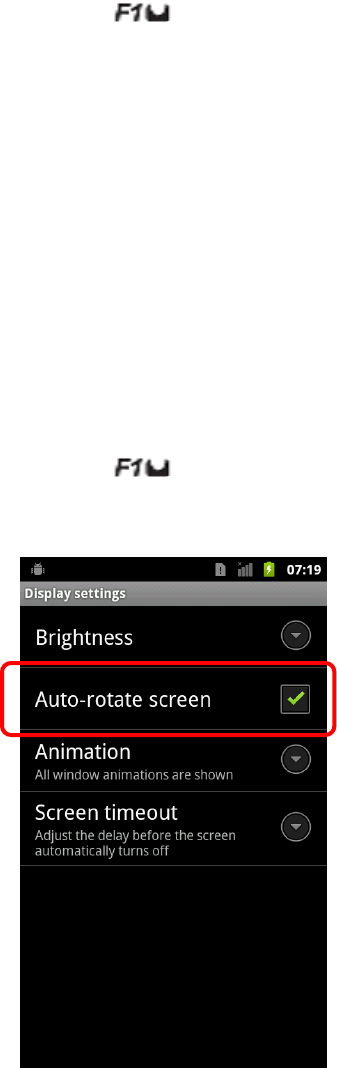
Rotate the screen
Your C350T can rotate its display automatically to stay right-side up while changing
the screen orientation.
Find it: > Settings > Display > Auto-rotate screen
8
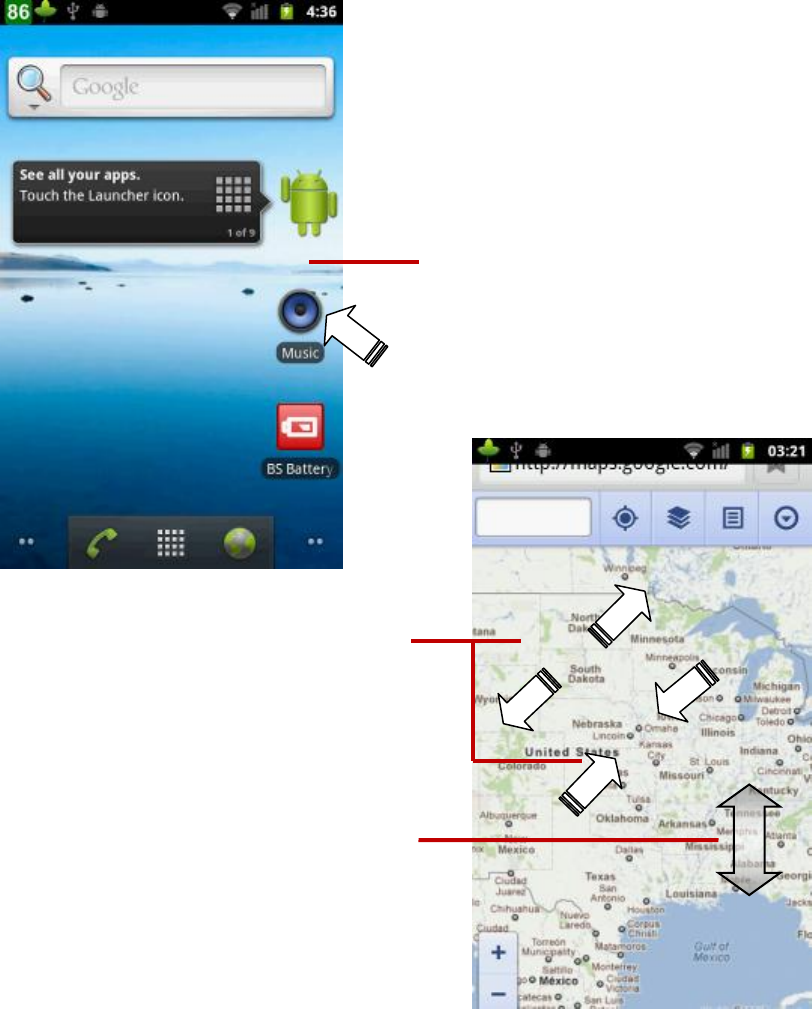
Touch Tips
One Touch: Choose an icon or option
Press and Hold: Show options
Drag: Scroll or move slowly
Flick: Scroll or move quickly
Zoom: Pinch the screen with two fingers apart or together to zoom in or out
on Google Maps™, web pages or photos.
Slide two fingers apart
or together to zoom in
or out.
Drag or flick to scroll.
Touch & hold to show options.
9
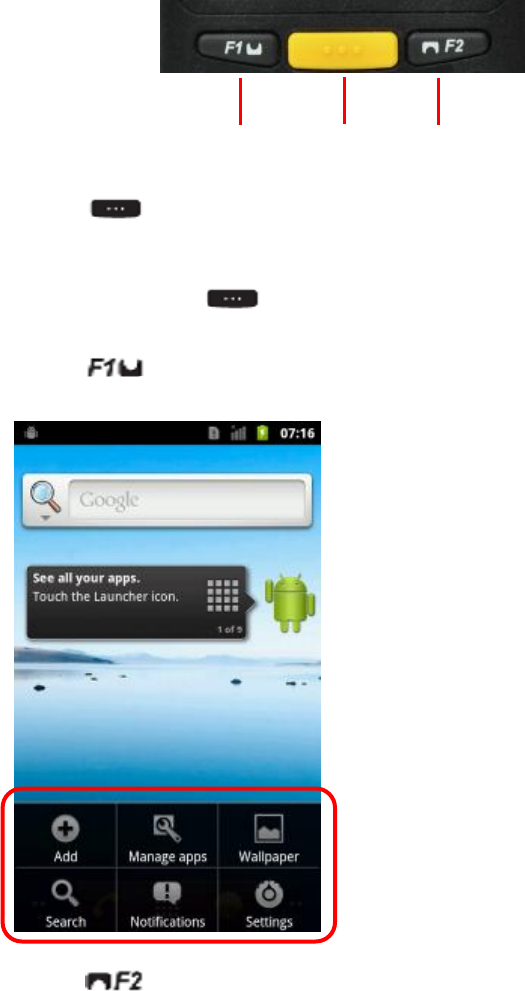
KEYPADS AND FUNCTION BUTTONS
Main Function Keypads
Menu Home Back
Touch to close any menu or app and return to home screen.
Or touch and hold on home screen to find the latest apps used.
Touch to open menu options.
Touch to return to the previous page.
10
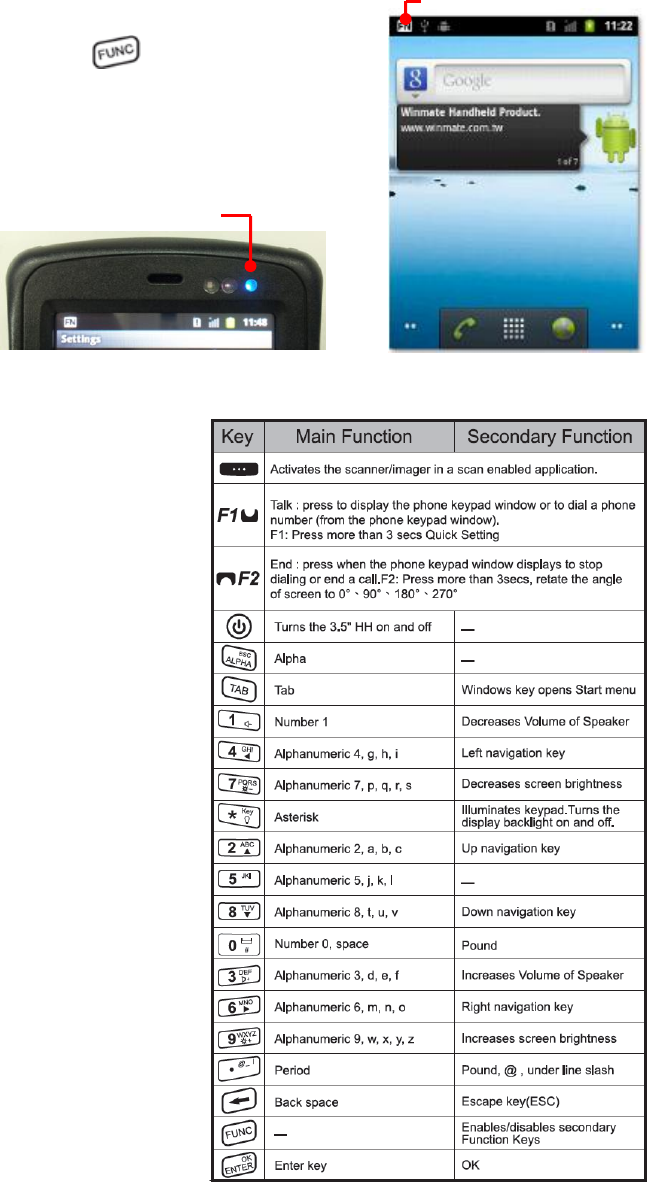
Keypads
The keypad enables you to both enter information and interact with the PDA
operating system and also operate secondary functions using the function button.
When the green function button is pressed, the orange icon functions on the keypad
become available.
When the Function button is pressed, an icon
appears in the operating system and LED indicator show
blue color:
The following table describes the keypad keys:
Function Active Icon
LED Indicator shows BLUE
11
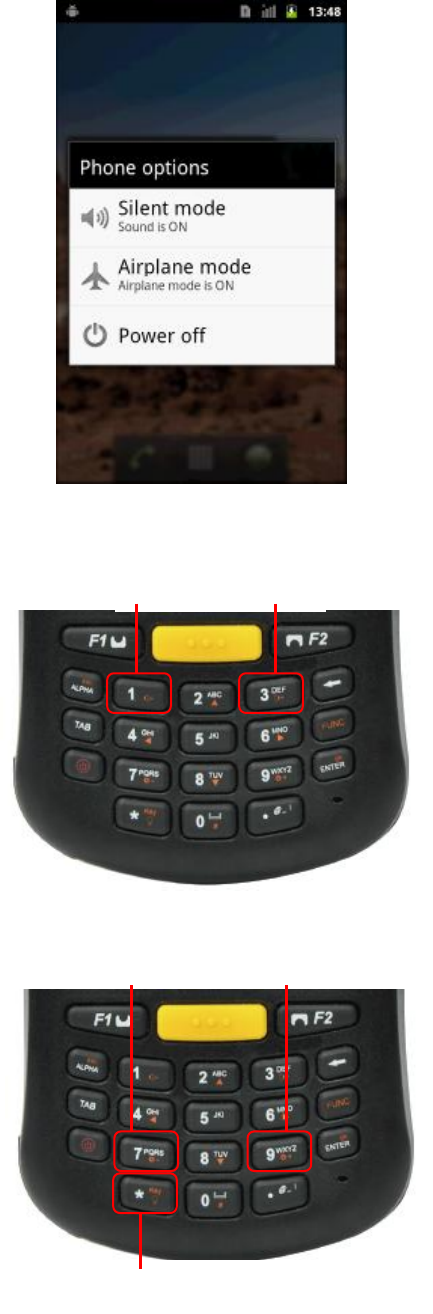
Power Key Menu
Press and hold Power Button for 3 seconds to open
the power key menu, where you can:
Mute the PDA from “Silent mode”
Turn off all wireless functions, including the
call function, data services, Bluetooth, and
Wi-Fi from “Airplane mode”
Turn off your C350T from “Power off”
Adjust System Volume
Press the FUNC keys to jump to function-key-layer:
Ringer volume
- on the home screen
Earpiece volume
- during a call
Media volume
- when playing music or video files,
Adjust Screen Brightness
Adjust brightness in function-key-layer
Enable / Disable Key Pad backlight
Adjust brightness in function-key-layer
- Brightness +
Key Pad BL Enable / Disable
- Volume +
12
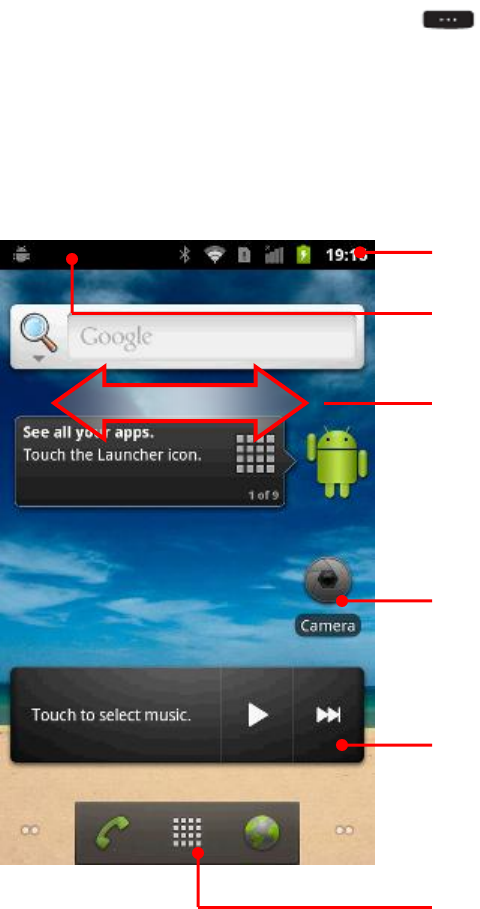
HOME SCREEN & STATUS
Home Screen
Home screen gives you all your latest information in one place. It is the screen you
can see when you turn on C350T or touch from a menu.
Home screen also provides a space where you can personalize your C350T by setting
different wallpaper or having shortcuts of the apps frequently used.
Status Bar
Shortcuts
Touch to open
Widget
Touch to use
Touch to open the app menu
Notification:
Drag this bar down to see details.
Flick left or right to see more panels or
widgets
13
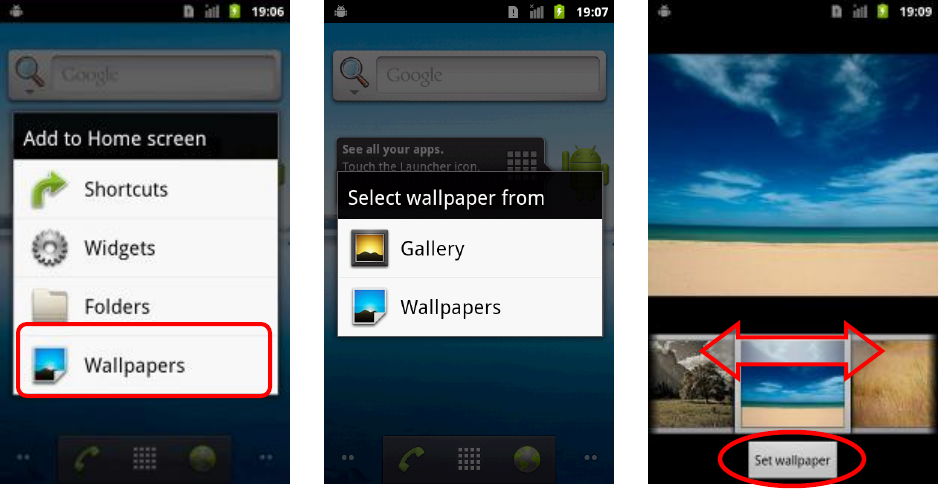
Add to Home Screen
You can personalize your Home screen by changing wallpaper or adding some
frequently-used shortcuts and widgets.
To change your wall paper:
Touch and hold home screen to open the Add to Home Screen list.
Tap Wallpapers and select a wallpaper source.
Select the wallpaper you like, and touch Set Wallpaper to finish your settings.
To add a shortcut / widget / folder to your home screen:
Touch and hold home screen to open the Add to Home Screen list.
Touch the type you like on Add to Home Screen list to open the details list.
Tap the one you are going to add to home screen.
The item you have chosen will show up at the home screen. The setting is done.
14
You can also add a shortcut from the App Menu.
Touch to open the App list.
Find the App you are going to set, then touch and hold the App icon.
The display will return to home screen with the new shortcut you just set.
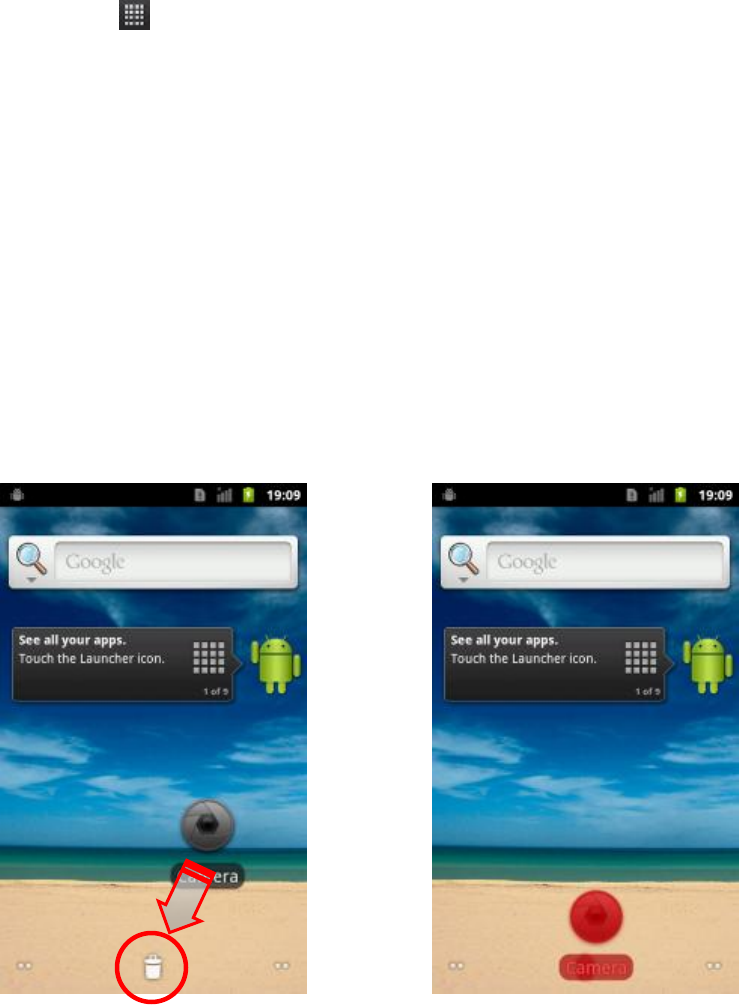
To remove a shortcut from Home screen:
Touch and hold the shortcut icon on your home screen.
You can find a trash can icon show up on the bottom of your home screen.
Drag the shortcut to the trash can icon, and the shortcut will be deleted.

15
Status & Notifications
Icons at the top of the screen notify you about messages and C350T status. To view
your notifications, touch the status bar and drag it down. Touch a notification to see
details.
The table shows different icon’s meanings.
16
SET UP LANGUAGE
Your C350T series PDA support diverse languages. You can find a language list from:
Find it: > Settings > Language & Keyboard > Select Language
Select the language you like.
The screen will return to Language & Keyboard Settings menu. The language
setting is done.
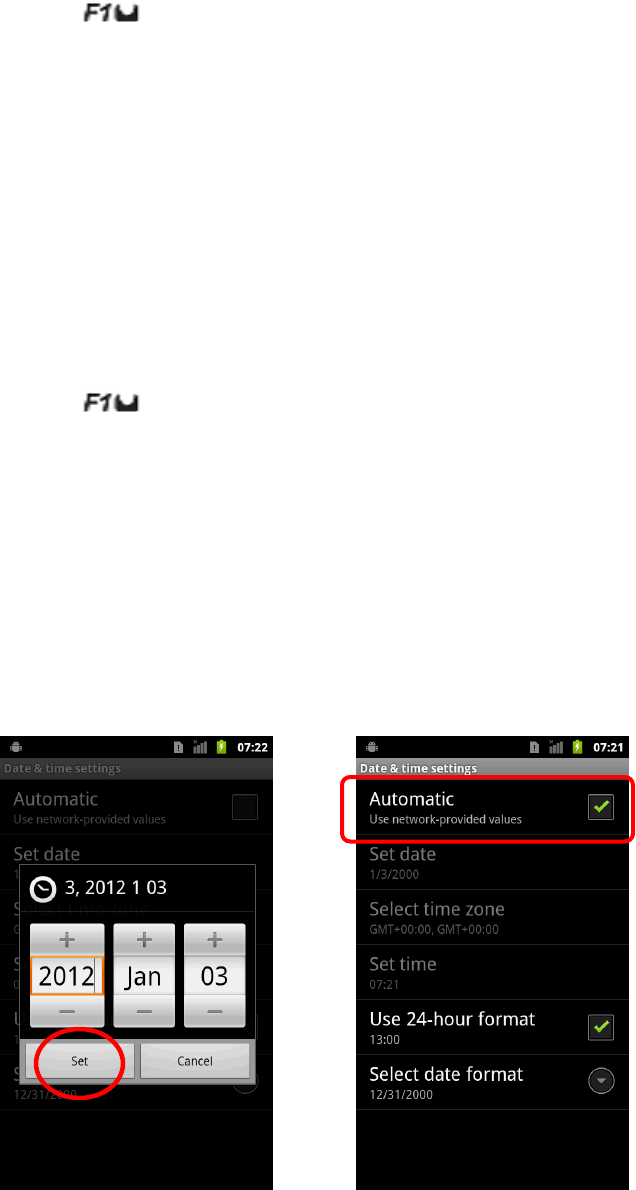
SET UP DATE & TIME
You can set the time manually or have it set up automatically.
Find it: > Settings > Date & Time
To set up the date and time manually:
Tap on Set Date, choose the right values of Month / Date / Year, and touch Set
to finish your setting.
Tap on Set Time to adjust time and touch Set to finish your setting.
You can also set up time with network-provided values by tapping on Automatic.
Adjust Time Manually Adjust Time Automatically

17
INTERNET CONNECTION
Your C350T can access the Internet with WiFi connection or Data Connection.
WiFi Connection:
To turn on WiFi function and scan available networks:
Find it: > Settings > Wireless & Networks > WiFi.
When your C350T is connected to the network, the Wi-Fi connected indicator
appears in the status bar.
To set up your WiFi connection:
Find it: > Settings > Wireless & Networks > WiFi settings.
Touch WiFi to turn on WiFi function and to start scanning available networks.
If WiFi is already on, you should be able to see a list of networks within range.
Choose the network you are going to connect. If necessary, enter Network SSID,
Security and Wireless password.
Touch Connect to finish your WiFi connection settings.
Available networks

18
Note: To extend battery life, turn off Wi-Fi power when not in use.
Note: Wi-Fi is mostly used in indoor environment. If you often need to access the
Internet outdoor, we strongly recommend that you choose the C350T series
model with 3G function.
Data Roaming
When your C350T is out of your mobile operator’s service area, you can still connect
to the operator’s partner’s network with Data Roaming function.
Find it: > Settings > Wireless & Network > Mobile Networks > Data
Roaming > OK
Caution! Using data services while roaming will be costly. Check with your mobile
operator for data roaming rates before you use data roaming.
19
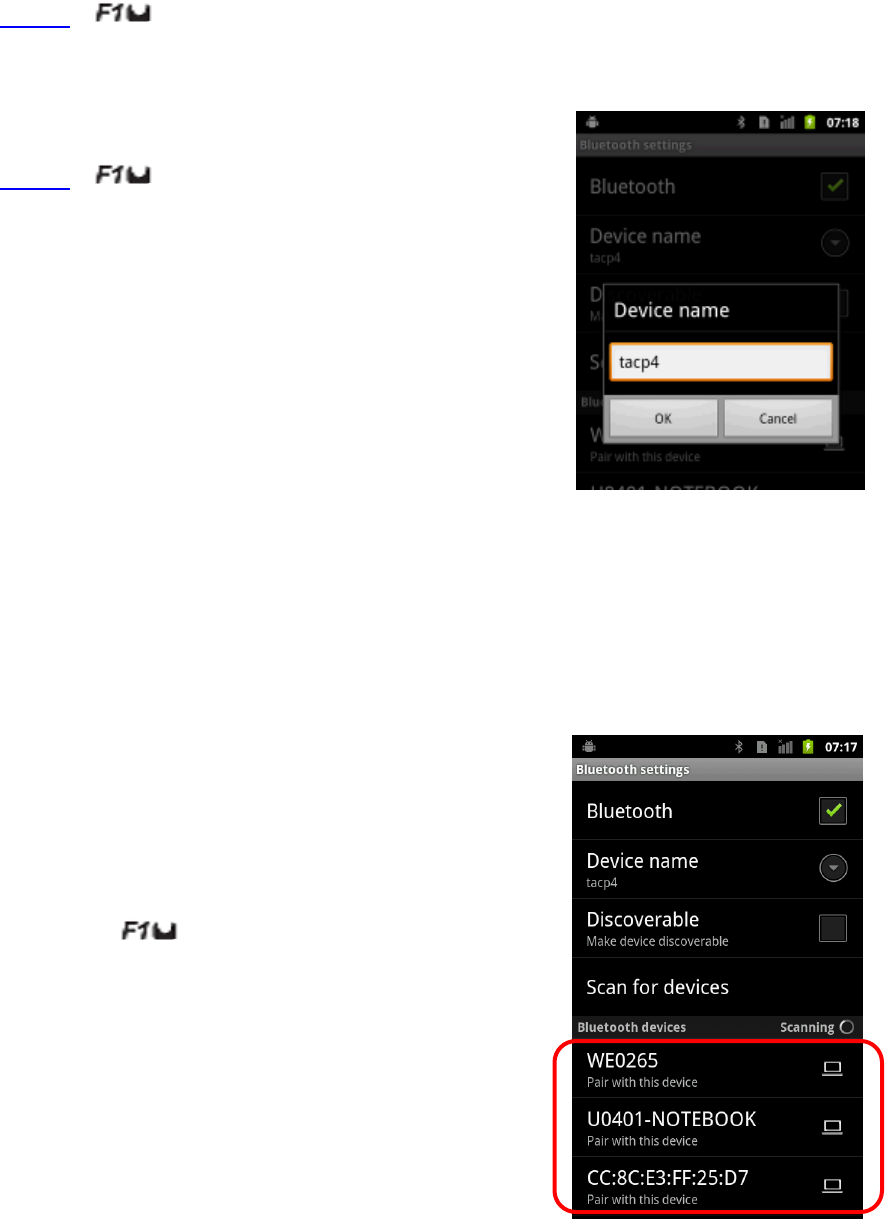
BLUETOOTH
To turn on Bluetooth function and scan available devices:
Find it: > Settings > Wireless & Networks > Bluetooth
To set up your Bluetooth connection:
Find it: > Settings > Wireless & Networks
> Bluetooth settings.
Make sure your Bluetooth function is turned on.
If not, turn on it by tapping Bluetooth.
To change the device name, touch Device Name,
enter new name you like, and touch OK to finish
your setting.
Connect new devices
Note: This feature requires an optional accessory. To connect with a new device, you
need to pair with it. You only need to do this once for each device—to connect again,
just turn on the device.
Make sure the device you are pairing with is in
discoverable mode.
Note: Refer to the guide that came with the
device for details.
Touch > Settings > Wireless & networks
> Bluetooth settings.
Touch Bluetooth to turn on and scan.
If Bluetooth power is already on, touch
Scan for devices.
You can see a Bluetooth device list. Touch a
device to connect.

20
If necessary, touch OK, or enter the device passkey (like 0000) to connect to the
device.
When the device is connected, the Bluetooth connected indicator appears in the
status bar.
Note: Using a mobile device or accessory while driving may cause distraction and
may be illegal. Always obey the laws and drive safely.
Reconnect devices
To automatically reconnect your C350T with a paired device, simply turn the device
on.
To manually reconnect your C350T with a paired device, touch the device name
under the Bluetooth devices list.
Disconnect devices
To automatically disconnect your C350T from a paired device, simply turn the device
off.
To manually disconnect your C350T from a paired device, touch the device name in
the devices list, and then touch OK.
Note: To extend battery life, turn off Bluetooth power when not in use.
21
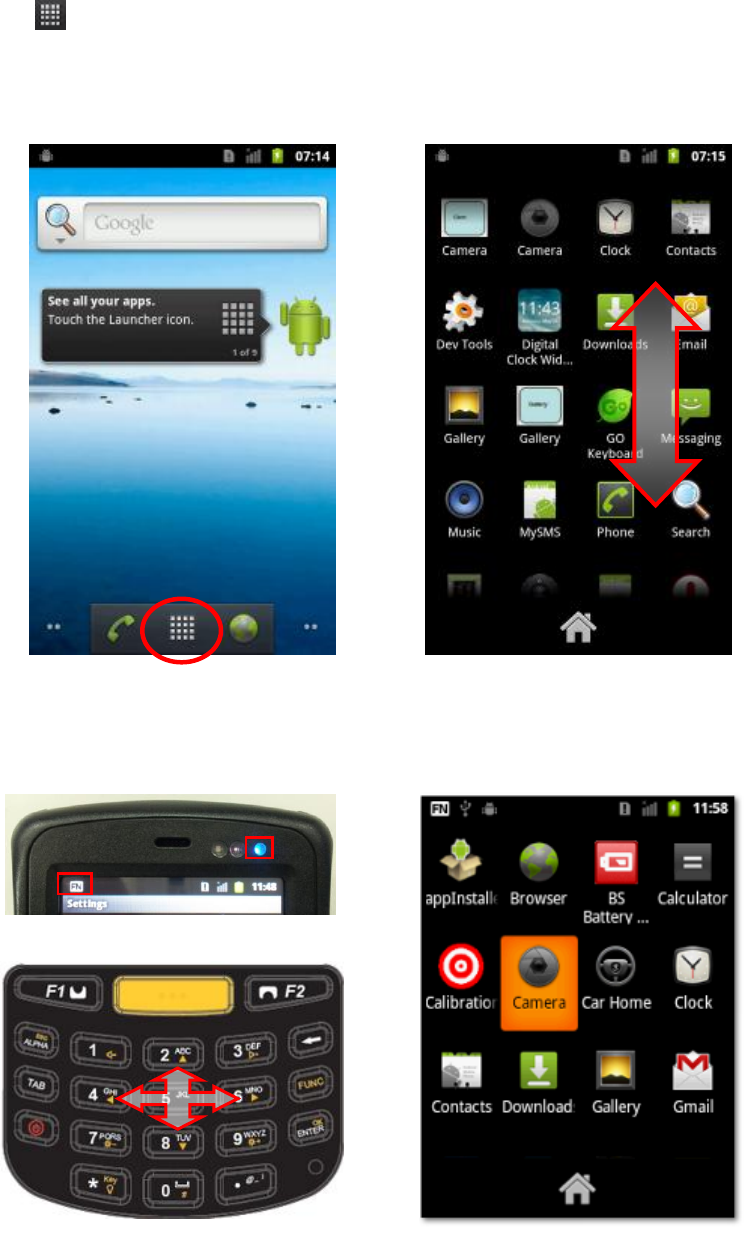
APP MENU
Tap on to enter App Menu and see all available apps. When the App list is
longer than one page, you have two ways to see more items.
Swipe up/down
Direction Keys
22
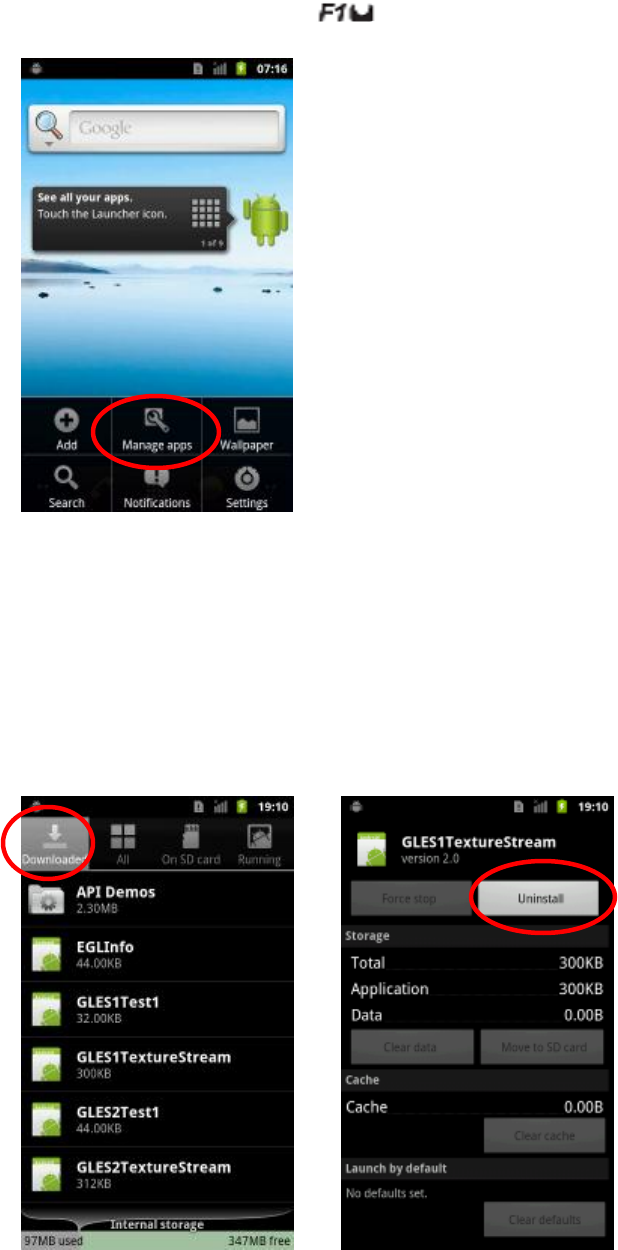
Manage & Restore Apps
From the home screen, press > Manage apps.
To uninstall the Apps you have downloaded:
Switch to Downloaded tab
Touch the app you are going to uninstall
Touch Uninstall to finish your settings.

23
SOFTWARE UPDATE
You can update the latest C350T software using your computer:
On your computer, go to www.winmate.com.tw, find your C350T product webpage,
and check the "Download Center" links. If an update is available, follow the
installation instructions listed as below.
Download the update file and copy the file into Micro SD card in C350T
Reboot your C350T.
This might take a few minutes. Please wait till system boot successfully.
Erase the update file from the SD card in your C350T series PDA.
Note: Before updating your C350T series PDA, please backup your personal data. The
data may be damaged or erased during update process.
24
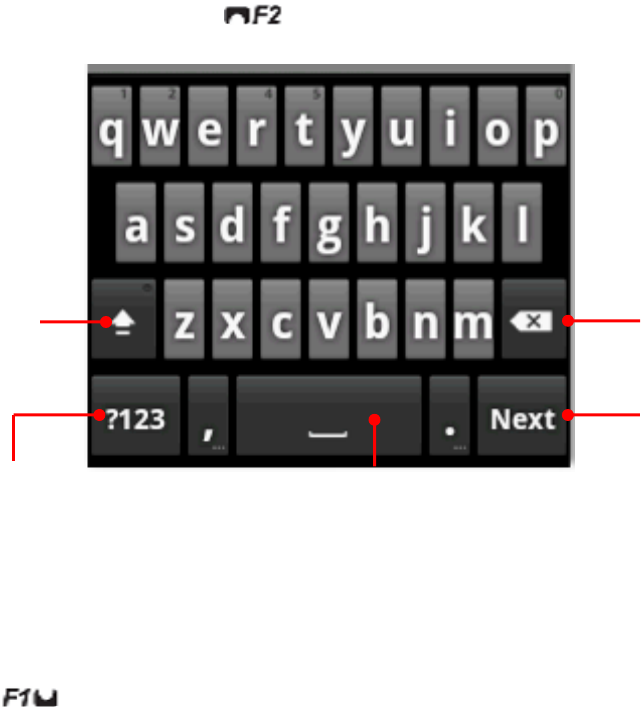
TEXT ENTRY
Touchscreen keypad
You can open a keypad on your screen by touching a text box.
To close the keypad, press .
Text input settings
Find it: > Settings > Language & keyboard
To edit your dictionary, touch User dictionary.
To change the language and the style for your touchscreen keypad, touch Select
Language.
To change your onscreen keyboard settings, touch Built-in Keyboard or GO
Keyboard.
Shift
Delete
Enter
Space
Switch to numbers
/ Symbol keypads
25
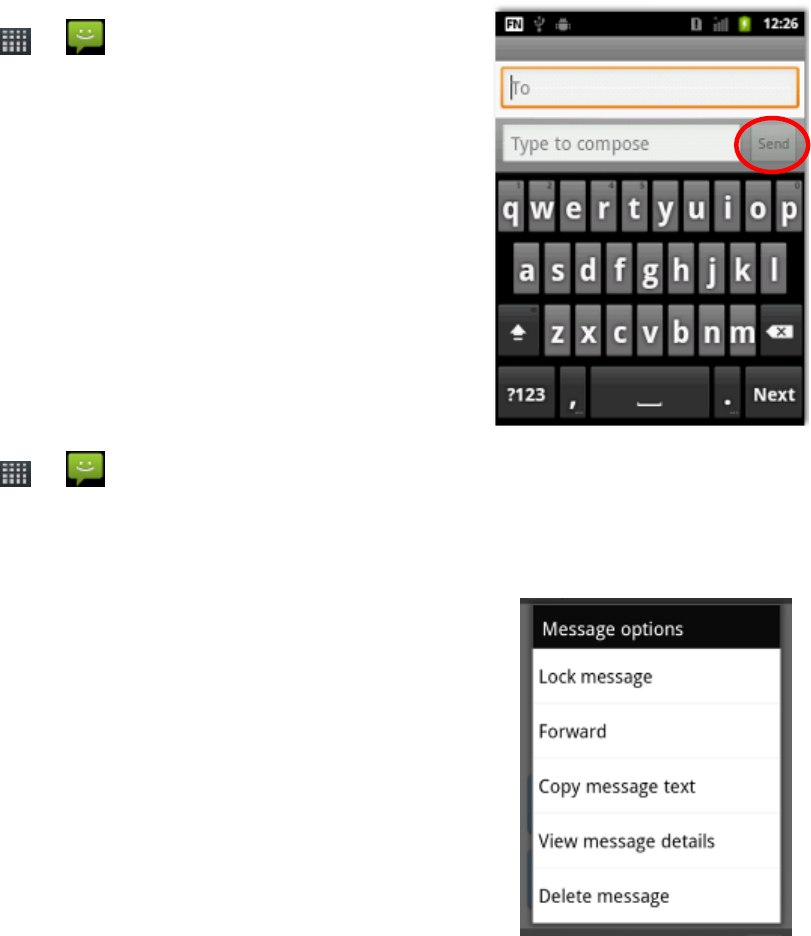
MESSAGING
To compose a new message:
Find it: > Messaging > New message
Touch To and type keyword to search a known
contact.
Touch Type to Compose and enter the message
content.
Tap Send to send out the message.
To read & reply a messages
Find it: > Messaging > Message box
To open a message and the message history with the same contact, simply
touch the name of your Messaging list.
To reply the message, touch the text box at the
bottom of the screen, enter your response, and
tap Send to finish the message delivery.
To see more options for message edit, touch
and hold a message in the conversation history
to open Message options list.
Note: Message box shows all of your messages together—text, email and social
networking messages. To show only one type of message, touch a message type
instead of Message box.
Touch here to search a contact
Touch here to enter texts
26
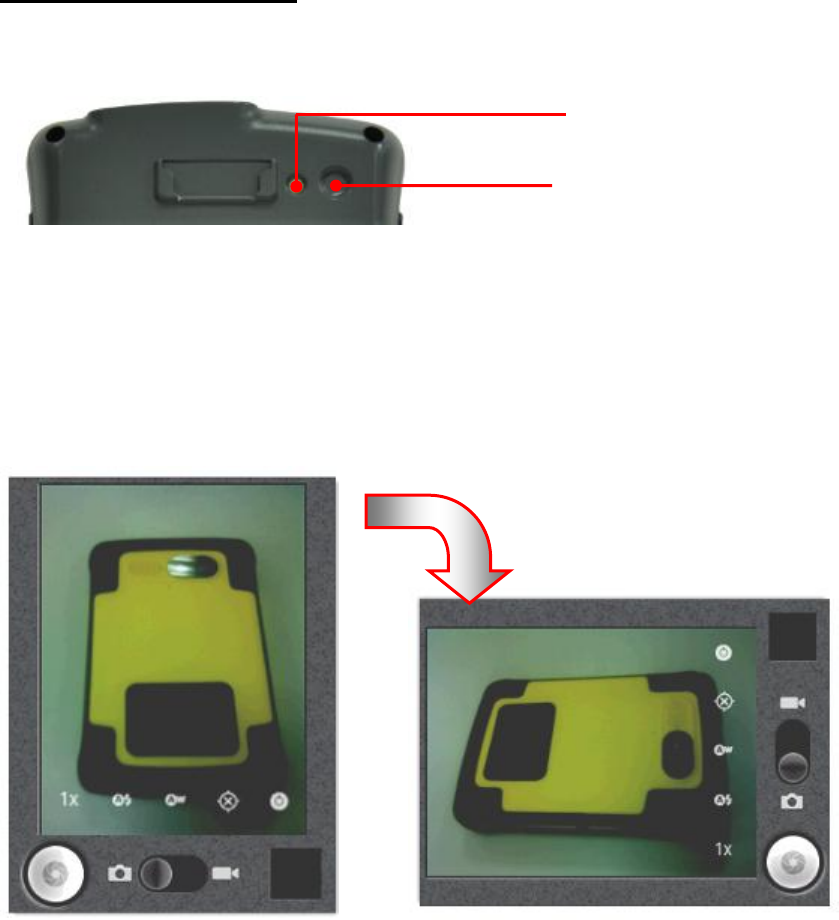
CAMERA
C350T Series PDA supports dual built-in cameras which can be used for taking
pictures or recording video clips.
Main Camera at the rear side:
Note: Your C350T PDA built-in camera supports rotation function. When turn your
C350T PDA to 90 degree (left or right), the preview screen display will rotate
accordingly. This function is not eliminated by your display settings.
5 Mega-Pixel Camera
LED Flash

27
Take Photos
To take photos, open the Camera App:
Find it: > Camera
Caution! Please make sure the Micro SD card has been inserted.
Well using the onscreen control helps take good photos.
You can tap to switch from photo mode to video mode. To switch
back to photo mode, tap under video mode.
Tap You can also zoom in or zoom out.
Tap to switch between different flash mode:
Tap to switch between different photo effects.
When you are ready to take pictures, touch to have a shut.
Gallery
Here you can review
pictures or videos.
Preview Screen
Switch Photo
/ Video Modes
Camera shutter
Switch Flash Mode
Special Effect Options
Zoom-in / out
Store Location
Focus Mode
28
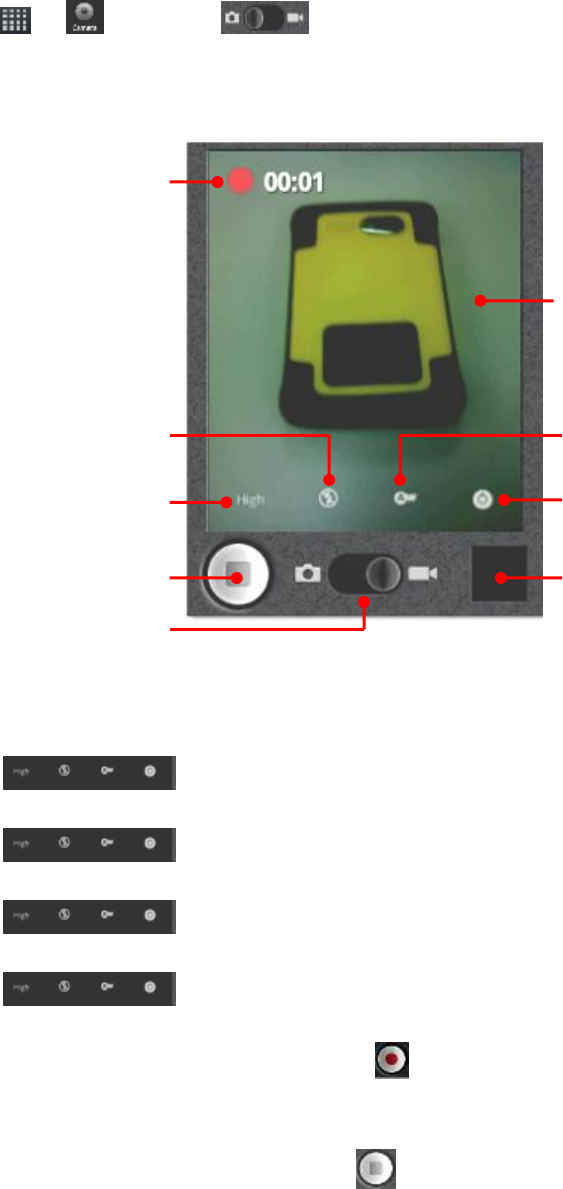
Record Videos
To record video clips, open the Camera App:
Find it: > Camera >
Caution! Please make sure the Micro SD card has been inserted.
Well use the onscreen controls helps record great video clips.
Tap to change the quality of video.
Tap to turn on / off the LED light while recording videos.
Tap to check white balance.
Tap to change different special effects.
When you are ready to take videos, touch to start recording.
The color of recording button will become bright pink when the recording is
started. To stop recording, simply touch again.
Preview Screen
Gallery
Here you can review
pictures or videos.
Special Effect Options
Recording Button
Switch Video /
Photo Modes
LED Light On/Off
White Balance
Video Quality
Recording Time
29
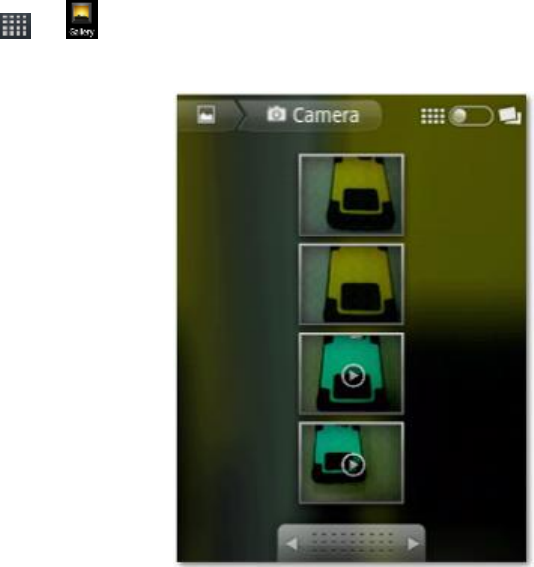
PHOTO & VIDEO
The taken photos and recorded video clips will be restored in the Micro SD card. To
review these files, please check:
Find it: > Gallery
Tap to open the file you are going to review.
30
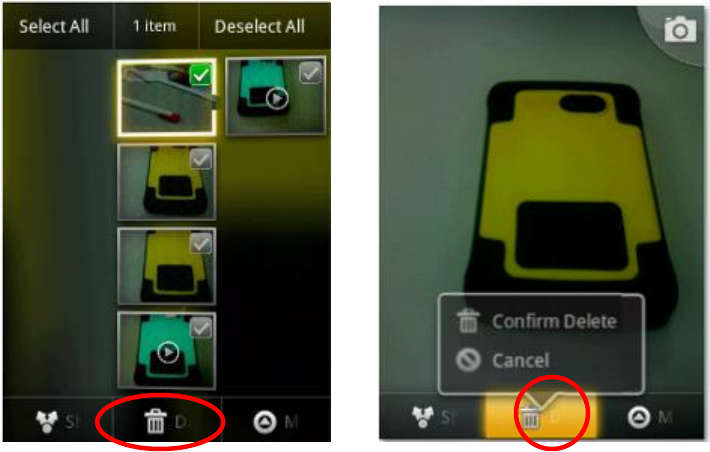
To delete photo or video files:
Touch and hold on the file you are going to delete till the green mark shows up.
Follow the same procedure on other files to be deleted.
Tap trash can icon and then touch OK to finish the setting.