Winstars Technology WSWN622HN1 Wireless N USB Adapter 150Mbps Hi-Gain User Manual Manual
Winstars Technology Limited Wireless N USB Adapter 150Mbps Hi-Gain Manual
Manual
Wireless N USB Adapt er 150Mbps
Hi-Gain
WS-WN 622 HN 1 ,U1 2-43 87 1

Introduction
Thank you for purchasing the Wireless USB Adapter, Wireless USB Adapter
allows you to connect your laptop or desktop to any Wireless networks in
your home or office. The Wireless USB Adapter is great for those who want
to upgrade older computers to be able to access the internet over a Wireless
network.
Package Contents
�Wireless USB Adapter
�Setup CD with user manual
�Quick install
g
uide
System Requirements
�Notebook or desktop PC with Pentium 1 GHz-compatible o
r
higher
processor
�Windows 2000/XP/Vista
/
7, MAC OS, Linux
�
A
vailable Hi-Speed USB 2.0 port
Inst a lla t ion
IMPORTANT: For proper operation, do not connect the Wireless USB
Adapter to your computer before you install the software. If you do, wait for
the Found New Hardware screen to display and click “Cancel”; otherwise,
the installation process will likely be adversely affected.
Insert the included setup CD in the CD-ROM Drive and start the Setup.exe
pro
g
ram.
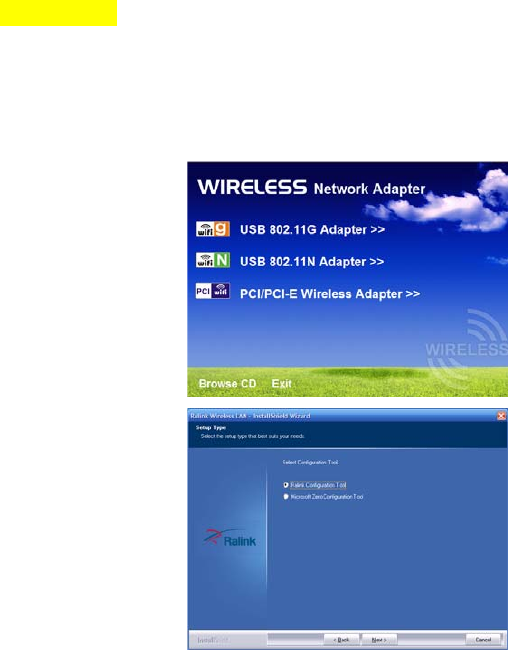
To start the installation,
please click on the
“USB 802.11N
Adapter” or “USB
802.11G Adapter”
Wait fo
r
the installe
r
to
run
When the License
A
g
reement screen
displa
y
s, read the
a
g
reement and click
“Next” to accept the
terms and continue with
the installation.
On the second Setup
T
y
pe screen
(
below
)
,
choose a confi
g
uration
tool. “Ralink
Configuration Tool” is recommended, as it provides access to all adapter
features.
If you prefer to use the tool provided by Windows XP/Vista, select
“Microsoft Zero Configuration Tool.” Choose either (the setting can be
changed after the install), then click “Next.”
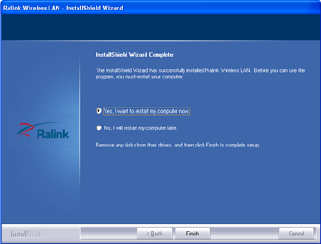
The installer will
automatically install the
pro
g
ram. When done
Select
Y
es.
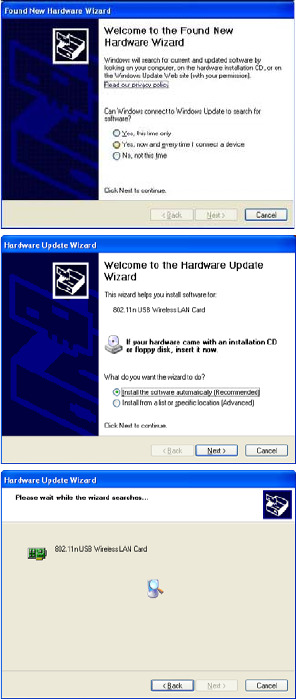
With the Welcome to the
Found New Hardware Wizard
screen displa
y
ed
(
which is
automatic when the adapter
is connected to
the .computer
)
, select the
option “No, not this time” and
click “Next.”
When prompted with “What
do
y
ou want the wizard to
do?” select “Install the
software automatically
(
Recommended
)
” and click
“Next.”
A
status screen will displa
y
,
indicatin
g
that the installation
is in progress. No action is
needed at this point.
When the Completin
g
the
Found New Hardware Wizard
screen displa
y
s, it indicates
that the installation has been
successfully completed and
y
our Wireless USB Adapter is
read
y
fo
r
confi
g
uration.
Configura t ion
Once the installation is complete, you can configure the Wireless Adapter to
connect to a wireless access point (AP). The wireless configuration utility will
start automatically, and you’ll also find a tray icon at the lower right in your
Windows systems tray.
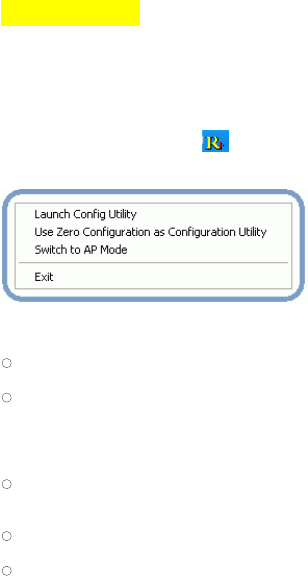
Right-click on the Ralink icon in the task bar in the bottom right hand
corner of your screen.
Lets you change the operation mode of the Utility.
�Launch Confi
g
Utilit
y
:Select this option to displa
y
the Utilit
y
's main
screen.
�Use Zero Confi
g
uration as Confi
g
Utilit
y
:
(
Windows XP onl
y)
Select
this option to use Windows to set up and manage your network
connection. Selection of this mode is not necessary in Windows Vista,
7 or higher, as you can use Windows and the Ralink Utility to manage
the Adapter without changing operating modes.
�Switch to Client +
A
P Mode: (Windows 7 and higher only) Select this
option to let computers and devices connected to the Ralink AP access
the Internet (or another network to which the Ralink AP is connected).
�Switch to AP Mode: Select this option to use the Utility as an access
point and to set up a wireless network of your own.
�Exit: Select this option to close the main screen and exit the pro
g
ram.
Any wireless connections managed by the Ralink Utility will be
disconnected.
Accessing the Utility's Features
The Ralink Utility lets you connect to a wireless network and the Internet, set
up a wireless network, connect directly to other computers or devices using
Wi-Fi Direct, and many more wireless-related features.
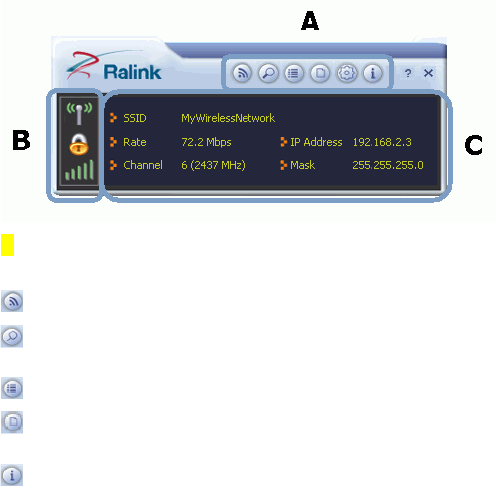
From the main screen, you can access the main features of the Utility (A),
and find out about the status of your current network connection (Band C).
By accessing the menu from the Ralink taskbar icon。
AClick these buttons to open the following screens and access the Ralink
Utility's features.
Use the Wi-Fi Direct screens to set up a Wi-Fi Direct connection, and
to share media files such as music or movies.
Use the Available Networks screen to find out about available wireless
networks and their network status, and to connect to a wireless
network.
Use the Link Information screens to find detailed information on the
status of your wireless connection.
Use the Profile Settings screens to set up and use profiles to more
quickly connect using frequently used settings, and to set up wireless
security.
Use the About screen to find version information for your Utility.

BUse these buttons and icons to manage transmission and to find
information about your wireless connection.
Click this button to enable or disable wireless transmission.
Indicates the security status of your connection.
Indicates the quality of your wireless connection.
CUse this screen to find information on wireless network settings.
�SSID: This shows the name of
y
our wireless network.
�Rate: This shows the speed of
y
our connection.
�Channel: This is the channel assi
g
ned to
y
ou
r
connection. Chan
g
e this
if interference is a problem on your network.
�IP Address: This identifies the Ralink Adapte
r
on
y
our wireless
network, much like a physical mailing address identifies a house on a
street.
�Mask: The subnet mask hides
y
our IP address from outside
y
ou
r
wireless network.
NOTE: For advanced settings and additional features of the Wireless
Adapter, refer to the user manual on the enclosed CD.
FCC INFORMATION
This device complies with Part 15 of the FCC Rules. Operation is
subject to the following two conditions:
1. This device may not cause harmful interference, and 2. This
device must accept any interference received, including
interference that may cause undesired operation.
Note: This equipment has been tested and found to comply with the
limits for a Class B digital device, pursuant to part 15 of the FCC
Rules. These limits are designed to provide reasonable protection
against harmful interference in a residential installation. This
equipment generates, uses and can radiate radio frequency energy
and, if not installed and used in accordance with the instructions,
may cause harmful interference to radio communications. However,
there is no guarantee that interference will not occur in a particular
installation. If this equipment does cause harmful interference to
radio or television reception, which can be determined by turning
the equipment off
and on, the user is encouraged to try to correct the interference by
one or more of the following measures:
—Reorient or relocate the receiving antenna.
—Increase the separation between the equipment and receiver.
—Connect the equipment into an outlet on a circuit different from
that to which the receiver is connected.
—Consult the dealer or an experienced radio/TV technician for help.
Caution: Any changes or modifications not expressly approved by
the party responsible for compliance could void the user's authority
to operate this equipment.
FCC Radiation Exposure Statement
This equipment complies with FCC RF radiation exposure limits set
forth for an uncontrolled environment.
The Maximum SAR value:0.725W/Kg