Wintecronics TR53A Car Alarm Transceiver User Manual
Wintecronics Ltd Car Alarm Transceiver Users Manual
UserManual.wiki
>
Wintecronics
>
TR53A User Manual
User Manual
Navigation menu
Upload a User Manual
Namespaces
Wiki Guide
HTML
PDF
Info
Views
User Manual
Discussion / Help
Navigation
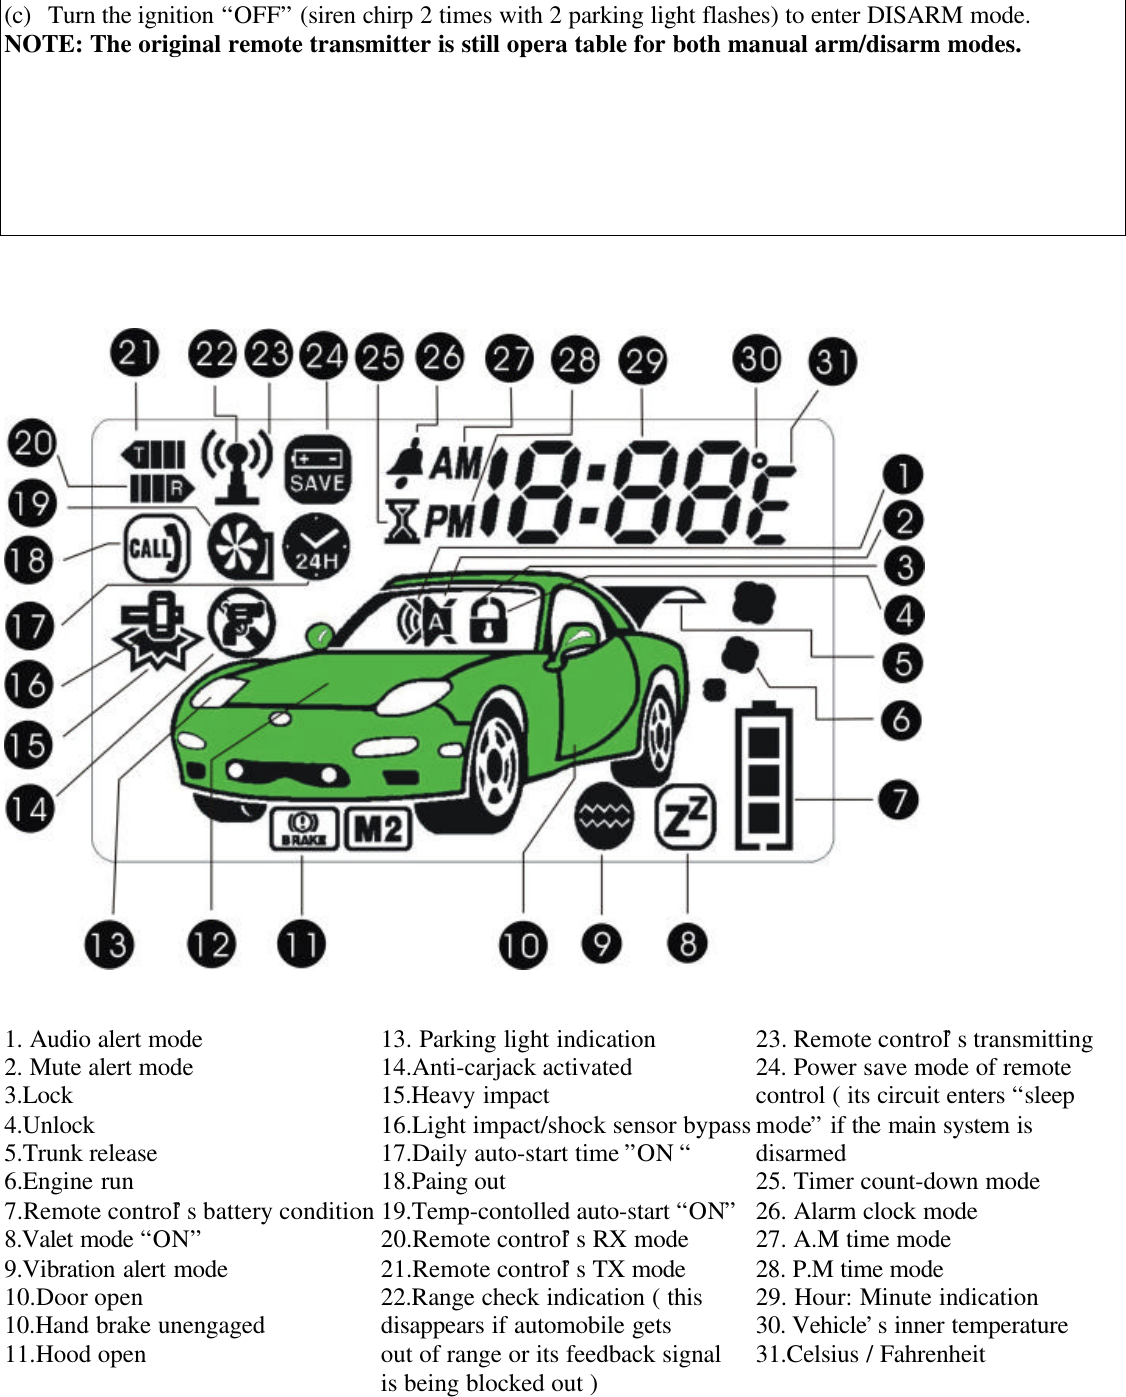
![1. For safety sake, check first if your ignition key can activate engine start while the hand gear is engaged. Ifengine starting can be done if hand gear is engaged, set gear mode in “manual hand gear mode” duringinstallation (Refer to the operation guide.)2. Check if immobilization feature is present in your automobile. If so, another accessory (Item no: 444) isrequired to enable remote engine start. This accessory can be bought from the same dealer.3. Check the circuits and their current first. Refer to [Installation diagram for input/ output current values]. Ifthe output current is lower than the requirement, additional relays must be added.]※ check the following after installation of alarm system1. Installation is abnormal if the remote engine start can be done under these conditions (a) the gear isengaged 9b) ignition key is in “ Ignition ON Mode” (c) the engine hood is open (D) the hand brake is notengaged.2. The remote control should control operation of function is the same way as the original key .If remotecontrol can hardly remote engine start, the installation is abnormal. Check the related circuit connection ofthe ignition cylinder.3. For servicing, repair and valet parking, “Valet mode” must be set to “ON”.Remote control features【 】【 】【】【 】【 】1. Remote door lock/armTo remote door lock, press and release 】button after closing the door;: siren chirps once with oneparking light flash.l The remote transmitter sound 1 buzz and its LCD display locked icon. 【It remote transmitter sound 4buzzes , the system is not working normally】.2. Remote door unlock/disarmTo remote the locked door, press and release【 】; siren chirps twice with 2 parking light flashes .l The remote transmitter sounds 2 buzzes and its LCD show unlock icon2 stages door unlock /disarm 【Refer to #36, Program table 1】Another accessory [1xxx] buyable from the same dealer is required .After setting the system at 2stage door unlock, a press on button【 】can unlock driver’s door and longer press on the samebutton can unlock all other others. Siren chirps 2 times with 2 parking light flashes.l The remote transmitter sounds 2 buzzes and its LCD shows unlock iconSingleOption(ChooseOneonly) Activate channel # 3【Refer to # 36, Features program table 1】The system must be set at Channel # 3 mode. Press and hold 【 】.The system responds accordingto its mode setting with 3 parking light flashes.l The remote transmitter sounds 3 buzzes and its LCD shows unlock icon3. Security diagnostic reportIf there is \unlock/ disarm command received by the main system under lock/ arm mode; the main systemwill still remain in the arm mode. If any intrusion is attempted, the siren will chirps 4 times with 4 parkinglight flashes. The remote transmitter sounds 4 buzzes and its LCD will display the attempted zones.4. Remote engine startTo remote engine start while the ignition “OFF”, press and release 【 】; siren chirps 3 times with 3parking light flashes. During starting process, the remote transmitter sounds melody and its LCD showstarting process, current status of the car.l The remote transmitter sounds melody with its LCD showing engine runs status. For runtime setup, 【referto Program table at #36】. Engine run shuts off when the preset time expires. If the engine start fails, theremote transmitter’s buzzer sounds 4 beeps twice.5. Remote activate engine run time【Refer to Remote transmitter’s functions table】Following the success of the engine start, each time press on 【 】 can automatically extend engineruntime with 5 min step-up time. Maximum 20 min runtime can be attained. Engine shuts off※ PRE-INSTALLATION CHECKModel No. TR53A SUPER RANGE 2-WAY SECURITY WITH REMOTE ENGINE START](https://usermanual.wiki/Wintecronics/TR53A/User-Guide-182685-Page-1.png)
![automatically when the runtime expires.6. Remote engine shut offTo remote stop engine running, press and hold 【 】,can engine will shut off with 2 confirming sirenchirps and 2 parking light flashes.l The remote transmitter sounds melody with its LCD showing engine shutoff icon and current status.7. Remote temperature-controlled start “ON/OFF” 【Refer to Features Program table at #36, 37or Remote transmitter’s functions table】To turn “ON” this remote temperature-controlled start feature, press and hold both 【 】【 】simultaneously . Siren chirps 3 times with 3 parking light flashes. [Refer to #36 for temperature setting].When the pre-set temperature is reached, the engine start automaticallyl The remote transmitter sounds melody with LCD showing temp-start icon. To turn this feature “OFF” Toturn this feature “OFF”, press both【 】【 】simultaneously. The remote transmitter sounds melody butits LCD does not show tem-start icon.8. Programmed daily start-time “ON/OFF” 【Refer to Features program table at # 37】Press and hole both【 】【 】simultaneously at the desired time of the day to make the engineautomatically start at the same time beginning the next day. Siren chirps 6 times with 6 parking lightflashes. Press and release both【 】【 】to deactivate this function.l The remote transmitter sounds melody with its LCD showing daily start-time icon “ON” and this featuresstandby mode .Engine begins running immediately in this mode.。For runtime setup, refer to Program tableat # 36. Engine run shuts off when preset time expires.When the Engine start is done, the remote transmitter sounds melody with its LCD showing current statusmodes.9. Status CheckPress button 【 】 to monitor the latest vehicle status. The parking light flashes 3 times,。l The remote transmitter sounds melody and its LCD showing vehicle’s status.10. Activate channel # 1 release trunkPress and hold 【】to release trunk regardless of either lock/arm or unlock/disarm mode. Trunk isreleased with 3 parking light flashes and siren chirps 3 times.l The remote transmitter sounds melody showing the trunk release icon and the car’s status.11. Remote siren /horn ON/OFF 【Refer to Features program table at # 36 or Remote transmitter’s featurestable 】Press and release 【 】to select between siren “ ON” and “OFF”.l The remote transmitter’s LCD shows siren and music note if the siren setting is “ON” .The LCD will notshow the siren and music note if siren is set “ OFF”.12. Activate channel 2 headlight delay 【Refer to Features program table at #36】To activate head light delay, press and hold 【 】[ Channel # 2 activated features can be programmed asrequired, as in this section for 30 sec head light delay ] either in arm or disarm modes. Following 2parking light flashes, headlight stays on 30 sec before it automatically turns off. Another press on thesame button can shut off this feature.l Remote transmitter sounds melody and its LCD showing the car’s status.13. Car locator/searchTo locate the car, press and release both 【 】【 】 simultaneously,siren chirps 6 times with 6 parkinglight flashes.l Remote transmitter sounds melody with its LCD showing car’s status.](https://usermanual.wiki/Wintecronics/TR53A/User-Guide-182685-Page-2.png)
![14. Lock/arm shock sensor by passThis features is used to avoid nuisances in case of alarm from shock sensor caused by heavy truck or trainpassing by or thunder’s sound. Press and release both 【 】【 】simultaneously (either the system isLock/arm or unlock/ disarm modes ) to make shock sensor inoperative but all alarm features still are instandby mode.【Refer to lock/arm features】.l The remote transmitter sounds 1 buzz with its LCD showing shock sensor and lock icons15. Defective zoon by passWhen remote arming is activated; if there is a defective zone like the trunk being released or handbrakenot engaged, siren chirps 4 times with 2 parking light flashes. The defective zones is ignored andbypassed. [If the defective zone is re-closed, the system enters full arm mode.]l The remote transmitter sounds 4 buzzes with its LCD showing the defective zone16. Alarm mode & warn awayWhile in arm mode, if the alarm is triggered by 1st stage shock sensor; the siren chirps twice with 2parking light flashes (except the system is in MUTE ARM mode).l The remote transmitter sounds 2 long beeps with its LCD showing impact iconWhile in arm mode, if the alarm is triggered by 2nd stage shock sensor; the siren chirps for 15 sec alongparking light flashes (except the system is in MUTE ARM mode).l The remote transmitter sounds long beeps for 15 sec with 2 vibrations. Its LCD shows impact iconWhile in arm mode, if the door’s car is opened, trunk/hood is opened or the ACC is turned “ON”; thesiren blurts 30 sec with 60 sec parking light flashing. The start-kill takes effect.l The remote transmitter sounds long beep with vibration for 60 sec. Its LCD shows icon of triggered zones.※ In all above trigger modes, one press on【 】 to deactivate the alert mode. A second press on【 】to getsystem into Unlock/Disarm mode.17. Alarm trigger zone by pass with safetyFor any abnormal situations like hijack mode, zone defects caused by hood/trunk open whilearming ,impact trigger or prolonged ACC “ON” while in arm mode; the engine-start is immediately killedbut siren blurts for 2 min. ( regardless of ARM or MUTE ARM),parking light flashes 2 min. Both sirenand parking light alert will stop after 2 min but the start-kill is still in effect. If the triggered zone is re-closed, the whole alarm system restores to normal arm mode.l The remote transmitter sounds long beeps and vibrates for 60 sec.; its LCD shows “trigger icon”18. PanicWhen the ignition is “OFF”, press and hold both 【 】【】; siren chirps 3 times with 3 parking lightflashes.l The remote transmitter sounds melody and its LCD showing car’s status..19. Remote anti-carjack onWhile the engine is running, press and hold both 【 】【】to activate remote hi-jack mode. The alarmsystem undergoes 3 alert stages. In the 1st stage, the parking light flashes for 20 sec. In the 2nd stage,siren starts to chirp for 20 ~ 30 sec with the parking light still flashing. In the 3 rd stage, the siren blurtsfor 30~ 60 sec with parking light flashing and the start kill takes effect.l The remote transmitter sounds alert with its LCD showing hijack mode icon.To deactivate on-going carjack mode in any stage , press and release【 】20. Anti-carjack switchWhile the engine is running, press and release the anti-carjack switch (concealed near the alarm board ),The alarm system undergoes 3 alert stages. In the 1st stage, the parking light flashes for 20 sec. In the 2ndstage, siren starts to chirp for 20 ~ 30 sec with the parking light still flashing. In the 3 rd stage, the sirenblurts for 30~ 60 sec with parking light flashing and the start kill takes effect. To deactivate on-goingcarjack mode in any stage, press the anti-hijack switch for 5 sec.l The remote transmitter sounds alert with its LCD showing hijack mode icon.21. Valet mode by remote ON/OFF【Remote transmitter’s Features program table】 or 【Valet mode byover-ride switch, refer to #37 Features program table】Press and hold both 【】【 】to turn the remote valet “ON” .Siren chirps 3 times with 3 parking lightflashes. The system loses all features except for lock、unlock, trunk release. While the valet “ON” mode.,press and release 【】【 】simultaneously to turn the valet “OFF” where all features become normal.](https://usermanual.wiki/Wintecronics/TR53A/User-Guide-182685-Page-3.png)
![l The remote transmitter sounds melody with its LCD showing valet mode icon while system in valet “ON”mode. In valet “OFF” mode, the remote transmitter sounds melody but with its LCD not showing the valetmode icon22. Feedback function massage for L C D & buzzer or vibrator【Refer to remote transmitter’s featurestable】Status feedback & confirmation signal having received transmitter’s command and successfully processedits command, the main system will send feedback signal to the transmitter .The remote transmitter soundsconfirmation signal with its LCD showing car’s latest status.FEATURES OF MAIN UNIT23. Memory Learning from 4 different remotes 【Refer to # 35】The main unit can learn coding from 4 remote transmitters.24. Power failure memoryThe main unit retains the memory of last settings if its power source is disrupted.25. Low voltage auto engine-restThe main unit retains the memory of last settings if its power source is disrupted.26. Safety remote engine start/stop engine circuitFor each time of remote engine start, the main unit will perform check on related circuit. Only in perfectcondition of all switches, will the engine start.27. Smart of engine crank circuitHaving received remote engine start signal by remote transmitter, the system will try engine starting.Cranking will automatically terminate immediately after engine-start success.28. Success of engine start diagnosed RPM/voltage 【Refer to the Installation Diagram, note (9)】The main unit will diagnose the engine-start success be means of RPM or voltage sensing.29. Valet mode by override switch 【Refer to Features Program Table, at # 37】While valet mode ”ON”, all other functions are still operative except for the engine-start, which will notbe operable unless valet mode is switched “OFF”.30. Auto relock [Refer to Features program table, at # 36]After car central door unlocked, it will automatically relock it self if nobody opens the door within 15sec.l The remote transmitter sounds melody with its LCD showing the car’s status.31. Safety door lock/unlock upon ignition on/off 【Refer to Features Program Table, at # 36】The central door locking system will be activated and all doors are automatically locked if the ignition isturned on. All doors will be unlocked immediately the ignition is turned off.32. Remote start kill origin alarm【Refer to Installation guide, note (5)】In case of inability to remote start your car with original immobilizer, this system feature can overcomethis problem by means of by-passing the immobilizer feature.。33. Remote start with automatic and manual gear 【Refer to Installation diagram note (10)】【1】Auto transmission gear: The remote transmitter is compatible with this type. The automobile mustbe in free gear mode otherwise the auto remote start is not operative.【2】Manual gear car : To enable remote engine start for this type, following steps must be done.(a) Engage the hand brake while the engine is running(b) Press the remote engine start button of the remote transmitter and try to complete steps (c) and (d)within 30 sec.(c) While the engine is still running, turn the ignition “OFF”(d) Open the car door and re-close it. Power door lock is activated. (The engine will automaticallyStop running at the same time). All the features become operative now.※ If there is any mistake in any of the above steps, the system can fail its remote engine start.](https://usermanual.wiki/Wintecronics/TR53A/User-Guide-182685-Page-4.png)
![36. Features Programmed Table ( 1 )Follow the steps as below.(1) Turn the ignition “ON” ( Engine must not be running)(2) Press and release the override switch 6 times.(3) Turn the ignition “OFF ” , siren chirps 6 times to confirm it has entered programming mode.(4) During programming mode, each press on override switch is followed by 1 siren chirp .The number ofsiren chirps reflect default “ ON “ and “OFF” as shown in the chart below. The shaded value is the factorydefault setting. Features Program Table [1]Operation of buttonsPressing onOver-ride switch Program Options K1K2K3K41 timeEngine runtime upon each remote start for 5/10/15/20 min□5□10□15□202 timesTemp-controlled engine start at -5º/-10º/-20º/-30º□-5º□-10º□-20º□-30º3 timesCrank time for each remote start ( with longer stepup timefor next attempted remote start )□800ms□1000ms□1600ms□2000ms4 timesCH # 2 output time 0.8s/10s/30s/on.off□0.8s□10s□30s□On/off5 timesCH # 3 output time 0.8s/10s/30s/on.off□0.8s□10s□30s□On/off6 times](https://usermanual.wiki/Wintecronics/TR53A/User-Guide-182685-Page-6.png)
![37. Features Programming Table (2)Follow the steps as below.(1) Turn the ignition ‘Off”(2) 【Total 3 times press of override switch for valet mode】【Total 4 times press of override for programmed daily start-time】【Total 5 times press on override for temp-controlled auto start.】 ※ Number of presses on override switch is followed by equal siren chirps.(3) Turn the ignition “ON” to decide in each features mode.(4) Press again override switch once /twice to decide each feature “ON” or “OFF”※ The shaded indication like OFF is the factory default modes.Features Program Table (2) OnceTwice3 times, valet ONOFF4 times, programmed daily start time on/offON {Refer below note}OFF5 times, time-controlled auto start on/off ONOFFSiren and L E D indicator 12Note: NOTE: Having set the programmed daily start time mode “ON”, when the ignition is turned “OFF”, the engine willimmediately be running to indicate this feature in at standby mode. (Use remote control to engine stop engine running in thiscase.)38. How to restore setting to factory default.Follow the steps as below.(5) Turn the ignition “ON” (Engine must not be running)(6) Press and release the override switch 10 times.(7) Turn the ignition “ OFF” (Siren chirps 10 sounds. This confirms system has entered featuresprogramming mode.)(8) Press over-ride switch.1 more time. Siren chirps 1 time to confirm the # 30, #31 are ready for changeof default(9) Press remote’s button【 】Its buzzer makes 1 sound to confirm # 30, # 31 are restored to factorydefault.39. Manual ARM / DISARM Modes 【in case that the remote transmitter is lost)】Manual Arming(a) Turn the ignition “ON” (The engine must not be running)(b) Press and release the over-ride switch 8 times.(c) Turn the ignition “OFF” (siren chirps 1 time with 1 parking light flash), the system enter ARM mode20 sec afterwards. [During Manual Arm mode; if there is any incidence to security, siren chrips3 timesWith 3 parking light flashes); 20 sec afterwards, the system enter Alarm mode & Warn Away [Refer to# 16]Manual Disarming(a) Turn the ignition “ON” (The engine must not be running)(b) Press and release the over-ride switch 4 times.Over rideFeatures programming](https://usermanual.wiki/Wintecronics/TR53A/User-Guide-182685-Page-9.png)