Wireless Matrix SDT5 Satellite Earth Station Equipment User Manual users manual
Wireless Matrix Corporation Satellite Earth Station Equipment users manual
users manual
Wireless Matrix
SDT-5000
Installation and User Guide
Wireless Matrix SDT-5000 Installation and User Guide
Doc. 020-331-0002v1.1 2/31
Wireless Matrix SDT-5000 Installation and User Guide
Copyright © 2005 Wireless Matrix. All rights reserved.
Printed in the United States of America
Created On: 11-17-05
This document is proprietary to Wireless Matrix Corporation. Do not reproduce, use or disclose without
permission.
We have made every effort to ensure the accuracy of all information contained in this document. However,
Wireless Matrix Corporation makes no expressed or implied warranty or representation based upon the
enclosed information.
Wireless Matrix SDT-5000 Installation and User Guide
Doc. 020-331-0002v1.1 3/31
WIRELESS MATRIX
SDT-5000 INSTALLATION AND USER GUIDE
TABLE OF CONTENTS
SAFETY PRECAUTIONS 4
INTRODUCTION 7
TECHNICAL SUPPORT 7
PRE-INSTALLATION CONSIDERATIONS 8
General Considerations 8
Mounting Recommendations 9
Site Selection 9
Power Requirements 9
Regulatory Information 9
ANTENNA INSTALLATION 10
Attaching to a Free Standing Pole 11
Attaching to an Existing Structure (Meter Shed or Compressor Building) 11
Orientating the Antenna Using a Compass 12
Connecting the Cable to the SDT-5000 14
Cable Selection 14
Cable Assembly 14
Mating the Cable to the Junction Box 14
Aiming the Antenna 16
Using the Multi-meter and the RSSI to Aim the SDT-5000 16
Using an RS232 Connection and Terminal Program to Aim the SDT-5000 17
Status Line 21
Operational States 22
Sending a Test Message 25
SDT-5000 System Verification List 28
Trouble Shooting 28
WARRANTY 30
SDT-5000 COMPONENT LIST 31
Wireless Matrix SDT-5000 Installation and User Guide
Doc. 020-331-0002v1.1 4/31
Safety Precautions
Read and understand the entire manual and follow the safety instructions
WARNING!
1. Replace fuse with same type and rating for protection against fire and damage.
2. The SDT-5000 is a Radio Frequency (RF) generating device. Do not operate the unit when
anyone is in the vicinity noted in the Safety Information section of this guide. This could
result in personal injury.
3. Do NOT operate the SDT-5000 unit in areas where explosives are in use as the RF
frequency could interfere with the operation, causing hazardous conditions. Do NOT
operate the SDT-5000 unit in areas where two-way radio communications is prohibited.
4. For safety purposes, use caution when determining the SDT-5000 installation location.
CAUTION!
1. READ THIS MANUAL IN ITS ENTIRETY!
2. Keep all original Packing Materials.
3. Follow the instruction enumerated in the Installation Section of this guide to ensure proper
hardware installation.
4. Ensure that the SDT-5000 is installed in a location that will NOT affect the RF transmission.
5. Pay close attention to the electrical power installation requirements described in this guide.

Wireless Matrix SDT-5000 Installation and User Guide
Doc. 020-331-0002v1.1 5/31
Safety Information
Read and understand the complete Installation Guide, including the Safety Precautions, prior to
using the SDT-5000 Modem.
The SDT-5000 is a radio unit used to receive and transmit data. When in operation, the SDT-5000
transmits and receives RF signals to and from a Geo-stationary orbital satellite.
Follow appropriate guidelines when installing the SDT-5000 near hazardous locations.
As defined in ANSI/ISA Standard S82.01, Electric and Electronic Test, Measuring,
Controlling, and Related Equipment, General Requirements.
All electrical wiring and grounding must comply with National Electrical Code requirements
and local inspection authorities.
Metal enclosures and exposed metal parts of electrical instruments must be grounded in
accordance with OSHA rules and regulations pertaining to Design Safety Standards for
Electrical Systems, 29 CFR, Part 1910, Subject S, dated 16 April 1981 (OSHA rulings agree
with the National Electric Code).
The unit must be installed in an unclassified area outside the Class I, Division 2, hazardous
classified location as defined by ANSI/API RP 500 – 1998 Recommended Practice for
Classification of Locations for Electrical Installations at Petroleum Facilities Classified as
Class I, Division 1 and Division 2.
The enclosure is designed so it is sealed at all times to protect from accidental electrical
shock.
The SDT-5000 must be used in accordance with the safety guidelines stated in this document.
Failure to comply could result in physical harm and can be a hazard to the health of the operator of
this unit.

Wireless Matrix SDT-5000 Installation and User Guide
Doc. 020-331-0002v1.1 6/31
Important Safety Notice
The SDT-5000 satellite radio emits radio frequency (RF) energy when transmitting. Operators
should maintain a safe distance from radio when transmitting. The safe distance of 20 cm is
measured from the center of the antenna beam with respect to the ANSI/IEEE C95.1-1992
standard. The SDT-5000 uses a directional antenna. In the case of this antenna, the 20 cm
distance should be maintained under the following conditions:
The antenna is powered on and transmitting. The SDT-5000 transmits only when the
remote terminal unit (RTU) sends messages to the host computer. These transmission
periods are typically less than 10 seconds. Otherwise, the SDT-5000 remains in receive
mode or sleep mode and does not emit RF energy.
A person is blocking line-of-sight to the satellite during transmission. The satellite is 101°
longitudes and the antenna will point in that direction at all times while in operation.
A person must be exposed to transmissions, as described above, for a continuous period of
at least thirty minutes to exceed recommended exposure limits set by the Federal
Communications Commission.
The SDT-5000 must be mounted a minimum distance of 20 cm away from all persons and must
not be co-located or operating in conjunction with any other antenna.

Wireless Matrix SDT-5000 Installation and User Guide
Doc. 020-331-0002v1.1 7/31
Wireless Matrix SDT-5000
Installation and User Guide
Introduction
This guide explains procedures for installing the Wireless Matrix SDT-5000 (Modem). The SDT-
5000 itself consists of a high gain antenna, which is mounted on top of a transceiver unit. A
remote terminal unit (RTU) must be connected to the satellite modem before any communication
with a remote host can take place.
The guide does not provide detailed installation instructions for every type of location. Instead,
because of the variety of available locations, it outlines the installation process and allows the
installer to choose appropriate options.
Though the installation process is straight forward, it is important to plan your installation carefully.
By planning your installation you can avoid potential problems and determine the best approach to
installing the SDT-5000. Be aware that changes to a component’s position or mounting method
may be necessary due to variations that could not be anticipated when writing this guide. Try to
predict installation variations by reviewing the Installation Instructions section of this guide before
installing the SDT-5000 hardware.
Technical Support
Technical support is provided through your service provider. They will provide information and
answers to questions about the hardware and software described in this guide.

Wireless Matrix SDT-5000 Installation and User Guide
Doc. 020-331-0002v1.1 8/31
Pre-Installation Considerations
You should perform a pre-installation evaluation before installing any SDT-5000 components. A
pre-installation evaluation will provide information about how and where to install the SDT-5000
and will help identify potential installation issues. During the pre-installation evaluation, you should
estimate available space for component placement, cable routing and inspect the location to
determine the most suitable area for an antenna installation. After completing a pre-installation
evaluation, you should know where to locate components, how to route cabling and what additional
mounting accessories, wiring and cabling conduits will be required for the installation.
General Considerations
Check for obstructions at the site below ground level when digging holes for the units
mounted on poles.
Stay at least 20 cm away from an operating antenna when you are above the level of the
antenna base.
Do not remove the antenna cover: removing the antenna cover will void the product
warranty.
Do not paint the antenna: paint on the antenna will void the product warranty. Paint may
also interfere with signal transmission or reception.

Wireless Matrix SDT-5000 Installation and User Guide
Doc. 020-331-0002v1.1 9/31
Mounting Recommendations
The antenna mount must support the antenna weight and wind force created by the nominal
wind speeds for that location.
An “unobstructed line of sight” from the antenna to the satellite is essential for reliable
communications.
Mount the antenna as far away from any noise producing sources as possible. RF
interference can originate from any number of unexpected sources such as high-tension
lines, electrical and radio equipment and telecommunication towers. When installed and
properly maintained next to or in an existing structure, ensure antenna is well away from air
conditioners, electrical motors or other electrical devices.
Site Selection
Your SDT-5000 assembly has been thoroughly tested and designed for use in rugged weather
conditions. However, care and attention is still required for a proper installation. Select a site with
a clear unobstructed line of sight to the satellite.
The SDT-5000 is environmentally sealed, so it may be mounted directly outdoors. The unit may be
installed indoors behind a glass window, provided there is a line of sight from the antenna to the
satellite through the window, and the window does not have a coating that reflects RF energy.
The SDT-5000 was tested and certified to operate in Class 1, Div. 2, Groups C&D hazardous
locations.
Power Requirements
The SDT-5000 requires a 12-volt DC battery or other 12-volt power source for operation. The
SDT-5000 current draw, transmit mode: <1.3 A; receive mode: <425 mA; sleep mode: <15 mA
Regulatory Information
FCC ID: P5ISDT5
IC ID: 1478A-SDT5
Note: The SDT-5000 must be mounted a minimum distance of 20 cm away from all persons and
must not be co-located or operating in conjunction with any other antenna.
Wireless Matrix SDT-5000 Installation and User Guide
Doc. 020-331-0002v1.1 10/31
Antenna Installation
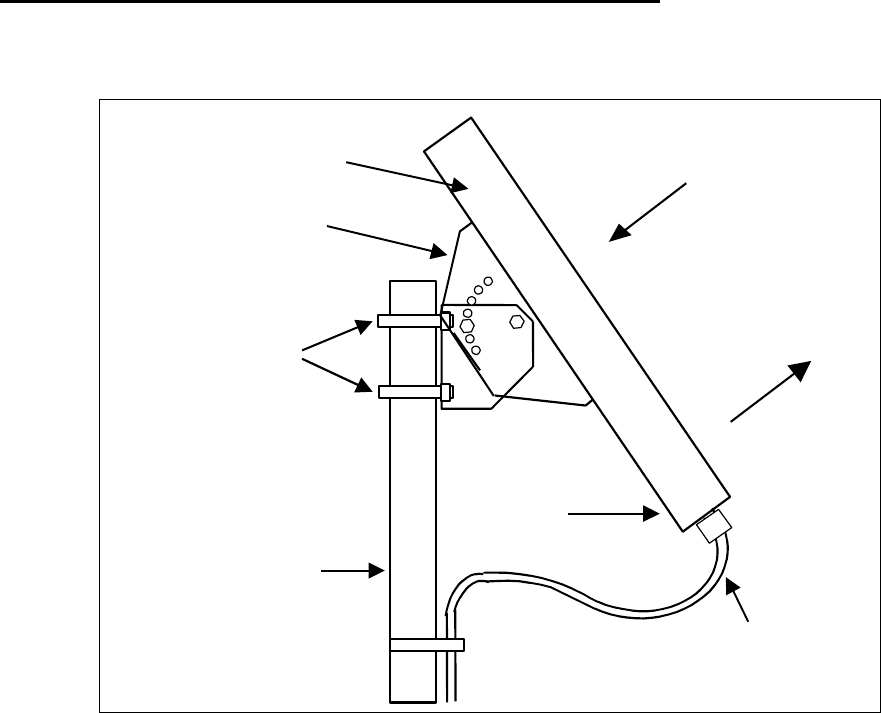
Wireless Matrix recommends placing other antennas (private radio or cellular) at least 3-feet from
the antenna mount. A typical pole mounted antenna is displayed in figure 1.
Patch
A
ntenna
Connector Cable
(not included)
Mounting
Bracket
Mounting
Pole
U-Bolts
SDT-5000
Integrated
Junction
Box
Satellite
Direction
Figure 1. Typical Pole Mounted Antenna
Please refer to “Appendix A” for a listing of materials shown in figure 1 that are supplied and not
supplied with the SDT-5000.

Wireless Matrix SDT-5000 Installation and User Guide
Doc. 020-331-0002v1.1 11/31
Attaching to a Free Standing Pole
1. An in-ground free standing pole installation will consist of a 10 to 12-foot
2 3/8 or 2 7/8-inch schedule 40 pipe installed in a hole filled with concrete.
2. Identify the installation site keeping in mind that the location must be outside any hazardous
area and “unobstructed line of sight” to the satellite is essential.
3. Dig the hole at least 2-feet below the frost line where possible.
a. The top of the concrete should be at least 6-inches below the frost line.
b. The hole should be at least 12-inches in diameter.
4. In high wind areas, install a bolt or pipe in the bottom portion of the pole. This should
prevent the pole from turning in the concrete pad causing misalignment of the antenna or
solar panels and damage to the power-data cable.
5. Allow concrete to harden before proceeding with installation of antenna or solar panels.
6. Use proper sized pole brackets/U-bolts to affix antenna to pole.
7. Secure the cable with cable clamps or ties every 12 to 18-inches or run cable inside conduit
or Seal-Tite. Avoid tight bends and kinks in the cable and grounding cable. The
recommended tightest allowable bend radius is 2-inches.
Attaching to an Existing Structure (Meter Shed or
Compressor Building)
1. Use two 1.5-inch Kindorf or equivalent channel, bolted to shed or building support struts.
One to be installed near the bottom of the structure and the second to be installed near the
top of the structure.
2. Use Kindorf or equivalent pipe brackets (for 2 3/8 or 2 7/8 inch pipe) to affix pole to Kindorf
channel.
3. Use proper sized pipe brackets (for 2 3/8 or 2 7/8 inch pipe) to affix antenna base to pole.
4. Secure the cable with cable clamps or ties every 12 to 18-inches or run cable inside conduit
or Seal-Tite. Avoid tight bends and kinks in the cable and grounding cable. The
recommended tightest allowable bend radius is 2-inches.

Wireless Matrix SDT-5000 Installation and User Guide
Doc. 020-331-0002v1.1 12/31
Orientating the Antenna Using a Compass
Before powering up the antenna, it is important to orient the antenna in the general direction of the
satellite. Failure to point the antenna in the general direction of the SDT-5000 will cause the unit to
go into a Channel Search, which could take as long as fifteen minutes to complete. Steps to point
the antenna using the compass provided are described below.
1. Refer to the Antenna Positioning Map (see figure 2) for the correct positioning of the SDT-
5000.
NOTE:
The below map diagram may vary 5 to 10 degrees, in regards to Elevation and
Azimuth, depending on the specific location. It is provided solely as an aid to assist
in positioning the SDT-5000.
Az=90º
Az=110º
Az=130º Az=150º Az=170º
Az=190º
Az=210º
Az=230º
El=10º
El=20º
El=30º
El=40º
El=50º
El=60º
Figure 2. Antenna Positioning Map with Azimuth and Elevation Degrees
NOTE:
Figure 2 displays the extent of Wireless Matrix’s satellite coverage into Canada.
Wireless Matrix SDT-5000 Installation and User Guide
Doc. 020-331-0002v1.1 13/31
2. Find the general installation location on the Antenna Positioning Map and make note of the
specific Azimuth (150-240 Degree Range) and Elevation (30-60 Degree Range). Using the
compass provided with the installation guide, find a flat surface and line up Magnetic North
with the correct end of the Compass Hand. Once the hand is fixed on North, find the
location’s Azimuth on the compass face and position the SDT-5000 in the same direction.
Now that the SDT-5000 is facing in the correct direction to satellite, it is necessary to adjust
the Antenna’s Elevation. Using the Antenna Positioning Map, find your Elevation and adjust
accordingly. Line of sight is necessary for operation.

Wireless Matrix SDT-5000 Installation and User Guide
Doc. 020-331-0002v1.1 14/31
Connecting the Cable to the SDT-5000
The SDT-5000 does not ship with a connector cable. This section describes instructions for cable
selection, assembly and mating to the SDT-5000.
Cable Selection
The cable connecting the SDT-5000 junction box to an RTU should have stranded wires,
separately insulated, with an overall sheath around it sufficiently durable to withstand
environmental and mechanical conditions.
It is recommended that shielded cable be used. This reduces signal leakage to/from the cable and
improves noise immunity.
Signal lines should use 20 AWG stranded wire. Power and ground (power return) lines should use
14 AWG stranded wire.
The cable and the conduit shall be constructed of materials that are Class 1, Div. 2 compliant.
Cable Assembly
The cable connects to the junction box by individual wires being connected to terminal blocks
inside the junction box. This end of the cable requires some insulation trimming and tinning of wire
strands.
Each wire connecting to the junction box should have its insulation trimmed back by exactly ¼”.
After the insulation has been trimmed, each wire should be tinned.
The cable shield should be attached to the power ground or the chassis ground.
Mating the Cable to the Junction Box
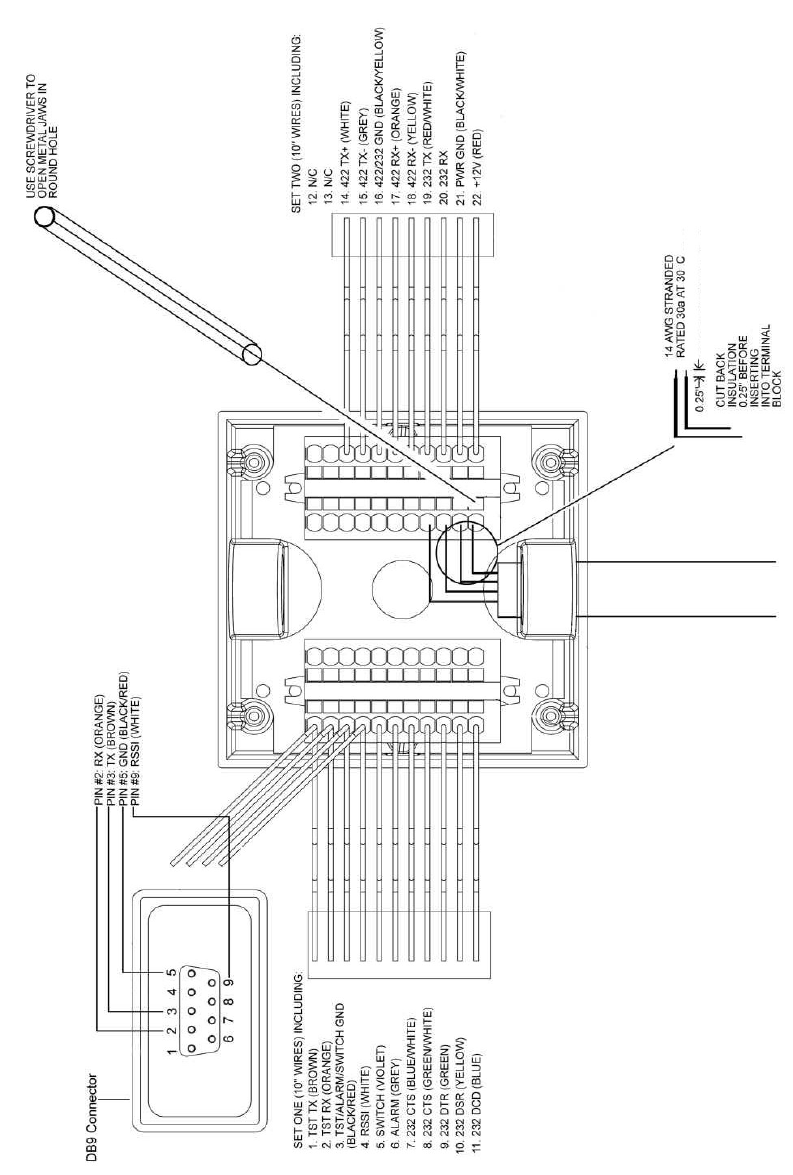
When cable wires are connected to the junction box they are inserted into the rounded oval holes
of the terminal blocks, as shown in figure 3.
Wireless Matrix SDT-5000 Installation and User Guide
Doc. 020-331-0002v1.1 15/31
Figure 3. Mating Cable to Junction Box
1. Insert a small screwdriver into the square hole right next to the rounded oval hole.

Wireless Matrix SDT-5000 Installation and User Guide
Doc. 020-331-0002v1.1 16/31
NOTE:
This opens up the metallic jaws in the rounded oval hole.
2. Insert the wire into the rounded oval hole.
3. Remove the screwdriver. The jaws clamp down on the exposed wire at the end of the
cable.
4. Repeat steps 1 through 3 for every wire in the cable that needs to be connected to the
terminal blocks.
5. Unused wires in the cable sheath should be neatly rolled up and taped or secured so no
electrical connection is made to the junction blocks.
Aiming the Antenna
Using the Multi-meter and the RSSI to Aim the SDT-5000
When the SDT-5000 is first powered up it provides a voltage proportional to its receive signal
strength. The voltage is indicated on the receive signal strength indicator (RSSI) wire (white with
red stripe) or pin “9” on the DB9 connector on the cover of the junction box.
1. Connect the positive lead of the voltmeter to the RSSI wire and the negative lead to a
ground wire (white with black stripe).
2. Position the meter so the display is easy to view.
3. Power-up the SDT-5000. The RSSI voltage will rise and fall as the SDT-5000 is rotated.
4. Position the SDT-5000 so the RSSI voltage is at its maximum.
5. Rotate the SDT-5000 over a wide angel to ensure the maximum RSSI voltage has been
found. The RSSI should be greater than 2 V.
6. The RSSI voltage is only generated for a short period of time. If the RSSI voltage is no
longer displayed, power down the SDT-5000 and power it up again.
7. Once an optimal RSSI voltage is achieved, secure the bolts that lock the position of the
SDT-5000.

Wireless Matrix SDT-5000 Installation and User Guide
Doc. 020-331-0002v1.1 17/31
Using an RS232 Connection and Terminal Program to Aim the SDT-
5000
Complete the following steps to connect terminals and logon to the SDT-5000 modem.
NOTE:
The sample screens for this task were obtained from ZOC.
1. Connect a PC based terminal communication program (i.e., hyper terminal, ZOC, or
PROCOMM) to the test port of the cable assembly of the SDT-5000 modem. The terminal
should be configured as follows:
9600 baud
no parity
8 data bits
1 stop bit
full duplex
flow control none
2. Connect the unit to the battery using the supplied power cable. The unit should turn on and
the PC terminal should display the following message:
Power up – self test in progress…
The SDT-5000 modem will require about 15 seconds to boot and run self-tests. During this
self-test time the SDT-5000 modem will print a number of diagnostic messages to the test
port. Should the diagnostic messages not appear, check the terminal setup, serial cables
and power cable connections.
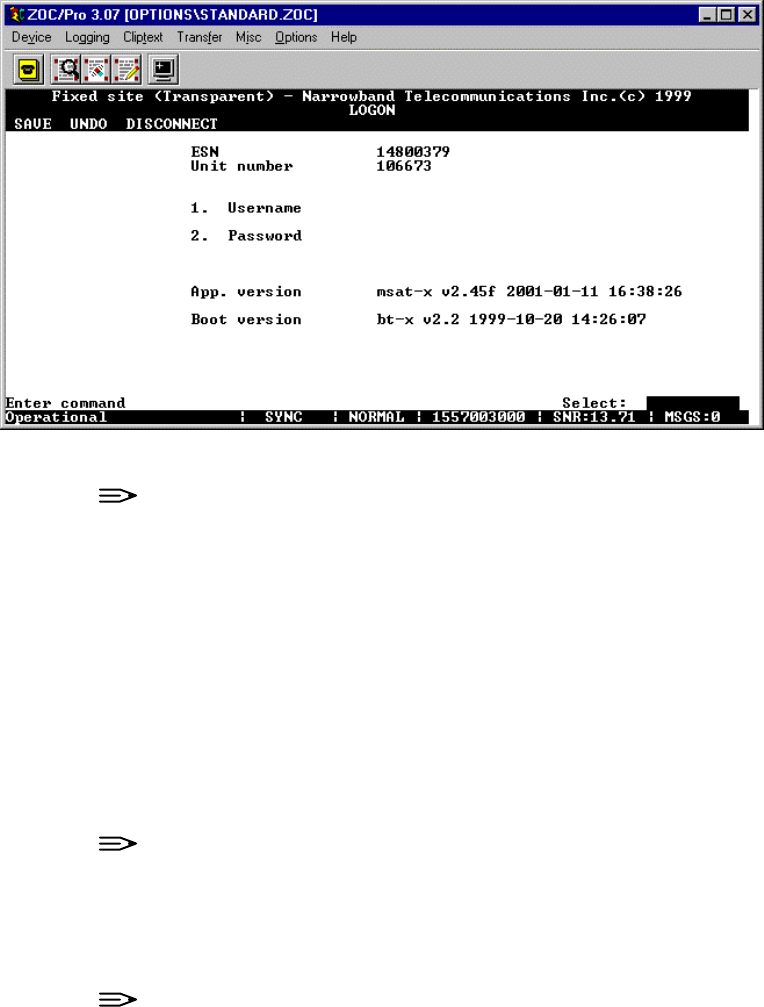
3. Press the Enter key twice, and the following Logon (see figure 4) window should appear.
Wireless Matrix SDT-5000 Installation and User Guide
Doc. 020-331-0002v1.1 18/31
Figure 4. LOGON window
NOTE:
The windows displayed in this section are shown in the Transparent mode for
example purposes. The same selections described below are applicable for all
modes.
The window is displayed for 30 seconds to enter a username and password before the
window will clear. If the window clears, press the Enter key twice again and the window will
be displayed.
4. The Select field is displayed on the second line from the bottom of the window. When
inputting a selection, the number selected will be displayed in the Select field. Type “1” and
press the Enter key. The cursor moves to the Username field.
5. Type “USER” in the Username field. Press the Tab key. The cursor moves to the
Password field.
NOTE:
The manufacturer sets the USER’s default username to “USER” and the
password to “user”. The username and password are case sensitive.
6. Type the default password “user” in the Password field. Press the Enter key. The cursor
moves to the Select field.
NOTE:
The Select field recognizes portions of commands as being unique. This means
instead of typing “SAVE” and pressing the Enter key to save the changed data
type “S” and press the Enter key because the “S” can normally be uniquely
identified with the Save selection.
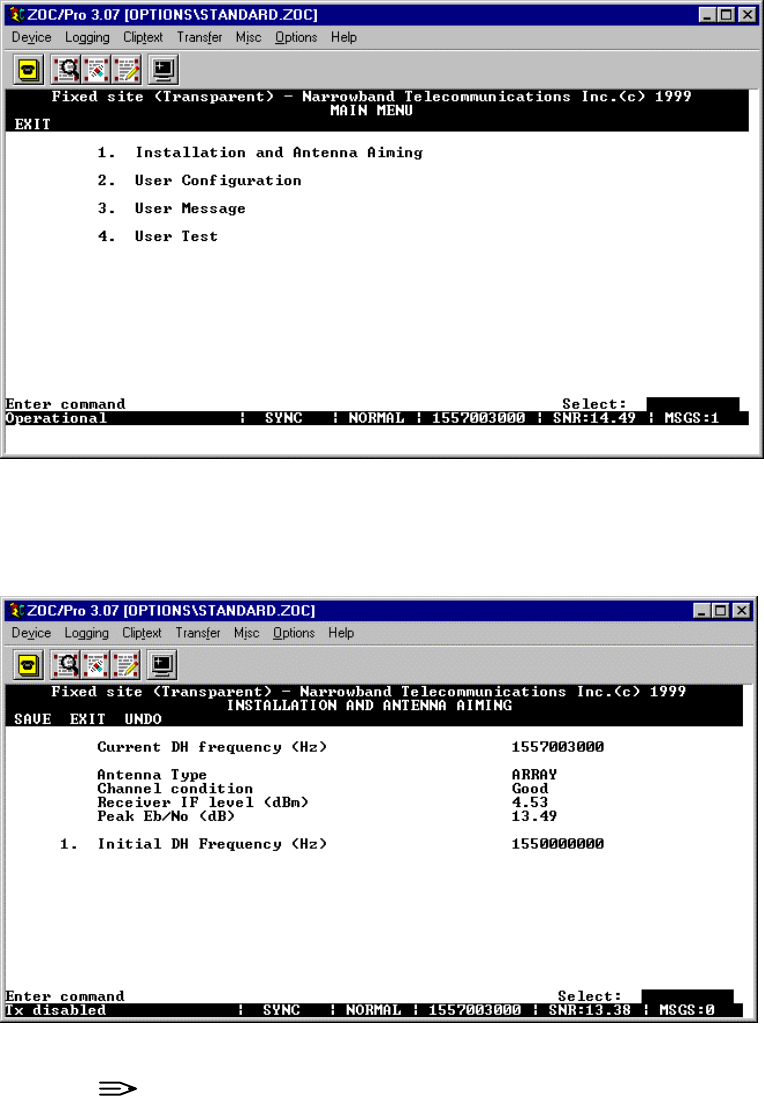
7. To complete the logon, type “S” (for save) in the Select field and press the Enter key. The
Main Menu window (see figure 5) is displayed.
Wireless Matrix SDT-5000 Installation and User Guide
Doc. 020-331-0002v1.1 19/31
Figure 5. Main Menu window
8. From the Main Menu, select option “1” Installation and Antenna Aiming by typing “1” in the
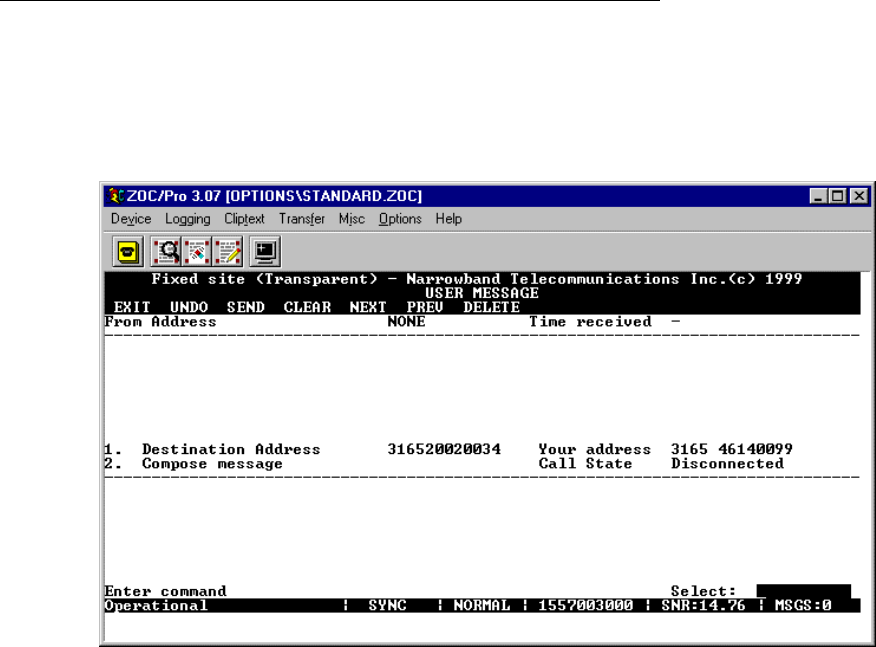
Select field. Press the Enter key. The Installation and Antenna Aiming window is displayed
(see figure 6).
Figure 6. Installation and Antenna Aiming window
NOTE:
Do not change any information in the Installation and Antenna Aiming window.
The purpose of the “Installation and Antenna Aiming” screen is to help aim the
antenna during initial installation by monitoring the Signal to Noise Ratio (SNR).
The antenna aiming is aided by displaying the current DH frequency, the
measured condition of the channel, and the signal quality.

Wireless Matrix SDT-5000 Installation and User Guide
Doc. 020-331-0002v1.1 20/31
CAUTION:
The SDT-5000 will not transmit when it is in this screen. This is to protect the
installer from exposure to RF energy. Aim the antenna ONLY while in the
“Installation and Antenna Aiming” screen.
9. Wireless Matrix configures the Initial DH Frequency during commissioning, and the installer
does not need to change this value unless directed by Wireless Matrix support personnel.
10. The antenna should be aimed according to its location in North America. From eastern
North America, start by aiming the antenna in a southwesterly direction. From western
North America, start by aiming the antenna in a southeasterly direction. From central North
America, start by aiming the antenna in a “due south” direction.
11. While monitoring the Signal to Noise Ratio in the “Installation and Antenna Aiming” screen,
rotate the antenna slowly in the horizontal direction and stop at the point that shows the
highest reading. Then increase and decrease the antenna elevation until the highest Signal
to Noise reading is displayed. If the receiver is tuned to a DH Channel (SYNC displayed on
the Status Line), and the antenna is aimed in the optimum direction a Signal to Noise Ratio
of above 16 dB should be displayed. If this is not the case, the antenna is either blocked or
it hasn’t been aimed accurately.
12. To navigate to another window or logoff the system, type “E” (for exit) in the Select field and
press the Enter key. The Main Menu window (see figure 5) is displayed.
13. The unit will display “Operational” on the Status Line, and will be ready to send and receive
messages to the Host.

Wireless Matrix SDT-5000 Installation and User Guide
Doc. 020-331-0002v1.1 21/31
Status Line
The Status Line is the last line (line 24) displayed on the VT100 monitor for all windows. The fields
on the status line are: the Operational state, SYNC, DSP Mode, Current DH frequency and Signal
to Noise Ratio (SNR). Data on the Status Line is updated in real time and provides important
information on the Wireless Matrix Modem’s state.
NOTE:
References to MET or MT are synonymous with the Wireless Matrix Modem.
Table 1 describes the fields for the Status Line.
Table 1. Descriptions for Status Line fields
Function Description
Operational state The Wireless Matrix Modem has a number of possible
states. Valid messages for this field are: “Operational”,
“SASK Invalid”, “MUI Invalid”, “Channel Search”, “BB
Invalid”, “Logon Pending”, “MET Deactivated”, “Ready for
Commissioning” and “Fade”. Unless this field displays
“Operational”, there will be no communications sent or
received. Refer to the section “Operational States” in this
guide.
SYNC state The Wireless Matrix Modem may be in SYNC or in the NO
SYNC state with relation to the Data Hub (DH) frequency.
If the Sync state is SYNC then the Wireless Matrix Modem
is receiving the Data Hub signal. When in SYNC the
SYNC/TX LED will be lit green. If the Sync state is NO
SYNC the SYNC/TX LED will be turned off, and the
Wireless Matrix Modem will be constantly searching for the
Data Hub signal on all known DH frequencies. The Sync
state will also be NO SYNC if the Wireless Matrix Modem is
missing the Initial DH frequency. Valid messages for this
field are: “SYNC”, “NO SYNC”, “PILOT SEARCH” or
“CHANNEL SEARCH”. Unless this field displays “SYNC”,
no messages will be sent or received.
DSP Mode Display of the current Digital Signal Processor (DSP) mode
should read NORMAL after a successful power up.
Current DH frequency Display of the current DH frequency.

Wireless Matrix SDT-5000 Installation and User Guide
Doc. 020-331-0002v1.1 22/31
Table 1. Descriptions for Status Line fields (continued)
Function Description
Signal to Noise Ratio The Signal to Noise Ratio (SNR) is an indicator for the
Wireless Matrix Modem receiving the satellite signal. If this
value drops below “16.00” the Wireless Matrix Modem will
have difficulty maintaining Sync and may experience a very
high bit error rate. A value of “16.00” or above is an
indicator of a normal operational signal.
Operational States
Operational states are defined by the Mobile Data Services (MDS) system and define the Wireless
Matrix Modem’s ability at an instant in time. The Wireless Matrix Modem will normally be in the
Operational state if everything is functioning correctly. The state will be Fade or Channel Search if
the Wireless Matrix Modem is having difficulty receiving SYNC.
Table 2 describes the fields for the Status Line.
Table 2. Descriptions for Operational States
Function Description
Ready for
Commissioning
The Wireless Matrix Modem has not been commissioned on
the Mobile Data Services (MDS) network and is in the process
of passing a series of tests and authentication procedures with
the DH. You may see this state during installation or if internal
parameters are corrupt. When the Wireless Matrix Modem
has been successfully commissioned the state will change to
Operational. If the Wireless Matrix Modem commissioning is
unsuccessful, the state will normally change to MET
Deactivated by the Data Hub.
Operational Operational is the desired state for the Wireless Matrix
Modem. Operational is an indication the unit is functioning
normally and ready to communicate through the DH to
anywhere you choose. The Wireless Matrix Modem may
display Channel Search or BB Invalid for a few seconds
before reaching the Operational state.

Wireless Matrix SDT-5000 Installation and User Guide
Doc. 020-331-0002v1.1 23/31
Table 2. Descriptions for Operational States (continued)
Function Description
Channel Search The Wireless Matrix Modem is tuning to various frequencies
and searching for a Data Hub (DH) signal (there is more than
one signal). This will occur under the following conditions:
- the Initial DH Frequency is incorrect or was never entered.
You may enter this value from the Installation window.
- the DH signal is not present due to a blockage (e.g. truck,
building, trees, mountain, etc.), or the system provider took
the DH signal off air.
- the antenna is out of alignment or damaged.
Pilot Search When the channel search has failed to find a valid Data Hub
(DH) frequency the Wireless Matrix Modem will search for pilot
frequencies. Tuning to a pilot allows the Wireless Matrix
Modem to correct for any frequency drift and restart the
channel search.
Tx Disabled The window is being modified and may receive data; however,
it cannot send any data.
SASK Invalid The Seed Access Security Key (SASK) parameter is incorrect.
Check the SASK entered. Contact the Value Added Reseller
(VAR) that provided the Wireless Matrix Modem to have it
fixed.
MUI Invalid The Mobile Data Services (MDS) User Identification (MUI)
parameter is incorrect. Check the MUI entered. Contact the
VAR that provided the Wireless Matrix Modem to have it fixed.
Fade The Wireless Matrix Modem is receiving the current Data Hub
(DH) channel with a Signal to Noise Ratio (SNR) that is below
an acceptable level. This may occur under the following
circumstances:
- the DH signal is not present due to a blockage (e.g. truck,
mountain, etc.), or the DH signal was taken off air by the
system provider.
- the Wireless Matrix Modem is crossing to a new beam.
- the antenna is out of alignment or damaged.

Wireless Matrix SDT-5000 Installation and User Guide
Doc. 020-331-0002v1.1 24/31
Table 2. Descriptions for Operational States (continued)
Function Description
BB Invalid The Wireless Matrix Modem is in SYNC, it is continuously
receiving blocks of bulletin board (BB) information (internal
Wireless Matrix Modem parameters that define how the
Wireless Matrix Modem is to operate). One of the blocks of
data is received frequently (about once every second) and is
called the Descriptor. If the Descriptor is not received within
five minutes or illegal parameters are received, the Wireless
Matrix Modem will set the state to BB Invalid. While in this
state the Wireless Matrix Modem cannot transmit, but will
continue looking for bulletin board information. This condition
only occurs for a short time during installation, or when the DH
signal is poor.
MET Deactivated The DH has disabled the Wireless Matrix Modem for
transmitting illegally or failing various tests when logging on.
The unit needs to be reinitialized by the system provider.
Contact the VAR that provided the Wireless Matrix Modem to
have it reinitialized.
Logon Pending The Wireless Matrix Modem is crossing satellite beams and
must logon to the MDS network. The process is automatic
and the Wireless Matrix Modem will only be in this state for an
instant. This only occurs when a user moves the unit to
another beam, as the beams are stationary.
Wireless Matrix SDT-5000 Installation and User Guide
Doc. 020-331-0002v1.1 25/31
Sending a Test Message
After the SDT-5000 has been configured, Wireless Matrix recommends sending a test message to
the Wireless Matrix echo port to ensure the unit is operating properly.
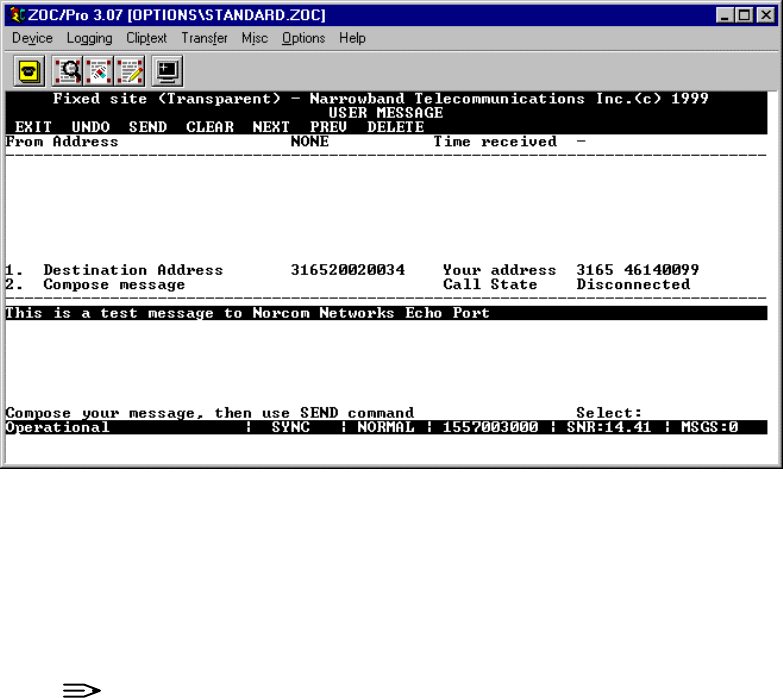
1. Select option “3” User Message” from the Main Menu window (see figure 5) by typing “3” in
the Select field. Press the Enter key. The User Message” window (see figure 7) is
displayed.
Figure 7. User Message window
2. The window is divided into two portions, an upper portion that receives the messages and a
lower portion to compose and send messages. Enter “1” in the Select field. Press the
Enter key. The cursor moves to the Destination Address field.
3. Input the echo port address of “316520010034” or “316520020034” in the Destination
Address field.
4. Tab to the compose message field in the Send (lower) portion of the window.
5. Type a short message (7 lines or less) as displayed in figure 8.
Wireless Matrix SDT-5000 Installation and User Guide
Doc. 020-331-0002v1.1 26/31
Figure 8. User Message (Send portion) window
6. Press the Enter key. The cursor moves to the Select field.
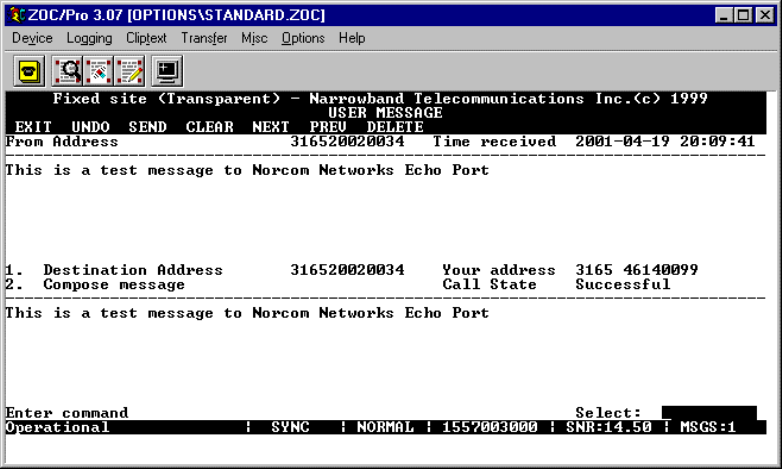
7. Type “S” for Send in the Select field. Press the Enter key.
8. As long as the status line at the lower left reads “OPERATIONAL | SYNC” and the SNR
reads above “16”, the message should be returned and displayed in the Receive (upper)
portion of the User Message screen (see figure 9).
NOTE:
If the message is unsuccessful, refer to the “Trouble Shooting” section of this
document.
Wireless Matrix SDT-5000 Installation and User Guide
Doc. 020-331-0002v1.1 27/31
Figure 9. User Message (Receive portion) window

Wireless Matrix SDT-5000 Installation and User Guide
Doc. 020-331-0002v1.1 28/31
SDT-5000 System Verification List
To verify the SDT-5000 System is operational, follow this checklist:
1. Verify the connection from the RTU or the end device going to the SDT-5000 is secure.
2. Verify the power source output is 12 to 13-volts.
3. Attempt to send a message to the host or have the host send a message to the RTU or end
device.
Trouble Shooting
The most common problems that affect the operation of the SDT-5000 are power connections and
configuration. PLEASE consult your service provider for details in configuring your SDT-5000.
Refer to table 3 for symptoms and suggestions for troubleshooting tips that may affect the
operation of the SDT-5000.

Wireless Matrix SDT-5000 Installation and User Guide
Doc. 020-331-0002v1.1 29/31
Table 3. Symptom and Suggestions for Troubleshooting Potential Problems
Symptom Suggestions
The VT100 test application
does not connect to the SDT-
5000.
a. Check that the power source is properly
connected to the antenna and the power source.
b. Using the voltmeter, verify power is 12 to 13.5-
volts.
c. Check the power fuse, and ensure it is connected
properly.
d. Verify the SDT-5000 is powered on.
e. If the problem persists, test the cable for continuity
and/or damage.
The VT100 Test port
application connects to the
SDT-5000 but is unable to
send test a message.
a. Check that your laptop COM port is fully
operational.
b. Verify that the RTU or end device is connected
to the RTU inter-cable, NOT the Test inter-cable.
c. Verify the SDT-5000 cable is properly connected.
d. Contact your service provider and verify the
following:
i. The address in the user logon screen
corresponds with the X.121 address of the
SDT-5000 unit. This address is also located
on a label on the SDT-5000.
ii. The correct destination address is configured in
the user message screen.
iii. The SDT-5000 unit is commissioned and
authorized for use.

Wireless Matrix SDT-5000 Installation and User Guide
Doc. 020-331-0002v1.1 30/31
Warranty
Wireless Matrix warrants that upon shipment to Customer from supplier’s facility and for the
Warranty Period, hereinafter defined, the Equipment shall be free from defective materials and
faulty workmanship and capable of accessing the Service ("Good Working Order"). The warranty
provided herein shall not apply to (i) hardware normally consumed in operation such as fuses,
cables, or mounting brackets, (ii) defects which, due to no fault of Wireless Matrix, are the result of
improper use or maintenance of the Equipment, (iii) improper operation of the Equipment used with
other equipment, (iv) Equipment which, due to no fault of Wireless Matrix, has been subjected to
any kind of detrimental exposure or has been involved in any accident, fire, explosion, Act of God,
or any other cause not attributable to Wireless Matrix, (v) any Equipment which has been altered or
repaired by any party other than Wireless Matrix without Wireless Matrix’s prior consent, (vi) any
Equipment sealed against the weather whereby the seal has been broken without Wireless
Matrix’s prior consent, or (vii) any Equipment hardware or software, including any revisions
provided by Wireless Matrix, which has been improperly stored, installed or implemented.
Customer shall de-install and return (unless otherwise directed by Wireless Matrix) the failed
Equipment to Wireless Matrix. Wireless Matrix shall return the Equipment, or a new or
reconditioned unit, at Wireless Matrix’s option, free of charge to Customer via best way ground,
unless otherwise specified by Customer (with additional costs thereof to Customer’s account),
during the one year from shipment ("Warranty Period"). Wireless Matrix’s warranty obligation is
limited to restoring the Equipment to Good Working Order. The repaired or replacement
Equipment is warranted for the remainder of the original Warranty Period.

Wireless Matrix SDT-5000 Installation and User Guide
Doc. 020-331-0002v1.1 31/31
SDT-5000 Component List
SDT-5000 Component Name
SDT-5000 Modem with Antenna
Attached mounting bracket
Junction Box
This Manual
Recommended Components (Not Supplied)
Laptop with suitable VT100 compatible communications software such as
Windows Hyper-terminal Application
Mounting Pole either 2 3/8” or 2 7/8” diameter
U-bolts (depending on mounting pole width)
12-Volt Power Supply - A typical remote site will require a battery with
recharging solar cell.
Multi-meter
Compass
7/16-inch and 9/16-inch (or adjustable) Wrench
Equipment and supplies to attach pole to existing structure or concrete in
hole for free standing mount
Equipment and supplies to attach power leads and RTU inter-cable to
remote measuring device
Equipment and supplies for routing through conduit or Seal-Tite if power
supply or remote measuring device is located in a hazardous area
Serial cables and adapters as required to connect computer to test inter-
cable