Wistron NeWeb DRUCU3 802.11 b/g USB 2.0 Adapter User Manual
Wistron NeWeb Corporation 802.11 b/g USB 2.0 Adapter
User Manual
802.11g USB 2.0 Adapter
DRUC-U3
User’s Guide
Version: 0.02 — May 2006
Copyright Statement
No part of this publication may be reproduced, stored in a retrieval system, or
transmitted in any form or by any means, whether electronic, mechanical,
photocopying, recording or otherwise without the prior writing of the publisher.
Windows™ 98SE/2000/ME/XP are trademarks of Microsoft® Corp.
Pentium is trademark of Intel.
All copyright reserved.
Regulatory Information
Federal Communication Commission Interference Statement
This equipment has been tested and found to comply with the limits for a Class
B digital device, pursuant to Part 15 of the FCC Rules. These limits are
designed to provide reasonable protection against harmful interference in a
residential installation. This equipment generates, uses and can radiate radio
frequency energy and, if not installed and used in accordance with the
instructions, may cause harmful interference to radio communications.
However, there is no guarantee that interference will not occur in a particular
installation. If this equipment does cause harmful interference to radio or
television reception, which can be determined by turning the equipment off and
on, the user is encouraged to try to correct the interference by one of the
following measures:
- Reorient or relocate the receiving antenna.
- Increase the separation between the equipment and receiver.
- Connect the equipment into an outlet on a circuit different from that to which
the receiver is connected.
- Consult the dealer or an experienced radio/TV technician for help.
This device complies with Part 15 of the FCC Rules. Operation is subject to the
following two conditions:
(1) This device may not cause harmful interference, and
(2) This device must accept any interference received, including interference
that may cause undesired operation.
(3) This device shall automatically discontinue transmission in case of either
absence of information to transmit or operation failure.
Information to User
To assure continued compliance, any changes or modifications not
expressly approved by the party responsible for compliance could void the
user’s authority to operate this equipment.
1
IMPORTANT NOTE:
FCC Radiation Exposure Statement:
This equipment complies with FCC radiation exposure limits set forth for an
uncontrolled environment.
End users must follow the specific operation instruction for satisfying RF
exposure compliance.
This transmitter must not be co-located or operating in conjunction with any
other antenna or transmitter.
The maximum reported SAR values are -
Body: 0.303 W/kg (802.11b); Body: 0.177 W/kg (802.11g)
2
Table of Contents
Regulatory Information _______________________________ 2
1. Welcome _________________________________________ 3
1.1 Kit Contents______________________________________________________4
1.2 Main Features of 802.11g USB 2.0 Adapter ____________________________5
1.3 Wireless Networking Scenarios ______________________________________5
2. Quick Start to Wireless Networking ___________________ 7
2.1 Installation_______________________________________________________7
2.2 Connecting to an Existing Network___________________________________8
3. Step-by-Step Installation Guide _____________________ 11
3.1 Driver / Utility Installation_________________________________________11
3.1.1 Additional Setup Processes ____________________________________13
3.2 Verifying the Driver/Utility ________________________________________14
3.3 802.11g USB2.0 adapter Setting_____________________________________15
3.4 Connecting to an Infrastructure Network ____________________________15
3.5 Creating an Ad-Hoc Network ______________________________________17
3.6 Removing your 802.11g USB 2.0 Adapter_____________________________18
3.7 Driver / Utility Uninstallation ______________________________________19
4. Using the Utility __________________________________ 20
4.1 Wireless Networks Tab ____________________________________________20
4.1.1 Configure-Association Tab ____________________________________21
4.1.2 Configure-Authentication Tab __________________________________24
4.2 Link Status Tab __________________________________________________27
4.3 About Tab_______________________________________________________28
5. Network Application_______________________________ 29
5.1 Surveying the Network Neighborhood _______________________________29
5.2 File Sharing _____________________________________________________30
5.3 Using the Shared Folder___________________________________________31
6. Glossary ________________________________________ 32
7. Product Spec. ____________________________________ 35

3
1. Welcome
Thank you for purchasing our 802.11b/g USB 2.0 Adapter, and welcome to Wireless
LAN—the easy way to wireless networking.
This user’s guide introduces to you the 802.11b/g USB 2.0 Adapter and describes the
most common configurations, which will help you connect to your network easily.
Please read this manual to get familiar with the IEEE802.11b/g Wireless LAN. This
manual contains detailed instructions in operation of this product. Please keep this
manual for future reference.
As this product is designed to run under Microsoft Windows, it is recommended that
to be installed by people who are familiar with the installation procedures for network
operating systems under Microsoft Windows.
4
1.1 Kit Contents
The 802.11b/g USB 2.0 Adapter kit should include the following items: One
802.11b/g USB 2.0 Adapter with USB cable, one CD and one Quick Start Guide.
a. One 802.11b/g USB 2.0 Adapter
b. One Software CD including:
1. Utility & Driver Installation Software
2. Acrobat Reader
3. User Manual PDF File
c. Quick Start Guide
If any of the items mentioned above are damaged or missing, please contact your
distributor.
5
1.2 Main Features of 802.11b/g USB 2.0 Adapter
High-speed wireless connection, up to 54 Mbps
IEEE802.11b/g (DSSS) standard for 2.4 GHz Wireless LAN
Plug-and-Play installation
Solid design with an integrated antenna
Full mobility and seamless cell-to-cell roaming
Automatic scale back at per packet level
Automatic load balancing for optimized bandwidth
Advanced power management
Supports Windows®98SE, ME, 2000 and XP (subject to availability)
1.3 Wireless Networking Scenarios
As our 802.11b/g USB 2.0 Adapter is interoperable and compatible with other IEEE
802.11b/g compliant products from other manufacturers, it offers you the most
freedom to establish your ideal wireless network. Therefore, after installing
802.11b/g USB 2.0 Adapter, you can connect your computer to:
1. A Peer-to-Peer Workgroup of 802.11b/g compliant wireless devices.
2. A LAN (Local Area Network) constructed by Access Point(s) or other 802.11b/g
compliant systems.
3. Share your Internet access by using just one connection, share printers and other
peripheral devices, share data and image files between networked PCs, play
multi-player games, and use other network enabled sharing resources.
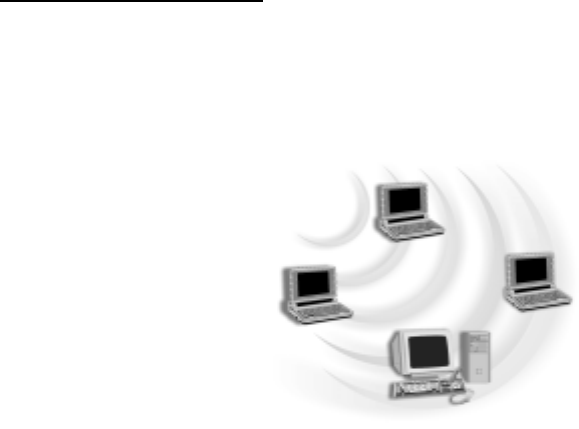
Peer-to-Peer Networking:
An Ad Hoc Network could be easily set up with some PCs and this 802.11b/g
USB 2.0 Adapter or our other WLAN devices. Therefore, it is very suitable to
build a network for temporary use, such as for demonstration in exhibition, for
new sales point/branch use and alike.
6
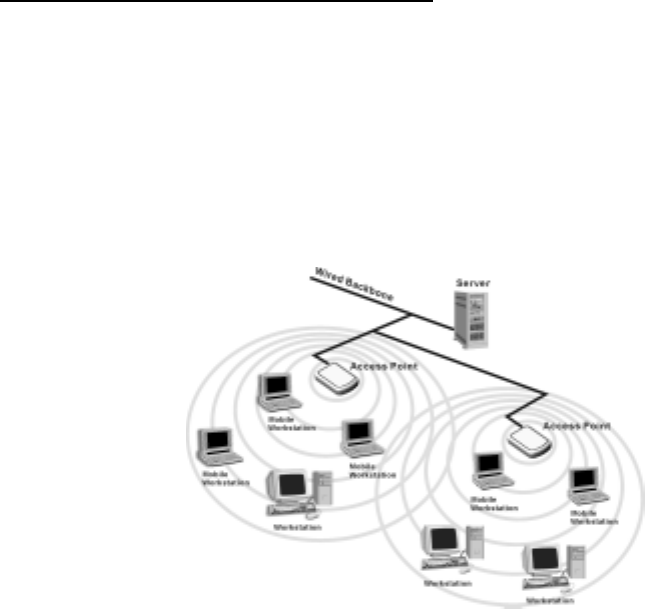
Cooperate LAN (Local Area Networking):
With some 802.11b/g USB 2.0 Adapters and Access Points, it is easy to construct
a LAN with access to Internet for enterprise use.
The construction is quite easy that the 802.11b/g USB 2.0 Adapter and Access
Point will automatically work at the most suitable frequency when Access Point is
set within the proper range.
In addition, commonly manufacturers will bundle the Site-Survey tool for users to
check the communication quality.

7
2. Quick Start to Wireless Networking
2.1 Installation
1. Insert the installation CD. It automatically starts the setup program for
software installation.
2. Follow the installation wizard to complete the software installation process and
restart your computer if necessary.
3. Connect the 802.11b/g USB 2.0 Adapter to your laptop PC/desktop PC.
4. Operation System will detect new device and verify the driver automatically.
Note! During installation procedure, each operating system may prompt different
specific options:
Windows 98SE: The system will request the original Windows CD during the
installation process. When the installation is finished, you’ll have to restart your
computer.
Windows Me: Please restart your computer when the installation is finished.
Windows 2000/XP: Select “Install the software automatically” when the window
with this option appears, and then click “Next” to continue installation.
8
2.2 Connecting to an Existing Network
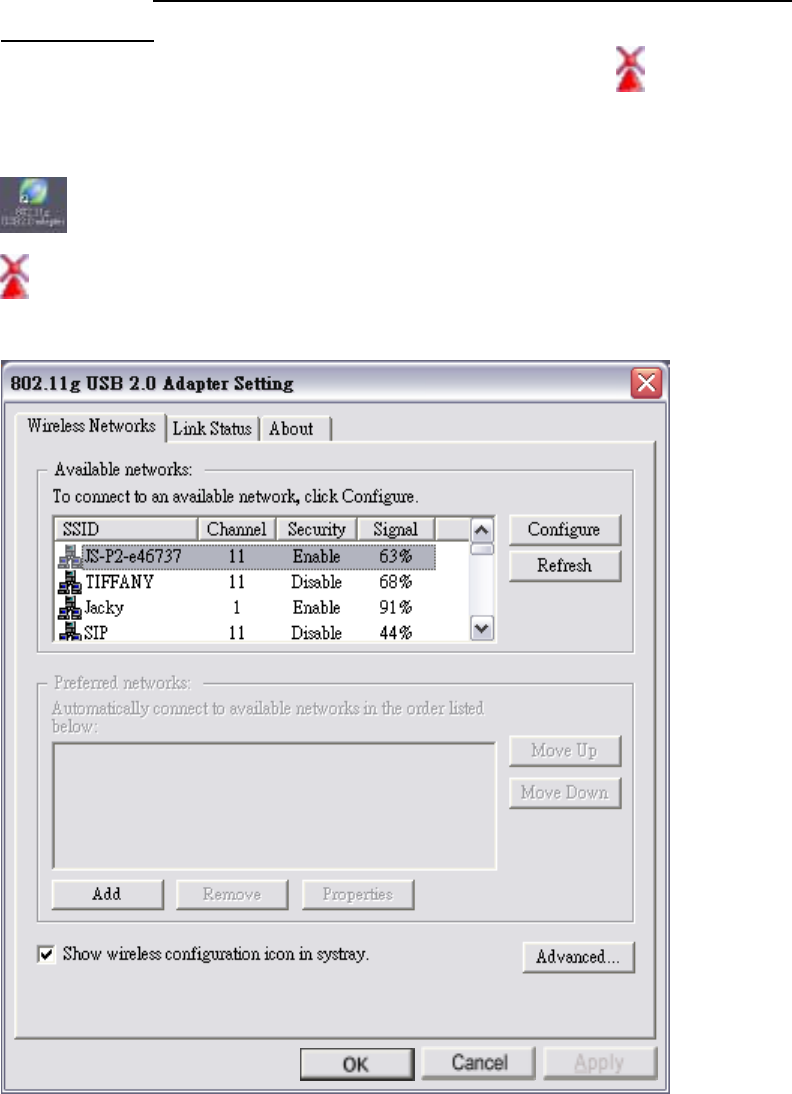
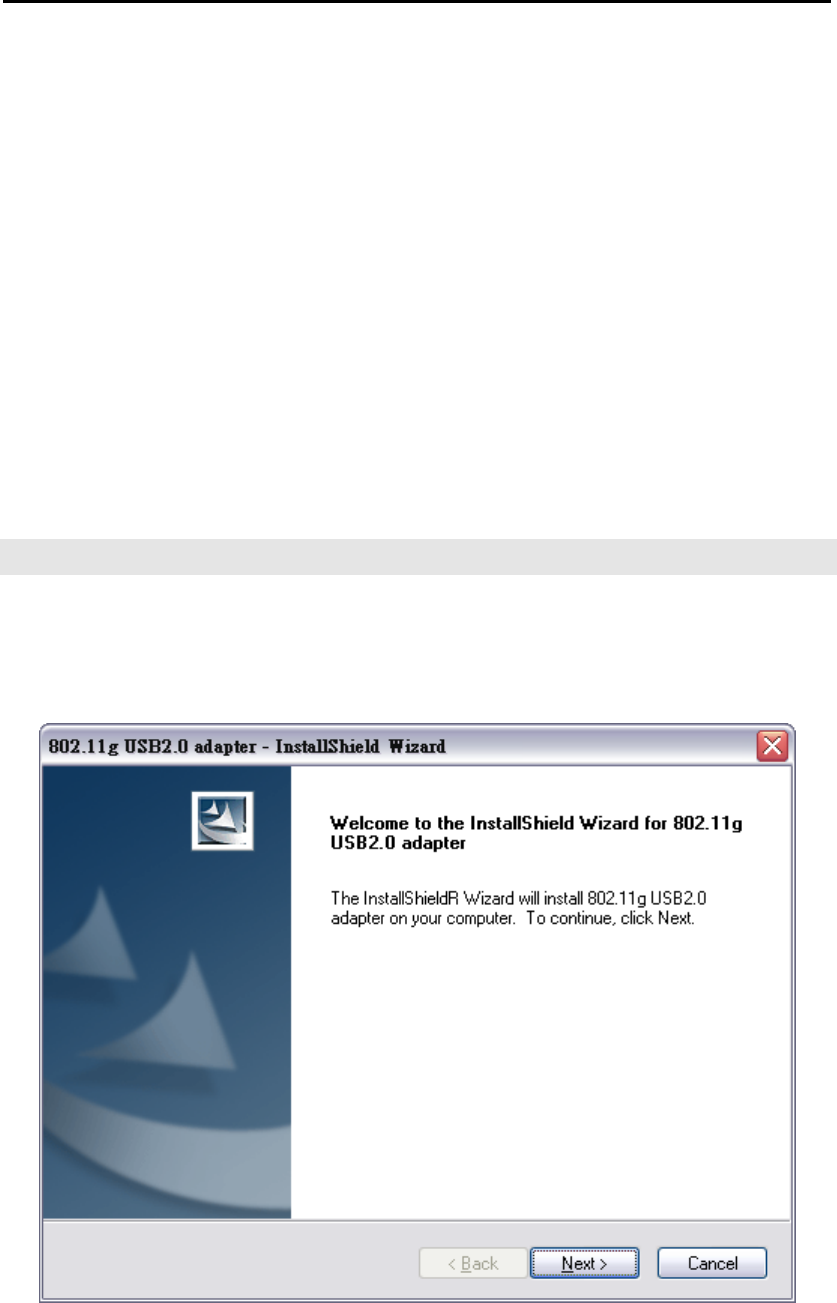
1. Go to windows Start > Programs > 802.11g USB2.0 adapter > 802.11g USB2.0
adapter setting to open the utility. The 802.11b/g USB2.0 Adapter Setting
window appears. You can see the wireless configuration icon in Windows
System Tray. Double click the shortcut icon or the wireless configuration icon
can also open the utility.
: Shortcut Icon
: Wireless Configuration Icon
9
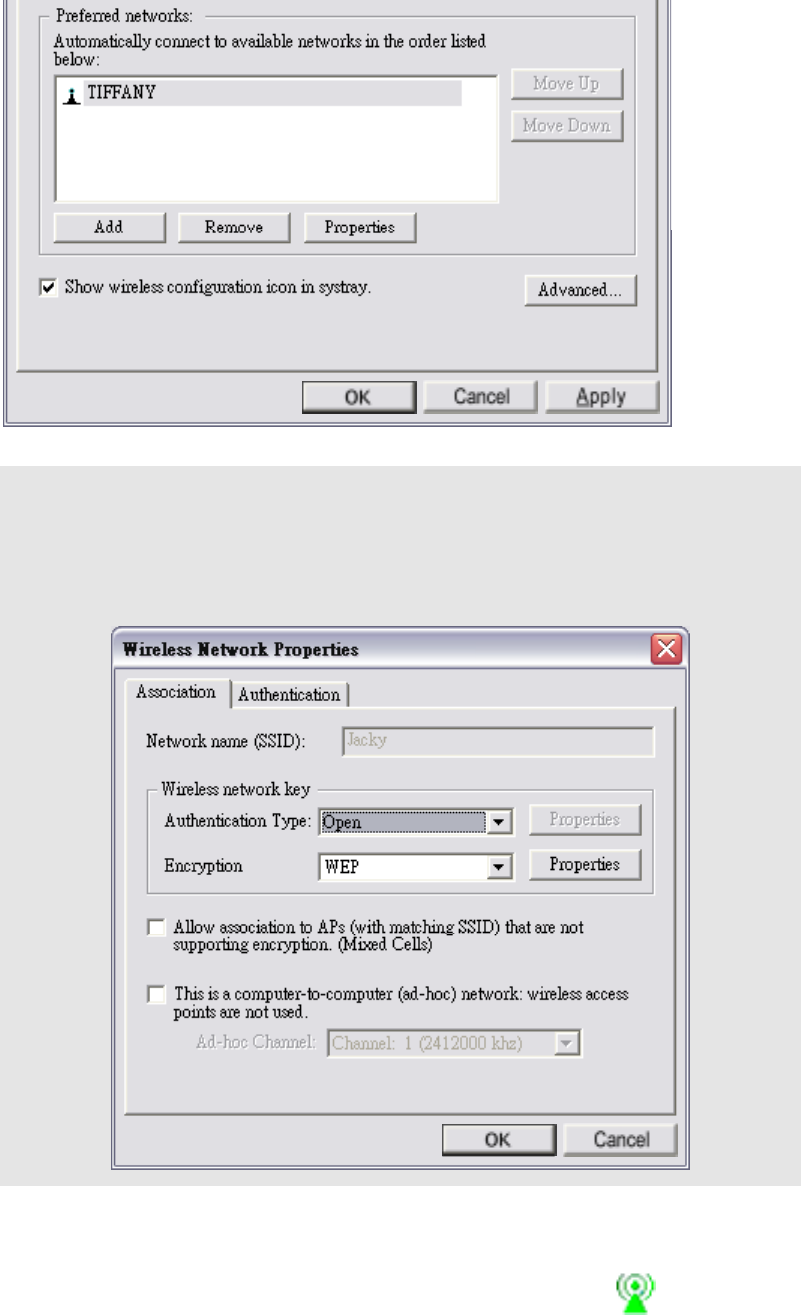
2. From the Available Networks list, click a network with better signal and click
“Configure”. The chosen network will appear in the Preferred Networks list.
Note! If the chosen network is secured (the Security is Enable), Wireless
Network Properties window pops up. Key in the Association and
Authentication settings and then click “OK”. (Contact your network
administrator for details of the settings.)
3. Click “Apply” and then wait for a while for the adapter to associate to the AP.
4. Once connected, the wireless configuration icon appears green and the icon

10
shown in Preferred networks appears connected . You can click
Link Status
tab to check the connection status.
5. For details of each tab in 802.11b/g USB2.0 WLAN Utility, please read User’s
Guide Chapter 4.
11
3. Step-by-Step Installation Guide
This section will lead you through the installation of 802.11b/g USB 2.0 Adapter
(both software and hardware) in detail.
To establish your wireless network connection, the following steps should be
executed:
1. Install the software by using the installation CD.
2. Install the 802.11b/g USB 2.0 Adapter.
3. Install the required network protocols to communicate with your network.
Mostly, you will need to set the TCP / IP protocol.
The product is designed to operate under Windows 98SE, ME, 2000 and XP. The
installation procedure is about the same. Please follow the installation wizard to
install the software.
3.1 Driver / Utility Installation
Note! Please install the software before inserting the 802.11b/g USB 2.0 Adapter.
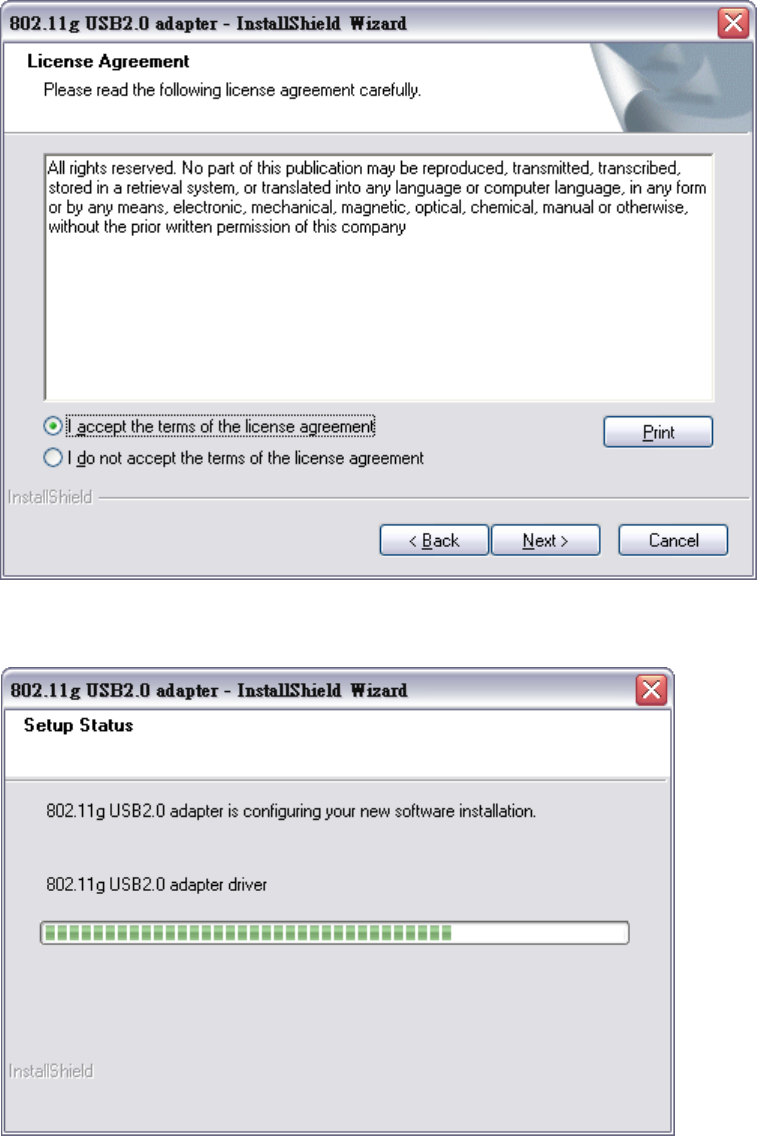
1. Insert the installation CD. Insert the installation CD into your CD-ROM drive.
The setup program automatically starts.
2. Click “Next”.
12
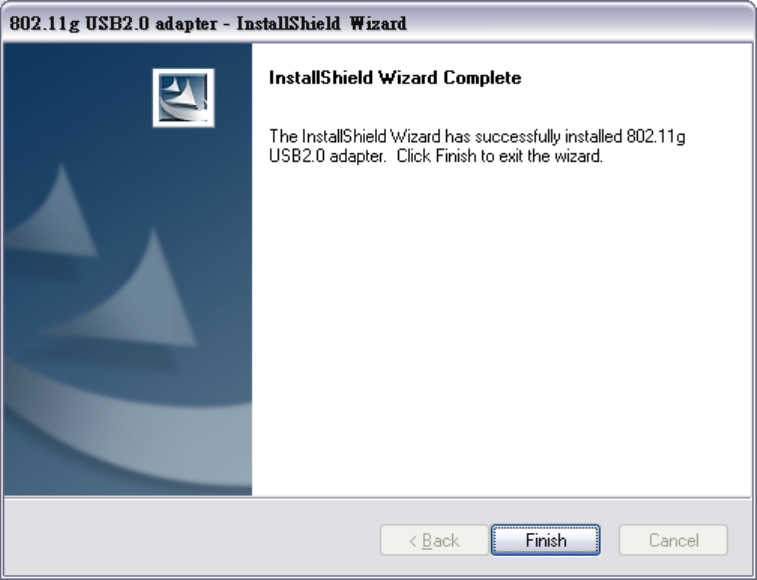
3. Choose “I accept the terms of the license agreement” and then click “Next”.
4. Wait for the installation.
13
5. Click “Finish”.
6. Connect the 802.11b/g USB 2.0 Adapter to your laptop PC/desktop PC.
3.1.1 Additional Setup Processes
During software installation procedure, each operating system may prompt different
specific options. Mostly, you will be asked to add some necessary protocols and to
edit some networking settings.
1. Windows 98SE: The system may request the original Windows CD during the
installation process. Please check with the network administrator for the values of
the settings. When the installation is finished, you’ll have to restart your computer.
2. Windows Me: Please check with the network administrator for the values of the
settings. Please restart your computer when the installation is finished.
3. Windows 2000: Please check with the network administrator for the values of the
settings. Select “Install the software automatically” when the window with this
option appears, and then click “Next” to continue installation.

14
4. Windows XP: Select “Install the software automatically” when the window with
this option appears, and then click “Next” to continue installation.
3.2 Verifying the Driver/Utility
1. Windows 98SE/Me:
Step 1. Right-click “My Computer” icon on the desktop and choose “Properties”.
Step 2. Select Device Manager tab and open “Network adapters”. You should see
your 802.11b/g USB 2.0 Adapter in the list. Highlight it and click
“Properties” button.
Step 3. From the “Device status”, you should see the line “This device is working
properly”. If, instead, you see error messages displayed, please remove
this Adapter (highlight this Adapter and click “Remove” button). Restart
your PC and go through the installation process again.
2. Windows 2000:
Step 1. Right-click “My Computer” icon on the desktop and choose “Properties”.
Step 2. Select Hardware tab and click “Device Manager”. Open “Network
adapters”. You should see your 802.11b/g USB 2.0 Adapter in the list.
Right-click this Adapter and choose “Properties”.
Step 3. From the “Device status”, you should see the line “This device is working
properly”. If, instead, you see error messages displayed, please uninstall
this Adapter (right-click this Adapter from the “Network adapters” list and
choose “Uninstall”). Restart your PC and go through the installation
process again.
3. Windows XP:
Step 1. Click “Start>Control Panel> System”.
Step 2. Select Hardware tab, and click “Device Manager”. Open “Network
adapters”. You should see your 802.11b/g USB 2.0 Adapter in the list.
Right-click this Adapter and choose “Properties”.
Step 3. From the “Device status”, you should see the line “This device is working
properly”. If, instead, you see error messages displayed, please uninstall
this Adapter (right-click this Adapter from the “Network adapters” list and
choose “Uninstall”). Restart your PC and go through the installation
process again.
15
3.3 802.11b/g USB2.0 adapter Setting
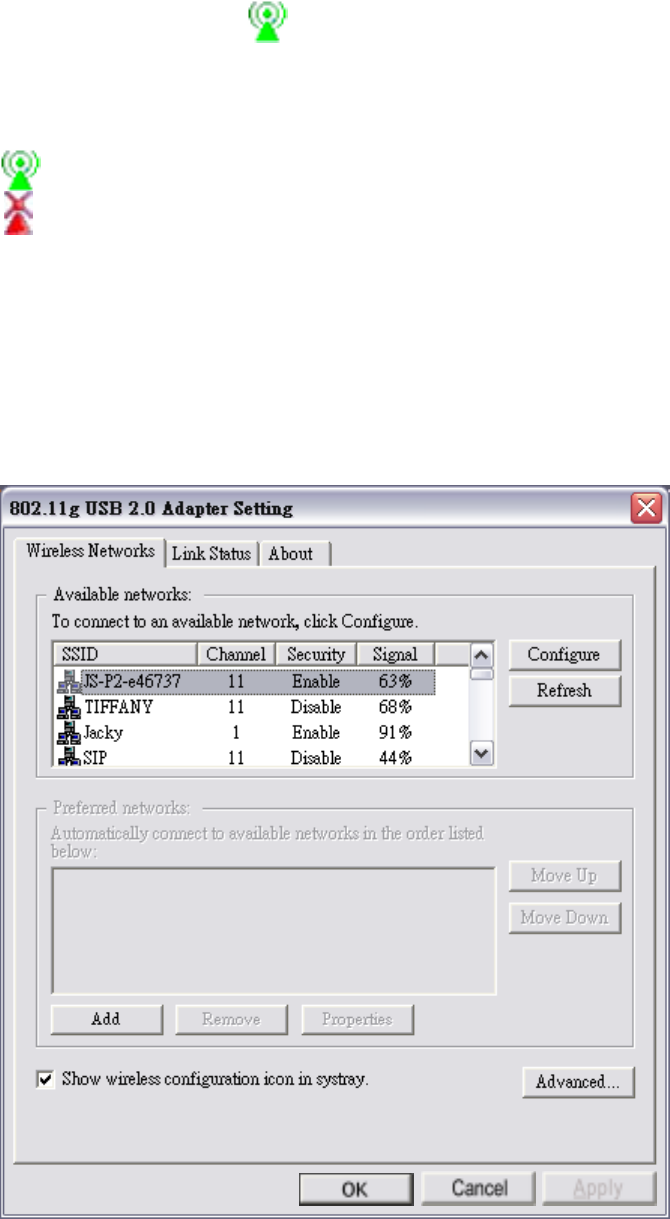
802.11b/g USB 2.0 Adapter has its own management software, named 802.11b/g
USB2.0 Adapter Setting, and users can control all functions provided with it. The
wireless configuration icon appears in the Windows System Tray. The Utility
includes three tabs: Wireless Networks, Link Status and About.
Wireless configuration icons:
Connected (Green)
Disconnected (Red)
To communicate in a Peer-to-Peer network, every station must have the same channel
number and Network Name, and all connected computers should have the same net
ID and subnet ID.
3.4 Connecting to an Infrastructure Network
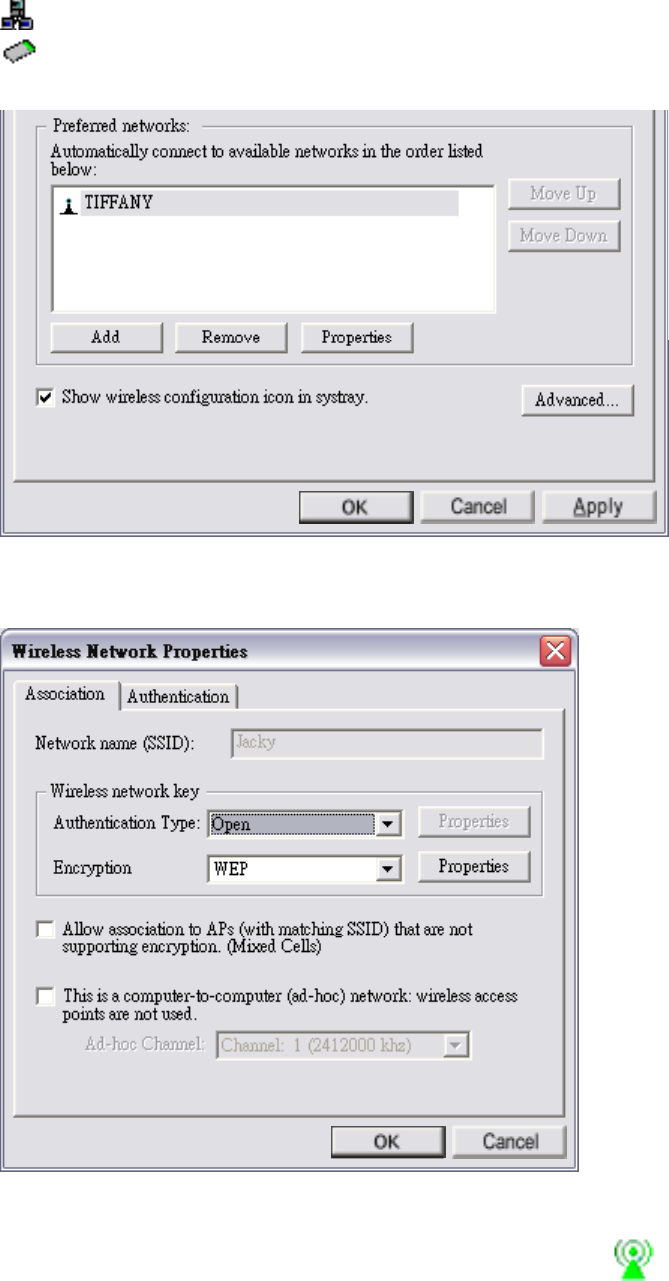
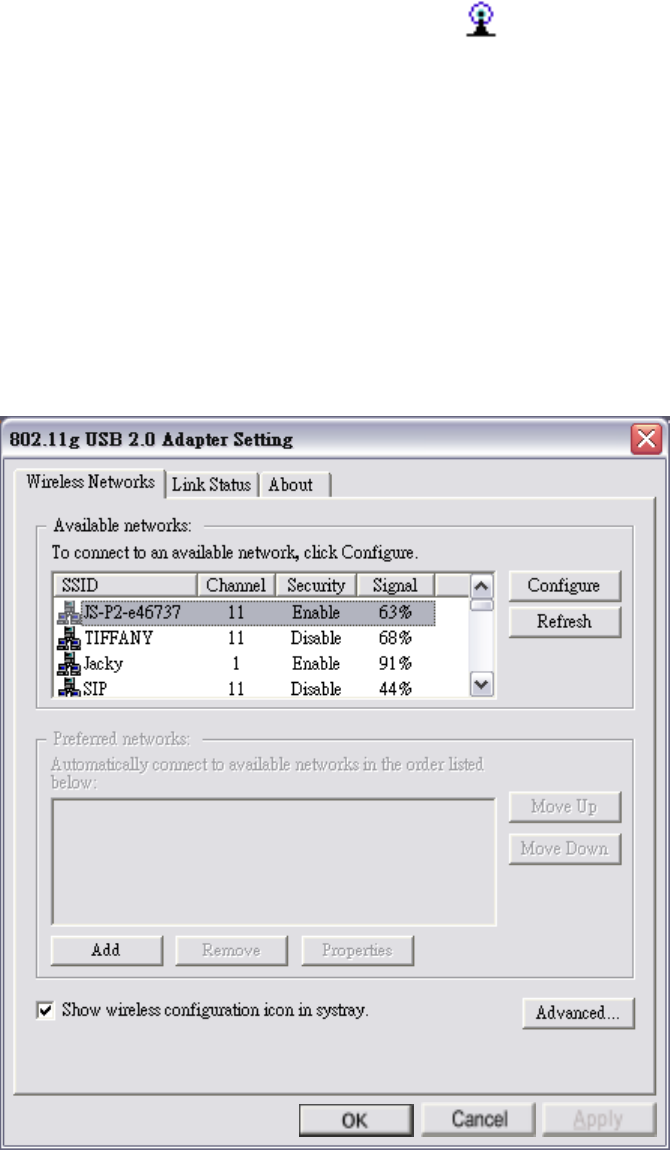
1. Select the Wireless Networks tab.
16
2. Click Refresh button to rescan all available networks in vicinity.
3. From the Available Networks list, click a network with better signal and click
“Configure”.
: Infrastructure Mode
: Ad-hoc Mode
4. The chosen network will appear in the Preferred Networks list.
5. If the chosen network is Security-Enabled, Wireless Network Properties window
pops up. Contact the network administrator for the encryption settings.
6. Click “Apply” and then wait for a while for the adapter to associate to the AP.
7. Once connected, the wireless configuration icon appears green and the icon
17
shown in Preferred networks appears connected . You can click
Link Status
tab to check the connection status.
8. For details of each tab in 802.11b/g USB2.0 WLAN Utility, please read refer to
Chapter 4.
3.5 Creating an Ad-Hoc Network
If you have more computers and only want to place them in a local area network, or
you want to communicate directly without using an Access Point or any connection to
a wired network, you can create a new Ad-hoc Network.
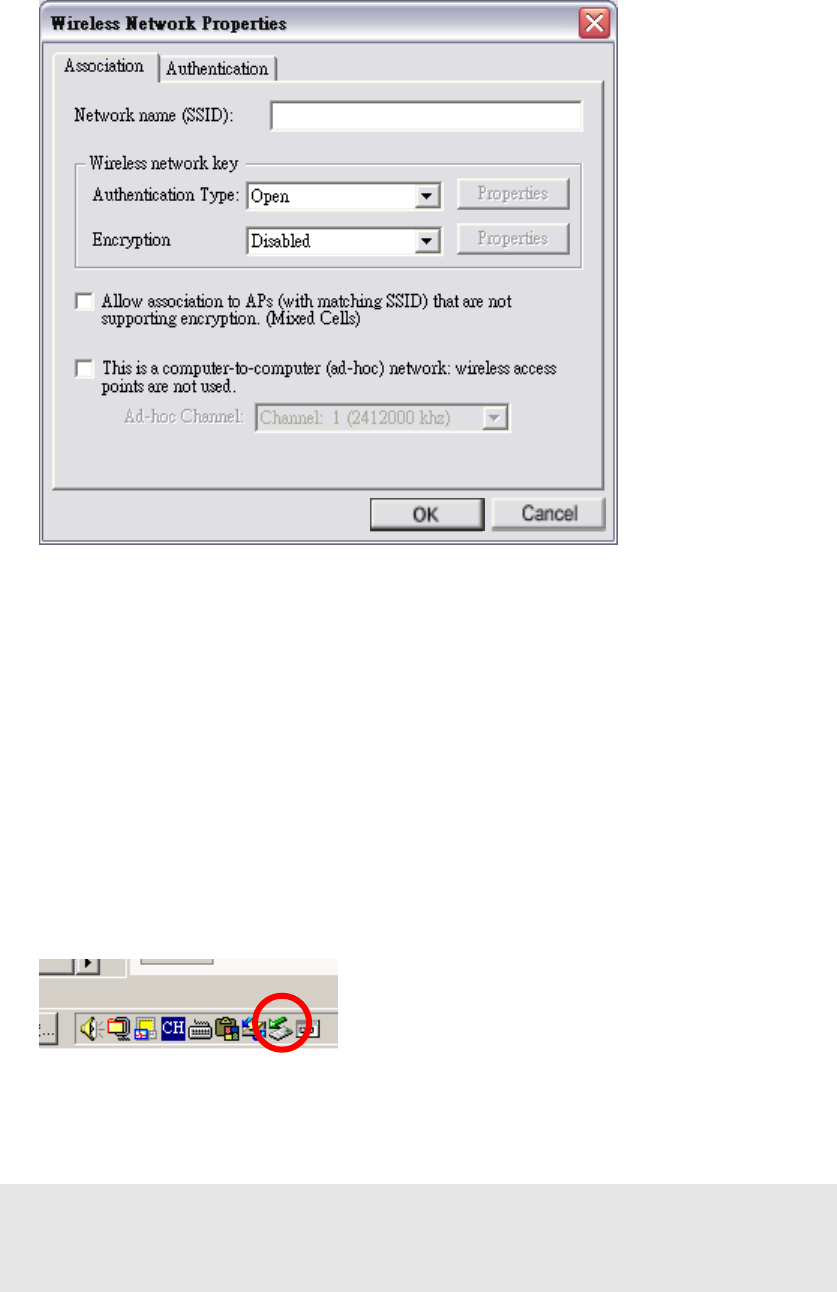
1. In Wireless Networks tab, click Add button.
18
2. Wireless Network Properties window pops up.
3. Select the check box “This is a computer-to-computer (ad-hoc) network:
wireless access points are note used.”.
4. Set
Wireless network key and Ad-hoc Channel if necessary.
5. Click
OK button.
3.6 Removing your 802.11b/g USB 2.0 Adapter
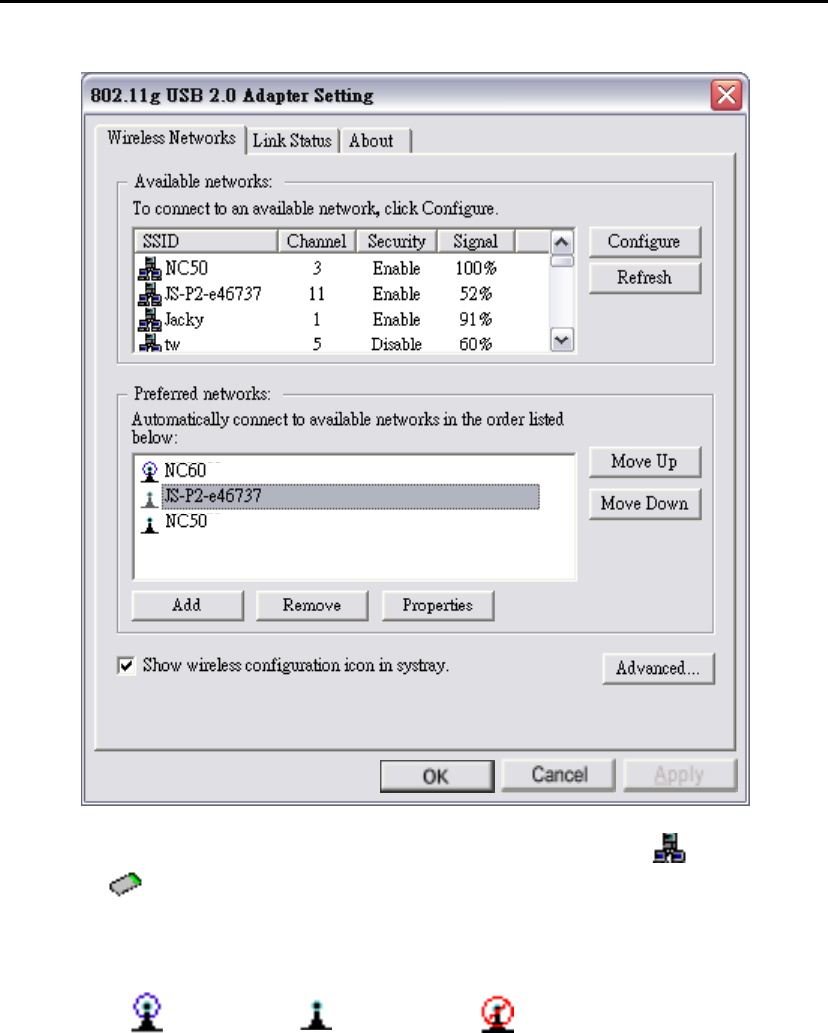
In Windows XP/ME and Windows 2000, please follow the safe removal procedure.
You can find a safe removal icon in your computer’s notification area.
1. Double click on the taskbar icon to “Unplug or Eject hardware”.
2. The “Safety Remove Hardware” dialogue box will appear. Click the device in the
list and then click “Stop”.
Note! When removing the 802.11b/g USB 2.0 Adapter, you will lose your connection
to the network. Make sure you have closed all files and network applications
(such as e-mail) prior to removing the 802.11b/g USB 2.0 Adapter.

19
3.7 Driver / Utility Uninstallation
1. Make sure the Utility is closed.
2. Go to windows Start > Programs_>802.11g USB2.0 adapter > Uninstall
802.11g USB2.0 adapter
3. Follow the uninstall wizard to complete the uninstallation.
4. Restart your computer.
20
4. Using the Utility
4.1 Wireless Networks Tab
Available networks: Lists all available networks (infrastructure or
Ad-hoc networks) in vicinity and shows each network’s information such as
SSID, Channel, Security and Signal.
Preferred networks: The order of preferred networks. It shows one network is
connected , disconnected or unavailable .
Configure button: Make configuration of the chosen network.
Refresh button: Click to rescan all available networks in vicinity.
Move Up / Move Down button: Click to arrange the order of the Preferred
networks.
Add button: Click to create new networks.
Remove button: Click to remove the chosen network from Preferred networks list.
Properties button: Click to configure the chosen network.
21
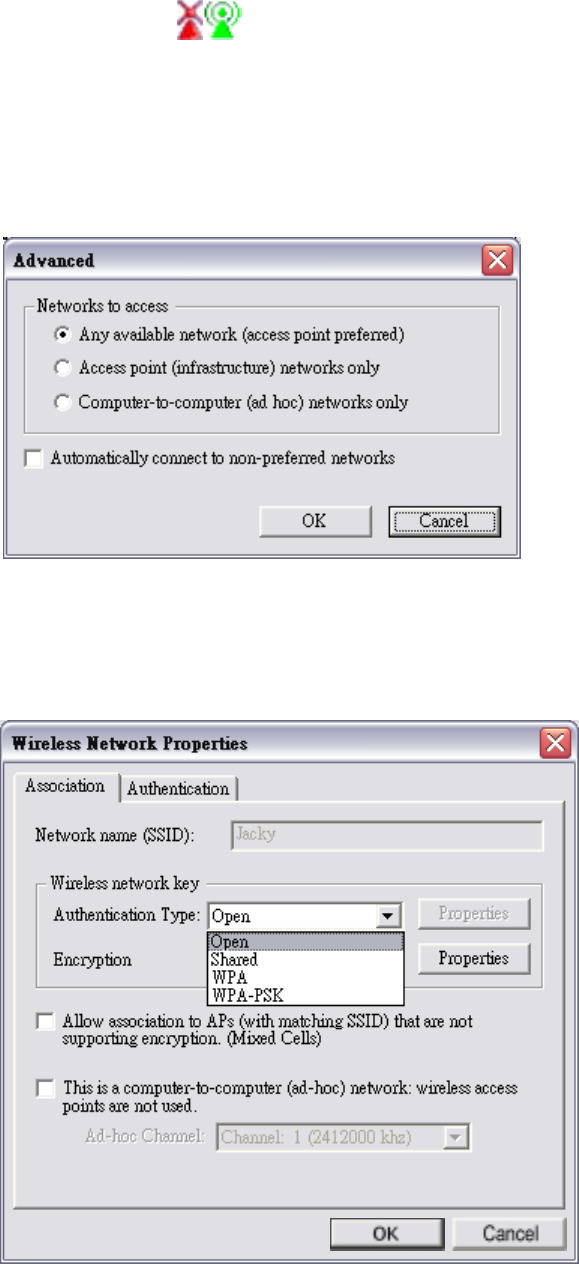
Show wireless configuration icon in systray: Checked to display wireless
configuration icon in Windows System Tray.
Advanced button: Click to choose one network access alternative.
Any available network (access point preferred)
Access point (infrastructure) networks only
Computer-to-computer (ad hoc) networks only
Automatically connect to non-preferred networks
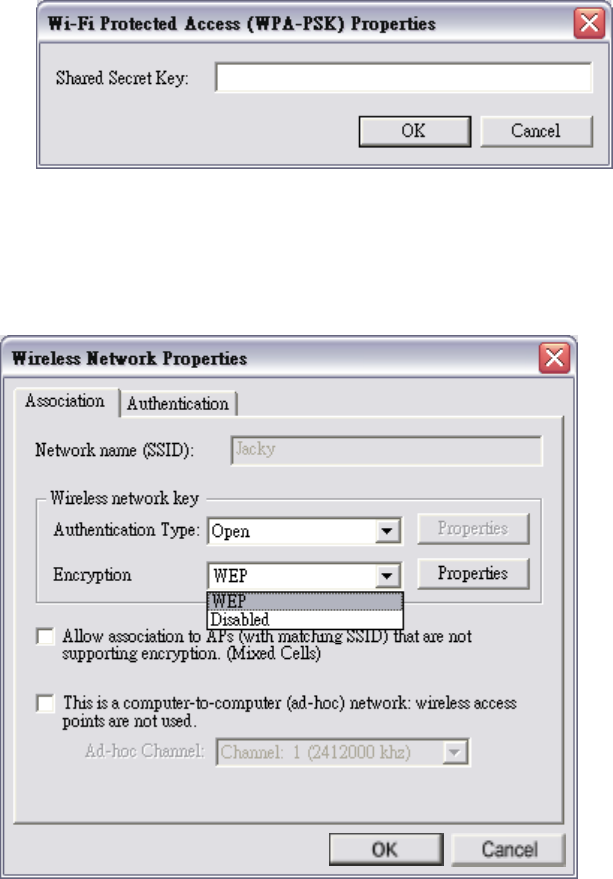
4.1.1 Configure-Association Tab
22
For Authentication Type, you can choose the following options from the
drop-down menu:
Open
Shared
WPA
WPA-PSK: Choose this option and then click “Properties” to set the Shared
Secret Key.
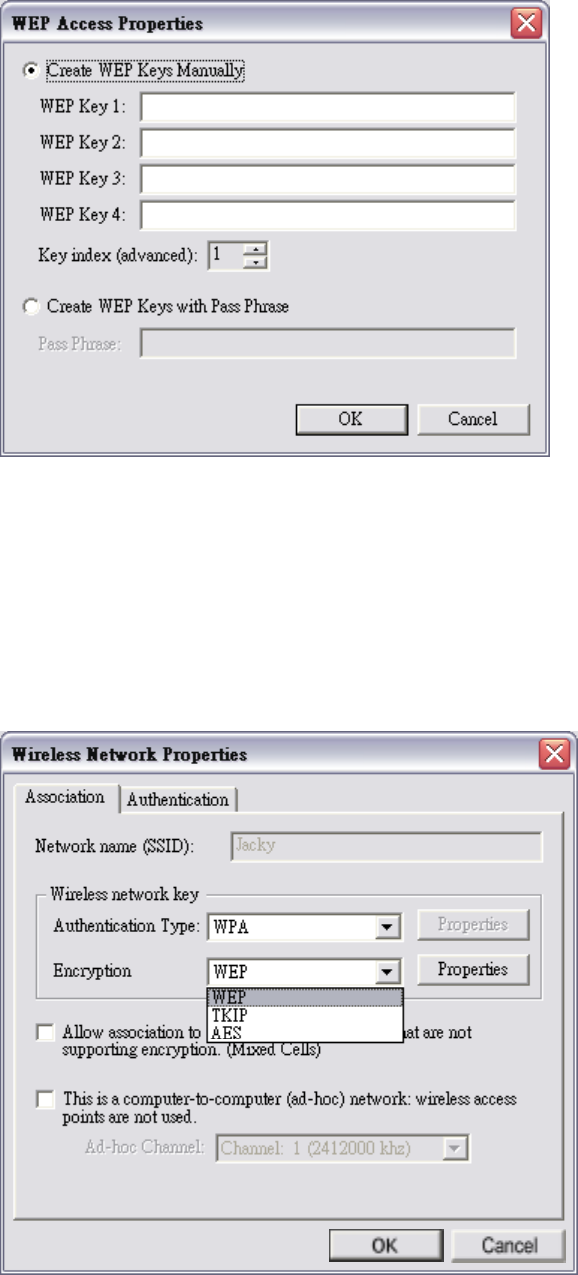
For Encryption, you can choose the following options from the drop-down menu:
WEP
Disabled
23
If you set Authentication Type to Open or Shared or WPA, and set Encryption
to WEP, click “Properties” to key in WEP keys.
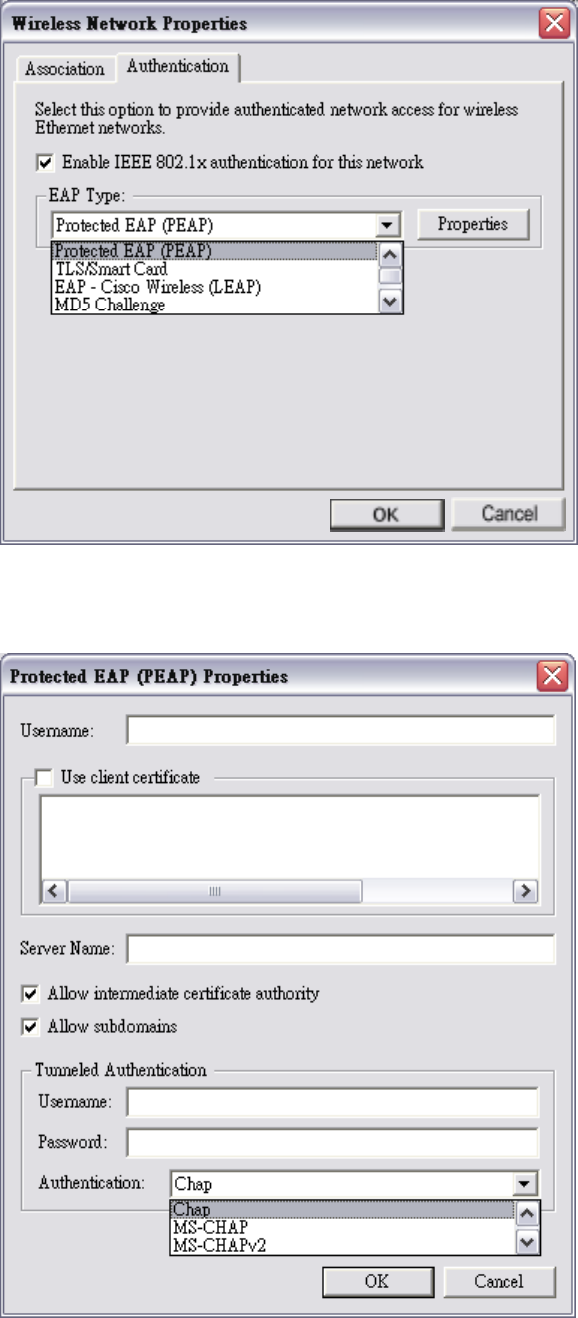
If you set Authentication Type to WPA or WPA-PSK, you can choose the
following options for Encryption setting:
WEP
TKIP
AES
24
4.1.2 Configure-Authentication Tab
In Authentication tab, you can enable IEEE 802.1x authentication.
You can choose the following items from EAP Type drop-down menu:
Protected EAP (PEAP): Click Properties to input further settings.
25
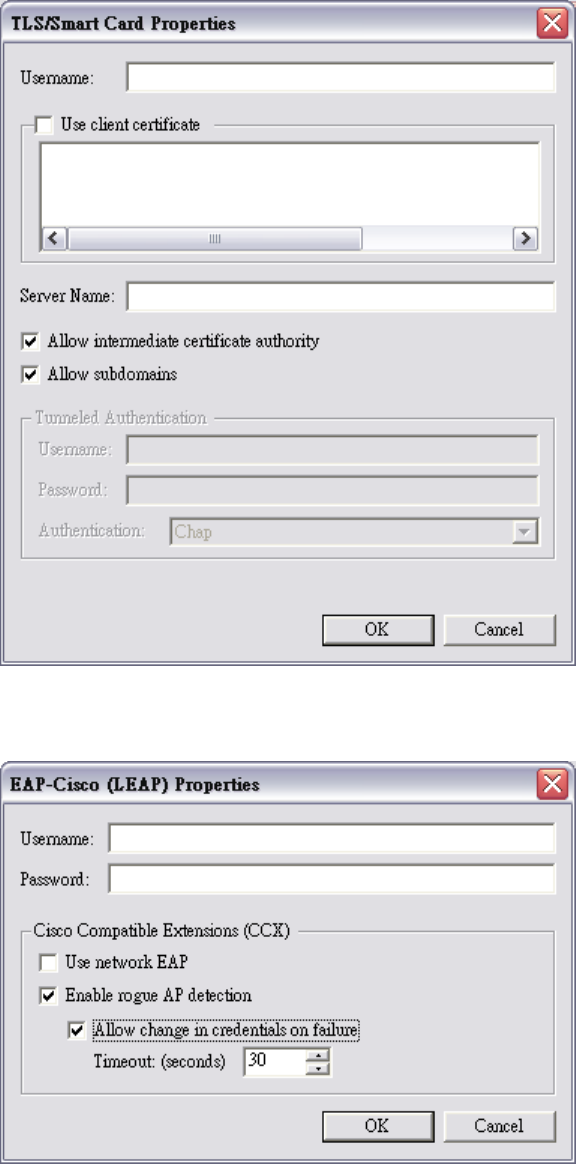
TLS/Smart Card: Click Properties to input further settings.
EAP-Cisco Wireless (LEAP): Click Properties to input further settings.
26
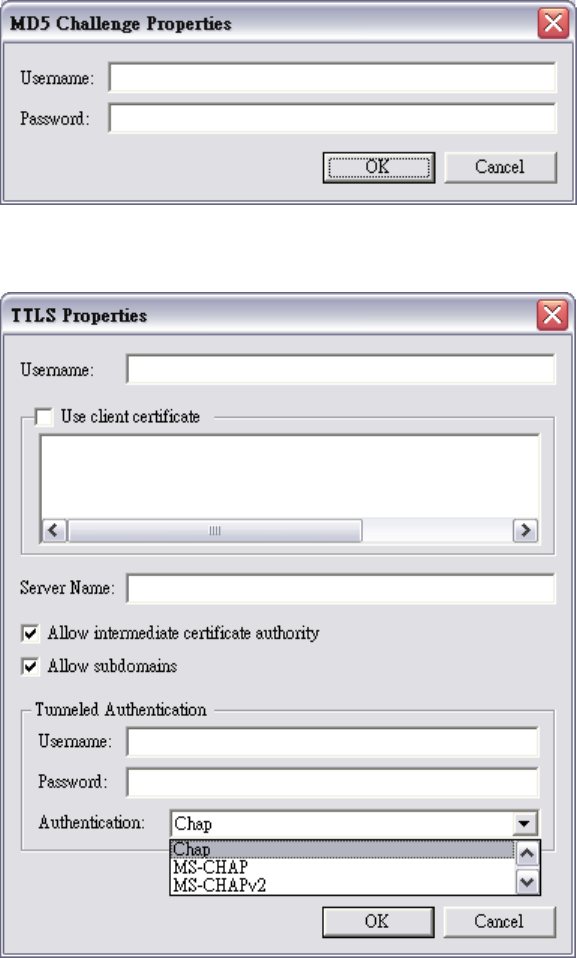
MD5 Challenge: Click Properties to input further settings.
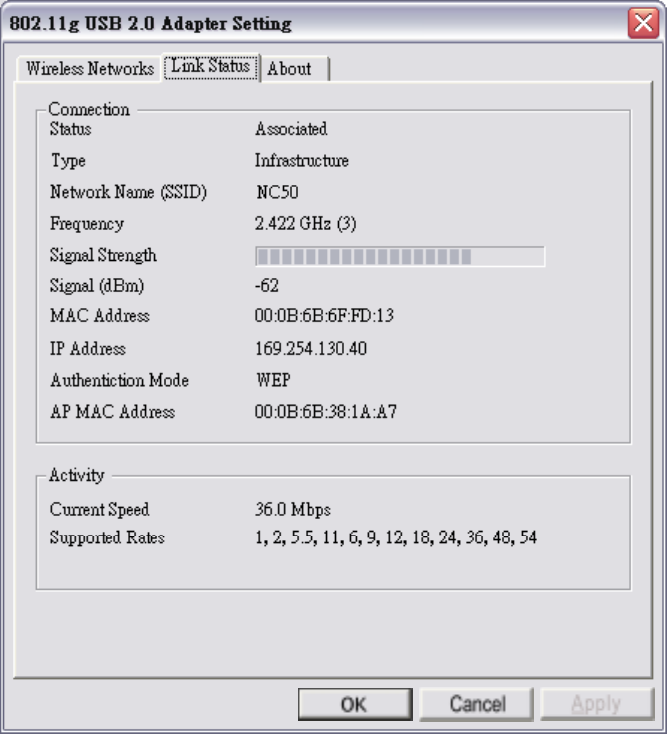
TTLS: Click Properties to input further settings.
27
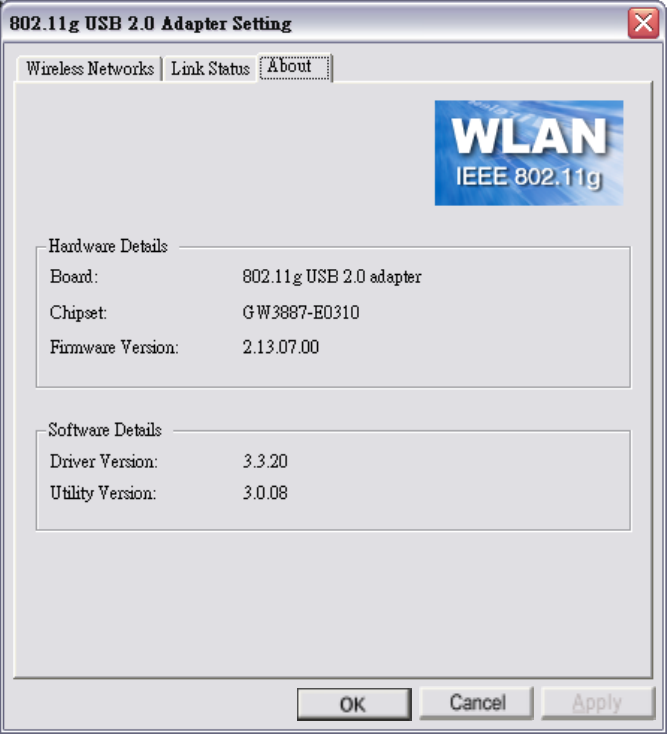
4.2 Link Status Tab
This tab shows Connection information.
This tab shows the following information:
Status: Associated (connected) or Scanning (disconnected).
Type: Infrastructure or Ad-hoc.
Network Name (SSID): The current connected network name.
Frequency
Signal Strength
Signal (dBm)
MAC Address
IP Address
Authentication Mode
AP MAC Address
Current Speed
Supported Rates
28
4.3 About Tab
This tab shows hardware and software details.
Hardware Details
Board: Product name.
Chipset
Firmware Version
Software Details
Driver Version
Utility Version

29
5. Network Application
This section consists of the network applications of 802.11b/g USB 2.0 Adapter,
including:
1. To survey the network neighborhood
2. To share your folder with your network member(s)
3. To share your printer with your network member(s)
4. To access the shared folder(s)/file(s) of your network members(s)
5. To use the shared printer(s) of your network member(s)
In fact, the network applications of 802.11b/g USB 2.0 Adapter are the same as they
are in a wired network environment. You may refer to the following 3 examples of
Surveying the Network Neighborhood, File Sharing and Using the Shared Folder.
5.1 Surveying the Network Neighborhood
When multiple base stations are up and running in your wireless network, you can use
the procedure described below to display the other computers:
1. Double-click My Network Places to display all stations in your Microsoft
Windows Network Group.
2. To display other workgroups in the network environment, double-click Entire
Network.
3. If there is a second network operating system running in your network
environment (for example a Novell NetWare network), the “Entire Network”
window will also display available servers running under the second network
operating system. If you click on these servers, you may be asked to enter your
user name and password that applies to the other network operating system. If
you cannot find it, verify whether the other wireless computers are:
Powered up and logged on to the network.
Configured to operate with identical Microsoft Network settings concerning:
Networking Protocol.
Wireless Network Name.
To enable the sharing of Internet access, you should set your WLAN mode as
“Infrastructure” and connect to the access point.
30
5.2 File Sharing
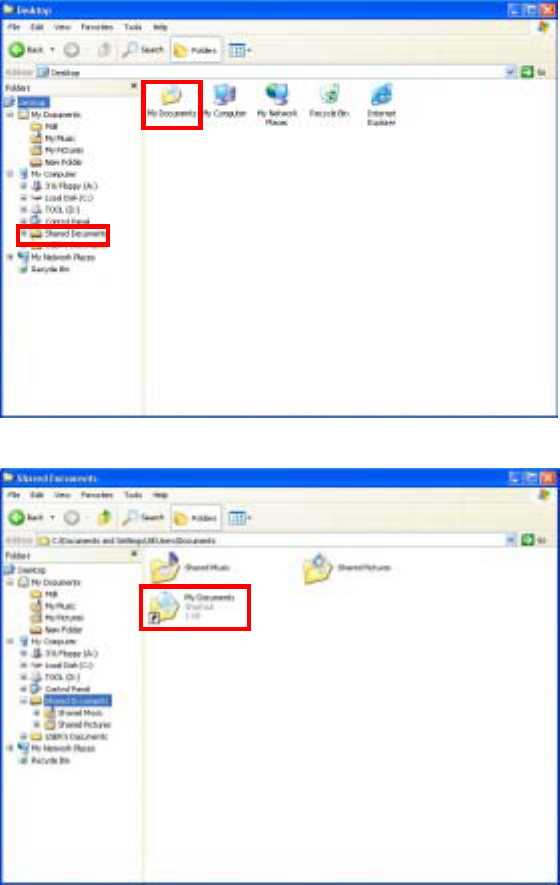
802.11b/g USB 2.0 Adapter allows the sharing of files between computers that are
logged onto the same wireless network. If you want to share your folder “My
Documents” with other computers of the wireless network, please highlight the
folder “My Documents” and drag it to Shared Documents folder.
Sharing files in the IEEE802.11b/g wireless network will be like sharing files on a
wired LAN.
31
5.3 Using the Shared Folder
If you would like to access a shared folder stored in other stations of same network,
please follow the process below:
1. Double-click the “My Network Places” icon, and then double-click the computer
where the shared folder is located.
2. Double-click the folder you want to connect to.
3. Now you may open the needed file(s).
Note! If a password is required, the Windows will prompt a password column to you.
Then you need to enter the password that had been assigned to this shared
folder.
32
6. Glossary
802.1X: The 802.1X standard is designed to enhance the security of wireless local
area networks (WLANs) that follow the IEEE 802.11 standard. 802.1X
provides an authentication framework for wireless LANs, allowing a user to
be authenticated by a central authority.
AES: Short for Advanced Encryption Standard, a symmetric 128-bit block data
encryption technique developed by Belgian cryptographers Joan Daemen
and Vincent Rijmen.
CHAP: Challenge Handshake Authentication Protocol. Security feature supported on
lines using PPP encapsulation that prevents unauthorized access. CHAP does
not itself prevent unauthorized access, but merely identifies the remote end.
The router or access server then determines whether that user is allowed
access.
EAP: Extensible Authentication Protocol. Framework that supports multiple,
optional authentication mechanisms for PPP, includes clear text passwords,
challenge-response, and arbitrary dialog sequences.
LEAP: Lightweight Extensible Authentication Protocol is a Cisco proprietary
EAP-Type. It is designed to overcome some basic wireless authentication
concerns through Mutual Authentication and the use of dynamic WEP
keys.
MD5: MD5 is an EAP-Type for authentication. It is analogous to the PPP CHAP
protocol. A challenge string is sent from the Authentication Server to the
Supplicant in the MD5-Challenge Request. The challenge string with the
user password is hashed using MD5 and the hash is returned in the
MD5-Challenge Response. The Authentication Server performs the same
hash and compares the result with that returned by the Supplicant to
determine whether the authentication is a Success.
33
PAP: Password Authentication Protocol. Authentication protocol that allows PPP
peers to authenticate one another. The remote router attempting to connect to
the local router is required to send an authentication request. Unlike CHAP,
PAP passes the password and the host name or username in the clear
(unencrypted). PAP does not itself prevent unauthorized access but merely
identifies the remote end. The router or access server then determines
whether that user is allowed access. PAP is supported only on PPP lines.
PEAP: Protected Extensible Authentication Protocol is a two-phase authentication
like TLS. In the first phase the Authentication Server is authenticated to the
Supplicant. Using TLS, a secure channel is established through which any
other EAP-Type can be used to authenticate the Supplicant to the
Authentication Server during the second phase. A certificate is only
required at the Authentication Server. PEAP also supports identity hiding
where the Authenticator is only aware of the anonymous username used to
establish the TLS channel during the first phase but not the individual user
authenticated during the second phase.
SSID: Name of wireless network.
TKIP: Short for Temporal Key Integrity Protocol. TKIP scrambles the keys using a
hashing algorithm and, by adding an integrity-checking feature, ensures that
the keys have not been tempered with.
TLS: TLS is an EAP-Type for authentication based upon X.509 certificates.
Because it requires both the Supplicant and the Authentication Server to
have certificates, it provides explicit Mutual Authentication and is resilient
to man-in-the-middle attacks. After successful authentication a secure TLS
link is established to securely communicate a unique session key from the
Authentication Server to the Authenticator.
TTLS: Tunneled TLS is an EAP-Type for authentication that employs a two-phase
authentication process. In the first phase the Authentication Server is
authenticated to the Supplicant. Using TLS, a secure channel is established
through which the Supplicant can be authenticated to the Authentication
Server using legacy PPP authentication protocols such as PAP, CHAP, and
MS-CHAP. TTLS has the advantage over TLS that it only requires a
34
certificate at the Authentication Server. It also makes possible forwarding
of Supplicant requests to a legacy RADIUS server. TTLS also supports
identity hiding where the Authenticator is only aware of the anonymous
username used to establish the TLS channel during the first phase but not the
individual user authenticated during the second phase.
WEP: Short for Wired Equivalent Privacy, a security protocol for wireless local
area networks (WLANs) defined in the 802.11b standard. WEP is designed
to provide the same level of security as that of a wired LAN.
WPA: Wi-Fi Protected Access is a replacement security standard for WEP. It is a
subset of the IEEE 802.11i standard being developed. WPA makes use of
TKIP to deliver security superior to WEP. 802.1X access control is still
employed. The Authentication Server provides the material for creating the
keys.

35
7. Product Spec.
Item Key specifications
Main Chipset Conexant Cohiba Blunt (GW3887A, ISL3686)
Frequency Range US/Canada: 2.400 ~ 2.4835GHz
Modulation Technique 802.11b: DSSS (CCK, BPSK, QPSK)
802.11g: OFDM
Host Interface USB 2.0
Channels Support US/Canada: 11 (1 ~ 11)
Operation Voltage 5V +/- 10%
Current Consumption Transmission mode 460mA @ 5VDC(Ave)
Receive mode 480mA @ 5VDC(Ave)
Standby mode 380mA @ 5VDC(Ave)
Output Power (typ.)
13 dBm@ 802.11g 48,54Mbps
15 dBm@ 802.11g 24,36Mbps
17 dBm@ 802.11g 6,9,12,18Mbps
17 dBm@ 802.11b mode
Sensitivity
PER < 0.08(11b)
PER < 0.1(11g)
-80dBm@ 11M 802.11b mode
-65dBm@ 54M 802.11g mode
Operation Distance (typ.) Indoor: 50m
Outdoor: 250m
Operation System
Supported
Windows 98, 98SE, Me, 2K, XP, X64
WinCE 4.2, 5.0 are supported by Conexant
Dimension 96.5mm (L) * 32.6mm(W) * 13.0mm(H)
Security 64-bit WEP, 128-bit WEP
WPA, WPA2
PEAP
TLS
LEAP
MD5
Operation Mode Infrastructure & Ad-hoc mode
Transfer Data Rate 802.11g:
54, 48, 36, 24, 18, 12, 9, 6Mbps, auto-fallback
802.11b:
11, 5.5, 2, 1Mbps, auto-fallback
LED Indicator WLAN activity indicator

36
Operation Temperature 0o ~ 55o C
Storage Temperature -25o ~ 70o C
Wi-Fi WiFi Alliance Compliant
EMC Certificate FCC part 15 (USA)
IC RSS210 (Canada)
Telec (Japan)
ETSI (Europe)
The above regulation depends on customer’s request