Wistron NeWeb DTVDCCK DirecTV Cinema Connection Kit User Manual
Wistron NeWeb Corporation DirecTV Cinema Connection Kit
User Manual

1
DIRECTV CINEMA™ Connection Kit Product Information .......................................................................................................................................2
Important Safety Instructions .................................................................................................................................................................................3
Product Overview .....................................................................................................................................................................................................5
Package Contents ....................................................................................................................................................................................................6
Connection ................................................................................................................................................................................................................7
Determine Your Connection Type ..........................................................................................................................................................................10
Direct Ethernet Connection ...................................................................................................................................................................................13
DIRECTV® Whole-Home DVR Service Compatible Connection ........................................................................................................................... 15
DIRECTV® Whole-Home DVR Service Compatible with Connected Home Adapter Connection ....................................................................... 18
Completing Wireless Protected Setup..................................................................................................................................................................21
Manual Wireless Setup ..........................................................................................................................................................................................23
Troubleshooting .....................................................................................................................................................................................................29
Warranty .................................................................................................................................................................................................................35
Federal Communication Commission Interference Statement ..........................................................................................................................39
Terms and Conditions ............................................................................................................................................................................................ 41
table of contents
2
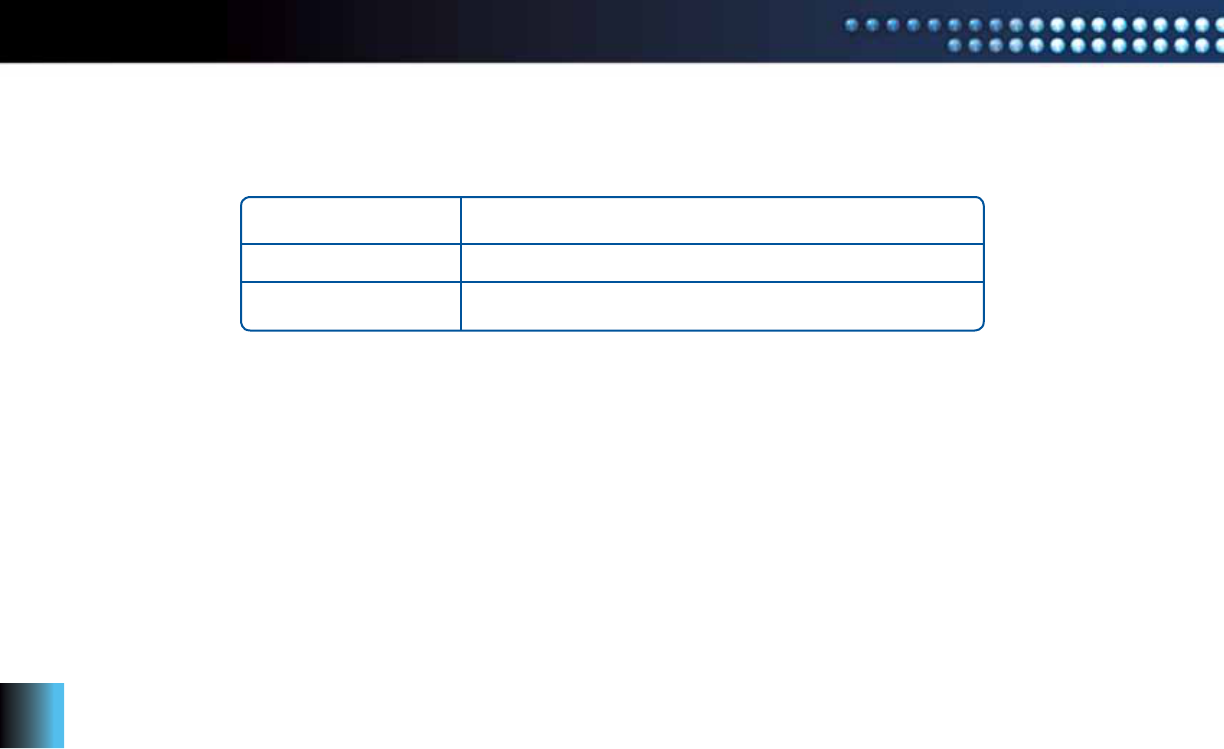
Keep your receipt as proof of acquisition to obtain warranty parts and service. Attach it here and record the serial number and model number
in case you need them. These numbers are typically on the rear panel of your device.
Product information
The DIRECTV CINEMA™ Connection Kit is compatible with receiver models R22, HR20, HR21, HR22, HR23, HR24. Additional models
may be added in the future. Please visit directv.com/getconnected for up-to-date listings.
Model No.
Serial No.
Dealer/Address/Phone

3
Important Safety Instructions
1) Read these instructions.
2) Keep these instructions.
3) Heed all warnings.
4) Follow all instructions.
5) Do not use this device near water.
6) Clean only with dry cloth.
7) Do not block any ventilation openings. Install in accordance with the manufacturer’s instructions.
8) Do not install near any heat sources such as radiators, heat registers, stoves, or other apparatus (including amplifiers) that produce heat.
9) Do not defeat the safety purpose of the polarized or grounding-type plug. A polarized plug has two blades with one wider than the other. A grounding-type plug has two blades
and a third grounding prong. The wide blade or the third prong is provided for your safety. If the provided plug does not fit into your outlet, consult an electrician for replacement
of the obsolete outlet.
10) Protect the power cord from being walked on or pinched, particularly at plugs, convenience receptacles, and the point where they exit from the device.
11) Only use attachments/accessories specified by the manufacturer.
12) Unplug this device during lightning storms or when unused for long periods of time.
13) Refer all servicing to qualified service personnel. Servicing is required when the device has been damaged in any way, such as power supply cord or plug is damaged,
liquid has been spilled or objects have fallen into the device, the device has been exposed to rain or moisture, does not operate normally, or has been dropped.
Your DIRECTV® device has been designed and manufactured to stringent quality and safety standards. You should, however, be aware of the following important precautions
for safe and optimal use of the equipment.
Meaning of symbols printed on the rear panel of the product:
This symbol indicates that there are important operating and maintenance instructions in the literature accompanying this unit.
This symbol indicates that dangerous voltage consisting of a risk of electric shock is present within this unit.
imPortant safety instructions
4
WARNING: To reduce the risk
of fire or electric shock, do not
expose this product to rain or
moisture. The device must not be
exposed to dripping or splashing
and objects filled with liquids,
such as vases, must not be placed
on the device.
IMPORTANT: Do not place your
DIRECTV
®
device near anything
WET or HOT!
TIP: We highly recommend
plugging the DIRECTV® device
into a surge protector to prevent
damage from fluctuations in
your power supply.
CAUTION: To reduce the risk of
electric shock, do not remove cover
(or back). No user-serviceable
parts inside. Refer servicing to
qualified service personnel.
• Ensure proper ventilation — the DIRECTV
®
device must be left uncovered to allow proper airflow to the unit. Blocking the airflow to the unit
could impair performance or damage your device and other components.
• Do not stack electronic components or other objects on top of the DIRECTV device. Also, do not stack the device on top of a “hot component”
such as an audio power amplifier.
• Protect your components from power surges by connecting all the components before plugging any power cords into the wall outlet.
Use of a surge protector is also recommended.
• Don’t overload power outlets or extension cords, which can result in the risk of fire or shock. It’s also important to use only the type of power source
indicated on the marking label or in this manual.
• Never insert objects of any kind into any openings in the DIRECTV device.
• It is preferable to place the device on a flat, hard surface.
• Always unplug your DIRECTV device before moving it.
• Always unplug the DIRECTV device, TV and other equipment before you connect or disconnect any cables.
• The only way to disconnect the DIRECTV device from the power supply is to remove the power cord. The DIRECTV device must therefore
be installed next to the power source which must be easily accessible.
• CAUTION: Electric Shock — never attempt to disassemble the DIRECTV device yourself; always take it to a qualified service person when repair
is required. Opening or removing covers may expose dangerous voltage or other risks, and incorrect reassembly can cause shock when the device
is subsequently used. Attempted self-repair may also void your warranty. Changes or modifications not expressly approved by the party responsible
for compliance (by the warranty or by the manufacturer) could void the user’s authority to operate the equipment.
• Do not drop your DIRECTV device and always move it with care.
• Have your DIRECTV device professionally serviced (do not attempt to service it yourself).
• Any changes or modifications in construction of this device which are not expressly approved by the party responsible for compliance could void
the user’s authority to operate the equipment.
• If you move your DIRECTV device between locations at different temperatures, allow it to reach room temperature before you apply power to it.
• Do not pick up or otherwise move your DIRECTV device while it is connected to the AC power supply. If you want to move your device,
first disconnect it, then wait at least 30 seconds before continuing.
• For your information: The identification sticker can be located on the rear of your device.
• The telecommunication network voltage used is the category number 3.
Note to Satellite Dish Installer: This reminder is provided to call your attention to articles 810 and 820 of the 2005 National Electrical Code.
Refer to article 810, in particular 810-1 and 810-15, for required grounding of the metal structure of the dish antenna. Refer also to the 810-2
which, by reference to article 820, requires that the satellite dish coaxial cable shield be connected to the grounding system of the building as
close to the point of cable entry as practical.
RISK OF
ELECTRIC SHOCK
DO NOT OPEN!
CAUTION
imPortant safety instructions
5
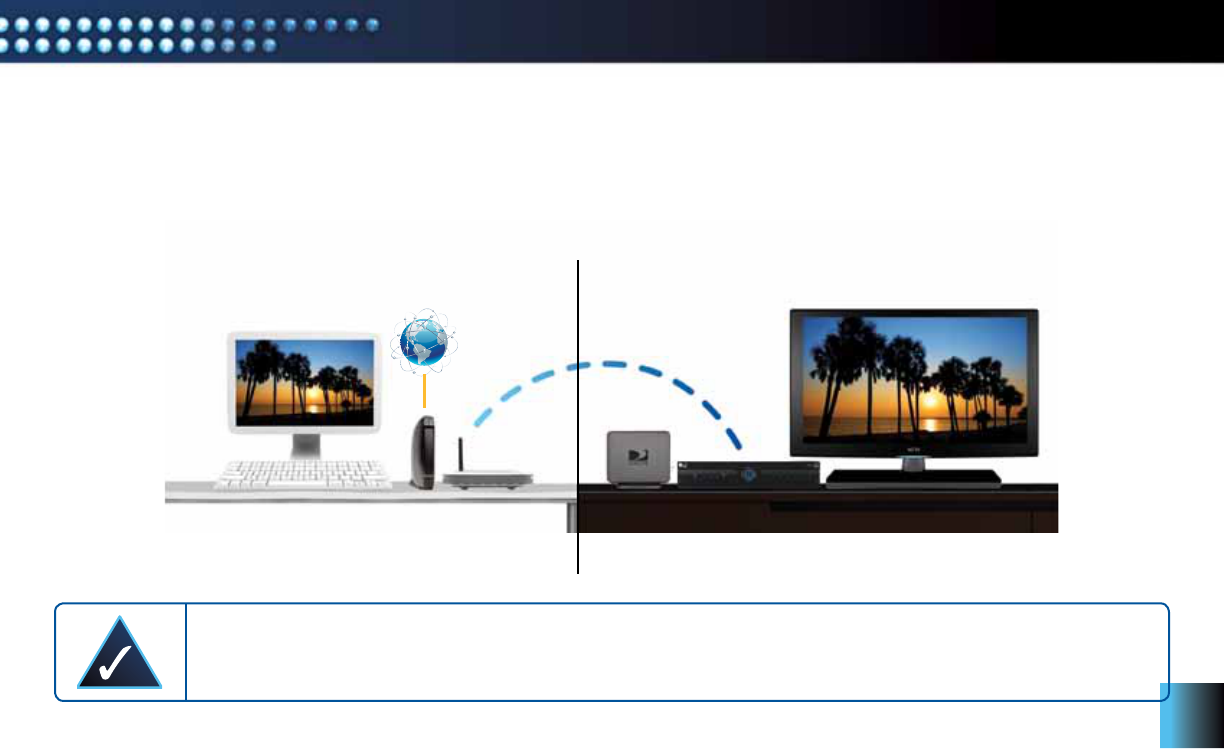
The DIRECTV CINEMA™ Connection Kit (DCCK) creates a wireless connection between your wireless router and your DIRECTV® Receiver
or DIRECTV® Whole-Home DVR service compatible network, so your DIRECTV Receiver can access the Internet. Your DIRECTV Receiver
has been customized to work with the DCCK device to enable the DIRECTV CINEMAplus™ service and other DIRECTV broadband services.
This User’s Manual will take you through the setup process to connect the DCCK device to your DIRECTV Receiver.
NOTE 1: Due to potential user interface improvements, the screens you see on your TV may differ slightly
from the ones included in this User’s Manual.
Product overview
Diagram of a Typical Installation
Internet
Modem Router
DCCK
Device DIRECTV
Receiver
OFFICE LIVING ROOM
6
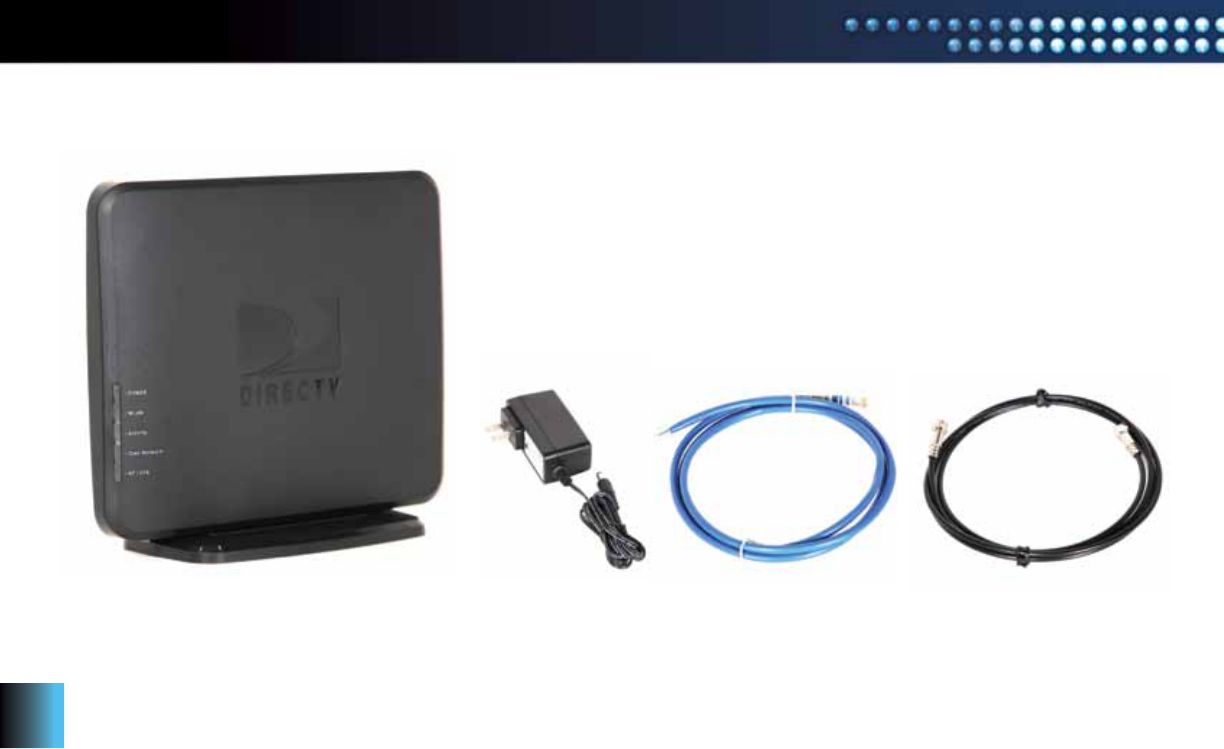
Package contents
DIRECTV CINEMA™
Connection Kit Device
Power Adapter Ethernet Cable Coaxial Cable
7
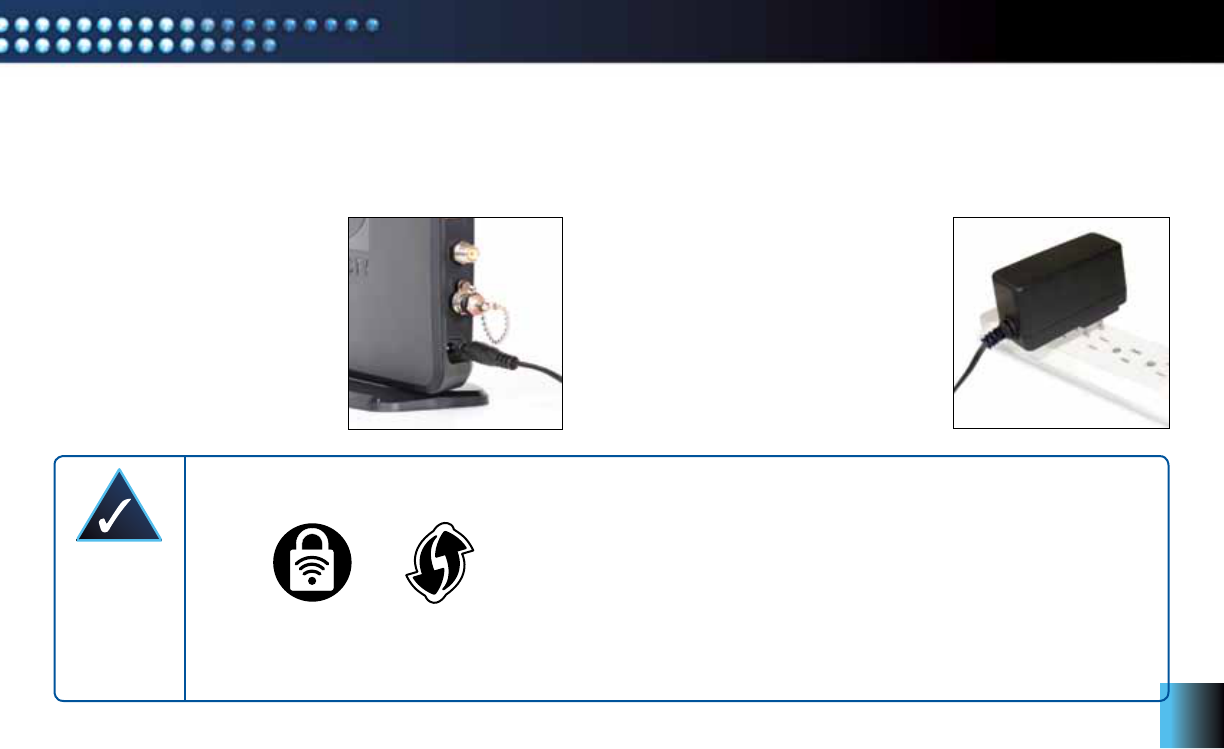
Connect Power Adapter
to DCCK Device
A. Plug the power adapter
into the
Power port of the
DCCK device.
B. Plug the other end of the power adapter
into a surge protector (recommended)
or an electrical outlet.
Before you begin the installation of the DIRECTV CINEMA™ Connection Kit (DCCK), make sure your DIRECTV® Receiver
and TV are powered on. Also, make sure you can connect to the Internet through your wireless router and computer.
Prepare Your DCCK Device for Connection
connection
Connect Power Adapter
to Electrical Outlet
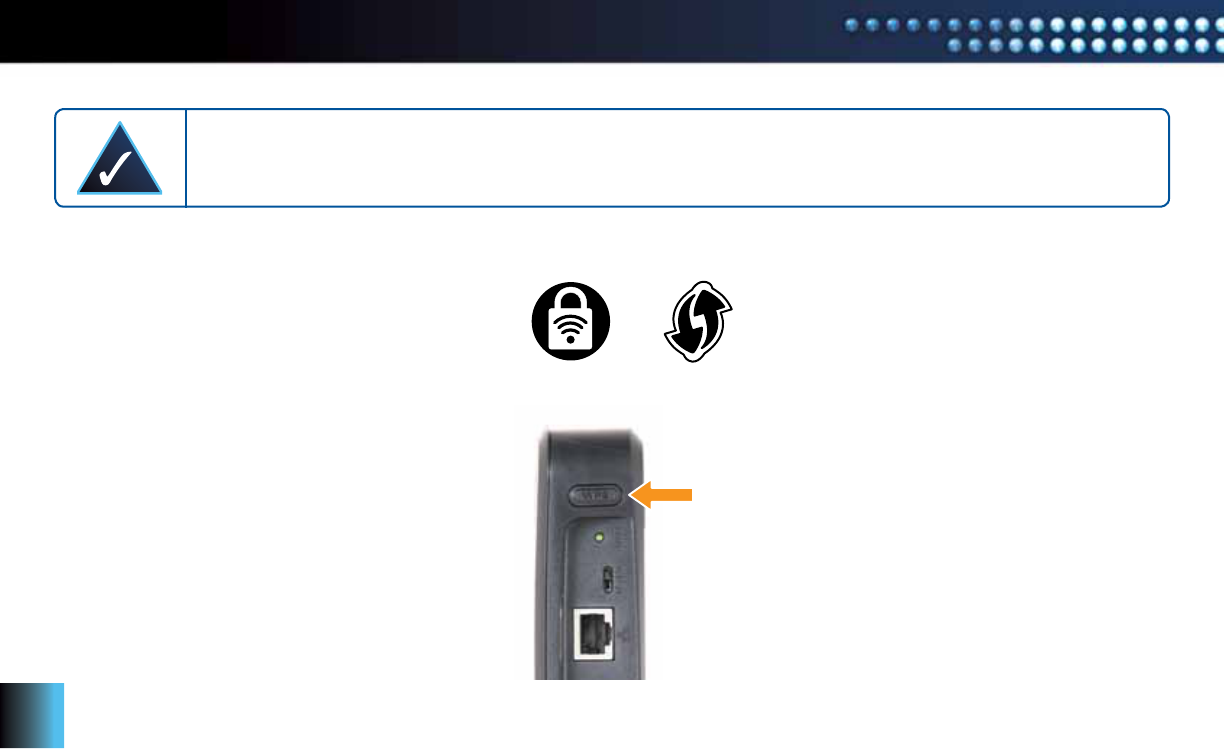
NOTE 2: If your Wi-Fi router features Wireless Protected Setup (WPS)*, continue to Step C. One of the images below
should appear on your router if it is WPS capable:
Otherwise continue to the “Determine Your Connection Type” section on page 10.
*WPS allows for easy and secure wireless network setup. WPS can automatically set up network names and wireless
security for wireless routers, access points, computers, adapters, Wi-Fi phones, and other consumer electronics devices.
or
8
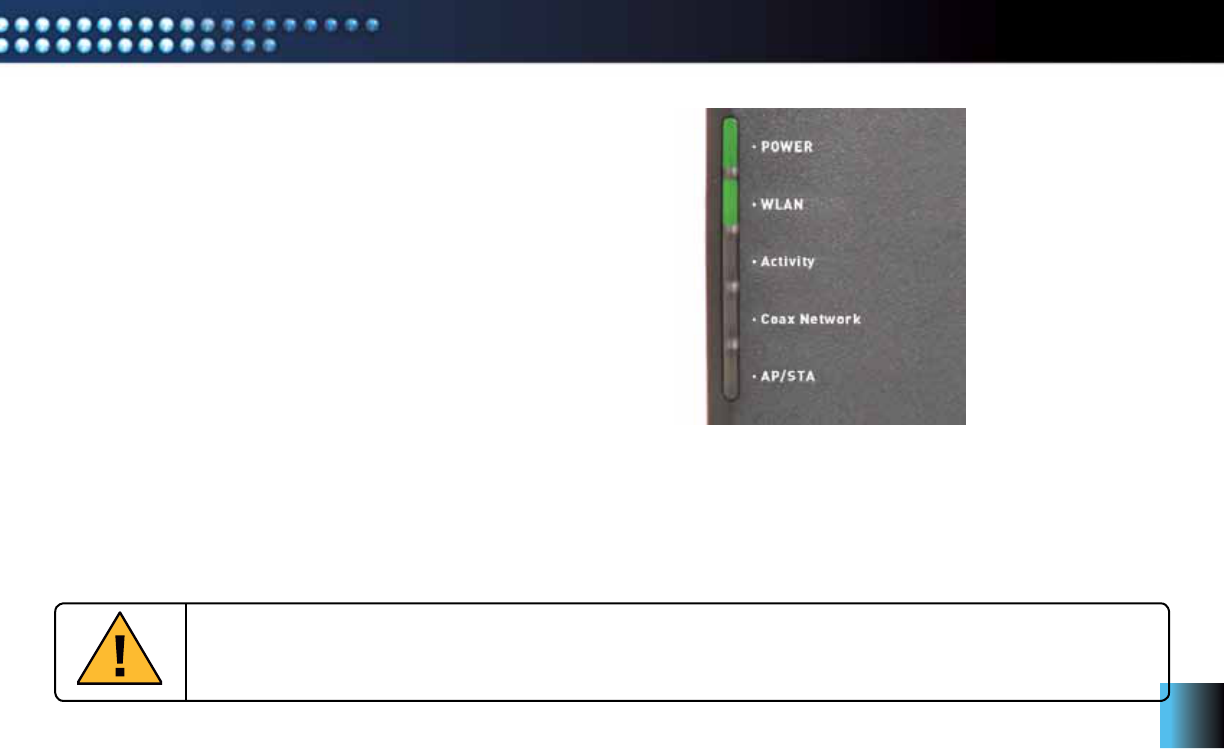
C. On your router, press the WPS button and wait until
the WPS LED begins to flash. The WPS button may look
like one of the icons to the right.
Press WPS Button on Router
Press WPS Button on DCCK Device
Within two minutes of activating WPS on your router,
press and hold the WPS button on the DCCK device
until the WLAN LED on the DCCK flashes green
(approximately 2 seconds).
connection
NOTE 3: During WPS configuration, the DCCK device should be powered on, but not connected to the DIRECTV® Receiver.
or
9
D. When the connection is complete, the WLAN LED displays solid green.
You have successfully completed the WPS connection between the DCCK
and your Wi-Fi router. You should now proceed to the next section
to connect the DCCK device to your receiver.
If the WLAN LED does not light up, then repeat Steps C and D. If the
WLAN LED still does not light up, then proceed to the next section
and you will have the option to manually configure the wireless connection
when you reach the “Manual Wireless Setup” section on page 23.
LED is solid green
connection
IMPORTANT: There are three different options for connecting your DCCK device to your receiver, depending
on the DIRECTV installation in your home. To properly install your DCCK device, carefully follow
the steps in the “Determine Your Connection Type” section (see page 10).
10
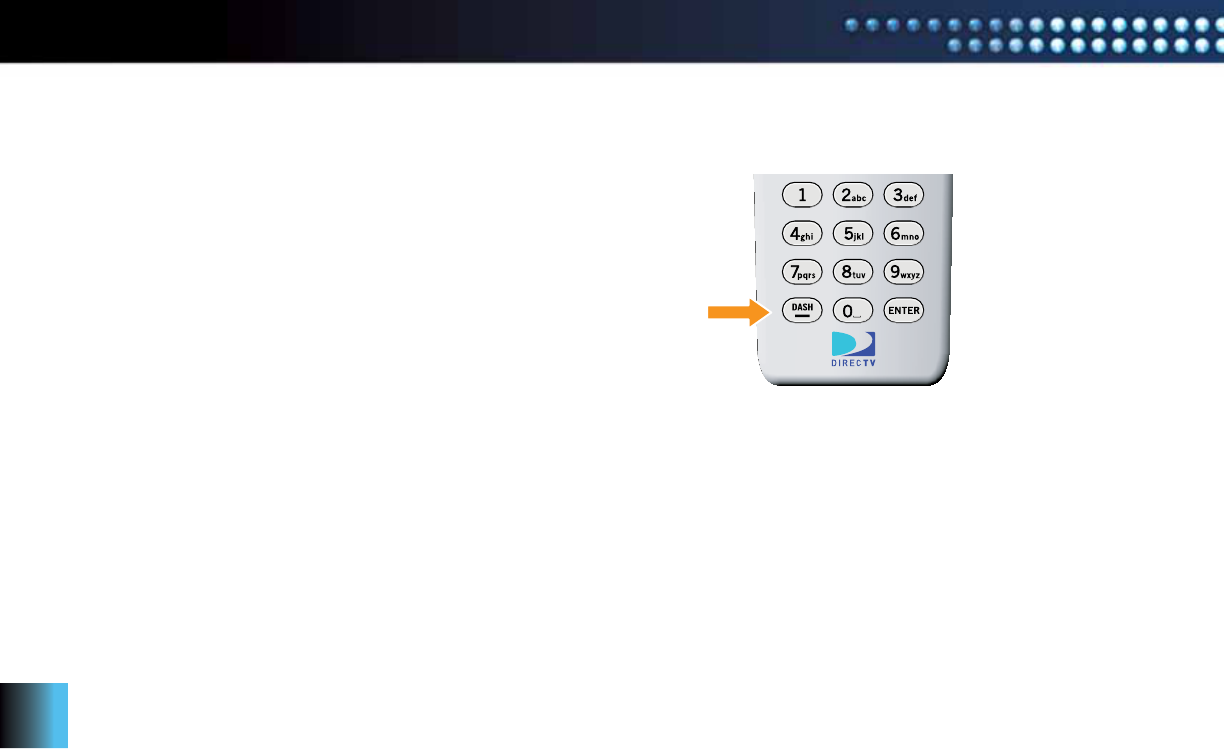
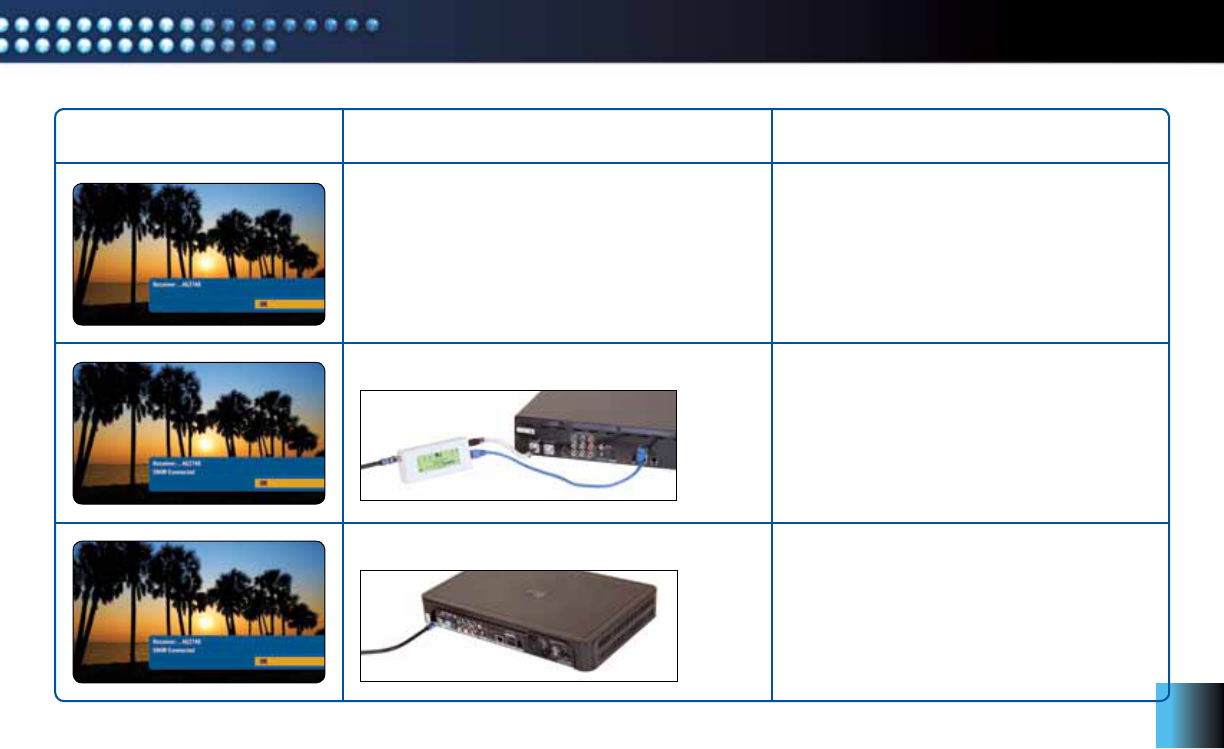
A. To determine your DIRECTV installation type, turn on the
HD DVR Receiver
that you will be connecting. Next, press the DASH key
(lower left key) on your
DIRECTV® Remote Control and note the information displayed on your TV.
This section will guide you through a simplified process to determine which DCCK connection type will work with your DIRECTV installation.
determine your connection tyPe
DIRECTV Remote Control Dash Key
11
determine your connection tyPe
DASH KEY DISPLAYS ON TV CHECK BACK OF RECEIVER CONNECTION
No check needed Proceed to the “Direct Ethernet Connection”
section on page 13.
Proceed to the “DIRECTV® Whole-Home
DVR Service Compatible with Connected
Home Adapter Connection” section
on page 18.
Receiver Models H24 or HR24 only – Proceed
to the “DIRECTV® Whole-Home DVR Service
Compatible Connection” section on page 15.
All other Receiver Models – Proceed to the
“Direct Ethernet Connection” section on page 13.
Connected Home Adapter attached to receiver
No Connected Home Adapter attached to receiver
12
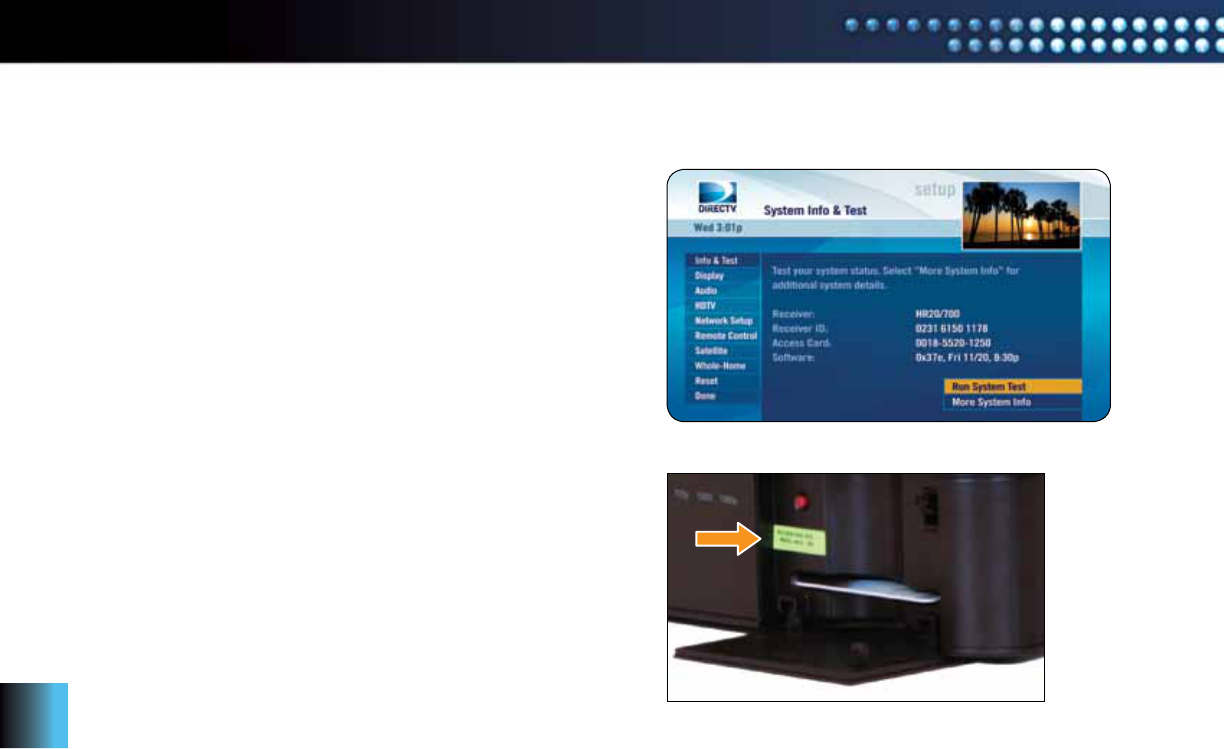
Determine your DIRECTV® Receiver model.
Go to System Setup to find your model type.
To do this, using your DIRECTV Remote Control, press “MENU”,
select “Parental, Fav’s & Setup”, then “System Setup”.
Note the name next to the text “Receiver:” on the right side
of the screen. “HR20/700” is the model name in the example
screen on the right.
The model name is also located on a sticker behind
the access card door (or underneath the receiver).
B. To determine your receiver model, you may use the on-screen display or find the model number
behind the access card door of the receiver.
System Information Screen
Sticker Behind Access Card Door on Receiver
determine your connection tyPe
13
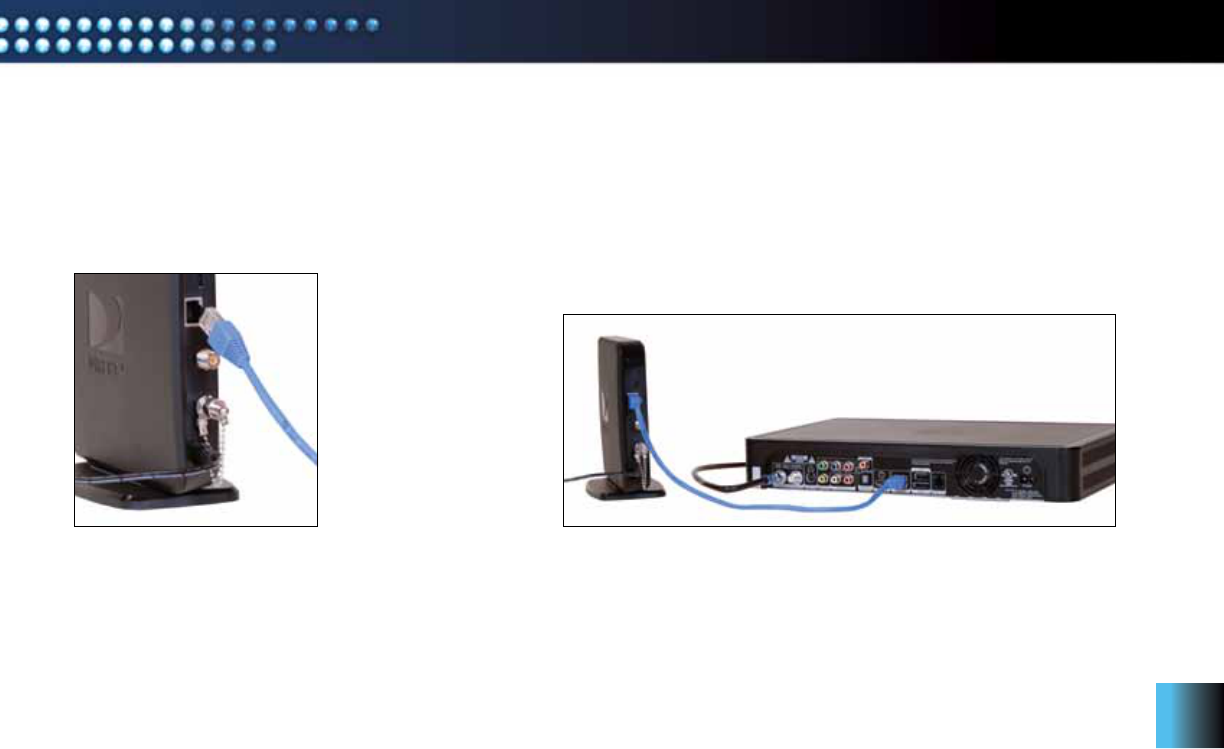
A. Connect one end of the enclosed
Ethernet cable to the Ethernet port
of the DCCK device.
B. Connect the other end of the Ethernet cable to the Ethernet
port on the back of your DIRECTV® Receiver. (If your DIRECTV
Receiver has two Ethernet ports, connect the cable to the upper
port labeled “ETHERNET 1”.)
Connect Ethernet to DCCK Device
This section describes how to attach your DCCK device if your installation requires the use of an Ethernet connection. In this installation,
you will use the enclosed Ethernet cable. The coaxial cable included with your DCCK will not be used in this configuration.
Connect Ethernet Cable to DIRECTV Receiver
direct ethernet connection
14
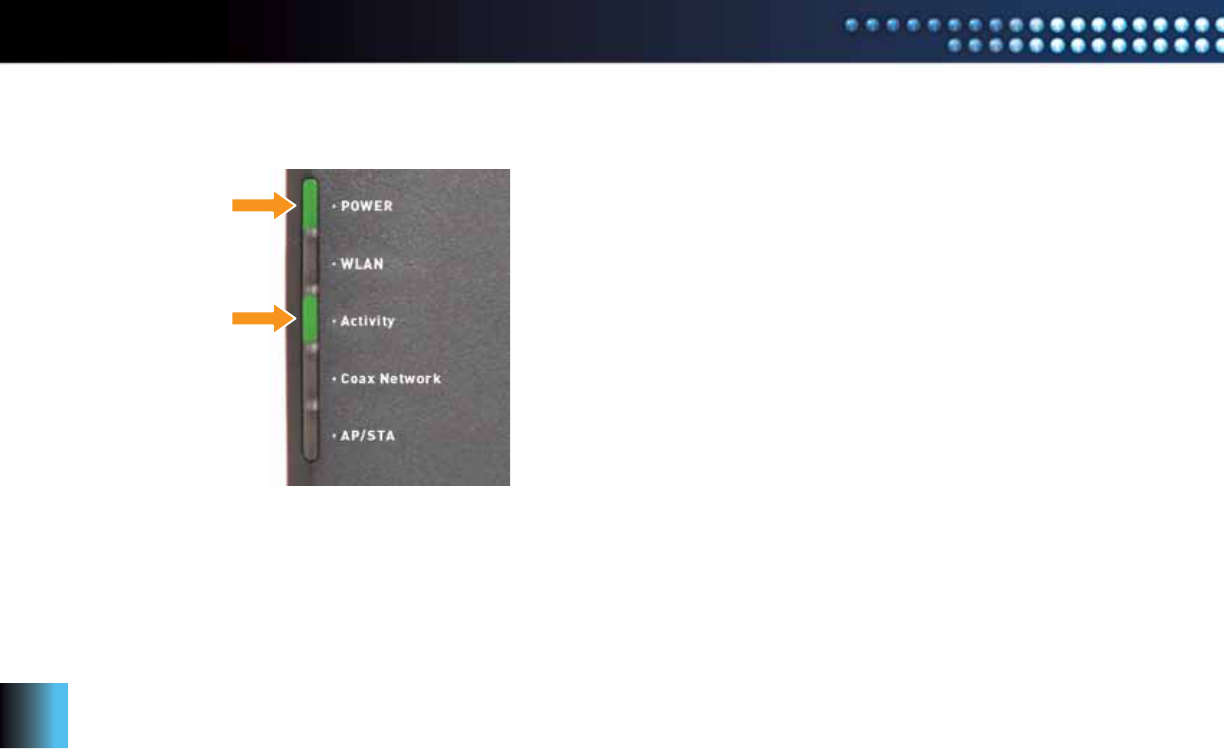
C. The POWER and Activity LEDs on the DCCK device should
light up. Wait for the POWER LED to stop flashing.
D. If you used WPS to automatically set up your wireless connection,
go to the “Completing Wireless Protected Setup” section on page 21.
Otherwise, if you cannot use WPS or are unsure if you have WPS,
go to the “Manual Wireless Setup” section on page 23 to manually
establish your wireless connection.
POWER and Activity
LEDs Light Up
direct ethernet connection
15
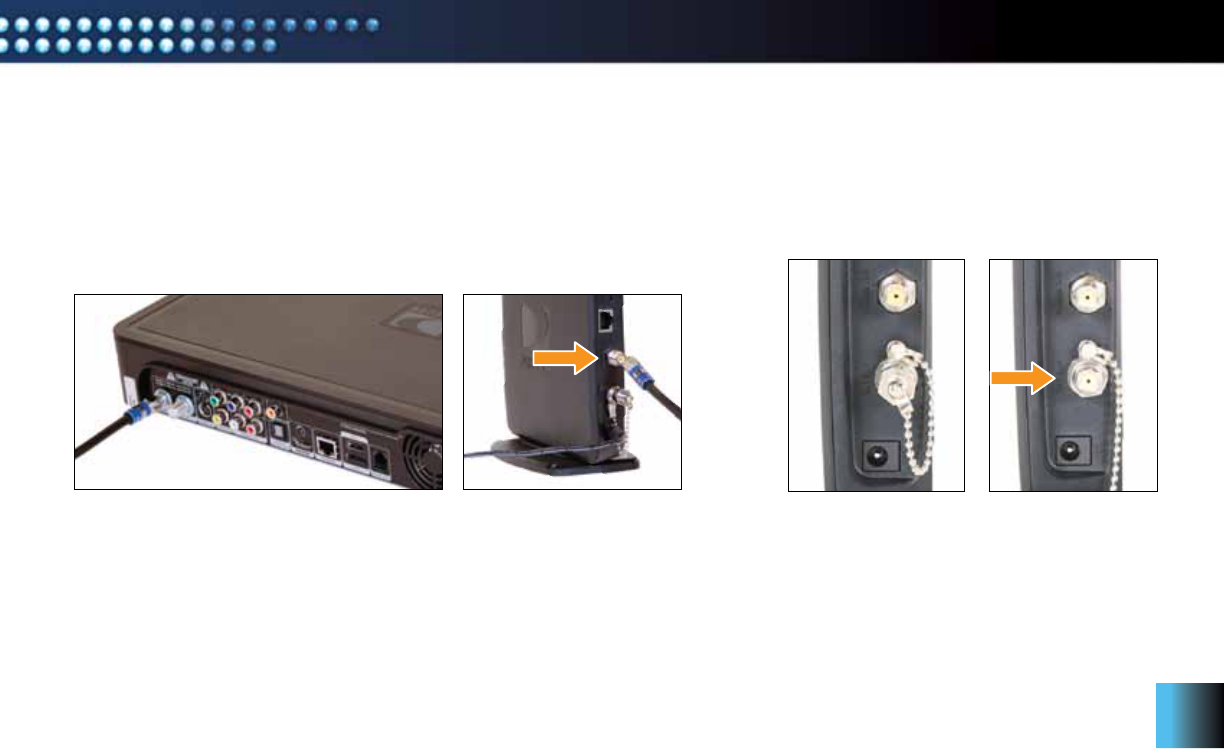
A. Disconnect the coaxial cable from the back of your Receiver, which should be
connected to the port labeled “SATELLITE IN 1” or “SAT IN 1.” and connect it
to the coaxial connector on your DCCK device labeled “Towards LNB”.
B. Unscrew the cap from the coaxial connector
labeled “SAT Rcvr” on your DCCK device.
Remove Cap from “SAT Rcvr” on DCCK Device
Disconnect Coaxial Cable from Receiver Connect Coaxial to “Towards
LNB” on DCCK Device
This section describes how to connect your DCCK device if you have a DIRECTV Whole-Home DVR service compatible installation.
In this installation, you will be using the enclosed coaxial cable. The Ethernet cable included with your DCCK will not be used.
directv® whole-home dvr service comPatible connection
16
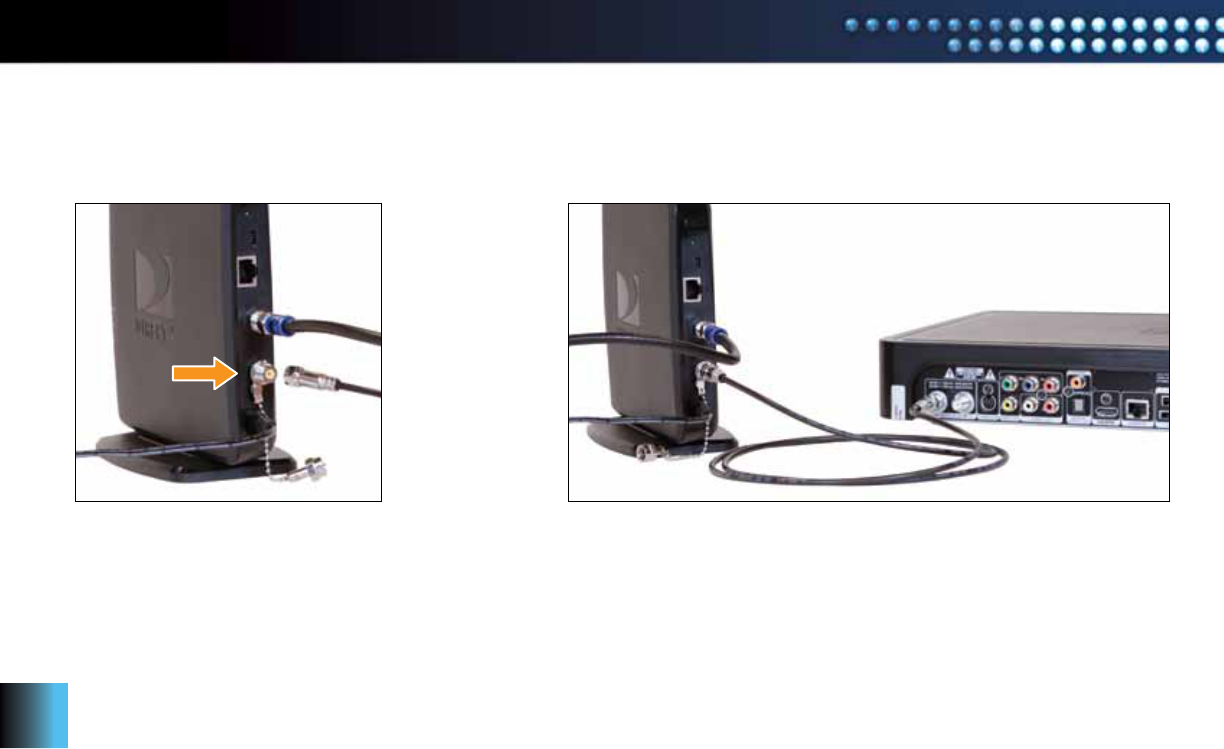
C. Using the enclosed coaxial cable, connect
one end to the coaxial connector on your
DCCK device labeled “SAT Rcvr”.
D. Connect the other end of the coaxial cable
to the coaxial connector labeled “SATELLITE IN 1”
or “SAT IN 1” on your Receiver.
Connect Enclosed Coaxial Cable
to “SAT Rcvr” on DCCK Device
Connect Enclosed Coaxial Cable to “SATELLITE IN 1” on Receiver
directv® whole-home dvr service comPatible connection
17
directv® whole-home dvr service comPatible connection
F. If you used WPS to automatically set up your wireless
connection, go to the “Completing Wireless Protected Setup”
section on page 21.
Otherwise, if you cannot use WPS or are unsure if you have
WPS, go to the “Manual Wireless Setup” section on page 23
to manually establish your wireless connection.
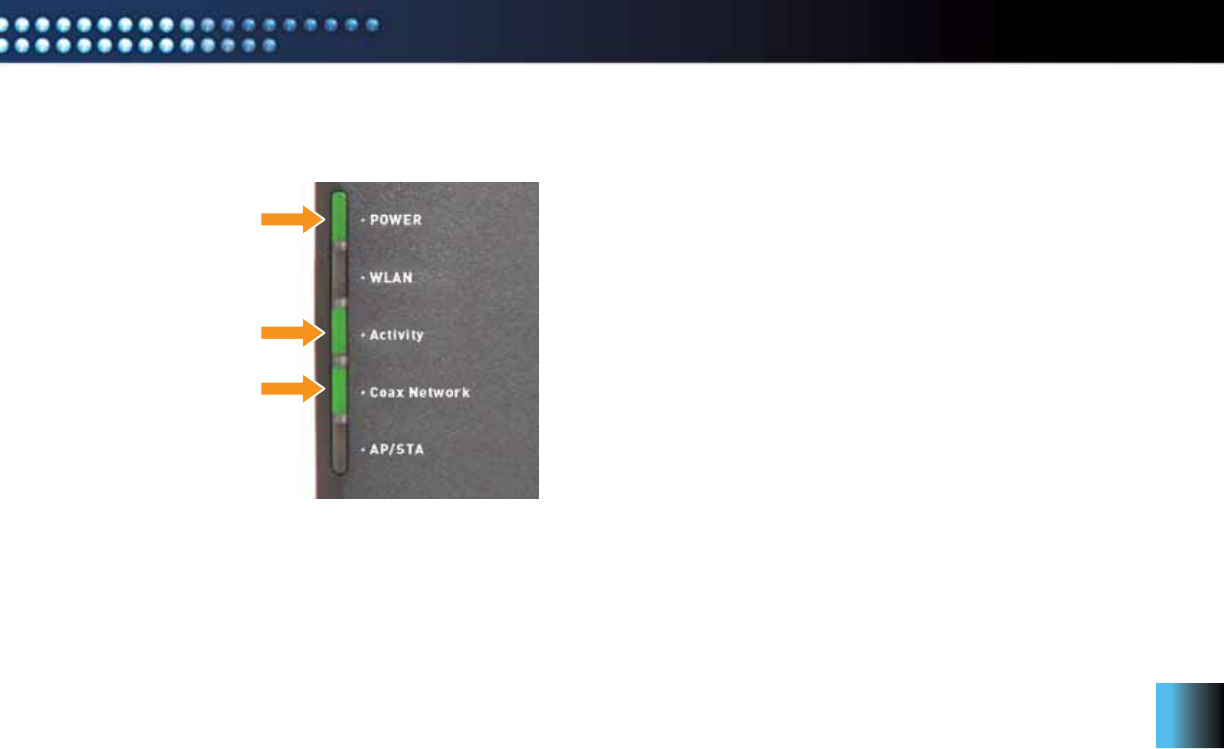
E. The POWER, Activity and Coax Network LEDs on the DCCK device
should light up. Wait for the POWER LED to stop flashing.
POWER, Activity and
Coax Network LEDs
Light Up
18
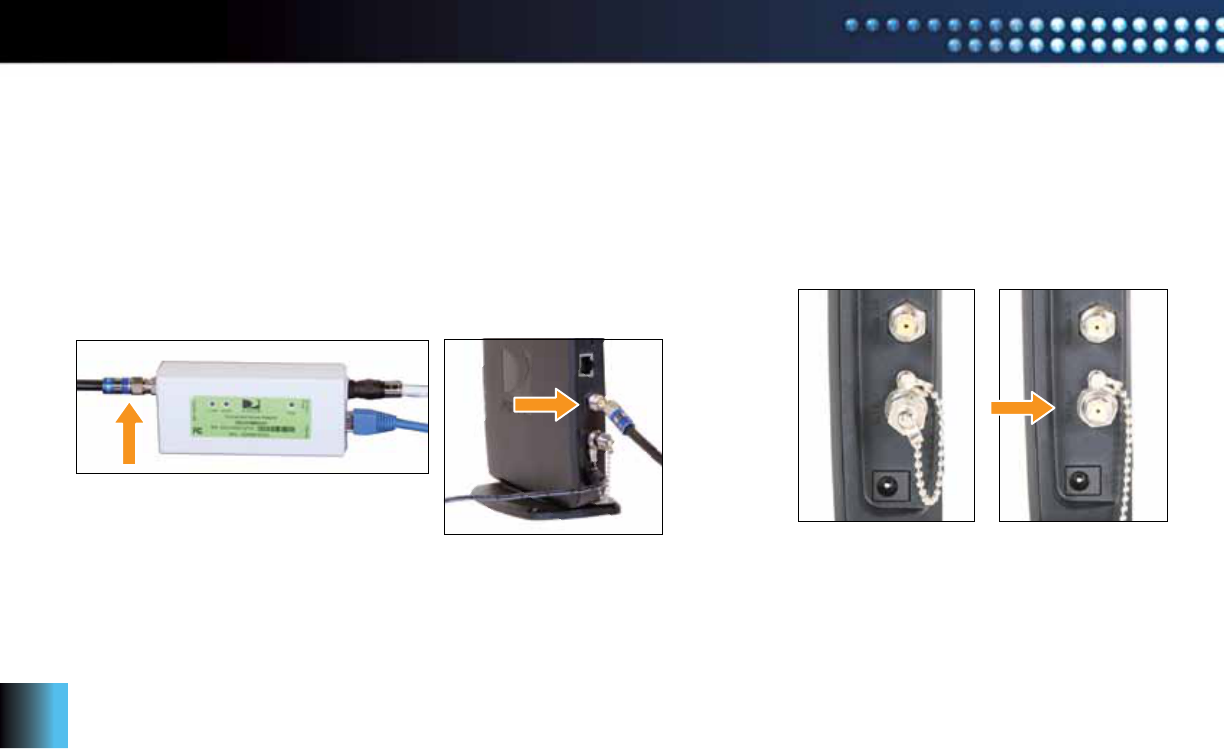
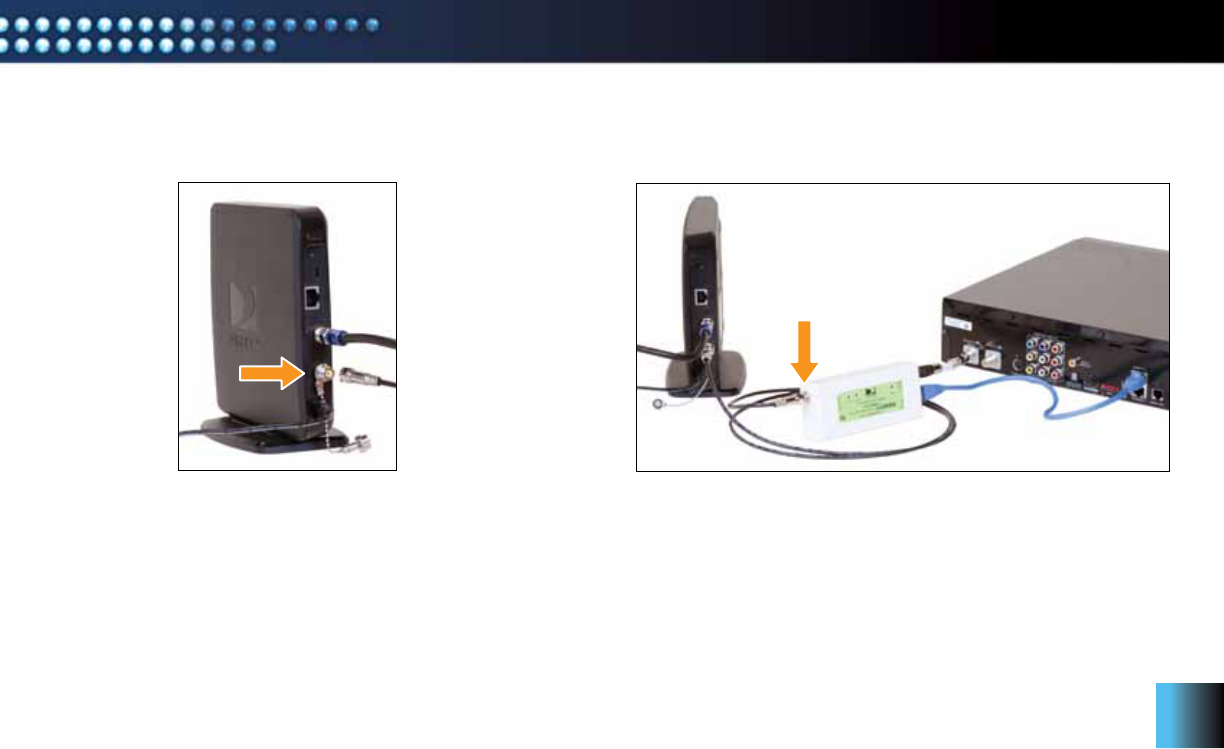
A. Locate the coaxial cable connected on the “Towards LNB” end of the
Connected Home Adapter (see image below). Disconnect the coaxial cable
from the Connected Home Adapter and reconnect it to the coaxial connector
on your DCCK device labeled “Towards LNB”.
This section describes how to connect your DCCK device if your installation uses one or more Connected Home Adapter units.
In this installation, you will use the enclosed coaxial cable. The Ethernet cable included with your DCCK will not be used,
but the existing Ethernet cable between your DIRECTV® Receiver and the Connected Home Adapter must remain connected.
directv® whole-home dvr service
comPatible with connected home adaPter connection
B. Unscrew the cap from the coaxial connector
labeled “SAT Rcvr” on your DCCK.
Remove Cap from “SAT Rcvr” on DCCK Device
Disconnect Coaxial Cable from
Connected Home Adapter
Connect Coaxial to “Towards
LNB” on DCCK Device
19
C. Using the enclosed coaxial cable, connect one end to the
coaxial connector on your DCCK device labeled “SAT Rcvr”.
D. Connect the other end of the coaxial cable to the coaxial connector
on your Connected Home Adapter labeled “Towards LNB”.
Connect Enclosed Coaxial Cable
to “SAT Rcvr” on DCCK Device
Connect Enclosed Coaxial Cable to “Towards LNB”
on the Connected Home Adapter
directv® whole-home dvr service
comPatible with connected home adaPter connection
20
F. If you used WPS to automatically set up your wireless
connection, go to the “Completing Wireless Protected Setup”
section on page 21.
Otherwise, if you cannot use WPS or are unsure if you have
WPS, go to the “Manual Wireless Setup” section on page 23
to manually establish your wireless connection.
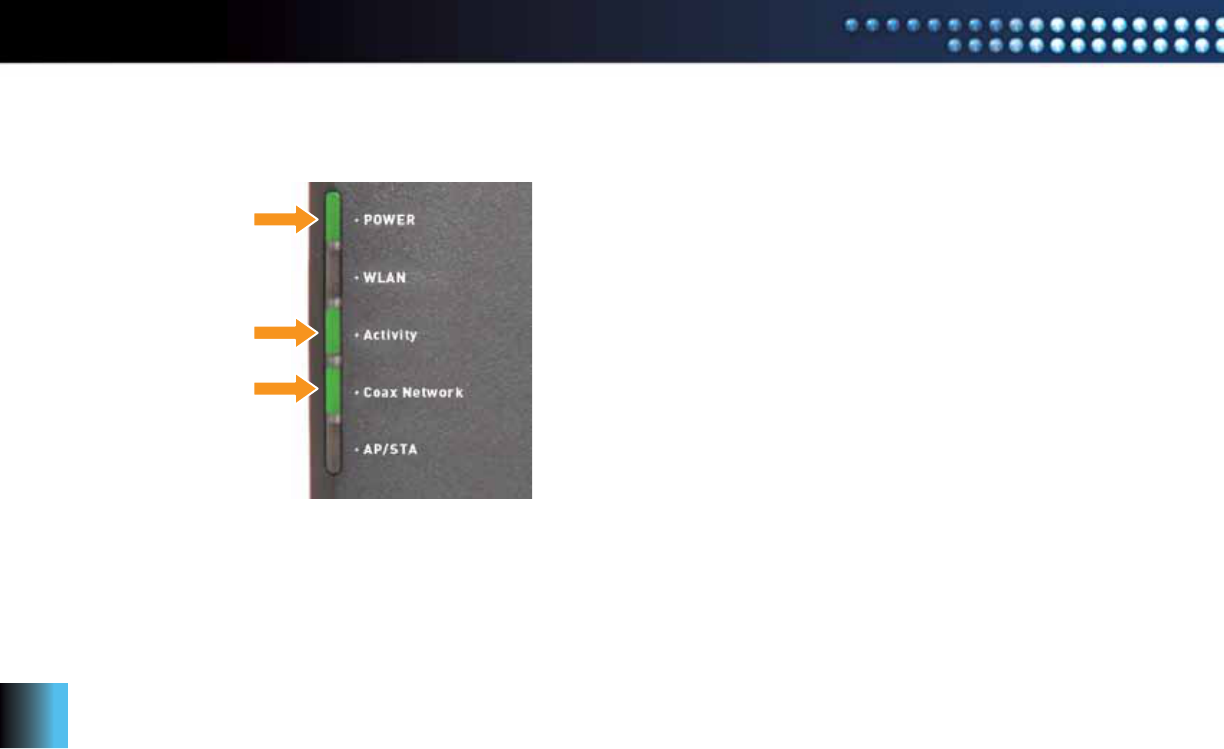
E. The POWER, Activity and Coax Network LEDs on the DCCK device
should light up. Wait for the POWER LED to stop flashing.
POWER, Activity and
Coax Network LEDs
Light Up
directv® whole-home dvr service
comPatible with connected home adaPter connection
21
comPleting wireless Protected setuP
IMPORTANT: If you did not use WPS to configure the DCCK device, proceed to the “Manual Wireless Setup” section
on page 23.
NOTE 4: The DCCK device should be powered on and connected to the DIRECTV® Receiver.
A. Wait 30 seconds to let the DIRECTV® Receiver establish a connection with the DCCK device.
B. To verify connection to the Internet, press the “MENU” button on your DIRECTV® Remote
Control. Select “Parental, Fav’s & Setup”, then “System Setup”, then “Network Setup”.
Then select “Connect Now” or “Repeat Network Setup”.

22
CONGRATULATIONS!
Setup is complete and you now have access to DIRECTV CINEMAplus™ content.
Please allow up to 48 hours for all of the DIRECTV CINEMAplus content to be downloaded onto your DIRECTV Receiver. You now have access
to thousands of additional titles that you can watch on your schedule. To begin your DIRECTV CINEMAplus experience, go to Channel 1000.
D. If you do not see the Internet connected screen, follow the
instructions in the “Manual Wireless Setup” section on page 23.
Otherwise, call DIRECTV at 1-800-531-5000.
C. To proceed, select “Continue”.
When the DIRECTV® Receiver is connected to the Internet,
the Internet connected screen appears.
Select “Continue”
comPleting wireless Protected setuP
23
Troubleshooting Tip: If you still do not see the Wireless Adapter Found screen, then press the “MENU” button on your DIRECTV Remote Control.
Select “Parental, Fav’s & Setup”, then “System Setup”, then “Network Setup”. Then select “Repeat Network Setup”
or “Connect Now”. Follow the on-screen instructions and choose “Wireless” for the method you will use to connect.
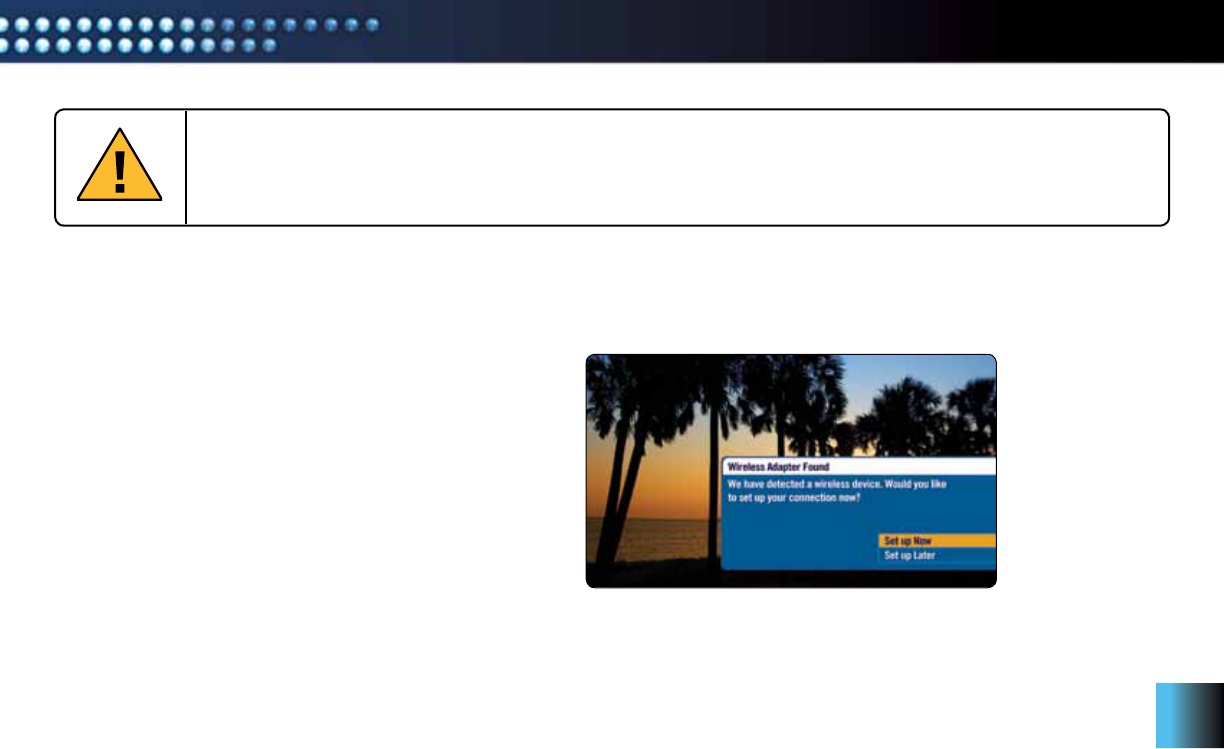
A. Within 60 seconds, the TV should present a screen
that prompts you to configure your wireless device.
Select “Set up Now” to continue.
Select “Set up Now”
manual wireless setuP
IMPORTANT: If you have successfully completed WPS setup in the “Completing Wireless Protected Setup” section above,
then you do not need to follow the instructions in this section. Your setup is complete.
Otherwise, if you did not attempt or could not successfully complete the WPS setup, continue with this section.
After you connect your DCCK device to your DIRECTV® Receiver, instructions will automatically be displayed on your TV screen.
Follow the steps below to complete your wireless setup. Use the “SELECT” button on your DIRECTV® Remote Control to make your choices.

24
B. The TV displays a list of wireless networks. Use the UP and DOWN ARROW keys
on your DIRECTV® Remote Control to highlight your wireless network and press
“SELECT” to display a blue dot next to your network. Then select “Continue”
and proceed with Step C on page 26.
Note: If you have configured your router to hide the network name, it will not
appear in the list. Select “Enter Name” and proceed with the instructions
in “Hidden Wireless Network Name (SSID) Users” on the next page.
Troubleshooting Tip: If your wireless network is not displayed, try placing the DCCK device in an elevated or alternate location and remove
any obstacles that would block the wireless signal. To refresh the Wireless Networks list, press the “MENU” button
on your DIRECTV® Remote Control. Select “Parental, Fav’s & Setup”, then “System Setup”, then “Network Setup”.
Then select “Repeat Network Setup” or “Connect Now”. Follow the on-screen instructions and choose “Wireless”
for the method you will use to connect.
Select Your Wireless Network
manual wireless setuP
25
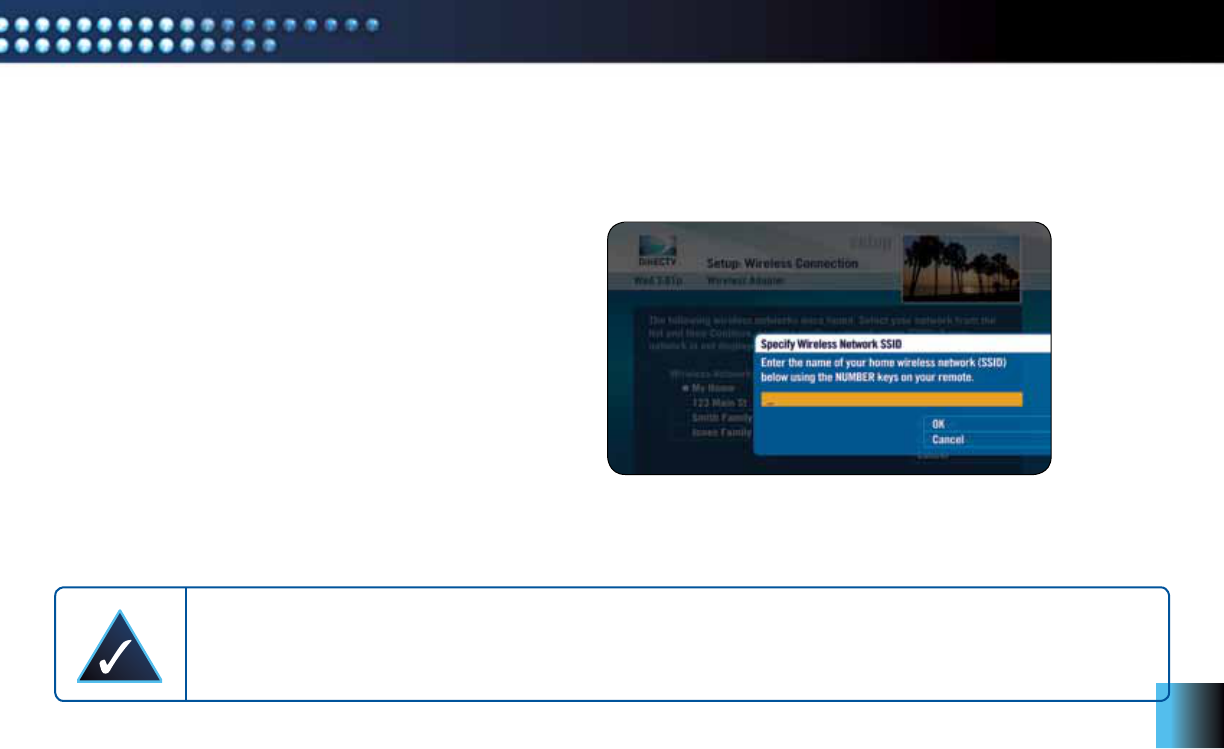
Enter your hidden network name (SSID) and then select “OK”.
Refer to Note 5 for help.
(This security key was created when you set up your wireless router.
Refer to your router’s documentation for more information.)
Hidden Wireless Network Name (SSID) Users:
If you are using a hidden wireless network name (SSID), then select “Enter Name” and use the instructions below.
Otherwise, proceed to Step C on page 26.
Enter Wireless Network Name (SSID)
NOTE 5: Use the number keypad on your DIRECTV® Remote Control to enter your hidden network name (SSID) or
security key. For each character, press the appropriate number button repeatedly until you see the desired
character (press the LEFT ARROW key to delete characters). When you are finished, press the DOWN ARROW
and then select “Continue”. DIRECTV® Receivers limit the security key to 26 characters — maximum.
manual wireless setuP
26
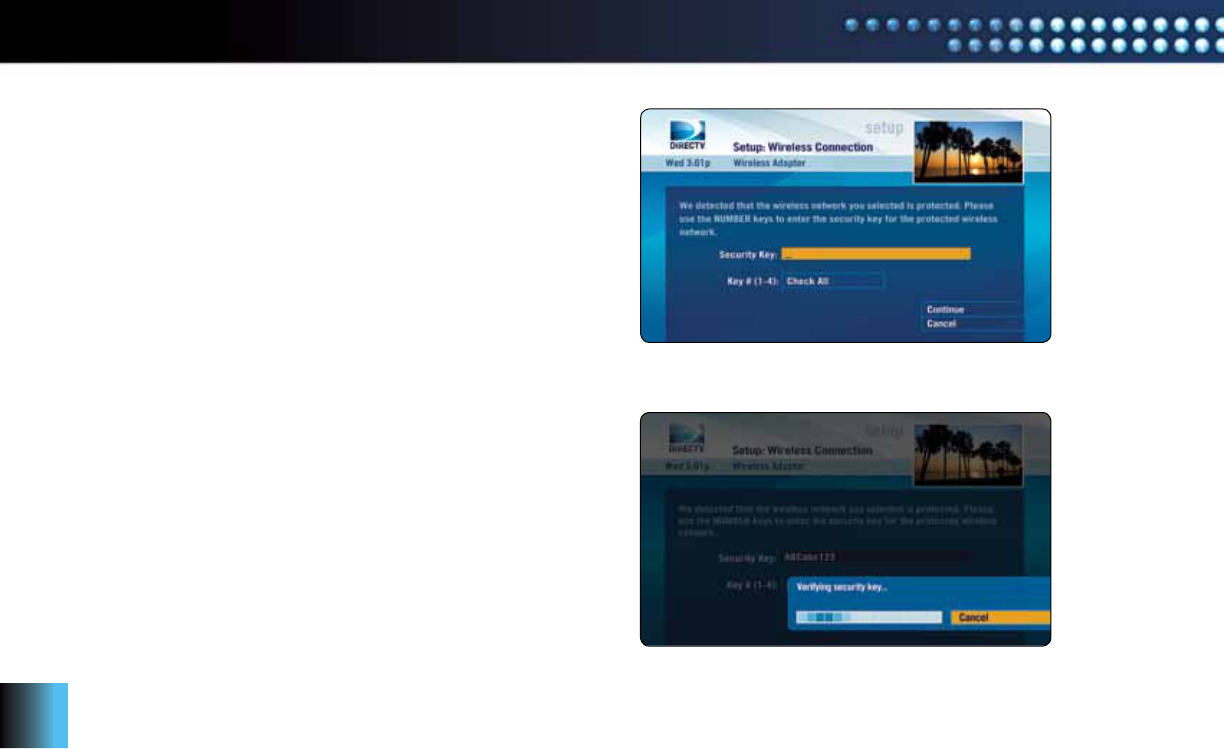
C. If your network does not use wireless security, proceed to Step E.
If your network uses wireless security, use the number keypad
on your DIRECTV® Remote Control to enter the security key. Refer
to Note 5 on the previous page for help. Then select “Continue”.
(The security key was created when you set up your wireless router.
Refer to your router’s documentation for more information.)
D. Wait until the security key is verified.
Enter Security Key
Verifying Security Key
manual wireless setuP
27
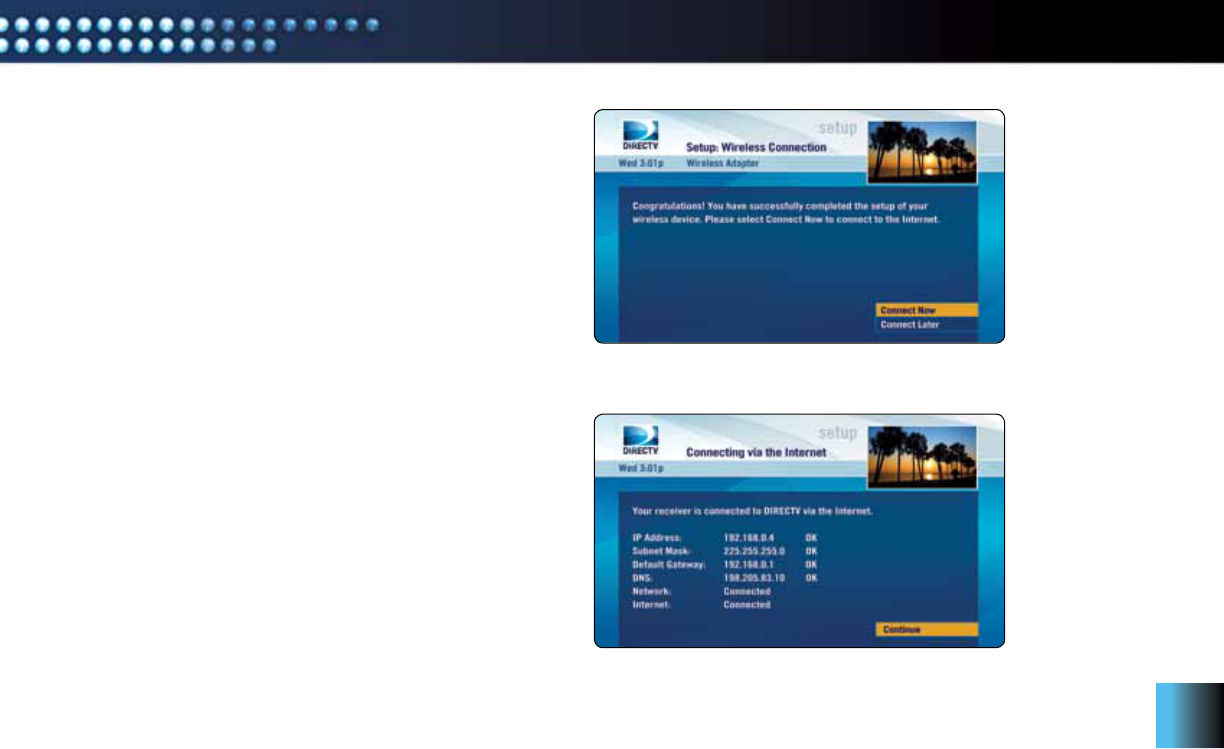
E. To connect the DIRECTV® Receiver to the Internet,
select “Connect Now”.
F. The DIRECTV Receiver is now connected to the Internet.
To proceed, select “Continue”.
If you receive an error on this screen, press the LEFT
ARROW key on the DIRECTV® Remote Control then select
“Connect Now” (as done previously in Step E). If an error
is shown again, wait a few minutes and then press the
LEFT ARROW key again on the DIRECTV Remote Control
and select “Connect Now”. If the error persists, please visit
directv.com/getconnected for troubleshooting support.
Select “Connect Now”
Select “Continue”
manual wireless setuP
28
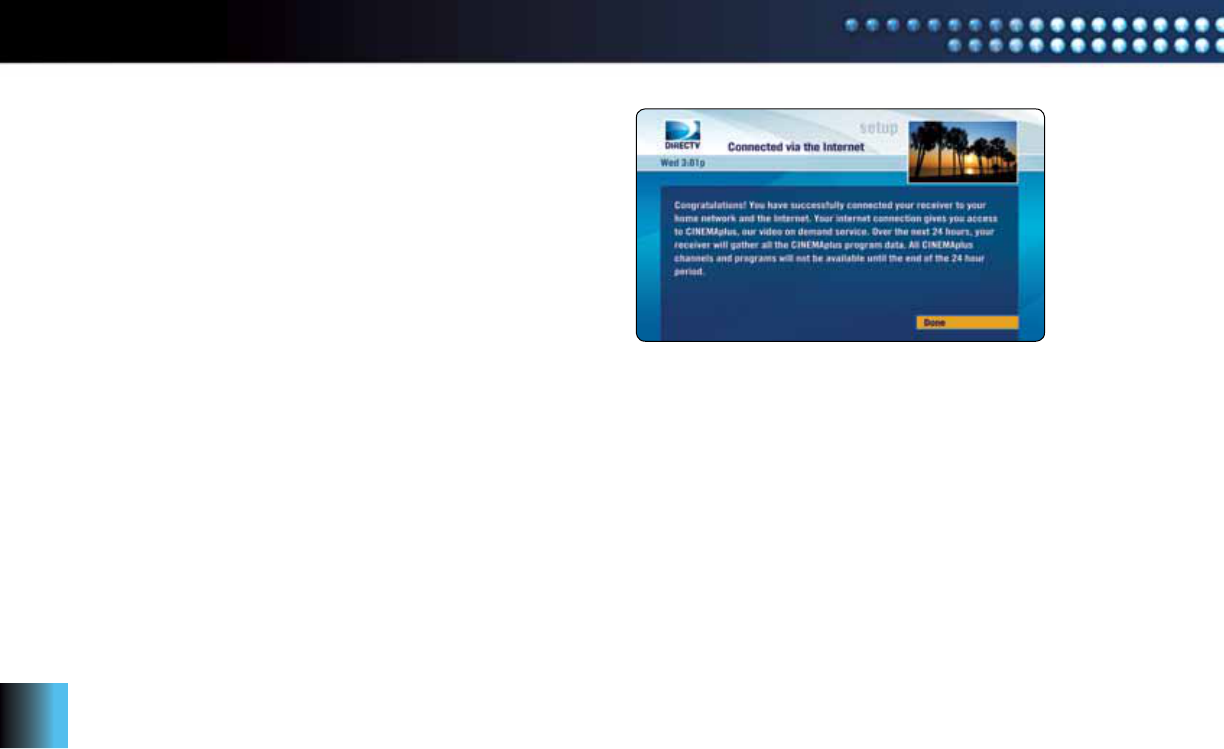
G. Please read the information on this screen. Then select “Done”.
If you do not see the Congratulations screen (see the image
to the right), please visit directv.com/getconnected for
troubleshooting support.
Select “Done”
manual wireless setuP
CONGRATULATIONS!
Setup is complete and you now have access to DIRECTV CINEMAplus™ content.
Please allow up to 48 hours for all of the DIRECTV CINEMAplus content to be downloaded onto your DIRECTV Receiver. You now have access
to thousands of additional titles that you can watch on your schedule. To begin your DIRECTV CINEMAplus experience, go to Channel 1000.
29
troubleshooting
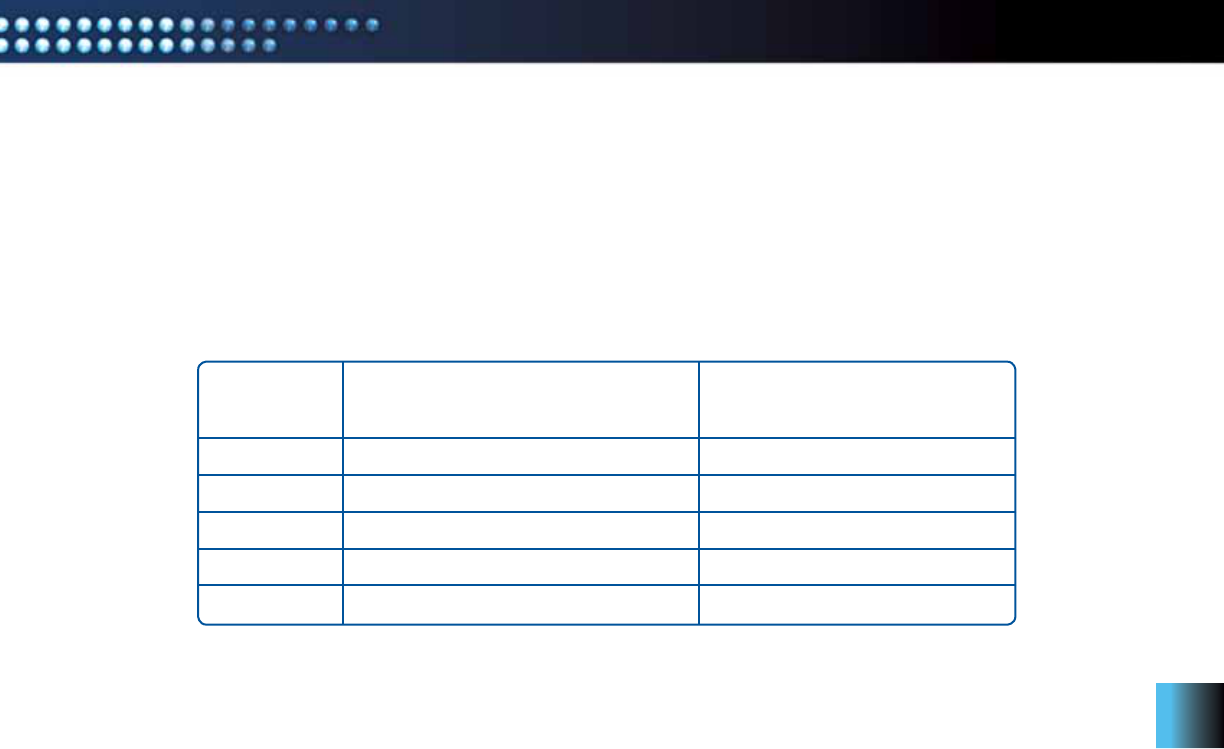
The DIRECTV CINEMA™ Connection Kit status lights can help you identify problems with your device. The information below
provides details regarding the various LED states and describes the meaning of each state.
LEDs for Successful Installation
If you are experiencing technical difficulties with your DIRECTV CINEMA Connection Kit (DCCK) installation, please consult the Expected LED
Configuration table below to verify the expected state for each LED after a successful installation. Identify your connection type (top of the table)
and ensure the status of each LED on your device matches those below the corresponding connection type.
LED LABEL ETHERNET CABLE CONFIGURATION COAXIAL CABLE CONFIGURATION
(as depicted on page 13) (as depicted on page 17 & 20)
POWER
WLAN
Activity
Coax Network
AP/STA
Solid Green
Solid Green
Flashing Green
Off
Off
Solid Green
Solid Green
Flashing Green
Solid Green
Off
Expected LED Configuration
30
troubleshooting
LED Definitions
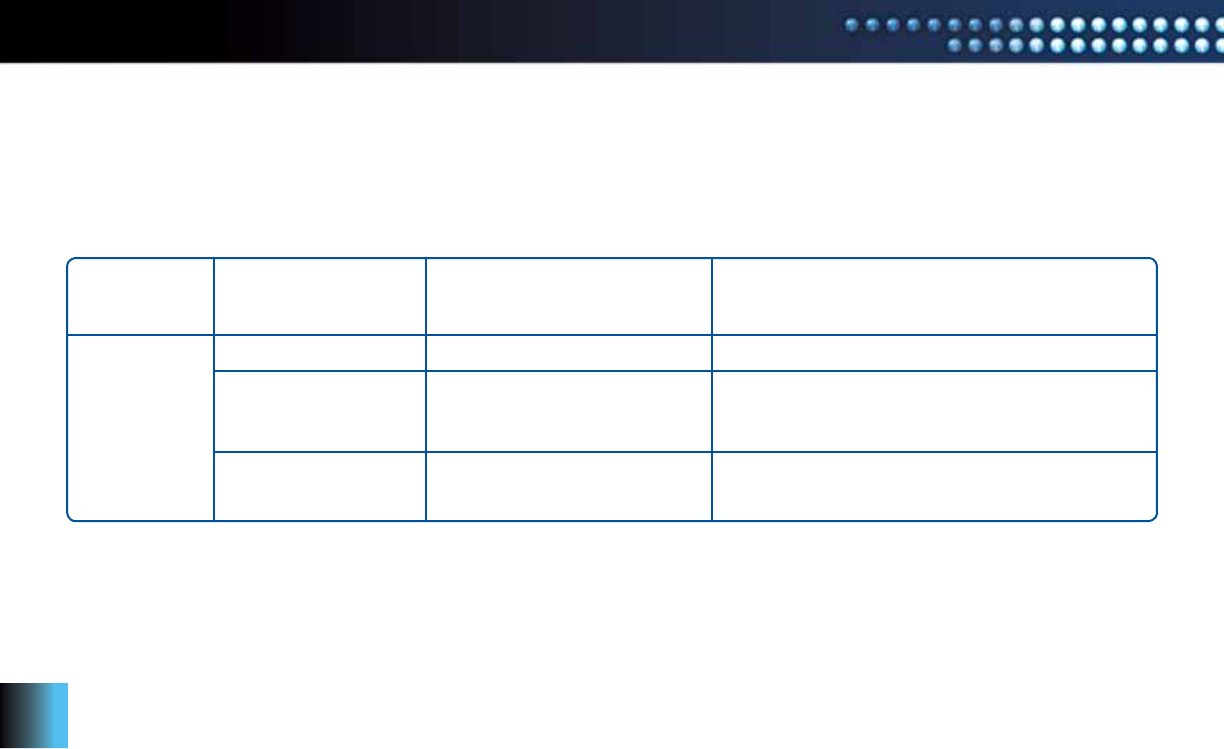
The LED Status Definitions table below provides detailed information about the possible status or meaning of each LED.
LED Status Definitions
LED LABEL POSSIBLE STATUS DEFINITION TROUBLESHOOTING HINTS
POWER Solid Green
Flashing Green
Off
Power is on, device is booted
Device is booting up
Device is not powered
Solid green is normal.
Wait for 30 seconds. If LED is not solid, unplug
the power from the DCCK device, wait 10 seconds,
then plug in the power to the DCCK device.
Check to ensure the power adapter is plugged into
the DCCK device and into an electrical outlet.

31
troubleshooting
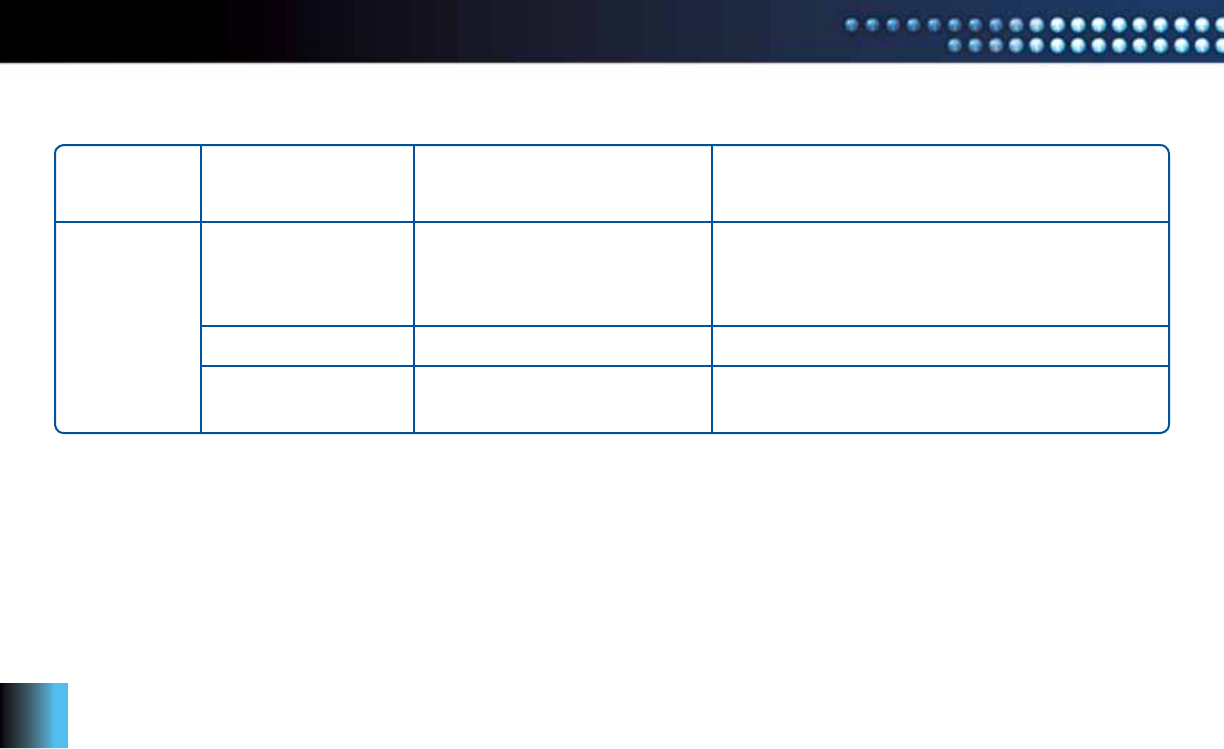
LED Status Definitions (Continued)
LED LABEL POSSIBLE STATUS DEFINITION TROUBLESHOOTING HINTS
WLAN Solid Green
Flashing Yellow
Flashing Green
Off
Wireless link is good
Wireless link is poor
WPS is connecting to your router
No wireless link
Solid green is normal.
Move the DCCK device closer to your router and/or
remove obstructions.
Wait for two minutes. If the LED is not solid green,
repeat the installation procedure beginning with
the “Connection” section on page 7.
Repeat the installation procedure beginning
with the “Connection” section on page 7.
32
troubleshooting
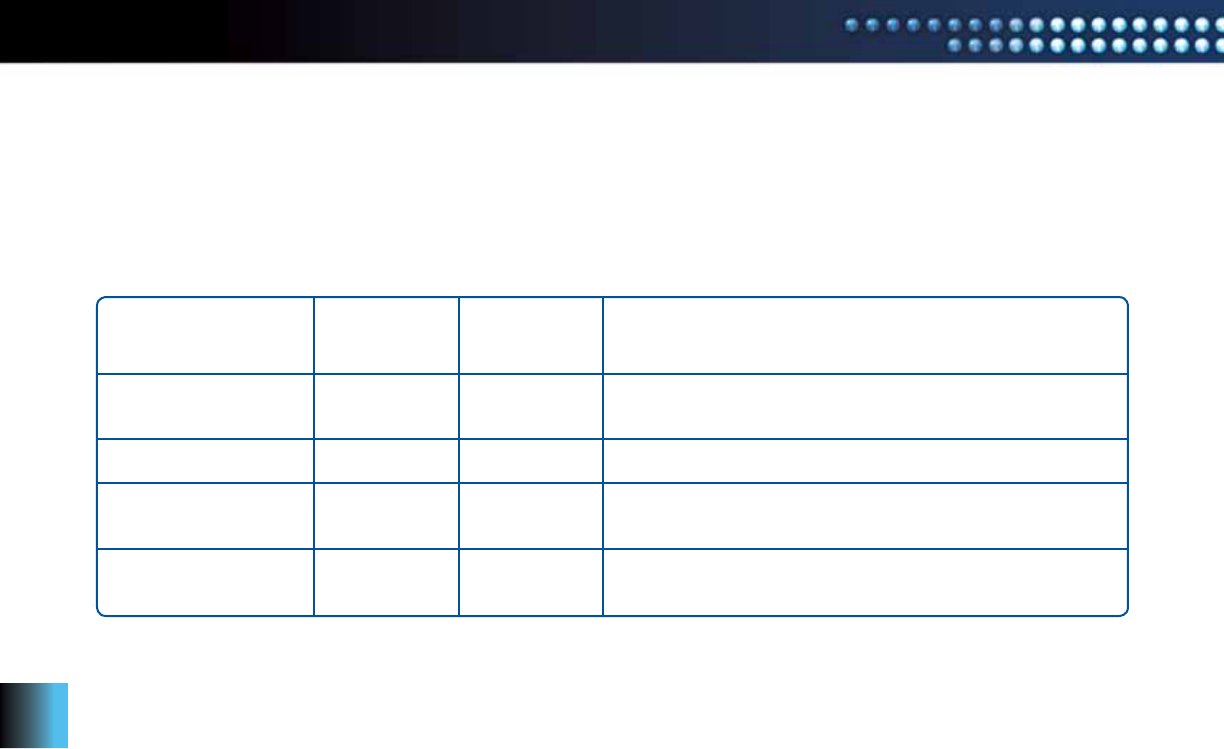
LED Status Definitions (Continued)
LED LABEL POSSIBLE STATUS DEFINITION TROUBLESHOOTING HINTS
Activity Solid Green
Flashing Green
Off
Network is established
Indicates active network traffic
No network established
Solid green is normal.
Note: If network traffic is expected, e.g. you have a
DIRECTV CINEMAplus™ download in progress, ensure
your home network is connected to the Internet.
Flashing green is normal.
Repeat the installation procedure beginning
with the “Connection” section on page 7.

33
troubleshooting
LED Status Definitions (Continued)
LED LABEL POSSIBLE STATUS DEFINITION TROUBLESHOOTING HINTS
Coax Network
AP/STA
Coaxial networking is good
Coaxial networking is marginal
No coaxial network
In station mode (this is
the default preferred mode)
Solid green is normal.
Check the coaxial cable connections at the DCCK
and Receiver and tighten cables if necessary.
Off is normal if you set up your DCCK device using
the Direct Ethernet Connection method. Otherwise,
check the coaxial cable connections at the DCCK
and Receiver and tighten cables if necessary.
LED is always Off (reserved for future functionality).
The Common Configuration Issues table on the next page provides common symptoms for installations that are not set up properly. If you
have chosen your connection type (Ethernet or coaxial cable) improperly and experience the issues in the “Symptom” column, repeat your
installation using a different connection type. Return to the “Determine Your Connection Type” section on page 10 and ensure you follow
the proper installation procedures. Note: This section also contains instructions for identifying your Receiver model number.
Solid Green
Solid Yellow
Off
Off
34
troubleshooting
The Receiver Model in the Common Configuration Issues table below refers to the receiver to which the DCCK device is connected.
To determine your receiver model number (e.g. HR21-100), look behind the door on the right-hand side of the front panel on the receiver
where the access card is located. Another way to determine your receiver model is to use the DIRECTV® Remote Control to display
the model information. To do this, press the “MENU” button on your DIRECTV Remote Control and select “Parental, Fav’s & Setup”,
then “System Setup” and refer to the “Receiver:” section on the right side of the screen.
If you are having difficulty connecting to the Internet or need more information, visit directv.com/getconnected or call 1-800-531-5000.
Common Configuration Issues
RECEIVER MODEL ETHERNET COAXIAL SYMPTOM
CONNECTED CONNECTED
H24 or HR24
H24 or HR24
H21, H23, HR21, 22,
23, or R22
H21, H23, HR21, 22,
23, or R22
√
√
√
√
DIRECTV® Whole-Home DVR service is lost.
You can no longer see the Playlist.
Pixelation or poor video quality at other receivers in the home.
DIRECTV Whole-Home DVR service is lost.
You can no longer see the Playlist.
Pixelation or poor video quality at other receivers in the home.

35
DIRECTV warrants your DIRECTV CINEMA™ Connection Kit (Model Number: DECAW1MR0-01) and any included accessories against
defects in material or workmanship for a period of twelve (12) months after the date of acquisition.
Who is Covered?
You must have proof of acquisition to receive warranty service. A receipt or other document showing that you acquired the product is considered
proof of acquisition. THIS LIMITED WARRANTY EXTENDS ONLY TO THE ORIGINAL CONSUMER ACQUIRER OR ANY PERSON RECEIVING
THE DIRECTV CINEMA CONNECTION KIT AS A GIFT FROM THE ORIGINAL CONSUMER ACQUIRER AND TO NO OTHER ACQUIRER OR
TRANSFEREE. THIS WARRANTY DOES NOT EXTEND TO COMMERCIAL USERS. THIS PRODUCT IS NOT AUTHORIZED FOR USE OUTSIDE
THE UNITED STATES AND ANY SUCH USE VOIDS THIS WARRANTY.
What is Covered?
Warranty coverage begins the day you acquire the product. For twelve (12) months from the acquisition date, at the option of DIRECTV,
the DIRECTV CINEMA Connection Kit will be repaired or replaced with a new, repaired, refurbished or comparable product (whichever
is deemed necessary) if it becomes defective or inoperative. This exchange is done without charge to you for parts and labor. You will be
responsible for the cost of shipping to and from the repair location designated by DIRECTV. If DIRECTV cannot reasonably repair or replace
the DIRECTV CINEMA Connection Kit then DIRECTV may, at its sole discretion, refund the price you paid for the product or the current
retail price of the product.
All products, including replacement products, are covered only for the original warranty period. When the warranty on the original product
expires, the warranty on the replacement product also expires. After twelve (12) months from the date of acquisition, you pay for the replacement
of all parts, and for all labor charges.
SOME STATES DO NOT ALLOW LIMITATIONS ON HOW LONG AN IMPLIED WARRANTY LASTS, SO THE ABOVE LIMITATION MAY NOT APPLY TO YOU.
warranty

36
What is Excluded?
Your warranty does NOT cover:
• Labor charges for installation or setup of the product.
• Installation, performance of, or repair of: audio/video cabling, telephone line, Internet connections, routers, or accessory attachments
used with the product.
• Product replacement because of misuse, accident, lightning damage, unauthorized repair, or other cause not within the control
of DIRECTV.
• Incidental or consequential damages resulting from the product. SOME STATES DO NOT ALLOW THE EXCLUSION OF INCIDENTAL
OR CONSEQUENTIAL DAMAGES, SO THE ABOVE EXCLUSION MAY NOT APPLY TO YOU.
• Any modifications or other changes to the product, including but not limited to software or hardware modification in any way other than
as expressly authorized by DIRECTV will void this limited warranty. Except in the case of hardware or software provided by DIRECTV,
installing software modifications, “hacks” or utilizing service access or “back doors” will void this limited warranty.
• Reception transmission problems caused by signal conditions, telephone line, Internet connections, or cable or antenna systems
outside the unit.
• A product that has been modified or adapted to enable it to operate in any country other than the country for which it was designed,
manufactured, approved and/or authorized, or repair of products damaged by these modifications.
• A product used for commercial or institutional purposes.
• The continued provisioning or availability of any of the programming, recorded content, and other services delivered through
the DIRECTV™ CINEMA Connection Kit including but not limited to television programming, show information, program guide data,
and scheduling information.
warranty

37
Make Sure You Keep...
Please keep your receipt or other document showing proof of acquisition. Attach it to this User’s Manual and keep both nearby. Also keep
the original box and packing material in case you need to return your product.
Before Requesting Repair Service...
Please check the troubleshooting section of this guide. This may save you a call to DIRECTV Customer Service.
To Get Warranty Service...
Warranty service will be provided by DIRECTV. If you believe you need service for your DIRECTV™ CINEMA Connection Kit, contact DIRECTV
at 1-800-531-5000. A representative will go through a diagnostic checklist with you. If it is determined that the product needs to be returned
for service or exchanged, you will receive a return authorization number. The representative will give you complete shipping details.
To Get Out-of-Warranty Service...
To obtain out-of-warranty service, contact DIRECTV at 1-800-531-5000 for information on the possibility of and any costs for repair
or replacement of out-of-warranty products.
ALL WARRANTIES IMPLIED BY LAW, INCLUDING ANY IMPLIED WARRANTIES OF MERCHANTABILITY AND FITNESS FOR A PARTICULAR
PURPOSE ARE EXPRESSLY LIMITED TO THE DURATION OF THIS EXPRESS LIMITED WARRANTY.
WITH THE EXCEPTION OF ANY WARRANTIES IMPLIED BY THE LAW OF ANY STATE OF THE U.S.A., THIS EXPRESS LIMITED WARRANTY
IS EXCLUSIVE AND IN LIEU OF ALL OTHER WARRANTIES, GUARANTEES, AGREEMENTS AND SIMILAR OBLIGATIONS OF DIRECTV.
REPAIR OR REPLACEMENT AS PROVIDED IN THIS LIMITED WARRANTY IS THE EXCLUSIVE REMEDY UNDER THIS LIMITED WARRANTY.
IN NO EVENT WILL DIRECTV BE LIABLE FOR ANY AMOUNT GREATER THAN THE RETAIL PRICE OF THE DIRECTV CINEMA CONNECTION
KIT. DIRECTV SHALL NOT BE LIABLE FOR ANY INCIDENTAL OR CONSEQUENTIAL DAMAGES FOR BREACH OF ANY EXPRESS OR IMPLIED
WARRANTY ON THE DIRECTV CINEMA CONNECTION KIT.
warranty

38
SOME STATES DO NOT ALLOW LIMITATIONS ON WARRANTIES, SO THE ABOVE LIMITATIONS MAY NOT APPLY TO YOU. THIS WARRANTY
GIVES YOU SPECIFIC LEGAL RIGHTS. YOU MAY HAVE OTHER RIGHTS WHICH VARY FROM STATE TO STATE.
DIRECTV, Inc.
2230 E. Imperial Hwy
El Segundo, CA 90245
1-800-DIRECTV
warranty

38 39
SOME STATES DO NOT ALLOW LIMITATIONS ON WARRANTIES, SO THE ABOVE LIMITATIONS MAY NOT APPLY TO YOU. THIS WARRANTY
GIVES YOU SPECIFIC LEGAL RIGHTS. YOU MAY HAVE OTHER RIGHTS WHICH VARY FROM STATE TO STATE.
DIRECTV, Inc.
2230 E. Imperial Hwy
El Segundo, CA 90245
1-800-DIRECTV
warranty
This equipment has been tested and found to comply with the limits for a Class B digital device, pursuant to Part 15 of the FCC Rules.
These limits are designed to provide reasonable protection against harmful interference in a residential installation. This equipment generates,
uses and can radiate radio frequency energy and, if not installed and used in accordance with the instructions, may cause harmful interference
to radio communications. However, there is no guarantee that interference will not occur in a particular installation. If this equipment does
cause harmful interference to radio or television reception, which can be determined by turning the equipment off and on, the user
is encouraged to try to correct the interference by one of the following measures:
• Reorient or relocate the receiving antenna.
• Increase the separation between the equipment and receiver.
• Connect the equipment into an outlet on a circuit different from that to which the receiver is connected.
• Consult the dealer or an experienced radio/TV technician for help.
FCC Caution: Any changes or modifications not expressly approved by the party responsible for compliance could void the user’s authority
to operate this equipment.
This device complies with Part 15 of the FCC Rules. Operation is subject to the following two conditions: (1) This device may not cause harmful
interference, and (2) this device must accept any interference received, including interference that may cause undesired operation.
For operation within 5.15~5.25GHz frequency range, it is restricted to indoor environment.
This product is firmware-limited to operate in channels 1 through 11, and 5.15 through 5.25 GHz, and 5.725 through 5.85 GHz for the US market.
Selection of other channels is not possible.
IMPORTANT NOTE:
FCC Radiation Exposure Statement:
This equipment complies with FCC radiation exposure limits set forth for an uncontrolled environment.
This equipment should be installed and operated with a minimum distance of 20cm between the radiator & your body.
This transmitter must not be co-located or operating in conjunction with any other antenna or transmitter.
The availability of some specific channels and/or operational frequency bands are country dependent and are firmware programmed
at the factory to match the intended destination. The firmware setting is not accessible by the end-user.
federal communication commission interference statement

40
1 This product will be used for indoor operations.
2 The band from 5600-5650MHz will be disabled by the software during the manufacturing and which cannot be changed by the end-user.
3 This device meets all the other requirements specified in Part 15E Section 15.407.
federal communication commission interference statement

41
Disclaimer:
THE DIRECTV CINEMA™ CONNECTION KIT INCORPORATES SOFTWARE WHICH IS OWNED BY DIRECTV, INC. (“DIRECTV”) OR ITS THIRD PARTY
LICENSORS (the “Software”). BEFORE USING THE DIRECTV CINEMA CONNECTION KIT PLEASE READ THESE TERMS. IF YOU DO NOT AGREE
TO THESE TERMS YOU MAY NOT USE THE DIRECTV CINEMA CONNECTION KIT AND SHOULD IMMEDIATELY RETURN THE DIRECTV CINEMA
CONNECTION KIT TO DIRECTV OR YOUR SUPPLIER. THESE TERMS ALSO APPLY TO ANY MODIFICATIONS, UPDATES OR SUPPLEMENTS
TO THE SOFTWARE PROVIDED TO YOU.
Software license terms and conditions and GNU GPL
A. License Grant and Conditions
DIRECTV grants you a non-exclusive, non-transferable, limited license to use the Software solely in executable code form and solely
as integrated with, incorporated into, and in conjunction with the DIRECTV CINEMA Connection Kit. You must ensure that the copyright,
trademark and other protective notices contained in the Software are maintained and not altered or removed. The Software is protected
by copyright and other laws and international copyright and other treaties. All title and intellectual property rights in and to the Software
and all modifications, updates, enhancements and derivative works of the Software are owned exclusively by DIRECTV or its licensors and
you agree to execute any document reasonably requested by DIRECTV to evidence such ownership rights. Certain third party software used
in connection with the DIRECTV CINEMA Connection Kit may be made directly available to you by the providers thereof. The source code
to certain software subject to the GNU GPL and other open source licenses that is used in connection with the DIRECTV CINEMA Connection Kit
is made available to you by DIRECTV following the written request to DIRECTV. Use of such Software is also subject to the terms of any
applicable agreement between you and each such provider. DIRECTV reserves the right to modify, supplement, update and otherwise alter
the Software via software download or other modification procedures, and these terms will apply to such Software as modified, supplemented,
updated, and otherwise altered.
B. License Restrictions
You may not copy, modify or transfer the Software, or any copy thereof, in whole or in part. You may not reverse engineer, disassemble,
decompile or translate the Software, or otherwise attempt to derive the source code of the Software, except to the extent allowed under
any applicable law. Any attempt to transfer any of the rights, duties or obligations of this license agreement is void. You may not rent, lease,
terms and conditions

42
load, resell for profit or distribute the Software, or any part thereof. You may not export, transfer or re-export the Software in violation of any
applicable law. The Software may include some components that are covered by “free software” licenses, open source licenses and other
similar license use rights, which require such components to be used, modified and/or distributed only under the terms of such licenses.
Any such components are subject only to the terms of such licenses, and not these Terms.
C. Ownership of Software and Reservation of Rights
The Software is licensed, not sold, to you for use only under the terms of this license agreement, DIRECTV is NOT transferring title or any
ownership rights in the Software to you and DIRECTV and its suppliers reserve all rights not expressly granted to you. Except as stated
above, this license agreement does not grant to you any intellectual property rights in the Software.
D. Termination
These Terms are effective until terminated. You may terminate these Terms by returning the DIRECTV CINEMA™ Connection Kit to DIRECTV
or your supplier. These Terms will terminate automatically without notice if you fail to comply with these Terms or any other agreement
between you and DIRECTV. Upon termination you must return the DIRECTV CINEMA Connection Kit to DIRECTV or your supplier.
E. Disclaimer
THE SOFTWARE IS (TO THE EXTENT PERMITTED BY LAW) SUPPLIED “AS IS.” NEITHER DIRECTV NOR ANY OF ITS LICENSORS EXPRESSLY
MAKES OR PASSES ON TO YOU ANY WARRANTY OR REPRESENTATION ON BEHALF OF DIRECTV OR ITS LICENSORS WITH RESPECT TO THE
SOFTWARE, INCLUDING BUT NOT LIMITED TO ANY WARRANTIES, EXPRESS OR IMPLIED, INCLUDING (BUT NOT LIMITED TO ANY IMPLIED
WARRANTIES OF MERCHANTABILITY, SATISFACTORY QUALITY, FITNESS FOR A PARTICULAR PURPOSE, TITLE OR NON-INFRINGEMENT
OF THIRD PARTY RIGHTS. IN NO EVENT WILL DIRECTV OR ITS LICENSORS BE LIABLE TO YOU WITH RESPECT TO THE SOFTWARE FOR
ANY DIRECT, INDIRECT, CONSEQUENTIAL, SPECIAL, PUNITIVE OR INCIDENTAL DAMAGE (INCLUDING LOSS OF PROFITS, LOST SAVINGS,
LOSS OF DATA OR THE COST OF PROCUREMENT OF SUBSTITUTE GOODS, TECHNOLOGY OR SERVICES) ARISING OUT OF THE USE OR THE
INABILITY TO USE THE SOFTWARE, EVEN IF DIRECTV OR ITS LICENSORS HAVE BEEN ADVISED OF THE POSSIBILITY OF SUCH DAMAGES,
OR FOR ANY CLAIM BY A THIRD PARTY. Some states or jurisdictions do not allow the exclusion or limitation of incidental, consequential
or special damages, so the above limitations may not apply to you.
terms and conditions

43
terms and conditions
F. Third Party Beneficiaries
DIRECTV’S LICENSORS AND SUPPLIERS SHALL BE THIRD PARTY BENEFICIARIES OF THESE LICENSE TERMS, AS APPLICABLE. YOUR USE
OF THE DIRECTV CINEMA CONNECTION KIT CONSTITUTES YOUR ACKNOWLEDGEMENT THAT YOU HAVE READ THESE TERMS AND AGREE
TO BE BOUND HEREBY.
G. Additional Information
Certain additional terms and information for the Software and certain third party software (including the text of licenses applicable
to any free, open source and other similar software that may be included in the Software) may be found in the DIRECTV website located
at directv.com, and the GNU website located at www.gnu.org.
H. GNU GPL and Open Source Software
Certain components of the Software may be subject to the GNU General Public License, Version 2, June 1991 (“GPL”), “free software”
licenses and other open source software licenses. The foregoing components of the Software are not and may not be subject to the
License Restrictions in Section B above. In compliance with the GPL, DIRECTV, its suppliers, or its third party licensors, upon written
request, will make the source code of the software, libraries and associated utilities it uses, together with its modifications (if any),
available to the public in source code form. You are free to use, modify and distribute the software and any modifications as long as
you comply with the terms of the GPL referred to above and other open source software licenses. The license terms applicable to the
GPL may be found in the DIRECTV website located at www.directv.com, and the GNU website located at www.gnu.org, specifically at
http://www.gnu.org/licenses/old-licenses/gpl-2.0.html. To request a copy of the applicable source code please write to DIRECTV at:
Attention: Vice President, STB Engineering
DIRECTV, Inc.
2230 E. Imperial Highway
El Segundo, CA 90245
Requirement from IP owner/The OpenSSL Project
Redistributions of any form whatsoever must retain the following acknowledgment:
“This product includes software developed by the OpenSSL Project for use in the OpenSSL Toolkit. (http://www.openssl.org)”
Copyright ©1998-2008 The OpenSSL Project. All rights reserved.

DIRECTV services not available outside the U.S. DIRECTV programming is available separately and independently of DIRECTV equipment. A valid programming subscription is required to operate DIRECTV equipment.
Activate your DIRECTV programming today at 1-800-DIRECTV (1-800-347-3288). ©2010 DIRECTV, Inc. DIRECTV, DIRECTV Plus, DIRECTV CINEMA and the Cyclone Design logo are trademarks of DIRECTV, Inc. 31513-1