Wistron NeWeb JAW301 WiFi PSE adaptor User Manual Technical
Wistron NeWeb Corporation WiFi PSE adaptor Technical
Technical - User manual
FHD251E IP Camera
User Manual

Table of Contents
FCC STATEMENT ............................................................................... 1
SAFETY PRECAUTIONS ..................................................................... 3
1 INTRODUCTION ...................................................................... 5
1.1 PACKAGE CONTENTS ............................................................... 5
1.2 KEY FEATURES ....................................................................... 6
1.3 HARDWARE OVERVIEW ........................................................... 7
2 START USING THE CAMERA .................................................. 11
2.1 ASSEMBLING THE CAMERA & THE WIRELESS ADAPTER ................ 11
2.2 CONNECTING THE CAMERA TO A NETWORK............................... 14
2.3 REBOOTING AND RESETTING THE CAMERA ................................ 15
3 APPENDIX ............................................................................. 16
3.1 SPECIFICATIONS AND COMPLIANCE .......................................... 16
3.2 TROUBLESHOOTING .............................................................. 18
3.3 OBTAINING TECHNICAL SUPPORT ............................................ 19
3.4 DISPOSAL INSTRUCTIONS ....................................................... 19

1
FCC Statement
This equipment has been tested and found to comply with the limits
for a Class B digital device, pursuant to Part 15 of the FCC Rules.
These limits are designed to provide reasonable protection against
harmful interference in a residential installation. This equipment
generates, uses, and can radiate radio frequency energy and, if not
installed and used in accordance with the instructions, may cause
harmful interference to radio communications. However, there is no
guarantee that interference will not occur in a particular installation.
If this equipment does cause harmful interference to radio or
television reception, which can be determined by turning the
equipment off and on, the user is encouraged to try to correct the
interference by one of the following measures:
•
Reorient or relocate the receiving antenna.
•
Increase the separation between the equipment and receiver.
•
Connect the equipment into an outlet on a circuit different
from that to which the receiver is connected.
•
Consult the dealer or an experienced radio/TV technician for
help.
2
FCC Radiation Statement
This equipment complies with FCC radiation exposure limits set forth
for an uncontrolled environment. This equipment should be installed
and operated with minimum distance of 20 cm between the
radiator & your body.
This device complies with Part 15 of the FCC Rules. Operation is
subject to the following two conditions: (1) This device may not cause
harmful interference, and (2) this device must accept any interference
received, including interference that may cause undesired operation.
FCC Caution: Any changes or modifications not expressly approved
by the party responsible for compliance could void the user's authority
to operate this equipment.
This transmitter must not be co-located or operating in conjunction
with any other antenna or transmitter.

3
Safety Precautions
Please read this user manual before operating this product. The
information contained in this document is subject to change without
notice. Features or specifications may be different depending on the
type of product model purchased.
Safe Use of This Product
Carefully follow the warnings and safety notices presented within this
manual. Please pay special attention to the following indications of
potentially hazardous situations:
Warning: Indicates a hazardous situation, which, if not avoided, could
result in serious injury.
Caution: Indicates a situation, which, if not avoided, could damage
this product or other devices.
Note: Indicates additional user information to make the user aware
of possible problems and to help the user understand, use, and
maintain the product.

4
•
This product needs only an occasional wipe with a dry cloth.
•
Avoid high-moisture conditions and keep away from liquids and
humidity.
•
Do not install or use the product where it is exposed to direct
sunlight or heat.
•
Care must be taken when using the device in close proximity to
personal medical devices, such as pacemakers and hearing aids.
•
Do not use this product in environments where there are
potential explosion hazards.
•
The product must be placed horizontally on a hard, flat surface
or installed firmly with wall-mount kits. Do not place the
product where it may be subject to physical shock or vibration
or where the product may drop, topple, slide, or shake; this
may cause personal injury or damage to the product.
•
If lightning is expected, or the product is not going to be used
for a long period of time, unplug the power cord from the unit.
•
The use of electronic transmitting devices in aircraft, hospitals,
and petrol stations is forbidden. Please follow the rules and
warnings in these conditions.
•
The product must ONLY be used with the power supply cord
and power adapter supplied by the manufacturer.
•
Openings on the housing of the product are required for
ventilation. Do not block or obstruct the air flow through these
openings.
•
Do not operate the product on a soft surface such as carpet,
rug, bed, etc.

5
1 Introduction
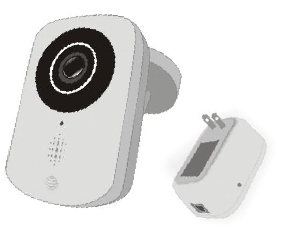
1.1 Package Contents
Thank you for purchasing this product. Before using the FHD251E
IP Camera (referred to in this manual as “the camera”), please
confirm that the packaging includes the following items and
accessories:
FHD251E IP Camera
WFB100S Wireless Power over Ethernet (PoE) Adapter (referred
to in this manual as “the wireless adapter”)
Camera bracket & screws
User manual

6
1.2 Key Features
FHD251E
• Full HD 1080p @ 30 fps (1920 × 1080)
• Visualization in total darkness up to 15 meters
• Switchable IR cut filter for vivid color during the daytime
• Light sensor to automatically detect ambient light conditions
• Motion detection
• Digital PTZ
• HDR
• LDC
• Power over Ethernet
• Waterproof IP65
• Easily connects to home-network environments
WFB100S
• Internal Power Module, V-in: 120 V, V-out: 48 V
• Wi-Fi: 2.4 GHz IEEE 802.11n 2 × 2
• RJ45 Ethernet connection
• IEEE 802.3af–compliant
• WPS for easy network pairing
7
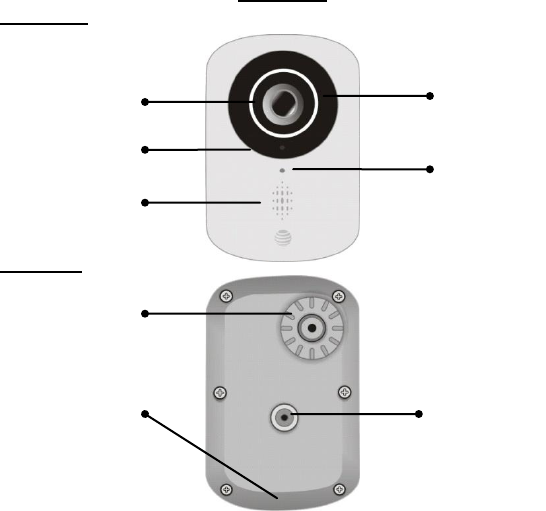
1.3 Hardware Overview
FHD251E
Front view
Rear view
Cap
Light guide
Status LED
Cap
Speaker
Microphone
Ball joint
IR lens

8
LED functions
LED Color
Function Description
Status
Red
Pre-boot
Solid on if “power OK”
Blue
Operating system
booting
Blinking 1 Hz, 50% duty
cycle
Green
Post-boot; no network
connectivity
Blinking 4 Hz, 50% duty
cycle
Green
Standby; encoder
recording locally
Solid on
Green
Streaming to the
network
Blinking 1 Hz, 50% duty
cycle
9
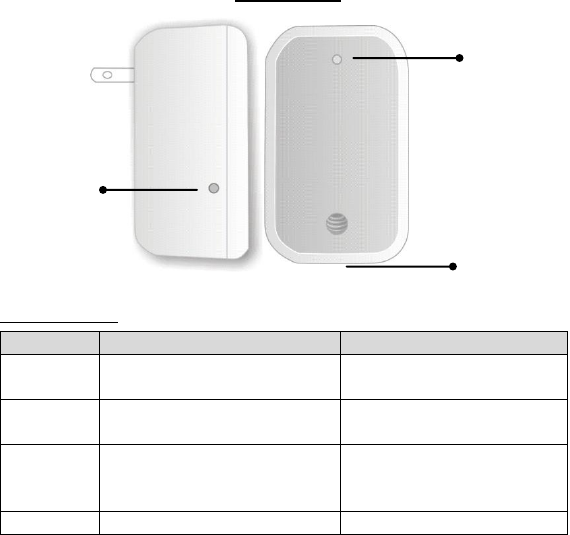
WFB100S
LED functions:
LED color
Function description
Status
Blue
Normal operation and
connected
Solid on
Blue
Power up and during
firmware download
Fast blinking, 4 Hz, 50%
duty cycle
Blue
Firmware download
complete but no
connectivity
Slow blinking, 1 Hz, 50%
duty cycle
Blue
WPS mode activated
Off
Light guide
Button
Ethernet port
10
11
2 Start Using the Camera
2.1 Assembling the Camera & the Wireless
Adapter
Follow the steps below to set up your camera hardware and ensure
that the camera operates properly.
1. Attach the camera bracket to the camera by gently tightening it
onto the camera.
Caution:
Ensure that the camera is securely fixed;
otherwise it may fall and cause damage
or injury.
12
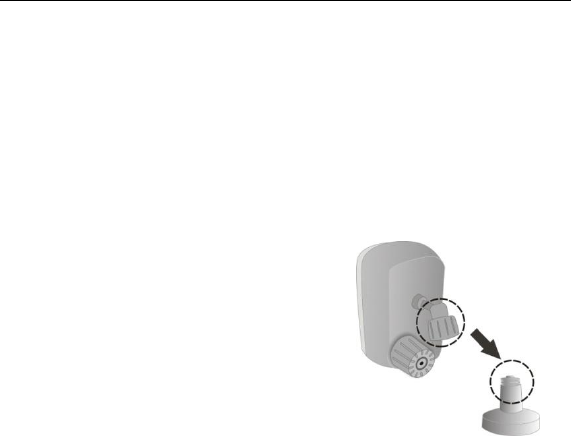
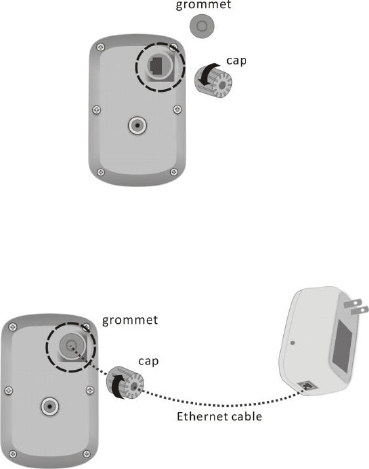
2. Remove the grommet and the cap on the rear side of the
camera.
3. Insert the Ethernet cable into the camera’s Ethernet port and
connect the other end to the wireless adapter, then place the
grommet back and screw on the cap.
13
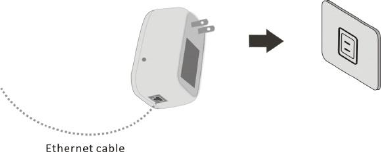
4. Plug the wireless adapter into an electrical outlet.

14
2.2 Connecting the Camera to a Network
1. After inserting the Ethernet cable into the camera’s Ethernet
port and connecting the other end to the wireless adapter, the
adapter will be able to supply power to the camera when
plugged into a wall outlet.
2. Press the WPS button of the AP that you want to connect to,
then press the adapter’s button to connect to the AP. Once the
Wi-Fi of the wireless adapter is paired with an AP via WPS, the
camera then connects to the network through the wireless
adapter.
3. The IP camera has been successfully added to your network after
the connection between the wireless adapter and your AP is
established.
The installation process is now complete. Now you may start using
the camera.
15
2.3 Rebooting and Resetting the Camera
and the Wireless Adapter
1. Press and hold the button on the wireless adapter for 0
seconds–3 seconds or over 20 seconds.
2. For factory reset, press and hold the button on the wireless
adapter for 10 seconds–20 seconds.

16
3 Appendix
3.1 Specifications and Compliance
Model
FHD251E
Resolution
1080p (1920 × 1080) @ 30 fps
IR LEDs
12 pcs.
IR LED Illumination Range
15 meters
Sensitivity
0 lux when IR LED is on (black & white video).
Sensors
CMOS 1/3” 4 megapixels
Lens
6 glass
Status LEDs
1 pc (Tri color—red, blue, and green)
FOV
138° (D)
Operating Voltage
V-in: 48 V (DC)
Ambient Operating
Temperature
–40 °C to +65 °C
Storage Temperature
–40 °C to +65 °C
Dimensions
77.05 mm × 115.97 mm × 79.2 mm
Weight
324 g
IP Rating
IP65
PoE
IEEE 802.3af

17
Model
WFB100S
CPU
RTL8196E
2.4 GHz
RTL8192ER
SPI Flash Memory
32 MB
DDR3
128 MB
Status LEDs
1 pc (Single color—blue)
RJ45
10/100 mbps
Operating Voltage
V-in: 120 V (AC), V-out : 48 V (DC)
Ambient Operating
Temperature
0 °C to +50 °C
Storage Temperature
–40 °C to +65 °C
Dimensions
91 mm × 57 mm × 44 mm
Weight
124 g

18
3.2 Troubleshooting
Problem
Solution
The button
has no
response.
1. Check the Ethernet connection status.
2. Plug out and plug in once to reboot the
wireless adapter.
The LED blinks
slowly after
the WPS
process is
completed.
1. Check the Ethernet connection status.
2. Restart WPS pairing and make sure the AP
router is in signal range and is in WPS mode.

19
3.3 Obtaining Technical Support
While we hope your experience with the FHD251E IP Camera is
enjoyable, you may experience some issues or have questions that
this User Manual has not answered.
If you have a problem with the FHD251E IP Camera, please contact us
at:
Tel.:+886 3 666 7799 Ext.: 3214
E-mail: Jacky.Liu@wnc.com.tw
Mobile: +886 916 324 575
Website: www.wnc.com.tw
3.4 Disposal Instructions
WNC is committed to responsible environmental stewardship. Please
dispose of this product in accordance with the local laws and
regulations in your area. Contact your local waste-disposal
authorities for relevant instructions.