Wistron MS2119 Laptop with 2.4 GHz 802.11 User Manual AJ e

Wistron Corporation Laptop with 2.4 GHz 802.11 AJ e

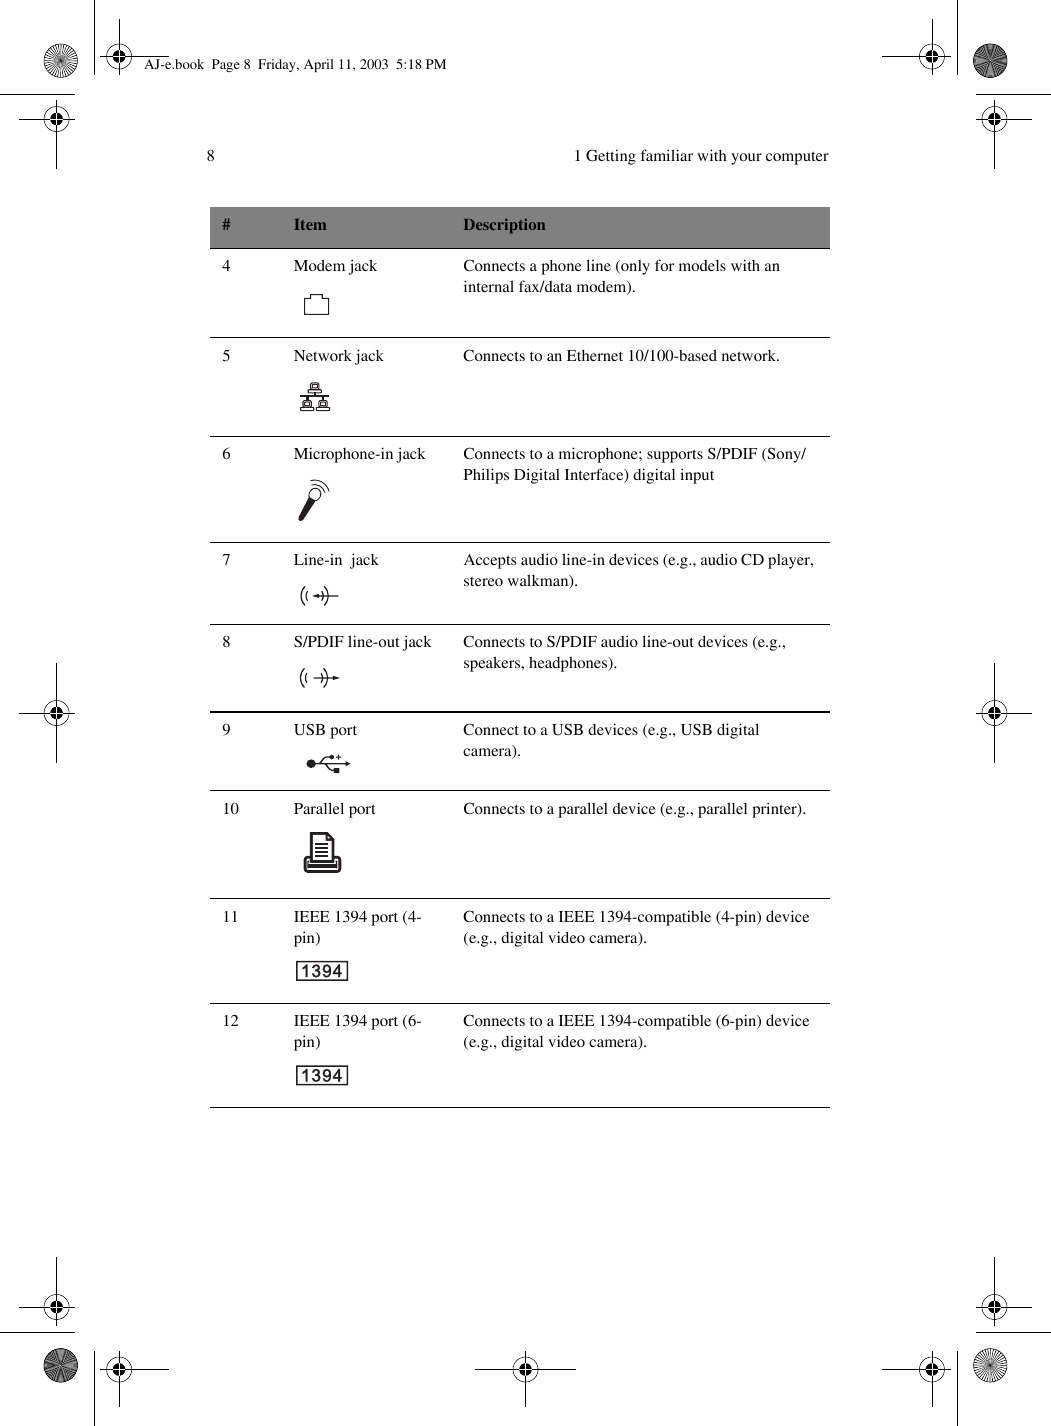
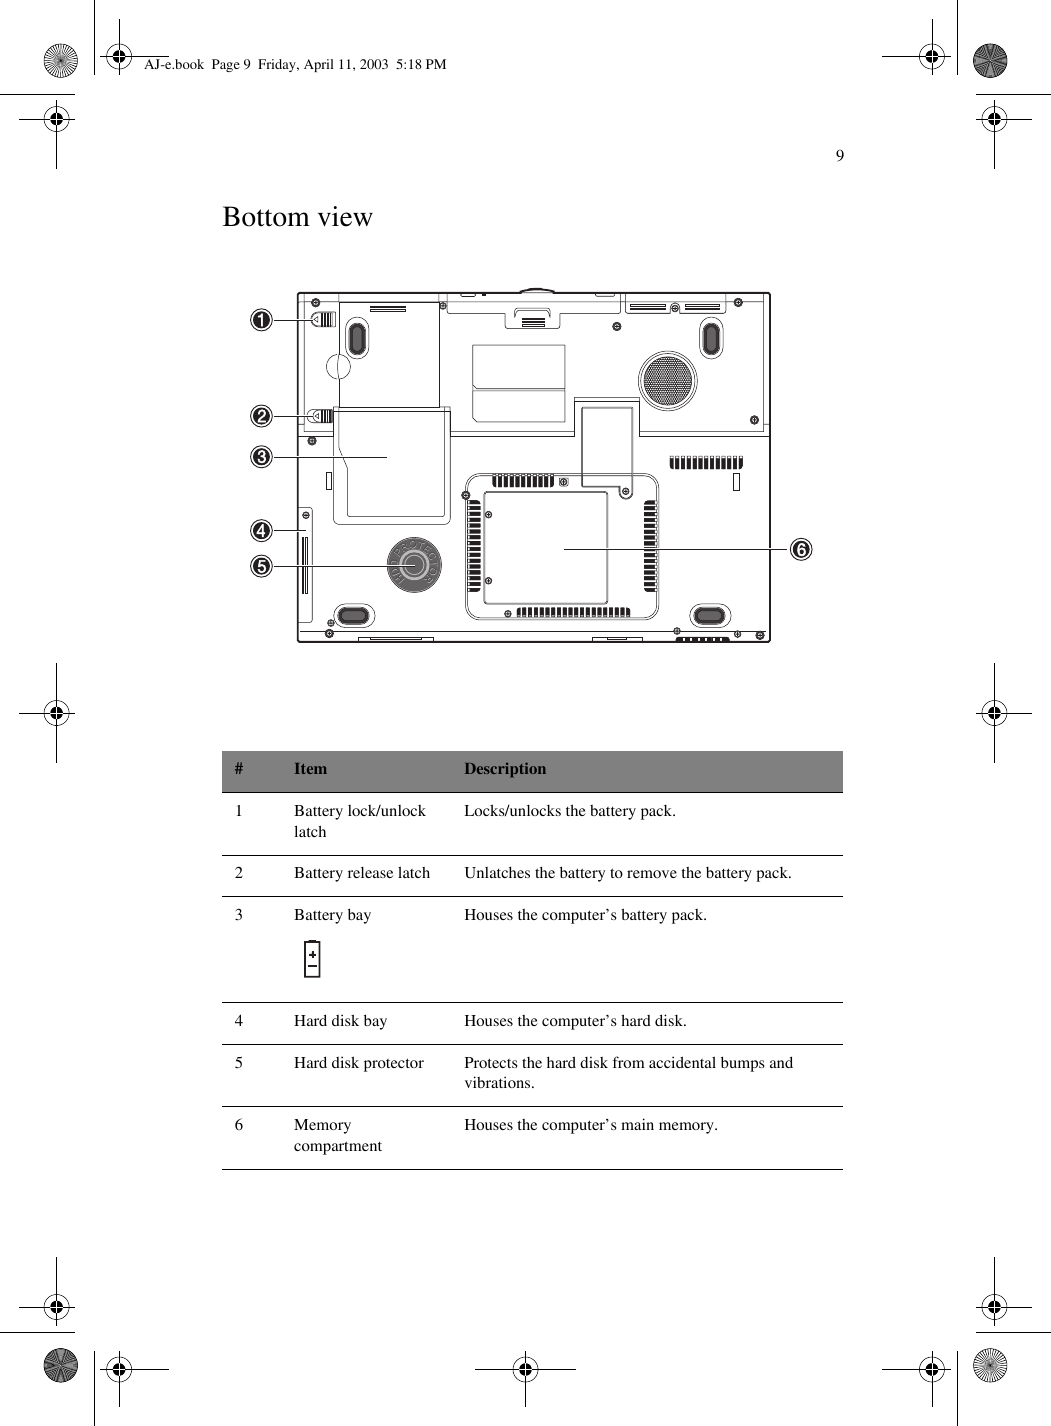
Notebook Manual Part 1

   Notebook PC  Users’ Guide    Model  M500B1
Changes may be made periodically to the information in this publication without obligation to notify any person of such revision or changes.  Such changes will be incorporated in new editions of this manual or supplementary documents and publications.  This company makes no representations or warranties, either expressed or implied, with respect to the contents hereof and specifically disclaims the implied warranties of merchantability or fitness for a particular purpose.Record the model number, serial number, purchase date, and place of purchase information in the space provided below.  The serial number and model number are recorded on the label affixed to your computer.  All correspondence concerning your unit should include the serial number, model number, and purchase information.Model Number : __________________________________Serial Number:____________________________________Purchase Date: ___________________________________Place of Purchase: ________________________________Copyright © 2002All Rights ReservedNotebook Computer User’s guideOriginal Issue: June 2002Notebook ComputerAll trademarks and registered trademarks are the properties of their respective companies.AJ-e.book  Page ii  Friday, April 11, 2003  5:18 PM
Contents iiiPreface  viiConnecting the computer  viiCare and maintenance ix1 Getting familiar with your computer 1A tour of your computer 3Top view 3Front view 5Left view  6Right view  7Rear view 7Bottom view 9Features 10Display 12Indicators 13Keyboard 15Special keys 15Keyboard ergonomics 20Touchpad 21Launch keys 23Storage 25Hard disk 25Optical drive 25Connectivity options 28Ethernet and LAN 28Fax/data modem 28Optional wireless communication 30Fast infrared 31Audio 32AV control panel 33Securing your computer 37Security notch 37Passwords 372 Operating on battery power 39Battery pack 41Battery pack characteristics 41Installing and removing the battery pack 42Charging the battery 43Checking the battery level 44Optimizing battery life 44AJ-e.book  Page iii  Friday, April 11, 2003  5:18 PM
ContentsivBattery-low warning 45Power management 45Advanced Configuration and Power Interface 463 Peripherals and options 47External monitor 49Using simultaneous display 49S-video 50External keyboard 51External pointing device 52Printer 53Audio devices 54PC Card 55PC Card slot 55USB devices 57IEEE 1394 devices 58Miscellaneous options 59Additional power packs 59Key component upgrades 60Memory upgrade 60Hard disk upgrade 604 Moving with your computer 61Disconnecting from the desktop 63Moving around 63Preparing the computer 63What to bring to short meetings 63What to bring to long meetings 63Taking the computer home 63Preparing the computer 64What to bring with you 64Special considerations 64Setting up a home office 64Traveling with the computer 65Preparing the computer 65What to bring with you 65Special considerations 65Traveling internationally with the computer 65Preparing the computer 65What to bring with you 66Special considerations 66AJ-e.book  Page iv  Friday, April 11, 2003  5:18 PM
v5 Software 67System software 69Launch Manager 70BIOS Utility 71Information 72Main 73Advanced 75Security 79Boot 81Exit 826 Troubleshooting 83Frequently-asked questions 85Error messages 87A Specifications 89B Notices 95Index 103AJ-e.book  Page v  Friday, April 11, 2003  5:18 PM
ContentsviAJ-e.book  Page vi  Friday, April 11, 2003  5:18 PM
viiPrefaceThis notebook computer incorporates such features as CardBus, internal pointing device, IEEE 1394, and Universal Serial Bus in an portable package.This manual should answer most of the questions you have about the day-to-day operation of your notebook computer.You should also take advantage of the online help files that are available with almost all of the programs shipped with your computer.We hope you enjoy your notebook computer.  With proper care, your computer will provide you with years of productive service.Connecting the computer Connecting the computer is as easy as 1-2-3.1. Insert the battery at an angle (1); press gently on the battery (2) until it click into place.  Then slide the lock/unlock latch into the lock position (3). Note: When using a battery pack for the first time, fully recharge the battery, then disconnect the adapter to use up the battery before recharging again.  Perform this action twice to condition the battery pack.AJ-e.book  Page vii  Friday, April 11, 2003  5:18 PM
viii2. Connect one end of the AC adapter to the DC-in port on the computer’s rear panel and the other end to a properly grounded power outlet.3. Slide the display cover latch to the left (1) to open the display (2).  Press the power switch (3) to turn on the power.  The POST (power-on self-test) routine executes and Windows begins loading.   AJ-e.book  Page viii  Friday, April 11, 2003  5:18 PM
ixNote: To turn off the power, we recommend that you use the Windows Turn Off command to shut down the computer.  If you are unable to shut down your computer normally, press and hold the power switch for more than four seconds to turn off the computer.  If you turn off the computer and want to turn it on again, wait at least two seconds before powering up.Care and maintenanceTaking care of your computerYour computer will serve you well if you take care of it.• Do not expose the computer to direct sunlight.  Do not place it near sources of heat, such as a radiator.• Do not expose the computer to temperatures below 0ºC (32ºF) or above 50ºC (122ºF).• Do not subject the computer to magnetic fields.• Do not expose the computer to rain or moisture.• Do not spill water or any liquid on the computer.• Do not subject the computer to heavy shock and vibration.• Do not expose the computer to dust and dirt.• Never place objects on top of the computer to avoid damaging the computer.• Never place the computer on uneven surfaces.Taking care of your AC adapterHere are some ways to take care of your AC adapter:• Do not connect the adapter to any other device.• Do not step on the power cord or place heavy objects on top of it.  Carefully route the power cord and any cables away from all potential traffic.• When unplugging the power cord, do not pull on the cord itself but pull on the plug.• The total ampere ratings of the equipment plugged in should not exceed the ampere rating of the cord if you are using an extension cord.  Also, the total current rating of all equipment plugged into a single wall outlet should not exceed the fuse rating.AJ-e.book  Page ix  Friday, April 11, 2003  5:18 PM
xTaking care of your battery packHere are some ways to take care of your battery pack:• Use only batteries of the same kind as replacements.  Turn the power off before removing or replacing batteries.• Do not tamper with batteries.  Keep them away from children.• Dispose of used batteries according to local regulations.  Recycle if at all possible.Cleaning and servicingWhen cleaning the computer, follow these steps:1. Power off the computer and remove the battery pack.2. Disconnect the AC adapter.3. Use a soft cloth moistened with water.  Do not use liquid or aerosol cleaners.Contact your dealer or see your service technician if any of the following occurs:• The computer has been dropped or the body has been damaged.• Liquid has been spilled into the product.• The computer does not operate normally.AJ-e.book  Page x  Friday, April 11, 2003  5:18 PM
1 Getting familiar with your computerAJ-e.book  Page 1  Friday, April 11, 2003  5:18 PM
This computer combines high-performance, versatility, power management features and multimedia capabilities with a unique style and ergonomic design.  Work with unmatched productivity and reliability with your new power computing partner.This chapter gives an in-depth "tour" of the computer’s many features.AJ-e.book  Page 2  Friday, April 11, 2003  5:18 PM
3A tour of your computerLet us show you around your new notebook computer.Top view#Item Description1 Display screen Also called LCD (liquid-crystal display), displays computer output.2 Status indicator LEDS (light-emitting diodes) that turn on and off to show the status of the computer and its functions and components.AJ-e.book  Page 3  Friday, April 11, 2003  5:18 PM
 1 Getting familiar with your computer43 AV control panel Control buttons for playing audio/video media.4 Touchpad Touch-sensitive pointing device which functions like a computer mouse.5 Palmrest Comfortable support area for your hands when you use the computer.6 Speakers Outputs sound.7 Click buttons (left, center and right)The left and right buttons function like the left and right mouse buttons; the center button serves as a 4-way scroll button.8 Keyboard Inputs data into your computer.9 Launch keys Buttons for launching frequently used programs.  See “Launch keys” on page 23 for more details.10 Power button Turns on the computer power.11 Microphone Inputs sounds and voices into your computer.# Item DescriptionAJ-e.book  Page 4  Friday, April 11, 2003  5:18 PM
5Front view #Item Description1 Battery bay Houses the computer’s battery pack.2 Eject button Ejects the CD/DVD disk.3 LED indicator Lights up when the DVD/CD-RW combo drive is active.4 Drive slot Slot for inserting a CD or DVD.5 Infrared port Interfaces with infrared devices (e.g., infrared printer, IR-aware computer).6 Expansion module Module for optional second hard disk or optional subwoofer.7 Display cover latch Unlatch to open the LCD display.AJ-e.book  Page 5  Friday, April 11, 2003  5:18 PM
 1 Getting familiar with your computer6Left view # Item Description1 Hard disk Bay Houses the computer’s hard disk.2PC Card slot Accepts one Type II 16-bit PC Card or  32-bit CardBus PC Card with ZV support.3 PC Card eject button Ejects the PC Card from its slot.4 SD slot Accepts Secured Digital (SD) memory card.5 Security keylock Connects to a Kensington-compatible computer security lock.AJ-e.book  Page 6  Friday, April 11, 2003  5:18 PM
7Right view Rear view#Item Description1 USB ports Connect to a USB devices (e.g., USB mouse).2 Fan slots Keep the computer cool. Do not cover these slots to prevent the computer from overheating.# Item Description1 DC-in jack Connects to an AC adapter.2 External monitor port Connects to a display monitor (up to 2048x1536 resolution).3 S-video port Connects to a television or display device with S-video input.AJ-e.book  Page 7  Friday, April 11, 2003  5:18 PM
 1 Getting familiar with your computer84 Modem jack Connects a phone line (only for models with an internal fax/data modem).5 Network jack Connects to an Ethernet 10/100-based network.6 Microphone-in jack Connects to a microphone; supports S/PDIF (Sony/Philips Digital Interface) digital input7 Line-in  jack Accepts audio line-in devices (e.g., audio CD player, stereo walkman).8 S/PDIF line-out jack Connects to S/PDIF audio line-out devices (e.g., speakers, headphones).9 USB port Connect to a USB devices (e.g., USB digital camera).10 Parallel port Connects to a parallel device (e.g., parallel printer).11 IEEE 1394 port (4-pin)Connects to a IEEE 1394-compatible (4-pin) device (e.g., digital video camera). 12 IEEE 1394 port (6-pin)Connects to a IEEE 1394-compatible (6-pin) device (e.g., digital video camera). #Item DescriptionAJ-e.book  Page 8  Friday, April 11, 2003  5:18 PM
9Bottom view #Item Description1 Battery lock/unlock latchLocks/unlocks the battery pack.2 Battery release latch Unlatches the battery to remove the battery pack.3 Battery bay Houses the computer’s battery pack.4 Hard disk bay Houses the computer’s hard disk.5 Hard disk protector Protects the hard disk from accidental bumps and vibrations.6 Memory compartmentHouses the computer’s main memory.AJ-e.book  Page 9  Friday, April 11, 2003  5:18 PM
 1 Getting familiar with your computer10FeaturesThis computer was designed with the user in mind.  Here are just a few of its many features:Performance• Mobile Intel® Pentium™ 4 Processor - M with Enhanced Intel® SpeedStep™ technology  • 512K on-die L2 cache• 15.2” 15:10 SXGA (1280x854) widescreen TFT LCD panel• nVidia® GeForce4 Go™ high-performance graphics chipset with 32MB frame buffer• Onboard memory upgradable to 1024 MB with 2 DDR-266 SoDIMM• High-capacity, Enhanced-IDE hard disk• Lithium Ion battery pack• Power management system • Dual display capability• Simultaneous LCD and CRT display• LCD panel supports resolution up to 1280x854• VGA monitor supports resolution up to 2048x1536• Embedded TV encoder supports resolution up to 1024x768Multimedia• AV control panel• Playback MP3 through SD, HDD or Audio CD with system off• Audio Codec support stereo 18-bit ADC/20-bit DAC• AC’97 2.2 compliant stereo audio• S/PDIF line-out jack• Enhanced audio system with 2 speakers and an optional subwoofer• Built-in microphone • Slot-loading DVD/CD-RW combo drive• S-video output portAJ-e.book  Page 10  Friday, April 11, 2003  5:18 PM

Navigation menu