Wistron SP500 GSM/EDGE Cellphone with WLAN & BT User Manual SP500 UG EN
Wistron Corporation GSM/EDGE Cellphone with WLAN & BT SP500 UG EN
Wistron >
Users Manual Revised 080108

Wistron/SP500
User Guide

COPYRIGHT
© 2008 by Generic, Inc. All rights reserved.
No part of this publication may be reproduced or used in any form, or by any electrical or
mechanical means, without permission in writing from Generic. This includes electronic or
mechanical means, such as photocopying, recording, or information storage and retrieval
systems. The material in this manual is subject to change without notice.
The software is provided strictly on an "as is" basis. All software, including firmware, furnished
to the user is on a licensed basis. Generic grants to the user a non-transferable and non-
exclusive license to use each software or firmware program delivered hereunder (licensed
program). Except as noted below, such license may not be assigned, sublicensed, or otherwise
transferred by the user without prior written consent of Generic. No right to copy a licensed
program in whole or in part is granted, except as permitted under copyright law. The user shall
not modify, merge, or incorporate any form or portion of a licensed program with other program
material, create a derivative work from a licensed program, or use a licensed program in a
network without written permission from Generic. The user agrees to maintain Generic’s
copyright notice on the licensed programs delivered hereunder, and to include the same on any
authorized copies it makes, in whole or in part. The user agrees not to decompile, disassemble,
decode, or reverse engineer any licensed program delivered to the user or any portion thereof.
Generic reserves the right to make changes to any software or product to improve reliability,
function, or design.
Generic does not assume any product liability arising out of, or in connection with, the
application or use of any product, circuit, or application described herein.
No license is granted, either expressly or by implication, estoppel, or otherwise under any
Generic, Inc., intellectual property rights. An implied license only exists for equipment, circuits,
and subsystems contained in Generic products.
Generic and the Stylized M Logo and Model and the Model logo are registered in the US Patent
& Trademark Office. Bluetooth is a registered trademark of Bluetooth SIG. Microsoft, Windows
and ActiveSync are either registered trademarks or trademarks of Microsoft Corporation. All
other product or service names are the property of their respective owners.
Generic, Inc.
One Generic Plaza
Holtsville, New York 11742-1300
http://www.Model.com
Federal Communications Commission (FCC) & Industry Canada(IC) Statement
15.21
You are cautioned that changes or modifications not expressly approved by the part responsible for
compliance could void the user’s authority to operate the equipment.
15.105(b)
This equipment has been tested and found to comply with the limits for a Class B digital device,
pursuant to part 15 of the FCC rules. These limits are designed to provide reasonable protection
against harmful interference in a residential installation. This equipment generates, uses and can
radiate radio frequency energy and, if not installed and used in accordance with the instructions,
may cause harmful interference to radio communications. However, there is no guarantee that
interference will not occur in a particular installation. If this equipment does cause harmful
interference to radio or television reception, which can be determined by turning the equipment off
and on, the user is encouraged to try to correct the interference by one or more of the following
measures:
-Reorient or relocate the receiving antenna.
-Increase the separation between the equipment and receiver.
-Connect the equipment into an outlet on a circuit different from that to which the receiver is
connected.
-Consult the dealer or an experienced radio/TV technician for help.
Operation is subject to the following two conditions:
1) this device may not cause interference and
2) this device must accept any interference, including interference that may cause undesired
operation of the device.
FCC RF Radiation Exposure Statement:
For body worn operation, this phone has been tested and meets FCC RF exposure guidelines when
used with an accessory that contains no metal and that positions the handset a minimum of 1.5 cm
from the body. Use of other accessories may not ensure compliance with FCC RF exposure
guidelines."

Welcome
5
Welcome
Thank you for making SP500 your choice for your mobile computing and communication
needs. Your new sleek SP500 is a fully integrated GPS PDA phone. It combines the
power of high-performance PDA applications with the wireless connectivity of an EDGE/
GPRS/WLAN/Bluetooth-enabled mobile phone. The integrated GPS solution makes
traveling a breeze, and with the 3M built-in camera you’re sure to capture the local
scenery. All these features make your SP500 the ideal digital companion for both work
and play.

Welcome
6

1 First Things First
Package contents
7
1 First Things First
ïPackage contents
ïPreparing to use your SP500
Package contents
Your SP500 comes packed in a cardboard box. Carefully unpack the box and remove the
contents. If any of the following items are missing or damaged, contact your dealer
immediately.
ïSP500 Enterprise Digital Assistant
ïStylus
ïStandard life battery
ïAC adapter (with four region-specific clip plugs)
ïUSB sync cable
ïSP500 Quick Start Guide
ïSP500 Regulatory Guide
Preparing to use your SP500
Perform the following easy setup tasks to begin using your device:
1 Install the battery pack.
2 Charge your device.
3 Install ActiveSync 4.2 or higher on your computer.
4 Start the SP500.
5 Create an ActiveSync partnership between your device and your computer.
Installing the battery pack
Your SP500 uses a high-density removable and rechargeable 1100 mAh lithium ion
battery pack. See “Battery problem” on page 241 for more information on how to
conserve power consumption to make your battery last longer.
WARNING! There is a risk of fire and burns if the battery is handled improperly. DO
NOT disassemble, crush, puncture, short external contacts, or dispose the battery in fire
or water. DO NOT attempt to open or service the battery. Dispose of used batteries
according to local recycling guidelines in your area.

1 First Things First
Preparing to use your SP500
8
To install the battery pack:
Align the tabs on the battery pack with the grooves on the rear side of the device, and
then insert the battery pack in place. The battery pack locks to the chassis with an
audible click.
To uninstall the battery pack:
1 If the device is on, press the Power button to turn off the device.
Wait for five seconds to allow the device to completely power off.
2 Slide the battery latch toward the unlock icon to release the battery pack from
the chassis (1).
3 Completely detach the battery pack from the device (2).
Charging the SP500
Initial charging takes about four hours. After the initial charging, charge your device
everyday to restore the battery to full capacity. Charge your device using the AC adapter
cable, see instructions below.
While waiting for the initial charging to complete, install Microsoft® ActiveSync® 4.2 or
higher on your computer to prepare for the initial synchronization procedure. Refer to the
next section for instructions.
To charge your device:
NOTE: Use the clip plug applicable in your country.
1 Slide the replaceable clip plug into the AC adapter until it locks into place with an
audible click.

1 First Things First
Preparing to use your SP500
9
2 Plug the AC adapter cable into the mini USB connector on bottom of the device.
3 Connect the AC adapter cable into an electrical outlet.
The charging LED indicator on the right side of the touch screen lights up orange to
signify that AC connection is made.
If the battery level becomes low in the course of normal use, a status icon appears
on the device screen indicating low or depleted battery status (see "Status icons" on
page 18 for more information). In both cases, perform an ActiveSync operation to
back up your data, and then recharge your device as soon as possible.
If the battery level reaches low status, the device enters sleep mode; if the battery
level reaches very low status, the device enters deep sleep mode. In this case, you
have about 72 hours to recharge your device after which you risk losing all data on
your device’s internal memory.
Installing Microsoft ActiveSync
ActiveSync is already installed on your SP500; you only need to install it on your
computer.
System installation requirements
ïSupported operating systems:
ïWindows 2000 Service Pack 4
ïWindows Server® 2003 Service Pack 1
ïWindows Server 2003 Service Pack 1 for Itanium-based Systems
ïWindows Server 2003, Standard x64 Edition
ïWindows XP® Media Center Edition
ïWindows XP Professional x64 Edition
ïWindows XP Service Pack 1
ïWindows XP Service Pack 2
ïWindows XP Tablet PC Edition
ïMicrosoft Outlook® 2000, Microsoft Outlook XP, or Microsoft Outlook® 2003
(recommended) messaging and collaboration clients required for Microsoft Outlook
Office Mobile synchronization
ïMicrosoft Office 2000, Microsoft Office XP or Microsoft Office 2003 for Microsoft
Office Mobile® synchronization
ïMicrosoft Internet Explorer 6.0 or later for Internet Explorer Mobile favorites
synchronization
ïMicrosoft Systems Management Server 2.0
ïHard disk drive with 7 MB of available hard disk space (actual requirements may
vary based on selected features and user’s current system configuration)
ïUSB port, Bluetooth, or infrared connection

1 First Things First
Preparing to use your SP500
10
To install Microsoft ActiveSync on your computer:
1 Close all open programs, including those that run at startup, and disable any
virus-scanning software.
2 Download the ActiveSync setup software from the Microsoft ActiveSync Download
page at http://www.microsoft.com.
3 On the download prompt, click Open.
4 Follow all on-screen instructions to complete installation.
To confirm you've successfully installed ActiveSync, open ActiveSync, then click
Help > About Microsoft ActiveSync.
For detailed information about using ActiveSync on your computer, start ActiveSync
on your computer, click Help > Microsoft ActiveSync Help.
Starting the SP500
After you have initially charged your device, the device is ready for use. You can now
start your device where you will calibrate the display, learn basic stylus usage, and set up
the system date and time.
To start your SP500:
NOTE: After pressing the power button, wait four seconds for the device to power on
before pressing the power button again.
1 Turn on your device by pressing the Power/End key .
2 Follow the on-screen Welcome Screen Wizard instructions.
3 After the device setup, create an ActiveSync partnership to synchronize information
between your computer and/or server and your SP500.
Creating an ActiveSync partnership
After installing ActiveSync on your computer and completing the device setup, you can
now set up a partnership between your SP500 (first time connection only) and your
computer and/or a server with the help of the New Partnership setup wizard. This wizard
will help you:
ïSet up a partnership so you can synchronize information between your
device and your computer
ïCustomize your synchronization settings

1 First Things First
Preparing to use your SP500
11
To create an ActiveSync partnership:
1 Connect the USB sync cable into the connector on the bottom of your device, then
plug the USB sync cable into a USB port on your computer.
The Synchronization Setup Wizard automatically starts on your computer screen.
NOTE: If the wizard does not automatically appear, launch ActiveSync on your
computer by clicking on its icon from Start > Programs.
2 Follow the on-screen instructions.
To prevent synchronization problems, select the “Synchronize directly with a server
running Microsoft Exchange Server...” option only if you are certain that your
company is running Microsoft Exchange Server with Exchange ActiveSync and you
know the server address and logon credentials. For more information, contact your
corporate network administrator or service provider.
By default, ActiveSync only synchronize information for Contacts, Calendar,
Messaging (Outlook E-Mail), Tasks, and Favorites (for Internet Explorer Mobile). If
you decide to synchronize other files, for example, Word documents, ActiveSync
need to convert these files. Converted files may not contain all information found in
original file.

1 First Things First
Preparing to use your SP500
12
3Click Finish to close the wizard and start the initial synchronization.
During the synchronization process, the ActiveSync window appears on your
computer, while the Data connectivity icon appears on your device’s navigation
bar.
After the initial synchronization, the information types you’ve selected for
synchronization are copied to your device. Disconnect your device from your
computer and you're ready to go!
The next time you connect your device, your computer recognizes it automatically.
You don’t need to set up the partnership again. You can initiate synchronization
from your device anytime via several connection options—via USB sync cable,
infrared, or Bluetooth connections. For more information on these connection
options and other ActiveSync configuration settings, see “Using ActiveSync” on
page 31.

2 Wireless Communications
Wireless communication features
13
2 Wireless Communications
ïWireless communication features
ïManaging wireless connections
ïGetting connected
Wireless communication features
You can use your SP500 to exchange information with other mobile devices and connect
to your computer, a network, or the Internet. You have the following connection options:
ïUse the infrared sensor or the Bluetooth function to exchange files from another
IR- or Bluetooth-enabled device.
ïUse a GPRS or Wi-Fi connection to send and receive e-mail messages by using
Messaging; and view Web or WAP pages by using Internet Explorer Mobile.
Contact your mobile phone service provider to have your WAP or GPRS connection
activated.
Beam function
In a Microsoft Windows Mobile program (except Messaging), and Picture & Videos, you
can exchange files using either infrared or Bluetooth.
TIP: You can also beam files (not folders) from the File Explorer screen. To do, tap
and hold the item you want to send, then tap Beam File from the pop-up menu.
First activate the beam function before exchanging files with another IR- or Bluetooth-
enabled device.
To activate the Beam function:
1 Tap > Settings .
2 On the Connections tab, tap Beam .
3 Tap “Receive all incoming beams” check box.
4Tap ok.

2 Wireless Communications
Wireless communication features
14
Infrared connection
Using infrared, you can enable short-range file exchange between your SP500 and
another IR-enabled device.
Exchanging files using IR connection
Ensure that the IR function on both your SP500 and on other device you want to
exchange files with are enabled.
To send files via IR connection:
1 Switch to the program where you created the item you want to send and locate the
item in the list.
2 Align the IR port of your device with that of the IR-enabled device so that they
are unobstructed and within a close range.
3 Tap and hold the item, then tap Beam [type of item] on the pop-up menu.
4 Tap the device that you want to send the file to.

2 Wireless Communications
Wireless communication features
15
To receive files via IR connection:
1 Align the IR port of your device with that of the IR-enabled device so that they
are unobstructed and within a close range.
2 Have the owner of the other IR-enabled device send the file to you.
3 On the Receiving Data callout, tap Yes.
Bluetooth connection
Your device allows you to connect to any Bluetooth-enabled device in your personal area
network (PAN). Once connected you can perform the following:
ïSend and receive files to another Bluetooth-enabled device.
ïTransfer an outgoing call to a Bluetooth-enabled headset. See “To make a
call from a Bluetooth-enabled headset” on page 44 for more information.
ïPrint files to a Bluetooth-enabled printer.
Additional software is required on your device to enable you to print files to a
Bluetooth-enabled printer. Contact your local dealer for more information.
ïOnce connected to another Bluetooth-enabled device or computer, you can locate
and use any of the services available on the device.
Activating the Bluetooth function
You have two options to activate your SP500’s Bluetooth connection—using the Wireless
Manager or the Bluetooth option under the Settings > Connections preferences. Once
activated, connection is indicated as On in the Wireless Manager section of the
Today screen.
To activate Bluetooth via the Wireless Manager:
See “To activate Bluetooth via the Wireless Manager” on page 26 for more information.
To activate Bluetooth using the Settings option:
1 Tap > Settings .
2 On the Connections tab, tap Bluetooth .

2 Wireless Communications
Wireless communication features
16
3 On the Mode tab, select all the check boxes.
4Tap ok.
NOTE: Deactivate the Bluetooth feature when you do not plan to use it for an
extended time.
Creating a Bluetooth partnership
You need to create a partnership with another Bluetooth-enabled device to be able to
exchange information with it.
To create a Bluetooth partnership:
1 Ensure that your SP500 and the other Bluetooth-enabled device(s) are turned on,
visible, and within close range of each other.
2 Perform either of the following.
ïOn the Wireless Manager screen, tap Menu > Bluetooth Settings.
ïTap > Settings > Connections tab > Bluetooth .
3 On the Devices tab, tap Add new device.

2 Wireless Communications
Wireless communication features
17
Your device searches for Bluetooth-enabled devices on your personal area network
(PAN) and displays them in the device list.
4 Tap the name of the device in the list, then tap Next.
If you want to use a passcode, type an alphanumeric passkey, then tap Next; enter
the same passkey on the other device.
The passkey is recommended for enhanced security. Your passkey must be
between 1 to 16 alphanumeric characters.
If you do not want to use a passkey, tap Next.
5 On the Partnership Settings screen, perform the following:
(a) Type in a meaningful device name on the Display Name box to identify the
device later.
(b) Select the type of services you want to enable for this Bluetooth partnership.
6Tap Finish.

2 Wireless Communications
Wireless communication features
18
7 On the Bluetooth screen, tap the COM Ports tab, then tap New Outgoing Port.
8 Select the device you want to add, then tap Next.
9 Select a numbered COM port from the list.
10 Select “Secure Connection” option to designate the COM port for Bluetooth
partnership.
11 Tap Finish, then tap ok.
Exchanging files using Bluetooth
IMPORTANT: Ensure that the two devices have Bluetooth turned on, discoverable,
and within close range.
To send files via Bluetooth:
1 Switch to the program where you created the item you want to send and locate the
item in the list.
2 Tap and hold the item, then tap Beam [type of item] on the pop-up menu.
3 Tap the device that you want to send the file to.

2 Wireless Communications
Wireless communication features
19
To receive files via Bluetooth:
1 Have the owner of the other Bluetooth-enable device send the file to you.
2 On the Bluetooth callout, tap Yes.
GPRS connection
General Packet Radio Service (GPRS) is a packet-switched technology that allows
transmission of data between mobile phones and the Internet over a GSM network. It
supports an “always on” capability which uses the GSM network only during data
transmission. This means users only pay for the amount of downloaded information
rather than the duration of the network connection.
The communication software for creating a GPRS connection is already installed on your
device. Your service provider will provide software needed to install other services, such
as paging and fax services.
Once you’ve established a GPRS connection, you can:
ïUse Messaging to send and receive e-mail messages.
ïUse Internet Explorer Mobile to access Web or WAP pages
ïUse Windows Media Player 10 Mobile for Pocket PC to listen to streaming media
ïUse Live Messenger to conduct IM sessions with your friends and colleagues.
Configuring your GPRS connection
To manually configure GPRS connection:
See “To connect to the Internet” on page 28 for more information.
For more information on configuring your device’s GPRS setting, contact your mobile
phone service provider.
Connecting to the GPRS network
NOTE: When downloading large files through GPRS data connection, incoming phone
calls are not received. Phone calls are directed to voicemail.
A GPRS connection is required to connect to a GPRS network. To create a GPRS
connection, the GPRS features on your GSM account must be enabled and activated on
your SIM card. You may be required to configure your GPRS connection and
authenticate GPRS to connect to the GPRS network. Obtain the user name and
password from your mobile phone service provider.
To connect to GPRS network:
1 On the navigation bar, tap the Data connectivity icon .

2 Wireless Communications
Wireless communication features
20
2Tap Connect GPRS.
The Connecting call drop-down box displays. The GPRS data connection active
icon appears on the navigation bar and changes to and to once a GPRS
connection is established.
To end a GPRS connection:
Perform one of the following:
ïOn the navigation bar, tap the Data connectivity icon , then tap Cancel
on the Connectivity drop-down box.
ïOn the Today screen, tap Wireless Manager > Menu > Disconnect
Cellular Data.
Wi-Fi connection
Your SP500 supports an optional Wi-Fi hardware (IEEE 802.11b/g) you can use to scan
for existing wireless local area network (WLAN) access points or hot spots. WLAN
access points or hot spots can be found in homes and office or public areas such as
inside airports, restaurants, coffee shops, hotels, or other public areas. Just like in a
GPRS connection, a Wi-Fi access allows you to connect to a computer, access the
Internet, and send/ receive e-mail and files.
NOTE: Wi-Fi access in some areas may require a separate purchase of a service
contract with a wireless service provider. Check with a Wi-Fi service provider in your
area for more information.
Activating a Wi-Fi connection
You have several options to activate your SP500’s Wi-Fi connection—from the Today
screen using the Wireless Manager or the Wi-Fi option under the Settings > Connections
preferences. Once activated, Wi-Fi connection is indicated as On in the Wireless
Manager section of the Today screen.
To activate Wi-Fi connection via the Wireless Manager:
See “To activate Wi-Fi connection via the Wireless Manager” on page 27 for more
information.

2 Wireless Communications
Wireless communication features
21
Setting up a wireless network connection
After activating Wi-Fi connection, you can proceed to the wireless network setup. A
wireless network can be automatically detected or be manually added by entering the
related network settings. Before performing the procedure in this section, determine if
authentication information is needed.
Check the following before setting up a wireless network connection for your device.
ïMake sure that the Internet Protocol (TCP/IP) is installed on your computer.
ïMake sure the network system and remote access server in your workplace
supports TCP/IP protocol
ïMake sure you have remote access account. Ask your network administrator for
assistance on setting up a wireless connection.
To set up a wireless network connection:
1 Enable the device’s wireless networking function. See “To activate Wi-Fi connection
via the Wireless Manager” on page 27 for more information.
2Tap > Settings .
3 On the Connections tab, tap Wi-Fi .
TIP: Alternatively, from the Today screen, you can tap Wireless Manager > Menu >
Wi-Fi Settings.
4 On the Wireless tab, perform one of the following:
ïIf your preferred network is not listed, tap Add New. See “To add a wireless
network “ on page 23 for more information.
ïTap an available wireless network. Previously configured networks are
already listed. To change network settings, tap a network and follow the
on-screen instructions.
5 In the Networks to access drop-down list, select the type of network you wish to
connect to. Options include:
ïAll available
ïOnly access points
ïOnly computer-to-computer
6Tap ok.

2 Wireless Communications
Wireless communication features
22
To configure a network adapter:
1 On the Wi-Fi screen, tap the Network Adapters tab.
2 Make your desired changes to the available adapters on the list.
3Tap ok.
To connect to a wireless network:
1 Tap > Settings .
2 On the Connections tab, tap Wi-Fi .
3 On the Wireless tab, tap an available wireless network.
4 On the command bar, tap Connect.
If a wireless network is detected, a similar screen appears, tap Connect on the
command bar.

2 Wireless Communications
Wireless communication features
23
To add a wireless network:
If your preferred wireless network is not automatically detected, you can add the network
provided you know the wireless network settings. Contact your network administrator for
wireless network settings applicable to your network.
1 Open the Configure Wireless Networks screen by performing one of the following:
ïTap > Wireless Manager > Menu > Wi-Fi Settings.
ïTap > Settings > Connections tab > Wi-Fi .
2 On the Wireless tab, tap Add New.
3 Enter the Network name, then choose whether the wireless network connects to
The Internet or Work network.
4 If you want to connect to another wireless device (Ad-hoc mode), select the “This is
a device-to-device (ad-hoc) connection” option.
5Tap Next.
6 In the Authentication drop-down list, select the authentication method.
7 In the Data Encryption drop-down list, select an encryption method.
8 Tap “The key is automatically provided” check box or enter the network key.
NOTE: Obtain network security settings from the network administrator.

2 Wireless Communications
Wireless communication features
24
9Tap Next.
10 Tap the “Use IEEE 802.1x network access control” check box.
11 In the EAP type drop-down list, select an appropriate EAP method.
12 Tap Finish.
To set Wi-Fi region code:
1 On the Wireless Manager screen, tap Menu > Wi-Fi Region Code Setting.
2 Select the region code applicable to your country.
3Tap Done.

2 Wireless Communications
Managing wireless connections
25
To set Wi-Fi performance mode:
1 Disable Wi-Fi connection on the Wireless Manager screen.
2Tap Menu > Wireless Power Mode.
3 Select a running mode, then tap Done.
Managing wireless connections
Using Wireless Manager
The Wireless Manager provides easy management to the wireless features on your
device. This program complements your device’s integrated wireless card enabling you
to turn the wireless features on and off and allows for centralized management of the
Wi-Fi, Bluetooth, and Phone settings.
To open Wireless Manager:
Perform one of the following:
ïOn the Today screen, tap Wireless Manager .
ïOn the navigation bar, tap the Data connectivity icon or signal icon ,
then from the Connectivity drop-down box, tap Wireless Manager.
ïTap > Settings > Connections tab > Wireless Manager .
Activating wireless features
You can use Wireless Manager to turn the following wireless features on and off— one at
a time or all at the same time. Wi-Fi and Phone can not be turned on at the same time.
ïWi-Fi
ïBluetooth
ïPhone
ïCellular Data GPRS connection

2 Wireless Communications
Managing wireless connections
26
To turn multiple wireless features on:
ïOn the Wireless Manager screen, tap All > Done.
To activate Bluetooth via the Wireless Manager:
1 On the Today screen, tap Wireless Manager .
2 On the Wireless Manager screen, tap Bluetooth.
Tap to launch the
Wireless Manager.

2 Wireless Communications
Managing wireless connections
27
3Tap Done.
To activate Wi-Fi connection via the Wireless Manager:
1 On the Today screen, tap Wireless Manager .
2Tap Wi-Fi > Done.
To activate Phone via the Wireless Manager:
1 On the Today screen, tap Wireless Manager .
2Tap Phone > Done.
To disconnect cellular data GPRS connection via the Wireless Manager:
1 On the Today screen, tap Wireless Manager .
2Tap Menu > Disconnect Cellular Data.
3Tap Done.
Configuring the multiple wireless settings
Using Wireless Manager, you can set Phone, Bluetooth, and Wi-Fi settings.
To configure the Phone settings:
1 On the Wireless Manager screen, tap Menu.
2Select Phone Settings.
The Phone Settings screen has five tabs—Phone, Services, Network, Band,
and PPP Auth. See “Phone preferences” on page 61 for the configuration
options available for each tab.

2 Wireless Communications
Getting connected
28
To configure the Bluetooth settings:
See “Bluetooth connection” on page 15 for more information.
To configure the Wi-Fi settings:
See “Wi-Fi connection” on page 20 for more information.
For information on configuring the Bluetooth settings, Phone settings, or
Wi-Fi settings, tap Help .
Getting connected
After configuring your device’s wireless settings you can now define the network settings
you’ll be using to access the Internet, connect to your office network, and view intranet
URLs.
For help information on performing the following procedures, tap Help from the
screen you’re having difficulty with.
Once you’ve establish these network settings; use Internet Explorer Mobile to view
Internet and intranet sites. See “Internet Explorer Mobile” on page 96 for more
information.
Connecting to the Internet
You can connect to the Internet by using a modem or wireless connection. Before you
perform the procedure below, obtain the following information from your Internet service
provider (ISP) or wireless service provider.
ïISP server phone number or access point
ïUser name and password
To connect to the Internet:
1 Tap > Settings .
2 On the Connections tab, tap Connections .
3 On the Tasks tab, tap Add a new modem connection from either My ISP or
My Work Network.
4 Enter a name for the connection (e.g. Internet).
5 In the Select a modem list, select your modem type.
If you will be using a mobile phone network, select Cellular Line.
If you will be using GPRS, select Cellular Line (GPRS).
6Tap Next.
7 Enter the number to be dialed or the access point name provided by your mobile
service provider.
8Tap Next.

2 Wireless Communications
Getting connected
29
9 If required, enter the user name, password, and domain name.
If the mobile phone service provider specified the IP addresses of your DNS
servers, tap Advanced > Servers tab. Select Use specific server address, enter
the DNS addresses, then tap ok.
10 Tap Finish.
The connection is automatically started when you begin using a program that uses
an Internet connection.
To manually start the connection, perform one of the following:
ïRepeat steps 1 and 2, then on the Tasks tab, tap Manage existing
connections under My ISP. Tap and hold a connection name, then
select Connect from the pop-up menu.
ïPerform the “To connect to a wireless network” procedure on page 22.
Flight Mode
Flight Mode allows you to turn off all the active wireless connections for safe use on an
airplane.
To turn off wireless connections:
1 Press and hold the End button for five seconds.
2Select Yes when the Turn On Flight Mode notification appears. All active wireless
connections are turned off.
When you want to turn the wireless connections back on, press and hold the End
button for five seconds. Select Yes when the Turn Off Flight Mode notification
appears. The device remembers which wireless connections were active prior to
entering Flight Mode and only turns on those wireless connections.
Connecting to your office network
You can connect to your office network by using a modem, virtual private network (VPN),
or wireless connection. Before you perform the procedure below, obtain the following
information from your network administrator or your wireless service provider.
ïFor a modem connection:
ïISP server phone number or access point
ïUser name and password
ïFor a VPN connection:
ïUser name, password, and domain name
ïTCP/IP settings
ïVPN server host name or IP address
ïISP server phone number or access point
If you will be using a modem or a VPN connection, perform the procedure in this section.
If you will be using a wireless connection, perform the “To connect to a wireless network”
procedure on page 22.

2 Wireless Communications
Getting connected
30
To connect to your office network:
1 Tap > Settings .
2 On the Connections tab, tap Connections .
3 Under My Work Network on the Tasks tab; select the kind of work connection you
will be using.
4 Enter the required information for the selected work connection.
5Tap Finish.
The connection is automatically started when you use Internet Explorer Mobile to
connect to your work network. Begin using a program that uses an Internet
connection. To manually start the connection, perform one of the following:
(a) Repeat steps 1 and 2, then on the Tasks tab, tap Set up my proxy server
under My Work Network.
(b) On the Modem or VPN tab, tap and hold a connection name, then select
Connect from the pop-up menu.
Viewing intranet URLs
If you’ll be connecting to intranet sites that have periods in their URLs (e.g.
intranet.corporatename.com), you must add them the to Work URL Exceptions list.
Otherwise, Internet Explorer Mobile will search for them in the Internet rather than the
company’s intranet.
To add an intranet URL:
1 Tap > Settings .
2 On the Connections tab, tap Connections .
3 On the Advanced tab, tap Exceptions.
4Tap Add New URL.
5 Enter the intranet URL.
TIP: If you use URLs that share the same root company name, you can add them as
group by entering *.corporatename.com.
6Tap ok.

2 Wireless Communications
Getting connected
31
Setting an e-mail server connection
You can set up a connection to an e-mail server so that you can send and receive e-mail
messages on your device. You can use multiple e-mail accounts to receive your
messages. For each e-mail account you intend to use, first set up and name the e-mail
service. If you use the same service to connect to different mailboxes, set up and name
each mailbox connection.
There are two types of e-mail account that can be managed using your device.
ïMicrosoft Outlook
Using Microsoft Outlook, your Inbox is updated each time you sync with your
computer or corporate e-mail server.
ïPOP3/IMAP4
This includes e-mail service from providers. These e-mail accounts can be
managed remotely using a wireless connection.
To set up an e-mail account:
For an explanation on any of the setup screens, tap > Help .
1 Tap > Messaging .
2Tap New E-mail Account.
3 Enter your e-mail address.
4 Tap the “Try to get e-mail settings automatically from the Internet” check box to
allow auto setup to connect to the Internet and obtain e-mail server settings.
5Tap Read Privacy Statement online to address privacy concerns.
6Tap Next.
This will initiate auto setup which attempts to connect your device to your
e-mail server and automatically download the necessary e-mail connection settings.
If auto-configuration is successful you can begin sending/receiving e-mails. If
unsuccessful you will need to manually enter the settings.
7 Once auto setup is finished, tap Next.
8 Enter your name and the name you want displayed when you send an e-mail.
9Tap Next.
If auto setup is not successful, contact your ISP or network administrator for the
following information and enter them manually:
ïUser name and password
ïDomain name
ïAccount type and name
ïIncoming and outgoing e-mail server

2 Wireless Communications
Getting connected
32

3 Using Phone
Phone setup
33
3 Using Phone
The phone function of your SP500 EDA boasts of standard cell phone features—such as
mailbox and text messages—as well as several handy call features including Speed Dial,
Caller ID, Conference Call, Call Forwarding, Call Waiting, Voice Mail and Text messages,
Fixed Dialing, Call Barring, Call History, speakerphone, note taking, voice mail, and
emergency number setting.
The Phone program is integrated with both Microsoft Contacts and Messaging. This
means you can make a call and send e-mail/text messages from any of these three
programs. This fully integrated functionality of Phone also makes sharing contact
information between programs an easier task.
This chapter shows you how to install a SIM (Subscriber Identity Module) card on your
device. It also describes basic phone operations and features, as well as ways of
customizing the phone function based on your preferences.
ïPhone setup
ïDialer screen
ïPhone operation
ïMaking phone calls
ïPhone features
ïPhone profiles
ïPhone preferences
Phone setup
Installing the SIM card
If you wish to use the phone function, you need to first install a valid SIM card.
A SIM card is a small printed circuit board that must be installed when signing on as a
subscriber in a GSM-based mobile phone like your SP500. It contains subscriber details,
security information and memory for a personal directory of numbers.
To install the SIM card:
1 If the device is switched on:
(a) Press the Power/End key to turn off the device.
(b) Wait for five seconds to allow the device to completely enter sleep mode.
2 Remove the battery pack. See “To uninstall the battery pack” on page 8 for
instructions.
3 With the rear panel facing you, slide the SIM card holder to the right.
4 Lift the holder halfway from the recess area.

3 Using Phone
Phone setup
34
5 Insert the SIM card into the SIM card holder.
Note the proper position of the SIM card—the card connector (i.e., gold area) should
be facing downward with the beveled corner fitting the lower-left corner of the
recess area.
6 Press the SIM card holder down.
7 Slide the SIM card holder to the left to lock it into place.
8 Reinstall the battery pack. See “To install the battery pack” on page 8 for
instructions.
The default settings for your device are programmed on the assumption that you’ll
be using the phone function once you’ve properly installed a SIM card (and in some
cases, entered a PIN), you can then proceed to establishing a connection to your
mobile service provider’s network.
NOTE: If you’re not going to install a SIM card on your device, keep the Phone
program closed or turn the program off using Wireless Manager to minimize power
consumption.

3 Using Phone
Phone setup
35
Entering your PIN
After installing the SIM card you’ll be able to activate your mobile service connection. In
most cases, SIM cards are preset with a PIN (Personal Identity Number), provided by
your mobile service provider.
To enter your PIN:
1 Tap > Phone .
2 On the Dialer screen, enter the preset PIN from your mobile phone service provider.
3 Tap Enter.
If you consecutively enter a wrong PIN for three times, the SIM card is blocked. If
that happens, you can unblock it with the PIN Unblocking Key (PUK code) also
provided by your mobile phone service provider.
3 Using Phone
Dialer screen
36
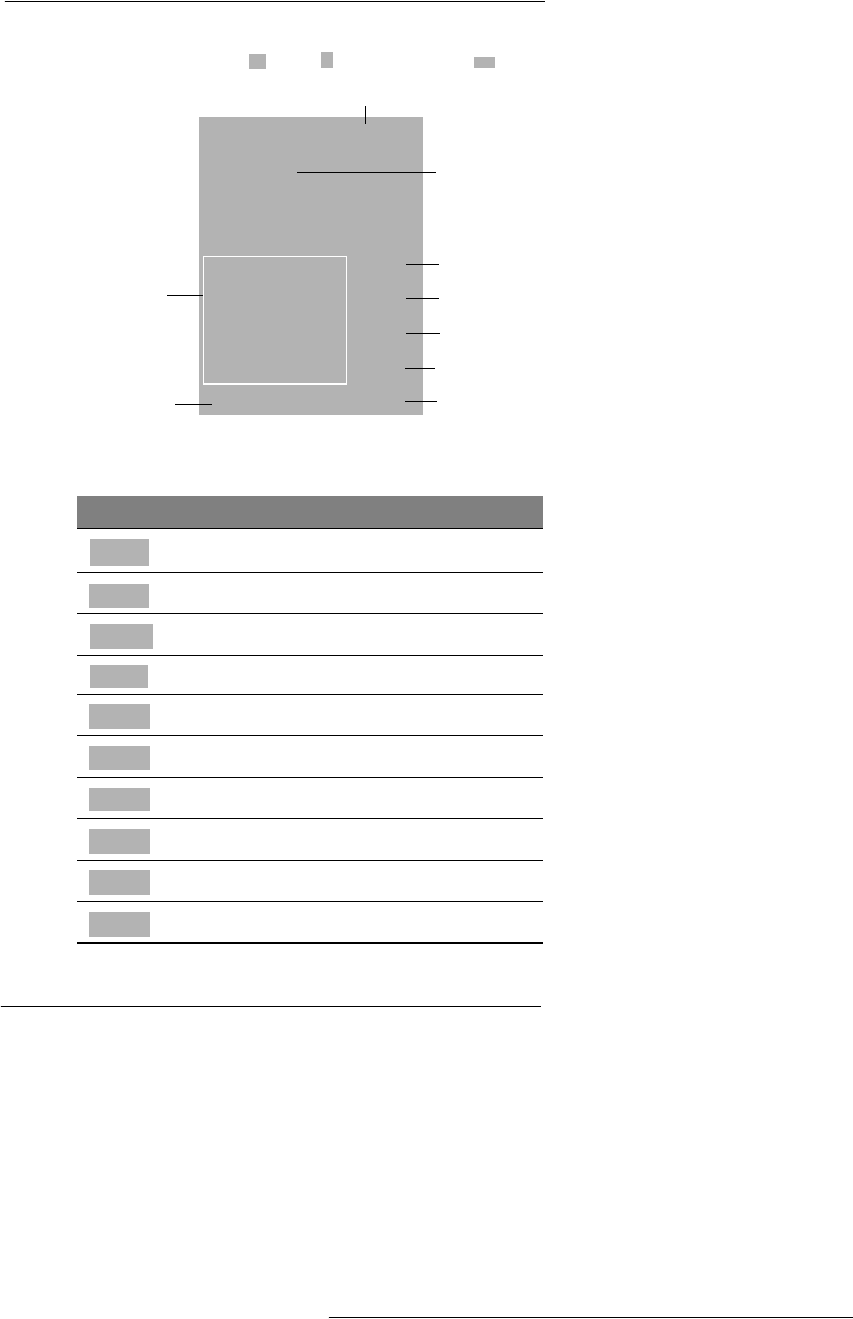
Dialer screen
To launch the Dialer screen, tap > Phone or press the Send button .
Dialer buttons
The list below shows the actions of the Dialer screen buttons.
Tap to back space
over individual
numbers.
Tap to call the
currently displayed
number.
Tap to view the
Speed Dial list.
This icon indicates the status of
the mobile service connection.
Tap to view the Call
History entries.
Tap to view the
Contacts list.
Soft keypad for
inputting.
Last number called
is displayed here.
Tap Menu, then
Options to view
Phone Settings.
Icon Description
Tap to erase the number you entered.
Tap to view the Speed Dial list.
Tap to see all received, made, and missed calls.
Tap to call the displayed number.
Tap to enable speakerphone mode.
Tap to view Contacts.
Tap to mute a call.
Tap to hold a call.
Tap to end a call.
Tap during a call to create a note or recording for a particular call.

3 Using Phone
Phone operation
37
Phone status icons
The list below shows the Phone-related status icons.
Phone operation
Turning the phone function on and off
If you have turned the phone function off, removed and then reinstalled the SIM card, the
connection to your mobile service provider’s network is not automatically enabled. You
have the option to just use the device’s EDA features or you can re-establish the mobile
service connection.
IMPORTANT: In many countries it is required by law to turn off cell phones when
boarding commercial flights. Turning off your SP500 does not turn off the device’s
phone function; you must use the Wireless Manager to turn off the phone.
Icon Name Description
Network search Indicates that the device is attempting to
establish mobile service connection.
No network Indicates that the device is not able to
establish mobile service connection.
Phone off Indicates that the phone is off.
In network service Indicates that the phone is connected to a
network.
Signal status The number of bars indicates the strength of your
connection signal. As the strength of the signal
diminishes the number of bars in the icon
diminishes, with no bars indicating no signal.
Active call Indicates that a call is being made or there is an
incoming call.
Speakerphone Indicates that the speakerphone mode is
enabled. See “Using the speakerphone” on
page 40 for more information on how to activate
the speakerphone.
Missed call Indicates that you have a missed call.
Unread message Indicates that you have unread text or e-mail
message(s), as well as voice mail notification(s).

3 Using Phone
Phone operation
38
To turn on the phone function:
1 Launch the Wireless Manager application:
ïOn the Today screen, tap Wireless Manager .
-or-
ïOn the Today screen, tap the signal icon on the upper right corner
of the screen, then from the Phone callout, tap Wireless Manager.
Tap to launch the
Wireless Manager.

3 Using Phone
Phone operation
39
2 On the Wireless Manager screen, tap Phone to turn on phone function.
The signal icon changes indicating the SP500 is searching for a mobile
connection. This may take a few seconds. The signal icon changes to , and
to once a mobile connection is established.
To turn off the phone function:
1 Launch the Wireless Manager application.
ïOn the Today screen, tap Wireless Manager .
-or-
ïOn the Today screen, tap the signal icon and select Wireless
Manager.
2 On the Wireless Manager screen, tap Phone to turn off phone function.
Erasing number input
If you entered a wrong phone number when dialing, you can either backspace to erase
individual digits or you can delete the entire phone number
ïTap to backspace over digits.
ïPress the Backspace key on the keypad.

3 Using Phone
Phone operation
40
Answering a call
ïOn the Call Notification callout, tap Answer or press the Send button.
Rejecting a call
ïOn the Call Notification callout, tap Ignore or press the End button.
Depending on your mobile service subscription, either a busy tone is sent
out, or the call is forwarded to your voice mailbox.
Ending a call
ïTap End or press the End button.
Adjusting the phone volume
To adjust the phone volume, you must do so during a call. If you adjust the volume at
another time it only affects the level of the system sounds (i.e., ring and notification
alerts, .wmv/MP3 playback).
To adjust the phone conversation volume:
1 Tap on the navigation bar or press the volume key down to bring up the Volume
drop-down box.
2 Drag the slider to adjust the phone volume.
Using the speakerphone
To attend to phone calls, attach the single earbud headset or activate the speakerphone
mode. The speakerphone function allows you to talk hands-free and/or let other people
listen to the caller.
To enable speakerphone mode:
ïPress and hold the Send button or tap the Speaker On screen
button until the speakerphone turns on as indicated by the appearance of the
Speakerphone icon on the navigation bar.
To disable speakerphone mode:
ïPress and hold the Send button or tap the Speaker On screen
button again until the Speakerphone icon disappears from the
navigation bar.

3 Using Phone
Phone operation
41
Muting a call
During a call you can mute the microphone so that the person with whom you are
speaking cannot hear you, but you can still hear him or her. This is useful if, for example,
you do not want the other person to hear a conversation or background noise on your
side of the call.
To mute a call:
ïDuring a call, tap Mute to toggle the mute function on and off.
The mute icon is displayed on the Dialer screen’s entry area to indicate that the
mute function is enabled.
Making phone calls
The integrated nature of your device’s phone function lets you make calls in a variety of
ways across different applications. You can make a call by:
ïManually entering a phone number using the Dialer keypad.
ïAccessing numbers using Speed Dial, Call History, Microsoft Contacts or
SIM Manager.
Once a call has been initiated the signal icon changes to indicating
an active call.
To make a call using dialer:
1 On the Dialer keypad, tap the phone number you want to call.
2 Tap Talk or press the Send button.
Tap to terminate
the call.
This icon indicates a call
is being made and the
strength of the signal.
The number being
called is displayed
here.

3 Using Phone
Phone operation
42
To make a call using Microsoft Contacts:
There are several ways to make a call in Contacts. In this section, only the method using
the hardware buttons is described. See "Calling a contact" on page 67 for instructions on
other methods.
1 Tap > Contacts .
Contacts opens to the contact list.
2 Type a name or number, or move the joystick up or down to scroll through the
contact list and select the contact you want to call.
3 Press the Send button twice—once to launch Phone and another to make the
call. The call will be made to that contact’s priority number.
To make a call using Speed Dial:
Speed Dial is a list you create for numbers you call regularly. Only numbers stored in
Microsoft Contacts can be added to this list.
You can make a call in two ways:
ïBy memorizing a phone number’s position in the Speed Dial list, you can dial
the number by entering its location number.
In the picture above, Clarisse Madeline Ang is at position 2. To dial her
number, tap and hold 2 on the Dialer keypad until you hear a beep.
If a number holds a position of 10 or higher tap the first number, and then tap
and hold the second to dial. For instance, to call the number in position 12,
tap 1 then tap and hold 2.

3 Using Phone
Phone operation
43
ïAlternatively, if you don’t remember the position of a number in the Speed
Dial list follow the steps below:
(a) Tap Speed Dial .
(b) On the Speed Dial screen, press the joystick to go through the list to find the
number you want to call.
(c) Once the number is selected, you can either press the joystick or the Send
button to initiate the call.
To make a call using Call History:
Call History is a record of all incoming, outgoing, and missed calls.
1 Tap Call History .
2 Find the number you want to call. You can select a call category—All Calls, Missed,
Outgoing, Incoming, and By Caller—by tapping the pick list in the top-left corner of
the screen.
3 Once the number has been selected press the joystick or the Send button to make
the call.
Tap the category icon on the left of the selected number.
Tap to adjust voice
mail settings.
Tap to edit contact
details.
Tap to add a
contact to the
Speed Dial list.
Tap a Speed Dial
number to call that
contact.
Tap a category icon
to call the number
opposite it.

3 Using Phone
Phone operation
44
To make a call using SIM Manager:
SIM Manager is a program you can use to view and manage the contents of your SIM
card.
1 Tap > Settings .
2 On the System tab, tap SIM Manager .
Wait for the SIM card contents to load.
3 Scroll to the SIM contact you want to call and perform any of the following:
ïPress the joystick.
ïPress the Send button.
ïTap and hold the SIM contact, then select Call from the pop-up menu.
To make a call from a Bluetooth-enabled headset:
You can use a Bluetooth-enabled headset with your device when you create a
partnership between your device and the headset.
1 Make sure that the two devices are turned on, discoverable, and within close range.
2 Tap > Settings .
3 On the Connections tab, tap Bluetooth .
4 On the Devices tab, tap Add new device.
Your device will search for other Bluetooth devices and displays them in the device
list.
5 Tap the name of the Bluetooth-enabled hands-free device in the list, then tap Next.

3 Using Phone
Phone features
45
6 If you want to use a passcode, enter the alphanumeric passcode for the Bluetooth-
enabled hands-free device, then tap Next.
You can find the passcode in the manufacturer’s documentation for your hands-free
device.
7 Tap Finish.
8 Select the check box for the Hands Free service, and tap Finish.
To make an International call:
For making a call to an overseas number that is not stored either in your SIM card or on
your device, follow the steps below.
1 Tap and hold the Backlight/0 key until the plus (+) sign appears.
This sign replaces the international number prefix “00”.
2 Enter the full phone number you want to dial.
It includes the country code, area code (without the leading zero), and phone
number.
3 Tap Talk or press the Send button.
Making an emergency call
SP500 supports the international emergency number 112, and for US/Canada residents,
the emergency number 911 as well. You can call these numbers for emergency police,
fire, and medical assistance.
NOTE: In some cases, additional local emergency numbers may be provided by your
mobile phone service provider.
Generally, you can make a call to these emergency numbers, with or without a SIM card
installed on your device, as long as a mobile phone service network is available in your
area. However, some mobile phone service providers may require that a SIM card is
inserted, and in some cases that the PIN has been entered as well, before an emergency
call can be made. Contact your mobile service provider for the requirements applicable
to your mobile subscription.
To make an emergency call:
1 Dial the emergency number by using Dialer.
ïFor international emergency calls, dial 112.
ïFor US/Canada emergency calls, dial 911.
2 Tap Talk or press the Send button.
Phone features
Flexibility is a hallmark of your device’s phone function. This is best exemplified in such
features as Call Notification, Call Hold and Conference Call, which allows you to attend
to more than one call simultaneously—all with a simple tap of your stylus.
Variety is another hallmark of your device’s phone function. This is implemented in such
range of features as Call Notes, text/e-mail messaging, Voice Mail, and Contacts
Integration.
NOTE: The availability of some of the phone features described in this section may
depend on your mobile service subscription. Contact your mobile service provider for
information.

3 Using Phone
Phone features
46
Call notification and identification
The Call Notification feature lets you know if another person is trying to call you when
you are talking on the phone. When this happens the following callout appears.
The Caller Identification feature matches the incoming call number with those stored in
Contacts so you know who is calling you.
Call hold
After being notified of an incoming call while already on the phone, you can choose to
reject a call by tapping the Ignore button on the Call Notification callout, or you can use
the Call hold feature to attend to both calls.
To put a call on hold:
ïOn the Call Notification callout, tap Answer to take the incoming call and put
the original one on hold.
To swap between calls:
ïTo shift between two callers tap Menu > Hold.

3 Using Phone
Phone features
47
Conference call
With the Conference Call feature you can create a conversation line between several
callers. You can either, put a call on hold, then dial another number and wait for it to be
picked up; or accept an incoming call when you already have one in progress.
To set up a conference call:
ïDuring a call with two active numbers, tap Menu > Conference.
If the conference connection is successful the word “Conference” will appear
in the input area of the Dialer screen.
To add additional people to a conference call:
You can connect up to six (6) callers at a time in a conference call.
1 During an active conference call, tap Menu > Hold.
2 Key in the new number.
3 Tap Resume to return and continue with the conference call.
4 Repeat steps 1-3 to add more people in the conference call.
Call notes
The Call Notes feature allows you to create a written or recorded note during a call. The
call note will be saved as an attachment to your call as viewed in Call History.
To create a call note:
1 During an active call, tap Note .
2 On the Notes screen, use any of the input methods to compose your call note.
3 After you finished your call note, tap ok.
To add a recording to a call note:
1 During an active call, tap Note .
2 On the Notes screen, tap Menu > View Recording Toolbar.
3 Position your device's built-in microphone near your mouth or other source of
sound.
4 On the Recording toolbar, tap .
5 Tap to stop recording.

3 Using Phone
Phone features
48
The new recording appears as an embedded icon.
6 Tap ok.
To view a call note:
You can view call notes either from the Call History screen or from the Notes program.
ïOn the Call History screen:
(a) Tap Call History .
(b) Select a log item marked with this icon.
(c) Tap and hold the selected log item, then tap View Note from the pop-up
menu.
Tap a call note.

3 Using Phone
Phone features
49
ïOn the Notes screen:
Tap the call note from the list.
A call note’s label corresponds to the name or phone number of the related
contact.
Text messaging service
Just like a regular mobile phone, you can send and receive text messages using your
device. Your account is automatically setup in Inbox when you activated your mobile
service subscription.
To view a text message:
You can view a text message whether the phone function is on or off.
ïWhen the phone function is on, you can view a text message from its
notification callout:
Tap the text message notification icon on the navigation bar to display
the message.
Call note

3 Using Phone
Phone features
50
The Caller Identification feature matches incoming text message numbers with
those stored in Contacts so you know who is sending you a message. Furthermore,
the “New Text Message” callout gives you the option to call the sender or save,
dismiss, or delete the message.
ïWhen the phone function is off, you can still view received text message in
Messaging:
(a) Perform one of the following:
•Tap > Messaging > Text Messages.
-or-

3 Using Phone
Phone features
51
• On the Today screen, tap Text Messages.
(b) In the message list, tap a text message.
NOTE: If the phone function is turned off and you tried to call the sender, send a reply,
or forward the message, you will be prompted to turn the phone function on.
Tap Text Messages.
Tap to reply the message.

3 Using Phone
Phone features
52
To create a text message:
1 On the Dialer screen, select a contact name that you want to send a message to.
2 Tap Menu > Send Text Message.
3 Compose your message.

3 Using Phone
Phone features
53
The auto-correct feature automatically fixes common spelling errors as you type so
your messages are more accurate.
The character counter lets you see and control the size of the message as you
compose.
If you want to know if your text message was received, tap Menu > Message
Options, then select the Request SMS text message delivery notification check
box.
4 Tap Send when you've finished the message.
If the phone function is turned on, your text message will be sent out. If it’s off, you
will be prompted to turn on the phone function. If you do so, the message will be
sent out; otherwise when you tap ok, the message will be saved in the Drafts folder
and you can send it out later.
Voice mail
With the voice mail service you need not miss a message when you miss a call.
Unattended calls (i.e., no answer, phone function is turned off or is out of network
service) or a busy line will automatically forward callers to your voice mailbox where they
can leave their messages.
When you insert your SIM card into your device, it will automatically detect and set as
default the voice mailbox number provided by your mobile service provider. By default,
the first Speed Dial location is assigned to your voice mailbox.
To retrieve your voice mails:
ïTap and hold the button on the Dialer keypad.
Your voice mail retrieval number is automatically dialed.

3 Using Phone
Phone features
54
ïTap the New Text Message Notification icon informing you of the new
voice mail, then tap Menu > Call sender from the “New Text message”
callout.
Contacts integration
Your device’s phone function is integrated with other applications making it easy for you
to share contacts—phone numbers—between programs. Listed below are the places
where contacts can be stored on your device:
ïMicrosoft Contacts
Your contact list contains phone numbers that you can use in Phone.
ïYour SIM card
You interchange your SIM card between your SP500 and another device;
while using the other device you can create new contacts on the SIM card.
ïCall History
New contact numbers can be found in incoming or missed calls.
Sharing contacts in Microsoft Contacts
Below are several advantages for exporting contact information to Microsoft Contacts:
ïAs a backup in case you lose your SIM card while using it with another
device.
ïIf you are using your SIM with another device, you may need the numbers
stored in Microsoft Contacts.
ïExporting phone numbers to Microsoft Contacts allows you to create a more
detailed record.
To add contacts to Microsoft Contacts:
You can choose to create new contacts or add contacts from SIM Contacts or from Call
History.
ïSee “To create a contact” on page 66 for more information on creating new
contacts.
ïSee “Sharing contacts in call history” on page 55 for more information on
adding Call History items.
ïSee “Sharing contacts in SIM Contacts” on page 55 for more information on
adding SIM contacts.
To export contacts from Microsoft Contacts:
1 Perform one of the following:
ïTap and hold a contact to display the pop-up menu.
ïTap a contact to select it, then tap Menu.
If you do not select a contact, the first entry on the list will be exported.
2 Select the location where to export the contact.

3 Using Phone
Phone features
55
To export a contact to Speed Dial:
1 Tap a contact to select it, then tap Menu > Add to Speed Dial.
2 In the next screen add the contact details.
3 Select a location. You can either:
ïAccept the default location which is the first available position in the
Speed Dial list.
ïUse the up and down arrows in the Location field to scroll and select the
desired location. If you want to put a number in a position that is already
occupied, the new number will overwrite the number already there.
4 Tap ok.
Sharing contacts in SIM Contacts
SIM Contacts enable you to manage all contacts stored in your SIM card with the option
to export this information to Microsoft Contacts.
To export SIM contacts:
You can choose to export individual or all SIM Manager contacts to Microsoft Contacts.
Sharing contacts in call history
Call History is a record of all incoming, outgoing, and missed calls. You have the option
to export new numbers under the Incoming and Missed categories to Microsoft Contacts.
To export Call History entries to Microsoft Contacts:
1 On the Dialer screen, tap Call History .
The Incoming or Missed categories appear.
2 Tap and hold the number you want to export.

3 Using Phone
Phone features
56
3 In the pop-up menu that appears select Save to Contacts.
4 On the Contact screen add additional contact details.
5 Tap ok or press the joystick.
The call details in the Call History for the transferred number will change to display
the contact name specified.
Call History
All calls made on your device are recorded in Call History. It provides the time and
duration of all incoming, outgoing, and missed calls, and a summary of total calls. You
can refer to it to access any notes taken during a call. You can also set a limit on the
number of entries or delete them as necessary to save memory space.
To view Call History:
ïOn the Dialer screen, tap Call History .

3 Using Phone
Phone features
57
To change the Call History view:
You can limit the number of entries that appear on the Call History list according to
specific criteria, such as All Calls, Missed, Outgoing, Incoming, or By Caller.
1 On the Dialer screen, tap Call History .
2 Tap Menu > Filter, then select a different view. For example, you can view only
missed or incoming calls.
The Call History list can be filtered according to the following criteria.
Category Description
All Calls Shows all calls made to and from your device in a
chronological order.
Missed Shows calls made to your device that were not answered.
Outgoing Shows all calls made from your device.
Incoming Shows all calls made to your device.

3 Using Phone
Phone features
58
Call details
Call History allows you to check the date and time a call was made, as well as the
duration.
To view call details:
ïFind the call you are interested in, then tap it once.
Call history limit
To minimize the memory space occupied by the Call History items, you can set a limit for
the number of entries retained after a specific period of time. You can also delete items
that you no longer need.
To set the Call History limit:
1 On the command bar, tap Menu > Call Timers.

3 Using Phone
Phone profiles
59
2 On the Call Timers screen, tap the ”Delete call history items older than” pick list,
then, tap a time period option.
3 Tap ok.
To delete individual Call History entries:
ïTap and hold the entry you want to delete, then from the pop-up menu,
select Delete.
To delete all Call History entries:
ïFrom the command bar, tap Menu> Delete All Calls.
Phone profiles
Your device supports five types of preset profiles. These preset profiles allow you to
personalize the ring tone, image, and profile expiration time settings of your device, and
to activate a profile for different events and environments.
To activate a pre-defined phone profile:
1 Tap > Settings .
2 On the System tab, tap Phone Profiles .
3 Select a profile setting.
4 Tap Menu > Active.

3 Using Phone
Phone profiles
60
To create a new phone profile:
1 Tap > Settings .
2 On the System tab, tap Phone Profiles .
3 Tap New > Yes.
4 Define the phone profile settings.
5 Tap OK > ok.
To change a phone profile setting:
1 Tap a profile setting that you want to change.
2 Tap Menu > Edit.
3 Enter a profile name.
4 Set the ring volume for incoming voice calls and messages by pressing the Volume
key up or down.
5 Select a ringing option for incoming voice calls in the Ring Type list.
6 Select a ringing option for incoming messages; tap the Short Message Sound list.
7 Select a picture to add to your profile by tapping Browse.
8 Set the duration of the alerting signal prior to an incoming voice call or SMS
message.
9 Tap Advance.
10 On the Incoming, Reminders, and Message tab, define settings for an incoming
voice call or SMS message.
11 Tap Save > OK.
12 Tap OK > Yes.

3 Using Phone
Phone preferences
61
To delete a phone profile:
1 Tap a profile setting.
2 Tap Menu > Delete.
3 Tap Yes > OK.
To activate the HAC profile:
SP500 is compliant with the FCC HAC (Hearing Aid Compatibility) requirements. When
some wireless devices are used near hearing devices (such as hearing aids and
cochlear implants), a buzzing, humming, or whining noise may be detected. Some
hearing devices may be more immune than others to this interference, and wireless
devices also vary in the amount of interferences they generate. SP500 has a predefined
HAC profile that optimizes the audio performance for some hearing aids.
NOTE: Some hearing aids may be more immune than others are to interference.
Consult your hearing health-care professional to determine the rating of your hearing aid
and whether the hearing aid will work with this device.
1 Tap > Settings .
2 On the System tab, tap Phone Profiles .
3 Tap HAC.
4 Tap Menu > Active.
Phone preferences
You can configure most features of the phone function to suit your preferences. You do
this by accessing the Phone option under Settings.
To access Phone settings:
ïOn the Dialer screen, tap Menu > Options.
- or -
From any other screen, tap > Settings > Personal tab > Phone .
The Phone Settings screen has five tabs—Phone, Services, Network, Band,
and PPP Auth. Refer to the following sections for the configuration options
available for each tab.

3 Using Phone
Phone preferences
62
Phone tab
Configure sound and security settings in this tab.
NOTE: Before proceeding with the configuration, make sure Phone is turned on.
To configure ring type, ring tone, and keypad sounds
1 Turn on Phone .
2 In the Sounds option, tap the pick list for each field, then select your choice from the
drop-down list.
To listen to a ring tone:
ïSelect the ring tone file you want to play, then tap the Play button. To stop
ring tone playback, tap the Stop button.
To customize the ring tone options:
To have a more personalized batch of ring tones to choose from, you can download
additional sound files to your device. File formats supported include .wav, .wma, .mp3,
and .mid.
1 To add more ring tone options to your device, you can:
ïSynchronize sound files from your computer using ActiveSync.
ïDownload sound files from a network using a GPRS or Wi-Fi
connection
ïReceived sound files from other IR- or Bluetooth enabled devices.
Ring Type Ring Tone Keypad Sounds

3 Using Phone
Phone preferences
63
2 After receiving the sound files in your device, use File Explorer to make sure
that they are located in the My Device | Windows | Rings folder. Only then will they
be listed as ring tone options.
3 Create customized ring tone options by creating stand-alone recordings in Notes.
These recordings are automatically copied to the My Device | Windows | Rings
folder. See “To set a voice recording as ringtone” on page 30 for related
instructions.
To associate a ring tone with a contact:
Rings tones can be set to be triggered by a contact to let you know at once when an
incoming call is from that contact without looking at the display.
1 Tap > Contacts .
2 Tap a contact in the contact list (or select it using the joystick), a summary screen
displays. This is referred to as a contact card.
3 Tap Menu > Edit.
4 On the Ring tone list, select a voice recording.
5 Tap ok.
Configuring your PIN
Under the Security options, you can change your PIN and have it enabled or disabled.
To enable your PIN:
ïSelect the “Require PIN when phone is used” check box.

3 Using Phone
Phone preferences
64
To disable your PIN:
ïDeselect the “Require PIN when phone is used” check box.
To change your PIN:
1 Tap the Change Pin button. The Dialer screen displays.
2 Enter the old PIN, input a new one, then retype it for confirmation.
Services tab
Configure the different phone services in this tab—Call Barring, Caller ID, Call
Forwarding, Call Waiting, Voice Mail and Text Messages, and Fixed Dialing.
NOTE: The availability of some of the phone services described in this section may
depend on your mobile service subscription. Contact your mobile service provider for
information.
Call barring
You have the option to block calls in specific situations.
To enable or disable call barring:
1 On the services list, tap Call Barring.
2 Tap the Get Settings button (retrieving settings may take a few minutes).

3 Using Phone
Phone preferences
65
3 On the next screen, define the call barring settings.
ïBlock incoming calls
ïAll calls - to prevent any calls from coming through
ïWhen roaming - to block incoming calls when in phone service is in
roaming status
ïOff - to accept all incoming calls
ïBlock outgoing calls
ïAll calls - to prevent any calls from being made from your device
ïInternational - to block outgoing international calls
ïInternational except to home country - to block all outgoing international
calls other than those being made to the set home country
ïOff - to disable call barring for all outgoing calls
4 Tap ok.
To confirm the call barring function on your device is activated, repeat step 1 and 2.
The Settings screen displays with the new setting.
Caller ID
When this service is enabled and you make a call, your phone number will be displayed
on the phone screen of the person you’re calling.
To enable or disable Caller ID:
1 On the services list, tap Caller ID.
2 Tap the Get Settings button (retrieving settings may take a few minutes).
3 On the next screen, define the caller ID settings.
ïEveryone - to enable Caller ID
ïNo one - to disable Caller ID

3 Using Phone
Phone preferences
66
ïOnly to contacts - to enable caller ID for selected phone numbers only
4 Tap ok.
To confirm the caller ID function on your device is activated, repeat step 1 and 2.
The Settings screen displays with the new setting.
Call forwarding
This service allows you to forward incoming calls to another phone number. You can
choose to forward all calls to the same number or specify a number based on the
following conditions:
ïUnavailable - the phone function is turned off or is out of network service
ïBusy - when you are attending to a phone call
ïNo answer - when you are not answering your phone calls
To enable or disable call forwarding:
1 On the services list, tap Call Forwarding.
2 Tap the Get Settings button (retrieving settings may take a few minutes).
3 On the next screen, follow these steps to enable or disable call forwarding:
ïTo enable call forwarding:
ïTap the “Forward all incoming phone calls” check box, then specify the
call forward phone number on the “To” field.
- or -
ïTo forward incoming calls to a different number based on the following
conditions, then specify the call forward phone number on the box
opposite it:
ïNo answer - forward calls to a specific phone number when you
can’t answer your phone
ïUnavailable - forward calls to a specific phone number when the
phone is turned off or you are unreachable
ïBusy - forward calls to specific phone number when the line is busy

3 Using Phone
Phone preferences
67
ïTo disable call forwarding, deselect all the check boxes.
4. Tap ok.
To confirm the call forwarding function on your device is activated, repeat step 1 and
2. The Settings screen displays with the new setting.
Call waiting
This service allows you to receive another call during an active call.
To enable or disable call waiting:
1 On the services list, tap Call Waiting.
2 Tap the Get Settings button (retrieving settings may take a few minutes).
3 In the next screen, define the call waiting settings.
ïNotify me - to enable call waiting, or
ïDo not notify me - to disable call waiting
4 Tap ok.
To confirm the call waiting function on your device is activated, repeat step 1 and 2.
The Settings screen displays with the new setting.

3 Using Phone
Phone preferences
68
Voice mail and text messages
By default your device will automatically detect and set the voice mail and text messages
access numbers provided by your mobile service provider. You can view these numbers
for your reference.
To view voice mail and text messages numbers:
1 On the services list, tap Voice Mail and Text Messages.
2 Tap the Get Settings button (retrieving settings may take a few minutes).
3 Enter the voice mail or text message phone number.
4 Tap ok.
To confirm the voice mail and text messages function on your device is activated,
repeat step 1 and 2. The Settings screen displays with the new setting.
Fixed dialing
This service allows you to set predefined numbers or prefixes that you would like to call.
To create fixed number entries:
1 On the services list, tap Fixed Dialing.
2 Tap the Get Settings button (retrieving settings may take a few minutes).
3 Tap the “Enable fixed dialing” check box, then tap Done.
4 To add a number to the list, tap Menu > Add.
5 Enter the phone number or area code you want to be restricted, then tap Done.
6 Repeat steps 4 and 5 to add more numbers, then tap Done.

3 Using Phone
Phone preferences
69
7 Enter the unblock (PUK2) code.
8 Enter the PIN2, then tap Done.
9 Tap ok.
To confirm the fixed dialing function on your device is activated, repeat step 1 and 2.
The Settings screen displays with the new setting.
To edit entries:
1 On the services list, tap Fixed Dialing.
2 Tap the Get Settings button (retrieving settings may take a few minutes).
3 Select the number pattern, then tap Menu.
4 Tap Edit, then enter PIN2 and tap Done.
5 Enter the new number, name, and position, then tap Done.
Network tab
This tab allows you to configure settings related to mobile service networks. The
currently activated network is indicated on the first line of this tab.
To find a network:
Do this when the network status is currently out of network service and you want to
conduct a search.
ïTap the Find Network button (search process may take a few minutes).
To select a network:
Set the mode for conducting a network search.
ïIn the Network selection drop-down list, tap either Automatic or Manual.
Retrieving network settings may take a few minutes if you select Manual.

3 Using Phone
Phone preferences
70
To set preferred networks:
If there are many mobile phone service providers available in your area, you can
configure this function to select your preferred ones and set its priority level.
1 Tap the Set Networks button (search process may take a few minutes).
2 To include a listed network as a preferred network, tap the check box opposite it.
3 To set the priority level, tap a preferred network, then tap the Move Up or
Move Down buttons.
4 Tap ok.
Band tab
SP500 operates on the GSM 850/900/1800/1900 bands. Use the Band tab to select a
GSM band for your device to operate on.
To set your device’s roam mode:
1 On the Band tab, select a GSM band.
2 Tap Apply.

3 Using Phone
Phone preferences
71
PPP Auth tab
The PPP Auth tab provides option for setting up PPP authentication to provide secure
communications over the network. With PPP authentication protocols such as Challenge
Handshake Authentication Protocol (CHAP), Microsoft Challenge Handshake
Authentication Protocol (MS-CHAP) , and Password Authentication Protocol (PAP), the
integrity and privacy of sensitive data is ensured.
To set the global settings for your network connection:
1 On the PPP Auth tab, select a PPP authentication protocol.
2 Tap Apply > ok.

3 Using Phone
Phone preferences
72

4 Using GPS Navigation
GPS antenna
73
4 Using GPS Navigation
ïGPS antenna
ïUnpacking the SP500 vehicle mount kit
ïSetting up SP500 on your vehicle
ïUsing SP500 safely
GPS antenna
SP500 has an internal micro-antenna for the GPS (Global Positioning System) receiver.
This antenna, located beneath the top left of the device, receives radio signals and
process position information between the device receiver and the satellite signals.
GPS accuracy and signal availability and quality may be affected by your location,
buildings, canyon walls, hard ground, and weather conditions. Use your device outdoors
to allow reception of GPS signals.
Unpacking the SP500 vehicle mount kit
The vehicle mount kit includes:
ïVehicle mount
ïCradle plate
ïAuto charger cable
ïHeadset
Setting up SP500 on your vehicle
WARNING! Some countries prohibit the mounting of any electronic device in any
location on the vehicle dashboard. Be sure to check your local laws acceptable
mounting areas before installing the auto mounting kit.
Installation reminders
ïDo not mount the device where it will obscure the driver’s view of the road.
ïDo not mount the device near the driver seat air bag deployment area.
ïDo not place the device on top of the dashboard or anywhere without
securing the device on the vehicle mount.
ïDo not mount the device near the passenger seat air bag deployment area.

4 Using GPS Navigation
Setting up SP500 on your vehicle
74
ïInstall the vehicle mount on the surface of your vehicle that is reasonably flat
and free of dirt and oil
Device mounting precautions
ïSome countries prohibit the mounting of any electronic device in any location
on the vehicle dashboard. Be sure to check your local laws acceptable
mounting areas before installing the auto mounting kit.
ïSome newer vehicle models may have a heat reflective shield embedded in
the windshield. This may in some cases obstruct the GPS signal reception.
In some cases, poor GPS signal are caused by:
ïIndoors and GPS cannot receive satellite positioning signal
ïPylon or mobile phone base station
ïBad weather, thunder, lightning, cloudy sky, fog, or rain
ïDriving at high speed
ïThe heating and cooling cycle of a vehicle’s interior will in some cases
loosen the adhesion of the suction cup. Check the vacuum seal of the
vehicle mount kit for adequate adhesion each time you use the unit, and
reinstall if necessary.
ïIf the vehicle mount kit has problems staying on, clean the plastic suction
cup with alcohol, then reinstall.
To set up the device on your vehicle:
Install the vehicle mount on the surface of your vehicle that is reasonably flat and
free of dirt and oil
1 Clean the mounting surface with a glass cleaner and a clean cotton cloth.
2 Install the vehicle mount on the windshield or other flat car surface.
(a) Fix the suction cup mount to the selected area with the suction lever facing
up.
(b) Flip the lever down to create a vacuum between the suction cup and the
mounting surface.
Make sure that the suction bond is strong enough before proceeding to the
next step.
(c) Insert the vehicle mount’s cradle plate to the holes on the back of the cradle.
(d) Move the car cradle until both parts are engaged.

4 Using GPS Navigation
Setting up SP500 on your vehicle
75
3 Slide the device into the cradle.
IMPORTANT: Before you start to use your device for GPS navigation, download
the LTO (Long Term Orbits) first to update the Ephemeris data (current satellite
position and timing information) onto your device. This data is needed to determine
the GPS position of your current location.
4 The internal GPS receiver of your device is located as shown, for best GPS
reception, make sure to mount your device in the correct position as shown in the
illustration.
5 Connect the charger cable to the device and connect the other end of the charger
cable to the cigarette lighter socket.
The LED indicator on the right side of the touch screen lights up orange during
charging.
Downloading the LTO satellite data
Global Locate LTO satellite data provides guidance information about your current
location and the distance and duration of travel. After the final location and time are
calculated, the coordinates in the GPS are expressed in specific coordinate system,
degrees and decimal degrees format, using the WGS 84 coordinate system.
The SP500 includes an Express GPS Connection application that makes use of the LTO
satellite data, which can be downloaded using a GPRS/EDGE wireless data service
connection or obtained from a server on the Internet through WLAN network. As an
alternative to GPRS/EDGE or WLAN download, you can retrieve the LTO satellite data
from a server on the Internet and transfer it to your SP500 when you connect it to your
PC via ActiveSync or Bluetooth. After downloading the satellite orbit data, Express GPS
Connection stores the data into the device’s GPS chipset.

4 Using GPS Navigation
Setting up SP500 on your vehicle
76
For your first location fix, it is best to be outdoors under an open sky, with no tall buildings
or other obstructions close by. It should take one to two minutes to compute the first
position fix. After obtaining the first fix, Express GPS Connect operates at the optimum
GPS performance level. If the data has expired, you should check your Express GPS
Connect settings.
You have two options to download LTO—from the Today screen, using the Express GPS
Connect icon ; or the Express GPS Connect option under the Settings >
Connections preferences.
NOTE: Be sure the current date is displayed on the SP500. If the date and time are
not current, tap the Clock icon on the Today screen.
To download the LTO satellite data file using Settings:
1 Start a remote connection to the server using a GPRS/EDGE or Wi-Fi connection.
2 Tap > Settings .
3 On the Connections tab, tap Express GPS Connect .
4 Tap Download Now.
To download the LTO satellite data file using the Express GPS Connect icon:
1 On the Today screen, tap the Express GPS Connect icon , located on the
lower right corner of the screen.
2 Tap Download Now.

4 Using GPS Navigation
Using SP500 safely
77
Once activated, Express GPS Connect icon on the Today screen turns from gray to
blue .
See “Express GPS Connect” on page 168 for more information on how to use Express
GPS Connection,
Using SP500 safely
For your safety, observe the following precautions carefully.
Driving precautions
ïDo not attempt to enter information or configure the device while driving. If
you need to do so, pull out of traffic and come to a stop in a legally
permissible and safe location before using your device.
ïVehicle operators must maintain full surveillance of pertinent driving
conditions at all times. Minimize the need to view the device screen while
driving and use voice prompts to guide you.
ïNever place the device on the passenger seat or any place else in the car
where it can become projectile during a collision or stop.
ïAn air bag inflates with great force, DO NOT mount the device in the area
over the air bag or in the air bag deployment area.

4 Using GPS Navigation
Using SP500 safely
78