Users Manual
LOGIC INSTRUMENT S.A
TEL: +33 (0) 1 34 28 61 61
FAX: +33 (0) 1 34 28 00 50
71 ROUTE DE SAINT-DENIS- BP116
95170 DEUIL LA BARRE
FRANCE
E-mail : Sales@logic-instrument.com
URL: http://www.tetra-computer.com
LOGIC INSTRUMENT (DEUTSChLAND) GMbh
TEL: +49 (0) 89 666 287-6
FAX: +49 (0) 89 666 287-87
WALLBERGSTRASSE 5
D-82024 TAUFKIRCHEN
DEUTSHLAND
E-mail : Sales@logic-instrument.de
URL: http://www.logic-instrument.de
LOGIC INSTRUMENT USA INC.
TEL: +1 410-833-25-96
FAX: +1 410-833-29-76
BALTIMORE MARYLAND
3240 MURRAY RD
FINKSBURG, MD 21048 - USA
E-mail: Sales@logic-instrument-us.com
URL: http://www.logic-instrument-us.com
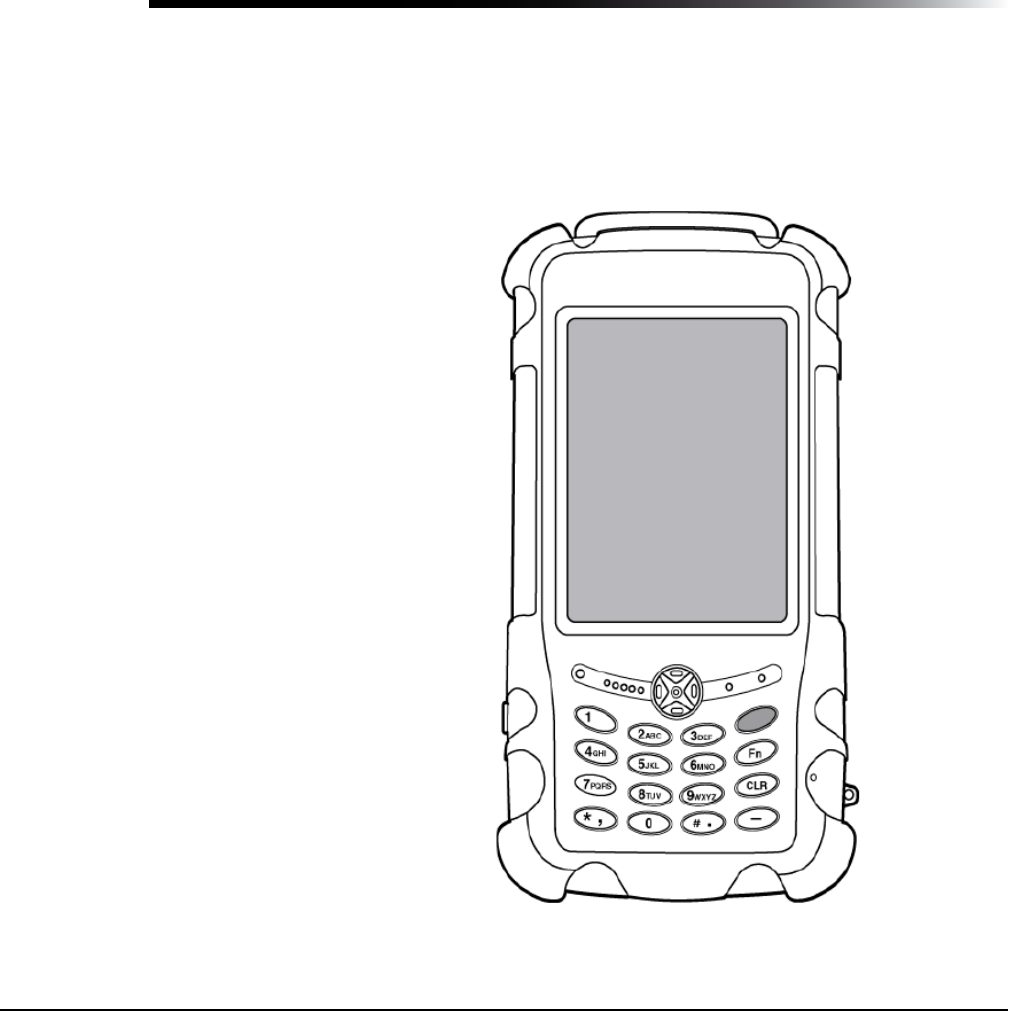
RUGGED PDA
TETRA COMPUTER
Rugged Mobile Solutions
designed for hARSh environments
Pad
USER’S HANDBOOK
T
URL: http://www.logic-instrument.com
REV/G.H./2006/07

TETRA® computer has made every effort to ensure the accuracy and completeness of
this document; however, because ongoing development efforts are made to continually
improve the capabilities of our products, we cannot guarantee the accuracy of the
contents of this document. We disclaim liability for errors, omissions, or future changes
herein.
Tetra and the Tetra logo are registered trademarks of Logic Instrument SA ; Tpad is a
trademark of Logic Instrument SA
Bluetooth is a registered trademark of Bluetooth SIG, Inc.
Microsoft and Windows are registered trademarks of Microsoft Corporation.
All other brands, product names, company names, trademarks and service marks used
herein are property of their respective companies.
Copyright © 2006 Logic Instrument SA All rights reserved. No part of this publication
may be copied, reproduced, or translated, without the prior written consent of Logic
Instrument. No part of this publication may be stored or transmitted in any electronic
form without the prior consent of Logic Instrument. Any unauthorized use is a violation
of copyright laws.
PN: ______________
Edition: 3, July 2006
DECLARATION OF CONFORMITY according to FCC Part 15
Responsible Party Name: Logic Instrument Address: 71 Route de Saint-Denis,
BP 116, 95170, DEUIL LA BARRE, France
Telephone: +33 1 34 28 61 61
Declares that product: Model Series: Tpad complies with Part 15 of the FCC Rules
This device complies with Part 15 of the FCC rules. Operation is subject to the following
two conditions: (1) This device may not cause harmful interference, and, (2) This
device must accept any interference received, including interference that may cause
undesired operation.
WARNING
Changes or modications to this unit not expressly approved by the party responsible
for compliance may void the user’s authority to operate this equipment.
TPAD User’s Handbook page 2

Before you use the Tpad, read these safety instructions and the
operation instructions in this handbook.
Failure to observe all these instructions voids the Limited Warranty
and may lead to suspension or denial of services to the offender, or legal
action, or both.
Follow any special regulations governing the use of the Tpad and, if radioenabled,
always switch it off in areas where radio devices are forbidden or when the radio device
can cause interference or danger.
Always follow any safety laws and regulations pertaining to the use of cell phones and
two-way radios, because these laws and regulations typically apply to the use of the
Bluetooth Tpad.
Observe all restrictions on the use of radio equipment in fuel depots (fuel storage and
distribution areas), chemical plants, and wherever blasting operations are in progress
or in any area in which restrictions on radio transmissions are imposed.
Switch off the Tpad when in an aircraft. The Tpad is not FAA-approved for use on
aircraft. The effect of the use of the Tpad in aircraft is unknown.
Using the Tpad in an aircraft may affect aircraft instrumentation, communication, and
performance; may disrupt the network; and may be illegal.
TPAD User’s Handbook page 3

Radio signals from your Tpad will not affect the operation of most modern equipment,
but certain electronic equipment, including automotive systems, may not be shielded
against radio signals from your Tpad. Check with the manufacturer of your motor
vehicle or the manufacturer’s representative to determine whether using the Tpad will
present any safety issues.
Avoid using the Tpad in any environment that requires your full attention, such as when
driving a vehicle. If you need to use your Tpad while driving, have a passenger use it
for you or nd a safe location to halt your vehicle.
WARNING
Use only battery types specied in this handbook. Using any other type of battery can
be dangerous and can disable the Tpad.
WARNING
Do not use any dock or any other accessory or attachment that is not manufactured or
supplied by TETRA computer or an authorized Tetra accessories supplier.
Use of any accessory or attachment that is not supplied or approved for use with the
Tpad by TETRA computer is not permitted because it may cause hazards.
Operate the Tpad only from the type of power source indicated on the marking label.
Route power supply cords so that they are not likely to be walked on or pinched by
items placed upon or against them.
Pay particular attention to cords at plugs and convenience receptacles, and at the point
where cords exit from the Tpad or its docking station.
Do not overload wall outlets, extension cords, or integral convenience receptacles
because this can cause re or electric shock.
Unplug the Tpad and refer the Tpad and docking station for service to qualied service
personnel if any of the following conditions occur:
The power supply cord or plug is damaged.
The Tpad or docking station does not operate normally when you follow the
instructions in this book.
The Tpad or docking station exhibits a distinct change in performance.
Adjust only controls for which there are instructions in this book. An improper adjustment
of other controls can result in damage and may require extensive work by a qualied
technician to restore the Tpad or docking station to normal operation
•
•
•
TPAD User’s Handbook page 4

CAUTION
Avoid prolonged physical contact with the exposed metal surfaces on the front and
back of the Tpad. While the Tpad may not feel hot to the touch, if you maintain physical
contact with the Tpad for a long time, your skin may suffer low-heat injury. In addition,
be careful when you remove a PC card that has been used for a long
time, because the card may be hot.
TPAD User’s Handbook page 5

Welcome 11
ABOUT THE TPAD 12
PACKAGE CONTENTS 13
QUICK CHECK 13
OPTIONAL ACCESSORIES 14
CONTACTING LOGIC INSTRUMENT 17
1 Getting Started 19
GETTING TO KNOW THE TPAD 20
FEATURES AND CONTROLS 20
FRONT VIEW 20
STATUS INDICATOR 22
BACK VIEW 24
SIDE VIEW 25
OPERATING ENVIRONMENT AND RUGGEDNESS 26
2 Using the Tpad 27
TURNING ON AND OF THE TPAD 27
USING THE STYLUS 28
TO GET THE BEST RESULTS WHEN USING YOUR STYLUS 28
VIRTUAL KEYBOARD 29
TRANSCRIBER 29
START PROGRAMS 30
CALIBRATE THE TOUCH SCREEN 30
SETTING LCD BRIGHTNESS 30
DISABLING AUTOMATIC BACKLIGHT CONTROL 30
SETTING POWER 31
ADJUST VOLUME 31
USING THE CURSOR CONTROL BUTTON 32
USING THE FUNCTION KEYS 33
SET YOUR OWN BUTTONS FUNCTIONS 34
USING THE DOCKING STATION 35
DOCKING THE TPAD 36
UNDOCKING THE TPAD 37
MOUNTING THE DOCKING CRADLE ON THE WALL 38
USING THE DESK STAND 39
TPAD User’s Handbook page 7
Contents

CONNECTING DEVICES 40
DOCKING CRADLE EXPANSION 41
ACTIVATING THE EXTERNAL MONITOR 41
ACTIVESYNC 42
REMOTE DISPLAY CONTROL 43
BACKUP DATA 44
RESTORE DATA 45
CHARGING THE TPAD BATTERY 46
CHARGING THE BATTERY IN THE DESK STAND 46
CHARGING THE BATTERY OUTSIDE THE DESK STAND 47
INSTALLING MEMORY OR MULTIMEDIA CARDS 48
3 Using the Bluetooth 50
GENERAL FEATURE 50
INSTALLATION 50
BLUETOOTH MANAGER 50
PERIPHERAL SEARCH 51
5 Troubleshooting and FAQ 56
Combination KEY table ( Function key) 57
1- How could we have a larger virtual keyboard? 57
2- How to Calibrate the touchscreen 57
3- How to display a presentation on PC monitor 58
4- Could we connect the TPad and/or Cradle directly to 58
vehicle?
5- What are the Compact Flash Cards available? 58
6- Could we use Bluetooth printer? 59
7- Alphanumeric keys and joystick life? 59
8- How To Extend Your PDA’s Battery Life 59
9- How long does it take to charge the battery 59
10- RMA Service 60
11- Cleaning & Maintenance 61
TPAD User’s Handbook page 8

6 Specication 62
CPU 62
MEMORY 62
DISPLAY 62
TOUCH SCREEN 62
I/O PORTS 62
SYSTEM UNIT DIMENSIONS AND WEIGHT 63
AC ADAPTER 63
BATTERY 63
ENVIRONMENTAL RATINGS 63
A Glossary 65
TPAD User’s Handbook page 9

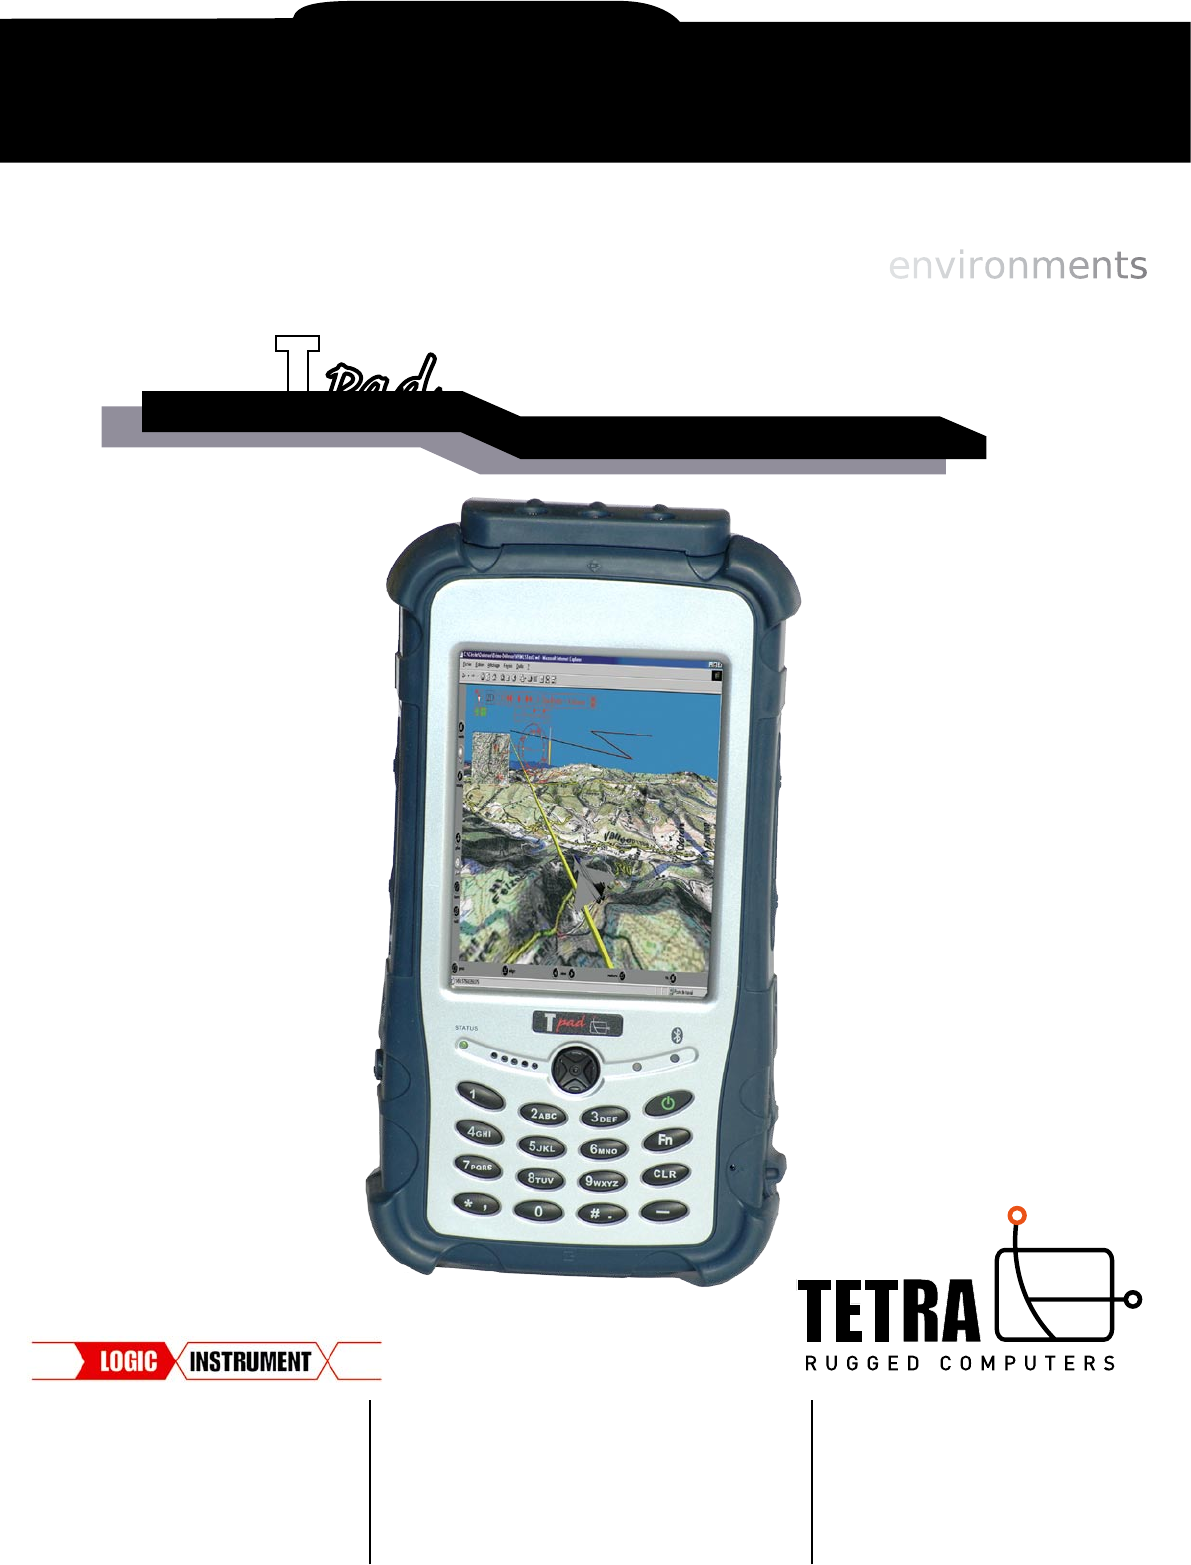
Welcome to the TETRA computer Technologies® Tpad™, the rugged,
multipurpose handheld device designed, tested, and manufactured to meet
the environmental and physical real-world challenges faced by today’s mobile
workers. The Tpad not only works the way you do, but can also take the abuses
of everyday wear and tear.
Advanced technology and an innovative, rugged design provide true mobility in
harsh operating conditions. Equally important is Logic Instrument’s commitment
to ensuring that you are treated with the same respect and honesty you offer
to your customers and peers every day.
TPAD User’s Handbook page 11
Welcome

The Tpad is a high-performance, handheld personal digital assistant (PDA)
that runs on the Microsoft® Windows® CE. NET operating system.
Your Tpad includes the following features:
Small and light-weight ergonomic design for true mobility
Ruggedized for portable and mobile applications in harsh operating
environments
High-performance Intel processor
High-resolution, daylight-readable, full-color VGA LCD display with
integrated touchscreen
Open architecture for support of multiple internal and external expansion
options
Compact Flash slot and extra features options
Extended operating time provided by user-replaceable, high capacity
lithium-ion battery pack
Versatile docking station with optional battery charger for desktop, wall,
and mobile applications
Integrated bluetooth
•
•
•
•
•
•
•
•
•
TPAD User’s Handbook page 12
Welcome
About the Tpad
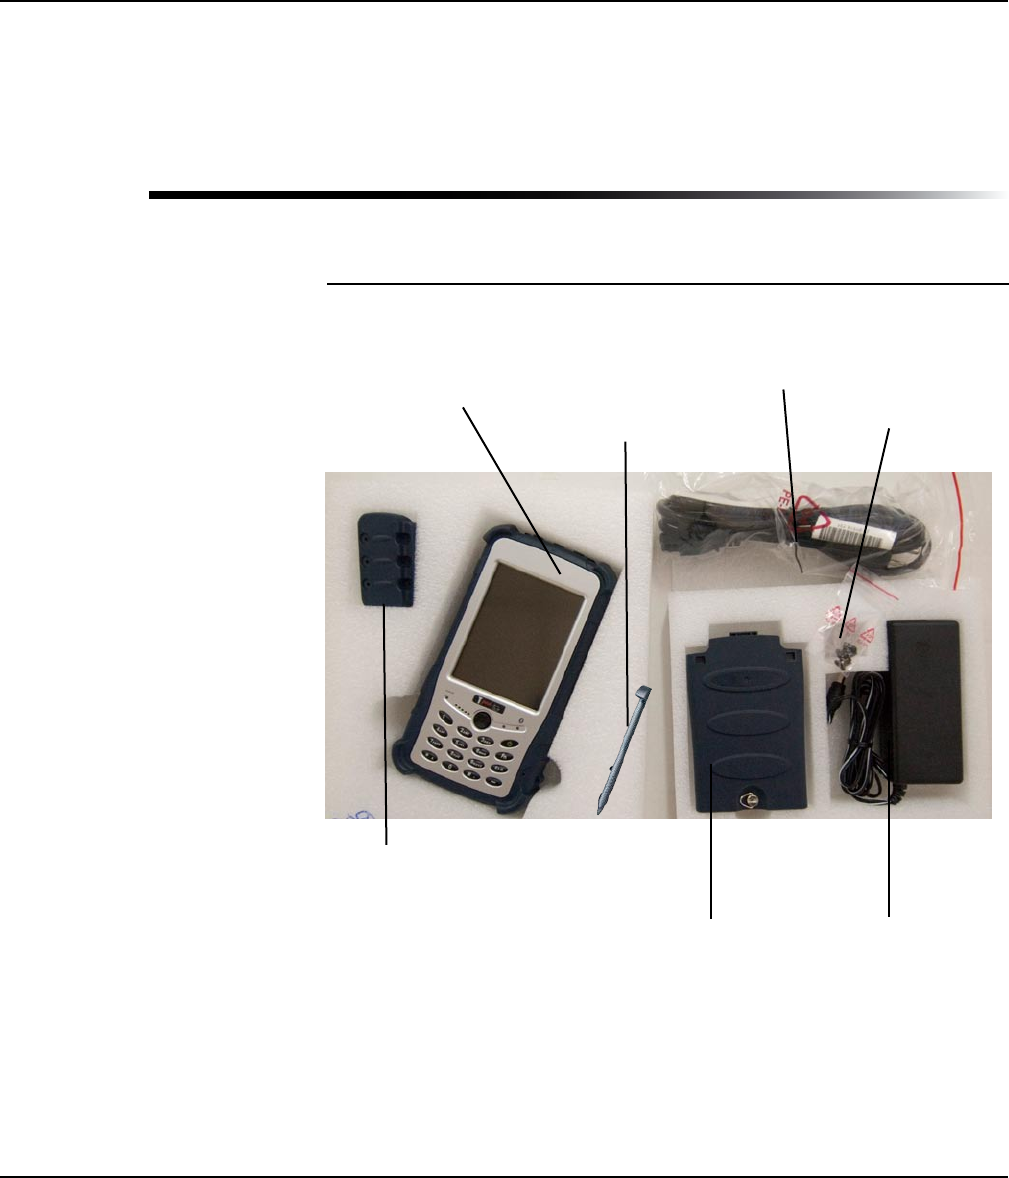
Check to make sure your package includes the following items:
Base Unit and Battery Pack
• Install the battery and then plug in the adapter to handheld device.
• Attach the AC adapter to AC outlet. The adapter LED indicates the power is ready.
Charge LED will light up till the battery is full. Charging time will be about 2 hours.
• Press the power button momentarily to turn on this device.
• Follow up the instruction on screen to nish the basic setting.
• Press power button momentarily to turn OFF
•
TPAD User’s Handbook page 13
Package contents
Base Unit AC power cord Pack
Welcome
Stylus
Compact Flash Cap
AC adapter
Battery Pack
CF cap Screw
Quick check
Docking station
Battery charger
•
•
Docking cradle
Desk stand
TPAD User’s Handbook page 14
Welcome
Battery charger
Data sync cable (USB)
Optional accessories

Quick Start Guide
This handbook
Your package also includes any optional accessories you ordered.
Power adapter
Secure Data (SD) card
MultiMedia (MMC) card
Handstrap/carrying case
Stylus
Expansion modules
Battery charger
Universal Compact Flash cover
•
•
•
•
•
•
•
•
•
•
TPAD User’s Handbook page 15
Welcome

If you purchased your Tpad from an authorized TETRA computer dealer,
contact the dealer for service and support.
If you purchased your Tpad directly from Logic Instrument, use any of the
following methods to contact Logic Instrument for service and support:
Tel +33-1-34286161
Fax +33-1-34286150
E-mail techsupport@logic-instrument.com
Web site http://www.tetracomputer.com
Before you contact Logic Instrument, have the following information ready so
that the customer support representative can quickly provide a solution:
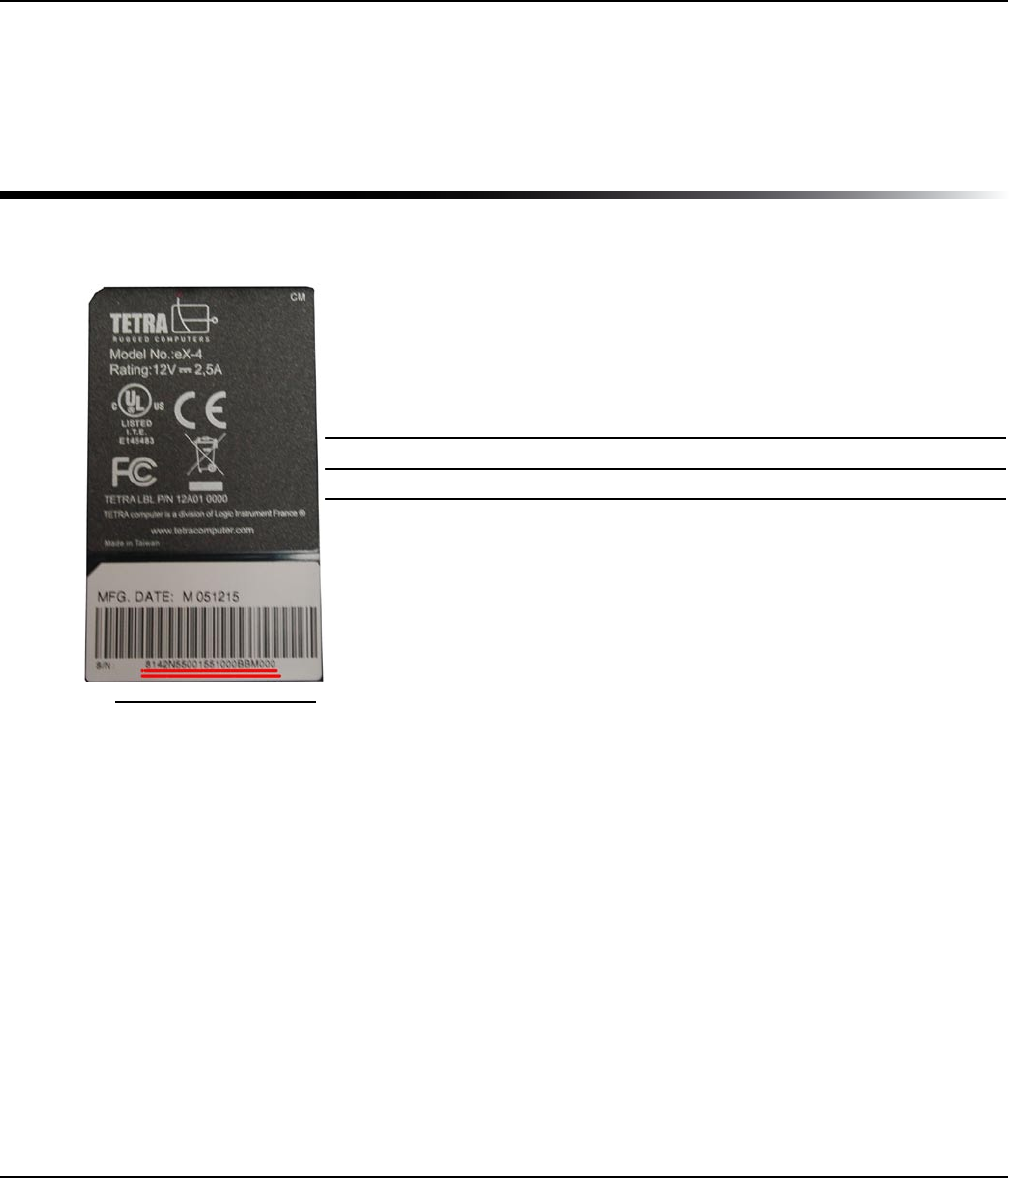
Product name: Tpad
Product serial number
Purchase date
Conditions under which the problem occurred
Any error messages that were displayed
Type of device connected, if any
TPAD User’s Handbook page 17
Contacting Logic Instrument
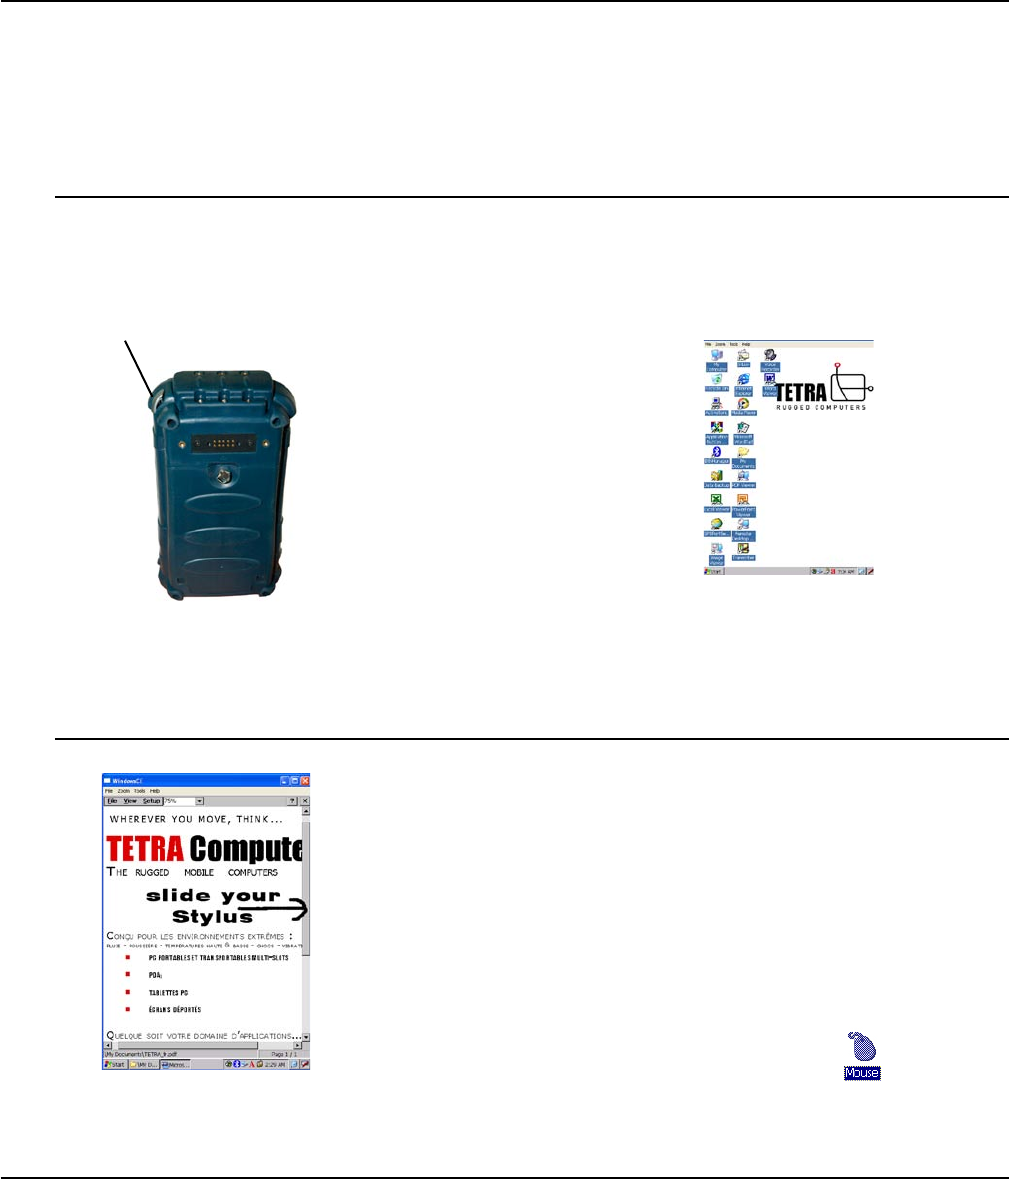
The serial number is on
the back of the Tpad
Welcome
This chapter provides basic information about your Tpad.
TPAD User’s Handbook page 19
1 Getting Started
This section shows the locations of some of the Tpad’s important
components.
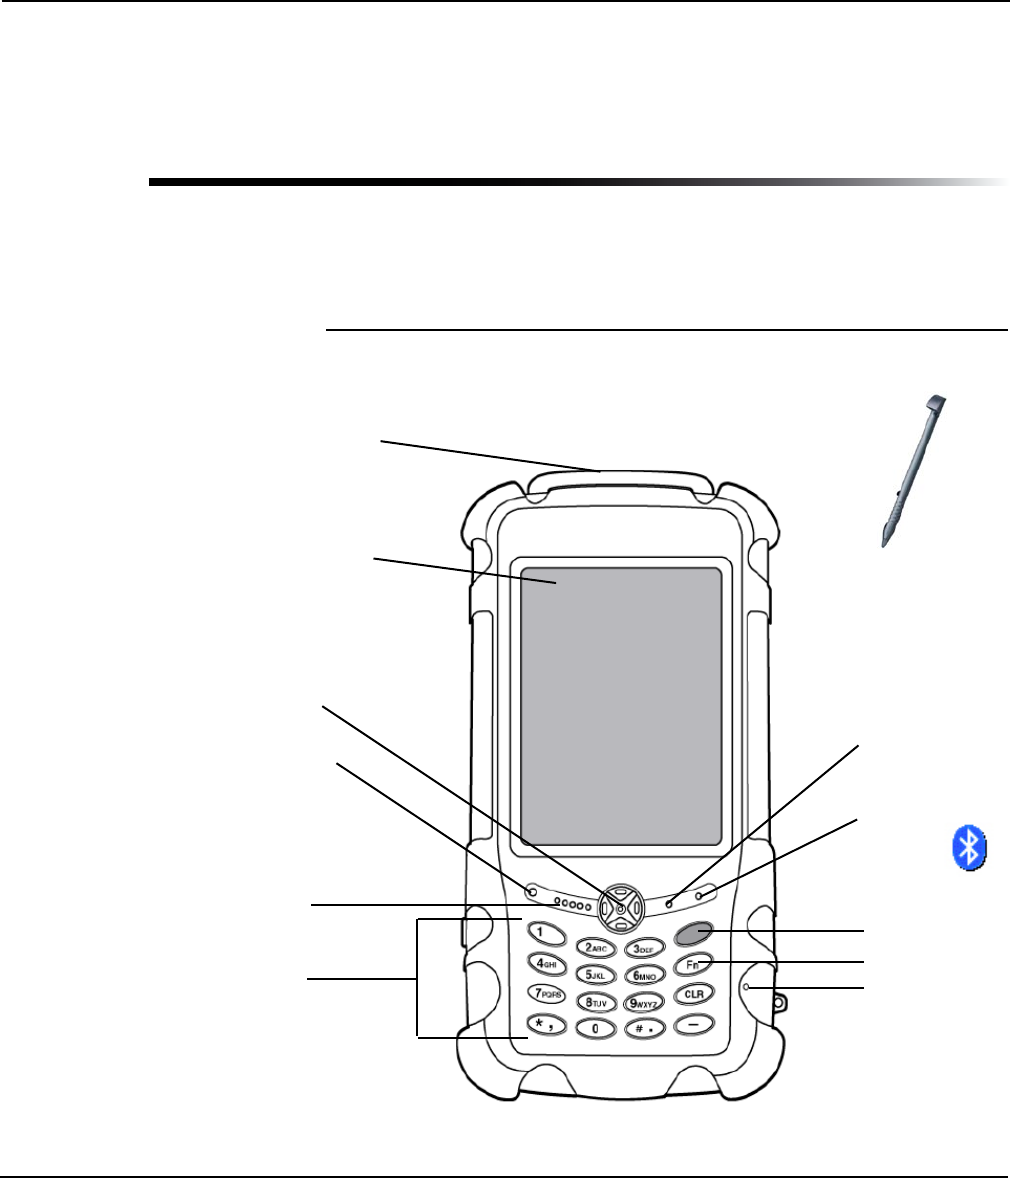
Front view
TPAD User’s Handbook page 20
Chapter 1. Geting Started
Getting to know the Tpad
Getting to Know The T pad
Features and controls
For more information
about each component,
see Chapter 2.
Speaker
Light sensor
Compact Flash socket
Status indicator
Touchscreen
Bluetooth Comm
indicator
Cursor Control
Keypad Microphone
Stylus pen
Power key
Function key

Feature Function
Compact Flash socket Enables you to use a compact ash card.
Touchscreen Enables you to use your nger or a stylus to enter
data and control applications.
Cursor Control button Lets you move the cursor up, down, left, and right.
Also performs the functions of an Enter key.
Status indicator Indicates system mode and charge status. (See
page 16.)
Speaker Provides mono audio output.
Keypad Provides alphanumeric keys you press to enter
data.
Photo sensor Automatically optimizes the LCD backlight.
Comm indicator Indicates Bluetooth® activity.
Power key Turns the Tpad on and off.
Microphone Enables you to input mono audio.
Stylus pen Enables you to enter data and control applications
directly on the touchscreen.
TPAD User’s Handbook page 21
Chapter 1. Geting Started
Getting to know the Tpad
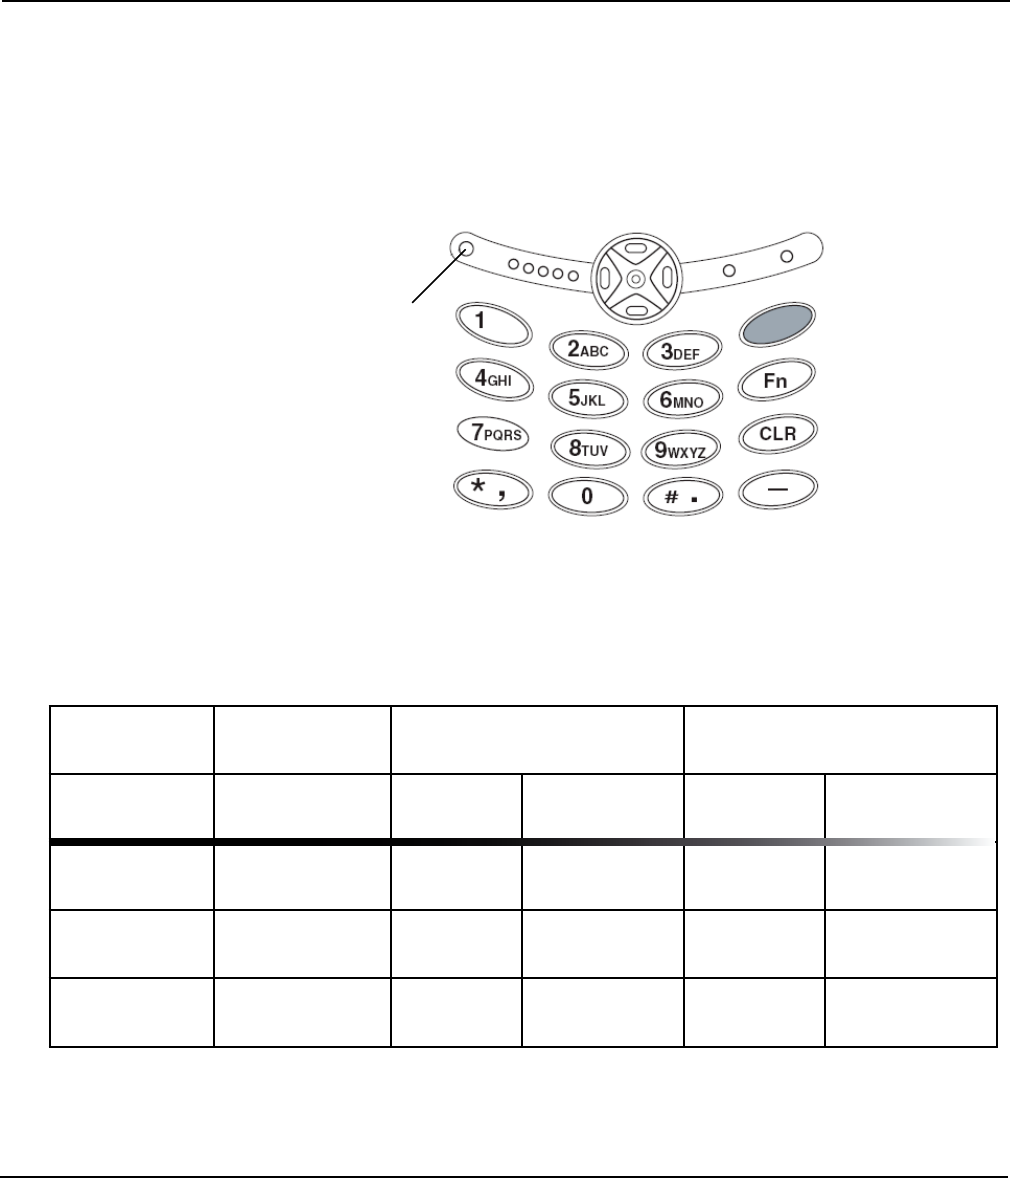
Status indicator
The following table shows the meanings of the Status indicator light
TPAD User’s Handbook page 22
Chapter 1. Geting Started
Getting to know the Tpad
System Mode Battery Power External Power Fault
Charging Not Charging Low Battery Temperature
Run/Idle Solid green Flashing
green Solid green Flashing red Solid red
Standby Solid orange Flashing
orange Solid orange Flashing red Solid red
Suspend Off Off Off Off Off
Status indicator
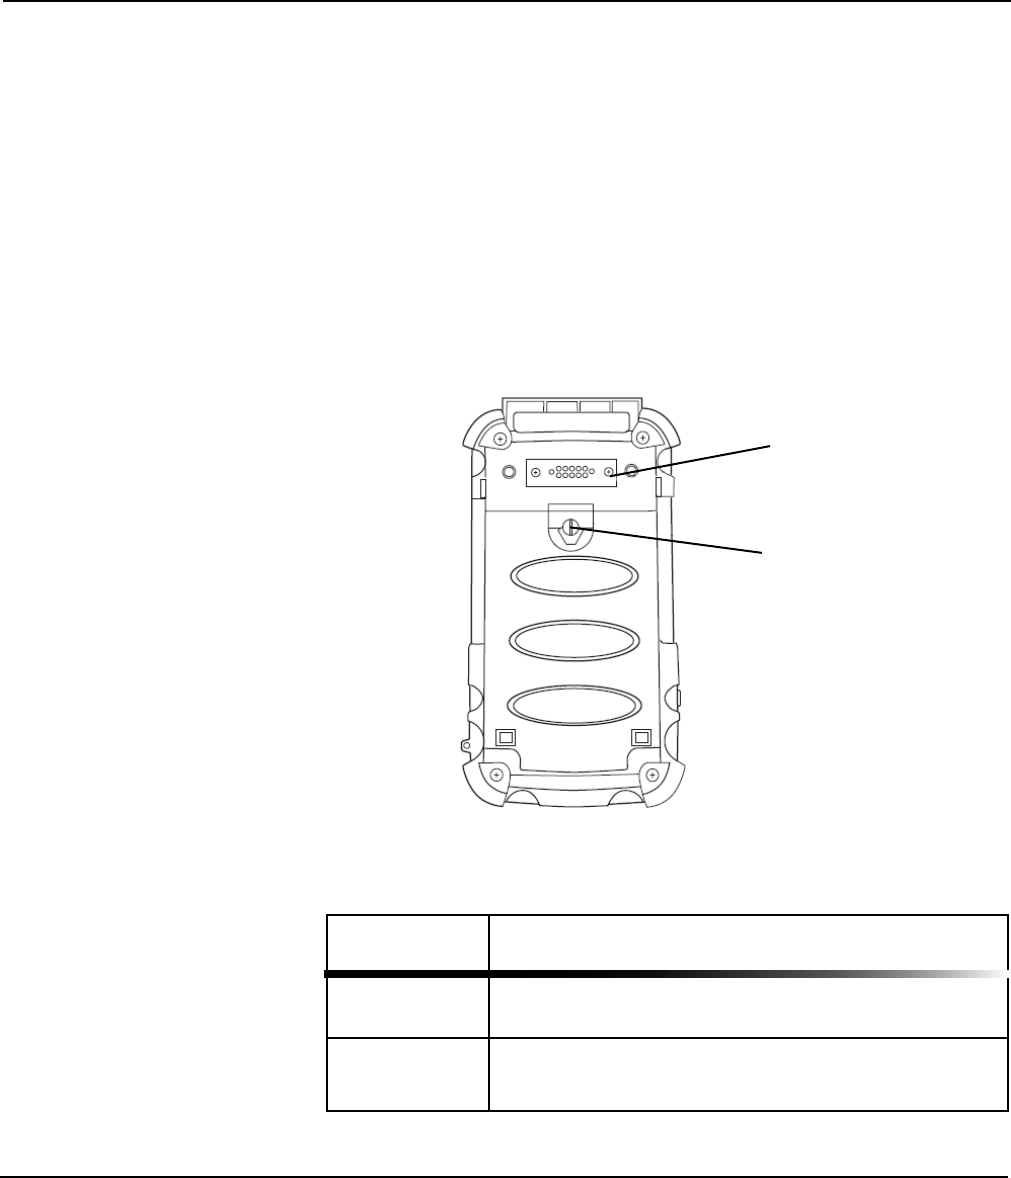
Back view
Feature Function
Expansion port Available for expansion module
Battery access Provides access to the replaceable battery.
turn clockwise to dismount battery module
TPAD User’s Handbook page 24
Chapter 1. Geting Started
Getting to know the Tpad
Battery access
Expansion
port
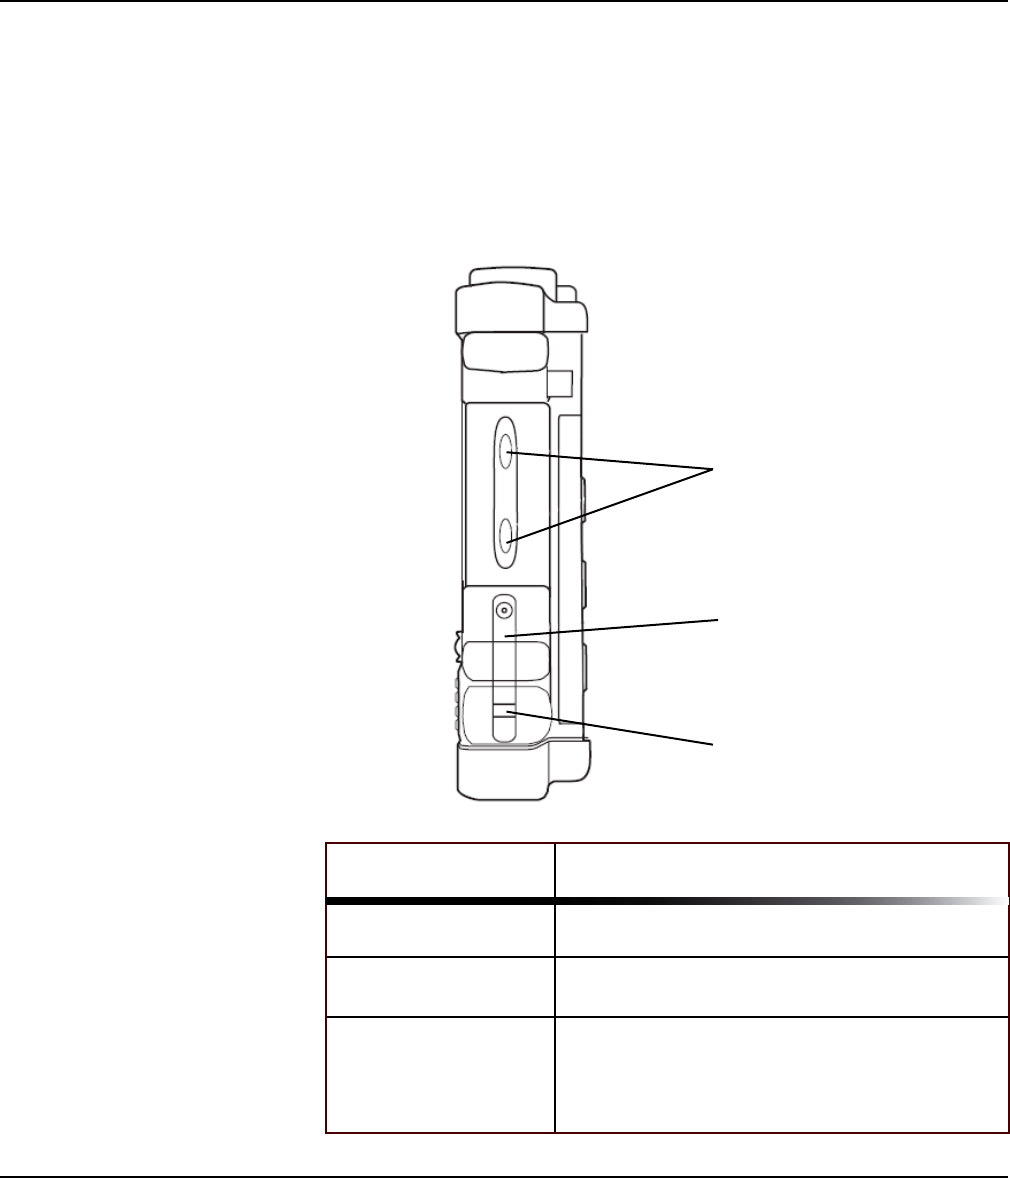
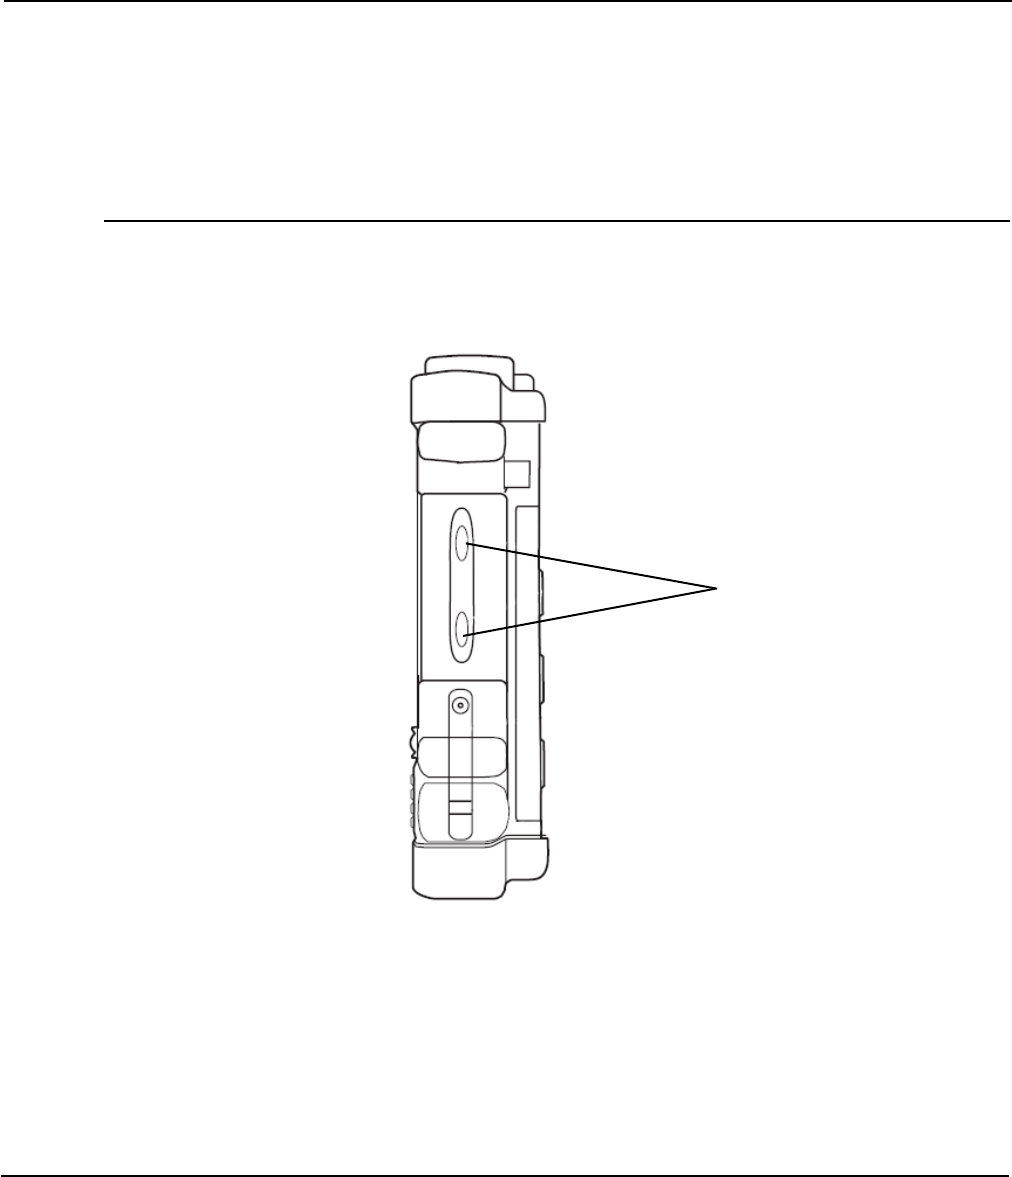
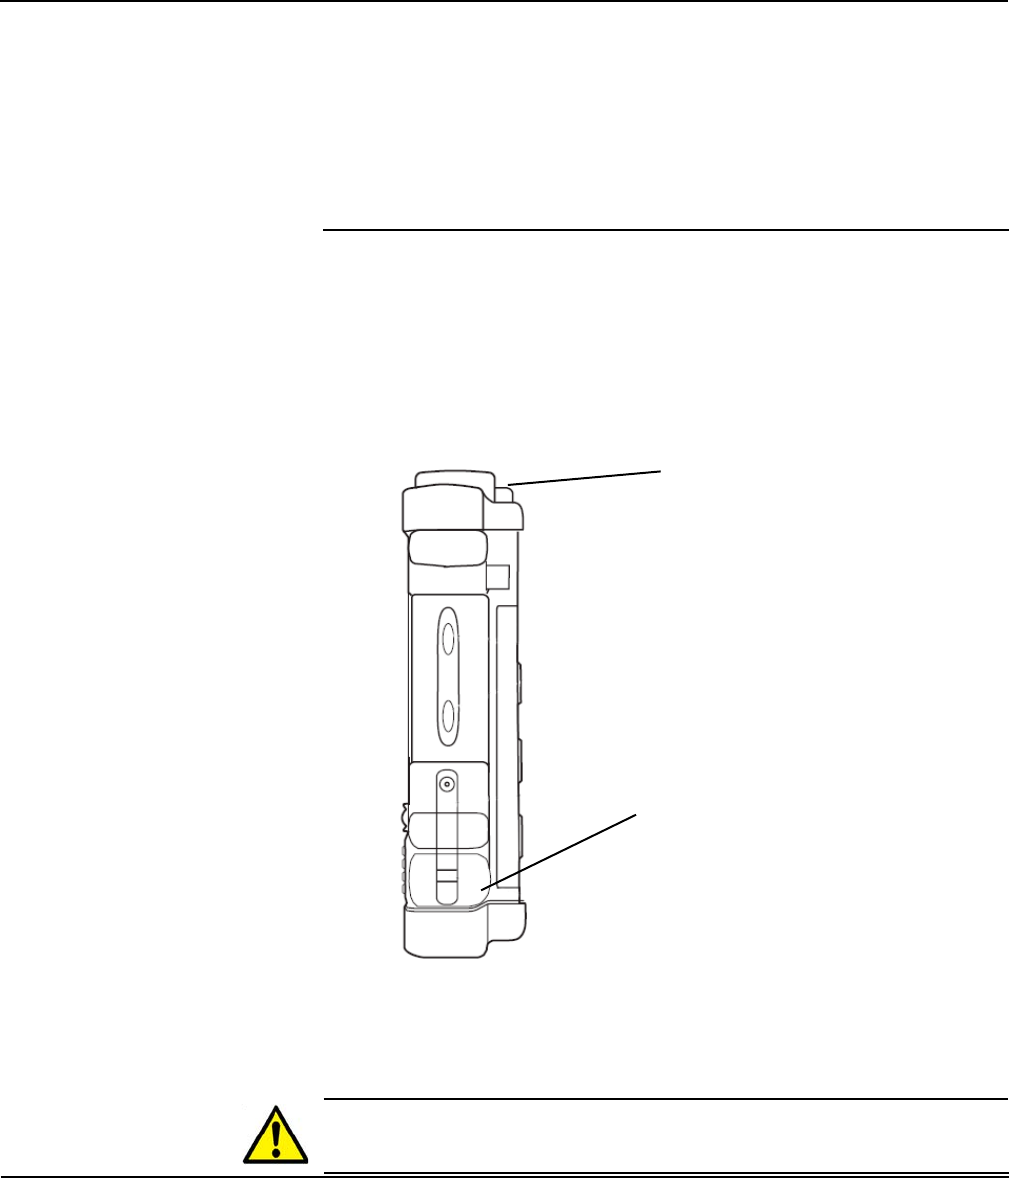
Side view
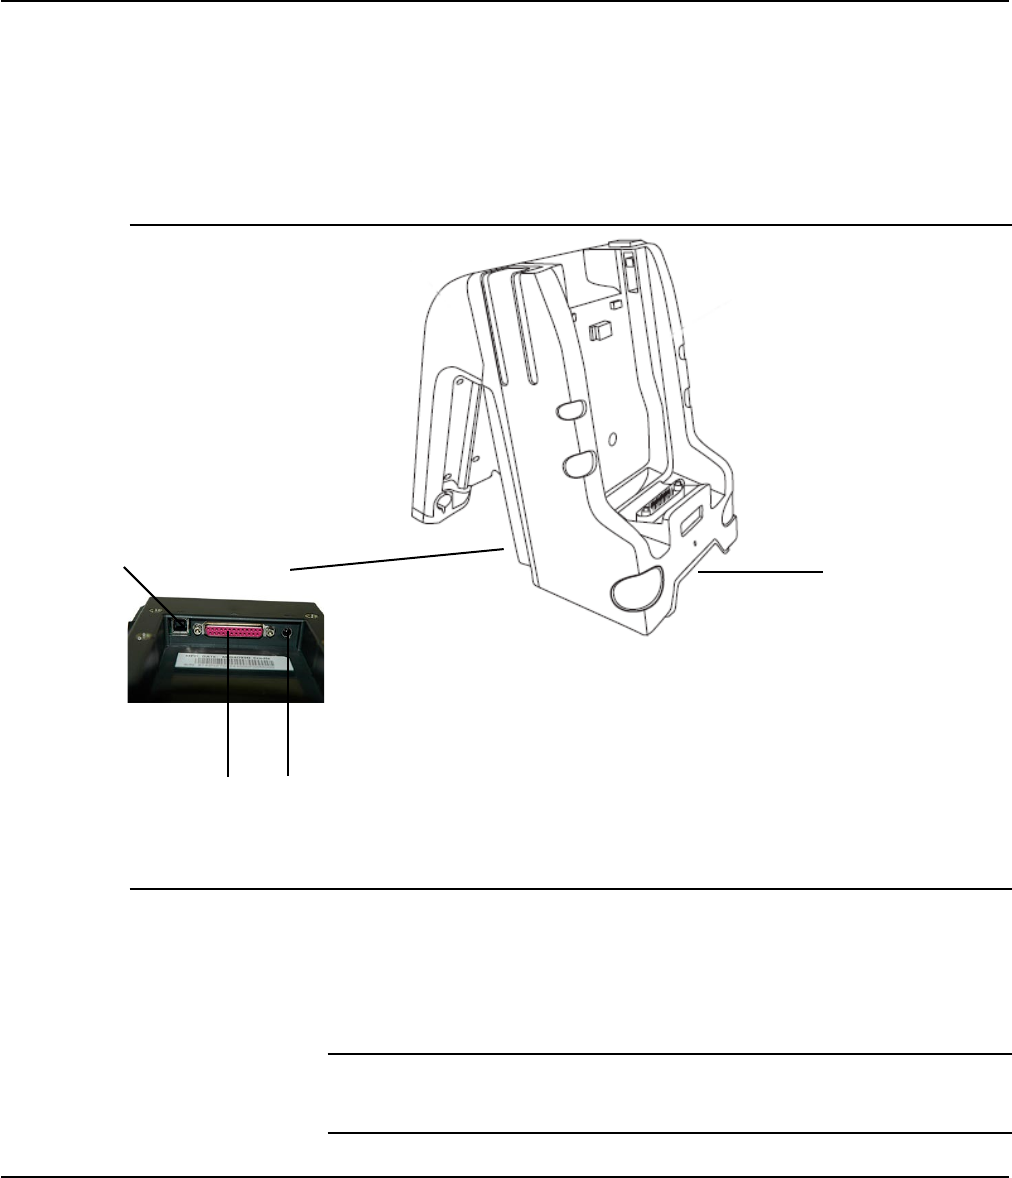
Feature Function
Function keys Shortcut to access pre-programed application.
Secure Data/MultiMedia
Card (SD/MMC) socket Supports memory cards and multimedia cards
(16 MB to 2 GB).
Diagnostic port For use by technicians only.
1 x UART convertible to RS232 with adapter
provided by logic instrument
TPAD User’s Handbook page 25
Chapter 1. Geting Started
Getting to know the Tpad
Function keys
SD/MMC socket
Diagnostic port

This section contains instructions to provide appropriate protection for using
your Tpad.
A clean and moisture-free environment is preferred.
If it is necessary to work in a hostile environment, please make sure all ports
are well protected from dust, moisture, or water.
Proper isolation from extreme hazardous exposure is recommended.
The handheld device is designed with rugged features of vibration, shock,
dust, and rain/water protection.
However, it is still necessary to provide appropriate protection while exposing
to harsh environments.
All connectors will decay or corrode if exposed to water or moisture.
Corrosion is accelerated if the power is ON.
Please take proper water-resistant measures for cable connections.
All port caps should be in place when no cable is attached.
Regularly maintain the computer by cleaning dust, water, etc. will help
keeping it in optimal condition.
There is no isolated compartment in SD slot. These ports must be tightly
sealed while working with dust/water.
Operating Environment and Ruggedness
TPAD User’s Handbook page 26
This chapter contains instructions for using your Tpad.
Make sure the Tpad is off.
Make sure the battery is charged or that the Tpad is plugged in to an
external power source.
Press the Power key to run the Tpad.
Press the Power key to switch to suspend mode.
1.
2.
3.
4.
TPAD User’s Handbook page 27
2 Using the Tpad
Turning on and off the Tpad
When the Tpad
is off, the status
indicator is off
Power key
When the Tpad is on
Stanby mode the status
indicator is orange
Power key
Use the stylus supplied by Logic instrument with the Tpad since it has
been designed with a non-abrasive material that neither scratches nor
deteriorates the touch screen.
Use the stylus to type with the on-screen keyboard, write on the writing pad,
and navigate by pointing and tapping.
Double-tap on a folder to open it.
To move a le to a folder, touch the le with your stylus and drag it to the
folder.
To navigate in a window, slide your Stylus/Pen on the Navigation Bar
or Click the Navigation Arrows
• Do not rest your hand on the Touchscreen. The screen is sensitive to touch;
pressure from your hand prevents your Display from functioning properly.
• Hold the stylus perpendicular to the touchscreen.
• Press and tap rmly when using the stylus. The screen is designed to
handle the stress of tapping and dragging with the stylus.
• Keep the stylus smooth and clean.
• Realign the screen and reset the double-tap speed if the touch screen
stops responding to your stylus taps. (Tap the mouse icon on the control
panel Display.)
• Never use a pen, pencil, or other object in place of your stylus. Such
objects can damage your touchscreen.
•
•
•
TPAD User’s Handbook page 28
Chapter 2. Using the Tpad
Using the stylus
Using the stylus
Stylus compartment
To get the best results when using your stylus
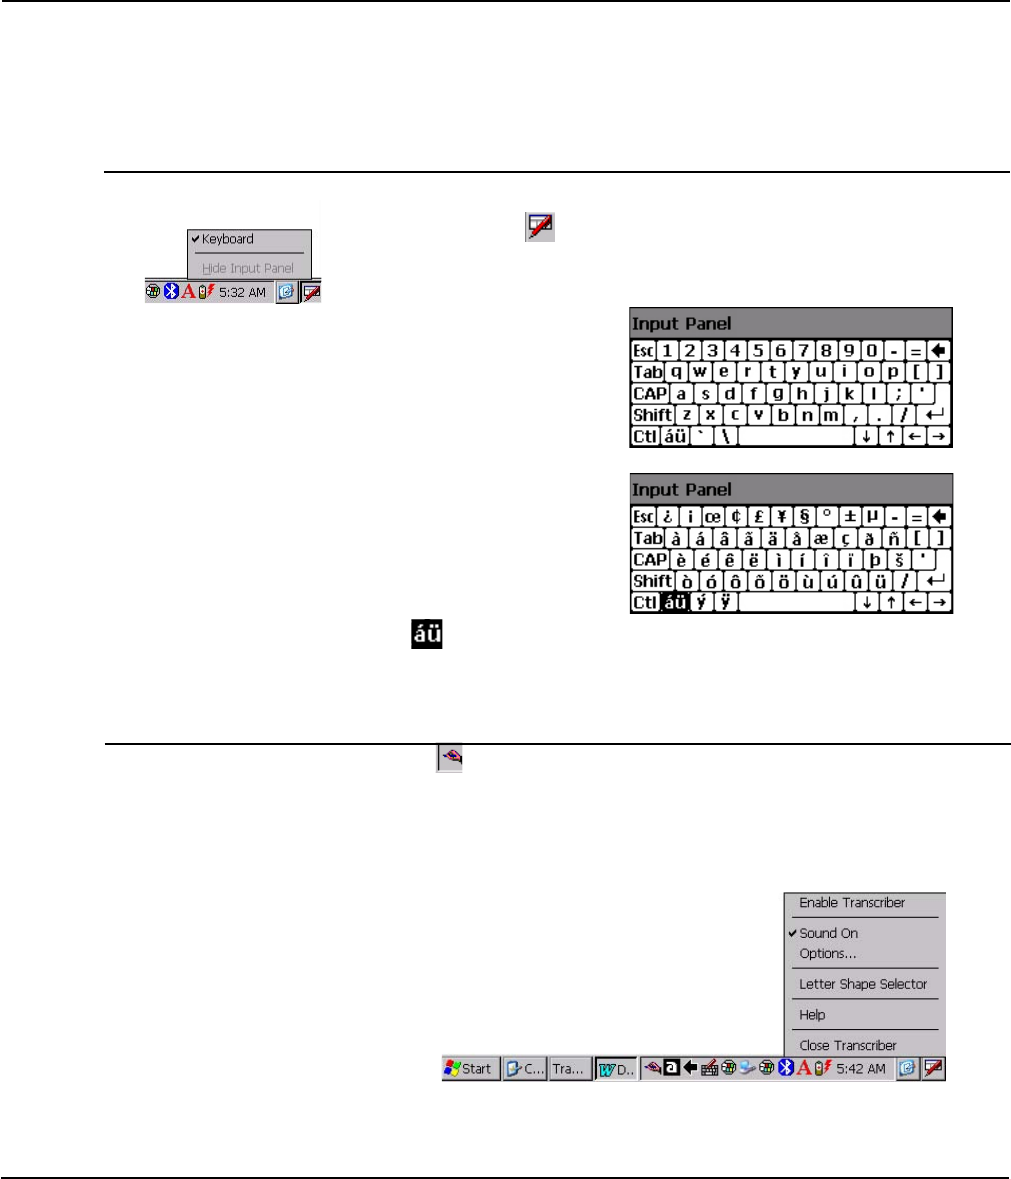
By clicking the Keyboard icon at the bottom right of the Task Bar, the Virtual
Keyboard will appear. The Virtual Keyboard may also appear
automatically in data entry elds image
Select Hide Input Panel to disengage the Virtual keyboard
Standard Keyboard
Extended Language keyboard
Pressing toggles between the Standard Keyboard and the Extended
Language keyboard
NOTE: Press the Shift key to access additional characters.
Transcriber lets you take down a phone number, take notes and more,
just as easily and naturally as writing on a piece of paper.
Transcriber recognizes all handwriting, be it cursive, printed or a combination
of both.
To work correctly some setting should be set.
To know how Transcriber works, select the Transcriber option and click the
Help button.
TPAD User’s Handbook page 29
Chapter 2. Using the Tpad
Virtual keyboard
Virtual Keyboard
Transcriber
TPAD User’s Handbook page 30
Chapter 2. Using the Tpad
Start programs
Tap Start Programs desired programs
Tap Start Settings Control Panel Stylus
calibration. and tap recalibrate
Use pen to touch the center of mark ” ” and repeat the action when the
mark ” ” moves.
Tap the enter button to conrm when nished.
This function can also be launch by pressing Fn and 2 then click
Calibration and Recalibrate
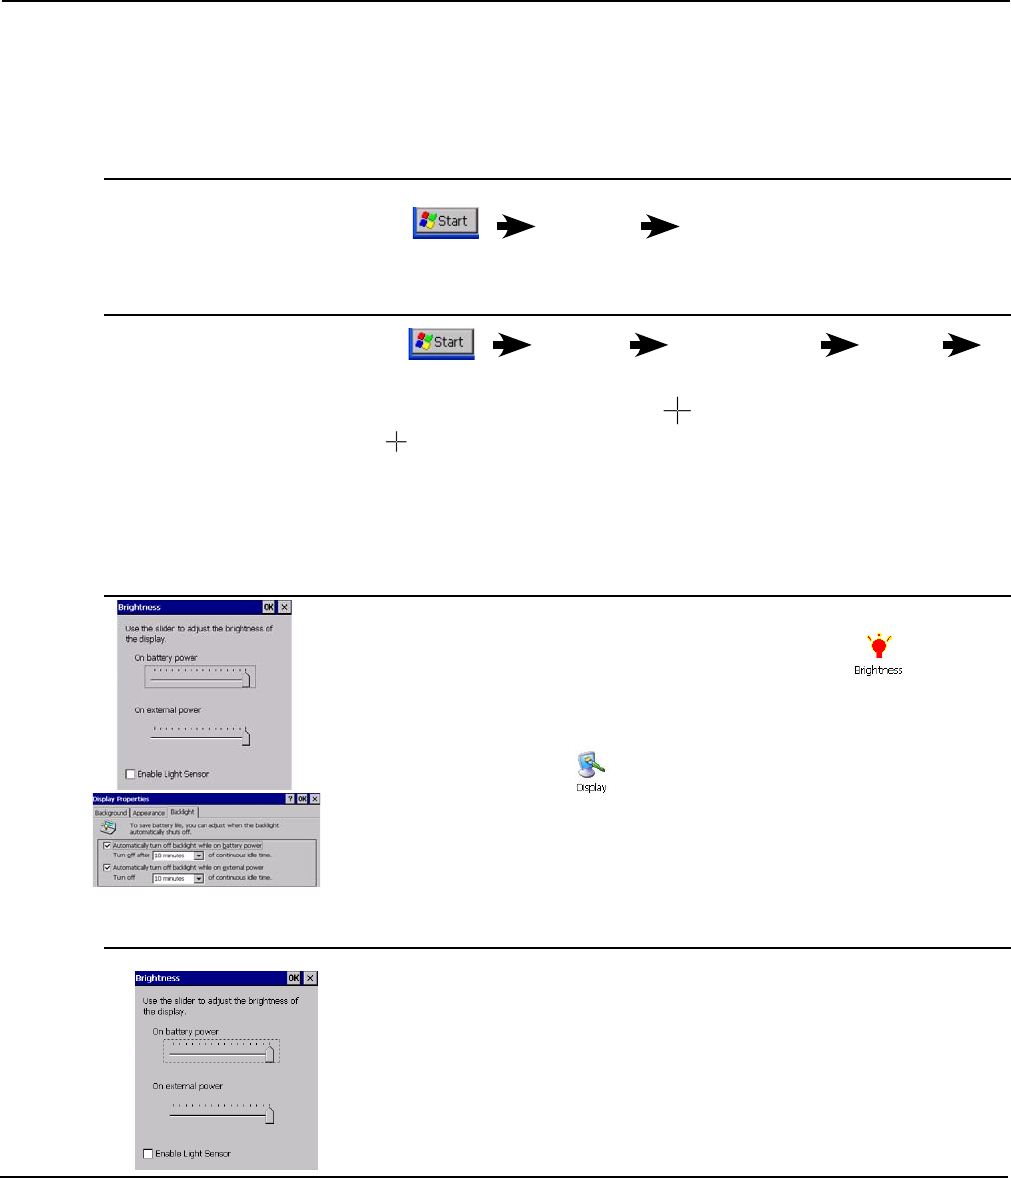
To dim / increase the brightness of the LCD backlight:
Enter brightness menu in the control panel options to adjust the brightness
level as desire.
Setting backlight timeout:
Enter display menu in the control panel options and select the backlight tab
to adjust the timeout period as desired.
Timeout is the idle time that the LCD backlight would turn OFF automatically.
When the ambient light sensor is enabled, the Tpad automatically controls
the amount of backlight sent to the screen to provide optimum brightness for
the lighting conditions in which you are working.
To disable / enable automatic backlight control
Enter brightness menu in the control panel options to disable / enable the
backlight sensor.
Start programs
Calibrate the Touch Screen
Setting LCD brightness Touch Screen
Disabling automatic backlight control
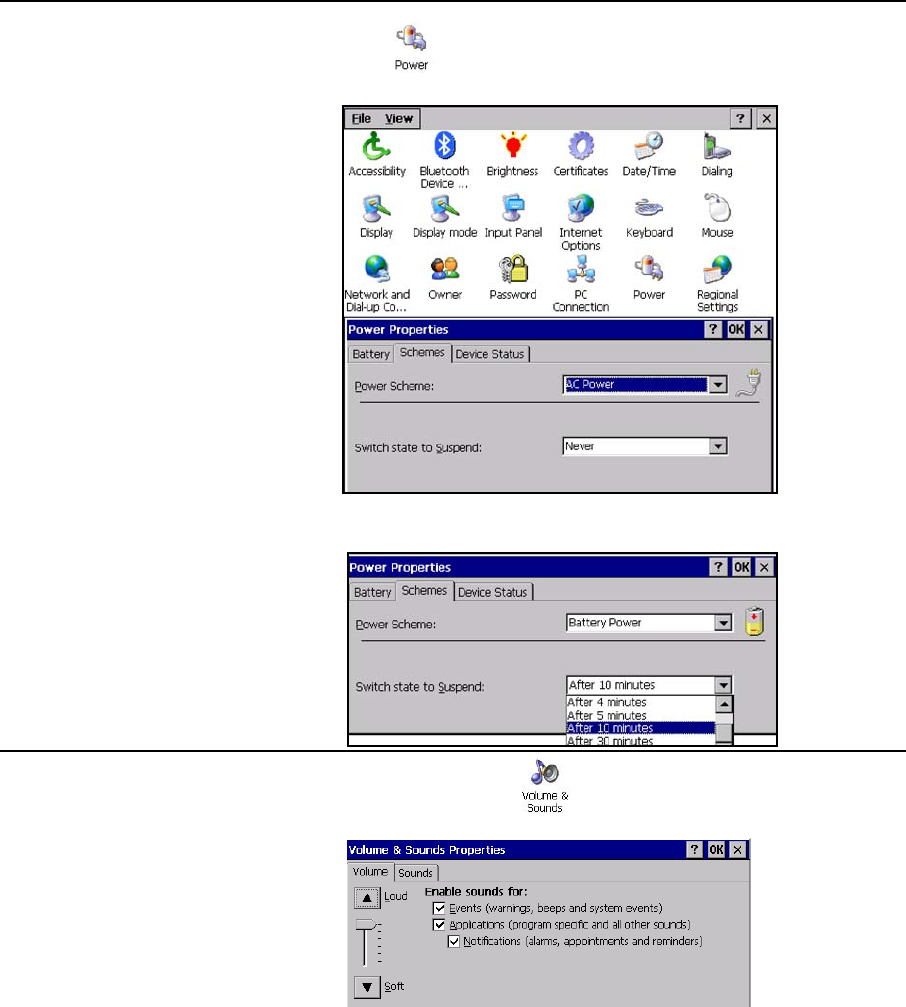
Setting power
Enter Power menu in the control panel options to adjust the idle time to
switch to suspend mode.
Select desired timeout conguration.
Enter Volume ans Sounds menu in the control panel options to adjust
the volume level as desired.
TPAD User’s Handbook page 31
Chapter 2. Using the Tpad
Setting power
Adjust volume
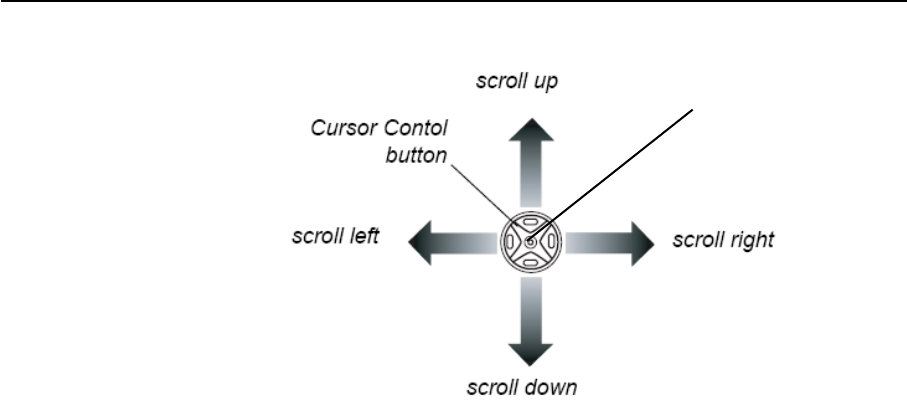
Using the Cursor Control button
Press the edge of the Cursor Control button to move the cursor:
enter key
TPAD User’s Handbook page 32
Chapter 2. Using the Tpad
Using the cursor control button
TPAD User’s Handbook page 33
Chapter 2. Using the Tpad
Using the function keys
Using the function keys
2 X function keys (both side)
TPAD User’s Handbook page 34
Chapter 2. Using the Tpad
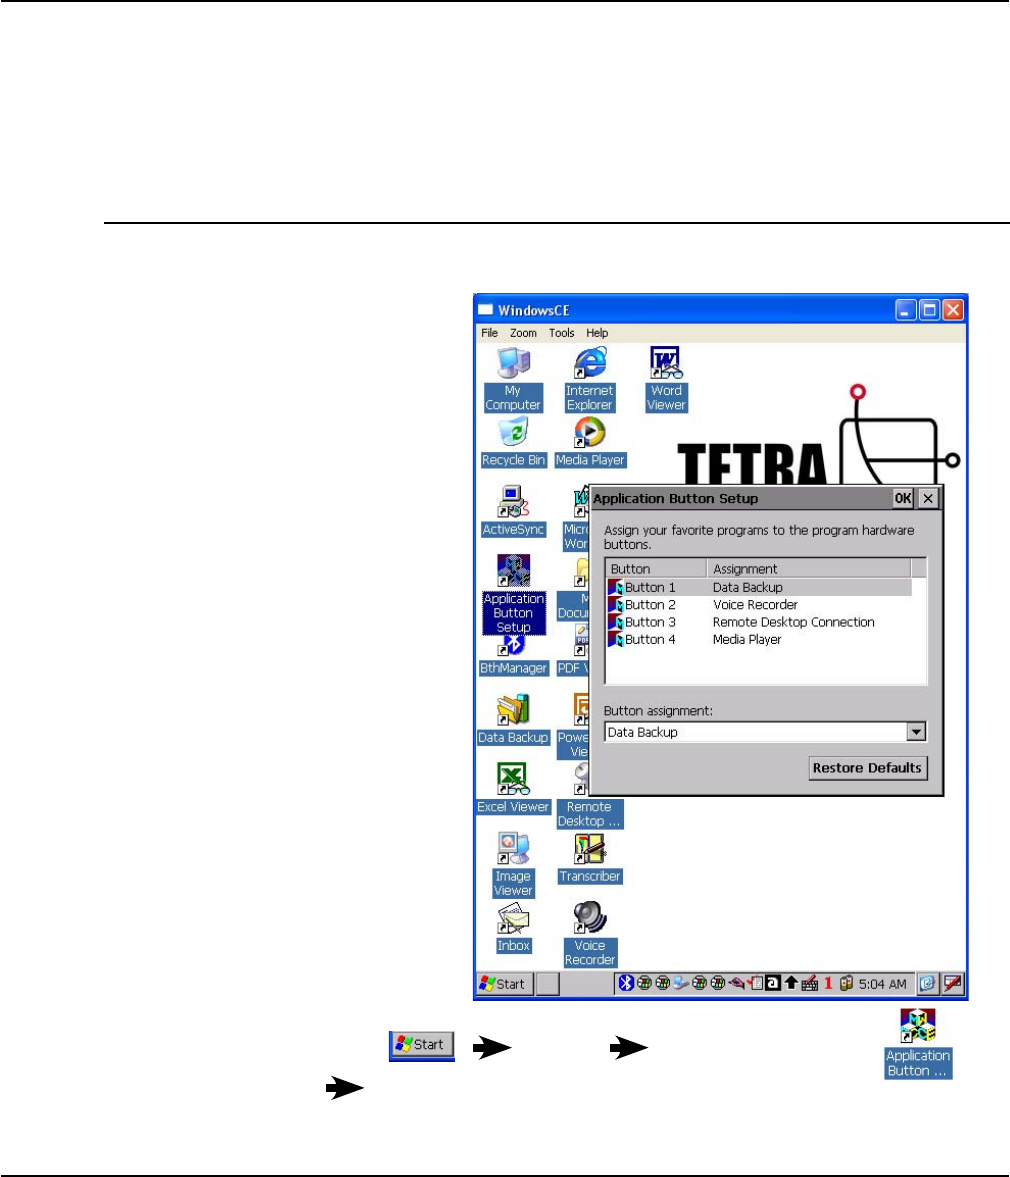
Set your own buttons functions
Set your own buttons functions
The four buttons functions at the side of the Tpad are user-denable.
Use the application button setup on Tpad desktop
or tap programs Application button setup
Dene the button functions as you want from the selection list. Other
buttons are not user-programmable.
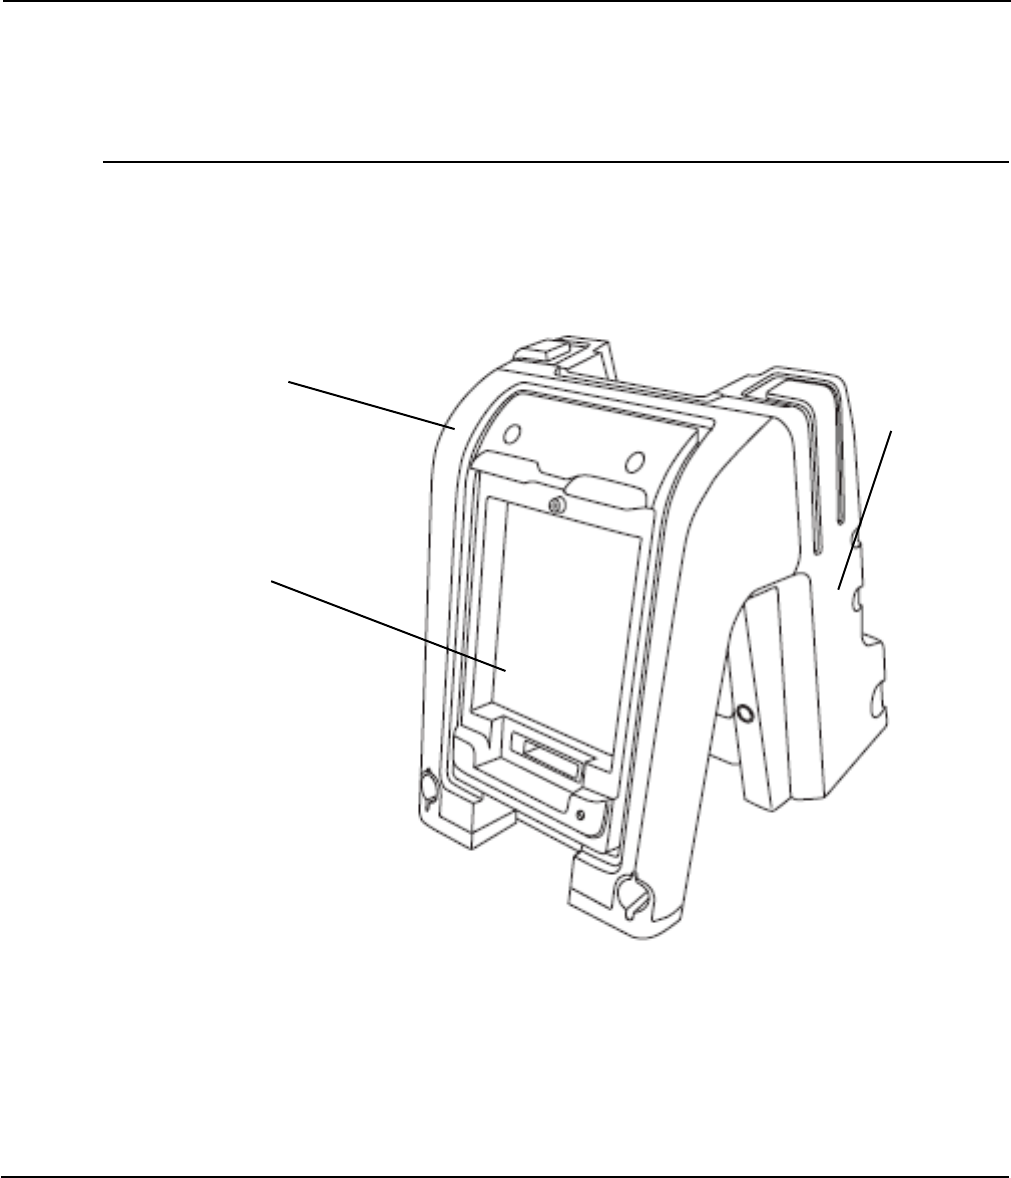
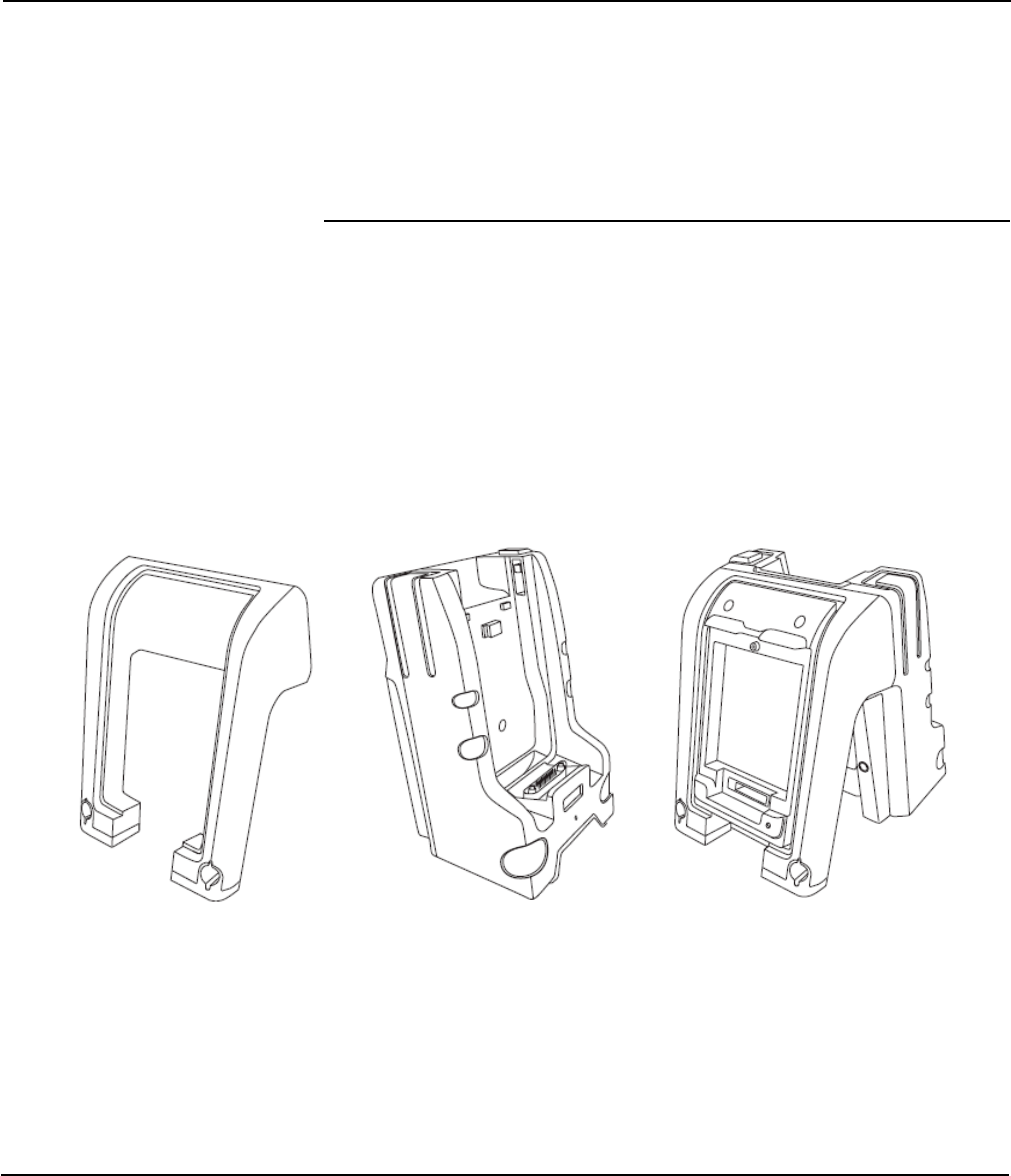
The TPAD docking station is a modular and multipurpose platform intended
for desktop, wall or mobile applications. The docking station concept is
shown in the gure below and consists of a docking cradle, battery charger,
and application specic mounting adapters.
The docking cradle and battery charger are both stand-alone devices that
may be used independently of one another with individual mounting adapters
for wall or mobile applications or in conjunction with one another using a
passive desktop mounting platform.
TPAD User’s Handbook page 35
Chapter 2. Using the Tpad
Using the docking station
Using the docking station
Desk stand
Battery
charger
Docking cradle
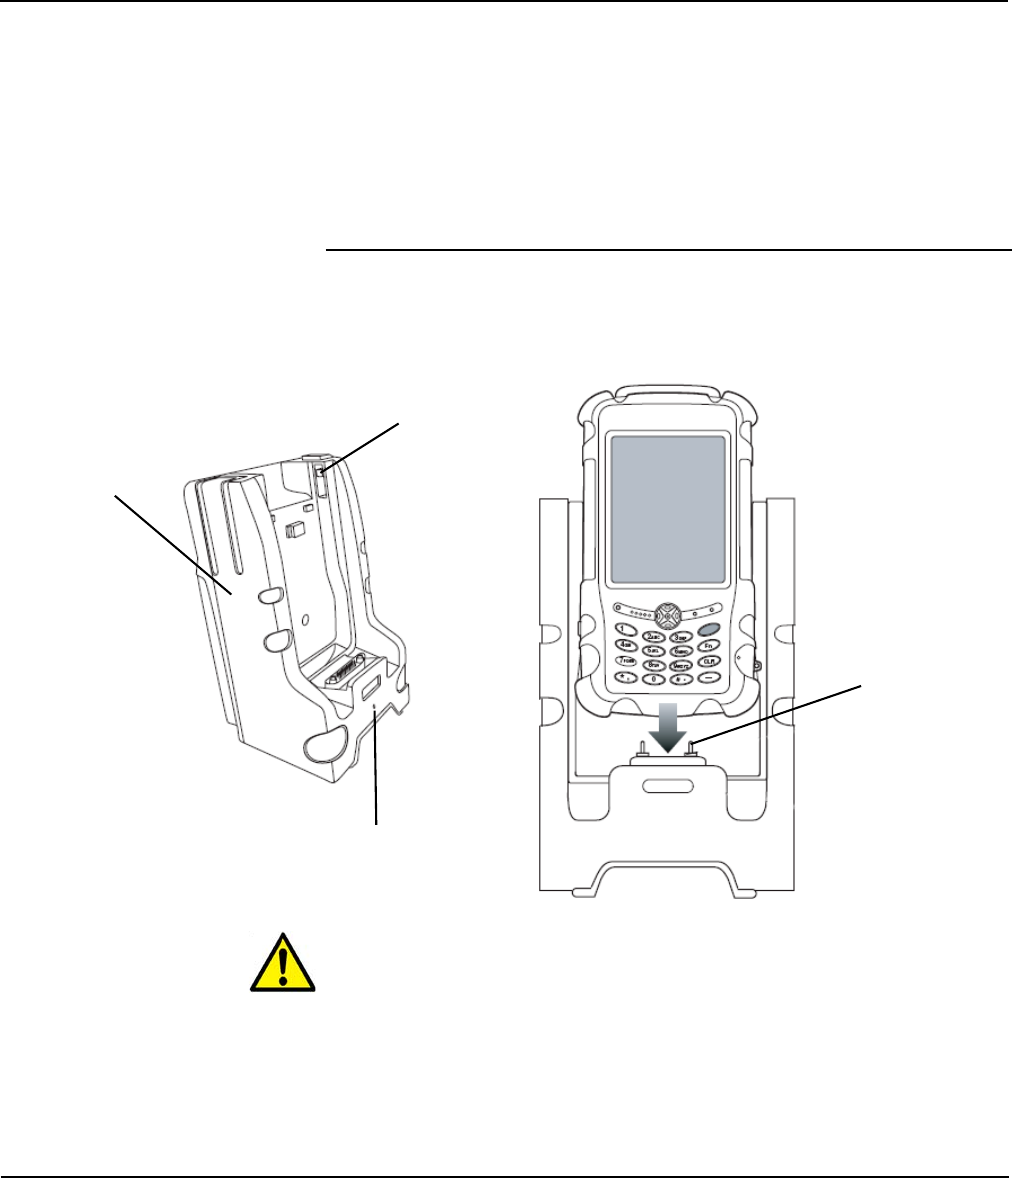
Align the Tpad into the docking cradle connectors and rmly push the
computer down and then push forward to engage the docking connector until
the locking pins click.
Solid green = power + Tpad docked
Flashing green = Power + Tpad not docked
Align the computer with cradle docking connector
TPAD User’s Handbook page 36
Chapter 2. Using the Tpad
Using the docking station
Docking the Tpad
docking
cradle
Locking
pins
docking
connectors
docking
indicators

Push the Eject button; then pull the Tpad up and away from the
cradle.
TPAD User’s Handbook page 37
Chapter 2. Using the Tpad
Using the docking station
Undocking the Tpad
Eject Button Docking
cradle
docking
indicators
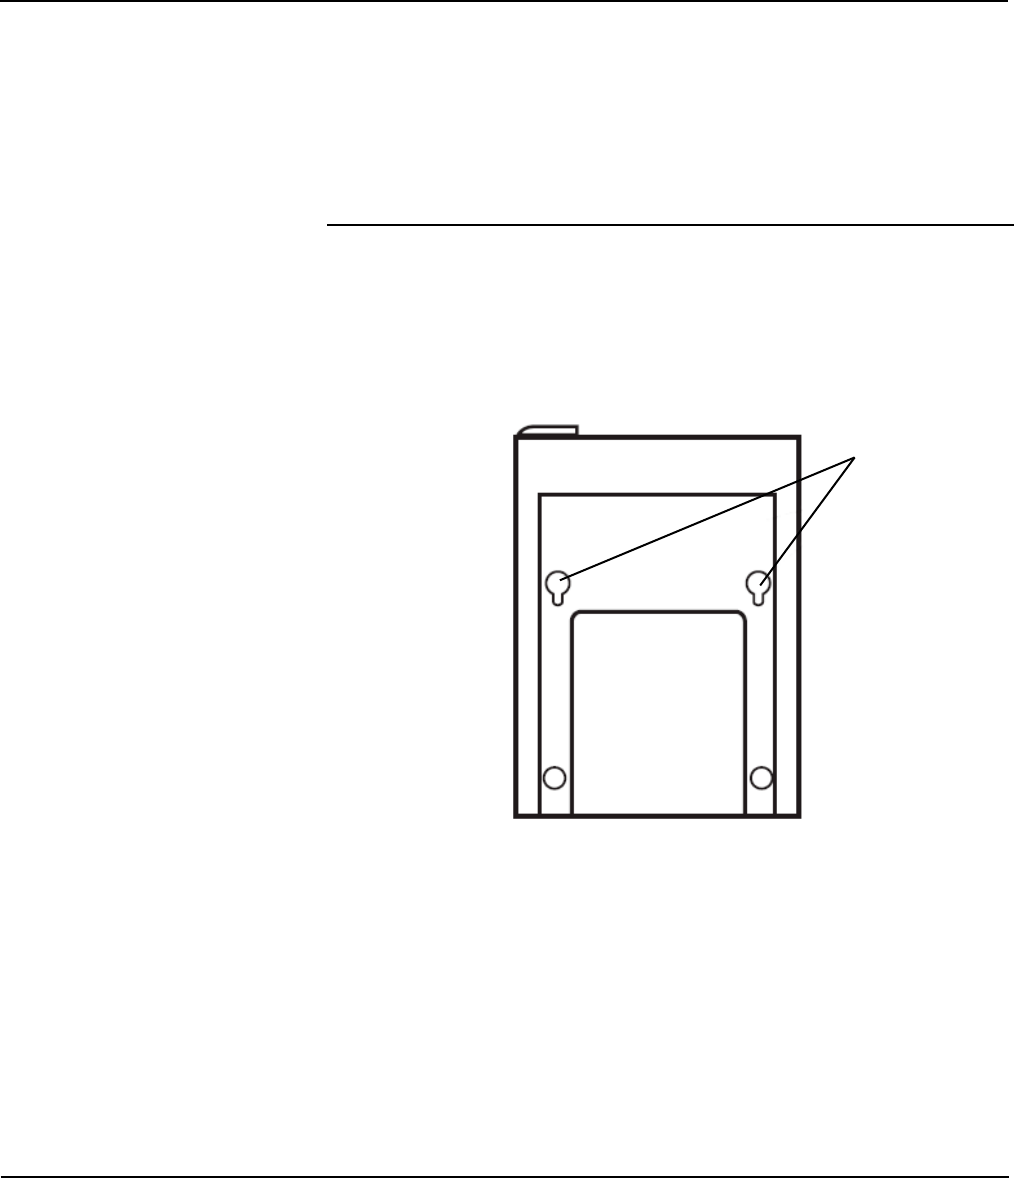
Mark the location for one of the keyhole slots on the wall; then measure
the distance to the other keyhole and mark that location.
Screw the mounting screws into the wall at the locations you marked.
Mount the docking cradle on the two screws.
1.
2.
3.
TPAD User’s Handbook page 38
Chapter 2. Using the Tpad
Using the docking station
Mounting the docking cradle on the wall
keyhole
slots
The desk stand attaches to the back of the docking cradle provides a stable
platform for the Tpad.
Snap the desk stand to the back of the docking cradle as shown in the
illustration.
TPAD User’s Handbook page 39
Chapter 2. Using the Tpad
Using the docking station
Using the desk stand
Desk stand Docking cradle
Desk stand connected
to the docking cradle

Refer to the following subsections for information about connecting external
devices to your Tpad.
TPAD User’s Handbook page 40
Chapter 2. Using the Tpad
Connecting devices
Connecting devices
USB client
SUB -D 25 extra features via special cable (not included)
- external CRT, Audio out -
3. Power port
After you connect the external monitor to the Video port on the PRM (cable
not included) slide the External Monitor switch to the right position as shown
in the illustration above.
Contact your local help desk or TETRA computer reseller.
Note
When activating external display switch (left or right) the handheld device
reset automatically.
make sure to back up your data.
1.
2.
TPAD User’s Handbook page 41
Chapter 2. Using the Tpad
Conecting devices
Docking Cradle expansion
Monitor
switch Right position
for external display
Connecting
external devices
Activating the monitor or projection panel
1
3
2
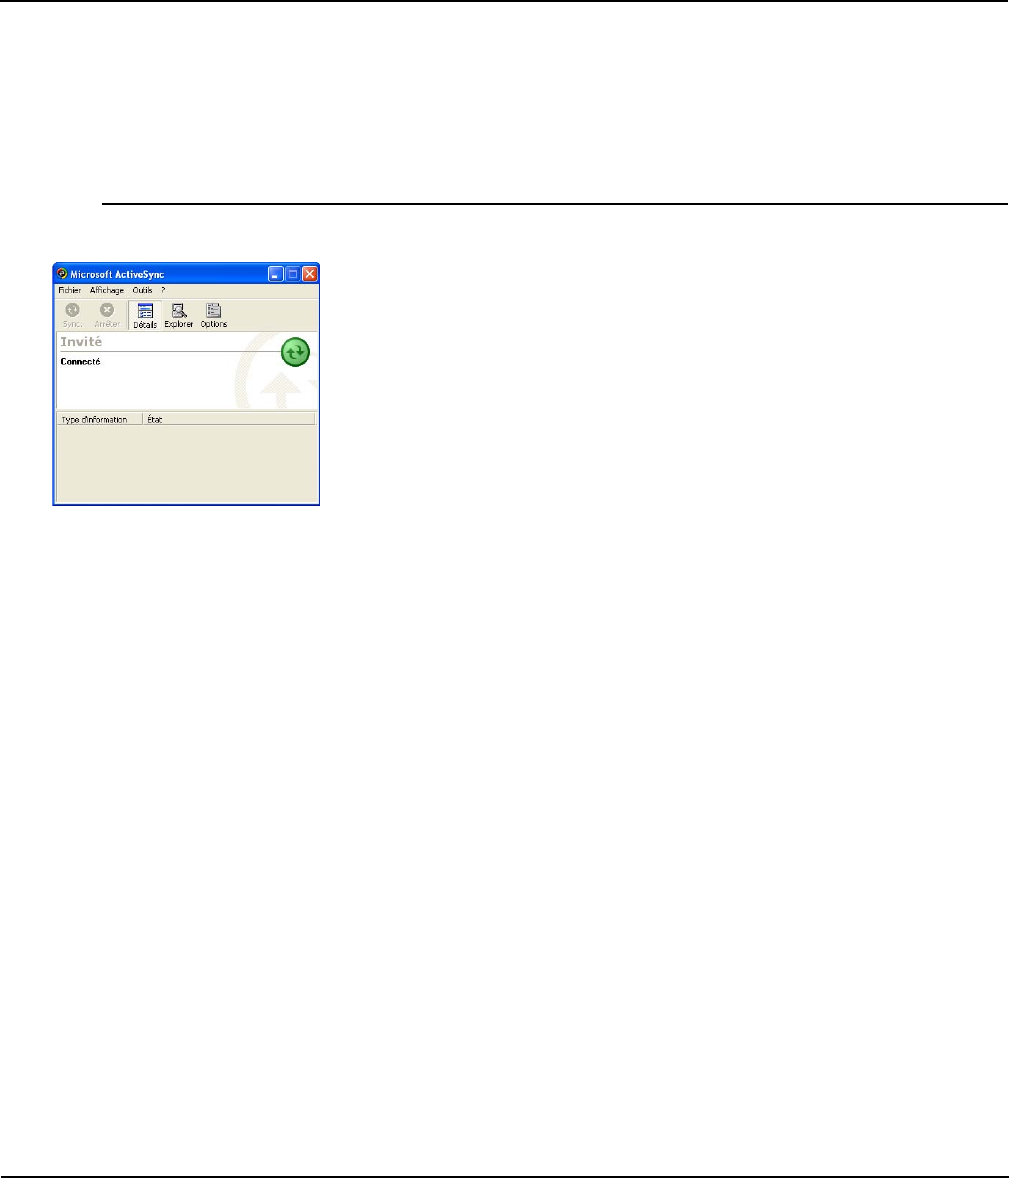
You may transmit/receive data between this handheld computer and other
computers via ActiveSync.
Install Microsoft ActiveSync 3.8 or above on host computer.
Connect handheld computer and host computer with the USB cable. Follow
the prompt to execute data sync. Perform Copy, Paste, Cut, Delete, etc.
same as PC.
Make sure you have administrative rights on the desktop PC before installing
or re-installing ActiveSync. Do not connect the Tpad to the desktop PC until
after you have completed installing Microsoft ActiveSync.
The latest version of Microsoft ActiveSync can be obtained from the following
website - http://www.microsoft.com/windowsmobile/default.mspx
Microsoft ActiveSync version 3.8 or higher is required to connect to the
computer.
TPAD User’s Handbook page 42
Chapter 2. Using the Tpad
Data sync
ActiveSync
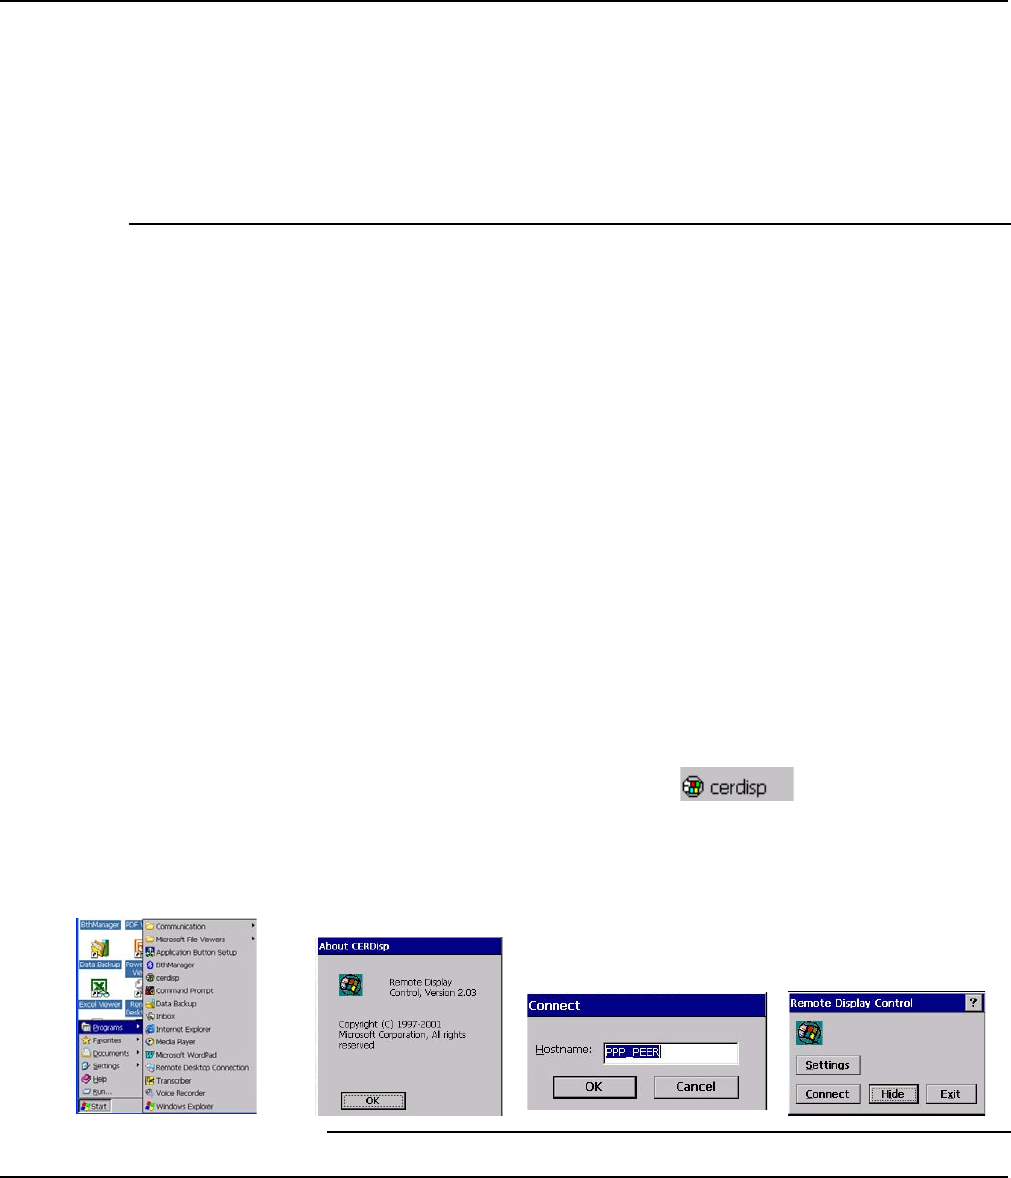
With the Remote Display Control application, you can display actions,
including user input, remotely on the display of a desktop computer.
Remote Display Control uses TCP/IP, and it can work with ActiveSync®
connections via USB client.
download remote display control : http://www.microsoft.com/technet/
prodtechnol/wce/downloads/ppctoys.mspx
The software is installed automatically C:\Program Files\Remote Display
Control\cerhost.exe. We recommend creating a shortcut on the desktop.
- Software Utilisation:
You could nd a user guide under C:\Program Files\Remote Display Control\
readme.txt.
Three steps are necessary:
- Connect the peripheral (on) to the PC. Please check that ActiveSync detect
the connexion.
- On the PC launch Remote Display Control (cerhost.exe)
- On the TPad execute \Windows\cerdisp.exe, click on Connect, use default
parameter (PPP_PEER), and click Ok.
All data displayed on the TPad are immediately visible on the PC monitor.
We could zoom this window.
Consequently, if a retro projector is connected to the PC; whole assistance
could see the displayed data on the TPad.
Remote display control
TPAD User’s Handbook page 43
Chapter 2. Using the Tpad
Remote display control
There are two types memory on the computer: Temporary memory RAM
(Random Access Memory) and permanent memory ROM (Read Only
Memory).
Most data of ongoing program are stored in RAM. It would stay intact when
power turns OFF. (Actually pressing power button OFF/ON is “suspend/
resume” only.
Part of the PDA is still running, power supply to memory is always ON.)
However, data or program in RAM will be lost when hardware reset. And if
primary battery been removed for too long time (for example, swap battery
for > 1 hours), there are risks to lose RAM data as back up battery may run
exhausted.
Long time storage will drain primary and backup battery to exhaust thus
unable to keep memory data.
To avoid data loss you may move data into ROM or memory card as follows:
Select Data Backup program on the desktop or tap start / programs /
data backup.
select the way you want to backup data / inbox / le / folders
then select Scheduled.... tab to automatically backup data and tick the
box enable Scheduled Backup
1.
2.
3.
TPAD User’s Handbook page 44
Chapter 2. Using the Tpad
Back up Data
Backup Data
you can protect your settings with password encryption
select the TOOLS tabs in the data backup main page
select options
Tick the box Encrypt backup le
Select Backup... tab then choose a password and conrm
To restore Data follow those step :
select the Action tab and the select Restore
select desired les / folders you want to restore and enter password if
you activated this option
1.
2.
3.
4.
1.
2.
TPAD User’s Handbook page 45
Chapter 2. Using the Tpad
Restore Data
Restore Data
You can charge the Tpad battery directly with the AC/DC adapter, or you can
connect the battery directly to the battery charger when the Tpad is not in the
desk stand.
Charging the battery in the desk stand
Place the battery in the battery charger.
Place the battery charger in the desk stand.
plug-in the power adapter on the battery charger
The Charge indicator ashes to indicate that the battery is charging.
When the battery is fully charged, the Charge indicator glows solid green.
1.
2.
3.
TPAD User’s Handbook page 46
Chapter 2. Using the Tpad
Charging the Tpad battery
Charging the Tpad battery
Using the desk stand
Charge indicator
battery charger
Charging the battery outside the desk stand
1. Place the battery in the battery charger.
2. Connect the AC/DC adapter to the battery charger’s Power connector.
3. Connect the AC/DD adapter to an electrical socket.
The Charge indicator ashes to indicate that the battery is charging.
When the battery is fully charged, the Charge indicator glows solid green.
Note: During battery swap the memory data is sustained by a small backup
battery.
Please swap battery within 1 hours to avoid data loss.
TPAD User’s Handbook page 47
Chapter 2. Using the Tpad
Charging the Tpad battery
Charging the battery outside the desk stand
battery charger
Tpad battery
You can install additional memory or multimedia cards in the Tpad’s SD/MCC
socket.
The computer accepts one SD card (Secured Digital Card). Insert the card
rmly into the slot and x the rubber cover for water/dust protection.
To remove the card, push the SD card to release it.
You can install Compact Flash card on the Tpad.
please refer to TETRA reseller or contact support@logic-instrument.com for
supported Compact Flash cards.
Note :
If the CF card does not t onto the Tpad with the CF cover installed then
the Tpad is not sealed and loose its protection depending on the size of the
Compact Flash card.
TPAD User’s Handbook page 48
Chapter 2. Using the Tpad
Installing Memory or multimedia cards
Installing memory, multimedia cards or Compact Flash card
SD/MMC socket
Compact Flash slot

This section describes how to use the BlueTooth Manager for Windows CE.
This section is for users and developers who need to use BlueTooth
functions:
This document describes:
• Software Installation.
• Bluetooth Manager utilisation (with print screen)
ACRONYMS
FTP : File Transfer Prole. Bluetooth service used for File Transfer.
OPP : Object Push Prole. Bluetooth service used to send a le or card.
SPP : Serial Port Prole. Bluetooth service used to open a virtual serial
communication between two peripherals.
1. Installation
Bluetooth manager is already installed on the Tpad.
By default, the installation installs “\Program Files\BthManager “and creates
the following directories: “\My Documents\Bluetooth\Ftp”, “\My Documents\
Bluetooth\Opp”, and “\My Documents\Bluetooth\Sync”.
2. BlueTooth Manager
When the BTh Manager is run in a window, icons are then displayed in the
tools bar:
TPAD User’s Handbook page 50
Using the Bluetooth
Using the Bluetooth
Using the Bluetooth
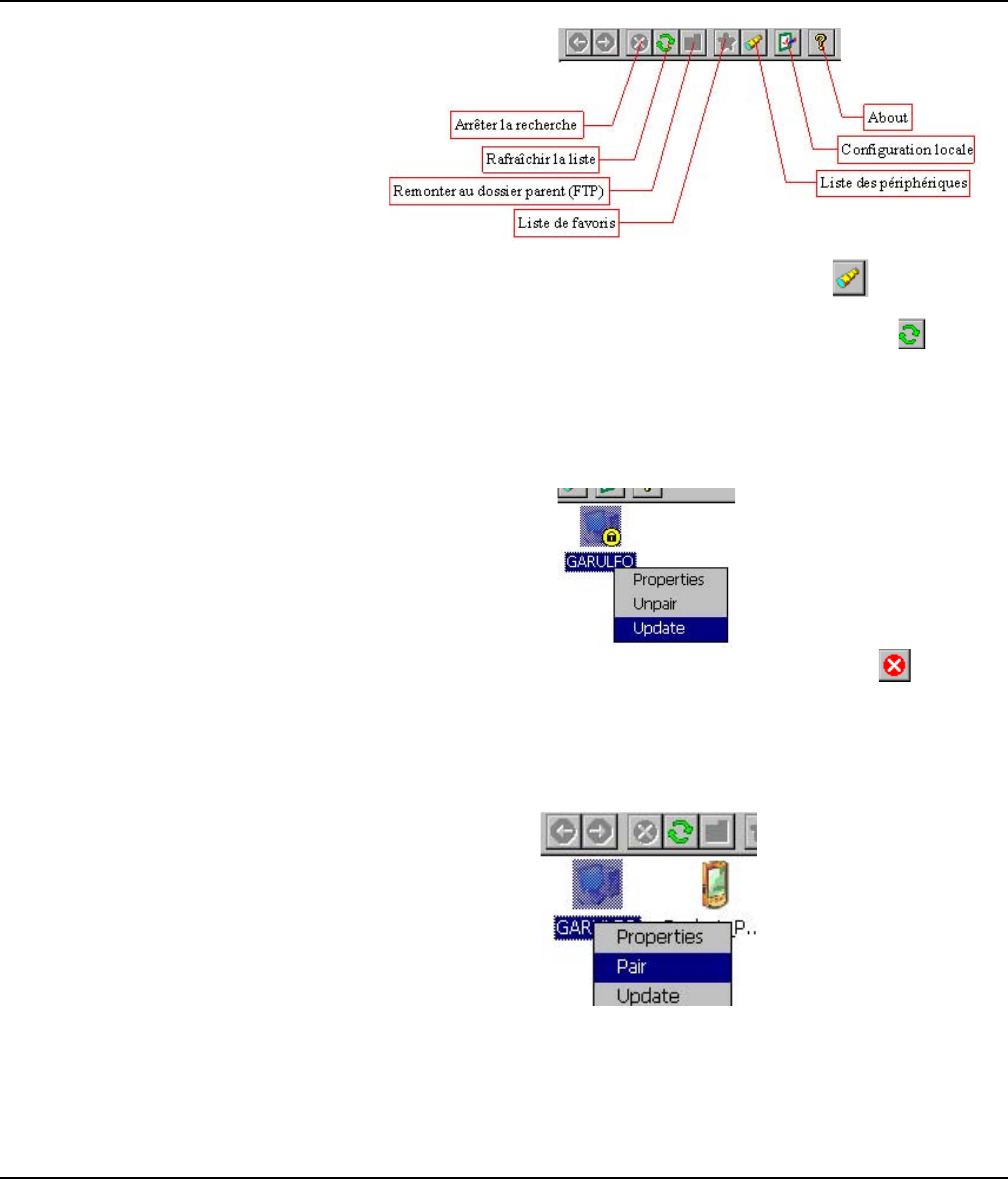
3 Peripheral search
On the initial start of the application, you need to click on to start the
search of the remote Bluetooth peripherals. Then all peripherals will always
be displayed to decrease search time. To refresh the list click on .
The search is done rst on coupled peripherals and then it looks at distant
peripherals.
During the search, the name or its class of the peripheral may not be is
found. You could then update the peripheral settings by:
The search time could be lengthy, but it can be stopped by the icon.
3.2 Coupling of peripheral
The coupling could be done in two ways:
Could be requested by a peripheral or by the TPAD BlueTooth Manager, or
the request is done by a right click and then choose «Pair».
TPAD User’s Handbook page 51
Chapter 3. Using the Bluetooth
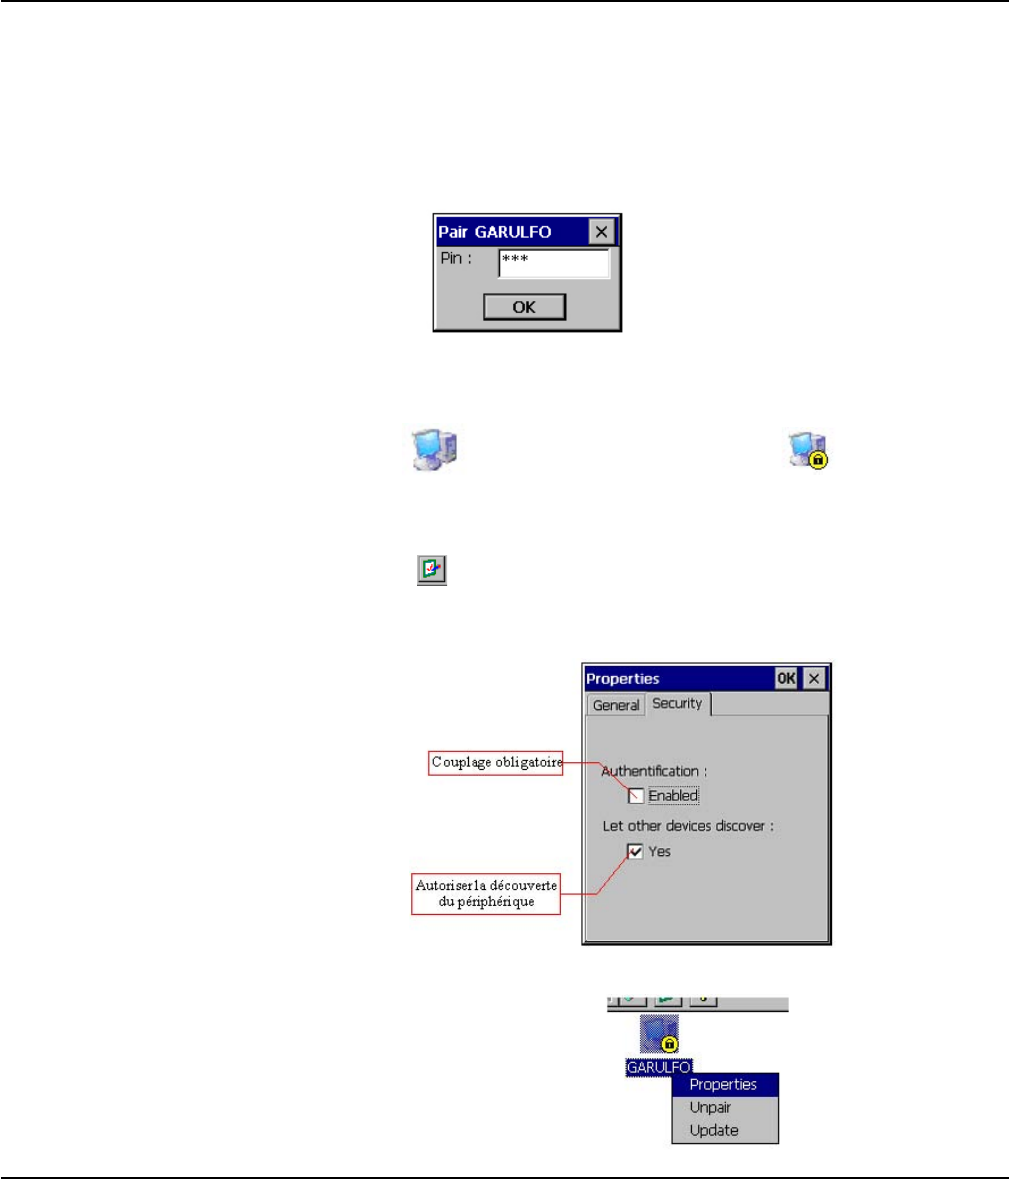
In both cases, you need to enter the password :
After the password is entered, the request is applied to the two peripherals,
you then could see if the peripherals are coupled:
Peripheral coupled Peripheral coupled
3.3 Proprietiesandconguration
Click on , to see the local peripheral proprieties (MAC address, name
and peripheral type) and it’s possible to modify the security settings. You
could choose if you want to set the peripheral to be detectable, un-detectable
or set the couple to be mandatory for access of local services.
With the contextual menu on the icons, you could see the properties. (of a
peripheral, a service, …).
TPAD User’s Handbook page 52
Chapter 3. Using the Bluetooth
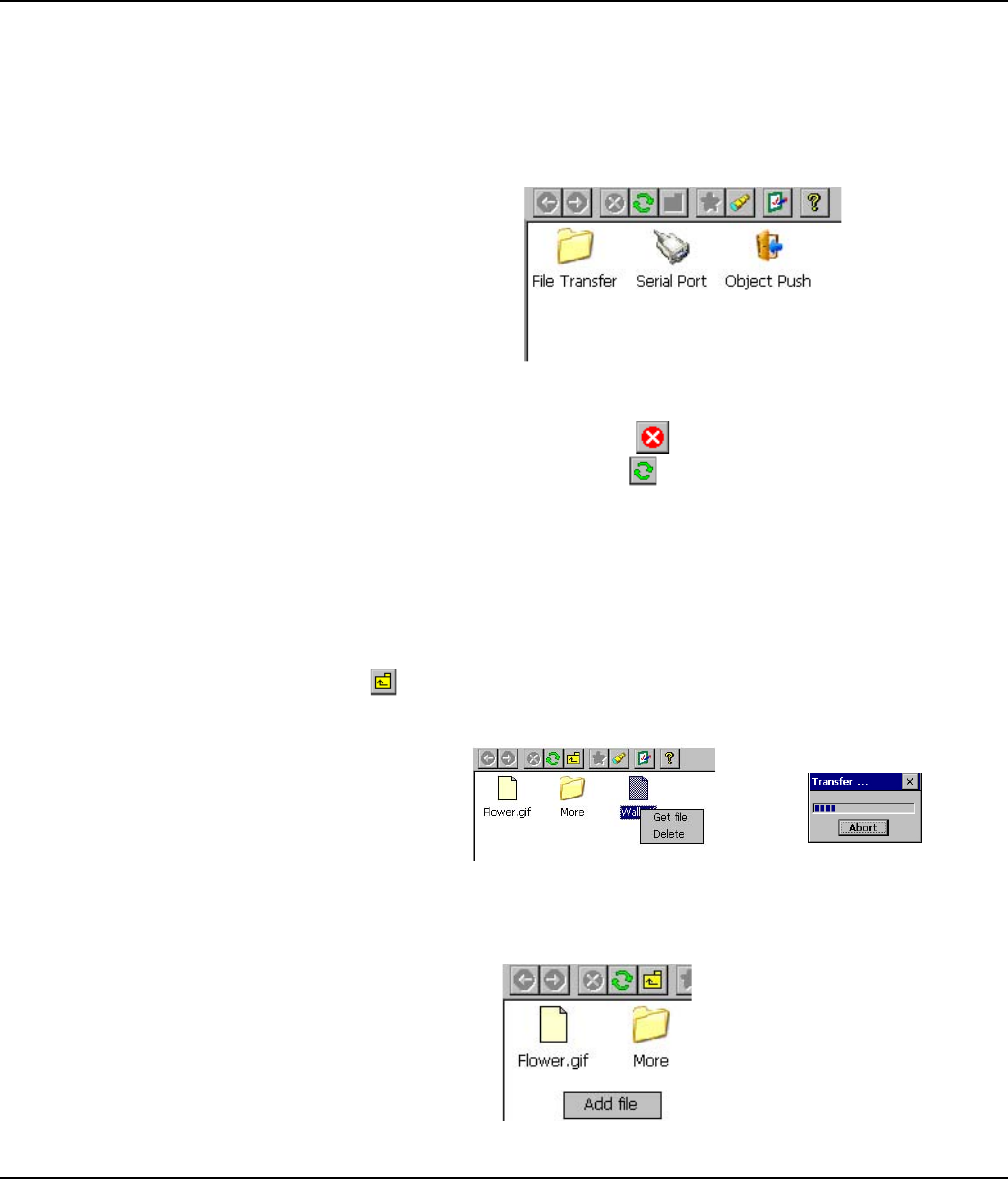
3.4 Services Search
For Service search, just double click on the peripheral icon, then the Blue-
Tooth manager will display if the peripheral has FTP, OPP,and SPP services.
For the initial search, the BlueTooth Manager asks for the request of each
service.
It’s possible to stop the search with or
refresh the service search list with .
3.5 Service Utilisation
3.5.1 File Transfer
To use this service, double click on the FTP icon or choose connect on the
contextual menu. The BlueTooth Manager displays the directory shared by
the distant peripheral. Then you can browse or choose the parent directory
with .
To get a le, double-click or choose “ Get File “ from the contextual menu. A
window is displayed with transfer time information.
The le transferred is located on the following “\My Documents\Bluetooth\
Ftp“. The path can change in the FTP proprieties.
The following window is displayed when you want to add a le to the distant
peripheral with a right-click on the folder or current folder.
Then, it’s possible to delete a le when “Delete“ is selected on the contextual
menu.
TPAD User’s Handbook page 53
Chapter 3. Using the Bluetooth
3.5.2 Object Push
To use this service, double-click or select “Push le“ from the contextual menu.
Then choose the le to transfer.
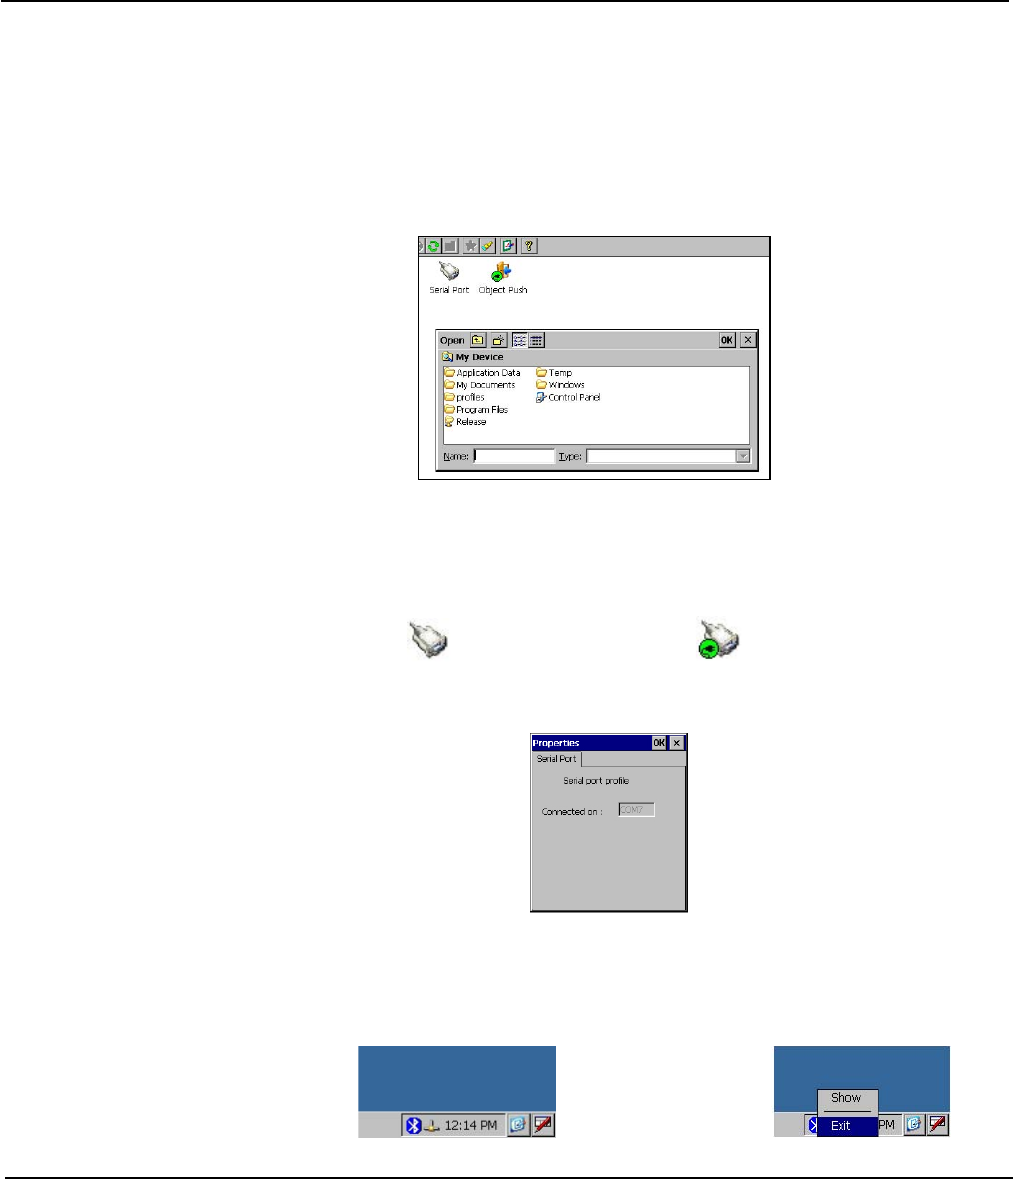
3.5.3 Serial Port
To use this serial service, double-click on the icon or choose “Connect “ from
the contextual menu. The information is displayed if the service is enabled or
not.
Service connected Service not connected
When the service is on, all applications could use the virtual COM port. To
know the COM port setting, select proprieties in the contextual menu.
3.6 Stop the Bluetooth Manager
When the BlueTooth Manager window is closed, in fact the application is still
running. To re-display or stop it, click on the BlueTooth icon on the Windows
bar and select : “Show” or “Exit” .
TPAD User’s Handbook page 54
Chapter 3. Using the Bluetooth

Should the computer fail to function properly, you may try the following
troubleshooting steps: (Please backup your data before troubleshooting)
• Check AC adapter, battery, and the power source.
• Press hardware reset to re-boot the computer.
Turn OFF the master switch for a while then turn ON and re-boot.
• Remove the software suspected.
TPAD User’s Handbook page 56
5 Troubleshooting and FAQ
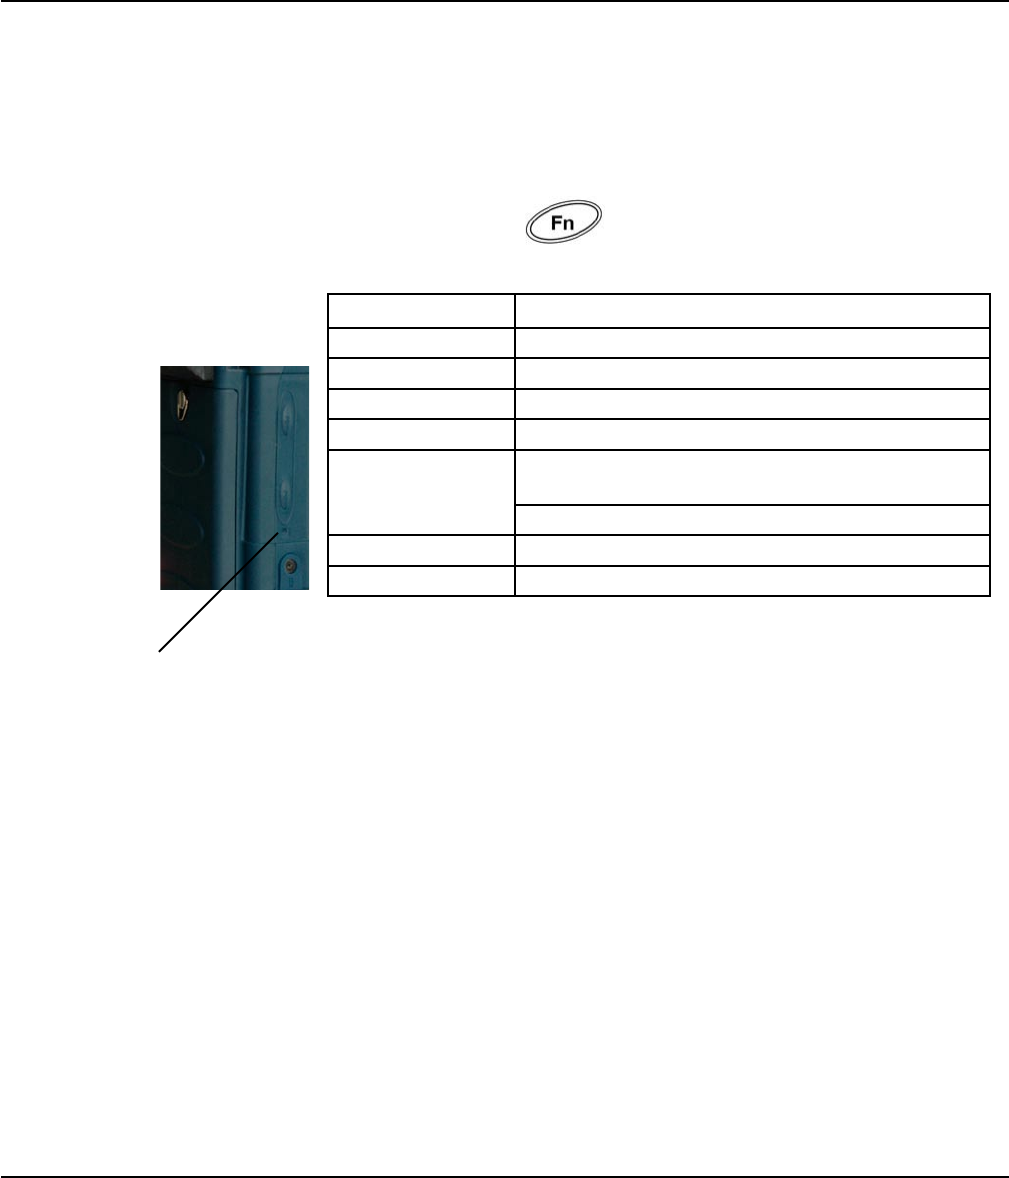
Combination key table
Pressing the Fn Key (Function Key) as a preliminary key allows
entering a shifted character. The Fn icon will appear on the task bar and
disappear when the second key is entered
1- How could we have a larger virtual keyboard?
=> 3 Steps to launch Soft Keyboard Options
1 - Launch Control Panel
2 - Launch «Input Panel»
3 - Click «Options...» button to launch «Soft Keyboard
Options»
2- How to Calibrate the touchscreen
=> After a reset, the Touchscreen needs to be re-calibrated.
There two different ways to access re-calibration.
1- enter in Control Panel / Stylus / Calibration and click on
Recalibrate.
2- access directly to the calibration tool by pressing
simultaneously Fn+ ‘2’ combination keys to launch
calibration
TPAD User’s Handbook page 57
Chapter 4. Ttroubleshooting and FAQ
Keys Function
CLR ESC
Fn+ ’’1’’ Lock Keyboard and Touchscreen
Fn+ ‘‘2’’ Calibration
Fn+ ‘‘*’’ Soft Reset
Fn
toggles between numeric, alpha lower case, and
alpha upper case
CLR key toggles between CLR and ESC
P3 + P4 + Reset Run Diagnostic utility
Reset + Power-on Hard Reset, default settings loose unsaved data
reset button

3- How to display a presentation on PC monitor
Example: Projection on a retro projector connected to a PC and TPad for
software demonstration:
- Install the software Microsoft ActiveSync from the following link:
http://www.microsoft.com/downloads/details.aspx?FamilyID=d2645c21-8a85-
45a2-8d13-653beb6cdddc&DisplayLang=en
- The software PowerToys Remote Display Control could be downloaded on
Microsoft following link:
http://www.microsoft.com/technet/prodtechnol/wce/downloads/ppctoys.mspx
The software is installed automatically C:\Program Files\Remote Display
Control\cerhost.exe. We recommend creating a shortcut on the desktop.
- Software Utilisation:
You could nd a user guide under C:\Program Files\Remote Display Control\
readme.txt.
Three stapes are necessary:
- Connect the peripheral (on) to the PC. Please check that ActiveSync detect
the connexion.
- On the PC launch Remote Display Control (cerhost.exe)
- On the TPad execute \Windows\cerdisp.exe, click on Connect, use default
parameter (PPP_PEER), and click Ok.
All data displayed on the TPad are immediately visible on the PC monitor.
You can now zoom the window.
Consequently, if a retro projector is connected to the PC; whole assistance
could see the displayed data on the TPad.
4- Could we connect the TPad and/or Cradle directly to vehicle?
NOT directly but only with specic optional adapter provided by Logic
Instrument.
5- What are the Compact Flash Cards available?
The Tpad accept almost all CF cards available on the market however not all
of them will t in the Tpad due to Compact Flash cover size.
If you do not sealed the CF cover then the Tpad is not protected and severe
injury may occur.
To know if a CF card t with the Tpad please contact our local representative
or e-mail us at support@logic-instrument.com
TPAD User’s Handbook page 58
Chapter 4. Ttroubleshooting and FAQ

6- Could we use Bluetooth printer?
Normally all BT printers or BT/USB/Parallel adapter should work properly if at
least SPP prole is available, as BPP, BIP, OPP, HCRP proles could also be
used.
7- Alphanumeric keys and joystick life?
• Power-key is 65,000 times.
• Keyboard (each key) is 260,200 times.
• Reset-key is 6,500 times.
• Function-key are 65,000 times.
• 5 ways SW (each direction) is 260,200 times.
8- How To Extend Your PDA’s Battery Life
Your PDA is a valuable tool for mobile work. When the battery begins to fail
or has failed, mobile users can be stuck. Take steps to protect and extend
your PDA’s battery life.
Here’s How:
1. Use the AC adapter whenever you can. This not only charges the
battery but extends the battery life.
2. Set your PDA to power down after a set period of inactivity.
3. Adjust the brightness of the screen. You don’t need it to be 100%
bright and it will consume less power.
4. Set the backlighting to turn off after a certain period of time.
5. Set your PDA on the lowest setting possible when not in use.
6. Remove any unused devices such as Compact Flash and PC
cards.
9- How long does it take to charge the battery
It takes two hours to charge the battery at 25°C.
TPAD User’s Handbook page 59
Chapter 4. Ttroubleshooting and FAQ

10- RMA Service
If troubleshooting is unsuccessful, please consult your dealer for service
If it is necessary to send in the Handheld device for repairs, please follow the
dealer’s instructions for RMA# procedure.
Shipping instructions:
1. Use the original shipping container and packing materials,
if possible.
2. If the original packing materials are not available, wrap the
equipment with soft material (e.g., PU/ PE form) then put the
wrapped equipment into a hard cardboard shipping box.
3. Include a sheet with the following information: (Note:
please keep a copy for your record)
• Name
• Address
• Unit serial number
• Place and date of purchase or the original invoice
number
• Date of failure
• A DETAILED description of the problems you have
encountered
• A list of the hardware/software conguration, if
applicable.
4. Clearly mark the outside of the shipping box with the RMA
number. This will facilitate faster processing and avoid faulty
return.
5. Unless prior arrangements have been made, the customer
is responsible for all shipping costs. Unauthorized use of the
company’s shipping accounts is not permitted.
TPAD User’s Handbook page 60
Chapter 4. Ttroubleshooting and FAQ

11- Cleaning & Maintenance
Always turn OFF the power, unplug the power cord and remove the battery
before cleaning. The exterior of the system and display may be wiped with a
clean, soft, and lint-free cloth. If there is difculty removing dirt, apply non-
ammonia, non-alcohol based glass cleaner to the cloth and wipe.
An air gun is recommended for cleaning water and dust. For salty water
please wipe with fresh water then blow-dry with an air gun.
Close all caps tightly before water cleaning.
TPAD User’s Handbook page 61
Chapter 4. Ttroubleshooting and FAQ

CPU
Intel XScale PXA263 CPU speed 400MHz
Operating system Windows CE NET 4.2
MEMORY
SDRAM 64MB
ROM 64MB
DISPLAY
Type: Resistive Touchscreen 4” Active TFT Full VGA
Resolution (480x640), 64k/16-Bit colors
Backlight: YES
Transmissive, outdoor readable, integrated backlight, Automatic/Manual
brightness controller
I/O PORTS
Mono speaker
DC jack x 1
Docking port
XPM port
Compact Flash slot (type II x 1)
SD slot
serial port (optional)
Bluetooth COMMUNICATION
Built-in Bluetooth
TPAD User’s Handbook page 62
6 SPECIFICATIONS

SYSTEM UNIT DIMENSIONS AND WEIGHT
Width: 102.8mm
Depth: 46.5mm
Height: 186.1mm
Weight: 600g
AC ADAPTER
Voltage: AC 110~220 V
Frequency: 50/60 Hz
BATTERY
Type: Lithium Ion
Capacity: 7.4V 2400mAH
Back up battery NiMH 20mAH
ENVIRONMENTAL RATINGS
MIL-STD-810F: Operating Temperature ; Storage Temperature ;
Thermal Shock ; Relative Humidity ; Solar Radiation
Salt Fog ; Corrosive Agents ; Integrity Vibration ;
Vehicle Vibration ; Functional Shock ; Crash Shock
Drop Test ; Transit Drop
IP65 (IEC 60529): Dust impenetrable, jet water proof
Regulatory Compliance: CE, FCC part 15, EC 60950, CSA C2.2,
designed to be ATEX 94/9/EC zone 2
Temperature: -20° C (-4° F) to +50° C (122° F) operating
-40° C (-40° F) to +85° C (185° F) storage
Humidity: 95% @ 60° C (140) F)
TPAD User’s Handbook page 63
Chapter 4. SPECIFICATION

Adapter. A device that provides an interface between two dissimilar
electronic devices. For example, the AC adapter modies the power
from a wall outlet for use by the computer.
Advanced Power Management (APM). A facility consisting of one or
more layers of software that support power management. The APM software
interface enables applications, operating systems, device drivers, and the
APM BIOS to work together to reduce power consumption.
Alternating Current (AC). Electric current that reverses its direction
of ow at regular intervals.
Analog signal. A signal with characteristics such as amplitude and
frequency that vary in proportion to (are an analog of) the value to be
transmitted. Voice communications are analog signals.
Application. A program that performs specic tasks on your computer,
such as word processing or creating spreadsheets.
BIOS. Programs that contain such basic hardware operations as an
interaction with diskette drives, hard disk drives, and the memory.
Board. A circuit board. An internal card containing electronic components
called chips, which perform a specic function or increase the capabilities of
the system.
Boot. To load a program or operating system into system memory.
Bits Per Second (BPS). In serial transmission, the instantaneous bit
speed with which a device or channel transmits a character.
Card. Synonym for board; see board.
TPAD User’s Handbook page 65
A Glossary

Compatibility. 1.The ability of one computer to accept and process data
in the same method as another computer without modifying the data or
the media upon which it is being transferred. 2.The ability of one device to
connect or communicate with another system or component.
Conguration. The specic combination of hardware components of the
computer, and their operating status. The conguration of your computer
includes pre-dened memory, type and speed of microprocessor, type of and
size of hard disk drive, etc.
Default. The preset parameter value automatically selected by the
computer when you or a program do not provide instructions.
Device driver. A program that controls communication between a
specic peripheral device and the computer.
Display. An image-producing device used to view computer output.
Double-click. To press and release the pen/stylus twice within a time
frame you dene, without moving the pointer off the choice.
Driver. Software that allows an application program to communicate
with a particular piece of equipment, such as a printer or the pen/
stylus.
TPAD User’s Handbook page 66
Appendix A
glossary

Hardware. The physical electronic and mechanical components of a
computer system. typically, the computer itself, CPU, memory, etc.
Hertz. A unit of wave frequency that equals one cycle per second.
Interface. 1. Hardware and/or software components used specically to
connect one computer or device to another. 2. To physically connect one
system or device to another to exchange information. 3. The point of contact
between user, the computer, and the program (for example, the pen/stylus or
a menu).
Kilobyte (KB). A unit of 1024 bytes measuring storage space, typically in
memory or on storage media such as a diskette or hard disk drive.
Local area network (LAN). Assembly of separate computers into an
integrated network that connects the various computers together and to
common devices such as printers and fax machines.
Light Emitting Diode (LED). A semiconductor device that emits light
when a current is applied.
Liquid Crystal Display (LCD). liquid crystal sealed between two sheets
of glass coated with transparent conducting material. Applying a voltage
between the glass sheets darkens the liquid crystal to provide contrast to
lighted portions of the display.
Megabyte (MB). A unit of data storage equal to 1024 kilobytes.
Megahertz (MHz). a unit of wave frequency that equals 1 million
cycles per second.
Modem. A device that connects your computer to a telephone line,
allowing it to communicate with another computer at another location.
TPAD User’s Handbook page 67
Appendix A.
Glossary

Pen. See stylus.
Peripheral device. An input/output device that is external to the central
processor and/or main memory such as a printer or scanner.
Pixel. Picture elements (tiny dots) that compose a screen image.
Port. The electrical connection through which the computer sends and
receives data to and from devices or other computers.
Program. A set of instructions a computer can execute to tell the system
what to do and how to do it.
Random Access Memory (RAM). A hardware component of your
computer that temporarily stores active program code and data.
Reset. The act of reloading the operating system.
Resolution. The number of pixels displayed on the screen. A higher
resolution provides greater clarity and allows more information to be
displayed on the screen at once.
Restart. Resetting a computer without turning it off (also called
warm boot or soft reset).
Resume. The act of returning the computer to an active, operational state.
Read Only Memory (ROM). The portion of your computer’s memory that
contains permanent instructions, and which cannot be modied.
TPAD User’s Handbook page 68

Status Indicator (LED). a light above the LCD screen which indicates the
current status of a particular device or hardware component.
Stylus. A writing instrument. For pen computers, the stylus is used to
interface with the LCD and digitizer.
Suspend mode. A power conservation mode in which electrical current is
removed from most components of the computer.
Universal Serial Bus. A serial interface that enables communication
between devices and the computer.
TPAD User’s Handbook page 69

Important safety information
Before you use the Tpad, read these safety instructions and the
operation instructions in this handbook.
Failure to observe all these instructions voids the Limited Warranty
and may lead to suspension or denial of services to the offender, or legal
action, or both.
Follow any special regulations governing the use of the Tpad and, if
radioenabled,
always switch it off in areas where radio devices are forbidden or
when the radio device can cause interference or danger.
Always follow any safety laws and regulations pertaining to the use of cell
phones and two-way radios, because these laws and regulations typically
apply to the use of the BluetoothTpad.
Observe all restrictions on the use of radio equipment in fuel depots (fuel
storage and distribution areas), chemical plants, and wherever blasting
operations are in progress or in any area in which restrictions on radio
transmissions are imposed.
Switch off the Tpad when in an aircraft. The Tpad is not FAA-approved
for use on aircraft. The effect of the use of the Tpad in aircraft is unknown.
Using the Tpad in an aircraft may affect aircraft instrumentation,
communication, and performance; may disrupt the network; and may be
illegal.
Operating the Bluetooth Tpad may interfere with the functioning of
inadequately protected medical devices such as pacemakers. Consult a
physician or the manufacturer of the medical device if you have any
questions.
TPAD User’s Handbook page 70
This transmitter must not be co-located or operating in conjunction with any other antenna or
transmitter.