Woodstream SPRAY Spray Away User Manual SNA SPRAY manual
Woodstream Corporation Spray Away SNA SPRAY manual
Users Manual
PAGE 1 Spray Away’s Manual
Thank you for purchasing the Havahart Spray Away® Hydro Repellent Sprinkler with Remote
(CONTENTS)
Woodstream® Corporation
69 North Locust Street
Lititz, PA 17543
United States
www.Havahart.com
If you encounter any problems while assembling your Spray Away, please refer to the Troubleshooting
section of this manual or call us at 1.855.5.HAVAHART. We’re also available for live chat online at
www.havahart.com.

PAGE 2 Cautionary Reminders
• Intended to operate with typical
household water pressure–between 30
and 80 psi.
• When pushing the stake into the ground,
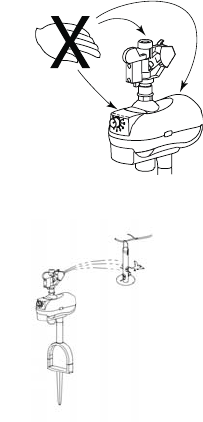
use the step-in-stake footstep. DO NOT
push down or apply weight on the unit.
• To prevent damage from freezing water,
take Spray Away™ inside when the
temperature drops below 32°F.
• Dust, dirt or hard water can limit
sensitivity – keep infrared sensor clean
by wiping it gently with a damp cloth.
• Before disconnecting hose from unit,
turn water off and activate unit with
hand to drain hose.
• A maximum sensitivity level is more
prone to have repeated/erroneous sprays.
• To minimize false triggers, avoid
pointing Spray Away at moving water,
windy areas and moving vehicles.
• When the mode dial is set to
SPRINKLER, Spray Away immediately
starts to spray water – be sure to stand
behind Spray Away when setting to this
mode.
DO NOT PUSH DOWN ON UNIT!!
MAY FRIGHTEN BIRDS!!
WARNING: Changes or modifications to this device not expressly approved by Woodstream
Corporation could void the user’s authority to operate the equipment.
“NOTE: This equipment has been tested and found to comply with the limits for a Class B digital
device, pursuant to Part 15 of the FCC Rules. These limits are designed to provide reasonable
protection against harmful interference in a residential installation. This equipment generates,
uses, and can radiate radio frequency energy and, if not installed and used in accordance with
the instructions, may cause harmful interference to radio communications. However, there is no
guarantee that interference will not occur in a particular installation. If this equipment does cause
harmful interference to radio or television reception, which can be determined by turning the
equipment off and on, the user is encouraged to try to correct the interference by one or more of
the following measures:
• Reorient or relocate the receiving antenna.
• Increase the separation between the equipment and receiver.
• Connect the equipment into an outlet on a circuit different from that to which the receiver
is connected.
• Consult the dealer or an experienced radio/TV technician for help.”
This Device complies with part 15 of the FCC rules. Operation is subject to the following two
conditions. (1) This Device may not cause harmful interference, and (2) this device must accept
any interference received, including interference that may cause undesired operation.
Under Industry Canada regulations, this radio transmitter may only operate using an antenna of a
type and maximum (or lesser) gain approved for the transmitter by Industry Canada. To reduce
potential radio interference to other users, the antenna type and its gain should be so chosen that
the equivalent isotropically radiated power (e.i.r.p.) is not more than that necessary for successful
communication.
Conformément à la réglementation d'Industrie Canada, le présent émetteur radio peut
fonctionner avec une antenne d'un type et d'un gain maximal (ou inférieur) approuvé pour
l'émetteur par Industrie Canada. Dans le but de réduire les risques de brouillage radioélectrique à
l'intention des autres utilisateurs, il faut choisir le type d'antenne et son gain de sorte que la
puissance isotrope rayonnée équivalente (p.i.r.e.) ne dépasse pas l'intensité nécessaire à
l'établissement d'une communication satisfaisante.
This device complies with Industry Canada licence-exempt RSS standard(s). Operation is subject
to the following two conditions: (1) this device may not cause interference, and (2) this device
must accept any interference, including interference that may cause undesired operation of the
device.
Le présent appareil est conforme aux CNR d'Industrie Canada applicables aux appareils radio
exempts de licence. L'exploitation est autorisée aux deux conditions suivantes : (1) l'appareil ne
doit pas produire de brouillage, et (2) l'utilisateur de l'appareil doit accepter tout brouillage
radioélectrique subi, même si le brouillage est susceptible d'en compromettre le fonctionnement.

PAGE 3 How it Works
Havahart Spray Away® Hydro not only provides an innovative and humane way to keep animals out of
your yard, but also it conveniently doubles as an oscillating irrigation sprinkler, so you can use it to water
the surrounding vegetation. Simply select your mode, and use the provided remote control to
communicate with your Spray Away from up to 100 feet away.
ON MODE: When set to ON, Spray Away Hydro’s infrared sensor goes to work to seek out animal
intruders that cross its path. When an animal is detected, Spray Away deploys a burst of water that,
combined with the unexpected noise and motion of the sprinkler, creates a safe an effective animal
deterrent. Simply select your ideal sensitivity with the remote control, and allow Spray Away to do the
rest.
If you wish to water your lawn with Spray Away in ON mode, simply select your desired amount of time
on your remote control: 15, 30, or 60 minutes. If you wish to stop the sprinkler before time is up, press
STOP, and your Spray Away will go back to detecting animal activity.
SPRINKLER MODE: When set to SPRINKLER, Spray Away will begin watering your lawn
immediately, and continue watering until you select a timer setting, or STOP on your remote control. In
this mode, Spray Away will not detect animals.
OFF MODE: In this mode, Spray Away Hydro is off, and will not respond to the remote. You must select
one of the other two modes in order to effectively communicate with Spray Away via the remote control.
PAGE 4 Components
Missing something? Call us at 1.855.5.HAVAHART
(DIAGRAM WITH #S THAT CORRESPOND TO LIST BELOW)
(NEED UPDATED DIAGRAM)
1. Sprinkler Head
2. Function Knob
3. Unit Body
4. Hose Connection
5. Gasket
6. Battery Case
7. Battery Cover
8. Step-in-Stake
9. Indicator Light
10. Adjustable Sensor Eye
11. Infrared Sensor
12. Receivers
13. Remote Control
14. Wrench
15. Owner’s Manual
What you will need:
PAGE 5 MODE GUIDE
(DIAGRAM OF BACK OF UNIT WITH #S THAT CORRESPOND TO LIST BELOW)
(NEED DIAGRAM)
1. SPRINKLER Mode: Spray Away immediately and continuously sprays water. You may choose
to STOP the sprinkler, or set a 15, 30, or 60-minute timer with your remote control, after which
time the sprinkler will automatically stop. Spray Away does not detect movement in this mode.
2. ON Mode: Spray Away acts as a motion-activated sprinkler, and also responds to remote
sprinkler commands.
• To use as a motion-activated sprinkler, choose your ideal sensitivity based upon the charts on page
(#). Spray Away will always remember your most recently selected sensitivity, unless you replace
the batteries, in which case the sensitivity is automatically set to 5.
• To use as a sprinkler, select the amount of time you wish for Spray Away to continuously spray
(15, 30 or 60 minutes). Stop the sprinkler by pressing STOP or selecting a sensitivity, and Spray
Away will go back to detecting and repelling animals.
3. OFF Mode: Spray Away is off and does not respond to the remote control.
PAGE 6 REMOTE GUIDE
(DIAGRAM OF REMOTE WITH #S THAT CORRESPOND TO LIST BELOW)
(NEED DIAGRAM)
(SPRINKLER)
1. STOP: Stops the sprinkler from continuously spraying.
2. (mins): Commands Spray Away to continuously spray for 15, 30 or 60 minutes, unless interrupted
by another remote command.
(SENSITIVITY)
3. ON/OFF: Turns the infrared sensor on or off, only for use in ON mode.
4. Sensitivity: Communicates proper sensitivity level to Spray Away. See chart on page (#). Only for
use in ON mode.
5. LED light: Illuminates when a signal is sent to the unit. If you do not see illumination when a
button is pressed, replace the batteries.
Note: The remote control best communicates with Spray Away at a distance of 0-90 feet. When the
unit successfully receives a signal from the remote, the indicator light will blink for one second to
acknowledge the signal. If the indicator light does not blink when you press a button on your
remote, try communicating closer to the unit. If that does not work, check the batteries of your unit
and of the remote control.
PAGE 7 ASSEMBLY GUIDE
1. Attach Sprinkler Head
• Attach sprinkler head lightly by hand to the top of unit body.
• Fully tighten sprinkler head by turning clockwise with the provided plastic wrench.
Note: Using tools other than the provided wrench will damage the unit and result in leaking and
malfunction.

2. Install Batteries into Remote Control first, and then Unit Body
• Remote Control:
o Insert 2 AA batteries into remote control first.
o To test, press any button. Remote LED light should illuminate as the button is pressed. If
LED light does not illuminate, change your batteries.
(NEED DIAGRAM)
• Unit Body:
o Be sure the function knob is set to OFF
o Insert 4 AA batteries into battery case.
o If indicator light is blinking continuously every 3 seconds, batteries are low.
Note: Each time new batteries are installed, sensitivity is automatically set to a level of 5.
3. Check Spray Away Operation (Dry Test: Do NOT Attach Hose!)
• Turn function knob to ON, and point infrared sensor toward a wall, or something that does not
move.
• Wait 5 seconds, then wave hand in front of infrared sensor
• Spray Away will make a “click” or motor sound and indicator light will illuminate. Spray Away
will reset for 8 seconds between activation and will not detect motion.
Note: If you do not hear sound, try new batteries and try hooking your unit up to water. If the problem
persists, call us toll-free at 1.855.5.HAVAHART or live chat at www.havahart.com.
4. Assemble Step-in-Stake and Attach to Unit Body

PAGE 8 PLACEMENT GUIDE
1. Find the Ideal Location
• Place Spray Away in an area where animals will cross the detection range, or in an area you wish
to irrigate.
• Place the unit so that the unit body is level to the ground, and the infrared sensor is facing the
area to be protected.
Note: Spray distance varies as it is directly related to your hose water pressure.
2. Stake Spray Away into the Ground
• If ground is too hard or unsuitable for Step-in-Stake, try wetting ground to soften soil, or stake
Spray Away in a bucket or flowerpot filled with sand or gravel.
• Do NOT push on top of sprinkler head or unit body.

PAGE 9
SENSITIVITY GUIDE
1. Setting the Sensitivity
• Using the suggested settings charts below, select your ideal sensitivity with the remote control.
Because Spray Away detects heat, the sensitivity must be set higher in warmer temperatures. Use
the charts below as guidelines.
Note: In warmer temperatures, along with using higher sensitivity settings, the risk of false
triggering is higher. The sensitivity should be turned down in the case of false triggers.
Cooler temperatures (55 degrees F)
Distance
Animal Size 10 Feet 20 Feet 30 Feet
Small 5 7 8
Medium 3 4 5
Large 1 1 2
Warmer temperatures (90 degrees F)
Distance
Animal Size 10 Feet 20 Feet 30 Feet
Small 9 9 9
Medium 8 9 9
Large 4 5 6
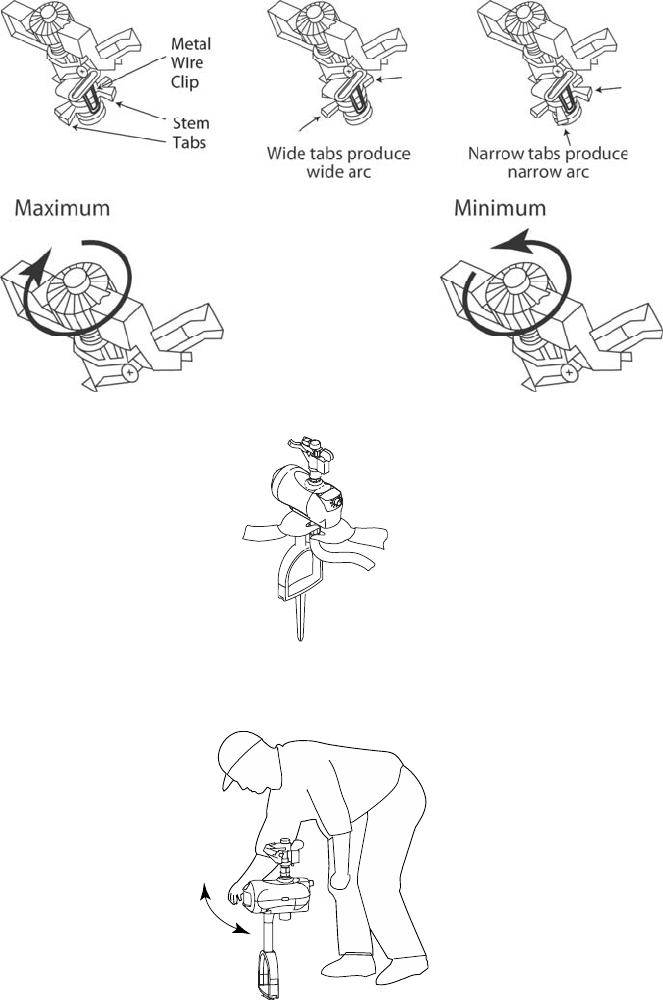
2. Adjust Sensor Eye
• Up: if terrain inclines in front of unit, or for sensing large animals
• Down: if terrain descends in front of unit, or for sensing small animals
• Use palm of hand to change position of sensor eye. Do NOT push directly on lens – it will damage
the unit.
3. Testing the Sensitivity
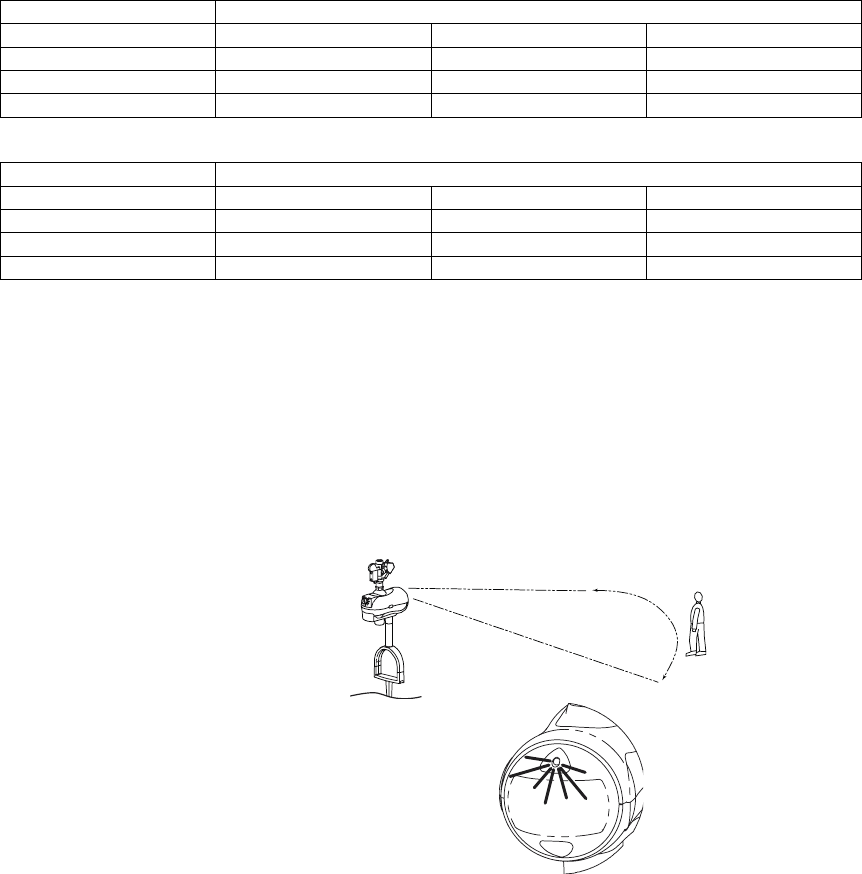
• Start outside your desired coverage area and walk across path in front of Spray Away.
• Spray Away’s indicator light will illuminate for 3 seconds when it senses you.
• IMPORTANT NOTE: Spray Away will reset for 8 seconds between activations and will not
detect.
• Repeat this process until you are satisfied with Spray Away’s coverage area.
Determine coverage area
Indicator light flashes when sensing

PAGE 10
ADJUSTING WATER COVERAGE
1. Position Stem Tabs to Adjust Sprinkler Travel
Set the sprinkler’s spray pattern to direct the water towards the desired protection area.
2. Adjust the Distance of Water Spray
3. Attach Hose
Attach the hose to the hose connection at the bottom of the unit body.
4. Turn unit and water ON and Test from Behind
Stand behind Spray Away and wave your hand in front of the infrared sensor. Adjust the arc and
distance as needed. If you wish to test in full SPRINKLER mode, turn the mode dial to
SPRINKLER, standing behind the unit.
Note: When turned to SPRINKLER mode, Spray Away immediately begins spraying water. Stand behind
the unit when changing the setting, and use your remote control to stop and start the sprinkler as necessary.

PAGE 11
TROUBLESHOOTING
Problem Solutions Illustration
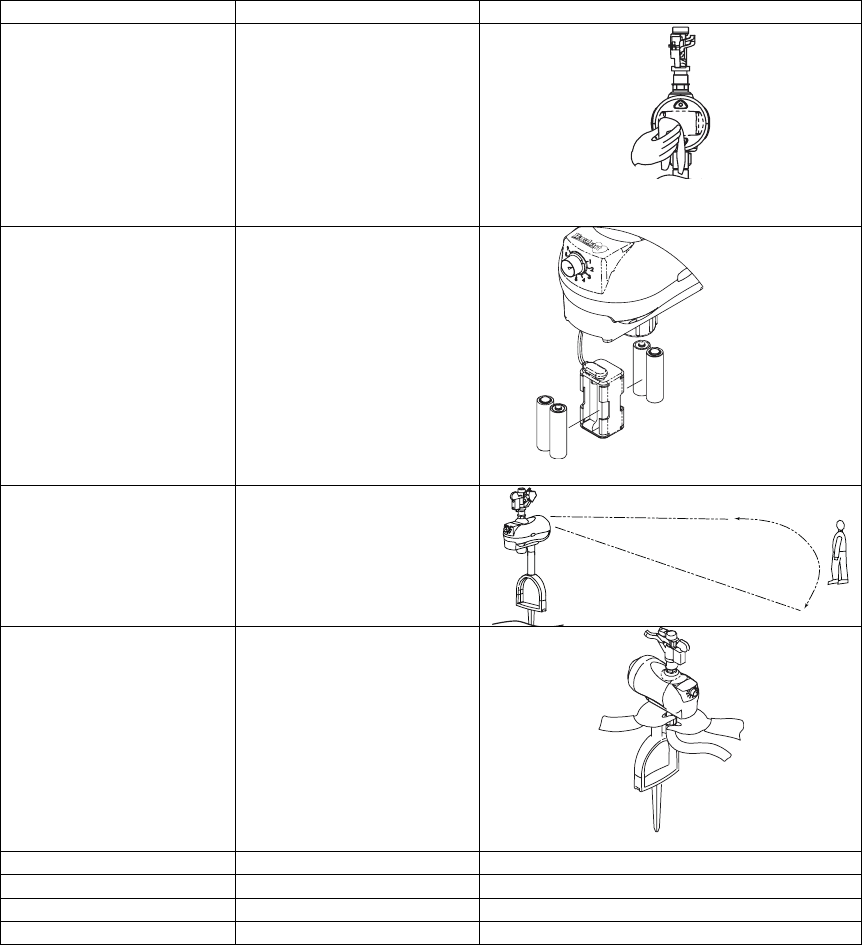
Spray Away does not ‘see’
animals Re-aim Spray Away
Clean infrared sensor with
damp cloth
On extremely hot days,
infrared sensor may not
detect animal’s heat. Please
refer to the chart on page 7
to determine the sensitivity
in warmer temperatures.
Spray Away is not
spraying, or is only lightly
spraying
If indicator light is
blinking continuously every
3 seconds, change batteries.
Water pressure from faucet
tap may be too low. Tighten
sprinkler head and hose
connection.
NEED NEW
DIAGRAM
Unit is activating when no
animal is present Spray Away is sensing
movement. Reduce
sensitivity and re-test the
sensing area as explained in
the instructions on page 7.
Unit is leaking Check to be sure unit is free
from debris at hose
connection.
Ensure hose thread is not
damaged.
Make sure hose and
sprinkler are tightly
secured.
Hose pressure could be too
high if over 80 psi.
PAGE 12
WARRANTY
This warranty, two (2) years from the purchase of the unit, is extended only to the original purchaser/user
of products.
Woodstream Corp. warrants its products to be free from defects in materials and workmanship for the
warranty period by the original purchaser/user.
For warranty service, please contact our Customer Service at (855) 5-HAVAHART. Please indicate the
nature of the defect.
If Woodstream Corp. determines there may be a defect, Woodstream Corp. will issue a Return Goods
Authorization (RGA) number. The defective unit or parts must be returned for warranty inspection using
the RGA number, when applicable, as identification within (30) days of return authorization date. DO NOT
return products to our factory without our prior consent, as they, as well as C.O.D. shipments will be
refused. Woodstream Corp., at its option, shall replace the unit, or replace the defective part(s) and return
such unit to you. Woodstream Corp.’s control; or products modified (including, but not limited to
modifications through the use of unauthorized parts or attachments) or repaired by anyone other than
Woodstream Corp. or its designee.
The foregoing warranty is exclusive and in lieu of all other warranties, express or implied, including
without limitation the implied warranties of merchantability and fitness for a particular purpose. It shall not
extend beyond the duration of the express warranty provided herein, and the remedy for violations of any
warranty shall be limited to repair or replacement of the defective product pursuant to the terms contained
herein. Woodstream Corp. shall not be liable for any consequential or incidental damages whatsoever.
This warranty gives you specific legal rights and you may also have other legal rights that may vary based
on location.
Register your product online at:
www.havahart.com/customerservice/product-registration