Workaround MARK-ONE-S ProGlove Mark One S Scanner User Manual
Workaround GmbH ProGlove Mark One S Scanner
User Manual
1
ProGlove Mark - User Manual
First Steps | Conguration | FAQ | Error Correction | Safety and Regulations | Technical Specication
www.proglove.com
PROGLOVE MARK - USER MANUAL
V 1.2 us
2ProGlove Mark - User Manual
“Production processes cannot do
without the flexibility and adaptabil-
ity of people. Our aim is to improve
and facilitate processes for people.”
Thomas Kirchner
ProGlove Co-Founder

1
ProGlove Mark - User Manual
Disclaimer
ProGlove reserves the rights to make changes to specications and other infor-
mation in this document without prior notice. The user should always consult
ProGlove to determine whether such changes have been made. The information
in this publication does not represent any obligation on the part of ProGlove.
ProGlove is not liable for any technical or editorial errors or omissions contained
herein. Either for accidental or consequential damages resulting from the use,
execution or use of this document.
This document contains copyrighted information. All rights are reserved. No part
of this document may be photocopied, reproduced or translated into another
language without the prior written consent of ProGlove.
Other names or brands mentioned in this document may be trademarks or reg-
istered trademarks of other companies and are the property of their respective
owners.
Safety Information
Before integrating and commissioning the ProGlove system, please read this man-
ual carefully and follow all safety guidelines.
Document Information
Title of the document: ProGlove MARK - User Manual (US)
Date of publication: 25.01.2018
Version: V1.2 us
Declaration of Conformity
If you require a declaration of conformity or other certication documents, please
contact us@proglove.com We will gladly send you the requested documents and
information.

TABLE OF CONTENTS
1. Overview p. 3
2. First Steps with ProGlove MARK p. 11
3. Scanning with MARK p. 18
4. Access Point Connection p. 19
5. Conguration Tool p. 20
6. Frequently Asked Questions p. 28
7. Bug Fixing p. 33
8. Maintenance and Care p. 37
9. Safety and Regulations p. 38
10. Support and Service p. 39
11. Technical Data Sheets p. 41
12. FCC Certication Compliance p. 44

3
ProGlove Mark - User Manual
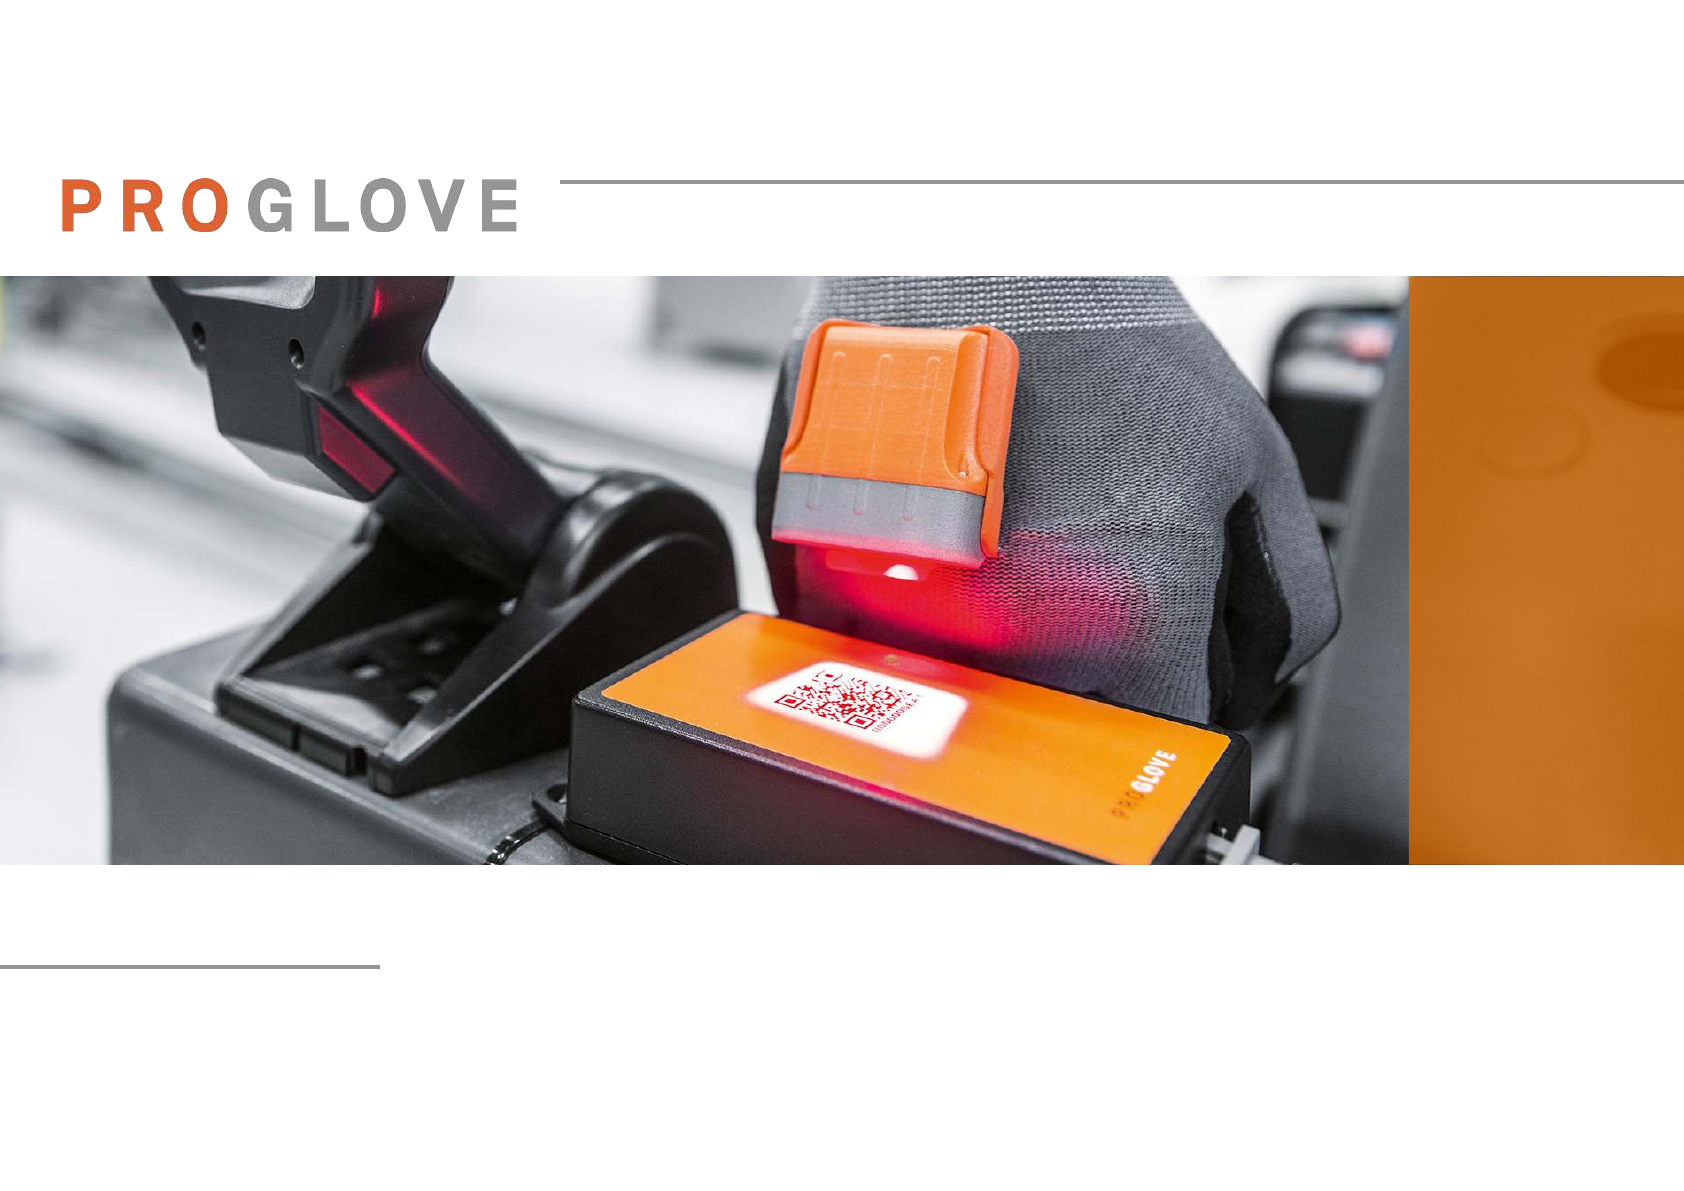
ProGlove MARK
The ProGlove MARK intelligent glove enables workers in manufacturing and logistics to work faster, safer
and more ergonomically. This makes work processes more ecient while improving quality and sustain-
ability.
Scanning can be done hands free and the user receives direct feedback via their ProGlove MARK.
About this Manual
This User Manual contains product specications, installation instructions, and programming instruc-
tions for the ProGlove MARK system.
ProGlove scanners are factory pre-programmed for the most common terminal and communication de-
vices.
If you want to change settings, follow the instructions in this manual to recongure the ProGlove Scanner
using the ProGlove Conguration Tool.
Unpacking
After opening the shipping carton with the ProGlove items, proceed as follows:
• Check the contents to make sure everything has been delivered correctly
• Store the shipping container for future storage or shipping
• Check the goods for damage. Immediately report any damage to the shipping company or
ProGlove Support
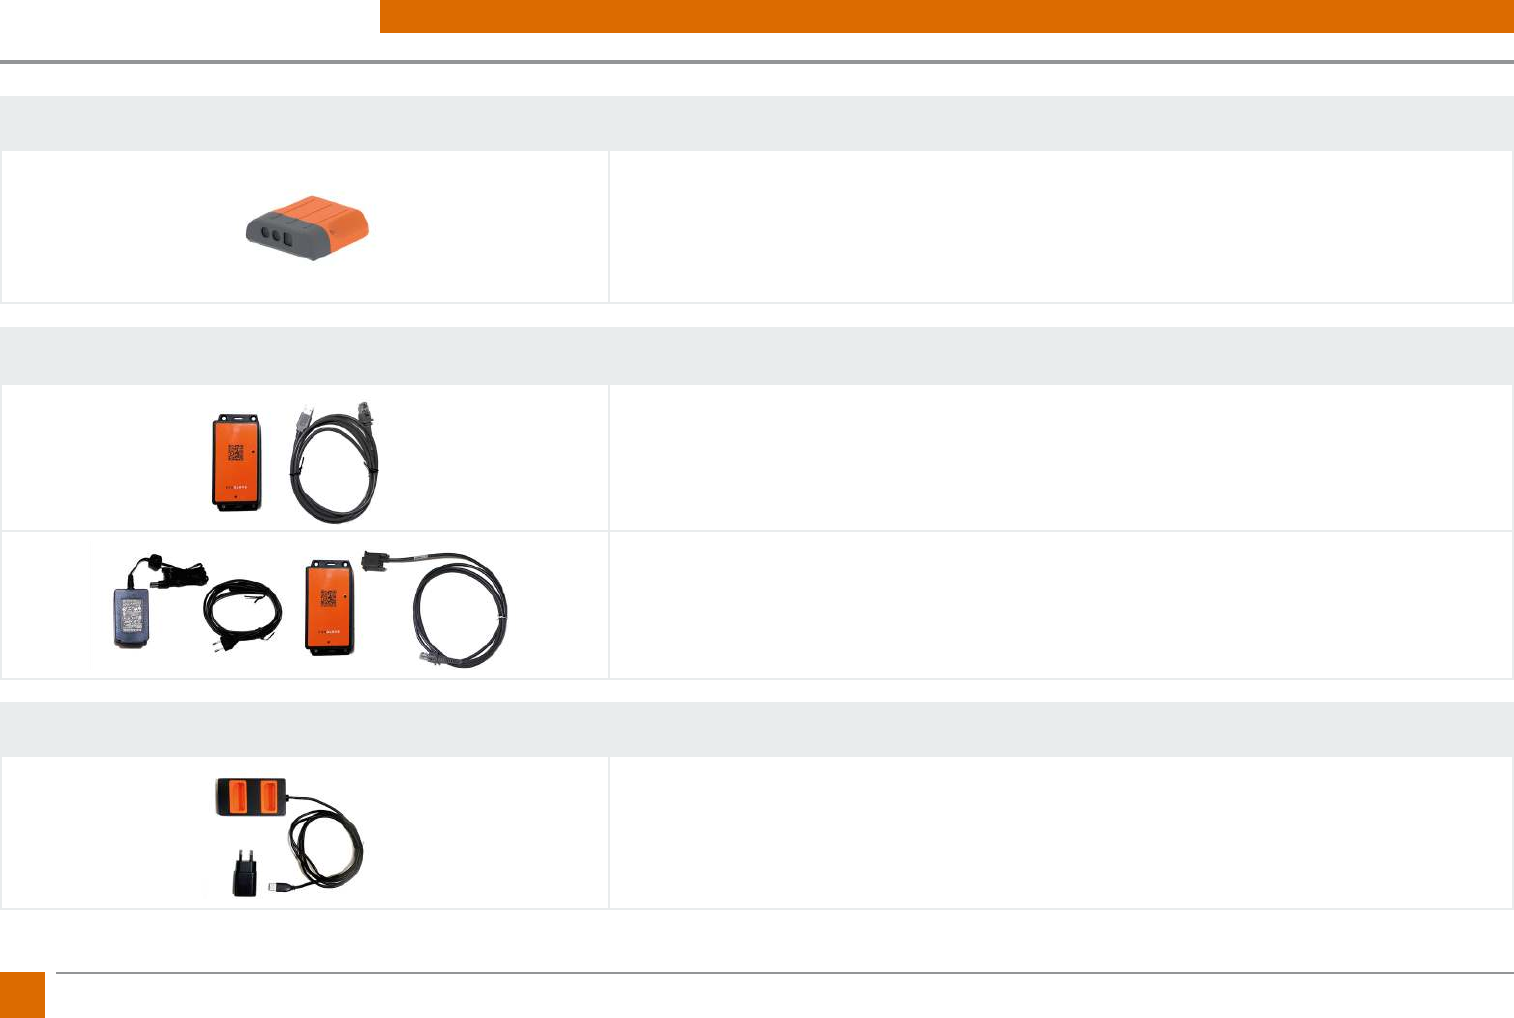
1. OVERVIEW
4ProGlove Mark - User Manual
DELIVERY SCOPE
MARK
• ProGlove Scanner MARK
Access Point USB / RS232
USB Bundle:
• ProGlove Access Point
• USB-Patch Cable
RS232 Bundle:
• ProGlove Access Point
• RS232-Patch Cable
• Power Supply
• Power Cable for Power Supply Unit
Charging Station
EU Bundle:
• ProGlove Charger
• Power Supply
5
ProGlove Mark - User Manual
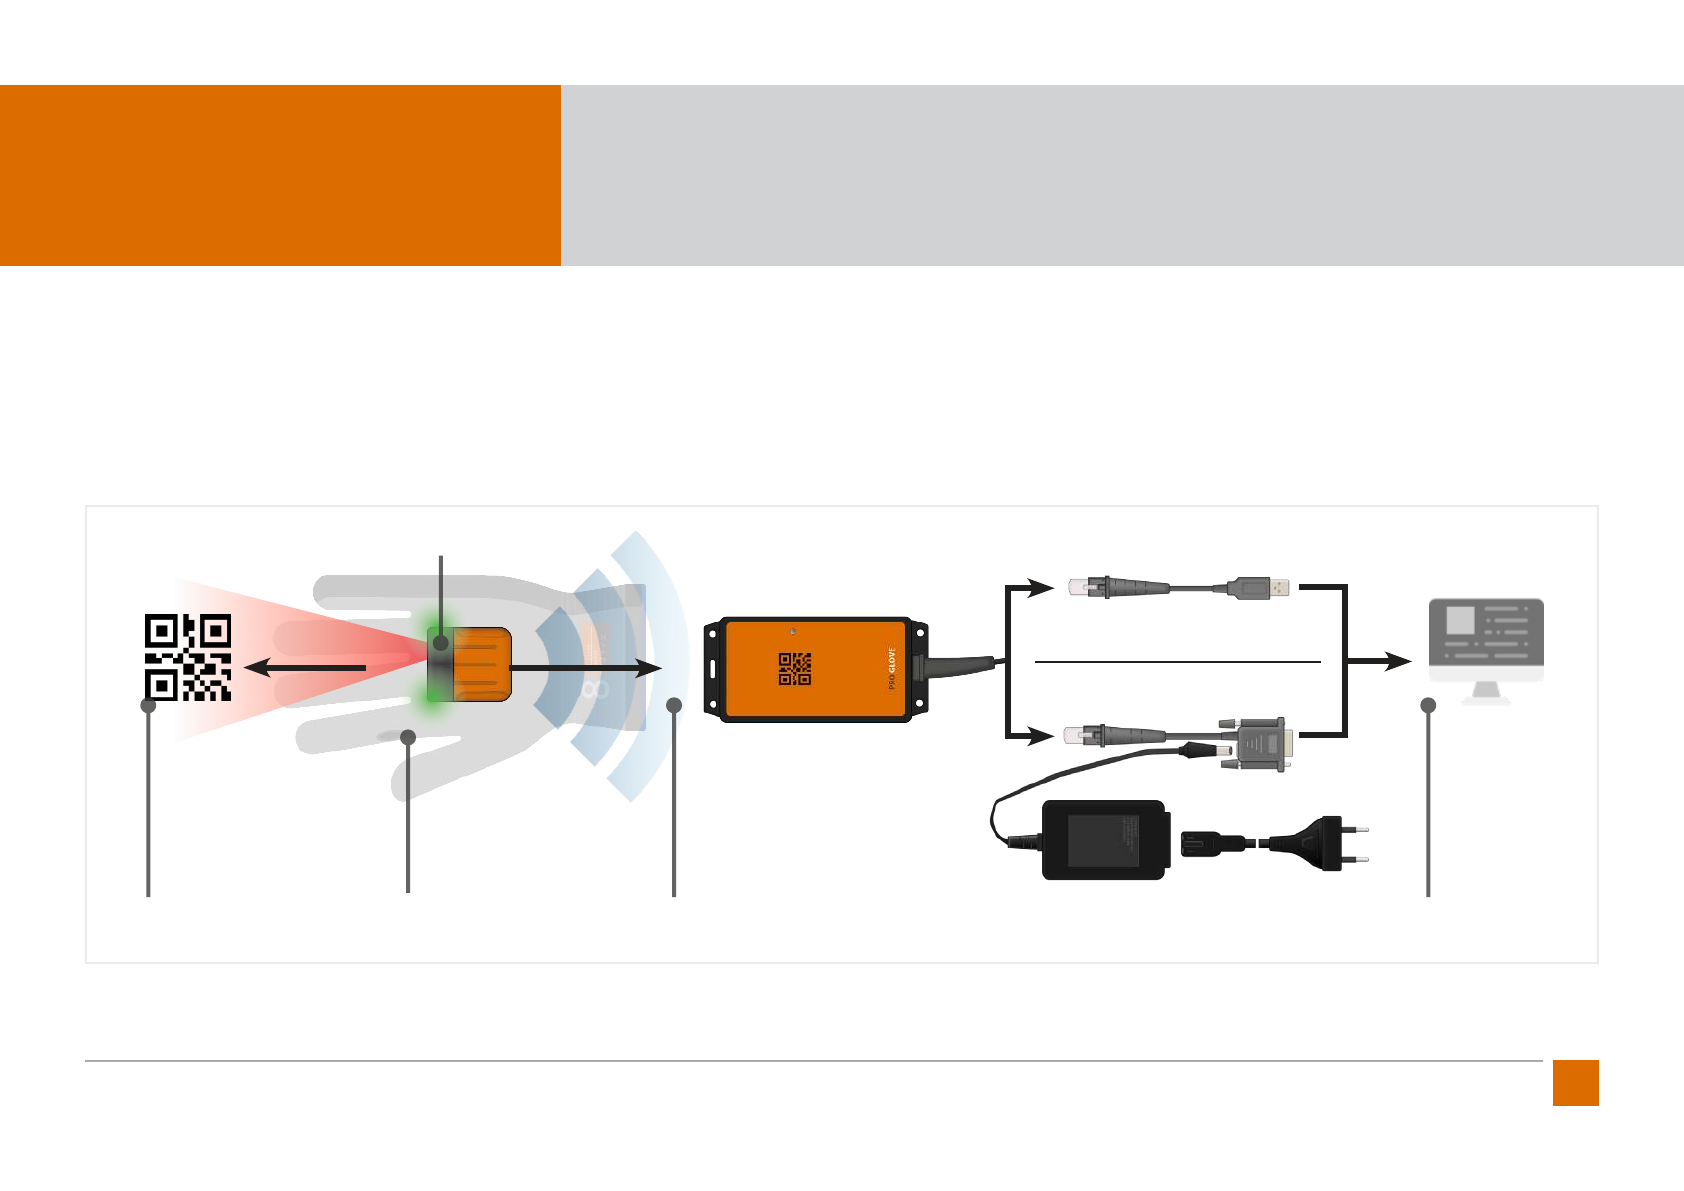
OVERVIEW
PROGLOVE MARK
The ProGlove system consists of a scanner with which all common 1D and 2D barcode types can be read. The scanning process is triggered by
a tactile button integrated in the ProGlove standard glove. Alternatively, ProGlove Longlife can be used. The barcode data is transmitted to the
Access Point via 915 MHz. The Access Point can be connected via USB (HID / CDC) or via RS232 with any PC, terminal, tablet, IPC, or similar device.
ProGlove MARK can give the user direct feedback via optical, haptic, and acoustic signals.
OVERVIEW SYSTEM
USB (HID / CDC)
RS232 + Power Supply (12V)
1D & 2D Barcodes
Datamatrix, , Code128,
QR, ITF, Aztec ...
Wireless Connection
Frequency: 915 MHz
> 100Ft reach
Plug-and-Play
Connection to Ter-
minal, IPC, Tablet...
Textil Trigger
Textile Scan Trigger
at glove
Feedback
optic, acoustic,
haptic
6ProGlove Mark - User Manual
Dimensions: 2 x 1.75 x 0.5 in
Weight: approx. 1.4 oz
Battery: Lithium Polymer (430mAh)
Feedback Signal: haptic, optical, acoustic
Transmission: Sub-1 GHz (915 MHz)
IP-Protection Class: IP 54 (dust and splash-proof)
Operating Temperature: 32 to 120 °F
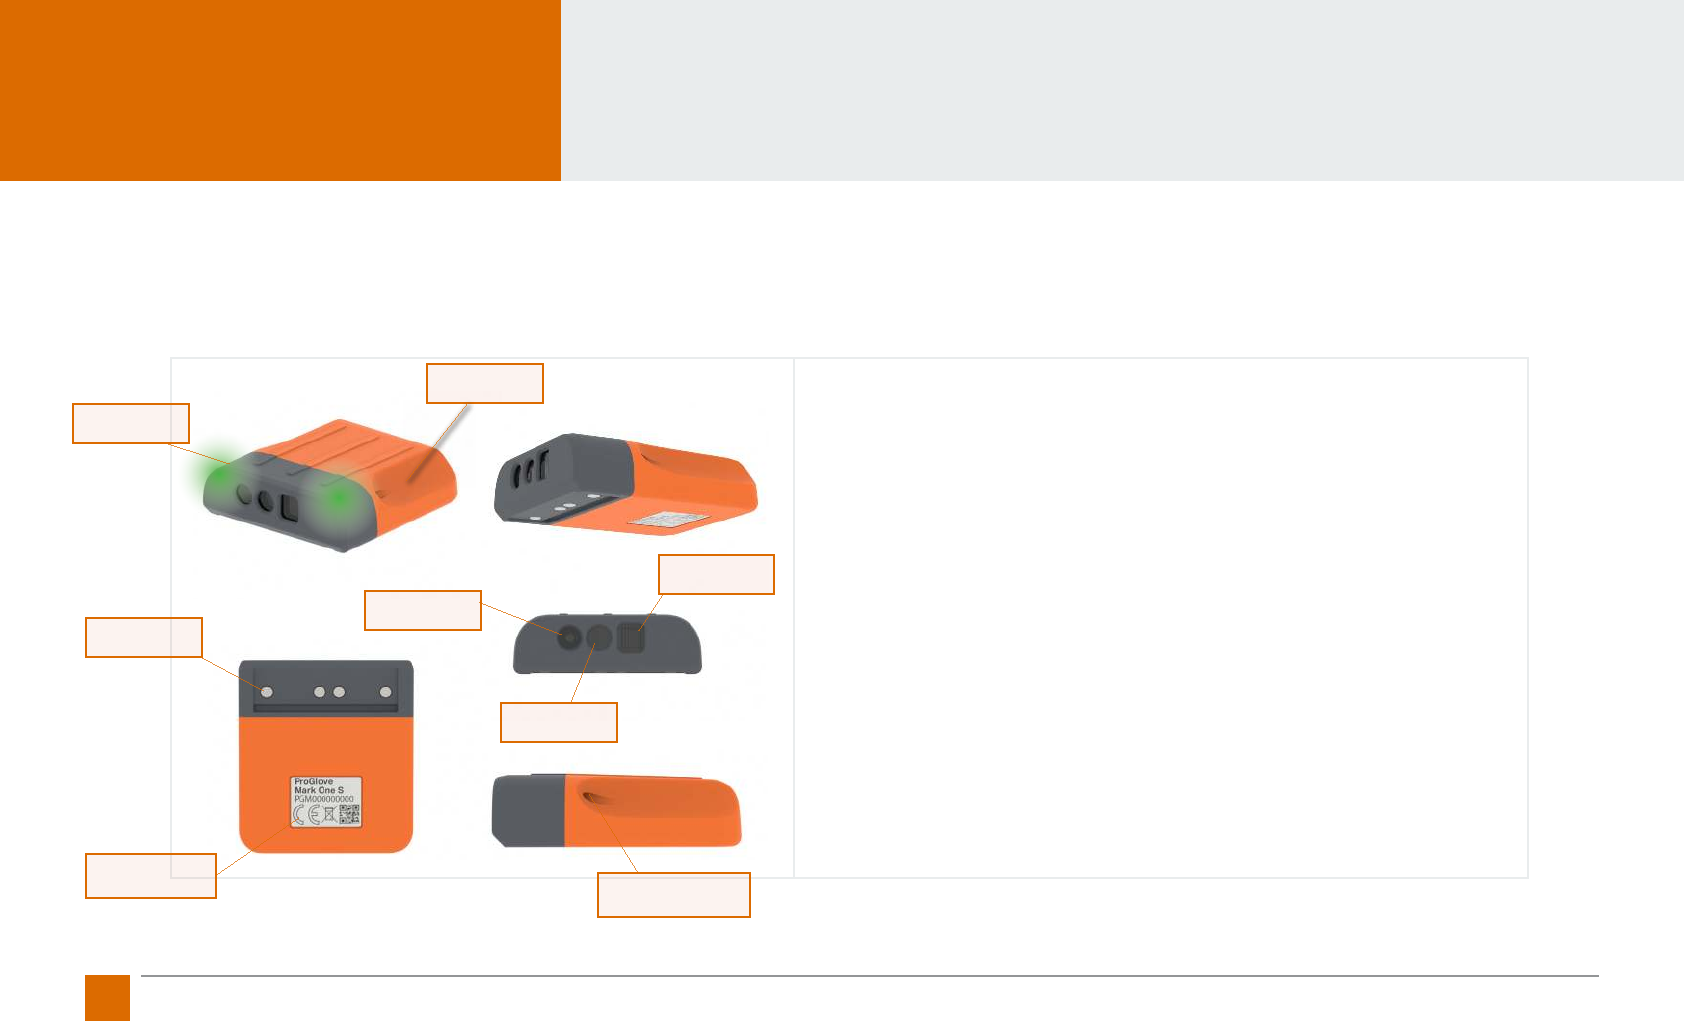
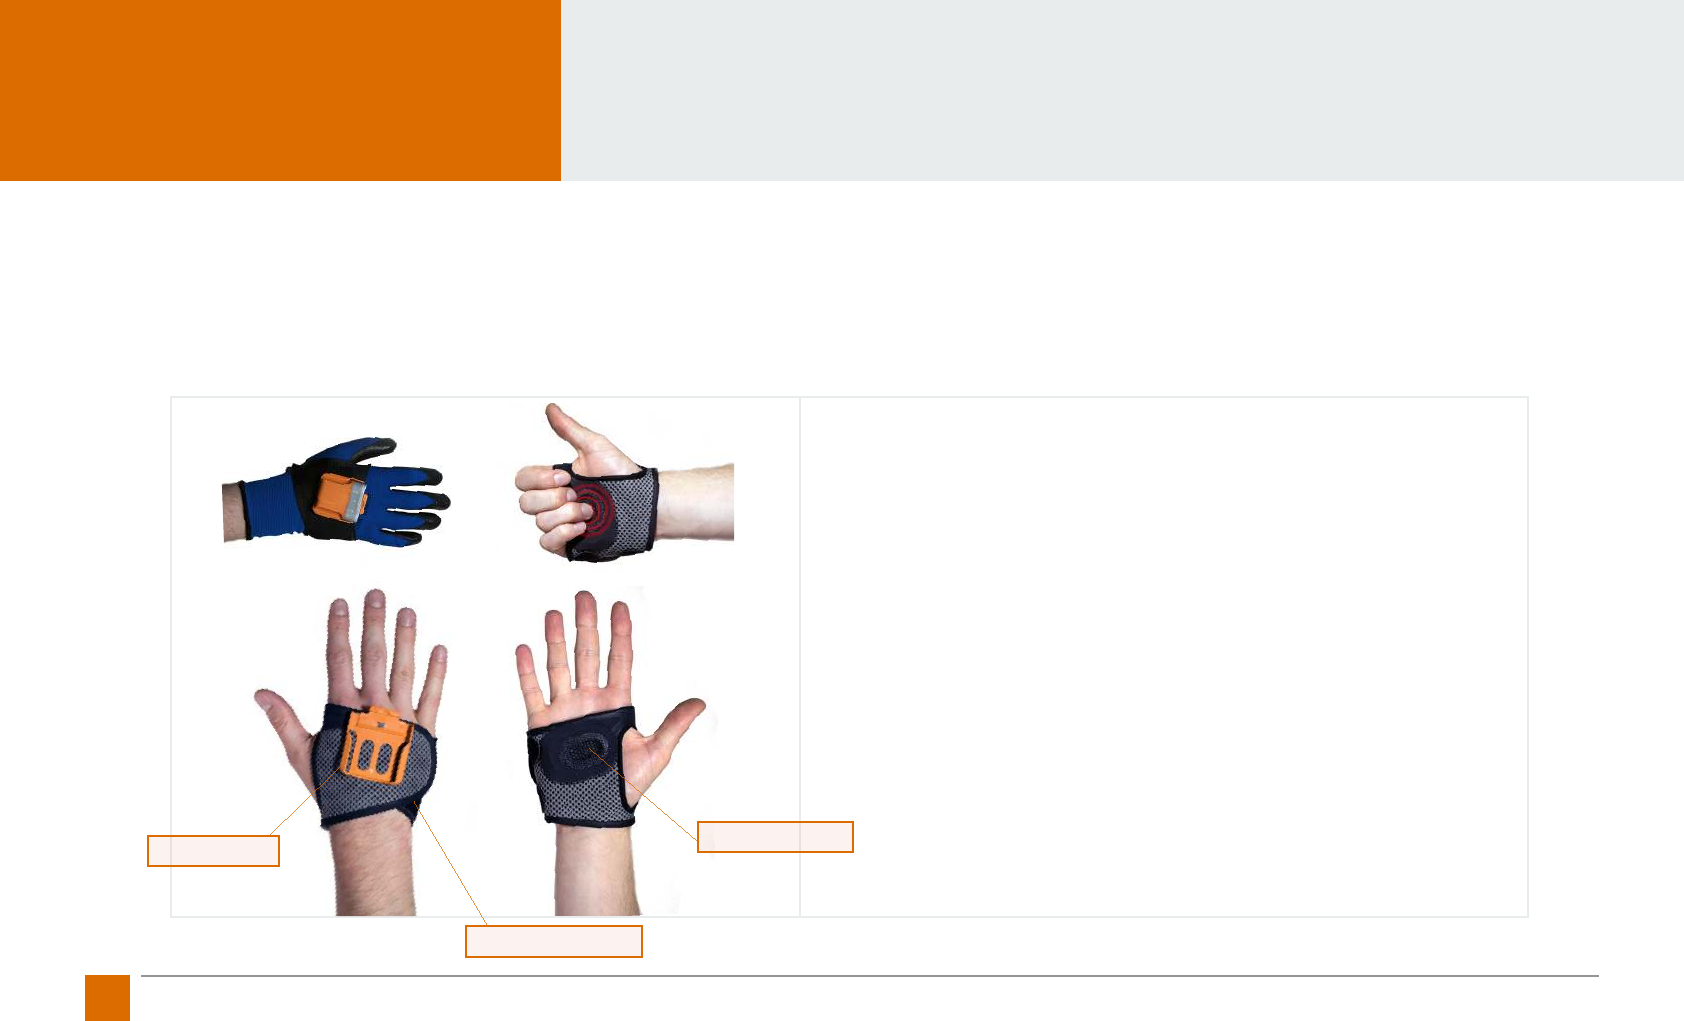
MARK
The scanner MARK is a lightweight, compact, and robust scanner that handles 1D and 2D barcodes. The short-range scanning module is designed for
barcode scanning in the gripping range. The lithium polymer battery has a running time of 8-10 hours depending on the intensity of use of the MARK
scanner. Feedback signals are returned haptically via a vibration module, acoustically via audio signals, and optically via LEDs (see signal table).
Label with Serial
Number
Pins
Imager
Focus LED
Scan LED
Locking Screws
Clip Rail
Feedback LED
7
ProGlove Mark - User Manual
Dimensions: 5.5 x 2.5 x 1.3 in
Weight: approx. 3.5 oz
Connection: RJ-45
Feedback Signal: optical
Transmission: Sub-1 GHz (915 MHz)
IP-Protection Class: IP 22
Operating Temperature: 32 to 120°F
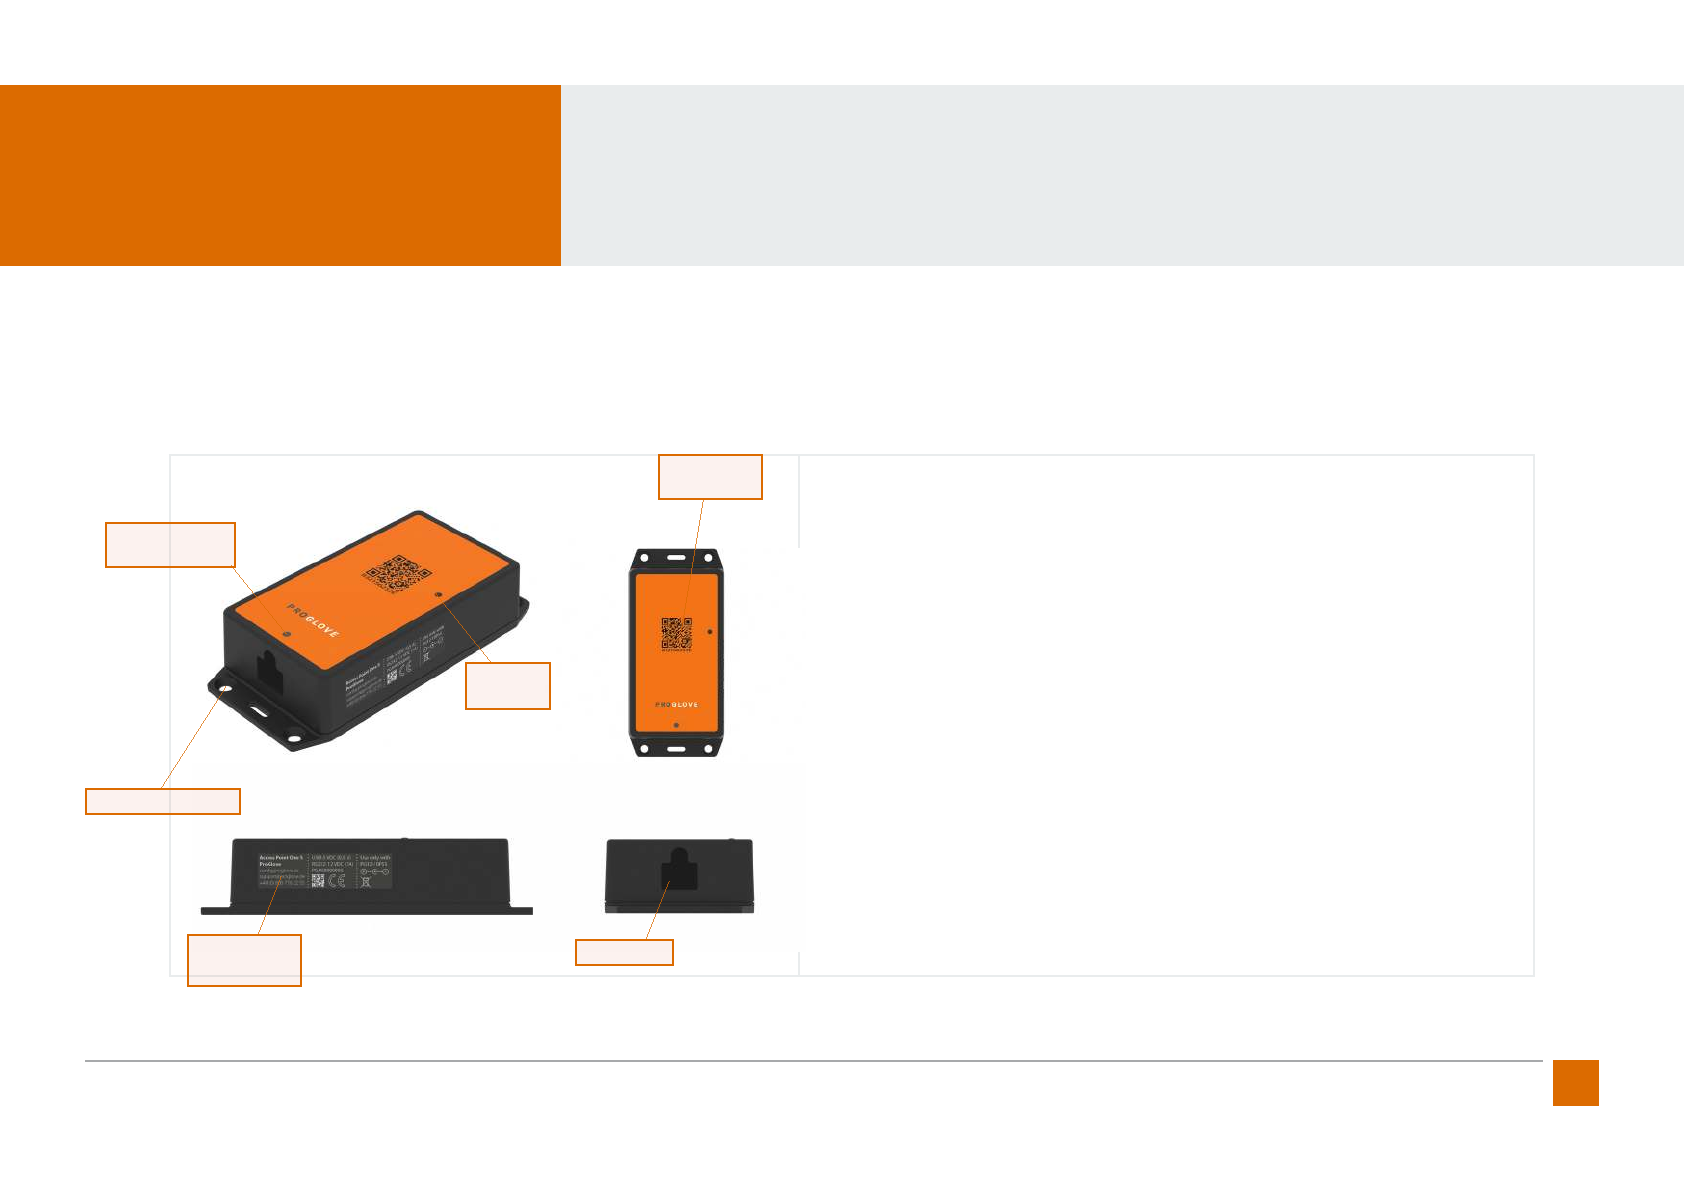
ACCESS POINT
The access point receives data from the barcodes scanned by the MARK scanner. This is connected to the PC, IPS, terminal or tablet via USB or RS232
cable. The pairing code is located on the top of the access point. A connection between the scanner and the access point is established by scanning
with MARK.
Label with
Serial Number
RJ45 Socket
Feedback
LED
Pairing
Barcode
Cable Release
Opening
Fixing Hole
8ProGlove Mark - User Manual
Dimensions:: 4.75 x 2.5 x 1.5 in
Weight: approx. 7 oz
Charging Time: 3hrs via Power Supply SAW-0501200
Power Supply: 5 VDC (1,2A) via Power Supply SAW-0501200
IP-Protection Class: IP 40
Operating Temperature: 32 to 120 °F
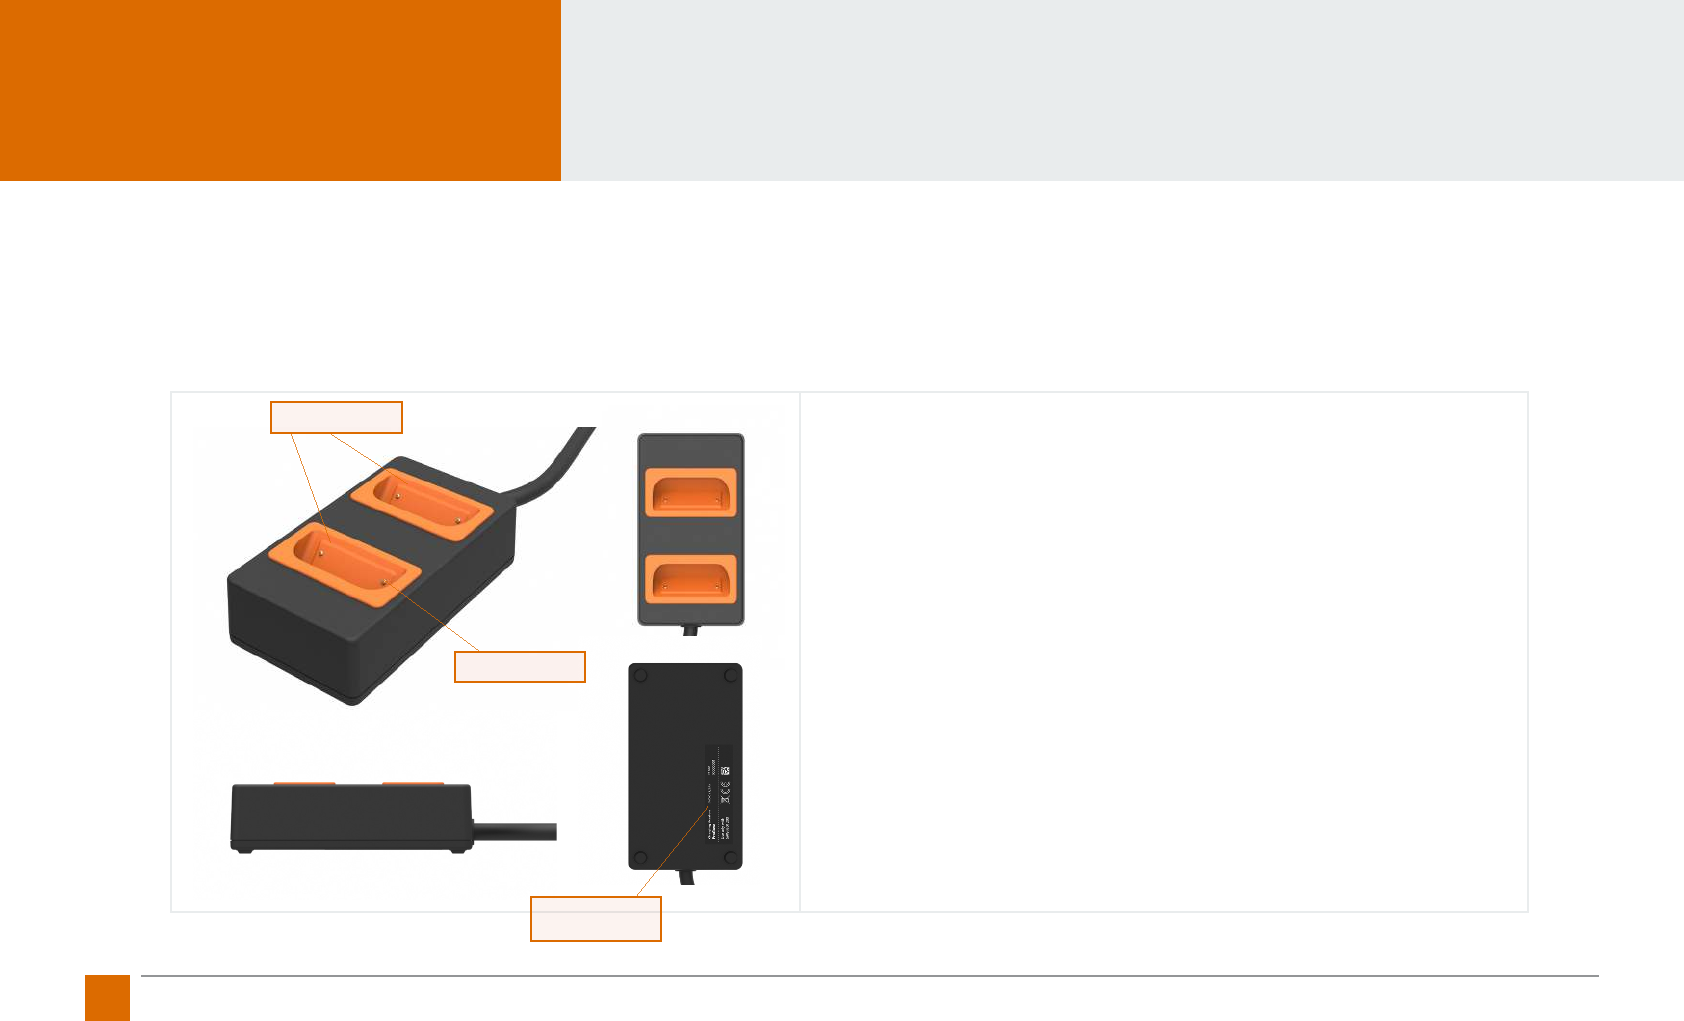
CHARGING STATION
The charging station can be used to charge two MARKs in parallel. The charging station is powered by a USB power supply. It takes approximately 3
hours to fully charge a MARK scanner. The charging status is indicated by the LEDs of the MARK scanners. In charging mode, the LEDs of the MARK are
pulsating red. When the battery is charged, the LEDs are pulsating green. When charging the MARK scanner is automatically unpaired from the access
point. For more information, please refer to the keyword „cradle function“.
Pins
Label with Serial
Number
Charging Cradle
9
ProGlove Mark - User Manual
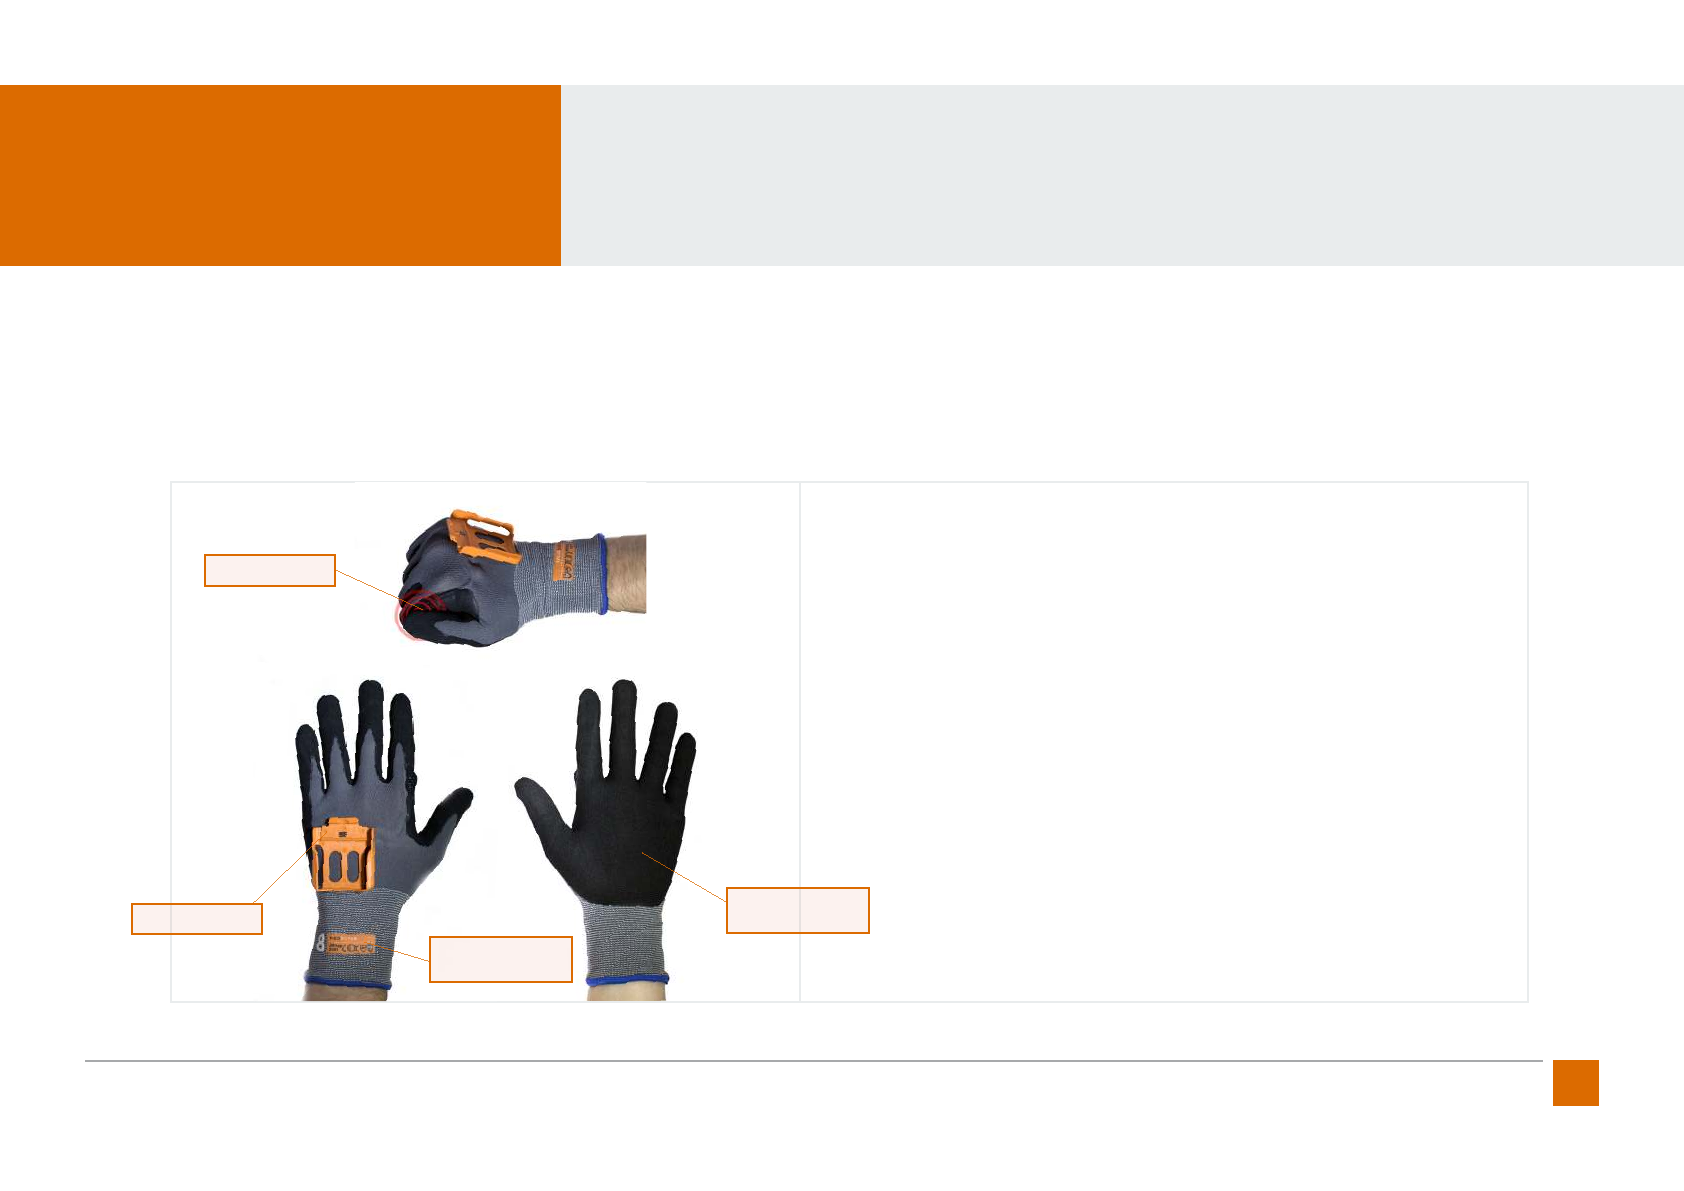
Trigger: The tactile trigger on the side of the index nger
Sizes: Industry Standard Sizes 7 - 10
(Textile Trigger on left or right)
Coating: Nitril-/ PU Coating
Back of hand and ngers free of coating
Standarts: EN 388 (2131)
EN 420
RoHS
CE-Marking
STANDARD GLOVE
The standard glove has a tactile trigger worked into the fabric of the glove and fastening clip that enables the user to safety and ergonomically scan
hands free. The glove is a breathable working glove (EN399:2131) with nitrile/Pu coated palm. Trigger and cable are glued inside the glove to protect
the electronics and maximize comfort. The trigger is reinforced with a Diamond polyacrylic cap to ensure long life and intensive use. The standard glove
comes in four dierent sizes to ensure optimal t and comfort when in use. Gloves are available with the trigger button on either the left or the right
side for use preference.
Fastening Clip
Textile Trigger
Label with size
Designation
Nitrile / PU coating
10 ProGlove Mark - User Manual
Trigger: Trigger sewn into the palm
Sizes: S, M, L (left or right release)
ESD: ESD version available on request
Standards: CE marking
RoHS
LONGLIFE
The ProGlove Longlife is an alternative to the ProGlove Standard glove. The exibility of the ProGlove Longlife allows the user a wide range of use cases.
The Longlife topcoat can be used in situations where ngertips are required.
The ProGlove Longlife can also be worn over other (specialized) gloves. This enables use cases where there are specic industrial safety requirements
(high cutting protection, thermal insulation, protection against substances, etc.). The scan trigger button is located on the palm of the ProGlove Long-
life. The Longlife is characterized by a long service life.
Fastening Clip Palm Trigger
Variable Velcro Fastener
11
ProGlove Mark - User Manual
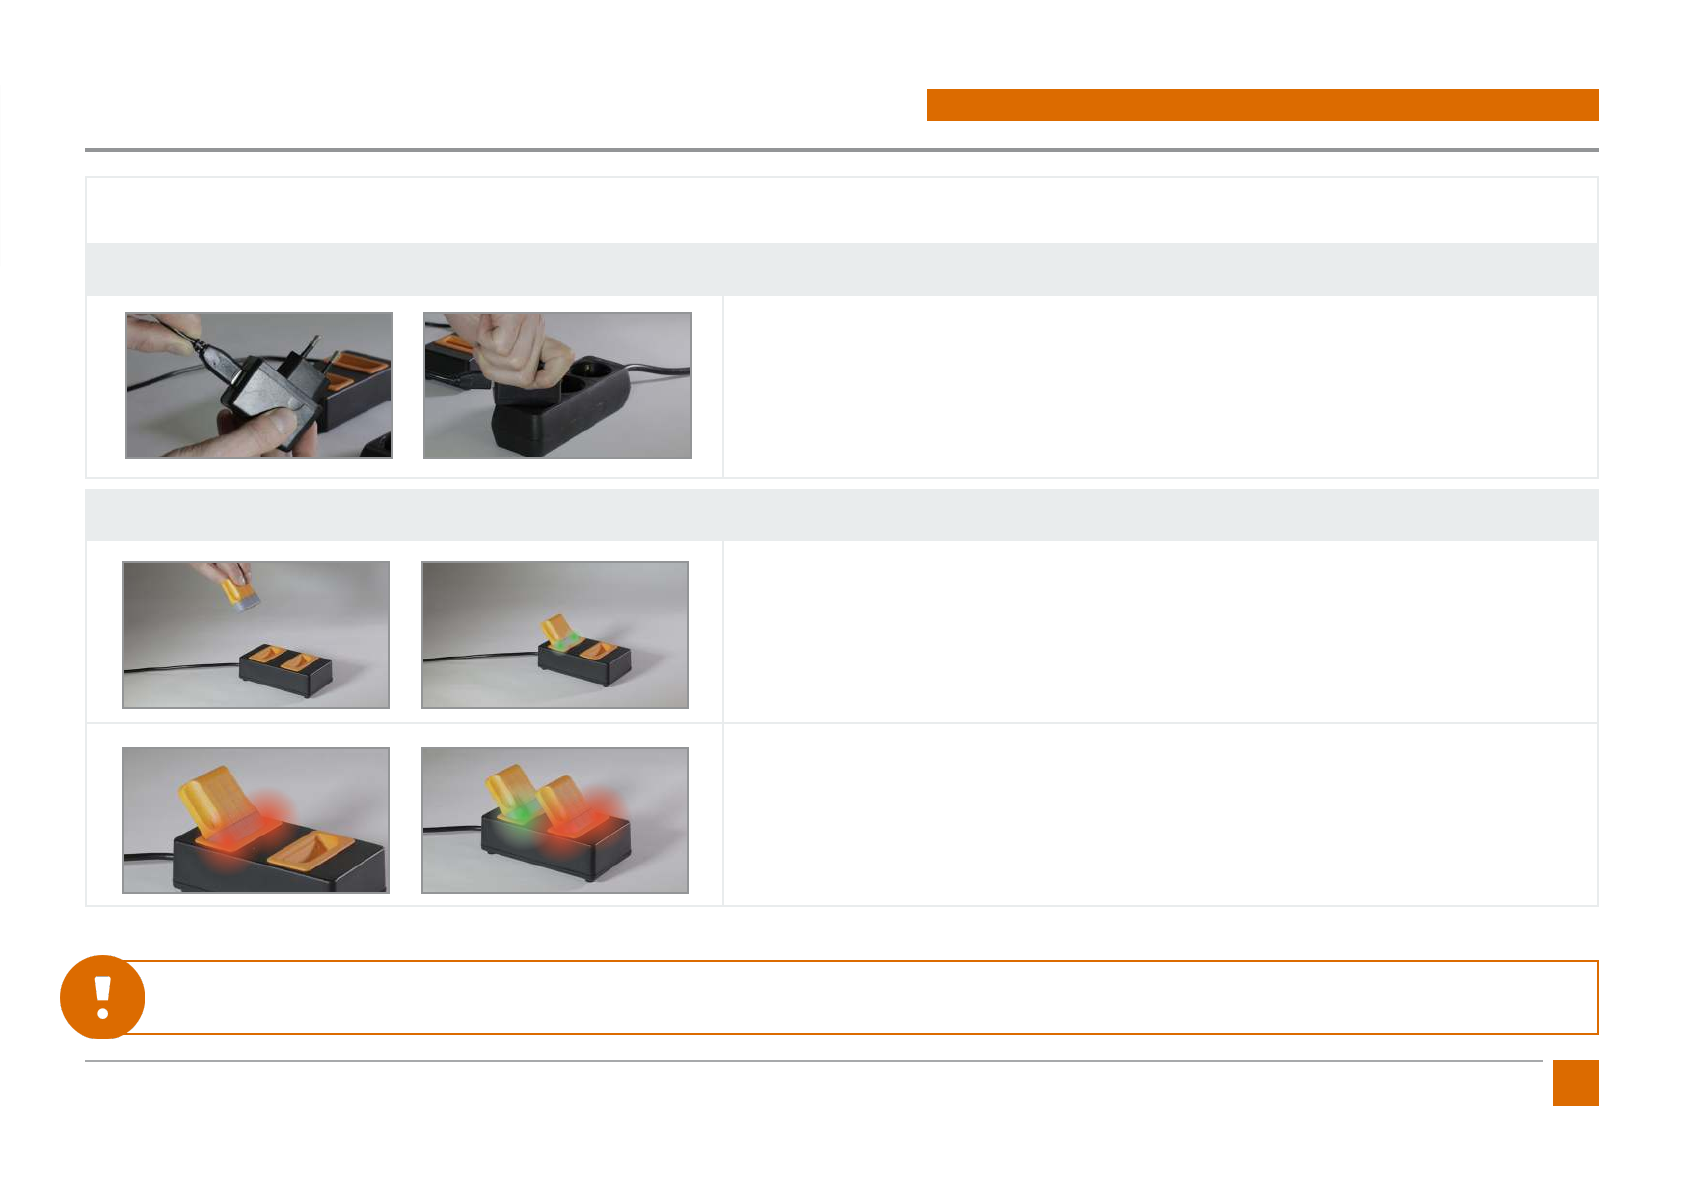
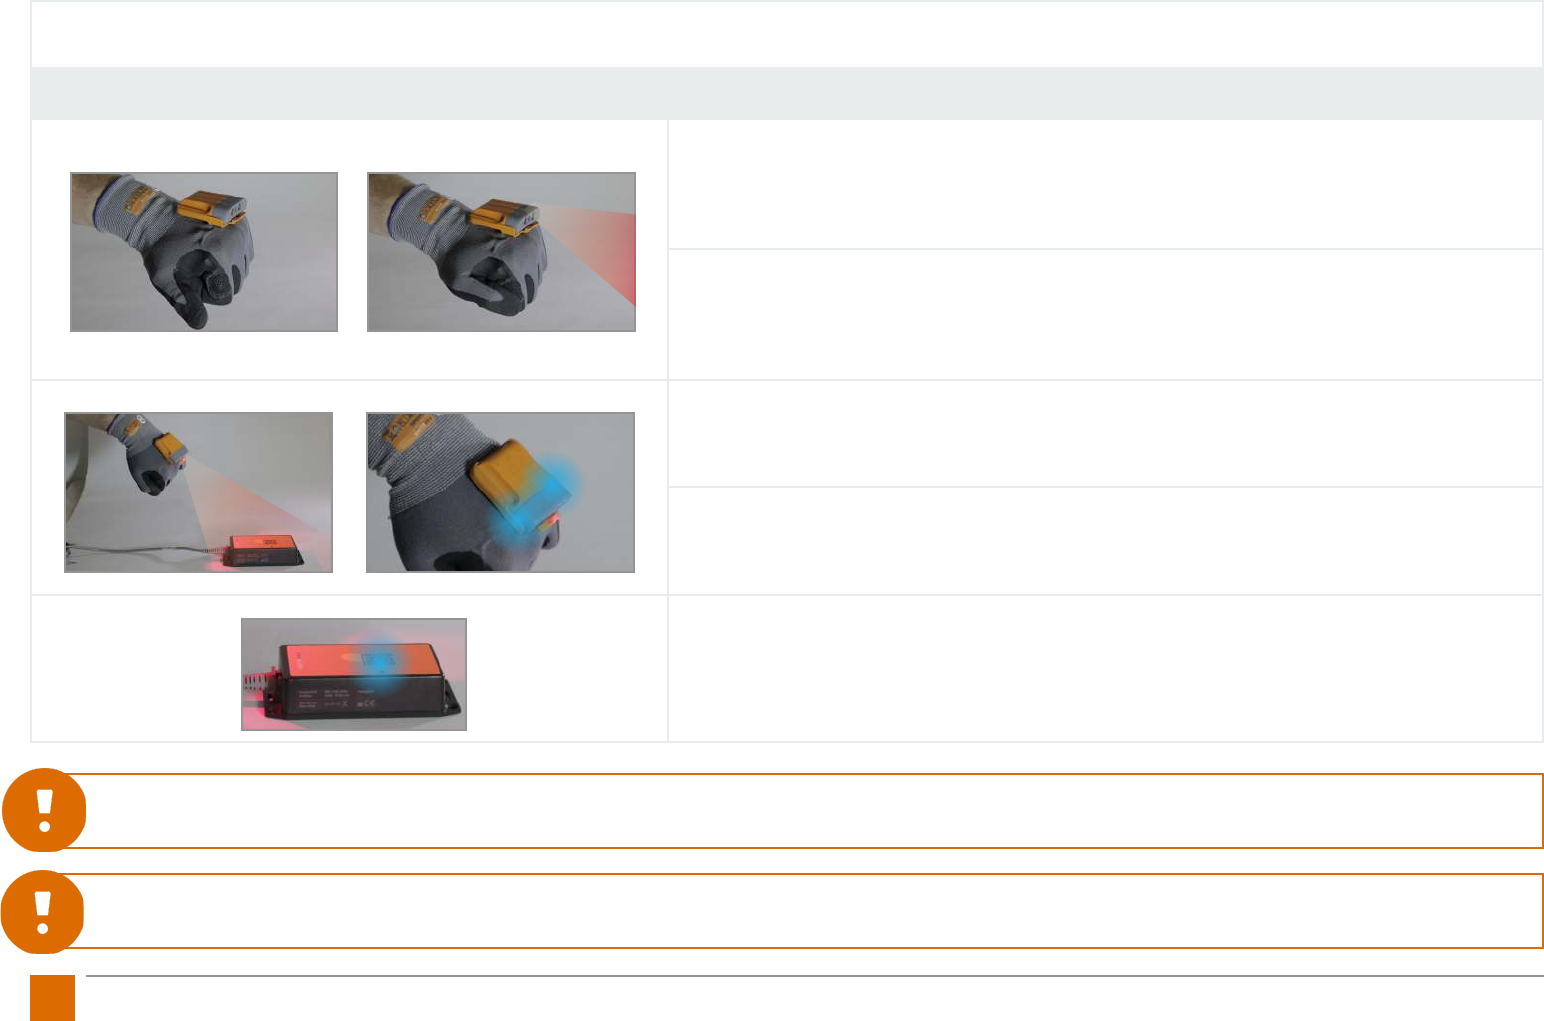
Charging the ProGlove MARK...
Connect the Charging Station to the Power Supply.
1. Connect the USB power supply unit to the plug. Connect the plug to an external power
source.
Charging the ProGlove MARK in the Charging Cradle.
1. Insert the MARK scanner diagonally into the charging station. The pins point downwards.
Two short, high-pitched beeps and a green ashing of the LEDs on the scanner conrm
correct insertion.
2. During the charging process, the LEDs of the scanners glow a pulsating red. When charg-
ing is complete, the scanner‘s LEDs will glow a pulsating green.
Hint: In standard conguration a complete charge takes 3 hours. A quick charge mode can be activated with the conguration tool.
The charging time is reduced to 1 hour and 30 minutes.
2. FIRST STEPS WITH PROGLOVE MARK
12 ProGlove Mark - User Manual
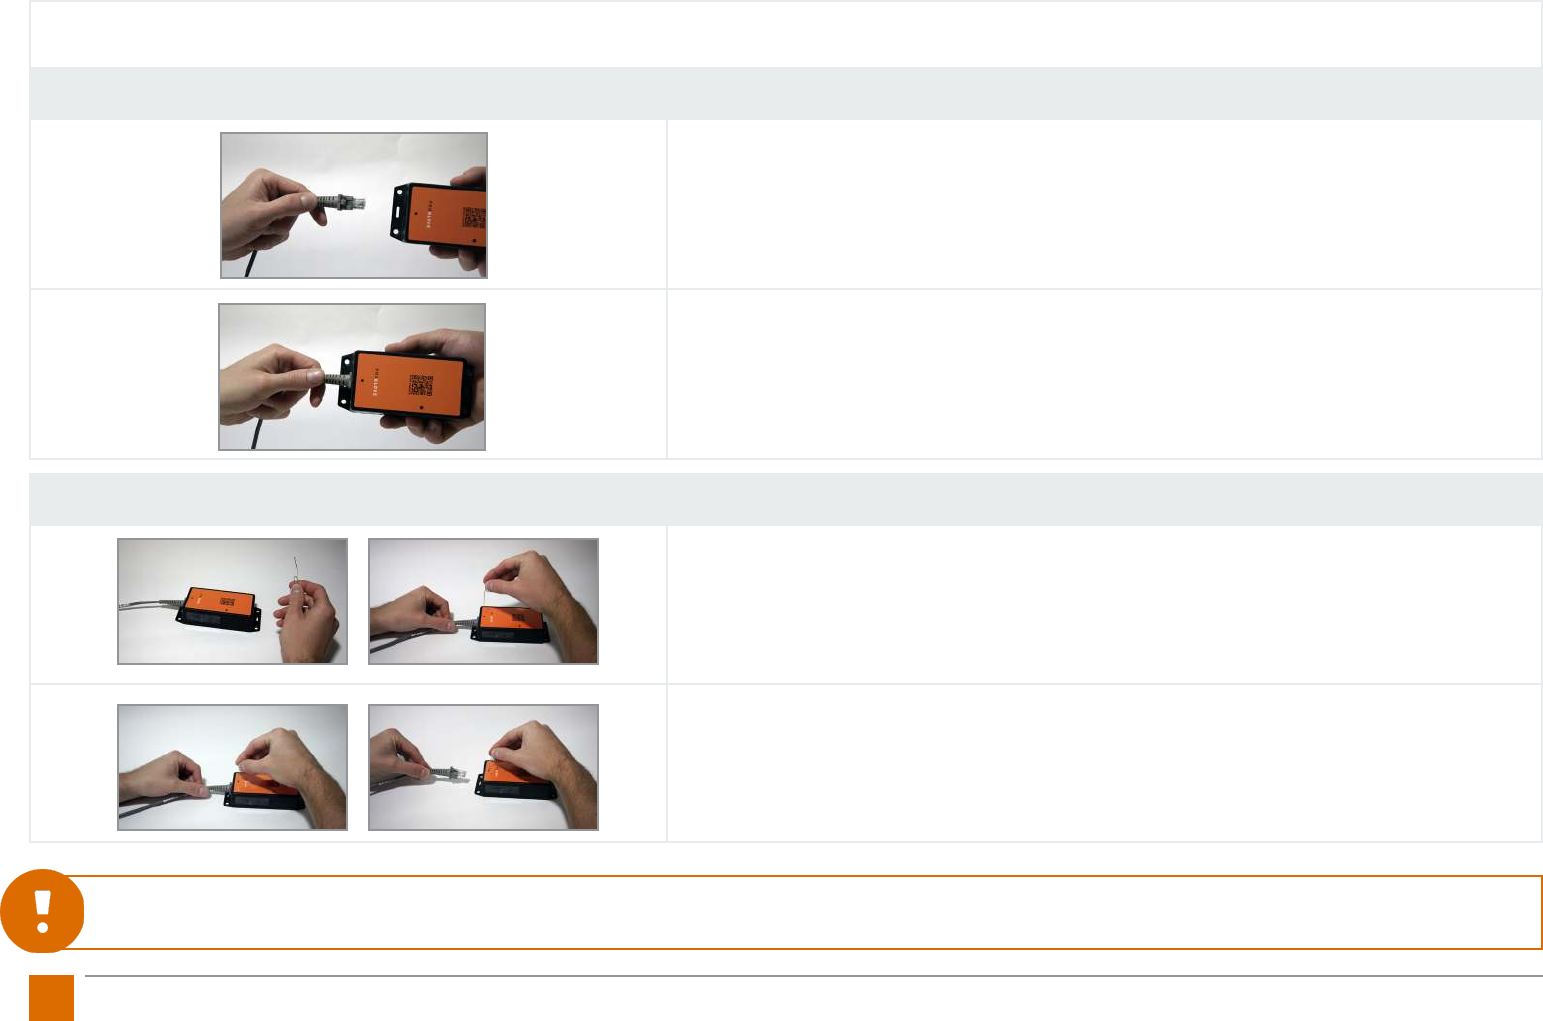
Connecting the Access Point...
Connect the connecting cable to the Access Point.
1. Connect the RJ45 connector of the USB or RS232 cable to the RJ45 jack of the access
point.
2. A clear clicking-in sound can be heard when the fastening is correct.
3. Then connect the USB or RS232 cable to the PC, terminal, tablet or similar.
4. When using the RS232 cable, connect the supplied power supply unit to the RS232 con-
nector. See the Hint below.
Disconnect the connection cable from the Access Point.
1. When unplugging the connection cable, the safety lock must be pressed. This can be
unlocked with the help of an elongated object (e. g. paper clip) through the opening on the
top of the access point.
2. Pull the connection cable out of the RJ45 socket while holding down the safety lock.
Hint: If the Access Point is connected with the RS232 cable, an external power source must be used. The RS232 connector is equipped with the correspond-
ing socket. Power supply and connection cable are included in the package.
1.
2.
3.
4.
13
ProGlove Mark - User Manual
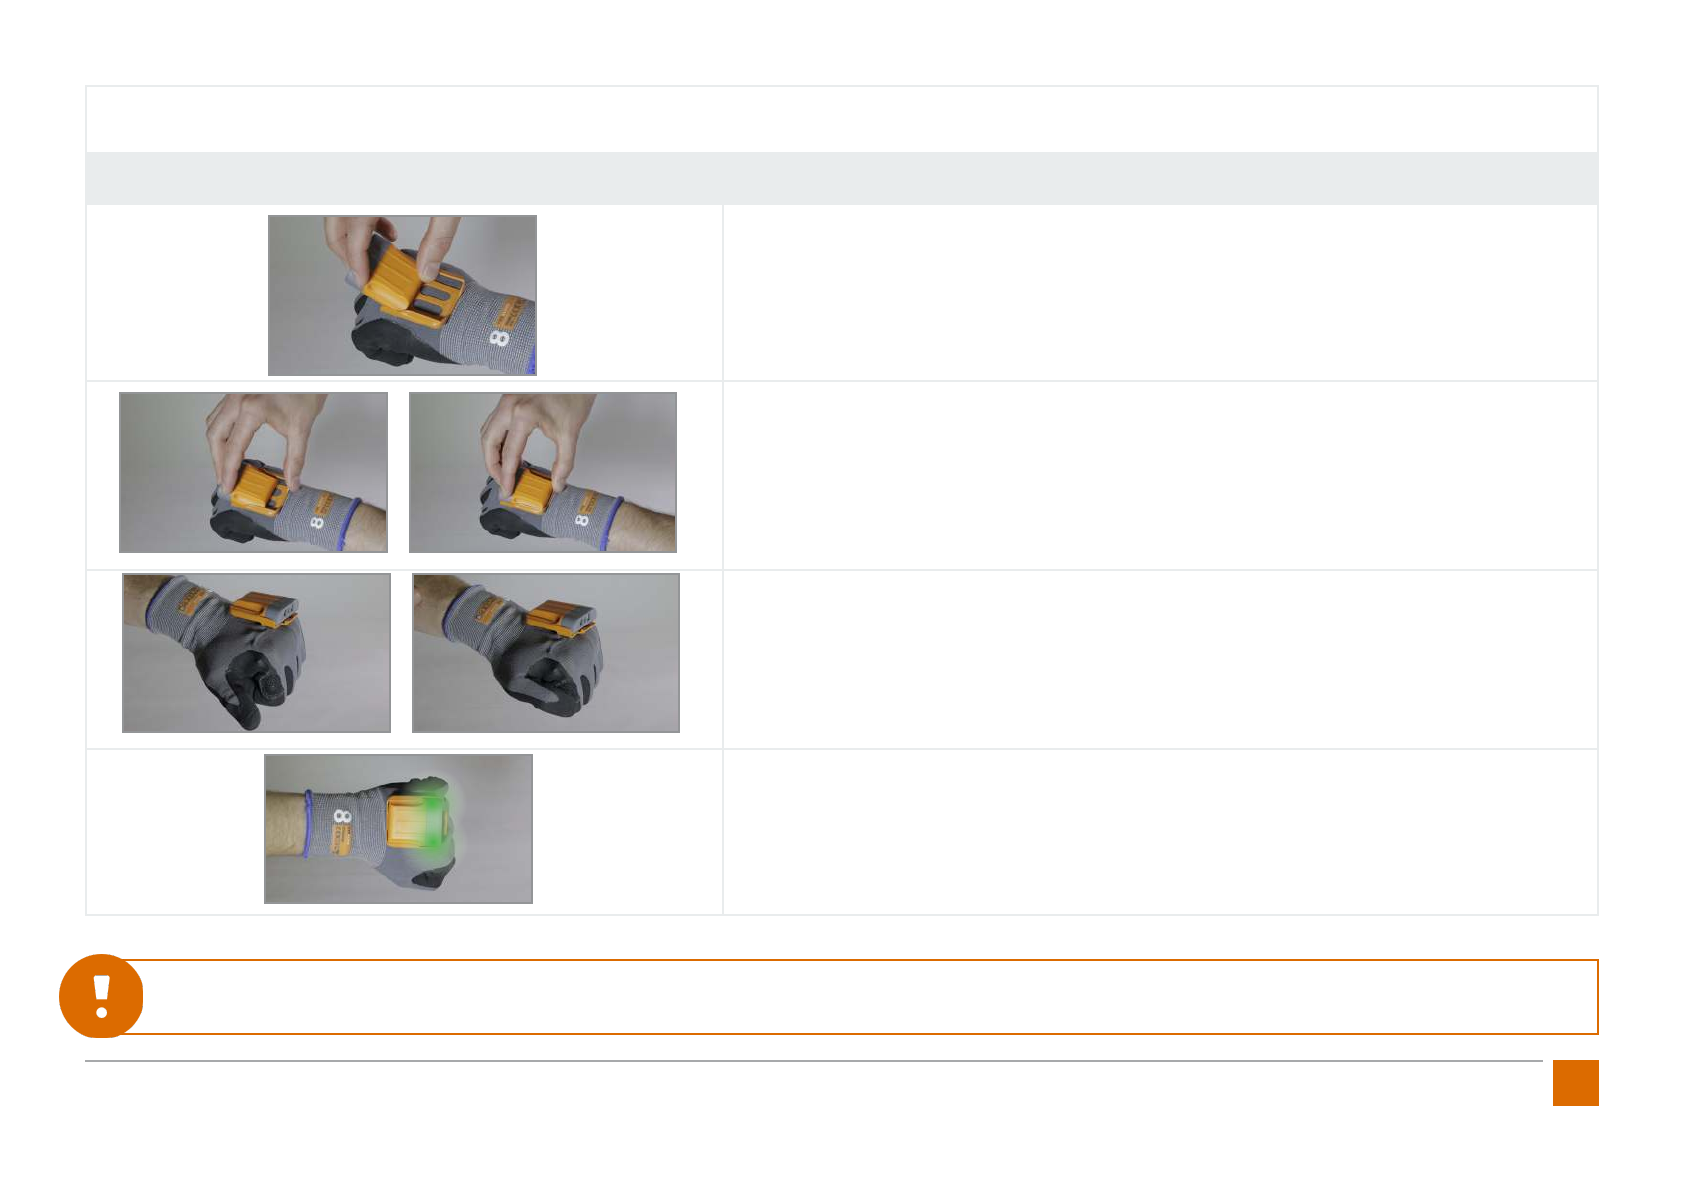
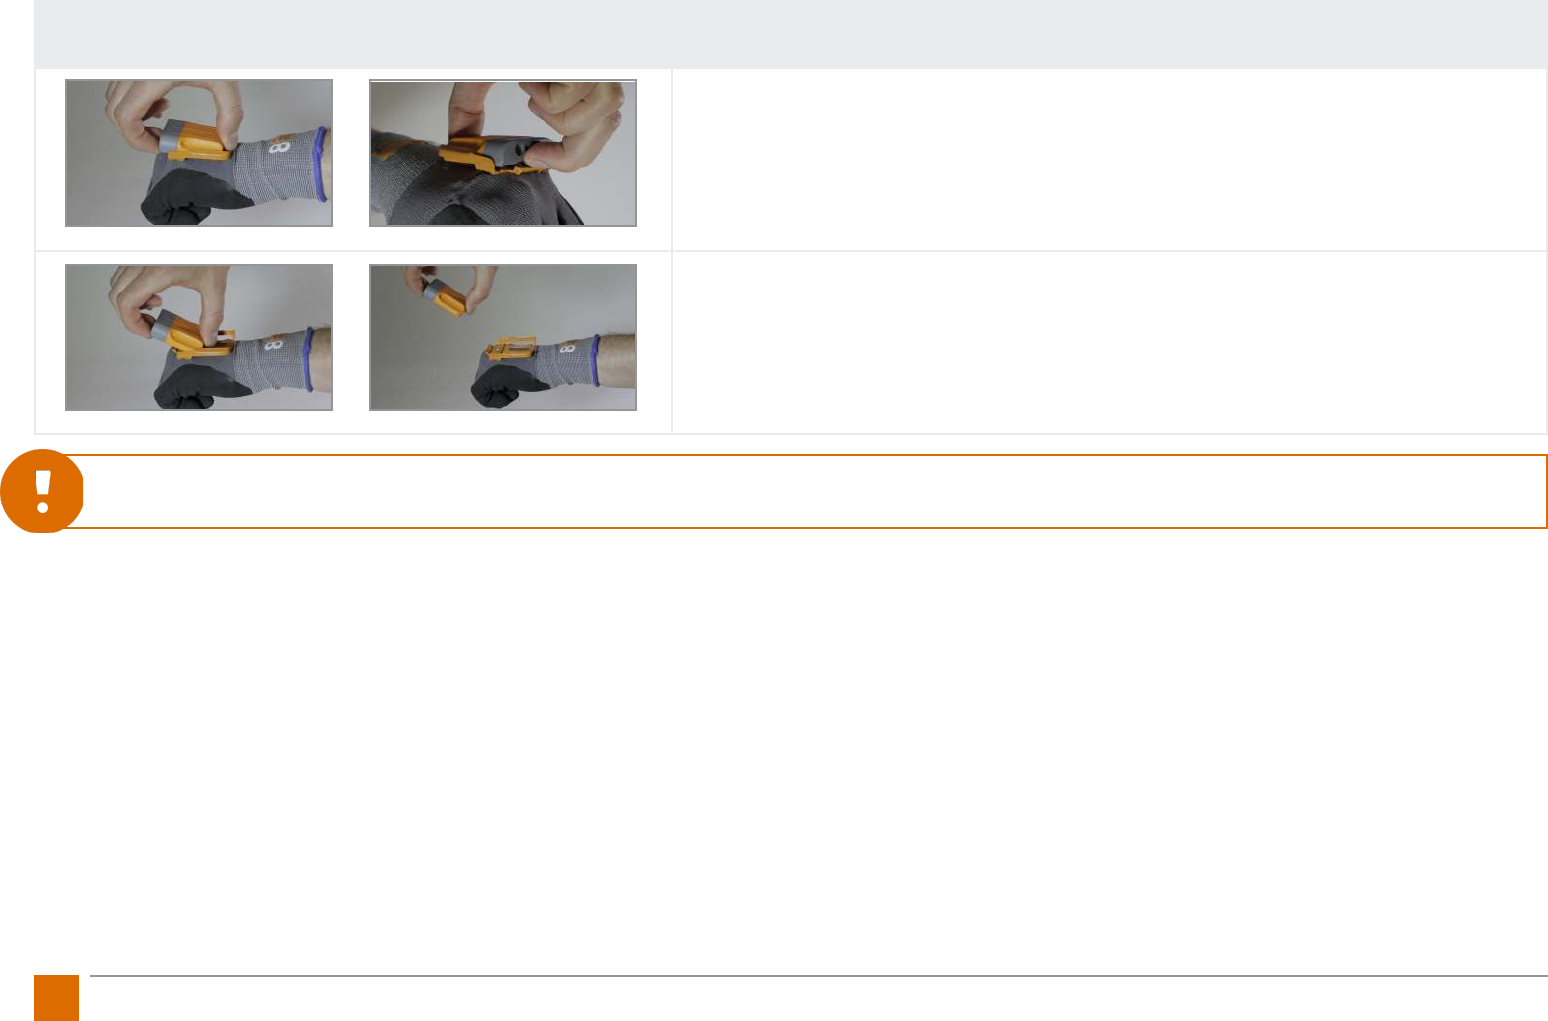
Switch on the ProGlove MARK...
Attach ProGlove MARK to the glove and switch it on.
1. Position the MARK scanner with the back towards the front end of the mounting clip. The
pins point downwards.
2. Push the scanner backwards until it clicks into place. The correct fastening is clearly audi-
ble with a clicking sound.
3. Hold the tactile trigger on the index nger for approximately 1 second with your thumb.
This starts the scanner.
4. The scanner‘s LEDs light up green briey. A short beep conrms that the scanner is ready
for use.
Hint: After 15 minutes (default setting, customizable), the MARK scanner switches to „sleep mode“. To reactivate the unit, repeat step 3. This time period can
be set with the conguration tool.
14 ProGlove Mark - User Manual
Connect the ProGlove MARK...
Connect ProGlove MARK to the Access Point via scanning.
1. Pressing the tactile trigger triggers the scanning process. The LED illumination and the
1D/2D scan module are activated.
2. Pressing and holding down the button will keep both the LED illumination and the 1D/2D
scan module active.
3. Point the sighting point of the red scanning eld towards the access point to scan the
pairing code.
4. The scanner ashes green for a moment, then blue. Two short beeps with a vibration are
returned as feedback.
5. The scanner is now connected to this access point. The connection is disconnected when
a pairing code of another access point is scanned. The connection is also disconnected
when the scanner is placed in the charger.
Hint 1: It is possible to connect several ProGlove MARKS to one access point.
Hint 2: The automatic disconnection of the connection between the scanner MARK and the access point can be deactivated with the conguration tool
under „Cradle function“.
15
ProGlove Mark - User Manual
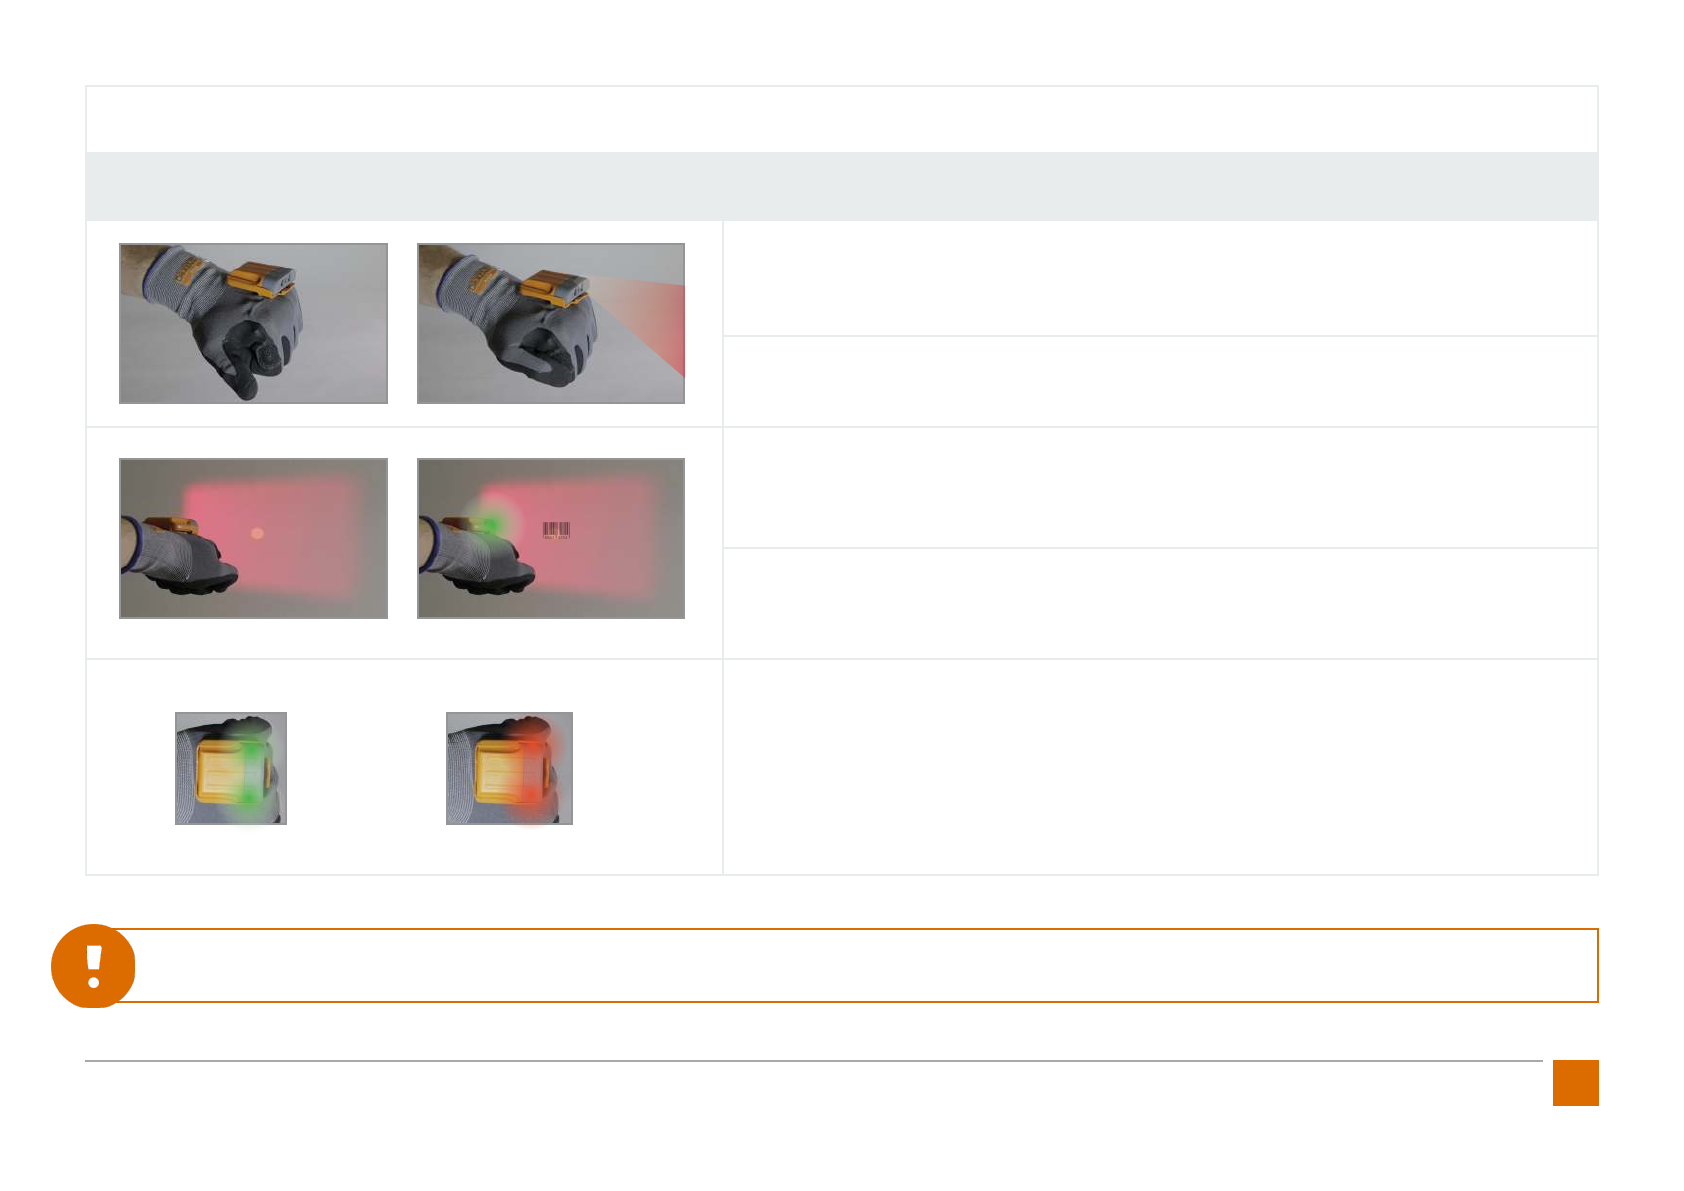
Scanning with the ProGlove MARK.......
1. Press the textile trigger with your thumb on the index nger to activate the red illumina-
tion of the 1D/2D scan module.
2. Hold down the tactile trigger to keep the 1D/2D scan module active.
3. Barcodes can be detected within the red rectangular eld. The point in the middle of the
barcode can be used to target the barcode (for further information see chapter 3 - Scanning
with MARK).
4. The lighting is deactivated when a barcode is detected. A short beep and a green light on
the LEDs on the scanner conrm the scan.
5. After the barcode information has been transmitted, ProGlove MARK returns the respec-
tive feedback signal.
Positive feedback - successful transmission: the LEDs on the scanner glow green and a
short beep is heard. The barcode was detected and sent.
Negative Feedback - failed transmission: the LEDs on the scanner turn red. A short vibra-
tion signal can be felt. The barcode was not recognized and not sent.
Hint 1: The feedback signals can be set with the conguration tool under „Device settings“.
16 ProGlove Mark - User Manual
Removing the MARK Scanner from the glove.
1. Press with your ngers between the scanner and the glove attachment clip.
2. Press the scanner slightly up and slide it forward.
Hint: ProGlove MARK switches itself o automatically after a predened time (factory setting of 15min) when switching into „sleep mode“.

17
ProGlove Mark - User Manual
Signal Table MARK
Optical Signal Acoustic Signal Haptic signal Description
In Scan Mode ...
green short ascending beep - scanner is operational
short green, short blue two short high-pitched beeps short vibration pairing code on Access Point is scanned
twice green two short high-pitched beeps short vibration positive feedback: barcode has been captured and sent
twice red short low-pitched beep short vibration negative feedback: barcode not caputred and not sent
orange - - battery of the MARK scanner is 95% empty
In Charge Mode...
twice green two short high-pitched beeps - scanner was inserted correctly into the charger cradle
pulsating red - - scanner is being charged
pulsating green - - scanner is charged
Signal Table for the Access Point
none - - Access Point is not connected to terminal device
green - - Access Point iis correctly connected to terminal device
short blue - - Conguration was transferred by scanning conguration
barcode

18 ProGlove Mark - User Manual
3. SCANNING WITH MARK
Scanning Module Specications
Omni-directional scanning:
The ProGlove MARK is an omni-directional scanner. This means that the
ProGlove MARK scans a wide range of barcodes and symbols. For this purpose,
the scan reading eld is simply placed over the barcode. The ProGlove MARK
will then record and decode it.
Decoding:
The ProGlove MARK can reliably scan all relevant 1D (linear) barcodes, 2D-stack
codes (such as PDF417) or 2D matrix symbols (such as DataMatrix) with the
help of powerful algorithms. The information from the barcode is sent to the
host immediately after decoding. The scanner is then ready for scanning further
symbols.
Data formatting:
The string of a decoded code can be processed and linked by simple or extend-
ed data formatting.
Decoder Reading Area
Smallest symbol in the barcode (the
mil (mm) number at the front shows
the size of the smallest function in the
barcode)
Possible distance between user and
barcode
4 mil (0.102 mm) Code 39 3.3 in./8.4 cm to 8.8 in./22.4 cm
5 mil (0.127 mm) Code 128 2.8 in./7.1 cm to 8.2 in./20.8 cm
5 mil (0.127 mm) Code 39 2.0 in./5.08 cm to 13.5 in./34.3 cm
5 mil (0.127 mm) PDF417 3.1 in./7.9 cm to 8.4 in./21.3 cm
10 mil (0.254 mm) DataMatrix
Example: A 10 mil DataMatrix symbol
that can carry 25 alphanumeric charac-
ters has a size of 4.57 mm * 4.57 mm.
2.9 in./7.4 cm to 10.1 in./25.7 cm
100% UPCA 1.8 in./4.6 cm to 26.0 in./66.0 cm
20 mil (0.508 mm) Code 39 2.0 in./5.08 cm to 30.0 in./76.2 cm
Decoder Settings
The ProGlove Mark automatically detects barcodes when the user activates the
trigger. The ProGlove MARK supports dierent reading congurations, which are
described below:
• Pick-List mode: The LED pointer is activated. MARK will only read LED bar-
codes.
• Manual (default): The scan unit starts capturing images when you press
the shutter release button. As soon as a barcode is detected in the scan
eld it is automatically decoded and transmitted.
• Display mode: When scanning barcodes from displays or digital displays
the ProGlove MARK can compensate for reections and detect barcodes
faster via the display mode.
The ProGlove conguration tool can be used to change the trigger modes.

19
ProGlove Mark - User Manual
4. ACCESS POINT CONNECTION
The ProGlove system supports RS232, USB HID, and USB CDC. Information on
the individual interface types is described in the following section:
USB HID (Human Interface Device)
The ProGlove emulates keyboard input via USB HID. The following keyboard
layouts are supported:
Croation
Czech
English (GB)
English (US)
French (Belgium)
French (Canada)
French (France)
German (Germany)
German (Switzerland)
Italian
Portuguese (Brazil)
Portuguese (Portugal)
Spanish
Slovak
Slovenian
The keyboard layout can be changed with the ProGlove conguration tool.
USB CDC (Communications Device Class)
The ProGlove supports USB CDC. In USB CDC mode, the Access Point is recog-
nized by the operating system as a serial device.
Baud Rate: All standard baud rates are supported.
Can be set with the conguration tool.
Data-Bits: 8
Stop Bits: 1
Parity: NONE
Data Flow: OFF
Handshake Controll: OFF
RS232
The ProGlove Access Point can be connected and operated serially via an RS232
cable.
The Baud Rate can be set with ProGlove conguration tool. All standard baud
rates are supported:
Data-Bits: 8
Stop Bits: 1
Parity: NONE
Data Flow: OFF
Handshake Controll: OFF

20 ProGlove Mark - User Manual
5. CONFIGURATION TOOL
Overview Conguration Tool
1. Barcode Settings 2. Data Formatting 3. Device Setting 4. Conguration Barcordes
Barcode type specic settings
Inverse codes
Prex und Sux
Advanced Formatting
(complex rules)
I/O (Connection)
Feedback
Energy
Cradle
Engine
Overview Settings
Conguration Barcodes
Print / Save Conguration
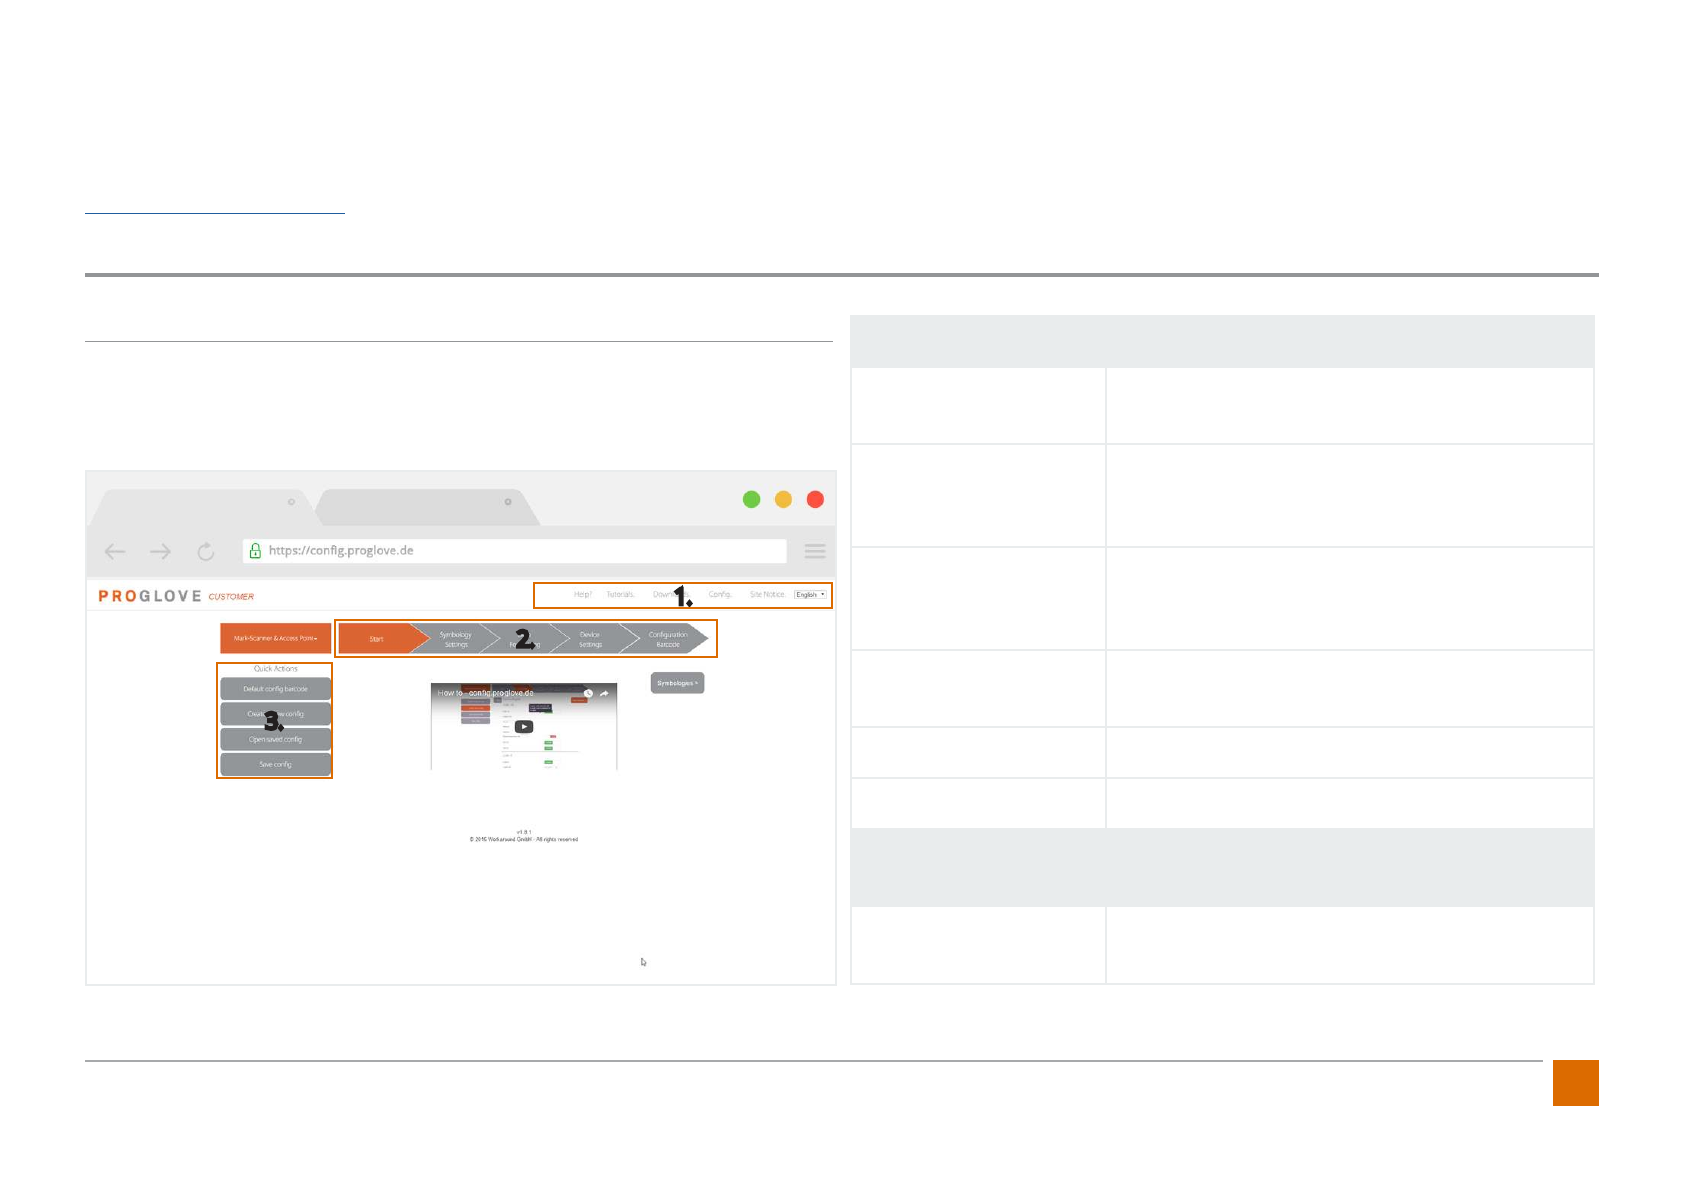
The configuration tool, which can be accessed online, is used for the individual configuration of the ProGlove system. It‘s under the link:
http://config.proglove.de/ and can also be used offline on all operating systems by downloading it. For mobile access, the tool is optimized for smart-
phones and tablets (responsive), so you can customize the configuration of the system anytime, anywhere. The configuration is done in four steps:
1. First of all, general settings are made for the barcodes used (e. g. exclusion of certain barcode types or inverse codes, etc.).
2. Subsequently, the data can be „manipulated“ with the help of simple and complex rules (e. g. pre- and suffix, if-then rules etc.).
3. Thirdly, further device settings are made (e. g. type of connection, sleep mode, feedback options, etc.).
4. Finally, the configurations made are transferred to the devices by scanning configuration barcodes. The individually set configuration can be
saved and printed to distribute to further customize at a later time.
21
ProGlove Mark - User Manual
General Navigation in the User Interface
After you have downloaded the conguration tool or opened it in your browser,
you will nd the following user interface. The three marked areas are described
below:
1. Header line - General use of the conguration tool
Help ProGlove address and contact details for support
requests by email or phone.
Instructions Video tutorials for general use of the conguration
tool and setting up complex rules.
Downloads
Download the conguration tool for oine avail-
ability at the workstation for dierent operating
systems (Linux, OS X, Windows).
Congs Video tutorials for general use of the congura-
tion tool.
Imprint Imprint
Language Selection German/English/French/Spanish
2. Conguration - Step-by-step presentation of the conguration via
tabs
Start Video tutorial on how to use the conguration
tool.
The individual conguration of the ProGlove system can be done via the conguration tool which is available online. It can be accessed via the link:
http://cong.proglove.de/ It is optimized for use on mobile devices and is also available as an oine version that can be downloaded. This means that
the conguration tool can be used on almost any device and with all conventional operating systems.
CONFIGURATION
3.
1.
2.
22 ProGlove Mark - User Manual
Barcode settings Settings specic for certain barcode types and
inverse barcodes.
Data formatting
Barcode data manipulation through pre- and
sux rules as well as advanced rules for more
complex logic over if-then links.
Device settings Settings for system connection, feedback op-
tions, energy, cradle and engine settings.
Conguration barcode Transferring the settings made by scanning con-
guration barcodes.
3. Quick settings - Quick access for conguration
Standard cong bar-
code Default conguration to reset to factory defaults.
Create new cong Create a new conguration.
Open cong Open a conguration that has already been saved
locally as a le.
Save cong Local saving of a created conguration as a le.
Navigation within the conguration settings:
You can use the tabs above the settings to set the configuration in sequence. To complete an
operation and go to the next step, either click on the following tab or the button to the right
with the same name. If you want to go back to the previous step, click the button on the left
with the name of the previous step.
Example:
Current step: Barcode settings
Previous step: Start
Next step: Data formatting
Hint: By moving the mouse over the conguration interface, you can obtain
description texts for each selectable variant which explains the individual con-
guration options in detail.
To congure the ProGlove system, please follow the steps below.
Step 0: Start
Start your conguration by either going to Create New Cong under Quick Settings or
selecting Barcode Settings in the top of the tab.
23
ProGlove Mark - User Manual
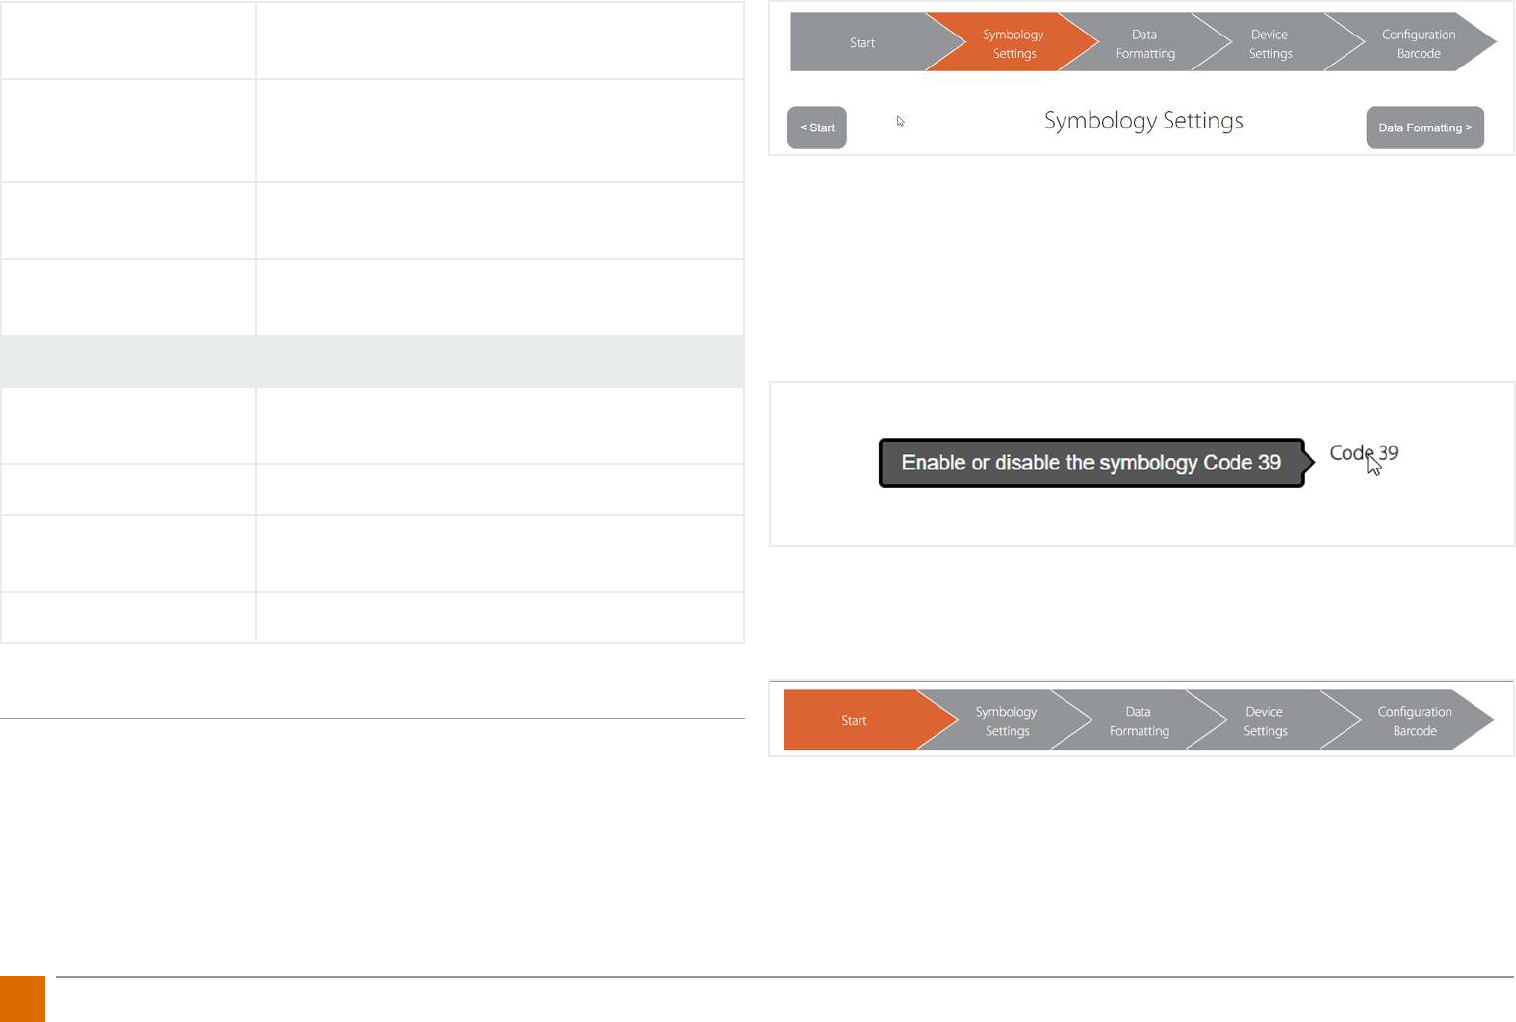
Step 1: Barcode Settings
Target:
Setting the MARK scanner for specic barcode types and inverse barcodes.
Application examples:
1. Avoid miss-scanns with multiple barcode types on one label by switching o all
barcodes that are not required.
2. Increase of the scan performance by reducing the amount of data to be proces-
sed.
Standard conguration:
All barcode types are switched on and can be scanned. Inverse Barcodes are
deactivated.
Barcode Settings
Barcode Types
Activation/deactivation of specic barcode types.
Detection of certain barcode lengths, edge toler-
ances and specic check digits.
Specic settings can be made for the following
barcode types:
Code 128, Code 39, Interleaved 2 of 5 (ITF), UPC/
EAN, Data Matrix, Portable File (PDF417), Code 93,
Aztec
Inverse
Enables the detection of inverse barcodes.
Individual activation for each barcode type.
Activation of the function guarantees simultane-
ous scanning of inverse and non-inverse bar-
codes.
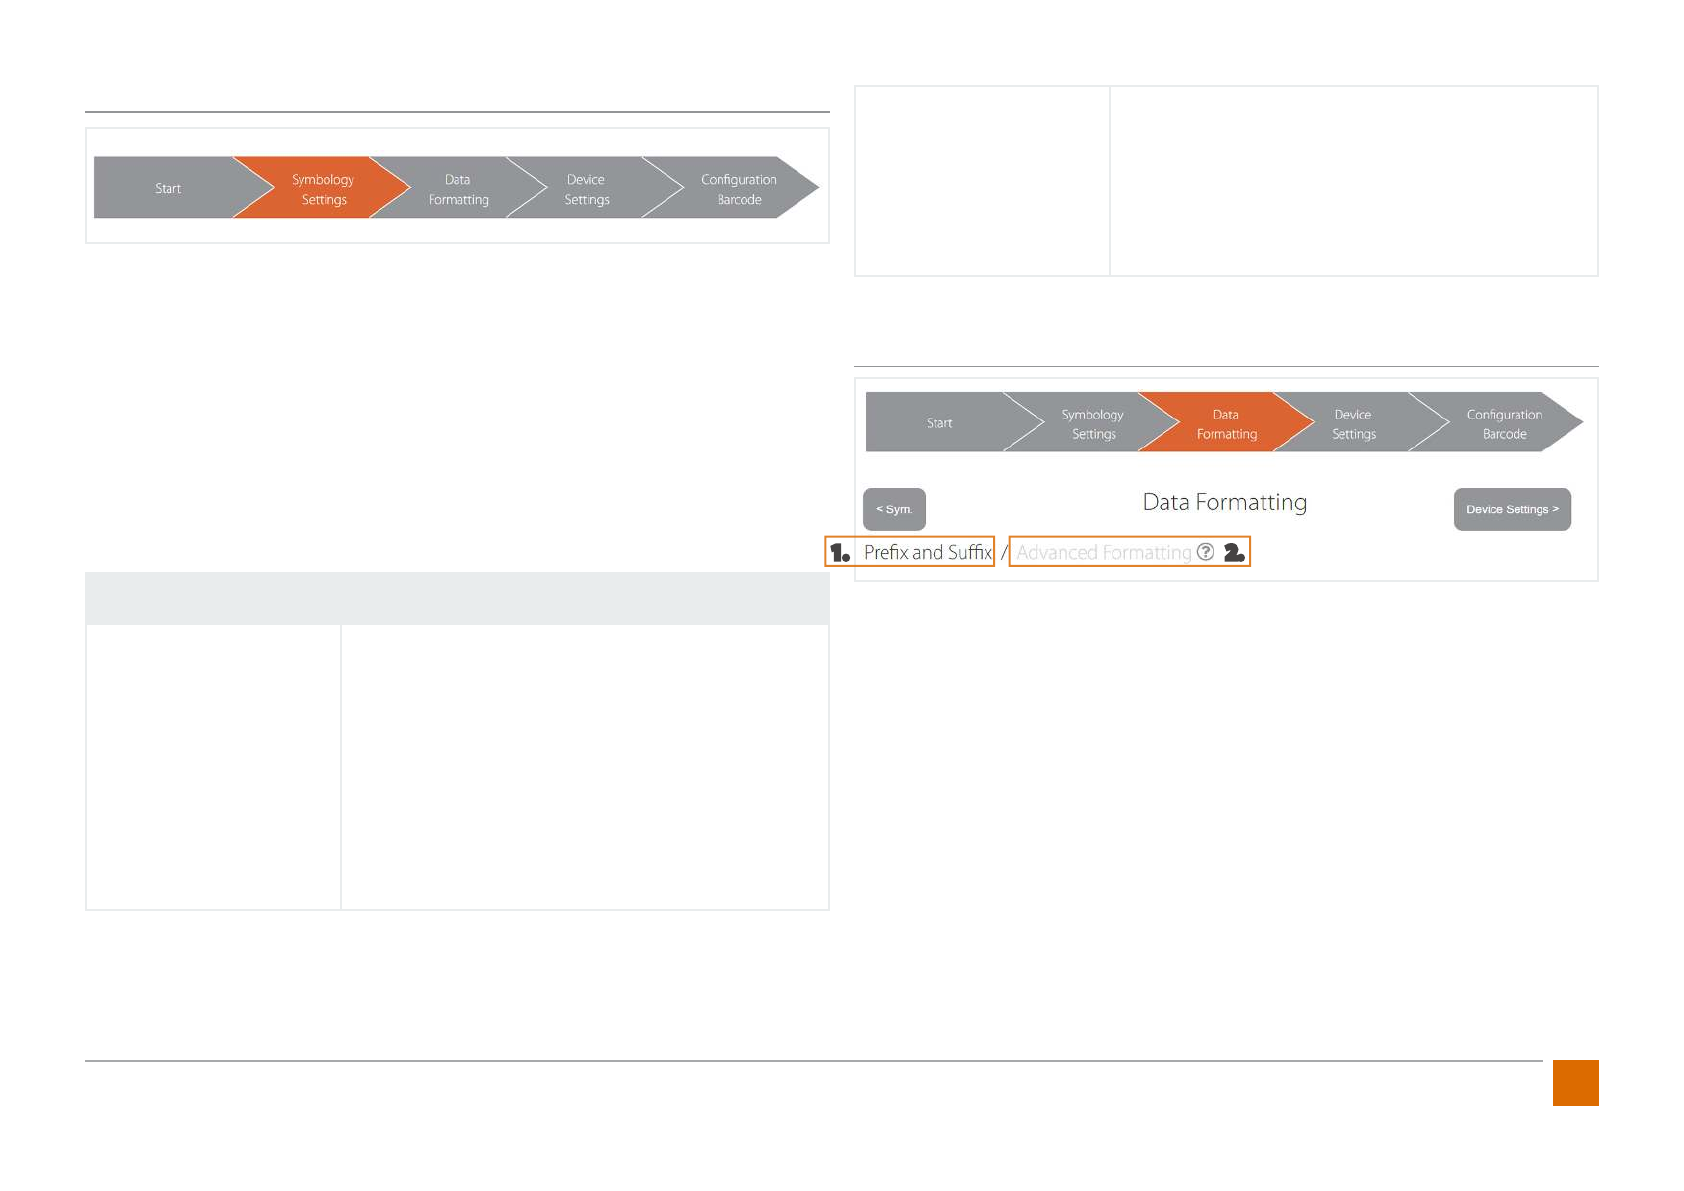
Step 2: Data Formatting
When data formatting, it is possible to perform two dierent „levels“ of data ma-
nipulation. First, the „simple“ prex and sux formatting is discussed (1.):
Target::
Manipulation of the data output by specifying prexes and suxes.
Application examples:
1. Conrmation „Enter“ as sux to jump to the mask of the next control panel.
2. Certain digit identier (e. g. workstation number) as prex to identify the re-
spective workstation.
Default conguration::
No prex dened, sux set with „Enter“.
1.
2.
24 ProGlove Mark - User Manual
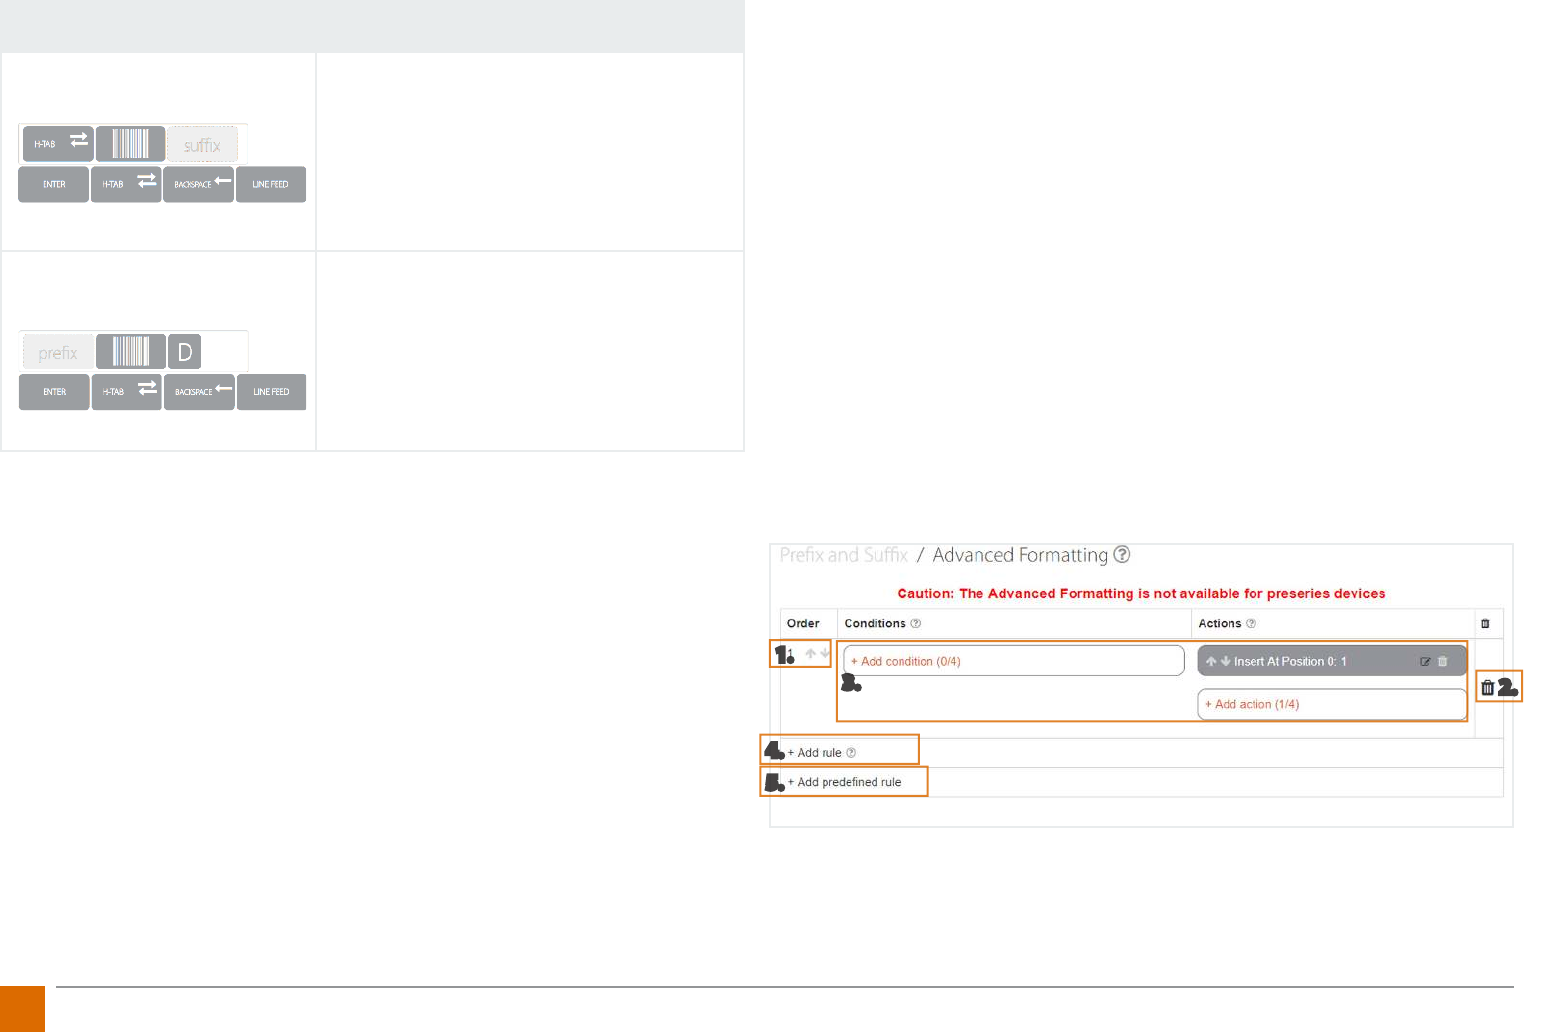
Data Formatting - Prex und Sux
Prex Selection of a prex from the presets or
manual text input via the keyboard.
Conguration example prex H-Tab:
To dene the desired prex, rst click in the
prex eld and then click on the H-Tab char-
acter in the specications.
Sux
Selection of a sux from the defaults or
manual text input via the keyboard.
Conguration example sux „D“:
To dene the desired sux, rst click in the
sux eld and then enter the text character
„D“ on your keyboard.
Hint:
1. You can delete the entry by moving the mouse over the eld and clicking on
the X that appears.
2. If you want to enter more than one character manually, you must do this in
advanced data formatting, which you will nd next to the tab Prex and Sux.
Advanced Formatting
Target:
Conversion of specic logic with resulting data manipulation is based on rules
that can be provided with conditions and actions.
Application Examples:
1. Replacing dened sequences within a barcode if it starts with a dened specic
starting digit.
2.Replace each Group Seperator (GS) with a hash (#).
Default Conguration
Does not include extended data formatting.
Navigation:
1. The sequence of the individual rules can be changed using the arrows in the
«Sequence» column.
2. Rules and conditions can be deleted by clicking on the trash symbol.
3. Within a rule, up to four conditions and actions can be added.
4. Up to 16 rules can be dened in total. You can add your own rules by clicking
on «Add rule».
5. Frequently used rules can be added via «Add predened rule».
1.
2.
3.
4.
5.
25
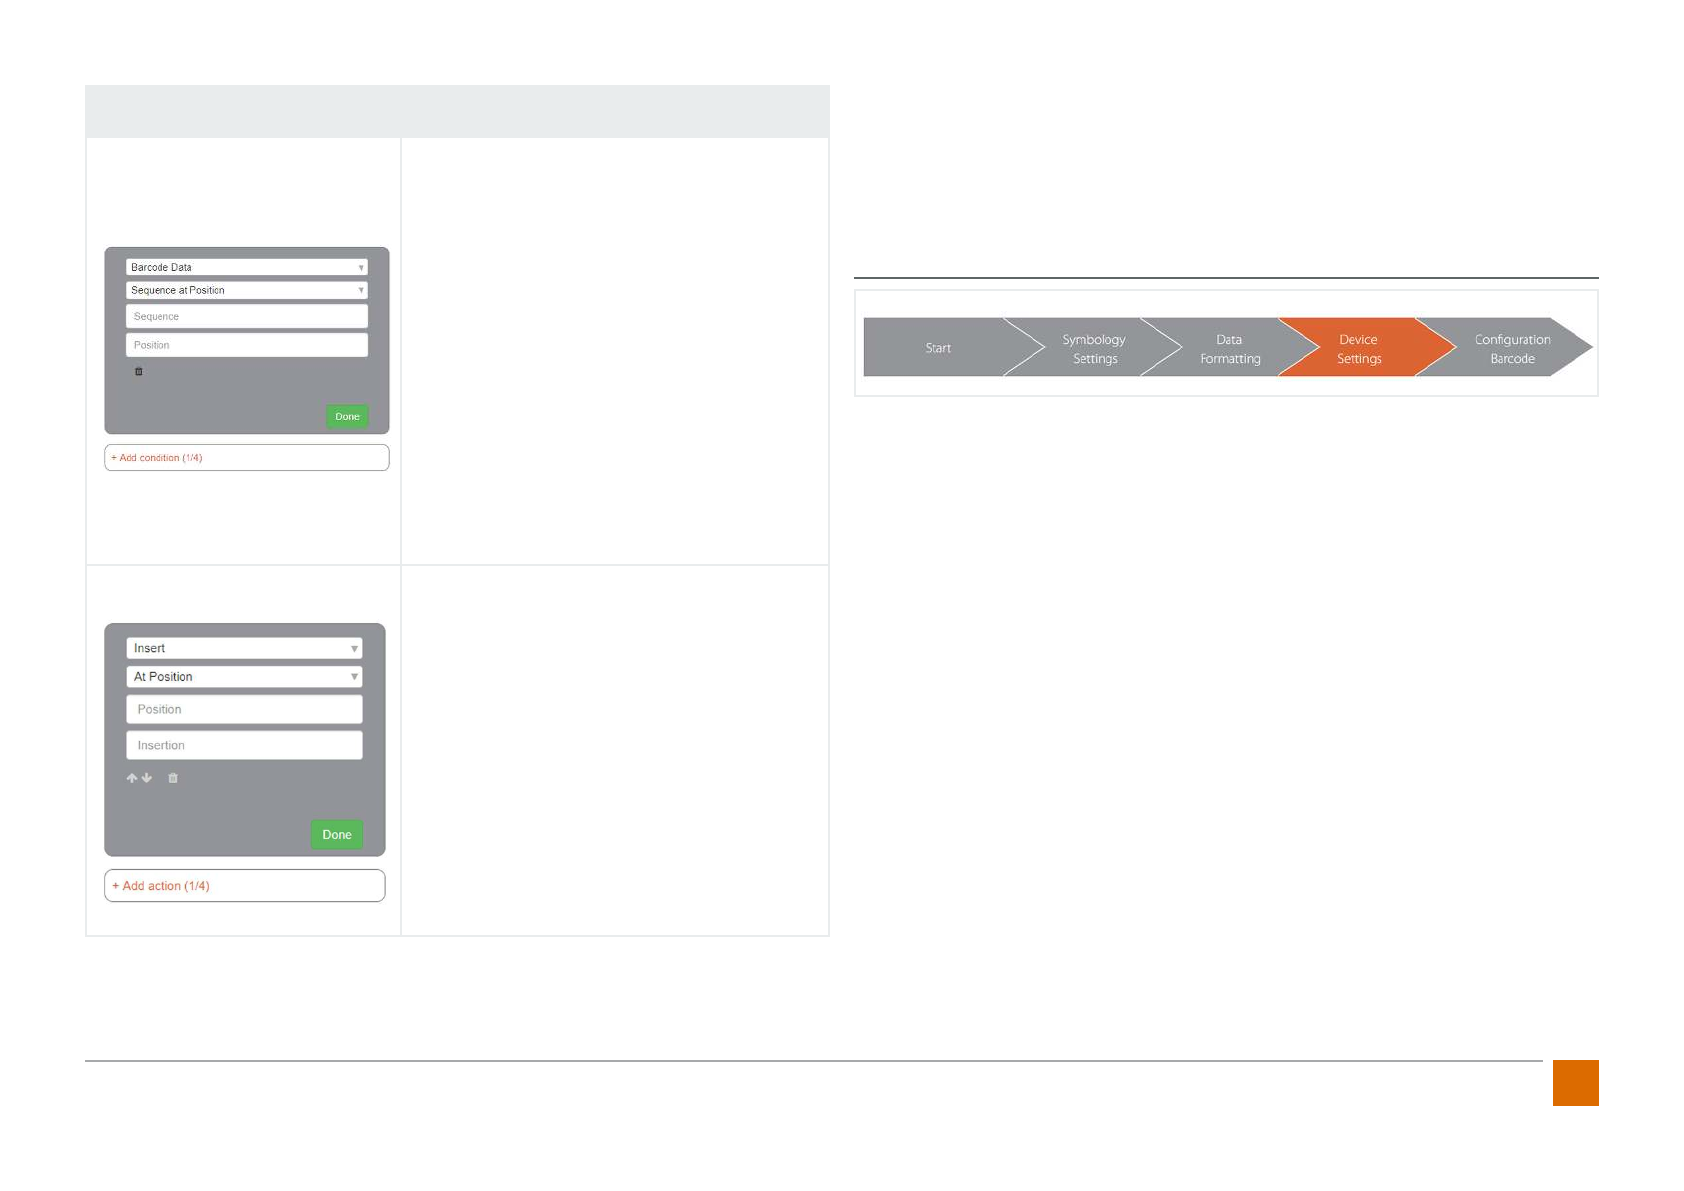
ProGlove Mark - User Manual
Data Formating - Prex und Sux
Terms
Selection of the barcode according to the
criteria: code types, barcode length, and
barcode data.
The system has the ability to congure
four dierent conditions per rule that are
linked to an AND function and are checked
at every scan. If you omit conditions, the
action is executed automatically.
Conguration example, condition Type
128:
To modify type 128, choose Code types in the
condition, „Include Code Types“ and „Code
128“. The selection is then conrmed by click-
ing on the Save icon.
Actions
Selection of the action to be executed:
Insert, Replace, and Delete.
Conguration example sux Pro:
To add the sux „Pro“ to barcode type 128,
select the Insert and Sux action and type
„Pro“ as a sequence. The action is then con-
rmed by clicking the Save icon.
Hint:
A maximum of 16 rules with 4 conditions and 4 actions can be performed.
The stored complex rules are later transferred to the Receiver (Access Point) by
scanning the third barcode in the Conguration Barcode tab. Therefore, it is es-
sential to scan this barcode in the last step «Conguration Barcode».
Step 3: Device Settings
Target:
Settings for system connection, feedback options, energy, cradle, and engine
settings.
Application Settings:
1. setting the selected port and keyboard layout.
2. Adjust the audio feedback to silent.
3. Activate Display Mode for optimized scanning performance when scanning
barcodes displayed on displays.
Default Conguration:
Feedback Prole: Normal
ACK/NACK Transmission: On
Low battery warning: On
Sleep Mode: 15 min
Delete connection to the access point when loading: On
Blurred 1D Processing: O
Aim Mode: O
Mobile Phone/Display Mode: O

26 ProGlove Mark - User Manual
I/O Settings - Connecting the system to your workstation
USB Output Mode
This setting selects the transfer mode of the
USB interface:
HID - Human Interface Device
CDC - Communications Device Class
USB Keyboard Layout
Here you can set the language settings of the
Pro-Glove system according to your keyboard
settings at the workstation.
HID Speed Here you can set the transfer speed of the USB
connection to the speed of your terminal.
RS232 Baudrate If you have a serial port (RS232), you can set the
transmission speed here.
Feedback Settings - Feedback to users
Feedback Prole Here you can adjust the signal length of the
LED, vibration unit and the audio signal.
ACK/NACK Transmission
Feedback
Here you can switch on and o the standard
red LED and the vibration feedback of the
MARK in case of a transmission error.
Low battery warning Here you can turn on or o a feedback warning
when the battery is low.
Energy Settings - Saving energy with MARK
Sleep Mode
This is where you can set the time after which
MARK enters power saving mode. To activate
MARK from sleep mode, the tactile trigger must
be operated once.
Afterwards it takes about 4 seconds until the
boot process is nished.
Cradle Settings - Settings for the charger cradle
Delete connection to
the access point during
loading
Here you can activate or deactivate the func-
tion of the MARK, which automatically discon-
nects itself from the previously connected re-
ceiver (access point) after it has been removed
from the charger.
Hint:
If this function is activated, the operator must
reconnect the device to the receiver (access
point) each time the MARK is removed from the
charger.
Application example:
If several MARKs with dierent receivers are
used by dierent operators, it is possible to
prevent the operator from scanning into the
wrong access points.
27
ProGlove Mark - User Manual
Engine Settings - Adaptation of the MARK scan module
Fuzzy 1D processing
If you often have incorrectly printed, soiled
or damaged 1D barcodes in your application,
activating this feature enables improved and
faster scanning.
Sighting Mode
If you have several barcodes on a label, the acti-
vation of this function only reads barcodes that
are below the center focus point. This enables
a more targeted and faster detection of the
desired barcode.
Mobile/Display Mode
If you need to read barcodes on your mobile
phone and on screens, this function ensures
improved capture.
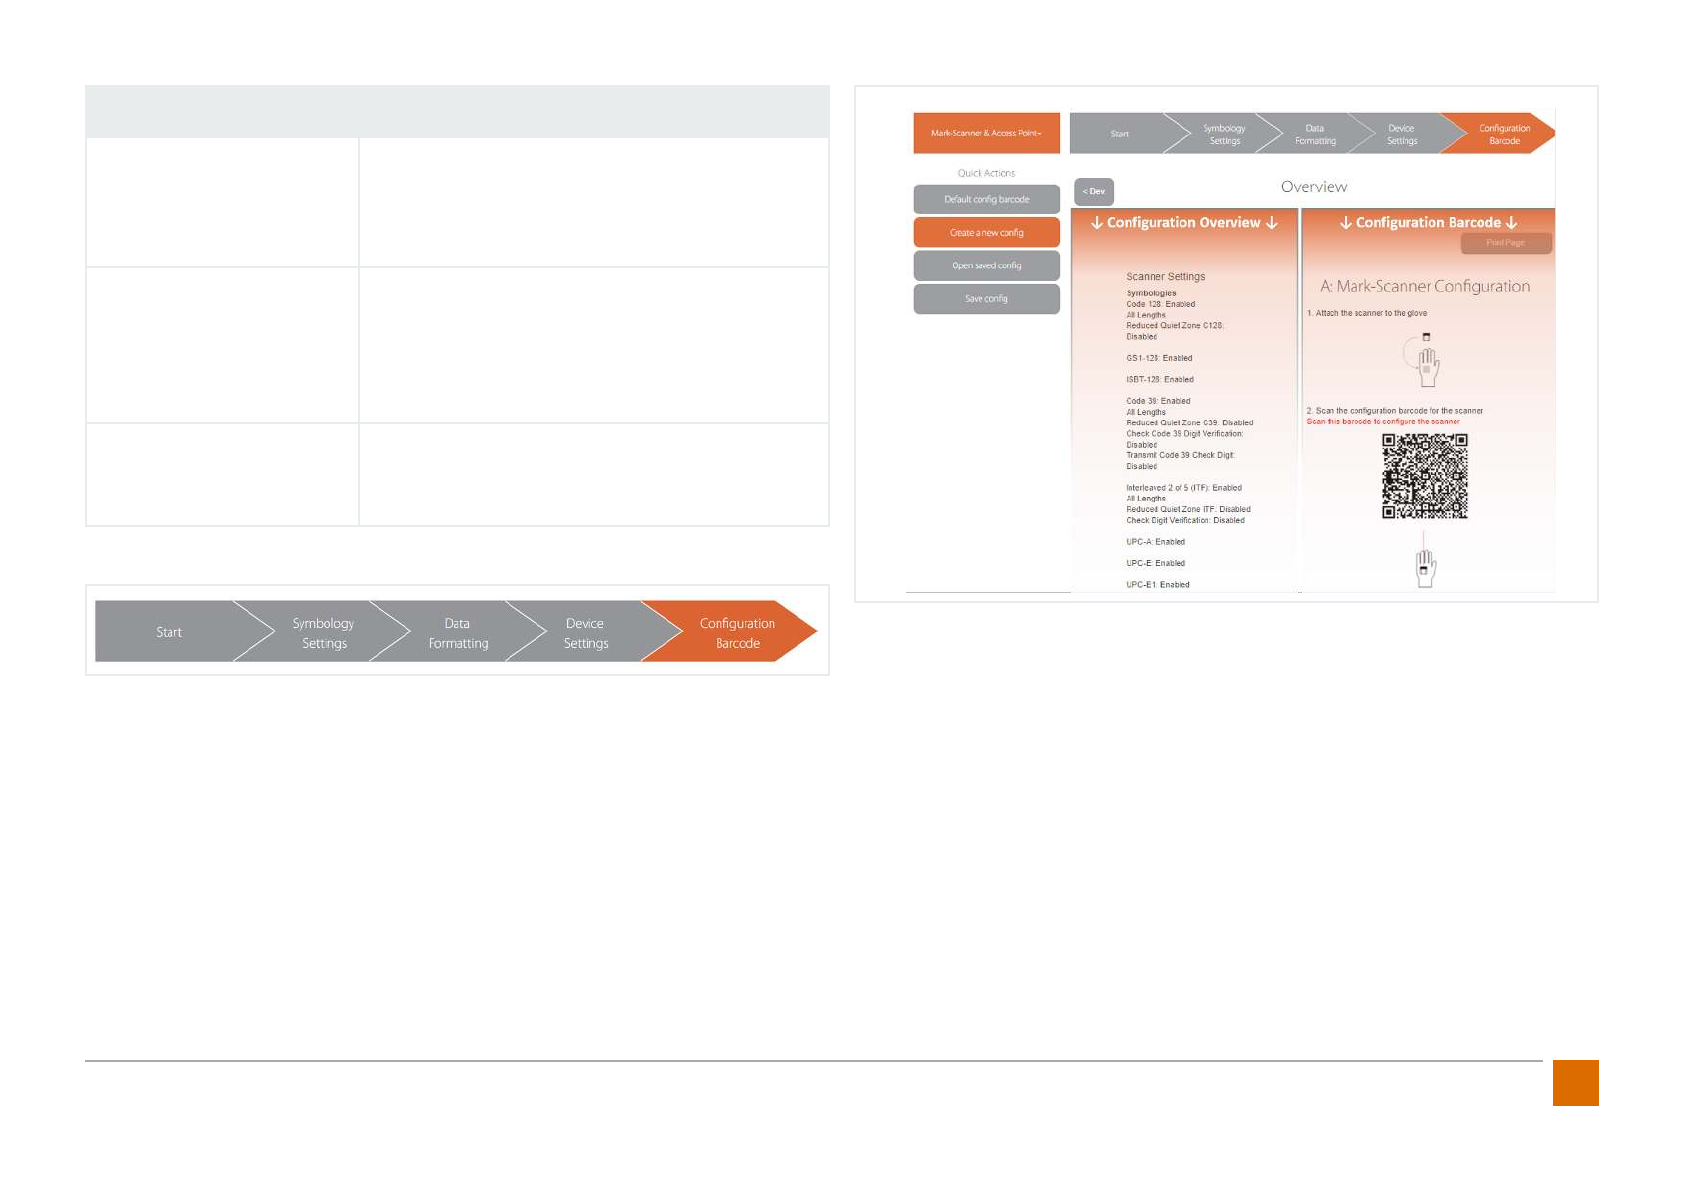
Step 4: Barcode Conguration
Prerequisite:
The MARK and the Access Point must be connected (supplied with power), swit-
ched on and connected to each other.
Target:
Congure the MARK and the Access Point with the settings you have made.
Navigation:
When barcode Conguration is complete, all congured settings are displayed on
the left-hand side according to the conguration sequence. Here you can check
the settings again.
On the right-hand side you will nd instructions for transferring the settings to
your devices. To do this, follow the instructions.
Hint:
If you wish to manually install the conguration at your workstation or any other
location, you can print the entire page of the conguration barcode by clicking
the «Print page» button at the top right of the tab or at the bottom of the page.
Finally, the conguration can be saved as a text le by selecting the «Save Cong»
button under Quick Settings on the left side.

28 ProGlove Mark - User Manual
6. PROGLOVE MARK FAQ
Frequently Asked Questions
The Scanner MARK / Access Point / Charging Station
1.1 How much does the scanner MARK weigh? What are the dimensions? Is the
MARK harmful to the user while working?
ProGlove MARK has been designed to be a part of the users natural movements.
With a weight of 1.4 oz, there is no additional load during manual work. Due to its
compact size of 2 x 1.75 x 0.5 in, ProGlove MARK does not interfere with work in
conned spaces (e. g. assembly) in most cases. In addition, the scanner can be worn
on both the left and right hand so that it can be adapted to any work situation.
1.2 How long does the battery last in daily operations?
The ProGlove MARK’s battery pack is designed for a shift of 8 hours with 2000-3000
scans. Due to environmental inuences and depending on the application, devia-
tions may occur. For multi-shift operation, two scanners are therefore required for
each workstation, which are used alternately. The scanner‘s battery is fully charged
within approximately 3 hours.
1.3 Which barcode types can be scanned?
All common 1D and 2D barcode standards can be scanned with the ProGlove
MARK. The scanable size depends on the resolution.
Supported barcode standards are listed in the following table:
1D Code 128, GS1-128, EAN-128, EAN-13, GTIN-13, EAN-8, GTIN-8, ISBN-
13, ISSN, ISMN, EAN-14, GTIN-14, DUN-14, SCC-14, ITF-14, EAN-18/NVE,
SSCC-18, UPC-A, GTIN-12, UPC-E, Code 39, Code 39 Extended, Code 25,
Code 25 Interleaved, EAN-5, EAN-2, JAN, EAN-99, EAN-Velocity, ISBN-
13 Dual, ISBN-10, Codabar, Code 93, Code 93 Extended, PZN7, PZN8,
Leitcode, Identcode, Code 128A, Code 128B, Code 128C, MSI Plessey.
2D PDF417, MicroPDF417, Datamatrix, QR Code, Micro QR Code, Aztec,
RSS, Composite, TLC-39, MaxiCode
Postal US PostNet, US Planet, UK Postal, Australian Postal, Japan, Postal, Dutch
Postal (KIX)
1.4 At what distance can barcodes be detected?
The ProGlove MARK is a short-range scanner which is optimized for use in arms
length scanning. Depending on the size and type of the barcode (and external fac-
tors such as light), the distance for optimum detection of the barcodes is 6-24 in.
1.5 Is the scanner harmful to my eyes?
In ProGlove MARK, a camera and LEDs are used to detect the barcodes. The scanner is
classied in accordance with IEC-62471 as a risk-free device which does not pose any
photobiological hazard.

29
ProGlove Mark - User Manual
1.6 Is it possible to scan DPM barcodes (direct part marking)?
DPM barcodes can be recorded with the ProGlove MARK, but the individual appli-
cation should be tested. Due to numerous factors, the performance of needled or
lasered barcodes can be limited.
1.7 Can several barcodes be detected at the same time?
Several barcodes cannot be detected at the same time. However, a barcode can
contain several pieces of information (e. g., ArtNr, batch, weight, etc.) that can
be analyzed and decoded via the access point - e. g., ArtBNr[TAB]Charge[TAB]
Weight[ENTER].
1.8 Is the scanner protected against dust and water?
The ProGlove MARK is designed for use in industrial environments. The scanner is
protected against dust and water on all sides and has the IP rating IP54 according
to DIN EN 60529.
1.9 At what temperatures can the ProGlove MARK be used?
The ProGlove MARK is designed for use at temperatures between 32 to 120°F. The
ProGlove MARK can function in sub zero environments (e.g. Freezer Storage) but
no long term tests have occurred to date. Therefore, use below freezing is not rec-
ommended.
1.10 Can barcodes be read at an oblique angle or on the head?
Yes, the ProGlove MARK can detect barcodes rotated both horizontally and verti-
cally. A rotation on its own axis (upside down) does not limit the scan performance.
1.11 How is data transferred from the MARK to the access point?
The data transmission between the ProGlove MARK and the Access Point takes
place via the frequency 915 MHz. This frequency band can be used royalty-free
and is reserved for short-range devices (e.g. radio microphones). Data transmission
only takes place after a successful decoding event. Therefore, ProGlove is a system
with low radiation exposure.
1.12 Can the data be transferred via Bluetooth or WiFi?
No, the data transfer between the MARK and the Access Point is carried out in the
sub 1GHz range (frequency 915 MHz) (see 1.11).
1.13 Can the Scanner MARK automatically change the access point depending
on the network strength (roaming) or be connected to several access points?
Automatic switching of the connection to dierent access points (roaming) is not
possible. MARK is connected to a single access point by scanning the pairing bar-
code. However, it is possible to connect several MARKs to one access point.
1.14 Does the ProGlove MARK have electromagnetic compatibility (EMC,
EMC, ETSI) certication?
The ProGlove MARK is certied as electromagnetically compatible according to
DIN EN 301489-1/-3 and EN 300220-2. The system thus meets the legal require-
ments for short-range radios (SRD).

30 ProGlove Mark - User Manual
1.15 Does the ProGlove system collect user data?
No, the ProGlove system is only used to transmit scanned barcode data. User data
about the worker, e. g. name of the operator Movement proles, location and e-
ciency gures are neither recorded nor transmitted.
1.16 How is the Access Point connected to my system?
The following interfaces allow us to connect the access point to a system or termi-
nal:
USB-HID: Emulated keyboard input. Simplest solution, works via Plug & Play
USB-CDC: Emulated serial interface. Driver installation required for this. Provided
by ProGlove.
RS232: Serial interface (additional external power source required).
No further installation of software is necessary.
1.17 Do access points interfere with each other if there are several access
points in the same room?
No, we use a frequency algorithm to ensure that there is no interference between
the access points.
1.18 Is the ProGlove MARK compatible with all ERP systems?
The ProGlove emulates a keyboard with the access point, thus the ProGlove system
is independent of third-party software. The ProGlove MARK is compatible with SAP,
Oracle, Infor, Sage, Excel, text editor - the IPC / Terminal receives the translated
barcode as input.
1.19 Can several MARKs be connected to one access point?
It is possible to connect several MARKs to one access point. For example, a work-
station would be possible where several users scan barcodes and send them to an
input mask of the ERP system. However, it is not possible to trace which user sends
the data to the system. In most cases, a user can only operate one input mask - this
requires two individual access points, which are connected to a MARK scanner.
1.20 How long does it take to charge a battery?
A complete charging cycle of a scanner MARK takes about 3 hours. During charg-
ing, the LED of the devices lights up red. If two devices are charged simultaneously
in the charger, the charging time does not change. As soon as the battery is fully
charged, the LED of the unit will turn green.
1.21 Is there a charging station with more than two charging stations?
No. Currently there is only one charging station for two MARK scanners.
1.22 Is there a way to increase battery life?
By individually adjusting the scanner MARK it is possible to increase the battery
life. The following settings can be made for this:
The Feedback option can be muted in the conguration tool under Device Set-
tings / Feedback Settings / Feedback Prole.
The Sleep Mode setting of the MARK scanner can also be shortened. These settings
can be made under Device Settings / Energy Settings / Sleep Mode.
All unused barcode types should be deactivated under Barcode Settings. If only 1D
barcodes are used: Activate the function Fuzzy 1D Processing under Device Settings /
Engine Settings.

31
ProGlove Mark - User Manual
ProGlove Standard Glove
2.1 How long does the ProGlove Standard glove last?
Depending on the application, our gloves last from a few shifts (in production and
assembly) up to several weeks (in some logistic applications). We have wear and
tear data available upon request.
2.2 What sizes of the ProGlove Standard gloves are oered?
The gloves are available in sizes 7 (small women‘s hand) to 10 (large men‘s hand).
The gloves come in 5 pair packs with either a left or right hand fastening clip for
the scanner.
Hint: If the glove is worn too small, it can lead to pressure marks on the back of
the hand. Furthermore, if the gloves are too small, the scanner can be accidentally
triggered by simply bending the nger.
2.3 To what extent does the ProGlove standard glove protect against me-
chanical stress (cut protection, tear resistance, etc.)?
The ProGlove Standard Glove is classied as a protective glove against mechanical
risks and covers most requirements for use in industrial environments. The perfor-
mance classication 2131 is covered in accordance to the basic standard EN 420
and the specic standard EN 388.
Abrasion resistance: Level 2 Cut resistance: Level 1
Tear resistance: Level 3 Puncture resistance: Level 1
2.4 How often can the scan button on the ProGlove standard glove be trig-
gered?
The switch is designed for up to 300,000 trips. The trigger is reinforced with a Dia-
mond polyacrylic cap to ensure long life under intensive use.
2.5 Does the ProGlove Standard glove have ESD certication (Electrostatic
Discharge)?
The ProGlove Standard Glove is designed for use in manufacturing, assembly, and
logistics and therefore has no ESD certication. A special version of the ProGlove
Longlife was developed for use in ESD applications (see 3.1).
2.6 Can a tablet be operated with the ProGlove Standard glove?
This depends on the tablet. Our ProGloves have worked seamlessly with all com-
mon tablets so far. These tablets can be easily operated with our gloves.
2.7 Can the ProGlove Standard glove be recycled?
ProGlove is registered with the Foundation „Elektro-Altgeräte Register“ (electron-
ic waste register) in accordance with ElektroG and thus ensures that customers
have the possibility to return their old equipment and act in compliance with the
law. We take care of the recycling and dispose of it for our customers. If necessary,
please contact us@proglove.com.
2.8 Is the ProGlove Standard Glove according to the ATEX Directive suitable
for use in potentially explosive atmospheres?
No. The ProGlove Standard Glove has no certication for use in potentially ex-
plosive dust and gas atmospheres, as well as for use in mining and underground
operations.

32 ProGlove Mark - User Manual
ProGlove Longlife
3.1 In which sizes is the ProGlove Longlife available?
The ProGlove Longlife is available in three dierent sizes (S, M, L). Thanks to a
dirt-repellent industrial Velcro fastener, the cu can be individually adapted and
quickly put on and taken o. The variable closure system therefore enables an op-
timal t on dierent hand sizes and shapes with the best wearing comfort.
3.2 Can accidental scanning occur due to the trigger in the palm?
Accidental scanning due to gripping movements is prevented by an integrated
plastic protective ring, which adapts to the palm of the hand by means of an elastic
foam.
3.3 Why was the trigger on the ProGlove Longlife placed into the palm of the
hand?
The ProGlove Longlife has been designed as an overwrap which can be worn over
the free hand or over other gloves. The positioning of the trigger in the palm of the
palm also allows the user to wear very thick or special gloves (e. g. cold protection
or cut protection class 3). The trigger is placed in the depression of the palm of the
hand so that triggering is a natural hand movement. Thanks to ergonomic and
medical examinations and cooperation with a hand surgeon, it was possible to
determine the optimum position for the trigger button.
3.4 Does the ProGlove Longlife have ESD certication (electrostatic dis-
charge)?
Yes - a special version of the ProGlove Longlife was developed for use in ESD ap-
plications (electronics production). This is suitable and certied according to D-3-
00036 or DIN EN 61340-5-1 for use in the ESD area.

33
ProGlove Mark - User Manual
7. TROUBLESHOOTING
Trouble Shooting Tables
Problem Cause Solution
The Scanner MARK cannot be turned on.
The battery is not charged. Load the scanner MARK in the charging station.
The glove is defective. Change the glove.
The Scanner MARK does not charge in
charging station.
The Charging station is not connected to power source. Connect the charging station to the power source.
The Scanner MARK is not inserted correctly into the
charger tray.
Place MARK correctly in the charger. Conrmed with a
signal tone and 2x green ashing light.
The Scanner MARK defective (short circuit, cold solder
joint etc.). Replacement of the device via RMA.
The Charging station is defective.
Insert the second MARK into the charger. If it does not
charge, the charger is defective. Replacement of the
device by RMA.
The Scanner MARK lights up red 3x when
inserted in charger tray, and makes a beep-
ing sound.
The Charger slot is defective.
In this case, the charging station must be replaced via
RMA.
Please contact support@proglove.com

34 ProGlove Mark - User Manual
Problem Cause Solution
The Barcode data is not transferred.
The Scanner MARK is not paired with Access Point.
Pairing the scanner MARK with the access point. To do
this, scan the pairing barcode on the respective access
point.
The Scanner MARK is out of range of Access Point.
Move the scanner MARK closer to the access point. Access
point should be freely accessible (not in metal containers
or similar). The distance between. MARK and access point
should be less than 100ft.
The access point does not work.
1. Connect the scanner MARK with the access point.
2. Check that a green light is on at the access point.
3. Scan the barcode. If the MARK scanner lights up
green once and red twice, the barcode was not trans-
ferred. Repeat the steps with a second MARK scanner.
If the data is not transferred and the MARK scanner
lights up green once and red twice, the access point is
defective.
4. The access point must be replaced with an RMA.
Please contact support@proglove.com.
The Scanner MARK does not work.
1. Connect the MARK to the Access Point.
2. Check whether the green light at the access point is
illuminated.
3. Barcode scanning: If the MARK lights red 2x and barcode
is not transmitted, this indicates a defect of the scanner
MARK. Please contact support.
4. The MARK scanner may need to be replaced with an
RMA. Please contact support@proglove.com.

35
ProGlove Mark - User Manual
Problem Cause Solution
The Scanner MARK ashes yellow after
scanning. The battery level is less than 95 percent.
Charge the MARK scanner for at least 20 minutes.
A full battery charge takes about three hours.
The MARK’s battery is dead after less than
one shift.
Too many false scans are carried out due to poorly legi-
ble barcodes or badly illuminated workstations.
The following settings can be adjusted in the congu-
ration tool to increase battery life:
Sleep mode: 5min
Ack/Nack Transmission Feedback: OFF
Feedback Prole: Silent
Blurred 1D processing: ON
Then recongure the MARK and the access point using
generated conguration barcodes.
The disc is dirty, so that many false scans occur. Clean the front panel.
The MARK can‘t read barcodes well. The barcodes are dicult to read due to poor material
properties.
Adjust the following settings in the conguration tool,
which have a positive eect on readability:
Blurred 1D processing: ON
Then recongure the MARK and the access point using
generated conguration barcodes.
The barcode is transferred, but no automat-
ic ENTER input is carried out.
The ENTER sux is not executed automatically after
the bar code transfer.
In the conguration tool, insert the ENTER sux under
"Data formatting". Then recongure the MARK and the
access point using generated conguration barcodes.

36 ProGlove Mark - User Manual
Problem Cause Solution
The MARK scanner ashes green after
successful transmission, but the data is not
displayed on the screen.
The Scanner MARK is connected to the wrong access
point. Pair the MARK scanner with the desired access point.
The red scanning eld of the MARK scanner
lights up, but no barcodes are scanned.
The barcode is not readable. Create a new barcode label.
The barcode type is not readable.
Identify the barcode type (e.g. Code 128) and make sure
that this barcode type is activated in the conguration
tool.
The barcode length cannot be read. In the conguration tool, make sure that the maximum
barcode length has been set correctly.
The window of the scanner MARK is dirty. Clean the window (see chapter Maintenance and care).
Scanner MARK does not vibrate.
The vibration signal is deactivated. Activate the vibration signal in the conguration tool.
The vibration motor is defective. The MARK scanner must be replaced with an RMA. Please
contact support@proglove.com.
The LEDs on the MARK scanner do not light
up despite successful data transfer. The LEDs on the MARK scanner are defective. The MARK scanner must be replaced with an RMA.
Please contact support@proglove.com.
With serial connection: The MARK ashes
green after successful transmission, but
data is not displayed on the screen.
The System ProGlove MARK is connected to the wrong
COM port. Check the COM port.
The COM port has been congured incorrectly (e. g.
wrong baud rate, prex or sux settings).
Check the system requirements in the conguration
tool.
37
ProGlove Mark - User Manual
8. MAINTENANCE
Storage
The following must be considered when storing the equipment and gloves:
Storage Location: Ensure that you store all equipment, scanner, receiver, charger, and the
gloves/overwraps in a dry and clean environment. The storage location should be as free of
dust and chips as possible.
Temperature: The temperature at the storage location should be between 32 to 120°F.
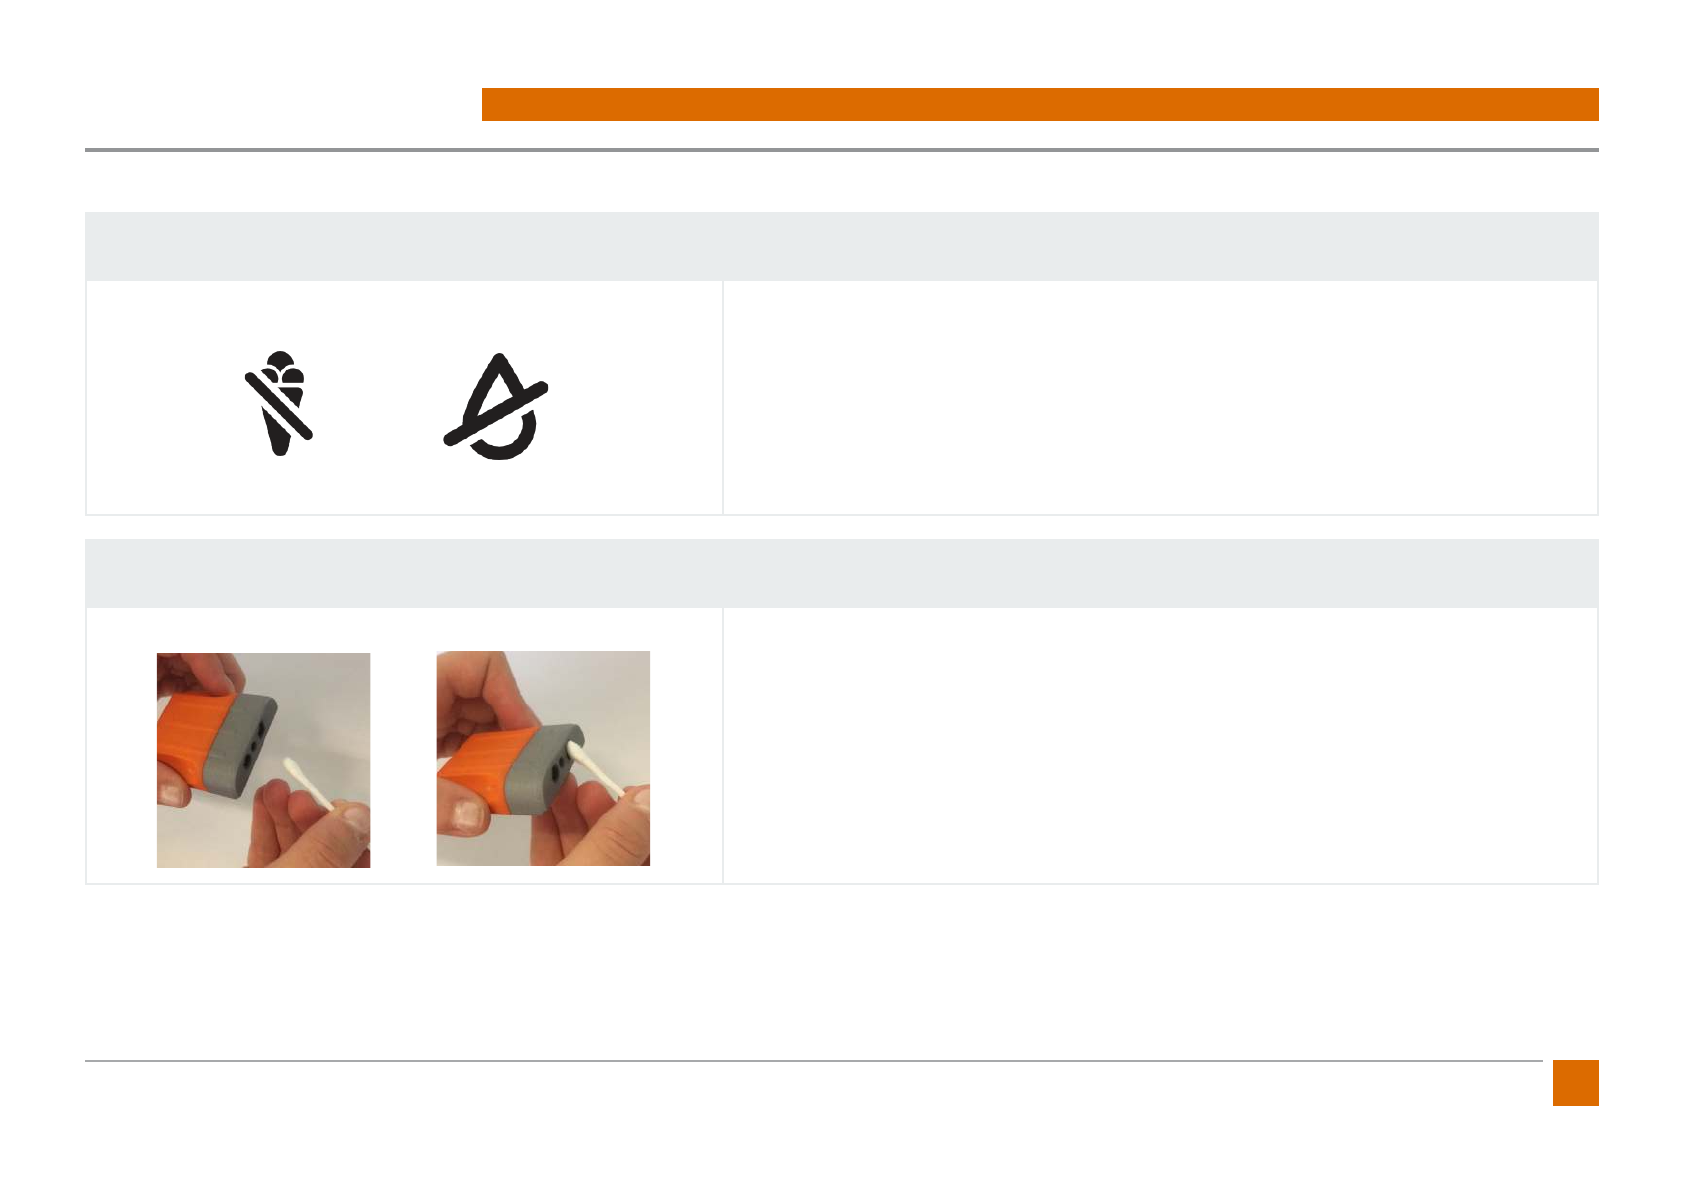
Cleaning
Scanner:
Avoid cleaning the scanner with chemicals, especially acetone. Instead, clean the scanner
glass regularly with a commercially available cotton swab.
Gloves and overwrap:
To protect against moisture and other particles, gloves and overwrap must not be cleaned.
Damaged gloves must not be reused under any circumstances.
38 ProGlove Mark - User Manual
9. SAFETY AND REGULATIONS
Regulatory information and guidance
All products are designed to comply with European rules and regulations and are
labelled as required. Modications or changes to equipment not expressly ap-
proved by ProGlove may void the type-approval.
The ProGlove system (MARK, access point, charging station and accessories) meets
the requirements for safe operation. To ensure safe operation, it is advantageous
to operate the devices in accordance with the following guidelines. Read these
guidelines carefully before using the device.
RADIO EN 61000-3- 3:2013
EN 61000-3- 2:2006 + A1:2009 +
A2:2009
EN 301 489-3 V1.6.1
EN 301 489-1 V1.9.2
EN 300 220-2 V2.4.1
OTHER Safety/LVD testing according to
EN 60950-1:2006 + AC:2011 +
A11:2009 + A12:2012 + A1:2010 +
A2:2013
LED CLASSIFICATION Exempt Risk Group LED product ac-
cording to IEC/EN 62471
COMPLIANCE WITH ENVIRONMENTAL
PROTECTION
Corresponds to EU ROHS
European Compliance
The device complies with the essential requirements of
the EU directives 1999/5/EC, 2004/108/EC and 2006/95/
EC, if applicable. A corresponding certicate can be re-
quested from your sales partner.
The ProGlove system complies with the European Par-
liament and Council Directive 2002/96/EC of 27 January
2003 on waste electrical and electronic equipment
(WEEE).
The production of this product requires the extraction and use of natural resourc-
es. It may contain hazardous substances which, if not disposed of properly, could
harm health and the environment.
In order to avoid the proliferation of these substances in our environment and to
reduce the consumption of natural resources, we encourage you to use the appro-
priate take-back systems for product disposal. From this take-back system, most of
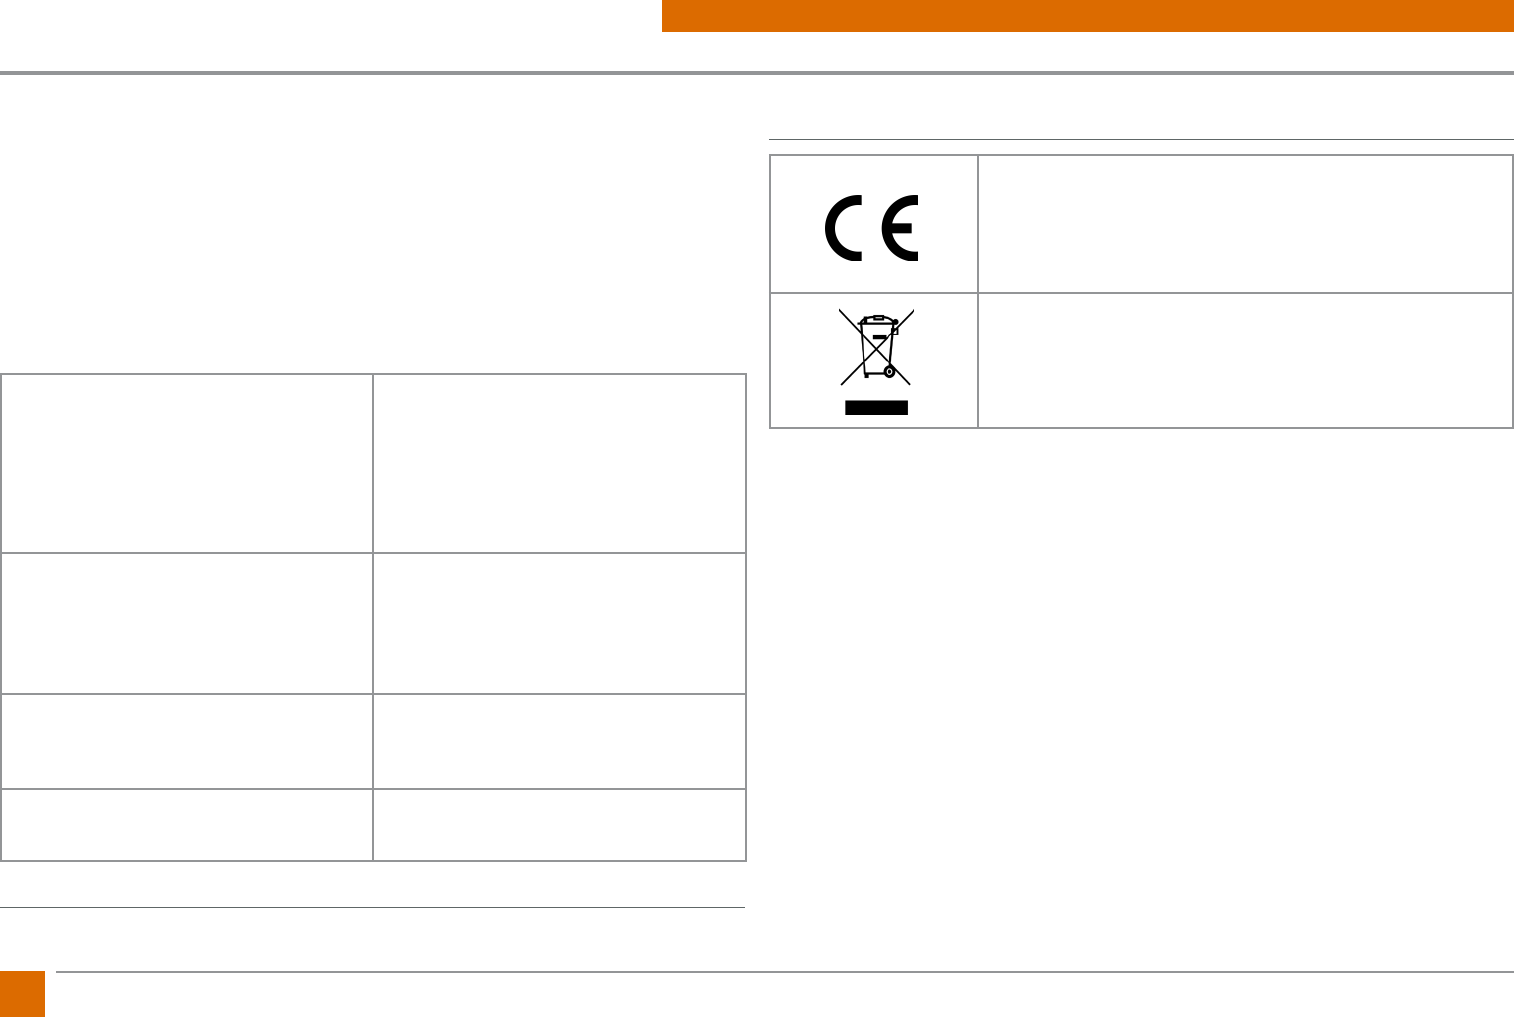
the product‘s materials are reused or recycled.
The crossed-out garbage can symbol informs you that the product must not be
disposed of with household waste and invites you to use the appropriate separate
collection systems for product disposal. For more information on collection, reuse
and recycling systems, please contact your local or regional waste management.
You can also contact your supplier for more information on the environmental per-
formance of this product.

39
ProGlove Mark - User Manual
10. SUPPORT AND SERVICE
Technical Support
If you have any questions about the integration or use of our devices, please do
not hesitate to contact our customer support. They will answer your request as
soon as possible. You can reach us by contacting:
support@proglove.com
and via telephone through:
646 641-4619 (United States and Canada)
+49 (0) 1520 2907017 (Abroad)
Precautions
Observe these precautions when installing the ProGlove system to reduce the risk
of injury or damage to the unit.
• To reduce the risk of damage or interference from overvoltage, line noise, elec-
trostatic discharge (ESD) or other irregularities, route all cables and wires away
from power sources.
• Changes or modications not expressly approved by the body responsible for
compliance may void the user‘s approval.
• Cable shielding may deteriorate, damage cables, or cause wear and tear if a
loop or bend radius is less than 10X of the cable diameter. The bending radius
must be at least 15 cm from the plug.
• This device should be used according to the instructions in this manual.
• All information is for reference purposes only and can be changed without pri-
or notication.
40 ProGlove Mark - User Manual
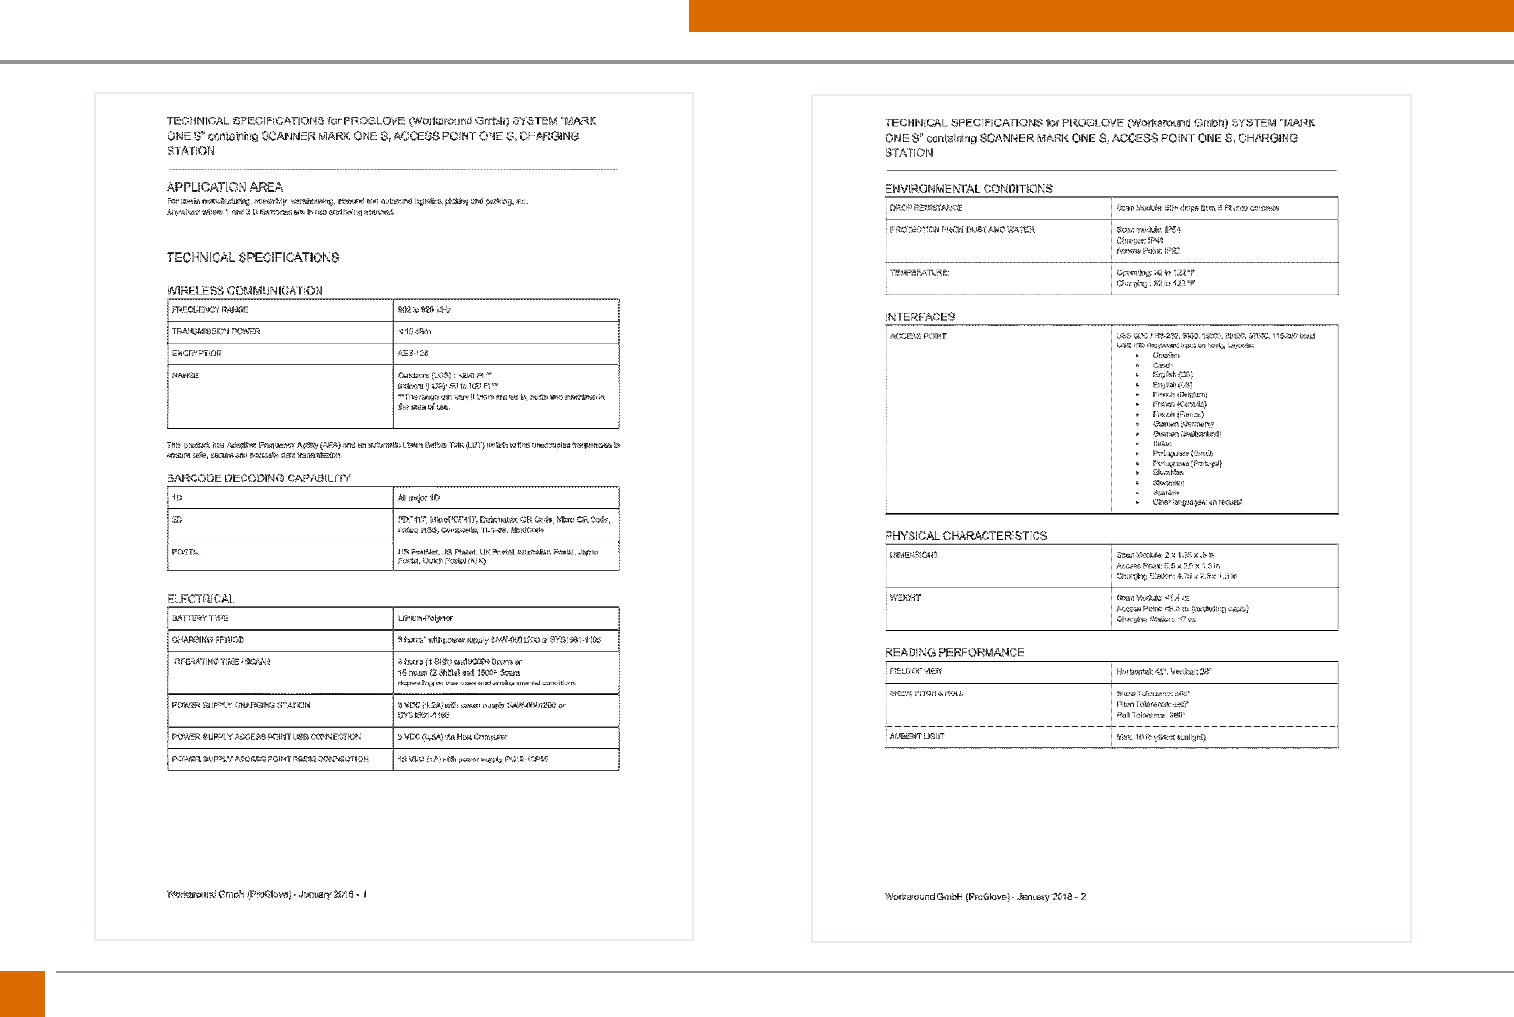
11. TECHNICAL SPECIFICATIONS
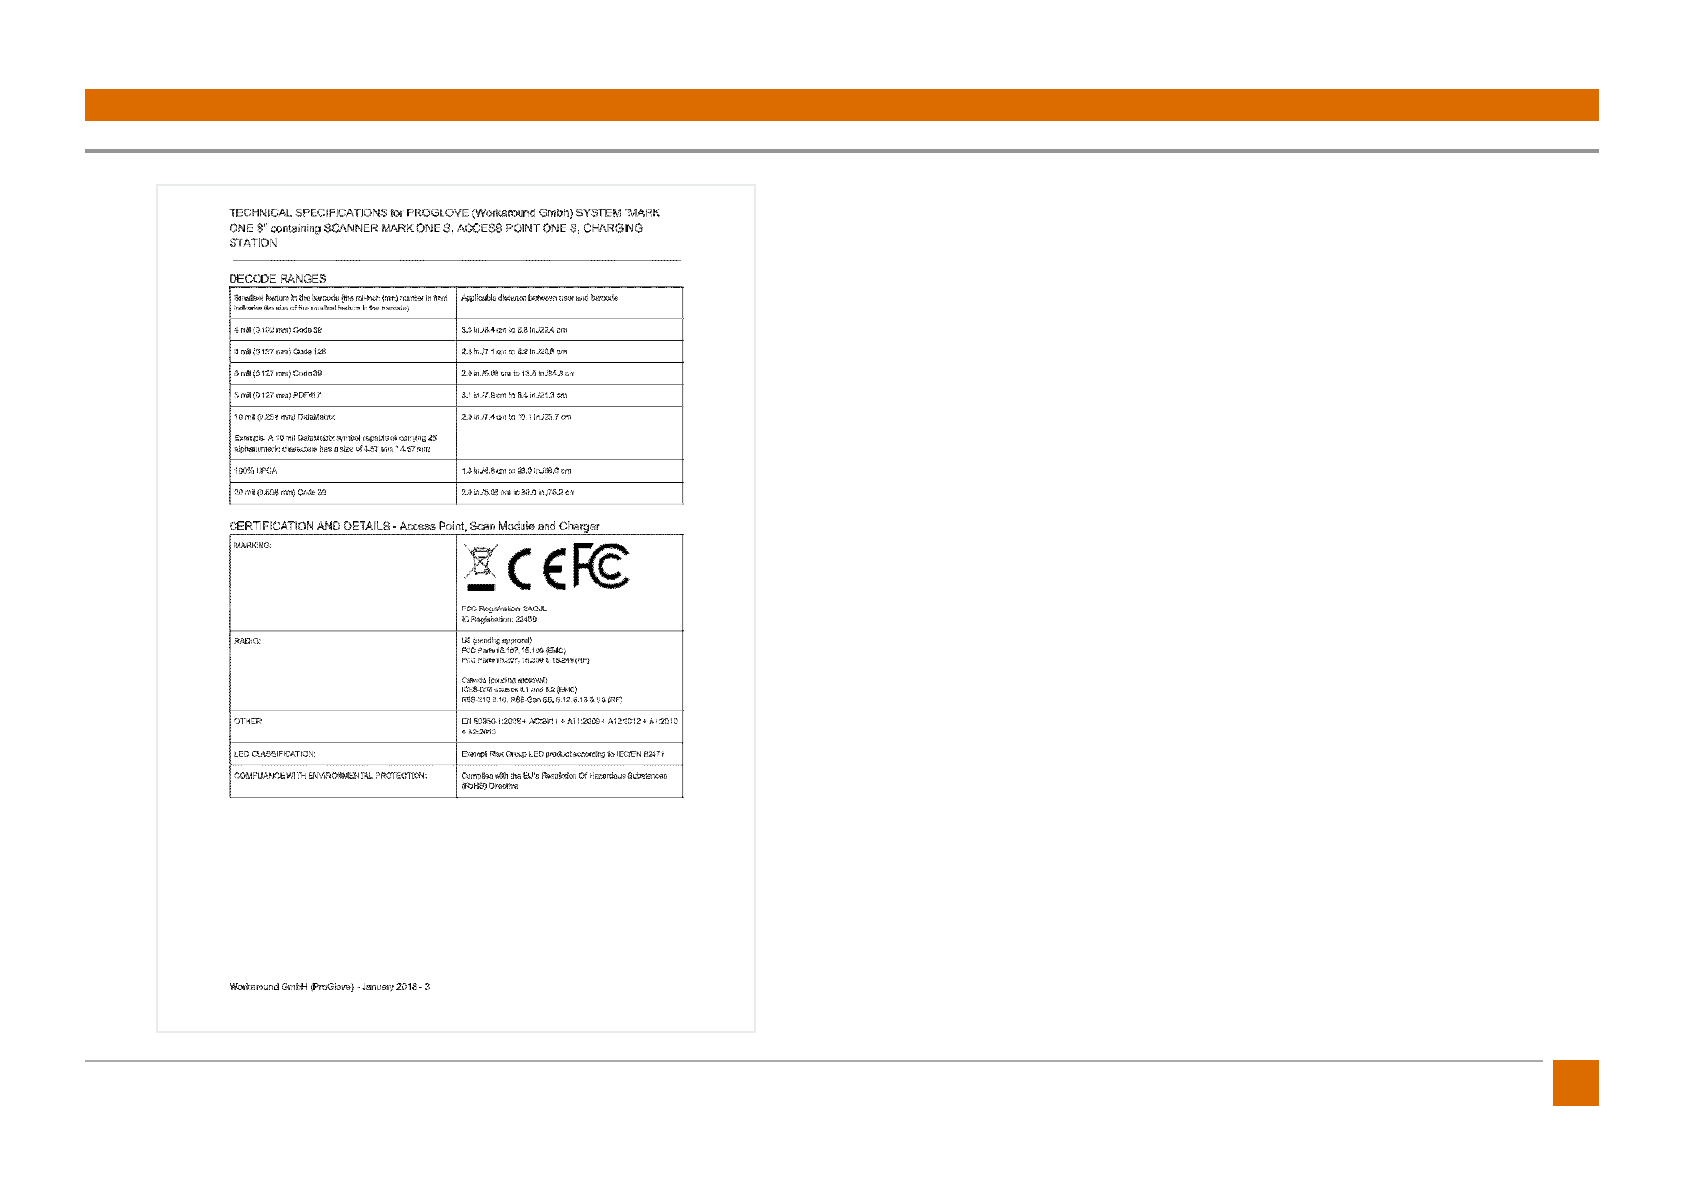
41
ProGlove Mark - User Manual
42 ProGlove Mark - User Manual
43
ProGlove Mark - User Manual

44 ProGlove Mark - User Manual
12. FCC Certication Compliance
FCC Certication Compliance
ProGlove Mark
The ProGlove Mark complies with the following FCC product categories:
• FCC Part 15 Sub-part C 249 (intentional radiators = RF transceiver)
• FCC 15 B 107/109 (unintentional radiator)
The ProGlove Mark is a portable device (distance between person’s body and
the antenna is 20 cm or less) and excluded from SAR (Specic Absorption Rate)
requirements.
Under the regulations of the FCC the user has to be aware of the following
when using the ProGlove Mark:
1. FCC CAUTION
Changes or modications not expressly approved by the party responsible for
compliance could void the user’s authority to operate the equipment.
2. This transmitter must not be co-located or operated in conjunction with any
other antenna or transmitter.
3. Operation is subject to the following two conditions:
(1) this device may not cause harmful interference, and
(2) this device must accept any interference received, including interference
that may cause undesired operation.
4. This equipment complies with FCC radiation exposure limits set forth for an
uncontrolled environment and meets the FCC radio frequency (RF) Exposure
Guidelines. This equipment has very low levels of RF energy that is deemed to
comply without testing of specic absorption rate (SAR).
5. This ProGlove System has been tested and meets the FCC RF exposure guide-
lines when used with the ProGlove accessories supplied or designated for this
product. Use of other accessories may not ensure compliance with FCC RF
exposure guidelines.
6. Note: This equipment has been tested and found to comply with the limits
for a Class B digital device, pursuant to part 15 of the FCC Rules. These limits
are designed to provide reasonable protection against harmful interference
in a residential installation. This equipment generates, uses and can radiate
radio frequency energy and, if not installed and used in accordance with
the instructions, may cause harmful interference to radio communications.
However, there is no guarantee that interference will not occur in a particular
installation. If this equipment does cause harmful interference to radio or
television reception, which can be determined by turning the equipment o
and on, the user is encouraged to try to correct the interference by one or
more of the following measures:
• Reorient or relocate the receiving antenna.
• Increase the separation between the equipment and receiver.
• Connect the equipment into an outlet on a circuit dierent from that to
which the receiver is connected.
• Consult the dealer or an experienced radio/TV technician for help.

45
ProGlove Mark - User Manual
ProGlove Access Point
The ProGlove Access Point complies with the following FCC product catego-
ries:
• FCC Part 15 Sub-part C 249 (intentional radiators = RF transceiver)
• FCC 15 B 107/109 (unintentional radiator)
This equipment complies with FCC radiation exposure limits set forth for an
occupational/controlled environment. This equipment should be operated
with a minimum distance of 20cm between the radiator and your body.
Under the regulations of the FCC the user has to be aware of the following
when using the ProGlove Access Point:
1. FCC CAUTION
Changes or modications not expressly approved by the party responsible for
compliance could void the user’s authority to operate the equipment.
2. This transmitter must not be co-located or operated in conjunction with any
other antenna or transmitter.
3. Operation is subject to the following two conditions:
(1) this device may not cause harmful interference, and
(2) this device must accept any interference received, including interference
that may cause undesired operation.
4. This equipment complies with FCC radiation exposure limits set forth for an
uncontrolled environment and meets the FCC radio frequency (RF) Exposure
Guidelines. This equipment has very low levels of RF energy that is deemed to
comply without testing of specic absorption rate (SAR).
5. This ProGlove System has been tested and meets the FCC RF exposure guide-
lines when used with the ProGlove accessories supplied or designated for this
product. Use of other accessories may not ensure compliance with FCC RF
exposure guidelines.
6. Note: This equipment has been tested and found to comply with the limits
for a Class B digital device, pursuant to part 15 of the FCC Rules. These limits
are designed to provide reasonable protection against harmful interference
in a residential installation. This equipment generates, uses and can radiate
radio frequency energy and, if not installed and used in accordance with
the instructions, may cause harmful interference to radio communications.
However, there is no guarantee that interference will not occur in a particular
installation. If this equipment does cause harmful interference to radio or
television reception, which can be determined by turning the equipment o
and on, the user is encouraged to try to correct the interference by one or
more of the following measures:
• Reorient or relocate the receiving antenna.
• Increase the separation between the equipment and receiver.
• Connect the equipment into an outlet on a circuit dierent from that to
which the receiver is connected.
• Consult the dealer or an experienced radio/TV technician for help.

46 ProGlove Mark - User Manual
Contact:
www.proglove.com
us@proglove.com
support@proglove.com
founder@proglove.de
Workaround GmbH (ProGlove)
Friedenstraße 4
81671 - Munich
Germany