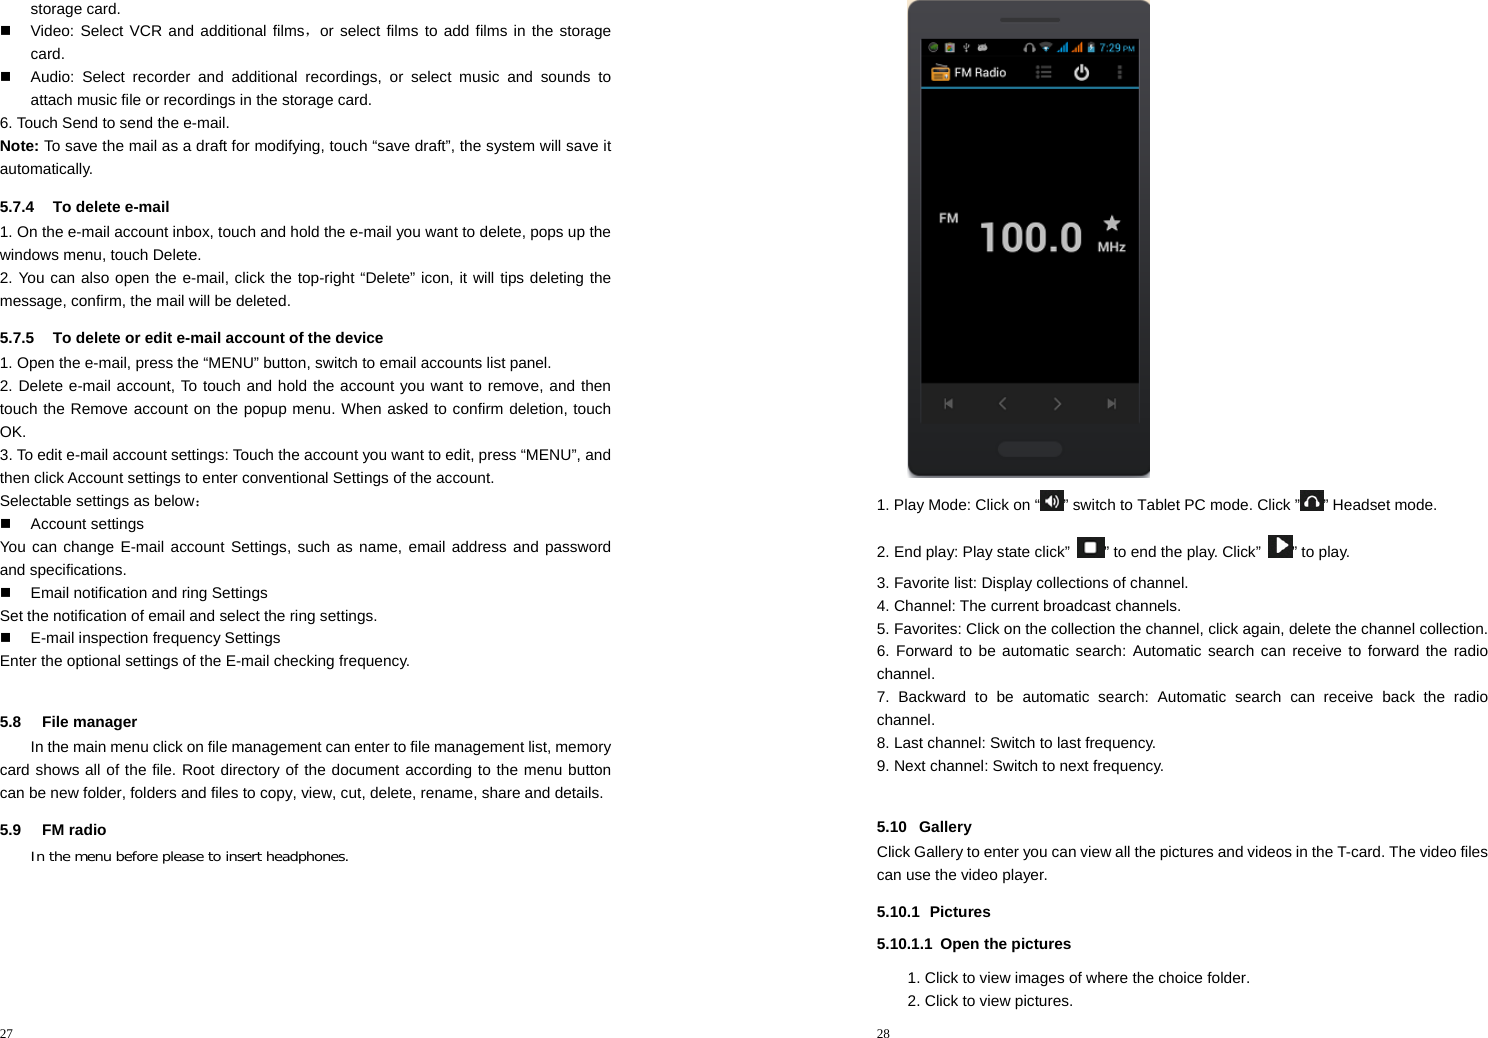
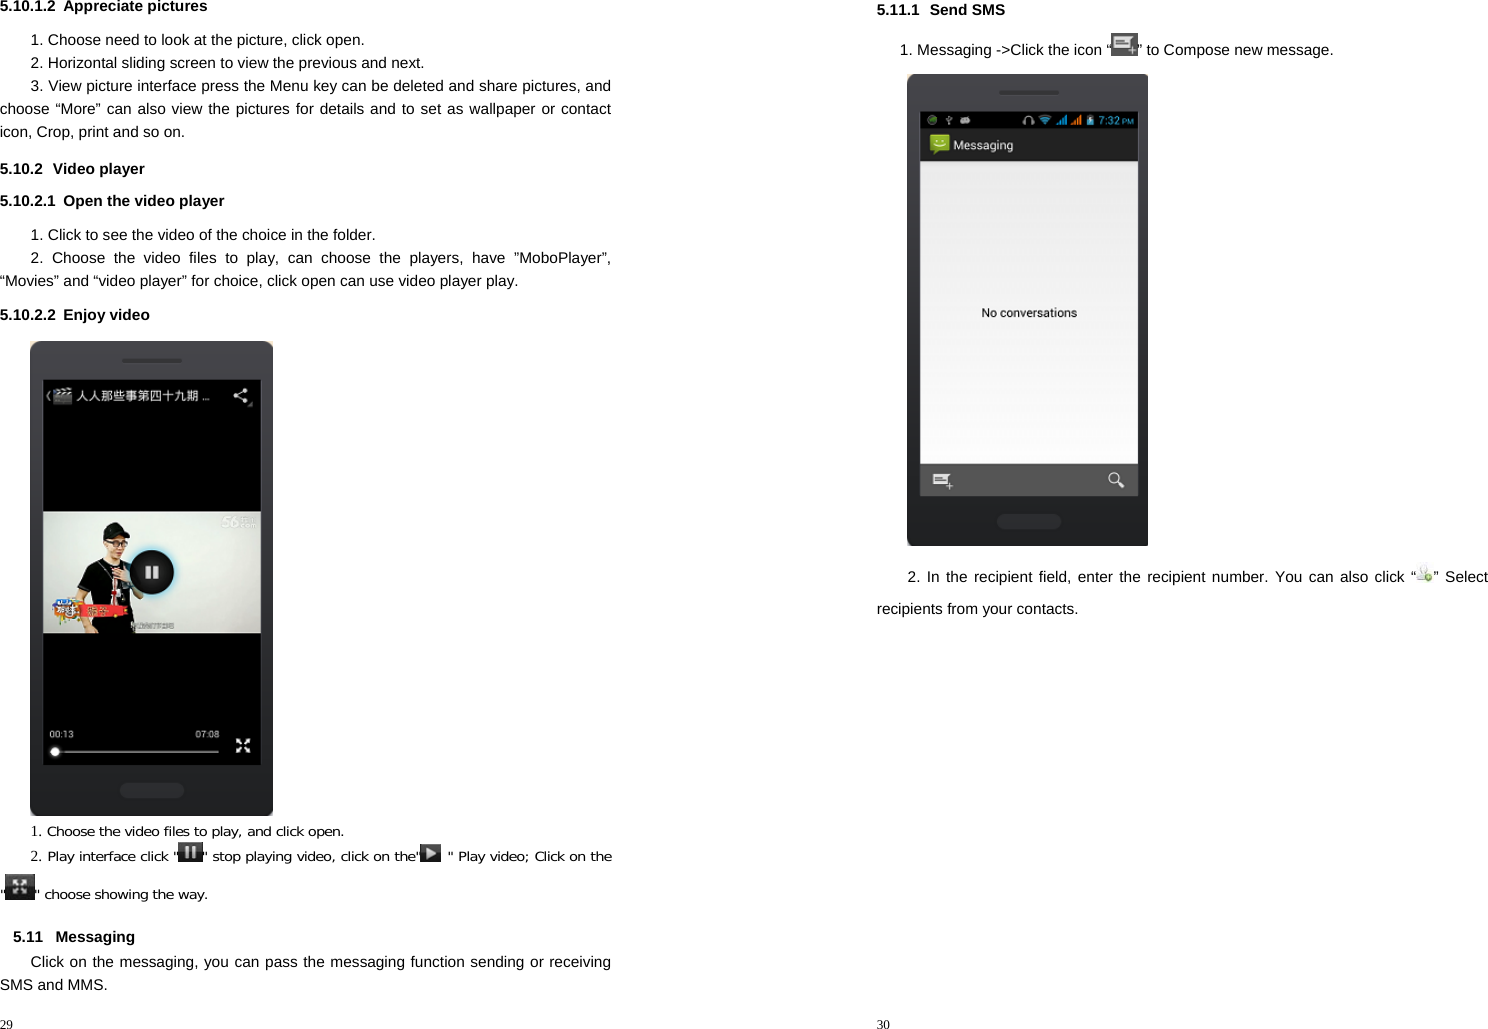
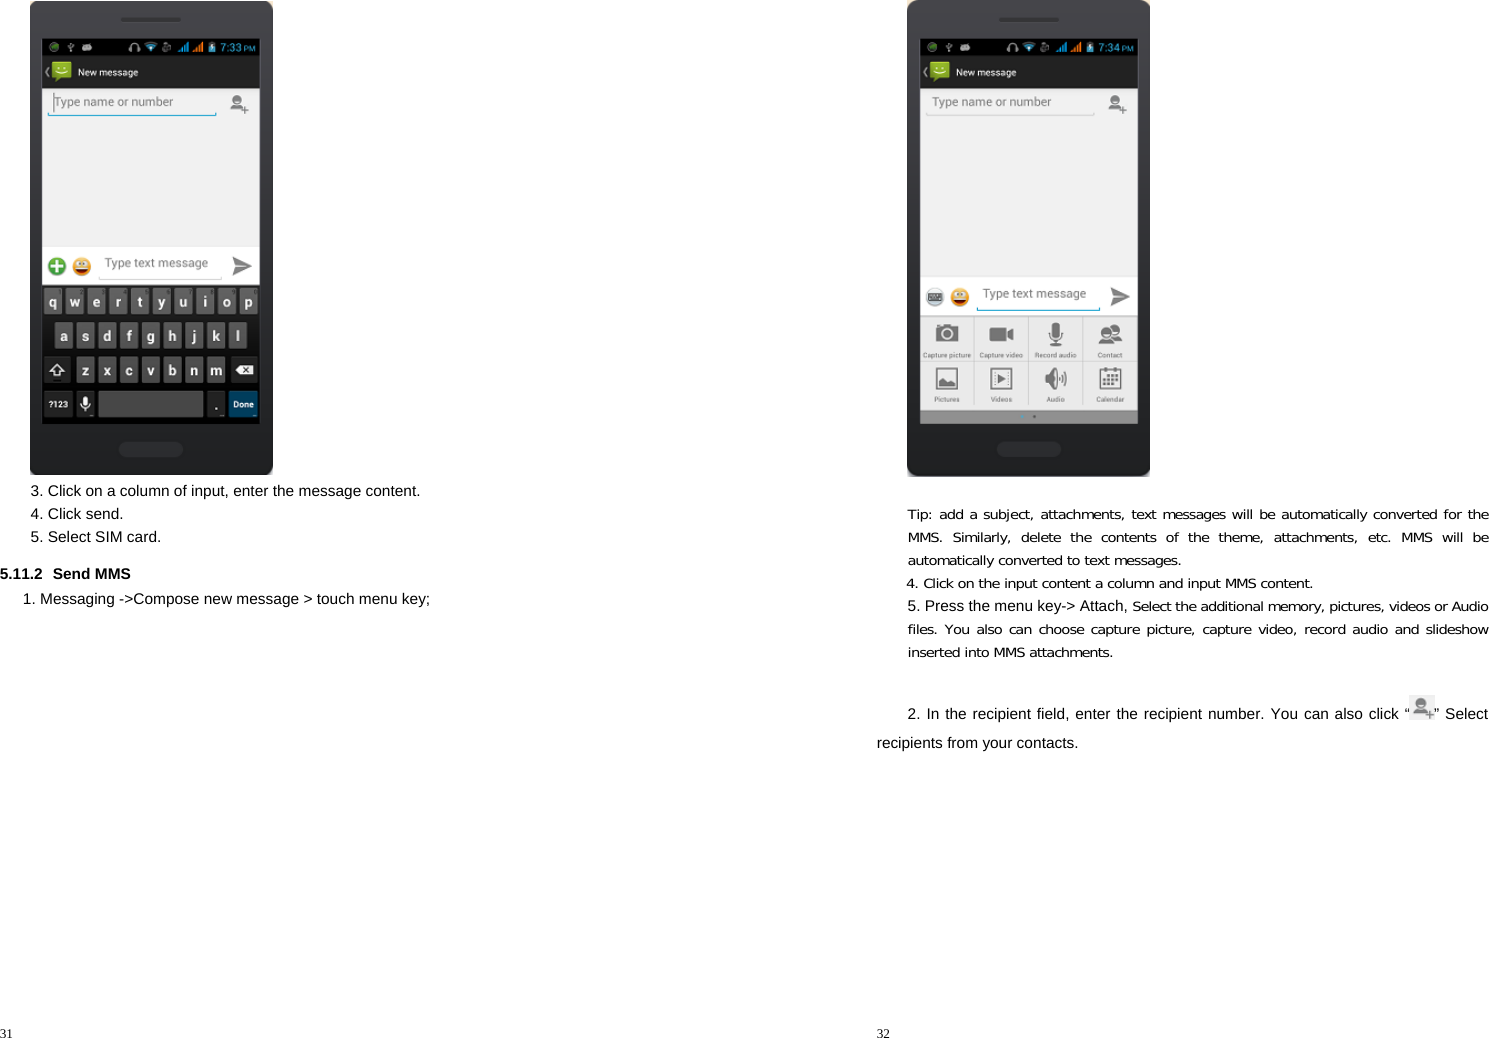
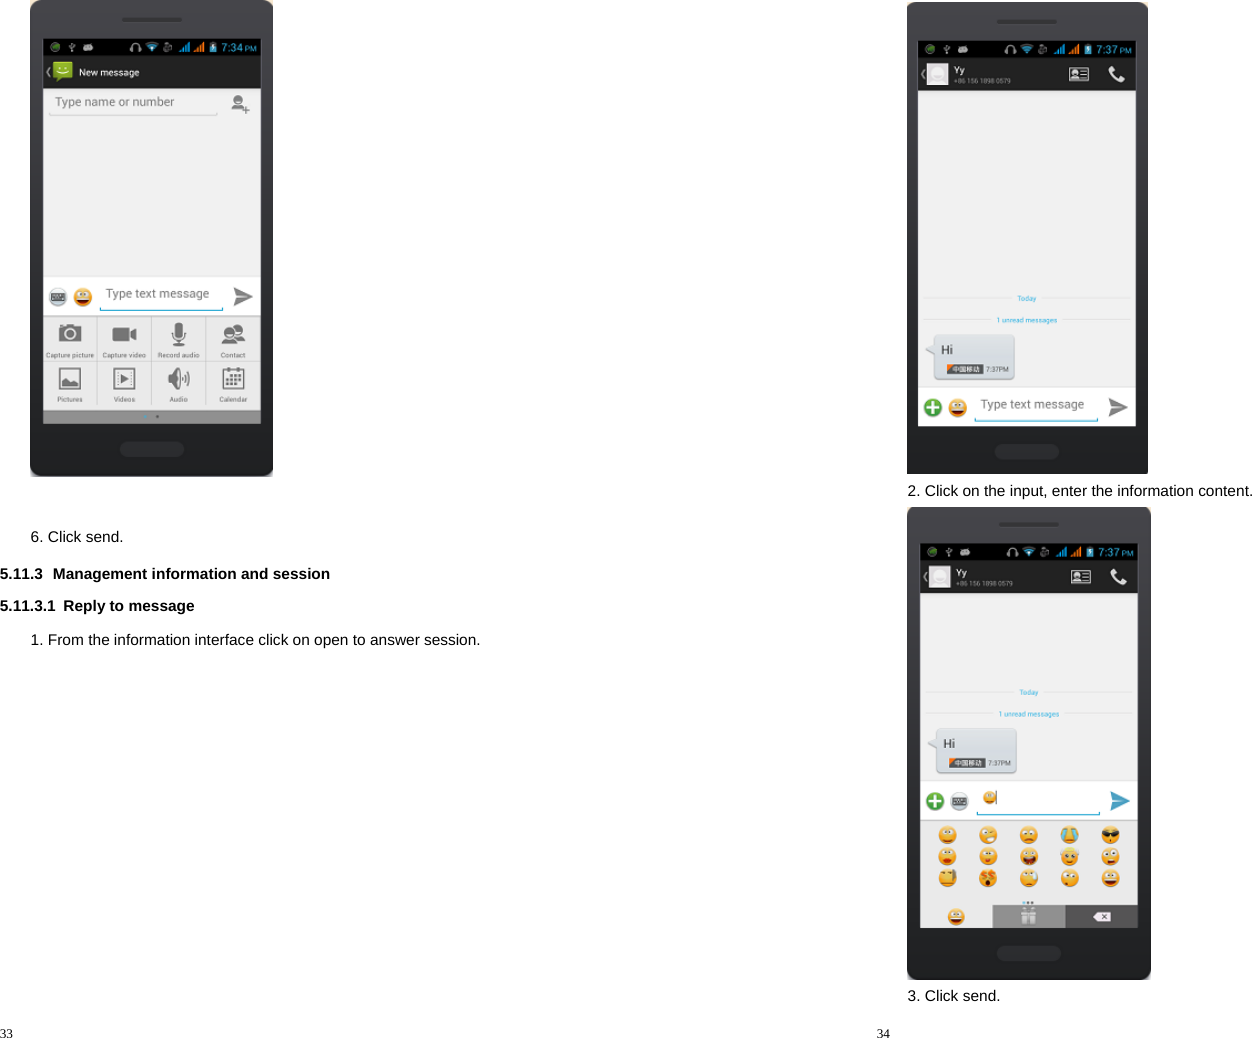
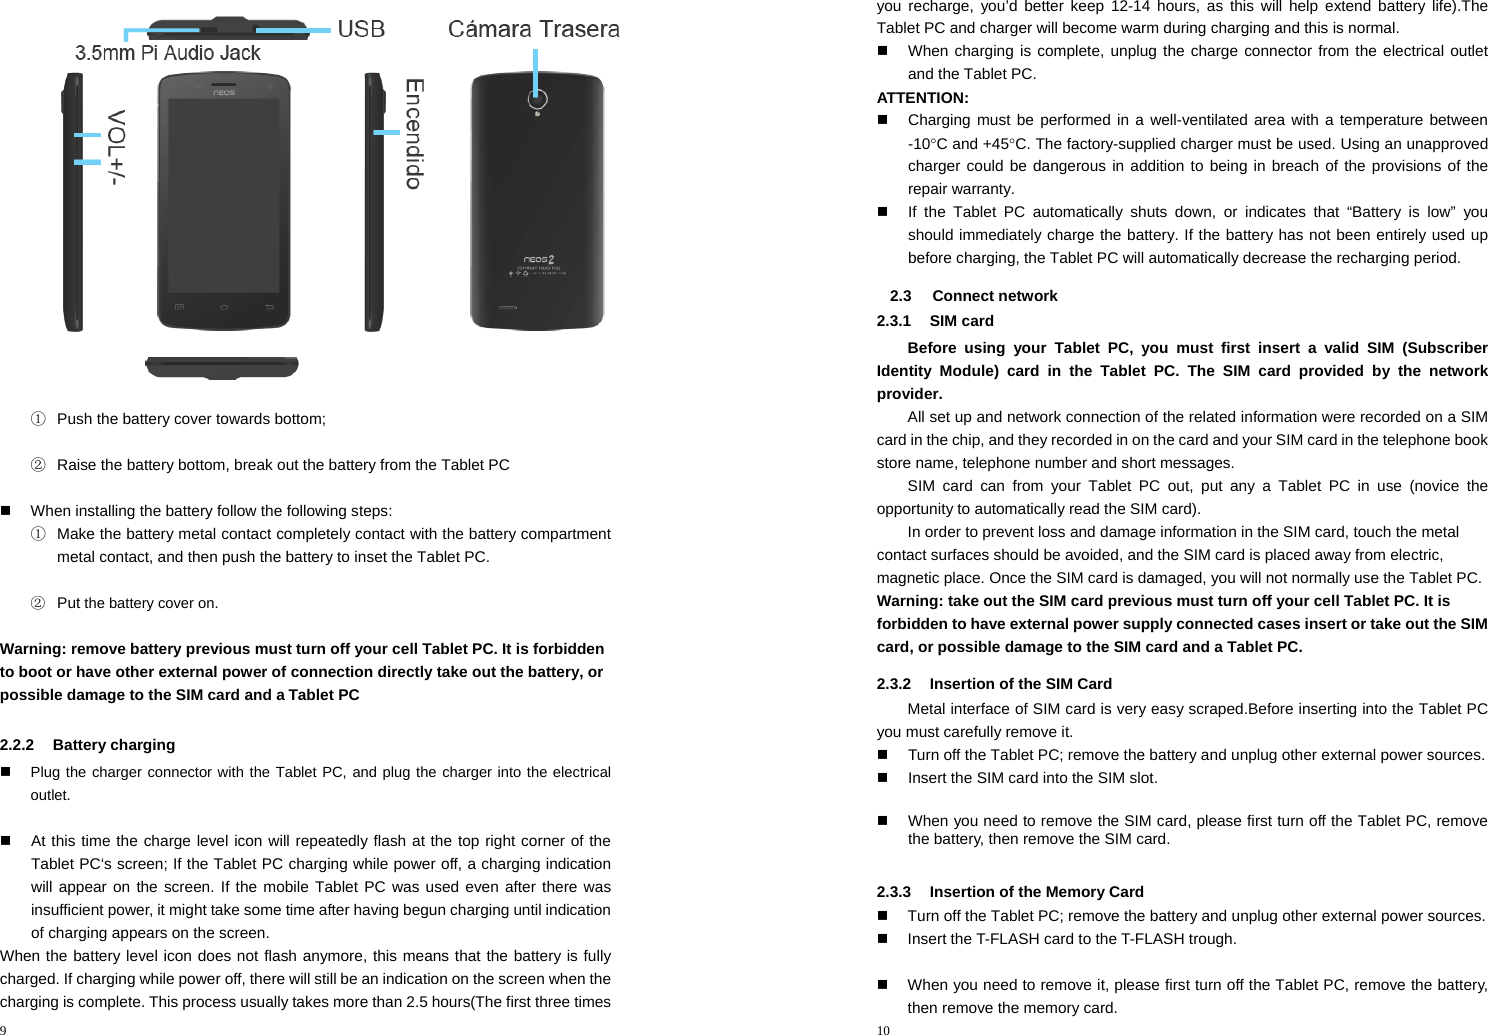
Worldex NEOS2 Tablet PC User Manual

Worldex International Ltd Tablet PC

User manual

1         User Guide Worldex International Ltd. neos 2   2  1Safety & Notice ........................................................................................................... 52Your Tablet PC ............................................................................................................ 62.1The Names and Explanation of Each Part ........................................................ 62.1.1Technical information.....................................................................................62.1.2Appearance.....................................................................................................72.1.3Keypad function descriptions........................................................................72.1.4Icons (Icon changes without prior NOTICE)...............................................72.2Battery ................................................................................................................ 82.2.1Remove and install of the Battery................................................................82.2.2Battery charging..............................................................................................92.3Connect network .............................................................................................. 102.3.1SIM card.........................................................................................................102.3.2Insertion of the SIM Card............................................................................102.3.3Insertion of the Memory Card.....................................................................102.3.4Turning the Tablet PC On and Off..............................................................112.3.5Tablet PC card unlock..................................................................................112.3.6SIM card unlock............................................................................................112.4Screen control .................................................................................................. 112.5Idle interface .................................................................................................... 122.5.1The extension of home page interface......................................................122.5.2Wallpaper.......................................................................................................132.5.3Manage App..................................................................................................132.5.4System settings.............................................................................................132.5.5Remove apps................................................................................................133Function Menu .......................................................................................................... 143.1People .............................................................................................................. 143.2Messaging ....................................................................................................... 143.3View all applications ........................................................................................ 143.4Using the mobile Tablet PC memory card as U disk ....................................... 153.4.1The Tablet PC memory card set as U disk...............................................153.4.2U disk to uninstall from the computer........................................................163.5WLAN ............................................................................................................... 163.5.1Open the WLAN and connect to a wireless network...............................173.5.2Connection to other WLAN networks........................................................173.6Bluetooth .......................................................................................................... 183.6.1Turn on Bluetooth or set the Tablet PC can be detected........................183.6.2Matching and connecting Bluetooth headset...........................................183.6.3Interrupt and the Bluetooth headset connection......................................184Input Methods ........................................................................................................... 194.1Screen  virtual  keyboard  Introduction ............................................................... 194.1.1Google input Method....................................................................................194.1.2Android keyboard.........................................................................................195Application ................................................................................................................ 195.1Browser ............................................................................................................ 19
3  5.1.1Open Browser...............................................................................................205.2Calculator ......................................................................................................... 215.3Calendar .......................................................................................................... 215.4Camera ............................................................................................................ 225.4.1Camera...........................................................................................................225.4.2Video recorder...............................................................................................245.5Clock ................................................................................................................ 255.6Downloads ....................................................................................................... 265.7Email ................................................................................................................ 265.7.1To open Email applications.........................................................................265.7.2To create Email account..............................................................................265.7.3To compose and send e-mail......................................................................265.7.4To delete e-mail.............................................................................................275.7.5To delete or edit e-mail account of the device..........................................275.8File manager .................................................................................................... 275.9FM  radio ........................................................................................................... 275.10Gallery .............................................................................................................. 285.10.1Pictures..........................................................................................................285.10.2Video player...................................................................................................295.11Messaging ....................................................................................................... 295.11.1Send SMS......................................................................................................305.11.2Send MMS.....................................................................................................315.11.3Management information and session......................................................335.11.4Message setting............................................................................................365.12Music ................................................................................................................ 365.12.1Open music player.......................................................................................365.12.2Enjoy music...................................................................................................375.12.3Add to playlists..............................................................................................375.12.4Management play lists.................................................................................375.12.5Add to play lists.............................................................................................375.12.6Set music use as ringtone...........................................................................385.12.7Set sound effects..........................................................................................385.13Setting .............................................................................................................. 385.13.1SIM management.........................................................................................385.13.2Wi-FI...............................................................................................................385.13.3Buletooth........................................................................................................385.13.4Data usage....................................................................................................385.13.5More................................................................................................................395.13.6Audio profiles.................................................................................................395.13.7Display............................................................................................................395.13.8Storage...........................................................................................................395.13.9Battery............................................................................................................395.13.10Apps........................................................................................................395.13.11Accounts & sync...................................................................................394  5.13.12Location services..................................................................................405.13.13Language & input..................................................................................405.13.14Backup&Reset......................................................................................405.13.15Date & time............................................................................................405.13.16Schedule power on/off.........................................................................405.13.17Accessibility...........................................................................................405.13.18About Tablet PC....................................................................................415.14SIM toolkit ........................................................................................................ 416Troubleshooting ....................................................................................................... 41 
5  1 Safety & Notice WARNING: Please pay attention to these guidelines, it’s dangerous and may break the law, even the manufacturer will not undertake any responsibility to the user who does not follow with the following recommendations or improper to use the .   If the Tablet PC supports the “Flight mode” function, please set the mode as “Flight mode” on the plane. If not support, please turn off the Tablet PC before boarding, because theTablet PC may cause interference in aircraft. Please follow any restrictions on the airplane.   Switch the device off near the fuel, chemicals, or blasting areas. Keep the device away from the children.     While driving please obey local laws and regulations with regard to Smart Tablet PC use. When talking on theTablet PC while driving, please obey the following rules: Concentrate on driving and be aware of traffic conditions; if your Tablet PC has a hands-free function, please use it in this mode. Under poor driving conditions, please stop the car before you dial or pick up the Tablet PC.   Switch off the Tablet PC in the hospital or other forbidden using Tablet PC place. The Tablet PC will affect the normal work of electronic equipment and medical devices, such as pacemakers, hearing aids and other medical electronics equipment.     Non-original accessories and components are not provided with repair warranty qualification.     Please do not disassemble your Tablet PC by yourself, if your Tablet PC. is out of order, please contact your supplier.   Please do not charge the Tablet PC before battery is installed. Do not short-circuit the battery.     Tablet PC must be charged in the good ventilated and cooling environment, and away from flammable and explosive materials.   In order to demagnetization, please keepTablet PC away from the magnetic material, such as disks, credit card etc.     Keep the device dry. Precipitation, humidity, and all types of liquids or moisture can contain minerals that will corrode electronic circuits. If your device does get wet, remove the battery, and contact with the supplier.     Do not use the Tablet PC in too high or too low temperature environment, and do not expose theTablet PC to strong sunlight or high humidity.     Do not use liquid or wet cloth with strong detergent to clean the device.   This Tablet PC is provided photograph, video recording and sound recording functions; please follow the relevant laws and regulations to use those functions. Photograph, video recording and sound recording without authorization may violate laws and regulations.     While using the network functions, please do not download the files which have virus, do not install any photos and ring tones which have been damaged. If it results theTablet PC abnormally, our company will not 6  undertake any responsibility.   Please dispose of batteries according to local regulations, please recycle when possible. Please do not dispose as household waste.   STATEMENT: Our Company reserves the right to revise this manual content without prior notice. 2 Your Tablet PC Thank you for choosing CHERRY Tablet PC. You can read the manual, to get a comprehensive understanding of the use of Tablet PC sCHERRY, enjoy its perfect functions and simple operation. CHERRY Tablet PC are for GSM / GPRS network environment and the design of a bar Tablet PC. Android 2.3.5 OS, dominant frequency 650MHz, Capacitive touch screen. It is a current mainstream configuration, powerful Tablet PC.       This manual is used to help you the right to use the product, this product does not represent the software and hardware configuration of any description. The picture in this manual is only for reference, If individual picture does not match with the product in kind. Please refer to the products. Many network functions described in this manual is the special services provided by the network service provider, can I use these networks depends on the network service providers to provide services to you. In any case, they are incorrect any data or income losses, or any special, incidental, incidental or consequential loss responsibility, no matter what the loss by causes. This manual content copyright laws and regulations by the protection, you may not, by any means, copy, copy of this manual, or will this manual in any form in any cable or wireless network for transmission, or will this manual translated into any words. 2.1  The Names and Explanation of Each Part 2.1.1 Technical information Tablet PC Dimensions (w×h×t)     Weight     Lithium Battery Model             Nominal voltage         Nominal           Capacity rating         Travel charger Model             Input               Output               USB data charge wire spec      Earphone spec      Call time/standby time Note: the call time and standby time is depending on the situation of the local network, use case and the SIM card itself. (For the specific parameters, please the customer fill out in accordance with the actual
7  value) 2.1.2 Appearance   2.1.3  Keypad function descriptions  Keypad function  Explain Power key  z  Shutdown state, long press this button boot z  Power on and the standby mode, long press to open the Tablet PC options menu. Through these menus, you can be enabled Silent mode, Airplane mode, Reboot, you can also choose Power off. z  Power on and the standby mode, short press to switch the Tablet PC to sleep mode; Sleep mode, short press the wake-up Tablet PC. Home key  z  From any interface to return to home page. z  Long press to open recently used programs list. Menu key Pop-up menu options. Return key  Short press return to last menu, long press to open the lock screen function.(Detailed instructions see below) Volume button  Adjust the volume。  2.1.4  Icons (Icon changes without prior NOTICE)   8  Icon Explain  SIM signal intensity of interne  GPRS connect  Display batteries energy  Charging  Vibration Mode  Flight Mode  New E-mail  Missed calls Tablet PC speaker is muted  Music playing  USB connected   Startup alarm Earphone connect  New MMS New SMS  Talking On NOTICE: In this manual "short by" a certain button, the button is pressed after the release, "long by" one button, the button is pressed to maintain two seconds or more than two seconds. 2.2 Battery  2.2.1  Remove and install of the Battery.  When removing the battery follow the following steps:
9   ①  Push the battery cover towards bottom;  ②  Raise the battery bottom, break out the battery from the Tablet PC    When installing the battery follow the following steps: ①  Make the battery metal contact completely contact with the battery compartment metal contact, and then push the battery to inset the Tablet PC.  ② Put the battery cover on.  Warning: remove battery previous must turn off your cell Tablet PC. It is forbidden to boot or have other external power of connection directly take out the battery, or possible damage to the SIM card and aTablet PC   2.2.2 Battery charging  Plug the charger connector with the Tablet PC, and plug the charger into the electrical outlet.    At this time the charge level icon will repeatedly flash at the top right corner of the Tablet PC‘s screen; If the Tablet PC charging while power off, a charging indication will appear on the screen. If the mobile Tablet PC was used even after there was insufficient power, it might take some time after having begun charging until indication of charging appears on the screen.   When the battery level icon does not flash anymore, this means that the battery is fully charged. If charging while power off, there will still be an indication on the screen when the charging is complete. This process usually takes more than 2.5 hours(The first three times 10  you recharge, you’d better keep 12-14 hours, as this will help extend battery life).The Tablet PC and charger will become warm during charging and this is normal.   When charging is complete, unplug the charge connector from the electrical outlet and the Tablet PC. ATTENTION:   Charging must be performed in a well-ventilated area with a temperature between -10°C and +45°C. The factory-supplied charger must be used. Using an unapproved charger could be dangerous in addition to being in breach of the provisions of the repair warranty.   If the Tablet PC automatically shuts down, or indicates that “Battery is low” you should immediately charge the battery. If the battery has not been entirely used up before charging, the Tablet PC will automatically decrease the recharging period. 2.3 Connect network 2.3.1 SIM card Before using your Tablet PC, you must first insert a valid SIM (Subscriber Identity Module) card in the Tablet PC. The SIM card provided by the network provider. All set up and network connection of the related information were recorded on a SIM card in the chip, and they recorded in on the card and your SIM card in the telephone book store name, telephone number and short messages. SIM card can from your Tablet PC out, put any a Tablet PC in use (novice the opportunity to automatically read the SIM card). In order to prevent loss and damage information in the SIM card, touch the metal contact surfaces should be avoided, and the SIM card is placed away from electric, magnetic place. Once the SIM card is damaged, you will not normally use the Tablet PC. Warning: take out the SIM card previous must turn off your cell Tablet PC. It is forbidden to have external power supply connected cases insert or take out the SIM card, or possible damage to the SIM card and a Tablet PC. 2.3.2  Insertion of the SIM Card Metal interface of SIM card is very easy scraped.Before inserting into the Tablet PC you must carefully remove it.   Turn off the Tablet PC; remove the battery and unplug other external power sources.   Insert the SIM card into the SIM slot.    When you need to remove the SIM card, please first turn off the Tablet PC, remove the battery, then remove the SIM card.  2.3.3  Insertion of the Memory Card   Turn off the Tablet PC; remove the battery and unplug other external power sources.   Insert the T-FLASH card to the T-FLASH trough.    When you need to remove it, please first turn off the Tablet PC, remove the battery, then remove the memory card.
11  2.3.4  Turning the Tablet PC On and Off To turn on or off the Tablet PC please hold down the Power key. If you turn on the Tablet PC without having inserted the SIM card, Tablet PC will display “No SIM card”. After inserting the SIM card, the Tablet PC will automatically check if the SIM is useable. The following will be displayed in this order: Input Tablet PC Lock Code    —If you set the Tablet PC Lock. Input PIN           —If you set the SIM Lock. Searching          —The Tablet PC will conduct a search to find the appropriate network connections. 2.3.5  Tablet PC card unlock In order to prevent the illegal use, your Tablet PC can be setup lock password to encryption protection. Choose this function, every time you need to enter on the screen lock password so that you can to the screen to unlock, allows handset into the normal use state. Users can be closed screen lock, in this case, mobile Tablet PC    can't prevent be illegal use. Long press the power key to open the Tablet PC. Input screen lock password, Click on the " " deletion errors input. Click "ok" confirmation. 2.3.6  SIM card unlock In order to prevent the illegal use, Your SIM card using PIN (personal identification number) code encryption protection. Choose this function, if you have already set up PIN code protection, in every time you boot must input PIN code, so that you can unlock a SIM card, and then to normal cell Tablet PC use. The user can close a SIM card password protection, but in this case, the SIM card can't prevent be illegal use.   Long press the power key to open the Tablet PC.   Input PIN, Click on the " " deletion errors input. Click "ok" confirmation. For example, if the PIN is set for 1234, the following input: 1 2 3 4        OK If you input three times error PIN code of the SIM card, your SIM card network will be locked and the Tablet PC will be asked PUK code.   NOTICE: Your network supply chamber of commerce for your SIM card set a standard PIN (4 to 8 digits) number, you should be the change as soon as possible for your personal password. 2.4 Screen control You can through the screen of a series of operations to control your Tablet PC.   Click: you can choose the screen by clicking on the screen of the project, and the open application, use the buttons below the screen input. 12    Sliding: you can pass on the screen horizontal or vertical sliding, realize the pages up and down, or displayed around.   Long press: you can through the long by some projects get its available menu. In the long press application programming interface program icon, can the application shortcuts to add to the main screen.   Drag: you can drag on the screen through some projects achieve certain operation.   Did screen switching: you can flip through mobile Tablet PC screen display of switching namely. Did display function only in some interface effective, such as text input interface, surf the web interface, etc. 2.5 Idle interface Turned on and unlock the screen, the display shows the interface is the idle interface.  In addition to the diagram shown in the shortcut icon of the idle interface, need to add or delete a folder, other shortcuts or widgets. When idle space after use, you can slide horizontally on the screen to open the home of the extension interface and add the desired content. 2.5.1  The extension of home page interface Extension of the interface is used to store more shortcuts, widgets or folders. You can interface extension of the horizontal sliding screen to open the idle interface.
13  2.5.2 Wallpaper  1. Press the Home key to return to the idle interface. 2. Press the Menu key and select the wallpaper. 3. Select the wallpaper location: Gallery, Live wallpapers, Wallpapers. 4. Select the wallpaper, click on setting the wallpaper. 2.5.3 Manage App Can View, force stop,Install,Uninstall,Clear data,move    apps all over the Scard and Tablet PC; 2.5.4 System settings Set the System settings, as Settings menu,will introduction later;      2.5.5 Remove apps       Long press to Remove the app until the top of the screen "Remove" icon. 14   3. The show will be a drag to "Remove" can be deleted 3 Function Menu   3.1 People You can use the People function to save contact information. You can view or management your contacts. NOTICE: SIM card number of records storage capacity and its related 3.2 Messaging You can send or receive SMS and MMS through information function. 3.3  View all applications Press the Home key, Click on the " " can view the Tablet PC all applications:
15    View all applications click “Home ” switching to the idle interface.   3.4  Using the mobile Tablet PC memory card as U disk To the computer to transfer music, photos and other files to your memory card, you must first Tablet PC memory card is set to U disk. 3.4.1  The mobile Tablet PC memory card set as U disk   1. Use USB line will be Tablet PC connected to the computer. The status bar will show the notification icon. 2. Open the notice panel. 3. In the notification panel, touch “USB connected”, and then touch "turn on USB storage". 16                              NOTICE :If you in the cell Tablet PC connections to the computer select open USB storage devices, Tablet PC will not be able to identify memory CARDS. You will not be able to use some of the Tablet PC applications, such as the camera. 3.4.2  U disk to uninstall from the computer The same methods and the connection, See the figure below.                             3.5 WLAN Provide as far as 300 feet WLAN (100 M) wireless network access range. If you want to use the Tablet PC of WLAN, you have to connect to wireless access point or "hot Click“USBcontacted”PopuprighthintsboxClick“TurnoffUSBstorage”Popuprighthintsbox
17  spots". NOTICE: The availability of WLAN signal coverage and will depend on the quantity, infrastructure, and other signals penetrate the object and decide. 3.5.1  Open the WLAN and connect to a wireless network 1. Press the Home key, click on “ ” -> Settings-> Wireless & networks. 2. Select WLAN check box, to open Wi-Fi. The Tablet PC will automatically scan can be used a wireless network. 3. Click on the Wi-Fi settings. Then WLAN network will display a list of WLAN to find the network of the name and security Settings (open network or with WEP, WPA/WPA2 encryption). If the opening set of WLAN network notice, to find a cell Tablet PC in the open wireless network can be used in the status bar shows the icon( ). 4. Touch one of the WLAN network to connection. When you select open network, mobile Tablet PC will be connected to the network. If selected is WEP, WPA/WPA2 encryption network, it must first corresponding input password, and then the touch connection NOTICE: When the Tablet PC is connected to a wireless network, the status bar will display the WLAN icon ( ), and displays the approximate signal strength (light up the number of strip).If touch Tablet PC at present the connected to a wireless network, will display the name of the state, WLAN network, speed, signal strength, safety information and IP address. If you want to remove Tablet PC wireless networks set, please touch this window on the "don't save". If you want to connect to the network, you must enter again these Settings. Unless you choose not to save network, or the next Tablet PC to connect to previously had connected encryption wireless network, will not have to enter a password accordingly. The network will search by WLAN, also is the mobile Tablet PC does not need to perform additional steps can be connected to the WLAN network. Unless you choose not to save encrypted network, or the next Tablet PC to connect to previously had connected encryption wireless network, will not have to enter a password accordingly. The network will search by WLAN, also is the Tablet PC does not need to perform additional steps can be connected to the WLAN network. 3.5.2  Connection to other WLAN networks 1. Wireless and network on the screen, touch the WLAN settings. Find WLAN networks will be displayed in the WLAN network list. 2. Touch other WLAN networks can be connected to the network. NOTICE: In addition, the Tablet PC via GPRS Internet. GPRS SIM card in our current default boot is open, the user can manually select the specific location in "Settings -> SIM management -> Data connection, touch “Data connection” to close the current SIM card data connection. 18  3.6 Bluetooth 3.6.1  Turn on Bluetooth or set the Tablet PC can be detected 1. Press the Home key, click on “ ” -> Settings. 2. Click on “Wireless & networks”, Then Select “Bluetooth” check box, to open Bluetooth. The Tablet PC will automatically scan can be used a wireless network. After open, the status bar will appear Bluetooth ( ). Touch the "Scan for devices" will begin to scan for Bluetooth devices within range. 3. Touch Bluetooth Settings, All the equipment will show up in Bluetooth devices list below. (Select the check box can be detected, the    Tablet PC is set to be detected, so that within the scope of other Bluetooth devices can find the Tablet PC.) Important: cell Tablet PC scan detect the longest time for two minutes. 3.6.2  Matching and connecting Bluetooth headset 1. Press the Home key, click on “ ” -> Settings. 2. Click on “Wireless & networks” -> Bluetooth Settings, Then Select Bluetooth check box, to open Bluetooth. Then your Tablet PC to scan within the scope of the Bluetooth, and will all find to device display in Bluetooth device list below. Equipment found below in the list of Bluetooth devices. Tip: 1)  If the list can not find your device, touch “Scan for devices”, re-scan again. 2)  Please make sure you want the pairing of Bluetooth equipment is set to can detect the mode. 3)  Touch device list headphones, to match. NOTICE: The general Bluetooth devices need to enter a password to pair, more than "0000" as the default password. Matching and connection status displays in Bluetooth devices list below the headset. When the Bluetooth headset connected to hand unit, the status bar will display Bluetooth already connection ( ). Then you can start to use headphones call or to answer the Tablet PC. 3.6.3  Interrupt and the Bluetooth headset connection 1. Press the Home key, click on “ ” -> Settings -> Bluetooth Settings. 2. In the list of Bluetooth devices, touch or tap and hold hands-free headset is connected. 3. Long press and select “Disconnect & un pair”.
19  4 Input Methods 4.1 Screen virtual keyboard Introduction This Tablet PC supports many different input methods, can select any one according to the current language.   Your Tablet PC supports the Android keyboard, Google Pinyin Input Method. Enter text input interface, such as the need to switch input method. Please long press text input box until the shortcut menu pop-up, selection for the input method. Warm prompt: the screen virtual keyboard layout can follow use scene and version to upgrade and adjust. 4.1.1  Google input Method Chinese input method keyboard:  English input method keyboard:  4.1.2 Android keyboard  5 Application    In all the main menu or child menu interface, click on the selected menu to enter   In menu, under normal circumstances, press the Home key to return to the main menu interface.       5.1   Browser Through a web browser, you can connect to the Internet, free to enjoy WAP wireless network and Internet wireless web surfing function. The business need network support, 20  for billing business, the details of your consultation network operators. 5.1.1 Open Browser Touch Brower can open the browser. Interface as shown in the diagram:  In the browser, you can open the page by the following methods: 1. Click on the browser address bar, input for the open web site. Click. 2. Touch the menu key-> bookmarks, choose need to open the bookmarks or click on the most visited/history records label page to choose open other web pages.
21  5.2 Calculator  A have four basic function of the calculator, convenient for simple mathematical calculation you. 5.3 Calendar Enter calendar submenu, the calendar will display on the screen and the current date marked with the special color background frame.   22   5.4 Camera 5.4.1 Camera Your Tablet PC and camera with dual, it is equipped with a high vivid camera picture which you can use to take pictures at anytime or place and then save them on your Tablet PC, use them as your Tablet PC wallpaper or send them to your friends and colleagues via MMS and email. 5.4.1.1 Open camera Click on the camera can turn on the camera.
23   Warm prompt: in the camera's interface, you can click " " fast switching to the camera to video camera, click   to smile mode and click   to Multi view mode; 5.4.1.2  Taking a photo 1. During the view-finding mode, adjust the lens to allow what is being photographed to appear in the viewfinder. 2. After framing the picture you wish to take, keep the camera steady and press” “ to take pictures.    3. After taking photos will auto save to camera floders in picture;  4. Click “ ” return to camera interface. 5.4.1.3 Camera setting In the camera's interface you can undertake the camera's associated Settings: 1. Click Screen to Adjustment focus. 2. Click SCN to choose the capute mode; 3. Click    to choose the clocor;  24  2. Click” ” Adjustment White balance. 3. Click    to set the Flash Light on or off; 4. Click” ” set EV,    picture size, picture quality and color effect    an self-timer, face detection, anti-flicker and select camera setting 5.4.2 Video recorder The Tablet PC supports shoot function, the extent of film restrict according as current memory space. 5.4.2.1  Open video recorder  5.4.2.2 Recorder 1. During the view-finding mode, adjust the lens to allow what is being photographed to appear in the viewfinder. 2. Press”   “ to recorder.    3. Press “ ” end recorder. Complete recorder, you can click on the icon of the right, in the menu for the following in operation: 1. Click delete, you can delete the video. 2. Click share, you can through the information, E-mail or Bluetooth, etc and good friends share this video.
25  3. Click “ ” ,you can view the video. 4. Click more, You can view the video detailed information. 5.4.2.3 Video settings In the video you can attribute to camera interface Settings: 1. Click screen to Adjustment focus. 2. Click”  ” Adjustment White balance. 3. Click”  ” Choose Video quality, store location,EIS, Focus mode, Exposure,Scene mode,Video durations,Microphone,auti-flicker,Audio mode 4. Click   to set self-timer; 5. Click    to set SILLY FACE and background;  5.5 Clock   1. Click on the screen switch display mode. 2. Click on the " " set the alarm clock. Click the default alarm clock, or click add alarm clock or by the menu button-> add alarm, Checked open alarm clock check box. Set the alarm time, repeat and other necessary information. After the completion of the set, you also can press menu button-> delete alarm /preview the alarm clock 26  deleted or edit alarm.  5.6 Downloads Show all content downloaded from the browser. Click to view the downloaded content; checking the box you can choose to delete and clear all selected downloads. 5.7 Email Enter E-mail address and login password, choose communication protocol,Select data account [Edit wireless local area network or SIM card to connect to the E-mail network],Setting receiving server and send server address,Edit user name [username need to use the name generate itself], and save Settings, enter the mailbox options to write and receive mails. Note: Different email accounts communications business agreement may be different, communication protocol choose wrong can lead to you can send and receive E-mail. 5.7.1  To open Email applications Touch the application button on the main menu panel -> E-mail. 5.7.2  To create Email account Touch the “Email” icon, enter the Email account setting pane. Touch the arrow symbol at the top-left corner,exit E-mail account setting panel and return to main panel. Enter the E-mail account address and the password, and click user login, it tips your account has been set up and usable, input account name and name shown in the E-mail, then touch “finish”, in order to be recognized by receiver. After creating an account,if you need to create another e-mail account, touch the “Menu” button ->add account and enter E-mail account and password(You can also switch to account list panel, press the “+add account” icon at the top-left corner), after entering the e-mail account and password you can choose->Send mails from this account default. Note: The e-mail account you want to set up is not in the device e-mail database, you If will be asked to manually enter the e-mail account setting, including e-mail server, protocol, etc, and so on after touching Next. 5.7.3  To compose and send e-mail 1. Touch the Menu button ->e-mail. 2. In the email accounts inbox, click on the Menu button ->” compose ". 3. Enter the contacts e-mail address in the To field, the panel will display matching contacts at the same time,touch to choose the contact or continue to enter the address. If need to send email to many contacts, please use English semicolon to separate the addresses.  Note:If you want to copy or blind carbon copy e-mail sent to other recipients, press the MENU button, then click the Add Cc / Bcc 4. Enter the e-mail subject. 5. Compose your e-mail. To add attachments,please touch add attachment,  and then choose the options below:   Pictures: Select camera and attach photos, or select pictures to attach pictures in the
27  storage card.   Video: Select VCR and additional films,or select films to add films in the storage card.   Audio: Select recorder and additional recordings, or select music and sounds to attach music file or recordings in the storage card. 6. Touch Send to send the e-mail. Note: To save the mail as a draft for modifying, touch “save draft”, the system will save it automatically. 5.7.4  To delete e-mail 1. On the e-mail account inbox, touch and hold the e-mail you want to delete, pops up the windows menu, touch Delete.   2. You can also open the e-mail, click the top-right “Delete” icon, it will tips deleting the message, confirm, the mail will be deleted. 5.7.5  To delete or edit e-mail account of the device 1. Open the e-mail, press the “MENU” button, switch to email accounts list panel. 2. Delete e-mail account, To touch and hold the account you want to remove, and then touch the Remove account on the popup menu. When asked to confirm deletion, touch OK. 3. To edit e-mail account settings: Touch the account you want to edit, press “MENU”, and then click Account settings to enter conventional Settings of the account. Selectable settings as below:  Account settings You can change E-mail account Settings, such as name, email address and password and specifications.   Email notification and ring Settings Set the notification of email and select the ring settings.   E-mail inspection frequency Settings Enter the optional settings of the E-mail checking frequency.  5.8 File manager In the main menu click on file management can enter to file management list, memory card shows all of the file. Root directory of the document according to the menu button can be new folder, folders and files to copy, view, cut, delete, rename, share and details. 5.9 FM radio In the menu before please to insert headphones. 28   1. Play Mode: Click on “ ” switch to Tablet PC mode. Click ” ” Headset mode. 2. End play: Play state click”  ” to end the play. Click”  ” to play. 3. Favorite list: Display collections of channel. 4. Channel: The current broadcast channels. 5. Favorites: Click on the collection the channel, click again, delete the channel collection. 6. Forward to be automatic search: Automatic search can receive to forward the radio channel. 7. Backward to be automatic search: Automatic search can receive back the radio channel. 8. Last channel: Switch to last frequency. 9. Next channel: Switch to next frequency.  5.10 Gallery Click Gallery to enter you can view all the pictures and videos in the T-card. The video files can use the video player. 5.10.1 Pictures 5.10.1.1  Open the pictures 1. Click to view images of where the choice folder. 2. Click to view pictures.
29  5.10.1.2 Appreciate pictures 1. Choose need to look at the picture, click open. 2. Horizontal sliding screen to view the previous and next. 3. View picture interface press the Menu key can be deleted and share pictures, and choose “More” can also view the pictures for details and to set as wallpaper or contact icon, Crop, print and so on. 5.10.2 Video player 5.10.2.1  Open the video player 1. Click to see the video of the choice in the folder. 2. Choose the video files to play, can choose the players, have ”MoboPlayer”, “Movies” and “video player” for choice, click open can use video player play. 5.10.2.2 Enjoy video  1. Choose the video files to play, and click open. 2. Play interface click " " stop playing video, click on the"  " Play video; Click on the "" choose showing the way. 5.11 Messaging Click on the messaging, you can pass the messaging function sending or receiving SMS and MMS. 30  5.11.1 Send SMS 1. Messaging ->Click the icon “ ” to Compose new message.  2. In the recipient field, enter the recipient number. You can also click “ ” Select recipients from your contacts.
31   3. Click on a column of input, enter the message content. 4. Click send. 5. Select SIM card. 5.11.2 Send MMS 1. Messaging ->Compose new message > touch menu key; 32  Tip: add a subject, attachments, text messages will be automatically converted for the MMS. Similarly, delete the contents of the theme, attachments, etc. MMS will be automatically converted to text messages. 4. Click on the input content a column and input MMS content. 5. Press the menu key-> Attach, Select the additional memory, pictures, videos or Audio files. You also can choose capture picture, capture video, record audio and slideshow inserted into MMS attachments.  2. In the recipient field, enter the recipient number. You can also click “ ” Select recipients from your contacts.
33     6. Click send. 5.11.3 Management information and session 5.11.3.1  Reply to message 1. From the information interface click on open to answer session. 34   2. Click on the input, enter the information content.  3. Click send.
35  5.11.3.2 Delete message 1. Click on the need to choose from SMS interface to delete the messages or conversation. 2. . Press the menu key .>Select message->delete message.  3. Tags to delete text or conversation, click  thenclickthe  todelete. 36   Tip: you can also in the message interface menu button-> according to delete the conversation, and then choose the need to delete text message or conversation to delete. 5.11.4 Message setting Message screen, press the Menu key -> settings, you can make the message setting. 5.12 Music 5.12.1  Open music player Play music files before, need to music file copy to memory CARDS. Click on the music can open music player.
37   5.12.2 Enjoy music  1. Click on the artist/albums/songs/ library, find you need to play music files. 2. Click on the music files start playing. 5.12.3  Add to playlists   In order to facilitate the management of your music files, you can create some play lists. 1. Click on the songs tag page. 2. Choose need to add to playlist of music files, long press until pop-up shortcut menu. 3. Click on add to playlist. 4. Click on the new. 5. Input the name of the new play lists. 6. Click save. Right now you choose music file will be automatically added to the new play list.   5.12.4 Management play lists  1. Music->play list 2. Choose from the list to edit or play playlist, long press until pop-up shortcut menu. 5.12.5  Add to play lists   1. Open the music, choose songs tag page 2. Choose need to add to playlist of music files, long press until pop-up shortcut 38  menu. 3. Click add to playlist. 4. Choose need to add playlist. 5.12.6  Set music use as ringtone   1. Open the music. 2. Choose songs/play list tag page. 3. The music files to choose and long press until pop-up shortcut menu. 4. Click used as phone ringtone. Warm prompt: You can also play music, press the menu button-> used for the bell to set the current music for the bell. 5.12.7 Set sound effects 1. Open the music. 2. Press the menu button-> sound effects. 3. Tick enable sound, choose to enable the sound effects and checked open.  5.13 Setting 5.13.1 SIM management   SIM information: Choose SIM card enabled or disabled.   Default: Set up voice call, messaging and data connection use the default SIM card   General setting: Set the SIM card roaming and contacts & SIM. 5.13.2 Wi-FI  To turn on the wifi the can scan the network to browse wap page or other apps;   Wi-Fi: select on or off.   Wi-Fi settings: Set up and management wireless access points, etc.   Wi-Fi Direct settings: Set up and management WLAN Direct.   Tethering & portable hotspot: Will you move data connection through cell phone USB or as a portable WLAN hot share.   VPN settings: Setup and manage virtual private network.   Mobile networks: Check the mobile data usage, set access point name and network operators.   GPRS transfer prefer: Will you move data connection through cell phone USB to share. 5.13.3 Buletooth  Open/close Bluetooth.   Bluetooth settings: Management connection, setting device name and can detect the sex, etc. 5.13.4 Data usage Measured by your Tablet PC,Your carrier’s data usage accountiong may differ;
39  5.13.5 More   Airplane mode: Disable all wireless connection.   VPN settings: Setup and manage virtual private network.   Tethering & portable hotspot: Will you move data connection through cell phone USB or as a portable WLAN hot share.   Wi-Fi Direct settings: Set up and management WLAN Direct.   Mobile networks: Check the mobile data usage, set access point name and network operators.   GPRS transfer prefer: Will you move data connection through cell phone USB to share. 5.13.6 Audio profiles  General  Silent  Meeting  Outdoor 5.13.7 Display   Brightness: Set the brightness of the Tablet PC display   Scenes: to set the Scenes to default or work;   Wallpaper: Set up the wall paper of Tablet PC   Theme: to set up the Tablet PC’s theme;   Auto-rotate screen: Set up if open automatically rotating screen.   Sleep: Automatic adjustment screen lock the delay time before   Font size: to set the Tablet PC’s font size;  5.13.8 Storage   SD card: view SD card total space and available space.   Mount SD card: After unloading SD card SD card will not display.   Erase SD card: Remove the SD card all the data.   Internal storage: Display size available space. 5.13.9 Battery View Battery Condition  5.13.10   Apps   Unknown sources: Setting is allowed to install the electronic market to provide application.   Manage applications: Management and delete installation applications.   Running services: Check and control the currently running services.   Storage use: Check the application of storage space. 5.13.11 Accounts  &  sync   Background data: Applications can always synchronization, send and receive 40  data.   Auto-sync: Applications to be automatic synchronous data. 5.13.12 Location  services   Use wireless network: The use of mobile network in application check position.   Use GPS satellites: Accurate location to street level.   GPS EPO assistance: Use GPS auxiliary material (EPO) to accelerate the GPS positioning.   EPP settings: View the modified EPO configuration information   A-GPS: Use auxiliary data can accelerate the GPS positioning.   A-GPS: View the modified A-GPS Settings  5.13.13 Language & input   Language settings: can select language and user dictionary.   Keyboard settings: choose the Android keyboard, Sogou input method and Google Pinyin input method.   Input method: Choose input method way.  5.13.14   Backup&Reset   Back up my data:back up app data,WIFI passwords,and other settings to Google Service;   Backup account:backing up to debug-only private cache   Automatic restore:When reinstalling an app,restore backed up settings and data   DRM reset: Delete all    DRM licenses   Fatory data reset: Erases all data on Tablet PC; 5.13.15 Date & time   Automatic: Use networks offer a time and date.   Set date: Manually edit date.   Select time zone: Manually choose time zone.   Set time: Manual set a time.   Use 24-hour format: set Open/close.   Select date format: Choose the date the format of the show 5.13.16 Schedule power on/off Each time, including the timing of the setup time and repeat way content, set up complete and checked open the alarm clock check box, when the corresponding setting time, will be set according to the switch machine operation and executive boot or shutdown action. 5.13.17 Accessibility Accessibility: set Open/close. Power button ends call: Press power key words will end the call, not shut down the screen.
41  Quick boot: set Open/close.  5.13.18 About  Tablet  PC  System updates   Status: Check the current state of the Tablet PC.   About battery: View power consumption situation   Legal information: check the open source license   About version: Display model. 5.14 SIM toolkit Show the current use SIM card network operators, click on that network operators to provide you with value-added services list. If a SIM card and network operators don't support the service, this function will not be used.   6 Troubleshooting If anything unusual occurs while using your Tablet PC, please refer to the following table. Frequently Occurring Problems Cause How to Fix Poor reception Using the Tablet PC in an area with poor reception such as near tall buildings or in a basement where radio waves cannot be transmitted. Try to avoid. Using the Tablet PC when the network is busy, such as during rush hour, when the lines are full making it impossible to get through. Try to avoid. Related to the distance from the base station built by the network. You can request that the network service provider provide a service area plan. Echo or noise   Caused by poor network relay, a regional problem. Hang up and redial, if the relay is changed then the line may be better. Some calling regions have poor lines. Shortening of the standby time Standby time is related to the network system. Please temporarily turn off your Tablet PC, as you are located in an area with poor reception. Batteries need to be replaced  Replace the batteries 42  When you cannot get a signal, the Tablet PC will continue to transmit in order to find a base station, thereby expending large amounts of electricity will cause the standby time to decrease. Please move to an area with a strong signal or temporarily turn off your Tablet PC. Unable to turn on the Tablet PC The battery is empty.    Look at the remaining electricity or recharge. SIM card malfunction SIM card is damaged.  Contact  your  network  service provider.  SIM card is not properly inserted.  Confirm  SIM  card  is  properly inserted. There is a dirty substance on the metal surface of the SIM card. Use a clean cloth to wipe off the metal contact point of the SIM card. Unable to connect with the network Expired SIM card  Contact your network provider.   Outside the GSM service area  Consult  your  network  provider on the service area. Poor signal.  Please move to a place with a better signal and try again. Unable to make a call Using the call bar function  Cancel the call bar function. Using the fixed dial function.  Cancel  the  fixed  call setting. Incorrect PIN number Consecutively enter the wrong password three times. Contact your network provider. Unable to charge The Battery or charger is damaged. Replace the battery or charger. Recharging in the environment of less than -10 or higher than 55 .℃℃Change the charging environment. Poor contact  Check if the plug is properly connected Unable to add new Tablet PC book entries The storage space of the Tablet PC book is full Delete a portion of the Tablet PC number entries Unable to set certain functions Your network provider does not support this function or you have not applied for it. Contact your network provider.
43  FCC Statement: 1. This device complies with Part 15 of the FCC Rules. Operation is subject to the following two conditions: (1) This device may not cause harmful interference. (2) This device must accept any interference received, including interference that may cause undesired operation. 2. Changes or modifications not expressly approved by the party responsible for compliance could void the user's authority to operate the equipment. NOTE:  This equipment has been tested and found to comply with the limits for a Class B digital device, pursuant to Part 15 of the FCC Rules. These limits are designed to provide reasonable protection against harmful interference in a residential installation. This equipment generates uses and can radiate radio frequency energy and, if not installed and used in accordance with the instructions, may cause harmful interference to radio communications. However, there is no guarantee that interference will not occur in a particular installation. If this equipment does cause harmful interference to radio or television reception, which can be determined by turning the equipment off and on, the user is encouraged to try to correct the interference by one or more of the following measures: Reorient or relocate the receiving antenna. Increase the separation between the equipment and receiver. Connect the equipment into an outlet on a circuit different from that to which the receiver is connected.   Consult the dealer or an experienced radio/TV technician for help.  SAR Information Statement Your wireless Tablet PC is a radio transmitter and receiver. It is designed and manufactured not to exceed the emission limits for exposure to radiofrequency (RF) energy set by the Federal Communications Commission of the U.S. Government. These limits are part of comprehensive guidelines and establish permitted levels of RF energy for the general population. The guidelines are based on standards that were developed by independent scientific organizations through periodic and thorough evaluation of scientific studies. The standards include a substantial safety margin designed to assure the safety of all persons, regardless of age and health. The exposure standard for wirelessTablet PCs employs a unit of measurement known as the Specific Absorption Rate, or SAR. The SAR limit set by the FCC is 1.6 W/kg. * Tests for SAR are conducted with the Tablet PC transmitting at its highest certified power level in all tested frequency bands. Although the SAR is determined at the highest certified power level, the actual SAR level of the Tablet PC while operating can be well below the maximum value. This is because the Tablet PC is designed to operate at multiple power levels so as to use only the power required to reach the network. In general, the closer you are to a wireless base 44  station antenna, the lower the power output. Before a Tablet PC model is available for sale to the public, it must be tested and certified to the FCC that it does not exceed the limit established by the government adopted requirement for safe exposure. The tests are performed in positions and locations (e.g., at the ear and worn on the body) as required by the FCC for each model. The highest SAR value for this model Tablet PC when tested for use at the ear is   0.224W/Kg and when worn on the body, as described in this user guide, is  0.607W/Kg(Body-worn measurements differ among Tablet PC models, depending upon available accessories and FCC requirements). The maximum scaled SAR in hotspot mode is1.006W/Kg. While there may be differences between the SAR levels of various Tablet PC   and at various positions, they all meet the government requirement for safe exposure. The FCC has granted an Equipment Authorization for this model Tablet PC with all reported SAR levels evaluated as in compliance with the FCC RF exposure guidelines. SAR information on this model Tablet PC is on file with the FCC and can be found under the Display Grant section of http://www.fcc.gov/ oet/fccid after searching on  FCC ID: 2ACZ2-NEOS2 Additional information on Specific Absorption Rates (SAR) can be found on the Cellular Telecommunications Industry Asso-ciation (CTIA) web-site at http://www.wow-com.com. * In the United States and Canada, the SAR limit for Tablet PC used by the public is 1.6watts/kg (W/kg) averaged over one gram of tissue. The standard incorporates a sub-stantial margin of safety to give additional protection for the public and to account for any variations in measurements.  Body-worn Operation This device was tested for typical body-worn operations. To comply with RF exposure requirements, a minimum separation distance of 10mm must be maintained between the user’s body and the handset, including the antenna. Third-party belt-clips, holsters, and similar accessories used by this device should not contain any metallic components. Body-worn accessories that do not meet these requirements may not comply with RF exposure requirements and should be avoided. Use only the supplied or an approved antenna.

Navigation menu