WowWee Group 0235 26.96-27.28MHz WIRELESS R/C TOY-TX User Manual Astro Flex ai
WowWee Group Limited 26.96-27.28MHz WIRELESS R/C TOY-TX Astro Flex ai
USERS MANUAL
INSTRUCTION ManualINSTRUCTION Manual
Spy HunterSpy Hunter ControllerController
Battery Installation and Power On/Off
Using the Controller
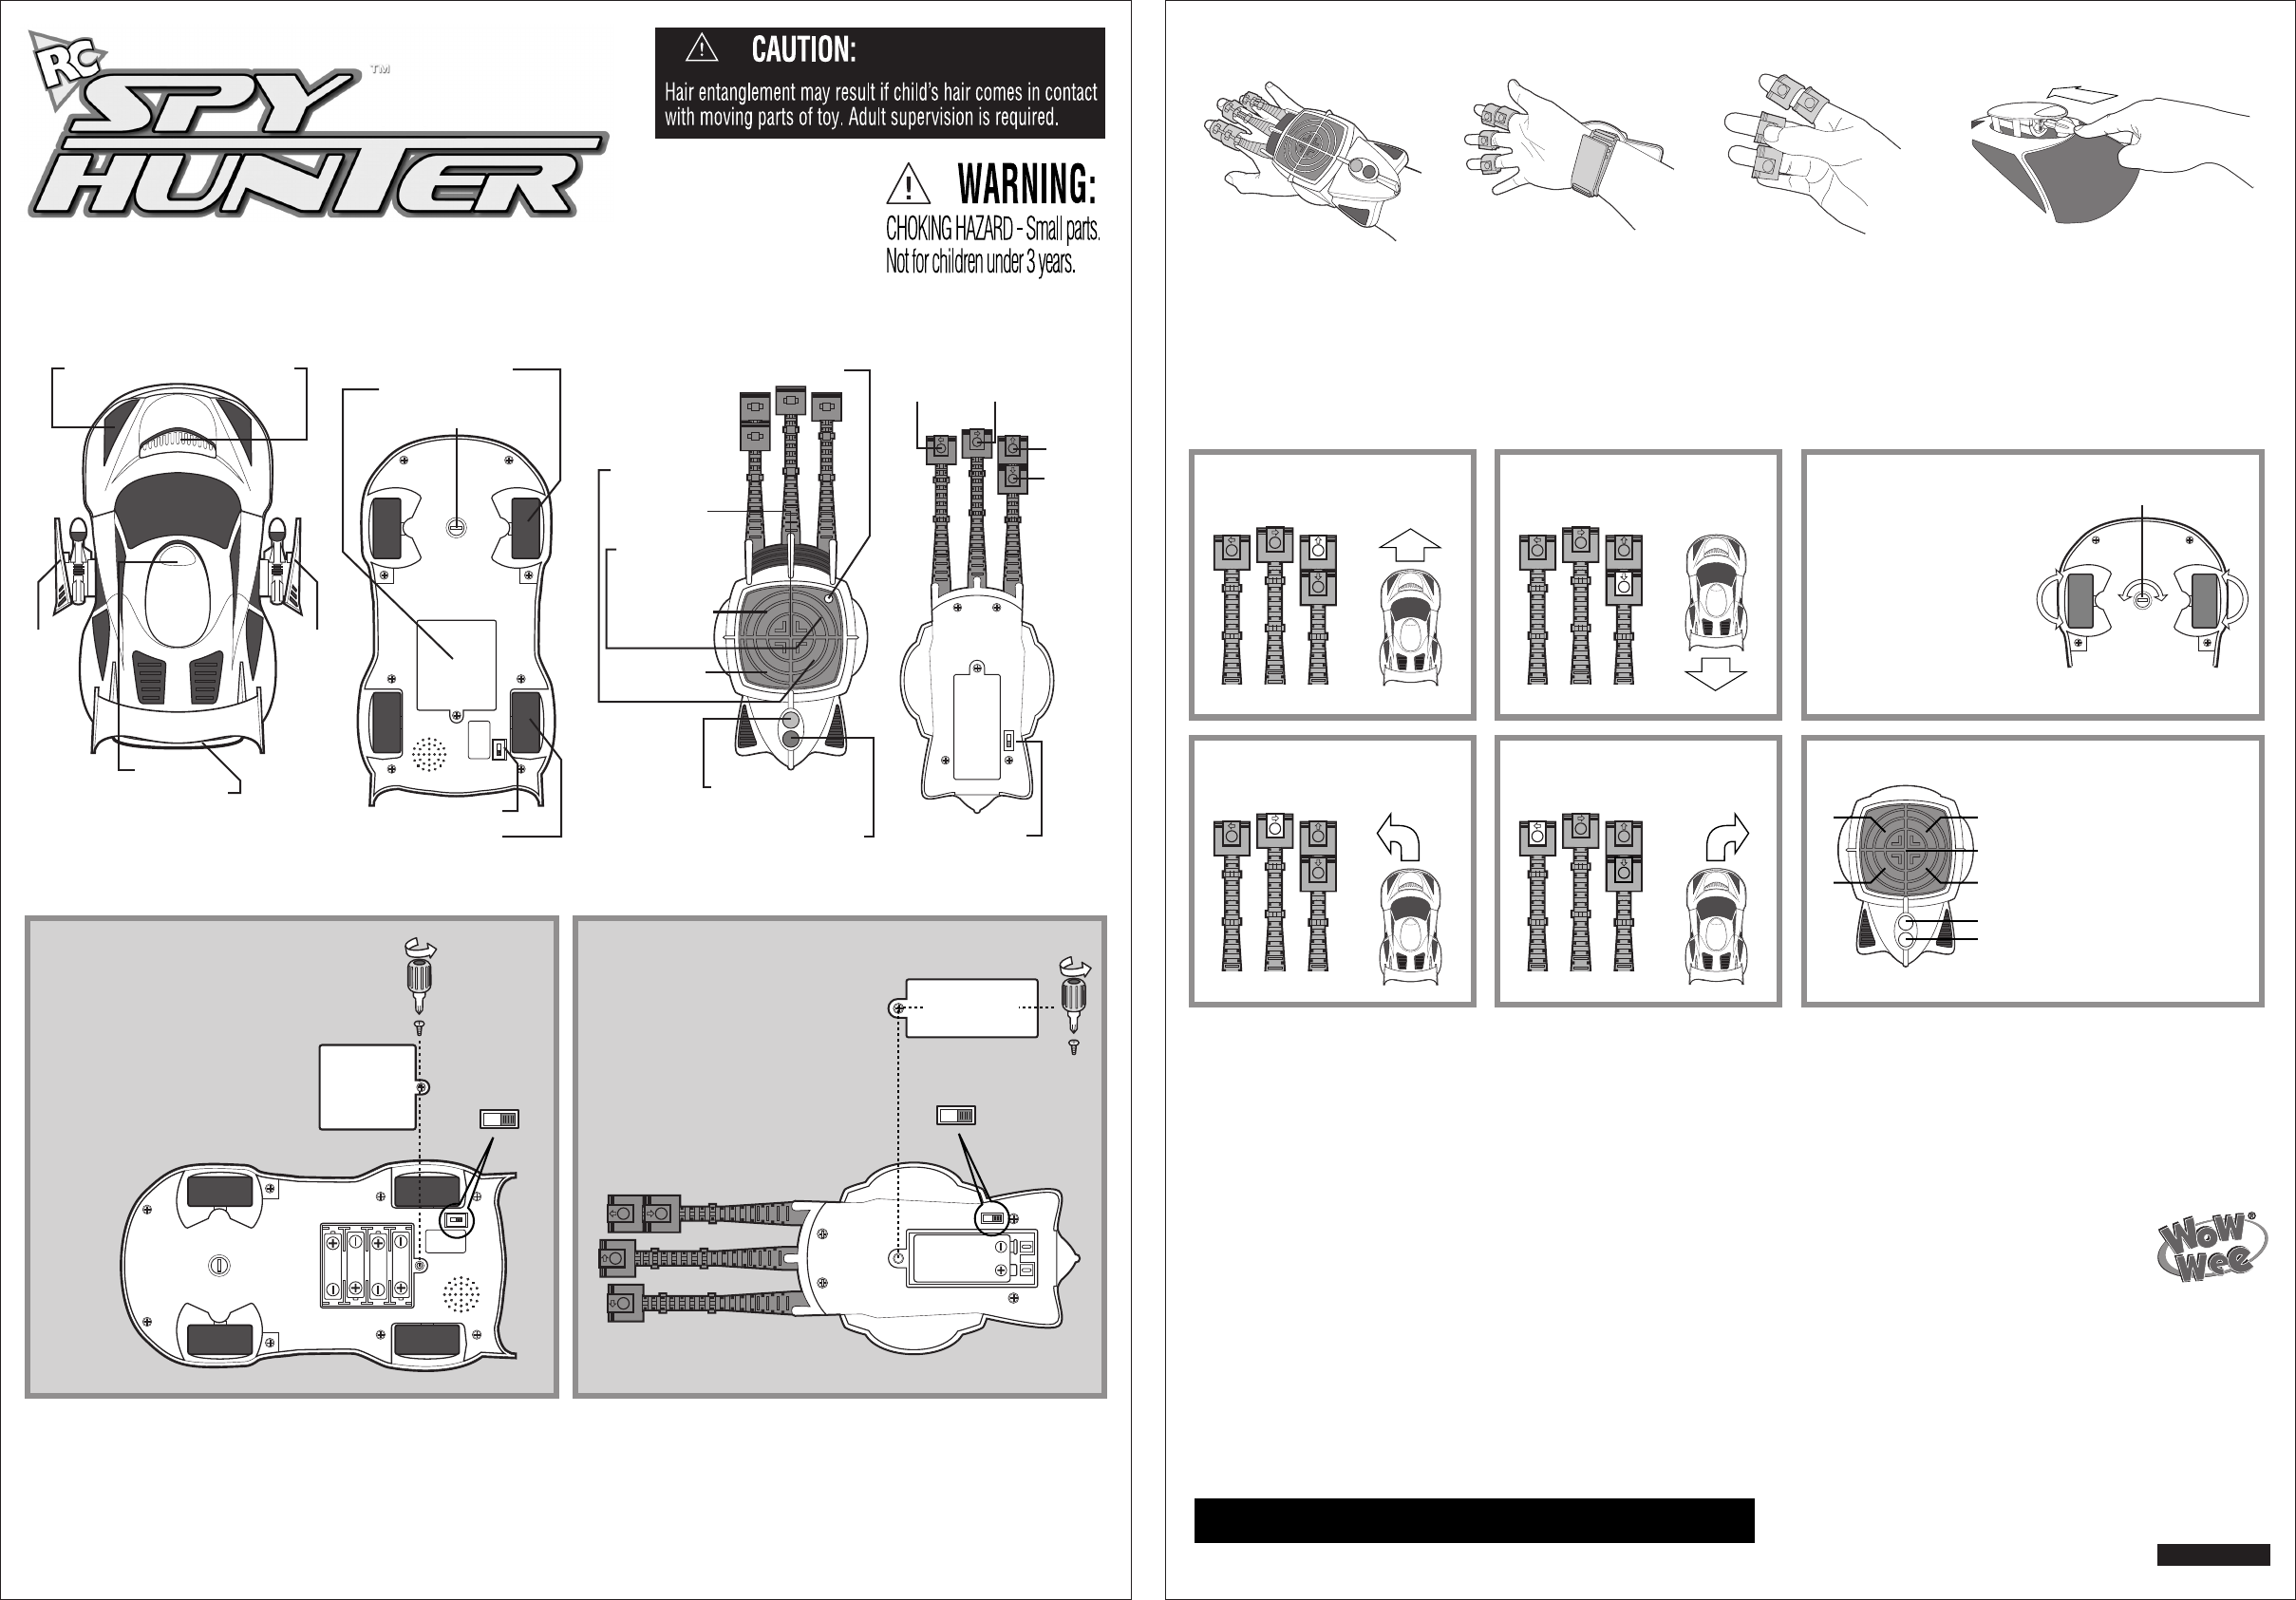
Driving the Spy Hunter
Forwards
Mounting the missile
Attention: Important Battery Information
• Use only fresh batteries of the required size and recommended type.
• Do not mix old and new batteries, different types of batteries (standard alkaline,
or rechargeable), or rechargeable batteries of different capacities.
• Remove rechargeable batteries from the toy before recharging them.
• Rechargeable batteries are only to be charged under adult supervision.
• Please respect the correct polarity, (+) and (-).
• Do not dismantle batteries of any type.
• Do not try to charge non-rechargeable batteries.
• Do not throw batteries into the fire.
• Replace all batteries of the same type/brand at the same time.
• Do not short-circuit the battery contacts.
• Remove exhausted batteries from the toy.
• Batteries should be replaced by adults because of small parts.
• Remove batteries if the toy is not going to be played with for some time.
WARNING: Changes or modifications to this unit not expressly approved by the party
responsible for compliance could void the user’s authority to operate the equipment.
Please keep these instructions as they contain important information
WARNING: Changes or modifications to this unit not expressly approved by the party
responsible for compliance could void the user’s authority to operate the equipment.
Please keep these instructions as they contain important information
Driving & Safety Tips:
• Never fire the missile at other people or pets.
• The missile is a small object, be careful not to let young children play with it.
• When you have finished playing, make sure that you turn the On/Off switch on the controller and the Spy Hunter to “Off”.
• Remember that when the vehicle is coming towards you, it will steer in the opposite direction to the way you turn the
wheel. Try to imagine that you are in the driver’s seat to work out the direction it will turn in.
• Keep fingers, hair and loose clothing away from the tires and wheels while the vehicle is in motion.
• Never drive your Spy Hunter on the streets.
• Do not pick up the vehicle while it is in motion.
• Do not drive the vehicle through water.
• For best results, hold the antenna up, not pointing down towards the vehicle.
This device complies with Part 15 of the FCC Rules. Operation is subject to the following two conditions: (1) This device
may not cause harmful interference, and (2) This device must accept any interference received, including interference that
may cause undesired operation.
NOTE: This equipment has been tested and found to comply with the limits for a Class B digital device, pursuant to Part 15
of the FCC Rules. These limits are designed to provide reasonable protection against harmful interference in a residential
installation. This equipment generates, uses and can radiate radio frequency energy and, if not installed and used in
accordance with the instructions, may cause harmful interference to radio communications. However, there is no
guarantee that interference will not occur in a particular installation. If this equipment does cause harmful interference to
radio or television reception, which can be determined by turning the equipment off and on, the user is encouraged to try
to correct the interference by one or more of the following measures:
• Reorient or relocate the receiving antenna.
• Increase the separation between the equipment and the receiver.
• Connect the equipment into an outlet on a circuit different from that to which the receiver is needed.
• Consult the dealer or an experienced radio/TV technician for help.
Manufactured and distributed by
© 2004 WowWee Ltd.
All Rights Reserved.
WowWee (Asia Office)
Unit 301A-C, 92 Granville Rd.,
T.S.T. East, Hong Kong
WowWee (North America Office)
4480 Cote de Liesse, Suite 320,
T.M.R. Quebec, H4N 2R1, Canada
Consumer Hotline: (514) 344-1250
www.wowwee.com
We recommend that you retain our
address for future reference.
Printed in China.
EL0235US01
Indicator Light
Right Side
Panel Rocket
Left Side
Panel Rocket
Gattling Gun
Rear Mounted
Mortars
Front Mounted
Cannons
Reveal Secret Weapons
/Fire Missile
Hide Secret Weapons
Forward
Right TurnLeft Turn
Reverse
On/Off SwitchDrive Wheels
On/Off Switch
Steering Wheels
Battery Compartment
Steering Alignment Knob
Head Lights
Rear Mounted
Mortars
Gatling Gun
Front Mounted
Cannons
Right
Side
Rocket
Panel
Left
Side
Rocket
Panel
Size AA
Size AA
Size AA
Size AA
Battery
Compartment
Cover
On/Off switch
is located on
the bottom
of Spy Hunter
On/Off switch
is located on
the bottom
of Spy Hunter
1) Remove the battery compartment
cover using a Phillips or crosshead
screwdriver (not included).
2) Insert 4 x AA batteries (not included)
into the battery compartment as
shown in the diagram.
3) Replace the battery compartment
cover and the screw.
1) Remove the battery compartment
cover using a Phillips or crosshead
screwdriver (not included).
2) Insert 4 x AA batteries (not included)
into the battery compartment as
shown in the diagram.
3) Replace the battery compartment
cover and the screw.
1) Remove the battery compartment
cover using a Phillips or crosshead
screwdriver (not included).
2) Insert 1 x 9V battery (not included)
into the controller as shown in the
diagram.
3) Replace the battery compartment
cover and the screw.
1) Remove the battery compartment
cover using a Phillips or crosshead
screwdriver (not included).
2) Insert 1 x 9V battery (not included)
into the controller as shown in the
diagram.
3) Replace the battery compartment
cover and the screw.
Size 6LR61
9V
On/Off switch
is located on
the bottom
of Controller
On/Off switch
is located on
the bottom
of Controller
Battery
Compartment
Cover
1. Push the finger controls onto your
fingers as shown in the diagram.
Make sure that the buttons are facing down.
Press the Forward button to make
the Spy Hunter move forwards.
1. Turn on the Spy Hunter and the controller using the On/Off switches.
2. The Spy Hunter headlights will glow as long as the Spy Hunter battery has power. The Spy Hunter will power down after a few minutes of no action
and the headlights will turn off. To use the car again, turn the On/Off switch off and back on again.
3. The indicator light on the controller will glow when a button is pressed, as long as the controller has power.
3. The finger buttons can be
pressed using your thumb as
shown in the diagram.
Before using the Missile Launcher, you must insert
the missile. Reveal the secret weapons by pressing
the Reveal Secret Weapons button on the controller.
Push the missile in gently until it clicks into place.
Hide the secret weapons by pressing the Hide Secret
Weapons button on the controller.
2. Strap the controller to your wrist
using the wrist strap as shown.
Backwards
Press the Reverse button to make
the Spy Hunter move backwards.
Steering Correction
Secret Weapons
If you find that the Spy Hunter
steers to the left or right while
driving forwards or reverse, use
the Steering Alignment Knob to
correct the steering.
If the Spy Hunter steers to the left,
turn the Steering Alignment Knob
in a clockwise direction.
If the Jet Car steers to the right,
turn the Steering Alignment Knob
in a counter-clockwise direction.
Reveal the secret weapons by pressing the
Reveal Secret Weapons button once (F).
Press the Reveal Secret Weapons button
again to fire the missile (F).
Press the Side Panel Rocket buttons
to fire the side panel rockets (B & C).
Press the Gatling Gun button to fire
the Gatling gun (E).
Press the Rear Mounted Mortars button
to fire the rear mounted mortars (D).
Press the Front Mounted Cannons button
to fire the front mounted cannons (A).
Hide the secret weapons by pressing the
Hide Secret Weapons button once (G).
Left Turn
Press the Left Turn button to make
the Spy Hunter move forwards to the left.
Right Turn
Press the Left Turn button to make
the Spy Hunter move forwards to the right.
Bottom view of control straps Bottom view of control straps
Bottom view of Spy Hunter
Top view of Controller
Bottom view of control straps Bottom view of control straps
Steering Alignment Knob
C D
F
G
A B
E
Battery Requirements
Spy Hunter 4 x AA
(not included)
Controller 1 x 9V
(not included)
Battery Requirements
Spy Hunter 4 x AA
(not included)
Controller 1 x 9V
(not included)