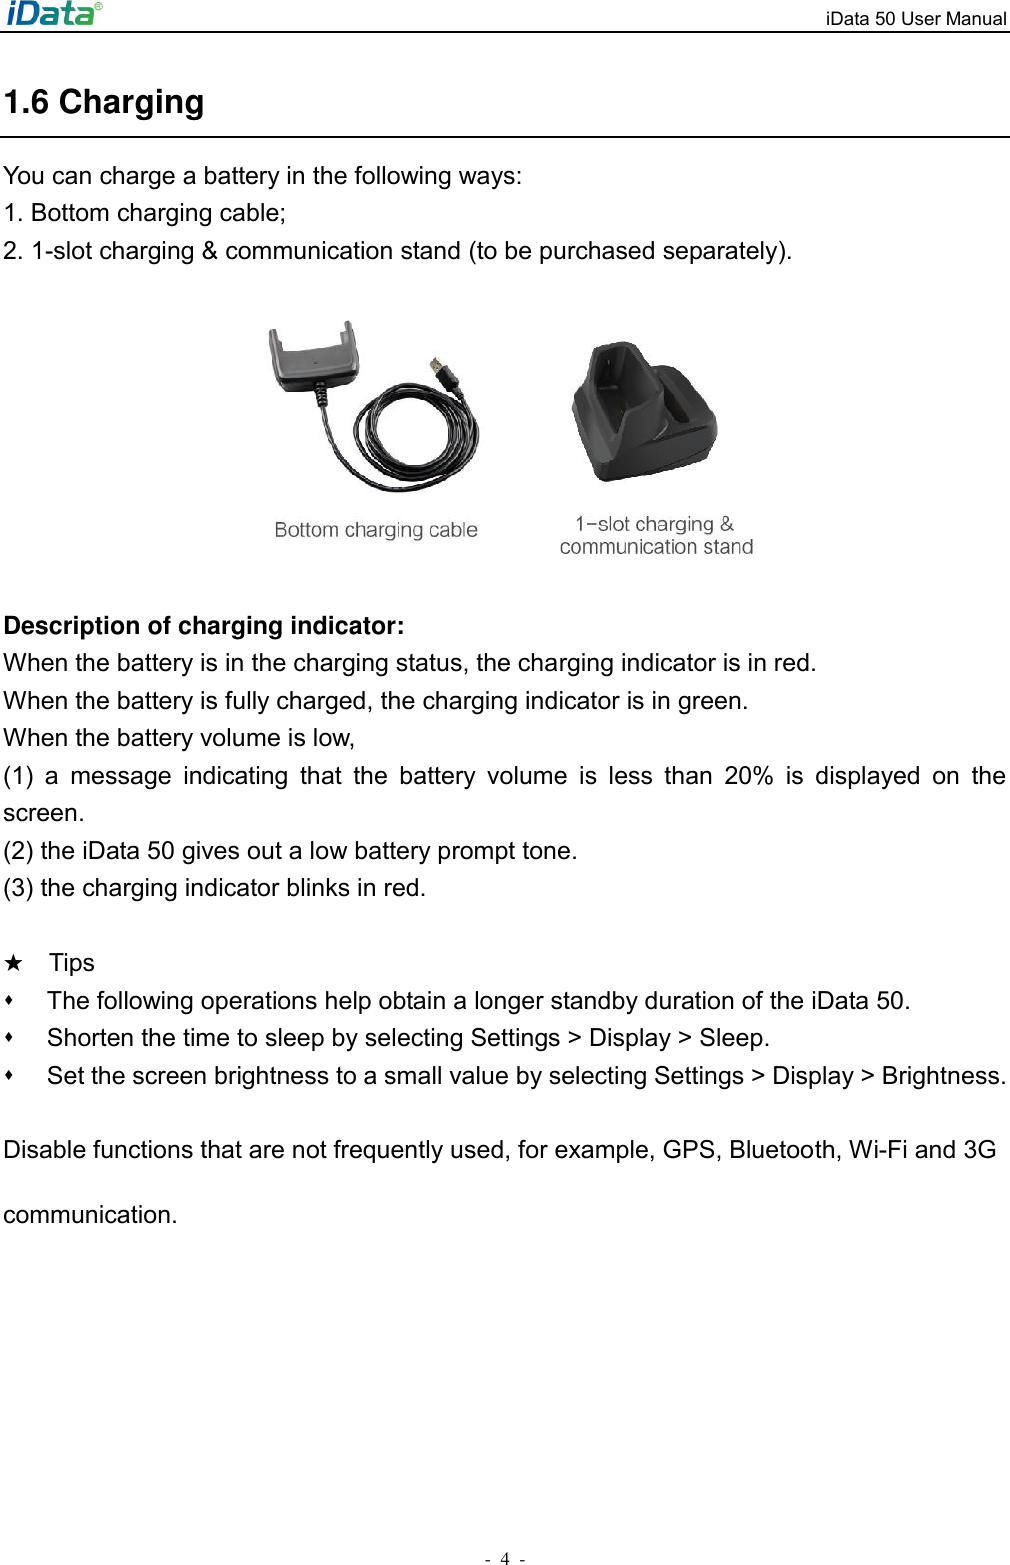
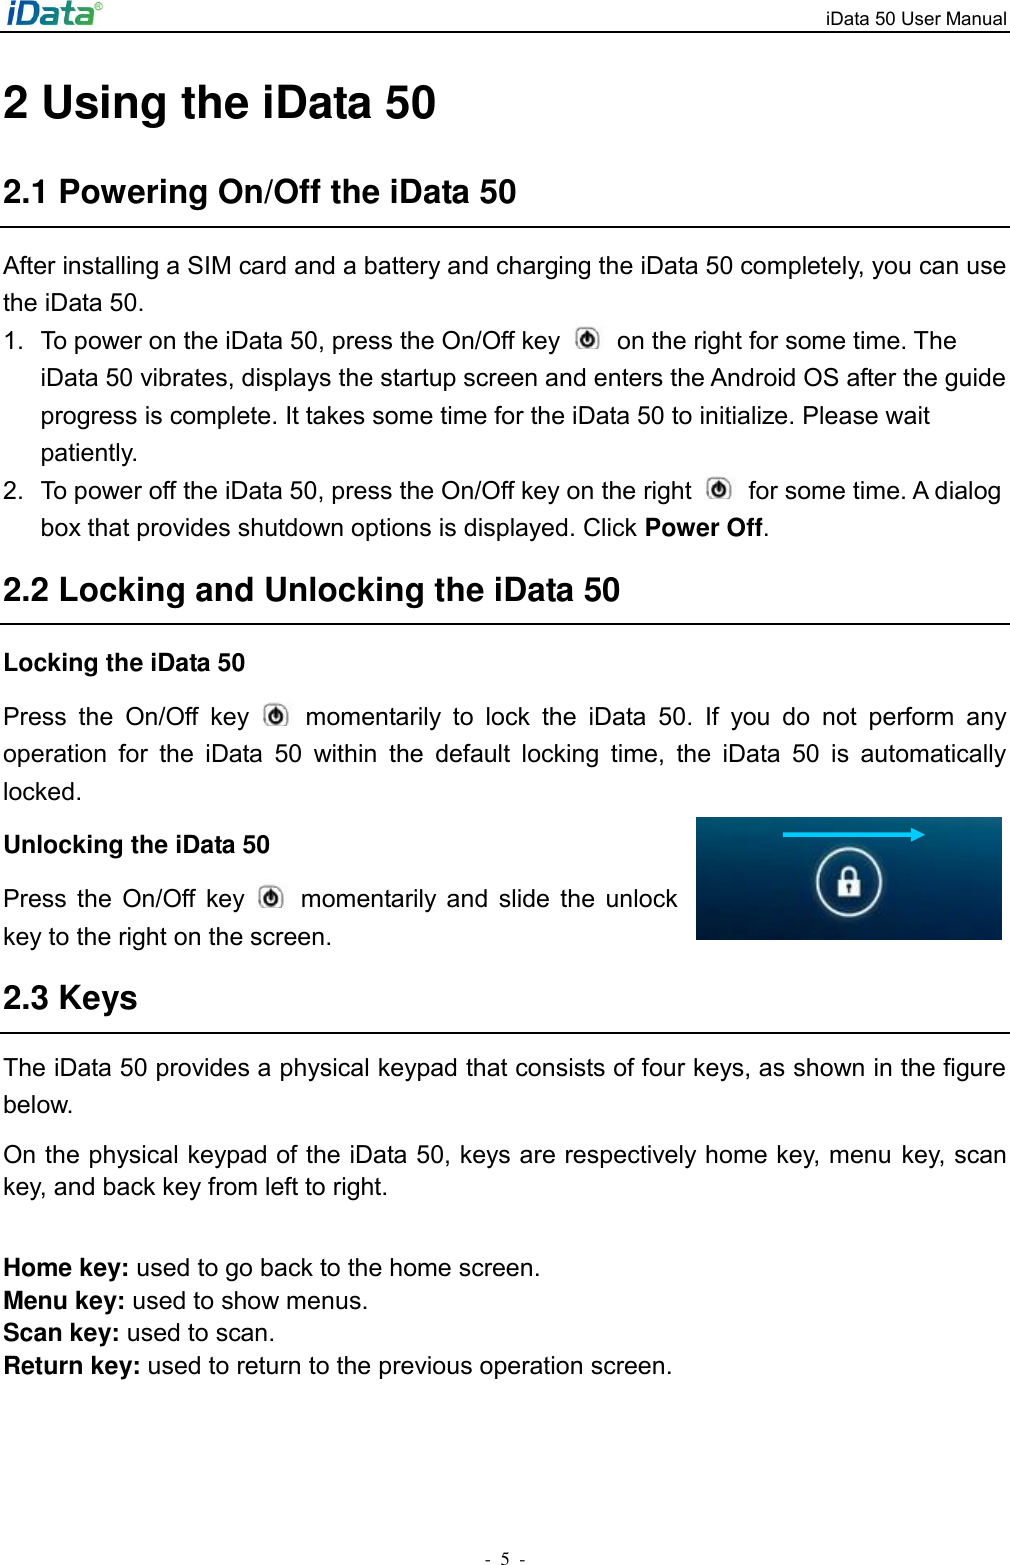
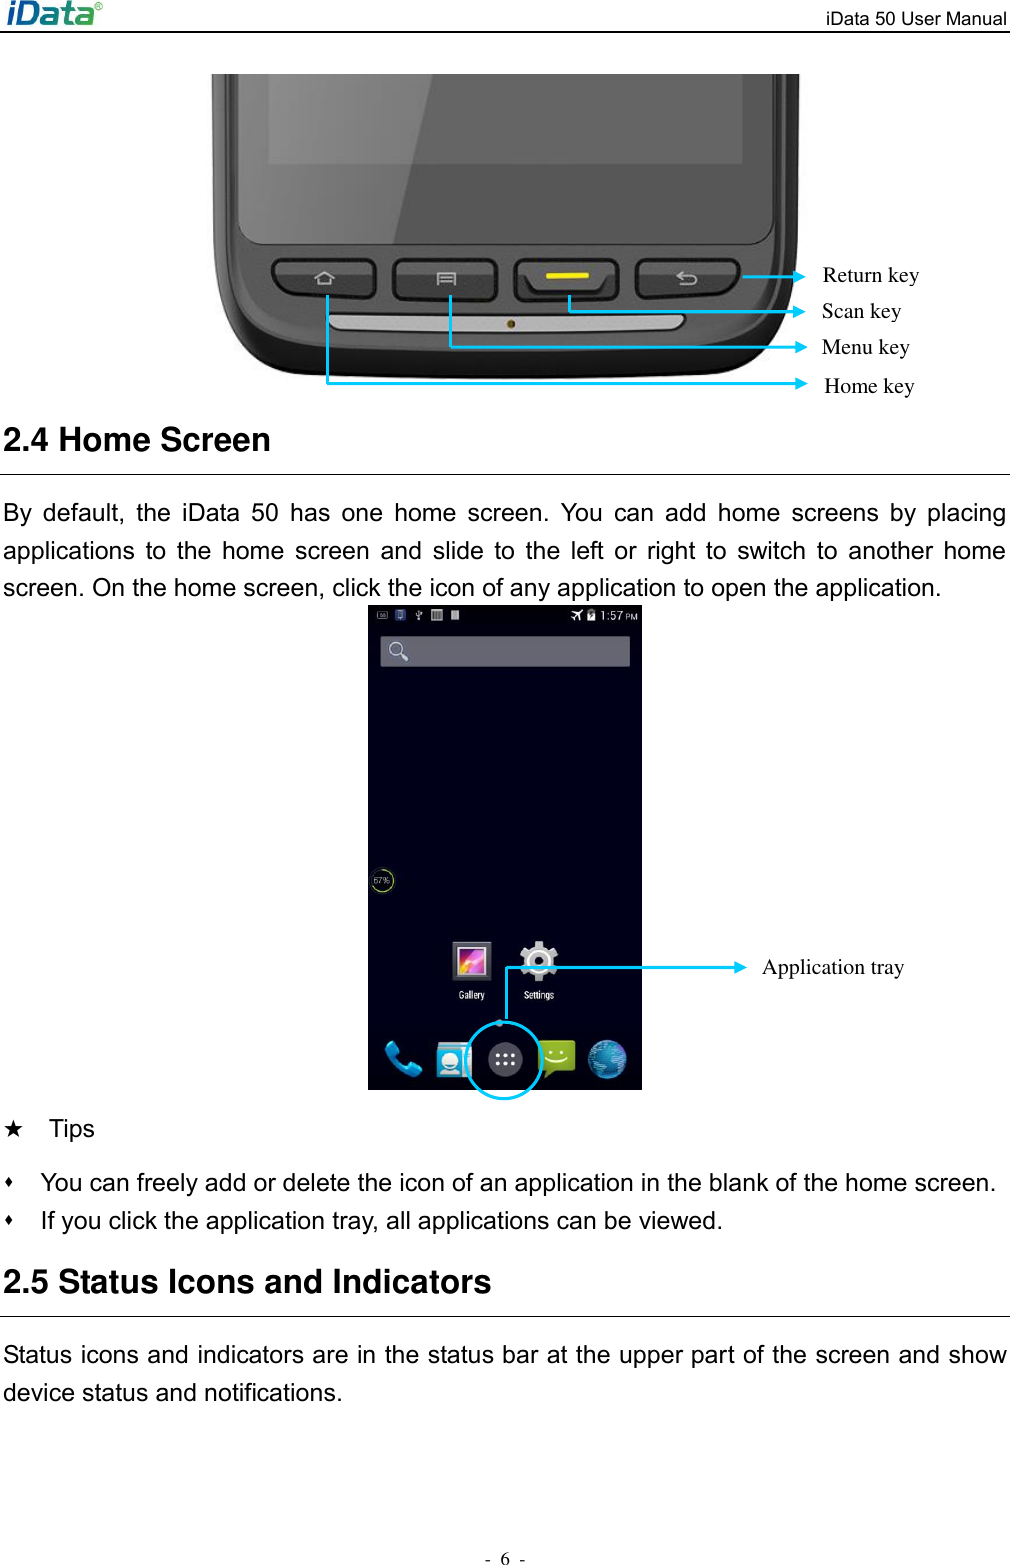
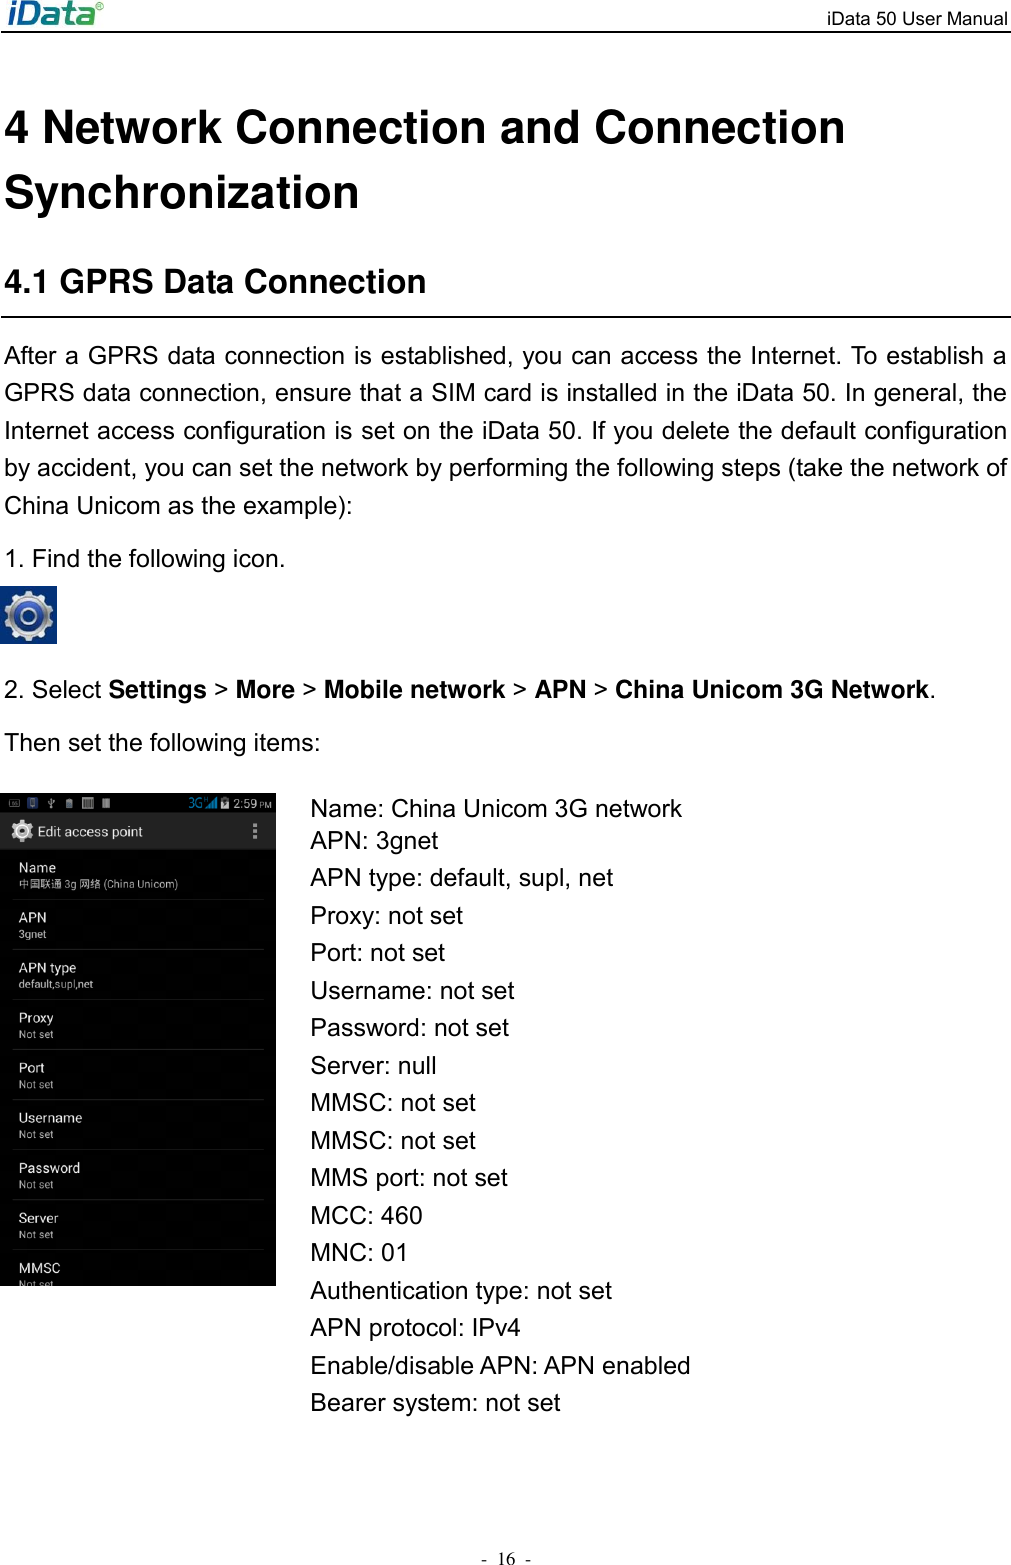
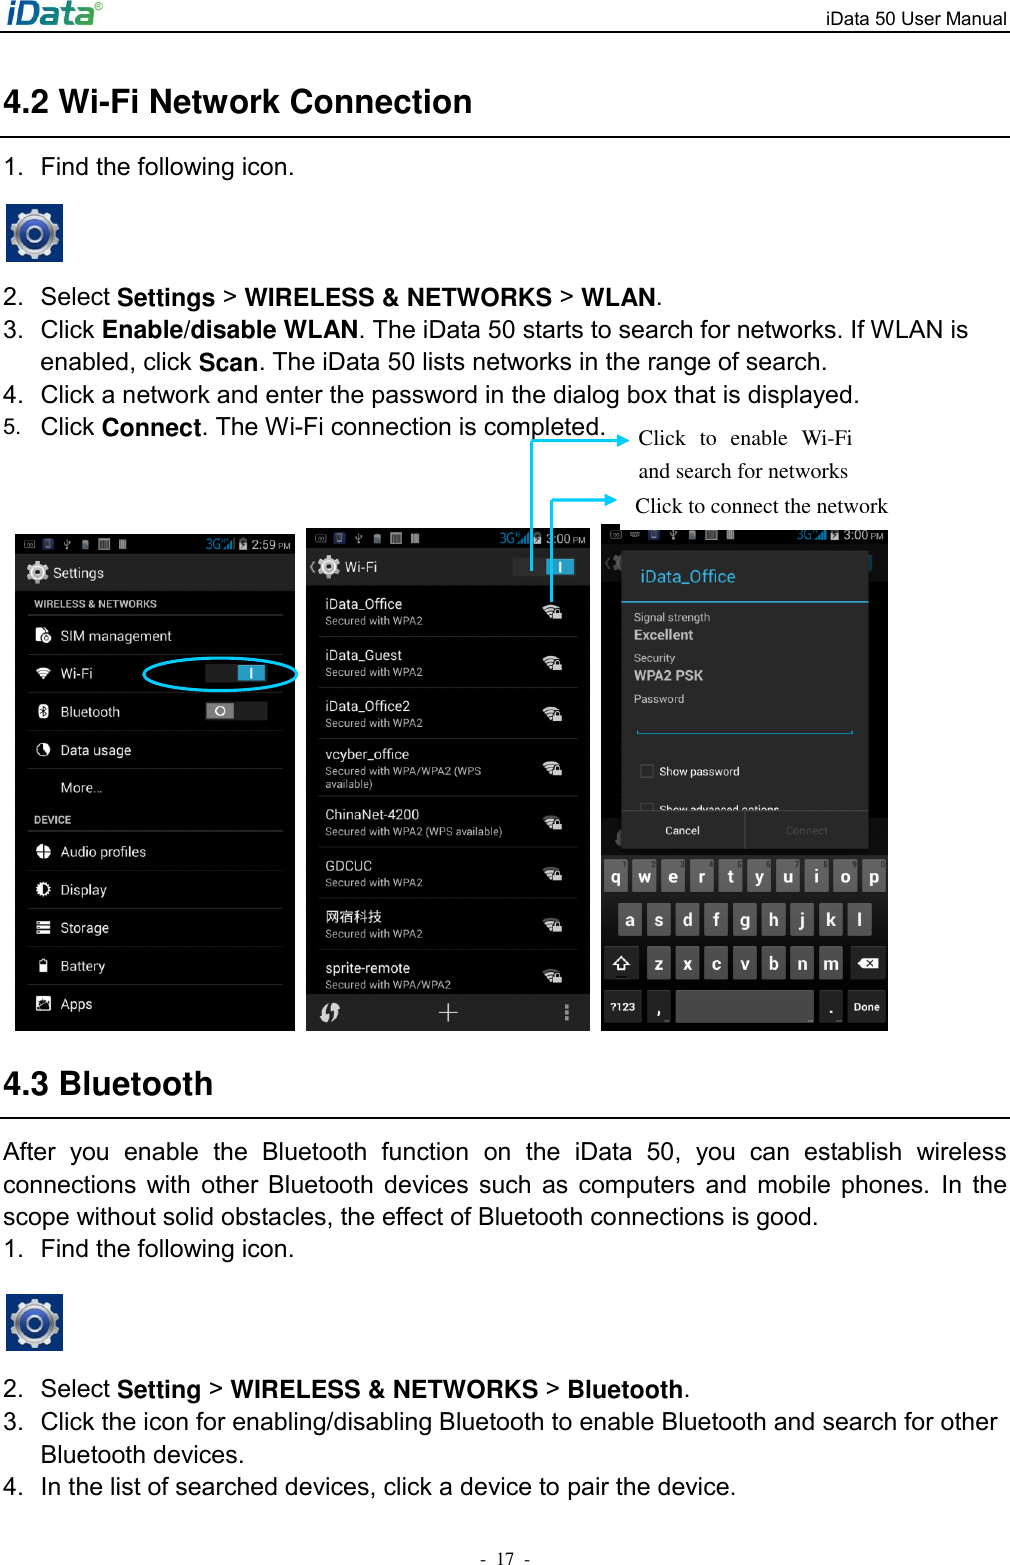
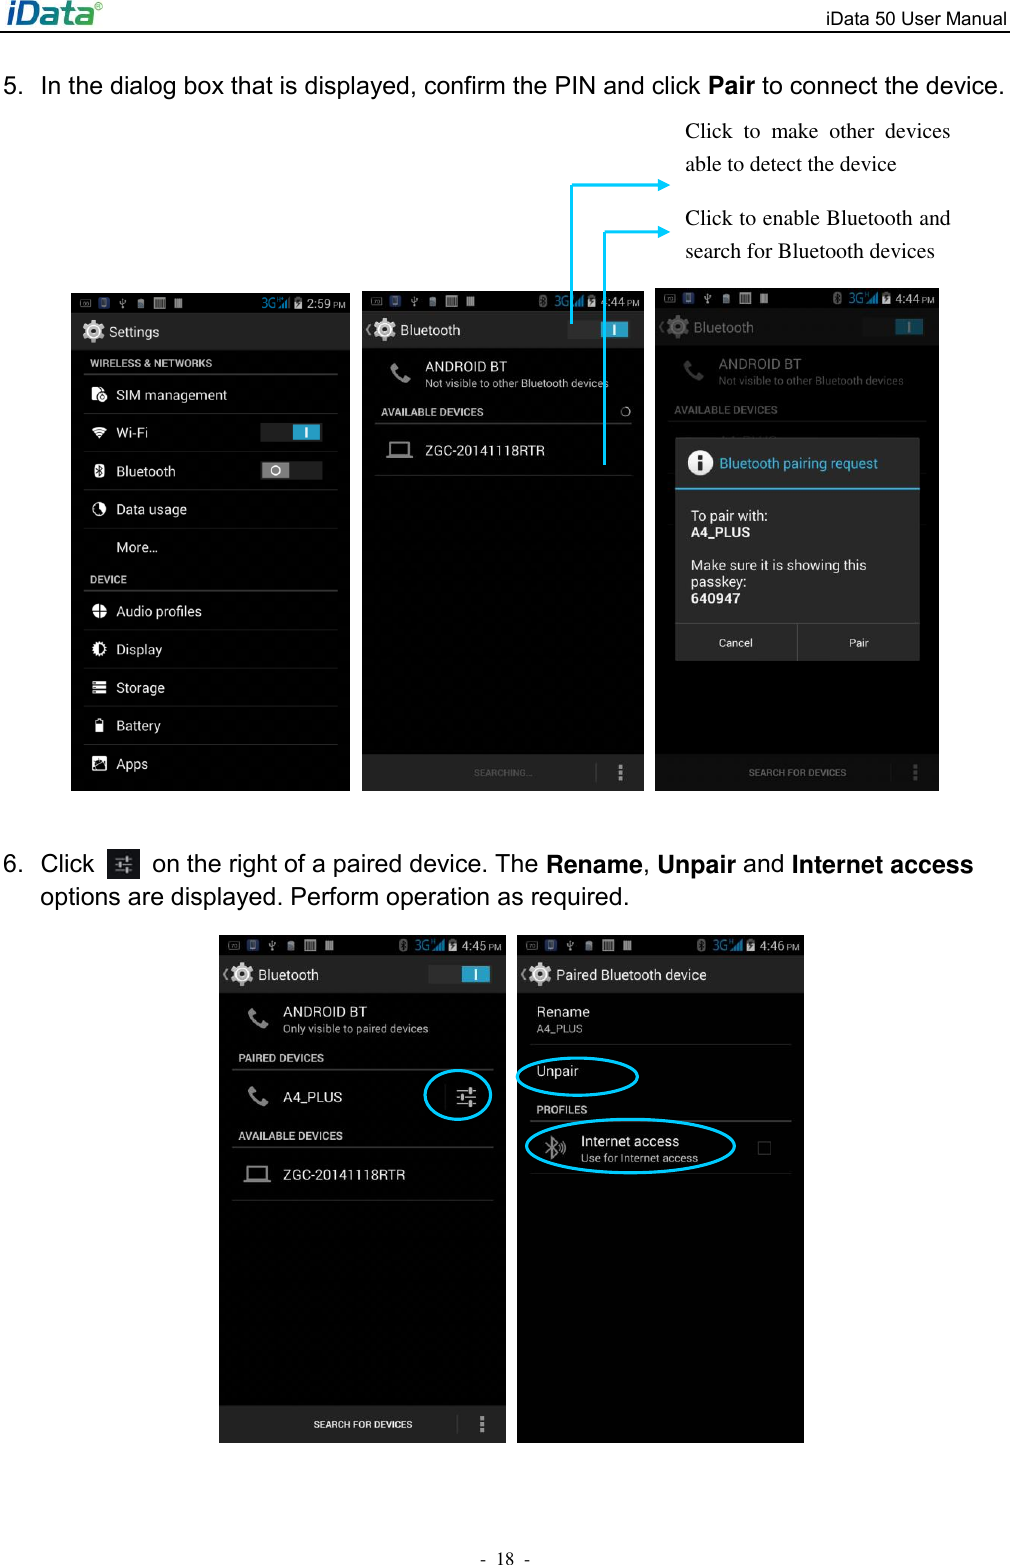
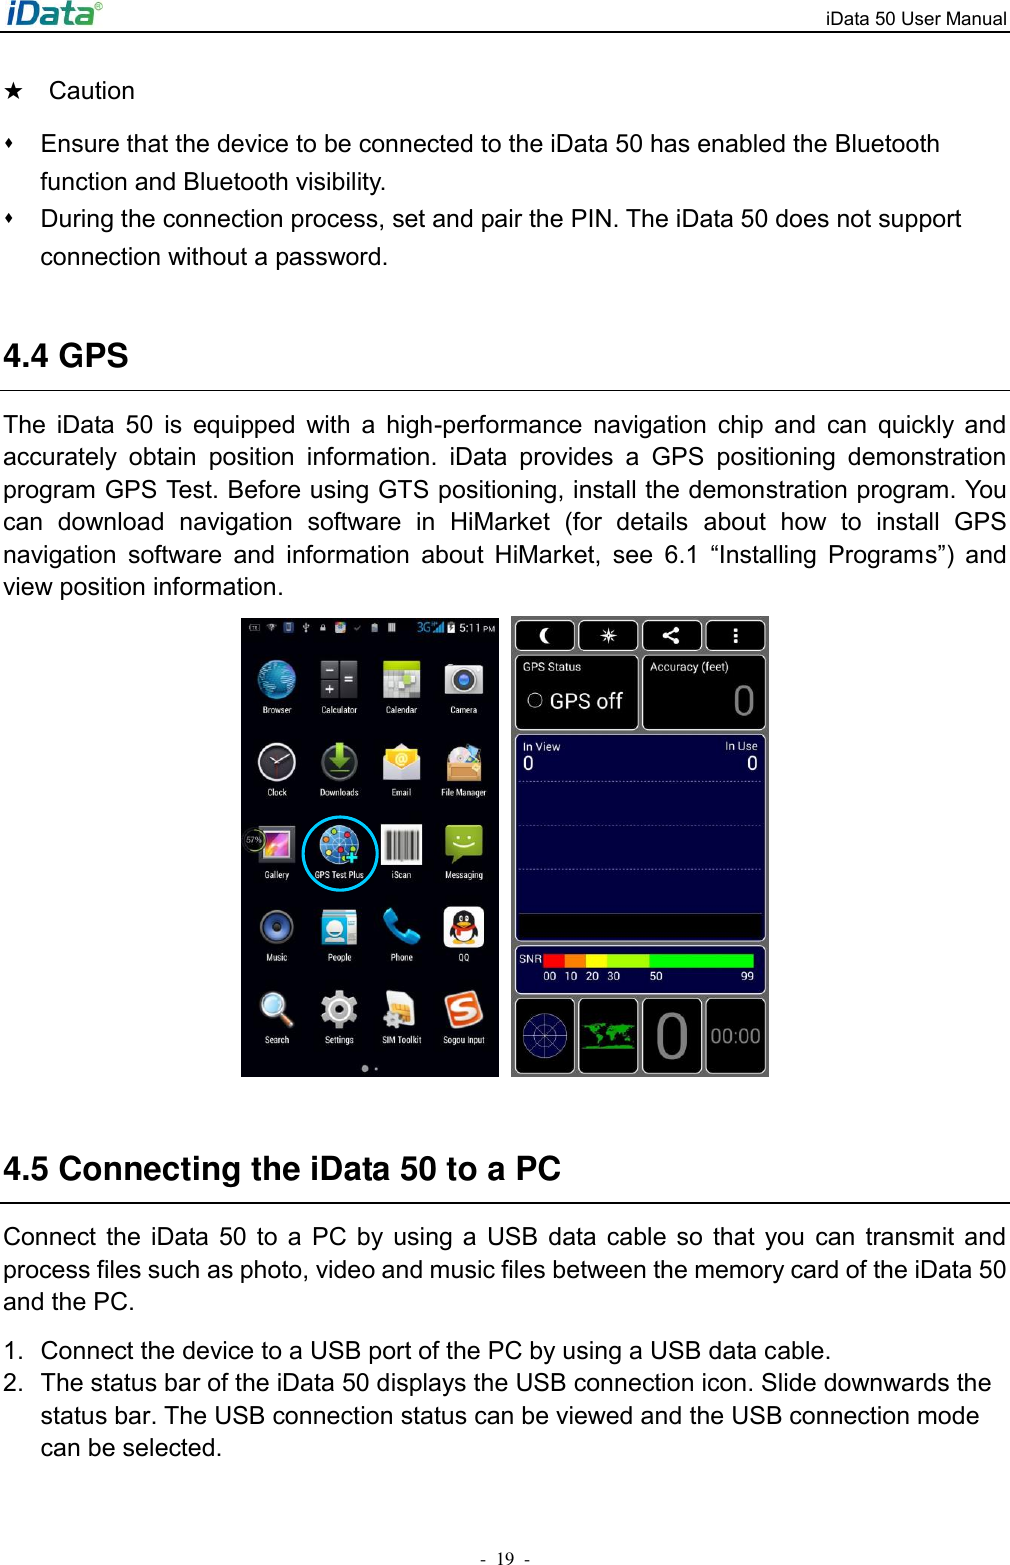
Wuxi iData Technology
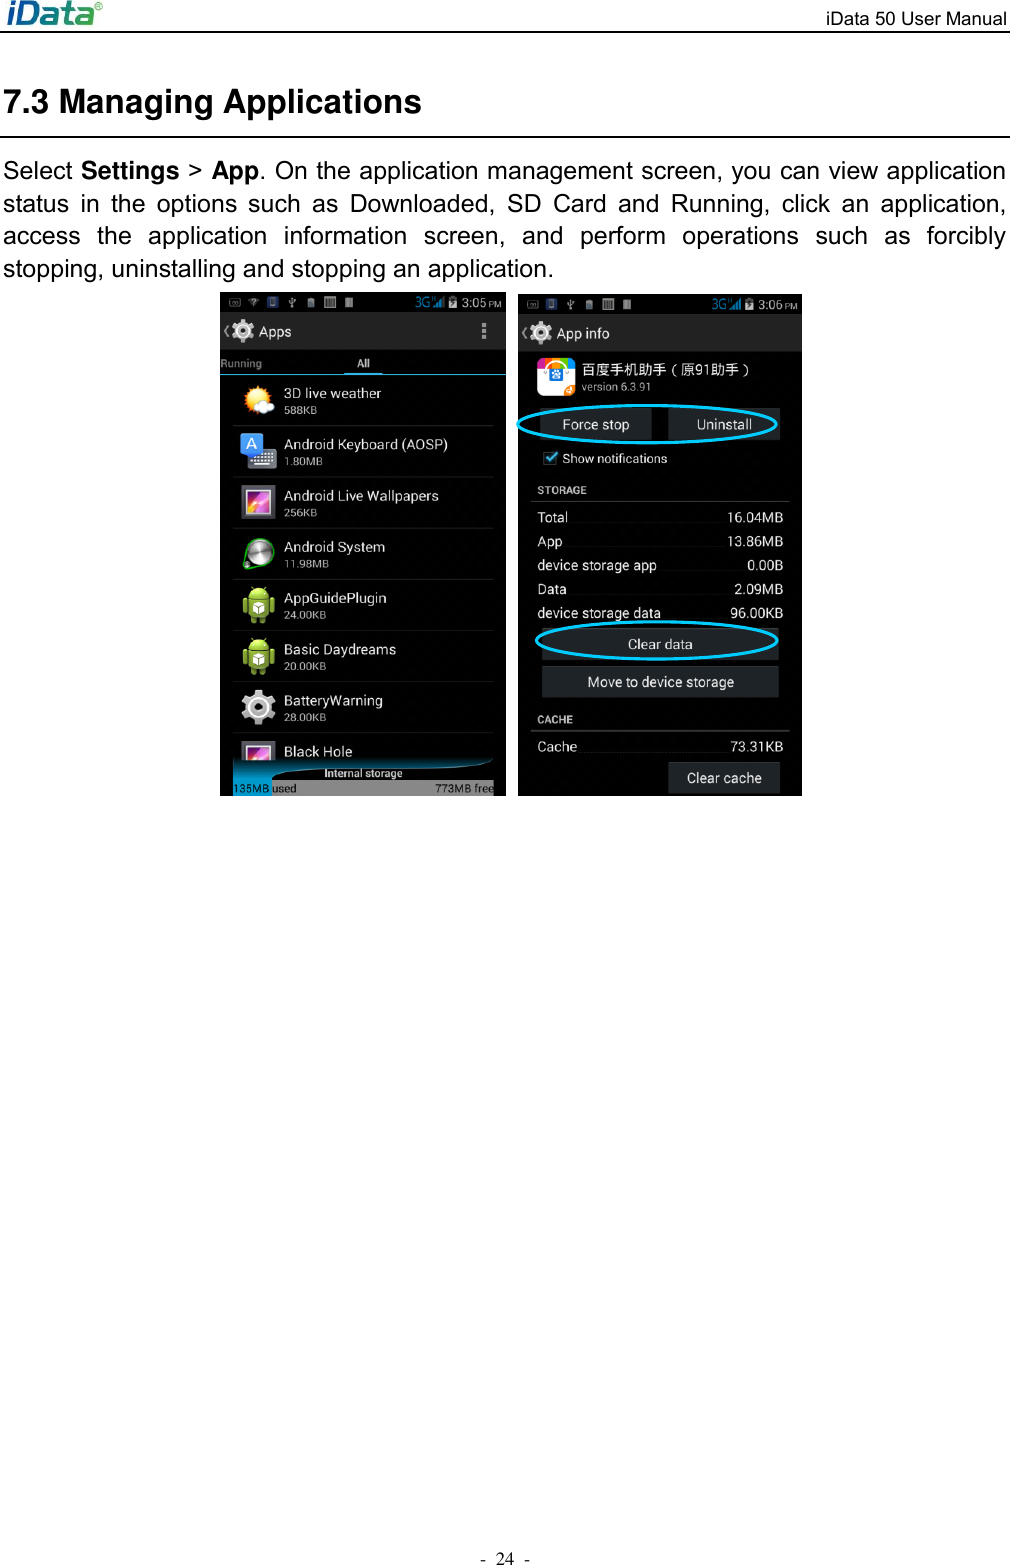
 NMC001 NEW MOBILE COMPUTER User Manual iData MC80

WUXI IDATA TECHNOLOGY COMPANY LTD. NEW MOBILE COMPUTER iData MC80

User manual

 Contents 1 Introduction ................................................................................................................................... 1 1.1 Appearance of iData 50 ........................................................................................................................... 1 1.2 Installing the Battery ................................................................................................................................ 2 1.3 Removing the Battery .............................................................................................................................. 2 1.4 Inserting a SIM Card ................................................................................................................................ 2 1.5 Inserting a TF Card .................................................................................................................................. 3 1.6 Charging .................................................................................................................................................... 4 2.1 Powering On/Off the iData 50 ................................................................................................................ 5 2.2 Locking and Unlocking the iData 50 ...................................................................................................... 5 2.3 Keys ........................................................................................................................................................... 5 2.4 Home Screen ............................................................................................................................................ 6 2.5 Status Icons and Indicators..................................................................................................................... 6 2.6 Basic Settings ........................................................................................................................................... 7 3 Call Function ............................................................................................................................... 12 3.1 Making a Call .......................................................................................................................................... 12 3.2 Contacts ................................................................................................................................................... 12 3.3 SMS and MMS ........................................................................................................................................ 13 3.4 Email ........................................................................................................................................................ 14 4 Network Connection and Connection Synchronization .................................................. 16 4.1 GPRS Data Connection ........................................................................................................................ 16 4.2 Wi-Fi Network Connection .................................................................................................................... 17 4.3 Bluetooth.................................................................................................................................................. 17 4.4 GPS .......................................................................................................................................................... 19 4.5 Connecting the iData 50 to a PC ......................................................................................................... 19 4.6 Synchronization ...................................................................................................................................... 20 5 Enabling the Scan Function .................................................................................................... 21 5.1 To start the iScan program and enable scanning, do as follows: ................................................... 21 6 Enabling the NFC Function ..................................................................................................... 22 6.1 To enable the NFC function, do as follows ......................................................................................... 22 7 Managing the iData 50 .............................................................................................................. 23 7.1 Installing Applications ............................................................................................................................ 23 7.2 Uninstalling Applications ....................................................................................................................... 23 7.3 Managing Applications .......................................................................................................................... 24 8 Precautions and Troubleshooting ......................................................................................... 25 8.1 Precautions ............................................................................................................................................. 25 8.2 Troubleshooting ...................................................................................................................................... 26 Appendix ......................................................................................................................................... 29
iData 50 User Manual -  1  - 1 Introduction 1.1 Appearance of iData 50  Figure 1-1 Front view of iData 50      Figure 1-2 Rear view of iData 50
iData 50 User Manual -  2  - 1.2 Installing the Battery 1.  Push the battery to the bottom of the battery compartment and press it downwards. 2. Push the battery cover lock to the right to lock the battery cover.         1.3 Removing the Battery 1.  Push the battery cover lock to the left.   2.  Pull up the battery cover from the groove at the upper end of the battery cover. (Note: The iData 50 adapts integrated design for the battery and battery cover.)     1.4 Inserting a SIM Card 1.  Insert a SIM card by following the direction in the figure below. (Note: Micro SIM cards are applicable to the iData 50. After replacing a SIM card, restart the iData 50.)
iData 50 User Manual -  3  -  1.5 Inserting a TF Card 1.  Push the card cover by following the OPEN direction marked on the card cover.   2.  Open the card cover upwards and insert a TF card, as shown in the figure below.    3. Close the card cover, as shown in the figure below. 4.  Pull back the card cover by following the LOCK direction marked on the card cover.   (Note: TF cads, namely Micro SD cards, are applicable to the iData 50. After replacing a TF card, restart the iData 50.)
iData 50 User Manual -  4  - 1.6 Charging You can charge a battery in the following ways: 1. Bottom charging cable; 2. 1-slot charging & communication stand (to be purchased separately).          Description of charging indicator: When the battery is in the charging status, the charging indicator is in red. When the battery is fully charged, the charging indicator is in green. When the battery volume is low,   (1)  a  message  indicating  that  the  battery  volume  is  less  than  20%  is  displayed  on  the screen. (2) the iData 50 gives out a low battery prompt tone. (3) the charging indicator blinks in red.  ★  Tips ⬧  The following operations help obtain a longer standby duration of the iData 50.   ⬧  Shorten the time to sleep by selecting Settings > Display > Sleep.   ⬧  Set the screen brightness to a small value by selecting Settings > Display > Brightness.   Disable functions that are not frequently used, for example, GPS, Bluetooth, Wi-Fi and 3G communication.
iData 50 User Manual -  5  - 2 Using the iData 50 2.1 Powering On/Off the iData 50 After installing a SIM card and a battery and charging the iData 50 completely, you can use the iData 50. 1.  To power on the iData 50, press the On/Off key    on the right for some time. The iData 50 vibrates, displays the startup screen and enters the Android OS after the guide progress is complete. It takes some time for the iData 50 to initialize. Please wait patiently. 2.  To power off the iData 50, press the On/Off key on the right    for some time. A dialog box that provides shutdown options is displayed. Click Power Off. 2.2 Locking and Unlocking the iData 50 Locking the iData 50 Press  the  On/Off  key    momentarily  to  lock  the  iData  50.  If  you  do  not  perform  any operation  for  the  iData  50  within  the  default  locking  time,  the  iData  50  is  automatically locked. Unlocking the iData 50 Press  the  On/Off  key    momentarily and  slide  the  unlock key to the right on the screen.   2.3 Keys The iData 50 provides a physical keypad that consists of four keys, as shown in the figure below. On the physical keypad of the iData 50, keys are respectively home key, menu  key, scan key, and back key from left to right.  Home key: used to go back to the home screen. Menu key: used to show menus. Scan key: used to scan. Return key: used to return to the previous operation screen.
iData 50 User Manual -  6  -  2.4 Home Screen By  default,  the  iData  50  has  one  home  screen.  You  can  add  home  screens  by  placing applications  to  the  home  screen  and  slide  to  the  left  or  right  to  switch  to  another  home screen. On the home screen, click the icon of any application to open the application.    ★  Tips   ⬧  You can freely add or delete the icon of an application in the blank of the home screen. ⬧  If you click the application tray, all applications can be viewed.   2.5 Status Icons and Indicators Status icons and indicators are in the status bar at the upper part of the screen and show device status and notifications.     Return key Scan key Application tray Home key Menu key
iData 50 User Manual -  7  - Table 2-1 Status icons Icon Description Icon Description  WLAN  Signal strength  Bluetooth  Flight mode  USB connection  Network access restricted    Missed calls  USB debugging  New messages    Charging    Modem logs  Battery full  Silent mode  Multiple  notification  icons, which  are beyond the  scope of display    Application permission  EDGE  Connection between USB and PC pea pod   ★ Note As  software  is  upgraded  continuously,  status  indicators  may  be  different  from  those displayed on the iData 50. The actual status indicators prevail. 2.6 Basic Settings  2.6.1 Date and Time Settings To change the date and time in the iData 50, do as follows: 1. Find the following icon.
iData 50 User Manual -  8  - 2. Select Settings > Date & time > Set date or Set time.           2.6.2 Display Setting 1. Find the following icon.   2. Select Settings > Display > Lock screen notification/Wallpaper/Brightness/Auto-rotate screen/Sleep/Interactive screensaver/Font size/Cast screen.
iData 50 User Manual -  9  - 2.6.3 Ringtone Setting 1. Find the following icon.    2.  Select  Settings >  Audio  profiles >  General/Silent/Meeting/Outdoor.  Click  different modes and set the ringtone in the modes.         2.6.4 Security Setting 1. Find the following icon.   2. Select Settings > Backup & reset > Factory data reset.   The iData 50 starts to restore factory settings.
iData 50 User Manual -  10  -      ★  Caution If you perform the preceding operation, the following data will be cleared: ⬧  Account ⬧  Data and settings of the system and applications ⬧  Downloaded applications The following data will not be cleared: ⬧  Current system software and bound applications ⬧  Files in the SD card, for example, music and photos 2.6.5 Language and Input Method Setting 1. Find the following icon.   2. Select Settings > Language & input, click Language, select a language, click Default, and select an input method.
iData 50 User Manual -  11  -      2.6.6 Shortcuts You can add shortcut icons on the home screen of the iData 50. On the home screen, click the icon of application tray, press and hold an icon and drag it to the home screen.   2.6.7 Widgets   You can add widgets such as clock, music player and calendar on the home screen of the iData 50.   On the home screen, press  and  hold  a  blank space. The entry for setting  wallpaper and widgets is displayed. Click a widget and drag it to a blank space.   Click the icon of a widget to open the widget.
iData 50 User Manual -  12  - 3 Call Function 3.1 Making a Call 1.  Find the following icon.   2.  Enter a phone number. 3.  Click    to make a call. 4.  Click    to terminate the call.            3.2 Contacts 1.  Find the following icon.   2.  Click Contacts to open the list of contacts. 3.  To add a contact, click  . 4.  To import or export contacts, press the menu key and click Import/Export.   5.  To edit or delete a contact, select the contact, press the menu key and click Edit/Delete. Call records Contacts Keypad for dialing Voice call
iData 50 User Manual -  13  -      3.3 SMS and MMS 1.  Find the following icon.  2.  Click    enter a receiver and text to be sent. 3.  Click    to send the message. 4.  On the message editing page, press the menu key, click Add subject to convert the message into a multimedia message. After editing the message, click    to send the message. ★  Tips   Click    to add attachments such as photo, video and audio.
iData 50 User Manual -  14  -       3.4 Email You can send or receive emails. ★ Note To create an email account on the iData 50, first set the account on a PC. Take a QQ email account as an example. Log in to the QQ email account, click Settings in the upper right corner of the email account page, find and select the server option and inbox option and then save. The email account is set. To set an email account on the iData 50, do as follows: 1.  Find the following icon.   2.  Enter an email address and password and click Next.   3.  Set Inbox checking frequency and click Next. 4.  Create a name for the account and click Next. The email receiving page is displayed.
iData 50 User Manual -  15  -        To synchronize or delete an account, do as follows: 1.  On the home screen, click Settings. 2.  Under the ACCOUNTS option, click POP3 to open added accounts and click the name of an account to be synchronized or deleted. On the Sync page, click    in the upper right corner and select Sync now or Remove account.
iData 50 User Manual -  16  - 4 Network Connection and Connection Synchronization 4.1 GPRS Data Connection After a GPRS data connection is established, you can access the Internet. To establish a GPRS data connection, ensure that a SIM card is installed in the iData 50. In general, the Internet access configuration is set on the iData 50. If you delete the default configuration by accident, you can set the network by performing the following steps (take the network of China Unicom as the example): 1. Find the following icon.    2. Select Settings > More > Mobile network > APN > China Unicom 3G Network. Then set the following items:  Name: China Unicom 3G network APN: 3gnet APN type: default, supl, net Proxy: not set Port: not set Username: not set Password: not set Server: null MMSC: not set MMSC: not set MMS port: not set MCC: 460 MNC: 01 Authentication type: not set APN protocol: IPv4 Enable/disable APN: APN enabled Bearer system: not set
iData 50 User Manual -  17  - 4.2 Wi-Fi Network Connection 1.  Find the following icon.    2.  Select Settings > WIRELESS & NETWORKS > WLAN. 3.  Click Enable/disable WLAN. The iData 50 starts to search for networks. If WLAN is enabled, click Scan. The iData 50 lists networks in the range of search. 4.  Click a network and enter the password in the dialog box that is displayed. 5. Click Connect. The Wi-Fi connection is completed.          4.3 Bluetooth After  you  enable  the  Bluetooth  function  on  the  iData  50,  you  can  establish  wireless connections  with  other Bluetooth  devices  such  as  computers  and mobile  phones.  In  the scope without solid obstacles, the effect of Bluetooth connections is good. 1.  Find the following icon.   2.  Select Setting > WIRELESS & NETWORKS > Bluetooth.   3.  Click the icon for enabling/disabling Bluetooth to enable Bluetooth and search for other Bluetooth devices. 4.  In the list of searched devices, click a device to pair the device. Click to connect the network Click  to  enable  Wi-Fi and search for networks
iData 50 User Manual -  18  - 5.  In the dialog box that is displayed, confirm the PIN and click Pair to connect the device.          6.  Click    on the right of a paired device. The Rename, Unpair and Internet access options are displayed. Perform operation as required.       Click to enable Bluetooth and search for Bluetooth devices Click  to  make  other  devices able to detect the device
iData 50 User Manual -  19  - ★  Caution ⬧  Ensure that the device to be connected to the iData 50 has enabled the Bluetooth function and Bluetooth visibility. ⬧  During the connection process, set and pair the PIN. The iData 50 does not support connection without a password.  4.4 GPS The  iData  50  is  equipped  with  a  high-performance  navigation  chip  and  can  quickly  and accurately  obtain  position  information.  iData  provides  a  GPS  positioning  demonstration program GPS Test. Before using GTS positioning, install the demonstration program. You can  download  navigation  software  in  HiMarket  (for  details  about  how  to  install  GPS navigation  software  and  information  about  HiMarket,  see  6.1  “Installing  Programs”)  and view position information.    4.5 Connecting the iData 50 to a PC Connect  the  iData  50  to  a  PC  by  using  a  USB data  cable  so  that  you  can  transmit  and process files such as photo, video and music files between the memory card of the iData 50 and the PC. 1.  Connect the device to a USB port of the PC by using a USB data cable. 2.  The status bar of the iData 50 displays the USB connection icon. Slide downwards the status bar. The USB connection status can be viewed and the USB connection mode can be selected.
iData 50 User Manual -  20  -    4.6 Synchronization 1.  Find the following icon.   2.  Select Settings > Accounts & sync. 3.  Click Add account to set a new account. 4.  Select Company or Email, enter the email address and password, click Next and wait until the connection is complete (for details about email setting, see 3.4 “Email”). 5.  Click Accounts. On the synchronization setting page, perform setting as required.  Click the option to open the USB storage device and copy files between the PC and the device
iData 50 User Manual -  21  - 5 Enabling the Scan Function 5.1 To start the iScan program and enable scanning, do as follows: 1. Click the iScan icon on the menu page. 2.  Click the  blue  slider on  the  right  of Enable  Barcode Scanning  to  enable the  scanning function (if you click the slider again, the scanning function is disabled).   3. Press the  yellow key to scan a barcode. When the scanning indicator becomes green from red and a beep is heard, the barcode is scanned successfully.  Note: iScan is used to scan barcodes. By default, iScan is installed and scanning is enabled upon delivery of the device. You can down the latest version from the following address: http://t.cn/8k5hWCo
iData 50 User Manual -  22  - 6 Enabling the NFC Function 6.1 To enable the NFC function, do as follows 1. Click the Settings icon on the menu page. 2. Select WIRELESS & NETWORKS/More > NFC.   3. Click the blue slider on the right to enable NFC (if you click the blue slider again, NFC is disabled). 4. Put an NFC card close to the back of the iData 50. After a beep is heard, the card is read successfully.
iData 50 User Manual -  23  - 7 Managing the iData 50 7.1 Installing Applications The  iData  50  uses  Google  Android  OS,  where  the  suffix  of  Android  software  is  apk.  To install programs on the iData 50, use the following methods: 1.  Download software at the online software store (Google Play) provided by Google or on the Android software download platform (HiMarket) available in China and install software. HiMarket is recommended. 2.  Download software installation packages, store them on the SD cad and install the software through file manager. 3.  Connect the iData 50 to a PC by using a USB data cable and install software for the iData 50 on the PC. However, first of all, you need to install phone assistant software such as APK install, pea pod and phone assistant 91. In this way, programs can be installed in batches. 7.2 Uninstalling Applications If too many programs are installed or some programs are unnecessary, uninstall programs to improve the running speed of the iData 50. To uninstall a program, do as follows: 1.  Select Settings > App. In the application list that is displayed, select an application and click it. On the page for uninstalling the application, click Uninstall and then click OK. Wait several seconds until the application is uninstalled. 2.  Click the application tray. On the application screen, find the icon of an application, press and drag the icon to the dustbin to uninstall the application.
iData 50 User Manual -  24  - 7.3 Managing Applications Select Settings > App. On the application management screen, you can view application status  in  the  options  such  as  Downloaded,  SD  Card  and  Running,  click  an  application, access  the  application  information  screen,  and  perform  operations  such  as  forcibly stopping, uninstalling and stopping an application.
iData 50 User Manual -  25  - 8 Precautions and Troubleshooting 8.1 Precautions To ensure that the iData 50 does not fail, follow the following precautions during use of the iData 50: ⬧  Put the iData 50 and its components and accessories in the places where children cannot reach. ⬧  Keep the iData 50 dry. Rain, moisture and liquid contain acidic materials and will corrode the circuit board. ⬧  Do not store or use the iData 50 in dusty or dirty places. ⬧  Do not store the iData 50 in a place that is too hot. High temperature will shorten the service life of electronic components. ⬧  Do not store the iData 50 in a place that is too cold. When the temperature inside the iData 50 rises, moisture is generated inside the iData 50, which may damage the circuit board. ⬧  Do not try to disassemble the iData 50. Otherwise, the iData 50 may be damaged.   ⬧  Do not touch the screen surface of the iData 50 by using a pen, a pencil or other sharp articles in case the screen may be scratched. ⬧  Do not throw, beat or violently collide the iData 50. Otherwise, the components of the iData 50 may be damaged and the iData 50 may be faulty. ⬧  Do not use strong chemical products or strong detergent to clean the iData 50. If the iData 50 become dirty, clean the surface of the iData 50 by using a soft cloth soaked with dilute glass detergent. ⬧  Please use the protective film to reduce wear as much as possible. The screen protective film can improve the availability and durability of the screen. Pay attention to the following during use of the battery. ⬧  The area where the iData 50 is charged must keep away from scraps, inflammables or chemical substances. ⬧  When you charge the battery of a mobile device, the temperature on the battery and charger must be in the range 0C to 40C. ⬧  Do not use incompatible batteries or chargers, which may cause fire, explosion, leakage or other hazards. ⬧  Do not disassemble, press, twist, pierce or cut the battery. ⬧  Do not make the battery short-circuited or contact the connecting terminal of the battery by using metal or other conductive objects. ⬧  Do not insert other materials into the battery, contact the battery with water or other liquid, or expose the battery in an open fire, explosive source or other sources of danger. ⬧  Do not put or store the battery in the environment where the temperature is too high.   ⬧  Do not put the battery in a microwave oven or a drying machine.
iData 50 User Manual -  26  - ⬧  Do not put the battery into a fire. ⬧  If the battery leaks, do not let the liquid stain your skin or eyes. Otherwise, wash your skin or eyes with lots of water and go to see the doctor immediately. Cleaning iData 50 ⬧  Shell   Clean the shell by using a cloth soaked with alcohol, including keys and space between keys. ⬧  Display screen You can clean the display screen by using a cloth soaked with alcohol. Do not let the liquid gather around the screen. Otherwise, dry the screen by using a soft non-woven cloth in case strip marks are left on the screen. ⬧  Scan lens Clean the scan lens regularly by using lens paper or other articles suitable for cleaning optical materials. 8.2 Troubleshooting Table 8-1 iData 50 troubleshooting   Fault Cause Solution After  the  power  key  is pressed, the iData 50  is not powered on. The  battery  volume  is  too low  or  the  battery  is  not charged.   Charge the battery or replace the battery. The  battery  is  incorrectly installed.   Correctly install the battery.   The system breaks down. Restore factory settings. The  rechargeable battery can no longer be charged. The battery fails. Replace the battery. The  temperature  of  the battery is too high or low. Put the battery in normal temperature. During  data communication,  data  is not  transmitted  or transmitted  data  is incomplete. The  cable  configuration  is incorrect. Consult the system administrator. The  communication software  is  incorrectly installed or configured. Install  or  reinstall  the  synchronization software to update the driver. The  relevant  function  is not activated after a user clicks a button or icon. The  system  does  not respond. Restart the system. No sound can be heard. The volume is too low or is disabled. Adjust the volume. The iData 50 is closed. The  iData  50  is  in  the inactive state. After being inactive for a period of time, the iData 50 is locked. The battery is used up. Replace the battery. The iData responds at a Too many files are stored in Remove  unused  memos  and  records.  If
iData 50 User Manual -27  -Fault Cause Solution low speed. the iData 50. necessary, save the  records on the host or increase  the  storage  capacity  by  using  an SD card. Too  many  applications  are installed on the iData 50. Remove  applications installed  on  the  iData 50. The  iData  50  cannot decode a barcode while reading it. The  scan application  is  not loaded. Load the scan application in the iData 50. Reading a barcode fails. Check that the barcode is indefective. The battery volume is low. If  the  scanner  stops  sending  out  a  light beam  after  you  press  the  trigger  switch, check the battery volume.
iData 50 User Manual -  28  - Table 8-2 Bluetooth troubleshooting   Fault Cause Solution The  iData  50  cannot detect  any  Bluetooth device nearby. The iData 50 system is too far  away  from  other Bluetooth devices. Move the  iData  50  close to other  Bluetooth devices, making the distance between them within 10 meters. The  Bluetooth  devices nearby are not enabled. Enable  the  Bluetooth  devices  you  are searching for. Bluetooth devices are in a mode  that  cannot  be detected. Set Bluetooth devices in a mode that can be detected. When a user attempts to connect  a  Bluetooth phone  to  the  iData  50, the  Bluetooth  phone identifies the iData 50 as the  previously  paired iData 50. The  Bluetooth  phone memorizes  the  name  and address  of  the  iData  50 paired  previously  over Bluetooth. Remove  the  paired  device  and  the  name from the Bluetooth phone. A  Bluetooth  device  can be  detected  but  cannot be connected. The  iData  50  does  not support  connecting  a Bluetooth device without a password. Set a password for the Bluetooth device. Table 7-3 Cable troubleshooting Fault Cause Solution Charging fails. The  cable  is  in  poor contact. Replace the cable. Connecting  to  the  iData 50 fails. The  cable  is  in  poor contact. Replace the cable. Table 7-4 Wi-Fi troubleshooting   Fault Cause Solution Connecting  to  an  AP fails. The  message “Authentication  failed”  is displayed. The  password  for  the  WLAN  device  is incorrect.
iData 50 User Manual -  29  - Appendix Table 1    Accessories of the iData 50 Component Description iData 50  Standard battery    Charging base  Hand strap  Package    Quick guide  Warranty card  One-slot USB charging base Optional Power adapter Optional , used to charge the battery. Bottom charging cable Optional Table 2 Technical specifications of the iData 50 Item iData 50 System configuration   CPU High-performance quad-core  1.3 GHz processor Operating System Android 5.1 Memory 16 GB ROM+2 GB RAM Expansion Slot Micro SD card, up to 32 GB Display 4.7- inch, 1280 x 720 High resolution Touch Panel Industrial-grade capacitive touch panel (supporting operation with gloves) Camera (Optional) 8 MXP camera in the back side, autofocus lens, LED flash Exit Window Corning® Gorilla® glass Keypad 4 front keys, 4 side keys , Power key Battery 3.7 V 3300 mAh rechargeable lithium polymer battery Audio Built-in microphone /Micro USB/Headphone connector Notification Vibrator alerts/LED/Audio notification Vibration Motor Built-in programmable vibration motor Structure parameters Dimensions (L x W x D) 150 mm x 73.5 mm x 16 mm (24 mm thick at the head) Weight 230g (including battery) Communication and transmission   Wireless WAN  (Network frequency) North America:    GSM-Quad band support (Band 5/8/3/2)    UMTS/HSPA+ Primary bands 2/5. Roaming bands 8. LTE Bands 2/4/5/17     Europe: GSM - Quad band support (Band 5/8/3/2) UMTS / HSPA+ Primary bands 1/8. Roaming bands 2/5. LTE Bands 1/3/7/8/20     Wireless WAN  GPRS/EDGE/ CDMA2000 1x/ EVDO /HSPA+/TDD-LTE/FDD-LTE
iData 50 User Manual-30  -Item iData 50 (Data service) Wireless LAN Wi-Fi 802.11a/b/g/n    (Dual-band Wi-Fi: 2.4G+5G) Bluetooth Bluetooth 4.0 GPS (optional) Supporting GPS/ AGPS Operating environmentDevelopment tool Android SDK+JDK+Eclipse Supported language Java Operating Temp. -10℃  ~ 50℃  (14℉  to 122℉)Storage Temp. -20℃ ~ 60℃  (-4℉  to 140℉)Humidity 0 to 95% (non-condensing) Drop specification 1.2-meter drops to concrete ground Sealing standard IP65 ESD  15 kV air discharge, 8 kV direct discharge 1D laser scanning engineOptical resolution  4 mil Scan depth of field 3.81 cm to 60.98 cm Scanning angle 473 (standard) Scanning speed 10212 times per second (two-way) 1D/2D image scanning engineOptical resolution  3 mil Scanning angle Omni-directional Scanning speed 300 times per second NFC Frequency 13.56 MHz Reading distance Within 10 mm Protocol ISO14443A/14443B/15693 Input/output portUSB Port 1 (Micro USB port) Charger Port 1 (Charging interface at the bottom) Headset Port 1
iData 50 User Manual-31  -CE marking:CAUTION RISK OF EXPLOSION IF BATTERY IS REPLACED BY AN INCORRECT TYPE. DISPOSE OF USED BATTERIES ACCORDING TO THE INSTRUCTIONS. To prevent possible hearing damage, do not listen at high volume levels for long periods. Fully understand user manual before use. Ensure your player at low volume levels or power off before you leaving. Statements changes or modifications not expressly approved by the party responsible for compliance could void the user’s authority to operate the equipment. This equipment has been tested and found to comply with the limits for a Class B digital device,  pursuant  to  Part  15  of  the  FCC  Rules.  These  limits  are  designed  to  provide reasonable  protection  against  harmful  interference  in  a  residential  installation.  This equipment generates, uses and can radiate radio frequency energy and, if not installed and used  in  accordance  with  the  instructions,  may  cause  harmful  interference  to  radio communications.  However,  there  is  no  guarantee  that  interference  will  not  occur  in  a particular installation. Power Adapter: Manufacturer: SHENZHEN FUJIA APPLIANCE CO.,LTD. Model: FJ-SW1260502000UNInput: AC 100-240V; 50/60Hz;0.4Amax Output: DC5.0V;2000mA Battery: Manufacturer: WUXI IDATA TECHNOLOGY COMPANY LTD.Model: iData 50Capacity:3300 mAh 12.2Wh Nominal Voltage: DC 3.7V3.Maximum Charge Voltage: DC 4.2V
iData 50 User Manual -32  -If  this  equipment  does  cause  harmful  interference  to  radio  or  television  reception, which can be determined by turning the equipment off and on, the user is encouraged to try to correct the interference by one or more of the following measures: -- Reorient or relocate the receiving antenna. -- Increase the separation between the equipment and receiver. -- Connect the equipment into an outlet on a circuit different from that to which the receiver is connected. -- Consult the dealer or an experienced radio/TV technician for help. § 15.19 Labelling requirements. This device complies with part 15 of the FCC Rules. Operation is subject to the following two conditions: (1) This device may not cause harmful interference, and (2) this device must accept any interference received, including interference that may cause undesired operation. § 15.21 Information to user. Any Changes or modifications not expressly approved by the party responsible for compliance could void the user's authority to operate the equipment. Specific Absorption Rate (SAR) information: This Smart phone meets the government's requirements for exposure to radio waves. The guidelines are based on standards that were developed by independent scientific organizations through periodic and thorough evaluation of scientific studies. The standards include a substantial safety margin designed to assure the safety of all persons regardless of age or health.FCC RF Exposure Information and Statement The SAR limit of USA (FCC) is 0.976 W/kg averaged over one gram of tissue. This device was tested for typical body-worn operations with the back of the handset kept 10mm for body worn. To maintain compliance with FCC RF exposure requirements, use accessories that maintain a 10mm for body worn. The use of belt clips, holsters and similar accessories should not contain metallic components in its assembly. The use of accessories that do not satisfy these requirements may not comply with FCC RF exposure requirements, and should be avoided. Body-worn Operation This device was tested for typical body-worn operations. To comply with RF exposure requirements, a minimum separation distance of 10mm for body worn must be maintained between the user’s body and the handset, including the antenna. Third-party belt-clips, holsters, and similar accessories used by this device should not contain any metallic components. Body-worn accessories that do not meet these requirements may not comply with RF exposure requirements and should be avoided. Use only the supplied or an approved antenna.
© 2018 iData Global. All Rights Reserved. This  document  is  prepared  by  iData  Global.  according  to  the  existing  information.  The content in this document is subject to update without notice.   Without  written  approval  of  iData  Global.,  no  one  shall  copy,  extract,  back  up,  modify, spread, or translate any part of this document in any form or method or use the whole or part of this document for business purposes.   If you have any question, you are free to send an email to support@idataglobal.com. IDATA GLOBAL Commercial HQ: Rm. 502, Sci.&Tech. Park Building, No.6, Keyuan Road, Science and Technology Park, Shenzhen City, China E-mail: sales@idataglobal.comWebsite: www.idataglobal.com

Navigation menu