X Micro Technology SBS0201 SweetBeam Digital Photo Frame User Manual Operation Menu 20101012 lab
X-Micro Technology Corp., SweetBeam Digital Photo Frame Operation Menu 20101012 lab
User Manual
Operation Menu
Version: 1.0

Operation Menu
I
FCC Statement
Federal Communication Commission Interference Statement
This equipment has been tested and found to comply with the limits for a Class B
digital device, pursuant to Part 15 of the FCC Rules. These limits are designed to
provide reasonable protection against harmful interference in a residential
installation. This equipment generates, uses and can radiate radio frequency energy
and, if not installed and used in accordance with the instructions, may cause harmful
interference to radio communications. However, there is no guarantee that
interference will not occur in a particular installation. If this equipment does cause
harmful interference to radio or television reception, which can be determined by
turning the equipment off and on, the user is encouraged to try to correct the
interference by one of the following measures:
● Reorient or relocate the receiving antenna.
● Increase the separation between the equipment and receiver.
● Connect the equipment into an outlet on a circuit different from that to which the
receiver is connected.
● Consult the dealer or an experienced radio/TV technician for help.
FCC Caution: Any changes or modifications not expressly approved by the party
responsible
for compliance could void the user’s authority to operate this equipment.
This device complies with Part 15 of the FCC Rules. Operation is subject to the
following two conditions: (1) This device may not cause harmful interference, and (2)
this device must accept any interference received, including interference that may
cause undesired operation.
This device and its antenna(s) must not be co-located or operation in conjunction
with any other antenna or transmitter.
IMPORTANT NOTE:
FCC Radiation Exposure Statement:
This equipment complies with FCC radiation exposure limits set forth for an
uncontrolled environment. This equipment should be installed and operated with
minimum distance 20cm between the radiator & your body.

Operation Menu
I
Content
1. Power on 1
2. Mode button 2
3. User button 3
4. HTTP control panel 4
5. Specification 4

Operation Menu
1
1. Power on
There are three working modes after power on.
Maintenance: The device is connected using the USB interface to a PC with specific
software named NandPDT to perform firmware update, reset to factory
operation to adjust/debug its behavior. This mode is activated by pushing the
“Mode” button for 10 seconds with the USB plugged in to a computer. Please
refer to section 5. Firmware upgrade.
Install: The device is not playing any content but just display its configuration
settings on the screen. The device automatically tries to connect to a default
open WIFI network named SBMAMA (Ad-Hoc or Managed) and runs a HTTP
control panel for configuration over the WLAN. The operator gets to this service
by reading the IP address displayed on the device screen and typing the
following URL into its browser http://the.device.ip.address. This mode is
activated by pushing the Mode button for 5 seconds.
The device will try to be managed mode to connect to the WiFi AP named
SBMAMA, the name/SSID of WiFi AP can be configured by field of SSID on
HTTP control panel. If it failed to establish a link with the AP within 30 seconds,
then it will switch to ad-hoc mode with SSID SBMAMA. Pressing the Mode
button for 1 second will turn the device back to managed mode again.
Operation: The device is configured and plays the content from the server. It uses
the network settings from the configuration to connect to the hotel network. It
also runs the HTTP control panel to offer configuration over the LAN using the
same URL. The operator gets to this service by reading the IP address that is
displayed temporarily for 5 seconds on the device screen when the “Mode”
button is pressed, the display seconds can be configured by field of
Stand_seconds_at_Install_Mod on HTTP control panel.

Operation Menu
2
2. Mode button
Pressing 1 second to turn the device to set the WiFi to be managed mode and try to
establish a new link with WiFi AP named SBMAMA, the name/SSID of WiFi AP can
be configured by field of SSID on HTTP control panel. If it failed to establish a link
with the AP within 30 seconds, then it will switch to ad-hoc mode with SSID
SBMAMA. Pressing the Mode button for 1 second will turn the device back to
managed mode again.
Pressing 5 seconds to turn the device to Install mode, and showing in formations
including Networking mode, Mac address, IP address, SSID, Networking status and
Feed URL to be display.
Pressing 10 seconds to turn the device to reboot. If the device is connected using the
USB interface to a PC with specific software named NandPDT to perform firmware
update, reset to factory default. Please refer to section 5. Firmware upgrade.

Operation Menu
3
3. User button
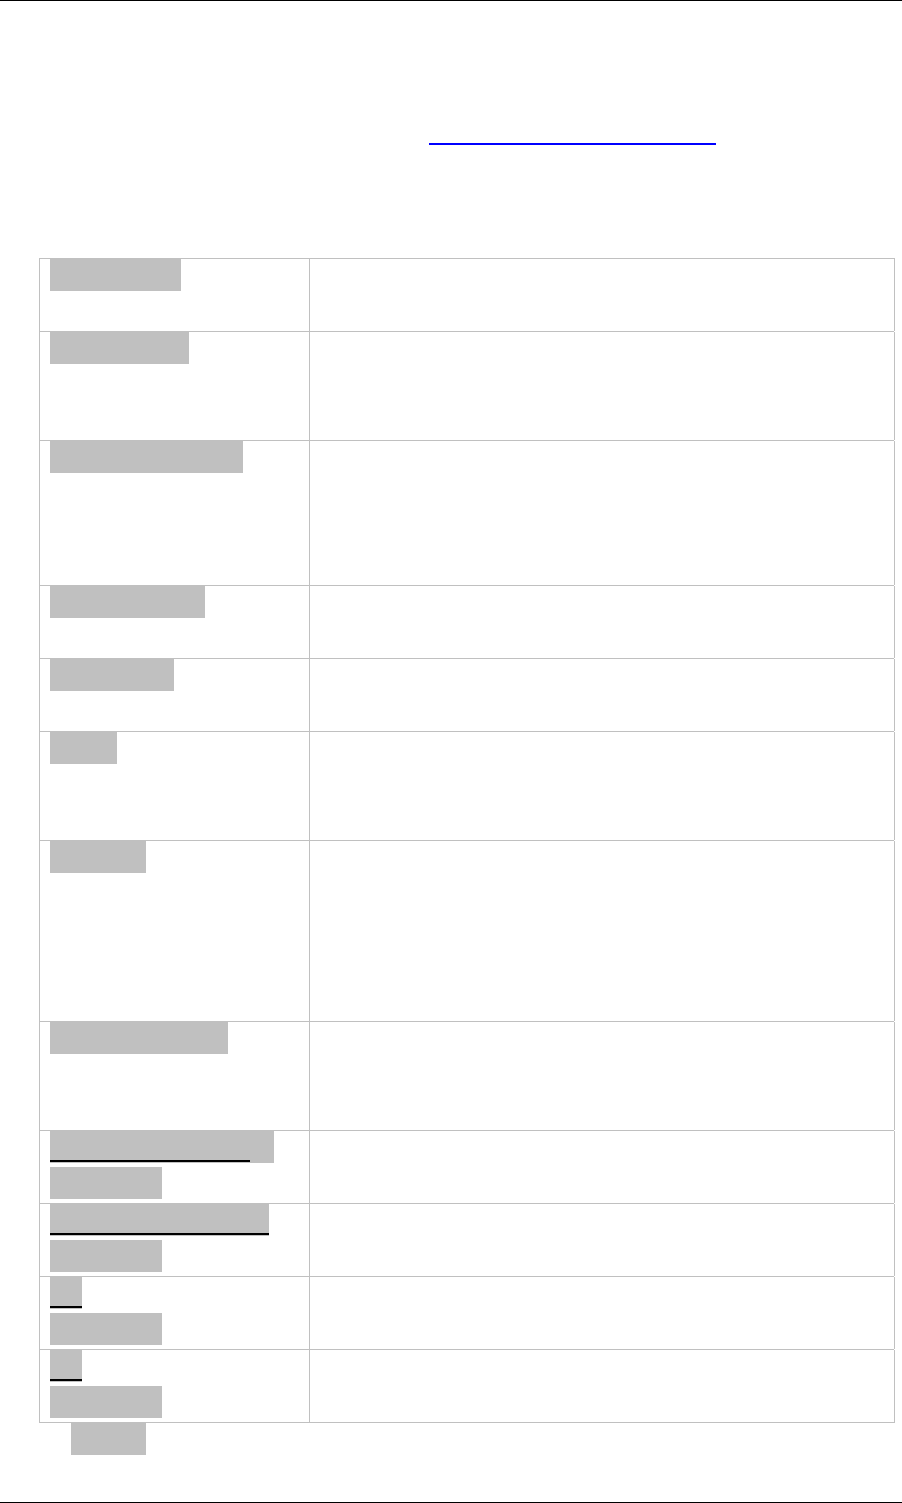
User button will act multifunction and its role is configured by HTTP control panel.
Default to disable.
Disable : the User button will be no function, no response to any touch.
User Off : the photo frame backlight will turned off once the User button was touched,
and keep it off as long as hours defined by the value of UserOff parameter
on HTTP control panel.
Select Feed : the photo frame will switch to Select Feed window and allow users to
pick Feed URL that he/she preferred.
Press the user button to move down one row and it will circle back to top
once meet the last row. The LED will light to indicate the button be pressed
and you have to wait the LED off then press it as you want.
There are total 16 feeds can be selected and users can update the Feed’s
URL through HTTP Control Panel.
Interaction : pressing the user button will generate a request for interaction according
to the current image on the slideshow. It is managed by the context of RSS
Feed that supports a special tag to perform interaction request.
<sweetbeam:interaction anchor="button"
event="http://192.168.1.123/picture1.jpg" timeout="30">
<media:content url="http://192.168.1.123/feedback.jpg" duration="5"/>
</sweetbeam:interaction>
Operation Menu
4
4. HTTP control panel
Open the device HTTP control panel by http://the.device.ip.address on browser like
Microsoft Internet Explorer.
4.1 System Parameters
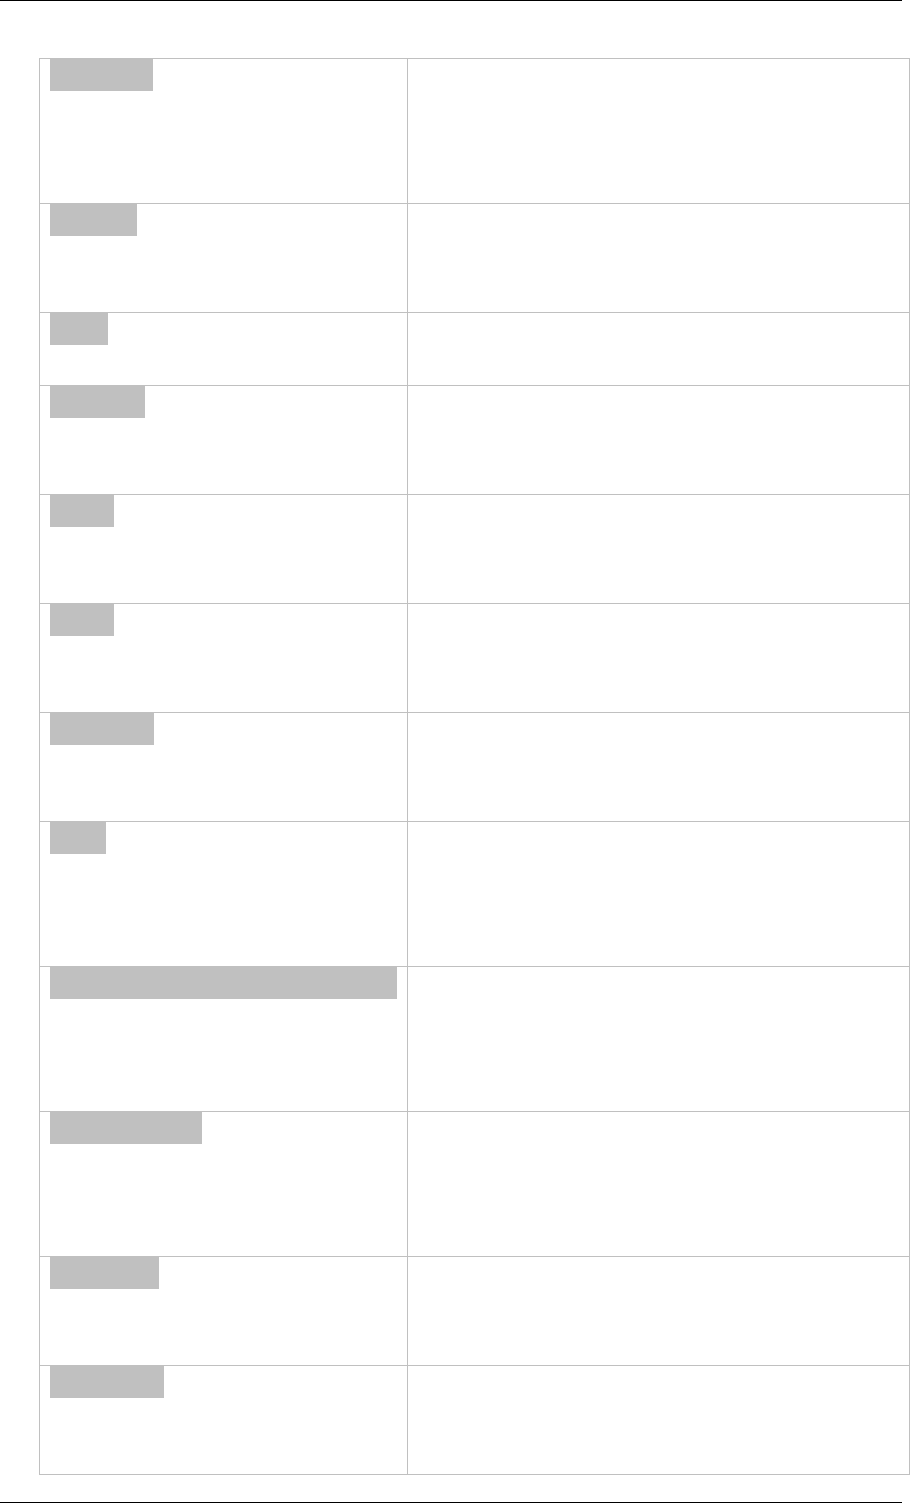
FW_Version A display only data field shows the firmware version
on photo frame.
Active_Mode A display only data field shows the active mode on
photo frame.
There are install, Operating and Maintenance modes.
Networking_Mode A display only data field shows the Networking mode
on photo frame.
There are WiFi Managed, WiFi Ad-Hoc and LAN
modes.
MAC_Address A display only data field shows the MAC address of
photo frame.
IP_Address A display only data field shows the IP address of
photo frame.
Status A display only data field shows the networking status
of photo frame.
There are Connected and Disconnected status.
Login_ID A text edit field allows users to manage the login
identification of HTTP control panel, maximum 20
characters.
Default to the MAC address of photo frame on format
of xxxxxxxxxxxx.
Login_Password A text edit field allows users to manage the login
password of HTTP control panel.
Default to an empty string.
Light_sensor_level
Level 9 - 0
Text edit fields allow users to manage the ambient
light sensor detect value in range of 0% to 100%.
LCD_backlight_level
Level 9 - 0
Text edit fields allow users to manage the backlight
strength in range of 0% to 100%.
On
Level 9 - 0
Radio buttons allow users to set the light level to turn
on the backlight of photo frame.
Off
Level 9 - 0
Radio buttons allow users to set the light level to turn
off the backlight of photo frame.
Press Submit button to update the parameters to photo frame.
Operation Menu
5
4.2 Networking Parameters
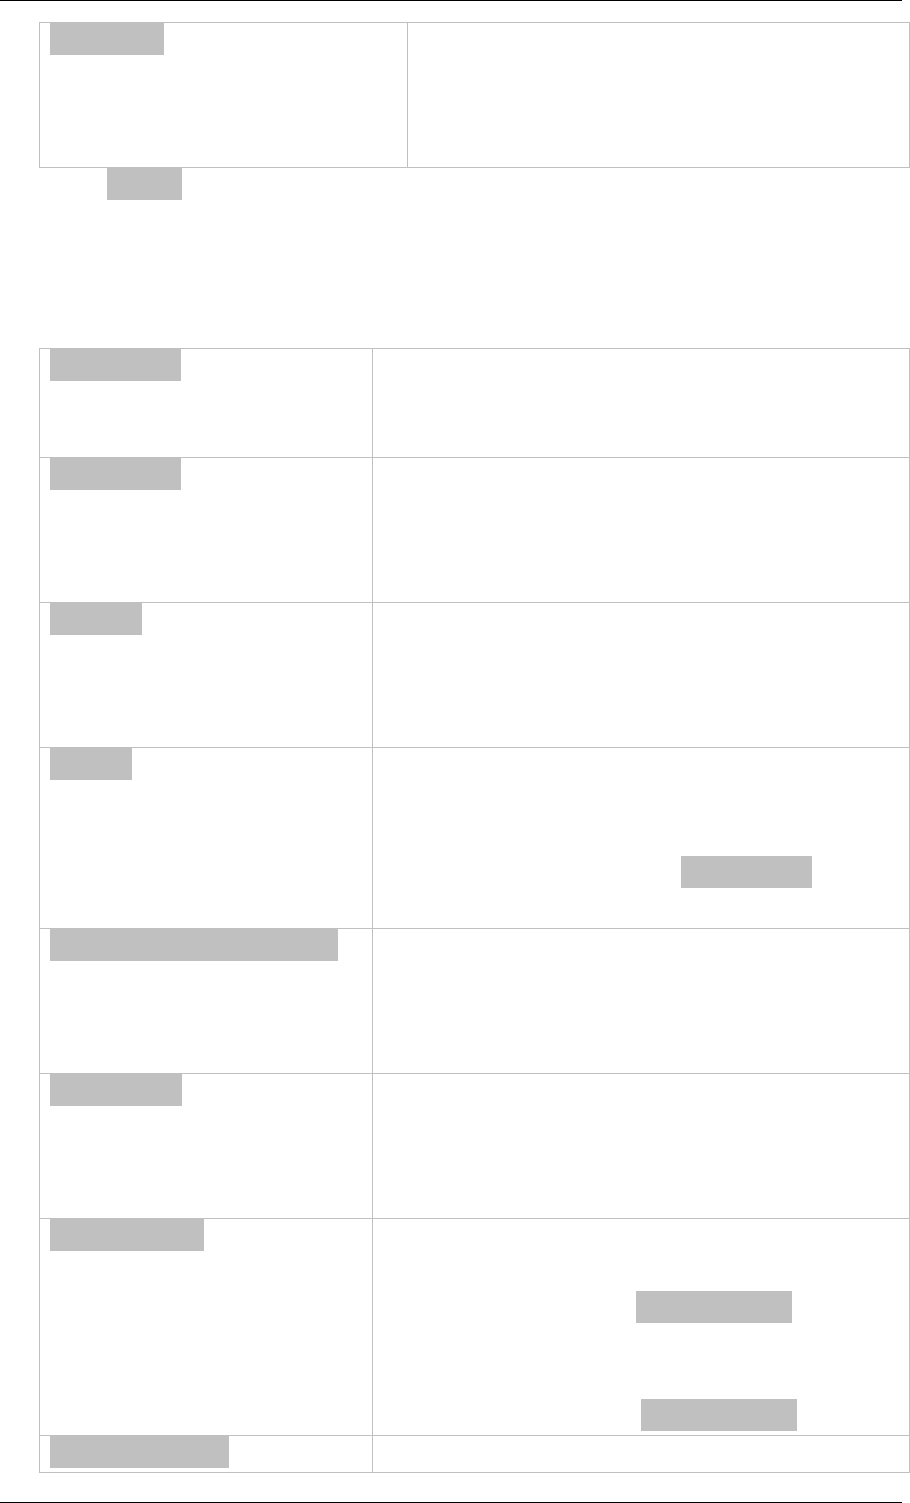
IP_Select Radio buttons allow users to set IP address
on either Auto (DHCP client) or Specific (Fix
IP).
Default to Auto mode.
IP_Addr Text edit field allows users to set IP address
under Specific IP mode, in format of
xxx.xxx.xxx.xxx
Mask Text edit field allows users to set Mask under
Specific IP mode, in format of xxx.xxx.xxx.xxx
Gateway Text edit field allows users to set Gateway
address under Specific IP mode, in format of
xxx.xxx.xxx.xxx
DNS1 Text edit field allows users to set first DNS
address under Specific IP mode, in format of
xxx.xxx.xxx.xxx
DNS2 Text edit field allows users to set second DNS
address under Specific IP mode, in format of
xxx.xxx.xxx.xxx
LAN_Port Radio buttons allow users to enable or
disable the Ethernet interface. Default to
Disable mode.
SSID Text edit field allows users to manage the
SSID of WiFi network.
Maximum 20 characters, default to
SBMAMA.
Stand_seconds_at_Install_Mode Text edit field allows users to set the display
duration in second for install mode. If the
networking status is connected then photo
frame will move to operating mode after it.
Authentication Radio buttons allow users to select the
authentication method on WiFi. There are
mode NONE, WEP, WPA and WPA2.
Default to NONE.
WEP_Key Text edit field allows users to set the
encryption key for WEP mode, maximum 20
characters.
WPA_PSK Text edit field allows users to set the
encryption key for WPA and WPA2 mode,
maximum 20 characters.
Operation Menu
6
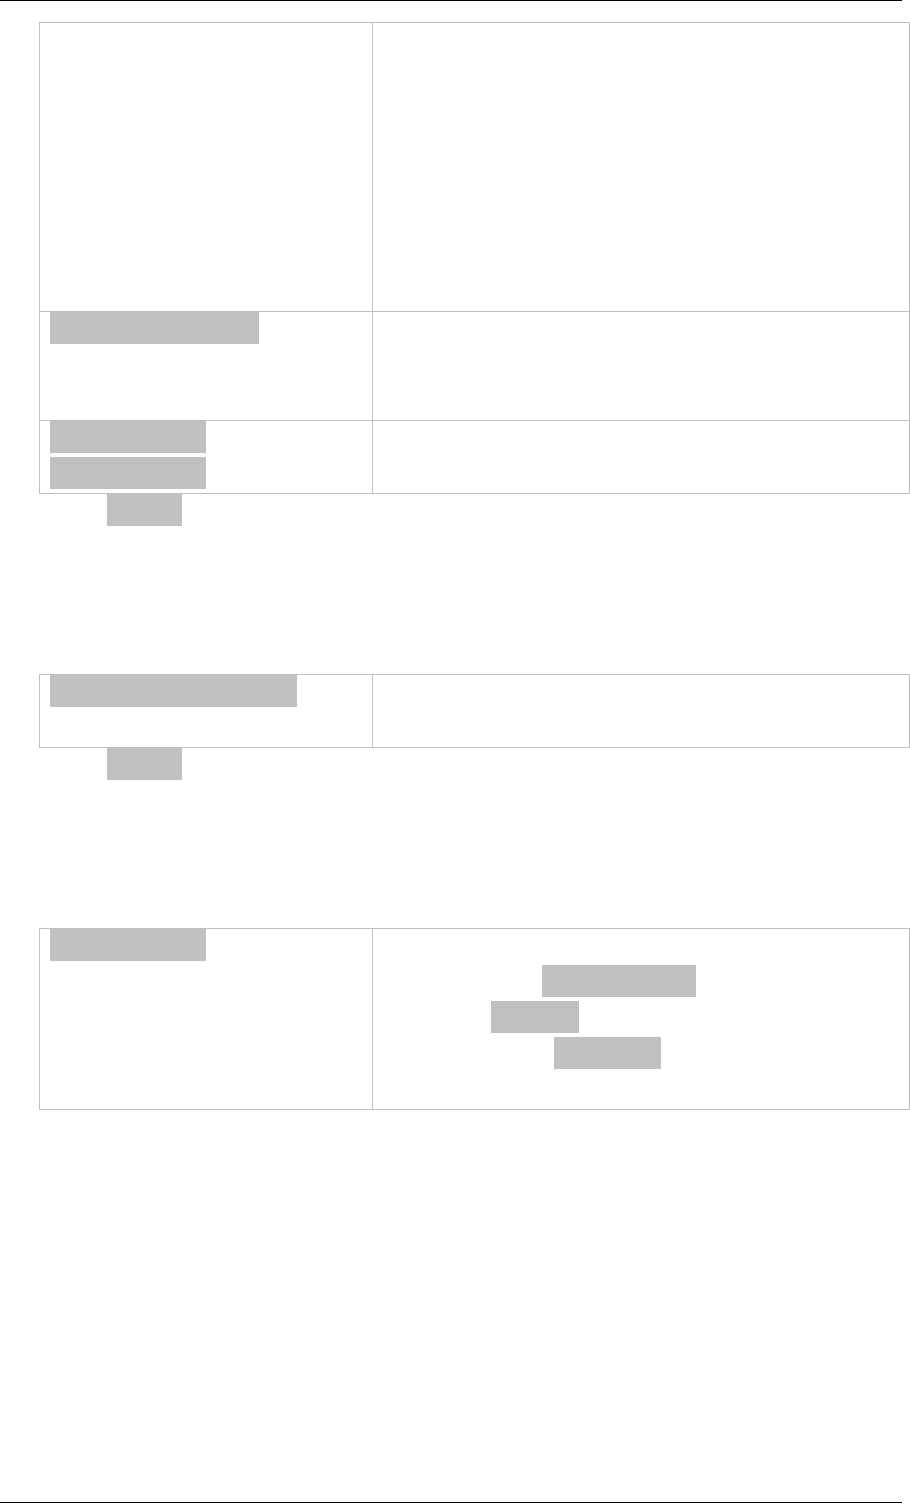
Encryption Radio buttons allow users to select the
encryption method on WPA and WPA2
mode. There are method TKIP and AES.
Default to TKIP.
Press Submit button to update the parameters to photo frame.
4.3 RSS parameters
Sync_Policy Radio buttons allow users to select the RSS
synchronization policy, on either Once or
Online.
User_button Radio buttons allow users to select the function
on User Button. There are Disable, User Off,
Select Feed, and Interaction modes. Default to
Disable.
LED_On Text edit field allows users to set the LED on
seconds after pressing the user button, value in
range of 0 to 9999 seconds. LED will not
function if user button is under disable mode.
UserOff Text edit field allows users to set the hours to
turn off backlight after pressing user button,
value in range of 0 to 9999 hours. This field is
used only if the function of User_button be set
to User Off.
Default_slide_show_period Text edit field allows users to set the deault slide
show period, value in range of 0 to 32767
seconds. This default value is used only if the
duration tag is missed on RSS download file.
Default_TTL Text edit field allows users to set the deault TTL,
value in range of 0 to 32767 minutes. This
default value is used only if the ttl tag is missed
on RSS download file.
Feed_Timeout Text edit field allows users to set the timeout of
Feed download in range of 0 to 32767 minutes.
Photo frame will show Default_Image if it failed
to download the Feed over this timeout value.
Default to 0 means ignore the failure of Feed
download, not to show Default_Image.
Transition_Effect Radio buttons allow users to select the transition
Operation Menu
7
effect between slideshows. There are Random,
Top down, Bottom up, Horizontal close,
Horizontal open, Random Horizontal lines,
Forward brick fill, Random brick fill, Backward
brick fill, Whirlpool, Wave, Left to right, Right to
left, Vertical close, Vertical open, Random
vertical lines, Meet, Fade out and in and Fade
in and out effects. Default to Fade in and out.
Current_Feed_URL A display only data field shows the current Feed
URL. The Feed URL can be changed by user
button of selected feed mode.
Feed_URL__1 to
Feed_URL_16
Text edit field allows users to set 16 Feed URL,
maximum 80 characters for each.
Press Submit button to update the parameters to photo frame.
4.4 Reset to factory default
Reset to factory default Tick the check box field and press submit button
to reset all the parameters to factory default.
Press Submit button to update the parameters to photo frame.
4.5 Default_Image
Default_Image This image will be shown if failed to download
feed over the Feed_Timeout minutes.
Press the Browser button and pick one jpg file,
then press the Download button to send it to
photo frame.
Operation Menu
8
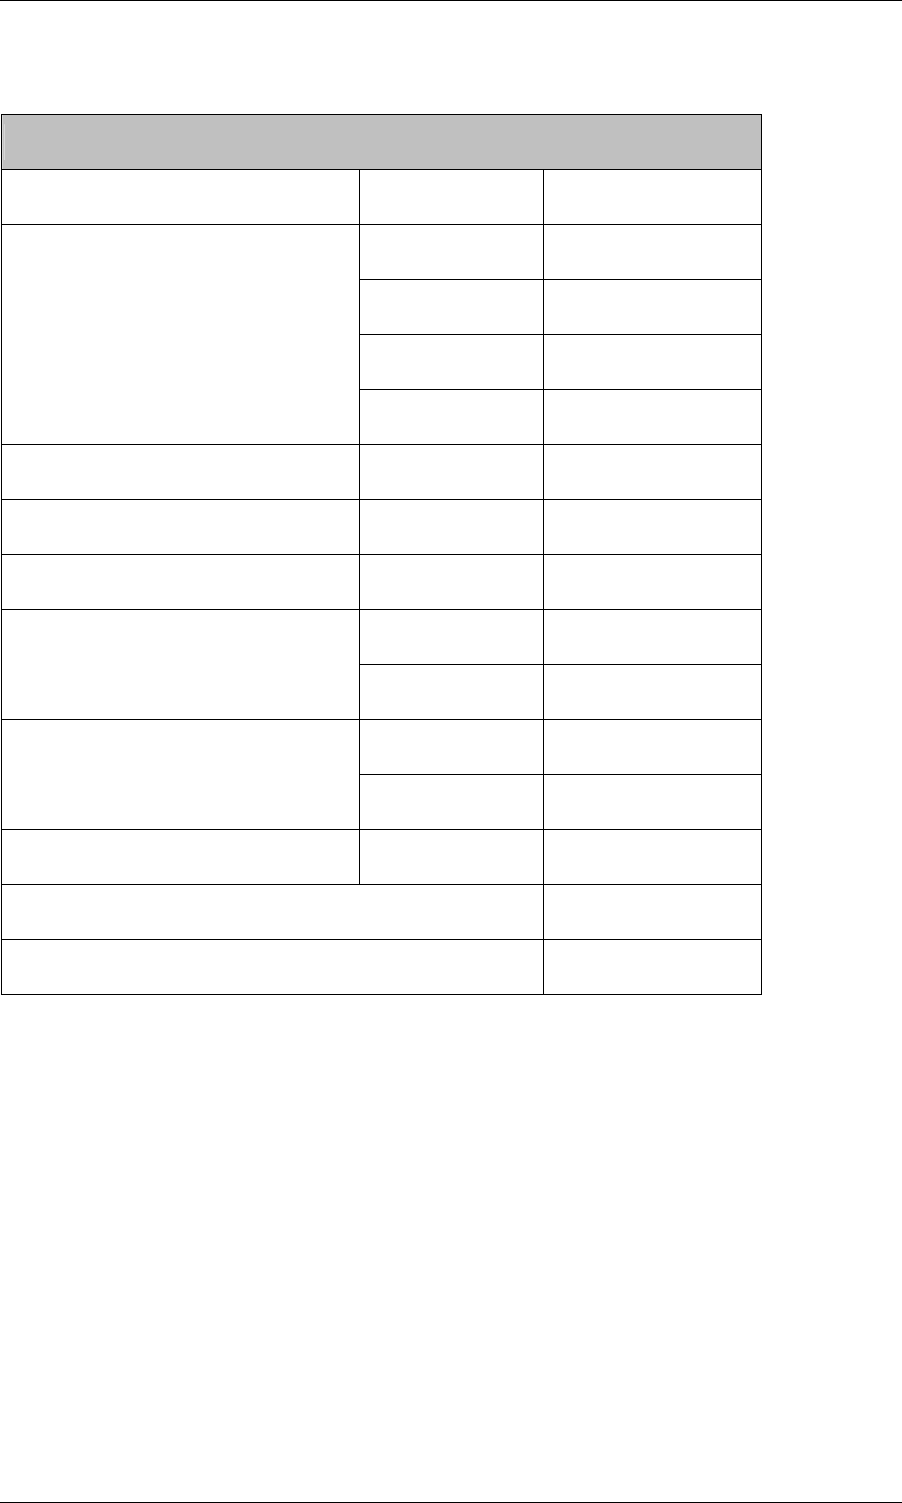
5. Specification
Specification
Item Description 10.4inch
LCD Type Digital TFT-LCD
Support Color Full-colors
Resolution 800x600
Display
Screen Ratio 4:3
Certification & Safety CE, FCC, RoHS Compliance
Main Chip Type ARM11
Operation System System Linux
SDRAM 64MB(Byte)
System Internal Memory
NAND Flash ROM 1GB
WiFi optional(11n/g/b)
Networking
RJ-45 connection supported
USB 2.0 Port – Host (For F/W upgrade) Type-A supported
AC/DC Power Adapter:100~240V DC 5.3V/2.5A
Light sensor supported