X NET NETHAWK-N2 NETHAWK User Manual User guide GARU7000
X-NET Oy NETHAWK User guide GARU7000
X NET >
User guide GARU7000

NetHawk Analyser 1
Ver 5.0 GARU7000
NETHAWK ANALYSER USER´S GUIDE
NETHAWK ANALYSER
USER'S GUIDE
Version: 5.0
Revision Date: 30.09.99

2NetHawk Analyser
Ver 5.0 GARU7000
Precautions NETHAWK ANALYSER
NETHAWK ANALYSER
USER'S GUIDE
April, 01
Document number GARU7000
IBM is a trademark of International Business Machines Corporation.
Windows 95, Windows 98 and Windows NT are trademarks of Microsoft Corporation.
Notice:
•All rights reserved. Reproduction of any part of this user's guide in any form whatsoever without
written permission from X-Net is forbidden.
•The contents of this user's guide are subject to change without notice.
•X-Net accepts no responsibility for any errors in this user's guide.
Copyright 1998, 1999 X-Net Oy

NetHawk Analyser 3
Ver 5.0 GARU7000
NETHAWK ANALYSER Precautions
TABLE OF CONTENTS
1. Precautions............................................................................................................................................ 4
2. Installation ............................................................................................................................................ 5
2.1 What do I need to install the NetHawk Analyser ............................................................... 5
2.2 Installing the N2 card.......................................................................................................... 6
2.3 Connecting to G.703 interface with N2.............................................................................. 6
2.4 Connecting to G.703 interface with NPC........................................................................... 7
3. Specifications and performance............................................................................................................ 8
3.1 N2 specifications ................................................................................................................ 8

4NetHawk Analyser
Ver 5.0 GARU7000
Precautions NETHAWK ANALYSER
1. Precautions
Follow the instructions in this manual. They are meant to ensure your own
safety and to prevent any damage to the NetHawk adapter and to your PC.
Keep the NetHawk adapter at room temperature for 12 hours before
installation. This ensures that any moisture is dried from the adapter surface.
•Electrical current from PC power and communications cables is
hazardous. For the safety of yourself and others you should always
connect the PC and other equipment to properly grounded mains
outlet.
•Always handle the NetHawk adapter carefully to avoid accidentally
damaging it.
•The NetHawk adapter is meant to be used in normal room
temperatures. The allowed operational temperature is +10 - +40 °C
(+50 - +100 °F) and relative humidity 20 - 85 %.
•Note that the PC equipment and NetHawk adapter may be damaged if
you power them up below +10 °C.
•Remember to take proper anti static precautions in order to avoid
damage to the equipment due to static discharge.
•X-Net Oy accepts no responsibility for any damage done to the
analysed device when connecting cables, nor is it responsible for
damage made to the NetHawk adapter or to the analysed device when
using self made cables.
In case of Ethernet adapters delivered with NetHawk analysers, follow the
instructions provided by the manufacturer of the adapter.

NetHawk Analyser 5
Ver 5.0 GARU7000
NETHAWK ANALYSER Installation
2. Installation
This chapter explains the installation of the NetHawk adapters and the
NetHawk Analyser software. There are five different NetHawk adapters:
- NetHawk Advanced PCM Card (NAP),
- NetHawk CardBus PCM Card (N2),
- NetHawk PCM Card for E1 interface (NPC E1),
- NetHawk PCM Card for T1 interface (NPC T1) and
- NetHawk ISDN Card (NIC).
The analyser software may be:
- NetHawk GSM,
- NetHawk V5,
- NetHawk SS7,
- NetHawk ISDN or
- NetHawk ISDN BRI
Performance of the NetHawk Analyser depends on the performance of your
PC. The README.TXT file states the requirements for the latest analyser
version.
2.1 What do I need to install the NetHawk Analyser
Before you start installing the analyser check you have all the necessary
components available. When installing the one card version of the NetHawk
Analyser you should have:
-a PC,
- software license agreement and 31/2'' diskette(s) containing the
NetHawk Analyser software,
- one NetHawk adapter,
- optionally, an Ethernet adapter delivered with the NetHawk Analyser
- User's Guide (this document) and
- one set of cables.
When installing the two card version there are additional parts:
- second NetHawk adapter and
- another set of cables.
6NetHawk Analyser
Ver 5.0 GARU7000
Installation NETHAWK ANALYSER
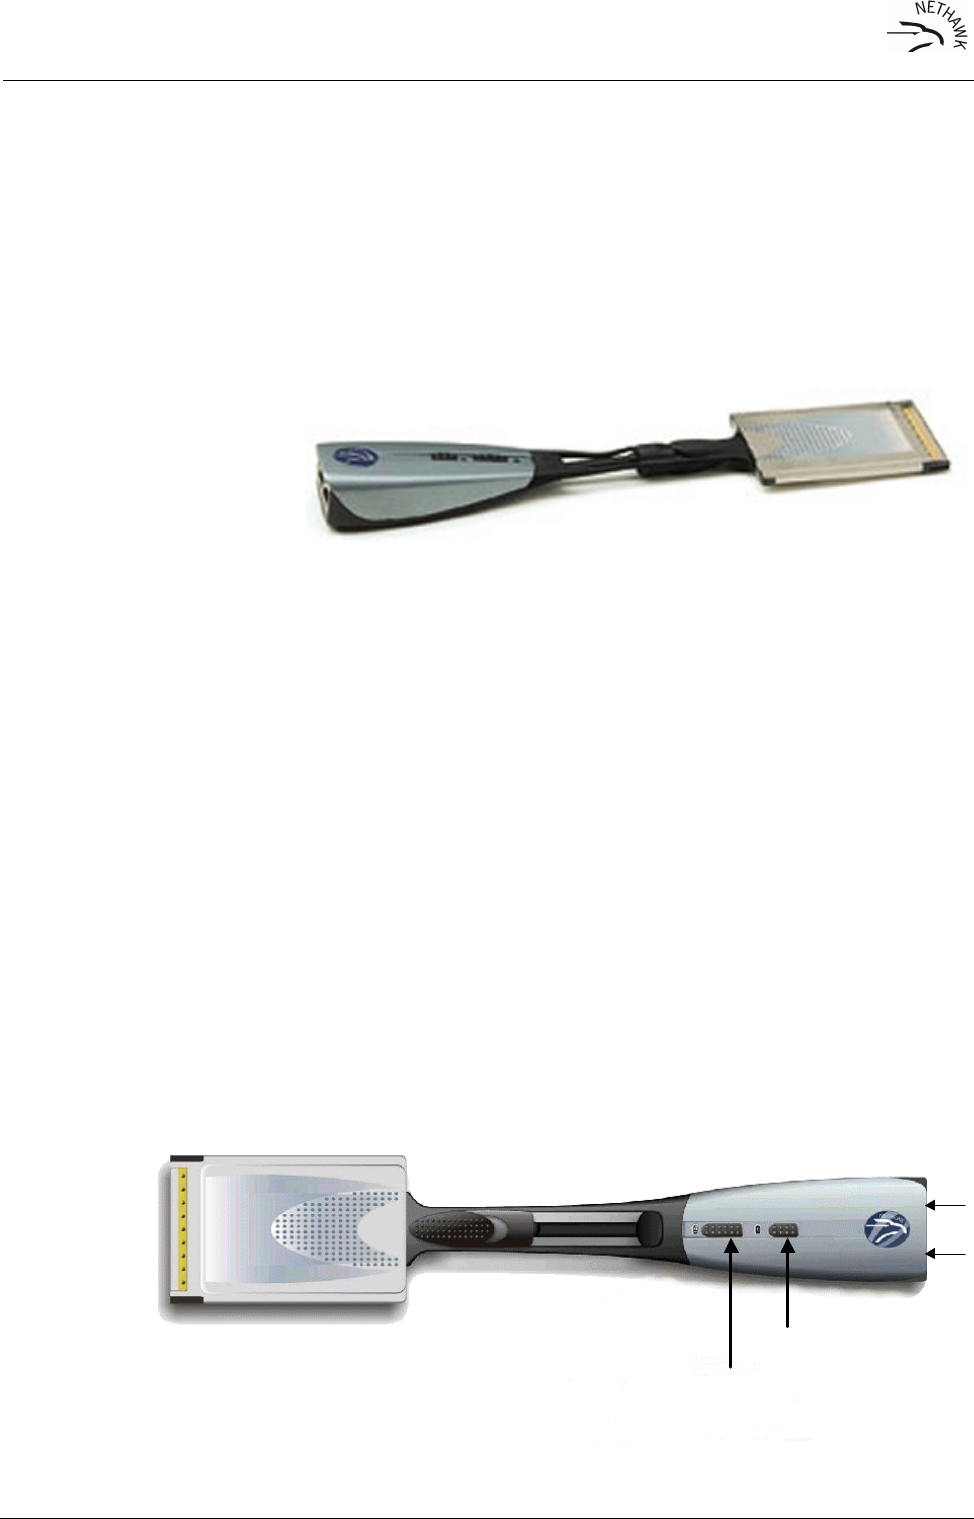
2.2 Installing the N2 card
The N2 is a CardBus (PC Card type II ) adapter. Open the parcel carefully
and remove the card from its package.
There are three parts that make the NetHawk product: adapter for CardBus
slot (PCC), a POD that contains the physical interface and a connecting
cable. Note that the cable has been soldered both to the POD and to the
PCC. Do not attempt to disconnect the cable!
N2 adapter.
When you plug the NetHawk adapter in the slot of your PC, the PC Card
software automatically reserves resources for the card.
Please check that the high/low impedance switch of the N2 POD is set to
HIGH position.
2.3 Connecting to G.703 interface with N2
The N2 requires a PC Card type II slot with CardBus interface. The physical
interface of the N2 adapter can be configured with software. You can select
either the 2 Mbit/s E1 interface or the 1.544 Mbit/s T1 interface. The
selection is made from the User Interface of the NetHawk analyser
(Tools|Options|Hw -dialog).
When monitoring a G.703 interface, you should connect the NetHawk
parallel to the G.703 line to be analysed. The type of the standard
monitoring cable for N2 card is 3045C.
Connectors and selectors of N2 adapter
Nominal impedance selector
Coarse impedance selector
Line 1
Line 2
POD
PCC
NetHawk Analyser 7
Ver 5.0 GARU7000
NETHAWK ANALYSER Installation
Check that the 'coarse impedance selector' is in HIGH position before
connecting the N2 to the line.
You can analyse one physical G.703 line with one N2 adapter. You can have
up to 2 N2 adapters installed to your PC. To monitor two (2) PCM lines, a
second N2 card and two-card software version has to be purchased.
N2 is connected to the G.703 line like NPC adapter. See ch. 4.15
'Connecting to G.703 interface with NPC' for more details.
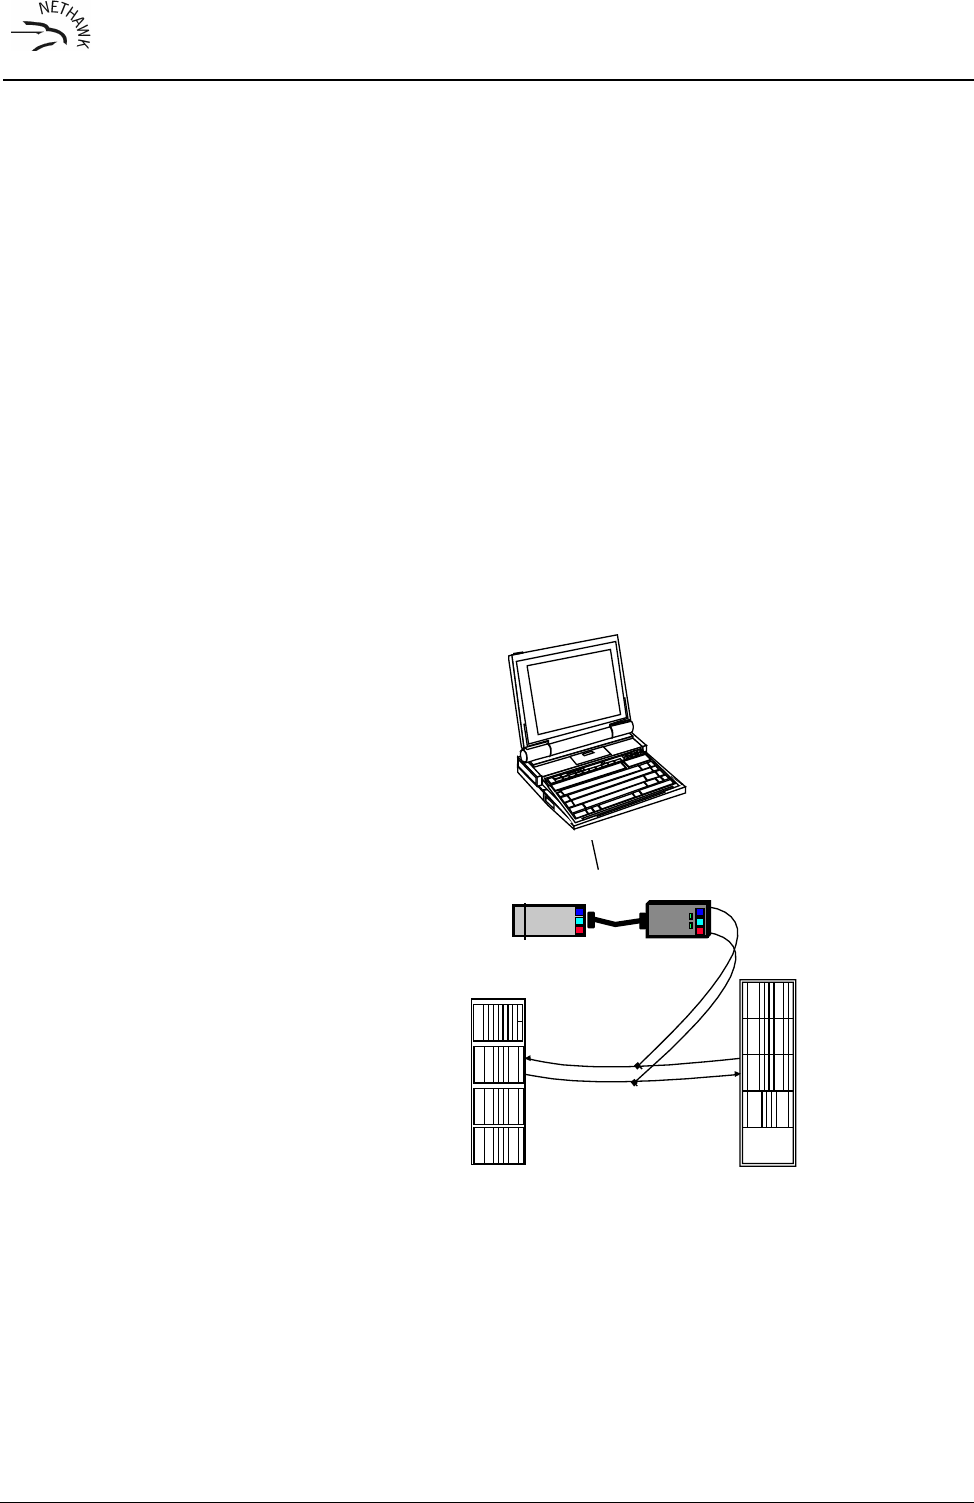
2.4 Connecting to G.703 interface with NPC
The NPC requires a PC Card type III slot. There are two types of NPC
adapters: the NPC E1 for the 2 Mbit/s E1 interface and the NPC T1 for the
1.544 Mbit/s T1 interface.
When monitoring a G.703 interface, you should connect the NetHawk
parallel to the G.703 line to be analysed. The type of the standard
monitoring cable for NPC card is 3005.
Exchange 1 Exchange 2
NetHawk E1 or T1 Adapter
Connecting NPC or N2 to a G.703 line.

8NetHawk Analyser
Ver 5.0 GARU7000
Specifications and performance NETHAWK ANALYSER
L2L1
H L
PCM line 2 connector
PCM line 1 connector
Impedance selector
Handset connector
Line 2 status indicator
Line 1 status indicator
Connectors of NPC POD.
When the cables are firmly connected and NPC has been plugged in the slot
of your PC, you can start the NetHawk Analyser to seek traffic in G.703
interface.
At start-up an information window will be displayed. Open the ‘Setup
Connections’ dialog by pressing F7. If you want to view pre-recorded traffic
select the ‘File’ radio button from the ‘Source’ pane and click the ‘Trace
file’ button to select the file. You can monitor up to eight connections
simultaneously. Activate the time slots that you want to monitor. You can
also activate the built-in Scanner (click ‘Tools|Scanner’ from main menu) of
the analyser to search for the signalling and traffic timeslots from the PCM
for you.
The monitoring window will display the signalling messages on the
connections you have activated according to the default decoding settings.
Press F6 to change the settings.
If you wish, you can save the set-up to be used later. Type F7. Enter the
name for your configuration file. If you use the name Default.gcf, the
NetHawk will load this file automatically the next time you start it.
You can do the same action for the trap file. NetHawk will load the traps
defined in Default.gtd at start-up.
3. Specifications and performance
3.1 N2 specifications
Dimensions: PCC POD
Height 5,0 mm 25,5 mm
Width 54,0 mm 38,0 mm
Depth 85,6 mm 90,0 mm

NetHawk Analyser 9
Ver 5.0 GARU7000
NETHAWK ANALYSER Specifications and performance
Weight 100 g
Electrical values
Power supply 3,3 V
Current consumption 650 mA
CardBus
The ‘PC Card Standard 1995 release’ compatible CardBus host interface.
68 pin connector.
PCM interface
According to G.703 specification
Input impedance >> 120 Ω
Receiver performance
The signal levels 36dB below the level specified in G.703 can be detected.