X Rite orporated KOHSPEC Spectrophotometer User Manual CE Declaration
X-Rite Incorporated Spectrophotometer CE Declaration
UserManual
Spectrophotometer
User Guide
Version 1.0

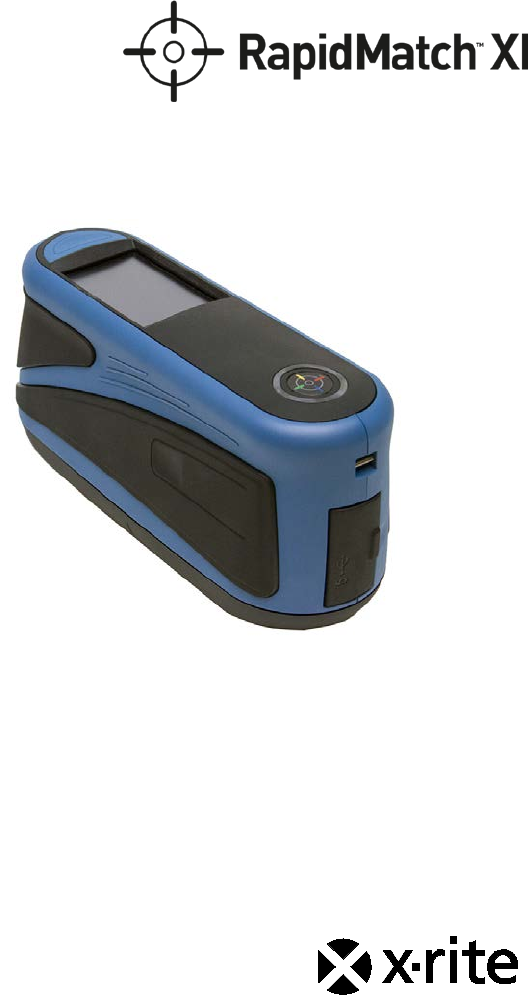
RapidMatch™ XI Spectrophotometer
2
CE Declaration
Hereby, X-Rite, Incorporated, declares that this device is in compliance with the
essential requirements and other relevant provisions of Directive(s) R & TTE
1999/5/EC, LVD 2014/35/EU and RoHS 2011/65/EU.
Hereby X-Rite Incorporated declares that this device is in compliance with the
technical regulations of the customs union according to declaration registration
number: ТС N RU Д-US.А301.В.01051
For more information please see http://fsa.gov.ru/
Federal Communications Commission Notice
NOTE: This equipment has been tested and found to comply with the limits for a Class A
digital device, pursuant to Part 15 of the FCC Rules. These limits are designed to provide
reasonable protection against harmful interference when the equipment is operated in a
commercial environment. This equipment generates, uses, and can radiate radio
frequency energy and, if not installed and used in accordance with the instruction manual,
may cause harmful interference to radio communications. Operation of this equipment in a
residential area is likely to cause harmful interference in which case the user will be
required to correct the interference at his own expense.
NOTICE:
Changes or modifications made to this equipment not expressly approved by
(manufacturer name) may void the FCC authorization to operate this equipment.
Industry Canada Compliance Statement
CAN ICES-3 (A) / NMB-3 (A)
NOTICE:
This device complies with Part 15 of the FCC Rules and with Industry Canada licence-
exempt RSS standard(s).
Operation is subject to the following two conditions:
this device may not cause harmful interference, and this device must accept any
interference received, including interference that may cause undesired operation.
Le présent appareil est conforme aux CNR d'Industrie Canada applicables aux appareils
radio.
exempts de licence. L'exploitation est autorisée aux deux conditions suivantes:
(1) l'appareil ne doit pas produire de brouillage, et
(2) l'appareil doit accepter tout brouillage radioélectrique subi, même si le brouillage est
susceptible d'en compromettre le fonctionnement.
RF Exposure
• The radiated output power of the device is far below the FCC radio frequency
exposure limits. Nevertheless, the device shall be used in such a manner that
the potential for human contact during Wi-Fi transmission is minimized.
• La puissance rayonnée par cet appareil est très inférieure aux limites
d'exposition aux ondes radio définies par la FCC. Néanmoins, l’appareil doit être
utilisé de telle manière que le potentiel de contact humain pendant la
transmission par Wi-Fi soit minimisé.
RapidMatch™ XI Spectrophotometer
3
Safety
• WARNING: This instrument is not for use in explosive environments.
• Do not immerse the instrument in liquid.
• Transportation: This product contains a lithium-ion battery. Should you need to
ship this device, you may wish to consult published guidance documents by one
or more of these organizations for advice on how to comply with the regulations:
IATA, ICOA, IMDG & PHMSA. The battery contained in this device is 107g in
weight, 7.4V, 2.4 Ah, and complies with the UN 38.3 tests in effect the year it
was originally shipped.
• The RapidMatch™ XI product is a sensitive measurement instrument. If the
instrument experiences a drop, a calibration should be performed before any
measurements are taken to ensure the instrument is working properly. Refer to
the Calibration section for information on performing a Calibration.
Certifications and Compliance
• cULus listing, FCC part 15B & subpart C, CeC BC, Industry Canada Class A,
CE, RCM, EAC, BIS, PSE, NOM, KC, KCC, KMEPS, IRAM, CCC, China RoHS,
BSMI, SII, ISC, KONCAR, KUCAS, SASO, KEBS, ST COA, KVALITET, PSB,
SONCAP, SABS, UKR cert.
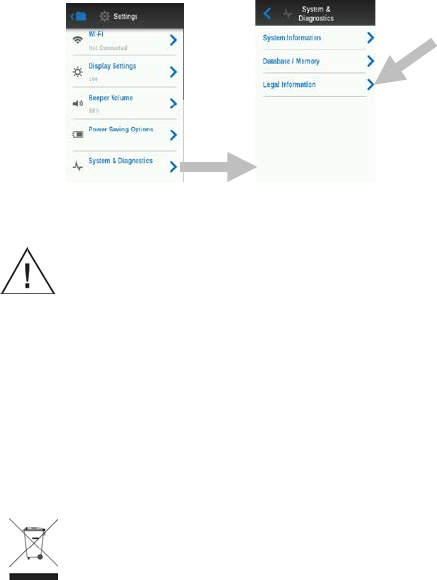
• See the “Legal Information” menu on the device for Certification and
Compliance, including FCC ID. To view, choose Settings > System and
Diagnostics > Legal Information.
Equipment Information
Consult this documentation in all cases where the Attention symbol appears.
This symbol is used to inform you of any potential HAZARD or actions that may
require your attention.
Use of this equipment in a manner other than that specified by X-Rite,
Incorporated may compromise design integrity and become unsafe.
To avoid discomfort, do not look directly into the measurement optics when the
instrument is on.
Operational hazard exists if a power adapter other than the one provided is used.
Use the rechargeable Li-ion batteries provided; other types may cause personal
injury or damage to the device.
Please remove the battery from the device before shipping.
Instructions for disposal: Please dispose of Waste Electrical and Electronic
Equipment (WEEE) at designated collection points for the recycling of such
equipment.
RapidMatch™ XI Spectrophotometer
4
1. Packaging
Standard
• RapidMatch™ XI instrument
• USB interface cabling
• Power adapter
• Power cords
• Calibration reference
• Battery pack
• Safety strap
• USB Image library (contains
User Guide)
• Two light seals
• Screen protector
Optional
• Carrying case
• Home base
2. Overview
3. Installing the Battery Pack
Your new instrument is shipped from the factory with the battery pack
removed. The battery pack is located in the instrument case and should be
charged before use. The instrument will also operate from the power adapter
without a battery pack installed.
Use the rechargeable Li-ion batteries; other types may cause
personal injury or damage to the device. Replacement batteries can
be purchased from your authorized X-Rite representative or E-One
Moli Energy Corp.
NOTE: If the battery pack is ever dropped, check it for damage and
replace if necessary. Refer to Section 17 Specifications.
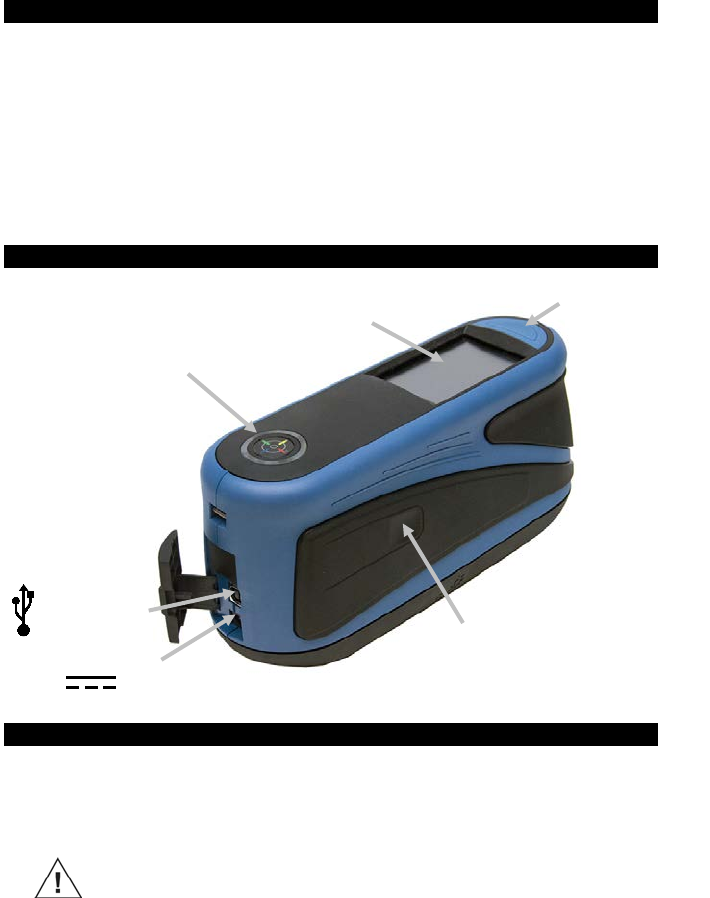
Power on/off and
measure button
USB data input
Indicator LED
Side measure button
(button also available on
opposite side)
Glass touch screen
Power adapter input
RapidMatch™ XI Spectrophotometer
5
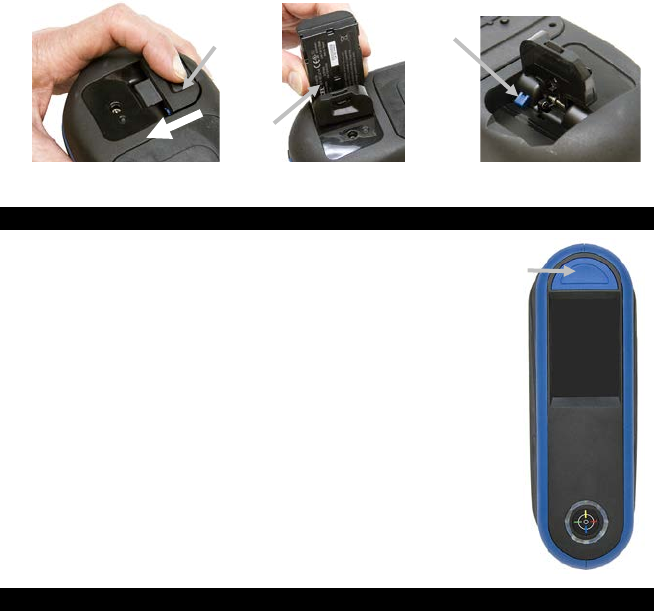
1. Carefully turn the instrument over and slide open the latch (1) that
secures the battery pack access cover. Open the access cover.
2. Slide the new battery pack (2) into the instrument with the battery contacts
facing down until the battery is positioned below the holding latch (3).
3. Close the access cover by pressing down until it locks into position.
4. Powering On
Press the power on/off and measure button
or plug in the power adapter to turn on the
instrument. If the instrument does not power
up after pressing the power button, the
batteries may require charging.
You can press and hold the button for three
seconds, and then tap Power Off in the
display to turn off the instrument.
5. Charging the Battery Pack
General
• The battery pack for your new instrument comes in a low to medium
charge state and should be charged before use (up to 4 hours for full
charge).
• A charged battery pack may eventually lose partial charge if not used
for an extended amount of time. You should charge the battery from
time to time and store in a cool environment when not in use to
maintain battery performance.
• The battery pack can be charged in the instrument (Refer to Section 6
Connecting the Power Adapter) or by use of the optional charging
station. The charging station is useful for charging up to two battery
packs.
• Battery Charge Temperature Range 5°C to 40°C.
(1)
(2)
(3)
Power on/off
measure button
RapidMatch™ XI Spectrophotometer
6
Battery Lifespan Expectations
• Lithium-ion batteries typically decay to 80% capacity after 700 charge
cycles. A charge cycle can be defined as several partial charges
equaling 100%. Partial charge and discharge cycles will help maintain
the life of the battery. It is best to avoid full discharge and charge
cycles. After roughly 700 charge cycles are reached, the amount of
measurements you can expect to achieve from one full charge is
reduced. At this point, you may wish to replace the battery pack.
Disposal
• Dispose of the battery pack in a designated disposal location for
recycling.
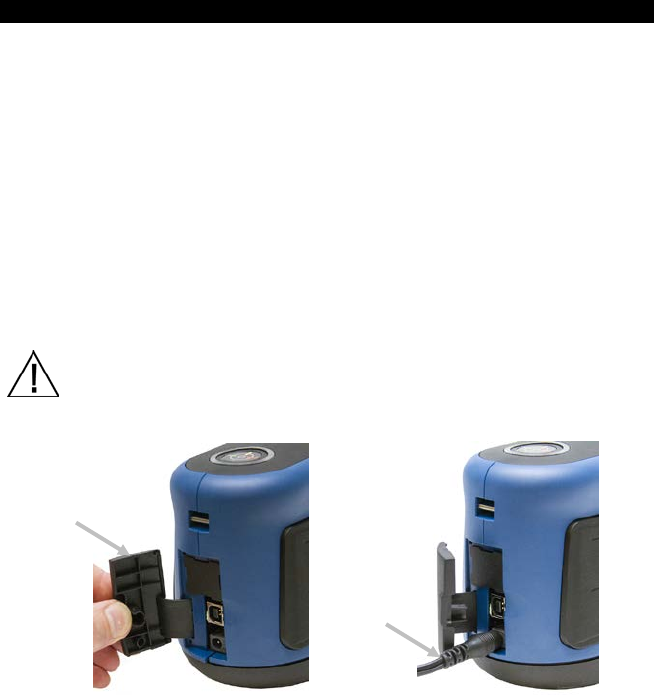
6. Connecting the Power Adapter
NOTE: The instrument can operate from the power adapter only. The
battery pack does not need to be installed. The power adapter overrides
any charge condition of the battery pack in the instrument. Measurements
can be taken even with a very low battery condition when using the power
adapter and the battery pack is charging.
1. Verify the voltage indicated on the power adapter complies with the AC
line voltage in your area.
2. Open the access cover (1) at the back of the instrument.
3. Insert the small plug from the power adapter (2) into the input connector
on the instrument.
4. Plug the detachable line cord in the power adapter and plug the line cord
into the wall receptacle.
Power Adapter Ratings
Input: 100-240V 50-60 Hz and Output: 12VDC @ 2.5A
Operational hazard exists if a power adapter other than the one provided
is used.
(1)
(2)
RapidMatch™ XI Spectrophotometer
7
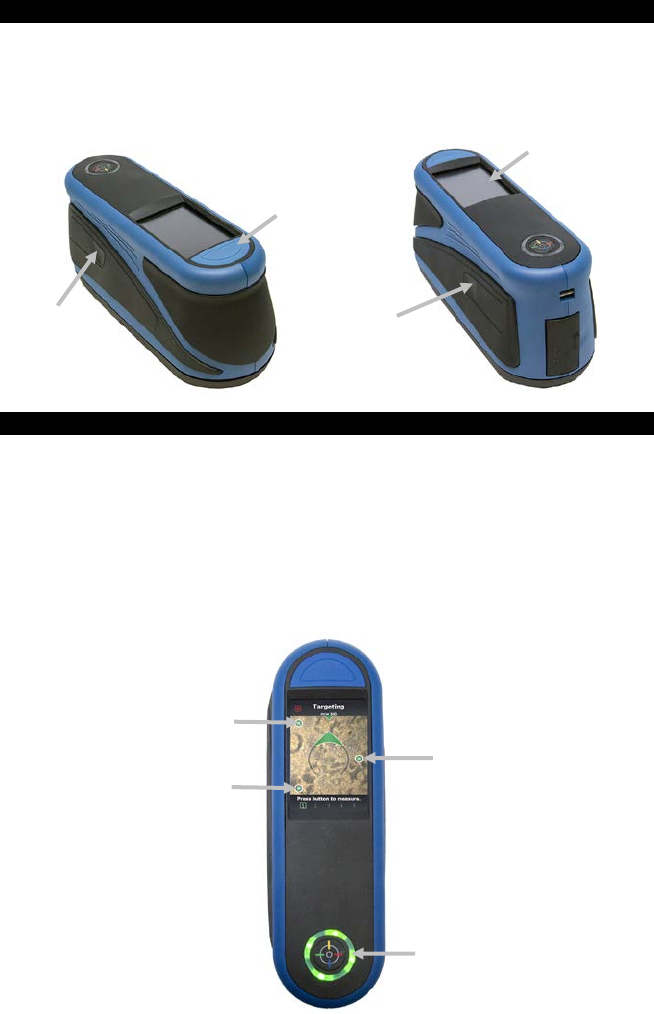
7. Measure Buttons
The instrument incorporates three measure buttons. One measure button (1)
is located on the top of the instrument. This is the same button that is used to
power on and off the instrument. The other two buttons are located on the left
(2) and right (3) sides of the instrument. You can also tap the center of the
screen (4) to initiate a measurement.
8. Pressure Sensors, Indicators and LEDs
The indicators in the screen are arranged in the same pattern as the pressure
sensors located around the measurement port.
• Green Indicator: ideal pressure is being applied to the corresponding
sensor. A measurement can be taken when all three indicators illuminate
green.
• Red Indicator: the required pressure is not being applied to the
corresponding sensor. Correct pressure must be applied to achieve a
green indicator condition.
(1)
(3)
(2)
Pressure sensor
indicator
LEDs
Pressure sensor
indicator
Pressure sensor
indicator
(4)

RapidMatch™ XI Spectrophotometer
8
The Circular multi-color LED located on the top of instrument provides visual
feedback on the status of a measurement and pressure sensors.
• Green LED: Indicates all three pressure sensors are activated properly
and a measurement can now be triggered.
• Red LED: Indicates one or more of the pressure sensors is not properly
activated or an error has occurred during a measurement.
• White LED: Indicates the instrument is being powered on or the power
adaptor is plugged in.
• Off: Indicates the instrument is in battery mode or off, not ready to
measure, or not in measure mode.
9. Main Screen
When the instrument is powered-up, the main (top level) screen appears after
the diagnostics test is complete. Select the modes by tapping the icons
located on the display screen.
Add New Job: This mode is the main mode of operation. Sample
measurements are taken, saved and analyzed in this mode.
Completed Jobs: This function is used to view and delete stored jobs.
Open Jobs: This function displays current jobs that have been downloaded
from the software and require measurements.
Settings Mode: The settings mode is used to set and edit the instruments
configuration options, and to enter the calibration mode. The settings options
should be reviewed before you use your instrument for the first time.
Footer Bar: Displays the calibration status, Wi-Fi connection (where
applicable), battery life status, and current time.
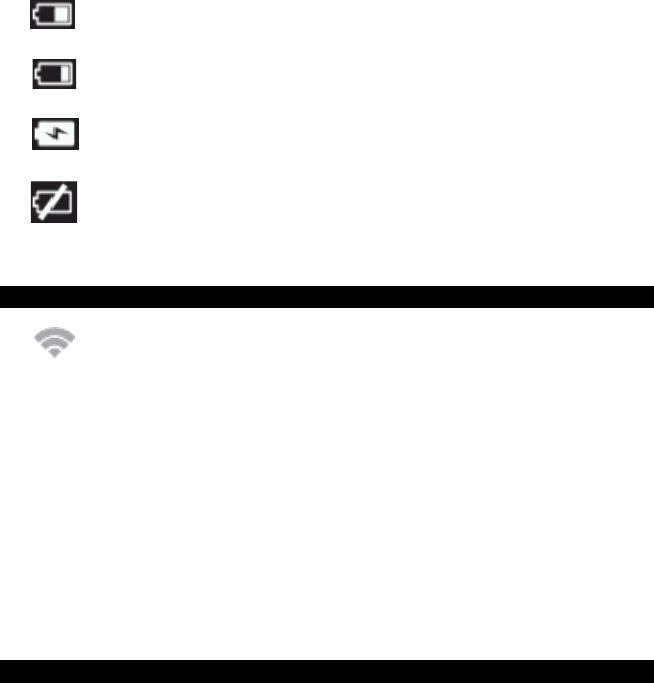
10. Battery Gauge
The battery gauge on the display depicts the current condition of the battery
pack.
Indicates the battery pack is fully charged.
Completed jobs
Add new job
Settings mode
Open Jobs
Footer Bar
RapidMatch™ XI Spectrophotometer
9
Indicates the battery pack has a sufficient charge for a substantial
number of measurements.
Indicates the battery pack is low, but measurements are still possible.
Battery pack should be charged soon
Indicates the power adapter is plugged in and the battery pack is
charging.
Indicates the power adapter is plugged in and no battery pack is
installed.
11. Wi-Fi Option
This option is used to activate or deactivate Wi-Fi mode.
The Wi-Fi icon appears at the bottom of the display when the option is
activated in the Settings.
To activate, tap Wi-Fi and then tap the toggle switch. When the toggle switch is
in the right position the option is ON, and when the toggle switch is in the left
position the option OFF.
Once activated, the screen will show all available networks.
RapidMatch XI supports Wi-Fi standards IEEE 802.11 b/g/n in the 2.4GHz
Band. For maximum data transmission speed, channel bandwidth in the
settings of the wireless Access Point (AP) should be set to 40MHz or auto.
Please note that the AP will default back to 20MHz if the area is congested
with a high number of APs.
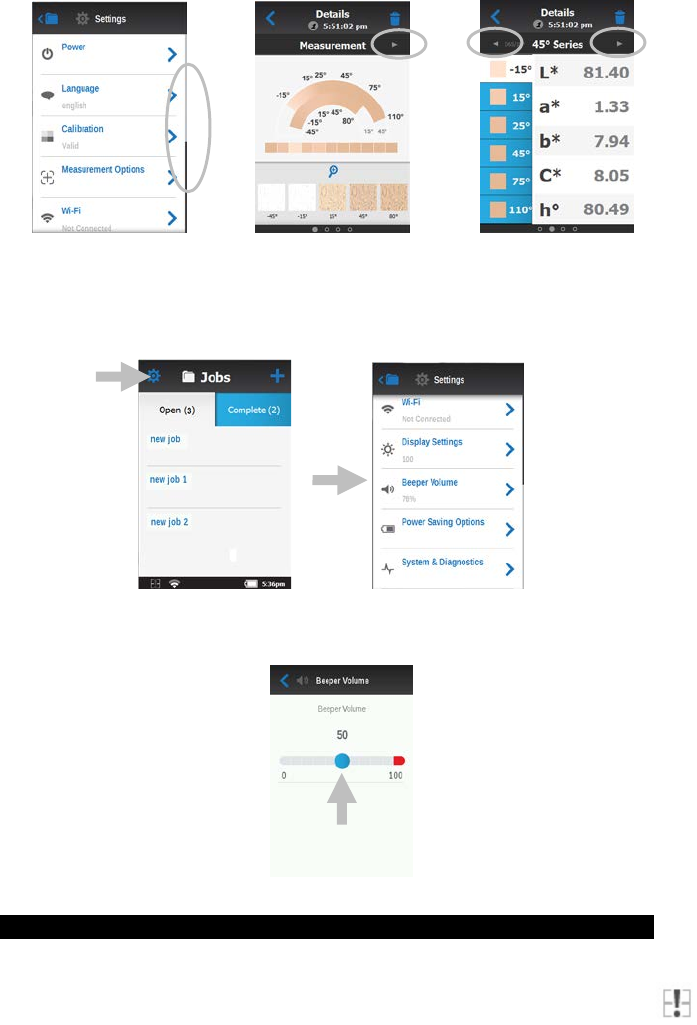
12. Navigating the Screen
The instrument features a graphical touch screen display. All functionality is
accessed directly through the screen.
Scrolling through Settings and Data
A scroll bar appears on screens when some settings or measurement data
cannot be accessed from the main view. A scroll bar on the right indicates
additional settings or data views are available. Swipe the screen up or down
to view the additional settings.
Left and right arrows at the top of the screen indicate that additional data is
available. Swiping the screen or tapping the arrows moves the screen to the
next available data screen. Swiping to the right or tapping the arrow returns
the screen to the previous view.
RapidMatch™ XI Spectrophotometer
10
Opening Settings and Jobs
Settings and jobs are accessed by tapping the corresponding icon on the
screen. For this example, the Settings icon was tapped to open the Settings
screen.
For setting controls that navigate from side to side, slide the dot
icon to the right or left to change the parameter. The Beeper
Volume option is shown below.
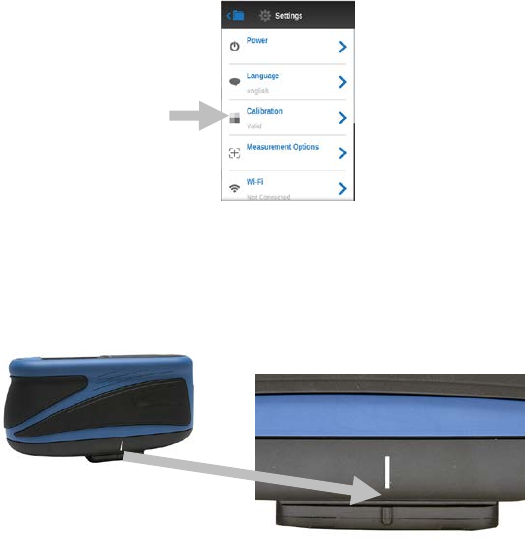
13. Calibration
The instrument must be calibrated on the white tile and effect tile every 30
days. The calibration icon at the bottom of the screen changes to indicate that
RapidMatch™ XI Spectrophotometer
11
a calibration must be performed. No measurements can be taken until the
calibration is completed.
NOTE: Make sure to use the calibration reference supplied with the
instrument for calibrating. Do not substitute this reference with a
reference from another instrument. The serial number on the
reference should match the reference serial number displayed on
the instrument screen during calibration.
• The white tile in the calibration reference is dramatically affected by
smudge marks, dust, and finger prints.
Cleaning the Calibration Reference
The white tile and effect tile in the calibration reference should be
cleaned using a mild soap and warm water solution, thoroughly rinsed
with warm water, and wiped dry with a clean, lint-free cloth. You must let
the reference dry completely before taking a calibration measurement.
• Do not move instrument while taking a calibration measurement. If
motion is detected, an error message will be displayed and calibration
aborted.
• When in calibration mode, swipe the screen to the left for additional
information on positioning.
1. Select the Calibration option from the Settings menu. Note: If
“Calibration required” message appears, advance to Step 2.
2. Tap Calibrate to continue with the calibration.
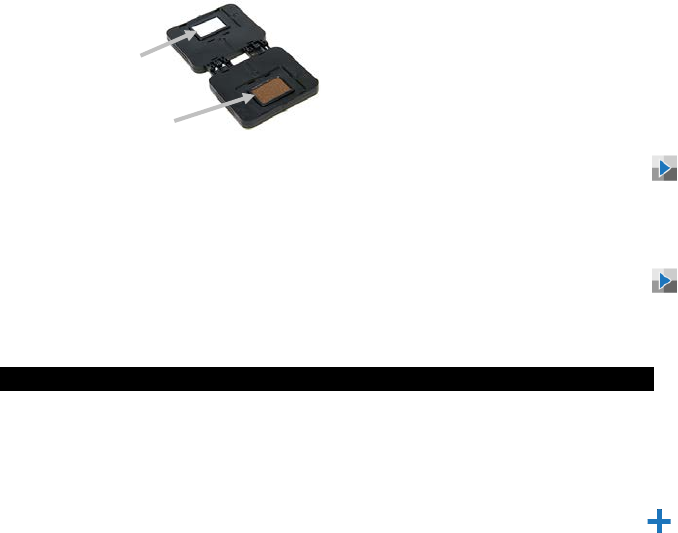
3. Lay the calibration reference flat. Position the instrument on the
calibration reference over the white tile (1) so that the three pressure
sensors around the measurement port align with the slots in the
calibration reference, and the white line aligns with the reference marks.
RapidMatch™ XI Spectrophotometer
12
4. When ready, press the Measure button or tap the Calibrate icon in the
screen. Do not touch the instrument throughout the measurement
sequence.
5. After calibration is completed, remove the instrument from the
white tile and position the measurement port over the effect tile
(2) in the calibration reference. Press the Measure button or tap
the Calibrate icon in the screen. Do not touch the instrument
throughout the reference verification sequence.
14. Measurement
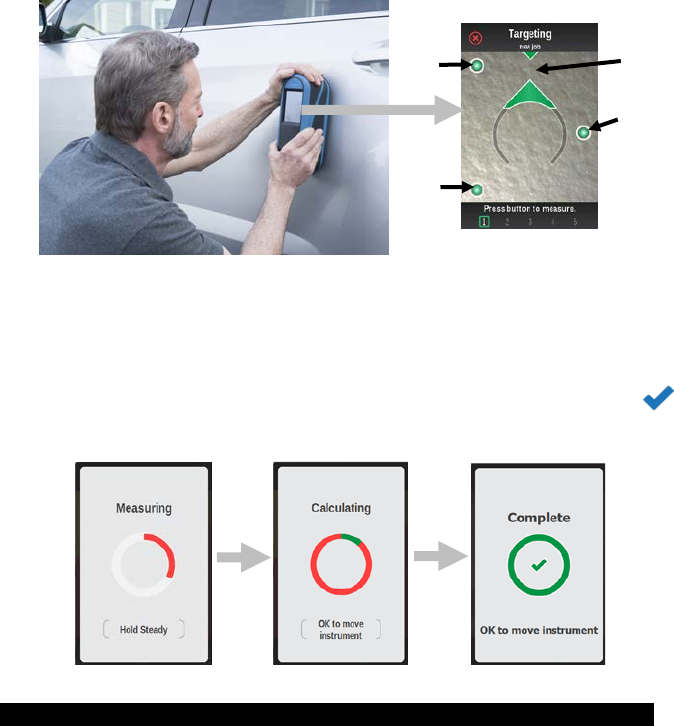
The Job mode is used to measure, view and delete sample data. The
following is a general job measurement procedure.
1. Search for a check area near the repair spot that is as flat as possible
and clean the area.
2. From the Main screen, select a downloaded job from the Open list or
tap the new job icon at the top of the screen to start a new job. The
instrument goes into targeting mode.
3. Using both hands, rotate the instrument to a vertically aligned position
with the top Measure button (1) up. Locate the measurement port in the
bottom of the instrument over the first measurement area while viewing
the screen (2). The large alignment arrow in the center of the screen
should turn green and be aligned with the small green arrow at the top
of the screen (3).
4. Gently rock the instrument until all three positioning indicators (4) in the
screen turn green. This indicates that all three pressure sensors are
activated.
(1)
(2)
RapidMatch™ XI Spectrophotometer
13
5. Hold the instrument steady and press a Measure button or tap the
screen to initiate a measurement. Continue to hold the instrument
steady until “Calculating” (5) appears in the screen.
6. Continue with the remaining area measurements to complete the job.
7. Tap the check mark icon on the Summary screen to save the job and
return to the main job screen.
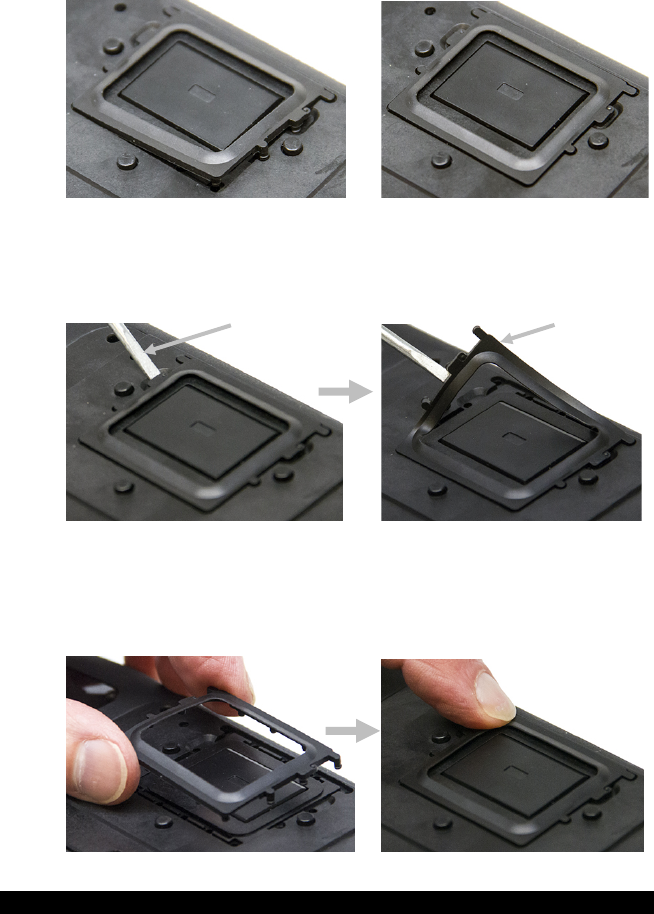
15. Light Seal Check and Replacement
The light seal that surrounds the measurement port on the bottom of the
instrument is important in providing consistent and accurate measurements.
Refer below for information on proper light seal installation.
Checking the Light Seal Installation
Verify the seal is lying flat and properly installed. If not, press into place using
your finger.
(5)
(4)
(3)
(4)
(4)
(2)
(1)
RapidMatch™ XI Spectrophotometer
14
Not Properly Installed Properly Installed
Replacing the Light Seal
1. Using your finger nail or a small flat blade screwdriver (1), lift out one
edge of the light seal (2) from the recessed area and remove.
2. Orientate the new light seal over the recessed area around the
measurement port.
3. Press the new light seal into place until all 14 of the rubber tabs are
inserted properly and the light seal is lying flat.
16. Cleaning
The exterior of the instrument may be wiped clean with a cloth dampened in
water or mild cleaner. Dried paint on the exterior of the instrument can be
carefully removed using a paint scraper.
(1)
(2)

RapidMatch™ XI Spectrophotometer
15
Important Notes:
• DO NOT use any solvents to the clean the instrument, this will
cause damage to the cover and internal electronic components.
• Compressed air should not be used to clean the instrument.
Cleaning the instrument with blown air can cause dirt on the outside
of the instrument to enter into the device, and contaminate optical
components.
17. Specifications
Environmental
• Operating Temp: 50°F to 104°F (10°C to 40°C)
• Humidity Max: 85% RH max (non condensing)
• Storage Temp: -4°F to 122°F (-20°C to 50°C)
Battery
• Cells: 2, Size: 18650
• Voltage: 7.4V
• Capacity: 2.4AH (2400mAh)
• Max Discharge: 2.4A
• Max Charge: 2.0A
• Package: Hard Plastic Case
• Compliance: UL Listed,PSE,KCC,CE,UN38.3,
• IEC CB 621331-1 2ND Edition
• Contains internal overcurrent & overvoltage protection
18. Troubleshooting
Prior to contacting X-Rite support department for instrument problems, try the
applicable solution(s) described below. If the condition persists, contact us
using one of the methods listed in the Service Information section.
Problem
Cause
Solution
Instrument not
responding.
Instrument is in
power down mode.
Press the power button.
Battery pack is very
low or bad.
Charge the battery.
If battery pack is bad, replace the
battery pack.
No battery pack
installed.
Install batteries or plug in power
adapter.
Reset the instrument from the
Settings>Systems &

RapidMatch™ XI Spectrophotometer
16
Diagnostics>Systems
Information screen.
Measurement
error or results
appear
inaccurate.
Material being
measured is
damaged (e.g.
scratched)
Obtain new material.
Instrument requires
calibration.
Refer to the Calibration
procedure.
Calibration
procedure fails.
Calibration reference
is dirty or damaged.
Clean the reference per
procedure in the Calibration
section, or replace if damaged.
Instrument and
software not
communicating
(USB
connection).
Interface cable not
connected.
Connect the interface cable
between the computer and the
instrument.
Close and restart the software
application. If this does not work,
reboot the computer.
Reset the instrument from the
Settings>Systems &
Diagnostics>Systems
Information screen.
Instrument will not
measure or
calibrate.
Sensor indicators in
the display do not
change color.
Make sure the light seal is lying
flat and not interfering with the
pressure sensors on the bottom
of the instrument. Refer to the
Light Seal Check and
Replacement section for
information on properly installing
a light seal.
Pressure sensors are not
working correctly. Put the
instrument into targeting mode
and place the instrument on a flat
surface and then lift. If one or
more of the sensor indicators in
the display do not change color
when lifted, there may be a
problem with the pressure
sensor. Contact technical
support.
Light seal not
installed properly or
damaged.
Refer to the Light Seal Check
and Replacement section for
information on properly installing
a light seal.

RapidMatch™ XI Spectrophotometer
17
19. Service Information
X-Rite provides repair service to their customers. Because of the complexity
of the circuitry, all warranty and non warranty repairs should be referred to an
authorized service center. For non warranty repairs, the customer shall pay
shipping and repair cost to the authorized service center, and the instrument
shall be submitted in the original carton, as a complete unaltered unit, along
with all the supplied accessories.
X-Rite, Incorporated has offices around the world. You can contact us using
one of the following methods:
• To identify the X-Rite service center nearest you, please visit our
web site at: www.xrite.com.
• For online help, visit our web site (www.xrite.com) and click the
Support link.
• Send an e-mail to Technical Support: casupport@xrite.com detailing
your problem and listing your contact information.
20. Replacement Parts
Part
Part Number
USB cable
SE108-USBAB-03
Line Cord – US 10A – 125V
SD33-07
Line Cord – European 10A – 250V
SD33-08
External Power Supply
SE30-277
Safety Strap
MA98-99
Screen Protector
KOH-27088
Light Seal
KOH-26506
External Battery Charger
SE15-42
Battery
SE15-40
RapidMatch™ XI Spectrophotometer
18

Corporate Headquarters
X-Rite, Incorporated
4300 44th Street SE
Grand Rapids, Michigan 49512
Phone 1 800 248 9748 or 1 616 803 2100
Fax 1 800 292 4437 or 1 616 803 2705
European Headquarters
X-Rite Europe GmbH
Althardstrasse 70
8105 Regensdorf
Switzerland
Phone (+41) 44 842 24 00
Fax (+41) 44 842 22 22
Asia Pacific Headquarters
X-Rite Asia Pacific Limited
Suite 2801, 28th Floor, AXA Tower
Landmark East, 100 How Ming Street
Kwun Tong, Kowloon, Hong Kong
Phone (852) 2568 6283
Fax (852) 2885 8610
Please visit www.xrite.com for a local office near you.
X-Rite® is a registered trademark of X-Rite, Incorporated. All other logos, brand names, and product
names mentioned are the properties of their respective holders.
Bulls Eye Logo is a registered trademark and RapidMatch is a trademark of PPG Industries Ohio, Inc.