X Rite orporated TOPAZ TOP-Spectrophotometer User Manual CE Declaration
X-Rite Incorporated TOP-Spectrophotometer CE Declaration
Contents
- 1. User Manual
- 2. User manual_RapidMatch_GO
- 3. User manual_MA3
User manual_RapidMatch_GO
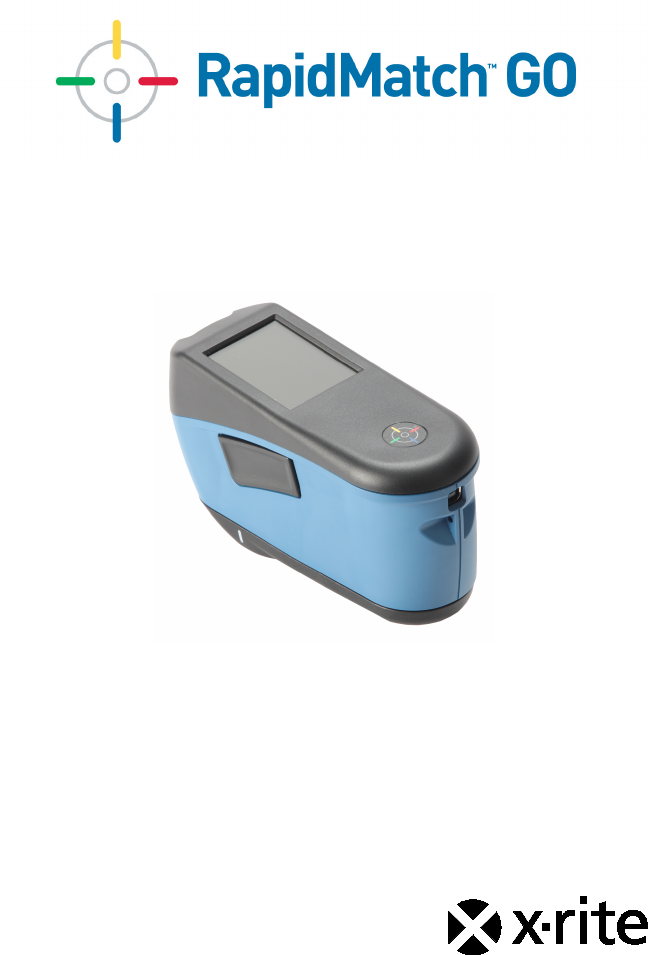
User Guide

RapidMatchTMGO Spectrophotometer
2
Table of Contents
1. Packaging 5
2. Overview 5
3. Powering On 6
4. Charging the Battery 6
5. Measure Button 7
6. Contact Sensors, Indicators and LEDs 8
7. Home Screen 8
8. Navigating the Screen 9
9. WiFi Mode 10
10. Settings Mode 10
11. Calibration 13
12. Measurement 14
13. Cleaning 17
14. Specifications 17
15. Troubleshooting 18
16. Service Information 20
17. Replacement Parts 20
Compliance Information
To view E label Compliance information for WiFi devices, choose Settings > Device
Information > Device Label
CE Declaration
Hereby, X-Rite, Incorporated, declares that this model is in compliance with the
essential requirements and other relevant provisions of Directive(s) EMC Directive
2014/30/EU, LVD 2014/35/EU and RoHS 2011/65/EU.
Models with WiFi:
CE Mark: Radio Equipment Directive (2014/53/EU) CE 1177
Zentri Module No. AMW106
CE Mark: Radio Equipment Directive (2014/53/EU) CE 1177
EN 300 328 V2.1.1
EMC : EN 301 489-1 V2.1.1, EN 301 489-17 V.3.1.1,
EN 55022:2010/AC:2011, EN 55024:2010
Health : EN 62311: 2008
Safety : EN 60950-1:2006+A11:2009+A1:2010+A12:2011+A2:2013
Federal Communications Commission Notice
NOTE: This equipment has been tested and found to comply with the limits for a
Class A digital device, pursuant to Part 15 of the FCC Rules. These limits are
RapidMatchTMGO Spectrophotometer
3
designed to provide reasonable protection against harmful interference when the
equipment is operated in a commercial environment. This equipment generates,
uses, and can radiate radio frequency energy and, if not installed and used in
accordance with the instruction manual, may cause harmful interference to radio
communications. Operation of this equipment in a residential area is likely to
cause harmful interference in which case the user will be required to correct the
interference at his own expense.
Models with WiFi:
Zentri Module No. AMW106
FCC ID: LSV-TOPAZ
RF Exposure requirements for mobile and base station transmission devices, a
separation distance of 20 cm or more should be maintained between the antenna
of this device and persons during operation. To ensure compliance, operation at
closer than this distance is not recommended. The antenna(s) used for this
transmitter must not be co-located or operating in conjunction with any other
antenna or transmitter.
NOTICE:
Changes or modifications made to this equipment not expressly approved by X-
Rite, Incorporated may void the FCC authorization to operate this equipment.
Industry Canada Compliance Statement
CAN ICES-3 (A) / NMB-3 (A)
Models with WiFi:
Zentri Module No. AMW106
IC ID: 20894-TOPAZ
RF Exposure requirements for mobile and base station transmission devices, a
separation distance of 20 cm or more should be maintained between the antenna
of this device and persons during operation. To ensure compliance, operation at
closer than this distance is not recommended. The antenna(s) used for this
transmitter must not be co-located or operating in conjunction with any other
antenna or transmitter.
NOTICE:
Changes or modifications made to this equipment not expressly approved by X-
Rite, Incorporated may void the FCC authorization to operate this equipment.
Modèles avec Wi-Fi :
Module Zentri n° AMW106
ID IC : 20894-TOPAZ
Exigences en matière d'exposition aux radiofréquences pour les appareils de
transmission (mobiles et stations de base) : une distance d'au moins 20 cm doit
être maintenue entre l'antenne de cet appareil et toute personne pendant le
fonctionnement. Afin d'assurer la conformité, il est déconseillé d'utiliser l'appareil à
une distance inférieure à celle-ci. La ou les antennes utilisées pour cet émetteur
ne doivent pas être installées ou utilisées conjointement avec d'autres antennes
ou émetteurs.
REMARQUE :
Les changements ou modifications apportés à cet équipement sans l'autorisation
expresse de X-Rite, Incorporated peuvent annuler l'autorisation d'utilisation de cet
équipement accordée par la FCC.
RapidMatchTMGO Spectrophotometer
4
Japanese Ministry of Internal Affairs and Communications (MIC)
Models with WiFi:
Zentri Module No. AMW106
Equipment Information
Use of this equipment in a manner other than that specified by X-Rite,
Incorporated may compromise design integrity and become unsafe.
To avoid discomfort, do not look directly into the measurement optics when the
instrument is on.
No user serviceable parts in this product.
WARNING: This instrument is not for use in explosive environments.
Do not immerse the instrument in liquid.
Transportation: This product contains a lithium-ion battery. Should you need to
ship this device, you may wish to consult published guidance documents by one or
more of these organizations for advice on how to comply with the regulations:
IATA, ICOA, IMDG & PHMSA. The battery contained in this device is 46g in
weight, 3.6V, 2.15 Ah, and complies with the UN 38.3 tests in effect the year it was
originally shipped.
The instrument is a sensitive measurement instrument. If the instrument
experiences a drop, a calibration should be performed followed by a selftest before
any measurements are taken to ensure the instrument is working properly. Refer
to the Calibration section for information on performing a Calibration.
Instructions for disposal: Please dispose of Waste Electrical and Electronic
Equipment (WEEE) at designated collection points for the recycling of such
equipment.
Firmware Software Licenses
1. Firmware consists of source code of:
Copyright 2006, Atmel Corporation
All rights reserved
Redistribution and use in source and binary forms, with or without modification, are
permitted provided that the following conditions are met:
- Redistributions of source code must retain the above copyright notice, this list of
conditions and the disclaimer below.
- Redistributions in binary form must reproduce the above copyright notice, this list
of conditions and the disclaimer below in the documentation and/or other materials
provided with the distribution.
RapidMatchTMGO Spectrophotometer
5
Atmel's name may not be used to endorse or promote products derived from this
software without specific prior written permission.
DISCLAIMER: THIS SOFTWARE IS PROVIDED BY ATMEL "AS IS" AND ANY
EXPRESS OR IMPLIED WARRANTIES, INCLUDING, BUT NOT LIMITED TO,
THE IMPLIED WARRANTIES OF MERCHANTABILITY, FITNESS FOR A
PARTICULAR PURPOSE AND NON-INFRINGEMENT ARE DISCLAIMED. IN NO
EVENT SHALL ATMEL BE LIABLE FOR ANY DIRECT, INDIRECT, INCIDENTAL,
SPECIAL, EXEMPLARY, OR CONSEQUENTIAL DAMAGES (INCLUDING, BUT
NOT LIMITED TO, PROCUREMENT OF SUBSTITUTE GOODS OR SERVICES;
LOSS OF USE, DATA, OR PROFITS; OR BUSINESS INTERRUPTION)
HOWEVER CAUSED AND ON ANY THEORY OF LIABILITY, WHETHER IN
CONTRACT, STRICT LIABILITY, OR TORT (INCLUDING NEGLIGENCE OR
OTHERWISE) ARISING IN ANY WAY OUT OF THE USE OF THIS SOFTWARE,
EVEN IF ADVISED OF THE POSSIBILITY OF SUCH DAMAGE.
2. Acknowledgement:
Independent JPEG Group License
The Firmware uses source code under the IJG license
1. Packaging
• RapidMatch™GO instrument
• USB interface cabling
• Calibration reference
• Safety strap
• Screen protector
• Spare light seal
• Soft carrying case
• Docking station
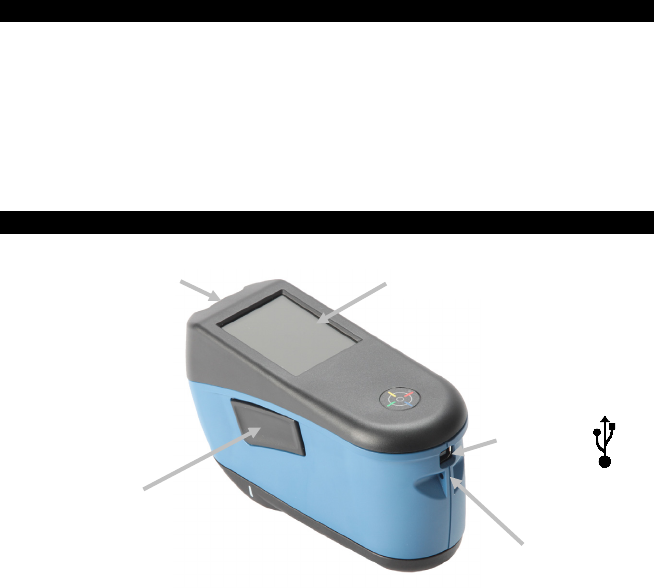
2. Overview
Power on/off and
measure button
USB data
input/battery
charging
Indicator LED
Touch screen
Safety strap
connection

RapidMatchTMGO Spectrophotometer
6
3. Powering On
The power/measure button is used to initiate
the instrument from a power off state. Simply
press the button for about one second to turn
on the instrument. If the instrument does not
power up after pressing the power button, the
battery may require charging. Refer to
Charging the Battery section. The instrument
is also powered on by plugging the USB
cable into your computer’s USB port.
Powering Off
The instrument turns off automatically after two hours of nonuse. It is not
required to turn off the instrument manually.
When first powered up, the instrument goes through a startup procedure and
displays a splash screen before the Home screen appears.
Splash Screen Home Screen
4. Charging the Battery
General
The battery for your new instrument comes in a low to medium charge state
and should be charged before use.
Connect the USB cable to the instrument and your computer’s USB port.
Make sure that the USB cable is connected directly to the computer. A
connection to a USB port of a keyboard or PC monitor or a bus-powered USB
hub is not recommended. PC monitor or keyboard USB ports are low power
USB ports.
Power/measure
button
USB cable
RapidMatchTMGO Spectrophotometer
7
During charging, the instrument switches on and indicates charging with a
“lightning bolt” in the battery icon. The instrument will not power completely
off while plugged into the computer USB port, however, it will go into standby
mode. This is indicated by a blue pulsing LED.
A full charge from empty will take approximately 6 hours connected to a
computer USB port. Alternatively a standard USB charger can be used.
The charging time will not be reduced with a standard USB charger.
A USB charger with at least 500 mA is required. A standard charger with 1 A
will not charge any faster.
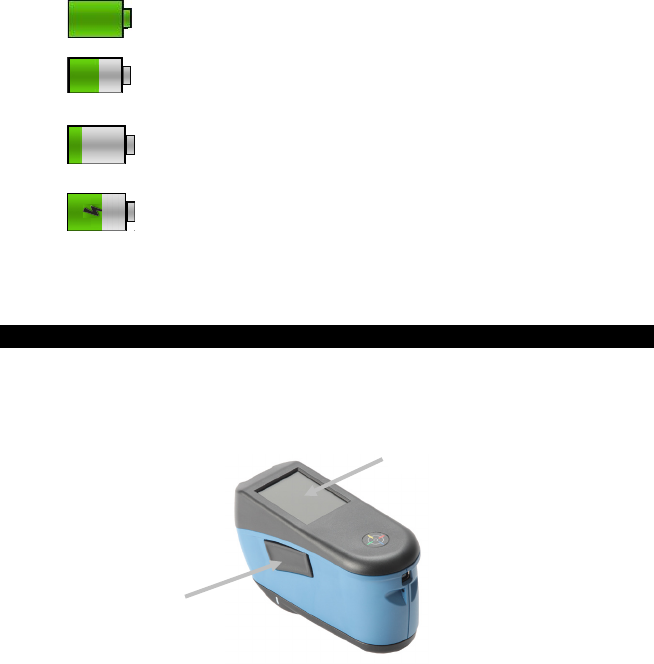
Battery Icon Information
This icon at the top of the screen would indicate the
battery is fully charged.
This icon at the top of the screen would indicate the
battery has a sufficient charge for a substantial number
of measurements.
This icon at the top of the screen would indicate the
battery pack is low, but measurements are still possible.
Battery should be charged soon.
The “lightning bolt” in the center of the icon at the top of
the screen indicates the battery is charging.
Battery status is also reported in the Device Information menu item of the
Settings window.
5. Measure Button
The measure button (1) is located on the side of the instrument. This is the
same button that is used to power on and off the instrument. You can also tap
the center of the screen (2) to initiate a measurement.
NOTE: In case of a firmware crash, this button acts as a RESET button.
Remove the USB cable, press and hold the button for 10 seconds and then
release. The instrument will turn off. Refer to the Troubleshooting section for
additional information.
(1)
(2)
RapidMatchTMGO Spectrophotometer
8
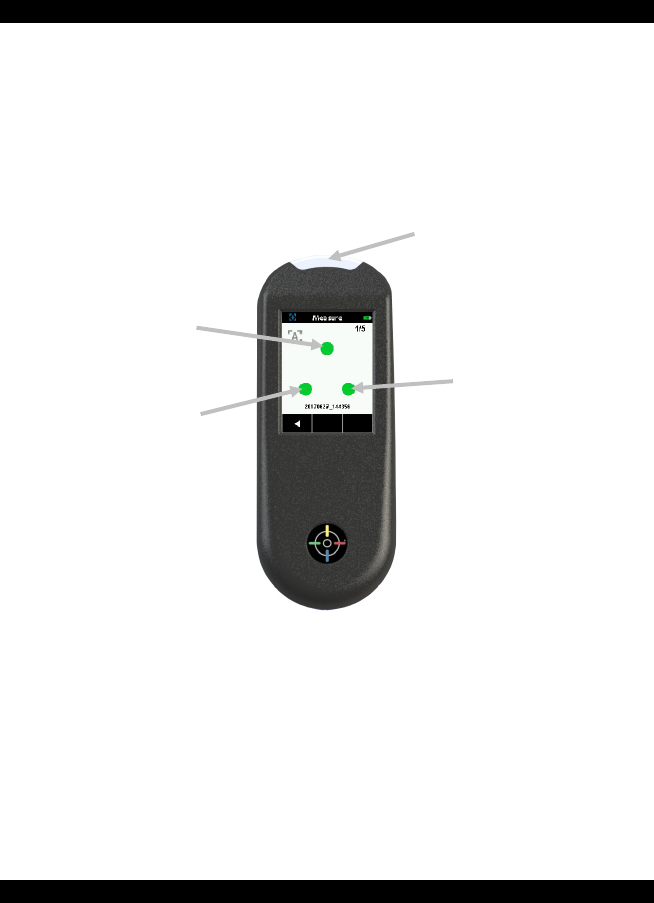
6. Contact Sensors, Indicators and LEDs
The indicators in the screen are arranged in the same pattern as the contact
sensors located around the measurement port.
• Green Indicator: ideal contact is being applied to the corresponding
sensor. A measurement can be taken when all three indicators illuminate
green.
• Red Indicator: the required contact is not being applied to the
corresponding sensor. Correct contact must be applied to achieve a
green indicator condition.
The multi-color LED located on the front of instrument provides visual
feedback on the status of a measurement and contact sensors.
• Green LED: Indicates all three contact sensors are activated properly
and a measurement can now be triggered.
• Red LED: Indicates one or more of the contact sensors is not properly
activated or an error has occurred during a measurement.
• Blue Pulsing LED: Indicates the instrument is in standby mode with the
USB cable plugged into the computer and charging.
• Off: Indicates the instrument is off and not ready to measure.
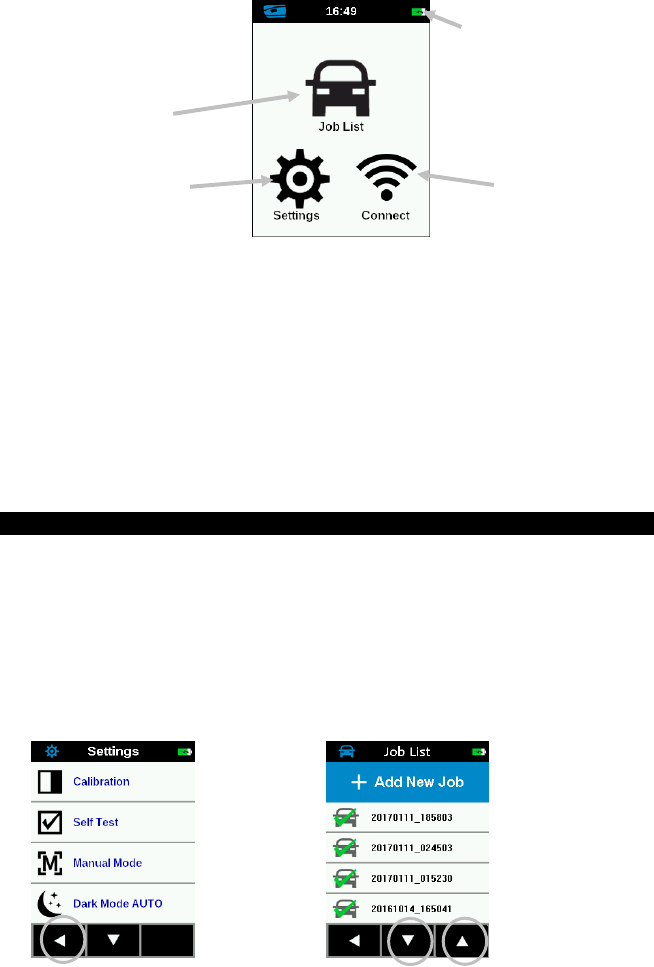
7. Home Screen
When the instrument is powered-up, the home (top level) screen appears
after the startup procedure is complete. Select the modes by tapping the
icons located on the display screen.
Contact sensor
indicator
LEDs
Contact sensor
indicator
Contact sensor
indicator
RapidMatchTMGO Spectrophotometer
9
Job List Mode: This mode is the main mode of operation. Jobs are added,
selected, deleted, and measurements are taken in this mode.
Settings Mode: The settings mode is used to set and edit the instruments
configuration options, and to enter the calibration mode. The settings options
should be reviewed before you use your instrument for the first time.
Connect WiFi: This icon is used to connect to WiFi network. Refer to WiFi
mode section for information.
Header Bar: Displays the current mode, WiFi connection (where applicable),
and battery life status.
8. Navigating the Screen
The instrument features a graphical touch screen display. All functionality is
accessed directly through the screen.
Scrolling through Settings and Jobs
The Up (▲) and Down (▼) arrows appears on screens when some settings
or jobs cannot be accessed from the main view. You can also swipe the
screen up or down to view the additional settings and jobs.
The Left (◄) arrow at the bottom of the screen is used to return the screen to
the previous view.
Connect WiFi
Settings mode
Job List mode
Header bar
RapidMatchTMGO Spectrophotometer
10
Opening Settings and Jobs
Settings and jobs are accessed by tapping the corresponding icon on the
Home screen. For this example, the Settings icon was tapped to open the
Settings screen. See Settings Mode descriptions that follow.
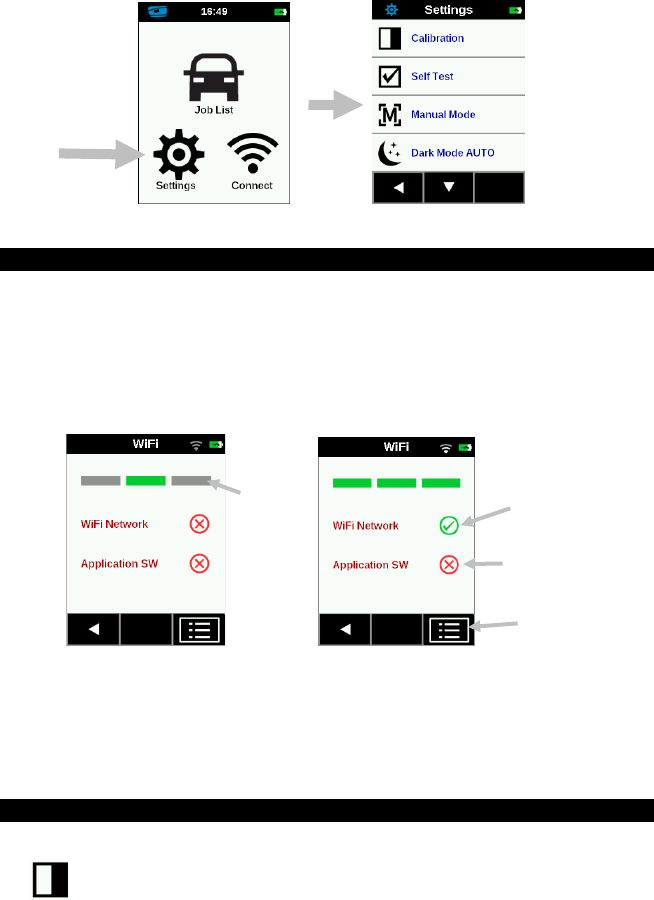
9. WiFi Mode
The WiFi Mode is used to connect to the available networks when activated
in the Settings mode.
1. From the Home screen, tap the Connect icon to access the WiFi
screen.
2. The instrument will search for available networks. Available networks for
connection appear with a green checkmark next to the name.
3. Tap the screen to open the Job Viewer screen.
4. Tap the Settings icon to view the WiFi Settings for the connected
network.
5. Tap the Left (◄) arrow to return to the home screen.
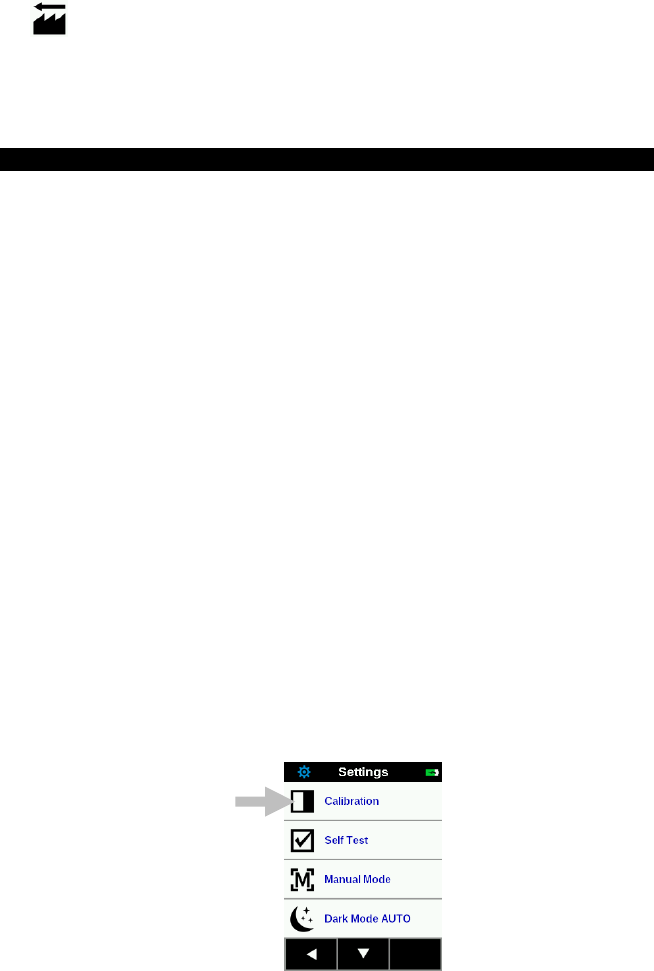
10. Settings Mode
Settings mode is used to adjust and view the instrument’s settings.
Calibration
This option is used to activate the calibration procedure.
Search
bars
Connected to WiFi
network
Customer application
disconnected
WiFi details

RapidMatchTMGO Spectrophotometer
11
To access, tap Calibration. Refer to the Calibration mode section later in this
manual for detailed information on performing a calibration.
Self Test
This option is used to run a self test of the instrument.
1. To activate, tap Self Test and then place the instrument on the white
calibration tile.
2. Tap the Start icon in the display. The self test goes through 10 steps.
Measurement Option
This option is used to set auto measure mode.
Manual Measure: When set to Manual, you must press the Measure button
or tap the screen once all three contact sensor indicators turn green in the
display to take a measurement.
Automatic Measure: When set to Automatic, this option allows the
instrument to automatically take a measurement once all three contact sensor
indicators turn green in the display. No measurement switch press or screen
tap is required. Once a measurement is taken, the instrument must be
repositioned in order for another measurement to occur.
Dark Mode Option
This option is used to help reduce measurement noise on very dark sample
measurements.
Off: When set to off, the option is not utilized.
Manual: When set to Manual, the instrument will display a message after the
first measurement asking if you would like to turn on dark mode when a dark
sample is detected. Select Yes to turn on Dark Mode or select No to continue
without the option being used.
Automatic: When set to Automatic (default setting), the instrument
automatically switches to dark mode after a dark sample is detected.
Speaker Option
This option is used to turn the instrument speaker on or off. The instrument
beeps when the screen is tapped, after a measurement, and after a
calibration.
WiFi Option
Off: When set to off, the option is not activated.
On: When set to on, the WiFi option is activated.
WiFi Setup: Tapping the button will cause the instrument to scan for
available network. After scanning the available networks are displayed on the
screen. Tap a desired network and setup the password if required. When
finished, tap OK to select the Wifi network.

RapidMatchTMGO Spectrophotometer
12
Language
This option is used to set the language that is displayed on the instrument
during operation.
To set the language, tap Language and then tap the desired language.
N (measurement number) Option
This option is used to set the default number of measurements when using
“Add new Job” option. The jobs created by the user software can define
number of measurements individually for each job. Tap the option, enter the
measurement number and tap the icon to save and exit.
Device Information
This option is used to view important instrument information such as
hardware version, calibration reference serial number, battery data, etc.
Power Off
This option is used to power off the instrument.
To access, tap Power Off and then tap Power down to confirm.
Date and Time Option
This option is used to adjust the timestamp clock for the instrument.
1. To access, tap Date and Time. The flashing value in the field is the
current value that can be adjusted.
2. Tap the “Up” arrow icon to increase the value.
3. Tap the “Down” arrow icon to decrease the value.
4. Tap the “Left” arrow icon to move the flashing field to the next field to
the left.
5. Tap the “Right” arrow icon to move the flashing field to the next field to
the right.
6. Tap the “Checkmark” in the center to save changes and exit the option.
Set LCD Color Option
This option is used to change the background color of the LCD screen
slightly.
1. To access, tap Set LCD Color.
2. Tap the desired backlight color panel on the screen to save and exit the
option.
RapidMatchTMGO Spectrophotometer
13
Factory Reset Option
This option is used reset the instrument to its factory default settings. All
stored sample will also be deleted when activated. Select Yes to reset to the
factory default settings or select No exit the setting without resetting.
11. Calibration
The instrument must be calibrated on the white tile every 14 days.
Measurements with expired calibration are still possible, but with a warning at
the beginning of each job.
NOTE: Make sure to use the Calibration reference supplied with the
instrument for calibrating. Do not substitute this reference with a reference
from another instrument. The serial number of the Calbration reference is
shown in the Setting>Calibration screen.
• Calibration should be performed at room temperature (23°+/-1°C and
40-60% relative humidity).
• The white tile in the calibration reference is severely affected by smudge
marks, dust, and finger prints.
Cleaning the Calibration Reference
The white tile in the calibration reference should be cleaned using a mild
soap and warm water solution, thoroughly rinsed with warm water, and
wiped dry with a clean, lint-free cloth. You must let the reference dry
completely before taking a calibration measurement.
• Do not move instrument while taking a calibration measurement. If
motion is detected by the contact sensors, an error message will be
displayed and calibration aborted.
• Make sure the USB cable is unplugged from the instrument before
performing a calibration.
1. Select the Calibration option from the Settings menu. Note: If
“Calibration expired” message appears, advance to Step 2.
2. Open the Calibration reference and lay it flat.
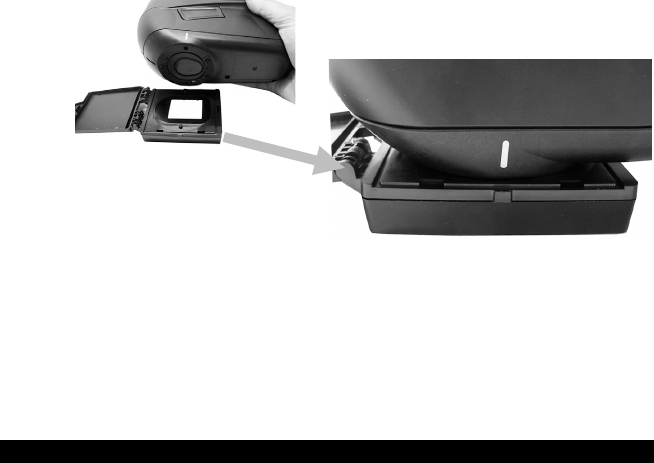
RapidMatchTMGO Spectrophotometer
14
3. Position the instrument over the white tile by locating the two pins in the
Calibration reference into the holes in the measurement base. NOTE:
The pins are keyed and will only insert in one direction.
4. When ready, tap Calibration and then tap Yes to start calibration. Do
not touch the instrument throughout the measurement sequence.
5. After calibration is completed, remove the instrument from the
calibration reference and close the reference case.
NOTE: It is recommended to perform a Self-Test after the Calibration
Refer to the Settings screen.
12. Measurement
IMPORTANT:
• To avoid discomfort, do not look directly into the measurement optics
when the instrument is on and measuring.
• Do not move instrument while taking a sample measurement. If motion
is detected by the contact sensors, an error message will be displayed
and the measurement aborted.
• Measurement performance may decline under certain condensing
conditions.
• Do not move the instrument on the sample surface with pressure. This
may cause scratches to the sample surface.
The Job List is used to measure and delete sample data. The following is a
general job measurement procedure.
1. Search for a check area near the repair spot that is as flat as possible
and clean the area.
2. From the Home screen, tap the Job List icon.
3. Select a downloaded job from the list or tap the Add New Job icon at the
top of the screen to start a new job. After selection, the instrument goes
into measure mode.
NOTE: Downloaded jobs available for measurement do not have a
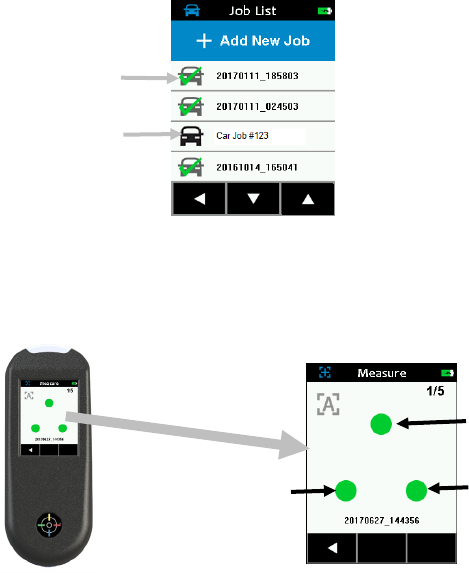
RapidMatchTMGO Spectrophotometer
15
green checkmark. Downloaded jobs that have a green checkmark have
already been completed.
4. Locate the measurement port in the bottom of the instrument over the
first measurement area while viewing the screen (1).
5. Gently rock the instrument until all three positioning indicators (2) in the
screen turn green. This indicates that all three contact sensors are
activated.
6. Hold the instrument steady and press the Measure button or tap the
screen to initiate a measurement in case the instrument is configured in
Manual Mode. If the instrument is configured in Automatic Mode, the
measurement will be triggered as soon as (with a one-second delay) the
instrument is correctly positioned on the check zone and all pins are in
contact (green indicators on UI). Continue to hold the instrument steady
until the progress bar in the screen reaches 100%.
7. Continue with the remaining area measurements to complete the job.
8. After the last measurement is completed, the quality of the
measurement is indicated with a 5 point system. Five points indicates
excellent measurement without variation between the readings, 3-4
points indicates good measurement and 1-2 points indicates an
acceptable measurement. Tap the Left (◄) arrow on the Job data
saved screen to return to the Job List screen.
(2)
(2)
(1)
Available job
Completed job
(2)
RapidMatchTMGO Spectrophotometer
16
9. If the job was created on the instrument using the Add New Job feature,
you can edit the name if desired. Click on the Edit icon at the button of
the screen and enter a job name using the virtual keyboard. Click the
Checkmark icon to save the job name.
Deleting a Single Job
1. To delete a single job or job data, tap the job from the Job list. You will
need to tap the Down (▼) or Up (▲) arrow icons if the job you want to
delete is not showing up in the list. You can quickly get to the end of the
job list or top of the job list by pressing and holding the Down (▼) or Up
(▲) arrow icon for 2 seconds and then releasing.
2. Tap Delete Data or Delete Job in the screen to continue. If Delete Data
is selected, only the data will be deleted and not the job.
3. A message appears asking you to confirm that you want to delete the
data or job. Tap Yes to confirm or No to return to the Job List screen.
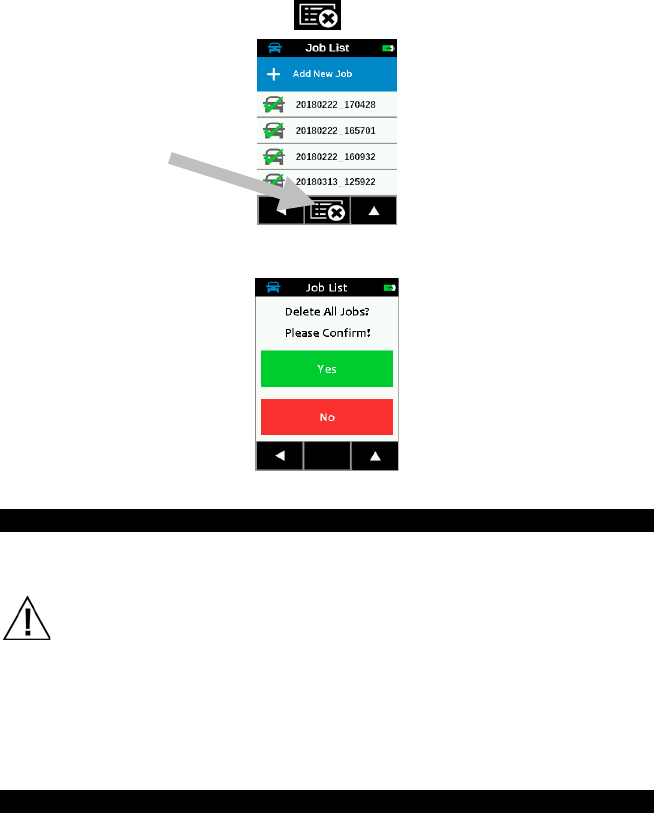
All Jobs
1. To delete all jobs, press and hold the Down (▼) arrow icon for 2
seconds and release to advance to the end of the job list.
RapidMatchTMGO Spectrophotometer
17
2. Tap the delete all jobs icon at the bottom of the screen.
3. A message appears asking you to confirm that you want to delete the
job. Tap Yes to confirm or No to return to the Job List screen.
13. Cleaning
The exterior of the instrument may be wiped clean with a cloth dampened in
water or mild cleaner.
Important Notes:
• DO NOT use any solvents to the clean the instrument, this will
cause damage to the cover and internal electronic components.
• Compressed air should not be used to clean the instrument.
Cleaning the instrument with blown air can cause dirt on the outside
of the instrument to enter into the device, and contaminate optical
components.
14. Specifications
Environmental
Operating Temp: 50°F to 95°F (10°C to 35°C)
Humidity Max: 85% RH max (non condensing)
Storage Temp: -4°F to 122°F (-20°C to 50°C)
Battery
Type: Lithium Ion Battery
Cell Size: 18650
Nominal Voltage: 3.6V

RapidMatchTMGO Spectrophotometer
18
Capacity: 2.15 Ah
Max. discharge current: 4A
Max. charge current: 2.15A
Inner resistance: <= 120 mΩ
Compliance: UN38.3, IEC62133B, CE
Protection: over current, over charge, over discharge
15. Troubleshooting
Prior to contacting PPG support department for instrument problems, try the
applicable solution(s) described below.
Problem
Cause
Solution
Instrument
screen
remains dark.
Instrument is turned off.
Turn instrument on by pressing
the power/measure button.
Instrument is in power
down mode.
Touch the screen.
Battery is very low.
Charge the battery min. 1 hour.
After max. 5 minutes the screen
will turn on.
Battery is defective.
Charge the battery. If the screen
does not turn on after max. 5
minutes check if the USB cable
is correctly connected to the
computer or power supply (USB
ports on computer monitors and
keyboards do not deliver enough
power). If it still does not work
the battery needs to be replaced.
Contact technical support.
Screen is
instable (turns
on and off
periodically)
when the
instrument is
connected to a
computer or
power supply.
Battery is defective.
Battery needs to be replaced.
Contact technical support.
Screen is
Firmware is locked up.
Disconnect USB cable. Press

RapidMatchTMGO Spectrophotometer
19
frozen.
and hold the power/measure
button for 10 seconds and then
release. Instrument turns off.
Instrument can be started
normally.
Measurement
error or results
appear
inaccurate.
Material being
measured is damaged
(e.g. scratched).
Repeat measurement.
Calibration was
performed on a dirty
calibration reference.
Clean the calibration reference
and repeat the calibration per
procedure in the Calibration
section.
Instrument requires
calibration.
Perform calibration on calibration
reference followed by a self test.
If calibration and self test fails,
the instrument is defective.
Contact technical support.
Instrument is defective.
Perform a self test in the Settings
menu. If the self test fails the
instrument is defective. Contact
technical support.
Calibration
procedure
fails.
Instrument defective.
Contact technical support.
Instrument and
software not
communicating
(USB
connection).
USB cable not
connected.
Connect the USB cable between
the computer and the instrument.
USB cable is defective.
Exchange USB cable.
Communication crashed
between application
software and the
instrument.
Unplug the USB cable, wait 1
second and connect the cable
again.
If the communication still does
not work, close and restart the
software application. Restart the
instrument. If the communication
still does not work, reboot the
computer.
Instrument will
not measure or
Contact sensor(s) do not
properly contact the
Lift the instrument and place it
properly on the sample. Make
RapidMatchTMGO Spectrophotometer
20
calibrate.
sample surface.
sure that all 3 sensor indicators
on the screen turn green.
Contact sensor(s) are
not working correctly.
Sensors may be stuck
due to dirt or paint; or
they are defective.
Open a new job to show the 3
sensor indicators on the screen
and place the instrument on a flat
surface and then lift it. If one or
more of the sensor indicators in
the screen do not change color
when lifted, there may be a
problem with the contact
sensor(s). Contact technical
support.
Shutter error.
Instrument defective.
Contact technical support.
Multiple error
messages.
Instrument encountered
a cascade of errors.
Press OK button in error
message for 2 seconds.
Date and time
wrong.
Incorrect setting.
Refer to instruction in manual.
16. Service Information
If you have any service request, please contact your local PPG Service and
Support.
17. Replacement Parts
Part
Part Number
USB cable
SE108-USBAB-03
Safety Strap
59-902288-01
Screen Protector
TPZ-27724

Corporate Headquarters
X-Rite, Incorporated
4300 44th Street SE
Grand Rapids, Michigan 49512
Phone 1 800 248 9748 or 1 616 803 2100
Fax 1 800 292 4437 or 1 616 803 2705
European Headquarters
X-Rite Europe GmbH
Althardstrasse 70
8105 Regensdorf
Switzerland
Phone (+41) 44 842 24 00
Fax (+41) 44 842 22 22
Asia Pacific Headquarters
X-Rite Asia Pacific Limited
Suite 2801, 28th Floor, AXA Tower
Landmark East, 100 How Ming Street
Kwun Tong, Kowloon, Hong Kong
Phone (852) 2568 6283
Fax (852) 2885 8610
Please visit www.xrite.com for a local office near you.
X-Rite® is a registered trademark of X-Rite, Incorporated. All other logos, brand names, and product
names mentioned are the properties of their respective holders.
RapidMatch is a trademark of PPG Industries Ohio, Inc.