XAVi Technologies XW501B WIRELESS USB ADAPTER User Manual XW501B UserManual 01032005
XAVi Technologies Corp. WIRELESS USB ADAPTER XW501B UserManual 01032005
USERS MANUAL

2
XAVi Technologies Corporation
Tel: +886-2-2995-7953
Fax: +886-2-29957954
9F, No. 129, Hsing Te Road, Sanchung City,
Taipei County 241,
Taiwan
Copyright © 2005, XAVi Technologies Corporation
Information in this manual is subject to change without notice. No part of this
manual may be reproduced or transmitted in any form or by any means,
electronic or mechanical, including photocopying or scanning, for any purpose,
without the written permission of XAVi Technologies Corporation.
XAVi Technologies Corporation provides this documentation without warranty
of any kind, implied or expressed, including, but not limited to, the implied
warranties of merchantability and fitness for a particular purpose.

3
CERTIFICATION NOTICE
Federal Communications Commission Compliance Notices
This device complies with 15 of the FCC Rules. Operation is subject to the
following two conditions:(1) this device may not cause harmful interference, and
(2) this device must accept any interference received, including interference that
may cause undesired operation.
To ensure continued compliance, use only shielded interface cables when
connecting to the computer or peripheral devices.
Federal Communication Commission (FCC) Statement:
NOTE: This equipment has been tested and found to comply with the limits for
a Class B digital device, pursuant to part 15 of the FCC Rules. These limits are
designed to provide reasonable protection against harmful interference in a
residential installation.
This equipment generates, uses and can radiate radio frequency energy and, if
not installed and used in accordance with the instructions, may cause harmful
interference to radio communications. However, there is no guarantee that
interference will not occur in a particular installation. If this equipment does
cause harmful interference to radio or television reception, which can be
determined by turning the equipment off and on, the user is encouraged to try
to correct the interference by one or more of the following measures:
Reorient or relocate the receiving antenna.
Increase the separation between the equipment and receiver.
Connect the equipment into an outlet on a circuit different from that to which
the receiver is connected.
Consult the dealer or an experienced radio/ TV technician for help.
Changes or modifications not expressly approved by the party
responsible for compliance could void the user’s authority to operate the
equipment.
The antenna(s) used for this transmitter must not be co-located or
operating in conjunction with any other antenna or transmitter.
The manufacture is not responsible for any radio or TV interference
caused by unauthorized modifications to this equipment. Such
modifications could void the user’s authority to operate the equipment.

4
Table of Contents
CERTIFICATION NOTICE ............................................. 3
Federal Communications Commission Compliance Notices.....3
Federal Communication Commission (FCC) Statement:............3
INFORMATION TO USER ............................................. 5
Introduction............................................................................................5
Package Contents................................................................................5
System Requirements.........................................................................5
How to Install XW501B:................................................ 6
Phase I -Install XW501B Driver......................................................6
Phase II -Install XW501B Hardware Winzard ..............................8
Verifying XW501B USB Adapter for Windows: ........ 12
Use the XW501B Utility:............................................. 13
Troubleshooting ......................................................... 19
5
INFORMATION TO USER
Introduction
Congratulations on purchasing this 802.11g WLAN USB Adapter. The
XW501B USB Adapter 54 Mbps data rate provides an equivalent Ethernet
speed to access corporate networks or the Internet in a wireless
environment. And also provides easy plug & play Installation program on
any computer with USB interface. When installed, the XW501B USB
Adapter is able to communicate with any 802.11g-compliant product,
allowing you to work anywhere in the coverage area, enjoying its
convenience and mobility.
Package Contents
The shipment should contain the following items. Please check each item
below and ensure that all items listed in below are included in the
shipment. If any of the listed items are damaged or missing, please notify
your local dealer.
XWAVE Series: XW501B WLAN USB Adapter should contain:
802.11g WLAN USB Adapter
CD-ROM (containing Drivers and Manual)
System Requirements
Windows ME/ 2000/ XP
If any item is missing, please contact your product provider.
6
How to Install XW501B:
Phase I -Install XW501B Driver
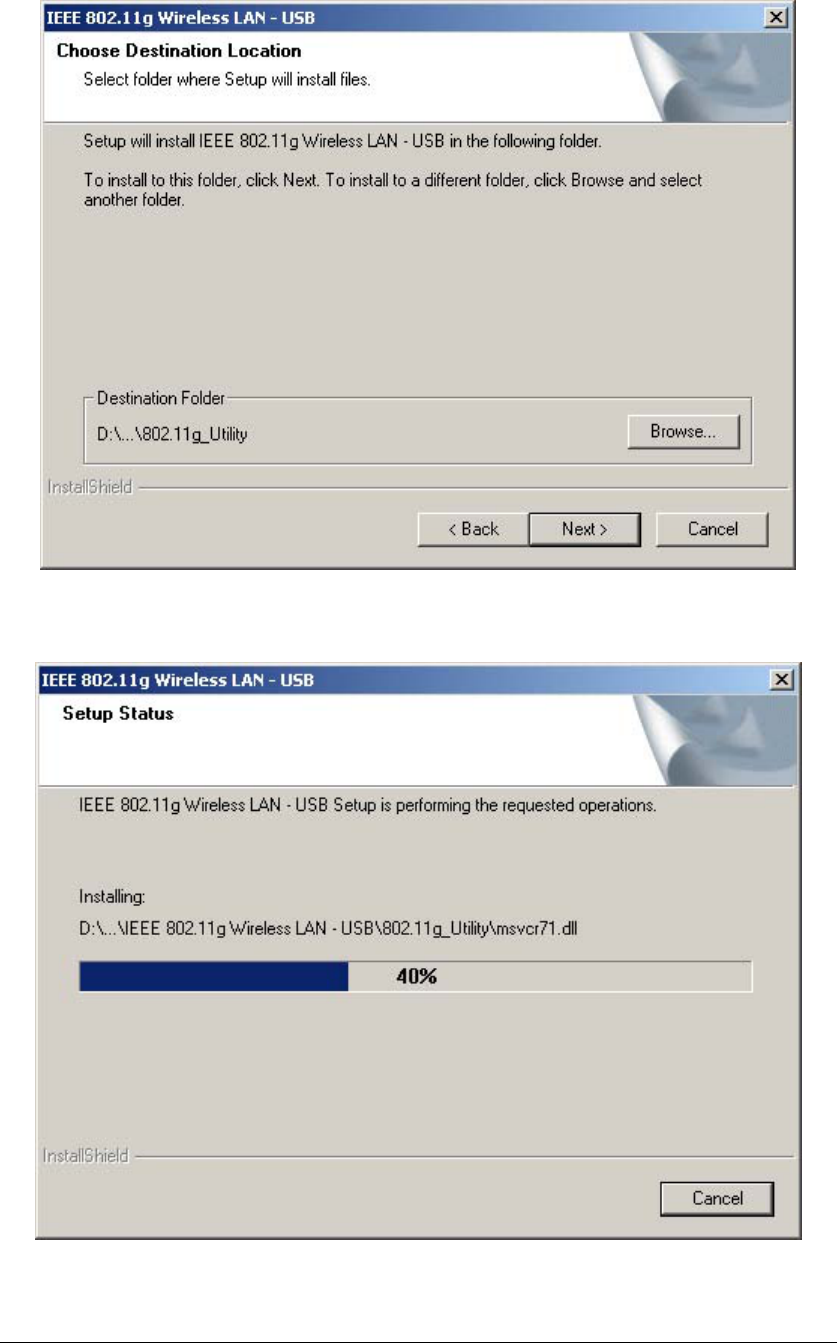
1. Turn on the computer and insert the driver CD into the appropriate drive.
The installation & driver CD will automatically activate the Auto Run
Installation program after you insert the disk into your CD drive.
2. The install will automatically appear.
3. Click Next to continue.
Do not insert your WLAN Adapter into the USB slot until you
have finished the software installation.
7
4. Click Next to install at the designated folder. Or, click “Browse” to select
different folder.
5. Start copying files until it finish the installation.
8
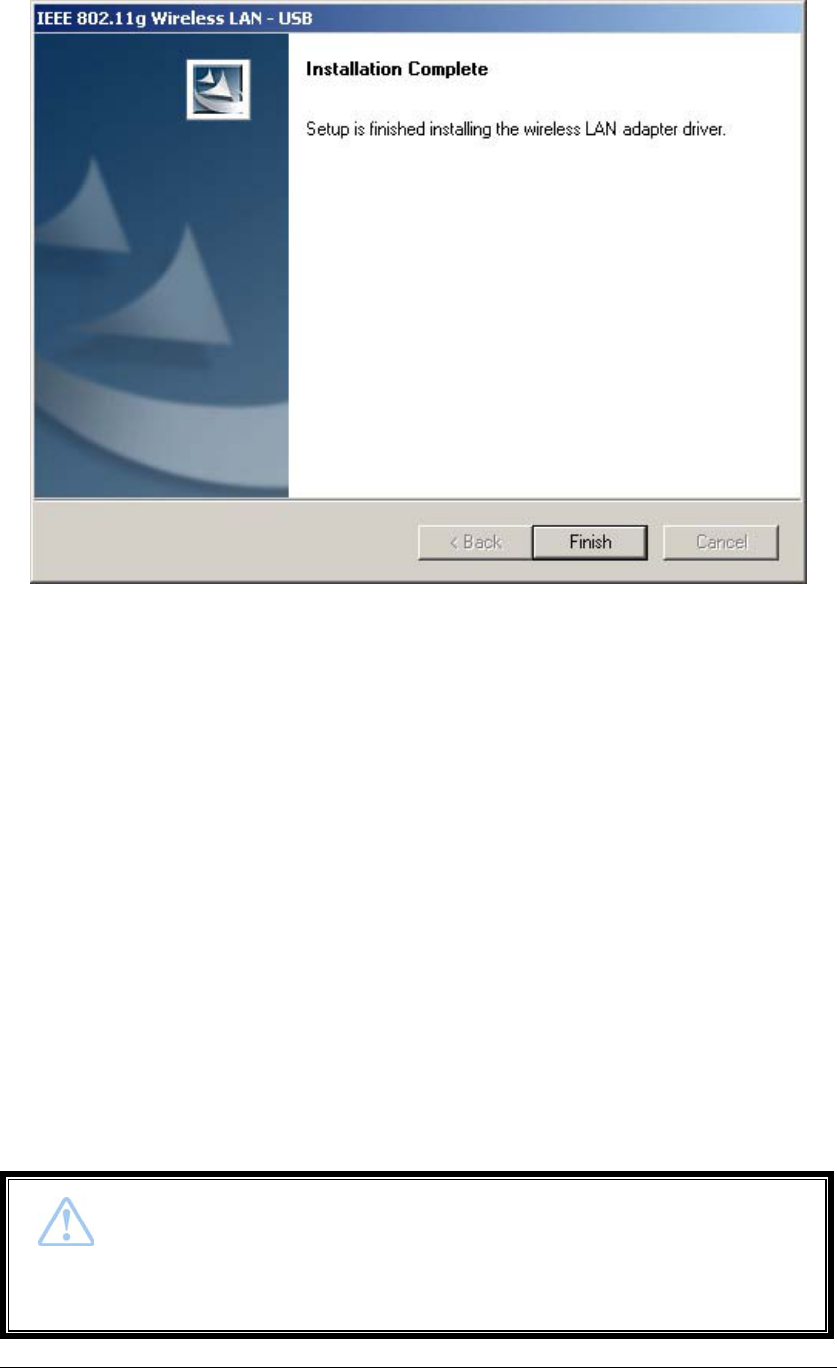
6. Click Finish to complete installation.
If the AutoRun function on your computer does not
automatically start, the select your CD-ROM driver and
double-click the file, SETUP.EXE under the Windows
director
y
.
9
Phase II -Install XW501B Hardware Winzard
1. Find the location of the USB slot on your desktop or laptop. And insert the
802.11g WLAN USB Adapter into the USB slot on your desktop or laptop.
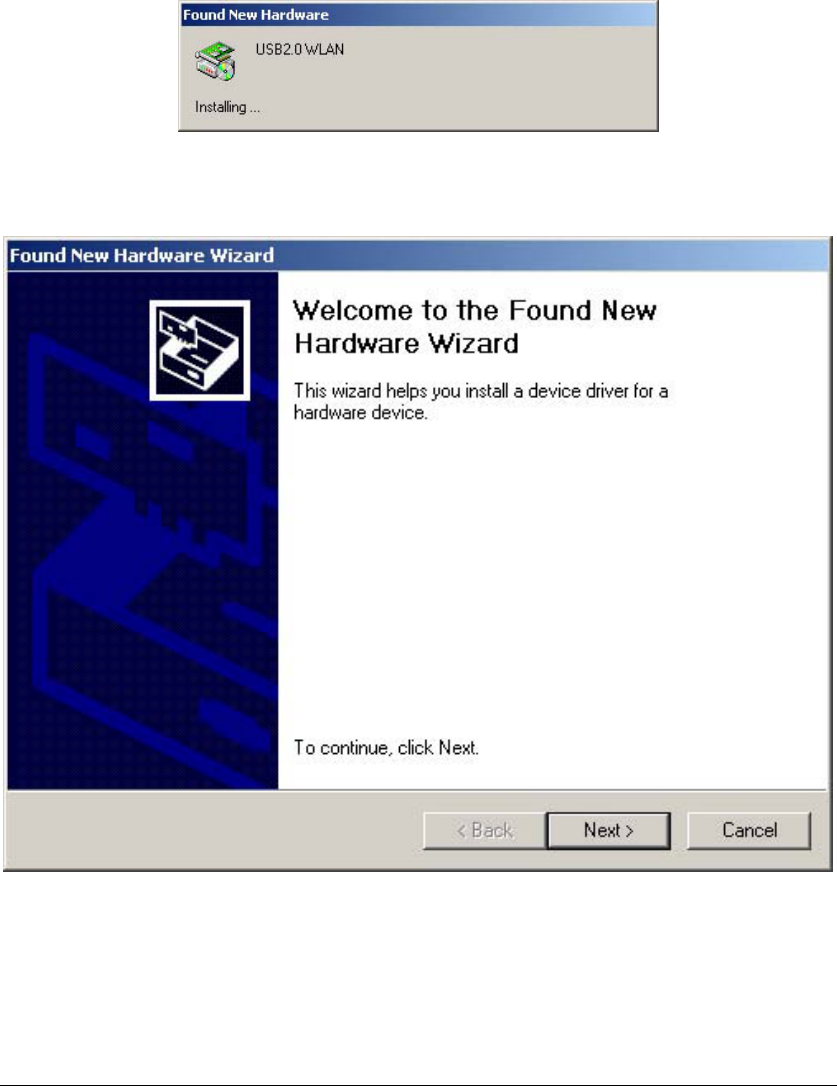
2. After inserting the WLAN Adapter into your computer, Windows will
automatically detect that new hardware has been installed. Depending on
which operating system you are using, the steps and screens may differ
slightly. Click “Next” to continue installing.
10
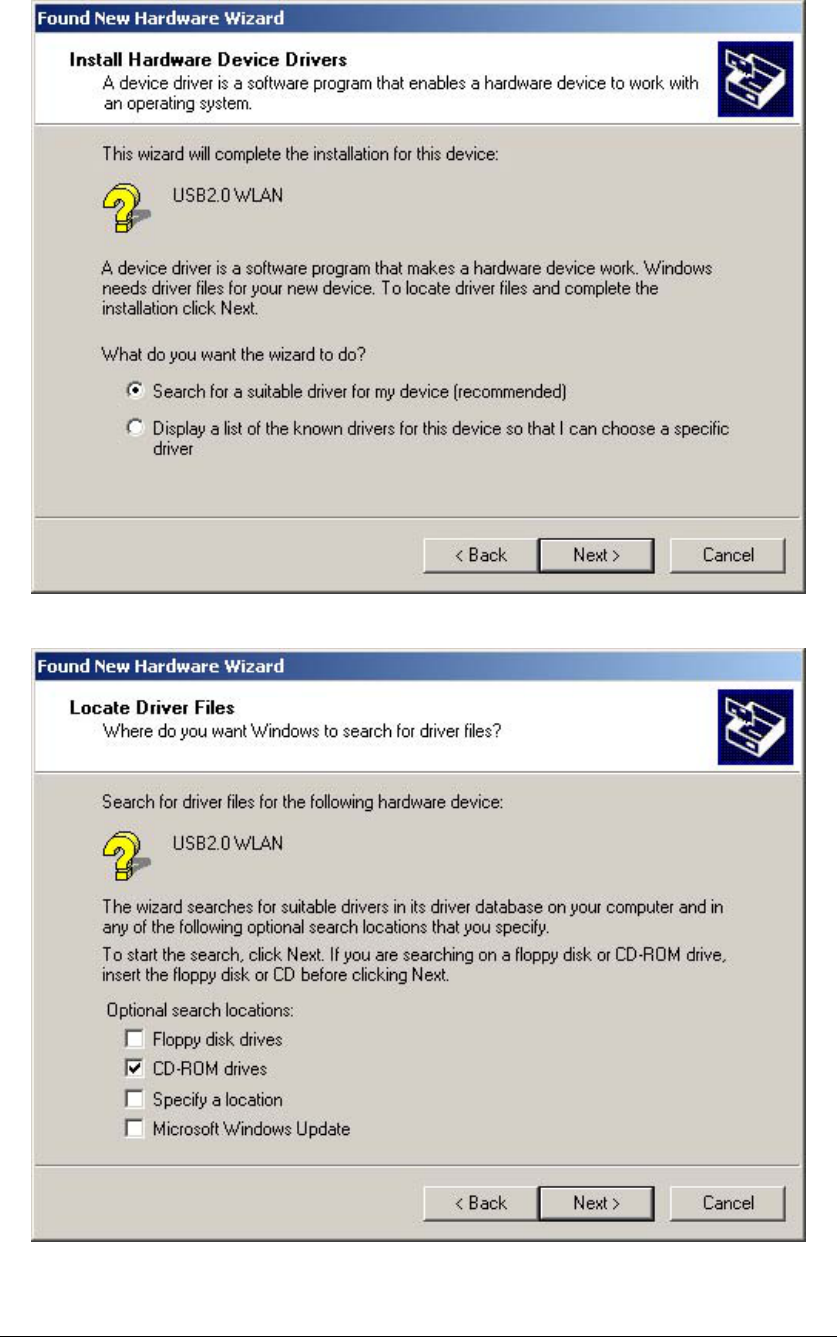
3. For searching a suitable driver automatically, check the item as shown
below.
4. Select “CD-ROM drivers” for looking for suitable drivers for XW501B.
11
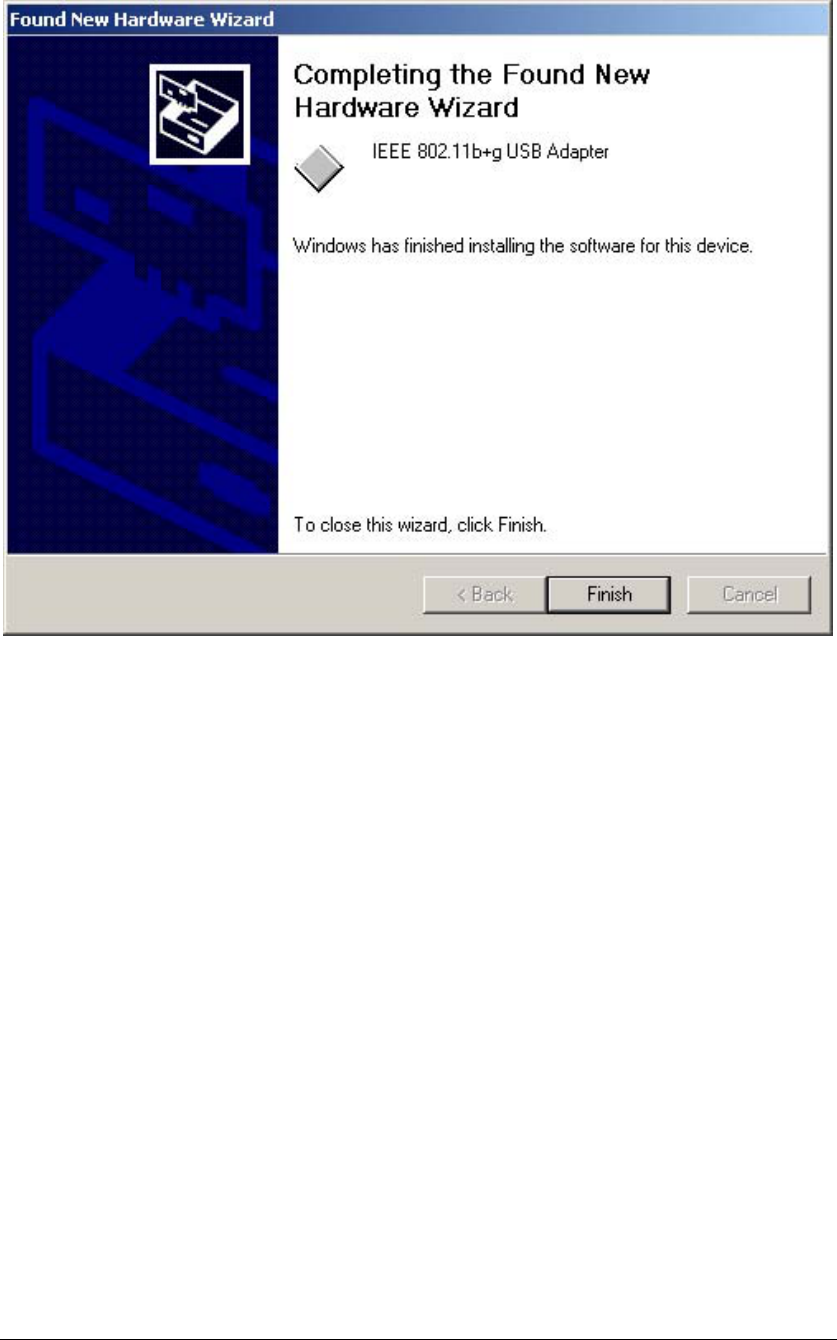
5. Press the “Finish” button to finish to finish the package installation.
After finishing the phase 1 installation of the driver, the NoteBooK (or PC) with
WinME OS shall be restarted, but Win2000 or WinXP OS doesn’t need to be
restarted.

12
Verifying XW501B USB Adapter for Windows:
This section provides the instructions that guide you to verify proper
operation of the driver and utility of your 802.11g WLAN USB Adapter for
the operating systems.
• To verifying Driver Installation
1. Start → Select “Settings” → click “Control Panel” and
double-click the “System” icon.
2. OR Click on “My Computer” → select “Properties” from the
Windows 2000 desktop.
3. Click on the “Hardware” folder tab and click the “Device Manager”
button.
4. Click the “Network adapters”.
5. There should be no yellow exclamation or red cross-sign in the front of
the 802.11g WLAN USB Adapter.
6. Double-click the 802.11g WLAN USB Adapter and the Device Status
windows should indicate that the 802.11g WLAN USB Adapter is
working properly.
• To verifying Driver Installation
To verify the utility of the 802.11g WLAN USB Adapter for properly
installation, be sure the Configuration & Monitor Utility icon is
loaded on the system tray of Windows task bar every time while the
card is running. You can open it by double-clicking on this icon. While
the station is in infrastructure mode and not associated to an Access
Point, the color of the icon is yellow. As soon as the station associates
itself to an Access Point, the icon color automatically turns to blue. In
Ad-Hoc mode the color remains yellow too, except when the card is
resetting and initializing where it turns to red during the reset
and initialization procedure.
13
Use the XW501B Utility:
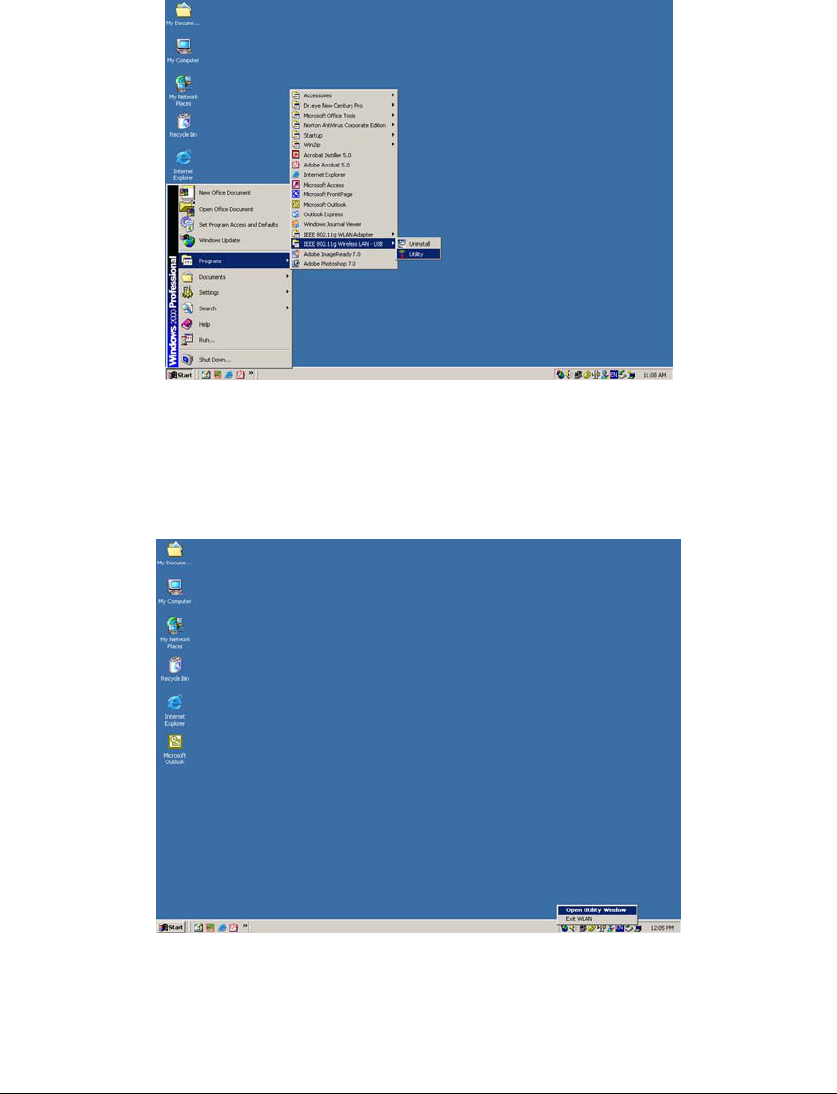
There are two different ways to open XW501B utility to configure you
wireless setting, although we provide another choice, but in functional, both
of them are similar. You can choose any one of them, which you more like or
convenience to use.
• Start → Select “Programs” → click “IEEE 802.11g Wireless LAN
-USB” and double-click the “Utility” icon.
OR
• Select the icon on the system tray of Windows task bar, and double
clicking to open the utility.
14
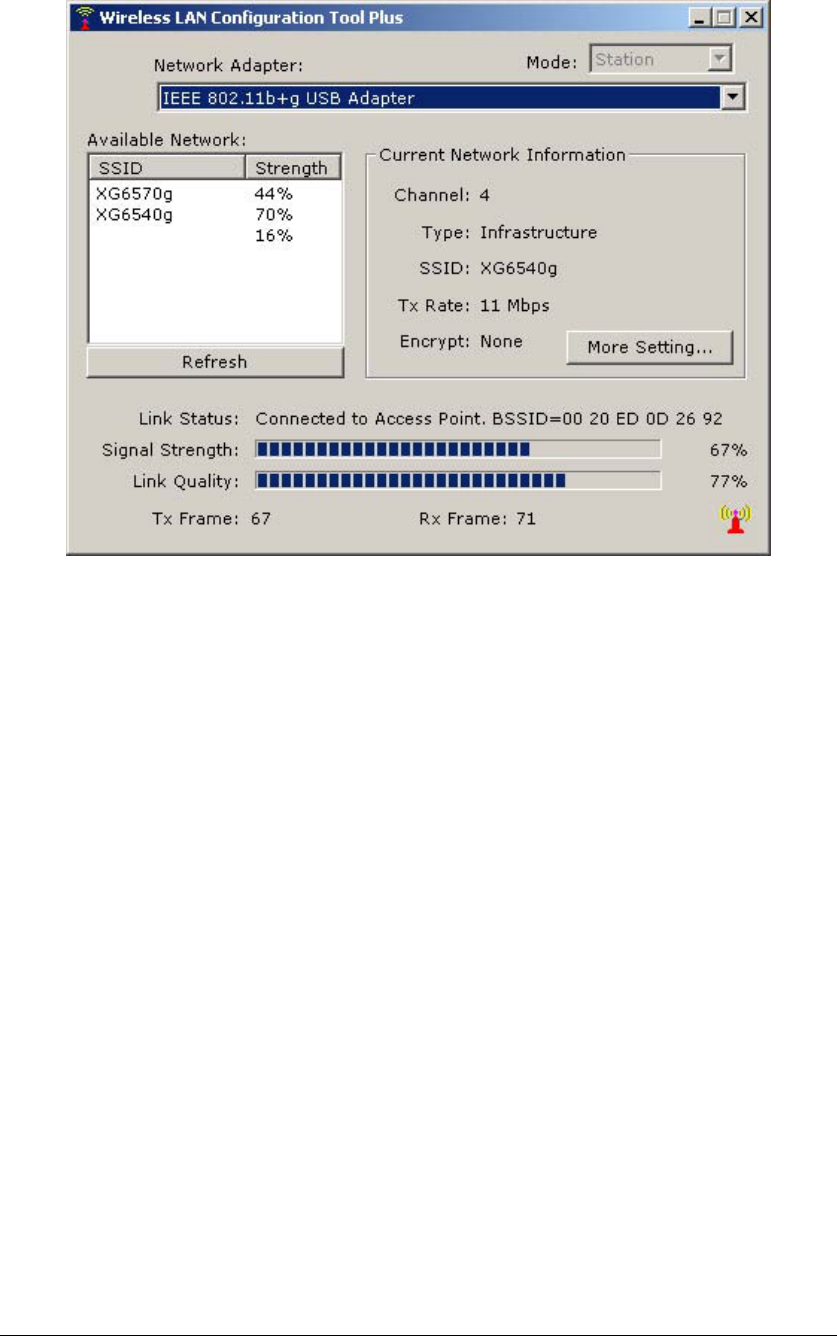
Open the XW501B Utility, you can see the “Wireless LAN Configuration
Tool Plus” window.
The adapter can be set at “Station” or “Access Point” Mode from the Mode
drop down menu. Station mode is selected for the document.
- You can site survey the neighboring SSID site by pressing the “Refresh”,
then sites name and signals strength of available SSID sites are shown on the
“Available Network” field.
- Double click the SSID site from “Available Network” field, and the SSID can
be connected directly.
The information of the SSID is shown on the “ Current Network Information”.
Show the BSSID of connecting AP on the “Link Status” filed.
“Signal Strength” and “Link Quality” shown on diagrammatic curve, and
described with percentage.
Record the number of Tx frames on the filed of “Tx Frame”.
Record the number of Rx frames on the filed of “Rx Frame”.
Click “ More Setting “ icon to enter “More setting “ window as shown follows.
15
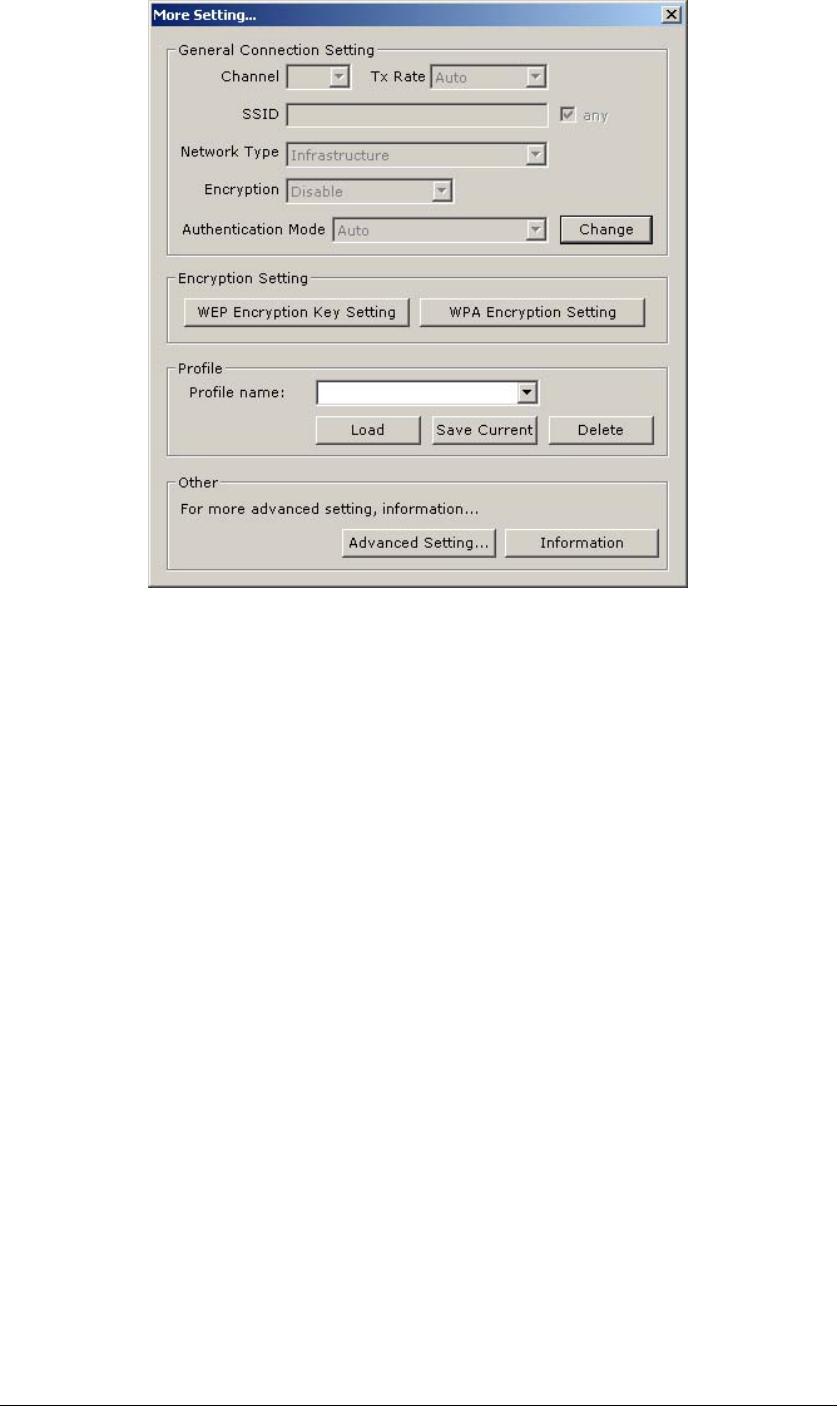
“General Connection Setting” group:
- Read the current status from the group if the “Change” button is not
pressed.
- Press “Change” button for modifying the status, when the modification is
finished, press “Apply” to save it. The button “Change” and “Apply” is
alternately shown on the same position.
- Modify the SSID name from the “SSID” field. When use the item, the “any
“will be unchecked previously.
- Change the channel by drop down menu “ Channel”. When use the item,
the Ad_Hoc Mode will be set previously. .
- Select the transmission rate by “ Tx Rate” drop down menu.
- Select the “Ad_Hoc” or “Infrastructure” Mode by the “Network Type” drop
down menu.
- Select the “Disable” , “WEP” , “TKIP” or “AES” by the “Encryption” drop
down menu.
- Select the “Open System” , “Shared Key” , “Auto” , “WPA” or “WPA PSK ”
from the “Authentication Mode” drop down menu.
16
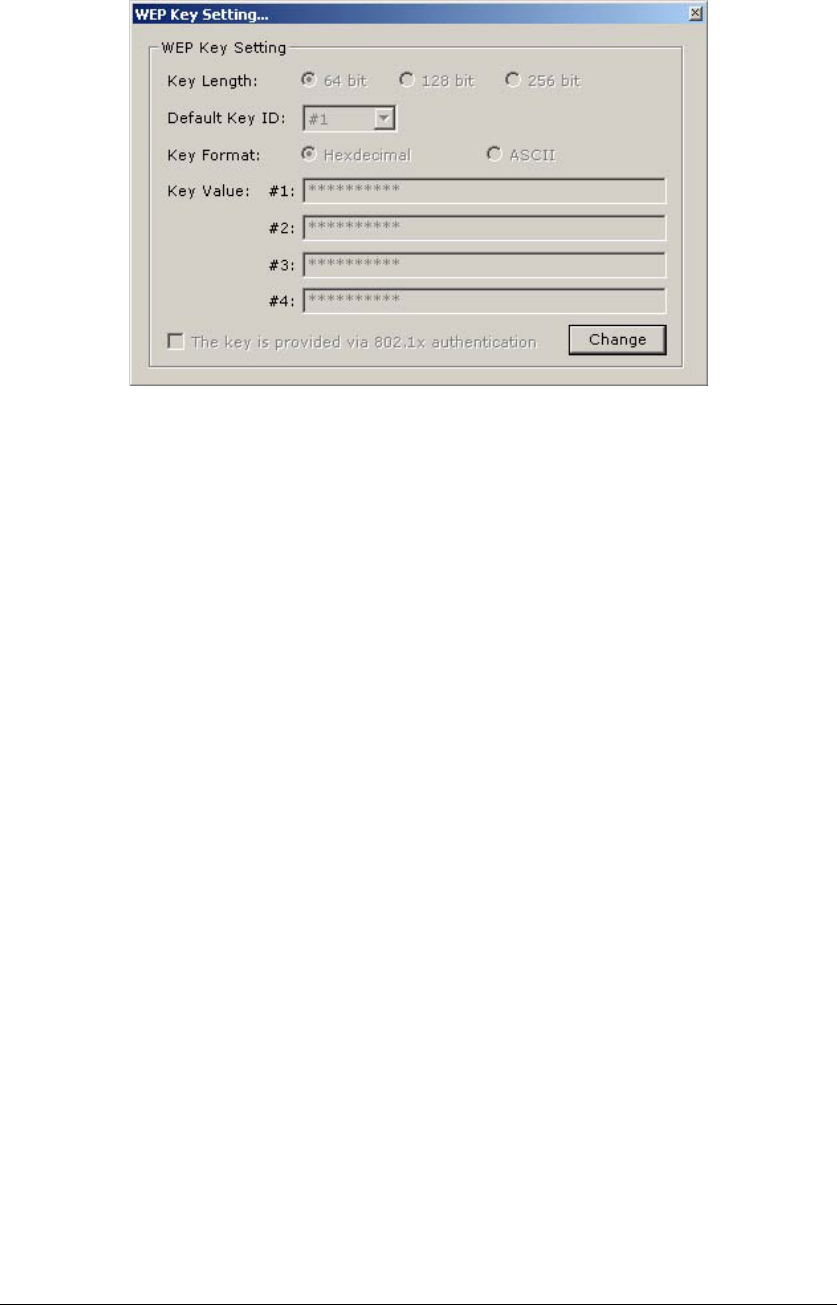
Encryption Setting – WEP
Press “WEP Encryption Key Setting” to enter the “WEP Key Setting”
page shown as
- Press the “Change” button to modify the contents of “WEP Key
setting”, when it is finished, press “Apply” to save it. The button “Change” and
“Apply” is alternately shown on the same position.
- Select which key length 64,128 or 256 bits will be modified or used by “Key
Length” item.
- Select which key set will be use by the field of “Default Key ID”
Modify the 4 sets key depending on the selected key length on the field of “Key
Value”. The key value is used the hexadecimal format.
Encryption Setting – WPA
Press “WPA Encryption Setting” to enter the “WPA Setting” page
shown as Figure
- Press the “Change” button to modify the contents of “WPA Setting”,
when it is finished, press “Apply” to save it. The button “Change” and “Apply” is
alternately shown on the same position.
- Select TLS or PEAP protocol and add user name / password on the field of
“Connect information”
- Add passphrase and select the key format on the field of “ Pre-shared
Key ”
- Select the Certificate you want by the “Certificate” drop down menu
“Profile ” group:
- Select the profile that has been saved previously from the “Profile name”
drop down menu, then press “Load ” button to load the status to use.
- Write the profile name on the field of “Profile name”, and press the “Save
Current” button to save the current status on the profile.
17
- Select the profile name that wanted to delete from the “Profile name” drop
down menu, and press “Delete” button to delete it
“Other” group:
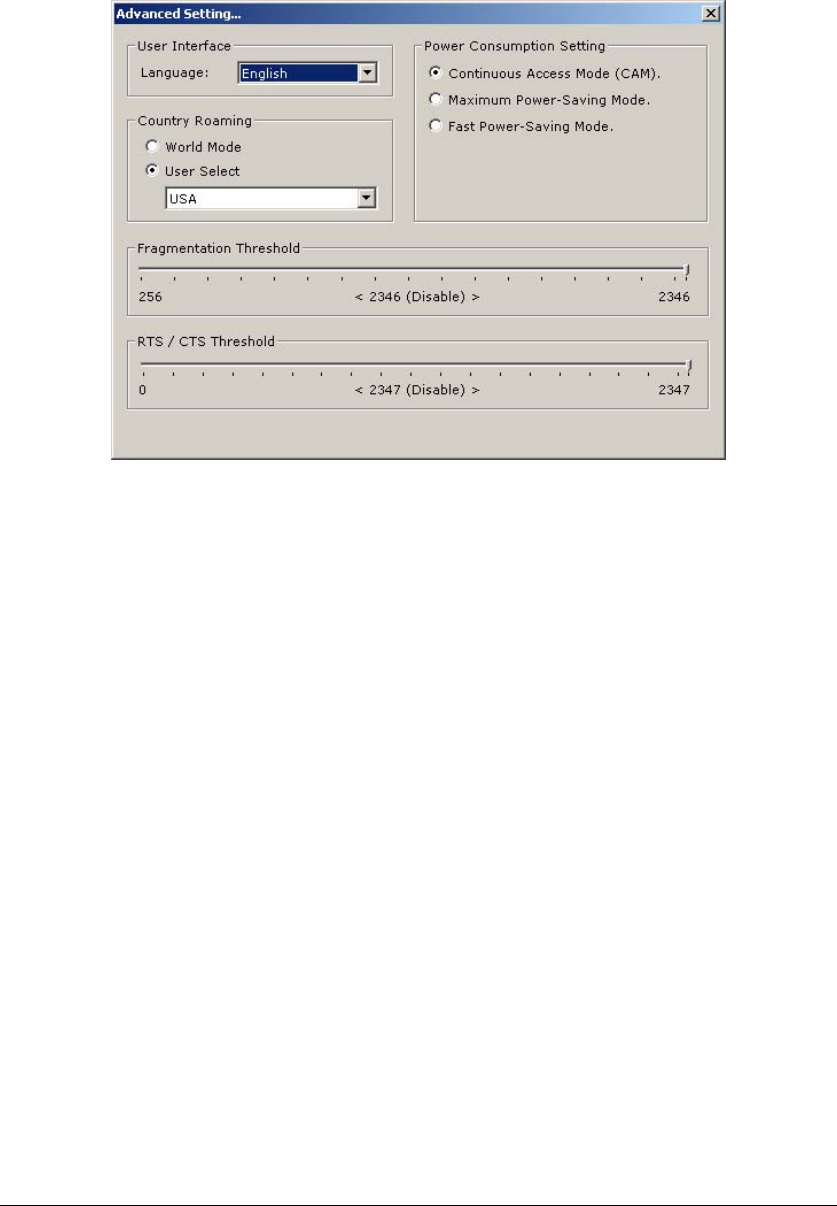
Press the “Advanced Setting” button, then the Advanced Setting page is
shown as
- Select the Window User Interface by the “Language” down drop menu.
If the English item is selected, all functions of window are described with
English. Select the Traditional Chinese item, and they are described with
Traditional Chinese.
- At “Power consumption Setting” group, select which power save level want
to be set by checking CAM Mode, Fast Power-Saving mode or Maximum
Power-Saving mode. The default is CAM mode. If the most save mode want to
use, select the Maximum Power-Saving mode, but it throughput is lower than
CAM and Fast Power-Saving mode. The throughput of “Fast Power-Saving
mode” is better than “Maximum Power-Saving mode”, but its power save is
less than “Maximum Power-Saving mode”.
- At “Country Roaming” group, the default depends on the region of
EEPROM. Select other region from “User Select” drop down menu, or check
“World Mode” item to set it to the word mode. When the word mode is set, it
depends on the behavior of AP. If the WLAN card is re-plug , the setting will
return to default setting.
- At “Fragmentation Threshold” bar, drop and move cursor to set the
fragmentation threshold point, the range is from 256 to 2346 bytes.
- At “RTS / CTS Threshold” bar, drop and move the cursor to set the
RTS threshold point, the range is from 0 to 2347 bytes.
18
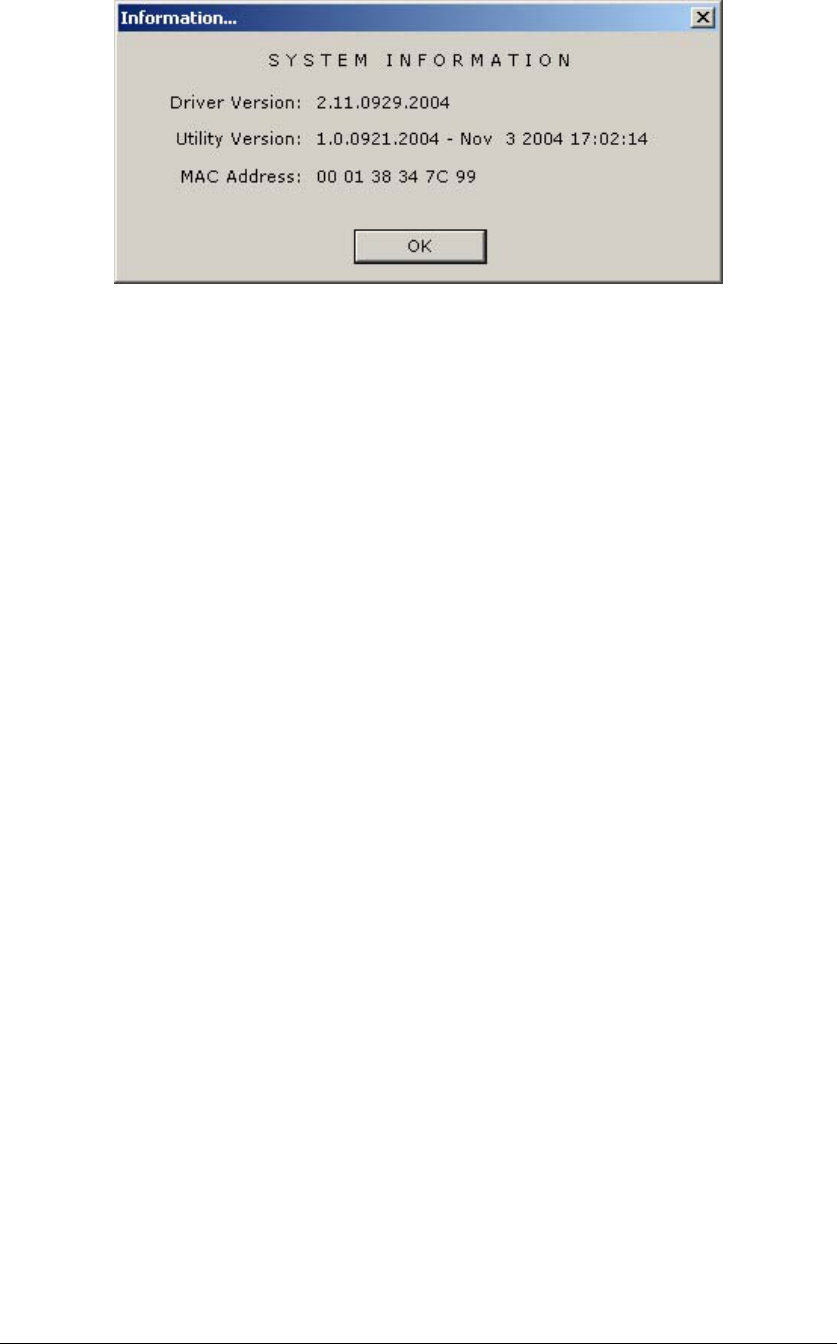
Press the “Information” button to enter the “Information” page shown as follows.
It includes the Driver version, Utility Version and MAC Address.

19
Troubleshooting
This chapter covers potential problems you may run into and the possible
remedies. After each problem description, some instructions are provided to
help you to diagnose and solve the problem.
Q: When you encounter problems, there are some preliminary
checklists that can help you to dig out the problems before you take
further actions?
A: - Try to isolate which part of the computer’s network connection is causing
the problem.
- Absence of, or conflict of the WLAN Card driver. Make sure that all device
drivers are correctly installed (refer to chapter 3).
- Determine if the location of your WLAN Card is not conducive for wireless
transmission (refer to chapter 2 “Site Selection”).
If a problem persists after you follow the instructions in this chapter, contact an
authorized dealer for help.
Q: When you encounter problems during Installation?
A: Don’t insert your WLAN Card into the USB slot until you have finished the
installation. If in case you should mistakenly insert your WLAN Card into your
computer before installing the driver and utility, then perform the following to
correct it:
Remove the WLAN Card from the USB slot.
Insert the driver CD into the CD-ROM drive and double-click the file
SETUP.EXE under the Windows directory. It would locate the already installed
driver and utility and uninstall it.
Re-boot your system after uninstalling.
Refer to chapter 2 and follow the instructions to properly install the driver and
utility before inserting the WLAN Card.
Re-insert the WLAN Card to the computer again.
Check if the I/O and IRQ for the WLAN Card have conflict problems with other
devices connected to your computer.
For Windows 98SE / 2000 / Me operating system, make sure that the USB
device driver is installed on your computer.
Q: During using Configuration & Monitor Utility, when you encountered
the problem to connect?
A: - Use the Monitor utility of your Configuration & Monitor Utility to check
the Link Quality of your WLAN Card with the AP it is associated with

20
(Infrastructure mode) or with other wireless station(s) (Ad-Hoc mode).
- Use the Site Survey utility of your Configuration & Monitor Utility to check
if there is high interference around the environment.
Q: When you cannot connect with Access Point?
A: - Make sure that the Access Point that your WLAN Card is associated with
is powered on and all the LEDs are working properly.
- Reconfigure and reset the Access Point.
- Use the Web Manager / Telnet of the Access Point to check whether it is
connected to the network.
Q: When Infrastructure mode is configured, the WLAN card cannot
communicate with the computer in the Ethernet?
A: - Make sure that the Access Point your WLAN Card is associated with is
powered on.
- Use the Site Survey utility of the Configuration & Monitor Utility to
verify if the operating radio channel is in good quality. Or, change the Access
Point and all the wireless station(s) within the BSSID to another radio channel.
- Out-of-range situation, which prevents the WLAN Card from establishing a
wireless connection with the network. Move the WLAN Card closer to the
Access Point it is associated with.
- Make sure that your WLAN Card is configured with the same security option
(encryption) to the Access Point.
- Make sure that the BSSID is the same as the Access Point for a
roaming-disabled wireless station, or the ESSID is the same as the Access
Point for a roaming-enabled wireless station.
Q: What should I do when I cannot access the network?
A: - Make sure that the necessary driver(s) was correctly installed.
- Make sure that the network configuration is appropriate.
- Make sure that the user name or password is correct.
- You have moved out of range of the network.
- Turn off power management.
Q: When the Configuration & Monitor Utility does not work correctly.
A: - Make sure that the Configuration & Monitor Utility is correctly installed
(refer to chapter 5).
- If you are sure the operation has stop, reset the computer.