Financial Export
2013-09-24
: Xenios Financial Export Financial Export ReferenceManuals Curriculum ation 2TouchPOS XeniosWeb
Open the PDF directly: View PDF ![]() .
.
Page Count: 14

1
2TouchPOS
Financial Exports
2
Overview
2TouchPOS has the ability to export its financial data to external sources. Currently QuickBooks, Microsoft Dynamics
GP (formerly Great Plains) and Generic XML files are supported. For each Z report that runs, 2TouchPOS will create
an export file that can be manually imported into one of the supported accounting packages.
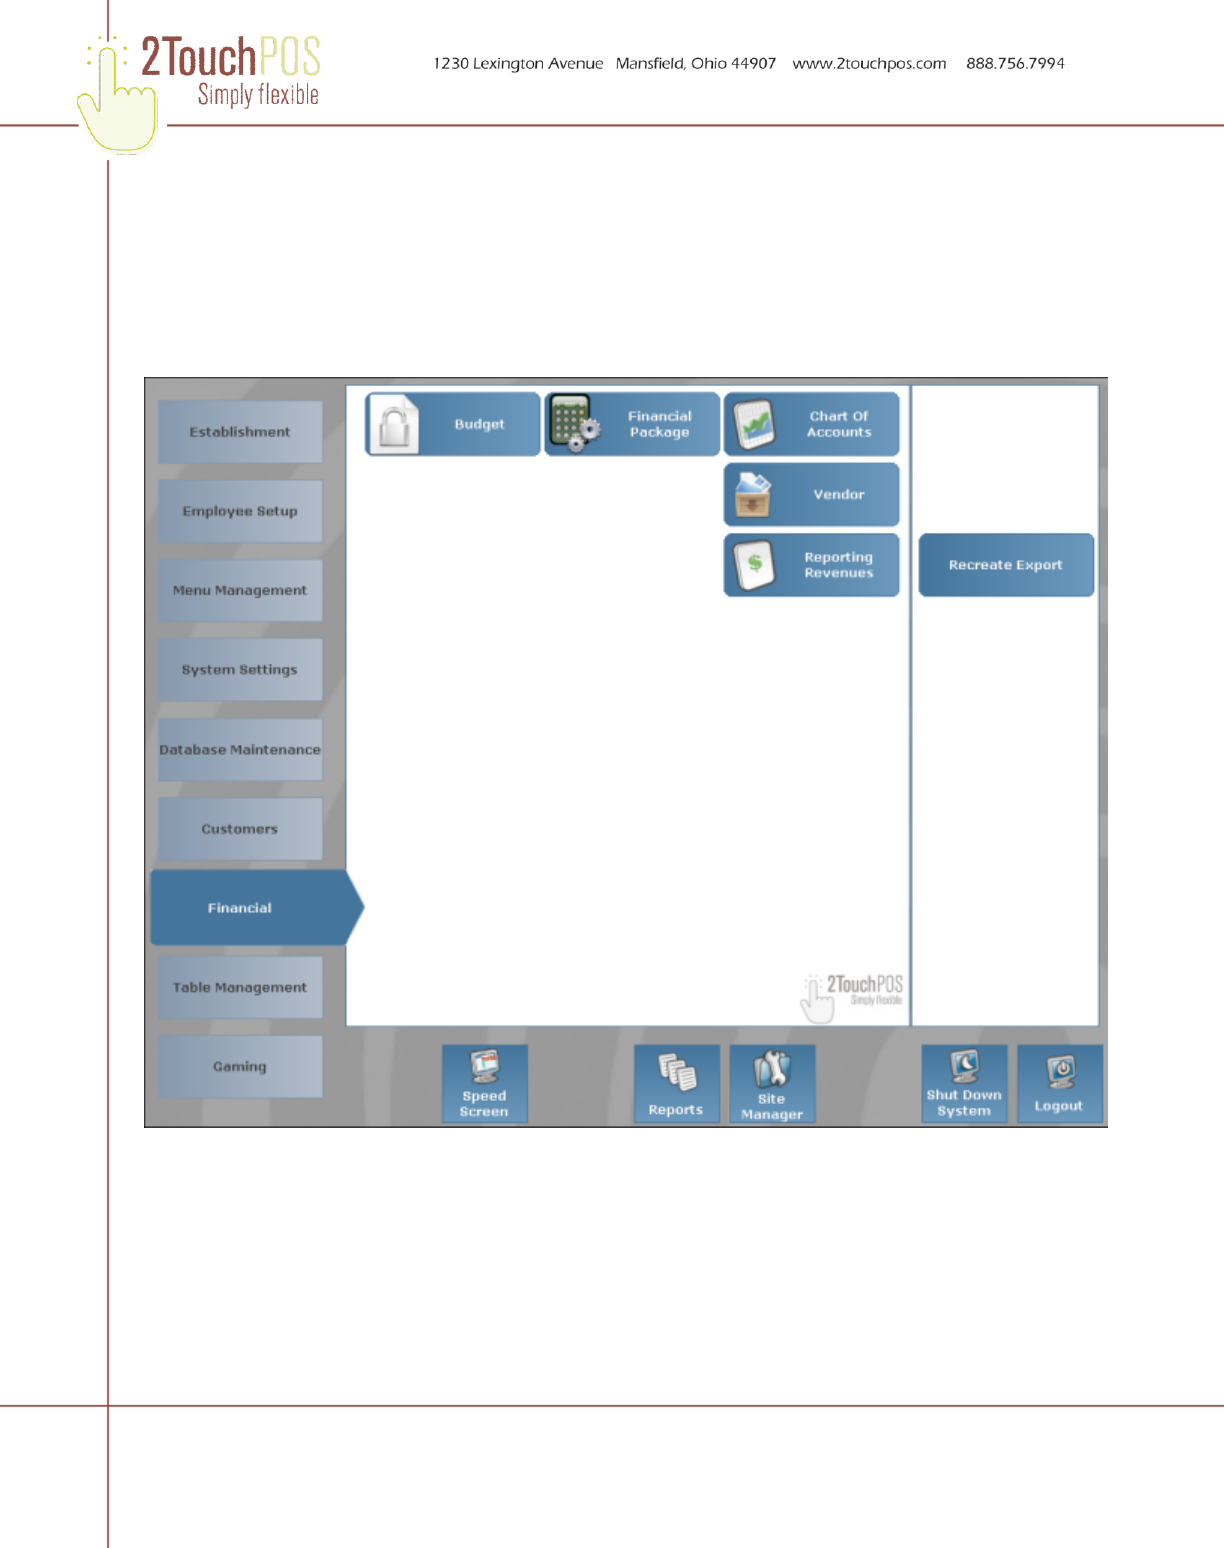
All of the settings for enabling and configuring 2TouchPOS to generate an export file are located under Options-
>Admin-Financial.
The Financial Package section is used for general settings dealing with the type of export, were the files will be
produced, and the method for processing the file.
The Char of Accounts section is used to import, add, delete, and edit your chart of accounts.
The Vender section is used to import, add, delete, and edit your vendors.
The Reporting Revenues section is used to assign GL codes from your chart of accounts to the figures used in
2TouchPOS.

3
The Recreate Export section is used to view the exports created by 2TouchPOS. This screen will enable you to see
what was generated in the export file and help you troubleshoot journal entries that may be out of balance, add
journal entries and reprocess particular days.
Enabling Your Accounting Package
In order to enable the financial export feature, you must configure a few basic settings. Press the Financial Export
Package button located under the Options->Admin->Financial menu. The first time you press this button you will be
prompted for an authorization key. This key must be obtained from your dealer or reseller. Once the screen appears it
will look similar to the one below.
You need to check the Activated Checkbox, and then choose the appropriate Package Type from the drop down list.
In the Output Data section specify the full file path and file name where 2TouchPOS will generate the export file. If
you select the Create Dated Journal Entries checkbox, 2TouchPOS will append the date of the data being exported
to the file name.
The Process Method section determines which sales figures will be available to link to your chart of accounts in the
Reporting Revenues Section. If Net is chosen the category or department sales figures will not include comps and
discounts. If Gross is chosen category or Department sales figures will include comps and discounts.
Use the Department and Category radio buttons to determine whether category or department sales figures will be
used. This selection will determine what will be available on the Reporting Revenue setup screen later.
Vendors
Using the Options->Admin->Financial->Vendors button will display the setup screen for vendors. You can either
import a list of vendors exported from QuickBooks (see your QuickBooks documentation for details on how to do
this), or you can add vendors manually.

4
Pressing the Import button will present you with the standard file selection screen:
5
Use the Import Drive drop down to select on which disk the vendor import file is located. Navigate to the file using the
list box of directories and files below the Import Drive drop down. Once you have selected the correct vendor import
file, press the OK button and the vendors will be imported.
Vendors can also be modified from this screen. Just select the vendor you want to change in the list on the left, make
the appropriate changes on the right and press the Save button. Any changes you make will not be exported back to
QuickBooks.
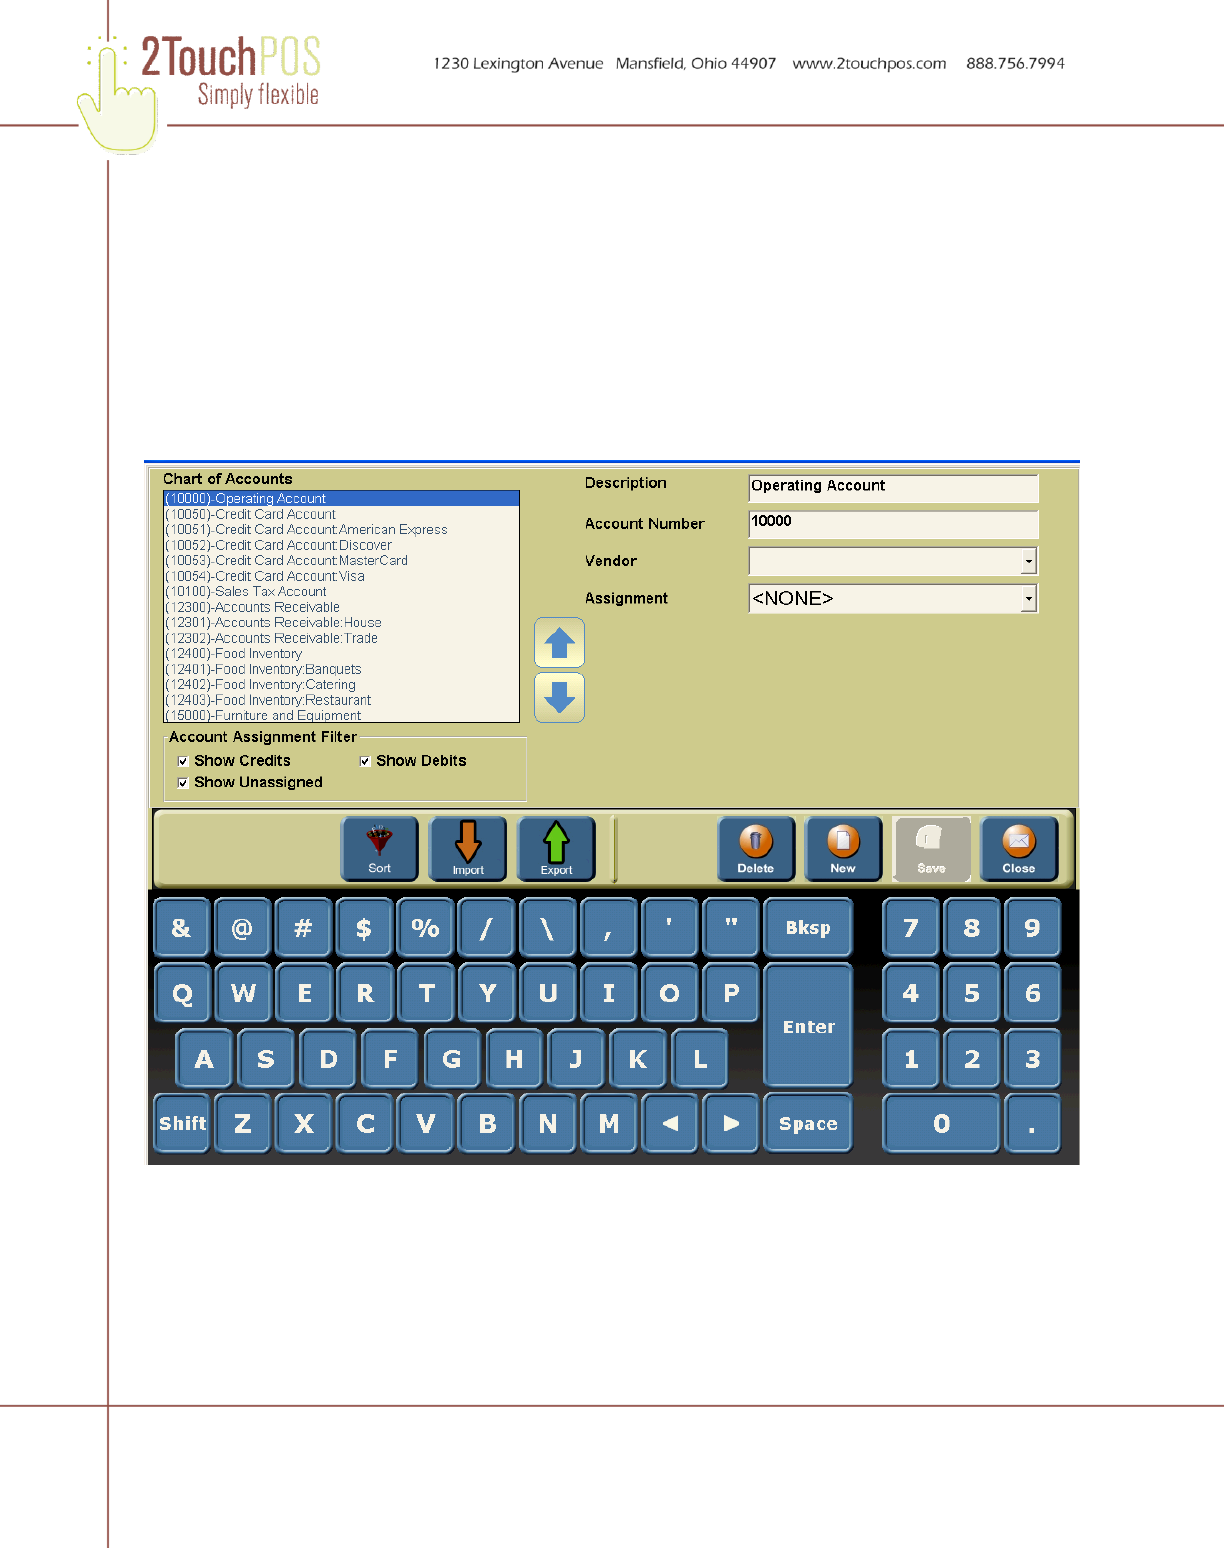
Chart of Accounts
Your chart of accounts is maintained using the Options->Admin->Financial->Chart of Accounts screen. Your chart of
accounts must be manually added and can be edited from this screen.
You can export your chart of account for use at additional 2Touch sites. To import a chart of accounts from another
site, Press the Import button and you will presented with the standard file selection screen. This screen is the same
one used to import vendors. Once you have selected the file and imported your chart of accounts you will not see
anything in the list box unless you check the Show Unassigned checkbox inside of the Account Assignment Filter
area. Once checked the screen will look similar to this:

6
Notice that each chart of account is preceded by its account number.
For each chart of account in the list on the left, you will need to assign it either as a Debit, Credit, or leave it
unassigned. Typically, not all of your chart of accounts will map to export fields in 2TouchPOS. Assigning your
accounts is done with the Assignment drop down list:
You can also assign a vendor to a chart of account using the Vendor drop down list:
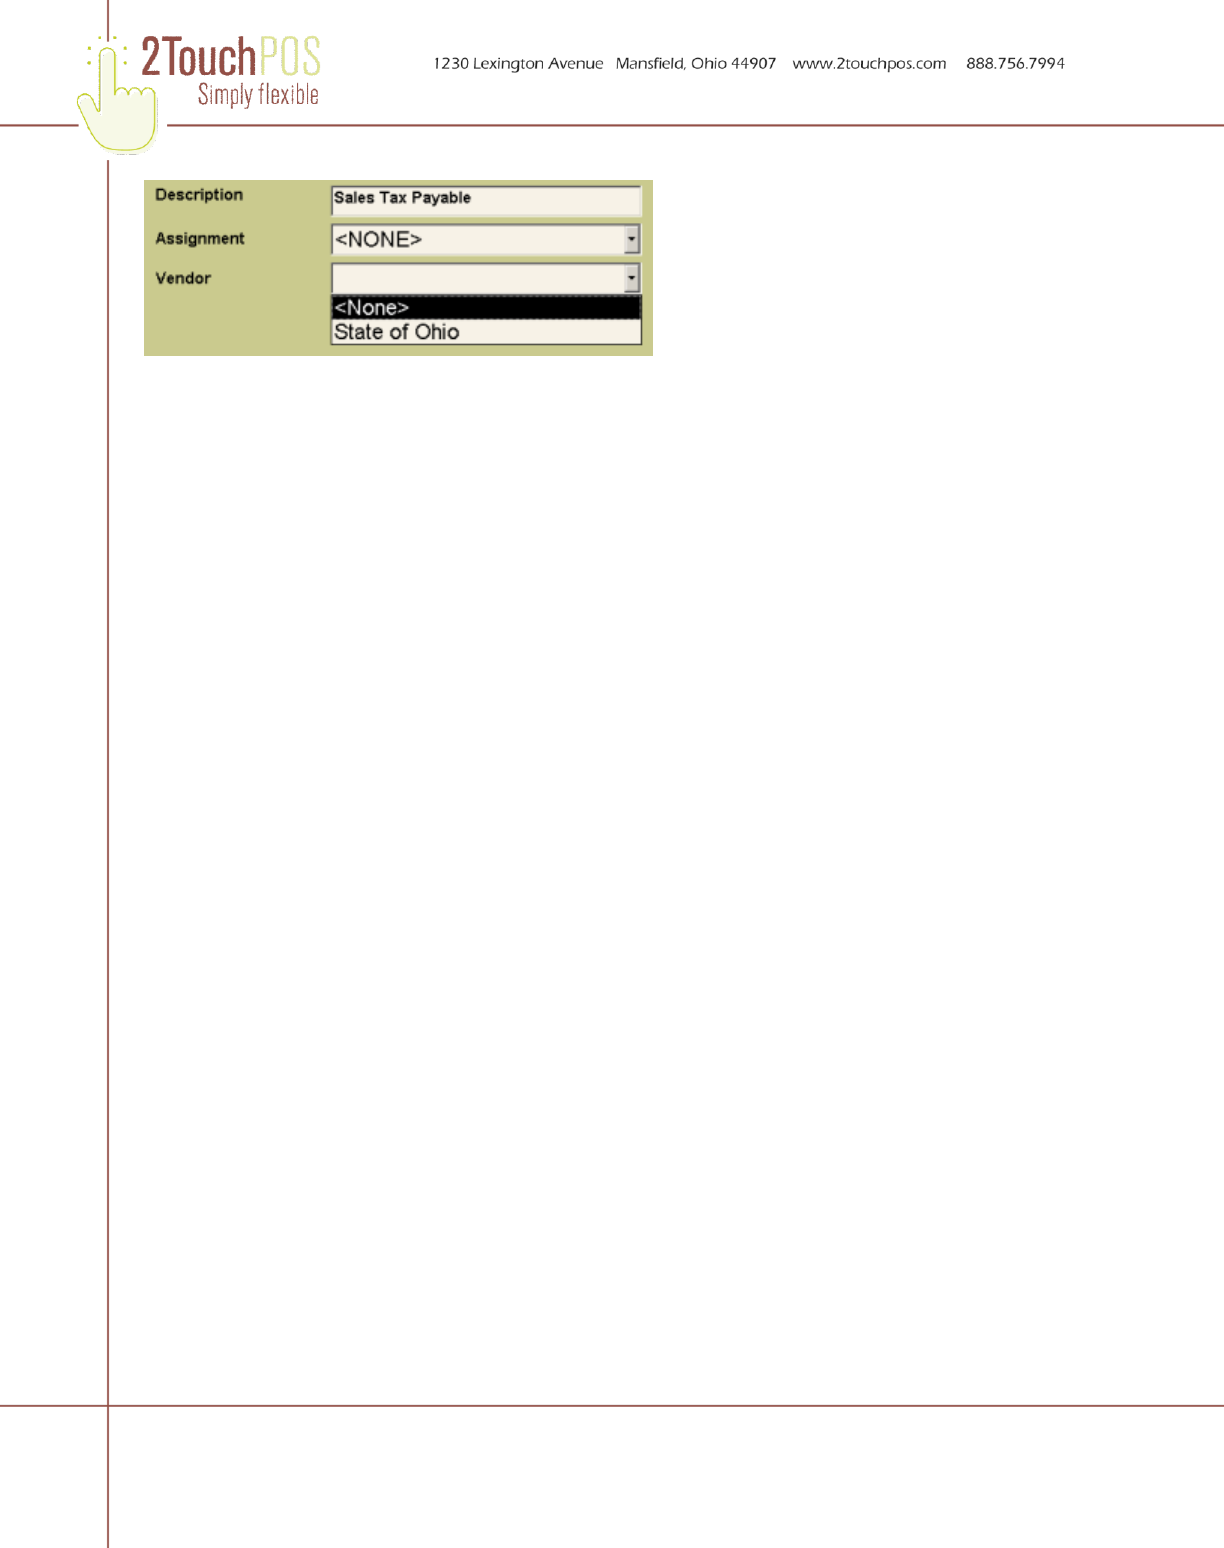
7
The only time assigning a vendor is required is when QuickBooks requires that a vendor be assigned to a particular
chart of account in a journal entry. If you do not assign a vendor, and QuickBooks requires one, you will be notified
when you try to import the file into QuickBooks.
As alluded to above, the Account Assignment Filter can be used to change what is visible in the Chart of Accounts
list. Using the checkboxes you can show or hide accounts assigned as credits, debits, or unassigned.
As mentioned above, there is no way to add, remove, or edit a chart of account. This must be done in QuickBooks
and then re-imported into 2TouchPOS. Re-importing your chart of accounts will not lose any assignments you have
made to accounts that have not changed.
Reporting Revenues (Chart of Account Assignments)
The Options->Admin->Financial->Reporting Revenues screen is where you link your chart of accounts to sales
figures in 2TouchPOS.

8
Listed in the grid are all of the different figures that can be assigned to a chart of account and exported in the export
file. Using the Type drop down list:
You can narrow down the grid to a particular type of figure. The Department type will read Category if your Process
Method is Category on the Financial Export setup screen.
For each line item that you want to appear in the export file, you need to assign a chart of account. This is done by
selecting the row in the grid you want to assign and choosing the appropriate account from the Chart of Account drop
down list.
The Reverse Journal Entry checkbox can be used to flip a chart of account form a debit to a credit for just that
particular line item.

9
The Show drop down list:
is used to filter the grid to all line items, unassigned line items, or only items that have a chart of account assigned to
them.
You can use the General Ledger Linkage report to help you understand what is and is not yet linked to a chart of
accounts. Options\Admin\Reports\Miscellaneous\General Ledger Linkage
Let the Exporting Begin
Now that you have finished the setup, 2TouchPOS will attempt to generate an export file when your Z report is run.
As long as the debits and credits balance to $0.00 an export file will be created. It is a bookkeeping effort to get the
debits and credits to balance. Seek your accountants advise should you need help
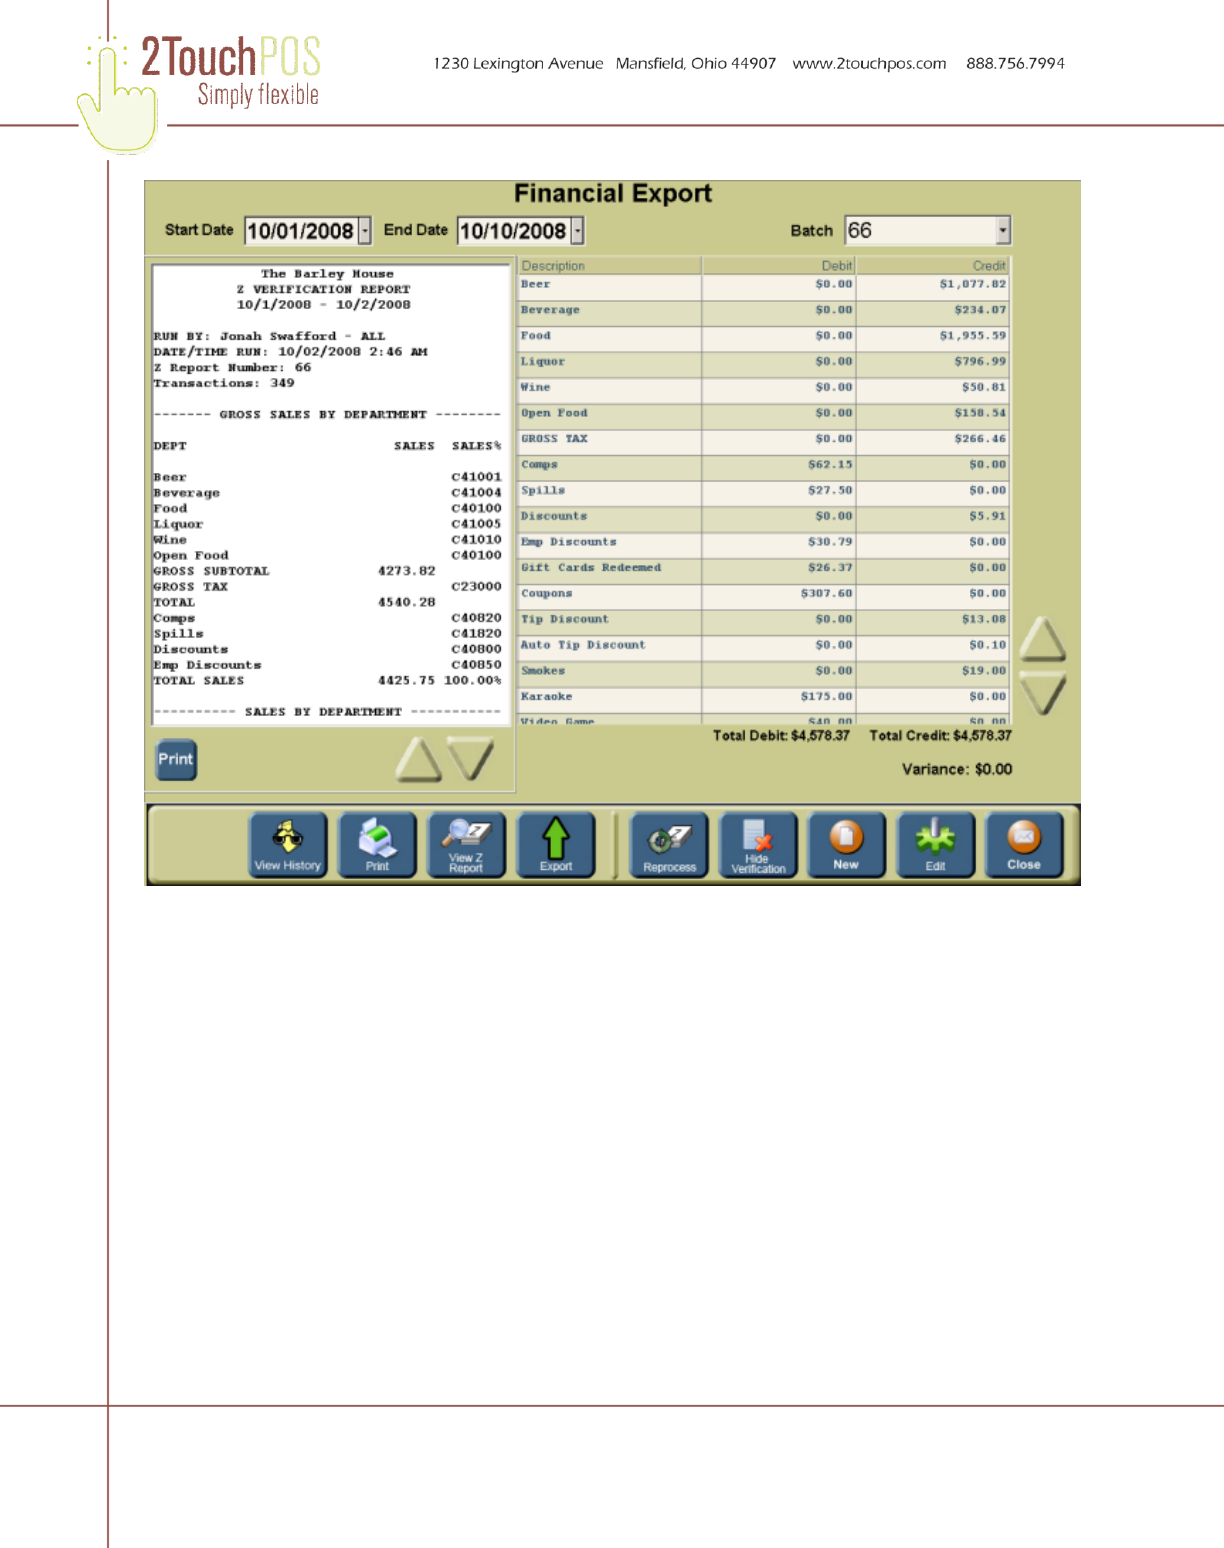
Using the Options->Admin->Financial->Recreate Export screen allows you to see each journal entry for a given
export, make modifications, compare with the Z report from that day and a few other handy tools.

10
Select a Start Date and an End Date in the upper left hand corner. Once you select a date range you will be able to
select a Batch (which is a Z report) from the batch drop down. Select a batch, and the screen will look similar to this:

11
Each line in the grid is a journal entry in the export file. The total of the debit and credit columns needs to be $0.00.
The View History Button will show a screen detailing the history for each journal entry in the export.
The Print Button will print the grid.
The View Z Report Button will display the Z report from which these journal entries were created:

12
This button will change to Hide Z Report if the Z report is showing.
The Export Button will produce the export file for this particular batch. If the Variance is not $0.00 the file will not be
generated. This file will be placed in the output directory and named according to the setup on the Financial Export
settings screen.
The Reprocess Button will force 2TouchPOS to recreate the journal entries for the current batch. This is useful when
you have made changes to the reporting revenues and you want to see what effect it has on the variance.
The Show Verification Button will display the Z report from which these journal entries were created. For each line
item that produced a journal entry in the export, the dollar figure will be replaced with the chart of account number.
13
This is useful for determining what accounts have been matched to particular line items on the Z. You will find this
very helpful when trying to get a $0.00 variance.
This button will change to Hide Verification if the verification is showing.
The New Button allows you to manually add a journal entry to this batch.

14
Select the chart of account, add a description and enter either a debit amount or credit amount.
The Edit Button allows you to edit a particular journal entry in the current batch. Select the line item you would like to
edit and press the button. A screen similar to the New Entry screen will appear allowing you to change the chart of
account, description, and debit or credit amount.
The Close button is pretty self explanatory.
