Table Management User Guidex Guide
2013-09-24
: Xenios Table Management User Guide Table Management User Guide Tables Curriculum ation 2TouchPOS XeniosWeb
Open the PDF directly: View PDF ![]() .
.
Page Count: 26

2013 Xenios LLC
82 Saint Paul Street
Rochester, NY 14604
Phone 585.325.5242 • Fax 585.325.6989
2TouchPOS Operations Table
User’s Guide

Xenios LLC @2013 Page 2
Contents
About this Document ...................................................................................................................... 3
Beginning of Shift ....................................................................................................................... 4
Employee Code........................................................................................................................ 4
Employee Badge ...................................................................................................................... 4
Start a New Table ........................................................................................................................ 6
Re-Opening a Table .................................................................................................................... 6
Putting Items on Hold from a Tab ............................................................................................... 7
Releasing Items from a Table...................................................................................................... 8
Deleting Sent menu Items ........................................................................................................... 9
Transfer Check to another Server.............................................................................................. 10
Transfer to Table ....................................................................................................................... 11
Transfer to Tab .......................................................................................................................... 12
Combine Checks ....................................................................................................................... 14
Split Checks............................................................................................................................... 15
Applying Tax Exempt ............................................................................................................... 19
Add Gratuity .............................................................................................................................. 20
Print Checks .............................................................................................................................. 20
Comp Check .............................................................................................................................. 21
Payment ..................................................................................................................................... 22
Splitting Check Payment ........................................................................................................... 23
Adding or Adjusting Tips .......................................................................................................... 24
Server Report............................................................................................................................. 25
Server End of Shift .................................................................................................................... 26

Xenios LLC @2013 Page 3
About this Document
This document was written for 2TouchPOS version 3.03.4900.
Xenios LLC @2013 Page 4
Beginning of Shift
Employee Code
Clock in & out and Log in
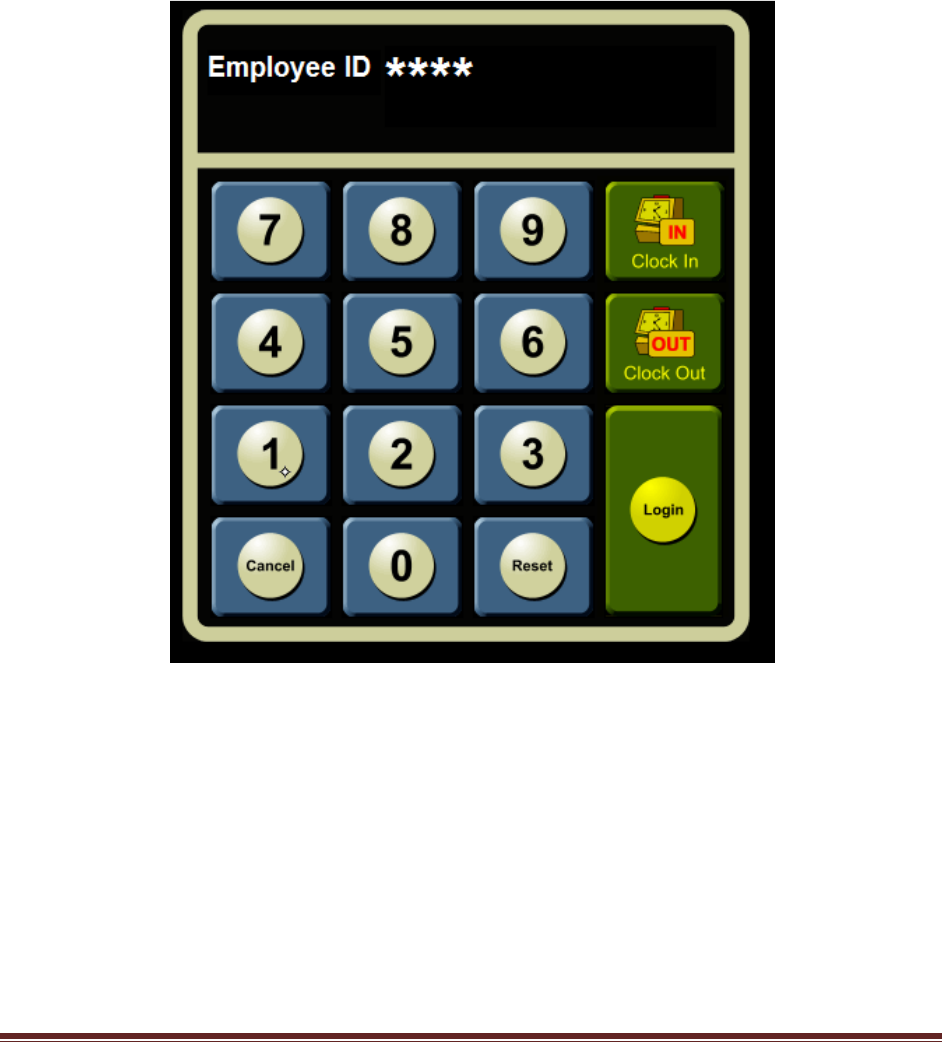
1. From the clock in/out screen, touch “Clock In” button.
2. Enter your employee code.
Log In
1. Re-enter employee code.
2. Touch “Log In” button.
Option 2
Employee Badge
Clock in/out
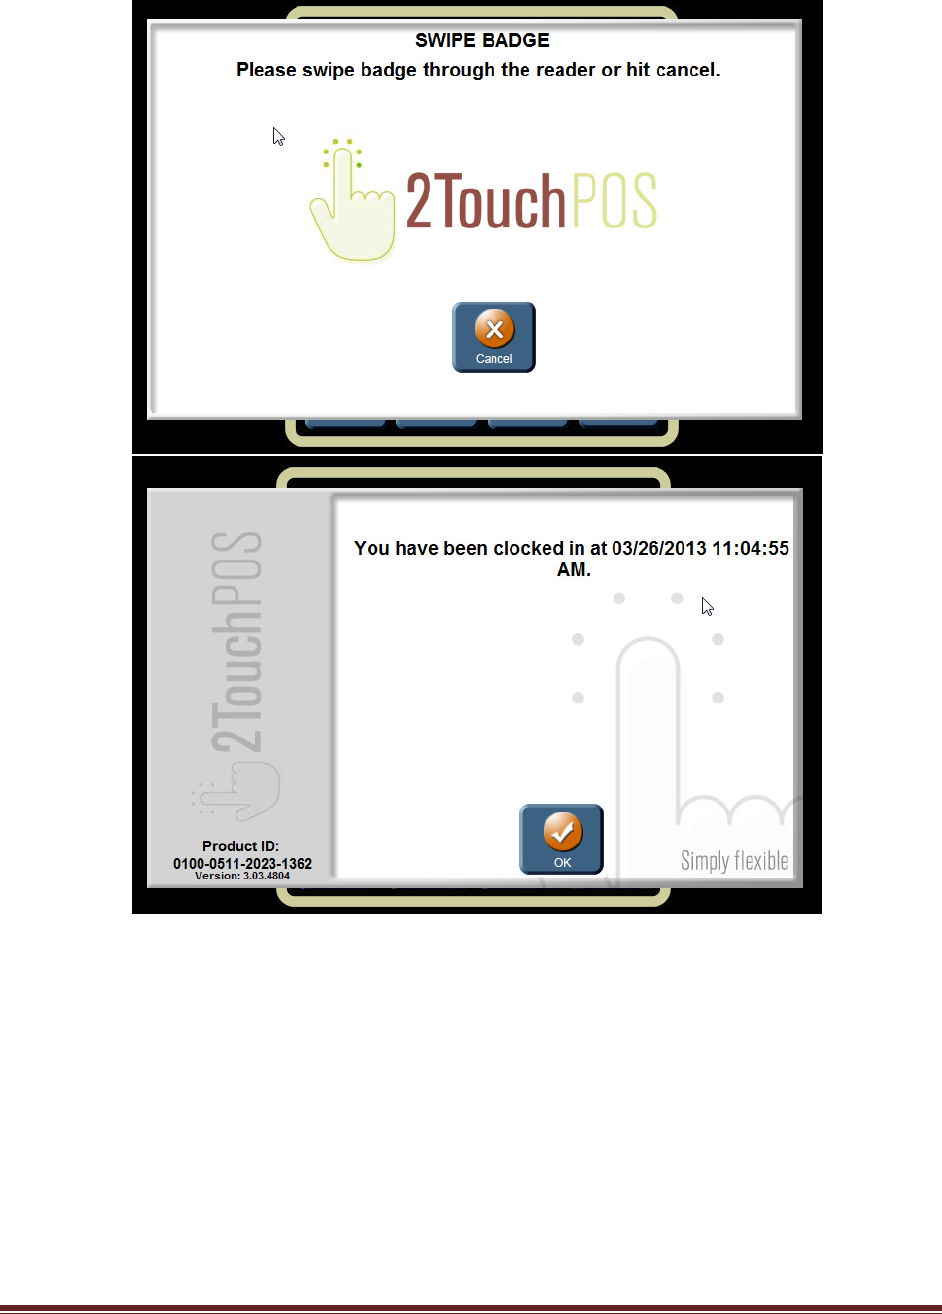
1. From the clock in/out & login screen, touch “Clock in” button, then swipe the employee badge.
2TouchPOS will notify employee they have been clocked in or clocked out.
Note: if an employee tries to log in, without being clocked in, 2TouchPOS will notify
employee they are not clocked in and would they like to clock in?
2. Swipe your employee again, touch “Login” button.
Xenios LLC @2013 Page 5
Log in
1. Swipe employee badge
Option 3
Bio-Metric Reader
1. Place your index finger on bio-metric reader to clock in & out.
Log in
1. Place your index finger on bio-metric reader to clock in & out.
Xenios LLC @2013 Page 6
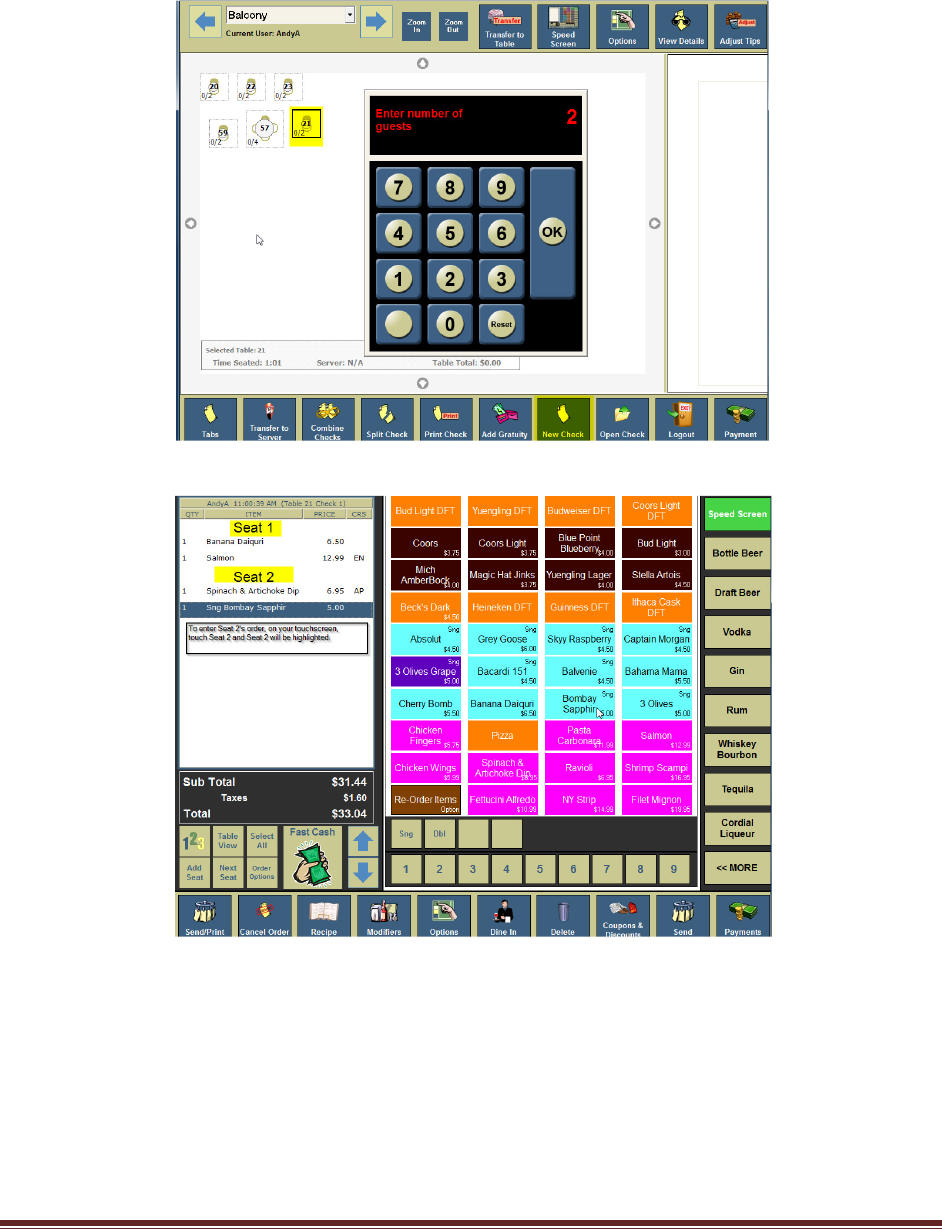
Start a New Table
1. From the table view management screen, select and highlight a “Table” button.
2. Touch “New Check” button, then enter number of guest and touch “Ok” button.
3. Enter Customer order by seat. To enter an order for another customer seating at the table,
touch “Seat #”. In entering an order for seat 2, touch seat 2 and enter customers order.
4. Once customers order has been entered, touch “Send” button.
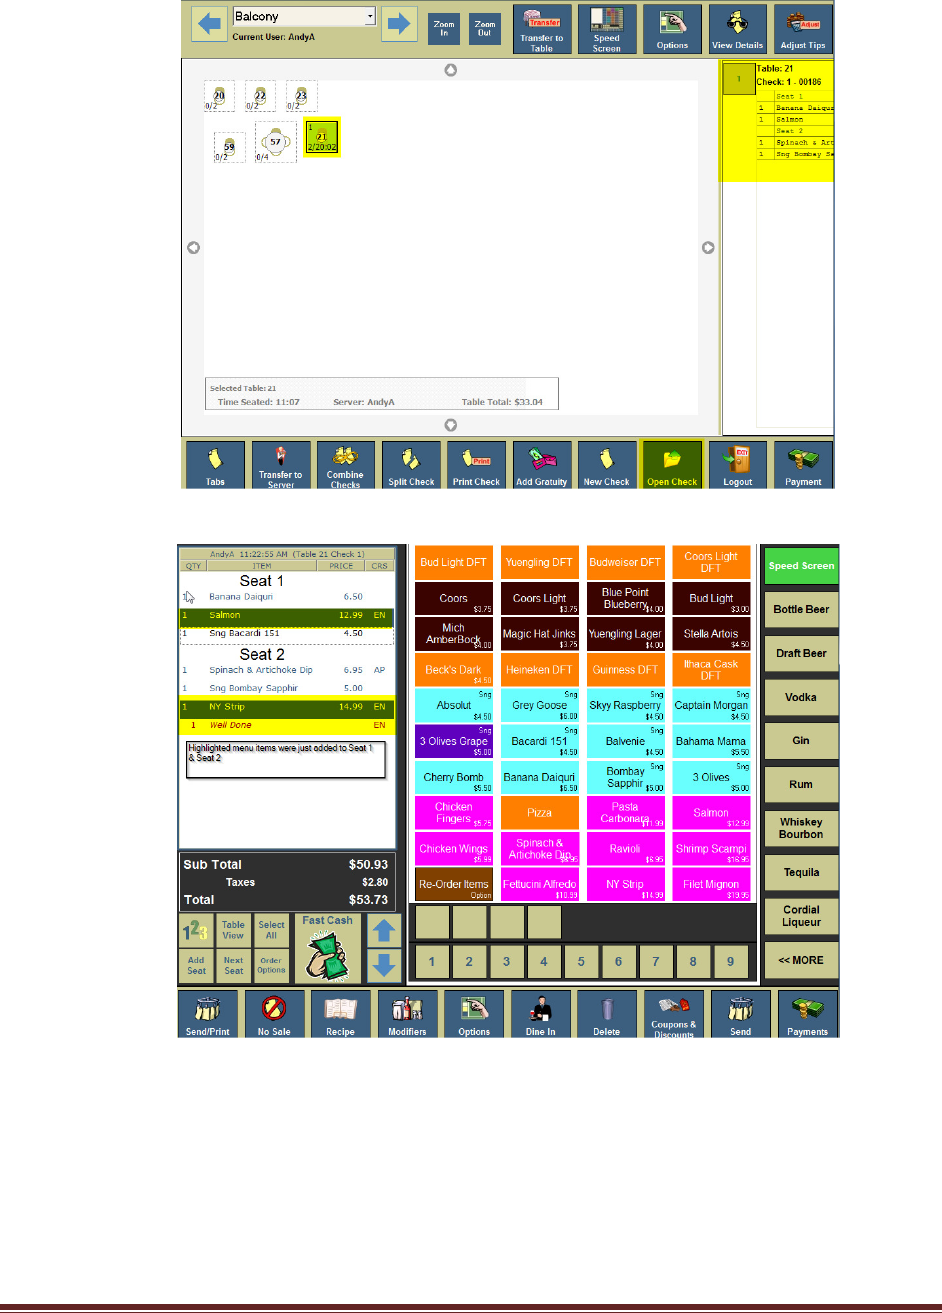
Re-Opening a Table
1. From the table view management screen, touch a specific “Table” button. The customer check
will appear on the right side of the screen.
2. Touch “Open Check” button, then enter number of guest and touch “Ok” button.
Xenios LLC @2013 Page 7
3. Select Seat Number, enter menu items, and then touch “Send” button.
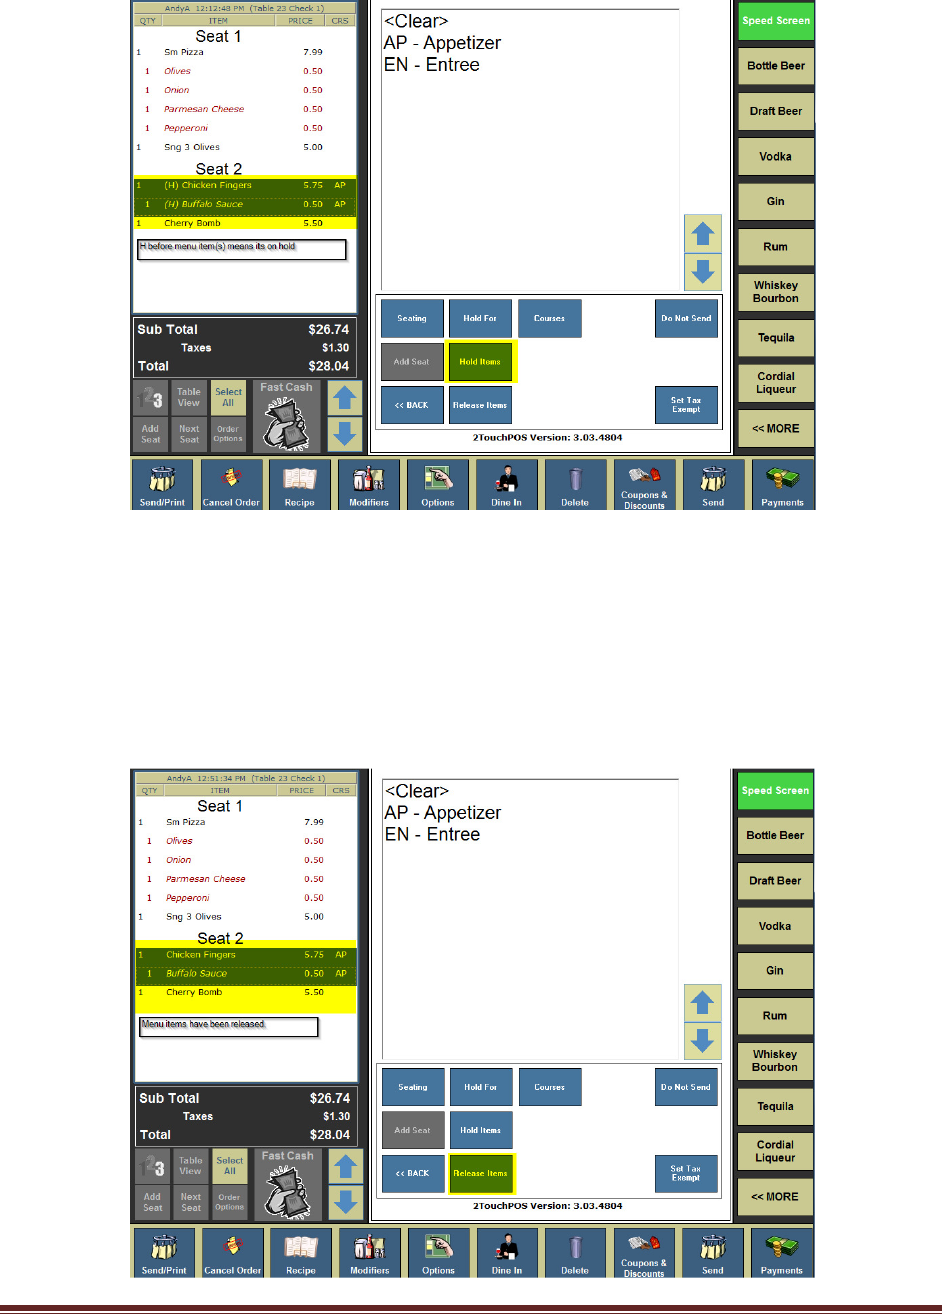
Putting Items on Hold from a Tab
1. From the table view management screen, highlight table, select “Open Check” button.
2. Touch “Order Options” button located underneath ticket.
3. Select the items that need to be held, then touch “Hold” button.
4. Touch the “Back” and “Send” buttons.
Note: To hold entire order, follow steps 1 & 2, underneath ticket, touch “Select All” button,
then touch “Hold Items” button.
Xenios LLC @2013 Page 8
Releasing Items from a Table
1. From the table view management screen, select and highlight a “Table”, touch “Open Check”
buttons.
2. Touch “Order Options” button located underneath ticket.
3. Select the items that need to be released, then touch “Release Items” button.
4. Press the “Back” and “Send” buttons.
Note: To release an entire order, follow steps 1 & 2, underneath ticket, touch “Select All”
button, then touch “Release Items” button.
Xenios LLC @2013 Page 9
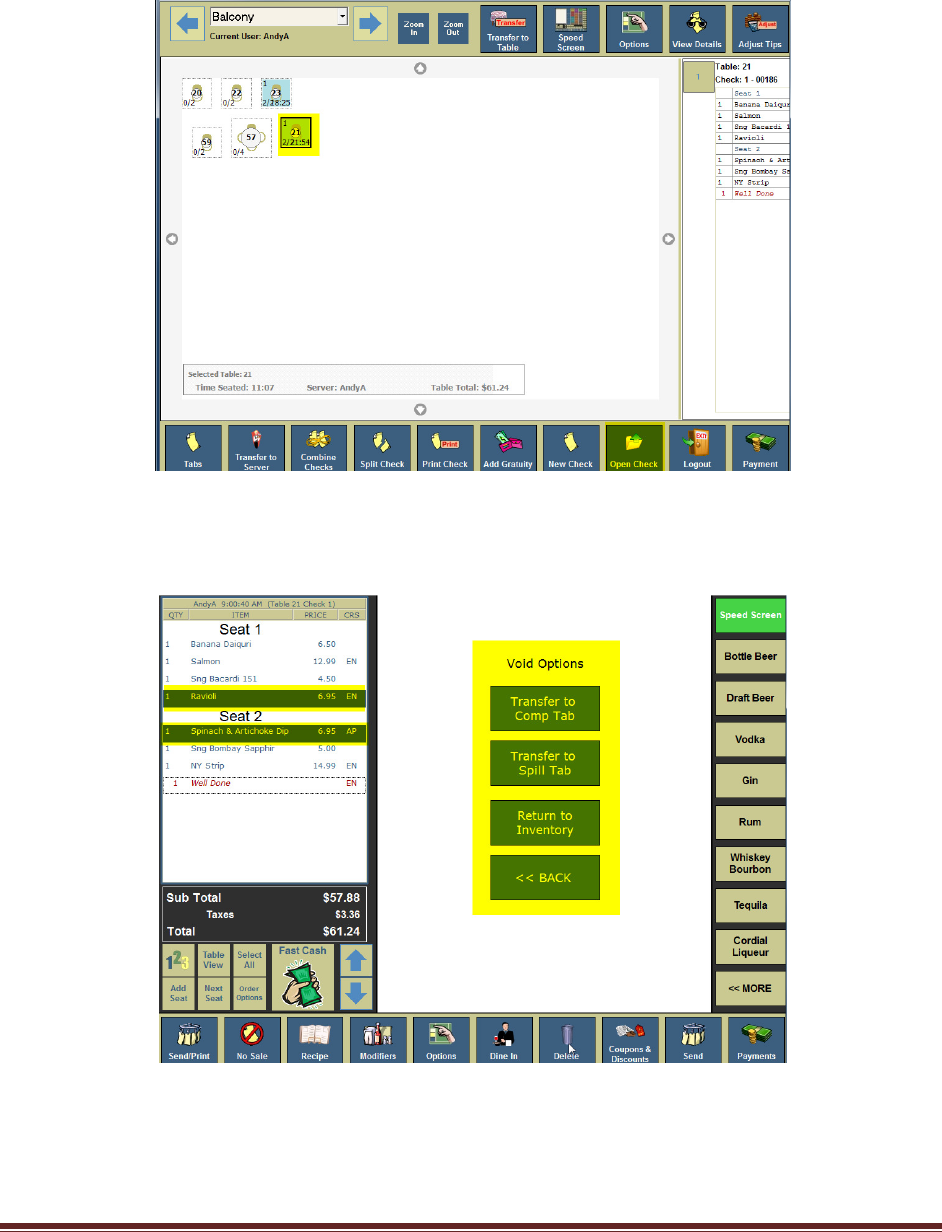
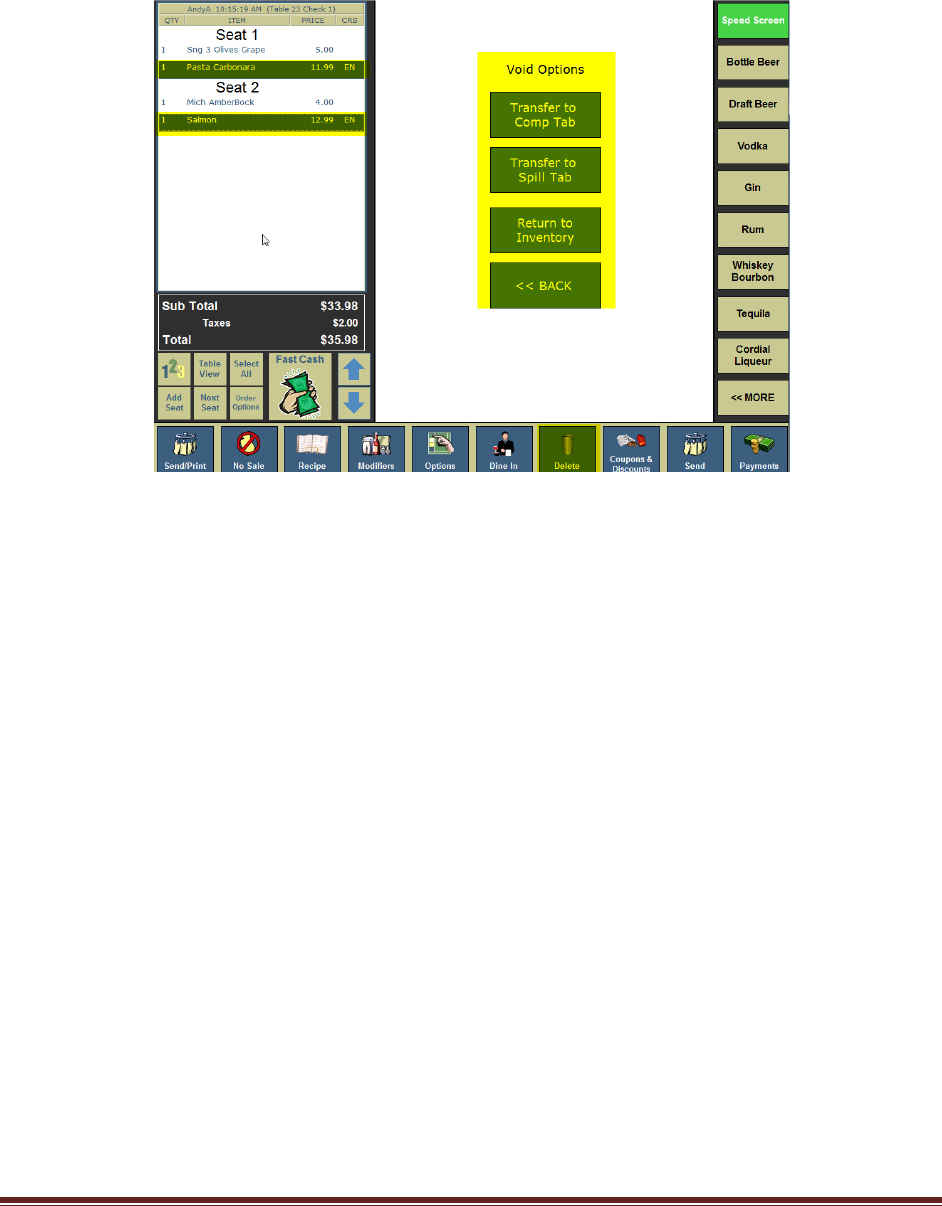
Deleting Sent menu Items
1. From the table view management screen, Select and highlight a “Table” button, touch “Open
Check” button.
2. Select menu item/s for deletion. (Manger’s approval maybe needed)
3. Touch “Delete” button, choose one of the following, transfer to “Comp Tab”, “Spill Tab” or
“Return to Inventory” buttons.
Xenios LLC @2013 Page 10
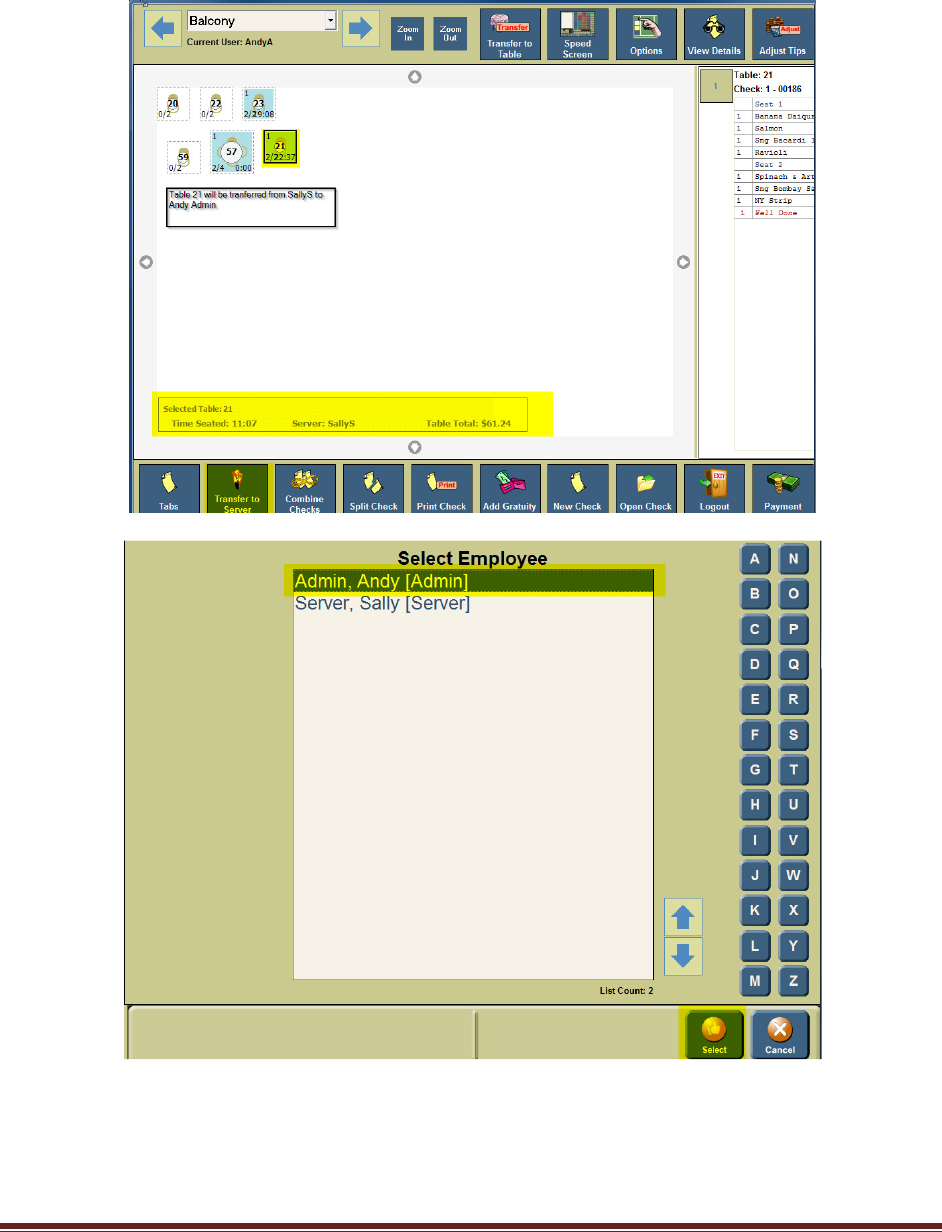
Transfer Check to another Server
1. From the table view management screen, select and highlight “Table” button, then touch
“Transfer to Server” button.
2. Select clocked in employee, then touch “Select” button.
Xenios LLC @2013 Page 11
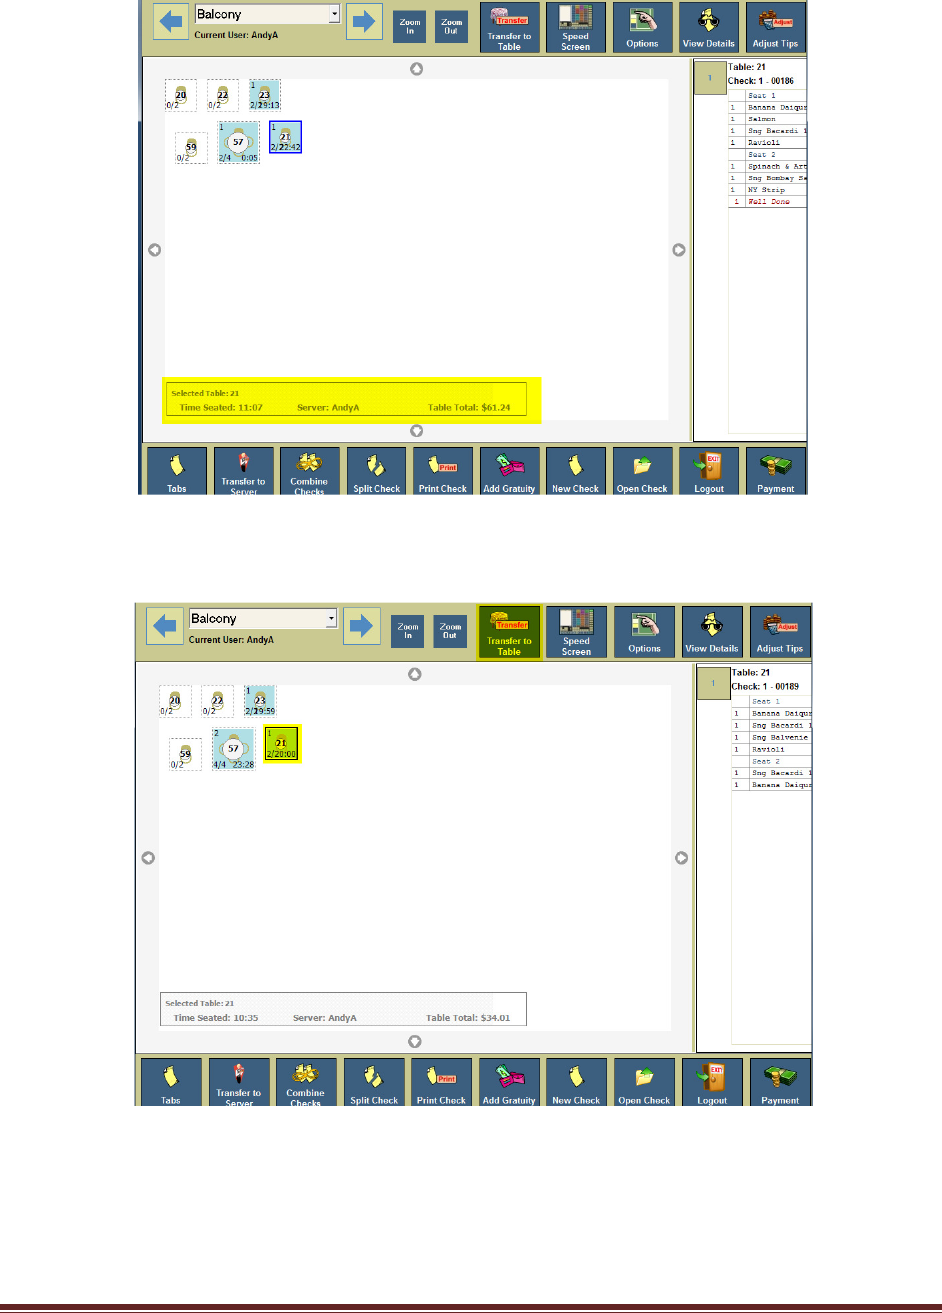
Transfer to Table
1. From the table view management screen, select and highlight “Table” button, then touch
“Transfer to Server” button.
2. Select “Table” button. (Note: when transferring a table to another table, you are
transferring a check that results in the table to have two or more checks).

Xenios LLC @2013 Page 12
Transfer to Tab
1. From the table view management screen, select and highlight a “Table” button, then touch
“Option” and “Transfer to Tab” button.
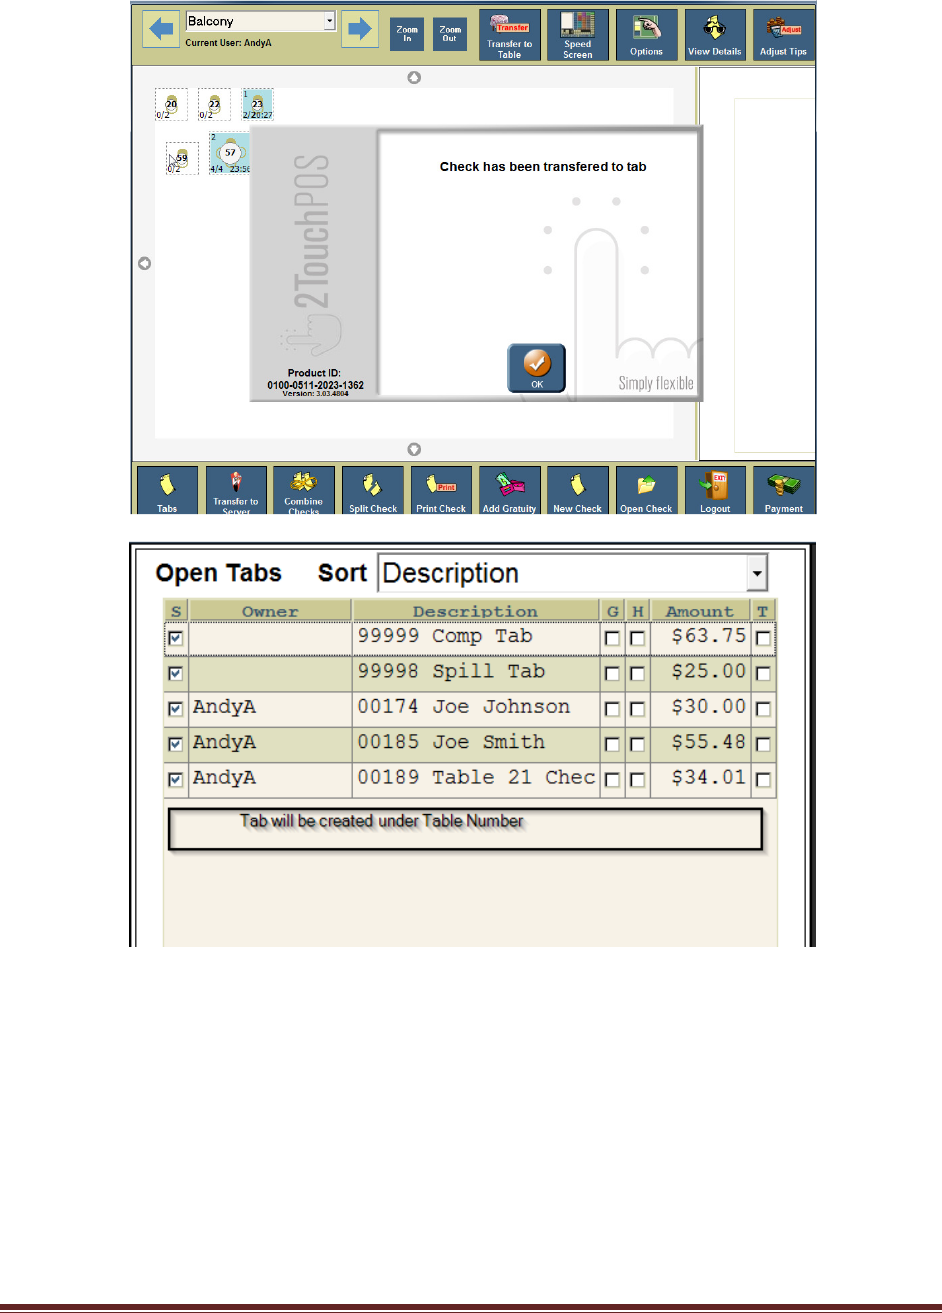
Xenios LLC @2013 Page 13

Xenios LLC @2013 Page 14
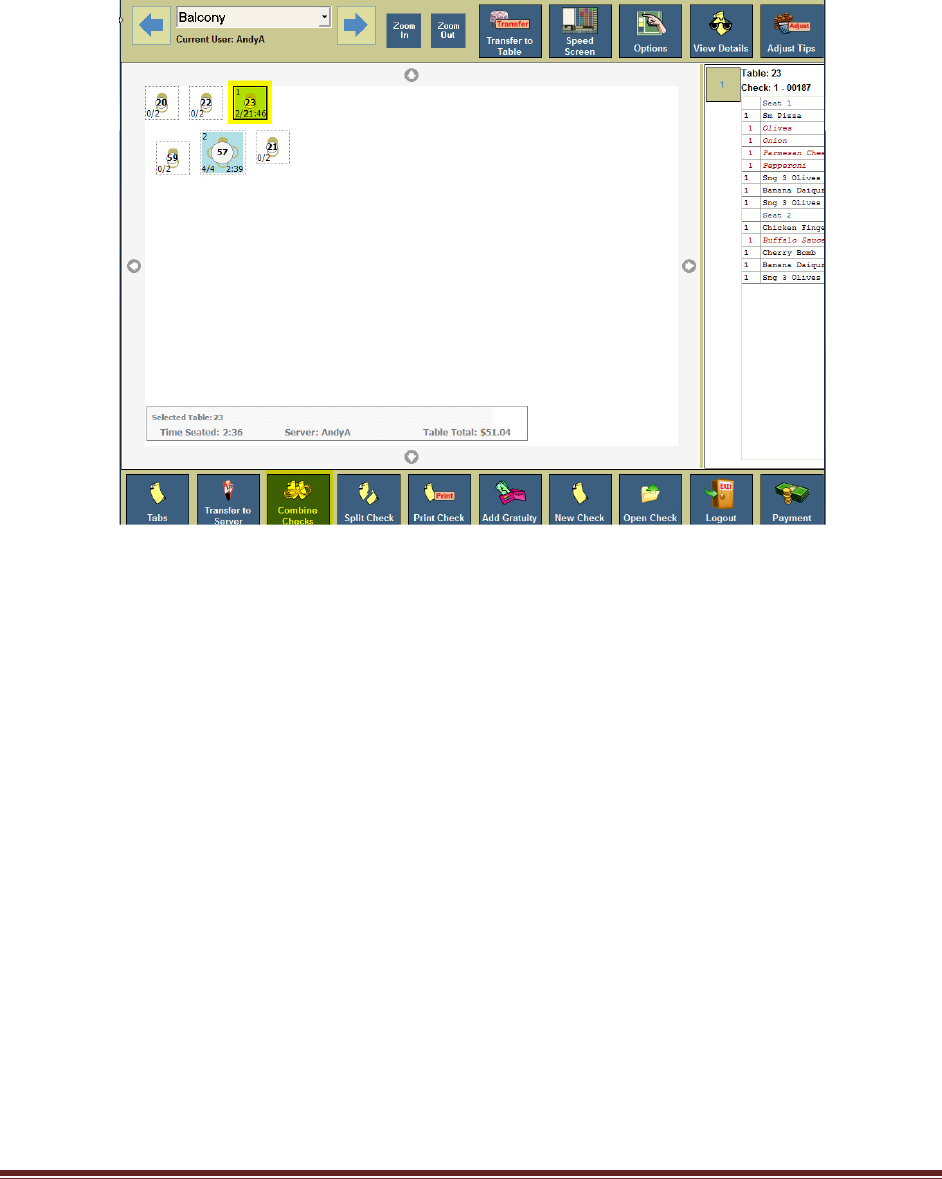
Combine Checks
1. From the table view management screen, select and highlight a “Table” button, then select and
highlight checks to be combined. Touch “Combine Checks” button
2. Touch “Ok” button.
\Users\DJohnson\Des ktop\reen Shots\2013-04-01 1_31_22 -2Touc hPO
Xenios LLC @2013 Page 15
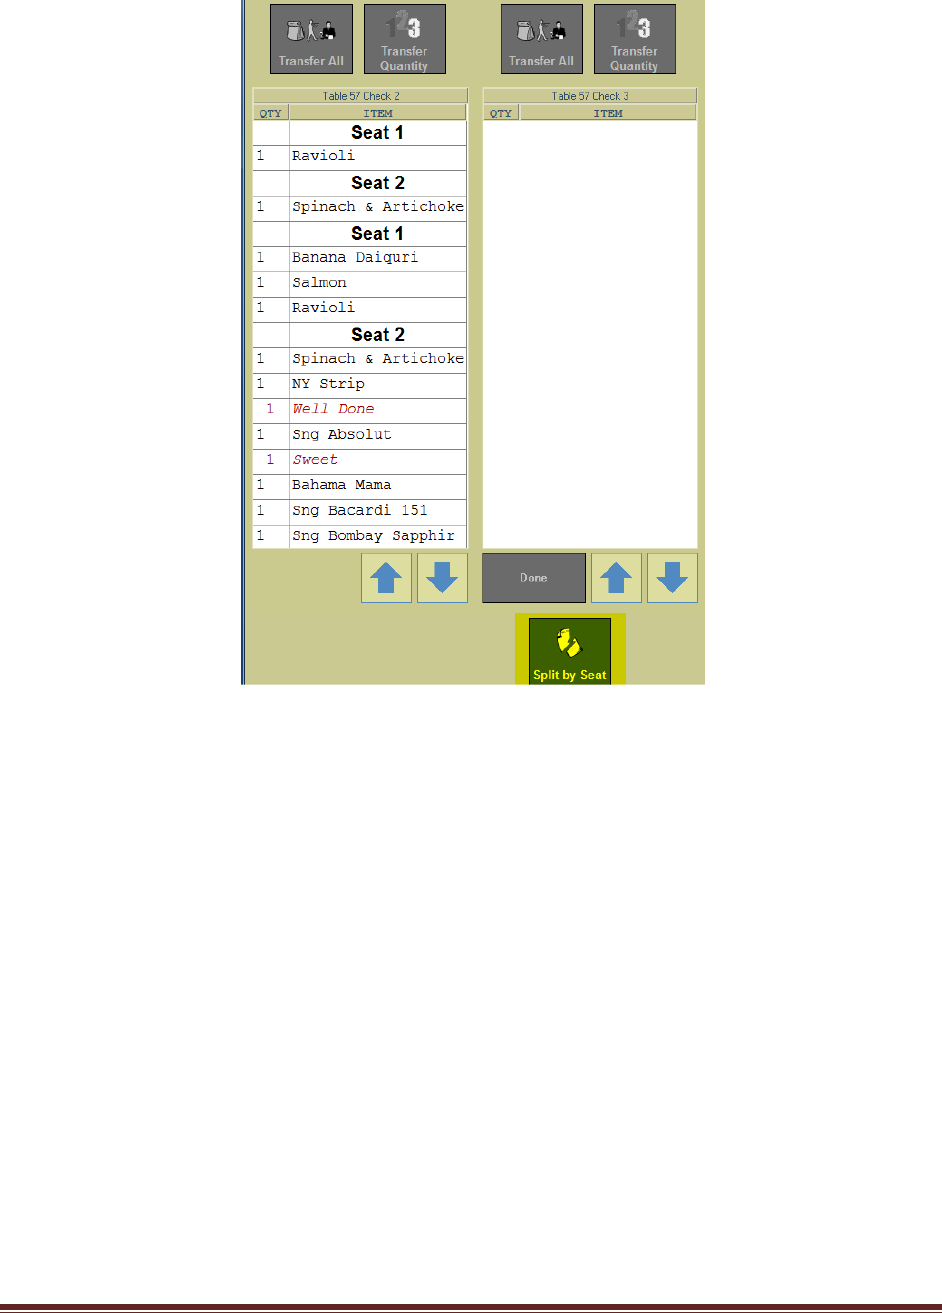
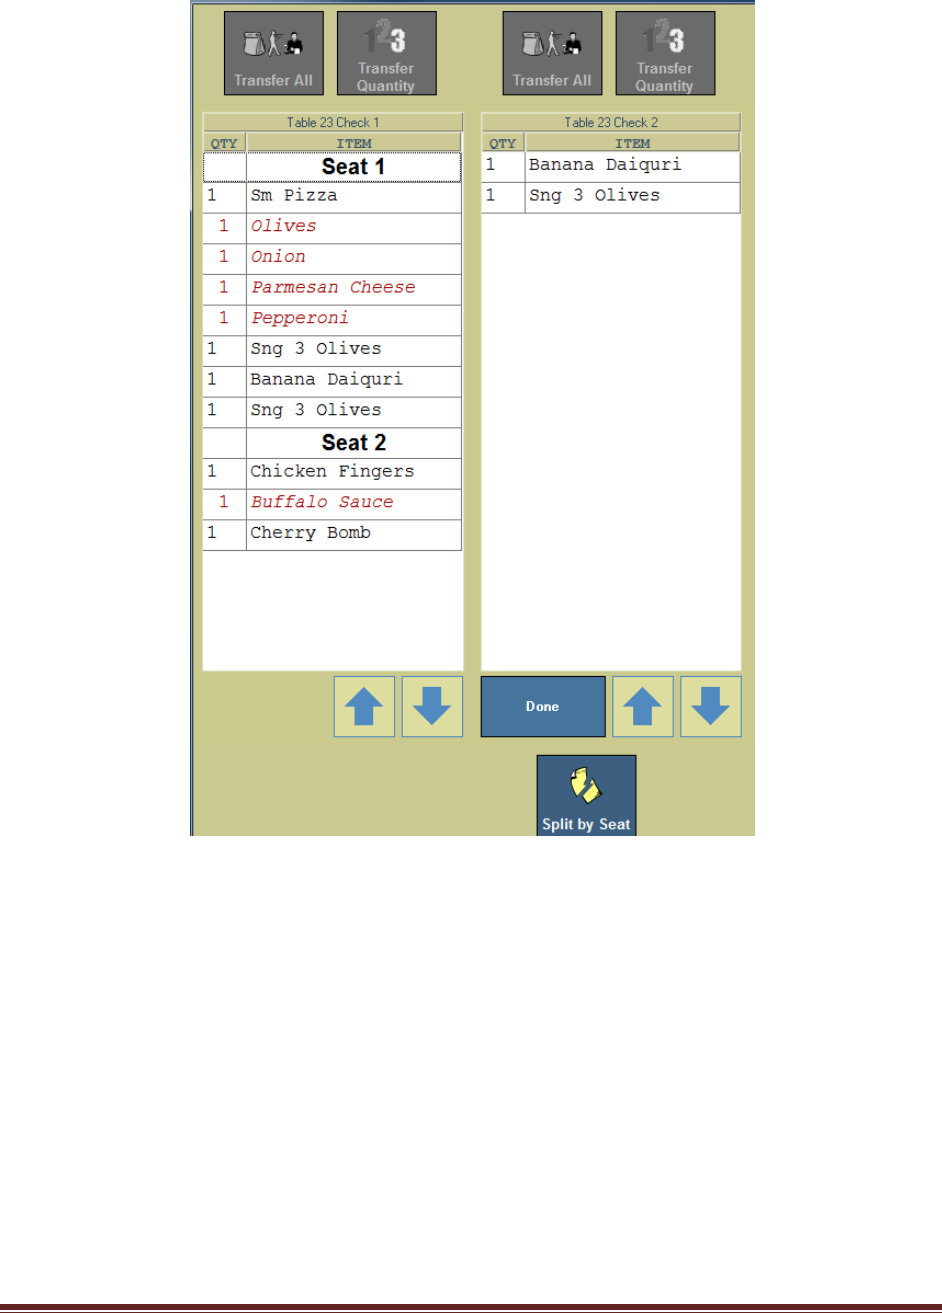
Split Checks
By Seat(s):
There are two different ways to split a check, by seat(s) or by menu items)
1. From the table view management screen, Select and highlight a “Table”, then touch “Split
Checks” button.
Option 1- By Seats
2. Touch “Split by Seat” button. (Checks are created for each individual seat. If you have
four seats, then the original check will be split into four different checks, by seats.)
Xenios LLC @2013 Page 16
Option 2 – By Menu Items
3. Select menu items, touch “Transfer All” and “Done” buttons.
Xenios LLC @2013 Page 17
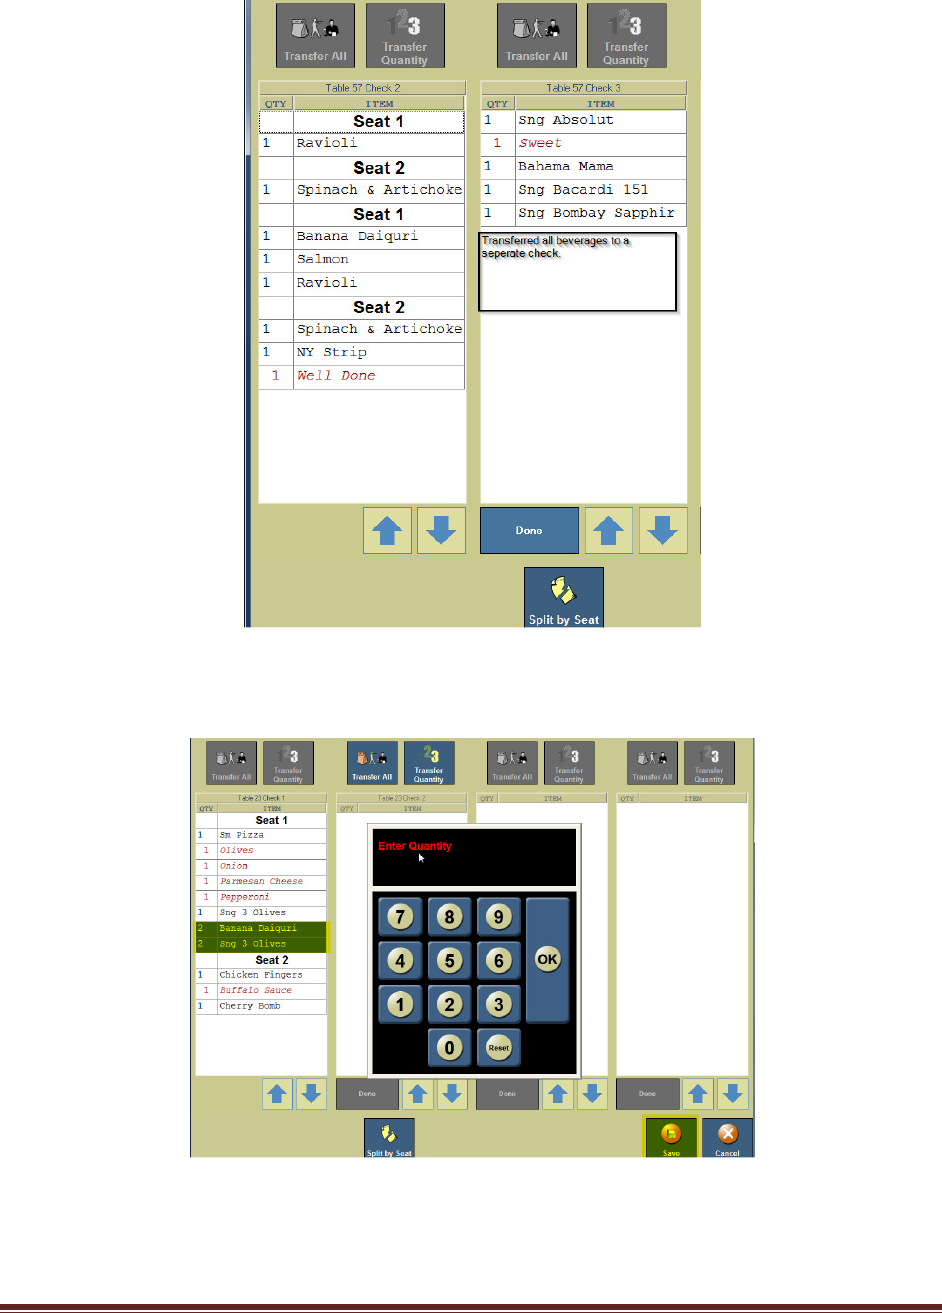
Option 3 – By Quantity of Menu Items
4. Select menu items, enter quantity amount (whole numbers), and then touch “Save”
button. Touch “Done” button.
Xenios LLC @2013 Page 18
Xenios LLC @2013 Page 19
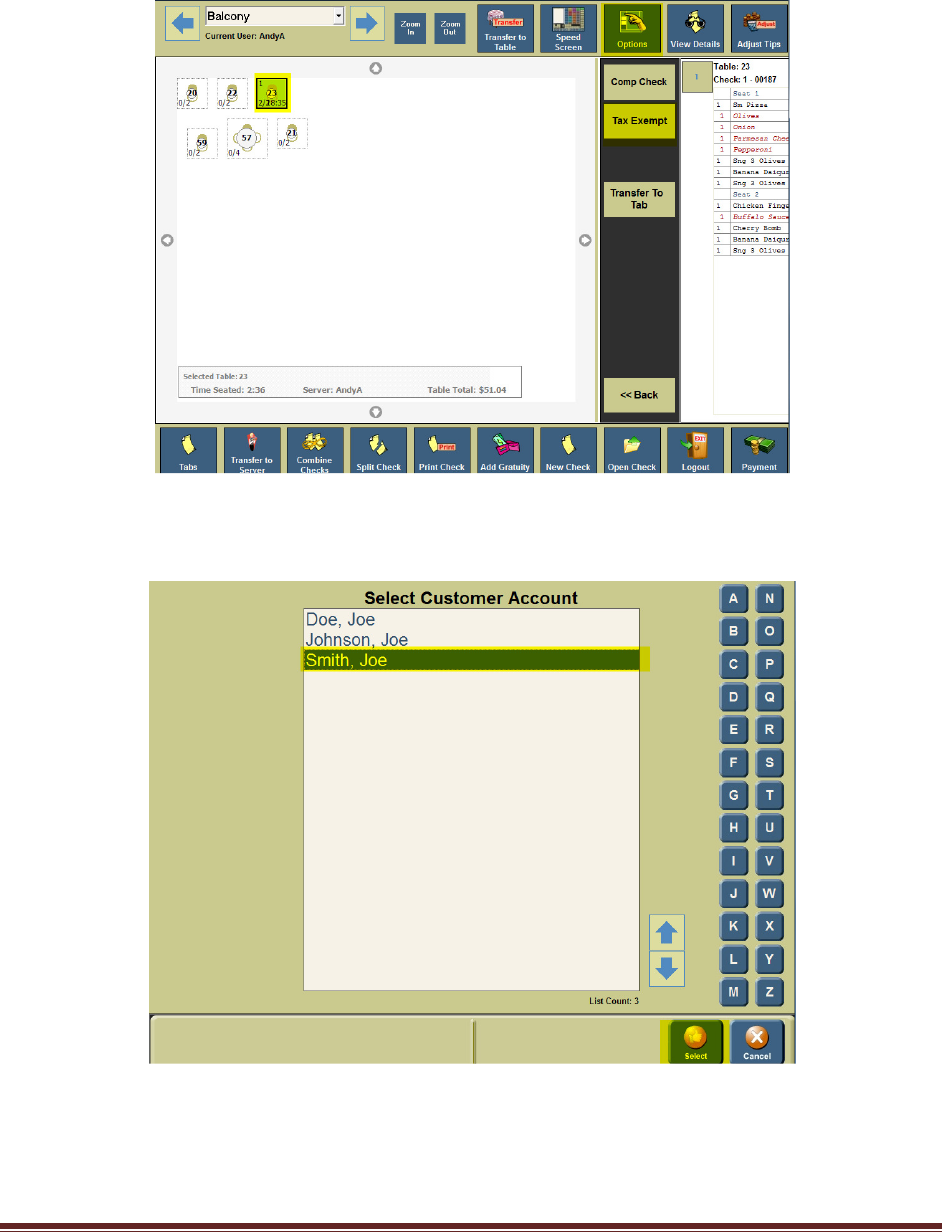
Applying Tax Exempt
1. From the table view management screen, Select and highlight a “Table”, then touch
“Options” button.
2. Touch “Tax Exempt” button. Select a Customer’s Account, then touch “Select”
button.
Xenios LLC @2013 Page 20
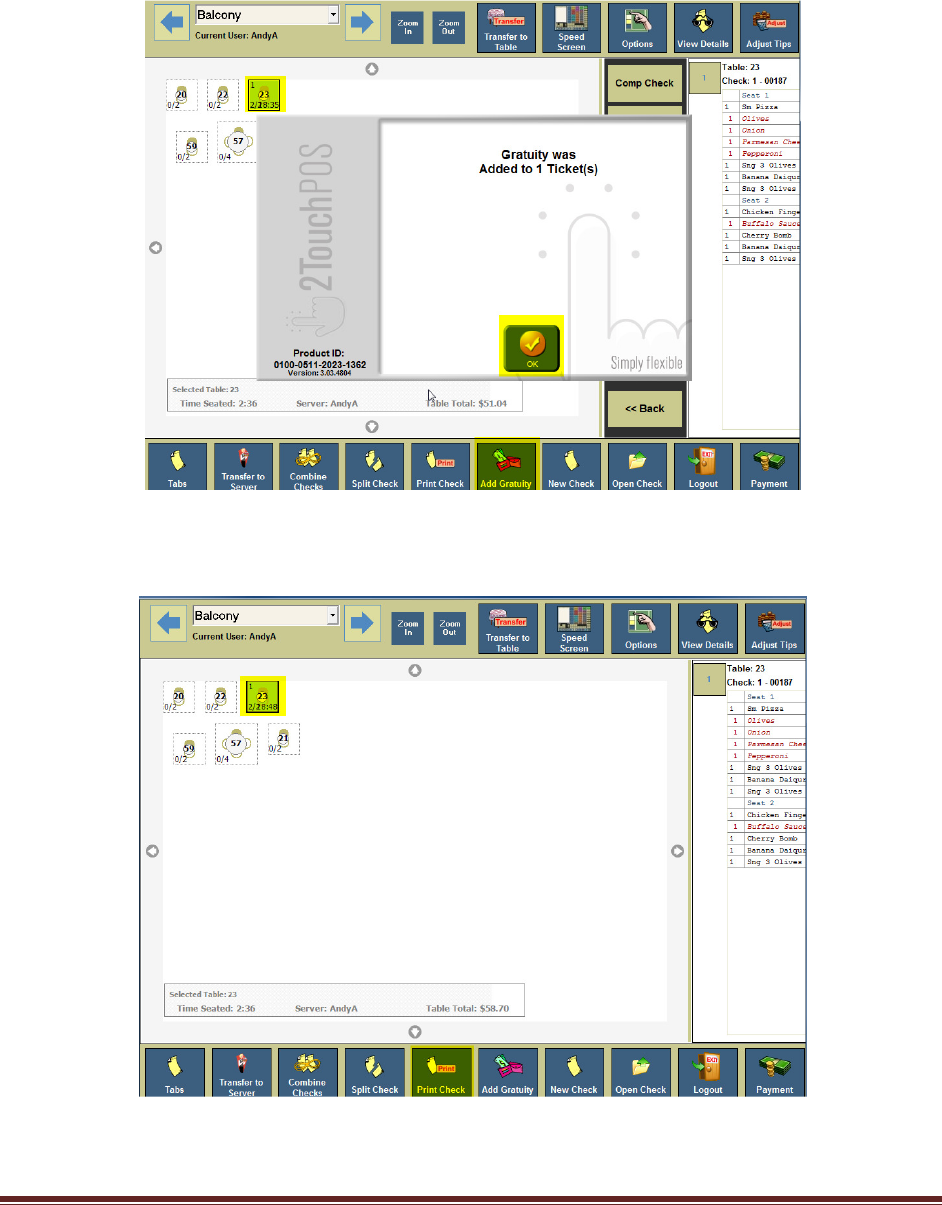
Add Gratuity
1. From the table view management screen, select and highlight a “Table”, then touch “Add
Gratuity” button. Touch “Ok” button.
Print Checks
1. From the table view management screen, select and highlight a “Table”, then touch “Print
Check” button. Touch “Ok” button.
Xenios LLC @2013 Page 21
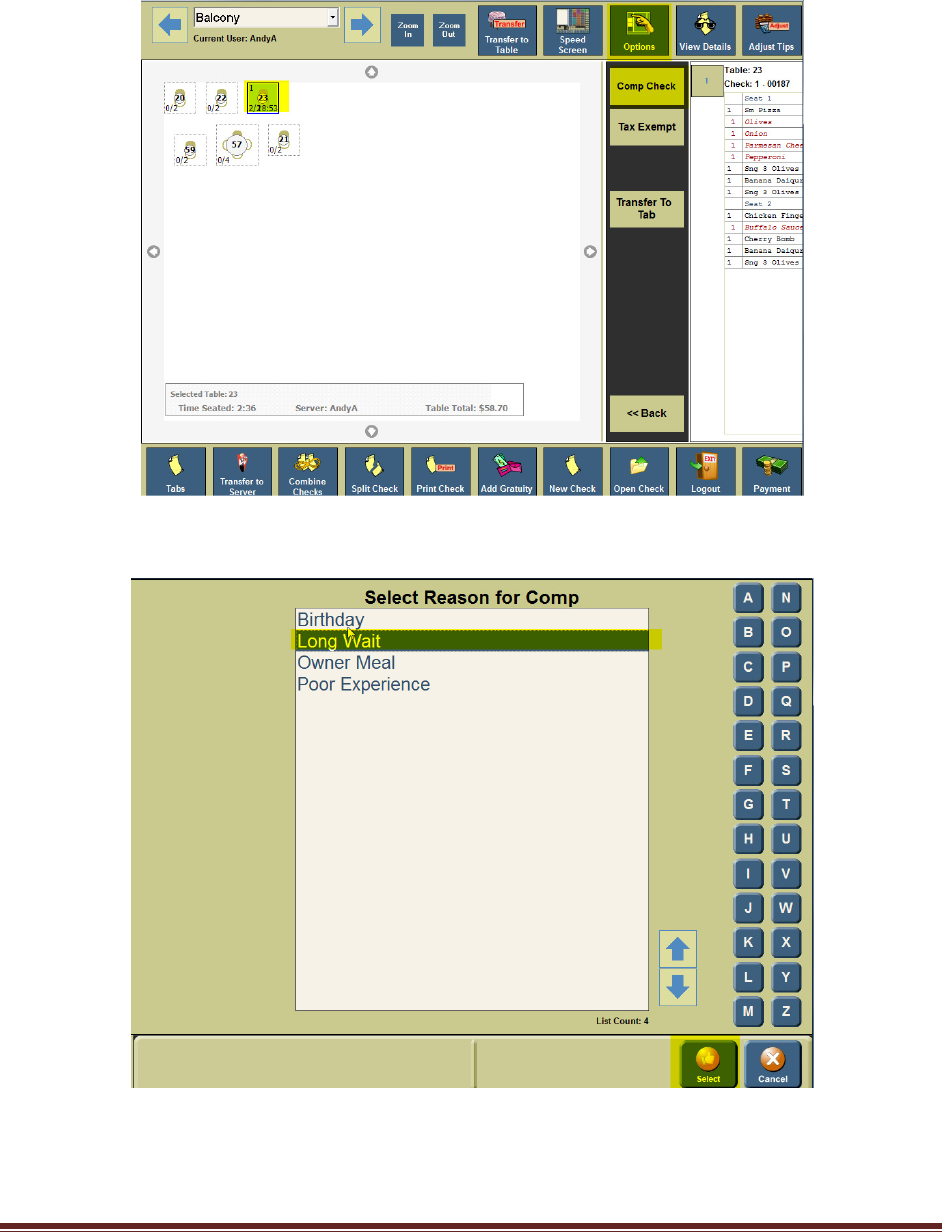
Comp Check
1. From the table view management screen, select and highlight a “Table”, then touch “Options”
button. Touch “Comp Check” button.
Option 1 – Entire Check Comp
2. Select Reason for Comp. Touch “Select” button. Touch “Ok” button.
Xenios LLC @2013 Page 22
Option 2 – Comping Individual Menu Items
3. From the table view management screen, select and highlight a “Table”, touch “Open Check”
button.
4. Select menu items, touch “Delete” button. Select a Void Option.
Payment
1. From the table view management screen, select and highlight a “Table”, touch “Payment”
button.
2. Select method of payment.
a. Cash Payment – Enter Cash Amount, touch “Ok’ button.
b. Check Payment – Enter amount of check.
c. Credit Card Payment – Swipe Customer’s Credit Card.
d. Customer Account – Swipe Customer’s Customer Account Card or Select
Customer Account.
Xenios LLC @2013 Page 23
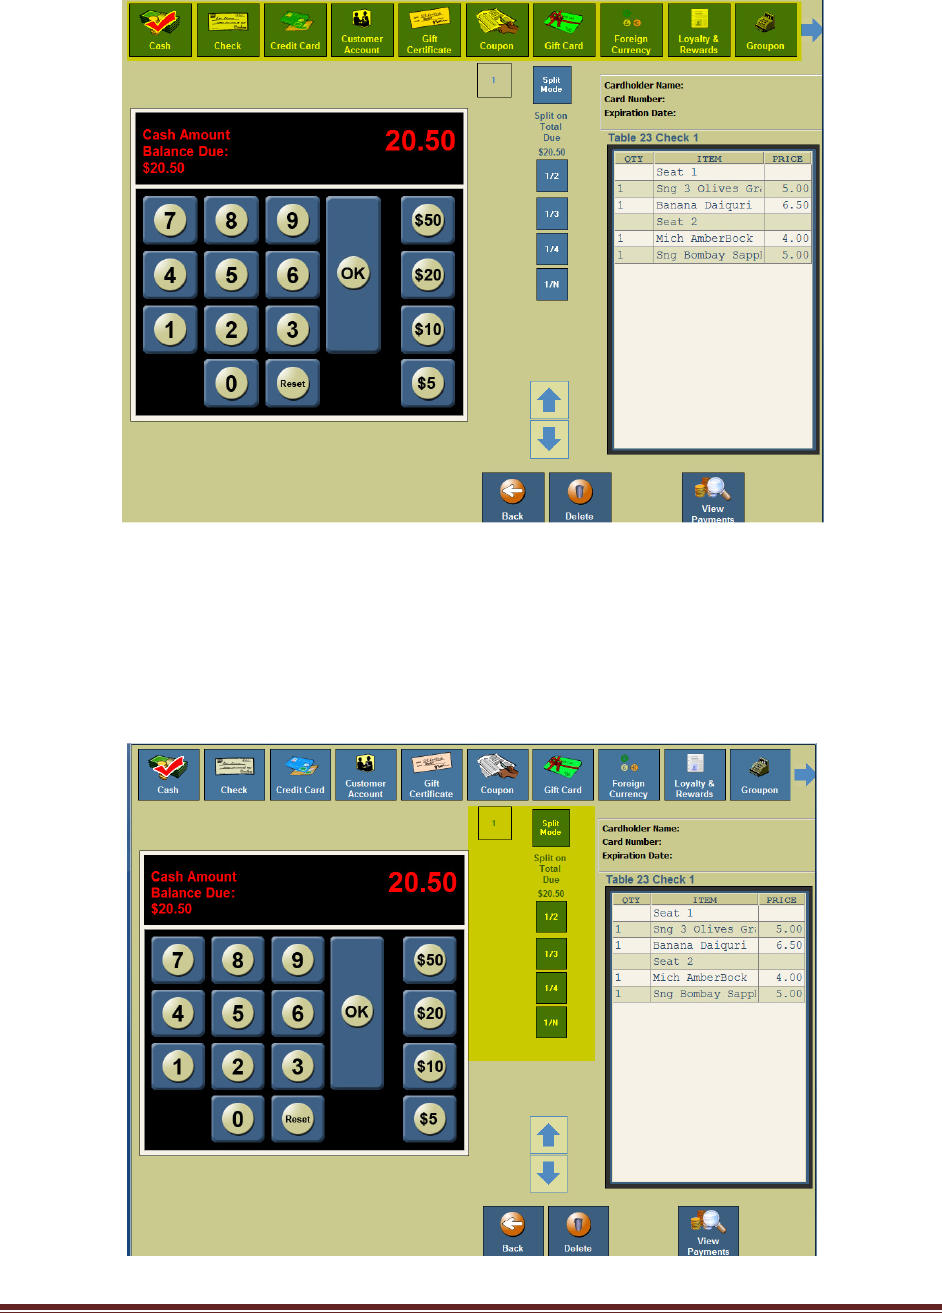
Splitting Check Payment
1. From the table view management screen, select and highlight a “Table”, touch “Payment”
button.
2. A payment can be split by 1/2, 1/3, 1/4, or 1/N (any way a customer would like check
payment split). Select Split mode, then select payment method (cash ect). Follow Step
2’s, a, b, c, or d payment methods.
Xenios LLC @2013 Page 24
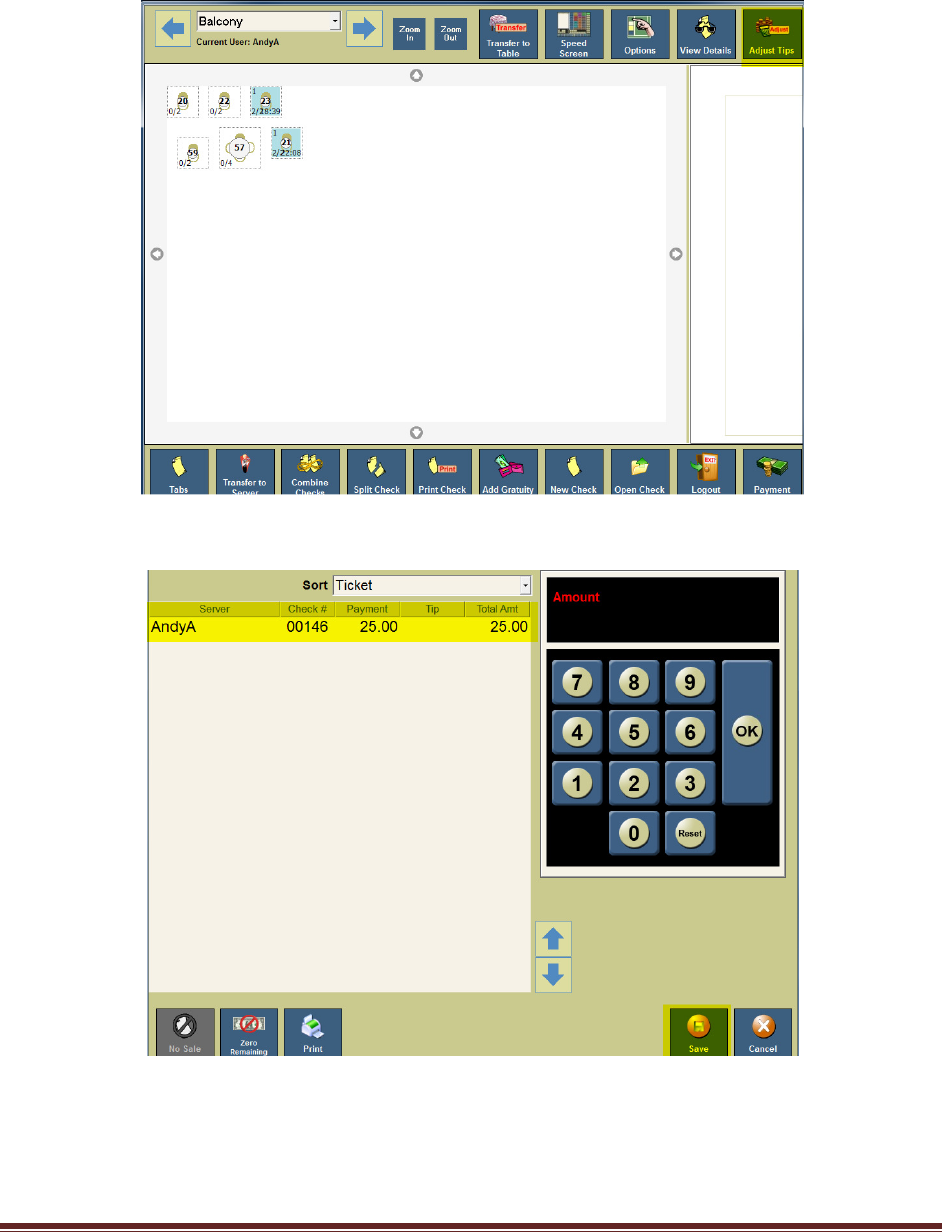
Adding or Adjusting Tips
1. From the table view management screen, touch “Adjust Tips” button located in the upper right
corner.
2. Select the correct credit card transaction and enter the tip amount.
Note: Repeat step 2 as needed for any/all credit card transactions that need to be
adjusted. If left blank, that employee will lose their tip.
3. Touch “Save” button located in the lower right hand corner.
a. If a button appears asking whether you want to post your tips, press the “No” button. If
you press the “Yes” button, you will not be able to readjust tips that were on the screen.

Xenios LLC @2013 Page 25
Server Report
1. From an empty speed screen, touch “Options” button.
2. Touch “Reports” button.
Note: The Server Report can be found under to different sections, Favorites or
Daily reports.
3. If Server Report is under favorites, touch “Server Report” button.
4. If Server Report is under Daily, Touch “Daily” button. Touch “Server Report” button.
Note: If your 2TouchPOS has two cash drawers, the server needs to run
their cash in drawer report from assigned cash drawer.
5. Touch “Run” button. Select server name, then touch “Ok” button.

Xenios LLC @2013 Page 26
Server End of Shift
1. Make sure all Tables and checks have been closed:
a. From table view management screen, select highlighted table, touch “Payments” button.
Process customer’s payment.
2. Make sure all tips have been adjusted: (If left blank, that employee will lose their tip).
a. From table view management screen, touch “Payments” , “Adjust Tips” buttons, then
select appropriate ticket and enter tip amount,
b. Touch “Save” and “Close” buttons. (Repeat this step of all tips that need to be adjusted).
3. Make sure all money and reports has been collected from employees:
a. Run a Server Report. Hand in your cash due.
i. Touch “Options” button, touch “Reports”, then touch either “Favorites” or
“Daily” button
ii. Touch “Server Report”, “Run” buttons,
iii. Select employee, touch “Ok” button, then print, email and/or save report. Touch
“Close” button.
4. Logout & Clock Out.
1. Touch “Save” button located in the lower right hand corner.
a. If a button appears asking whether you want to post your tips, press the “No” button.
If you press the “Yes” button, you will not be able to readjust tips that were on the screen.
