Xerox 701P40016 Users Manual
2015-01-23
: Xerox Xerox-701P40016-Users-Manual-308946 xerox-701p40016-users-manual-308946 xerox pdf
Open the PDF directly: View PDF ![]() .
.
Page Count: 131 [warning: Documents this large are best viewed by clicking the View PDF Link!]

Xerox Production Print Services
Guide to Printing Using Xerox Production Print Services
701P40016
Version 3.7
March, 2003

Xerox Corporation
Global Knowledge and Language Services
800 Phillips Road
Building 845-17S
Webster, New York 14580
USA
© 2003
Copyright by Xerox Corporation. All rights reserved.
Copyright protection claimed includes all forms and matters of copyrighted material
and information now allowed by statutory or judicial law hereinafter granted including
without limitation, material generated from the software programs that are displayed
on the screen such as styles, templates, icons, screen displays, looks, and so on.
Printed in the U.S.A., U.K., and France.
XEROX®, XEROX Europe®, and XEROX Canada Limited®, The Document
Company, the stylized X, and all names identifying numbers used in connection with
Xerox products mentioned in this publication are trademarks of XEROX
CORPORATION. All non-Xerox brands and product names are trademarks or
registered trademarks of their respective companies.
This product includes software developed by the Apache Software Foundation (http://
www.apache.org/).” SWOP® is a registered trademark of SWOP, Inc.
Other company trademarks are also acknowledged.While the information in this
Guide is correct at the time of this publication, Xerox reserves the right at any time to
change the information without notice. Changes are made periodically to this
document. Changes and technical updates will be added in subsequent editions.
GUIDE TO PRINTING USING XDS iii
Table of Contents
1. Introduction 1-1
Before you use this guide 1-1
About XPPS 1-1
XDS 1-2
XDS Plus 1-2
Xerox custom drivers 1-2
Third party drivers and PPDs 1-2
Web Interface 1-3
Command line client 1-3
About this guide 1-3
Contents 1-3
Conventions 1-4
Related documentation 1-5
Customer Support 1-5
2. Using XDS 2-1
Prerequisites 2-1
Accessing XDS from Windows 2-2
Accessing XDS from Macintosh OS X 2-2
Overview of the printing process 2-2
Windows printing process 2-2
Macintosh printing process 2-3
Using drag and drop to print one or more jobs 2-4
Selecting a printer type and queue 2-5
Selecting a file for printing 2-5
Customizing the printer list 2-6
Adding a printer 2-7
Setting the default printer 2-7
Modifying a print queue 2-8
TABLE OF CONTENTS
iv GUIDE TO PRINTING USING XDS
Deleting a printer 2-8
Accessing printer information 2-9
Checking the printer connections 2-9
3. Using the XDS Plus software 3-1
Prerequisites 3-1
Accessing the XDS Plus software 3-2
Accessing XDS Plus from Windows 3-2
Accessing XDS Plus from Solaris 3-2
Accessing XDS Plus from the Internet 3-3
XDS Plus printing process 3-4
Printer and queue setup 3-5
Selecting a printer and queue 3-5
Change Printer window components 3-5
Viewing printer and queue properties 3-7
Selecting a printer and queue 3-8
Printer and queue setup 3-8
Selecting a printer and queue 3-9
Change Printer window components 3-9
Viewing printer and queue properties 3-11
Selecting a printer and queue 3-12
4. Printing a job using the DocuSP web interface 4-1
Overview of the web interface printing process 4-1
Setting up a print job 4-2
Job tickets 4-3
Specifying job ticket parameters for the current job 4-3
Selecting the queue default job ticket 4-5
Selecting the default job ticket 4-5
Modifying the default job ticket 4-6
Selecting the [Printer Default] option 4-6
Specifying the number of copies 4-7
Specifying a page range for printing 4-8
Specifying the main stock for the job 4-8

TABLE OF CONTENTS
GUIDE TO PRINTING USING XDS v
Setting up stocks 4-9
Displaying the stock window 4-9
Stock window components 4-9
Selecting a stock for the job 4-11
Creating a new stock 4-11
Specifying the sides imaged 4-13
Specifying a finishing option 4-14
Specifying collation 4-14
Specifying slip sheets 4-14
Setting up advanced features 4-15
Setup options in the Image Adjustment section 4-15
Specifying an image shift 4-15
Specifying Rotation 4-17
Selecting OPI 4-17
Selecting OPI Prescan 4-17
Specifying Halftone 4-18
Specifying tone reproduction curves (TRCs) 4-18
Enabling anti-aliasing 4-18
Setting color features 4-18
Color Adjustments 4-19
Color Cast 4-20
Setting Expert Color parameters 4-20
Specifying source color profiles 4-21
Specifying output color parameters 4-21
Entering Job Information 4-23
Setting user preferences 4-24
Printing a document 4-25
Selecting a print queue 4-25
Selecting a file for printing 4-26
Submitting a job for printing 4-26
Checking job, printer, and queue status and messages 4-26
Viewing messages 4-28
TABLE OF CONTENTS
vi GUIDE TO PRINTING USING XDS
Viewing properties 4-28
5. Xerox PPDs and PlugIns 5-1
PPDs and PlugIns using a Macintosh 5-1
Guidelines for selecting printing requirements 5-1
Selecting the printing options 5-2
Using the Xerox PlugIn 5-2
Using drag and drop to print one or more jobs 5-3
PPDs and PlugIns using Windows 5-3
Creating your document 5-4
Printing options 5-4
6. Using Command Line Client 6-1
Accessing the XDS Command Line software 6-1
Accessing XDS Command Line from Windows 6-1
Accessing XDS Command Line from Solaris and Mac OS X 6-1
XDS Command Line operating modes 6-2
Using Print command mode 6-2
Print command mode parameters 6-2
Accessing XDS Command Line Help: -help and -\? 6-2
Exiting XDS Command Line: -exit 6-3
Listing the printers: -ListP 6-3
Listing printer status: -ListP <options> 6-3
Selecting a file for printing: -f <file> 6-3
Setting the job ticket: -jt <job> 6-4
Setting the number of copies: -copies <#> 6-4
Setting the number of sides 6-4
Setting the finishing option 6-5
Setting user name 6-5
Display job status: -ListJob 6-5
Setting the printer: -p <printer> 6-7
Print queue status: -ListQ <options> 6-7
Setting the RegFileLoc 6-8
TABLE OF CONTENTS
GUIDE TO PRINTING USING XDS vii
Printing in print command mode 6-8
Command quick reference 6-9
7. The Xerox Custom PCL printer drivers 7-1
Features 7-1
Printing a document 7-2
Accessing the features and options 7-2
Starting printing 7-3
8. The Xerox Custom PostScript printer drivers 8-1
Features 8-1
Printing a document 8-2
Accessing the features and options 8-2
Starting printing 8-3
9. Job ticket options 9-1
Setting up a print job 9-1
Printer Limitations window 9-1
The Printer default option 9-2
Setting job ticket options for XDS 9-2
Accessing the Setup window 9-3
Accessing job ticket features for XDS Plus 9-3
Creating a new job ticket 9-3
Setting up a job ticket 9-4
Specifying the number of copies 9-5
Specifying the page range 9-5
Selecting the job type 9-5
Specifying the job disposition (printing or saving) 9-6
Specifying job setup parameters 9-6
Entering Job Notes 9-11
Specifying stocks for the job 9-12
Specifying stock properties 9-15
Specifying covers 9-17
TABLE OF CONTENTS
viii GUIDE TO PRINTING USING XDS
Specifying exception pages 9-20
Specifying full-color parameters 9-23
Setting highlight color parameters 9-27
Specifying page inserts 9-29
Specifying chapter starts 9-31
Printing a document 9-32
Selecting a print queue 9-32
Selecting a file to print 9-32
Reprinting a saved job 9-33
Reprinting without changing the job ticket parameters 9-34
Reprinting with different job ticket parameters 9-35
Checking the status of a job 9-36
Setting the XDS print options 9-36
Setting up a printer capabilities file 9-37
File contents 9-37
Sources for the printer capabilities file for Windows 9-38
Generating a printer capabilities file on XDS Plus 9-38
Exiting the XDS software 9-39
Exiting the XDS Plus software 9-39

TABLE OF CONTENTS
GUIDE TO PRINTING USING XDS ix

TABLE OF CONTENTS
xGUIDE TO PRINTING USING XDS
1-1
1. Introduction
Using a networked workstation and the Xerox Production Print
Services software, documents that have been created using a
publishing application can be printed at a supported Xerox
printer.
Before you use this guide
This guide is intended for users of the following workstations:
• PCs running Windows 95, 98, Millennium, NT 4.0, 2000, or
XP
• Sun workstations running Solaris 2.6 or higher
• Macintosh OS
To use the XPPS software to publish documents, your
workstation must be able to access the Xerox printer through a
Xerox supported network.
You should be familiar with the application you will be using, with
using a mouse, and with managing the dialog boxes and
windows.
About XPPS
The Xerox Production Print Services (XPPS) software, contains
a variety of applications which allow users to submit jobs for
printing to connected and supported Xerox printers.
Introduction Guide to Printing Using Xerox Production Print Services
1-2
XDS
Xerox Document Submission software application (XDS) is a
standalone application that is used to enter job ticket information
for an existing PDL file and submit the job to an available printer
running DocuSP version 3.1 or higher software. This software
enables users of Xerox supported networks to take advantage of
the many printing options that are offered by the supported
Xerox printing systems.
NOTE: Documents need to have been printed to file as .ps, .pcl,
.pdf, tiff, or ascii text.
XDS Plus
The Xerox Document Submission Plus (XDS Plus) software is a
standalone application that is used to enter job ticket information
for an existing PDL file and submit the job to an available printer
running DocuSP version 3.1 or higher software. This software
enables users of Xerox supported networks to take advantage of
the many printing options that are offered by the supported
Xerox printing systems. XDS Plus supports the same feature set
as XDS with the addition of printer status, Xerox Job Ticket
Converter, and Xerox Document Submission Command Line.
Xerox custom drivers
The Xerox Custom printer drivers are drivers that include Xerox
value added user interface controls to access the features
specific to the supported Xerox printers.
Third party drivers and PPDs
You can use a third party printer driver with a Xerox PPD file to
create a document and submit it for printing to the Xerox printer.
Third party drivers and PPDs can be loaded and used in addition
to any Xerox custom drivers. Depending on the driver installed,
different job ticket options will be available.
Third party drivers do not allow access at the workstation to all of
the supported printer features.
Guide to Printing Using Xerox Production Print Services Introduction
1-3
Web Interface
With the web interface you use a browser to access windows
that enables you to select a document file, set up a job ticket,
and submit your print job to the printe, all from the internet.
Command line client
If you use the print, listjob, listq or listp command for your
workflow, it is recommended that you use the new XDS
Command Line client included with the XDS Plus software.
About this guide
Before you perform any procedures in this guide, become
familiar with its contents and conventions.
Contents
The following list describes the contents of this guide:
•Chapter 1, “Introduction” contains an introduction to this
guide.
•Chapter 2, “Using XDS,” contains the information that you
need to access and understand to complete the printing
process when using XDS. Information about printer and
queue setup is also detailed in this chapter.
•Chapter 3, “Using the XDS Plus software,” contains the
information needed to access and use the XDS Plus software
application for submitting files for print.
•Chapter 4, “Printing a Job using the DocuSP Web
Interface,” contains information for using the online version
of XPPS. It includes setting up a job ticket as well as steps
needed to complete the printing of a job.
•Chapter 5, “Xerox PPDs and PlugIn,” contains guidelines
for selecting printing requirements and using Xerox PPDs
and PlugIns for both Macintosh and Windows applications.

Introduction Guide to Printing Using Xerox Production Print Services
1-4
•Chapter 6, “Using Command Line Client,” The Xerox
Document Submission Command Line software enables you
to set up and submit print jobs by entering commands in a
DOS or Unix window, from a PC or Sun workstation. This
chapter describes the procedure and syntax for entering the
print and job setup commands.
•Chapter 7, “The Xerox Custom PCL printer drivers,”
contains information about printing a document using the
Xerox Custom PCL printer drivers.
•Chapter 8, “The Xerox Custom PostScript printer
drivers,” contains feature information and steps to print a
document using the Xerox Custom PostScript print drivers.
•Chapter 9, “Job ticket settings,” contains the procedures
for printing a document file using the Xerox Document
Submission and Xerox Document Submission Plus software.
Conventions
This guide includes the following conventions:
• Angle brackets: Variable information that is displayed on the
window or that can be entered as part of a command line is
enclosed within angle brackets. Examples include "Unable to
copy <filename>;" “set –p <printer>.”
• Square brackets: Square brackets are used for the following:
– Names of menu options that you select; for example,
[Printer Default]
– Names of buttons that you select; for example, [OK] and
[Cancel]
– Names of text boxes, list boxes, and fields; for example,
"the [From] text box," "the [Directories] list box," “the
[Color Source] field”
• Bold: Boldface type is used for the following:
– Directory paths; for example, “Browse to the Win_nt40/
Xeroxdrv directory.”
– Text that you enter; for example, "Enter purple or XDS."
– Calling attention to text that is particularly important; for
example, “Select [Stop] on the user interface window. Do
not press the red stop button on the controller.”
– Introductory words or phrases that begin items in a list; for
example,
Guide to Printing Using Xerox Production Print Services Introduction
1-5
[Hold job]: The document is held at the printer...
[Cancel job]: The document is not printed...
• Note: Notes are hints that help you perform a task or
understand the text. Notes are presented in italics, in
separate paragraphs. Example:
NOTE: You cannot submit a job unless the printer is
connected to your workstation.
Related documentation
Further information on the specific Xerox printer and the print
server or controller that is part of your printing system may be
obtained by referring to the documentation that was delivered
with the elements of the system.
Customer Support
To place a customer service call, dial the direct TTY number for
assistance. The number in the US is 800-735-2988.

Introduction Guide to Printing Using Xerox Production Print Services
1-6
2-1
2. Using XDS
This chapter contains the procedures for accessing the XDS
software on a Xerox printing system from your computer running
Windows 95, Windows 98, Windows NT 4.0, Windows 2000,
Windows Millennium, XP, a Sun workstation that is running
Solaris 2.6 or 2.8, or from a Macintosh that is running OS X. The
Xerox Document Submission (XDS) software provides you with
windows you use to select a document file, to set up the job
ticket, and to submit your print job to the printer.
When you run the XDS software, you must make your printer
and document selections from the XDS window before
programming the job ticket.
NOTE: If you created your PDL file using the print to disk or print
to file option, and any of the Xerox printer drivers, do not use the
XDS software to submit the job. The job ticket information
included with the PDL file may conflict with the job ticket
information programmed in XDS. Use another submission
method to print the document.
Prerequisites
You must satisfy the following prerequisites before you use the
XDS software:
• Make sure that the Microsoft Windows, Sun Solaris, or
Macintosh software is installed on your workstation. If the
software is installed as a shared copy on your network server,
contact your system administrator.
• Know how to use the tools in Windows, Solaris, or Macintosh
to connect to the network disk drives or to disconnect from
the drives to which you are currently connected.
• Make sure that the XDS Plus software is installed on your
workstation. Refer to the “Installation Guide” for the
procedures.
Using XDS Guide to Printing Using Xerox Production Print Services
2-2
• Know how to save your document as a PDL format file by
using the print-to-file method; or know how to create a valid
TIFF, PDF, or ASCII file.
Accessing XDS from Windows
Follow these steps to display the XDS software from Windows:
1. Log on to your network.
2. From your workstation Start menu, select [Programs], [Xerox
Applications], and then [XDS]. The XDS window opens.
Accessing XDS from Macintosh OS X
When you run the Xerox Document Submission Client software,
you must make your printer and document selections from the
Document Submission window before programming the job
ticket.
To run the Xerox Document Submission Client software, double-
click the [XDS] icon.
Overview of the printing process
The steps to print a document on a selected printer are listed
below. For the details on performing the procedure specified in
each step, refer to the “Printing a document” section found later
in this guide.
Windows printing process
1. Open the XDS window.
Refer to “Accessing the XDS software,” in the previous
section.
2. Select a print queue.
Refer to “Selecting a print queue,” later in this chapter.
3. Select a file to print.
Refer to “Selecting a file to print,” later in this chapter.

Guide to Printing Using Xerox Production Print Services Using XDS
2-3
4. Set up the print job and job ticket.
The following setup procedures are accessed from the Print
Setup window:
• Specifying the imaging and finishing options.
• Including the notes that contain information about the job.
• Defining the stocks to use during printing.
• Selecting any special features of the job, such as covers,
blank inserts, or exception pages.
Refer to “Setting up a print job,” later in this chapter.
5. Send the document file to the print queue.
Refer to “Submitting a print job,” later in this chapter.
NOTE: When you are performing the procedures, if you press
the <Return> or the <Enter> key, the XDS software executes the
default button in any Window. You can use <Tab> to select the
text boxes in every Window.
Macintosh printing process
The steps to print a document on a selected printer are listed
below. For the details on performing the procedure specified in
each step, refer to the procedure explanation later in this
chapter.
1. Set up a printer and select the printer icon on the desktop.
2. Launch the Xerox Document Submission software.
NOTE: More information about how to use the XDS software
is located in the next section of this chapter.
3. On the Document Submission window, select a printer type
from the Printer Type pop-up menu.
4. From the Printer Queue menu, select [Use Default Printer]. If
you want to create Xerox job tickets without printing, select
[None].
5. Select a file for printing.
6. Select [Print...] to set up the print job.
7. On the job ticket dialog box that opens, specify the available
parameters. Depending on your printer, the following
parameter fields may be displayed:
• [Copies]

Using XDS Guide to Printing Using Xerox Production Print Services
2-4
• Page range ([To] and [From])
• [Job Type]
• [Disposition]
8. Enter the job notes.
9. Define the stocks that you will use for the print job.
10.Select any special features for the job, such as covers, blank
inserts, or exception pages
11. Select [OK] to send the document file to the printer.
NOTE: When you are performing the procedures, if you press
the <RETURN> or <ENTER> key, the XDS software executes
the task that is initiated by the [Default] button in any dialog box.
If you press <Command(Apple) -Period> or <ESC>, the XDS
software executes [Cancel] when applicable.
Using drag and drop to print one or more jobs
You can select one or more jobs, then drag and drop them on the
XDS icon to print.
Before dragging and dropping the job icon, highlight the
designated printer icon on the desktop.
NOTE: This should be the default printer.
After the jobs are dropped:
1. The printer type selection dialog box is displayed. Select the
printer type on which the jobs will be printed.
2. The Job Ticket dialog box is displayed for the first job that
was dropped. Program the ticket for the job, then select [OK].
If more than one job was dropped at the same time, the first
job is sent to the printer, and the job ticket dialog is displayed
for the next job. The job ticket programming that was selected
for the first job is retained for the next job.
Saved job tickets may be accessed and opened for any job
that has been dragged and dropped using the procedures
that are described in this chapter. When a saved job ticket is
used for a job, the programming of the saved ticket is
retained for the next job.
A job may be cancelled prior to printing from XDS. The Job
Ticket dialog box then opens for the next job in line.

Guide to Printing Using Xerox Production Print Services Using XDS
2-5
3. When all jobs that have been dropped on XDS have been
submitted or cancelled, XDS closes automatically.
Selecting a printer type and queue
The Printer Type pop-up menu gives you a list of the available
printer types that you can use to print your document.
The Printer Queue pop-up menu determines whether the job and
job ticket will be submitted to the selected printer queue ([Use
Default Printer]), or the job ticket will be created and saved for
future use ([None]).
1. From the Printer Type pop-up menu, select the appropriate
printer.
2. From the Printer Queue menu, select the desired queue.
• If you want to create and save the job ticket for later use
without printing now, select [None].
• To print to a printer that is on the desktop, select the
designated printer icon, then select [Use Default Printer].
If the Printer Type pop-up menu does not display the desired
printer, select [Product Configuration] from the Options pull-down
menu on the workstation menu bar. In the product configuration
dialog box, select the categories of products that you want to use
to print documents from your workstation. Use the following
selections:
• [DocuTech Servers] for DocuTech 135
• [DocuPrint] and/or [DocuSP] for DocuTech 61xx, DocuTech/
DocuPrint 65/90, and DocuPrint 2000 Series EPS printers
• [DocuPrint] for DocuPrint NPS printers
• [DocuColor] for DocuColor 20xx, 6060, iGen3
Selecting a file for printing
Follow these steps to select a file for submission to print:
1. In the Document Submission dialog box, do one of the
following:
• Select [Select File].
• Select [Select File] from the File pull-down menu.
• Press <Command-F> to choose the [Select File] option.
A directory dialog box is displayed. Selecting [Show Text
Files Only] filters the directory display to show only text files.
Using XDS Guide to Printing Using Xerox Production Print Services
2-6
2. Select the file that you want to print. The file must be in one of
the supported formats: PostScript, PDF, PCL, ASCII, or TIFF,
as supported by the printer.
NOTE: Ensure that file names are fairly small in length. Long file
names are not displayed and a system generated name is
attached to the file.
3. Select [Select] or double-click the file name or icon to open
the file. The name of the document file that you selected is
displayed in the Document Submission dialog box.
4. On the Document Submission dialog box, select [Print]. The
Job Ticket dialog box is displayed.
Customizing the printer list
You can set up a customized printer queue list that contains
those queues you use most often. The queues in the list must be
queues that are available to you on the printer.
For each queue in the list, you can assign a unique name. The
printer queue name that you assign may indicate the location of
the printer that services the queue, or may describe the purpose
of the queue if special purpose queues have been established
by your print shop.
You may customize the queue in the following ways:
• Change the name of the printer queue
• Delete a queue from the list
• Reassign a queue name to a different printer queue
• Set a default queue that is selected automatically when you
access the XDS software
NOTE: Do not rename printers. If you need a printer renamed, it
can only be done immediately after the printer is installed.
Several unconnected queues are automatically added to the
printer queue list at installation. These queues are used when
you are not connected to a printer.
Refer to “Preparing and saving a job ticket on your workstation,”
later in this chapter, for information on using these queues.

Guide to Printing Using Xerox Production Print Services Using XDS
2-7
Adding a printer
You can set up a customized list of printers that you use
regularly. To start a printer list or add to an existing one, follow
these steps:
1. Select [Connections] on the XDS window. The Printer
Connections window is displayed.
2. On the Printer Connections window, select [Add New...]. The
Add New Printer window is displayed.
3. On the Add New Printer window, select the appropriate
network type for your environment.
Select [No connection] if this printer connection will be used
only for creating or modifying job tickets. You will not be able
to print to this printer connection.
4. Continue following the instructions in the Add New Printer
wizard to add a new printer to the Printer Connections list.
NOTE: The network connection dialog that is displayed
depends on the type of network you selected. Refer to your
network documentation for further information.
NOTE: If a message appears informing you that the selected
queue is not a Xerox print queue, contact your system
administrator.
Setting the default printer
After you create a list of customized printer queues, you may
specify one of them as a default printer queue. The default
queue is then selected automatically whenever you enter the
XDS software.
1. On the XDS window, select [Connections]. The Printer
Connections window is displayed.
2. Select the name of the printer queue in the Printer list box.
3. Select [Set Default]. The default printer queue name remains
selected when you enter the XDS software.
4. Select [OK] to return to the XDS window.

Using XDS Guide to Printing Using Xerox Production Print Services
2-8
Modifying a print queue
The XDS software allows you to change a print queue name in
the Connected Printers list box, or to reassign the name to
another print queue.
1. Select [Connections] from the XDS window. The Printer
Connections window is displayed.
2. In the Printers list box, select the print queue that will be
changed, and select [Modify...].
3. Continue to follow the steps indicated by the Modify Printer
wizard.
4. Check the information on the Modify Printer – Review
window.
• If the information displayed is correct, select [Finish] to
complete the modification and return to the Printer
Connections window.
• If the information is not correct, continue selecting [Back]
until you reach the screen that you want to correct. After
making your corrections, repeat the previous steps to
return to this step.
5. After you have completed all printer modifications, select
[OK] to return to the XDS window.
Deleting a printer
1. Select [Connections] from the XDS window. The Printer
Connections window is displayed.
2. In the [Printers] list box, select the printer queue that you
want to delete.
3. Select [Delete]. The Confirm This Option window is
displayed.
4. Select [Yes] to delete the printer name.
If you want to cancel your choice and return to the Printers
and Connections window, select [No].

Guide to Printing Using Xerox Production Print Services Using XDS
2-9
Accessing printer information
You may access the following information about any printer in
the Connected Printers list box on the Printer Connections
window:
• Printer model
• Server type
• Connection type
• Server
• Virtual Printer
Follow these steps to display the printer information:
1. Select [Connections] on the XDS window. The Printers and
Connections window is displayed.
2. Select the name of the printer in the [Printers] list box. The
printer information is displayed in the sections below the
[Printers] list box.
3. When you are finished viewing the printer information, select
[OK] or [Close] to exit the window.
Checking the printer connections
When the XDS software is accessed, the system checks all
connected printers to ensure that the network connection is
enabled and active.
• A network icon in front of the printer name indicates that the
network connection to that printer is active.
• A circle with a slash in front of the printer name indicates that
the network connection to that printer is not active or there is
a problem connecting to the printer.
• No icon in front of the printer name indicates that the printer is
unconnected and has been selected for the customized
printer list.
The printer connections may be checked at any time as
necessary.
1. On the XDS window, select [Connections]. The Printers and
Connections window is displayed.

Using XDS Guide to Printing Using Xerox Production Print Services
2-10
2. To check one printer, select its name and select [Check
Printer]. While the connection to the selected printer is being
checked, a window is displayed, showing the status of the
checking process.
To check all of the printers, select [Check All]. While all of the
printer connections are being checked, a window opens to
show the percentage of checking that has been completed.
NOTE: If an indication of a network problem is displayed, notify
your System Administrator.
3-1
3. Using the XDS Plus software
This chapter contains the procedures for accessing the XDS
Plus software on a Xerox printing system from your computer
running Windows 95, Windows 98, Windows NT 4.0, Windows
2000, Windows Millennium, XP, a Sun workstation that is running
Solaris 2.6 or 2.8, or from a Macintosh that is running OS X. The
Xerox Document Submission Plus (XDS Plus) software provides
you with windows you use to select a document file, to set up the
job ticket, and to submit your print job to the printer.
Prerequisites
You must satisfy the following prerequisites before you use the
XDS Plus software:
• Make sure that the Microsoft Windows, Sun Solaris, or
Macintosh software is installed on your workstation. If the
software is installed as a shared copy on your network server,
contact your system administrator. The XDS Plus software
runs correctly only when installed on your workstation.
• Know how to use the tools in Windows, Solaris, or Macintosh
to connect to the network disk drives or to disconnect from
the drives to which you are currently connected.
• Make sure that the XDS Plus software is installed on your
workstation. Refer to the “Installation Guide” for the
procedures.
• Know how to save your document as a PDL format file by
using the print-to-file method; or know how to create a valid
TIFF, PDF, or ASCII file.
Using the XDS Plus software Guide to Printing Using Xerox Production Print Services
3-2
Accessing the XDS Plus software
The XDS Plus window gives you access to all job setup, printing,
and job management tasks that you can perform on your
Windows or Solaris or Macintosh client. You can access the XDS
Plus software either from files on your workstation, or over the
Internet using the XDS Plus Job Submission Applet.
For the procedure for printing a document using XDS Plus, refer
to “Printing a document,” later in this chapter.
NOTE: The XDS Plus Applet does not run on Internet Explorer
5.0 for Solaris. To run XDS Plus Applet on Solaris, you must use
Netscape 6.2.1 for Solaris.
NOTE: Netscape is not supported on Windows applications
Accessing XDS Plus from Windows
Follow these steps to open XDS Plus from Windows:
1. Log on to your network.
2. From your workstation Start menu, select the following
options in the order shown below.
a. [Programs]
b. [Xerox Applications]
c. [XDS Plus Tool Suite <version>]
d. [XDS Plus]
e. [XDS Plus]
Accessing XDS Plus from Solaris
Follow these steps to open XDS Plus from Solaris:
1. Log on to your network.
2. Using File Manager, double-click the [XDS Plus] application
icon, located in the following directory:
/<your home directory>/Xerox_Applications/
XDS_Plus_Tool_Suite_<version>/XDS_Plus/XDS_Plus
3. On the Action: Run window that opens, select [OK]. A Run
window opens.

Guide to Printing Using Xerox Production Print Services Using the XDS Plus software
3-3
4. Wait for the XDS Plus window to open. This may take several
seconds.
Accessing XDS Plus from the Internet
You can open the XDS Plus window on your Windows or Solaris
workstation by using the XDS Plus Job Submission Applet from
the Internet. The Applet opens the XDS Plus window and
displays it with your Internet browser. From this XDS Plus
window you perform all the same functions that are available
when you access them from your workstation.
You do not need to install XDS Plus on your workstation in order
to access it using the Internet.
NOTE: To ensure that you are running the latest version of the
XDS Plus software, you should bypass your Proxy Server, if a
Proxy Server is used) when accessing XDS Plus from the
Internet. See your system administrator for more information.
If the XDS Plus software has been updated, you should clear
your browser cache to ensure that the latest version of the XDS
Plus software is downloaded to your workstation. See your
system administrator for more information.
Follow these steps to access XDS Plus from the internet:
1. Open your Internet browser (NetScape or Internet Explorer
version 4 or higher).
2. In the address field, enter http://, followed by your printer
host address.
Example:
http://12.240.36.123
The printer web page opens.
3. On the printer web page, select [Job Submission Applet].
4. If this is the first time you are accessing XDS Plus from the
Internet, a window opens on which you are asked if you want
to download Java 2 Runtime Environment. Select [Yes].
5. A message window appears, asking you to wait while XDS
Plus loads a Java plug-in enabled browser. Wait until the
XDS Plus window opens.
From the XDS Plus window, you can perform all the available
job setup and submission functions.

Using the XDS Plus software Guide to Printing Using Xerox Production Print Services
3-4
XDS Plus printing process
1. Open the XDS Plus window.
Refer to “Accessing the XDS Plus software,” in the previous
section.
2. Select a print queue.
Refer to “Selecting a printer and queue.”
3. On the Files tab window, perform the following:
a. Select a document file to print.
Refer to “Selecting a file to print.”
b. Select a job ticket file, if you do not intend to create a new
ticket for this job.
c. Select the job destination (print, save, or print and save).
Refer to “Selecting printing or saving.”
4. Set up the print job and job ticket parameters as required.
Select the following tabs to access and set up the various job
parameters:
• Job Setup
•Output
• Image Adjustment
•Color
• Special Pages
Refer to “Setting up a print job.”
5. If desired, record job notes by entering them on the Job
Notes tab window.
6. Send the document file to the print queue.
Refer to “Submitting a print job.”
NOTE: When you are performing the setup procedures, you can
use <Tab> to move the cursor to the next button or text box in
every window. Holding down <Shift> while pressing <Tab>
causes the cursor to move backward through the items on the
window.
Guide to Printing Using Xerox Production Print Services Using the XDS Plus software
3-5
While the job is printing, you can check the job status by
selecting the [Administration] button and view the information.
Refer to “Checking job, printer, and queue status,” later in this
chapter.
Printer and queue setup
NOTE: The printer discovery file must be set up on your
workstation before setting up the printer and queue. If the printer
discovery file was not added to your workstation during
installation, select the Preferences option from the Options menu
and add the printer discovery file.
Printers and their queues for XDS Plus printing are set up
automatically when XDS Plus is installed and run. XDS Plus
detects all printing systems with DocuSP controllers running
DocuSP 3.X that are connected to your workstation. You record
the network addresses of these printers in a file called
“printer.disc,” after you install XDS Plus on your workstation.
When you select [Change Printer...] on the XDS Plus window,
the names of the printers that are listed in the printer discovery
file are displayed in the [Printers] section of the Change Printer
window and on the Print Monitor tab.
Selecting a printer and queue
The Change Printer window enables you to select a printer and a
queue for the job that you want to print, and to view the printer
and queue properties.
Change Printer window components
Printers and
Queues sections The Change Printer window contains two sections:
•[Printers]: The [Printers] section lists the printers that the
system detects in the printer discovery file when XDS Plus is
started. It also lists an Unconnected printer and a queue for
supported printers. Refer to “Printer and queue setup,” earlier
in this chapter, for further information about this file.

Using the XDS Plus software Guide to Printing Using Xerox Production Print Services
3-6
The columns in the Printers table display the following
properties:
–Name: The name that was given to the printer when it
was installed at your site
–Type: The type or brand of printer, such as the Xerox
DocuColor 2060
–Jobs: The number of jobs that have been submitted to
the printer, based on the type of viewing filter that was
most recently selected on the Print Monitor window. For
example, if [Processing Jobs] was selected, the Jobs
number would reflect only the number of jobs that are
currently being processed.
•[Queues]: The [Queues] section lists the print queues that
have been set up at the printer controller for your selected
printer. The columns in the Queues table display the following
properties:
–Name: Name that was specified for the queue at the
printer controller
–Printer: Name of the printer that is associated with the
queue
–Accept Jobs: Indicates whether or not the queue is
currently accepting jobs
–Release Jobs: Indicates whether or not the queue is
currently set up to release jobs
–Status: What the printer is currently doing, such as
“Printing,” “Stopped,” etc.
NOTE: You are not able to add printers or queues to these lists
at the Change Printer window.
The title of each section is preceded by a number that indicates
how many items are on the list that is displayed there. However,
if you select an item in one of the tables, the number changes to
reflect the number of that item. For example, if you select a
queue from the Queues list, the number changes to the number
of jobs in that queue.
Resizing the
sections The [Printers] and [Queues] sections are separated by a splitter
bar. You can drag this bar up and down to increase or decrease
the height of the sections relative to each other.

Guide to Printing Using Xerox Production Print Services Using the XDS Plus software
3-7
You can also expand either section to fill the work space of the
Change Printer window by selecting the small, triangular buttons
near the left edge of the splitter bar.
Buttons The Change Printer window contains the following buttons:
•[Show All Printers]: Displays in the Printers section all the
printers that have been specified in the printer discovery file
(printer.disc) and are currently available.
•[Show All Queues]: Displays in the [Queues] section all
queues that have been created at the controller, for all
printers that have been specified in the printer discovery file
and are currently available.
•[Set Print Path]: Confirms your queue selection and closes
the Change Printer window. This button is grayed out unless
a queue is selected.
•[Refresh]: Updates and redisplays the Printers and Queues
lists.
Viewing printer and queue properties
You can view information about printers and queues in the
following ways:
• Select the printer or queue name on the Change Printer
window.
– If you select a printer name, the [Queues] section of the
Change Printer window displays the queues that are
enabled for that printer only.
– If you select a queue name, the [Printers] section of the
Change Printer window displays only the printer that
contains that queue.
You can select multiple printer or queue names by holding
down the <Control> or <Shift> key while selecting the items.
If you select more than one printer or queue, the other
window displays the queues or printers for all the items that
you selected.
• Open the Properties window for the desired queue or printer
by following these steps:
1. Select [Change Printer] on the XDS Plus window. The
Change Printer window opens.

Using the XDS Plus software Guide to Printing Using Xerox Production Print Services
3-8
2. In the [Printers] or [Queues] section on the Change
Printer window, double-select the name of the printer or
queue. Or, right-select on a printer or queue and select
[Properties]. The read-only Properties window opens for
the selected queue or printer.
3. When you are finished viewing the information, select
[Close] to close the Properties window.
NOTE: You can also access individual printer and queue
information from the Printers and Queues lists on the Print
Monitor tab window, which you display by selecting
[Administration] on the XDS Plus window.
Selecting a printer and queue
Follow these steps to select a printer and print queue for your
job:
1. On the XDS Plus window, select [Change Printer] to open the
Change Printer window.
2. If the queue that you want is not displayed in the [Queues]
section, select [Show All Queues].
3. In the [Queues] section, select the name of the queue to
which you want to send the job.
The Printers section displays the name of the printer that is
associated with the queue that you selected.
4. Select [Set Print Path] to confirm your selection and close the
Change Printer window.
NOTE: This can also be performed using the Printer menu and
select [Change Queue].
Printer and queue setup
NOTE: The printer discovery file must be set up on your
workstation before setting up the printer and queue. If the printer
discovery file was not added to your workstation during
installation, select the Preferences option from the Options menu
and add the printer discovery file.
NOTE: Refer to the Installation Guide for the procedure to
create a printer discovery file.
Guide to Printing Using Xerox Production Print Services Using the XDS Plus software
3-9
Printers and their queues for XDS Plus printing are set up
automatically when XDS Plus is installed and run. XDS Plus
detects all printing systems with DocuSP controllers running
DocuSP 3.X that are connected to your workstation. You record
the network addresses of these printers in a file called
“printer.disc,” after you install XDS Plus on your workstation.
When you select [Change Printer...] on the XDS Plus window,
the names of the printers that are listed in the printer discovery
file are displayed in the [Printers] section of the Change Printer
window and on the Print Monitor tab.
Selecting a printer and queue
The Change Printer window enables you to select a printer and a
queue for the job that you want to print, and to view the printer
and queue properties.
Change Printer window components
Printers and
Queues sections The Change Printer window contains two sections:
•[Printers]: The [Printers] section lists the printers that the
system detects in the printer discovery file when XDS Plus is
started. It also lists an Unconnected printer and a queue for
supported printers. Refer to “Printer and queue setup,” earlier
in this chapter, for further information about this file.
The columns in the Printers table display the following
properties:
–Name: The name that was given to the printer when it
was installed at your site
–Type: The type or brand of printer, such as the Xerox
DocuColor 2060
–Jobs: The number of jobs that have been submitted to
the printer, based on the type of viewing filter that was
most recently selected on the Print Monitor window. For
example, if [Processing Jobs] was selected, the Jobs
number would reflect only the number of jobs that are
currently being processed.

Using the XDS Plus software Guide to Printing Using Xerox Production Print Services
3-10
•[Queues]: The [Queues] section lists the print queues that
have been set up at the printer controller for your selected
printer. The columns in the Queues table display the following
properties:
–Name: Name that was specified for the queue at the
printer controller
–Printer: Name of the printer that is associated with the
queue
–Accept Jobs: Indicates whether or not the queue is
currently accepting jobs
–Release Jobs: Indicates whether or not the queue is
currently set up to release jobs
–Status: What the printer is currently doing, such as
“Printing,” “Stopped,” etc.
NOTE: You are not able to add printers or queues to these lists
at the Change Printer window.
The title of each section is preceded by a number that indicates
how many items are on the list that is displayed there. However,
if you select an item in one of the tables, the number changes to
reflect the number of that item. For example, if you select a
queue from the Queues list, the number changes to the number
of jobs in that queue.
Resizing the
sections The [Printers] and [Queues] sections are separated by a splitter
bar. You can drag this bar up and down to increase or decrease
the height of the sections relative to each other.
You can also expand either section to fill the work space of the
Change Printer window by selecting the small, triangular buttons
near the left edge of the splitter bar.
Buttons The Change Printer window contains the following buttons:
•[Show All Printers]: Displays in the Printers section all the
printers that have been specified in the printer discovery file
(printer.disc) and are currently available.
•[Show All Queues]: Displays in the [Queues] section all
queues that have been created at the controller, for all
printers that have been specified in the printer discovery file
and are currently available.

Guide to Printing Using Xerox Production Print Services Using the XDS Plus software
3-11
•[Set Print Path]: Confirms your queue selection and closes
the Change Printer window. This button is grayed out unless
a queue is selected.
•[Refresh]: Updates and redisplays the Printers and Queues
lists.
Viewing printer and queue properties
You can view information about printers and queues in the
following ways:
• Select the printer or queue name on the Change Printer
window.
– If you select a printer name, the [Queues] section of the
Change Printer window displays the queues that are
enabled for that printer only.
– If you select a queue name, the [Printers] section of the
Change Printer window displays only the printer that
contains that queue.
You can select multiple printer or queue names by holding
down the <Control> or <Shift> key while selecting the items.
If you select more than one printer or queue, the other
window displays the queues or printers for all the items that
you selected.
• Open the Properties window for the desired queue or printer
by following these steps:
1. Select [Change Printer] on the XDS Plus window. The
Change Printer window opens.
2. In the [Printers] or [Queues] section on the Change
Printer window, double-select the name of the printer or
queue. Or, right-select on a printer or queue and select
[Properties]. The read-only Properties window opens for
the selected queue or printer.
3. When you are finished viewing the information, select
[Close] to close the Properties window.
NOTE: You can also access individual printer and queue
information from the Printers and Queues lists on the Print
Monitor tab window, which you display by selecting
[Administration] on the XDS Plus window.

Using the XDS Plus software Guide to Printing Using Xerox Production Print Services
3-12
Selecting a printer and queue
Follow these steps to select a printer and print queue for your
job:
1. On the XDS Plus window, select [Change Printer] to open the
Change Printer window.
2. If the queue that you want is not displayed in the [Queues]
section, select [Show All Queues].
3. In the [Queues] section, select the name of the queue to
which you want to send the job.
The Printers section displays the name of the printer that is
associated with the queue that you selected.
4. Select [Set Print Path] to confirm your selection and close the
Change Printer window.
NOTE: This can also be performed using the Printer menu and
select [Change Queue].

4-1
4. Printing a job using the DocuSP
web interface
This chapter contains the procedures for printing using the
DocuSP web interface on your workstation and submitting a
document file over the web for printing on a Xerox printing
system using XPPS. With the web interface you use a browser to
access windows that enable you to select a document file, set up
a job ticket, and submit your print job to the printer.
NOTE: The features that appear on the windows and in the list
boxes vary, depending on which features are available from the
job ticket settings you select or for the printer that you are using.
Overview of the web interface printing process
The process to print a document on the printer to which you are
connected over the web interface are listed below. Following
each step is the name of the section of this chapter in which you
can find a detailed description of the procedure.
1. Access the web interface window.
2. Select a print queue. Refer to “Selecting a print queue.”
3. Select a document file to print. Refer to “Selecting a file for
printing.”
4. If desired, specify your default job ticket file if you do not
intend to create a new job ticket for this job. Refer to
“Selecting the default job ticket.”
5. Select the job disposition (print, save, or print and save). If
you selected a save option, specify a save location and
format. Refer to “Selecting printing or saving (disposition).”
6. Select the type of page description language (PDL) that will
be used for the job. If you select an [ASCII] option, select the
font and its size and the font orientation. Refer to “Selecting
the PDL type.” Select the [Printer Default] check box if you
want to specify the setting that is entered at the printer
controller.

Printing a job using the DocuSP web interface Guide to Printing Using Xerox Production Print Services
4-2
7. Set up the remaining job ticket parameters in this section of
the Job Submission window as required. Refer to “Setting up
a print job.”
8. Specify the job parameters in the [Image Adjustment] section
of the Job Submission window as needed. Refer to “Setting
up advanced features.”
9. If desired, record job notes by entering them in the fields in
the [Job Information] section. Refer to “Entering job
information.”
10.Send the document file to the print queue. Refer to
“Submitting a print job.”
NOTE: When you are performing the setup procedures, you can
use <Tab> to move the cursor to the next button or text box in
every window. Holding down <Shift> while pressing <Tab>
causes the cursor to move backward through the items on the
window.
While the job is printing, you can check the job status by
selecting the [Administration] button. Refer to “Checking job,
printer, and queue status and messages,” later in this chapter.
Setting up a print job
The web interface Job Submission window enables you to set up
your print job by creating or selecting job tickets. This window is
divided into two sections:
•Printing section: This stationary section at the top of the Job
Submission window contains queue and file selections and
the [Print] button.
•Job parameters section: This section contains fields in
which you can specify job parameters such as copies, PDL
type, and image shift. It also contains a Job Information
section in which you can record information such as the job
name, sender and recipient names, and the account number.
NOTE: Do not enter job names, sender names, or queue names
which total over 140 characters.
NOTE: A queue name, sender name, and job name must
contain valid URL characters when using the DocuSP web
interface for job submission, job and queue status, and listings.
Valid URL characters are:

Guide to Printing Using Xerox Production Print Services Printing a job using the DocuSP web interface
4-3
“a-z” “A-Z” “0-9” “-” “_” “.” “!” “~” “*” “‘” “(“ “)”
The following sections discuss the parameters and print
instructions that you can specify from the Job Submission
window.
Job tickets
A job ticket is a set of specified printing options that the system
will use for a job. On the Job Submission window, you can
specify a wide range of parameters for the job that you are
printing. The information in the job ticket accompanies the job to
the printer and gives the printer instructions on how to print the
job.
When you submit a job, you can specify its parameters by one of
the following methods:
• Specify all desired parameters that are available on the Job
Submission window. These settings apply to the current job
only and are not saved as a job ticket file.
• Select the default job ticket that is on your workstation. You
can modify and save this job ticket from the Job Submission
window if desired.
• Select the queue default job ticket that was specified on your
printer controller.
Specifying job ticket parameters for the current job
You can create a new ticket for a job at the time you are sending
the job to print, by selecting or entering options in the fields on
the Job Submission window. You cannot save or restore this job
ticket unless you save it as your default job ticket, replacing the
existing one. Refer to “Modifying the default job ticket,” later in
this chapter, for the procedure.
Follow these steps to create a job ticket for the current job:
1. Select a printer queue.
2. Enter all desired specifications in the fields on the Job
Submission window. Refer to the following sections for
explanations of these fields. Use the slider button at the right
of the window to scroll to access all the available fields.
3. When you have completed specifying the desired parameters
for your job, do one or both of the following.

Printing a job using the DocuSP web interface Guide to Printing Using Xerox Production Print Services
4-4
• Select [Print] to submit the job.
• Save the specifications as your default job ticket. Refer to
“Modifying the default job ticket,” later in this chapter.
Selecting printing or saving
In the [Print Options] field you can specify to print, save, or print
and save your current job. You can also select the format in
which the job will be saved. (These options are sometimes
referred to as the “destination” of the print file.)
1. Select one of the following options from the Print Options
pull-down menu:
•[Print]: Prints the job file but does not save it. This is the
default setting.
•[Save]: Saves the print file on the print server, including
the current job ticket, without printing the job. Note that
different printers save the print job in different ways.
(Refer to the “Job ticket features by printer” chapter and
the specific printer documentation, for more information
on how each printer saves the job.)
•[Print and Save]: Prints the job file and saves the file,
including the current job ticket. (Not all printers support
the Print and Save option.)
2. If you selected [Save] or [Print and Save], in the [Save Job
Repository] pull down, select the default job repository. For
example:
file:///job_repository
3. If you selected [Save] or [Print and Save], in the [Save Field
In] text box, enter the subdirectory within the job repository.
4. In the [File Name] text box, enter the name of the saved job.
You may select the [Use Job Name] check box, located
below the [File Name] text box, if you want to use the job
name as the file name of the saved job.
5. If you selected [Save] or [Print and Save], select the format in
which the job will be saved, from the [Save Job Format] pull-
down menu. The following formats are available, Fast Reprint
and Fast Reprint with Display Resolution Images.
NOTE: You are not able to reprint saved jobs using the web
interface. You must use XDS or XDS Plus to reprint the jobs.
However, you can select and print saved jobs as regular print
jobs if you have access to the saved job.

Guide to Printing Using Xerox Production Print Services Printing a job using the DocuSP web interface
4-5
Selecting the type of page description language
The [PDL Type] field, located in the section of the Job
Submission window, displays the type of page description
language, or PDL, in which the selected document file was
saved. You can specify a different PDL type for the job by
following these steps:
1. From the PDL Type menu, select the page description
language for your document. The options that are available
depend on the selected printer. Refer to the “Job ticket
features by printer” chapter for information on the options that
each printer supports.
Select the [Printer Default] check box if you want to set the
PDL that was specified at the printer controller.
2. If you select one of the Plain Text options, the following fields
are enabled in the PDL Type field:
•[Orientation]: Select the font orientation from the pull-
down menu.
•[Font Name]: Select the font from the pull-down menu.
•[Font Size]: Enter a number for the font size, or select
the arrow buttons until the desired size is displayed.
Selecting the queue default job ticket
If you want to use the default job ticket parameters that were
specified at the controller for the queue that you selected, follow
these steps:
1. Select the queue and the file to print.
2. Select [Restore Queue Default Ticket]. The following
message is displayed:
Are you sure you want to restore the current settings to
the queue’s default Job Ticket?
3. Select [OK]. The settings that are specified for your selected
queue are displayed in the Job Submission window fields.
Selecting the default job ticket
The default job ticket, once one has been saved, is the set of job
programming parameters that are displayed when you first view
the Job Submission window.
When you switch to a new print queue, the currently displayed
job ticket does not change.

Printing a job using the DocuSP web interface Guide to Printing Using Xerox Production Print Services
4-6
If you want to use the default job ticket that is stored on your
workstation to print the job, follow these steps:
1. Select the queue and the file to print.
2. Select [Restore My Default Ticket]. The following message is
displayed:
Are you sure you want to restore the current settings to
your default Job Ticket?
3. Select [OK]. The settings that are specified in your default job
ticket are displayed in the Job Submission window fields.
Modifying the default job ticket
You can make changes to the default job ticket that is stored on
your workstation and save the modified job ticket with those
changes.
NOTE: You are not able to create additional job tickets from
your default job ticket. You have access to only one job ticket for
your workstation. Each workstation can have its own default job
ticket.
Follow these steps to change parameters on your default job
ticket:
1. On the Job Submission window, ensure that your default job
ticket options are displayed by selecting [Restore My Default
Ticket], then selecting [OK] on the confirmation message
window.
2. In the parameter fields, enter or select any options that you
want to change.
3. Select [Save My Default Ticket]. A confirmation window
opens, displaying the following message:
Are you sure you want to save the current settings as
your Default Ticket?
Selecting the [Printer Default] option
A [Printer Default] check box appears in many of the job ticket
fields on the Job Submission window. This option can be used to
print the job using the queue default, the queue override, or the
option that was set using the PostScript setpagedevice
command.
Guide to Printing Using Xerox Production Print Services Printing a job using the DocuSP web interface
4-7
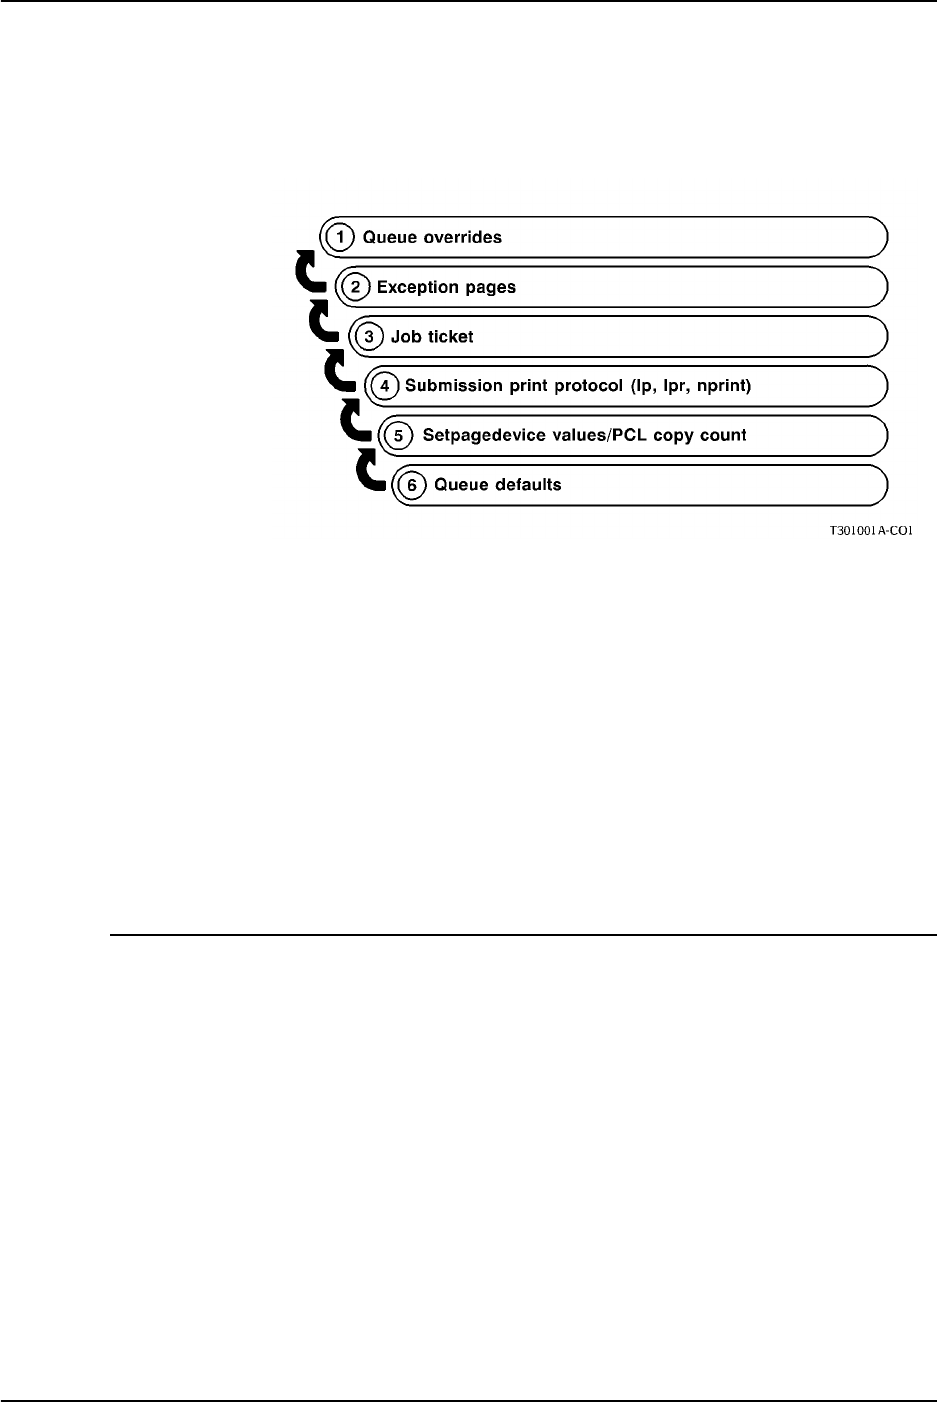
When [Printer Default] is selected, the job is printed using the
option that was set in one of the categories that are shown in
priority order in the following figure.
The figure above illustrates that parameters that are specified as
queue overrides at your printing system controller are used as
defaults first. If no queue overrides have been specified,
parameters on any exception pages are used, and so on.
NOTE: If the [Printer Default] check box is selected, you must
deselect it if you want to select any of the other options in the
same field.
For information regarding selecting a print queue, refer to
“Selecting a Print Queue” found later in this chapter.
Specifying the number of copies
To select the number of copies of your document that will be
printed, follow these steps:
1. On the Job Submission window, scroll until the [Quantity] field
is visible.
2. In the [Quantity] text box, either enter the number of copies,
or select the arrow buttons until the desired number of copies
is displayed.

Printing a job using the DocuSP web interface Guide to Printing Using Xerox Production Print Services
4-8
Specifying a page range for printing
To specify a range of pages that will be printed, follow these
steps:
1. On the Job Submission window, scroll until the [Quantity] field
is visible.
2. Do one of the following:
• Select the [All] radio button if you want to print all the
pages in the document.
• Select the [From/To] radio button if you want to specify a
range of pages to print. The default range of pages is 1 -
99999.
In the [From] field, enter the first page number that you
want to print; and in the [To] field, enter the last page
number. The [All] radio button must be deselected before
you can enter numbers in these fields.
NOTE: The value in the [From] field must be less than or
equal to the value in the [To] field.
Specifying the main stock for the job
The main stock is the stock on which most of the job is printed.
Follow these steps to specify a stock that will be used for all
pages in the job that are not programmed to use one of the other
available stocks.
The Main Paper Stock pull-down menu contains all stocks that
have been designated on the stocks window as Favorites.
Follow these steps to select the main stock for your job:
1. From the Main Paper Stock pull-down menu, select the stock
on which you want to print the job. The properties of the stock
that you select are displayed in the features box below the
menu.
NOTE: Unless you specifically want to print a smaller image
on a larger sheet of paper, or a larger image on a smaller
sheet of paper, ensure that the paper size that is specified in
the application matches the paper size in the job ticket.
2. If the desired stock does not appear on the menu, select the
[Stocks...] button next to the Main Paper Stock menu to
display a list of all stocks that have been enabled for your
printer.
Guide to Printing Using Xerox Production Print Services Printing a job using the DocuSP web interface
4-9
You can also define a stock by selecting [New] from the Main
Paper Stock window.
3. Add the stock that you want to the Main Paper Stock pull-
down menu by selecting the [Favorites] check box next to the
name of the stock on the stock window.
If your desired type of stock does not appear on the stocks
window, you may add it as a user stock.
Refer to “Setting up stocks,” in the next section, for the
procedure for adding a stock.
Setting up stocks
The stock window enables you to select a stock to use for the
job, or to add a new stock as the user stock. You are able select
one stock for a job.
Displaying the stock window
To display the stock window from which you select stocks for the
job, select [Stocks...] on the Job Submission window.
The stock window is displayed in the Job Submission window
below the stationary printing section.
Stock window components
This section describes the parts of the stock window.
Sections
The stock window contains the following major sections in which
stocks are described:
•[Stock used in Job]: This section displays the name and
properties of the printer or user stock that has been selected
for the current job.
•[Stocks]: This section lists the printer stocks that are
associated with the printer. Properties for these printer stocks
are entered at the printer controller user interface window.
•[User Stock]: This section displays the name and properties
of a stock that a user defines. You can define only one user
stock per workstation.

Printing a job using the DocuSP web interface Guide to Printing Using Xerox Production Print Services
4-10
Stock properties
Each section displays the following properties for each stock that
it contains:
•Name: The name of the stock.
•Size: Stock size expressed in inches or millimeters,
depending on what was selected on the Preferences window.
(Refer to “Setting user preferences,” later in this chapter, for
information on setting the unit of measure.)
•Color: The color of the stock.
•Type: The type of stock (standard, transparency, etc.)
•Drilled: Indicates whether or not the stock has drilled holes.
•Weight: The weight of the stock in grams per square meter
(g/m2)
•Side 1: Coating or surface on side 1 of the stock (matte,
glossy, satin, etc.)
•Both: Coating or surface on both sides 1 and side 2 of the
stock.
Stock selection buttons
The following buttons are displayed for the user stock entry and
for each printer stock entry in the [Stocks] section.
•[Favorites] check box: When selected, this check box
indicates that the stock is used frequently, and adds its name
to the Main Paper Stock pull-down menu on the Job
Submission window. (Refer to “Specifying the main stock for
the job,” earlier in this chapter.)
•[Selected Stock] radio button: Selects the stock for the
job. Selecting this button displays the stock name in the
[Stock used in Job] section. It also displays the stock name in
the Main Paper Stock field on the Job Submission window.
NOTE: Unless the [Favorites] check box is also selected for
this stock, it does not remain on the Main Paper Stock menu
after another stock is selected, or the Job Submission
window is closed.
Additional buttons
The following buttons are displayed at the bottom of the stocks
window:

Guide to Printing Using Xerox Production Print Services Printing a job using the DocuSP web interface
4-11
•[User Stock]: Displays the Custom window, which contains
fields that enable you to define properties for a user stock.
Refer to “Adding a user stock,” later in this chapter, for the
procedure.
•[Apply]: Implements the changes that you have made on
the stock window without closing the window.
•[OK]: Implements your changes and closes the stock
window.
•[Cancel]: Closes the stock window without making any
changes that you may have entered.
Selecting a stock for the job
You are able to select one stock for the current job. The web
interface does not support special pages that may require
additional stocks. Use the following procedure if the stock that
you want to use for your job does not appear on the Main Paper
Stock pull-down menu on the Job Setup window.
1. On the Job Submission window, select [Stocks...]. The stock
window is displayed.
2. On the stock window, select the radio button at the left of the
desired stock name. You may select a printer stock from the
[Stocks] section, or the current user stock.
If you do not see the stock that you want on the stock
window, you may add the stock as the user stock. Refer to
“Creating a new stock,” later in this chapter, for the procedure
for creating a new custom stock.
3. If you want this stock to remain on the Main Paper Stock pull-
down menu after the job is completed and new job
parameters are entered, select the [Favorites] check box next
to the stock name on the stock window.
4. Select [OK] to confirm your selection and close the stock
window. The stock name that you selected appears in the
Main Paper Stock field on the Job Submission window.
Creating a new stock
You can create a new custom stock that becomes the user stock
and specify this stock for subsequent jobs. When you add a new
user stock, it replaces the existing user stock; you are not able to
have more than one user stock available at a time.
Follow these steps to create a new user stock:

Printing a job using the DocuSP web interface Guide to Printing Using Xerox Production Print Services
4-12
1. On the Job Submission window, select [Stocks...].
2. On the stock window, select [User Stock...]. The User Stock
dialog window is displayed.
3. On the User Stock window, make specifications in the fields
as desired, or select the [Printer Default] check box to specify
the setting that was made at the printer controller. The
following parameters are available:
•[Name]: Either select one of the printer stock names from
the Name pull-down menu; or select [Custom], and enter
a name of up to 255 characters in the text box.
•[Color]: Select a color for the stock from the pull-down
menu or select [Custom] and enter a custom color in the
text box.
•[Size]: Select one of the standard paper size options or
[Custom] from the pull-down menu.
If you select [Custom], the [width] and [height] text boxes
are enabled, and you can enter a custom width and height
(length) for the stock.
Default size: The default stock size for this field is
determined by the unit of measure that was specified on
the Preferences window. (Refer to “Setting user
preferences,” later in this chapter.)
– Metric systems: 213 mm by 279 mm (A4)
– Systems using inches: 8 1/2 by 11 inch (US Letter)
•[Weight]: Either select a standard weight from the pull-
down menu; or select [Custom], and enter the gsm
(grams per square meter) weight in the text box.
For equivalent weights in pounds, refer to Helpful Facts
about Paper, which is delivered with your printing system.
•[Type]: Select a stock type from the pull-down menu.
Available stock types vary, depending on your printer. To
enter a custom type, select [Custom] from the pull-down
menu. Enter a custom type in the text box. If either
Custom or Pre-Cut tabs is selected, an order count may
be specified. The Order Count is defined by how many
sheets that are in a set before a new set begins.
•Drilled: Select the [Drilled] check box if you want to
specify that the stock type that you selected has drilled
holes.

Guide to Printing Using Xerox Production Print Services Printing a job using the DocuSP web interface
4-13
•Sides Coated: Select the number of sides that are
coated from the pull-down menu. Select [Uncoated] if the
stock has no special coating.
•Coating Type: Select a surface coating from the pull-
down menu for one or both sides of the stock. Options are
Glossy, High Gloss, Semi Gloss, Semi, or Matte
•Uncoated Finishing: Printer Default, Smooth, Regular,
or Rough
•Grain: Printer Default, Short or Long
NOTE: If the print job is 1-sided, you may still specify
different coatings for side 1 and side 2.
4. When you have finished specifying properties, select [OK] in
the bottom-right corner of the Custom window to implement
your changes and to close the Custom window. The new
stock is displayed in the [User Stock] section of the stock
window.
Specifying the sides imaged
To select the number of sides of the paper on which the job will
be printed, follow these steps:
1. On the Job Submission window, scroll until the [Sides
Imaged] field is visible.
2. From the Sides Imaged pull-down menu, select the number
of sides on which you want to print. The options, depending
on the capabilities of your printer, may include the following:
•[1 sided]: Prints the document on one side of each sheet
(simplex).
•[2 sided]: Prints the document on both sides of each
sheet (duplex).
For landscape documents, this selection prints the
document in calendar format. Both sides of the page are
printed but the position of the image is reversed (from top
to bottom) on every other page. This is also known as
“head-to-toe” or “tumble” printing.
•[Head-to-toe]: Prints the document on both sides of
each sheet (duplex).
This selection prints the document in head-to-toe format
for portrait oriented documents.

Printing a job using the DocuSP web interface Guide to Printing Using Xerox Production Print Services
4-14
Specifying a finishing option
The [Finishing] field allows you to select how the job is finished.
The available finishing options are dependant on the selected
printer. Refer to the “Job ticket features by printer” chapter for
information on the finishing options that each printer supports.
The icon at the left of the Finishing menu changes to reflect your
selection.
NOTE: If custom finishing for DocuTech 61xx and DocuPrint
EPS printers is supported, a pull-down menu will become
editable allowing you to type in custom finishing.
Specifying collation
When [Collated] is selected, the pages of each copy of the
document print in numerical sequence. If collation is not
specified, the system prints all copies of the first page, followed
by all copies of the second page, and so on.
1. To specify collation, select the [Collated] check box. The icon
at the left of the check box changes to reflect your selection.
Specifying slip sheets
When [Slip Sheets] is selected, blank sheets are inserted
between sets of collated jobs. The default stock for the slip
sheets is the main paper stock that was specified for the job,
except that the color of the slip sheet stock is blue. If the main
paper stock that was programmed for the job is blue, then white
stock is used for the slip sheets.
NOTE: Slip sheets can only be specified for collated jobs and
jobs without finishing.
1. To specify slip sheets, select the [Slip Sheets] check box. The
icon at the left of the check box changes to reflect your
selection.
Guide to Printing Using Xerox Production Print Services Printing a job using the DocuSP web interface
4-15
Setting up advanced features
As you scroll down the Job Submission window, you arrive at a
section called “Advanced Features.” In this section, you can
specify image adjustment parameters, including color
optimization parameters, and enter information about the job.
The following sections describe the procedures for specifying
parameters within the [Advanced Features] section of the Job
Submission window.
Setup options in the Image Adjustment section
The following parameters are available in the [Image
Adjustment] section of the Job Submission window. Select
[Printer Default] check box in any field for which you want to
specify the settings that were entered at the printer controller.
Specifying an image shift
Image shift allows you to offset the printed image vertically or
horizontally from the edge of one or both sides of the sheet.
Shifting the image is particularly useful for bound or drilled jobs.
NOTE: When an Image Shift option is set at 0 (zero), the image
is not shifted in that direction.
You can shift the image in one of the following ways for side 1,
side 2, or both sides, depending on your printer capabilities, and
on the selection that you made in the [Sides Imaged] field.
•x (horizontal) image shift: Shifts the image the specified
amount of inches or millimeters from the left edge of the
page. A positive number shifts the image to the right, and a
negative number shifts the image to the left.
•y (vertical) image shift: Shifts the image a specified
number of inches or millimeters from the top edge of the
page. A positive number shifts the image up, and a negative
number shifts the image down.
•Image shift for head-to-toe printing: For head-to-toe
printing, side 1 and side 2 image shifts behave as follows:
– For side 1, a positive x value shifts the image to the right
and a positive y value shifts the image up.

Printing a job using the DocuSP web interface Guide to Printing Using Xerox Production Print Services
4-16
– For side 2, a positive x value shifts the image to the left
and a positive y value shifts the image down.
NOTE: Any shift that you set using the Image Shift option may
interfere with any offset for binding that the application sets in the
document file.
To shift the image on the printed page, follow these steps:
1. From the Image Shift pull-down menu, select one of the
following image shift options.
NOTE: These options may be available only if the Sides
Imaged parameter on the Job Setup tab window is set to one
of the [2 Sided] options, and the printer supports independent
side 2 image shift.
•[Independent]: Independent vertical or horizontal shift
for the images on both side 1 and side 2.
•[Mirror X]: A horizontal-only shift that moves the images
on both sides in opposite directions. This leaves the
vertical shift independent for both sides.
•[Mirror Y]: A vertical shift that moves the images on both
sides in opposite directions. This leaves the horizontal
shift independent for both sides.
•[Mirror X and Y]: A horizontal and vertical image shift
that moves the images on both sides in opposite
directions from each other. [Mirror both] is best used for
two-sided jobs.
•[Mirror X, Tandem Y]: A horizontal shift that moves the
images on both sides in opposite directions from each
other, and a vertical shift that moves both of the images in
the same direction.
•[Mirror Y, Tandem X]: A vertical shift that moves the
images on both sides in opposite directions from each
other, and a horizontal shift that moves both the images in
the same direction for both sides.
•[Tandem X]: A horizontal shift that moves the images on
both sides in the same direction. This leaves the vertical
shift independent for both sides.
•[Tandem Y]: A vertical shift that moves the images on
both sides in the same direction. This leaves the
horizontal shift independent for both sides. Tandem is
best used for head-to-toe jobs.
Guide to Printing Using Xerox Production Print Services Printing a job using the DocuSP web interface
4-17
•[Tandem X and Y]: A horizontal and vertical shift that
moves the images on both side 1 and side 2 in the same
direction.
2. Set the amount of image shift in the x (horizontal) and y
(vertical) directions for Side 1 and Side 2 (if required). You
can enter the amount in the text boxes or select the
incremental arrow buttons until the desired amount of shift is
displayed.
NOTE: The amount of image shift that you specify may be
stated in inches or millimeters. The title of the Image Shift pull-
down menu displays in parentheses the unit that was selected
from the Preferences window. Refer to “Setting user
preferences,” later in this chapter, for the procedure for setting
the desired unit of measure for your system.
Specifying Rotation
The Rotation field allows you to select a rotation. The choices
available depend upon the attached printer, but may include 0,
90, 180, and 270.
Selecting OPI
Open Prepress Interface (OPI) is an extension of the PostScript
page-description language that enables you to design pages
with low-resolution images, then replace those images with high-
resolution images when printing. By using low-resolution images
in page layout applications (e.g., in Adobe PageMaker or
QuarkXPress), you can reduce the size of the page layout files
and reduce processing time when working in the file. Select
either [Substitute High Resolution Images] or [Printer Default]
from this option.
Selecting OPI Prescan
This job-level programming feature allows you to specify one of
three options, described below. The feature is only applicable to
jobs sent to non-streaming queues. The feature is supported
only on PostScript jobs. The options available are:
•None: The controller shall neither locate high-resolution
image files nor retrieve them to the input spool disk prior to
decomposition
•Scan: The controller shall attempt to locate high-resolution
image files and record known paths prior to decomposition.
Printing a job using the DocuSP web interface Guide to Printing Using Xerox Production Print Services
4-18
•Scan and Gather: The controller scans and also attempts to
locate high-resolution files and retrieve them to the input
spool disk prior to decomposition.
•Printer Default: Default set for the system
Specifying Halftone
This feature provides the ability to specify the halftone screen
that the job is to be rendered using. Select a halftone option that
most closely represents the frequency you desire.
Specifying tone reproduction curves (TRCs)
From the Tone Reproduction Curves pull-down menu, you can
select a set of four intensity transfer functions for cyan, magenta,
yellow, and black, in order to modify the intensity of the printed
colors. The menu contains a list of transfer functions that were
created at the controller.
Enabling anti-aliasing
The [Anti-Aliasing] field allows you to alleviate any aliasing
problem that may occur in an image. Aliasing means inaccurate
rendition of line width and position and a jagged appearance at
edges. If anti-aliasing is enabled, the system uses intermediate
levels of imaging intensity to improve the accuracy of line work
and reduce the jagged effect.
To enable anti-aliasing, select the [Anti-Aliasing] check box.
Setting color features
The Color Features section allows you to specify color attributes
for optimal print quality in your full-color job. Using these
selections, you can make a variety of changes to the way
colored areas in the job are printed.
You can make the following specifications in the Color
Optimizations field:
•[Print As Grayscale]: Is a check box which allows you to
select color or monochrome (grayscale) printing for your job.

Guide to Printing Using Xerox Production Print Services Printing a job using the DocuSP web interface
4-19
•[Trapping]: Compensates for misregistration occurring at
the printer. When color planes are not registered exactly with
one another, white gaps and regions of shifted hue can
appear at object boundaries. When the [Trapping] check box
is selected, registration problems are masked, resulting in
better color print quality. Select the appropriate width for
trapping.
When you select Trapping, the Trapping Setup dialog box will
appear. Enter the number for Fast Scan pixels and Slow scan
pixels, or select the Printer default. A diagram is displayed to
better help you make your selection.
•[Black Overprint]: Prevents the background of a black
object from being removed when being printed over color.
When there is any misregistration, this background removal
causes a band of white to be visible at the edges of the black
objects that are printed directly onto colored areas. Selecting
the [Black Overprint] check box eliminates this white space.
Color Adjustments
The following settings are available in the [Color Adjustments]
section. In each section, you can select a value from the pull-
down menu or enter a value in the text box.
•[Lightness]: Determines the lightness or darkness of the
printed output.
– A value of -100 causes the output to appear black.
– A value of 100 causes the output to appear white.
– A value of 0 (zero) causes no change in the output.
NOTE: The output resulting from these selections may be
affected by the content of the original image.
•[Contrast]: Increases or decreases the variation between
light and dark areas of the output. Higher contrast values
increase the light and dark contrast; lower values decrease it.
– A contrast value of -100 causes the output to appear a
solid midtone gray.
– A contrast value of 100 causes the output colors to use
either full color or no color for cyan, yellow, magenta, and
black, depending on the content of the original image.
Printing a job using the DocuSP web interface Guide to Printing Using Xerox Production Print Services
4-20
Example: If a color such as a pastel is below a threshold
level, it may print as no color if a contrast value of 100 is
specified.
•[Saturation]: Specifies the amount of color that is used to
print the output.
– A value of -100 causes the output to appear grayscale.
– A value of 100 prints the output to appear in all bright
colors.
– A value of 0 (zero) causes no change to the output.
NOTE: The output resulting from these selections may be
affected by the content of the original image.
Color Cast
In this section you can select a color cast that will be applied to
all input colors. You can adjust the following color ranges:
•Cyan – Red: -100 specifies the maximum cyan cast that is
supported by the system, and 100 specifies the maximum red
cast.
•Magenta – Green: -100 specifies the maximum magenta
cast that is supported by the system, and 100 specifies the
maximum green cast.
•Yellow – Blue: -100 specifies the maximum yellow cast that
is supported by the system, and 100 specifies the maximum
blue cast.
Setting Expert Color parameters
The Expert Color Settings window allows you to make selections
to enhance the color quality within your document and to specify
source color profiles and output color parameters. To use the
expert color fields, follow these steps:
1. On the Job Submission window, select [Expert Color] in the
[Color Features] section.
2. Make all desired changes and specifications in the fields that
are described in the following sections.
3. When finished making expert color selections, scroll to the
top of the Expert Color Settings window and do one of the
following:

Guide to Printing Using Xerox Production Print Services Printing a job using the DocuSP web interface
4-21
• If you want to confirm your selections without closing the
Expert Color Settings window, select [Apply].
• Select [OK] to confirm your selections and close the
Expert Color Settings window.
• To close the window without making any changes, select
[Cancel].
The following sections describe the parameters that are
available on the Expert Color Settings window.
Specifying source color profiles
The [Source Color] section of the Expert Color Settings window
enables you to accurately identify the correct source for color in
the document by selecting an Images Profile and a Graphics and
Text Profile for the color spaces in the following fields:
• [RGB Color Space] (red/green/blue)
• [CMYK Color Space] (cyan/magenta/yellow/black)
• [Grayscale Color Space] (monochrome)
From the Images Profile and the Text and Graphics Profile pull-
down menus in the desired color space field, select one of the
source profiles that have been loaded onto the printing system at
the controller window. If you want to use the default profile that
was set at the printer controller, select the [Printer Default] check
box.
Specifying output color parameters
The [Output Color] section of the Expert Color Settings window
contains fields in which you can make advanced level
specifications that will modify colors in the printed output. In each
of the following fields you can select an option from the pull-
down menu, or select the [Printer Default] check box if you want
to use the profiles that were set at the printer controller.
•[Destination Profile]: Lets you specify an International
Color Consortium [ICC] color profile for the front, back, or
both sides of the printed page. This profile is used by the
decomposer when it converts color data to the appropriate
color space for your printer.

Printing a job using the DocuSP web interface Guide to Printing Using Xerox Production Print Services
4-22
The pull-down menu contain a list of the destination profiles
that have been created at the controller. You may select a
profile that applies to both the front of the page and the back.
•[Rendering]: Rendering allows the user to select desired
rendering effect for all PDL objects. A rendering intent selects
a predefined method for adjusting colors during rendering
(during the printing process) so as to achieve some particular
user requirement. This option allows you to specify a
rendering intent (a predesigned method for adjusting colors
during the printing process) for graphics, image objects, and
text objects.
Images, Text, and Graphics menus: These pull-down
menus enable you to select a rendering for Images, Text, and
Graphics.
Each of the three menus provides the following selections:
–[Saturation]: Adjusts the print colors to preserve the
amount of color saturation in order to optimize the
rendering of business graphics such as charts and
graphs.
–[Perceptual]: Adjusts the print colors to make full use of
the range of colors that the printer supports while
preserving the color relationships. This rendering
optimizes photographic images, producing the most
realistic appearance.
–[Relative Colormetric]: Adjusts the print colors to
account for the viewing illuminant and for the level of
whiteness of the stock. This rendering intent is also
optimized for logos and solids, but it uses additional
information on hue and saturation from the source profile
to select the most appropriate value within the printer
color gamut.
–[Absolute Colormetric]: Adjusts the print colors to
account for the viewing illuminant only (not the media
whiteness). This selection provides exact output color
matches from one printer to another, and optimizes
rendering of spot color and logos.
–[Pure]: Same as Saturation, but subdues halftone
textures in order to optimize colored text and line art.
–[Mixed Graphics]: Adjusts the print colors to optimize
the printed appearance of a variety of graphic types.

Guide to Printing Using Xerox Production Print Services Printing a job using the DocuSP web interface
4-23
–[Automatic]: Selects allows the printer to choose the
best choice for rendering. (Selecting [Automatic] disables
all other Rendering Intent options.)
•[Press Color Emulation]: Lets you specify the press
standard whose color appearance will be emulated when the
job is printed. This feature renders the color content of a job
to be as consistent in appearance as possible with a press
standard such as CMYK SWOP.
Entering Job Information
The [Job Information] section is the last section of the Job
Submission window. This section enables you to enter
information about the print job, such as the name of the job, the
names of the individuals that are sending and receiving the job, a
billing account number, and so on. This information is available
to the printer operator and prints on the banner sheet with the
job.
You may specify the printer default for any of the optional items
on this window by selecting the [Printer Default] check box below
the item.
You may enter information in the following fields:
•[Job Name]: Enter the name of the document that you want
to print up to 140 characters.
•[Account]: Enter the name of the account that will be billed
for the current job.
If you use the [Account] field, you must enter a minimum of
three characters. The characters that are allowed in the
accounting field are strictly limited. You may use only the
following characters:
– Capital letters A through Z
– Numbers 0 through 9
– The following punctuation marks:
• Pound or number sign (#)
• Plus sign (+)
• Hyphen (-)
• Slash (/)
• Asterisk (*)
Printing a job using the DocuSP web interface Guide to Printing Using Xerox Production Print Services
4-24
•Period (.)
• The space character
NOTE: he first character in the account field may not be a
space character.
•[Sender Name]: The name of the user who is submitting the
job. Initially, this field displays the name of the owner of the
desktop on the workstation from which the job is being sent. If
desired, you may enter a different name up to 140
characters.
•[Recipient Name]: If desired, enter the name of the
individual or group that will receive or collect the printed job.
Initially, this field displays the name of the owner of the
desktop on the workstation from which the job is being sent.
•[Banner Message]: In this field, you may enter a message
that will be printed on the banner page of the job. The
message may consist of a maximum of 255 characters.
•[Special Instructions]: In this field, you may enter a job
instruction that is forwarded to the operator at the start of the
job. The message may consist of a maximum of 255
characters.
Setting user preferences
The Preferences window enables you to specify options for the
way in which you interact with the web interface Job Submission
windows.
To set the user preferences for the web interface, follow these
steps:
1. Select the [Preferences] icon, which is located in the upper-
right corner of both the web interface printer home page and
the Job Submission window.
2. Make any desired entries, selections, or changes to the
options on the Preferences window. The following options are
available, depending on the printer you select:
•[Language]: From the pull-down menu, select the
language in which the web interface user interface
windows will be displayed
•[Direction]: Select [Left to Right] or [Right to Left] for the
direction in which text on the windows will be read.
Guide to Printing Using Xerox Production Print Services Printing a job using the DocuSP web interface
4-25
•[Character Set]: From the pull-down menu, select the
font in which all text on the web interface Job Submission
windows will be presented.
•[Units]: Allows you to select the unit of measure in which
measurements will be expressed on the web interface Job
Submission windows. Select the radio button next to
[Inches] or [Metric].
•[Use document name as the job name]: Automatically
uses the document file name as the name of the job on
the Job Notes window.
Select the [Require the account when submitting a job]
check box if you to require the account when submitting a
job.
3. [Restore Factory Default] button: Restores the defaults
that were set for the printer when it was manufactured.
4. Select [OK] to save your changes and to close the
Preferences window.
If you want to close the Preferences window without saving
any changes, select [Cancel].
Printing a document
After you have set up the job ticket parameters for your print job,
follow these procedures to print the job.
Selecting a print queue
The Queue pull-down menu, located on the stationary print
section of the Job Submission window, contains a list of the
queues that have been set up for your printer.
1. From the Queue menu, select the name of the queue to
which you want to send the job.
2. If you want to make the selected queue the default queue,
which is selected and displayed in the [Queues] field
whenever the Job Submission window is opened, select the
[My Default Queue] check box.
Printing a job using the DocuSP web interface Guide to Printing Using Xerox Production Print Services
4-26
Selecting a file for printing
To select a file for printing, follow these steps:
1. On the stationary printing section of the Job Submission
window, select the [Browse] button that is located at the right
of the [File Name] field.
2. On the Choose file window, browse to locate the file that you
want to print, and select it.
3. Select [Open]. The Choose file window closes, and the name
of the document, along with its directory path, is displayed in
the [File Name] field.
Submitting a job for printing
When you have finished making all your specifications for your
job and destination parameters, you are ready to submit your job
to the printer for printing or saving.
1. On the stationary printing section of the Job Submission
window, select [Print].
2. If any conflicts exist among the chosen parameters, an alert
dialog will be displayed.
3. While the job is being sent to the printer, you will see the
Submitting Job message displayed.
4. If the job submits successfully, the “The job has been
successfully submitted” message will appear in the status
section.
Checking job, printer, and queue status and messages
The Status and Messages for Queues and Jobs window allows
you to check the status or message of a job that has been sent
to a printer, as well as a print queue or a printer. On the Status
and Messages for Queues and Jobs window the following
sections are available for display:
•Queues: Lists all the queues that have been set up for the
printer to which your workstation is connected.
•Jobs in Queue: <queue name>: Lists the jobs that are in
the queue that have been selected for display.
You can scroll both sections to display additional job or queue
names.

Guide to Printing Using Xerox Production Print Services Printing a job using the DocuSP web interface
4-27
Follow these steps to display the job and queue status
information:
1. On the web interface Job Submission window, select
[Administration]. The Status and Messages for Queues and
Jobs window displays.
2. Select one or more viewing options. The following selections
are available:
•[Show Jobs] and [Show Queues] check boxes: Select
these check boxes to display the jobs list, queues list, or
both.
•Filter menu: This pull-down menu lets you select and
filter a subset of the jobs that have been submitted, to
display in the Jobs in Queue section. You can select the
following types of jobs to view:
–[All jobs]: All jobs that have been submitted,
including those that are completed, aborted, pending,
etc.
–[All completed]: Jobs that have completed printing
–[All not completed]: All jobs except those that have
been completed
–[Pending]: Jobs that have been completely or
partially received, and are being scheduled by the
system for printing
–[Held]: Jobs that have been placed on hold by the
printer operator
–[Processing]: Jobs that are currently printing
–[Stopped]: Jobs for which printing has been
interrupted
–[Canceled]: Jobs that have been deleted from the
print queue and will not be printed
–[Aborted]: Jobs that have been stopped during
printing, then deleted without completing.
•[Refresh] button: Selecting this button updates job and
queue lists and statuses.

Printing a job using the DocuSP web interface Guide to Printing Using Xerox Production Print Services
4-28
Viewing messages
You can view messages of any job, queue, or printer that is
displayed on the Status and Messages for Queues and Jobs
window. Messages allow you to check the current condition of a
print queue or a printer, as well as jobs that have been sent to a
printer. View messages by following these steps:
1. Select the [View] link under the [View Detailed Messages]
column for the job, queue, or printer that is listed in either
Queues or Jobs in Queue sections.
2. When finished viewing the properties, close the Properties
window.
Viewing properties
You can view the properties of any job, queue, or printer that is
displayed on the Status and Messages for Queues and Jobs
window, by following these steps:
1. Select the [View] link under the [View Properties] column for
the job, queue, or printer that is listed in either Queues or
Jobs in Queue sections.
The job properties information is displayed.
2. When finished viewing the properties, close the Properties
window.
5-1
5. Xerox PPDs and PlugIns
If the Xerox PlugIn is loaded, the AdobePS printer driver uses
the PlugIn rather than the Xerox PPD files. Any job ticket settings
override the PPD settings.
PPDs and PlugIns using a Macintosh
This section explains how to use the AdobePS printer driver with
Xerox PPDs and Xerox Job Ticket PlugIn to create a document
and submit it to a Xerox printer for printing when using a
Macintosh system.
Guidelines for selecting printing requirements
Plan how you want your document to look before you start. Set
up the physical page and document attributes by selecting the
appropriate features in the application layout, page setup, and
other associated dialog boxes.
When satisfied with the document, use the following information
to prepare it for submission to the printer.
Based upon your user type, consider the following before
selecting the printing requirements:
• If you are printing directly to the printer from an application, or
submitting a file for printing at another workstation using a job
submission utility other than the Xerox Document Submission
software, select the printing requirements in your application
and in the printer dialog boxes.
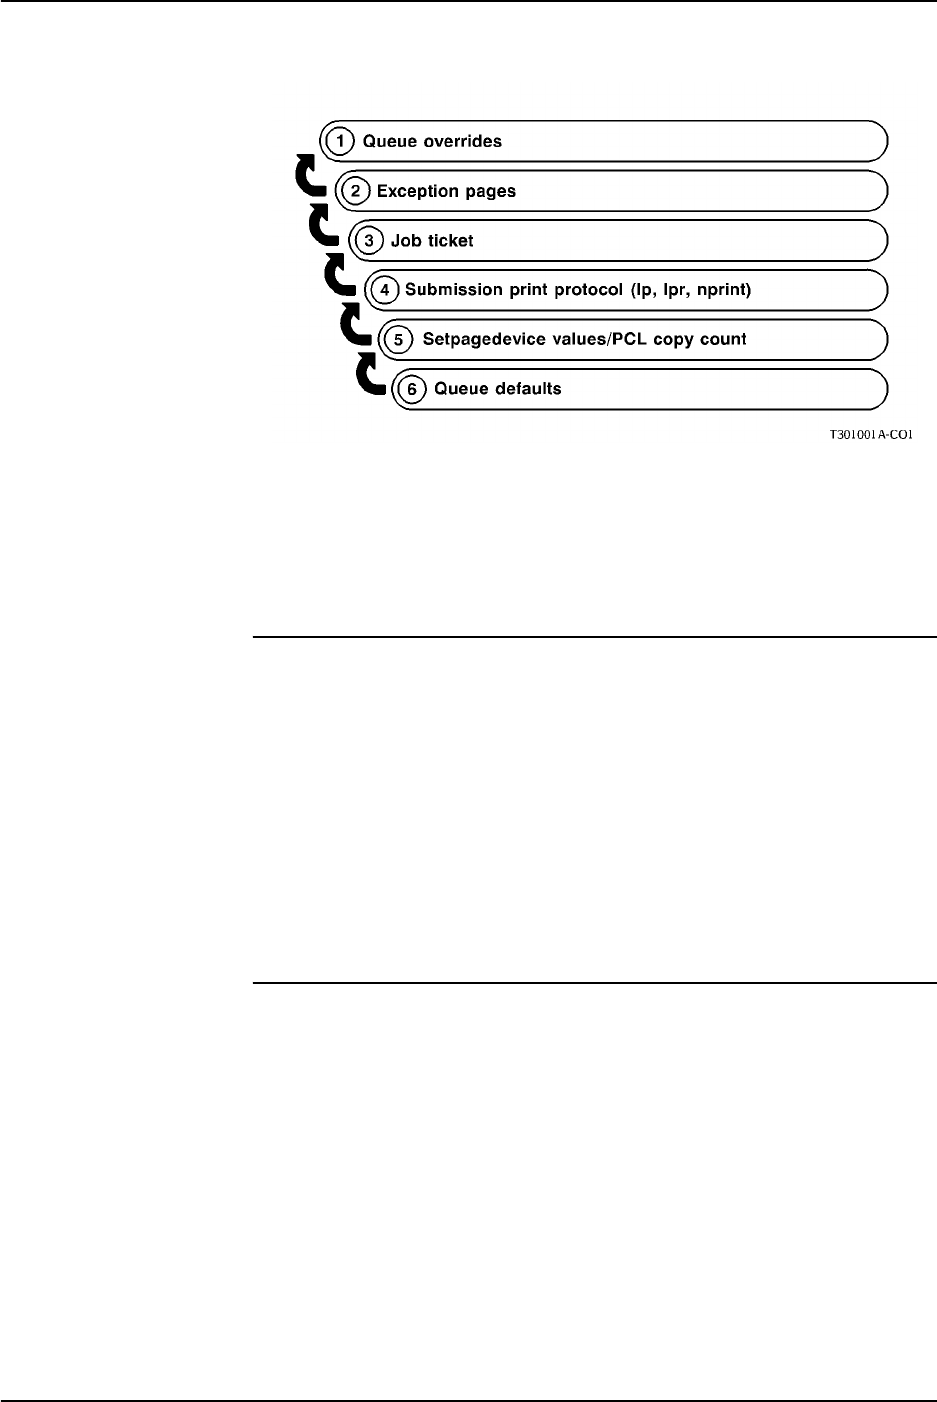
Xerox PPDs and PlugIns Guide to Printing Using Xerox Production Print Services
5-2
• If you are submitting your document to a service bureau, any
printing requirements you select from the XDS dialog boxes
are ignored. You must enter your requirements at the service
bureau, using a hardcopy job request form.
Selecting the printing options
To use the following procedure to select the printing options, you
must have the AdobePS printer driver installed and set up.
1. Select [File: Print] to display the Print dialog box for your
Xerox printer.
2. Select the printing options and select [Print]. If the Xerox
PlugIn is not loaded, no job ticket is available.
(Refer to the Adobe driver documentation for more information
on programming the printing features.)
Using the Xerox PlugIn
If the Xerox PlugIn for the selected printer has been installed,
select [File: Print] to display the Print dialog box for your Xerox
printer.
NOTE: Where the job ticket features overlay the AdobePS
driver features, only the Xerox job ticket features are displayed.
Refer to Chapter 4, Job ticket features by printer, for more
information on the specific job ticket features for your selected
printer.

Guide to Printing Using Xerox Production Print Services Xerox PPDs and PlugIns
5-3
Using drag and drop to print one or more jobs
To select one or more jobs using drag and drop, follow these
steps:
NOTE: This will not work on the Mac OS X because it does not
have desktop printers.
1. Select the icon for the job that you want to print.
2. Drag and drop the job file icon on a desktop printer icon to
print.
When a job is dragged over a printer icon, the software
checks to ensure that the job has a valid format for printing.
• If the format is valid, the icon darkens and allows the job
to be dropped.
• If the job is not a valid format, the system attempts to
locate the application that created the job.
If the application is found, the system starts it and
instructs you to print the document using the print dialog.
If the application can not be determined, a message is
displayed and the printing is cancelled.
NOTE: If the job was printed using a Xerox printer driver in
which the job ticket was programmed when the PostScript was
created, the printer icon does not recognize the job as being
valid PostScript and the printing fails.
The drag and drop process for the printer icons is best used with
jobs created using the AdobePS driver without the Xerox PlugIn.
PPDs and PlugIns using Windows
This section explains how to use a third party printer driver with a
Xerox PPD file for Windows to create a document and submit it
for printing to the Xerox printer.
Since the names of menus, dialog boxes, buttons, commands,
features, and options may vary from application to application,
the most commonly used names are included in this section.
Refer to the documentation that applies to your specific
application for the correct options.
Xerox PPDs and PlugIns Guide to Printing Using Xerox Production Print Services
5-4
NOTE: Font downloading and substitution may be different
between PostScript and PDF files of the same job. In addition,
font differences may be experienced between versions of
Windows.
Creating your document
Plan how you want your document to look before you start. Set
up the physical page and document attributes by selecting the
appropriate features in the application layout, page setup, and
other associated dialog boxes.
The application Layout or Page Setup feature will display all the
paper sizes that are available for the selected Xerox printer.
NOTE: The third party printer drivers with Xerox PPD files do
not fully support all of the features available with the Xerox
printers.
Printing options
The following information assumes that the third party printer
driver and the appropriate Xerox PPD file have been installed
and set up, and that the Xerox printer is selected as the default
printer and has been connected to the appropriate port.
If you are submitting to a service bureau, or using a document
submission utility, use the [File] port. For submitting directly from
an application, use the local port that is currently connected to
the correct network queue.
Select [Print] from the File menu to display the Print dialog box
for the Xerox printer. The following table identifies the various
print selections by driver and platform. Refer to the tables to
make the selections for your job.
Table 5-1. Available selections by printer driver in print
setup dialog
Print setup dialog
selections
Native Adobe or
Microsoft PS driver for
Windows 95 with
Xerox PPD files
Microsoft PS driver for
Windows NT 4.0 and Windows
2000 with Xerox PPD files
Print to file Select Print to File. Select Print to File.
Copies Copies set in
Properties dialog will
override any setting
here.
Enter the number of copies to
print.
Guide to Printing Using Xerox Production Print Services Xerox PPDs and PlugIns
5-5
Collate copies Keep selected (on). Keep selected (on).
Table 5-2. Available selections by printer driver in properties
dialog
Properties dialog
selections
Native Adobe or Microsoft
PS driver for Windows 95
with Xerox PPD files
Microsoft PS driver for
Windows NT 4.0 with
Xerox PPD files
Orientation • Landscape
• Portrait
• Rotated (landscape)
• Landscape
• Portrait
• Rotated (landscape)
Scaling 25 to 400% 1 to 1000%
Output format/
PostScript output
format
PostScript (optimize for
speed) for best results Not available
Collate Select to collate multiple
copies. Select to collate multiple
copies.
Duplex/Sides
Imaged •None
• Flip on long edge
• Flip on short edge
•None
• Short side
• Long side
Paper/Media Size Use Page Setup to set
paper size; not all paper
sizes may be supported by
the selected printer.
Not all paper sizes may be
supported by the selected
printer.
Copies Select the number of
copies. Same as the [Copies]
setting in the Print dialog
box
Paper/Media
Color All available colors
supported by the printer. All available colors
supported by the printer.
Use printer setting.
Paper/Media Type All available types
supported by the printer. All available types
supported by the printer.
Use printer setting.
Drilled Not available Not available
Paper Weight Not available Not available
Table 5-1. Available selections by printer driver in print
setup dialog
Print setup dialog
selections
Native Adobe or
Microsoft PS driver for
Windows 95 with
Xerox PPD files
Microsoft PS driver for
Windows NT 4.0 and Windows
2000 with Xerox PPD files
Xerox PPDs and PlugIns Guide to Printing Using Xerox Production Print Services
5-6
With head-to-toe printing, also known as “tumble duplex,” both
sides of the page are printed; but the position of the image is
reversed (from top to bottom) on every other page, similar to the
layout of a calendar.
Finishing All available finishing
options are supported by
the printer except
[Custom].
All available finishing
options are supported by
the printer except
[Custom].
Layout 1 up, 2 up, 4 up Not available
Resolution Set to 600 dpi Set to 600 dpi
Halftone For best results, use the
printer settings For best results, use the
printer settings
Special Negative image
Mirror image
PostScript Options - leave
settings at defaults
Table 5-2. Available selections by printer driver in properties
dialog (Continued)
Properties dialog
selections
Native Adobe or Microsoft
PS driver for Windows 95
with Xerox PPD files
Microsoft PS driver for
Windows NT 4.0 with
Xerox PPD files
6-1
6. Using Command Line Client
The Xerox Document Submission Command Line software
enables you to set up and submit print jobs by entering
commands in a DOS or Unix window, from a PC or Sun
workstation. This chapter describes the procedure and syntax for
entering the print and job setup commands.
To view more of the window or enable the scroll bars, right click
on the title bar for the Command Prompt window and then select
[Properties...]. Change the WIndow size to Width=100 and
Height-100. Select [OK]. Apply properties to the current window
only and select [OK]. Scroll bars should appear on the right of
the window.
Accessing the XDS Command Line software
The XDS Command Line software is installed as part of the
process of installing XDS Plus. Refer to the Installation Guide for
information on installing XDS Plus and all its components.
Accessing XDS Command Line from Windows
To open XDS Command Line from Windows, follow these steps:
1. Log on to your network.
2. From your workstation , open a command line prompt (such
as DOS) and navigate to the install directory.
The XDS Command Line DOS window opens, displaying the
XDSCL> prompt. You are now using XDS Command Line in
Multiple Command Mode and and may enter job setup and print
commands on the command line at this prompt.
Accessing XDS Command Line from Solaris and Mac OS X
Follow these steps to access XDS Command Line from Solaris:
Using Command Line Client Guide to Printing Using Xerox Production Print Services
6-2
1. Log on to your network.
2. Use the main application called Print. Type Print -
<argument>. Additional information about using this
application is in the following section.
3. Wait for the XDSCL> prompt to appear on the window. This
may take several seconds.
At the XDSCL> prompt, you are now using XDS Command
Line in Multiple Command Mode and and may enter job setup
and print commands on the command line at this prompt.
XDS Command Line operating modes
You can enter commands in the following mode:
•Print command mode: In this mode, you enter all the
specifications for setting up and printing a job as a single
command with multiple parameters.
You can key in commands and parameters at the XDSCL prompt
on the Java DOS window or the Unix Run window. The
command syntax differs for each mode.
NOTE: Unix commands are case-sensitive. Be sure to enter
each command exactly as it is represented in this chapter.
Using Print command mode
When operating in single command mode, you provide
instructions to XDS Command Line by entering one command.
All printing and job setup specifications that you can enter are
parameters of that one command. To access, type the following:
Print -<argument.
Print command mode parameters
You can perform the following functions in print command mode.
Accessing XDS Command Line Help: -help and -\?
Displays a list of parameters and arguments that are available in
single command mode, and their functions.
Guide to Printing Using Xerox Production Print Services Using Command Line Client
6-3
Syntax –help
-\?
Exiting XDS Command Line: -exit
Exits XDS Command Line.
Syntax –exit
Listing the printers: -ListP
Displays the directory paths and names of the available printers.
The printer name, printer status, output status, and printer type
for each available printer will display.
Syntax –ListP
Listing printer status: -ListP <options>
Using -Listp along with options will display printer status
information
Syntax -ListP <options>
Argument -v or -V
Displays the printer name, printer status, output status, printer
type, printer network address, output type, output format, and
server program for each printer.
Argument -p or -P
Displays the printer status information for the specified printer
only.
Argument -server <DocuSP controller name>
Displays the printer status information for the specified DocuSP
(controller) server .
Selecting a file for printing: -f <file>
Selects the document file that will be printed. This parameter is
required for printing.

Using Command Line Client Guide to Printing Using Xerox Production Print Services
6-4
Syntax –f <file>
Argument <file>
Specifies the directory path and name of the document file that
will be printed.
Setting the job ticket: -jt <job>
Specifies the job ticket that will be used with the current job. This
parameter is required for printing.
Syntax –jt <job>
Argument <job>
Specifies the directory path and name of the saved job ticket that
will be used to print the job.
Setting the number of copies: -copies <#>
Specifies the number of copies of the document that will be
printed.
Syntax –copies <#>
Argument <#>
Numeral that indicates the number of copies that will be printed
Setting the number of sides
Specifies the sides selection for the printed job, 1-sided, 2-
sided, or head-to-toe.
Syntax -sides <sides>
Argument <sides>
Enter one of the following:
•1-side
•2-side
• head-to-toe

Guide to Printing Using Xerox Production Print Services Using Command Line Client
6-5
Setting the finishing option
Specifies the finishing for the job.
Syntax -finishing <option>
Argument <option>
Enter one of the following:
• no-finish
• staple-top-left
• staple-bottom-left
• staple-top-right
• staple-dual-left
• staple-dual-right
•bind-left
• bind-right
• booklet-maker
Setting user name
Specifies the sender’s user name.
Syntax -user <sender>
Argument <sender>
Enter the sender’s user name as the argument.
Display job status: -ListJob
Displays the status information of jobs that have been sent to the
DocuSP controller. If no options are specified, the last 40 jobs
will be displayed. The information displayed will be the sender
name, job name, job identifier, and status.
Syntax -ListJob
Argument -v or -V

Using Command Line Client Guide to Printing Using Xerox Production Print Services
6-6
Displays the information in verbose mode. All job information will
be displayed up to 40 jobs. The number of records displayed
can be specified using the -n option. Use the -e option to display
the entire database.
Argument -l or -L
Displays the sender name, job name, number of copies, priority,
file size, submission date and time, job identification, job status,
format date and time, and forward date and time for the
requested job.
Argument -s or -S <status>
Displays the print job status for the jobs in the database. The
status values for this option are case sensitive and must be
entered completely. The status values are displayed as bold text
below:
•queued The job is queued for printing.
•processing The job is currently printing.
•completed The job has been completed. One of the
following messages that will display are: Complete,
CancelledByOperator, CancelledByUser,
CompleteWithWarning, CompleteWithErrors, Rejected, or
Aborted.
Argument -i or -I <identification number>
Displays the status of the job for the designated identification
number.
Argument -server <DocuSP controller name>
Displays the status of the jobs that currectly reside at the
specified controller. If the “-server” option is not used, the query
will be sent to the DocuSP controllers listed in the XDSPlus
printer discovery file (printer.disc).
Argument -p or -P <printer queue name>
Displays the jobs that have been submitted to the specified print
queue.
Guide to Printing Using Xerox Production Print Services Using Command Line Client
6-7
Setting the printer: -p <printer>
Specifies and sets the printer that will be used for print jobs. This
parameter is required for printing.
Syntax –p <printer>
Argument <printer>
Specifies the directory path and name of the printer to which you
want to send jobs. This path and name must be entered exactly
the way it appears on the printer list that is generated by the –
Listp command. Refer to “Listing the printers,” earlier in this
chapter.
Print queue status: -ListQ <options>
Lists available queues and displays the status of each queue.
Syntax -Listq <options>
Argument -l or -L
Displays the queue name, identification number, status, priority,
printer name, printer type, network address, and any comments
for the specified queue.
Argument -v or -V
Displays queue name, identification number, status, priority,
resolution, start date and time, creation date and time, number of
queued jobs, queue attributes, printer name, printer type, printer
network address and any comments.
Argument -server <DocuSP controller name>
Requests information for the specified DocuSP controller. If the
“-server” option is not used, a query will be sent to the DocuSP
controllers listed in the XDS Plus printer discovery file
(printer.disc).
Argument -p or -P
Requests information for the specified printer queue only.

Using Command Line Client Guide to Printing Using Xerox Production Print Services
6-8
Setting the RegFileLoc
For information on creating and setting up the printer discovery
file, refer to the Installation Guide. To set the Printer Registration
File location, use this synatax.
Syntax RegFileLoc -<location>
Argument <location>
Specifies the location of the Printer Registration file in URL
format.
Argument RegFileLoc -get
Displays the current location of the Printer Registration File.
Argument RegFileLoc -help
Displays usage help.
Printing in print command mode
Follow these steps to submit a print job in single command
mode:
1. To set up and print a job in single command mode, you must
edit and execute a batch file that is provided for you in the
folder that XDS Plus is installed in. Use one of the following
options:
• For Windows use jxdsclc_sc_win32.bat
• For Solaris use jxdsclc_sc_unix
The following parameters are required for printing:
•–p followed by a space, then the name of the printer to
which you are sending a job (as displayed on the printer
list)
•–f followed by a space, then the name of the document
file that you want to print
•–jt followed by the name of the saved job ticket that you
want to use with the job.
The basic syntax for a printing command is as follows:
–p <printer name> –f <file name> –jt <job ticket>
Guide to Printing Using Xerox Production Print Services Using Command Line Client
6-9
2. The job is submitted when you execute the batch file.
The single command mode is often used for batch operation.
To do this, copy and paste the command line and change the
parameters.
NOTE: Do not change other parts of the batch file.
You must have one command line for each separate
command to be executed. The following example displays a
file with two print commands, each to a different printer.
• com.xerox.jxds.frontends.clc.application.JXDS -p/
rebar.ess.c.xerox.com/default -f ./golden.ps -jt ./ticket.xpf
• com.xerox.jxds.frontends.clc.application.JXDS -p/
rebar.ess.c.xerox.com/rebar -f ./golden.ps -jt ./ticket.xpf
Refer to “Command syntax: single command mode,” for further
information on the command structure.
Refer to the “Single command mode commands,” earlier in this
chapter, for a list of the available parameters for the Print
command.
Command quick reference
The following tables list all the commands and parameters for
each mode of the XDS Command Line application.
Table 6-1. Print command mode commands and parameters
Parameter Function Arguments Argument definition
–p Set printer <printer> Name of printer
–f Set file to print <file> Name of document file to print
–jt Set job ticket <job> Name of job ticket file
–copies Set number of copies to print <#> Number of copies (numeral)
-sides Set sides to be printed <sides> 1-side, 2-side, head-to-toe
-finishing Sets finishing for job <option> no-finish, staple-top-left,
staple-bottom-left, staple-top-
right, staple-dual-left, staple-
dual-right, bind-left, bind-right,
booklet-maker
-user Identifies the sender’s user
name <sender> Enter the sender’s user name
–exit Exit XDS Command Line
Using Command Line Client Guide to Printing Using Xerox Production Print Services
6-10
–help Display list of available
commands
–Listp Display list of printers -v or -V Displays printer name, status,
type, network address, output
type, output format and server
program
-p or -P Displays printer status of
specified printer
-server
<DocuSP
controller
name>
Displays status of specified
Controller.
-Listjob Displays status information for
jobs sent to the Controller. -v or -V All information of all records
(max of 40)
-l or -L Displays sender name, job
name, copies, priority, file size,
submission date and time, job
ID, jobs status, format date and
time, forward date and time.
-s or -S
<status> Displays job status for
specified job type. Refer to
information earlier in this
section for complete listing.
-i or -I Displays job ID
-server
<DocuSP
controller
name>
Displays status of jobs
currently at specified DocuSP
Controller.
-p or -P
<printer
queue name>
Displays jobs submitted to
specified print queue.
-listq Lists available queues and the
status of queues. -l or -L Displays queue name, ID,
status, priority, resolution, start
date and time, creation date
and time, number of queued
jobs, attributes, printer name
and type, and printer network
address.
-server
<DocuSP
controller
name>
Displays queues available for
specified controller.
Table 6-1. Print command mode commands and parameters
Parameter Function Arguments Argument definition
Guide to Printing Using Xerox Production Print Services Using Command Line Client
6-11
-p or -P
<printer
queue name>
Displays information for the
specified printer queue.
-RegFileLoc Printer Registration File
Location -set
<location> The location of the Printer
Registration File in URL format
-get Displays current set location of
the Printer Registration File
-help Displays help usage for the
syntax
Table 6-1. Print command mode commands and parameters
Parameter Function Arguments Argument definition

Using Command Line Client Guide to Printing Using Xerox Production Print Services
6-12

7-1
7. The Xerox Custom PCL printer
drivers
This chapter describes how you may best use the Xerox PCL
printer drivers when using a Windows or Solaris based system.
The Xerox Custom PCL printer drivers are PCL drivers that
include Xerox value added user interface controls to access the
features specific to the supported Xerox printers.
If the driver is not installed or you wish to install an additional
printer driver, refer to the Installation Guide chapter for the
installation procedure.
Features
The PCL printer driver offers the following features.
• Full printing capabilities and finishing options of the
supported printers for users who print directly from within
Windows applications
• Full printing capabilities and finishing options for those who
create documents and PCL PDL (page description language)
files
• Sixty shades of gray for graphics printing and enhanced
graphics image quality
• Faster processing in many situations, compared to the PCL
mini-driver, especially when graphics are included in the
document
• True 600 dots per inch resolution for the printers that support
600 dpi.
• Xerox Printer Drivers can be shared from Windows 2000 or
Windows XP to other Windows 2000 or Windows XP clients.
Sharing to other operating systems is not supported.
The Xerox Custom PCL printer drivers Guide to Printing Using Xerox Production Print Services
7-2
Printing a document
This section explains how to select the options and features of
the Xerox PCL printer drivers for Windows, or Solaris
applications.
The procedure to get to the user interface window of the PCL
driver varies for different Windows applications. The most
common procedure is included in this section.
NOTE: Only open one Xerox printer driver user interface at a
time from the Document Default in Windows NT 4.0, or Printing
Preferences in WIndows 2000.
Accessing the features and options
1. From the [File] pull-down menu of your Windows application,
select [Print] or [Print Setup].
2. On the Print or Print Setup window, specify the following
options as desired.
• [Copies]: The Copies setting in the Xerox Document
Submission dialog box overrides any settings that you
make here.
• [Collate Copies]: Select this option if it is available.
NOTE: Do not set the number of copies in the application
[Print] and [Print Setup] dialog boxes. Instead set this in the
Xerox Document Submission window. Setting the number of
copies in the Print and Print Setup dialog boxes could cause
unexpected results when the job is printed.
3. Select [Printer] or [Setup].
4. Select the printer you intend to use.
5. Select [Options] or [Properties]. The Job Ticket setup window
is displayed.
NOTE: For Windows NT and Windows 2000, selecting
[Options] or [Properties] provides the printer properties. To
open the properties for other operating systems, select the
[Xerox Settings] tab to open the Job Ticket Setup window.

Guide to Printing Using Xerox Production Print Services The Xerox Custom PCL printer drivers
7-3
NOTE: If you are submitting a job with a defined page range
and the application supports defining a page range to print,
set the page range in the application rather than in the Xerox
Job Ticket. Setting the page range in the application creates
a smaller PDL file.
For further information regarding job ticket options and
selections, refer to the Job Ticket Options earlier in this
document.
Starting printing
After you have selected all of the options and features of the
print job, you must exit the tab windows and use your application
print windows to start the print process.
1. Select [OK] to exit the Setup window.
2. Select [OK] to exit the [Print Setup] window.
NOTE: When you are printing from WordPad, Internet Explorer
5.0, or Outlook Express in Windows 2000 using the Xerox PCL
drivers, copy count and collate/uncollate shuold be set in the
General Tab.
3. Select [OK] in the [Print Options] window to start printing.

The Xerox Custom PCL printer drivers Guide to Printing Using Xerox Production Print Services
7-4

8-1
8. The Xerox Custom PostScript
printer drivers
This chapter describes how you may best use the Xerox Custom
PostScript printer drivers when using a Windows, Macintosh, or
Solaris based system.
The Xerox Custom PostScript printer drivers include Xerox value
added user interface controls to access the features specific to
the supported Xerox printers.
If the driver is not installed or you wish to install an additional
printer driver, refer to the Installation Guide for the installation
procedure.
NOTE: Font downloading and substitution may be different
between PostScript and PDF files of the same job. In addition,
you may encounter font differences between versions of
Windows.
If you have a problem successfully installing teh PostScript
drivers in Windows NT, then the tfollowing files need to manually
removed before appempting to reinstall:
•XCOMCODE.DLL
• XUMPDRVR.DLL
• XPSCCKM.DLL
• XPSCCUI.DLL
These files can be found in the Windows NT printer drivers
directory: c:\WINNT\SYSTEM32\SPOOL\DRIVERS\W32X86\2
Features
The Xerox Custom PostScript printer drivers offer the following
features:
• The ability to print directly from within an application using
the features of the Adobe printer driver and the supported
printers
The Xerox Custom PostScript printer drivers Guide to Printing Using Xerox Production Print Services
8-2
• Access to the printer job ticket items from within applications
• Faster processing in many situations when compared to the
Microsoft PostScript printer driver, especially when graphics
are included in the document
• Improved efficient generation of PostScript files compared to
the Microsoft PostScript printer driver, and generally a
smaller PostScript file size
• PostScript Level 1, Level 2, and Level 3 support. (Refer to the
tables in the “Job Ticket features by printer,” chapter to
determine which level of PostScript is supported by your
printer type.)
• Access to edge-to-edge printing
• Full printing capabilities and finishing options for users who
submit documents as PostScript PDL files
Printing a document
This section explains how to select the options and features of
the Xerox Custom PostScript printer driver for applications.
The procedure to access the user interface windows of the
PostScript driver varies for different software applications. The
most common procedure is included in this section.
Accessing the features and options
1. Select [Print] or [Print Setup] from the File pull-down menu of
your Windows application. The [Print Setup] window opens.
2. Specify the following parameters as desired:
•[Copies]: The Copies setting in the Xerox Document
Submission dialog box overrides any settings that you
make here.
•[Collate Copies]: Select this option if it is available.
NOTE: Do not set the number of copies in the application
[Print] and [Print Setup] dialog boxes. Instead, set this
number in the Xerox Document Submission window. Setting
the copies in the [Print] and [Print Setup] dialog boxes could
cause unexpected results when the job is printed.
3. Select [Printer] or [Setup].
4. Select the printer you intend to use.

Guide to Printing Using Xerox Production Print Services The Xerox Custom PostScript printer drivers
8-3
5. Select [Options] or [Properties]. The Job Ticket setup window
is displayed.
NOTE: For Windows NT and Windows 2000, selecting
[Options] or [Properties] provides the printer properties. To
open the properties for other operating systems, select the
[Xerox Settings] tab to open the Job Ticket Setup window.
NOTE: If you are submitting a job with a defined page range
and the application supports defining a page range to print,
set the page range in the application rather than in the Xerox
Job Ticket. Setting the page range in the application creates
a smaller PDL file.
For further information regarding job ticket options and
selections, refer to the Job Ticket options section later in this
document.
Starting printing
After you have selected all of the options and features of the
print job, you must exit the Job Ticket setup window and use
your application print windows to start the print process.
1. Select [OK] to exit the Setup window.
2. Select [OK] to exit the [Print Setup] window.
3. Select [OK] or [Print] in the [Print Options] window to start the
printing process.

The Xerox Custom PostScript printer drivers Guide to Printing Using Xerox Production Print Services
8-4
9-1
9. Job ticket options
This chapter contains the procedures for printing a document
using the XDS and XDS Plus software on a Xerox printing
system from your computer running Windows 95, Windows 98,
Windows NT 4.0, Windows 2000, Windows Millennium, XP, or a
Sun workstation that is running Solaris 2.6 or 2.8. From a
Macintosh OS 8.6, 9.x, or OS in Classic Mode when running
XDS. When running XDS Plus, a Macintosh using OS X Native
mode must be used. The Xerox Document Submission (XDS),
the Xerox Document Submission Plus (XDS Plus) software, the
Xerox Custom drivers, and the DocuSP Web Client provide you
with windows you use to select a document file, to set up the job
ticket, and to submit your print job to the printer.
Setting up a print job
To set up a print job, you specify parameters that define the
appearance and destination of the printed output.
The Setup window enables you to specify the parameters for the
job that you are printing. On the Setup window, job setup
specification tasks may be accessed from icon buttons on the
icon bar, the pull-down menus on the menu bar, and the job
ticket fields that compose the rest of the window.
Printer Limitations window
If the current job ticket contains parameters that are not available
on the selected printer, the Printer Limitations window will
appear. On this window you can assign defaults to the indicated
areas, or cancel the operation. Select [Assign Defaults] to make
changes to the current job ticket, or select [Cancel the Operation]
to cancel. If you cancel, you return to the startup XDS window
and can select a different printer, or select a new job ticket.
NOTE: Printer Limitations is not available on Macintosh
systems.
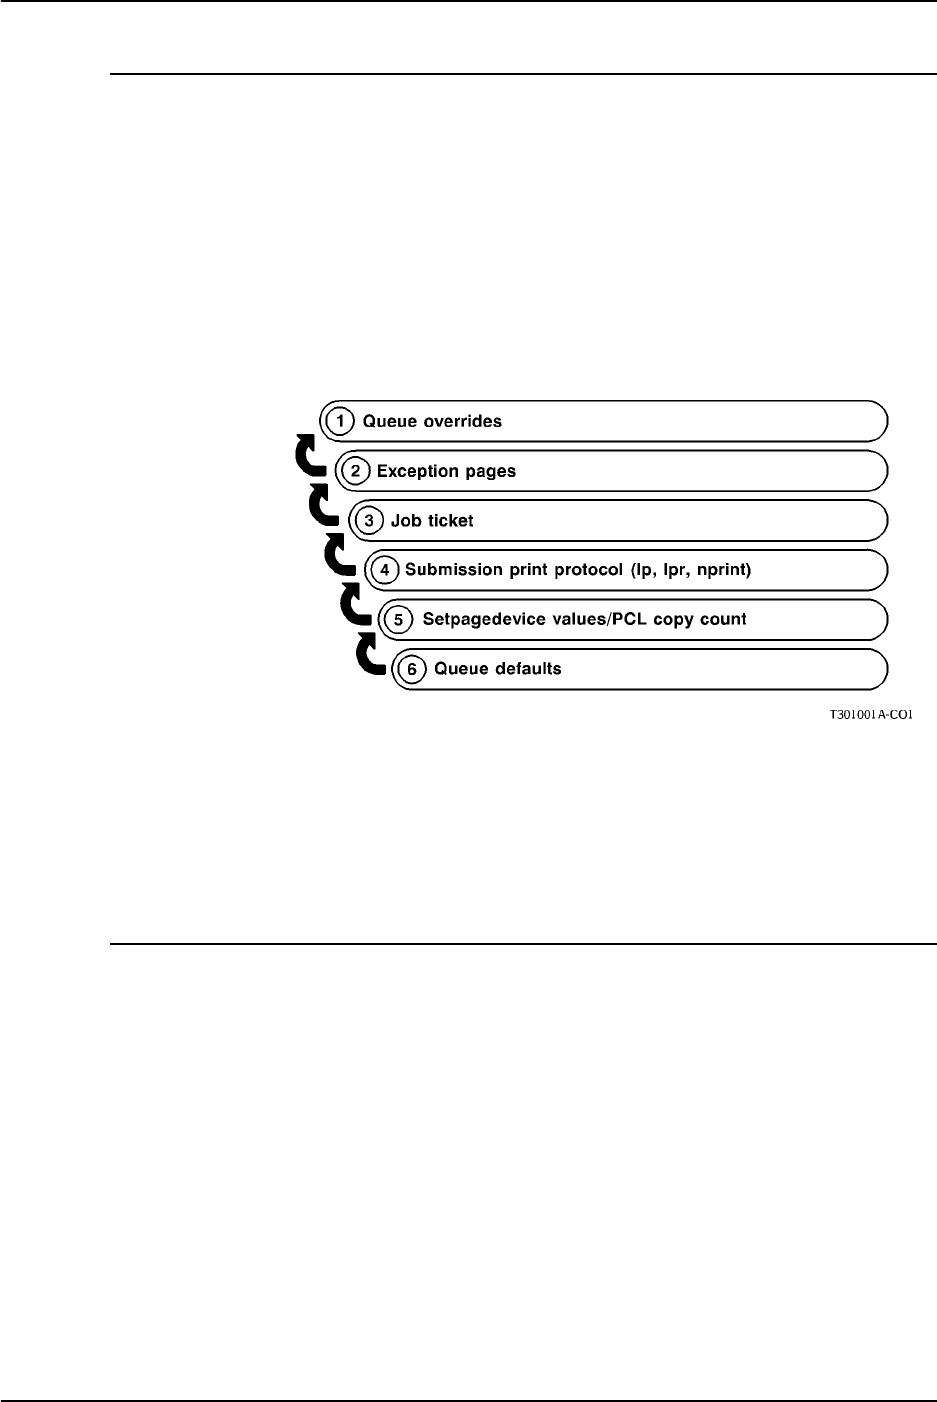
Job ticket options Guide to Printing Using Xerox Production Print Services
9-2
The Printer default option
A Printer default selection appears in many of the job ticket
fields. This option can be used to print the job using the queue
default, the queue override, or the option that was set using the
PostScript setpagedevice command.
When [Printer default] is selected, the job is printed using the
option that was set in one of the categories that are shown in
priority order in the following figure.
The figure above illustrates that parameters specified as queue
overrides at your printing system controller are used as defaults
first. If no queue overrides have been specified, parameters on
any exception pages are used, and so on.
Setting job ticket options for XDS
A job ticket specifies a set of printing options that the system will
use for a job. Every time you print a job, you must specify or
create a job ticket for it. The information in this job ticket
accompanies the job to the printer, and gives the printer
instructions on how to print it.
You select or enter parameters for the job ticket in the fields on
the Setup window. You can apply this set of specifications to your
current print job only, or you can save them as a job ticket file
and retrieve the file for use with other jobs.
Guide to Printing Using Xerox Production Print Services Job ticket options
9-3
NOTE: The features that appear in the job ticket fields and list
boxes on the Setup window vary depending on which features
are available from the job ticket settings that you select or are
supported by the printer that you are using. Refer to the Job
ticket features guide to determine which features are supported
by the printer that you selected.
Accessing the Setup window
To open the Setup window in order to specify job ticket
parameters, select [Setup...] on the XDS window.
NOTE: The Printer Setup window is not available on Macintosh
systems.
Accessing job ticket features for XDS Plus
You can specify a wide range of parameters for the job that you
are printing. On the XDS Plus window, the [Job Settings] icon
gives you access to tab windows on which you make
specifications for the job that you are printing. This set of
parameter specifications for a job is called a “job ticket.”
A job ticket specifies the set of printing options that the system
will use for a job. Every time you print a job, you must specify or
create a job ticket for it. The information in this job ticket
accompanies the job to the printer and gives the printer
instructions on how to print the job.
You can apply this set of specifications to your current print job
only, or you can save them as a job ticket (.xpf) file and retrieve
the file later for use with other jobs.
Creating a new job ticket
You can create a new ticket for a job at the time you are sending
the job to print, or you can create a job ticket when you are not
currently printing and save it on your workstation disk to use with
a job that you print later.
Follow these steps to create a job ticket:
1. Select a printer queue. Refer to “Selecting a print queue,”
earlier in this chapter, for the procedure.
2. Select the [Job Settings] icon. The Files tab window is
displayed, along with a set of other tabs that give you access
to other job parameters that you may specify.

Job ticket options Guide to Printing Using Xerox Production Print Services
9-4
3. If you want to use an existing job ticket as the base for your
new one, select the [Open] button to the right of the [Job
Ticket] field, and browse to select the job ticket that you want
to use.
4. Enter the rest of the job information on the Files window.
Refer to “Printing a job,” later in this chapter.
5. Select the other tabs as desired, to display additional
windows and to specify other parameters for your job. The
following tab windows may be available for you to specify
parameters, depending on the printer that you select.
NOTE: Different tabs may be displayed, depending on your
printer configuration.
• Job Setup tab window
• Output tab window
• Image Adjustment tab window
• Color tab window
• Special Pages tab window
NOTE: The features that appear on the tab windows vary
depending on which features are available from the job ticket
settings you select or for the printer you are using. Refer to
the Job ticket features guide to determine which features are
supported by the printer that you selected.
6. When you have completed specifying the desired parameters
for your job, do one of the following:
• Save the job ticket. Refer to “Saving a job ticket,” later in
this chapter.
• Print the job for which you created this job ticket. Your job
ticket specifications are transmitted with the job data.
Refer to “Managing job tickets,” later in this chapter, for
information on saving and retrieving the job ticket files.
Setting up a job ticket
A job ticket indicates which printing options you want to use to
print your document. Use the Job Ticket dialog box to set up a
job ticket for the document that you want to print.
Guide to Printing Using Xerox Production Print Services Job ticket options
9-5
The features that appear on the windows and the list boxes vary
depending on which features are available from the job ticket
settings you select or for the printer you are using as well as the
platform being used. Settings differ per platform (Windows,
Macintosh, Solaris). Refer to the “Job ticket features by printer”
guide to determine which features are supported by your printer.
The following sections describe the job parameters that are
displayed on the Job Ticket dialog box.
When making specifications in the job ticket dialog boxes, you
may use the <Tab> key or the mouse to move between text
boxes.
Specifying the number of copies
To select the number of copies of your document, perform the
following:
1. Select the [Copies] text box.
2. Enter the number of copies that you want to print.
Specifying the page range
To specify a range of pages that will be printed, follow these
steps:
1. In the [From] text box, enter the number of the first page that
you want to print.
2. In the [To] text box, enter the number of the last page that you
want to print. This number must be larger than the number
that you entered in the [From] text box.
To print all the pages of your document, select [All].
Selecting the job type
If your selected printer supports this feature, two options may be
displayed in the [Job Type] field. Select one of the following:
•[Standard]: Prints the job images sequentially on single
sheets of paper.
•[Signature]: Prints two images, side by side, on a single
sheet of paper. [Signature] is useful for booklet or tabloid
jobs. Make sure that, when you create your document for a
signature job, the page images are half the size of the paper
stock that you plan to use.

Job ticket options Guide to Printing Using Xerox Production Print Services
9-6
Specifying the job disposition (printing or saving)
The Disposition menu enables you to print, save, or print and
save your job, depending on your printer capabilities. To specify
the job disposition (sometimes called “destination”) follow these
steps:
1. Select one of the following options from the Disposition
menu:
•[Print]: Prints the job file and does not save it. This is the
default setting.
•[Save on Server]: Saves the print file, including the
current job ticket, on the print server but does not print the
job.
•[Print and Save on Server]: Prints the job file and saves
the file, including the job ticket.
Note that different printers save the print job in different ways.
Refer to the “Job ticket features guide” and your printer
documentation for more information on how each printer
saves the job.
2. If you selected [Save on Server] or [Print and Save on
Server], a dialog box opens, requesting a save location for
your job. Enter the path to the directory in which you want to
save your job, then select [OK].
NOTE: The above procedure may include additional steps if
you are using a DocuColor printer.
The file is not created until after it has been processed by the
print server or controller. If the print job is placed in a hold queue,
the print job is not processed and the file is not created until the
job is released to the printer.
Specifying job setup parameters
The Job Setup dialog box enables you to set job parameters
such as image editing, finishing, collation, and image shift. To
specify the Job Setup parameters, follow these steps:
1. In the Job Ticket dialog box, select the [Job Setup] icon.
2. In the Job Setup dialog box, make your desired specifications
in the available fields.
3. When the job setup programming is complete, select [OK] to
save the parameters that you specified and return to the Job
Ticket dialog box.

Guide to Printing Using Xerox Production Print Services Job ticket options
9-7
The following sections describe the options that may be
available on the Job Ticket dialog box, depending on your
printer.
Selecting the document type
The “document type” is the page description language (PDL)
format for the document. To specify the document type, do the
following:
1. From the Document Type pop-up menu, select one of the
following available PDL options: [PostScript], [PDF], [ASCII
Text], [TIFF], or [PCL].
2. If you select [ASCII Text], the dialog box displays additional
options that you must specify.
a. Select the font from the ASCII Font menu.
b. Enter the point size of the selected font in the [ASCII Font
Size] text box.
c. Select the font orientation from the ASCII Orientation
menu.
3. Select [Options...] to make additional selections for ASCII
and OPI selections.
Specifying the sides imaged
The Sides Imaged pop-up menu lets you specify whether the
document is printed on one or both sides of the paper. The
following options are available:
•[Printer Default]
•[1-Sided]: Prints the document on one side of each sheet.
•[2-Sided]: Prints the document on both sides of each sheet.
•[Head-To-Toe]: Prints the document in calendar format.
Both sides of the page are printed, but the images on the
front and back of each page are oriented in the opposite
direction. Head-to-toe is also known as “tumble printing.”
Selecting a finishing option
Select a finishing option in the finishing dialog box. The Finishing
option allows you to select a finishing option for the printed
document. The finishing options that are available depend on the
selected printer. Refer to the “Job ticket features guide” for
information on the finishing options that each printer supports.

Job ticket options Guide to Printing Using Xerox Production Print Services
9-8
Custom finishing is available for some of the Xerox printers. For
availability, refer to the guide titled, Job ticket features guide.” If
your connected printer supports a printer capability file, a pop up
button is available. When selected, the available custom
finishing devices will display.
NOTE: When you are using a Macintosh system, turn on the
Help Balloons option by selecting Help for additional descriptive
help when selecting finishing features.
Specifying collation
The Collation option determines the sequence in which the
finished prints are stacked in the output tray.
•[Printer Default]
•[Collated]: Prints the pages of a document in numerical
sequence.
•[Uncollated]: Prints the requested number of copies of the
first specified page of a document before printing the next
page.
Specifying the image rotation
From the Rotation pop-up menu, select [90], [180], or [270]
degrees if you want to rotate the page image on the printed
sheet.
Specifying an image shift
The options in the [Image Shift] field allow you to offset the
printed image from the vertical or horizontal edges of the sheet.
Shifting the image is particularly useful for finished jobs that
require drilled stock and for preprinted forms.
To shift the printed image for your job, follow these steps:
1. Select the image shift options button to display the Image
Shift dialog box.
2. On the Image Shift dialog box, use the arrow buttons to enter
the amount of shift in the desired direction for side 1 and side
2 as required.
NOTE: When the Image Shift option is set at 0 (zero), the
image is not shifted.
•[Horizontal image shift]: Moves the image horizontally
on the portrait or landscape page. The right arrow shifts
the image towards the right edge of the page and the left
arrow shifts the image towards the left edge of the page.

Guide to Printing Using Xerox Production Print Services Job ticket options
9-9
•[Vertical image shift]: Moves the image vertically on the
portrait or landscape page. The up arrow shifts the image
towards the top of the page and the down arrow shifts the
image towards the bottom of the page.
•[Independent side 2 image shift]: Some printers
support independent side two image shifting. If Sides
Imaged is set to [2-sided] or [Head-To-Toe], the image
shift values for X2 and Y2 may be available.
•[Image shift for head-to-toe printing]: For head-to-toe
printing, side 1 and side 2 image shifts behave as follows:
– For side 1, a positive x value shifts the image to the
right and a positive y value shifts the image up.
– For side 2, a positive x value shifts the image to the left
and a positive y value shifts the image down.
3. From the Options menu, select one of the following image
shift options. These options are available only if [Sides
Imaged] is set to 2-sided or Head-to-toe and the printer
supports independent side 2 image shift.
•[Independent]: Independent vertical or horizontal shift
for the images on both side 1 and side 2.
•[Mirror X]: A horizontal-only shift that moves the images
on both sides in opposite directions. This leaves the
vertical shift independent for both sides.
•[Mirror Y]: A vertical shift that moves the images on both
sides in opposite directions. This leaves the horizontal
shift independent for both sides.
•[Mirror Both]: A horizontal and vertical image shift that
moves the images on both sides in opposite directions
from each other. [Mirror both] is best used for two-sided
jobs.
•[Mirror X, Tandem Y]: A horizontal shift that moves the
images on both sides in opposite directions from each
other, and a vertical shift that moves both of the images in
the same direction.
•[Mirror Y, Tandem X]: A vertical shift that moves the
images on both sides in opposite directions from each
other, and a horizontal shift that moves both the images in
the same direction for both sides.
•[Tandem X]: A horizontal shift that moves the images on
both sides in the same direction. This leaves the vertical
shift independent for both sides.

Job ticket options Guide to Printing Using Xerox Production Print Services
9-10
•[Tandem Y]: A vertical shift that moves the images on
both sides in the same direction. This leaves the
horizontal shift independent for both sides. Tandem is
best used for head-to-toe jobs.
•[Tandem Both]: A horizontal and vertical shift that
moves the images on both side 1 and side 2 in the same
direction.
•[Printer Default]
4. Select [OK] to close the Image Shift dialog box. Your shift
specifications are displayed in the read-only [Image Shift]
field on the Job Setup dialog box.
NOTE: Any image shift that is set in the Image Shift dialog box
may interfere with any offset for binding that is set by the
application in the document file.
Selecting an Output Location
In the Job Setup dialog box, you can select an output location.
Ensure that the stock and finishing type that are selected are
compatible with the output that you select. The available output
selections are:
• Printer Default
• System Specified
•Top Tray
• Stacker
Specifying Halftone
This feature provides the ability to specify the halftone screen to
be used when the job is rendered. Select a halftone that most
closely represents the frequency you desire.
Tone Reproduction Curves (TRC)
This option allows you to select a set of four intensity functions
for cyan, magenta, yellow and black. The TRC pull-down menu
contains a list of transfer functions that were created at the
controller.

Guide to Printing Using Xerox Production Print Services Job ticket options
9-11
Specifying anti-aliasing
The [Anti-aliasing] field allows you to alleviate any aliasing
problem that may occur in an image. Aliasing means inaccurate
rendition of line width and position, and a jagged appearance on
the edges of images. If anti-aliasing is enabled, the system uses
intermediate levels of imaging intensity to improve the accuracy
of line width and reduce the jagged effect.
To enable anti-aliasing, select [On] from the Anti-aliasing pop-up
menu.
Entering Job Notes
The [Job Notes...] icon opens the Job Notes window, which
enables you to enter information about the print job. This
information is available to the printer operator and prints on the
banner sheet with the job. Only the [Job name] and [From] fields
require entries.
The fields that are available on the Job Notes dialog box vary,
depending on your printer type.
•[Job Name]: Enter the name of the document that you want
to print.
If you want to place a document file name automatically in the
[Job Name] field whenever you open this dialog box, follow
these steps:
1. Select a file that you want to print. Refer to “Selecting a
file for printing,” earlier in this chapter, for the procedure.
2. In the Job Ticket dialog box, select [Options...].
3. In the User Preferences dialog box, select the [Use the
Document Name as the Default Job Name] check box.
4. Select [Save].
•[From]: Indicates the name of the document sender. Your
network login name appears in this text box as the default. If
desired, enter a different name.
•[Deliver To]: Indicates the intended recipient of the
document. Your network login name appears in this text box
as the default. If desired, you may enter a different name.
•[Account]: Enter the name of the account that will be billed
for the current job.

Job ticket options Guide to Printing Using Xerox Production Print Services
9-12
DocuTech 135 and DocuTech/DocuPrint 90 restrictions: On
these systems, the [Account:] field must contain a minimum
of three characters. You may use only the following
characters in the [Account] field:
– Uppercase letters A through Z
– Numerals 0 through 9
– The following punctuation marks:
• Pound or number sign (#)
• Plus sign (+)
• Hyphen (-)
• Slash (/)
• Asterisk (*)
•Period (.)
• The space character
NOTE: The first character in the account field may not be
a space character.
•[Telephone]: Indicates your telephone number. If desired,
enter a different number of up to 19 characters.
•[Banner message]: In this field, you may enter a message
that will be printed on the banner page of the job.
•[Special instructions]: In this field, you may enter a job
instruction that is forwarded to the operator at the start of the
job.
Specifying stocks for the job
The Paper Stock dialog box enables you to define or select
stocks on which you will print your job. You can use this dialog
box in the following ways:
• Select one or more programmed stocks for your job from the
stock ID menu.
• Specify the properties of a stock that will be the main stock
for this job only.
• Program and save stocks for use with the current job and
subsequent jobs.
• Modify the properties of a previously defined stock.
You can program up to 20 different stocks for a job.

Guide to Printing Using Xerox Production Print Services Job ticket options
9-13
Stock categories
The XDS software organizes the stocks that it detects in job
tickets into the following categories:
NOTE: This section is specifically for Macintosh users.
•Printer stocks: Stocks that are loaded on the printer.
Properties for printer stocks are entered at the printer
controller user interface screen. You cannot change the
properties of these stocks from your client dialog boxes, nor
can you delete them from the ID menu.
Printer stocks are listed in the Printer Capabilities file, which
can be created on systems that run XDS Plus, then copied to
your Macintosh workstation or, created on your Mac OS X
system. Refer to “Creating a Printer Capabilities File,” later in
this chapter.
•User stocks: Stocks that a user defines and adds to the
stock list. The properties of these stocks can be edited, and
new user stocks can be added or deleted at any time.
User stocks are saved in the User Preferences file. If no user
stocks have been saved, a default list of 10 user stocks is
displayed in the Paper Stock dialog box.
Overview of the stock selection procedure
To select a stock for the job, follow these steps:
1. Select the [Paper Stocks...] icon in the Job Ticket dialog box
to open the Paper Stock dialog box.
2. From the Stock pop-up menu, select the stock number (within
the context of the current job) for which you want to specify a
stock. Stock 1 is the main stock that is used for the job.
NOTE: When you first select the stock number that you want
to program, the properties of the stock that was previously
defined for that number appear in the properties fields. You
can change these fields as desired.
3. Select the ID of a stock that has been defined, or specify the
properties for a new stock that will be identified with the stock
number that you selected in step 2. A check mark appears in
front of the selected stock ID on the pop-up menu.
Refer to “Selecting a stock ID” and “Specifying stock
properties,” later in this chapter.
4. If desired, repeat steps 2 and 3 to program additional stocks
for other stock numbers that will be used for the job.

Job ticket options Guide to Printing Using Xerox Production Print Services
9-14
For example, if you plan to use five different stocks for this
job (possibly for the main stock plus covers, exception pages,
and blank page inserts), you will need to perform the
specification procedure five times, for stocks 1 through 5 for
your current job.
5. When finished specifying stocks, select [OK] to save your
stock selections and to exit the Paper Stock dialog box.
Selecting a stock ID
The ID pop-up menu is your list of stocks that are available to
select for a job. The stock ID is a number that is assigned to
each stock by the system when the stock is read from the user
stock library or detected by the system as a printer stock. The
IDs of the stocks have the format qualifier Stock n, where
qualifier is “User” or “Printer,” and “n” is the identifier number. An
example would be “User Stock 1.”
NOTE: Printer stocks are defined in the Printer Capabilities file.
If no Printer Capabilities file has been selected, no printer stocks
appear on the ID menu. Refer to “Creating a Printer Capabilities
file,” later in this chapter, for further information.
To select an ID for the stock whose number is displayed on the
Stock menu, follow these steps:
1. In the Paper Stocks dialog box, select a number for the stock
from the Stock menu in the Paper Stock dialog box.
2. From the ID pop-up menu, select a stock ID number. The
fields on the Paper Stock dialog box display the properties of
the selected stock ID.
3. If you want to select additional defined stocks, select another
number from the Stock menu, then repeat step 2.
4. When finished selecting stock IDs, select [OK] to close the
Paper Stocks dialog box.
Modifying an existing stock
You can edit the properties of a stock that is on the ID list and
either save it as a user stock or use it for the current job ticket.
Follow these steps to modify a stock:
1. From the ID pop-up menu in the Paper Stock dialog box,
select the ID number of the stock that you want to modify.
The properties of the selected stock are displayed in the
property fields in the Paper Stock dialog box.

Guide to Printing Using Xerox Production Print Services Job ticket options
9-15
2. Make changes to the specifications in the property fields as
desired. Refer to “Specifying stock properties,” later in this
chapter, for an explanation of these fields.
3. When finished making changes, select one of the following
buttons at the bottom of the dialog box to save the
modifications:
•[Save As User Stock]: Saves the modified stock as a
new one. The system assigns it a new, unique ID number.
•[Modify User Stock]: Saves your changes to the user
stock that you modified and retains its original ID number.
The [Modify User Stock] button is grayed out and unavailable
unless a user stock ID has been selected from the ID menu.
Deleting a stock
To delete a user stock from the stock ID list, follow these steps:
1. On the Paper Stock dialog box, select a user stock ID from
the ID pop-up menu.
2. Select [Delete User Stock]. The selected ID is removed from
the ID menu.
The [Delete User Stock] button is grayed out and unavailable
unless a user stock ID has been selected from the ID menu.
Specifying stock properties
You can use the Paper Stock dialog box to define and save the
descriptions of stocks that you can use for future jobs, or to
modify the properties of an existing stock. You can also specify
properties for a transient stock that you will use only for the
current job and will not save. Transient stocks are defined during
the programming of the job.
NOTE: You can select any value for any stock attribute, even if
the value or attribute is displayed as not being valid for the
current printer.
Specifying the stock size
Follow these steps to specify the size of the stock:
1. From the Size pop-up menu, select a standard stock size or
[Custom].
2. If you selected [Custom], enter the width and length of the
stock in the appropriate text boxes.

Job ticket options Guide to Printing Using Xerox Production Print Services
9-16
3. If necessary, select the radio button for the desired unit of
measure for your stock size. Your options are [in.] (inches) or
[mm] (millimeters).
Specifying the stock color
Follow these steps to select the color of the stock:
1. From the Color pop-up menu, select a stock color or
[Custom].
2. If you select [Custom], a Custom Selection dialog box opens.
Enter the name of the custom color, up to 30 characters, and
select [OK] to close the Custom Selection dialog box.
NOTE: If you are using a DocuPrint NPS printer, you may
enter a name of up to 27 characters. Do not use spaces when
entering the color name.
Specifying the stock type
Follow these steps to select the type of stock that you are
defining:
1. From the Type pop-up menu, select the stock type.
Depending on your printer, the following options may be
available:
•[Standard]: Opaque paper
•[Transparency]: Clear, plastic sheets (8.5 to 9 inches /
213 to 225 mm wide). This option usually may be selected
with any stock color; however, on some systems, you may
have to select [Clear] for the stock color.
•[Precut Tab]: Paper stock on which tabs are cut in
incrementally spaced positions along the length of the
sheet, with one tab per sheet.
If you select this option, a Custom Selection dialog box
opens. Enter the desired number of tab positions, from 1
to 100, then select [OK] to close the Custom Selection
dialog box.
NOTE: An error will occur if 2-sided printing is programmed
for pre-cut tabs or drilled pre-cut tabs. Printing on these
stocks must only be 1-sided.
•[Fullcut Tab]: Stock on which tabs span the length of
one edge of the sheet.
•[Preprinted]: Stock on which a form, logo, etc., has been
printed previously.

Guide to Printing Using Xerox Production Print Services Job ticket options
9-17
•[Custom]: A stock type that is not on the Type menu.
The stock type name may have up to 30 characters. Do
not use spaces when entering the custom stock type
name.
If you select this option, a Custom Selection dialog box
opens. Enter a name for your custom stock type, then
select [OK] to close the Custom Selection dialog box.
To specify an ordered stock: If your custom stock type
is an ordered stock, select the [Ordered] check box to
display the [Order Count] field. Enter an order count of 1
to 100.
Specifying a stock name
In the [Name] text box, enter a name for your stock. The name
may have up to 255 characters.
Specifying the stock weight
In the [Weight] field, enter the stock weight in grams per square
meter (g/m2).
Specifying drilled paper
To indicate whether the stock for your print job has drilled holes,
select [Drilled] or [Not Drilled] from the pop-up menu in the
[Drilled] field.
Specifying coating/finishing
In the [Sides Coated] field, you can indicate which side coating is
on. You can select One Side, or Two Sides.
In the Coating Type section, select the type of coating that is on
that side of the stock.
In the finishing field, select what surface the coating is applied to.
Select Smooth, Regular, or Rough.
Specifying covers
The Covers dialog box enables you to specify covers and to
select different paper stock and printing options for a front cover,
a back cover, or both for the job.

Job ticket options Guide to Printing Using Xerox Production Print Services
9-18
Specifying front cover or back cover only
You can add just a front cover or a back cover to the print job.
Follow these steps to add one cover and to select the printing
options:
1. Select the [Covers...] icon on the Job Ticket dialog box. The
Covers dialog box opens.
2. Select [Front Only] or [Back Only] from the Covers pop-up
menu. The [Stock] and [Printing on] fields are displayed.
3. From the Stock pop-up menu, select the stock number for the
cover. The properties for the stock that was previously
specified for that number are displayed in the [Stock] field.
4. If you want to select a different stock ID or specify different
properties for the stock number, select the [Stocks...] icon to
open the Paper Stocks dialog box.
a. On the Paper Stocks dialog box, select the same stock
number from the Stocks menu that you selected on the
Covers dialog box.
b. Program the stock for the cover. Refer to “Specifying
stocks for the job” and “Specifying stock properties,”
earlier in this chapter, for further information.
c. Select [OK] to close the Paper Stocks dialog box and
return to the Covers dialog box.
5. Select the sides of the cover that will be printed. The
available options are [None], [Side 1], [Side 2], and [Both
Sides].
6. Select [OK] to save the covers programming and return to the
Job Ticket dialog box. The type of covers that you specified is
displayed below the [Covers] icon on the Job Ticket dialog
box.
If you want to remove the covers programming, select
[Cancel].
Specifying both front and back covers
You can add both a front and a back cover to the print job. Follow
these steps to add both covers and to select their printing
options:
1. Select the [Covers...] icon on the Job Ticket dialog box. The
Covers dialog box opens.

Guide to Printing Using Xerox Production Print Services Job ticket options
9-19
2. In the Covers dialog box, select either [Front and Back Same]
or [Front and Back Different] to add both a front and a back
cover to the job. Depending on your selection, either the
[Front Cover] and [Back Cover] fields or the [Both Covers]
field are displayed.
• Select [Front and Back Same] if the paper stock and the
sides printed will be the same for both the front and back
covers.
• Select [Front and Back Different] when the paper stock or
sides printed will be different for the front cover and the
back cover.
3. From the pop-up menu in the [Front Cover], [Back Cover], or
[Both Covers] field, select a stock number for the for one of
the covers, (or for both front and back covers if they will be
the same stock). The properties for the stock that was
previously specified for that number are displayed in the
[Stock] field.
4. If you want to select a different stock ID or specify different
properties for the stock number, select the [Stocks...] icon to
open the Paper Stocks dialog box.
a. On the Paper Stocks dialog box, select the same stock
number from the Stocks menu that you selected on the
Covers dialog box.
b. Program the stock for the cover. Refer to “Specifying
stocks for the job” and “Specifying stock properties,”
earlier in this chapter, for further information.
c. Select [OK] to close the Paper Stocks dialog box and
return to the Covers dialog box. Your new stock
specifications are displayed in the [Paper Stocks] field on
the Covers dialog box.
5. Select the sides of the cover that will be printed. The
available options are [None], [Side 1], [Side 2], and [Both
Sides].
6. If you selected [Front and Back Different], repeat steps 3
through 5 to program the remaining cover.
7. Select [OK] to save the covers programming and return to the
Job Ticket dialog box. The number of covers that you
specified (2, in this case) is displayed below the [Covers] icon
on the Job Ticket dialog box.
If you want to remove the covers programming, select
[Cancel].

Job ticket options Guide to Printing Using Xerox Production Print Services
9-20
Specifying exception pages
The Exception Pages dialog box enables you to select different
paper stocks for any specified pages or page ranges in the print
job.
Adding an exception page
You can add up to 250 exception page ranges. Follow these
steps to add exception pages:
1. In the Job Ticket dialog box, select the [Exception Pages...]
icon. The Exception Pages dialog box opens.
2. In page range (From and To) field, enter the range of pages
that will be programmed differently.
a. In the [From] text box, enter the number of the first page in
the range of pages that you want to specify.
b. In the [To] text box, enter the number of the last page in
the range of pages that you want to specify.
If the range is only one page, enter the same number in both
fields.
3. Specify the other properties of the exception pages from the
available options, as appropriate.
•[Stock]: Specify the stock for the exception pages.
a. Select a stock number from the Stock menu on the
Exception Pages dialog box. The properties for the
stock are displayed in the [Stock] field.
b. If you want to select a different stock ID or specify
different properties for the stock number, select the
[Stocks...] icon to open the Paper Stock dialog box.
c. On the Paper Stock dialog box, select the same stock
number from the Stocks menu that you selected on
the Exception Pages dialog box.
d. Program the stock for the exception page range. Refer
to “Specifying stocks for the job” and “Specifying stock
properties,” earlier in this chapter, for further
information.
e. Select [OK] to close the Paper Stock dialog box and
return to the Exception Pages dialog box. Your new
stock specifications are displayed in the [Stocks] field
on the Exception Pages dialog box.

Guide to Printing Using Xerox Production Print Services Job ticket options
9-21
•[Sides Imaged]: Select 1-sided, 2-sided, or head-to-toe
printing from the pop-up menu in this field. You can also
select [Use Job Setting].
•[Rotation]: Select Printer Default, None, or 180 to rotate
an image.
•[Image Shift]: If you want to shift the page image on the
range of exception pages, follow these steps:
a. In the [Image Shift] field, deselect the [Use Current
Values] check box to enable the [Image Shift] button.
b. Select the [Image Shift] icon to open the Image Shift
dialog box.
c. Enter the desired image shift parameters. Refer to
“Specifying an image shift,” earlier in this chapter, for
an explanation of these parameters.
d. Select [OK] to close the Image Shift dialog box. Your
specifications are displayed in the Image Shift read-
only field on the Exception Pages dialog box.
•[Color]: If the printer supports full color printing and you
want to specify color source and printing parameters for
the exception pages, do the following:
a. In the [Color] field, deselect the [Use Job Setting]
check box.
b. Select the [Color] icon to open the Color dialog box.
c. Make any desired color parameter specifications.
Refer to “Specifying full-color parameters,” later in this
chapter, for an explanation of the color fields.
d. Select [OK] to close the Color dialog box.
•[Anti-aliasing]: To reduce the appearance of jagged lines
and edges in exception page images, select [On] from the
Anti-aliasing pop-up menu.
•[Halftone]: This feature provides the ability to specify the
halftone screen to be used when the job is rendered.
Select a halftone that most closely represents the
frequency you desire.
•[Tone Reproduction Curves]: This option allows you to
select a set of four intensity functions for cyan, magenta,
yellow, and black. The TRC pull-down menu contains a
list of transfer functions that were created at the controller.

Job ticket options Guide to Printing Using Xerox Production Print Services
9-22
4. On the Exception Pages dialog box, select [Add]. The
exception page range is added to the [Defined Ranges] list
box.
5. Repeat steps 2 through 4 to program additional exception
pages if desired.
6. Select [OK] to save the exception pages and return to the Job
Ticket dialog box.
If you want to remove the changes you have made, select
[Cancel].
Viewing or changing an exception page
Follow these steps to view or to change an exception page or
range of exception pages:
1. On the Job Ticket dialog box, select the [Exception Pages...]
icon to open the Exception Pages dialog box.
2. In the [Defined Ranges] list box, select the exception page
range that you want to view or change. Double-clicking the
range in this list box displays the range settings in the dialog
box fields.
3. Make any necessary changes and select [Change].
4. Select [OK] to save your changes and return to the Job Ticket
dialog box.
If you want to remove the changes you made, select
[Cancel].
Deleting an exception page
Follow these steps to delete an existing exception page or range
of pages:
1. On the Job Ticket dialog box, select [Exception Pages...] to
open the Exception Pages dialog box.
2. In the [Defined Ranges] list box, select the range you want to
delete. Use the <Apple> or <Command> key to select
nonadjacent ranges.
3. Select [Delete]. The selected ranges are removed from the
Defined Ranges list box.
4. Select [OK] to enter your changes and return to the Job
Ticket dialog box.
If you want to remove your changes, select [Cancel].

Guide to Printing Using Xerox Production Print Services Job ticket options
9-23
Specifying full-color parameters
The [Color...] icon opens a Color dialog box, which allows you to
specify job submission attributes for optimal color print quality.
Select to print the job in Grayscale or Printer Default.
Settings in the Color fields
The Color dialog box contains several Color fields in which you
can make a variety of changes to the way colored areas in the
job are printed. You can make the following specifications in the
Color fields:
•[Print Job In]: Selects color or monochrome (grayscale)
printing for your job.
•[Trapping]: Compensates for misregistration occurring at
the printer. When color planes are not registered exactly with
one another, white gaps and regions of shifted hue can
appear at object boundaries. Turn Trapping on by selecting
the checkbox for [On] or [Printer Default]. Select an option for
Fast Scan, either Pixels, or Printer Default. Select an option
for Slow Scan, either Pixels, or Printer Default. Select [Ok]
when complete.
•[Black Overprint]: Prevents the background of a black
object from being removed when being printed over color.
When there is any misregistration, this background removal
causes a band of white to be visible at the edges of the black
objects that are printed directly onto colored areas. Select
[On] to eliminate this white space, or select [Off].
•[Lightness]: A slider lets you select a value that determines
the lightness or darkness of the printed output.
– A value of -100 causes the output to appear black.
– A value of 100 causes the output to appear white.
– A value of 0 (zero) causes no change in the output.
NOTE: The output resulting from these selections may be
affected by the content of the original image.
•[Contrast]: A slider enables you to increase or decrease the
variation between light and dark areas of the output. Higher
contrast values increase the light and dark contrast; lower
values decrease it.
– A contrast value of -100 causes the output to appear a
solid midtone gray.

Job ticket options Guide to Printing Using Xerox Production Print Services
9-24
– A contrast value of 100 causes the output colors to use
either full color or no color for cyan, yellow, magenta, and
black, depending on the content of the original image.
Example: If a color such as a pastel is below a threshold
level, it may print as no color if a contrast value of 100 is
specified.
•[Saturation]: A slider lets you specify the amount of color
that is used to print the output.
– A value of -100 causes the output to appear grayscale.
– A value of 100 prints the output to appear in all bright
colors.
– A value of 0 (zero) causes no change to the output.
NOTE: The output resulting from these selections may be
affected by the content of the original image.
•[Color Cast]: A slider lets you select a color cast that will be
applied to all input colors. You have three color ranges that
you can adjust:
–Cyan – Red: -100 specifies the maximum cyan cast that
is supported by the system, and 100 specifies the
maximum red cast.
–Magenta – Green: -100 specifies the maximum magenta
cast that is supported by the system, and 100 specifies
the maximum green cast.
–Yellow – Blue: -100 specifies the maximum yellow cast
that is supported by the system, and 100 specifies the
maximum blue cast.
Specifying source color profiles
The Color dialog box also contains a [Source Color] button,
which opens the Source Color dialog box. On this dialog box,
you can accurately identify the correct source for color in the
document. Each field contains pop-up menus from which you
can select an Images profile and a Graphics/Text profile for the
following color spaces:
• RGB (red/green/blue)
• CMYK (cyan/magenta/yellow/black)
• Greyscale (monochrome)

Guide to Printing Using Xerox Production Print Services Job ticket options
9-25
The menus contain profiles that are provided by Xerox, plus any
additional profiles that have been added by the system
administrator at the controller.
These color source profiles are defined in the Printer Capabilities
file that was selected in the User Preferences dialog box. If no
Printer Capabilities file has been selected, a default list of RGB
and CMYK source ICC profiles is displayed, and the other
source profile lists are empty. Refer to “Setting user
preferences,” later in this chapter, for information on selecting a
Printer Capabilities file.
To select a source profile, follow these steps:
1. Select [Source Color] on the Color dialog box. The Source
Color Setup dialog box opens.
2. From the Images or Graphics and Text pop-up menu in the
desired Color Space field, select either [Use Job Settings] or
one of the source profiles that have been loaded onto the
printing system at the controller screen.
3. Make additional profile selections as desired from the menus
in the other fields on the Source Color Setup dialog box.
4. Select [OK] to save your changes and to return to the Color
dialog box.
If you want to return to the Color dialog box without saving
any changes, select [Cancel].
Specifying output color parameters
The [Output Color] button on the Color dialog box opens the
Output Color Setup dialog box, on which you can make
advanced level specifications that will modify colors in the
printed output. The following fields are available:
•[Profile] field: In this field, you can select one of two types
of profiles: Destination and Emulation.
•[Select] field: Lets you specify an International Color
Consortium (ICC) color profile for the front, back, or both
sides of the printed page. This profile is used by the
decomposer when it converts color data to the appropriate
color space for your printer.
•[Rendering] field: Lets you specify a rendering intent (a
predesigned method for adjusting colors during the printing
process) for graphics, image objects, and text objects.

Job ticket options Guide to Printing Using Xerox Production Print Services
9-26
–[Same Rendering for All] check box: Causes the
rendering intent that you select from the Images menu to
be used for text and graphics as well. (The Graphics and
Text menus are disabled when you select this check box.)
–Images, Text, and Graphic menus: These three pop-up
menus enable you to select a rendering effect for Images,
Text, and Graphics. For each of these three items, the
following selections are available:
•[Printer Default]
•[Saturation]: Adjusts the print colors to preserve the
amount of color saturation.
•[Relative Colorimetric]: Adjusts the print colors to
account for the viewing illuminant and for the level of
whiteness of the stock.
•[Absolute Colorimetric]: Adjusts the print colors to
account for the viewing illuminant only (not the media
whiteness). This selection provides exact output color
matches from one printer to another.
•[Perceptual]: Also called “photographic rendering.”
Adjusts the print colors to make full use of the range of
colors that the printer supports while preserving the
color relationships. This rendering produces the most
realistic appearance.
•[Pure]: Same as Saturation rendering intent, but with
a bias against halftoning colored text.
•[Automatic]: Selects the printer defaults for all
rendering parameters. Selecting [Automatic] allows
the system to select all rendering options; therefore,
the rendering fields become inaccessible from the
dialog box.
The Destination ICC profiles are defined in the Printer
Capabilities file that was selected in the User Preferences dialog
box. If no Printer Capabilities file has been selected, the
Destination profile list is empty. Refer to “Setting user
preferences,” later in this chapter, for information on selecting a
Printer Capabilities file.
Follow these steps to specify output color parameters:
1. On the Color dialog box, select [Output Color]. The Output
Color Setup dialog box opens.
2. On the Output Color Setup dialog box, make your desired
selections in the [Profile] and [Rendering] fields.

Guide to Printing Using Xerox Production Print Services Job ticket options
9-27
3. Select [OK] to save your changes and to return to the Color
dialog box.
If you want to return to the Color dialog box without saving
any changes, select [Cancel].
Setting highlight color parameters
On printers that support highlight color, the Highlight Color Setup
dialog box enables you to specify the highlight color, the
mismatch action that will be taken by the system if the preferred
color is not installed at the printer, the extraction color, and the
rendering algorithm for printing the colors specified in the job.
Specifying the highlight color
To specify the highlight color that will be used to print a job,
select the desired color from the Highlight Color pop-up menu.
If the job contains specifications for full color, the system
provides a conversion of full color documents to highlight color
by mapping each color to a shade or a tint of the selected
highlight color.
Specifying the mismatch action
From the Mismatch action pop-up menu, select the action that
the printer will take if the preferred highlight color is not installed
in the printer.
The options are:
•[Printer Default]
•[Use Loaded Color]: The document is printed using the
color that is installed in the printer. This selection is
appropriate when the actual highlight color is not important.
•[Hold Job]: The document is held at the printer until the
specified color is installed.
•[Cancel Job]: The document is not printed and the print job
is cancelled if the specified color is not installed in the printer.
Specifying the extraction color
When a highlight color printing system receives a color job, it
prints it in whatever color of ink is loaded in the printer, using
solid color and a variety of shades (color plus black) and tints
(color plus white).

Job ticket options Guide to Printing Using Xerox Production Print Services
9-28
Extraction color determines how the existing color of text,
shading, or graphics contained in a job will print on your printer,
and which color will print in the solid highlight ink color. All colors
other than the highlight (printer ink) color print in a shade or tint
of the color that is loaded in the printer.
To specify the color in the document that is printed in the solid
highlight color, select the desired color from the Extraction color
pop-up menu.
All other colors in the document, including composite colors
using the extraction color, are printed as shades or tints of the
printer color.
Selecting the rendering algorithm
The rendering algorithm allows you to select which qualities of a
three-dimensional color application are the most important when
printing in highlight color.
The choices are:
•[Printer Default]
•[Pictorial]: Maintains the pictorial quality of the images as
follows:
– Colors with a hue that matches the map color are printed
unchanged.
– Colors with a hue close to the map color are printed at a
lower saturation level.
– Colors with a hue that is complimentary to the map color
are printed as shades of gray
•[Presentation]: Distinguishes between different colors.
[Presentation] is a good choice for charts and diagrams that
use distinctly different colors. Pictorial material may not print
as desired.
•[Color Tables]: Uses preset color tables to map the colors.
The color tables apply to red, green, and blue inks only.
•[Automatic]: The pictorial algorithm is used for embedded
graphics and the presentation algorithm for text, lines, and fill
areas. This option is the default.
•[Color To Highlight]: Discards the hue information and
preserves the saturation and value of the color application.
Fully saturated input colors are printed as solid highlight
color. This choice is useful for documents that use highlight
color for emphasis.

Guide to Printing Using Xerox Production Print Services Job ticket options
9-29
Specifying page inserts
The [Inserts...] icon opens the Page Inserts dialog box on which
you specify blank pages that will be inserted into the current
document. You may specify the page number that the blank
pages will follow, the number of blank pages to insert, and the
stock that will be used for the blank pages. Multiple sets of blank
pages can be inserted in the print job.
Adding an insert
Follow these steps to add a blank insert page to the job:
1. On the Job Ticket dialog box, select the [Inserts...] icon to
display the Page Inserts dialog box.
2. In the [After Page] field, enter the page number after which
the insert will be placed. Enter a 0 (zero) to insert a page
before the first page in the job.
3. Use the [Insert Position] box if you want to enter two or more
different sets of page inserts immediately following the given
page. For example, to specify three inserts of blue paper
followed by three inserts of green paper, the blue paper is
Insert Position 1 and the green paper is Insert Position 2.
4. In the [Quantity] field, enter the number of blank pages that
will be inserted.
5. Specify a stock for the blank page inserts.
a. From the Paper Stock pop-up menu, select the number of
the stock that will be used for the blank pages. The
properties for the stock are displayed in the [Paper Stock]
field.
The number of available stocks may vary, depending on
the type of printer.
b. If you want to select a different stock ID or specify
different properties for the stock number, select the
[Stocks] icon to open the Paper Stock dialog box.
c. On the Paper Stock dialog box, select the same stock
number from the Paper Stock menu that you selected on
the Insert Pages dialog box.
d. Program the stock for the insert. Refer to “Specifying
stocks for the job” and “Specifying stock properties,”
earlier in this chapter, for further information.

Job ticket options Guide to Printing Using Xerox Production Print Services
9-30
e. Select [OK] to close the Paper Stock dialog box and
return to the Inserts dialog box. Your new stock
specifications are displayed in the [Paper Stock] field on
the Inserts dialog box.
6. Select [Add]. The order number, page number, quantity, and
stock number of the new blank page insert range appears in
the [Inserts] list box.
7. Select [OK] to save the blank page insert information and
return to the Job Ticket dialog box.
If you want to remove the changes that you made, select
[Cancel].
NOTE: DocuSP allows multiple page inserts, as well as the
ability to insert a page after page 0 (before page 1). However, the
DocuTech 135 does not allow these functions.
Changing an insert
Follow these steps to change a blank insert:
1. On the Job Ticket dialog box, select the [Inserts...] icon to
display the Page Inserts dialog box.
2. In the list box, double-click to select the insert that you want
to change. The insert properties are displayed in the fields on
the Inserts dialog box.
3. Make any desired changes to the insert, then select
[Change].
4. Select [OK] to save the blank page inserts and return to the
Job Ticket dialog box.
If you want to remove the changes that you made, select
[Cancel].
Deleting an insert
Follow these steps to delete a blank insert:
1. On the Job Ticket dialog box, select the [Inserts...] icon to
display the Page Inserts dialog box.
2. From the list box, select the insert you want to delete.
3. Select [Delete].
4. Select [OK]. The amount of page inserts that have been
specified is displayed below the [Inserts...] icon on the Job
Ticket dialog box.

Guide to Printing Using Xerox Production Print Services Job ticket options
9-31
If you want to remove the changes that you made, select
[Cancel].
Specifying chapter starts
Use the [Chapter Start] option to identify a page as the first page
of a chapter or section of the job. The chapter start page always
prints on the first side of a two-sided page.
If the image that is selected is the back side of a two-sided page,
the system inserts a blank image for the back side of the sheet,
and moves the chapter start image to the first side of the next
page. Any remaining page images are reordered. Any inserts
that follow the chapter start page in the job are not reordered.
Follow these steps to specify a chapter start.
1. On the Job Ticket dialog box, select the [Chapter Starts...]
icon to open the Chapter Starts dialog box.
2. In the [Starting Page] text box, enter a page number on which
the chapter will start.
3. Select [Add]. The chapter starting page is displayed in the
[Page] field.
4. Repeat steps 2 and 3 to specify additional chapter starting
pages, as needed.
5. When finished, select [OK] to close the Chapter Starts dialog
box. The number of chapter starts that have been defined is
displayed below the [Chapter Starts...] icon on the Job Ticket
dialog box.
Changing a chapter start page
Follow these steps to change a specified chapter start page
number:
1. On the Job Ticket dialog box, select the [Chapter Starts...]
icon.
2. In the [Page] list box, select the page number that you want
to change.
3. In the [Starting Page] text box, enter the new page number.
4. Select [Change]. The selected chapter start page number is
replaced in the [Page] list box by the new number.
5. Select [OK] to confirm your specification and to close the
Chapter Starts dialog box.

Job ticket options Guide to Printing Using Xerox Production Print Services
9-32
Deleting a chapter start page
Follow these steps to delete a chapter start page.
1. On the Job Ticket dialog box, select the [Chapter Starts...]
icon.
2. In the [Page] list box, select the page number that you want
to delete.
3. Select [Delete]. The selected chapter start page number is
removed from the [Page] list box.
4. Select [OK] to confirm the deletion and to close the Chapter
Starts dialog box.
Printing a document
This section describes the procedures that are part of printing a
document that you set up and submitted. For an overview of all
the entire process of setting up, submitting, and printing a job,
refer to “Overview of the printing process earlier in this
document.
Selecting a print queue
The [Printer Connections] field displays a list of the print queues
that you have set up. You may also create a customized list of
the printer queues that you use most often.
To select a queue:
1. Access the XDS software.
2. From the Printer connections list, select the print queue you
want to use. The print queue that you select is displayed in
the title bar of the XDS window.
NOTE: Several unconnected printer queues always appear in
this list. The unconnected printer options allow you to set up and
save job tickets on your desktop without access to the printer.
Selecting a file to print
To select a file to print, you may use any of the following
methods:
• Use a Directory window to locate and select the file

Guide to Printing Using Xerox Production Print Services Job ticket options
9-33
• Use the Window Explorer to select the file and drag and drop
the file onto the XDS application. The file is sent directly to
the printer.
• Use the command line.
• Select the file from the File menu, which displays the four
most recently opened files.
Directory window
1. Select [Browse] in the [Document] area, or select [Open
Document] from the File menu. A Directory window is
displayed.
2. Select the file that you want to print. Make sure that the
document file is in a PDL format.
3. Select [Open].
The name of the selected document file is displayed in the name
field of the Document area.
Command line
1. From the workstation Start menu, select [Run].
2. Enter XDS <filename> in the Run Window.
The name of the selected document file is displayed in the name
field of the Document area.
Selecting a print server file
If the file that will be printed is a remote file, select the [Print
server file] check box and enter the directory path and file name
in the name field.
Selecting a saved file for reprint
If you want to reprint a saved file, select the [Reprint] check box.
Refer to the “Reprinting,” later in this chapter, for more
information.
Reprinting a saved job
Reprint allows you to print a job that has been saved to a
designated save location.
NOTE: This function does not reprint a job that has already
been printed. Only saved jobs can be “reprinted.” By specifying
Reprint, you are actually printing a saved job for the first time.

Job ticket options Guide to Printing Using Xerox Production Print Services
9-34
Saved jobs may be reprinted in one of the following ways:
• Without changing any of the saved job ticket parameters
• Changing one or more saved job ticket parameters
NOTE: Different network software modifies the reprint job name
to fit various naming conventions. In most cases, in order to
reprint a job from a DOS or Windows client, the Save
Preferences on the DocuSP controller must have the File Server
Type set to [PC]. Refer to your Print Service Operator Guide for
more information.
Reprinting without changing the job ticket parameters
When the job is saved, a job ticket is created and saved also. All
of the parameters that were set in the job ticket when the job was
saved are set in the saved job ticket. When the job ticket is
saved, a .jt extension is added to the end of the file name. If the
[Save Preferences] field is set to [PC File Server Type], the job
decomp.ps is saved as DECOMP.jt.
1. In the [Document] field on the XDS window, enter or browse
to locate and display the name of the document that will be
reprinted. If the save directory is the default save location that
was set at the DocuSP controller, then entering the source
directory path is not necessary. If a source directory that is
different from the default save directory was selected, enter
the directory path to the save location.
NOTE: The source directory and file names are case
sensitive and must be identical to the name of the file that
was submitted to be saved. Note that some network gateway
software changes the case to all lowercase or all uppercase.
2. Select the [Reprint] check box. A message appears,
informing you that the job ticket settings that were saved with
the job will be used.
3. In the message window, select [OK] to proceed with
reprinting.
4. Select [Setup] to open the Setup window.
NOTE: When [Reprint] is selected in the Xerox Document
Submission window, all of the job ticket parameters are set to
either the system defaults or to [Printer Default].
5. Ensure that the number of copies that will be printed matches
the number of copies that were specified for the reprint job,
then select [OK].

Guide to Printing Using Xerox Production Print Services Job ticket options
9-35
6. Select [Print]. The job is sent to the printer for reprinting.
Reprinting with different job ticket parameters
When a job is saved, its job ticket is saved with it. The job may
be reprinted with different job ticket parameters as necessary.
The saved job ticket cannot be changed. The job may be
submitted for reprinting with new parameters, but the new
parameters do not affect the saved ticket.
All of the job ticket parameters may be changed except the PDL
Type, which is set to [Printer default].
1. In the [Document] field on the XDS window, enter or browse
to locate and display the path to the document that will be
reprinted. If the save directory is the default save location that
was set at the DocuSP controller, then entering a source
directory path is not necessary. If a source directory that is
different from the default save directory was selected, enter
the directory path to the save location.
NOTE: The source directory and file names are case
sensitive and must be identical to the name of the file that
was submitted to be saved. Note that some network gateway
software changes the case to all lowercase or all uppercase.
2. Select the [Reprint] check box. A message appears,
informing you that the job ticket settings that were saved with
the job will be used.
3. In the message window, select [OK] to proceed with
reprinting.
4. Select [Setup].
5. Enter the job ticket parameters that you want to change from
the saved ticket parameters. For parameters that you wish to
keep the same as they were set in the saved job ticket, either
leave the parameters blank or set them to [Printer Default].
NOTE: When [Reprint] is selected in the Xerox Document
Submission window, all of the job ticket parameters are set to
either the system defaults or to [Printer Default].
6. Select [OK].
7. Select [Print]. The job is sent to the printer for reprinting.

Job ticket options Guide to Printing Using Xerox Production Print Services
9-36
Checking the status of a job
To check the status of a job that has been sent to a Novell print
queue, use the Novell NetWare PCONSOLE utility. To view the
Novell print queue:
1. At the DOS prompt, enter PCONSOLE.
2. From the Available Options menu, select [Print Queue
Information], and press <Enter>. (You may not have access
to some of the options in PCONSOLE.)
3. Select the required print queue from the list that is displayed,
and press <Enter>. If only one print queue is available, the
print queue list is not displayed.
4. Select [Current Print Job Entries] from the Print Queue
Information menu, and press <Enter>. A list of the currently
active jobs in the queue is displayed.
5. When you are finished, press <Esc> to leave PCONSOLE.
To check the status of the job at a DocuTech printer, enter the
Xerox Client Submission listjob command on the DOS
command line. Refer to Using the Xerox Client Software for
Solaris for information on using the listjob command.
Setting the XDS print options
The User Setup window enables you to customize the way that
you interact with the XDS application for printing. Follow these
steps to set the XDS printing options on the User Setup window.
1. In the XDS window, select [User Setup...] from the Options
menu. The User Setup window is displayed.
2. Select the check box next to the any of the following options
that you want to enable.
•[Print dropped document files]: Enables drag and drop
printing to a running XDS application. Drag and drop
printing uses the current job ticket and the selected or
default print queue.
If drag and drop printing is not selected, the file becomes
the currently selected document file.
•[Restore XDS when a file is dropped]: Enables a
minimized XDS application to be restored to its normal
size when a file is dragged and dropped onto it.

Guide to Printing Using Xerox Production Print Services Job ticket options
9-37
If [Restore XDS when a file is dropped] is not selected,
XDS remains minimized when files are dropped on it.
•[Print command-line document files]: Enables XDS to
print files that are specified on the command line.
If [Print command-line document files] is not selected, the
file becomes the currently selected document file.
NOTE: Command-line arguments may not have more
than 127 characters, including the path information and
any spaces between arguments.
•[Notify the user when a job has completed]: Enables
your PC to receive job status information.
Automatic job status must be enabled for the printer that
you are using so that you receive notification when your
job has been completed. Consult your system
administrator for further information.
NOTE: Job notification does not apply when you are
using TCP/IP.
•[Display the job submission success message]:
Enables your PC to receive a message when a
submission is successful.
3. Select [OK] to save your changes and to return to the XDS
window.
If you want to return to the XDS window without saving any
changes, select [Cancel].
Setting up a printer capabilities file
The printer capabilities file lists all attributes and capabilities of
the printer with which the file is associated. This file may be
stored on your workstation and is accessible to other clients that
may not be able to poll the printer directly regarding its
capabilities.
NOTE: In XDS for Windows, the printer capabilities file is
available only for the DocuColor 2045, 2060 and iGen3.
File contents
The printer capabilities file contains complete information about
the printer, including the following:

Job ticket options Guide to Printing Using Xerox Production Print Services
9-38
• Stocks in the Stock Library (names and records)
• Fonts that have been loaded
• Destination ICC profiles
• CMYK intensity transfer functions (TRC)
• RGB source color profile
• CMYK source color profile
• CMY source color profile
• Gray source color profile
Sources for the printer capabilities file for Windows
You are not able to generate a printer capabilities file using XDS
on your Windows system. Instead, you must create the file in
XDS Plus. You can either load XDS Plus on your PC that is
running Windows and create the file on your own system, or you
can create the printer capabilities file on a different system and
transfer it to your PC.
Systems on which you can load and run XDS Plus include:
• A PC running Windows
• A Sun workstation running Solaris 2.6 or 2.8
• Your DocuSP printer controller running DocuSP 3.X software.
Generating a printer capabilities file on XDS Plus
Follow these steps to generate a printer capabilities file for XDS,
using XDS Plus:
1. Install and open XDS Plus on one of the systems that
supports it. Refer to the Guide to Submitting Jobs Using XDS
Plus for the installation procedure.
2. On the XDS Plus window, select [Administration].
3. If necessary, select the [Status] tab to display the Status
window.
4. In the [Queues] section of the Status window, select a queue
name.
5. From the Options pull-down menu, select [Generate Printer
Capabilities File...].
Guide to Printing Using Xerox Production Print Services Job ticket options
9-39
6. On the Save Printer Capabilities File window, locate and
open the folder in which you want the system to save the
printer capabilities file that it generates. In the [File name] text
field, enter a name for the file. The name must have a .xcp
extension.
7. Select [Save]. The system saves the file in the selected
location, and the Save Printer Capabilities File window
closes.
8. If necessary, transfer the printer capabilities file to your
workstation from the system on which you created the file.
9. Specify the location of the printer capabilities file in the
Preferences window within XDS. Refer to “Setting user
preferences,” earlier in this chapter, for the procedure.
Exiting the XDS software
Follow these steps to exit the XDS software and to return to the
Windows environment:
1. Select [OK] on the Setup window. The XDS window is
displayed.
2. Select [Close] on the XDS window.
Exiting the XDS Plus software
To exit the XDS Plus software and to return to the Windows
environment:
1. From the Files pull-down menu on the XDS Plus window,
select [Exit]. The XDS Plus window closes.
