Xerox Docutech 180 Highlight Color Installation Guide Getting Ready For The Xerox® FreeFlow® Print Server 6.0
Xerox-Docutech-155-Highlight-Color-Installation-Guide-684986 xerox-docutech-155-highlight-color-installation-guide-684986
Xerox-Docutech-128-Highlight-Color-Installation-Guide-685032 xerox-docutech-128-highlight-color-installation-guide-685032
If not then FFPS_Getting_Ready_60_701P46985 Manual: ://.support.xerox.com/pub/docs/DocuPrint_100_100MX/userdocs/any-os/en/FFPS_Getting_Ready_60_701P46985
2015-04-02
: Xerox Xerox-Docutech-180-Highlight-Color-Installation-Guide-684941 xerox-docutech-180-highlight-color-installation-guide-684941 xerox pdf
Open the PDF directly: View PDF ![]() .
.
Page Count: 34

Version 6.0.xx, May 2007
701P46985
Getting ready
for the
Xerox® FreeFlow®
Print Server
Installation
Prepared by:
Xerox Corporation
Global Knowledge and Language Services
800 Philips Road Bldg. 845-17S
Webster, New York 14580
USA
©2007 by Xerox Corporation. All rights reserved.
Copyright protection claimed includes all forms and matters of copyrightable material and information
now allowed by statutory judicial law or hereinafter granted, including without limitation, material generated
from the software programs displayed on the screen such as icons, screen displays, or looks.
Printed in the United States of America.
XEROX® and all Xerox product names mentioned in this publication are trademarks of XEROX CORPORATION.
Other company trademarks are also acknowledged.
Changes are periodically made to this document. Changes, technical inaccuracies, and typographic errors will be
corrected in subsequent editions.
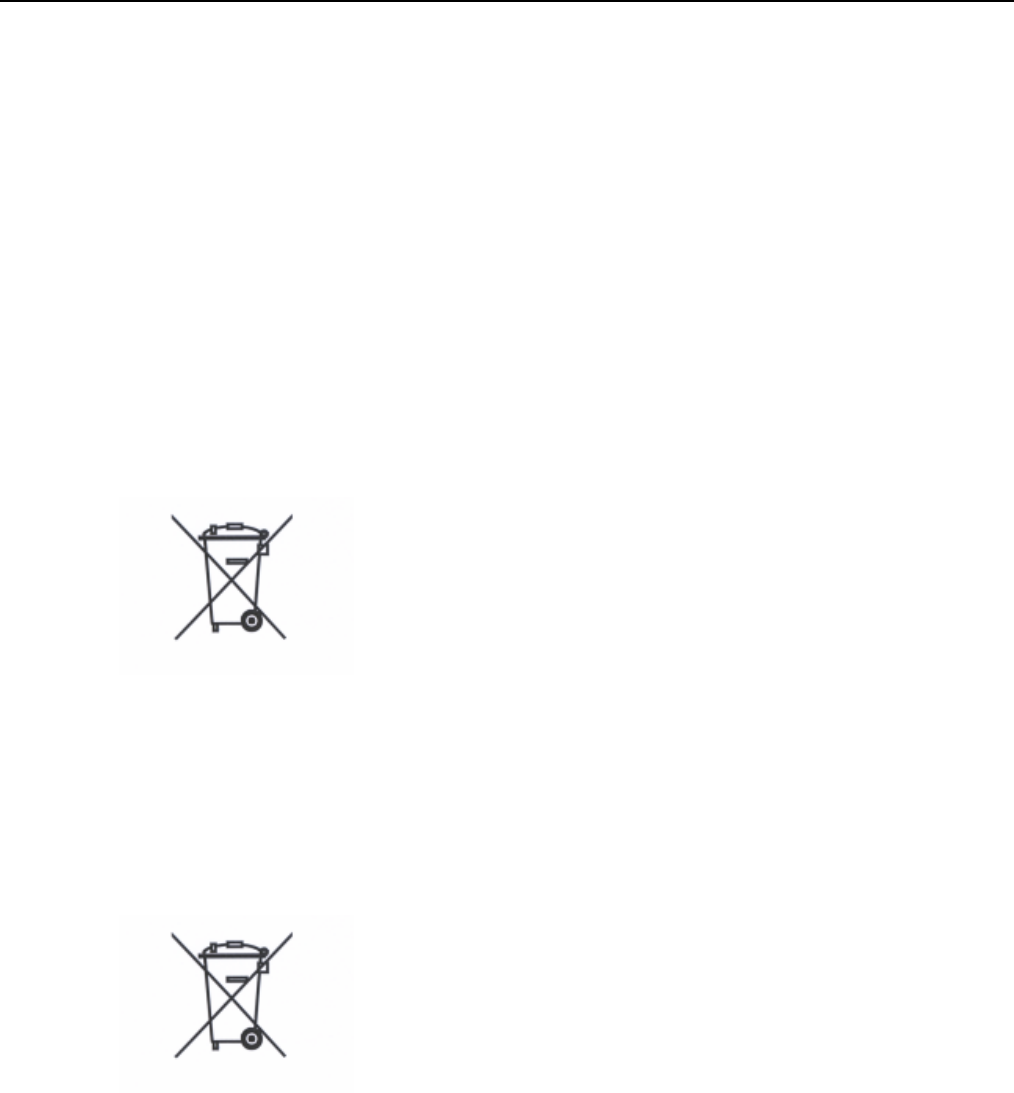
Product Recycling and Disposal
If you are managing the disposal of your Xerox product, please note that the
product contains lead, mercury, and other materials whose disposal may be
regulated due to environmental considerations in certain countries or states. The
presence of lead and mercury is fully consistent with global regulations applicable
at the time that the product was placed on the market.
European Union
Some equipment may be used in both a domestic/household and a
professional/business application.
Domestic/Household Environment
Application of this symbol on your equipment is
confirmation that you should not dispose of the
equipment in the normal household waste stream.
In accordance with European legislation end of life
electrical and electronic equipment subject to disposal
must be segregated from household waste.
Private households within EU Member States may
return used electrical and electronic equipment to
designated collection facilities free of charge. Please
contact your local disposal authority for information.
In some Member States when you purchase new
equipment your local retailer may be required to take
back your old equipment free of charge. Please ask
your retailer for information.
Professional/Business Environment
Application of this symbol on your equipment is
confirmation that you must dispose of this equipment in
compliance with agreed national Procedures.
In accordance with European legislation end of life
electrical and electronic equipment subject to disposal
must be managed within agreed procedures.
Prior to disposal please contact your local dealer or
Xerox representative for end of life take back
information.

Table of contents
Table of contents.................................................................................................................................................... 1
Installation worksheets.......................................................................................................................................... 1
Using the installation worksheets ..................................................................................................... 1
Available worksheets ..................................................................................... 2
About the worksheets .................................................................................... 4
W-1: Solaris operating system worksheet ..................................................... 5
W-2: Xerox Security worksheet ................................................................... 10
W-3: Xerox FreeFlow Print Server software worksheet .............................. 12
W-4: System configuration worksheet ......................................................... 14
W-5: Print Server software and gateways worksheet.................................. 17
W-6: Network configuration worksheet........................................................ 18
W-7: Novell NetWare gateway installation worksheet................................. 21
W-8: AppleTalk Gateway installation worksheet ......................................... 24
W-9: SNMP Gateway installation worksheet ............................................... 26
W-10: Client workstations ............................................................................ 27
W-11: Remote Services ............................................................................... 27
W-12: Data Overwrite and Backup Configuration........................................ 28


XEROX FREEFLOW PRINT SERVER 1
GETTING READY FOR THE PRINT SERVER INSTALLATION
Installation worksheets
The Getting Ready for the Xerox® FreeFlow® Print Server 6.0
Installation guide has been developed for you to use in the
gathering of the technical data required by the Xerox personnel
during installation of your customer’s print server hardware and
software. It is used in conjunction with the appropriate printer
installation planning guide.
Using the installation worksheets
The Xerox printer with FreeFlow Print Server software provides
a wide range of network printing services on industry-standard
networks, and consists of the following:
• A UNIX-based computer workstation with a Xerox interface
PWB and FreeFlow Print Server software installed.
• A supported Xerox printer.
Getting Ready for the Xerox FreeFlow Print Server 6.0
Installation contains the worksheets that must be completed to
support the installation of the Xerox FreeFlow Print Server
software on the server.
When these worksheets are completed they will contain a
record of the state of the system at the time of install. Most
likely, this setup and configuration state will change, so
encourage your customer to keep these worksheets with the
service record of the printer for future reference.
Your customer should not complete the worksheets if they are
not sure of the required information. Always encourage them to
contact the next level of technical support within their
organization for assistance.
NOTE: Worksheet W-5, the Novell NetWare gateway
installation worksheet, refers to on-site setup requirements that
your customer’s network administrator should already have
implemented prior to the FreeFlow Print Server install. The
values for the data elements entered during that setup activity
should be recorded on this worksheet.

FREEFLOW PRINT SERVER 6.0.xx
2 XEROX FREEFLOW PRINT SERVER
GETTING READY FOR THE PRINT SERVER INSTALLATION
Available worksheets
The following is a list of the worksheets that support the
installation of the FreeFlow Print Server software:
• Worksheet W-1: Solaris Operating System software
Complete this worksheet for each print server. This
information is used by the Xerox service representative to
install the Solaris operating system and is a required
worksheet.
• Worksheet W-2: Xerox Security
This information is used by the Xerox service representative
to set the appropriate level of security on the print server.
This worksheet requires an understanding of the level of
access required by the customer’s workflow and
applications, such as the Xerox FreeFlow Prepress Suite.
• Worksheet W-3: Xerox FreeFlow Print Server software
Complete this worksheet for each print server. This
information is used by the Xerox service representative to
install the FreeFlow Print Server software.
• Worksheet W-4: System configuration
This information is used by the Xerox service representative
to connect the print server to the Xerox printer and is a
required worksheet.
• Worksheet W-5: Xerox FreeFlow Print Server software and
gateways
This information is used by the Xerox service representative
to ensure the proper licenses are loaded for the FreeFlow
Print Server software.
• Worksheet W-6: Network Configuration
This information is used by the Xerox service representative
to set up and configure the network configuration of the
FreeFlow Print Server to match the customer’s site.
The customer can also use this information to configure
additional network information or to change the network
configuration at some future date.
• Worksheet W-7: Novell NetWare Gateway installation
This information is used by the Xerox service representative
to set up the Novell NetWare gateway.
The customer can also use this information to set up the
gateways on the print server after the gateways have been
installed and licensed.

FREEFLOW PRINT SERVER 6.0.xx
XEROX FREEFLOW PRINT SERVER 3
GETTING READY FOR THE PRINT SERVER INSTALLATION
• Worksheet W-8: AppleTalk Gateway installation
This information is used by the Xerox service representative
to set up the AppleTalk Gateway.
This information can also be used by the customer to set up
the AppleTalk Gateway after the gateway has been installed
and licensed.
• Worksheet W-9: SNMP Gateway installation
This information can be used by either the Xerox service
representative or the customer to set up the SNMP Gateway
after the gateway has been installed and licensed.
• Worksheet W-10: Client workstations
This worksheet is used only when your customer has
contracted Xerox to install additional document submission
software or print drivers on their client workstations.
• Worksheet W-11: PrInteract Remote Services
Remote Services is an option that allows the customer to
interact with Xerox through a web-based browser to resolve
printing issues, download and install software patches, and
send machine and job data to Xerox.
The information collected on this worksheet is used by the
Xerox service representative to set up the Remote Services
software.
• Worksheet W-12: Data Overwrite and Backup Configuration
Data Overwrite software removes all data from the spool,
swap, and outQ partitions of the FreeFlow Print Server hard
disk. The data cannot be retrieved.
The Backup Configuration utility allows customers to back
up and restore system configuration files as well as Remote
Services configuration files.
The information collected on this worksheet is used by the
Xerox service representative to set up the Data Overwrite
and Backup Configuration features.

FREEFLOW PRINT SERVER 6.0.xx
4 XEROX FREEFLOW PRINT SERVER
GETTING READY FOR THE PRINT SERVER INSTALLATION
About the worksheets
The worksheets contain a combination of the following
elements:
• The Data Element column contains a list of the specific
items of information needed to perform the procedure
identified in the worksheet title. Definitions for the required
data elements immediately follow each worksheet.
• Use the Customer Value column to enter the necessary
data element value. If the value is pre-determined, the value
required is indicated in the column.
Although necessary for install, it is up to your customer to
decide whether these values should be entered in the
tables. If the values are not available in the tables, make
sure your customer will be able to provide the information
during install.
FREEFLOW PRINT SERVER 6.0.xx
XEROX FREEFLOW PRINT SERVER 5
GETTING READY FOR THE PRINT SERVER INSTALLATION
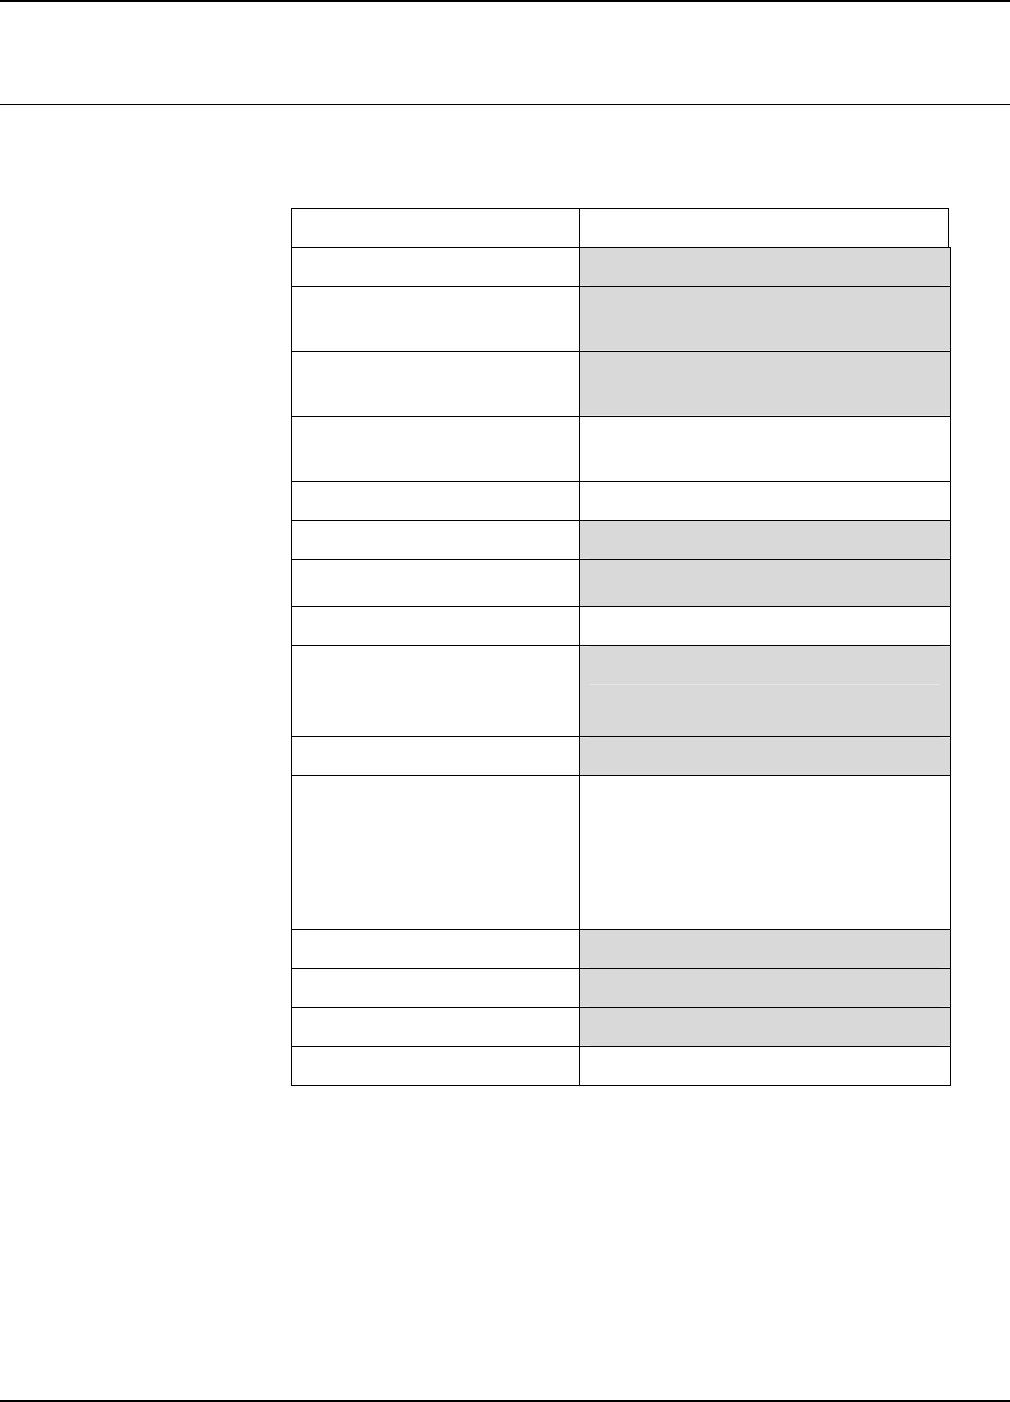
W-1: Solaris operating system worksheet
The Xerox service representative uses the following information
during the installation of the Solaris operating system on the
print server.
In the Customer Value column, fill in or circle the appropriate
value where applicable. Bold text indicates a standard
installation value.
Item # Data Element Customer Value
1 Primary Network Interface bge0 or bge1 or ce1
2 DHCP Yes No
3 Hostname
4 IP Address (If DHCP is yes, then skip)
Subnets? Yes No
5
If Yes, then enter Subnet Mask
6 Enable IPv6? No
Set the Default Route
Detect One
Specify One
None
7
Default Router IP Address
(Default gateway)
(If Specify One, enter the Router IP
Address)
8 Enable Kerberos Security? Yes No
9 Name Service NIS+ NIS DNS LDAP None
Domain Name
NIS+,
NISS
Locate server automatically Find one Specify
If Specify, then NIS Server Hostname
If Specify, then NIS Server IP Address
Domain Name
DNS DNS Server IP Address(es)
(Enter up to 3 addresses)
DNS Search List
(Enter from 1 to 6)
FREEFLOW PRINT SERVER 6.0.xx
6 XEROX FREEFLOW PRINT SERVER
GETTING READY FOR THE PRINT SERVER INSTALLATION
Domain Name
LDAP Profile Name
Profile Server IP Address
10 Geographic Region
11 Time Zone
12 Create System Backup Partition Yes No
13 Create Data Overwrite Partition
(Required for Data Overwrite)
Yes No
14 Space for System Backups
15 Security Profile High Medium Low
Default Operating System Only

FREEFLOW PRINT SERVER 6.0.xx
XEROX FREEFLOW PRINT SERVER 7
GETTING READY FOR THE PRINT SERVER INSTALLATION
W-1 data element definitions
Primary Network Interface:
Product Controller/Server Value
iGen3 PDSI Config 4 bge0
DocuColor (2XX, 5000,
7000/8000)
PDSi Config 2b,
2c, 2d
bge0
DocuTech 61XX
DocuPrint 1XX EPS
PDSi Config 2a bge0
DocuTech 61XX
DocuPrint 1XX EPS
SUN W1100z Determined
automatically
DocuTech 128/155/180
HLC
PDSi Config 2a bge1
DocuTech 128/155/180
HLC
SUN W1100z ce1
Xerox 41XX/45XX EPS,
XXP
SUN Ultra 20 Determined
automatically
Xerox Continuous Feed PDSi Config 4 bge1
Nuvera X86 Determined
automatically
DHCP: Dynamic Host Configuration Protocol. This is a TCP/IP
addressing method. If selected, the system should automatically
contact the DHCP server to obtain the IP address, subnet mask,
and default gateway address. This information can also be
manually entered into the FreeFlow Print Server Network
Configuration screens.
DHCP is the default for DocuColor 2XX. iGen3 may not use
DHCP.
Hostname: This is the name the print server will be known as
by users from other host machines on the TCP/IP network. This
name is an alias mapped to the IP address that is assigned to
the print server/host machine. The Hostname must start with an
alphabetic character, and cannot start with a number, space, or
any other non-alphabetic character.
IP Address: The lP or Internet Address is a unique 4 byte, 32
bit numeric value that is assigned to each local host and
workstation on a TCP/IP network. An IP address consists of four
fields, each separated by a decimal point. For example:
13.254.166.111.
NOTE: The TCP/IP Internet spans the entire world. The Internet
central committee assigns a set of unique network addresses to

FREEFLOW PRINT SERVER 6.0.xx
8 XEROX FREEFLOW PRINT SERVER
GETTING READY FOR THE PRINT SERVER INSTALLATION
your customer’s company. The customer network administrator
assigns IP address numbers within this set to each host and
workstation on the network.
Subnets: A “YES” answer to this query indicates that your
customer’s network is divided into segments or “subnets.” In this
instance the following data element, subnet mask, must also be
provided.
Subnet Mask: The subnet mask is a decimal or hexadecimal
group of four fields, each separated by a decimal point that
indicates how much of the IP Address is used with the Network
number to create subnets. The following is an example of a
subnet mask in its decimal and hexadecimal form.
255.255.0.0 = 0xff.0xff.0x0.0x0
The subnet mask is derived by the network administrator
according to how many subnets are needed. The subnet mask
is the same for all hosts that exist on a given network. Your
customer’s network administrator can provide this information.
Ipv6: Internet protocol version 6. FreeFlow Print Server is not
using this version of the Internet protocol at this time. Do not
select this option.
Default Router lP address: The default router IP address is a
unique 4 byte, 32 bit numeric value, for example, 13.252.12.198
that identifies the machine that is acting as the main router. The
router maintains tables of addresses of many networks in order
to forward data packets between these networks. During install,
the service representative creates a default router file on the
print server, if one does not already exist, and this number is
added to a line in the new file. Your customer’s network
administrator should provide this number.
NOTE: If another machine is not identified as the default router,
the print server will automatically take over the main router
function. This may noticeably slow down processing on the
network.
Kerberos Security: Kerberos security is a network
authentication protocol that is provided with the Solaris
environment. FreeFlow Print Server does not currently support
this protocol.
Name Service: DNS, NIS, NIS+, and LDAP are network
information services that hold user information. None indicates
that the user information is held locally. Additional information
for each of these services should be entered in the appropriate
table in W-6. The network services are enabled and configured
using the FreeFlow Print Server Network Configuration screens.
NOTE: In order to load and enable Remote Services, DNS must
be the Name Service type.
Geographic Region: Enter your customer’s geographical
country or region. The selections available are Africa, Western

FREEFLOW PRINT SERVER 6.0.xx
XEROX FREEFLOW PRINT SERVER 9
GETTING READY FOR THE PRINT SERVER INSTALLATION
Asia, Eastern Asia, Australia/New Zealand, Canada, Europe,
Central America, South America, United States, Other (offset
from GMT), and Other (specify rules file).
Time Zone: Enter your customer’s time zone. The selections
available are: Eastern, Central, Mountain, Pacific, Yukon,
East—Indiana, Arizona, Michigan, Samoa, Aleutian, Hawaii,
none of these (return to regional menu).
Create System Backup Partition: Backup and Restore utilities
provide a means to back up and restore either a complete
system image or configuration files containing user settings.
These utilities are only available if a system backup partition
(XRXbackup) is created. The option to create the partition is
selected by default. If the option is deselected, the backup
partition is not created and additional disk space is available.
NOTE: Xerox strongly recommends leaving this option checked.
Create Data Overwrite Partition: Select this option to allocate
space for the Data Overwrite Software feature. It is not selected
by default.
Space for System Backups: If the default value is not large
enough, use this control to increase the value of the space
allocated for backups. Increasing backup space reduces the
amount of space allocated for root.
Security Profile: Refer to the W-2 worksheet for the security
profile definitions.

FREEFLOW PRINT SERVER 6.0.xx
10 XEROX FREEFLOW PRINT SERVER
GETTING READY FOR THE PRINT SERVER INSTALLATION
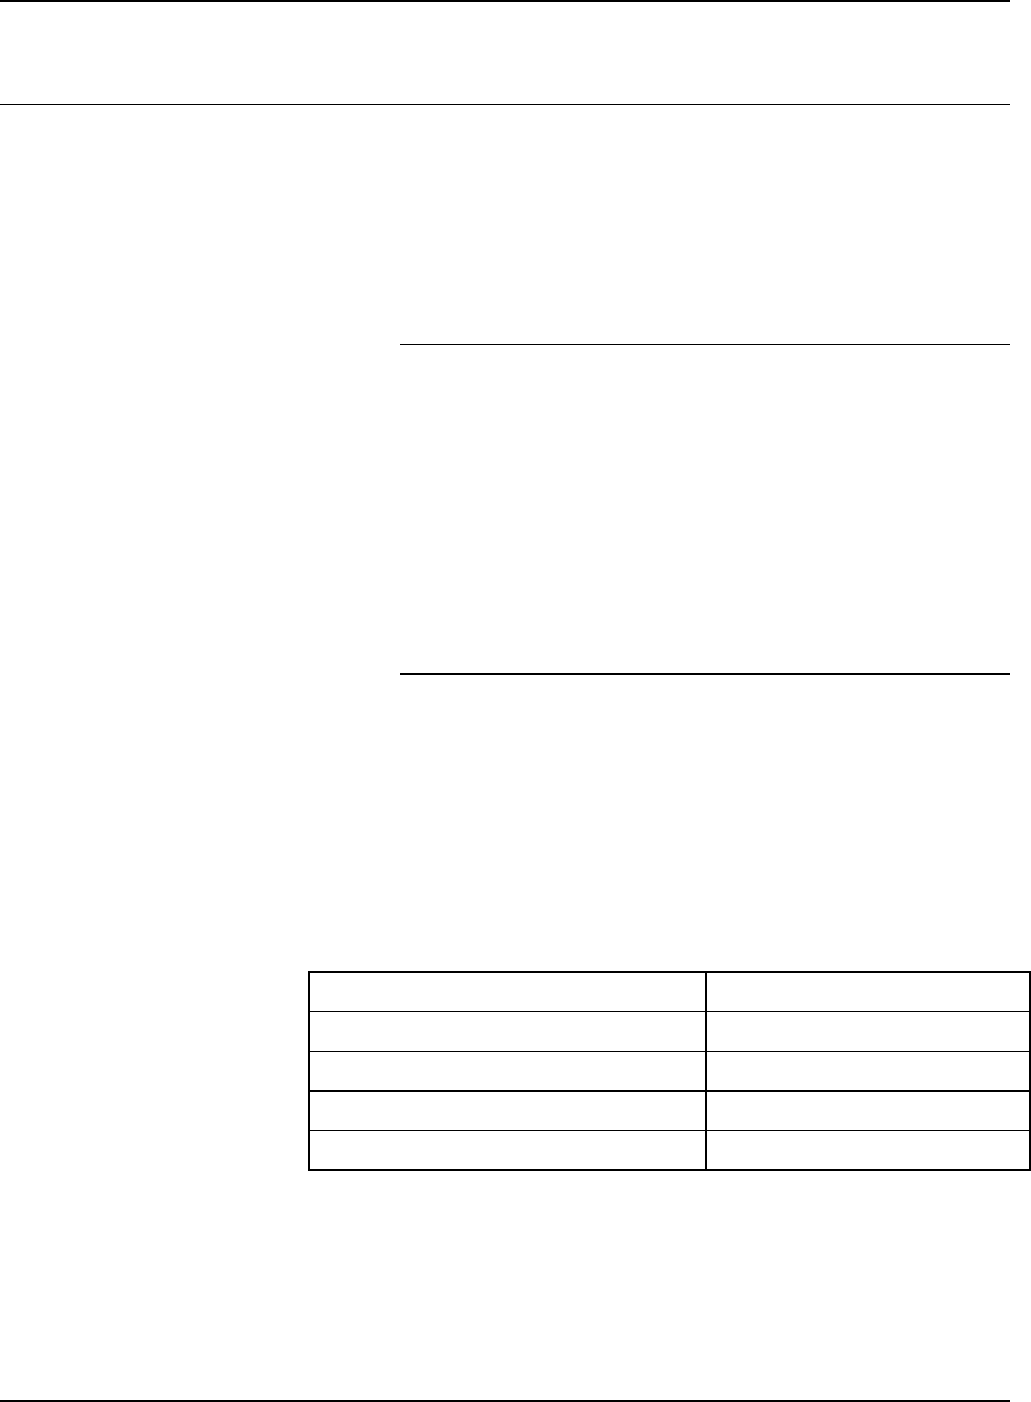
W-2: Xerox Security worksheet
Security is automatically installed and set to the default secure
mode of Low. Security can be modified from High (fully secure)
to None (not secure) through the FreeFlow Print Server
interface.
The System Administrator can modify the security levels through
the FreeFlow Print Server user interface.
For additional information on security, refer to the following table
and the Xerox FreeFlow Print Server Security Guide.

FREEFLOW PRINT SERVER 6.0.xx
XEROX FREEFLOW PRINT SERVER 11
GETTING READY FOR THE PRINT SERVER INSTALLATION
Profile Characteristics Value Legacy
Compatibility Comments
None • Default operating system only For customers
that have a
physically
closed
environment
Close to DocuSP
2.1 / 3.1 with no
adjustments
Similar to DocuSP
3.x Medium
Anonymous FTP is
read-only and
restricted
Low
(default
profile)
• FTP enabled
• telnet, rsh disabled
• NFS client is enabled
• AUTOFS is enabled
• The User login can reprint from
Saved Jobs and CD-ROM
• Terminal window is password
protected
• Auto login is enabled
First choice
setting for nearly
all marketplaces
Similar to DocuSP
3.x High
Supports
FreeFlow™
Prepress Suite
workflow
Anonymous FTP is
read-only and
restricted
To enable telnet, go
to Setup ->
FTP/Remote
Diagnostics menu
Medium • FTP is enabled
• telnet, rsh disabled
• NFS client is disabled
• AUTOFS is disabled, e.g.,
/net/<hostname> and
/home/<username> are not
automatically mounted
• NFS server is filtered via RPC
tab
• The User login can reprint from
CD-ROM
• Terminal window is password
protected
• Auto login is enabled
For customers
who need high
security but also
need to
integrate with
FreeFlow™
Prepress Suite
Supports
FreeFlow™
Prepress Suite
workflow
Anonymous FTP is
read-only and
restricted
To enable telnet, go
to Setup ->
FTP/Remote
Diagnostics menu
High • FTP disabled
• telnet, rsh disabled
• NFS client is disabled
• AUTOFS is disabled, e.g.,
/net/<hostname> and
/home/<username> are not
automatically mounted
• NFS server is disabled on
customer network
• The User login cannot reprint
anything
• Terminal window is password
protected
• Auto login is disabled (login is
always required from GUI)
Targeted for
secure sites
Does not support
FreeFlow™
Prepress Suite
workflow
FTP is disabled
File transfer can be
done via Secure
FTP
FREEFLOW PRINT SERVER 6.0.xx
12 XEROX FREEFLOW PRINT SERVER
GETTING READY FOR THE PRINT SERVER INSTALLATION
W-3: Xerox FreeFlow Print Server software worksheet
The Xerox service representative uses the following information
during the installation of the FreeFlow Print Server software.
During this process the gateway, which allows the print server to
receive documents and requests from UNIX clients, or PC
clients using TCP/IP protocol, is installed.
Data Element Customer Value
UNIX User Information
User Name
Password
User Group
Account Status
Account Comments
Other Input Devices (i.e. FreeFlow™
Prepress Suite)
User Name
User ID
User Password
Client IP Address
User Comment
Client Hostname

FREEFLOW PRINT SERVER 6.0.xx
XEROX FREEFLOW PRINT SERVER 13
GETTING READY FOR THE PRINT SERVER INSTALLATION
W-3 data element definitions
NOTE: A new user will be created on the print server to accept
print jobs from command line clients at either a UNIX or PC
workstation, or both. The first five data elements, User Name,
User ID, User Password, Client IP Address, and User Comment,
are required for these clients.
User Name: A distinctive name that each user needs in order to
gain access to the UNIX OS, which in turn associates the name
to the correct User ID in a UNIX host password file that grants
access.
User ID: The client user identification number that will be used
to uniquely identify the new user. This is a decimal or binary
number that represents a user login account. If the host
machine is on an NIS network (see W–1), then the uids are
managed from a central master server.
Example:
/etc/passwd entry:
>bob:*:200:800:Bob Lin:/home/bob:/usr/bin
You can find the User ID by performing the following at the
UNIX client workstation:
• Non-NIS network. On the command line enter the following:
cat /etc/passwd|grep [Client users name]
• NIS network. On the command line enter the following:
ypcat password|grep [Client users name]
User Password: The command line client should be prepared
to provide this information during installation.
In this worksheet the term “client” refers to the actual
workstation that will be used to submit jobs to the print server,
and the term “user” refers to the individual submitting jobs from
that workstation.
Client IP Address: The unique Internet address of the
workstation that will be submitting jobs to the print server.
User Comment: Any additional information that may provide a
more unique identification of the new user.
Client Hostname: The hostname of the workstation that will be
used to submit jobs to the print server. This entry is used in the
hosts.equiv file that is created during install.
FREEFLOW PRINT SERVER 6.0.xx
14 XEROX FREEFLOW PRINT SERVER
GETTING READY FOR THE PRINT SERVER INSTALLATION
W-4: System configuration worksheet
The Xerox service representative uses the following information
during the set up and configuration of the dC105 diagnostics
screen.
Data Element Customer Value
Server Serial Number
Printer Serial Number
Supported Xerox Printer Only
Customer Service Telephone
Number
Customer Telephone
Number
Customer Name & Address
Market Region
Printer Type
Service Option
Remote Connectivity
Enabled
Disabled
Remote Phone Number
Network Cable Circle one:
Twisted Pair Ethernet (TPE) RJ-45
Thick Net Ethernet (AUI)
Coax/Thinnet
Host ID
Ethernet Address
IP Address of Default Router
Virtual Printer Name

FREEFLOW PRINT SERVER 6.0.xx
XEROX FREEFLOW PRINT SERVER 15
GETTING READY FOR THE PRINT SERVER INSTALLATION
W-4 data element definitions
Server Serial Number: The serial number for the print server
platform.
Printer Serial Number: The serial number for the printer.
Customer Service Telephone Number: The 1-800 telephone
number used by the customer when service assistance is
needed.
Customer Telephone Number
Customer Name and Address
Market Region: Select the appropriate market region from the
following list:
USCO
XL (UK)
XCI
FX
Printer Type: Enter the type of printer being installed, for
example, DocuTech 6135.
Service Option: Select one of the following service options
based on your customer’s contract:
None
1x5 (1 Shift, M—F)
2x5 (2 Shifts, M—F)
3x5 (3 Shifts, M—F)
3x7 (3 Shifts, 7 days)
Time & Materials
Remote Connectivity: Select enabled or disabled.
Remote Phone Number: Enter the remote phone number.
Network Cable: During this process the network cable is
connected to the print server. Make sure the correct network
cable is available for this procedure. The only direct network
cable type available on the print server platform is UTP. Any
other media type requires a converter that must be supplied by
the customer. A converter that provides an AUI type connection
is available from Xerox.
Host ID and Ethernet Address: At the beginning of the Solaris
OS software installation, this information displays on the first
three lines of the Sun Microsystems banner screen. The service
representative will enter both data elements on this worksheet
for reference during the installation process.

FREEFLOW PRINT SERVER 6.0.xx
16 XEROX FREEFLOW PRINT SERVER
GETTING READY FOR THE PRINT SERVER INSTALLATION
IP Address of Default Router: The default router lP address is
a unique 4 byte, 32-bit numeric value that identifies the machine
that is acting as the main router. The router maintains tables of
addresses of many networks in order to forward data packets
between these networks. During install, the service
representative adds this number to the system. Your customer’s
network administrator should provide this number.

FREEFLOW PRINT SERVER 6.0.xx
XEROX FREEFLOW PRINT SERVER 17
GETTING READY FOR THE PRINT SERVER INSTALLATION
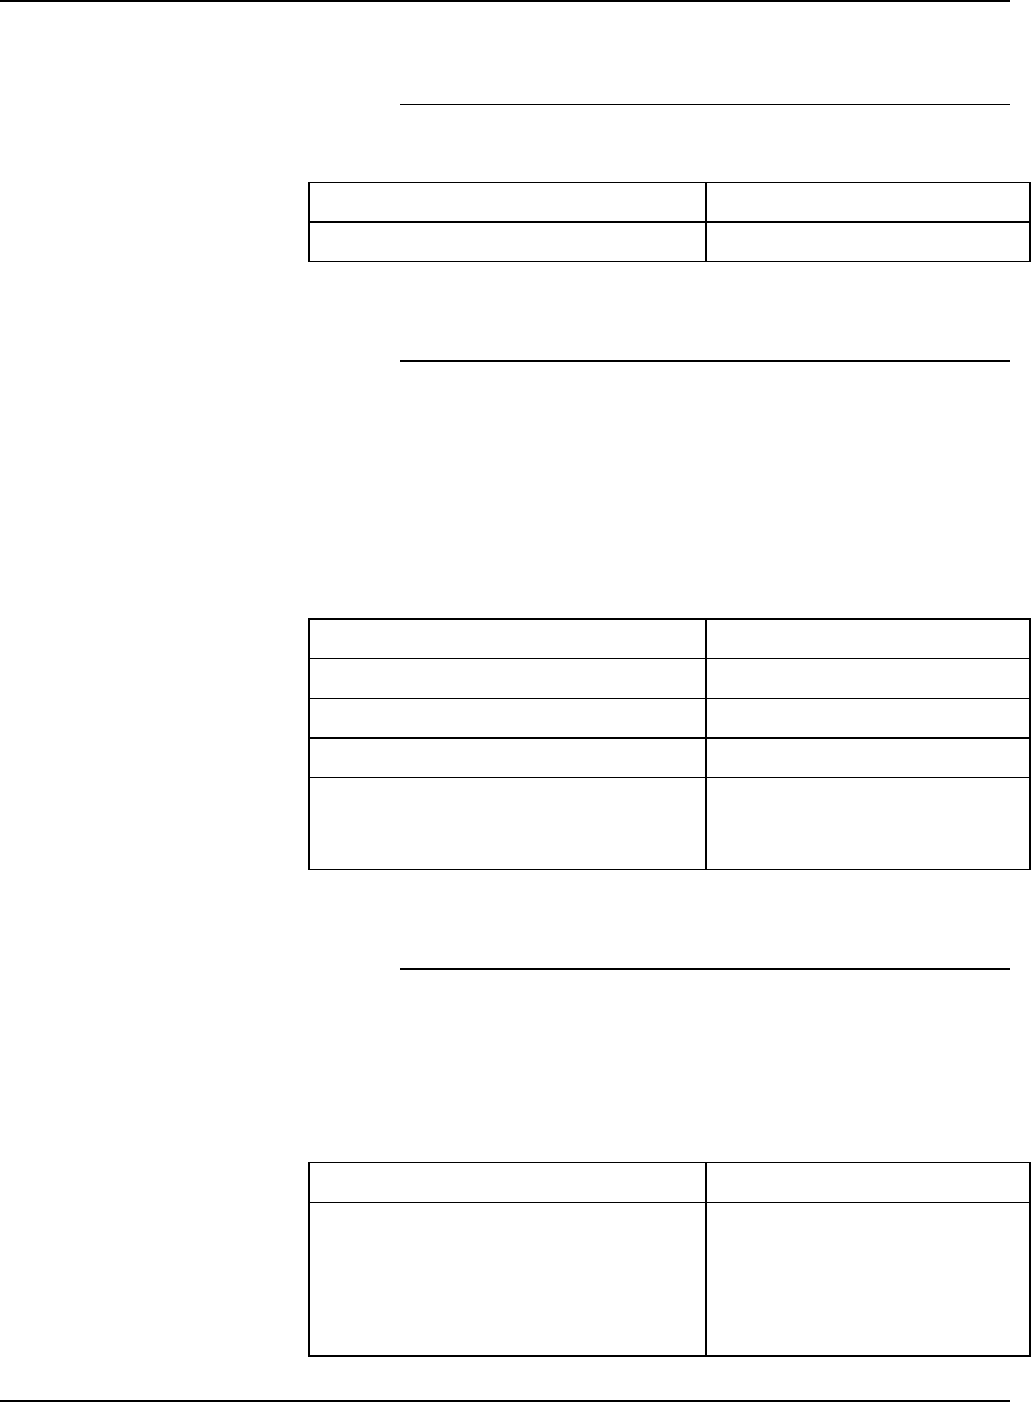
W-5: Print Server software and gateways worksheet
Indicate which gateways and other software features have been
selected by the customer to be licensed on the print server.
Data Element Customer Value
FreeFlow Prepress Suite Gateway Yes No
HTPP Gateway Yes No
Novell NetWare Gateway Yes No
AppleTalk Gateway Yes No
IPP Gateway Yes No
TCP/IP Socket Gateway Yes No
Online Gateway Yes No
Tape Client Gateway Yes No
SNMP Gateway Yes No
PostScript Decomposer/Interpreter Yes No
PCL Decomposer/Interpreter Yes No
TIFF Decomposer/Interpreter Yes No
LCDS Decomposer/Interpreter Yes No
PPML Decomposer/Interpreter Yes No
IPDS Decomposer/Interpreter Yes No
Imposition Yes No
Kanji Fonts (Double byte fonts
used in Asian countries only)
Yes No
Xerox Diagnostics with
Productivity Tools
Yes No
Third Party ISO Diagnostics Yes No
Customer Productivity Workshop
Diagnostics (eXcellerate)
Yes No
Job Preview Yes No
Page Parallel RIP (Color only) Yes No
VIPP Yes No
Data Overwrite Yes No
Preflight Yes No
Image Quality Package Yes No
Remote Services Yes No
FREEFLOW PRINT SERVER 6.0.xx
18 XEROX FREEFLOW PRINT SERVER
GETTING READY FOR THE PRINT SERVER INSTALLATION
W-6: Network configuration worksheet
Fill out the appropriate worksheet for the network configuration
the customer is using. This information is used to configure the
network through the FreeFlow Print Server Network
Configuration screens.
For further information on each network configuration, refer to
the FreeFlow Print Server on-line help.
IP Configuration
Two options are available for configuring TCP/IP on the
FreeFlow Print Server.
Static IP configuration requires that the System Administrator
enter the hostname, IP address, default router gateway, and
subnet mask information into the Network configuration UI. This
information is available on Worksheet W-1.
DHCP, or Dynamic Host Configuration Protocol, retrieves the
values for the configuration from the DHCP server on the
network. The System Administrator can rewrite the hostname.
NIS/NIS+
The Network Information Service (NIS and NIS+) provides
simple network lookup services. The purpose of NIS and NIS+
is to provide information that needs to be known throughout the
network to all machines on the network.
If the Domain Name, Server IP Address, and Server Name are
not known, select Find One in the dialog. The appropriate
information is obtained from the NIS/NIS+ server on the
network. The server must be configured to accept broadcast
requests.
Data Element Customer Value
Find NIS+ Server Find one Specify
NIS/NIS+ Domain Name
NIS/NIS+ Server IP address
NIS/NIS+ Server Name

FREEFLOW PRINT SERVER 6.0.xx
XEROX FREEFLOW PRINT SERVER 19
GETTING READY FOR THE PRINT SERVER INSTALLATION
DNS (Domain Name System)
DNS provides the ability to map hostnames to IP addresses, as
well as a mechanism for storing and retrieving information on
the network. If the customer is using DNS for Hostname
resolution on their network, fill out the appropriate information
below.
Dynamic DNS extends the capability of DNS to allow for
dynamic updates to the database. If the customer is using
Dynamic DNS, select to enable Dynamic DNS Registration.
Domain Name specifies the local domain name.
DNS Server List specifies the IP address or addresses of the
name servers that the system is to query.
Domain Search List specifies the look up list of host names.
The local domain name should be listed as a default.
Data Element Customer Value
Dynamic DNS Registration Yes No
Domain Name
DNS Server List
(IP Address or Addresses of the DNS
Servers)
Domain Search List
WINS (Windows Internet Name Service)
WINS provides the ability to easily locate devices on a network.
WINS maintains a database of NetBIOS names to IP address
mappings so users or applications can specify a name instead
of an IP address for a particular resource on the network.
The Primary WINS Server IP address can be entered and used
for all WINS and SMB operations.
If the Primary WINS Server field is left empty, the WINS client
broadcasts the request to the first available WINS server on the
network.
Data Element Customer Value
Primary WINS Server
FREEFLOW PRINT SERVER 6.0.xx
20 XEROX FREEFLOW PRINT SERVER
GETTING READY FOR THE PRINT SERVER INSTALLATION
Active Directory Services (ADS)
Active Directory Services is a Windows-based name service
typically used with Windows NT or 2000.
Data Element Customer Value
ADS Domain
SMB/FTP Filing capability
This feature enables the ability to transfer files or save jobs to
locations on the network.
SMB Filing is the underlying protocol for WINS. In order to use
SMB, WINS has to be enabled and a NetBIOS name entered
into the field.
FTP and SFTP are protocols used to transfer files between two
computer systems. SFTP, Secure File Transport Protocol,
encrypts the data for security.
Data Element Customer Value
SMB Filing Yes No
FTP Filing Yes No
SFTP Filing Yes No
NetBIOS Name
(FreeFlow Print Server Hostname
from W-1)
Connections
The Connections feature is set to Automatic on install, allowing
the FreeFlow Print Server software to automatically detect the
highest speed available.
However, if the customer is using an older speed hub or has a
configuration that requires manually setting the Ethernet speed,
note the required speed below.
Data Element Customer Value
Ethernet speed
(Speeds available are dependent upon the
installed Ethernet interface card)
Automatic
10 mbit/sec
100 mbit/sec
1000 mbit/sec
FREEFLOW PRINT SERVER 6.0.xx
XEROX FREEFLOW PRINT SERVER 21
GETTING READY FOR THE PRINT SERVER INSTALLATION
Ethernet MAC Address Automatically filled in
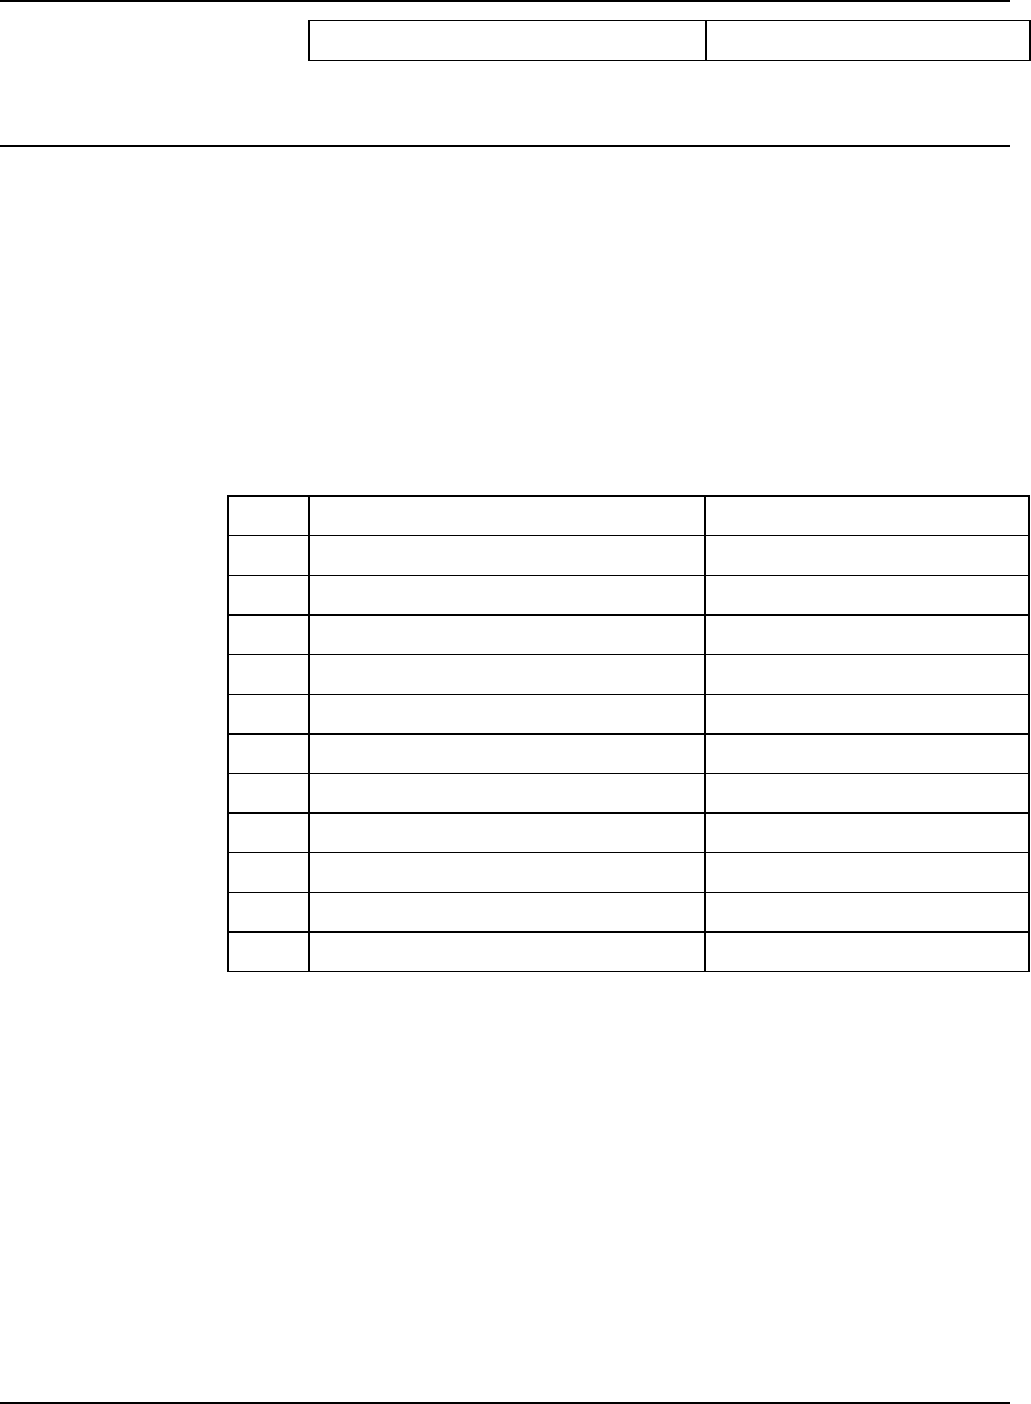
W-7: Novell NetWare gateway installation worksheet
Fill out this worksheet only if the customer has purchased the
Novell Connectivity — QServer gateway.
The Novell NetWare software is the gateway that allows clients
to communicate through a Novell Server (PC) to the FreeFlow
Print Server. Your customer’s network administrator or the
Xerox Systems Analyst at each Novell server who will be
submitting documents to the print server gathers the information
in this worksheet. At install, the service representative uses this
information to set up and configure the QServer gateway
software on the print server. The QServer software is included in
the FreeFlow Print Server installation.
Item # Data Element Customer Value
1 Novell Internet Net Number
2 Novell Net Number
3 Framing Type (Circle one) Ethernet 802.3 Ethernet Il
4 Novell File Server Name
5 Novell Print Queue Name
6 Novell Print Server Name
7 Novell Print Server Password
8 Print Server Operator User Name
9 Print Server Operator User Password
10 Novell Printer Name
11 Novell Account Login

FREEFLOW PRINT SERVER 6.0.xx
22 XEROX FREEFLOW PRINT SERVER
GETTING READY FOR THE PRINT SERVER INSTALLATION
W-7 data element definitions
This section defines the data elements determined by the
network administrator or the Xerox Systems Analyst during the
setup of the NetWare Gateway on each Novell Server who will
be transferring documents from Novell clients to the print server.
To support a smoother, faster install process, make sure these
data elements are known and entered in this worksheet before
the scheduled day of installation.
Novell Internet Net Number: This is the internal network
number, assigned to the print server that identifies the
FreeFlow Print Server on the Novell network. This data element
must be a new, eight-digit hexadecimal number that is a unique
number on the Novell network, and is available from the network
administrator.
NOTE: If necessary, pad the number with zeros from the left to
achieve the eight digits.
Novell Net Number: This is an eight-digit, hexadecimal,
network number that identifies the Novell network. The external
network number can be any number defined that falls within the
range of 1 to FFFFFFFFE.
NOTE: This number must be the same on both the Novell server
and the print server.
You can find the Novell network number by entering the
CONFIG command at the Novell File Server system console
prompt, as in the following Frame type ETHERNET_802.3
example. The network number is in bold on the last line of this
example, as the LAN protocol IPX network number. This
number may also be referred to as the Ethernet Net Number.
File server name: Cust 2
IPX internal network number: 0123A.B09
Novell NE2000
Version 3.25 June 17, 1993
Hardware setting: I/O Port 300h to 31Fh,
Interrupt 3h
Node address 00009B99E999
Frame type: ETHERNET 802.3
Boardname: PUBLIC
LAN protocol: IPX network 0000BB09
At this point, make a note of the name of the file server since it
will be needed later. This information will appear after the entry
File server name. The comparable ETHERNET_Il entry would
look like the following example where the name of the file server
is Cust_2 and the network number is in bold on the last line as
the LAN protocol IPX network number. Remember, this is an
example, and your setup will most likely be different.
File server name: Cust 2
IPX internal network number: 0123AB09
Novell NE2000

FREEFLOW PRINT SERVER 6.0.xx
XEROX FREEFLOW PRINT SERVER 23
GETTING READY FOR THE PRINT SERVER INSTALLATION
Version 3.25 June 17, 1993
Hardware setting: I/O Port 320h to 33Fh,
Interrupt 2h
Node address: 00009B99E9B9
Frame type: ETHERNET II
Boardname: DOCUTECH
LAN protocol: ARP
LAN protocol: IP address 13.254.166.111
mask FF.FF.FC.O
Interrupt 2h
LAN protocol: XNS
LAN protocol: IPX network 0000BB09
Printer and queue names must be unique and can be made up
of a maximum of 14 alphanumeric characters and underscores.
Framing Type: Necessary for install and must be the same as
the Novell File Server. The framing type is used to determine the
following two data elements:
ETHERNET_802.3
ETHERNET_Il
NOTE: If the network will be running both Novell NetWare and
AppleTalk, the framing type must be ETHERNET_Il.
NOTE: Selecting multiple framing types may cause the network
to slow down.
Novell File Server Name: Enter the name of the file server on
which the print queue, print server, and printer will be created or
already reside.
Novell Print Queue Name: This print queue will hold the print
jobs until the Xerox server is ready. Enter the name for this
queue in this column.
Novell Print Server Name: The Novell print server submits the
job from the queue to the Xerox server. Enter the name for this
server in this column.
Novell Print Server Password: The Novell Network
administrator password.
Print Server Operator User Name: The name of the Novell
print server user with the capability to operate the Novell print
server. The print server uses this operator account to manage
operations with the Novell Server. Enter the full <User Name>
for this user as the data element.
Print Server Operator User Password: The print server
operator should be prepared to provide this information at the
time of the gateway setup.
Novell Printer Name: One printer, of a type Remote
Other/Unknown, will be created at this time to represent the
Xerox printer. Enter the name for the printer in this column, for
example, DT6135, to represent a DocuTech 6135 printer.
Novell Account Login: The user’s Novell account user name
and password.

FREEFLOW PRINT SERVER 6.0.xx
24 XEROX FREEFLOW PRINT SERVER
GETTING READY FOR THE PRINT SERVER INSTALLATION
W-8: AppleTalk Gateway installation worksheet
If the customer has purchased the AppleTalk Connectivity —
Apple PAP gateway, fill out this worksheet.
Item # Data Element Customer Value
1 AppleTalk Phase Type
2 AppleTalk Zone Name
W-8 data element definitions
AppleTalk Phase Type: There are three AppleTalk Phase
Types:
• Phase 1 (non-extended network) is a single physical
network that can support up to 254 mode addresses
(devices). There is only one network number and one zone
assigned to the network.
Phase 1 is not configured as Phase 1, but should follow the
Transition mode install procedure. This is done so that
Macintosh Transparent Printing can be enabled.
• Phase 2 (extended network) is a network in which there are
two or more network numbers assigned to a single physical
network. Each network number on an extended network is
an addressing channel that can support 253 devices and
only one zone name. Phase 2 routers can be configured to
support non-extended networks.
• Transition mode (Phase 2 Transition) is a way of
configuring a Phase 2 router so that it can function on an
Internet that includes Phase 1 routers. Since Phase 1
routers cannot recognize multiple network numbers or
multiple zones on a network, a Phase 2 router in the
transition mode is deliberately limited to addressing only 253
devices.
You can determine which EtherTalk phase type is running by
completing the following steps:
1. Select the Control panel from the Apple Menu Icon (upper
left corner of the screen on a Macintosh).
2. Double-click the Network icon.
3. The icon describes the phase type:
a. An icon showing two single opposing arrows represents
EtherTalk 1.0 (Phase 1).
b. An icon showing two double opposing arrows
represents EtherTalk 2.0 (Phase 2).

FREEFLOW PRINT SERVER 6.0.xx
XEROX FREEFLOW PRINT SERVER 25
GETTING READY FOR THE PRINT SERVER INSTALLATION
If the EtherTalk 2.0 icon appears, double-click the icon and see
if an Internet router is found. If one is found, a panel appears
telling the user they belong to “SOMEZONE”, which is the
network default zone and the first one in the list, if a zone list
exists. Be careful not to make assumptions and be sure to
obtain detailed network specific information from the site
network administrator. The network administrator may try the
AppleShare icon first to see the network for which the Macintosh
is currently configured. Remember, the network can be toggled
between whatever network icons appear in the Control Panel
and, since LocalTalk is built-in, LocalTalk may be selected as
well.
AppleTalk NLM Zone Name: For a Novell Server running
AppleTalk, this represents the name of the zone in which the
Network Server will reside. The zone name is also assigned in
the Load AppleTalk statement. This refers to the parameter
“Apple-big-zone”.
NOTE: If the network will be running both Novell NetWare and
AppleTalk, the frame type must be Ethernet_II.

FREEFLOW PRINT SERVER 6.0.xx
26 XEROX FREEFLOW PRINT SERVER
GETTING READY FOR THE PRINT SERVER INSTALLATION
W-9: SNMP Gateway installation worksheet
If the customer is planning on using the SNMP Gateway, fill out
this worksheet. When SNMP is installed and licensed, items
such as the Printer ID are automatically configured.
Data Elements Customer Value
Enabled Yes No
Authentication Traps Yes No
Client IP Address
Client Port Number
Trap Persistence
Trap SNMP Version SNMP v.1
Traps Type:
Printer Alert On Off
Cold Start On Off
Warm Start On Off
Link Up On Off
Link Down On Off
Authentication Failure On Off
SNMP Serial numbers:
Tray 1
Tray 2
Tray 3
Tray 4
Tray 5
Tray 6
Stacker
Finishing Device(s)
W-9 Data elements
Enabled: The System Administrator can enable or disable the
SNMP gateway as needed.
FREEFLOW PRINT SERVER 6.0.xx
XEROX FREEFLOW PRINT SERVER 27
GETTING READY FOR THE PRINT SERVER INSTALLATION
W-10: Client workstations
The client submission software is now available in the following:
♦ CentreWare drivers designed and packaged for each
supported printer. Follow the installation instructions
packaged with the drivers.
♦ FreeFlow Print Manager. Follow the installation instructions
provided with the software.
W-11: PrInteract Remote Services
If the customer has agreed to enable and use Remote Services,
the following information is necessary to configure the FreeFlow
Print Server and Remote Services interface.
Item # Data Element Customer Value
1 IP Address
2 Port
3 DNS Name
With DNS – Use the Hostname
Without DNS – Use the IP Address
4 Level of Internet access allowed by the
customer
Full Internet access
No Internet access
5 Is a firewall used to restrict Internet access
to the customer’s network? Yes No
6 If a firewall is used:
HTTP Proxy Server IP Address
User Name (If required)
Password (If required)
7 Does the firewall restrict data transmission
in any way (For example, .zip files
blocked)?
List the restrictions below:
Yes No
FREEFLOW PRINT SERVER 6.0.xx
28 XEROX FREEFLOW PRINT SERVER
GETTING READY FOR THE PRINT SERVER INSTALLATION
W-12: Data Overwrite and Backup Configuration
If the customer has agreed to enable and use data overwrite
and/or backup services, the following information is necessary
to configure the FreeFlow Print Server. If the data overwrite box
is not checked, the data overwrite software should not be
installed or used. Data overwrite will not work. The customer will
need to scrape the system and check the data overwrite box.
Item # Data Element Customer Value
1 I plan to use data overwrite on this system Yes No
2 I plan to use backup configuration Yes No
3 How much space do you want to set-aside
for backups?
NOTE: Selection is via on-screen slider
bar.
