Xiamen Tongren IOT Technology US-IC101 Smart IR Controller User Manual
Xiamen Tongren IOT Technology Co.,Ltd. Smart IR Controller
User manual
SmartIRController‐Manual
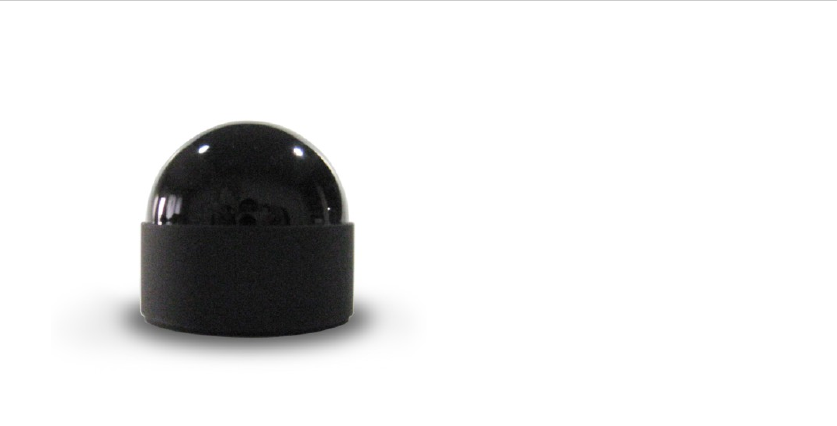
Productname:SmartIRController
Productdescription:thisisoneofthecomponentsofUSUNGSmartHomeSystem,andit
mustworkwithotherSmartHomecomponents.Itcanreplacevariousremotecontrollersto
controldifferentinfrareddevicessuchasairconditioners,TVs,DVDs,etc.
Installation&Usage:
1.Puttheinfraredcontrollerinupsidedownposition,andturnitsbottomcover
counterclockwiselyandopenit;
2.TakeouttheVIItwoAAAalkalinebatteriesfromthepackage,andinsertthebatteries
properlybyfollowingthepositive/negativeterminalmarks.
3.AligningthenotchonthebottomcovertotheprotrusionontopcoveroftheController,
dropthecoverandturnitclockwisely;
4.Placedirectly,orusethefoamtapecomeupwiththeproductpackagetofix,the
InfraredControllertoaproperposition;

Illustration:
Precautions:
1.Pleasechargethebatterieswiththechargercomeupwiththeproduct,andpleaseDO
NOTtrytochargeanon‐chargeablebattery,asmayleadtobatteryleakage,product
damageorpersonalinjury;
2.Pleasechargeusingthepoweradaptercomeupwiththeproduct;
3.Pleasedonotdisassembleortrytorepairtheproductinyourownwill;
4.Pleasedonotputtheproductunderextremeconditionslikehightemperatureorhigh
pressure,etc.;
5.Pleasekeeptheproductawayfrombabyorchild;
6.Pleasekeeptheproductdryandawayfromhumidity;
7.TheproductIDcanbeseenattheinnersideofthebottomcover.Youmayfinditwhen
openthebottomcoverbyturningitcounterclockwiselyandyou
XiamenTongrenIOTTechnologyCo.,Ltd.
24Hrhotlineservice:4008888022
Website:http://home.iusung.com

Smart Home Initial Configuration
and User Manual
SoftwareLoginConfiguration
z Firstly, please follow the user manual, correctly install the Smart Gateway
and other smart components, and power them on. Please make backup
and memo for each device during the installation in accordance with the
description of the attached ID Backup Table.
z Secondly, download and install the SmartHome Suite Client Software from
USUNG SmartHome System Official Website(downloading url:
http://home.iusung.com/download), or you may use a barcode scanner
tool from your mobile to check out the downloading address from the 2D
barcode shown below.
Note: There are various 2D barcode scanner tools available for mobiles, such as

Wechat. Take Wechat for example: select Discover -> choose Scan (if not available,
please enable the Scan tool in the Settings)
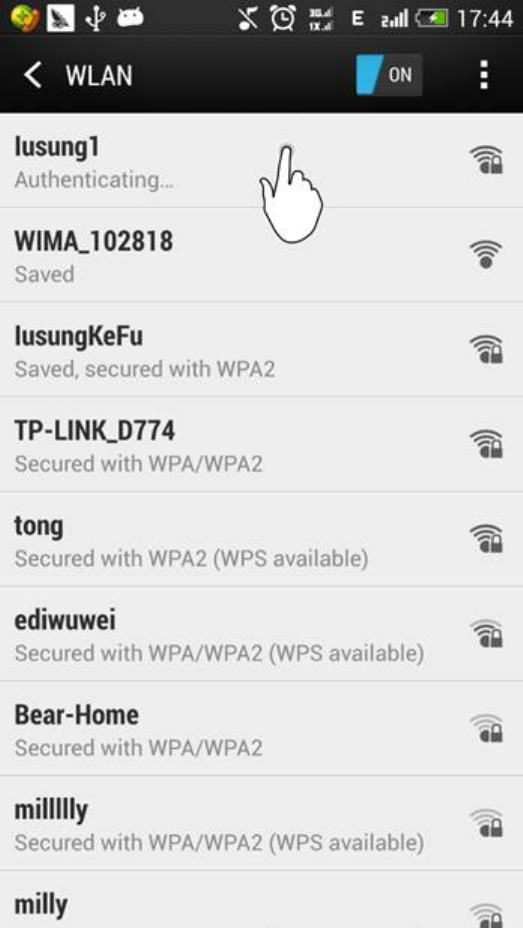
z Then, on your mobile, enter Settings Æ Wireless LAN, find the AP named
like“WIMA******”
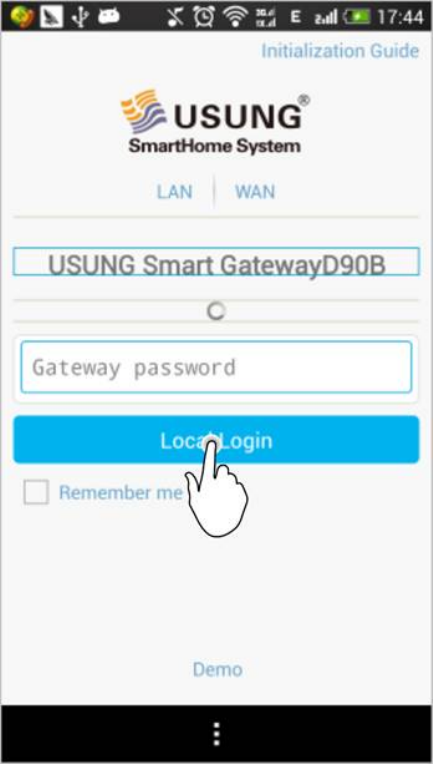
z Open the client software, from the Login interface , click on the “Initial

Usage Wizard”and enter the Router Configuration interface;
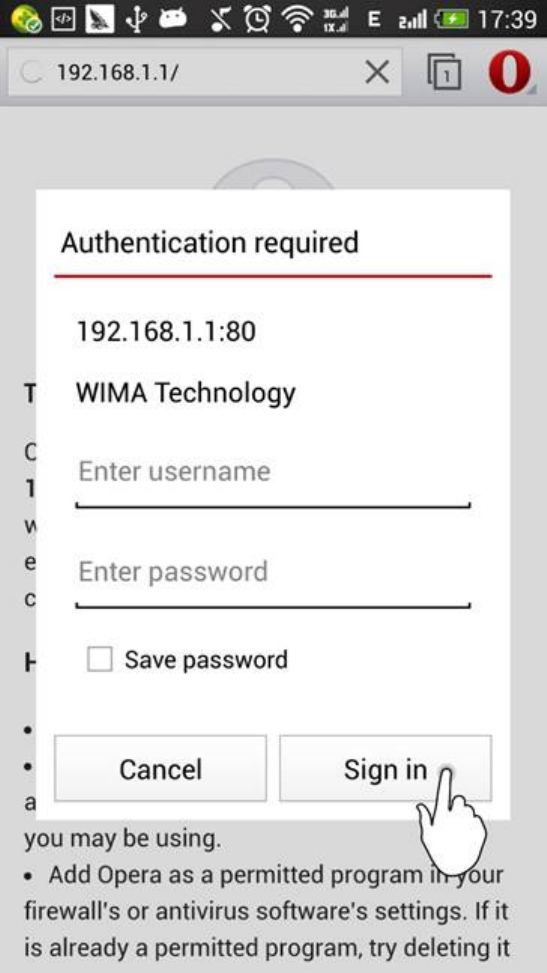
z In Router Configuration interface, click on Confirmation button, and you
will be redirect to your mobile phone’s default browser, where you can
login to the Smart Gateway (with“admin”as both default username and
password );
z Once logged in successfully, by following the interface requests, enter the
SSID of your Home WIFI, and please write down the MAC address shown in
the page that followed, which will be used in remote Controlling Settings
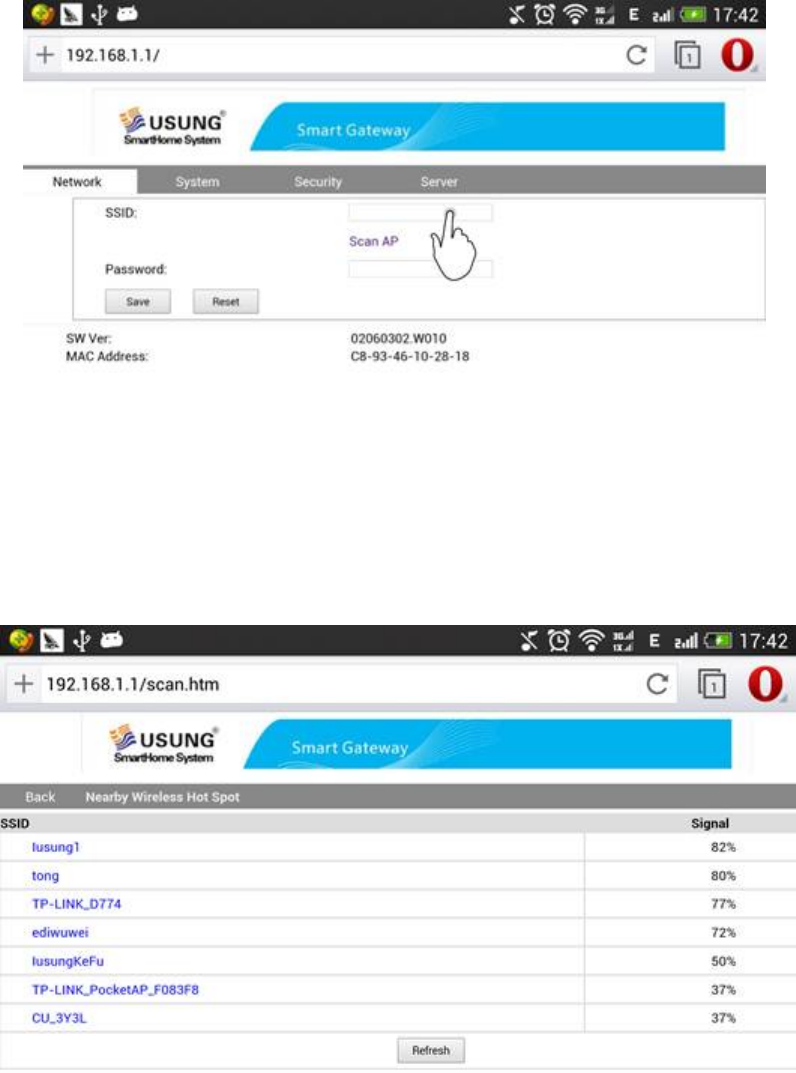
Or by auto-scanning using Scanning Hotspot function, you may choose the
SSID of your Home WIFI.
z Input the password for your home WIFI;
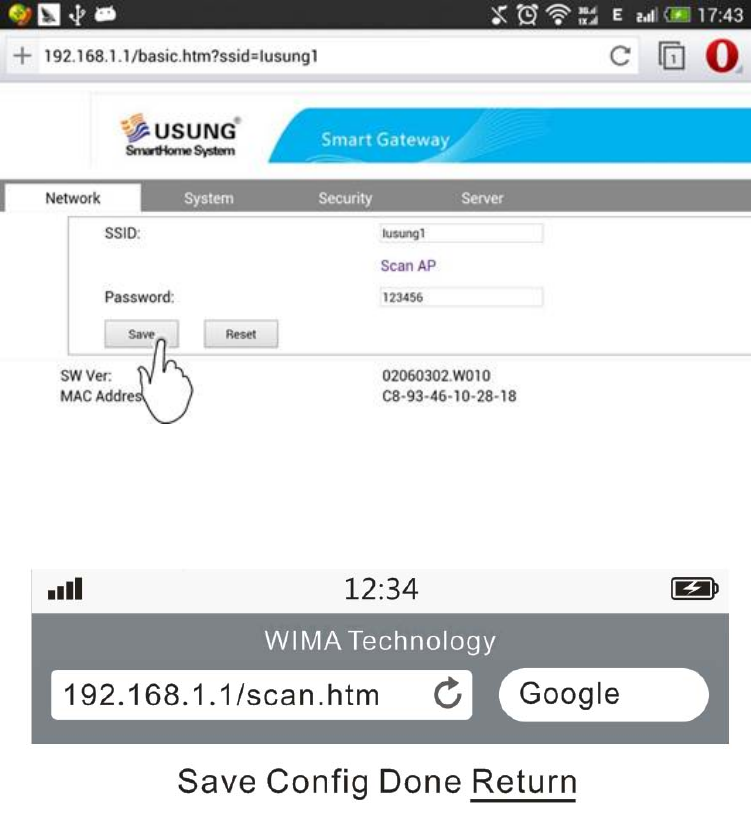
Click Save button to save the settings data.
Click Return to go back to the Router Configuration interface.
and then click on Return complete the settings.
z After completion of the above configuration, the Smart Gateway should
have joined your home WIFI.
Now, if your mobile has not yet connected to your home WIFI
automatically, please open the Settings Æ Wireless LAN, and connect your
mobile again to your home WIFI.
z Reopen your mobile client software and go back to the login interface;
The client software will automatically search the Smart Gateway that joined
already in your home WIFI, and display it (or them) in the login list.
(This process will last for 10-60 seconds, be patient please. If it takes too
long to find your WIFI, please press down the reset button at the back of
the gateway for 6 seconds to reset the gateway and then you may start the
configuration from the start again.
z After completion of the search , please choose the gateway that you want
to login and input the password for the gateway (default is the initial 8
digits of the gateway’s ID ).
Login! Congratulations! You’ve finished the settings, now you can use your
SmartHome System.
Note:
z Once completed above setting procedures, you may not change above initial
settings through the gateway’s built-in WIFI network directly, unless reset the
gateway.
z After completion of above setting procedures, if your other family members
need to control the SmartHome system by using the mobile client software
through the home WIFI, they are not required to repeat above configuration
but only to login with gateway password.
z When using the Mobile Client Software, please keep live the connection to the
wireless LAN of your home router.
z If you changed the home WIFI router, you need to reset the gateway (for
guidance please refer to the product manual), and repeat the configurations
described in this manual.
UsingAPPSoftware
z Naming and Area Definition
Please confirm firstly that you have correctly installed and powered on
all smart components.
Open the SmartHome APP software and login , in the main
interface, click on My Settings.

In My Settings interface, click to open the Online Device, where you
see all installed smart components.
The default name of a newly added device is its ID. Click on any device,
in the popup menu, you can rename the device and assign an area to
it.(if you have marked down the information of the device such as
installation location etc. by using the suite attached ID Backup Table,

you may now take advantage of it)
After completion of the settings, please click on Save button on the
top-right corner.
z Using Smart Power Controller
Before start using, please make sure you have correctly installed the
Smart Power Controller strictly following the attached Product Manual.
Then, please go back to the home interface of the software, click on
Online Devices button to enter the Online Device list.

Find any Smart Power Controller item in the list, click on the Switch
button , and you may turn on/off the light or light group controlled by
this controller.
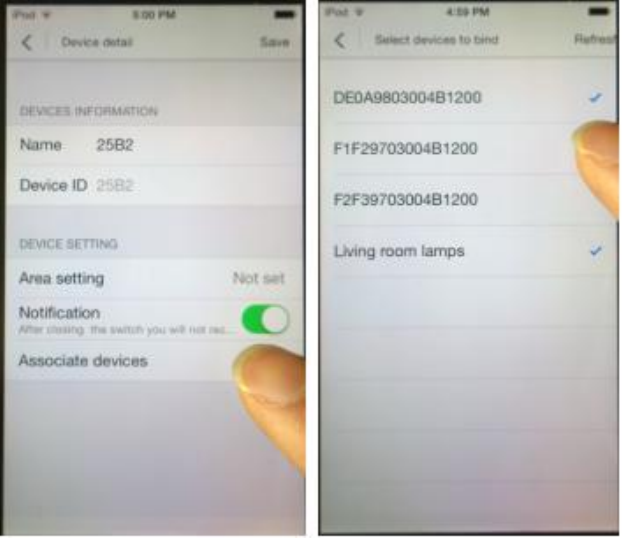
z Configure and use Smart Switch Panel
Click and enter My Settings Æ Online Devices to enter the list;
Click any Smart Switch Panel in the list, and enter the Device Details
interface.
In the Device Details interface, click Associate Device to open the Select
Device to Bind list ,and check the device that you want to bind with this
Switch Panel;
After binding, you may use the Switch Panel to turn on/off the light or
light group controlled by this Smart Power Controller.
Click it again to cancel the binding;
The Panel can be bound to multiple Smart Power Controllers
simultaneously.

z Configure and use Smart Infrared Controller
Please install the Smart Infrared Controller to a proper position
according to the product manual, so as to ensure those home
appliances can receive the controlling signals from the Smart Infrared
Controller(There should be no barrier between the infrared controller
and the appliances );
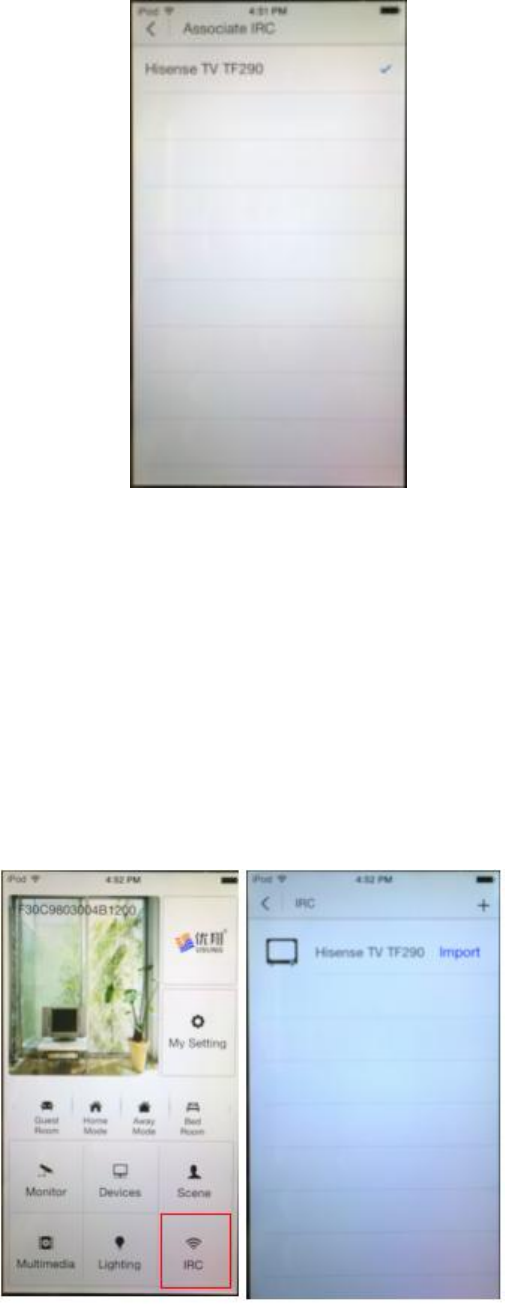
Click to enter My Settings Æ Remote Devices
Click top-right corner “+”, and add a new simulated remote controller
for the mobile client. In the Add New Simulative Remote Controller
interface, enter the name for the simulative Remote Controller, and
select the type for the remote controller, e.g.: TV.
Click the Remote Controller Name in the Add New list to open the
Remote Controller Learning interface. Prepare your TV remote, then you
may start to carry out the learning procedure for your simulative

remote controller. Take TV simulative controller for example, the
detailed steps are:
Prepare your TV remote controller, and make sure it can work
normally.
Click any key on the simulative remote controller to enter the
learning mode, when seeing prompt: On learning key, please turn
your remote controller to the gateway and press down
corresponding key!”, please operate according to the prompt
message;
When the key turns dark, and the prompt “learning’s done”
pops up , it shows the key is successfully learnt.
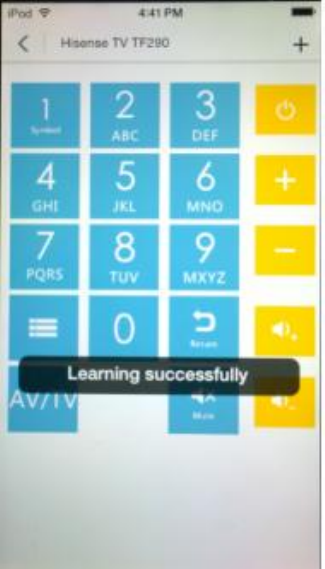
Thereafter, you may operate in turn to “learn”other necessary
keys for your simulative remote controller.
After the key-learning is done, go back to “My Settings”interface, and
click to enter “Online Device”.
Click Guest Room Infrared Controller to enter Device Details interface.
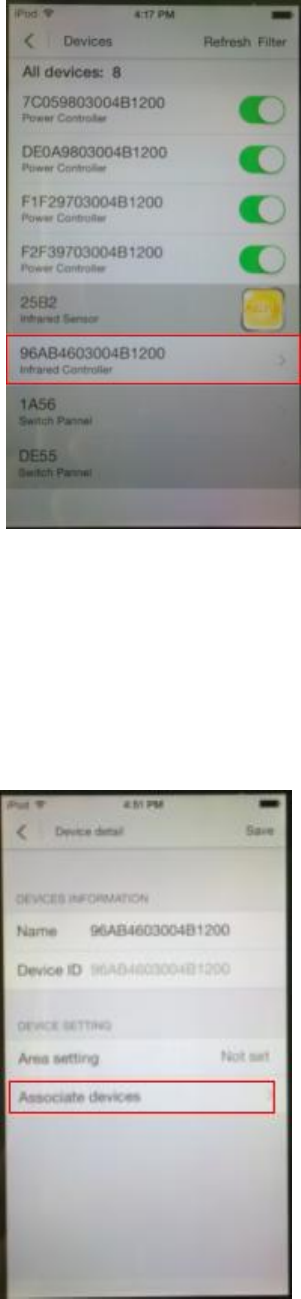
Click on Associate Remote Controller to enter Set Remote Binding
interface.
In Bind Remote Controller list, check to bind simulative TV remote
controller that was already created, and the setting is done!
Go back the software home, click Remote Controllable Devices key, in
the remote controllable device list, click to open TV simulative remote
controller. Now, you may start to use the keys of simulative remote
controller to control your TV.
FCC WARNING
This device complies with Part 15 of the FCC Rules. Operation is subject to the following two
conditions:
(1) This device may not cause harmful interference, and
(2) this device must accept any interference received, including interference that may cause
undesired operation.
NOTE 1: This equipment has been tested and found to comply with the limits for a Class B digital
device, pursuant to part 15 of the FCC Rules. These limits are designed to provide reasonable
protection against harmful interference in a residential installation. This equipment generates, uses
and can radiate radio frequency energy and, if not installed and used in accordance with the
instructions, may cause harmful interference to radio communications. However, there is no
guarantee that interference will not occur in a particular installation. If this equipment does cause
harmful interference to radio or television reception, which can be determined by turning the
equipment off and on, the user is encouraged to try to correct the interference by one or more of
the following measures:
- Reorient or relocate the receiving antenna.
- Increase the separation between the equipment and receiver.
-Connect the equipment into an outlet on a circuit different from that to which the receiver is
connected.
-Consult the dealer or an experienced radio/TV technician for help.
NOTE 2: Any changes or modifications to this unit not expressly approved by the party
responsible for compliance could void the user's authority to operate the equipment
FCC Radiation Exposure Statement
This equipment complies with FCC RF radiation exposure limits set forth for an uncontrolled
environment. This transmitter should be installed and operatated with a minimum distance of 20
centimeters between the radiator and your body and must not be co-located or operating in
conjunction with any other antenna or transmitter.