Xinhuafeng technology D28RSC Dash camera/DVR User Manual

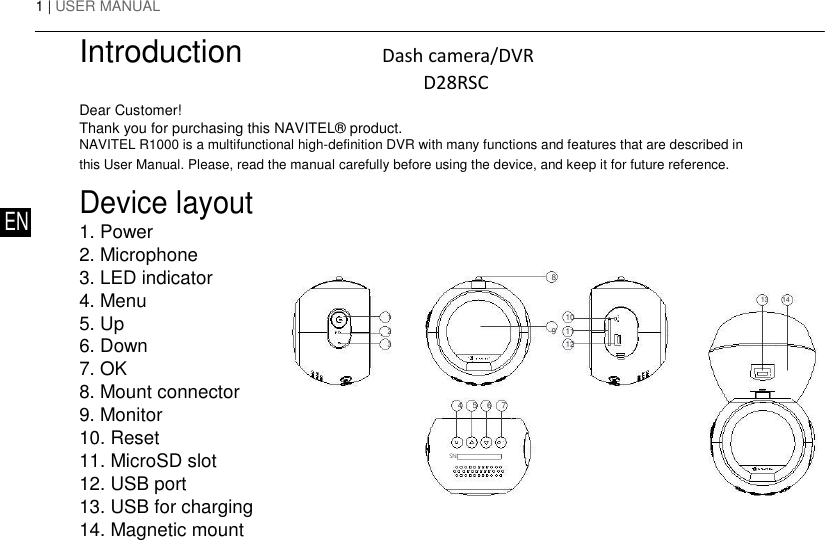
Shenzhen Xinhuafeng technology company Limited Dash camera/DVR

User manual

1 | USER MANUAL  Introduction                Dash camera/DVR                   D28RSC  Dear Customer!  Thank you for purchasing this NAVITEL® product.  NAVITEL R1000 is a multifunctional high-definition DVR with many functions and features that are described in this User Manual. Please, read the manual carefully before using the device, and keep it for future reference.   Device layout EN 1. Power   2. Microphone  3. LED indicator  4. Menu  5. Up  6. Down  7. OK  8. Mount connector  9. Monitor  10. Reset  11. MicroSD slot  12. USB port  13. USB for charging  14. Magnetic mount         8        13 14  1   9 10   2   11   3    12   4 5 6 7    SN:
                          | 2        Buttons          Button Functions          Press and hold for 3 seconds to turn the device on/off.    Power Press to switch between Video Record, Capture, and Playback modes.     Press to exit any selected menu.     EN      Menu Press to access Mode Settings menu. Press again to access Setup menu.            In Video Record mode, press to start recording; press again to stop.    OK In Capture mode, press to take a picture.    In Playback mode, press to select a file, or pause/unpause a video.         In the menu, press to select a menu item or to confirm selected option.          In the Main Menu, press to select next/previous menu item or file. In    Up/Down Video Recording mode press Down to lock the file (locked files cannot be     deleted or overwritten). In Capture mode, press to zoom in or out.         Reset If the device is not responding, press to reset.
3 | USER MANUAL  Specifications    Processor MSTAR MSC8328       Display 1.2” TN       Recording format MP4 EN      Video resolution 1080 FHD 1920x1080 P   /30 fps          Image format JPG       Image resolution 2048x1536       Storage microSD card       microSD card capacity 64 GB max       USB USB 2.0      Note: the specifications may change due to upgrades.   GPS Supported; built-in  antenna       Power USB 2.0 DC 5 V 1-1.5 A     Frequency 50 Hz / 60 Hz     Battery 180 mAh 3.7 V  Rechargeable battery       Working current 700 mA     Microphone/speaker Supported     Wi-Fi Supported;  Chipset AP6181        Chinese simplified, Chi-   nese traditional, Czech,   English, French, German,  Language Italian, Japanese, Korean,   Polish, Romanian,   Russian, Slovak, Spanish,   Ukranian
                           | 4       Device functions   Video Connect the device to an external power supply, put the microSD card in and it will start recording auto    matically (indicated by the flashing blue light). Press the OK button to stop recording (the blue light will    become steady). Press OK again to record another video. Each video will be saved automatically.   Photo In Video Record mode, press the Mode button to enter Capture mode, press the OK button to take a    photo (it will be saved automatically). You can also use the snapshot controller to take instant pictures    EN   remotely.     Playback Press Power button to enter Playback mode (in Video Record mode press the Mode button twice); press    the Up and Down buttons to select a file; press the OK button to play a file. During playback, press OK to    pause/unpause; press the Up and Down keys to fast forward/rewind.   Lock file In Video Record mode, press Down to protect the current recording. A key symbol will appear at the    bottom of the screen. In Playback mode, select a file, press Menu and select Protect, then Lock Current    or Lock All. Protected files cannot be deleted or overwritten. Select Unlock Current/Unlock All to remove    protection.   Video menu In this menu section you can choose the quality of the video and additional features such as color,    contrast, saturation etc.   Capture menu In this menu section you can choose the size of pictures and additional features such as color, exposure,    saturation etc.   Sound Record Choose this option to record video with or without sound.
  5 | USER MANUAL        Loop recording This setting allows saving the recording in separate files every few minutes. For example, if set to 60    seconds, 10 minutes of footage will be saved as 10 one minute fragments. If the memory card is full, all    unprotected files will be overwritten in the order they were created.   G-sensor If the vehicle is hit by something, the DVR will automatically lock the current video.   Stamp This function adds date stamp or device logo to the record. Press OK to select type of stamp or to    switch the function off. You can also choose GPS stamp to mark your location.   GPS location Device supports built-in GPS chipset and GPS antenna, it can show longitude, latitude and other informa- EN    tion on your current location. Press GPS Status to check GPS dates. Press On in the GPS Stamp menu to    add GPS information to your files.   Parking monitor When the device in the standby mode will detect the vibration, it will automatically start recording. If for    one minute vibration will not happen again, the device goes into standby mode.   Motion detection Motion detection function is available in the Parking mode (disabled by default). In the Video record    mode, select “Motion event REC”. When an object is moving the device will automatically start recording.    If the object does not move for more than 10 seconds, recording stops.   Battery Red indicator lights up when the device is plugged into an external power supply; as the battery is    charging, the red will gradually dim; the red light going out means the battery is full.   Screen saver The device can automatically shut off the screen to reduce power consumption; time interval can be    set in the Screen Saver menu.   APP support You can see and share your videos and photos, taken by DVR, in your mobile phone through special app.    The app is connecting via Wi-Fi network and should be installed on your mobile phone.
  DVR installation  1. Put the miscroSD card into the DVR. Use a high-speed SD card (Class10 or above); capacity should be within 8-64 GB.  2. Secure the device on the windshield with the bracket.  3. Connect the car charger to the cigarette lighter socket.  4. Connect the USB interface to the car charger with the charger extension cord.  5. Adjust the camera position.  6. Start the engine; check whether the device is installed correctly. EN  Note: if the device is installed correctly, the indicator will glow red; the device will start up and begin recording (indicated by fl ashing blue light.   Precautions  1. Use only the original charger adapter. Using another adapter may negatively affect the device’s battery.  2. Do not use the device in humid or hot environment.  3. Keep the lens clean.  4. Do not disassemble the device and do not perform repairs by yourself.  5. Strictly follow the laws and regulatory acts of the region where the device is used. This device can not be used for illegal purposes.
7 | USER MANUAL        Wi-Fi app installation   1. In the Settings menu of your DVR choose App QR Code, scan the code with your mobile phone to download DVR Wi-Fi    sharing application. Install it after completion of downloading.    2. Choose Wifi in Settings menu, press On.    3. Connect your mobile phone to the DVR through Wi-Fi connections. If necessary use the password given in the DVR.    4. Run the app, in opened window press Add new device [1].    5. Choose your DVR device in the list [2]. Now you can capture video or photo via the app [3]. Note, that DVR’s menu is  EN   unavailable when the app is on.       6. In the Setting menu you can control DVR functions as well as select video ratio and format your SD card [4].
FCC Caution. This device complies with part 15  of the  FCC Rules. Operation is  subject to  the  following two conditions:   (1) This device may not cause harmful interference, and   (2)  this  device  must  accept  any  interference  received,  including  interference  that  may  cause undesired operation.  Any Changes or modifications not expressly approved by  the party responsible for compliance could void the user's authority to operate the equipment.  Note: This equipment has been tested and found to comply with the limits for a Class B digital device, pursuant to part 15  of the FCC Rules. These  limits are designed to provide reasonable protection  against  harmful  interference  in  a  residential  installation.  This  equipment  generates uses and can radiate radio frequency energy and, if not installed and used in accordance with the instructions,  may  cause  harmful  interference  to  radio  communications.  However,  there  is  no guarantee  that  interference  will  not  occur  in  a  particular  installation.  If  this  equipment  does cause harmful interference to radio or television reception, which can be determined by turning the equipment off and on, the user is encouraged to try to correct the interference by one or more of the following measures: -Reorient or relocate the receiving antenna. -Increase the separation between the equipment and receiver. -Connect the equipment into an outlet on a circuit different from that to which the receiver is connected. -Consult the dealer or an experienced radio/TV technician for help.  This  equipment  complies  with  FCC  radiation  exposure  limits  set  forth  for  an  uncontrolled environment.  This  equipment  should  be  installed  and  operated  with  minimum  distance  20cm between the radiator & your body.

Navigation menu