Xinwei Electronic Quanzhou HST11 Bluetooth Headset User Manual
Xinwei Electronic Co., Ltd., Quanzhou Bluetooth Headset
User Manual
1
Welcome to use UTEL T11 bluetooth headset
UTEL T11 wireless Bluetooth headset surpass the
tradition. It is compact, small and lightweight, also easy
to use. Bluetooth V2.0 transmit more fast, voice quality more
better and high ability to avoid interference, Although you
don’t need wire connect anymore, but you will more close
with the pioneer global Bluetooth science and technology.
Free to communicate with others. Please read this manual
carefully before starting operation and keep it for future
reference.
Introduction
What is Bluetooth Wireless Technology?
Bluetooth devices communicate without wires, using built-in
radio transceivers that operate on a globally available radio
frequency to ensure worldwide compatibility. Your Bluetooth
wireless headset can communicate with other Bluetooth
devices within a range of approximately 10 meters (33feet).
2
How Can I Use My Wireless Headset?
Your Wireless headset, with Bluetooth technology, lets you connect
with other similarity equipped devices.
z Use your phone hands free
z Handle incoming and outgoing call with the handset
Multifunction control button (MFB)
z Use voice activation to make calls
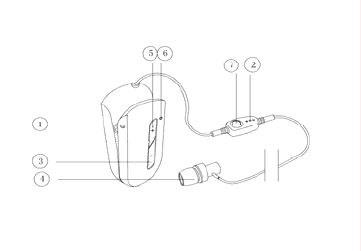
Headset Scheme
3
1. Charging Port-accepts the plug for your headset battery charge
2. Microphone-Picks up your voice input
3. Volume control buttons-Adjusts speaker volume down.
4. Speaker-Plays the sound you receive on the call
5.Volume control buttons-Adjusts speaker volume up
6. LED: work and charger light
7. Multifunction Button- controls multiple headset function
4
Using Your Headset
Charging Your Headset Battery
When to charge
First Time Use-Before you can use your headset, charge its
self-contained battery for two hours.
Recharging-when you hear five rapid high tones through the headset
speaker, repeated at 20-second intervals, the headset battery needs
recharging.
Over extended periods of time, batteries gradually ware down and
require longer charging times. This is normal.
Additionally, you battery will have less standby time the more you talk
on the phone with your headset.
The rechargeable batteries that power you wireless headset must be
disposed of properly and may need to be recycled. Contact your local
recycling center for proper disposal methods.
Warning: Never dispose of batteries in a fire because they may
explode.

5
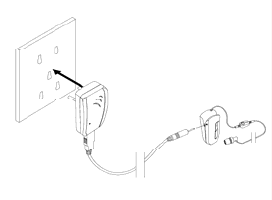
How to charge
1. Plug the charger into the headset.
2. Plug the other end the charger into an electrical outlet.
As the picture indicator.
During charging, the headset indicator turns on and remains
on until charging completes.
The headset will not work while charging. Your headset
fully charges in approximately two hours.
3. When charging completes (indicator off), remove the
charger for electrical outlet..
Note: You can also use a Original Vehicle Power Adapter to charge the
headset battery while in your vehicle.
A fully charged headset battery provides approximately
*8 hours talk time
* 160 hours standby time
6
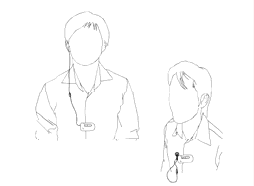
Wearing Your headset
Step
1. This new item is line-clip Bluetooth, you can wear in shoulder,
collapsible or frock pocket
2. Put the earphone into the ear.
3. Point the microphone toward your mouth near 7-8 cm
4. The earphone can keep in the handsfree hook when not use it.
5. The volume adjustable.
7
How to Power On/Off Your Headset
To Power Your Headset On
Action
Press and hold the MFB for 3 seconds until the LED flashes rapidly.
To Power Your Headset Off
Action
Press and hold the MFB for 3 seconds until the LED flashes rapidly.
Pairing Your Headset and Phone
Note: You must pair your headset and phone before you can make a
call.
“Pairing” creates a link between devices with Bluetooth wireless
technology, and allows the phone to remember the headset’s unique ID.
When your headset and phone are paired, your headset automatically
connects to your phone.
Pairing
With the headset and phone close together
Action
1. With the headset off, hold the multifunction Button until the LED
remains on (about 5 seconds).
2. Performa device discovery for your phone, refer to the phone’s user’
guide. When the scan is complete, the phone displays the devices
found.
3. Select the
Logo and model number from
the discovered devices
8
list and confirm following the on screen prompts.
4. When prompted by the phone enter the passkey 0000 and confirm to
pair the headset with the phone.
5. The device ID is now stored in the phone’s memory pairing is
successful when the headset indicator flashes rapidly.
Pairing to Additional Devices
Your headset can store pairing information for up to eight different
devices when Bluetooth wireless technology. Devices are stored in a
“Paired Device List” in memory in the order entered.
When an attempt to pair to more than eight devices is made, the oldest
paired device is removed from the list.
Any of the eight paired devices can initiate a connection to the headset.
The headset will only automatically initiate a connection (upon
power-up) with the last device is was connected to. If you want to
connect the headset to another device in the paired device list. You must
initiate the connection form that device. Whichever of the eight devices
initiates a connection to the headset afterwards. That device then
becomes the “last connected” device.

9
Adjusting Headset Volume
Increasing or Decreasing Volume
To increase speaker volume, press the top (+) volume button repeatedly
until you reach the desired volume level.
To decrease speaker volume, press the bottom (-) volume button
repeatedly until you reach the desired volume level.
Making and Receiving Calls
Your headset supports both handsfree and headset profiles.
Accessing call functions depends on which profile your phone supports.
Note: Some phone do not support all features listed. See your phone
user’s guide you can activate call functions for the Handsfree profile
according to the following
Using Your Headset Indicator LED
With charger plugged in:
Headset Indicator Status
On Charging in progress
Off Charging complete

10
With no charger plugged in:
Headset Indicator Status
Off Power off
ON (Steady) Pairing mode
10 rapid flashes Pairing successful
Flashes at a 3-second interval
(1. seconds ON
2.9 seconds OFF)
Standby (not on a call)
Pulses at an 8-second interval
(2.0 seconds ON
6.0 seconds OFF)
Connected (on a call)
Note: When the wireless headset is paired to the phone and there is no
activity for 5 minutes, the blue flashing LED turns off, any button press
on the headset, resets the timer and the flashing resumes. If you press
the up and down volume buttons at the same time during a call the
pulsing LED turns off for the duration of the call.

11
Audio Tones
Audio Tone Headset Status
Single high tone when pressing
volume button
Volume maximum or minimum
reached
Five rapid high tones, repeated
every 20 seconds
Low battery
No audio indications,
deteriorating audio quality
Out of range
Series of 4 tones, low to high Audio link open (headset mode).
Active call (hands free mode)
Ring tone Incoming call
Single high tone Pairing confirmation
Single low tone Initiate voice activation
Dual high/low tone Voice tag not recognized
Single high tone End call
Series of 4 tones, high to low Audio link closed (headset mode)
Call ended (hands free mode)
Fast high/low tone every 5
seconds (max & min. volume
confirm beep)
No network/service
No tone Power ON/OFF
12
Troubleshooting
* When the Bluetooth headset can not connect with the
handset. Please do follow operation:
1. Make sure the Bluetooth headset was turn on and was
paired with the handset.
2. The Bluetooth function was startup.
3. The distance between handset and Bluetooth headset
no over 10M, or there are some stumbling block
between the Bluetooth headset and handset like
wall or other electron equipments.
4. The paired Bluetooth list was full in the message.
One Bluetooth headset
can be linked up (or
"paired") with up to 8 devices
.
Please pair the
headset again when the paired handsets was full.
* When the headset can not connect with the selected
handset automatically.
Please use the charger to plug in again or turn off
the power and
pair it again.
Warning:
This device complies with part 15 of the FCC Rules.
13
Operation is subject to the following two conditions:
(1) This device may not cause harmful interference, and (2)
this device must accept any interference received, including
interference that may cause undesired operation.Changes or
modifications to this unit not expressly approved by the party
responsible for compliance will void the user’s authority to
operate the equipment. Any change to the equipment will void
FCC grant.
This equipment has been tested and found to comply with the
limits for a Class B digital device,pursuant to part 15 of the
FCC Rules. These limits are designed to provide reasonable
protection against harmful interference in a residential
installation. This equipment generates,uses and can radiate
14
radio frequency energy and, if not installed used in
accordance with the instructions, may cause harmful
interference to radio communications. However, there is no
guarantee that interference will not occur in a particular
installation. If this equipment does cause harmful interference
to radio or television reception, which can be determined by
turning the equipment off and on, the user is encouraged to try
to correct the interference by one or more of the following
measures:
--Reorient or relocate the receiving antenna.
--Increase the separation between the equipment and receiver.
--Connect the equipment into an outlet on a circuit different
from that to which the receiver is connected.
15
--Consult the dealer or an experienced radio/TV technician for
help.
The equipment compliance with FCC radiation exposure limit
set forth for uncontrolled Environment