Xplore Technologies EM7455 Radio Module User Manual Book R12 UG W10
Xplore Technologies Radio Module Book R12 UG W10
Users Manual

XSLATE® R12 Tablet
by Xplore™
Model iX125R1
User Guide

ii
© 2003–2016 Xplore Technologies Corporation of America. All rights
reserved.
This document contains information protected by copyright. No part of
this document may be reproduced in any form without written consent
from Xplore Technologies®corporation.
The information in this document is provided “as is” and is subject to
change without notice. Xplore Technologies is not liable for errors or
omissions in this document.
Xplore, Motion by Xplore, View Anywhere, and QuickNav are trademarks
or registered trademarks of Xplore Technologies Corporation of America
in the U.S.A. and other countries.
Acrobat is a registered trademark of Adobe Systems Incorporated.
Bluetooth is a registered trademark owned by the Bluetooth SIG, Inc.,
U.S.A. and licensed to Xplore Technologies Corporation of America.
Intel, Intel Atom, Core, vPro, and Centrino are trademarks or registered
trademarks of Intel Corporation or its subsidiaries in the United States
and other countries.
Android, Google, Google Play, and other marks are trademarks or
registered trademarks of Google Inc. in the United States and/or other
countries.
Windows, Windows Journal, and Skype and other marks are trademarks
or registered trademarks of Microsoft Corporation.
Corning and Gorilla Glass are registered trademarks of Corning
Incorporated.
Qualcomm, Gobi, and Gobi 5000 are trademarks or registered trademarks
of Qualcomm Incorporated.
Wi-Fi is a registered trademark of the Wi-Fi Alliance.
Kensington and MicroSaver are registered trademarks of the Kensington
Technology Group.
HDMI, the HDMI logo, and High-Definition Multimedia Interface are
trademarks of HDMI Licensing LLC in the United States and other
countries.
This product incorporates copy protection technology that is protected
by U.S. and foreign patents, including patent numbers 5,315,448 and
6,836,549, and other intellectual property rights. The use of the
Macrovision copy protection technology in the product must be
authorized by Rovi Corporation. Reverse engineering or disassembly is
prohibited.
Xplore Technologies Corporation of America has made every effort to
identify trademarked properties and owners on this page. All brands and
product names used in this document are for identification purposes only
and may be trademarks or registered trademarks of their respective
companies.
The warranties for Xplore and Motion by Xplore products are set forth in
the express limited warranty statements accompanying such products.
Nothing in this document constitutes an additional warranty.
The Xplore and Motion by Xplore products and services may be covered
by one or more patent-protected inventions. Additional patents may also
be pending. For more information, see this site:
https://www.xploretech.com/us/patents
The end user may access only one language version of the
operating system.
L'utilisateur final ne peut accéder qu'à une seule version linguistique
du système d'exploitation.
Der Endbenutzer darf nur auf eine Sprachversion des
Betriebssystems zugreifen.
De eindgebruiker heeft slechts toegang tot één taalversie van het
besturingssysteem.
L'utente finale può accedere a una sola lingua del sistema operativo.
El usuario final sólo podrá acceder a una versión de idioma del
sistema operativo.
Loppukäyttäjä voi käyttää vain yhtä käyttöjärjestelmän kieliversiota.
Användaren har endast tillgång till en språkversion av
operativsystemet.
Slutbrugeren har kun adgang til ét af operativsystemets
sprogversioner.
Sluttbruker kan aksessere kun én av operativsystemets
språkversjoner.
O utilizador final pode alcançar somente uma versão de língua do
sistema de exploração.
O usuário final pode acessar apenas uma versão de idioma do
sistema operacional.
ModeliX125R1
PN024-02-0576-A00
Revision Date: June 2016

Table of Contents iii
Chapter 1 Getting Started . . . . . . . . . . . . . . . . . . . . . 1
Features. . . . . . . . . . . . . . . . . . . . . . . . . . . . . . . . . . . . . . . . . . . . . . . . . . . . . . . . . . .1
Optional Features . . . . . . . . . . . . . . . . . . . . . . . . . . . . . . . . . . . . . . . . . . . . . . . . . .2
Mobile Broadband with GNSS . . . . . . . . . . . . . . . . . . . . . . . . . . . . . . . . . . . . . . . . . . . . . . . . 2
Discrete GPS with SBAS. . . . . . . . . . . . . . . . . . . . . . . . . . . . . . . . . . . . . . . . . . . . . . . . . . . . . . . 2
Security . . . . . . . . . . . . . . . . . . . . . . . . . . . . . . . . . . . . . . . . . . . . . . . . . . . . . . . . . . . . . . . . . . . . . . 2
TPM Protection. . . . . . . . . . . . . . . . . . . . . . . . . . . . . . . . . . . . . . . . . . . . . . . . . . . . . . . . . . . . . . . 2
Data and Device Security (Absolute DDS) . . . . . . . . . . . . . . . . . . . . . . . . . . . . . . . . . . . . . 3
Other Optional Features . . . . . . . . . . . . . . . . . . . . . . . . . . . . . . . . . . . . . . . . . . . . . . . . . . . . . . 3
Overview of the XSLATE R12 Tablet . . . . . . . . . . . . . . . . . . . . . . . . . . . . . . . . .4
Front . . . . . . . . . . . . . . . . . . . . . . . . . . . . . . . . . . . . . . . . . . . . . . . . . . . . . . . . . . . . . . . . . . . . . . . . 4
Back . . . . . . . . . . . . . . . . . . . . . . . . . . . . . . . . . . . . . . . . . . . . . . . . . . . . . . . . . . . . . . . . . . . . . . . . . 5
Right Side. . . . . . . . . . . . . . . . . . . . . . . . . . . . . . . . . . . . . . . . . . . . . . . . . . . . . . . . . . . . . . . . . . . . 6
Left Side . . . . . . . . . . . . . . . . . . . . . . . . . . . . . . . . . . . . . . . . . . . . . . . . . . . . . . . . . . . . . . . . . . . . . 6
Pen . . . . . . . . . . . . . . . . . . . . . . . . . . . . . . . . . . . . . . . . . . . . . . . . . . . . . . . . . . . . . . . . . . . . . . . . . . 7
Starting Your XSLATE R12 Tablet. . . . . . . . . . . . . . . . . . . . . . . . . . . . . . . . . . . .7
Powering Up the Tablet . . . . . . . . . . . . . . . . . . . . . . . . . . . . . . . . . . . . . . . . . . . . . . . . . . . . . . 7
Connecting to a Wireless Network . . . . . . . . . . . . . . . . . . . . . . . . . . . . . . . . . . . . . . . . . . . . 8
Setting Up Wi-Fi. . . . . . . . . . . . . . . . . . . . . . . . . . . . . . . . . . . . . . . . . . . . . . . . . . . . . . . . . . . 8
Setting Up Bluetooth . . . . . . . . . . . . . . . . . . . . . . . . . . . . . . . . . . . . . . . . . . . . . . . . . . . . . . 8
Setting Up Mobile Broadband with GPS (Optional) . . . . . . . . . . . . . . . . . . . . . . . . . 9
Locking and Unlocking Your Tablet . . . . . . . . . . . . . . . . . . . . . . . . . . . . . . . . . . . . . . . . . . . 9
Using Sleep Mode . . . . . . . . . . . . . . . . . . . . . . . . . . . . . . . . . . . . . . . . . . . . . . . . . . . . . . . . . . . . 9
Modifying Sleep Mode . . . . . . . . . . . . . . . . . . . . . . . . . . . . . . . . . . . . . . . . . . . . . . . . . . . . . . 10
Setting Up the Hibernate Mode. . . . . . . . . . . . . . . . . . . . . . . . . . . . . . . . . . . . . . . . . . . . . . 10
Becoming Familiar with Your Tablet. . . . . . . . . . . . . . . . . . . . . . . . . . . . . . . 12
Using the Windows Start Button . . . . . . . . . . . . . . . . . . . . . . . . . . . . . . . . . . 12
Tablet Mode Interface . . . . . . . . . . . . . . . . . . . . . . . . . . . . . . . . . . . . . . . . . . . . 13
Tablet Mode and the Start Button. . . . . . . . . . . . . . . . . . . . . . . . . . . . . . . . . . . . . . . . . . . . 13
Tablet Mode and Taskbar Visibility . . . . . . . . . . . . . . . . . . . . . . . . . . . . . . . . . . . . . . . . . . . 13
Accessing the Know Your Tablet Application . . . . . . . . . . . . . . . . . . . . . . . . 14
Optional Setup Tasks. . . . . . . . . . . . . . . . . . . . . . . . . . . . . . . . . . . . . . . . . . . . . 15
Creating a Recovery Drive . . . . . . . . . . . . . . . . . . . . . . . . . . . . . . . . . . . . . . . . . . . . . . . . . . . 15
Attaching the Pen Tether . . . . . . . . . . . . . . . . . . . . . . . . . . . . . . . . . . . . . . . . . . . . . . . . . . . 15
Connecting the Tablet to a Docking Station . . . . . . . . . . . . . . . . . . . . . . . . . . . . . . . . . 15
Connecting the Tablet to a Display Monitor . . . . . . . . . . . . . . . . . . . . . . . . . . . . . . . . . . 15
For More Information . . . . . . . . . . . . . . . . . . . . . . . . . . . . . . . . . . . . . . . . . . . . 16
Chapter 2 Using Your XSLATE R12 Tablet . . . . . . 17
XSLATE R12 Tablet PC Applications . . . . . . . . . . . . . . . . . . . . . . . . . . . . . . . 18
Using the Tablet Center . . . . . . . . . . . . . . . . . . . . . . . . . . . . . . . . . . . . . . . . . . 18
Opening the Tablet Center . . . . . . . . . . . . . . . . . . . . . . . . . . . . . . . . . . . . . . . . . . . . . . . . . . 18
Tablet Interface Settings. . . . . . . . . . . . . . . . . . . . . . . . . . . . . . . . . . . . . . . . . . . . . . . . . . . . . 19
Adjusting Pen Options . . . . . . . . . . . . . . . . . . . . . . . . . . . . . . . . . . . . . . . . . . . . . . . . . . . 19
Adjusting Touch . . . . . . . . . . . . . . . . . . . . . . . . . . . . . . . . . . . . . . . . . . . . . . . . . . . . . . . . . 19
Table of Contents

iv Table of Contents
Configuring the Tablet PC Settings . . . . . . . . . . . . . . . . . . . . . . . . . . . . . . . . 20
Setting Up the Display . . . . . . . . . . . . . . . . . . . . . . . . . . . . . . . . . . . . . . . . . . . . . . . . . . . . . . . 20
Setting the Display Options . . . . . . . . . . . . . . . . . . . . . . . . . . . . . . . . . . . . . . . . . . . . . . . . . . 21
Configuring the Tablet Function Buttons . . . . . . . . . . . . . . . . . . . . . . . . . . . . . . . . . . . . . 22
Configuring the Menus for Left or Right Hand . . . . . . . . . . . . . . . . . . . . . . . . . . . . . . . . 23
Setting Up Wireless Connections . . . . . . . . . . . . . . . . . . . . . . . . . . . . . . . . . . 24
Connecting to a Wi-Fi Network. . . . . . . . . . . . . . . . . . . . . . . . . . . . . . . . . . . . . . . . . . . . . . . 24
Temporarily Switching Off Wireless Devices . . . . . . . . . . . . . . . . . . . . . . . . . . . . . . . 25
Connecting to a Mobile Broadband Network . . . . . . . . . . . . . . . . . . . . . . . . . . . . . . . . . 26
Inserting a SIM Card . . . . . . . . . . . . . . . . . . . . . . . . . . . . . . . . . . . . . . . . . . . . . . . . . . . . . .26
Setting Up Mobile Broadband. . . . . . . . . . . . . . . . . . . . . . . . . . . . . . . . . . . . . . . . . . . . . 26
Advanced Information. . . . . . . . . . . . . . . . . . . . . . . . . . . . . . . . . . . . . . . . . . . . . . . . . . . . . . .27
Viewing Information about Your Tablet PC . . . . . . . . . . . . . . . . . . . . . . . . . . . . . . . . 27
Power Settings . . . . . . . . . . . . . . . . . . . . . . . . . . . . . . . . . . . . . . . . . . . . . . . . . . . 28
Changing the Power Plan . . . . . . . . . . . . . . . . . . . . . . . . . . . . . . . . . . . . . . . . . . . . . . . . . . . . 28
Configuring Advanced Power Settings . . . . . . . . . . . . . . . . . . . . . . . . . . . . . . . . . . . . 29
Sensors Settings. . . . . . . . . . . . . . . . . . . . . . . . . . . . . . . . . . . . . . . . . . . . . . . . . . 30
Compass . . . . . . . . . . . . . . . . . . . . . . . . . . . . . . . . . . . . . . . . . . . . . . . . . . . . . . . . . . . . . . . . . . . . 30
Location Services . . . . . . . . . . . . . . . . . . . . . . . . . . . . . . . . . . . . . . . . . . . . . . . . . . . . . . . . . 30
Showing the Map. . . . . . . . . . . . . . . . . . . . . . . . . . . . . . . . . . . . . . . . . . . . . . . . . . . . . . . . . . . . 30
Entering Text by Keyboard . . . . . . . . . . . . . . . . . . . . . . . . . . . . . . . . . . . . . . . . 31
Using the Windows On-screen Keyboards . . . . . . . . . . . . . . . . . . . . . . . . . . . . . . . . . . . . 31
Making a Keyboard Appear When Tapping in a Text Field . . . . . . . . . . . . . . . . . . 32
Accessing the Full On-screen Keyboard . . . . . . . . . . . . . . . . . . . . . . . . . . . . . . . . . . . . . . 33
After Displaying This Keyboard. . . . . . . . . . . . . . . . . . . . . . . . . . . . . . . . . . . . . . . . . . . . 33
Keeping the Icon on the Taskbar . . . . . . . . . . . . . . . . . . . . . . . . . . . . . . . . . . . . . . . . . . 33
Entering Text by Handwriting . . . . . . . . . . . . . . . . . . . . . . . . . . . . . . . . . . . . . 34
Using the Function Buttons . . . . . . . . . . . . . . . . . . . . . . . . . . . . . . . . . . . . . . . 35
Configuring the Function Buttons. . . . . . . . . . . . . . . . . . . . . . . . . . . . . . . . . . . . . . . . . . . . 36
Connecting an External Monitor . . . . . . . . . . . . . . . . . . . . . . . . . . . . . . . . . . . 36
Using the Built-in Microphones . . . . . . . . . . . . . . . . . . . . . . . . . . . . . . . . . . . . 36
Using the Cameras. . . . . . . . . . . . . . . . . . . . . . . . . . . . . . . . . . . . . . . . . . . . . . . . 37
The Web Camera . . . . . . . . . . . . . . . . . . . . . . . . . . . . . . . . . . . . . . . . . . . . . . . . . . . . . . . . . . . . 37
The Documentation Camera . . . . . . . . . . . . . . . . . . . . . . . . . . . . . . . . . . . . . . . . . . . . . . . . . 37
Camera Software . . . . . . . . . . . . . . . . . . . . . . . . . . . . . . . . . . . . . . . . . . . . . . . . . 37
Taking a Photo with the xCapture Pro Software . . . . . . . . . . . . . . . . . . . . . . . . . . . . . . 37
xCapture Pro Help . . . . . . . . . . . . . . . . . . . . . . . . . . . . . . . . . . . . . . . . . . . . . . . . . . . . . . . . . . . 38
Configuring the xCapture Pro Settings . . . . . . . . . . . . . . . . . . . . . . . . . . . . . . . . . . . . . . . 39
Editing a Photo in the xCapture Pro Application . . . . . . . . . . . . . . . . . . . . . . . . . . . . . . 40
Sending, Printing, and Copying Your Photos. . . . . . . . . . . . . . . . . . . . . . . . . . . . . . . . . . 41
Using the SlateMate Module (Optional) . . . . . . . . . . . . . . . . . . . . . . . . . . . . 42
Barcode Scanner . . . . . . . . . . . . . . . . . . . . . . . . . . . . . . . . . . . . . . . . . . . . . . . . . . . . . . . . . . . . 43
Barcode Scanner Tips . . . . . . . . . . . . . . . . . . . . . . . . . . . . . . . . . . . . . . . . . . . . . . . . . . . . . . . . 43
Using the RFID Reader . . . . . . . . . . . . . . . . . . . . . . . . . . . . . . . . . . . . . . . . . . . . . . . . . . . . . . . 44
Using the Battery . . . . . . . . . . . . . . . . . . . . . . . . . . . . . . . . . . . . . . . . . . . . . . . . . 45
Checking Battery Power . . . . . . . . . . . . . . . . . . . . . . . . . . . . . . . . . . . . . . . . . . . . . . . . . . . . .45

Table of Contents v
Removing and Replacing the Battery . . . . . . . . . . . . . . . . . . . . . . . . . . . . . . 46
Removing the Battery . . . . . . . . . . . . . . . . . . . . . . . . . . . . . . . . . . . . . . . . . . . . . . . . . . . . . . . 46
Replacing the External Battery . . . . . . . . . . . . . . . . . . . . . . . . . . . . . . . . . . . . . . . . . . . . . . . 46
Hot-swapping the Battery . . . . . . . . . . . . . . . . . . . . . . . . . . . . . . . . . . . . . . . . . . . . . . . . . . . 47
Long-term Battery Storage . . . . . . . . . . . . . . . . . . . . . . . . . . . . . . . . . . . . . . . . . . . . . . . . . . 47
Disposing of Used Batteries . . . . . . . . . . . . . . . . . . . . . . . . . . . . . . . . . . . . . . . . . . . . . . . . . 47
Battery and Power Management Tips . . . . . . . . . . . . . . . . . . . . . . . . . . . . . . . . . . . . . . . . 48
Tips for Saving Power . . . . . . . . . . . . . . . . . . . . . . . . . . . . . . . . . . . . . . . . . . . . . . . . . . . . 48
Changing the Power Plan. . . . . . . . . . . . . . . . . . . . . . . . . . . . . . . . . . . . . . . . . . . . . . . . . . . . 48
Power Saver Mode . . . . . . . . . . . . . . . . . . . . . . . . . . . . . . . . . . . . . . . . . . . . . . . . . . . . . . . 48
Changing the Power Plan. . . . . . . . . . . . . . . . . . . . . . . . . . . . . . . . . . . . . . . . . . . . . . . . . 48
Changing How the Power Button Functions. . . . . . . . . . . . . . . . . . . . . . . . . . . . . . . . . . 49
Changing What Happens When the Power Button Is Pressed . . . . . . . . . . . . . . 49
Using Location Services . . . . . . . . . . . . . . . . . . . . . . . . . . . . . . . . . . . . . . . . . . 49
Using Bluetooth . . . . . . . . . . . . . . . . . . . . . . . . . . . . . . . . . . . . . . . . . . . . . . . . . 50
Managing Bluetooth Devices . . . . . . . . . . . . . . . . . . . . . . . . . . . . . . . . . . . . . . . . . . . . . . . . 50
Using the Fingerprint Reader . . . . . . . . . . . . . . . . . . . . . . . . . . . . . . . . . . . . . 51
Setting Up a PIN. . . . . . . . . . . . . . . . . . . . . . . . . . . . . . . . . . . . . . . . . . . . . . . . . . . . . . . . . . . . . 51
Setting Up the Fingerprint Reader . . . . . . . . . . . . . . . . . . . . . . . . . . . . . . . . . . . . . . . . . . . 51
Inserting and Removing a SIM Card . . . . . . . . . . . . . . . . . . . . . . . . . . . . . . . 52
Inserting a SIM Card . . . . . . . . . . . . . . . . . . . . . . . . . . . . . . . . . . . . . . . . . . . . . . . . . . . . . . . . . 52
Removing a SIM Card. . . . . . . . . . . . . . . . . . . . . . . . . . . . . . . . . . . . . . . . . . . . . . . . . . . . . . . . 53
Using the SD Card Reader. . . . . . . . . . . . . . . . . . . . . . . . . . . . . . . . . . . . . . . . . 53
Inserting an SD Card. . . . . . . . . . . . . . . . . . . . . . . . . . . . . . . . . . . . . . . . . . . . . . . . . . . . . . . . . 53
Removing an SD card. . . . . . . . . . . . . . . . . . . . . . . . . . . . . . . . . . . . . . . . . . . . . . . . . . . . . . . . 53
Locating Your Serial Number . . . . . . . . . . . . . . . . . . . . . . . . . . . . . . . . . . . . . 53
Backing Up Your System . . . . . . . . . . . . . . . . . . . . . . . . . . . . . . . . . . . . . . . . . 54
Scheduling Backups with File History . . . . . . . . . . . . . . . . . . . . . . . . . . . . . . . . . . . . . . . . 54
Restoring Your System . . . . . . . . . . . . . . . . . . . . . . . . . . . . . . . . . . . . . . . . . . . 54
Creating a USB Recovery Drive . . . . . . . . . . . . . . . . . . . . . . . . . . . . . . . . . . . . . . . . . . . . . . 55
Using the Windows Recovery Drive . . . . . . . . . . . . . . . . . . . . . . . . . . . . . . . . . . . . . . . . . . 55
Finding Other Software. . . . . . . . . . . . . . . . . . . . . . . . . . . . . . . . . . . . . . . . . . . 56
Chapter 3 Caring for Your XSLATE R12. . . . . . . . . 57
General Care . . . . . . . . . . . . . . . . . . . . . . . . . . . . . . . . . . . . . . . . . . . . . . . . . . . . 57
Caring for the Display . . . . . . . . . . . . . . . . . . . . . . . . . . . . . . . . . . . . . . . . . . . . 57
Caring for the Pen. . . . . . . . . . . . . . . . . . . . . . . . . . . . . . . . . . . . . . . . . . . . . . . . 58
Replacing Pen Tips . . . . . . . . . . . . . . . . . . . . . . . . . . . . . . . . . . . . . . . . . . . . . . . . . . . . . . . . . . 58
Cleaning the Fingerprint Reader . . . . . . . . . . . . . . . . . . . . . . . . . . . . . . . . . . 58
Caring for the Tablet Battery. . . . . . . . . . . . . . . . . . . . . . . . . . . . . . . . . . . . . . 58
Traveling with Your XSLATE R12 Tablet PC. . . . . . . . . . . . . . . . . . . . . . . . . 59
Chapter 4 Troubleshooting and FAQs . . . . . . . . . 61
Power Issues. . . . . . . . . . . . . . . . . . . . . . . . . . . . . . . . . . . . . . . . . . . . . . . . . . . . . 61
Battery Issues . . . . . . . . . . . . . . . . . . . . . . . . . . . . . . . . . . . . . . . . . . . . . . . . . . . . . . . . . . . . . . . 62

vi Table of Contents
Display Issues . . . . . . . . . . . . . . . . . . . . . . . . . . . . . . . . . . . . . . . . . . . . . . . . . . . . 63
Touch or Pen Issues . . . . . . . . . . . . . . . . . . . . . . . . . . . . . . . . . . . . . . . . . . . . . . . 64
Full Keyboard . . . . . . . . . . . . . . . . . . . . . . . . . . . . . . . . . . . . . . . . . . . . . . . . . . . . . . . . . . . . . . . 66
Port and Connector Issues . . . . . . . . . . . . . . . . . . . . . . . . . . . . . . . . . . . . . . . . . . . . . . . . . . . 66
Network Issues . . . . . . . . . . . . . . . . . . . . . . . . . . . . . . . . . . . . . . . . . . . . . . . . . . . 67
Wi-Fi Issues. . . . . . . . . . . . . . . . . . . . . . . . . . . . . . . . . . . . . . . . . . . . . . . . . . . . . . . . . . . . . . . 67
Bluetooth Issues . . . . . . . . . . . . . . . . . . . . . . . . . . . . . . . . . . . . . . . . . . . . . . . . . . . . . . . . . . 67
Bluetooth Wireless Tips . . . . . . . . . . . . . . . . . . . . . . . . . . . . . . . . . . . . . . . . . . . . . . . . . . . 69
Mobile Broadband with GNSS Issues . . . . . . . . . . . . . . . . . . . . . . . . . . . . . . . . . . . . . . 69
Audio Issues. . . . . . . . . . . . . . . . . . . . . . . . . . . . . . . . . . . . . . . . . . . . . . . . . . . . . . 70
System Issues . . . . . . . . . . . . . . . . . . . . . . . . . . . . . . . . . . . . . . . . . . . . . . . . . . . . . . . . . . . . . . . 70
Frequently Asked Questions . . . . . . . . . . . . . . . . . . . . . . . . . . . . . . . . . . . . . . 71

Chapter 1 Getting Started Features 1
Getting Started 1
Features
The XSLATE R12 Tablet PC is a sleek and lightweight 12.5” rugged tablet that provides robust
computing power and a variety of integrated features to support any mobile workflow,
including a screen with a full-high definition (FHD) of 1920x1080 pixels.
The XSLATE R12 Tablet PC includes these features:
•Intel® Core™ i5 or i7 vPro™ Processors (i7 Processor includes Intel vPro™ technology)
•Windows® 10, 8.1, or 7 Pro 64-bit
•USB 3.0 and HDMI ports and an SD (memory) card slot
•Integrated 8.0 MP documentation camera and 2.0 MP web camera
•64GB Solid State Drive (SSD options up to 256GB)
•4 GB or 8 GB DDR3L 1600MHz SDRAM memory
•Intel® HD Graphics 4200
•Corning® Gorilla® Glass for increased display damage resistance
• 9-Axis MEMS sensor (Accelerometer, eCompass, Gyroscope) with an ambient light sensor
•Dual input—digitizer pen and capacitive 10-point touch
•12.5” wide viewing angle display with full-HD Resolution (1920 x 1080) and View
Anywhere® display
•Intel Display Power Saving Technology (DPST)
•Hot-swappable battery
•Integrated 802.11a/g/n/ac Wi-Fi® and Bluetooth® 4.0
•Integrated fingerprint reader
•One optional internal wireless:
Integrated mobile broadband with Global Navigation Satellite System (GNSS) support
or
an integrated Global Positioning System (GPS) with Satellite-based Augmentation System
(SBAS) support
•The TCG Trusted Platform Module (TPM) 1.2 for hardware-based security is built in.
•Absolute® Data & Device Security (DDS), formerly Absolute Computrace, is an option. This
DDS software lets you identify and locate your tablet in case of loss or theft and lets IT
manage and respond to risk assessments. The DDS software is installed on your tablet, so
all you need is a license that you can buy from the Xplore™ web site.
The following features must be factory installed and are available by ordering the optional
SlateMate® accessory with the tablet at the time of purchase:
•1D/2D barcode scanner
•Integrated 13.56 MHz high-frequency RFID reader
•Serial port

2Optional Features Chapter 1 Getting Started
Optional Features
This section describes the optional features available when you purchase your tablet.
Mobile Broadband with GNSS
You can purchase an XSLATE R12 Tablet PC with an optional embedded mobile broadband with
Global Navigation Satellite System (GNSS) module that enables you to connect to a variety of
mobile broadband networks for sending and receiving data wirelessly. You can typically use
mobile broadband anywhere you can use your mobile phone. Mobile broadband is based on
cellular network technology, so you can use it in more places than other local area wireless
technologies.
The GNSS receiver uses the U.S. Global Positioning System and the Russian Global Navigation
Satellite (GLONASS) System to determine the current location, altitude, heading, and horizontal
velocity of the XSLATE R12. You don’t need a network connection or an account with a mobile
broadband network carrier to use the GNSS receiver. You can use it with your preferred mapping
applications to find your current and desired locations.
NOTE: The GNSS module is not available on systems equipped with optional GPS with
Satellite-Based Augmentation System (SBAS).
For information on setting up mobile broadband, see USING LOCATION SERVICES on page 49.
Discrete GPS with SBAS
You can purchase an XSLATE R12 Tablet PC with an optional embedded discrete Global
Positioning System (GPS) module that supports the Wide Area Augmentation System (WAAS) for
improved accuracy in the United States, European Geostationary Navigation Overlay Service
(EGNOS) for improved accuracy in Europe, and Multifunctional Satellite Augmentation System
(MSAS) for improved accuracy in Japan. The proper augmentation system is detected based on
your location. No special selection is required. The augmentation feature uses signals from
geostationary satellites to improve on the reliability and accuracy of the signals from the GPS
satellites. You can use it with your preferred mapping applications to find your current and
desired locations.
NOTE:This option is not available on systems that have an optional mobile broadband with
GNSS.
Security
Your XSLATE R12 includes several features that you can use to enhance the security of your data
and serve as the foundation for complementary security technologies. The core security
features include password-protected BIOS, networking control, optional Absolute® (DDS
tracking software, a built-in fingerprint reader, and the TCG Trusted Platform Module (TPM) 1.
2.
TPM Protection
With the built-in TPM 1.2 and Infineon Security Platform tools, you can create and manage
digital certificates, user and device authentication, full disk data encryption, and restricted
network access. These features are most commonly used by enterprises and enabled by the
system administrator.

Chapter 1 Getting Started Optional Features 3
Data and Device Security (Absolute DDS)
The XSLATE R12 Tablet PC comes with an option for Absolute® Data & Device Security software
(DDS), formally known as Absolute Computrace Complete. This software offers enhanced data
protection, improved IT asset management, and managed computer theft recovery. With DDS
software, organizations can track, manage, and secure their entire computer fleet—including
remote and mobile devices—on or off the network.
You can purchase a license to enable the DDS software, which is already on your tablet. To
purchase and enable the software, go to the Accessories site for the XSLATE R12 tablet, scroll
down, tap Securities Software, and tap Buy.
Under the Absolute Computrace section, tap Click Here to Purchase.
Other Optional Features
Other XSLATE R12 optional features include:
•SlateMate® module—See USING THE SLATEMATE MODULE (OPTIONAL) on page 42.
•Barcode scanner (included with SlateMate)—See BARCODE SCANNER on page 43.
•RFID reader (included with SlateMate)—See USING THE RFID READER on page 44.
4 Overview of the XSLATE R12 Tablet Chapter 1 Getting Started
Overview of the XSLATE R12 Tablet
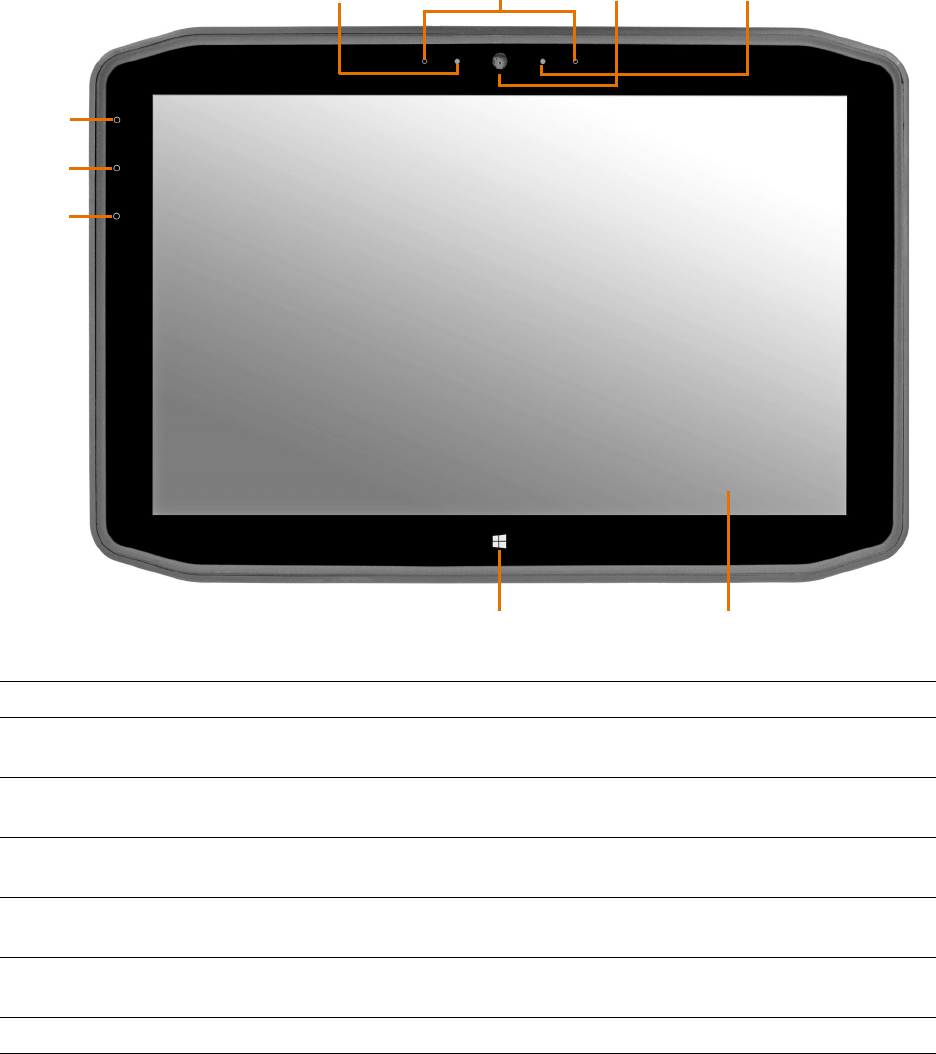
The following photos show the buttons, slots, and ports on the XSLATE R12 Tablet PC.
Front
Function
button 2
Function
button 1
Windows Start button Touchscreen display
Microphones Web
Ambient light
sensor camera Camera
indicator
Function
button 3
Function button 1 Press to display the Tablet Center; press and hold for Windows® Journal.
Function button 2 Press this button for the xCapture Pro™ application. Press and hold to display the
Pictures directory.
Function button 3 Press for Tablet PC settings or barcode scanner (if equipped with SlateMate).
Press and hold for on-screen keyboard.
Ambient light sensor Measures the light in your environment and can automatically adjust the
brightness of the display.
Microphones Front array microphones that optimize sound detection for speech recognition
and voice recording.
Web camera Interact with people online, stream video, or capture color images with a 2MP web
camera.
Camera indicator This light indicates that the web or documentation camera is active.
Chapter 1 Getting Started Overview of the XSLATE R12 Tablet 5
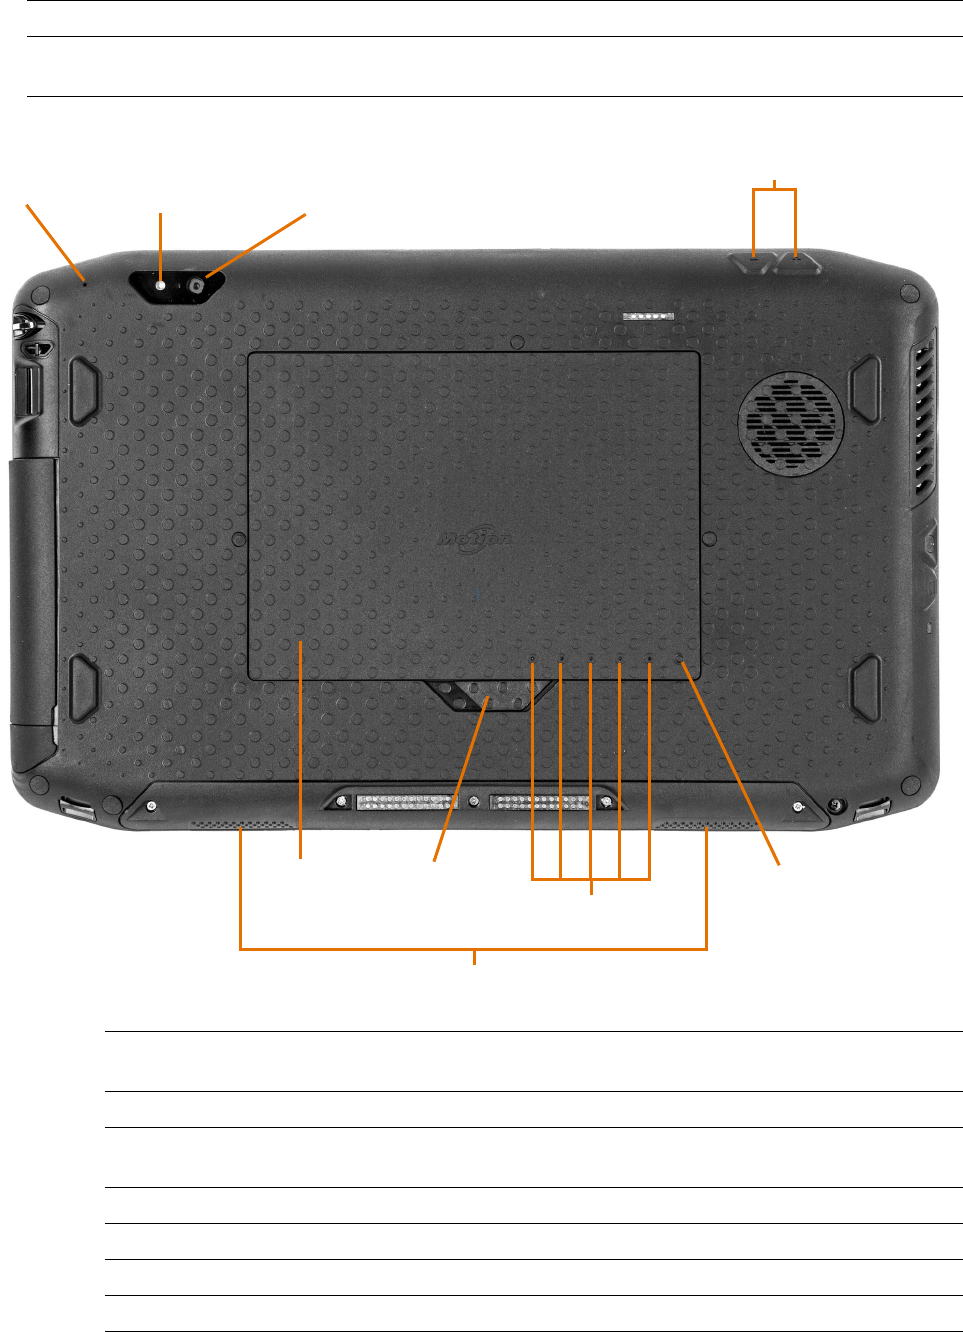
Back
Documentation camera
Documentation
camera light
Microphone
Volume buttons
Speakers
Battery latch
Battery
Battery charge
indicator lights
Battery charge
indicator button
Windows Start button Opens the Windows Start screen or the Windows desktop.
Touchscreen display Use your finger or pen to access all the functions of the XSLATE R12 on the 12.5”
display.
Microphone Used for detecting sound when the documentation
camera is in use.
Documentation camera light Provides light for the documentation camera.
Documentation camera 8MP autofocus camera that takes photos you can save to
your hard drive in BMP, JPG, and TIFF formats.
Volume buttons Use to adjust volume up or down.
Battery Powers the tablet when it is not plugged in or docked.
Battery latch Releases the battery.
Battery charge indicator lights Indicate the level of battery charge.
6 Overview of the XSLATE R12 Tablet Chapter 1 Getting Started
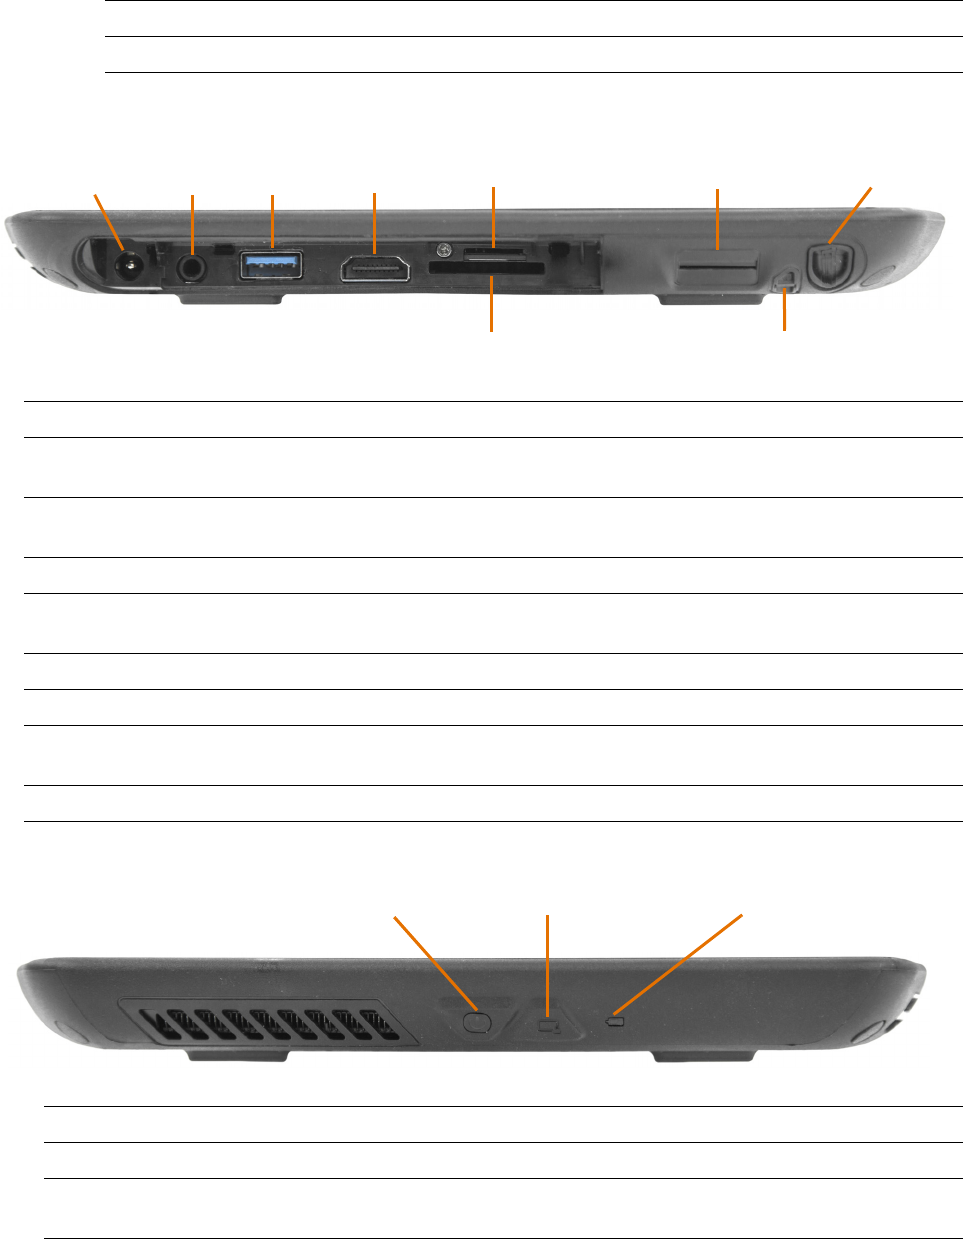
Right Side
Power
adapter port
Audio port
USB 3.0 port
HDMI
SD card slot Pen tether anchor
in/out port Fingerprint reader
SIM card slot Pen bay
Power adapter port Connect the power adapter.
Audio in/out port Supports external stereo speakers, a stereo headset, or a stereo headset with
microphone using a standard TRS or TRRS 3.5 mm plug.
USB 3.0 port Connect a USB device such as a mouse, digital camera, printer, or external storage
device.
HDMI port Connect digital audio/video devices such as an external digital monitor.
SIM card slot Required for some mobile broadband networks. If required, your cellular network carrier
provides the SIM card.
Fingerprint reader Scan your fingerprints for added security.
Pen bay Store the pen when not in use.
SD card slot Use with an SD memory card to play media files, view files from your camera or other
devices, or to use for extra file storage.
Pen tether anchor Loop a pen tether through this attach point to keep your pen with the tablet.
Left Side
Power button Security button Battery charging indicator light
Battery charge indicator button Press to view charge indicator lights.
Speakers Use for listening to audio.
Power button Turns the tablet on and off.
Security button Use to log on to or lock the tablet. Equivalent to Ctrl+Alt+Del on a keyboard.
Battery charging
indicator
This light indicates the battery charging status : green for fully charged, amber
for low or charging.
Chapter 1 Getting Started Starting Your XSLATE R12 Tablet 7
Pen
The XSLATE R12 Tablet PC supports touch with a pen, with your finger, and with an XSLATE R12-
Series digitizer pen. You might find the pen handy when you want to write a quick email or take
notes. The pen is particularly effective for precise data entry and navigation.
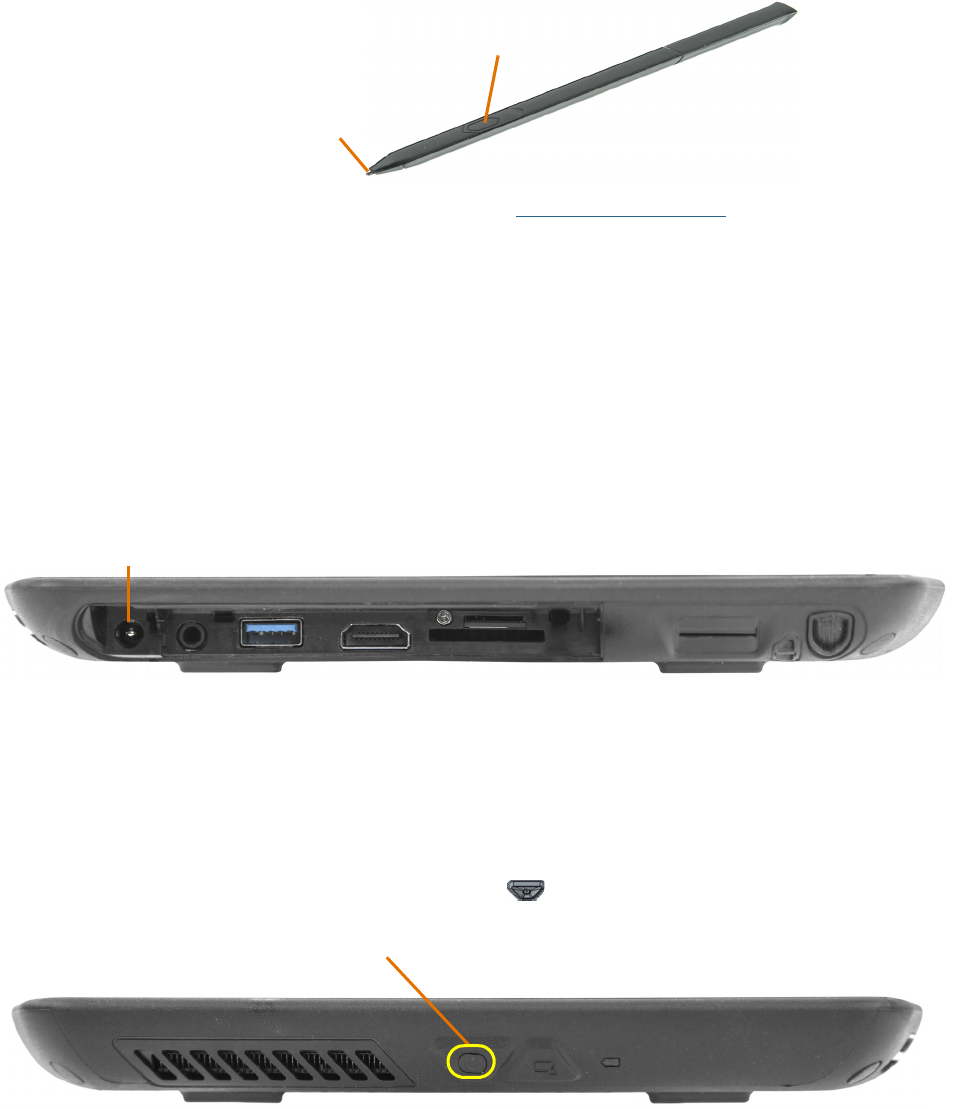
The XSLATE R12 digitizer pen includes a pressure-sensitive tip and a function button. There are
no batteries in the pen and it does not need external power.
Tip
Function button
You can purchase additional pens from the XSLATE R12 Accessories web page under the Input
Devices link.
Starting Your XSLATE R12 Tablet
This section has steps for powering up and setting up the XSLATE R12Tablet PC.
Powering Up the Tablet
1. Open the port door located at the bottom of the right side of the XSLATE R12 to expose
the power adapter port and plug in the AC adapter.
Power
adapter port
2. Plug the power cord into an outlet.
The battery charging indicator on the XSLATE R12 turns amber to indicate that the
battery is charging.
3. Keep the tablet on AC power until the battery is XSLATE R12 fully charged. (The battery
charging indicator turns green.) You don’t have to wait until the tablet is fully charged to
turn it on.
4. Press and release the Power button in the center of the left side of the XSLATE R12 to
turn it on.
Power button
8 Starting Your XSLATE R12 Tablet Chapter 1 Getting Started
Connecting to a Wireless Network
The XSLATE R12 tablet includes built-in Wi-Fi® and Bluetooth® technology. Your tablet might
also be equipped with mobile broadband.
Setting Up Wi-Fi
To enable Wi-Fi, follow these steps.
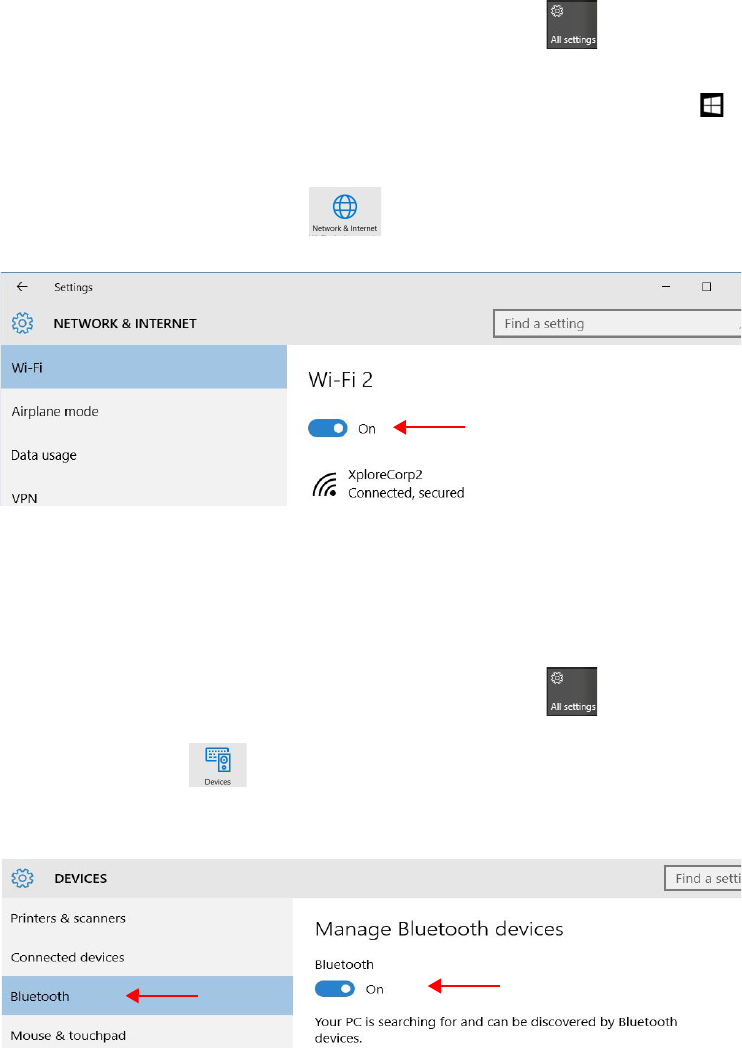
1. Swipe in from the right side of the screen and tap All Settings.
The Settings menu appears.
NOTE:You can also display the Settings menu by tapping the Windows Start button, ,
and then tapping Settings, which is the same as All Settings.
If you are in Tablet Mode the Start button works differently. Tap the All Apps button
just above the Start button and scroll down to the S section and tap Settings.
2. Tap the Network and Internet icon.
3. Tap the Wi-Fi slider to turn it On.
Turn Wi-Fi On.
4. Select a wireless network from the list of available networks.
5. Follow the on-screen instructions.
Setting Up Bluetooth
To enable Bluetooth, follow these steps.
1. Swipe in from the right side of the screen and tap All Settings.
The Settings menu appears.
2. Tap the Devices icon.
The Devices menu appears.
3. Tap Bluetooth in the left pane.
4. Tap the Bluetooth button to turn it On.
5. As your tablet discovers the Bluetooth devices that are turned on, you can tap them and
tap Pair to begin the pairing process.
Turn this slider On.
2. Turn the button On.
1. Tap.
Chapter 1 Getting Started Starting Your XSLATE R12 Tablet 9
Setting Up Mobile Broadband with GPS (Optional)
If you purchased your R12 with the optional mobile broadband module, you can connect to
high-speed cellular networks worldwide.
Important: Before you can connect to a mobile broadband network, you must have an active
account with a cellular network provider and a SIM card in your tablet for mobile broadband
access.
For instructions to set up mobile broadband, see CONNECTING TO A MOBILE BROADBAND NETWORK
on page 26.
Locking and Unlocking Your Tablet
When you leave your Tablet PC for a while, you can lock it to prevent unauthorized access. Press
the Security button and then tap Lock on the screen.
You can also configure the power button to shut down your Tablet PC, or to put it in Sleep or
Hibernate mode to save power when you press the power button.
NOTE:The power button blinks when the tablet is in Sleep mode.
Locking the Tablet
1. Press the Security button on the left side of the tablet.
A menu is displayed.
2. Tap Lock.
or
3. If a keyboard is attached, press Ctrl+Alt+Delete.
Unlocking the Tablet
1. Press the Security button or Ctrl+Alt+Delete on the keyboard again.
2. Enter your password to unlock the tablet. (Unless this has been disabled.)
Using Sleep Mode
Use Sleep mode when you go away for a short period of time. This mode conserves battery
power while you’re away and when you return, your desktop is the same as you left it.
Putting the Tablet in Sleep Mode
1. Save your files. (This step isn’t required, but it is a good precaution.)
2. Press and release the Power button.
While in Sleep mode, the power button blinks.
Waking up the Tablet from Sleep Mode
1. Press and release the Power button.
The tablet quickly resumes activity and your desktop is the same as you left it.
NOTE:If you have security enabled on your tablet, you need to unlock the Tablet PC.
10 Starting Your XSLATE R12 Tablet Chapter 1 Getting Started
Modifying Sleep Mode
You can modify the timing of sleep mode in the same way as you set up or modify hibernate
mode in the next topic. Modify either mode in the Power and sleep settings.
You can also open the Tablet Center to adjust the power plan, the function of the Power switch,
and the timing of sleep mode, hibernate mode, and the display.
Setting Up the Hibernate Mode
NOTE:You can also use this procedure to set up the sleep mode.
If you intend to leave your tablet for several hours or more, you can put the tablet in Hibernate
mode. When you return and start up again from hibernate mode, your desktop is the same as
you left it.
Important: If you have security enabled, you need to unlock the Tablet PC.
It takes longer to start up from Hibernate mode than from Sleep mode, but it consumes very
little power, saves data to disk beforehand, and is still faster than starting your tablet after
shutting it down.
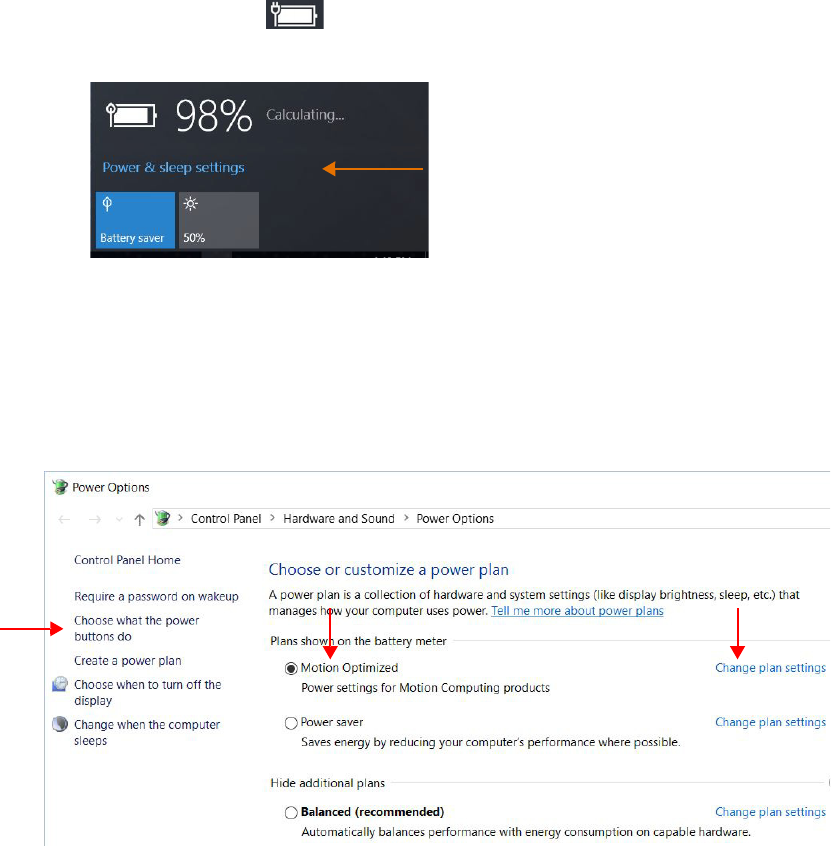
1. Tap the Battery icon in the notification area on the right side of the taskbar.
A power window appears.
Power and sleep settings
2. Tap the words: Power and sleep settings.
The System menu appears and the Power & sleep pane is highlighted. This pane displays
the settings to make the screen turn off automatically and to set the sleep timer for the
tablet.
3. In the right pane, under Related settings, tap Additional power settings.
The Power Options menu appears.
Use this menu to choose a power plan and to change what those plans do.
Chapter 1 Getting Started Starting Your XSLATE R12 Tablet 11
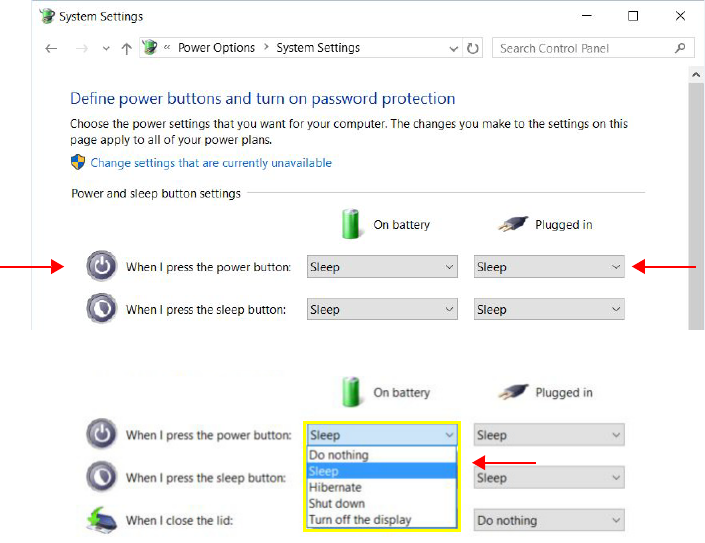
4. In the left pane of the Power Options menu, tap Choose what the power buttons do.
5. Use this menu to set the power button to one of the following actions: Do nothing, Sleep,
Hibernate, Shut down, Turn off the display.
6. Choose what the power button can do from this list.
NOTE:The Power button on the XSLATE R12 can act as a sleep button.
There is no dedicated sleep button on the XSLATE R12.
7. You can also select Sleep or other options.
HIBERNATE MODE: After setting up the tablet with the Hibernate mode, you can tap either
of the tablet buttons to put the tablet into hibernate mode or return to where you were
working when you left it in Hibernate mode. When you put the tablet into this mode, your
desktop is saved on disk. When you restart the tablet, it is slower to display the desktop as
you left it, but it is faster than rebooting and opening all your work.
NOTE:For more information on power options, see POWER SETTINGS on page 28.
12 Becoming Familiar with Your Tablet Chapter 1 Getting Started
Becoming Familiar with Your Tablet
After you have set up your XSLATE R12, take a few minutes to become familiar with your tablet.
•Calibrate the touch. You can adjust the touch settings by calibrating the digitizer. (The
digitizer is software that detects the position of the pen or your finger on the touchscreen
display.)
•Use Xplore tools to configure basic Windows 10 settings, customize your tablet according
to your work style, and to access XSLATE R12 documentation, Support, and Accessories.
–See USING THE TABLET CENTER on page 18 and
–See ACCESSING THE KNOW YOUR TABLET APPLICATION on page 14.
•Open the writing panel and provide handwriting samples to improve the recognition of
your handwriting. See ENTERING TEXT BY HANDWRITING on page 34.
•Take photos or use the web camera. See USING THE CAMERAS on page 37.
Using the Windows Start Button
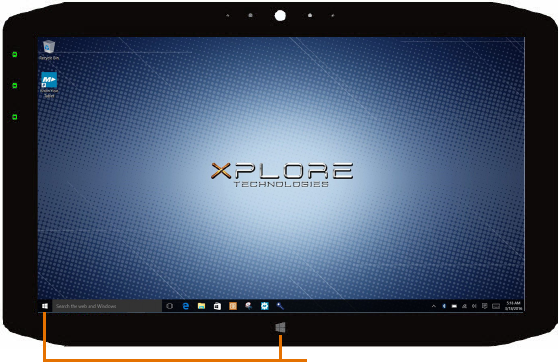
The Windows® Start button is on the center edge of the front of the tablet and in the lower left
corner of the screen.
Press this button to open the Windows Start screen. It displays the desktop icons, but they do
not fill the screen. If you are running an application, it remains on screen while the icons are
displayed.
If the Start screen icons are visible, you can tap the button to close them. You can also press and
hold the Start button to display a menu that includes the Desktop.
in two locations
Windows Start buttons
The Start button works a bit differently in tablet mode. See the next section for details.

Chapter 1 Getting Started Tablet Mode Interface 13
Tablet Mode Interface
To choose table mode, swipe left from the right edge of the screen and tap the Tablet mode
tile. You get a different user interface.
If you like tablet mode, explore it and use the Windows help to learn more.
Tablet Mode and the Start Button
In Tablet Mode, the Windows Start button, , works a little differently. If you are using an
application on screen and you can see the Start button, you can tap it to toggle between your
desktop view and a single application. You can also press and hold the Start button to display a
menu that includes the Desktop.
•If an application fills the entire screen and you cannot see the Start button, then you can
swipe left to right to shrink the application window. After shrinking it, you can close the
application window with the close button (X). You can also see the Start button and can
tap it to return to the desktop icons.
•You can also press the Start button in the center-bottom perimeter of the tablet to display
the desktop icons.
Tablet Mode and Taskbar Visibility
If you like to see the taskbar while in tablet mode, you can turn it on. By default, it is off.
1. To keep the taskbar visible in tablet mode, swipe left from the right edge of the screen
and tap All Settings.
2. In the Settings window, tap System.
The System window appears.
3. In the left pane of the System menu, tap Tablet mode.
The Tablet mode window appears.
4. In the right pane of the System menu, tap to make sure the button called Hide app icons
on the taskbar in tablet mode is turned Off.
This setting makes the taskbar visible in tablet mode.
14 Accessing the Know Your Tablet Application Chapter 1 Getting Started
Accessing the Know Your Tablet
Application
The Know Your Tablet application provides easy access to XSLATE R12 user documentation and
the Support and Accessories web sites.
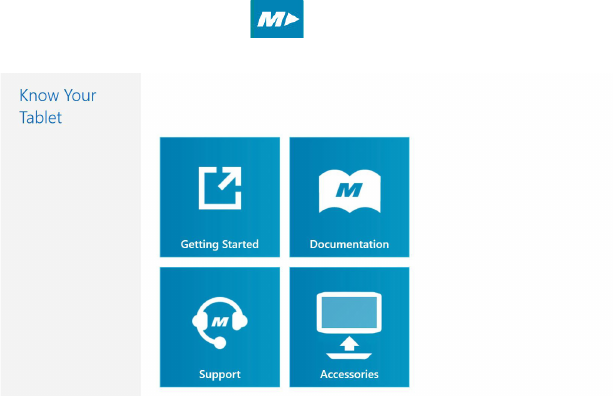
1. Locate the Know Your Tablet tile on the Windows® 10 Start screen or the desktop.
This tile opens an application with resources for using your tablet.
2. Tap the Know Your Tablet tile to open the application.
The application screen displays 4 tiles.
3. Tap the tile for the resource you want.
These four tiles provide different information and help in using your XSLATE R12 Tablet
PC. Each is listed here with a description.
•Getting Started
Opens the Getting Started Guide, which provides basic information about operating
your Tablet PC.
•Documentation
Lets you open user documentation for the XSLATE R12 tablet. You can view the PDF
files on line or save them to disk.
•Support
Links to the Support web site, which provides information about products, technical
support, and customer or professional services.
•Accessories
Opens the Xplore site for accessories and products that you can view and purchase for
your XSLATE R12 Tablet PC.

Chapter 1 Getting Started Optional Setup Tasks 15
Optional Setup Tasks
Creating a Recovery Drive
After setting up the XSLATE R12 the way you like it and installing applications, create a recovery
drive on an external USB drive. A recovery drive lets you start your tablet and access recovery
and troubleshooting tools if you encounter any issues with your Windows installation. For more
information, see CREATING A USB RECOVERY DRIVE on page 55.
Attaching the Pen Tether
The XSLATE R12 pen comes with a tether so that you can attach the pen to your tablet to avoid
misplacing it.
1. Slip one end of the tether through the hole at the end of the pen, and pull the pen
through the loop until it is tight.
2. Slip the other end of the tether through the attach point on the XSLATE R12, then pull the
pen through the loop until it is tight.
You can purchase additional pen tethers from the Xplore Accessories web page.
Connecting the Tablet to a Docking Station
A variety of docking solutions for the XSLATE R12 are available for purchase on the Xplore
Accessories web page.
The docking station for the XSLATE R12 adds functionality to your tablet, including port
expansion for Ethernet, VGA and HDMI monitors, and USB devices such as printers, keyboards,
and mice. The docking station also charges the tablet and includes a charging bay for an extra
battery. Mobile docks are also available for your XSLATE R12 and enable you to mount your
Tablet PC in a variety of vehicles. For details on installing and using the docking station, see the
User Guide of your docking station.
Connecting the Tablet to a Display Monitor
Connect a display monitor to your XSLATE R12 Tablet PC using either the VGA or HDMI port on
the docking station or the HDMI port located on the side of the tablet.

16 For More Information Chapter 1 Getting Started
For More Information
The Know Your Tablet application is located on the desktop and the Windows Start screen of the
tablet. Open this application to view the Getting Started document, which provides information
and tips to help you get started using your XSLATE R12 quickly.
NOTE:If you don’t have access to a particular feature or setting on your Tablet PC, contact
your system administrator for additional information.
This user guide describes the full set of XSLATE R12 features and provides instructions for
common tasks. The rest of this user guide is organized as follows:
•Chapter 2, USING YOUR XSLATE R12 TABLET on page 17:
Provides instructions for basic XSLATE R12 tasks including how to customize your tablet to
fit the way you work using the Tablet Center, how to use the cameras, how to set up
speech recognition, and more.
•Chapter 3, CARING FOR YOUR XSLATE R12 on page 57:
Provides suggestions for the care and maintenance of your Tablet PC.
•Chapter 4, TROUBLESHOOTING AND FAQS on page 61:
Provides answers for common issues you might encounter as you use your XSLATE R12.
You can find other useful information on the Xplore Technologies web site:
•Support
•Free Training Videos
•Knowledge Base for the XSLATE R12
•Accessories
•XSLATE R12 Overview
NOTE:This user guide is available in French, German, Spanish, and Portuguese on the
Xplore web site.

Chapter 2 Using Your XSLATE R12 Tablet 17
Using Your XSLATE R12
Tablet
2
USING THE CAMERAS on page 37This chapter provides information about the following tasks:
•USING THE TABLET CENTER on page 18
•CONFIGURING THE TABLET PC SETTINGS on page 20
•SETTING UP THE DISPLAY on page 20
•CONFIGURING THE TABLET FUNCTION BUTTONS on page 22
•SETTING UP WIRELESS CONNECTIONS on page 24
•POWER SETTINGS on page 28
•SENSORS SETTINGS on page 30
•ENTERING TEXT BY KEYBOARD on page 31
•ENTERING TEXT BY HANDWRITING on page 34
•USING THE FUNCTION BUTTONS on page 35
•CONNECTING AN EXTERNAL MONITOR on page 36
•USING THE BUILT-IN MICROPHONES on page 36
•USING THE CAMERAS on page 37
•USING THE SLATEMATE MODULE (OPTIONAL) on page 42
•USING THE SLATEMATE MODULE (OPTIONAL) on page 42
•USING THE RFID READER on page 44
•USING THE BATTERY on page 45
•CHANGING THE POWER PLAN on page 48
•USING LOCATION SERVICES on page 49
•USING BLUETOOTH on page 50
•USING THE FINGERPRINT READER on page 51
•INSERTING AND REMOVING A SIM CARD on page 52
•USING THE SD CARD READER on page 53
•BACKING UP YOUR SYSTEM on page 54
•RESTORING YOUR SYSTEM on page 54
•FINDING OTHER SOFTWARE on page 56
18 XSLATE R12 Tablet PC Applications Chapter 2 Using Your XSLATE R12 Tablet
XSLATE R12 Tablet PC Applications
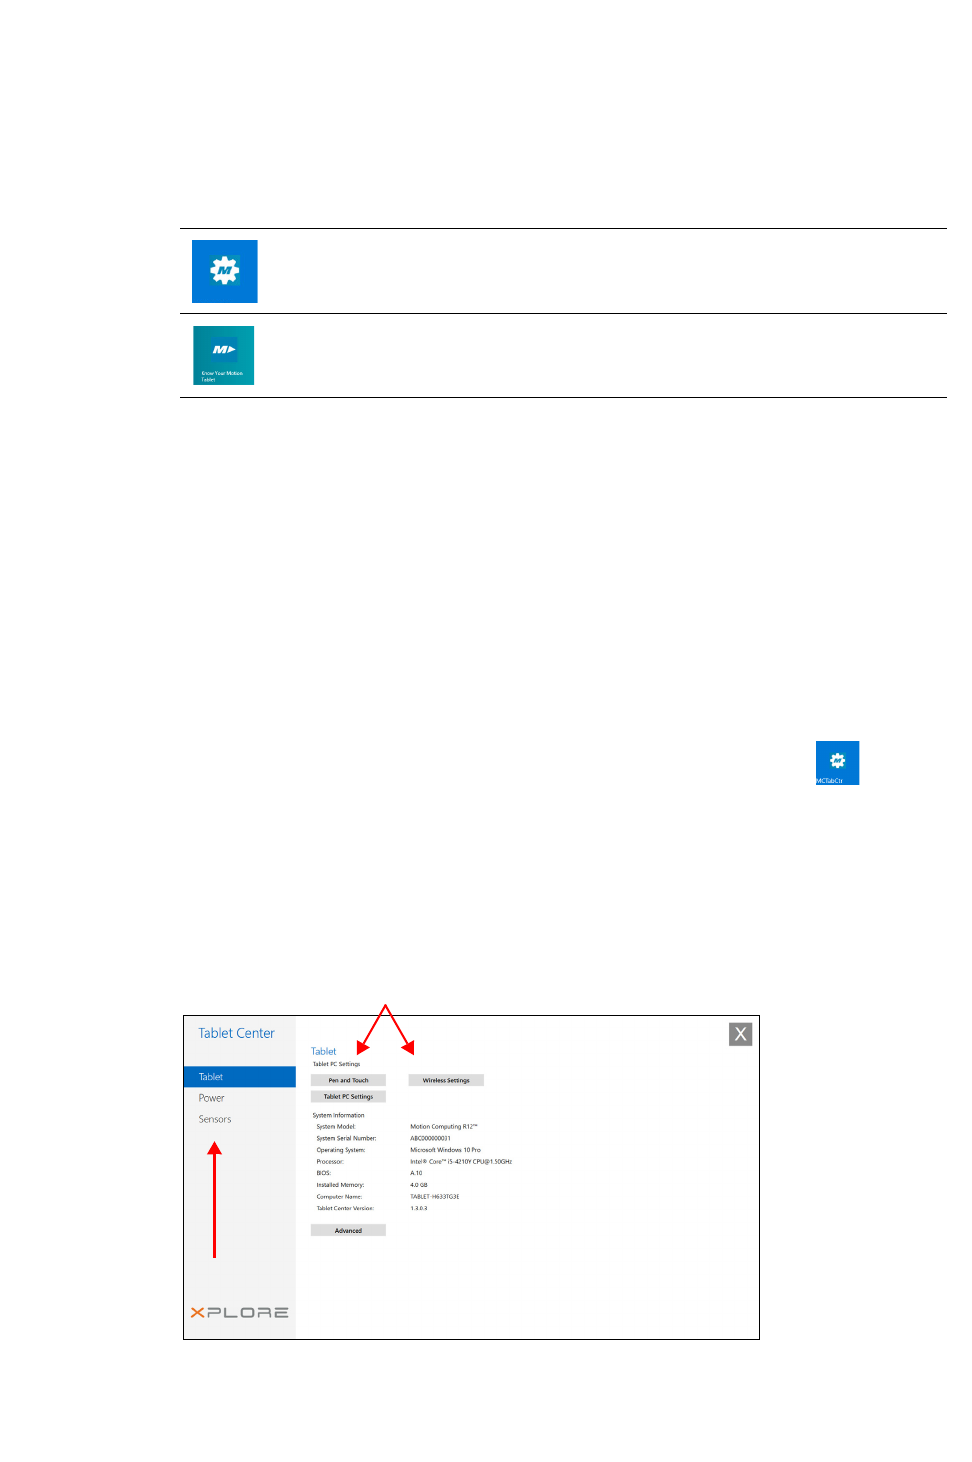
Your tablet includes these two Xplore™ applications to help you configure your XSLATE R12®
Tablet PC to fit your needs, to manage common Windows 10 settings, and to access resources
for more information.
Tablet Center Provides a central location for accessing and configuring
the many commonly used Windows 10 settings.
Know Your
Tablet
Provides easy access to Documentation, Support, and
Accessories.
Using the Tablet Center
You can use the Tablet Center to access and configure the most commonly used Windows® 10
settings.
Opening the Tablet Center
1. There is a Windows Start button in the middle bottom of the front of the tablet and
another one in the lower left corner of the display. Tap the Start button and scroll down to
see the Xplore icons.
2. On the Windows 10 Start screen, locate and tap the Tablet Center tile.
The Tablet Center is displayed.
TIP:A short cut to the Tablet Center is to tap Function button 1 on the upper left on the
front of the tablet. (It is at the very edge of the glass.)
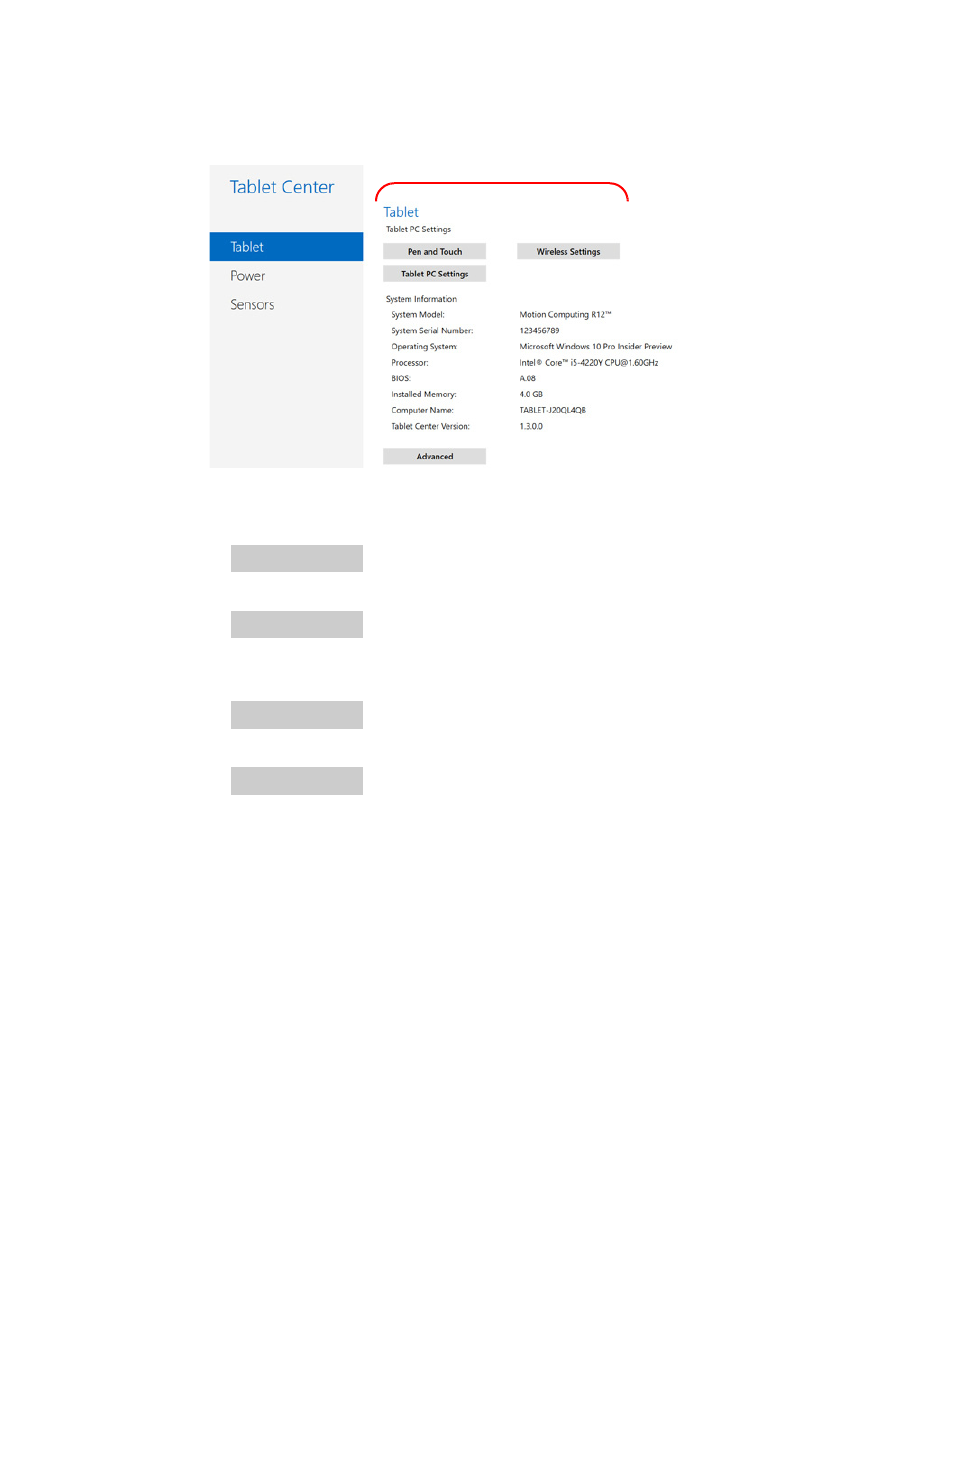
The Tablet Center is organized into categories in the left pane.
The pane to the right of the categories displays information about your tablet and gives you
access to the settings.
Settings and Information
Categories
Chapter 2 Using Your XSLATE R12 Tablet Using the Tablet Center 19
Tablet Interface Settings
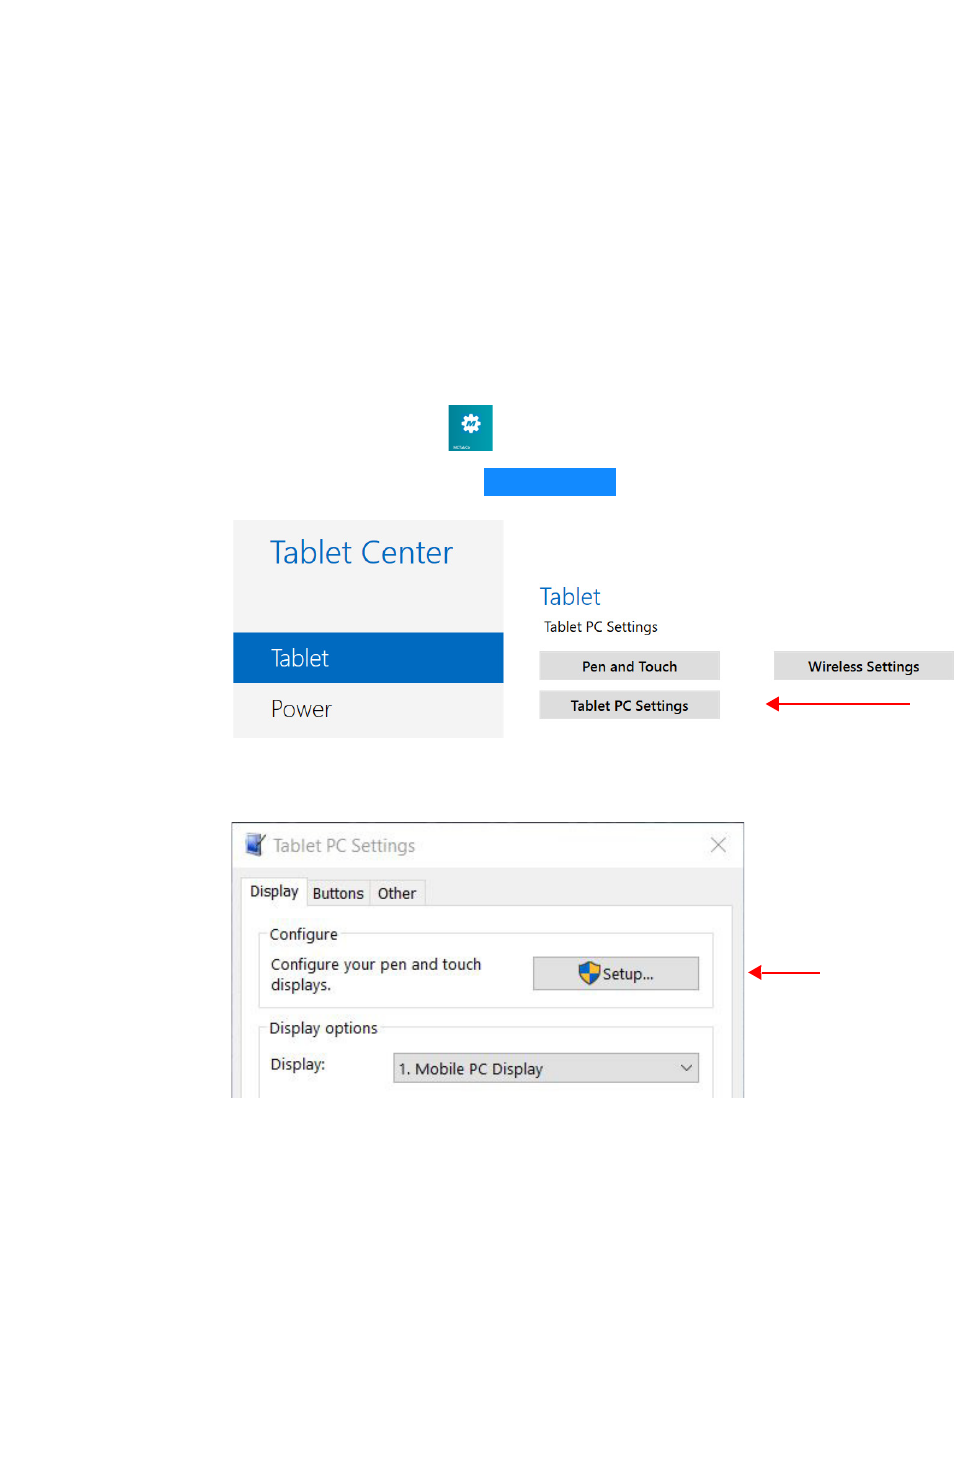
Tablet pane in the Tablet Center
You can view and set the following configuration options in the Tablet Center application. The
four highlighted rectangles on the right pane are selectable.
•
Pen and Touch
Provides access to Windows® Pen and Touch configuration options.
•
Tablet PC Settings
Use these settings to configure your display, and button actions, and set left- and right-
hand options.
•
Wireless Settings
Lets you view, configure, and connect to available wireless networks.
•
Advanced
Lets you view all system information for your Tablet PC.
Adjusting Pen Options
1. To change pen settings, tap Pen and Touch.
2. Select the Pen Options tab.
NOTE:You can adjust the Double-tap and the Press and Hold settings, but not the Single-
click.
3. Tap Double-tap or Press and Hold.
4. Tap the Settings button and use the form that appears to adjust the settings.
Adjusting Touch
1. To change touch actions, tap Pen and Touch.
2. Select the Touch tab.
3. Tap Double-tap or Press and Hold.
4. Tap the Settings button and use the form that appears to adjust the settings.
20 Configuring the Tablet PC Settings Chapter 2 Using Your XSLATE R12 Tablet
Configuring the Tablet PC Settings
This section shows you how to
•Set up your pen and touch input for one or multiple screens
•Calibrate the pen and touch
•Configure the tablet function buttons
•Set up for left- or right-hand use
Setting Up the Display
You can set up the display for pen or touch. You can do this for one or multiple screens.
1. Open the Tablet Center.
2. In the Tablet Center form with highlighted in the left pane,
tap Tablet PC Settings in the right pane.
The Tablet PC Settings form opens.
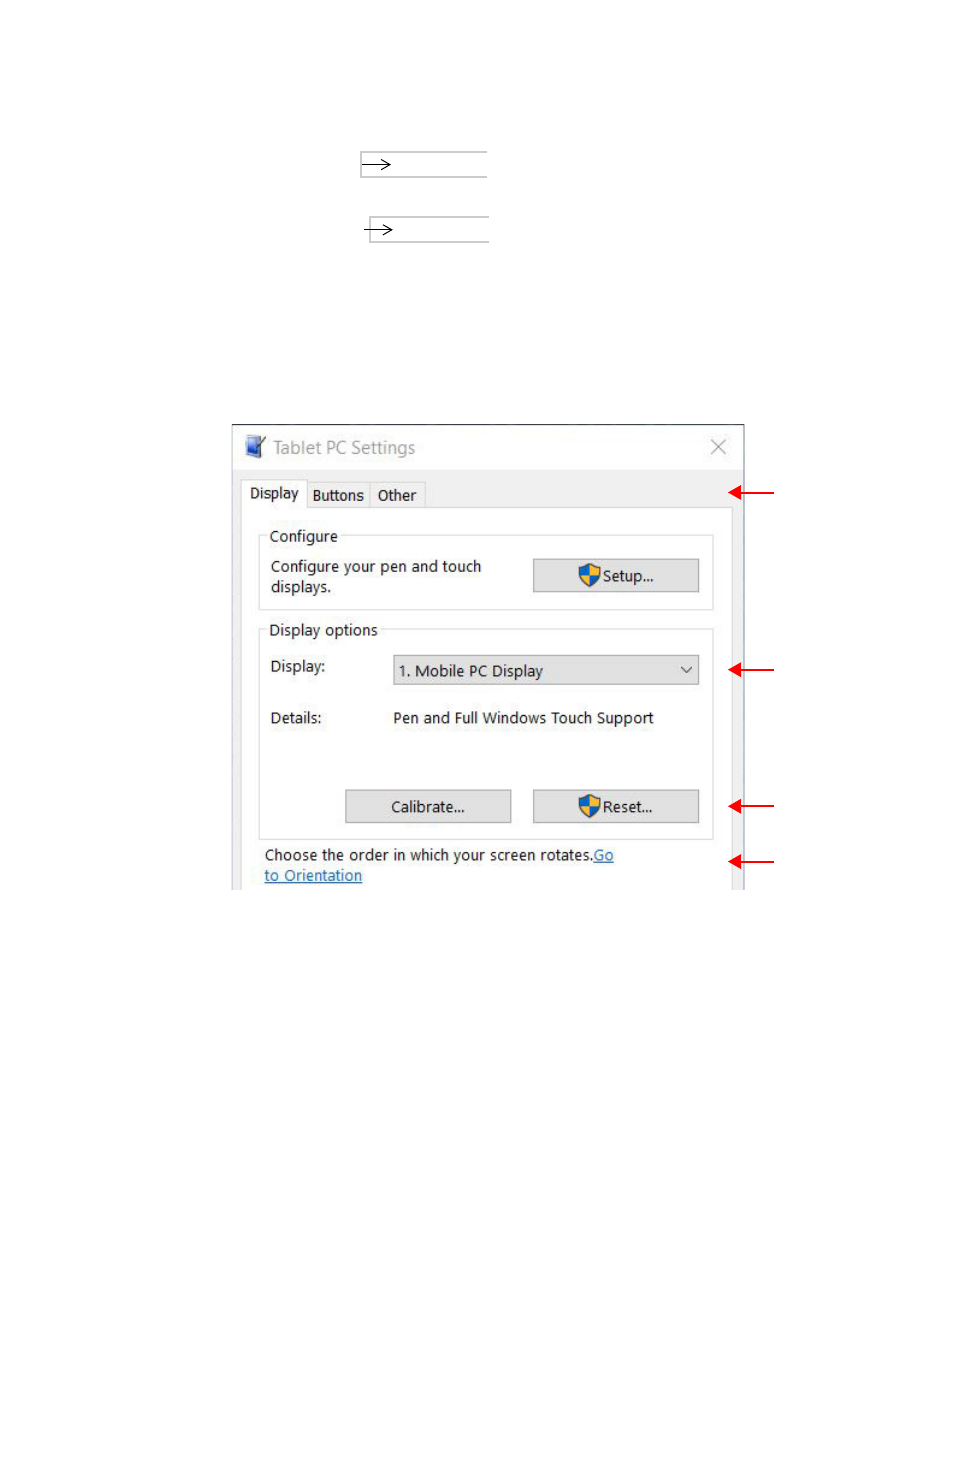
3. Make sure the Display tab is selected. (The Display tab is the default.)
4. Tap Setup next to Configure your pen and touch displays.
This setting is useful for assigning pen or touch to the appropriate display when one or
more displays are connected to the tablet.
A form asks you which type of screen you want to configure.
For example, you might have an external monitor that you use with touch, whereas you
usually use a pen on the tablet.
Tablet
Tap
Tap
Chapter 2 Using Your XSLATE R12 Tablet Configuring the Tablet PC Settings 21
5. Tap Pen Input or Touch Input, depending on the type of input you want to use on the
display as follows:
a. If you select
Pen Input
, then the next step asks you to tap the screen with the
pen to identify it as the pen input screen.
b. If you select
Touch Input
then the next step asks you to touch the screen that
you want to use as a touchscreen.
6. Click OK in the Display tab or choose another option from the form.
Setting the Display Options
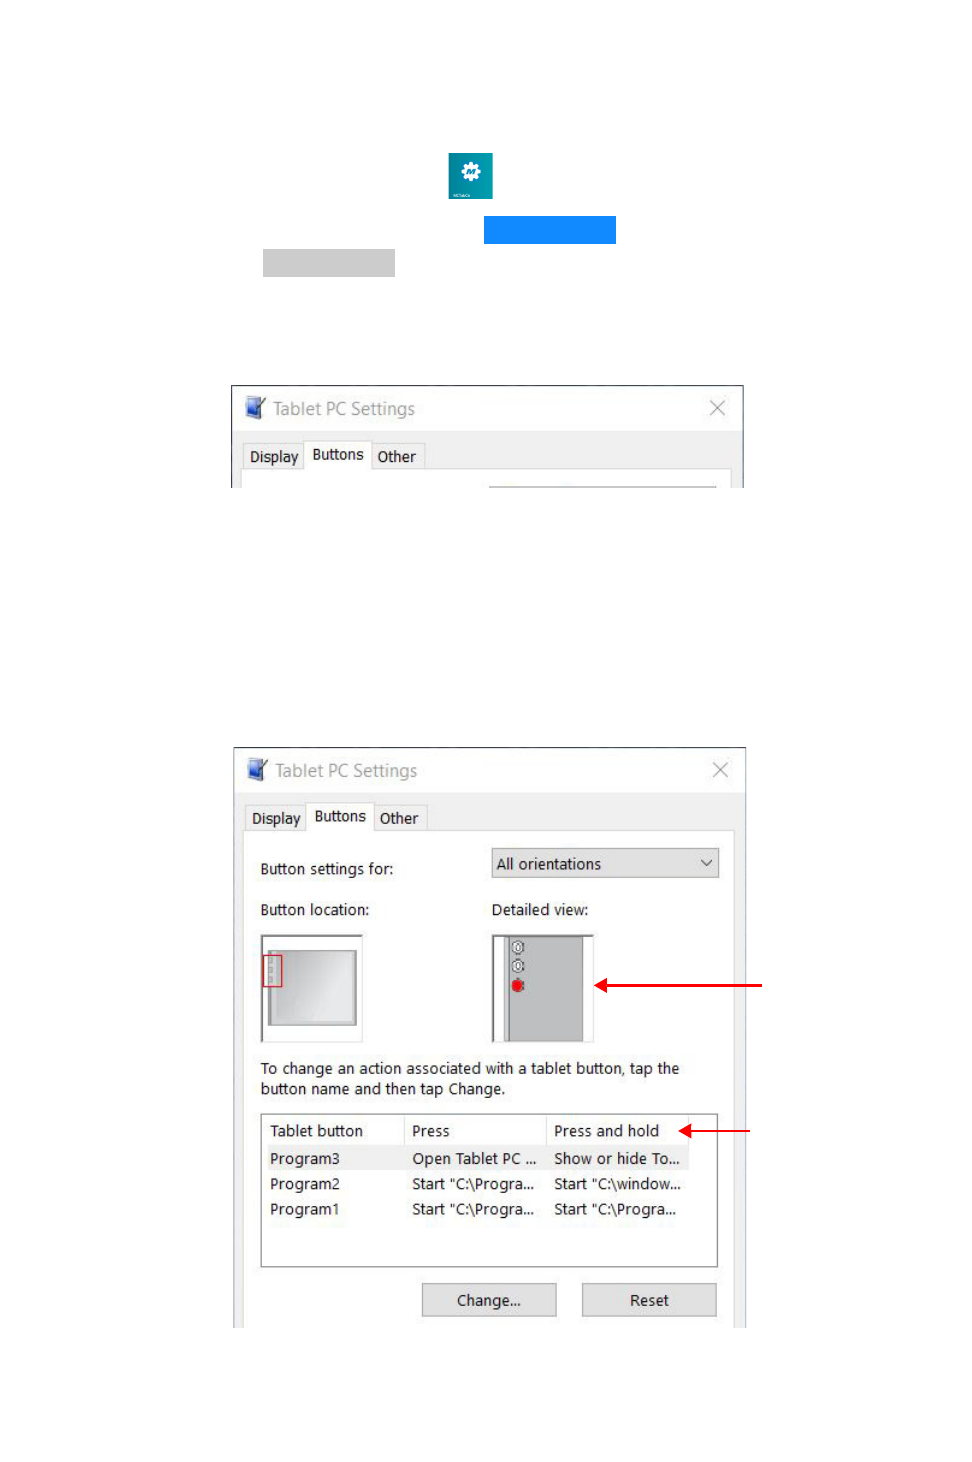
1. In the Display tab, you can configure display options (for your screen).
Select the available displays from the list in the Display options field.
2. Tap the Calibrate button to configure touch and pen input options, or tap Reset to reset
the options to the default settings.
3. To adjust the screen orientation sequence setting tap the Go to Orientation link and
choose the order in which your screen rotates.
a. Choose the preferences from the lists.
b. Click OK to confirm them and return to the Display tab of the Tablet PC Settings.
Display field
Calibrate and
Orientation link
Reset buttons
Display tab
22 Configuring the Tablet PC Settings Chapter 2 Using Your XSLATE R12 Tablet
Configuring the Tablet Function Buttons
You can configure the three function buttons on the front of the tablet. Each has two functions.
1. Open the Tablet Center.
2. In the Tablet Center form with highlighted in the left pane,
tap in the right pane.
The Tablet PC Settings form opens.
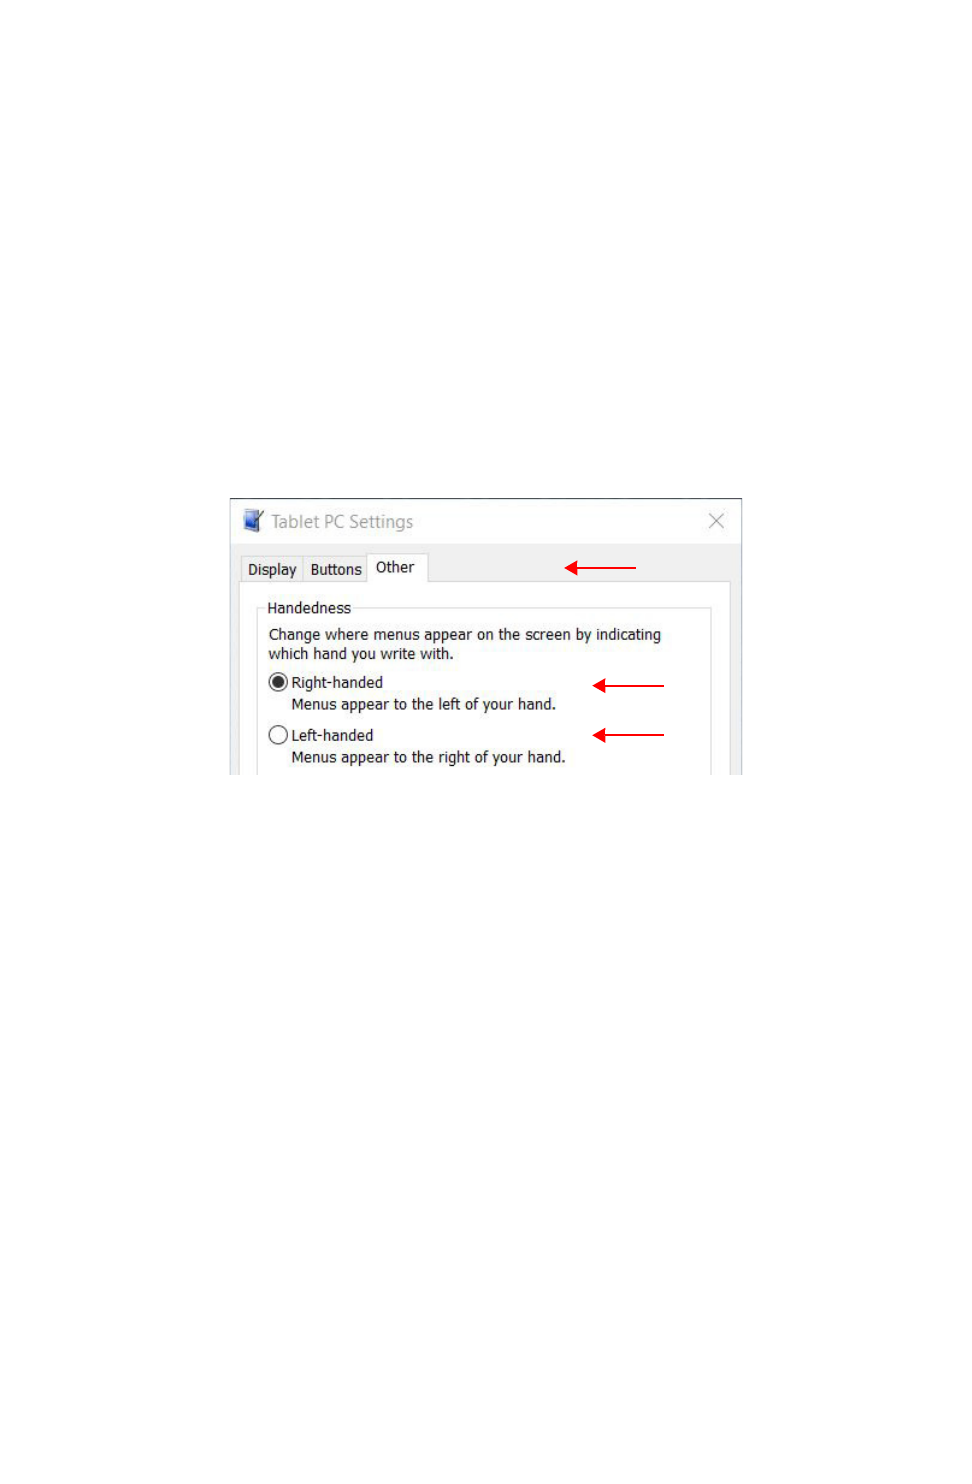
3. In the Tablet PC Settings form, tap the Buttons tab.
The Buttons tab is displayed.
Use this tab to configure the Function buttons.
4. Select the primary or secondary orientation for which you want to change the button
settings from the Button settings for drop-down list.
TIP:You can configure different button settings for different orientations. For additional
information on the front panel buttons, see USING THE FUNCTION BUTTONS on page
35.
5. Select the button to change.
The currently selected button is shown in red on the form.
One column for Press
One for Press and hold
Button 3
6. Tap Change.
The Tablet Button Actions form displays the settings for the selected button.
Tablet
Tablet PC Settings
Chapter 2 Using Your XSLATE R12 Tablet Configuring the Tablet PC Settings 23
7. Select the appropriate action for the button.
8. For some actions, you must enter more information, such as the location of a program to
start. You can select an action for Press and another for Press and hold. For more
information, tap WHAT IS PRESS AND HOLD? on this form.
9. Click OK to confirm the changes you have made.
The form closes.
10. To reset the buttons to their default values, tap the Reset button on the Buttons tab.
11. Click OK to close the Buttons form when you are done.
Configuring the Menus for Left or Right Hand
Use the Other tab to choose the hand you use for your tablet.
1. To select the left- or right-handed option, tap the Other tab in the Tablet PC Settings
window.
2. Tap Right-handed or Left-handed.
3. Click OK.
Other tab
Tap right-
or left-handed
24 Setting Up Wireless Connections Chapter 2 Using Your XSLATE R12 Tablet
Setting Up Wireless Connections
The wireless settings in the Tablet Center provide you with access to the Windows® Networks
menu, where you can view and connect to available mobile broadband, and Wi-Fi® networks.
You can also turn Airplane mode on or off in this menu, which disables all wireless
communication on the Tablet PC.
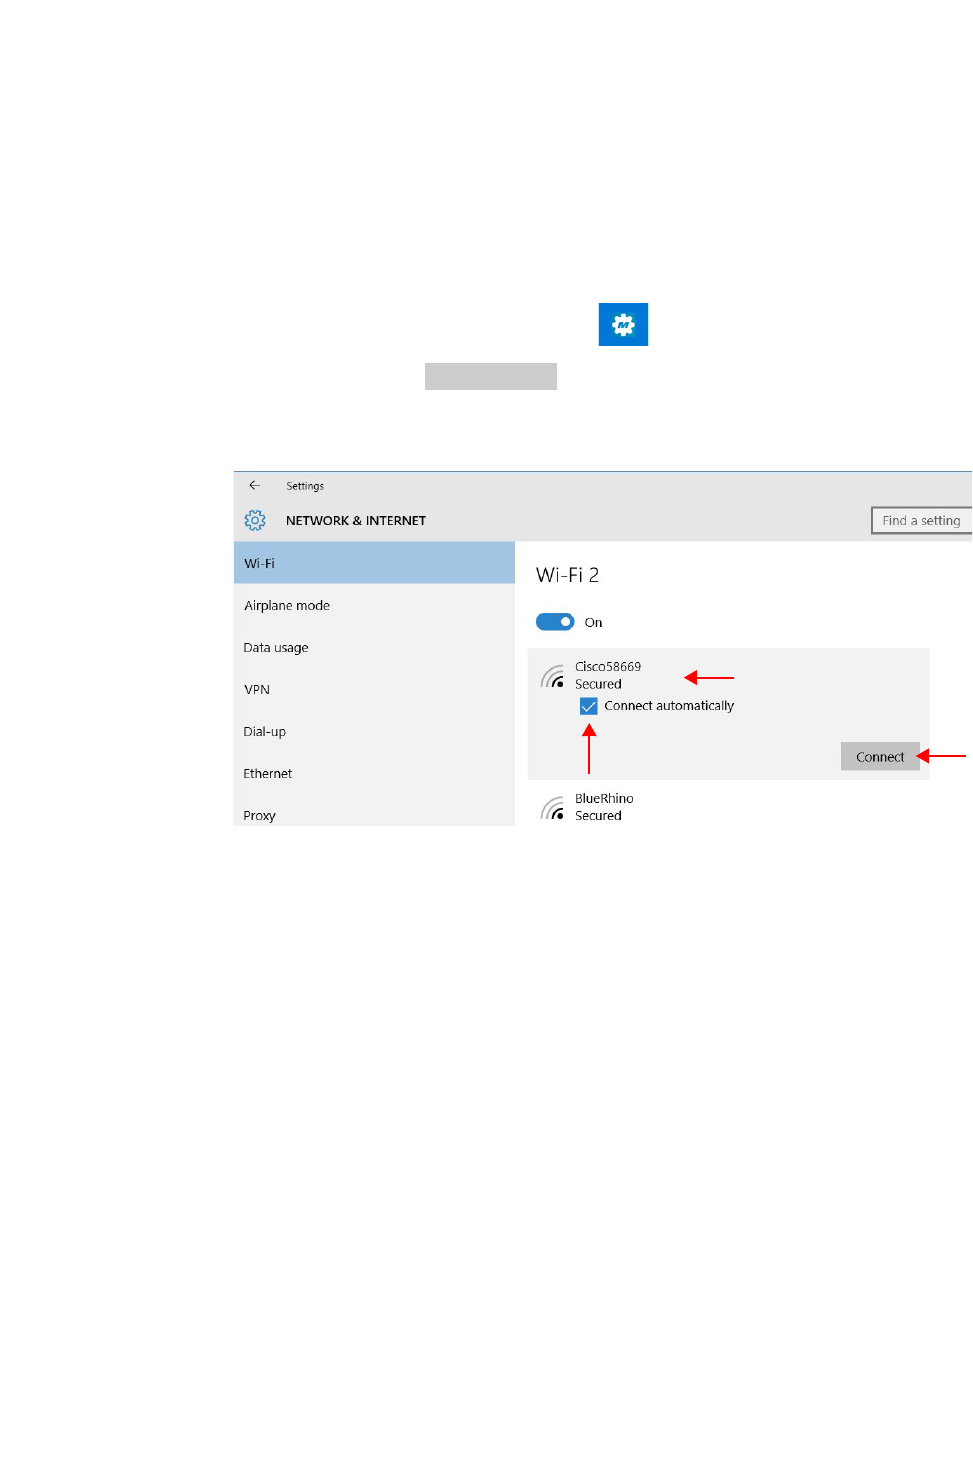
Connecting to a Wi-Fi Network
1. Open the Tablet Center by tapping the icon.
2. Tap Wireless Settings.
The Windows Network & Internet form opens.
The list of available wireless networks is displayed in the Wi-Fi pane on the right.
Network
3. Tap your network.
a. To use this network on a regular basis, select Connect automatically.
b. Tap the Connect button and enter the network security key when prompted.
Wireless Settings
Chapter 2 Using Your XSLATE R12 Tablet Setting Up Wireless Connections 25
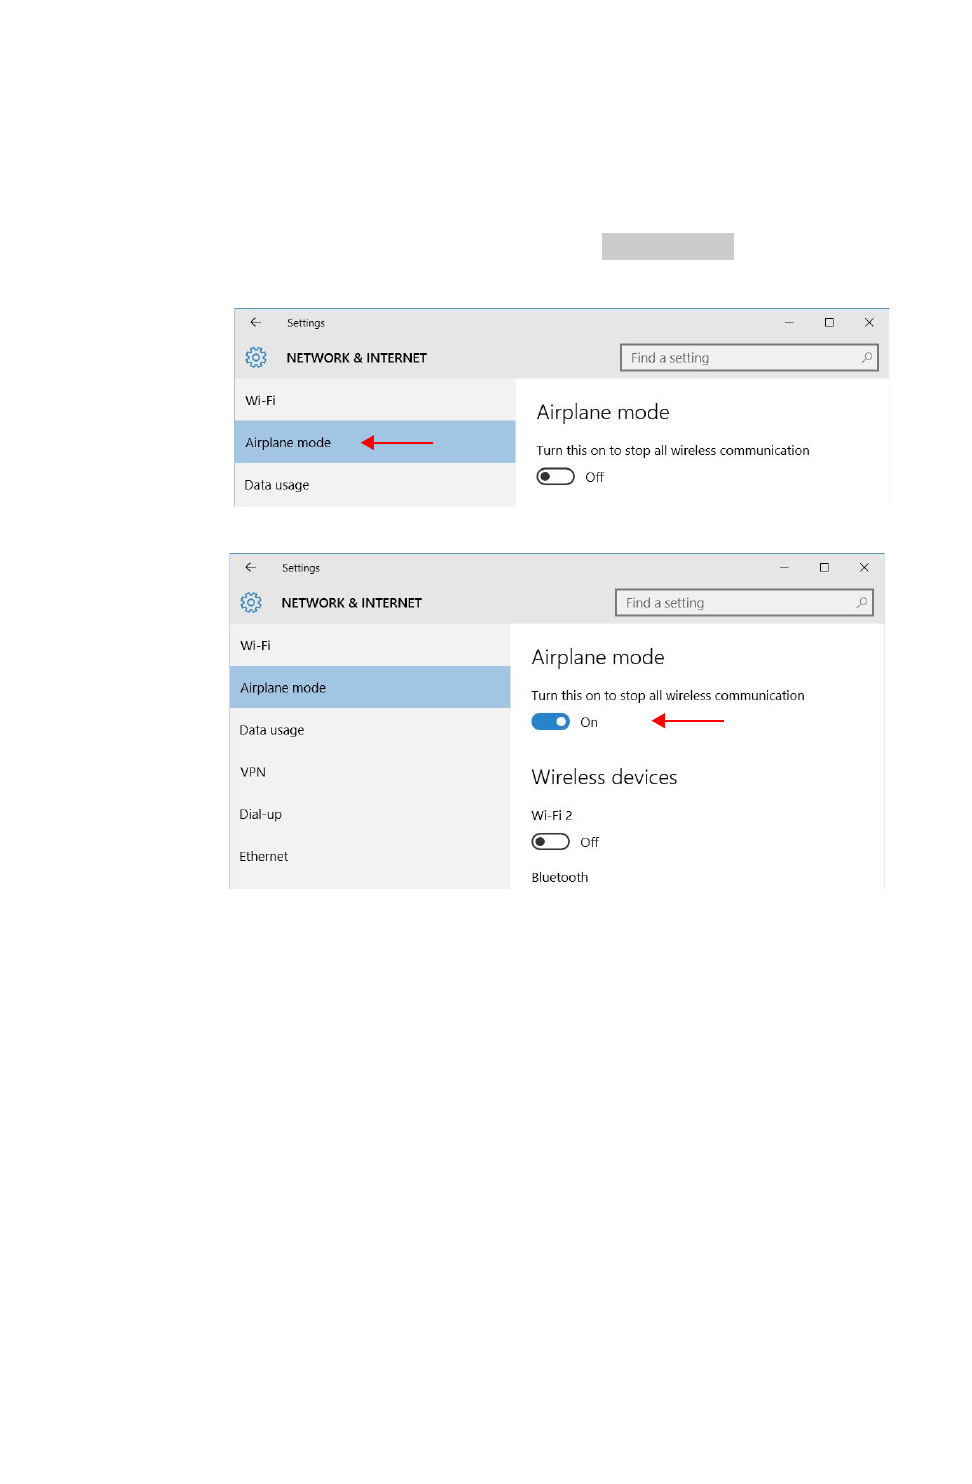
Temporarily Switching Off Wireless Devices
Check with your airline for exact rules on using your Tablet PC and Wi-Fi while traveling. If
required, you can disable all of your wireless devices using the Tablet Center.
1. To turn off the wireless devices in your tablet, open the Tablet Center.
2. Tap Wireless Settings on the Tablet screen.
3. In the left pane, tap Airplane mode.
4. In the right pane, turn on Airplane mode.
When this switch in on, the wireless devices are turned off.
5. Turn Airplane mode off to resume the use of wireless devices on your tablet.
Wireless Settings
Tap to turn on.
26 Setting Up Wireless Connections Chapter 2 Using Your XSLATE R12 Tablet
Connecting to a Mobile Broadband Network
Important: Before you can connect to a mobile broadband network, you must have an active
account with a cellular network provider and a SIM card in your tablet for mobile broadband
access.
Inserting a SIM Card
1. If you don’t have a SIM card in your tablet already, turn off the tablet.
2. Insert a SIM card into the SIM card slot on the right side of the tablet.
See INSERTING AND REMOVING A SIM CARD on page 52 for details about inserting a SIM
card.
After inserting the SIM card, the mobile broadband detects the SIM from your provider
and automatically configures the mobile broadband for use on your cellular network.
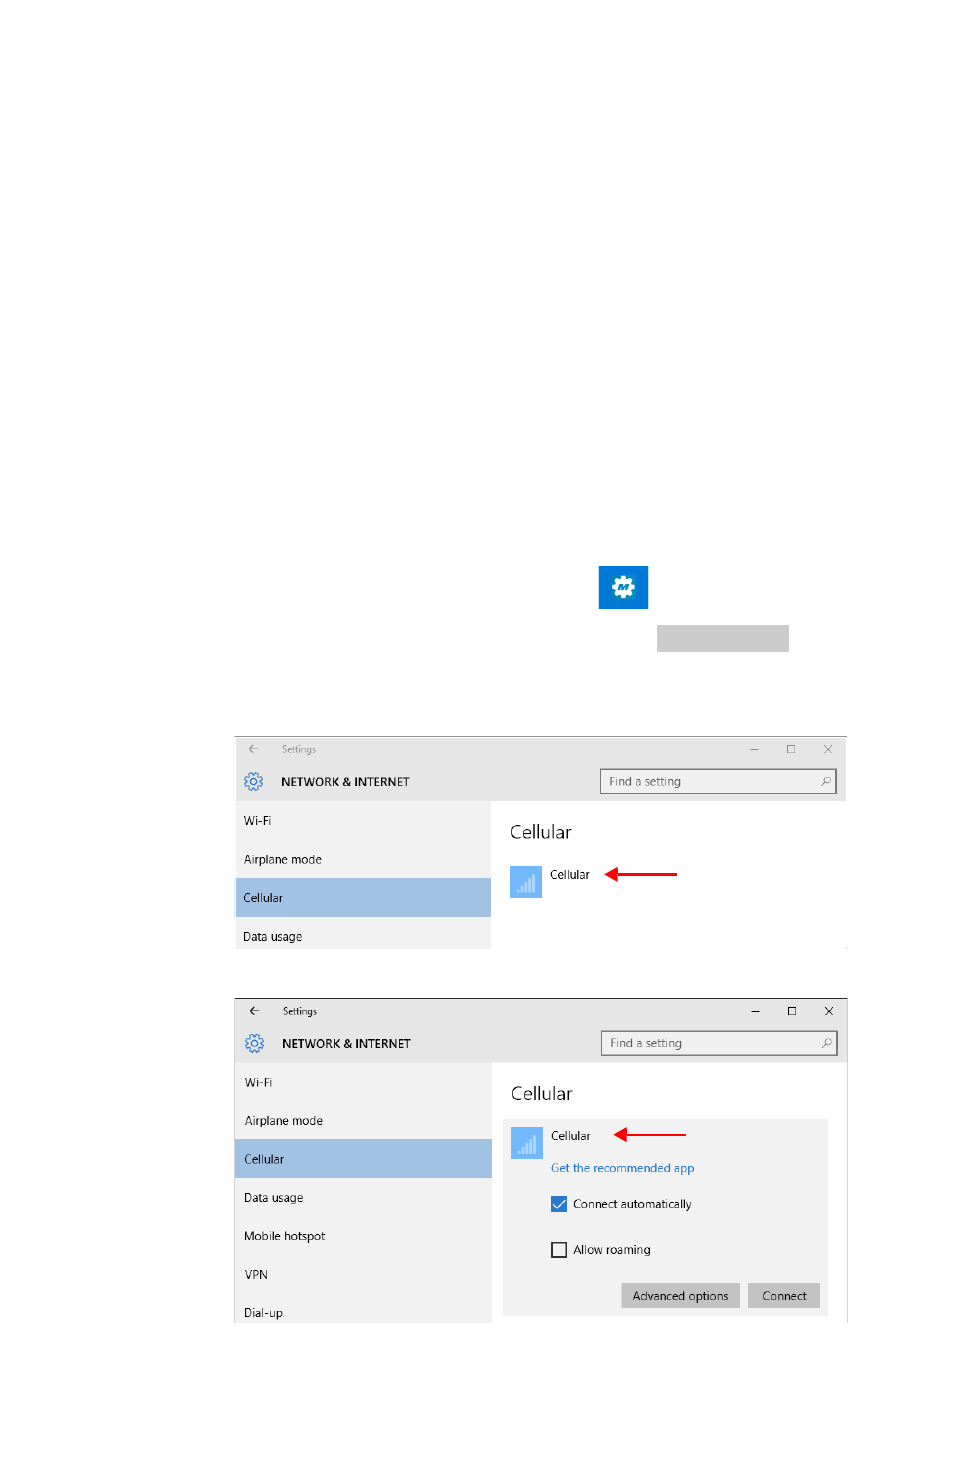
Setting Up Mobile Broadband
With the SIM card and an active account with a cellular network provider, you can connect to a
mobile broadband network.
1. Open the Tablet Center by tapping the icon.
2. Tap Wireless Settings on the Tablet Center screen.
The Windows Network & Internet menu opens.
3. Tap Cellular in the left pane if is it not already highlighted.
Your provider
appears here.
4. Tap your mobile broadband provider.
Tap your provider.
5. If you want to connect automatically in the future, select the Connect automatically
check box.
Wireless Settings

Chapter 2 Using Your XSLATE R12 Tablet Setting Up Wireless Connections 27
6. Tap Connect.
7. If prompted, enter the access point name (APN) or access string, the user name, and the
password. (You can find these in the information that came with the device or with your
mobile broadband service.)
If the entries in the previous step were correct, then you are connected to the net.
TIP:To view options and settings for the mobile broadband network, press and hold your
pen or your finger on the network name until a square appears. Select from the pop-
up menu.
Advanced Information
You can use the Advanced settings in the Tablet Center to view all system information for your
Tablet PC.
System Information lists categories in the left pane and details about each category in the right
pane. The categories include:
•System Summary
Displays general information about your computer and the operating system, such as the
computer name and manufacturer, the type of basic input/output system (BIOS) your
computer uses, and the amount of memory that is installed.
•Hardware Resources
Displays advanced details about your computer hardware and is intended for IT
professionals.
•Components
Displays information about disk drives, sound devices, modems, and other components
installed on your tablet.
•Software Environment
Displays information about drivers, network connections, and other program-related
details.
Viewing Information about Your Tablet PC
1. Tap Advanced on the Tablet Center screen.
The System Information window displays information about the hardware, the operating
system (OS), and system information.
2. To find a specific detail in System Information, type the information you are looking for in
the Find what field at the bottom of the window. For example, to find your computer
Internet protocol (IP) address, type IP address in the Find what field, and then tap Find.
TIP:You can save system information by tapping File > Save, typing a name for the file,
and then tapping Save again.
Advanced
28 Power Settings Chapter 2 Using Your XSLATE R12 Tablet
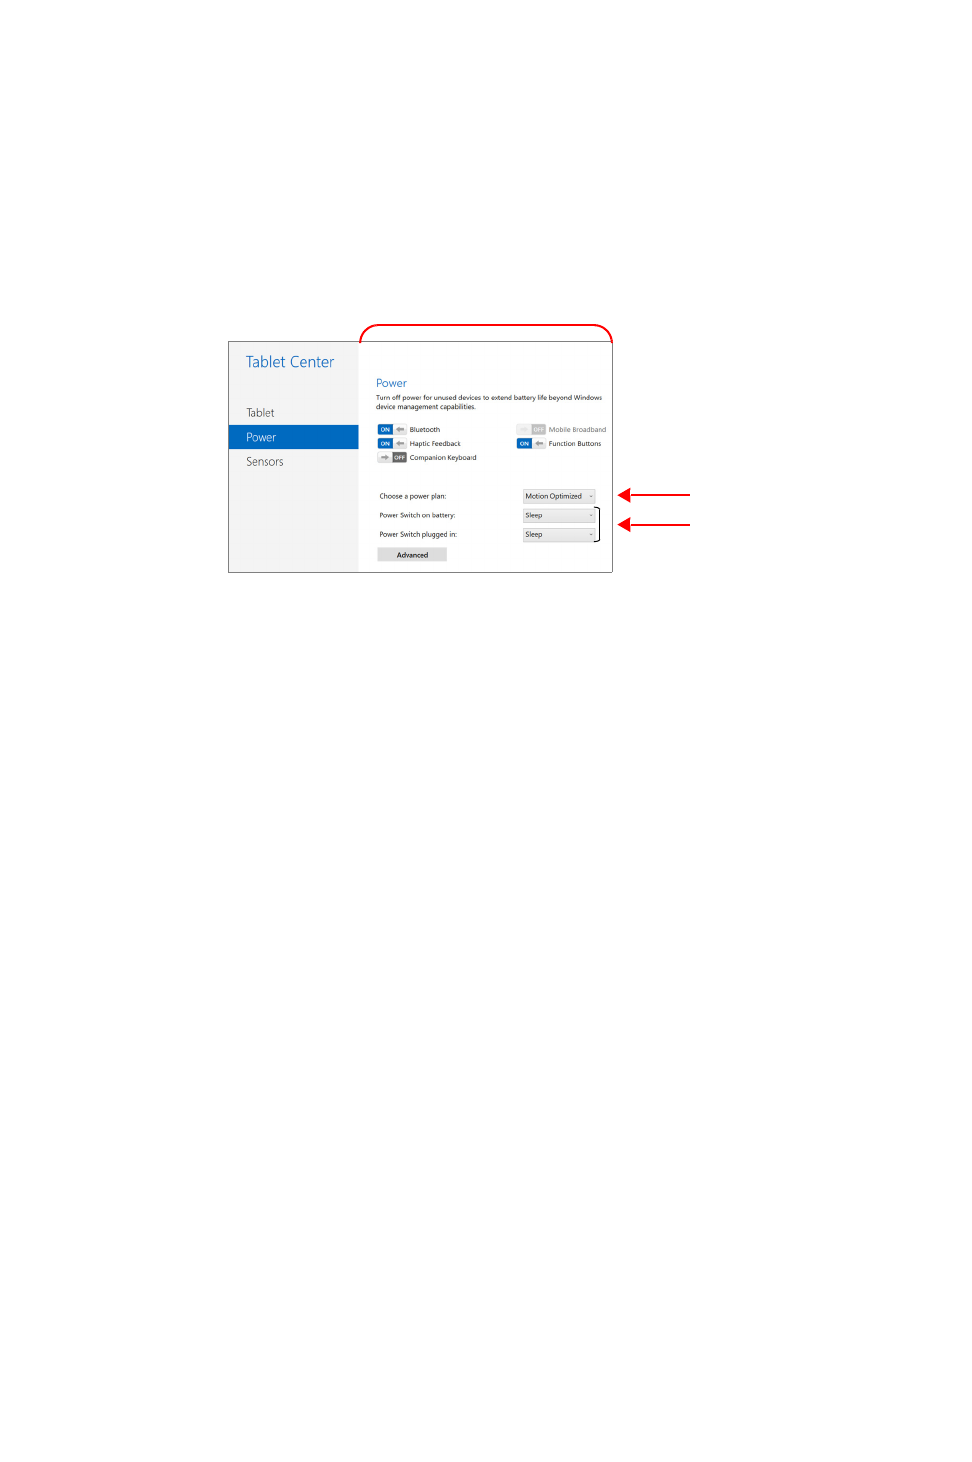
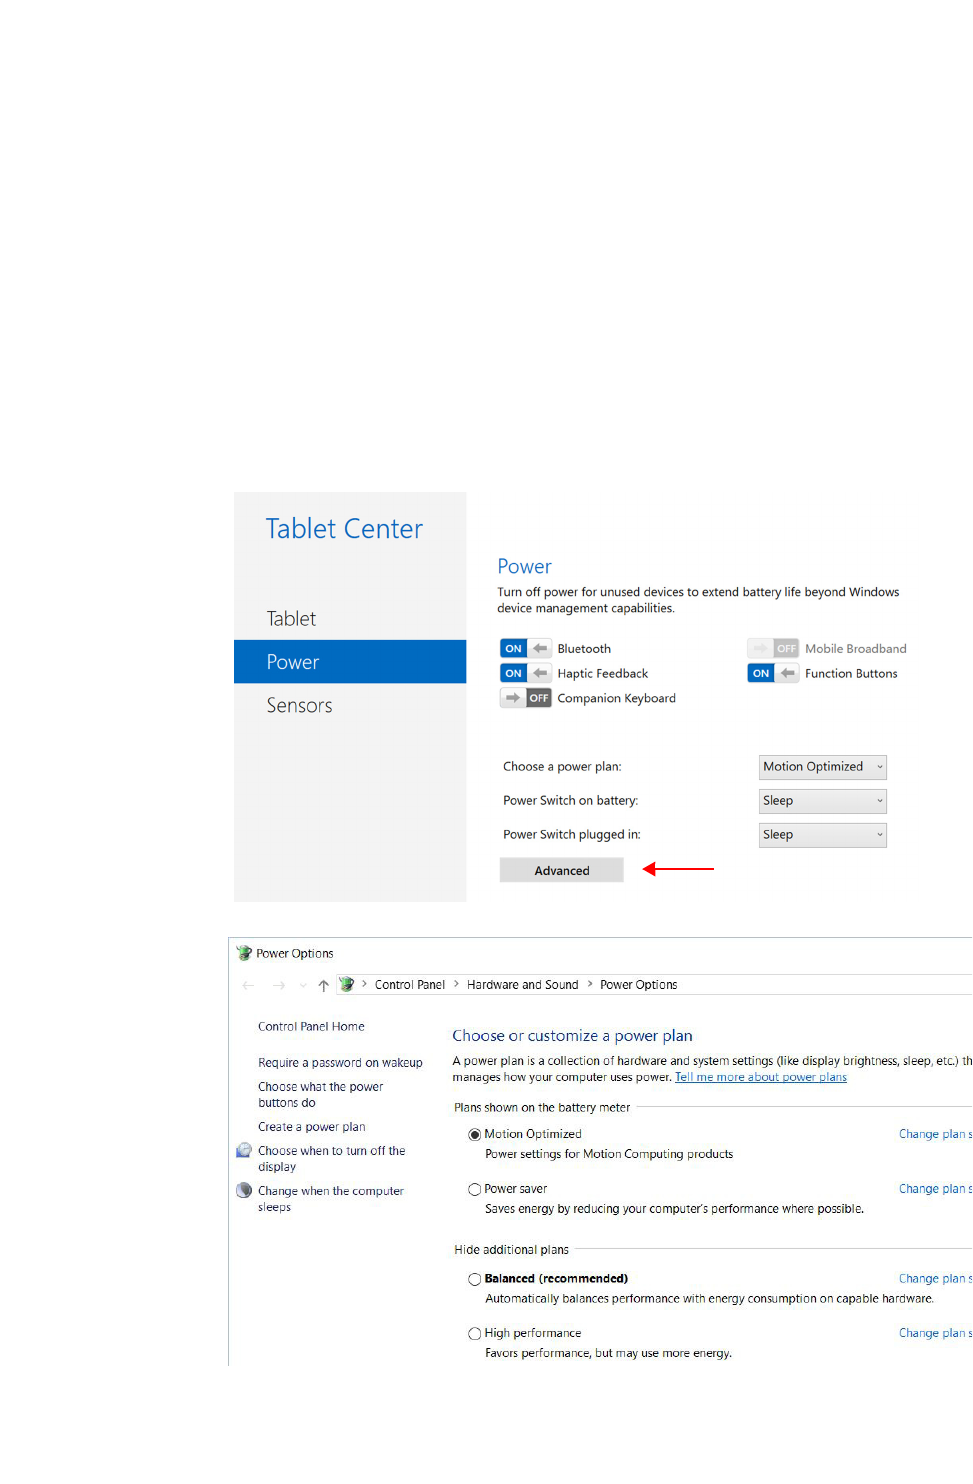
Power Settings
Use the Power pane for these tasks:
•Turn off power for unused devices or features to extend battery life.
•Choose a power plan.
•Change how the power button functions when on battery power or when plugged in.
•Advanced settings to choose or customize a power plan for your Tablet PC.
Power Plan field
Power Button field
Power pane in the Tablet Center
To disable unused devices so that you can extend the battery life of your Tablet PC, tap the
switch beside the devices that are on to turn them off. To enable these devices, tap the switch to
turn them on.
Changing the Power Plan
In the Power pane of the Tablet Center, tap the drop-down menu beside Choose a power plan
and select the power plan you want.
•Setting the power plan to Power Saver reduces the performance of the tablet while
saving power.
•There are other power plans to choose from as shown on the Power menu.
When you press and release the power button, the tablet can go into one of the following
modes:
•Sleep—The tablet pauses all activity immediately and quickly resumes when awakened.
This saves power when you’re away from your tablet for a short time. However, you will
lose unsaved data if there’s a power failure.
•Hibernate—The tablet saves the contents of memory to the hard drive and shuts down.
Press the power button to restore the desktop exactly as you left it.
•Shut down—Tablet shuts down. Pressing the power button reboots the tablet.
By default, the tablet goes to sleep when you press and release the power button. To wake up
your tablet, press and release the power button again. You can put the tablet in Hibernate mode
or shut it down completely from the Start menu.
You can change how the power button behaves when it is pressed either to hibernate or to shut
down the tablet. You can set the behavior individually, depending on whether the tablet is
running on battery or plugged in.
Chapter 2 Using Your XSLATE R12 Tablet Power Settings 29
Changing What Happens When the Power Button Is Pressed
•Tap the drop-down menu beside Power switch on battery and select the action the power
button performs when your Tablet PC is on battery power.
•Tap the drop-down menu beside Power switch plugged in: and select the action the power
button performs when your Tablet PC is on battery power.
Configuring Advanced Power Settings
The Advanced settings in the Tablet Center’s Power screen provide you with access to Windows
Power Options menu, where you can create your own power plan, customize the power plan for
the tablet, adjust the screen brightness, set a password on wake-up, choose when to turn off the
display, and change when the Tablet PC sleeps. You can also turn off these function: external
keyboard, Bluetooth, mobile broadband, and function buttons on the tablet.
1. In the Tablet Center, tap the Power category in the left pane, tap Advanced in the right
pane.
The Power Options menu is displayed.
2. Choose or customize a power plan, or select a task from the left pane for more settings.
Tap
30 Sensors Settings Chapter 2 Using Your XSLATE R12 Tablet
Sensors Settings
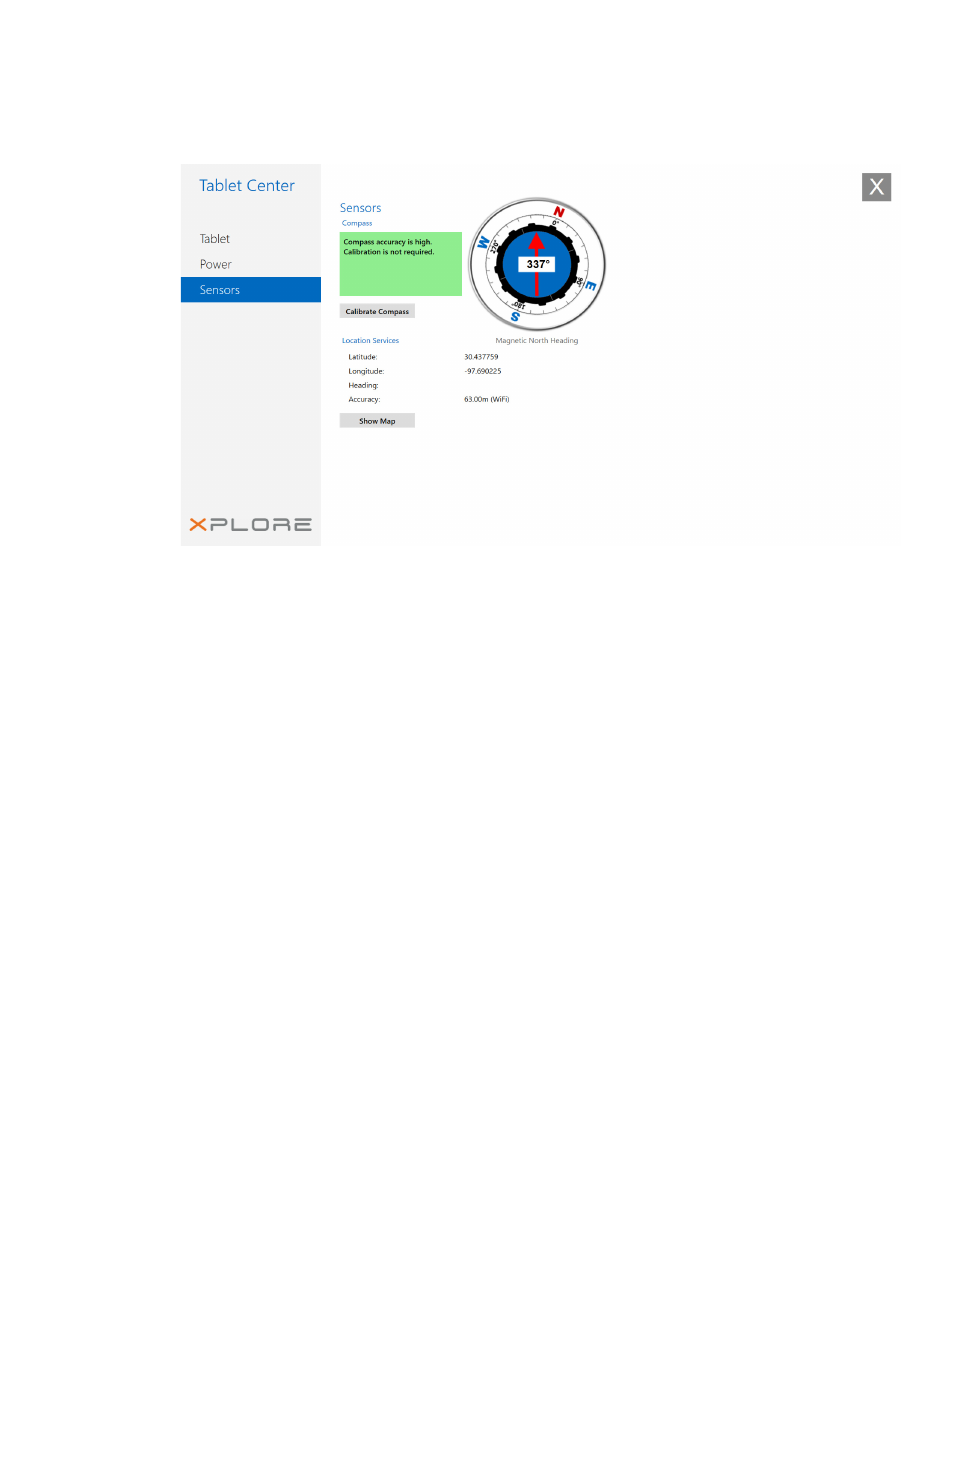
Compass
The on-screen compass displays the direction of the magnetic north pole relative to the
orientation of the tablet. Additionally, the compass accuracy status is displayed; if the compass
needs to be calibrated, you will see a notification alerting you to calibrate the compass. To
calibrate the compass, tap Calibrate Compass and follow the on-screen instructions.
Location Services
Location Services provides information about the current position of the tablet—latitude,
longitude, heading, and accuracy. Accuracy provides two pieces of information: the number
shown gives an approximate radius of accuracy in meters. For example, “55.0m” means that the
position shown is accurate within 55 meters. Adjacent to that number, in parentheses, is a
phrase that defines the source of the current position fix. This source will be one of the
following:
•Cellular—The position was obtained from cellular network data.
•Satellite—The position was obtained from satellite data.
•Wi-Fi—The position was obtained from Wi-Fi network data.
•IP Address—The position was obtained from an IP address.
•Unknown—The position was obtained from an unknown source.
Showing the Map
When you tap Show Map, Internet Explorer opens and you see the location of your Tablet PC in
Bing Maps.
NOTE:You need an active Internet connection to view current map data.
Chapter 2 Using Your XSLATE R12 Tablet Entering Text by Keyboard 31
Entering Text by Keyboard
You can use different methods to enter text with your XSLATE R12. You can use an on-screen
touch keyboard or the handwriting panel. There are several on-screen keyboards in Windows
10.
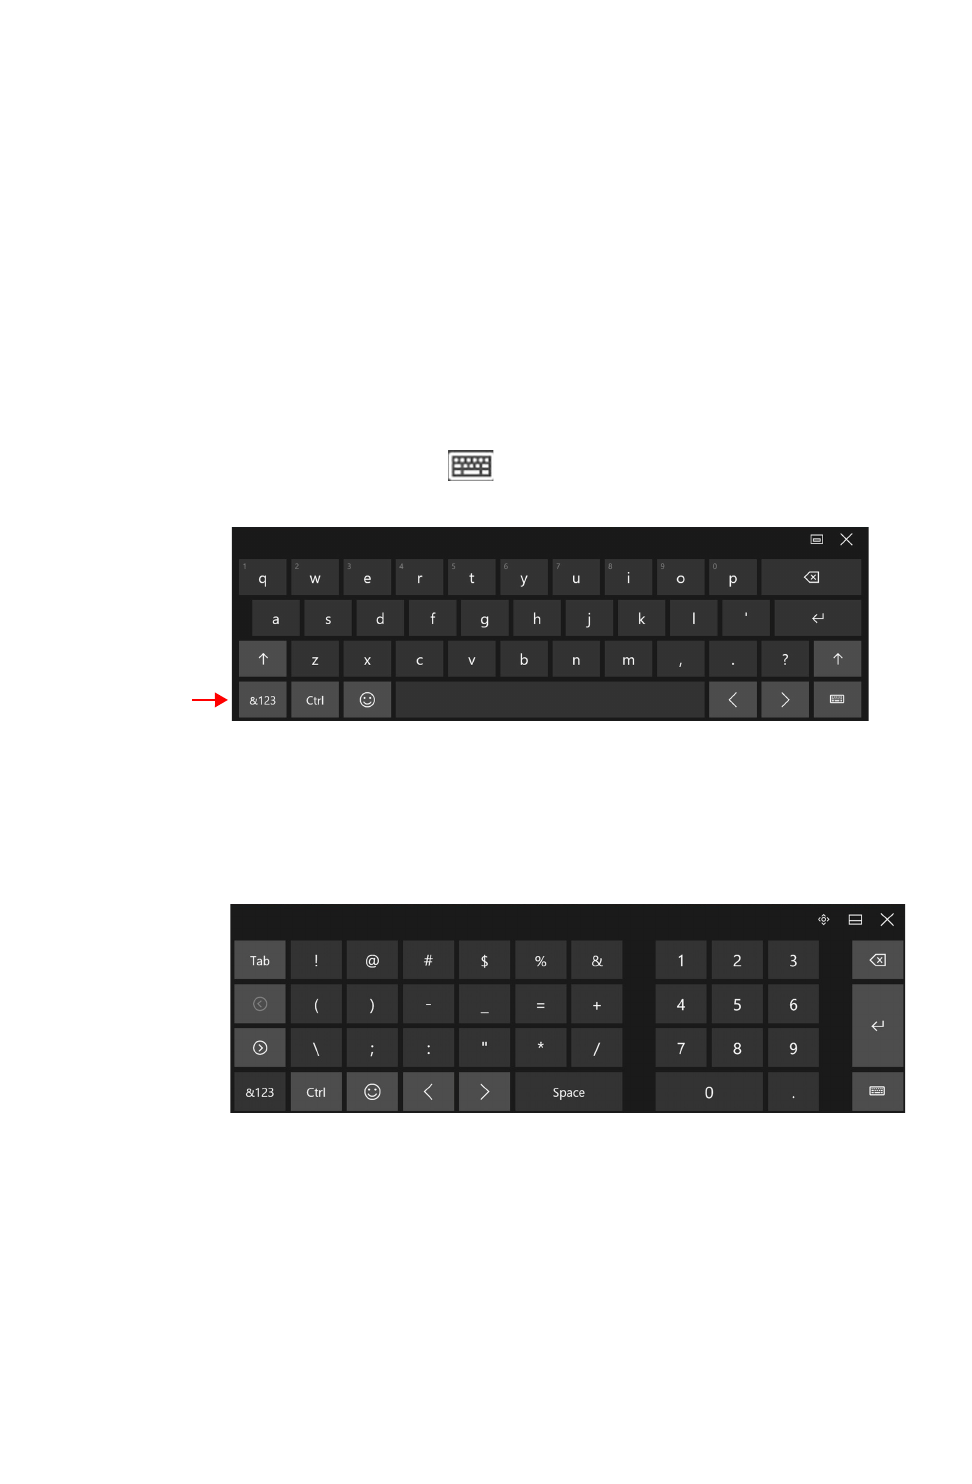
Using the Windows On-screen Keyboards
1. To open the default on-screen keyboard, choose one of these actions:
a. Tap in a text field or other area where you can type, such as the URL field in a web
browser. (If this does not work, see MAKING A KEYBOARD APPEAR WHEN TAPPING IN A
TEXT FIELD on page 32.)
or
b. Tap the Keyboard icon in the Windows notification area of the taskbar.
The default on-screen keyboard appears.
&123 Key
Default Keyboard
In addition to the default on-screen keyboard, Windows 10 provides other keyboard
layouts for entering text. You can use an expanded keyboard, which provides additional
keys or a keyboard that includes a numbers keypad.
2. Tap the &123 key in the lower left corner of the default keyboard, to switch to the
keyboard that includes the numbers keypad, punctuation, and symbols.
First Numeric-Symbol Keyboard
32 Entering Text by Keyboard Chapter 2 Using Your XSLATE R12 Tablet
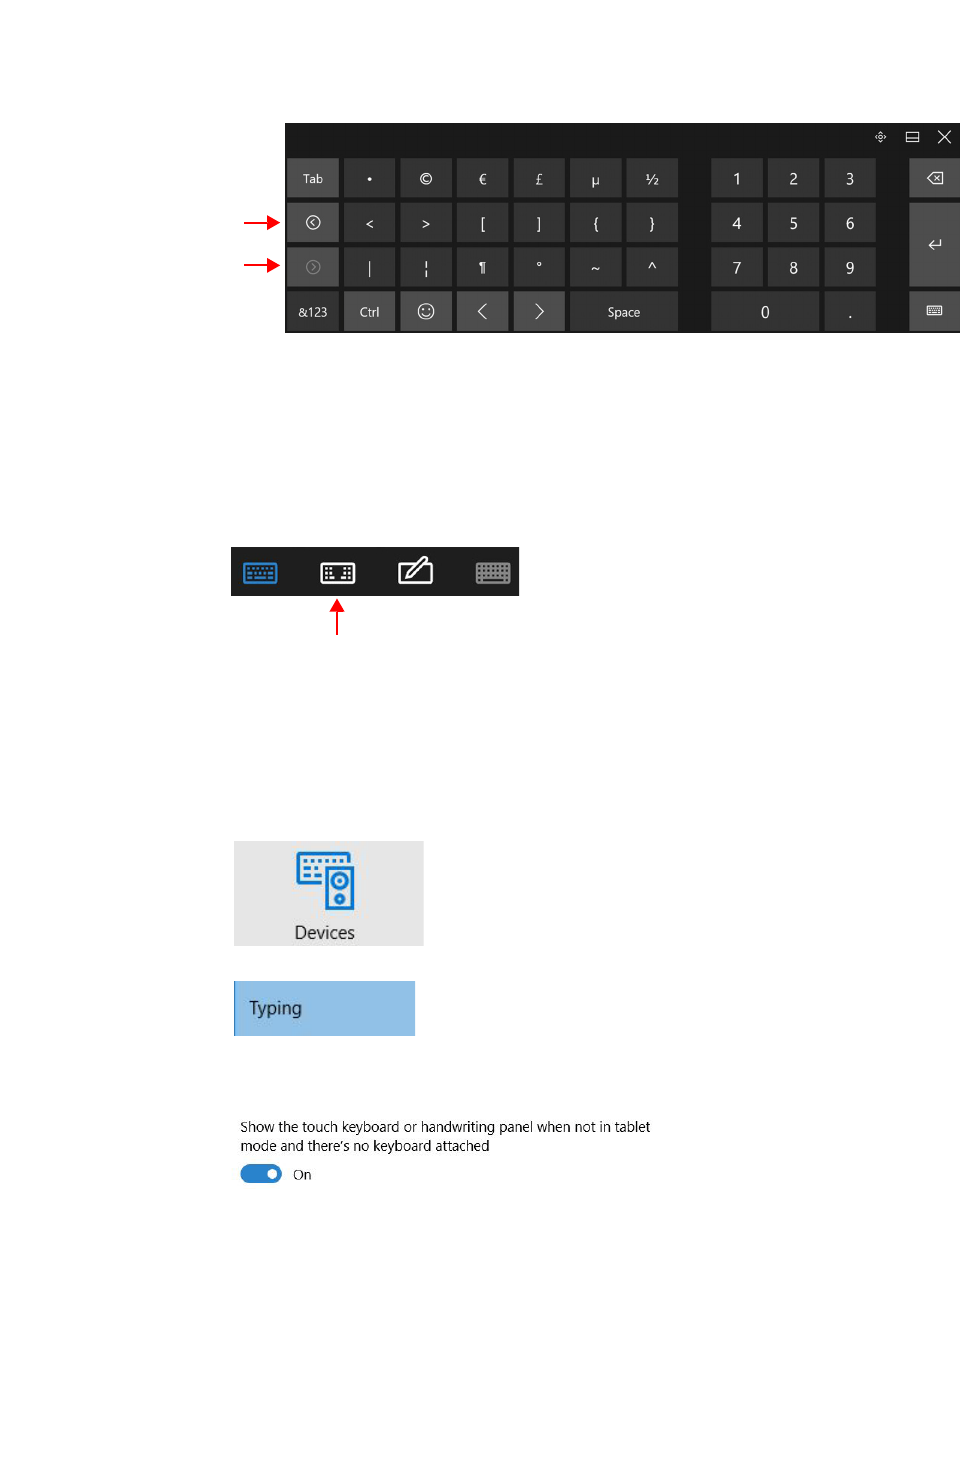
3. You can access a second numeric-symbol keyboard by tapping the keys on the left
side.
Second Numeric-Symbol Keyboard
between the two numeric-
the two numeric-symbol
keyboards.
Tap these keys to switch
4. To switch back to the default keyboard (alphabetic), tap the &123 key.
5. When you have a keyboard on the screen, you can tap the keyboard icon in the lower
right corner of that keyboard to display a menu for switching to different keyboards and
also for language preferences.
6. You can also switch to a split keyboard that lets you view the center of the screen.
Tap the split keyboard icon on the Keyboard Preferences menu.
Split Keyboard
Making a Keyboard Appear When Tapping in a Text Field
To make an on-screen keyboard pop up when you tap in a text field, follow this procedure.
1. Tap Settings in the Start menu, or swipe left from the right edge of the screen and tap All
Settings.
2. Tap the Devices icon.
3. In the Devices menu, tap Typing.
4. In the Typing menu, scroll to the end of the right pane.
5. Turn the last button ON.
Now when you tap in a text entry field, a keyboard appears automatically.
Chapter 2 Using Your XSLATE R12 Tablet Entering Text by Keyboard 33
Accessing the Full On-screen Keyboard
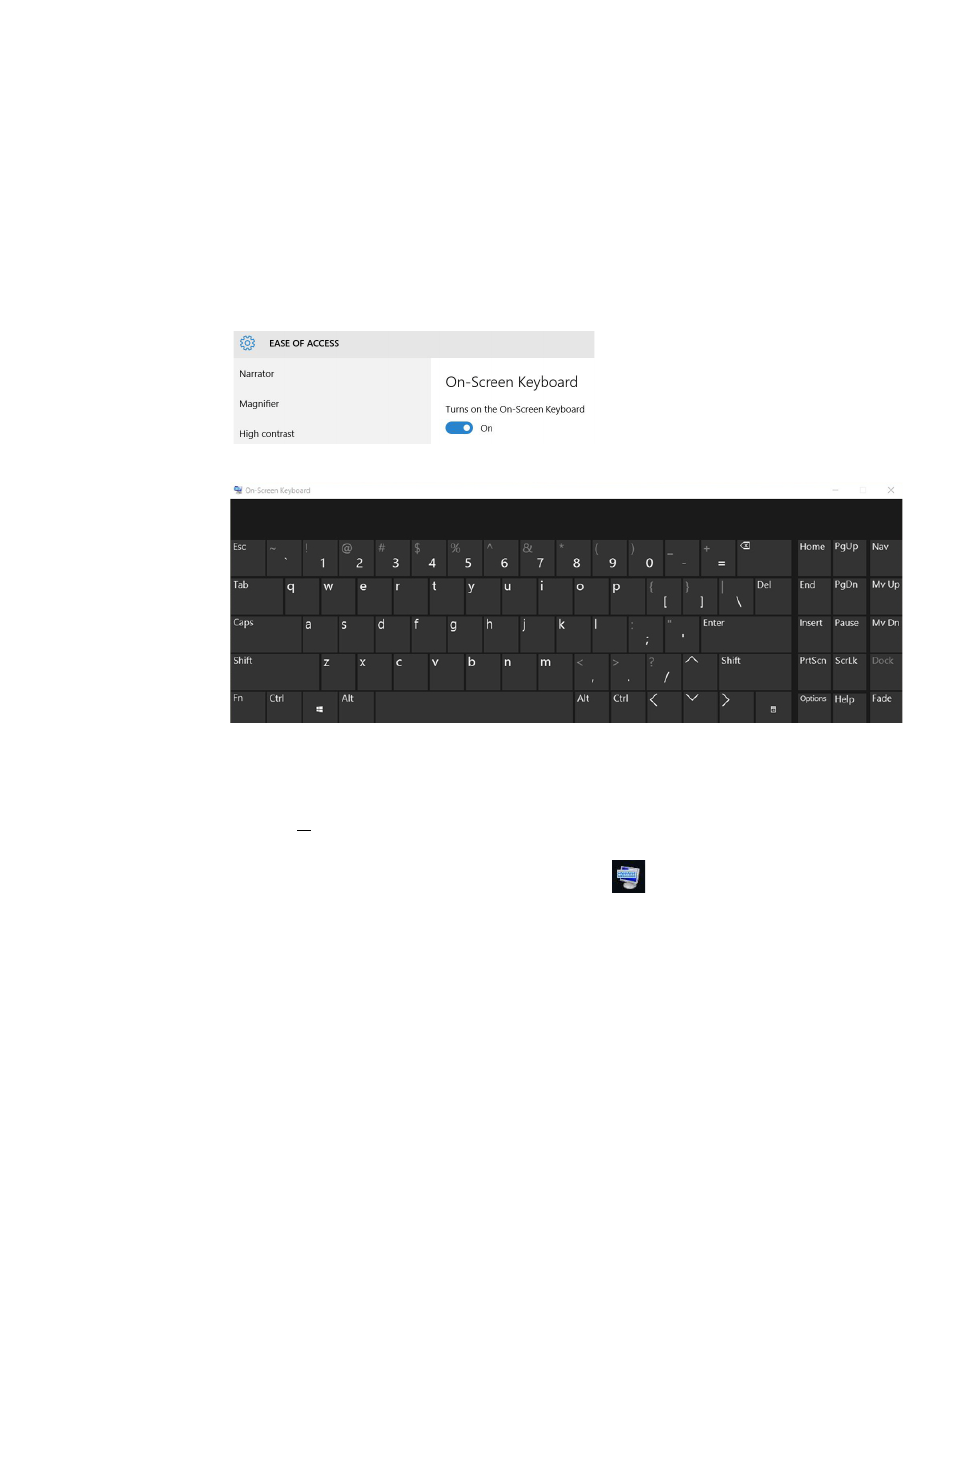
There is also a keyboard that has more keys like an external keyboard. To activate this fuller on-
screen keyboard, follow these steps:
1. Swipe left from the right edge of the screen and tap All Settings.
2. Tap Ease of Access on the Settings menu.
3. Tap Keyboard in the left pane.
4. Tap to activate the on-screen keyboard.
The full on-screen keyboard appears.
After Displaying This Keyboard
1. To minimize this keyboard but keep it available during your session, tap the Minimize
button, , in the upper right of the keyboard.
2. To reopen it after you minimize it, tap its icon, , in the taskbar to bring it up again.
3. To close it, tap the Close button,
x
.
The keyboard closes and disappears from the taskbar.
Keeping the Icon on the Taskbar
To make an icon permanently available,
1. When the icon is on the taskbar, press and hold the icon (right-click of a mouse).
A few commands pop up.
2. Select Pin to taskbar.
The full keyboard icon stays on the taskbar even after you shut down the tablet.
34 Entering Text by Handwriting Chapter 2 Using Your XSLATE R12 Tablet
Entering Text by Handwriting
In addition to keyboards, you can enter text by writing with the tablet pen on the handwriting
panel. When you write on the handwriting panel, your writing converts to digital ink. Digital
inking is the process of converting your handwriting to text.
1. Tap in a text field or other area where you can type, such as the text entry field in a web
browser.
Make sure a keyboard appears. If one does not appear, then tap the Keyboard icon in the
notification area so that you see a keyboard.
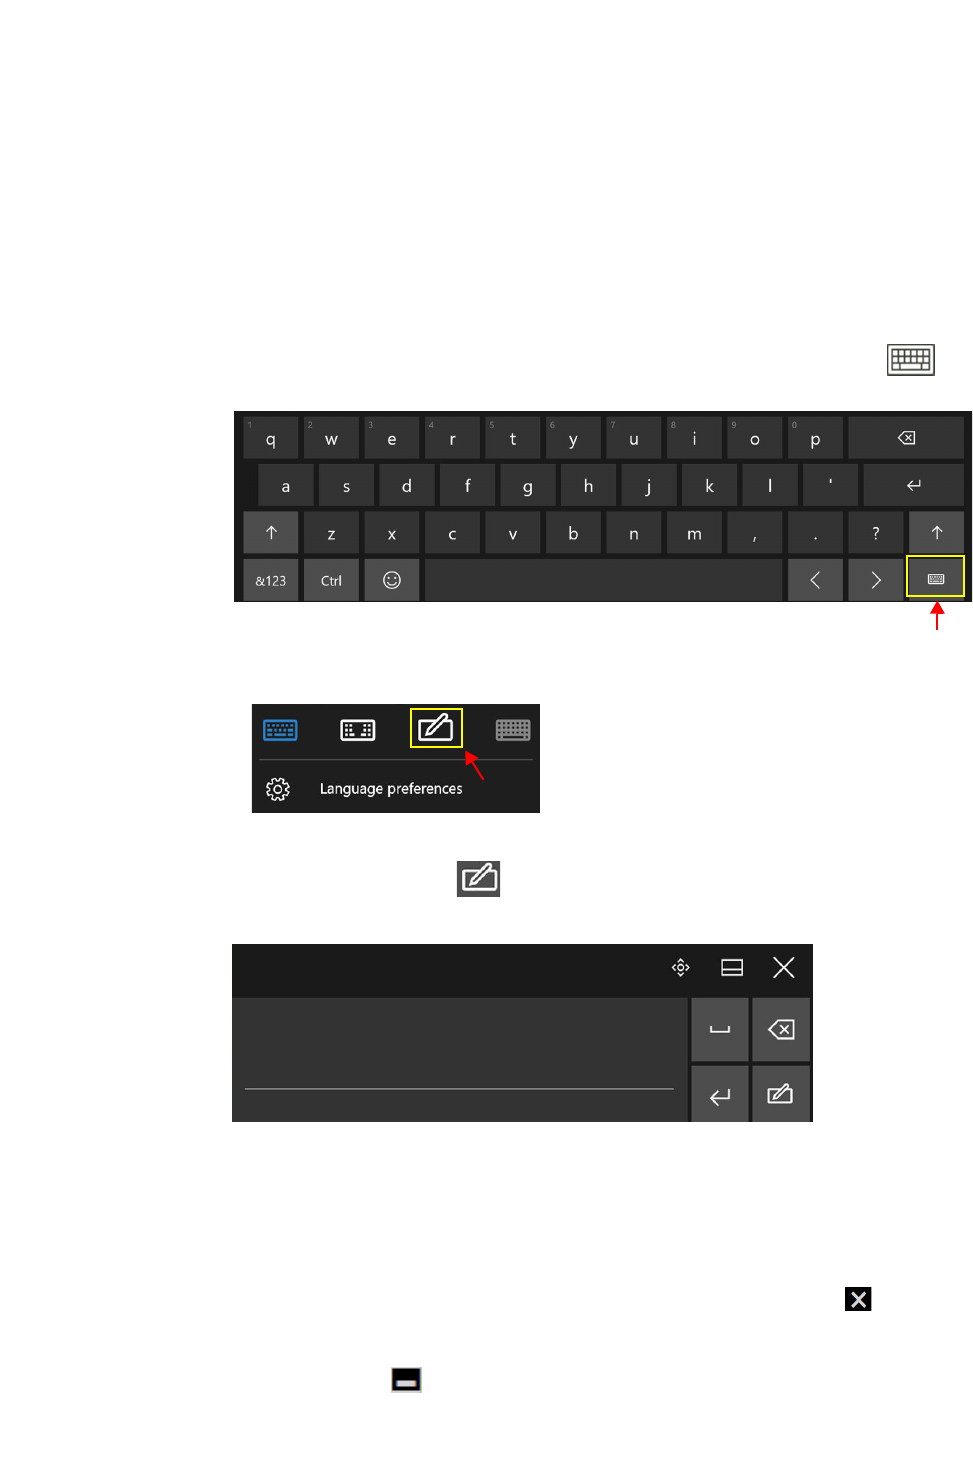
2. In the lower right corner of the default touch keyboard, tap the Keyboard icon to
change the keyboard.
The Keyboard Preferences menu appears and you can choose a keyboard or set language
preferences for language-specific keyboards.
Keyboard and Language Preferences
3. Tap the Handwriting icon.
The handwriting panel opens.
Handwriting Keyboard
Use the pen to begin writing in the handwriting panel. Your handwriting is converted to
text.
TIP:The more you write, the more accurately Windows software detects your
handwriting style.
4. To close the on-screen keyboard or handwriting panel, tap the Close icon in the
upper right corner.
To dock the on-screen keyboard or handwriting panel on the bottom of the screen, tap
the Minimize icon in the upper right corner.