Xunnengda Electronic HSY-013 Game Wireless User Manual
Shenzhen Xunnengda Electronic Co., Ltd. Game Wireless Users Manual
User Manual

product manual
Product name Game Wireless
Applicable
platform Switch gaming console /PC computer
Date 2018/08/03
Version V1.0
Note:
1.
2.
3.
4.
5.
※ If the following information is updated, it will be notified separately and
subject to the final product physical parameters.

一.product manual
1.1
This product is a wireless game controller that is compatible with the Switch game
console. The product adopts the mode of Bluetooth wireless communication and console
connection. Further increase the fun of the game in progress
1.2 This Switch wireless controller supports gyroscope axis function and supports motor vibration
functio
n
1.3 Support PC/PC360/PS3/ANDROID mode on the computer side.
1.4 ProductsupportsType‐cdatacableconnection
二. Specification
2.1 Provide a set of cross direction keys: up, down, left, right arrow keys
2.2 Control keys * 4: A, B, Y, X keys. Clear black and white function button design,
finger touch operation is more sensitive and fast.
2.3 Menu button Home button, SELECT- button, START+ button, with VIB screen capture
button function.
2.4 2 left and right joysticks: 3D rocker with novel design, 360-degree precision
operation
2.5 Function keys * 4: LB, RB, LT, RT new trigger and button switch design for a better
grip.
2.7 Provides a player controller number indicator: displays the indicator that the user
is the current player.
2.8
The controller uses Bluetooth wireless connection, which has strong
anti-interference ability. When connecting the game, it makes you feel more
comfortable, and the connection signal between the handle and the host is more stable.
2.9 The wireless product enters the sleep state for 5 minutes without any action, and the controller light
goes out.
三、 Connect Console Operation
3.1 1.Turn on the Switch console, wait for the switch console enter into the main interface, the console display is lit,
the connected display shows the main screen of the console
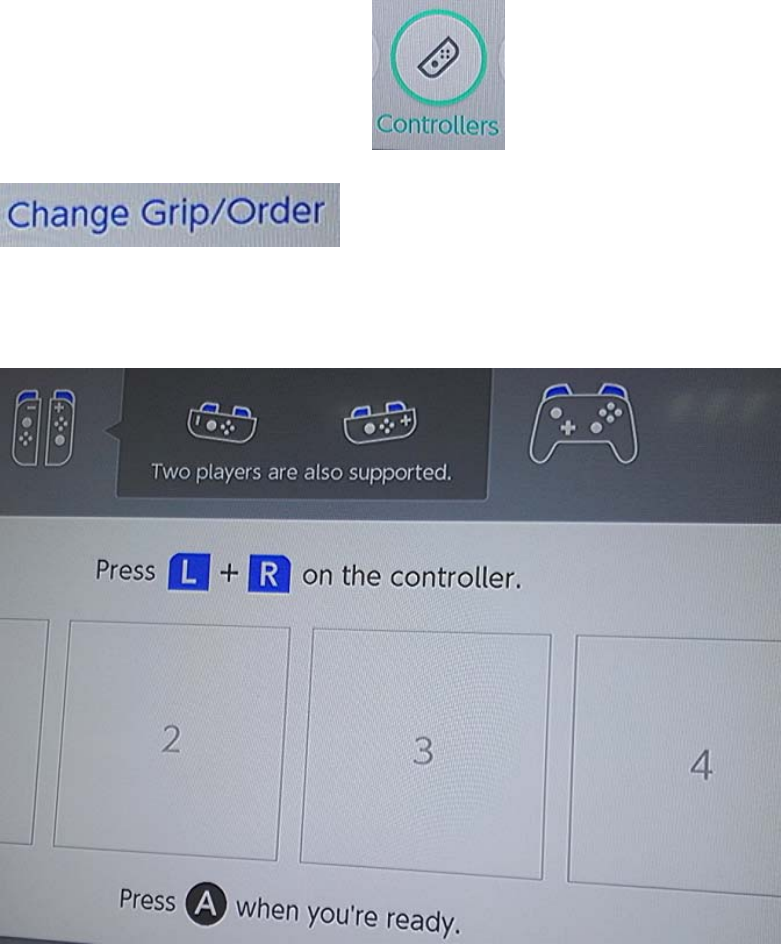
2.The steps of first time connect the console: Click controllers→change Grip/order one the console Menu
interface,enter the console pairing mode, when all the previously connected controllers are automatically closed
3.In the matching interface, press the HOME button 4-5S, the LED starts to flash rapidly, the controller enters the
pairing mode, after 5 seconds, the controller is paired with the console ,one LED of the controller is always on,
then press the A button to operate
Note: For the first connection, if you do not enter this interface, the controller will not be automatically paired
with the console
4.When reconnecting for the second time, press the HOME button directly to connect to the console
automatically. After connecting, press the A button to operate.
5. In the sleep state of the controller, first press the HOME button, then press and hold the A button to operate,
the controller and the console enter the return state.
3.2 Close the controller connection: Enter the setting interface of the Switch console. First connect the console with
the small left and right controller of the SWH. Select the controller connection. When connecting for the first
time, click controller→charge grip/order→ on the main menu of console,enter into the pairing mode. When the
console enters the paired page, all connected controllers will be automatically closed.

3.3
1.The basic button function test interface of the controller can be tested in the console setting
menu.:
Click on the console main menu system settingscontrollers and sensorstest input devices
Test controller buttons to test buttons.
2. Click on the console main menu system settingscontrollers and sensorscalibrate control
stickspress L3 You can test the left stick. After the test, press B to return, press R3 again
to test the right stick
3.4
Automatically recognize the PC/PC360/PS3/ANDROID USB terminal by holding down the STAR button and
plugging in the USB.
3.5
1. LED light indicator:
1.The four LEDs flash quickly, indicating that the controller is paired, and the slow LED flashes back to the
connected state.
2.When the connection state, the LED flashes rapidly, indicating that the controller is Low electricity
3.A single LED is always on, indicating that the controller and the console are properly connected.
3.6
1.Low voltage indication: When the controller battery voltage is lower than 3.6V, the indicator light flashes
quickly. When the voltage is lower than 3.3V, the controller cannot be turned on.
2.Charging and indication: Connect the USB cable to charge the controller.,The indicator light flashes slowly.
When the battery is fully charged, the indicator light goes out.
3.7
SWH wireless controller calibration method: when the controller is dormant, press L3 key, then press HOME
key, LED12 is always on, flatten the controller, then press R3 to release, LED1234 is always on, and the
controller light is off, the calibration is successful. Cannot move the controller when correcting
This SWH private wireless controller not support NFC function
Note:1.The Bluetooth test light board is used in the production test, and the code method
is the same as the Android controller.。
2.You can test the SWH wireless controller's button function, vibration function,
axis function, screen capture button function, and other functions.。
Use the ZX Android Bluetooth light board test to test the function of each button.
There will be corresponding indications on the light board. When testing the axis
function, the controller is leveled. The two sets of numbers are fixed and will not change.
When the controller is moved, the two groups The number will change and it will be OK。
Test axis two sets of numbers 00-FD-7D 00-00-00 error change value is less than 5,
acceptable
Specification Function:
ITEM RATING
Working Voltage DC 3.6-4.2V
Working current 20mA
Sleep current 0uA
Vibration current 70—130mA
Input DC5.0V/500mA
Battery capacity 3.7V/380mA
Using distance ≤8M
1. Connection instructions with SWH console
2. Put the SWH console into the console dock, and connect the console to the TV through

the HDMI cable. First connect the main unit with the left and right small Joy-cons
that come with SWH ,Select icon , Press A to enter , Select
,After entering the interface, press the prompt and
press and console the HOME button of the wireless controller. After 5 seconds, when
the single LED on the controller is always on, then press the A button to indicate
that the controller is connected to the controller!
3.
FCC Warning
This device complies with Part 15 of the FCC Rules. Operation is subject to the following
two conditions:
(1) This device may not cause harmful interference, and (2) this device must accept
any interference received, including interference that may cause undesired operation.
NOTE 1: This equipment has been tested and found to comply with the limits for a Class
B digital device, pursuant to part 15 of the FCC Rules. These limits are designed to
provide reasonable protection against harmful interference in a residential
installation. This equipment generates, uses and can radiate radio frequency energy
and, if not installed and used in accordance with the instructions, may cause harmful
interference to radio communications. However, there is no guarantee that interference
will not occur in a particular installation. If this equipment does cause harmful
interference to radio or television reception, which can be determined by turning the
equipment off and on, the user is encouraged to try to correct the interference by
one or more of the following measures:
- Reorient or relocate the receiving antenna.
- Increase the separation between the equipment and receiver.
-Connect the equipment into an outlet on a circuit different from that to which the
receiver is connected.
-Consult the dealer or an experienced radio/TV technician for help.
NOTE 2: Any changes or modifications to this unit not expressly approved by the party
responsible for compliance could void the user's authority to operate the equipment.