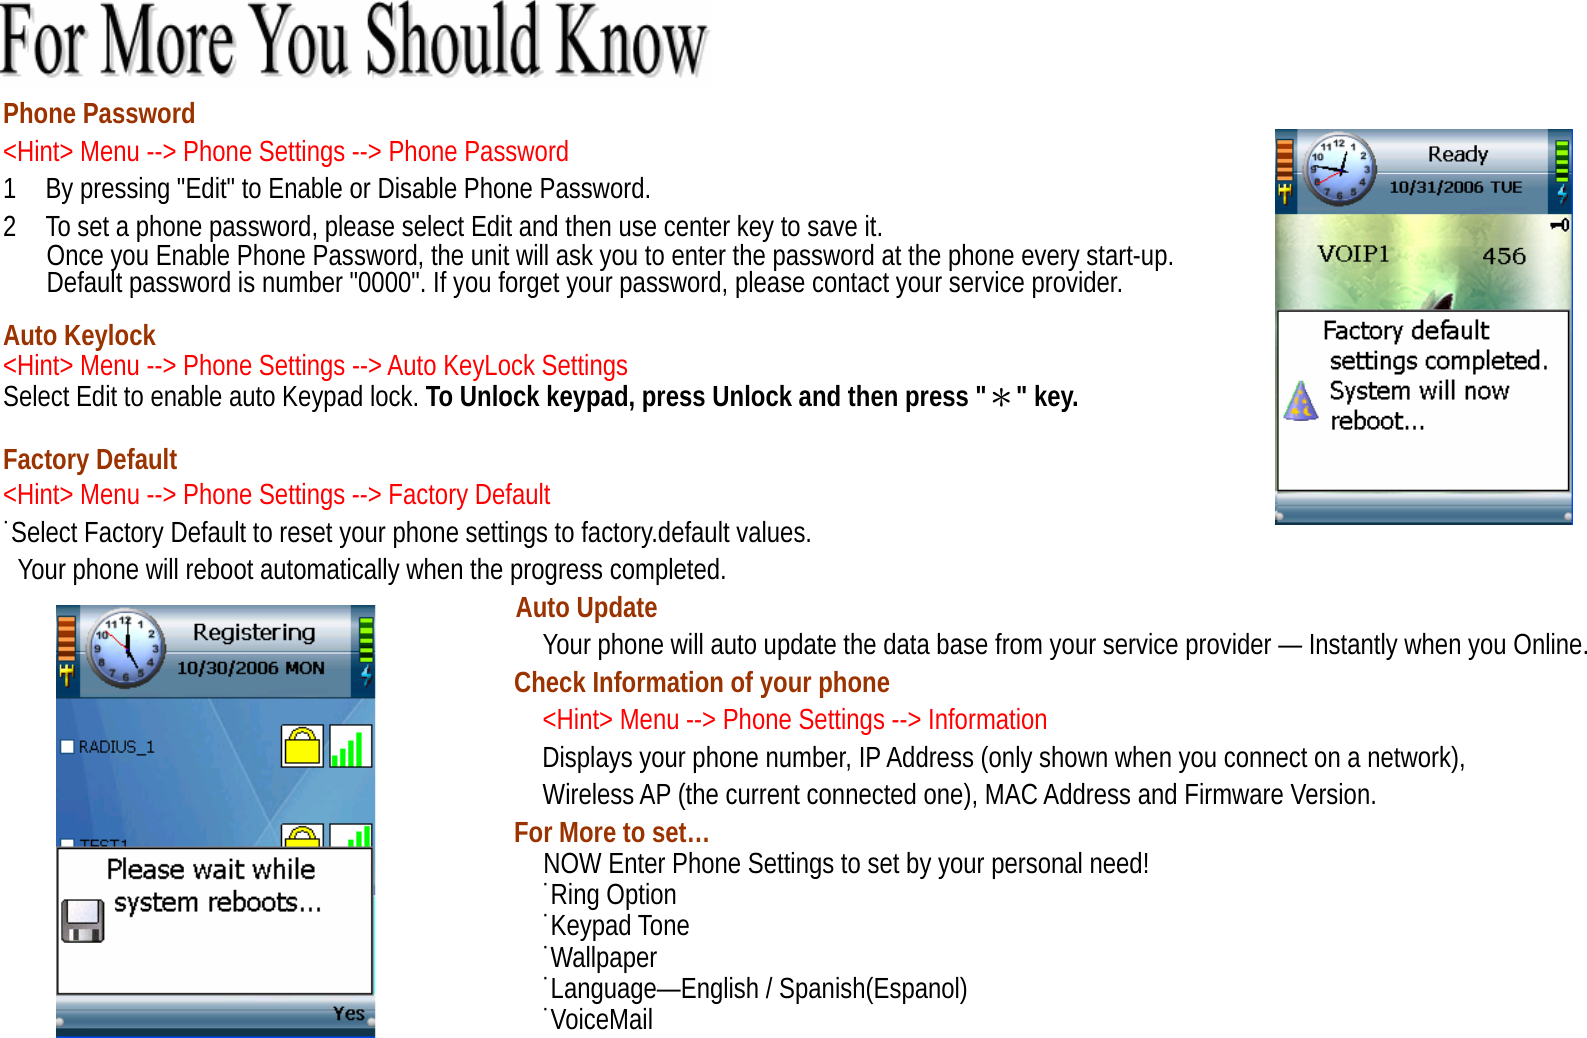
Y5World APOD-E800 @pod (Wireless IP Multimedia Phone) User Manual QIG Certify 1117

Y5World International Co., Ltd. @pod (Wireless IP Multimedia Phone) QIG Certify 1117

user manual

  Phone Feature ◇Key Features  ★ Skype Supported --  ․Presence   ․Skype Talk      ․Skype Out (with SkypeOut Country Code)   ★ MSN Supported --  ․Presence   ․IM   ․MSN Talk   ★  Multiple Media Supported --  ․IP TV   ․IP Radio   ․IP Camera – Web Cam Streaming ★ IE Browser Supported   ★ Hot Spot Auto-Login   ★  Auto Provision Supported ◇Features  ★ Phone book-- ․250 Records   ․with fields for name, numbers, ring tone, speed-dial, email information ★ VoIP -- ․3-Way Conferencing      ․Caller ID Presentation Restriction       ․Call Hold and Resume      ․Call Forward (Unconditional,Busy,Timeout) ․Call Transfer   ․Call Waiting and Retrieve      ․Speed Dial ★  Multiple Languages --  ․English   ․Spanish ★  Voice Mail Indication   ★  Date & Time (NTP Time Synchronization)     ★ Wallpaper ★  10 Wireless Profiles – Auto-scan / Auto-login ★  Call History : 20 Records   ★  Software Upgrade through Internet ○! Please note that local variations may apply. Specifications ◇Display  ★  2.2” QVGA TFT LCD ★  240x320 pixels with 65,536 colors ◇Size  135 x 45 x 18 mm ◇Weight  120 g / 4.2 oz ◇Power  ★  3.7V 1250mAh LI-ION Battery ★  5V 1.0A AC Adapter, 100V~240V
Performance Characteristics ◇Frequency  ․2.4GHz  ․FCC--Channel 1~11 Supported      ․CE—Channel 1~13 Supported        ․JP—Channel1~14 Supported ◇Transmit Power  11dBm for 802.11b/g ◇Radio Range  Outdoor up to 300m via Embedded Antenna ◇External Interface  ․One mini-USB Socket (For Charging Only)․One Stereo Earphone Jack ○! Stereo sound can only be heard with a compatible stereo headset ◇Memory  ․32MB Flash ․64MB SDRAM ○! Please note that actual free memory may vary due to phone pre-configuration. ◇Voice Protocols  ․SIP v2 Session Initiation Protocol (RFC3261) ․SDP (RFC2327)   ․SIP Session Keep Alive ◇Voice Codec’s  ․G.711(A-law and  μ-low) ․G.729a/b ◇DTMF Transmission  ․In-band  ․Out-band(RFC2833) ◇Voice Quality  ․G.168 Echo Cancellation ․Jitter Buffer Control (Default 180ms, Max 900ms) ․VAD-Voice Activity Detection ◇OS  Microsoft Windows CE 4.2 ◇Management Features  ․AES or SSL Encryption ․HTTP/ HTTPs/ FTP Supported for Firmware Upgrade ․HTTP/ HTTPs Supported for Configuration Change     ․Embedded Web Configuration Interface (With Password Protection) ◇Battery Life  ․Standby Time up to 60 Hours        ․Talking Time up to 3 Hours ○!  Battery talk and standby times are estimates only and depend on network configuration, signal strength, features used, batteryage and condition, charging practices, temperatures to which battery is exposed, and many other factors. Please note that the amount of time a phone is used for calls, Skype, or MSN will affect its standby time. Likewise, the amount of time that the phone is turned on and in standby mode will affect its talk time. Network Characteristics ◇Network Protocols  TCP/UDP/IP, IPV4, DNS, SDP, ARP, ICMP, DHCP Client, Static IP ◇Security  ․WEP (64 and 128 bit)        ․  WPA-PSK Encryption Supported
                                                           1  Center Key / Navigation Pad             ˙For a quick access to start Wi-Fi connection, or Open IE at the stand-by mode             ˙To activate a selected item or confirm an entry.             ˙Use Navigation pad to scroll items on the current menu.             ˙Use Navigation pad to control the cursor for a webpage.     2  Left Soft Key             ˙To open Menu at stand-by mode             ˙To select an action item shown on the current menu.             ˙To Edit or activate Option of a selected item.     3  Right Soft Key             ˙For a quick access to Phonebook.             ˙To Return or Exit from the current menu by layers. 4    Answer / Make-Call Key             ˙To answer or make calls. 5  Power / End-Call Key             ˙Press and Hold for few seconds to Power On/Off your phone.             ˙To end a call.             ˙To exit the current menu and skip back to stand-by screen directly.   6    Voice Mail Fast Dial Key (Numeric Key "1") ˙Press and Hold for few seconds to speed dial for voice mail. 7  Alphanumeric Keypad             ˙0~9 input number and characters 8    Numeric / Alpha Turn Key               ˙Press twice to enter the sign " + " before a country code while making a call.               ˙To switch between capital(A,B,C)/lowercase(a,b,c) letters, and numbers(1,2,3) 9    Symbol Selection or Space Key               ˙Press and hold for few seconds to Lock Keypad             ˙To open the Symbol selection menu.   10    Screen Light Control Button                ˙To keep the screen light on while IP TV, IP Radio, or IE performing. 11  Volume Adjustment Buttons                ˙To adjust Volume.
 Information Bar                                       1.  Wireless Signal Strength    ˙                                                   Indicates current Wi-Fi (also WiFi,wifi,etc.) network signal strength.   2  Clock & Date                                                      ˙Displays current time and date. Synchronization can occur only when connecting to the internet.    Within Phone Settings you can set the time properties in "Date &Time" settings. 3  Phone Status                                                      ˙Displays current Communicator information at stand-by screen. "Skype","MSN"   or "Ready" means you are available for Skype/MSN/SIP calls (Meanwhile the   power LED will flash in blue.) When the power LED flashes in red means you   are not available for all communicators. ˙Displays a highlighted item for action when you navigate through menus. 4  Battery Status                                                       ˙Indicates current status of battery power remains. 5  Network Name (SSID)                                                       ˙Displays the SSID you selected to connect.   6  SIP Phone Number                                                       ˙Displays your SIP number provided by your service provider when you register   on a SIP server successfully. If not, the indicator will not be shown.   Tool Bar   7  Left Soft Key Action     ˙Indicates the action of current menu Generally for "Select" or "Edit" usages.         At the stand-by mode, it is user menu access. 8 Right Soft Key Action     ˙Indicates the action of current menu Generally for "Return" or "Exit" usages.      At the stand-by mode, it is Phonebook quick access.
                                ˙Auto Hot-Spot Log-in                             <Hint>  Menu --> Phone Settings --> Wireless --> Hotspot                              <Note>When you stay in a Hotspot coverage, the unit will pop   out IE browser to notify and log in automatically. 1 If you already have a Hotspot account, select the Hotspot in "Settings."   2 A list of settings will be displayed. Edit your account information,   press Center key to save and then return.                                          ˙Set Your Wireless 1 Wireless Networks(WLANs) Scan                  ˙Power on your phone, it will auto-scan WLANs nearby.   ˙To set WLANs by manual, Select from menu or press Center key   at stand-by mode. The unit will start to find available WLANs.                                     <Hint> Menu --> Phone Settings --> Wireless --> Set WiFi.                                        2    A list will display, select a SSID you want to join in. 3    The Key Index will pop out if a WEP Key / WPA Key is required.   Enter the Key and then press center key, the connection will continue. 4 Select Exit when WLAN connection successfully,   or press left soft key to Rescan and then connect again.   You can enjoy your Wireless World NOW !!                  Set Your WiFi Profile                              <Hint> Menu --> Phone Settings --> Wireless --> Profiles ˙Select "Add" in Option to set the information of a WLAN you want as a location profile. ˙You can save the current connected WLAN as a location profile in Option.   <Note>˙If a location profile for the scanned SSID already exists, it will be used as the first choice to connect.                                   ˙If you were disconnected by an access point, the unit will reconnect to the same AP automatically.  <Tip> ˙In "Option" you can manage the profile in order, Edit the settings, or select to Connect.
  Before You start   Make sure your network has an active internet connection.    Sign in your MSN account ! If you have not yet registered MSN ever,   Go to MSN website and sign up for service!  <Hint> Menu --> MSN --> Settings 1    Edit your MSN registered Mail-address and password in Settings,   press center key to save and then return. 2    Scroll to "MSN", select it to sign you in. Now MSN will log in automatically. Sign in your Skype account !  If you have not yet registered Skype ever,                                                 Go to Skype website and get a Skype Name!  <Hint> Menu --> Skype --> Settings 1    A list of Skype settings will be displayed.                                                              Select “Edit” to enter your Skype account information— Name, Password, and Skypeout Country Code (if you have one). 2    Scroll to "Skype", select it to sign you in. Now Skype will login automatically.                                                <Note>You need ONLY 1 Time to set your Skype/MSN account information until you want to   log in by different account. To use another account? Please follow the steps above.
  IP Radio   <Hint> Menu --> IP Radio --> Option --> Select/Update   1    Use "Select" in Option to turn on the channel you want,   or press Center key to launch IP Radio ! 2 By selecting "Update" in Option, the IP Radio Channel list will auto-update.   <Note> Use Navigation pad to switch channels on the list.     IP TV   <Hint> Menu --> IP TV --> Option --> Select/Update   1 Open IP TV Channel list menu, you can press Center key or   Use "Select" in Option to turn on a channel you want! 2 By selecting "Update" in Option, the IP Radio Channel list will auto-update. <Note> Use Navigation pad to switch channels on the list.   Web Camera <Hint> Menu --> Web Cam --> Option --> Edit/Add/Delete 1 To watch web camera streaming, you need to set up your web cam path first.             In Option, you can set up the information of your web cam connection--URL,User Name,   and Password (if required). Press center to save and then return. 2    Select a Web camera you want to connect by the profile list, the unit will fill in the user name   and password automatically then connect to the selected web camera.
 IE Browser <Hint> Menu --> Web Site --> Option --> Add/Edit/Delete      1    Select "Add" to enter web site settings and edit the website information as a profile.   Use center key to save and then return. 2    In Option you can manage the Website profiles by Edit or Delete. Now you can browse your favorite website by just 1 click center key on the list!                                      <Tip> A cursor will appear at a webpage, use it for surfing internet!                                      To auto-scroll the webpage, press and hole the center key for 2 seconds   until you see the cursor turn to a blue one, press and hold for another additional   2 seconds till the cursor turns to an orange one, it is used for a page up/down scrolling navigation. Make A Call… Before You Start Make sure you already have a SIP account pre-set in the unit by your service provider. If you do not have a SIP number, please contact your service provider. 1 You are available to make a call only when it shows “Ready” and a phone number at the stand-by screen   with the power LED flashing in blue, If not, please register on your SIP server first.   2    Enter the phone number directly at stand-by screen, and press the make-call key. Now you are online. 3    You can select Option during a call connected, there are several line options available.   You can make any line action anytime by selecting from the line options list. <Tip>˙To change the volume during a call, You can use the side buttons to adjust Volume.    SIP Settings <Hint>    Menu --> Phone Settings --> SIP Settings   ․If you want to show your name to people you call, edit your “Display Name” in SIP Settings.
 Phone Password <Hint> Menu --> Phone Settings --> Phone Password 1    By pressing "Edit" to Enable or Disable Phone Password. 2    To set a phone password, please select Edit and then use center key to save it.       Once you Enable Phone Password, the unit will ask you to enter the password at the phone every start-up.         Default password is number "0000". If you forget your password, please contact your service provider.      Auto Keylock   <Hint> Menu --> Phone Settings --> Auto KeyLock Settings Select Edit to enable auto Keypad lock. To Unlock keypad, press Unlock and then press "*" key.  Factory Default <Hint> Menu --> Phone Settings --> Factory Default ˙Select Factory Default to reset your phone settings to factory.default values. Your phone will reboot automatically when the progress completed. Auto Update Your phone will auto update the data base from your service provider — Instantly when you Online. Check Information of your phone <Hint> Menu --> Phone Settings --> Information                                      Displays your phone number, IP Address (only shown when you connect on a network), Wireless AP (the current connected one), MAC Address and Firmware Version. For More to set…   NOW Enter Phone Settings to set by your personal need! ˙Ring Option ˙Keypad Tone ˙Wallpaper ˙Language—English / Spanish(Espanol) ˙VoiceMail
 Federal Communication Commission Interference Statement This equipment has been tested and found to comply with the limits for a Class B digital device, pursuant to Part 15 of the FCC Rules.  These limits are designed to provide reasonable protection against harmful interference in a residential installation.    This equipment generates, uses and can radiate radio frequency energy and, if not installed and used in accordance with the instructions, may cause harmful interference to radio communications.    However, there is no guarantee that interference will not occur in a particular installation.    If this equipment does cause harmful interference to radio or television reception, which can be determined by turning the equipment off and on, the user is encouraged to try to correct the interference by one of the following measures: -  Reorient or relocate the receiving antenna. -  Increase the separation between the equipment and receiver. -  Connect the equipment into an outlet on a circuit different from that to which the receiver is connected. -  Consult the dealer or an experienced radio/TV technician for help.  This device complies with Part 15 of the FCC Rules. Operation is subject to the following two conditions: (1) This device may not cause harmful interference, and (2) this device must accept any interference received, including interference that may cause undesired operation.  FCC Caution: Any changes or modifications not expressly approved by the party responsible for compliance could void the user's authority to operate this equipment.  IMPORTANT NOTE: FCC Radiation Exposure Statement: This equipment complies with FCC radiation exposure limits set forth for an uncontrolled environment. End users must follow the specific operating instructions for satisfying RF exposure compliance.  This transmitter must not be co-located or operating in conjunction with any other antenna or transmitter. E800  is limited in CH1~CH11 for 2.4GHz by specified firmware controlled in U.S.A.

Navigation menu