YA HORNG ELECTRONIC YAHORNG-BT Digital Arm Blood Pressure Moniture User Manual manual
YA HORNG ELECTRONIC CO., LTD. Digital Arm Blood Pressure Moniture manual
manual
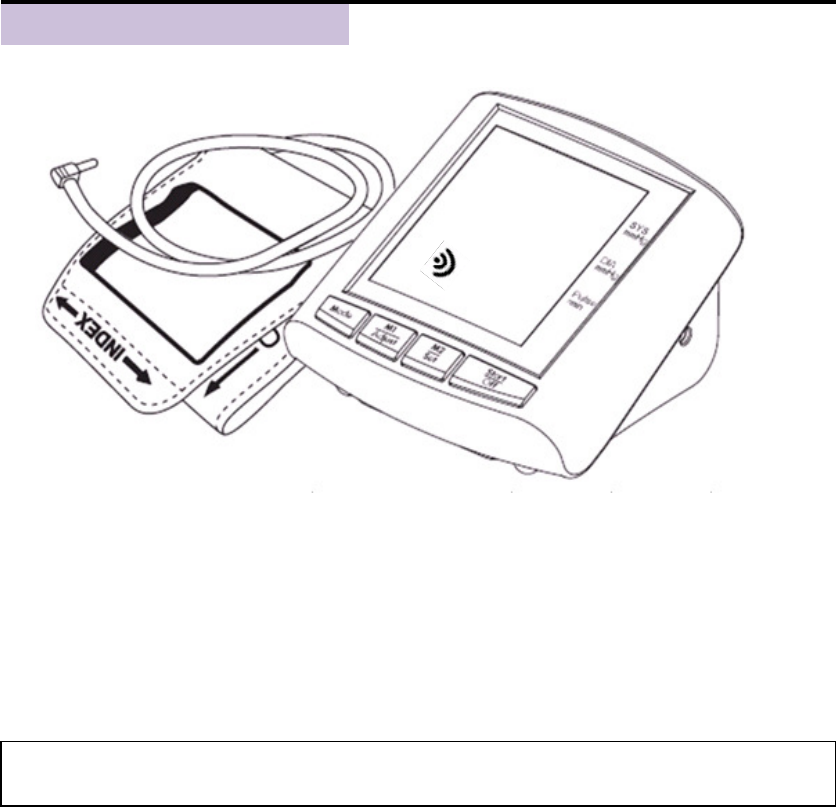
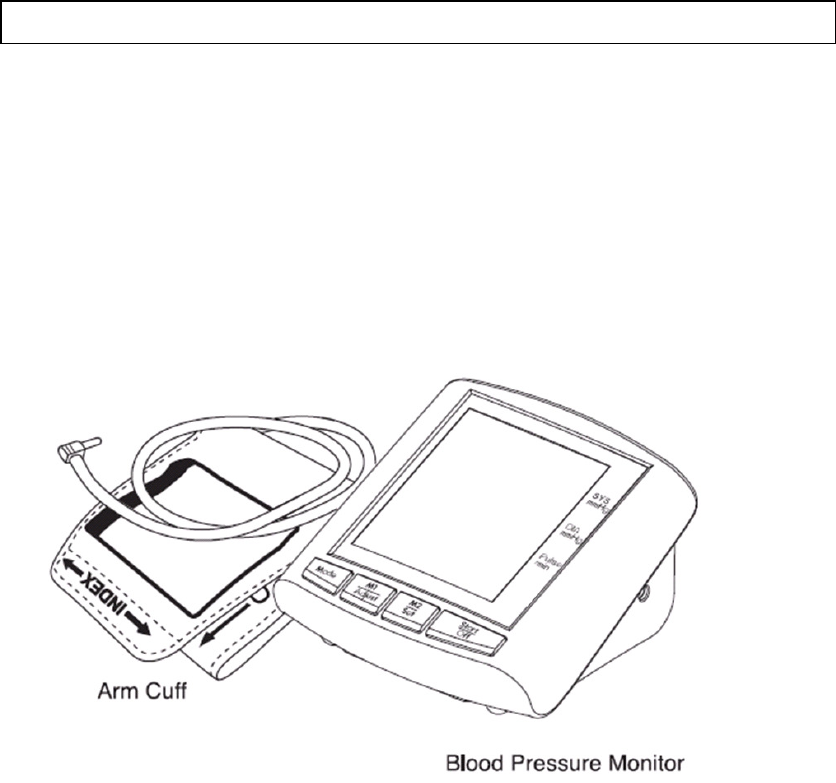
Blood Pressure
Monitor
Bluetooth Transmission
Quick Measuring System
Digital Upper Arm
Version 1.1
Sep.,2011
INSTRUCTION MANUAL BP-700W
Warranty
This blood pressure monitor is
warranted for 1 year
from date of purchase.
This warranty includes the instrument and the cuff. The warranty does not
apply to damage caused by improper handling, damage from leaking batteries,
accidents, failure to follow the operating instructions or alterations made to the
instrument by third parties.
Intended Use
This blood pressure monitor is designed for home use. It is non-invasive,
meaning no part of the monitor enters your body. It provides systolic pressure,
diastolic pressure and pulse measurements. This monitor is recommended
for use by people over the age of 18. It is not suitable for clinical use and is
intended for a single user (or at most two users living in the same household).
TABLE OF CONTENTS
About Blood Pressure……………………………………………………………………………………………
4
High Blood Pressure………………………………………………………………………………………………
5
How to Measure Your Blood Pressure……………………………………………………………………
6
Begin to Measure …………………………………………………………………………………………………
8
How to Transmit Data via Bluetooth……………………………………………………………………
9
Steps for data Transmitting………………………………………………………………………………… 9
Setting the Clock……………………………………………………………………………………………………
10
Installing and Replacing Batteries……………………………………………………………………… 11
After Use Cleaning…………………………………………………………………………………………………
11
Safety Statements………………………………………………………………………………………………. 12
Cuff Sizes………………………………………………………………………………………………………………….
13
Error Messages…………………………………………………………………………………………………………
13
Troubleshooting…………………………………………………………………………………………………… 14
Specifications…………………………………………………………………………………………………………
15
KNOW YOUR UNIT
2

* COUNCIL DIRECTIVE 93/42/EEC of 14 June 1993 concerning medical devices.
* IEC60601-1: 2005 + CORR. 1 (2006) + CORR. 2 (2007);
* EN 60601-1: 2006 Medical electrical equipment - Part 1: General requirements for basic
safety and essential performance
* ANSI/AAMI ES60601-1: 2005:
Medical Electrical Equipment-Part1: General requirement for basic safety and essential
performance
* EN1060-1: 1995 with Amendment A2: 2009:Non-invasive sphygmomanometer
Part 1: General requirements
* EN1060-3: 1997 with Amendment A2: 2009: Non-invasive sphygmomanometers,
Part 3: Supplementary requirements for electro-mechanical blood pressure measuring
systems
* EN55011: 2007 + A2: 2007;
* EN60601-1-2: 2007 / AC 2010: Medical electrical equipment: Part 1-2:
General requirements for basic safety and essential performance
* EN1060-4: 2004 Non-invasive sphygmomanometers. Test procedures to determine
the overall system accuracy of automated non-invasive sphygmomanometers.
* FCC 47 CFR PART 18: Electromagnetic Compatibility
* EN ISO 13485:2003 /AC:2009 & ENISO1497:2009
* EN ISO 10993-1:2009 Biological evaluation of medical devices
* ANSI/AAMI SP10:2002/(R)2008 -Manual, electronic, or automated sphygmomanometers
* ANSI/AAMI/ISO 81060-2:2009 Non-invasive sphygmomanometers -
Gederal Communications Commission (FCC) Statement
15.21
You are cautioned that changes or modifications not expressly approved by the part responsible for compliance
could void the user’s authority to operate the equipment.
15.105(b)
This equipment has been tested and found to comply with the limits for a Class B digital device, pursuant to part
15 of the FCC rules. These limits are designed to provide reasonable protection against harmful interference in a
residential installation. This equipment generates, uses and can radiate radio frequency energy and, if not installed
and used in accordance with the instructions, may cause harmful interference to radio communications. However,
there is no guarantee that interference will not occur in a particular installation. If this equipment does cause
harmful interference to radio or television reception, which can be determined by turning the equipment off and
on, the user is encouraged to try to correct the interference by one or more of the following measures:
-Reorient or relocate the receiving antenna.
-Increase the separation between the equipment and receiver.
-Connect the equipment into an outlet on a circuit different from that to which the receiver is connected.
-Consult the dealer or an experienced radio/TV technician for help.
This device complies with Part 15 of the FCC Rules.Operation is subject to the following two conditions:
1) this device may not cause harmful interference and
2) this device must accept any interference received, including interference that may cause undesired
operation of the device.
FCC RF Radiation Exposure Statement:
This equipment complies with FCC radiation exposure limits set forth for an uncontrolled environment.
End users must follow the specific operating instructions for satisfying RF exposure compliance.
3
ABOUT BLOOD PRESSURE
What is blood pressure?
The heart creates a force as it pushes blood into the arteries and through the
blood circulation system. The arteries create another force as they resist the
blood flow. Blood pressure is the result of these two forces.
What constitutes high blood pressure?
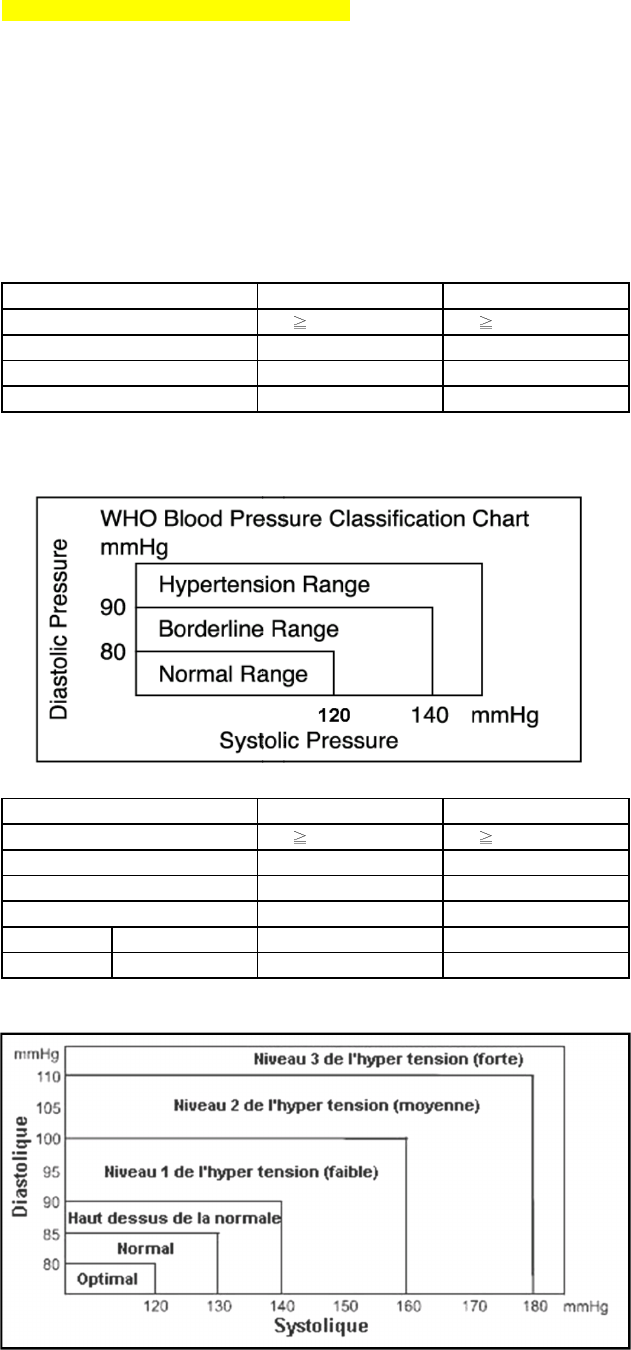
JNC7 Classification Table
Range
Stage 2 Hypertension
Stage 1 Hypertension
Prehypertension
Normal
SOURCE: The Seventh Report of the Joint National Committee on
Prevention, Evaluation and Treatment of High Blood Pressure for Adults.
National Heart, Lung and Blood Institute - may 2003.
Stage 3 Hypertension
Stage 2 Hypertension
Stage 1 Hypertension
High-Normal
Normal
Optimal
SOURCE: Standards to assess high blood pressure, without regard to age or
gender, have been established by the World Health Organization (WHO).
Systolic
140-159 mmHg
Systolic Diastolic
160 mmHg 100 mmHg
120-139 mmHg 80-89 mmHg
< 120 mmHg < 80 mmHg
WHO Classification Table - for adults outside of the U.S. (e.g. Canada, mexico)
Range Diastolic
160-179 mmHg
According to the Joint National Committee 7 (JNC 7) definitions, when systolic blood
pressure exceeds 140 mmHg or diastolic blood pressure exceeds 90 mmHg, this
constitutes high blood pressure (see figure below)
90-99 mmHg
90-99 mmHg
100-109 mmHg
< 130 mmHg < 85 mmHg
180 mmHg 110 mmHg
130-139 mmHg 85-89 mmHg
140-159 mmHg
< 120 mmHg < 80 mmHg
1
4
HIGH BLOOD PRESSURE
High Blood Pressure, or hypertension, is a medical condition in which the arterial
blood pressure is elevated. High blood pressure can be classified as "primary",
meaning that no medical cause can be found, or as "secondary", meaning that
it is caused by other conditions that affect the kidneys, arteries, heart or endocrine
system.
Persistent high blood pressure is a risk factor for conditions such as stroke,
heart failure, arterial aneurysm and others. It is also a leading cause
of chronic kidney failure. Even moderately elevated blood pressure for an
extended period of time may shorted your life expectancy.
A person's blood pressure is constantly changing. Blood pressure can fluctuate
considerably through the course of a single day, and it is also affected by the
seasons and by the weather. One or two readings are not sufficient to get an
accurate picture of your blood pressure.
Ideally, you should get into the habit of checking your blood pressure at fixed
times several times a day, every day, and keep a detailed record of these readings.
This record can then be reviewed by your doctor or other health care provider,
helping you to monitor your health on an ongoing basis.
For a normal, healthy person blood pressure fluctuates within a range
of approximately ±10 mmHg.
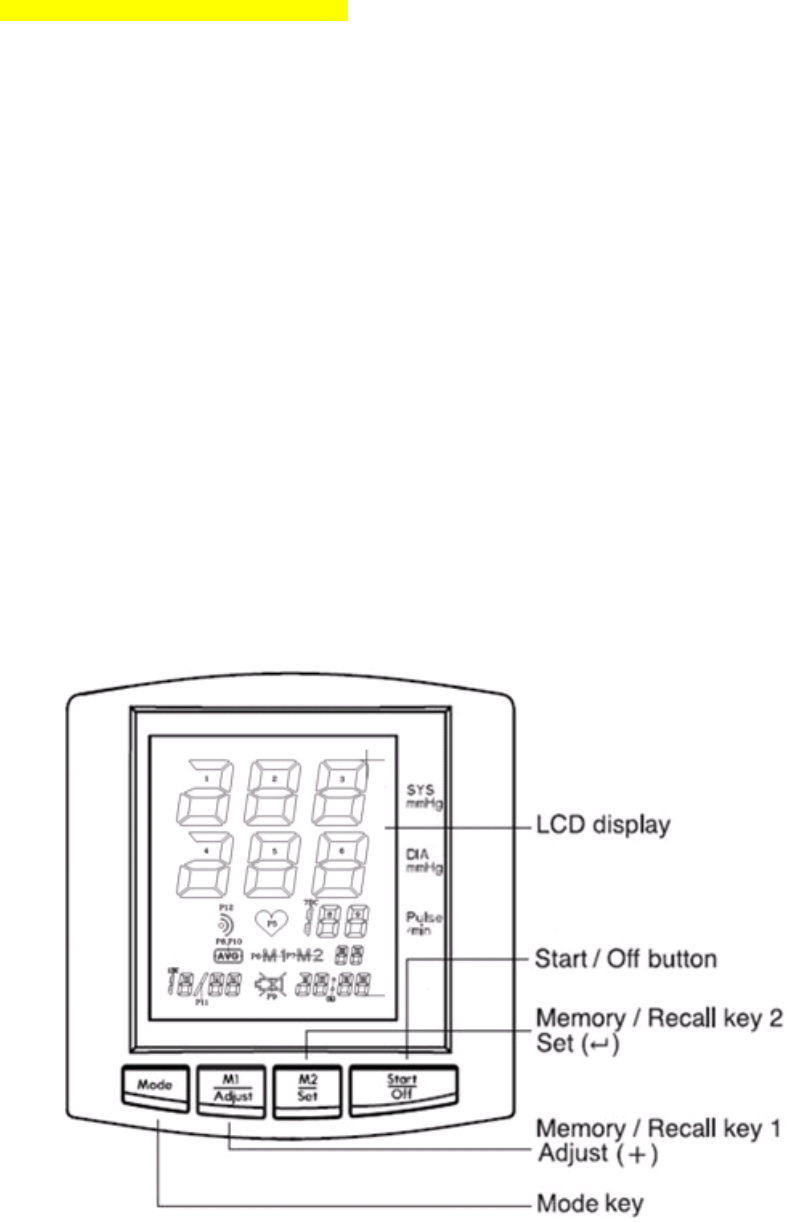
NAME/ FUNCTION OF BLOOD PRESSURE MONITOR
5
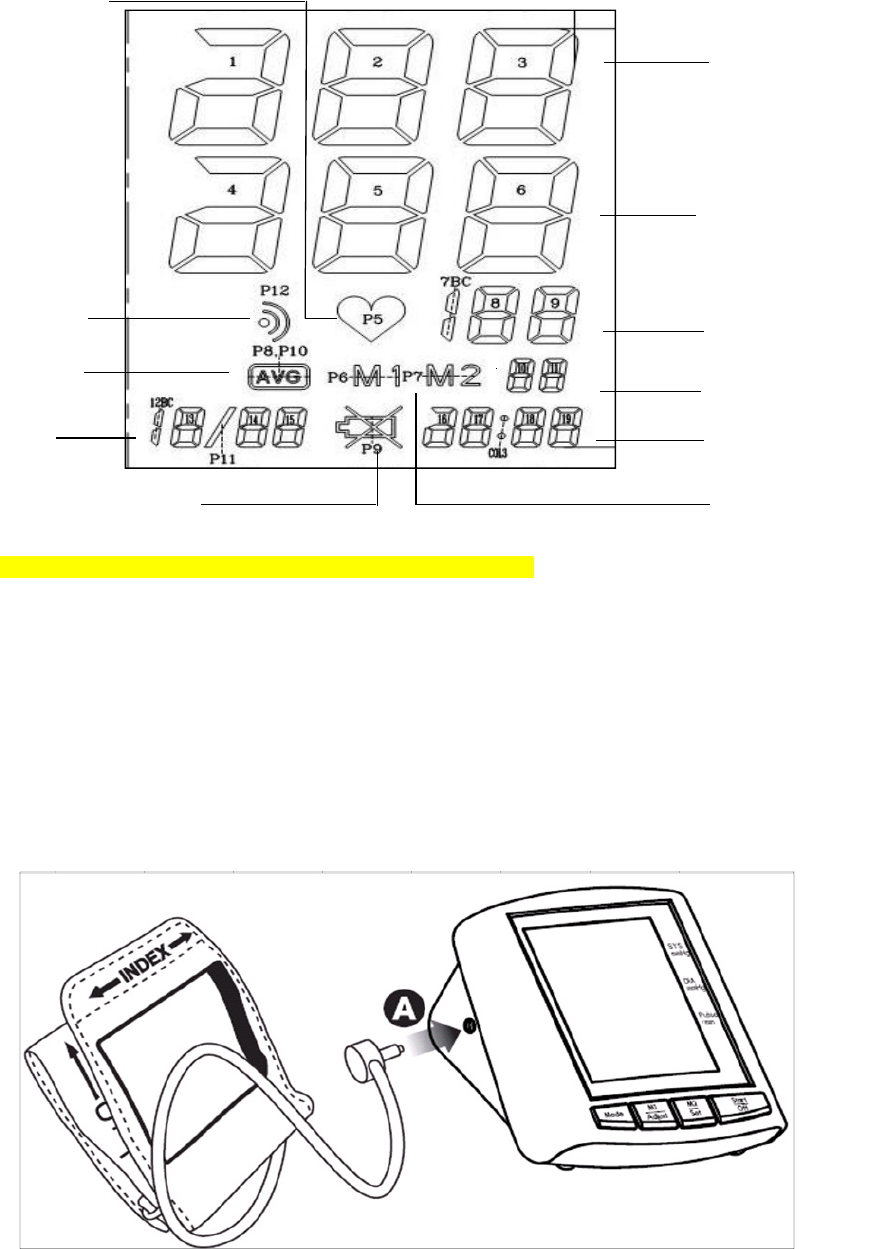
Explanation of the Display
Pulse mark
Systolic pressure
Diastolic Pressure
Bluetooth
mark
Pulse rate per
minute
Average
Memory set
Date
Time
Low Battery Indicator
Memory / Recall 1
Memory / Recall 2
HOW TO MEASURE YOUR BLOOD PRESSURE
Sit quietly before measuring your blood pressure
Before taking a reading, you should sit quietly for around 10 minutes, and
there should be an interval of at least 5 minutes between readings. While
taking a measurement you should stay calm and relaxed, and try not to
talk. This will improve the accuracy of the readings.
Applying the Arm Cuff
1.
Plug the cuff connector tube (A) into the unit.
6
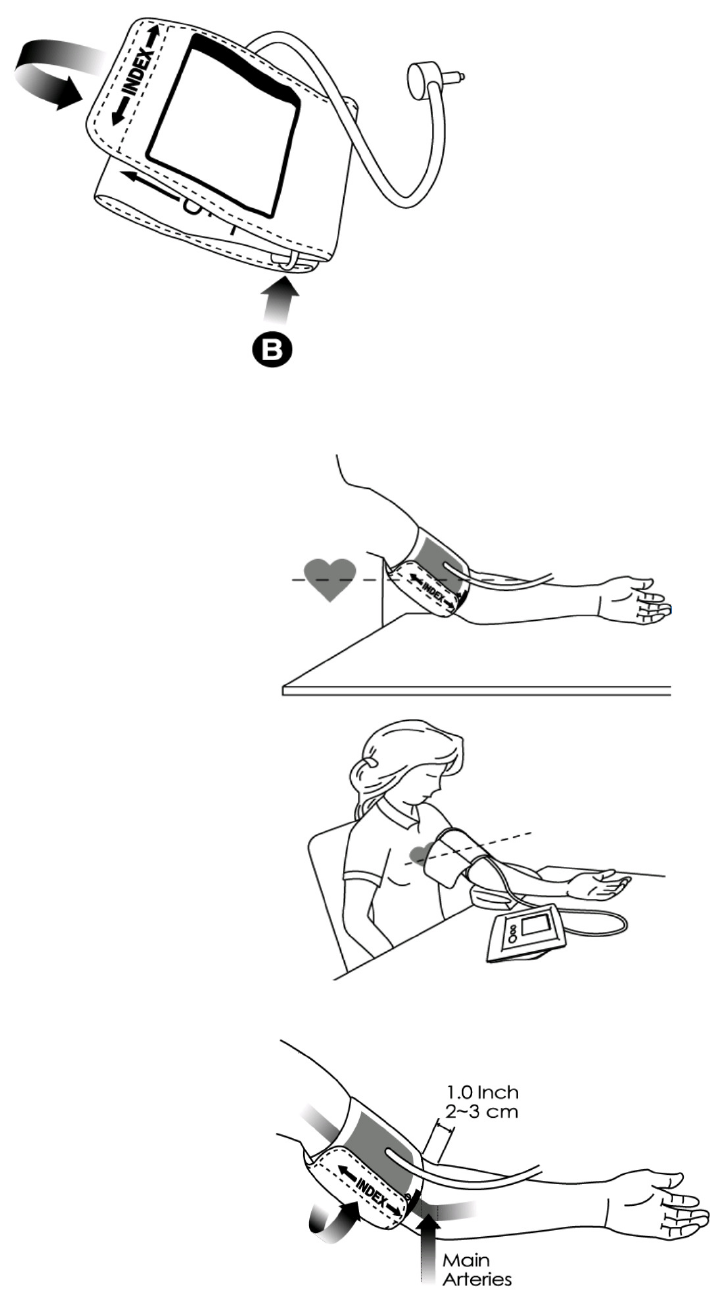
2.
Unwrap the arm cuff, leaving the "Index" end of the cuff through
the metal D-ring (B) of the cuff.
3.
Sit in the correct position for making a blood pressure reading.
Correct posture
Rest your left arm on a table and
relax your arm.
Correct cuff placement
Wrap the arm cuff snugly. You
should be able to fit one finger
between the cuff and your arm.
Correct level
Make sure the cuff is at heart level.
* When measuring blood pressure,
lightly bend your elbow while
resting your arm on a table.
* If the level of the arm cuff is lower
than the heart, adjust the height
by using a pillow or a cushion.
4. Put your left arm through the cuff
loop. The "OK" range indication
should be postitioned at the top
with the rubber tube pointing
downward in the direction of your
forearm. Position the artery mark
over the main arteries on the inside
of your arm as shown in the figure
below.The tube should be running
down the center of your arm
7
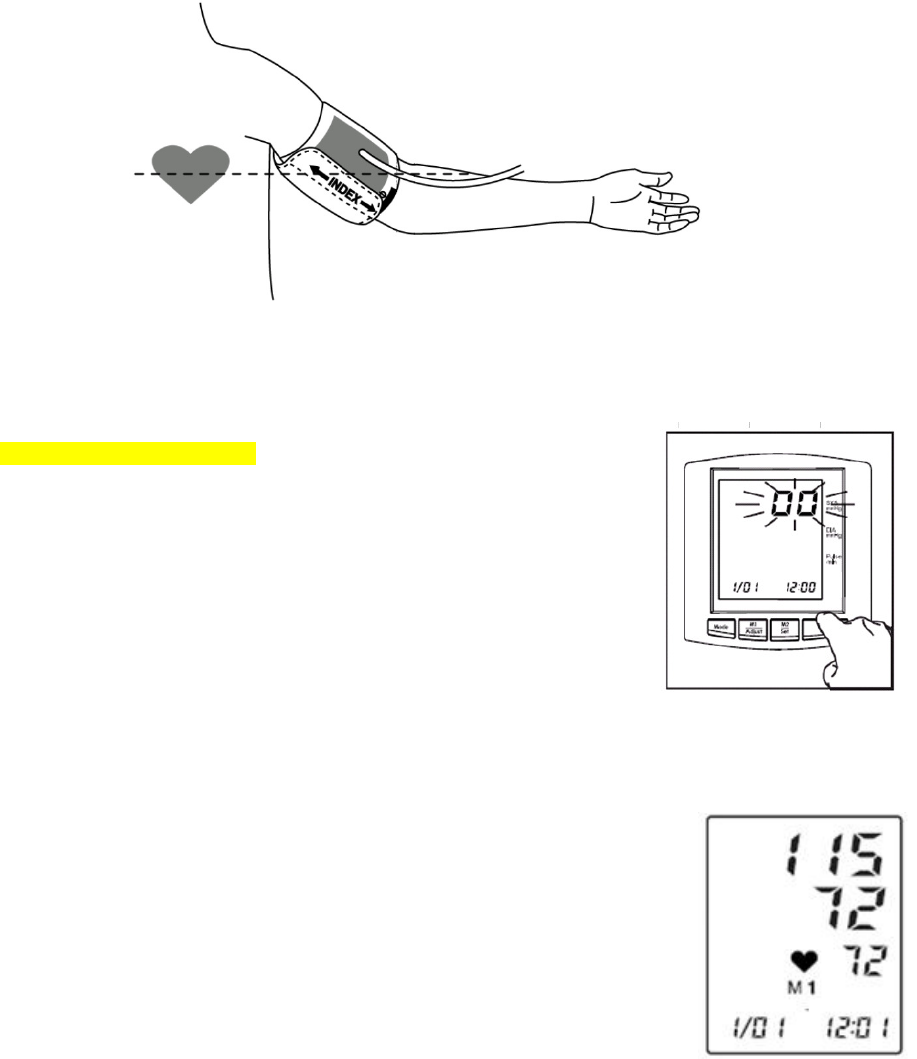
5.
Turn your left palm upward and place the edge of the arm cuff at
approximately 1 inch above your elbow. Tighten the cuff by pulling the
"Index" end of the cuff. The cuff should be tensioned onto the arm to
allow the insertion of one finger between the cuff and arm.
Remarks:
The following factors can affect the results of blood pressure readings: exercise,
having a shower or bath, using the toilet, breathing, speaking, smoking, drinking
alcohol, taking medication, vibration, eating, changes in temperature, stress,
mood, etc.
BEGIN TO MEASURE
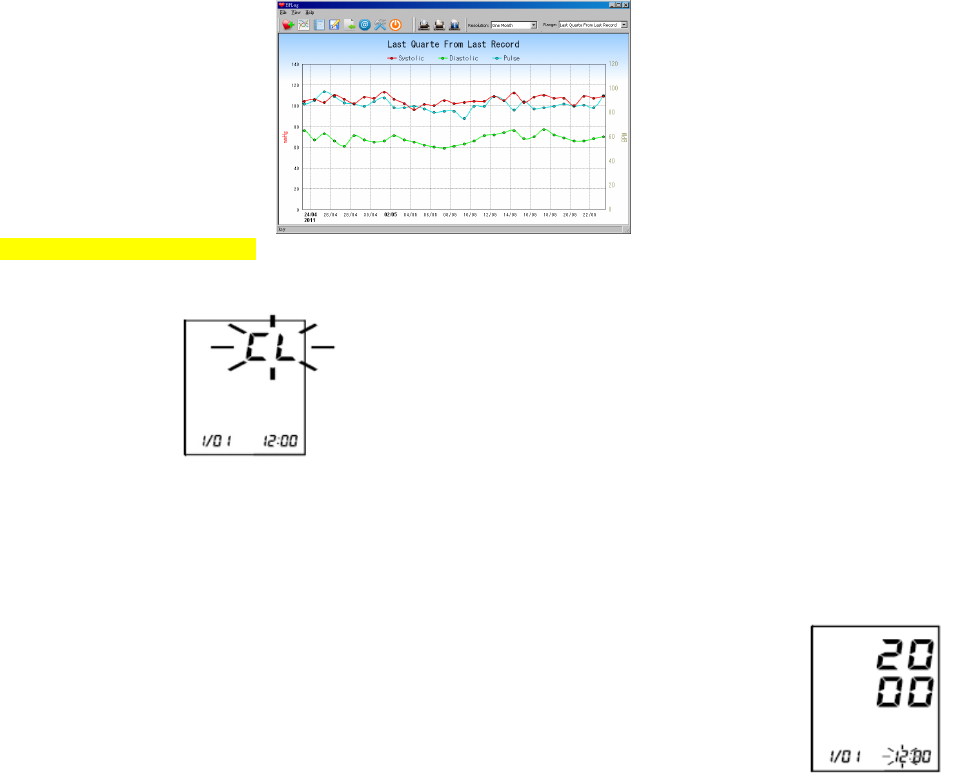
1.
Push the START button.
2.
The LCD will display the date, time
and 0 digit. The "0" will blink on the LCD.
3.
About 2-3 seconds later, the pressure will
be reset. Then the cuff will begin to inflate
and the pressure value will be displayed.
4.
This cuff will inflate automatically as
the monitor detects that your body requires
more pressure for measurement.
Note: The blood pressure monitor is a sensitive instrument. Measurements
can be disturbed if you move or talk while your monitor is measuring your blood
pressure. Remain quite and relaxed with your arm still during a measurement.
TAKING AND STORING A READING
1.
After finishing a measurement, values for
systolic pressure, diastolic pressure, pulse rate,
and time will be displayed on the LCD as
shown in the diagram.
2.
BP700W will automatically transfer your
measurement to Host control side via bluetooth
transmitting(End user's computer or any Health
Monitoring system equipped with bluetooth receiver)
3.
After Data transmitting,BP700W will automatically
return to "Clock" mode in 2 minutes or when
you press the START button.
4
When the result was shown, press "M1" or "M2" key, and the "M1" or "M2"
symbol will display on the LCD.The recorded data will be saved in the database.
5
This monitor has average function. It will average the latest three
measurements, which can help you to get your blood pressure values
more correctly. Never rely on single blood pressure readings.
Recommendation:
If measuring for the first time, please take 5-10 minutes rest
before measuring. Keep the habit of measuring at regular time.
8

HOW TO TRANSMIT DATA VIA BLUETOOTH
Requirement system for Host monitoring system
1
Host side Operation system:
Microsoft Windows Win7/ VISTA/ XP(32 /64-bit) / XP Professional service Pack3
2
Transmitting software : BPLogInstaller (Yahorng )
3
Bluetooth driver: Miscrosoft bluetooth driver
4
Bluetooth Dongle or Receiver
REMARK:
1) The Transmitting system of Host side is not compatible for mac or iOS system
2) If the user has already installed the software of bluetooth driver, we request user
to remove the program first. Now the transmitting interface should go through
via Windows system
STEPS FOR DATA TRANSMITTING
Activative BP700W BI- Direction Bluetooth Transmission
1 Press the button of "Mode" and choose " PC " mode.
The letters of "PC" will blink on the LCD
2 Press the button of "Adjust" to select "A" or "B" mode.Then you can press
" start / off " button back to main display
3
Remark:
[Sleep mode] A mode
Without touching any button of BP700W as long as 2 minutes, the device will
automatically switch into " sleep mode " for the purpose of power saving.
[ A mode ]
The symbol of wireless icon blinking in LCD means the automatic Sleep mode is
" ON " When BP700W is idle for more than 2 minutes, the wireless icon will
disappear so the device is entering sleep mode for saving power
Normally, " sleep mode " will automatically turn on if BP700W is idle more than 2 minutes.If
you see the wireless mark Disappear on the monitor, it means the function of bluetooth
transmitting is "OFF" On the contrary, if you see the wireless mark is shown on the monitor,
the bluetooth transmitting is "ON"
[ Bluetooth mode ] B mode
BP700W will always keep the bluetooth transmitting on ( BI-Direction ) and
the function of sleep mode is inactive
Once the device is idle more than
2 minutes, it will enter sleep mode
If you active the bluetooth, the
wireless icon will always stay
in the LCD
[ B mode ]
The symbol of wireless icon displaying in LCD means the fuction of Bluetooth is initiated. If
you are ready to search BP700W's Comport or send any command to BP700W , you had
better activate this icon first
9
Start the measurement
1
After finishing a measurement, values for systolic pressure, diastolic pressure,
pulse rate, and time will be displayed on the LCD
2
Pls refer to the transmitting manual downloaded together with software
3
Your measurement data will be automatically transferred to Host Controlling
Device or PC if your bluetooth linking is ON.
4
Any updated information or software download will be posted in our web site.
Please link with www.yahorng.com for any latest news released by us.
SETTING THE CLOCK
1
Press the "Mode" key several times until the letters "CL" blink on the LCD.
2
Press the "Set" key and the monitor will enter the Clock mode.
3
Use the "Set" and "Adjust" keys to set the correct date and time. The
date and time values appear on the display in the order "year", "month",
"day", "hour" and "minute". Press the "Set" key until the number that
you want to adjust blinks on the LCD, then press the "Adjust" key
to increase the number. For example, if you want to set the "hour"
press the "Set" key repeatedly until the "hour" blinks and then
press the "Adjust" key to increase the hour. Set the other values
in the same way.
4
After setting the date and time, press the "Off" key complete setting
the Clock.
Once if BP700W is idle more than 2 minutes,the device will stay in sleep mode
until you press any button to activate the bluetooth
10
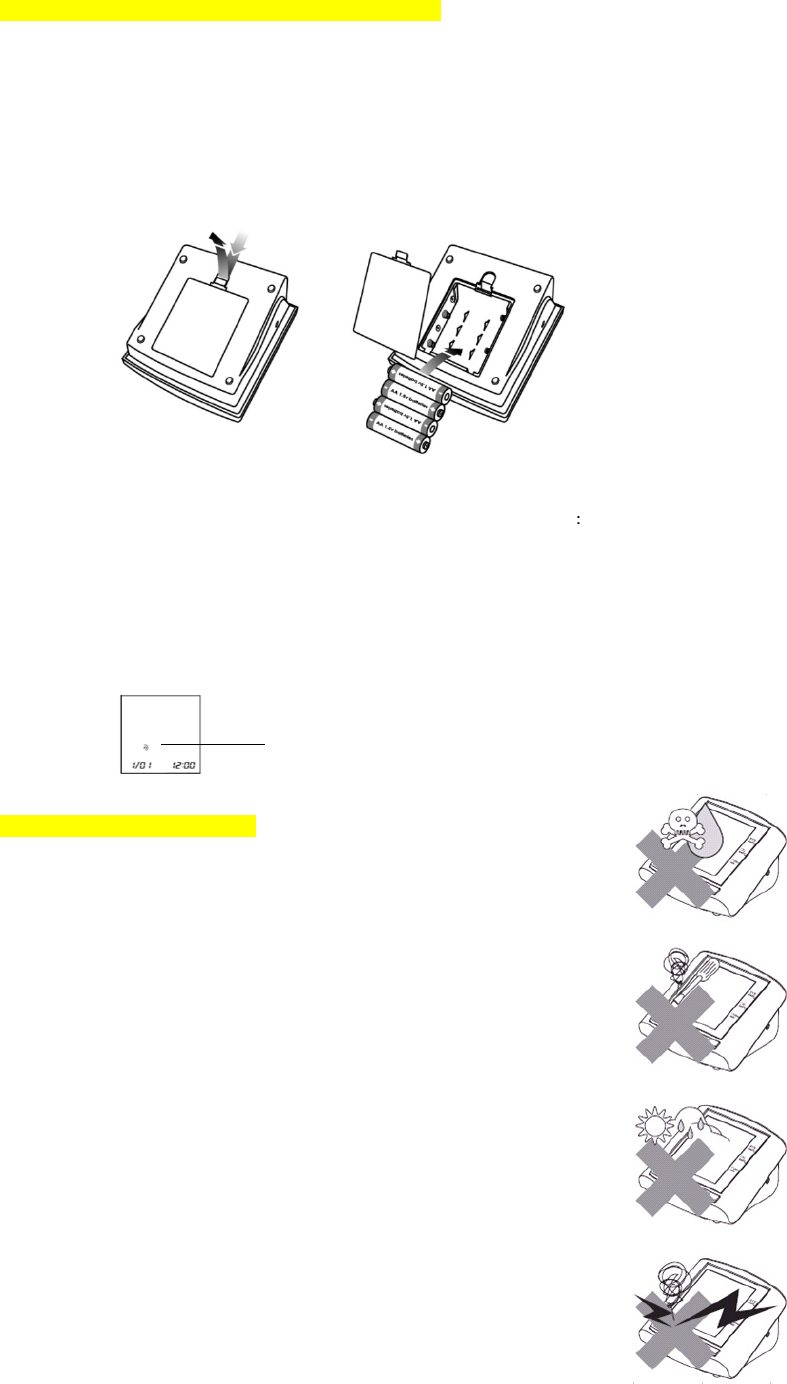
INSTALLING AND REPLACING BATTERIES
Installing Batteries
1.
Press down and lift the battery cover in the direction of the arrow
as shown in the illustration to open the battery compartment.
2.
Install or replace 4 AA 1.5 Volt batteries in the battery compartment
according to the battery direction indicator molded on the inside of
the compartment.
3.
Replace the battery cover by inserting the bottom tabs first, then pushing
in the top clip of the battery door until it engages.
Battery Replacement
1.
1- Press the button of "Mode" and choose " PC " mode.
The letters of "PC" will blink on the LCD
2- Press the button of "Adjust" for few seconds then the Bluetooth icon will disappear
2. It will allow you to replace the batteries in 18 seconds and the measurement
you saved in the device will not be vanished. This function provide
user enough time to install new batteries.
Bluetooth icon will
disappear
once you enter sleep mode
AFTER USE CLEANING
1.
Do not use an alcohol-based solvent or
cleaing agent to clean the device.
2.
Clean the device with a soft, dry cloth.
3.
The cuff can be cleaned using
a moist cloth and soap.
4.
Do not immerse the device or cuff in
water.
5.
Do not bend the cuff or sleeve, and do not
wrap the sleeve inside-out.
6.
Do not dismantle the device,
disconnect the cuff or try to repair the unit by
yourself. If you have a problem, contact
the distributor.
7.
Do not operate the unit
under conditions of extreme
temperature or humidity, or direct
sunshine.
8.
Do not shake the unit violently.
Storage
1.
If you do not plan to use the device for an
extended period, remove the batteries
from the battery housing for storage.
Make sure BP700W has entered into sleep mode ( Bluetooth icon
disappear)You can directly enter into sleep model
11

SAFETY STATEMENTS
Cautions:
1.
This unit will not serve as a cure for any symptoms of heart
disease. The measuring data is only for reference. Always consult
your physician for interpreting measurement results.
2.
Always follow the operating procedures described in this manual
to measure your blood pressure accurately.
3.
Do not inflate the arm cuff without having the cuff wrapped on your arm.
4.
Do not drop this unit. Protect it from strong impacts.
5.
Be sure to keep this manual in a safe place for future reference.
6.
Blood pressure measurement may be inaccurarate if the device is used close
to a television, microwave oven, mobile phone, X-ray or other
device with a strong electrical field.
7.
Do not use this unit on infants or on persons who cannot communicate.
8.
Please use only authorized parts and accessories from authorized
sources with this unit.
9.
Batteries may leak and damage the main unit. Please
observe the following precautions.
* When you are not going to use the unit for a long period of time
(approximately three months or more), take out the batteries.
* Replace worn batteries with new ones immediately.
* Do not use worn and new batteries together.
* Do not insert the batteries with their polarities in wrong direction.
Using the AC adapter (optional AC 120V / 230V )
1. Connect the AC adapter with AC adapter jack in the back of the unit.
2. Plug the AC adapter into the socket. Please use authorized AC
adapter. (AC adapters with required voltage and current indicated
near the AC adapter jack.)
Caution:
1. Please unload the batteries when operating with AC mode for a
longer period of time. Leaving the batteries in the compartment for a
long time may cause leakage, which may lead to damage of the unit.
2. No batteries are needed when operating in the AC mode. There is no
damage or danger caused even if batteries and AC adapter are
installed together.
3. AC adapters are optional. Please contact the distributor for the
compatible AC adapters.
12
CUFF SIZES
Cuff sizes indicate the diameter of the upper arm.
Metric
English
Medium Cuff Size
23 to 33 cm
9" to 13"
Large Cuff Size
33 to 43 cm
13" to 17"
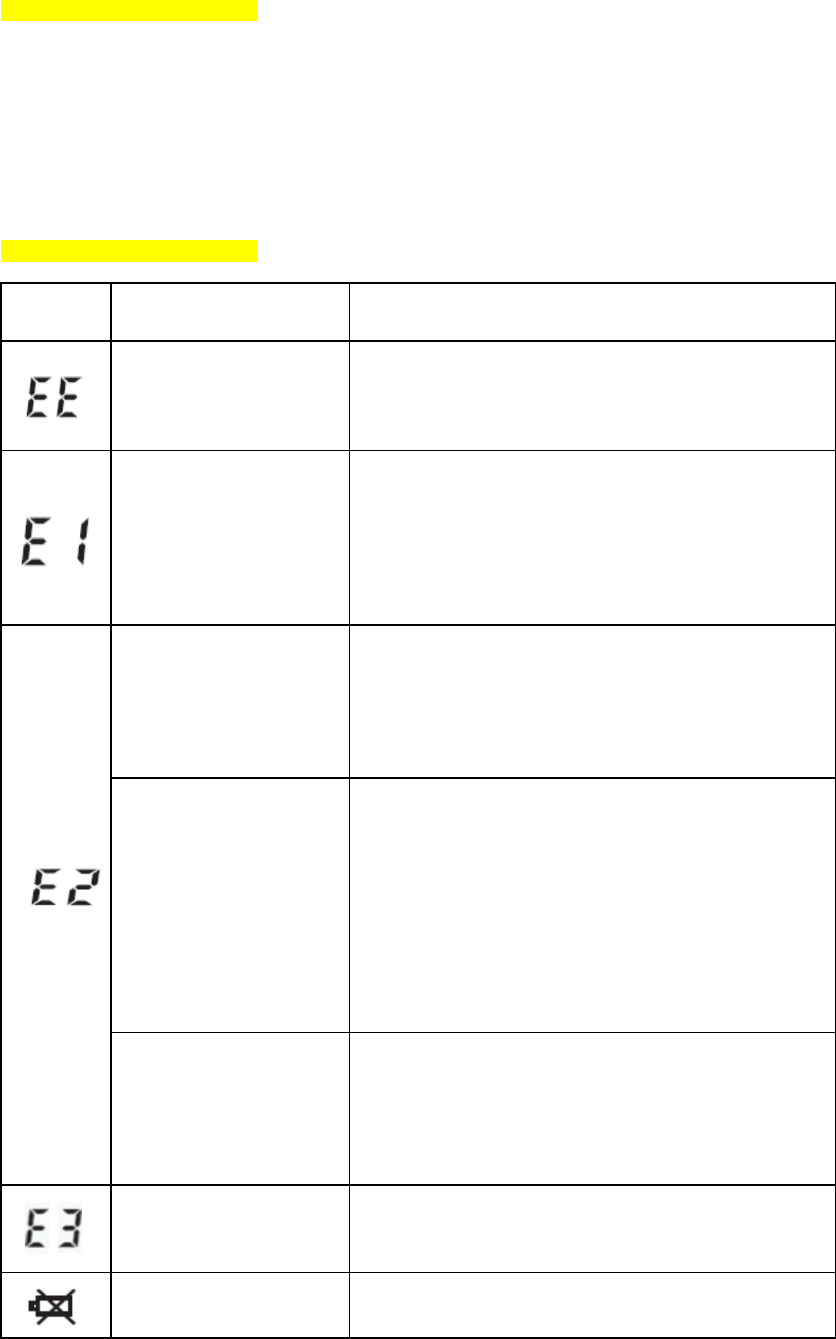
ERROR MESSAGES
Error
Message
1.
Cuff is not fastened well, please
re-fasten again according to the
instructions.
2.
Cuff broken.
3.
Pump or venting valve failure,
replace the device.
1.
User moved during the measurement.
2.
Incorrect measurement procedure
and/or posture.
3.
User is too tense and not
relaxed.
1.
If the value is not over 300mmHg,
measure again. If it still does not
work, and user has severe heart beat
problem or other medical condition,
please contact a physician.
2.
If the value is over 300mmHg,
send the device for replacement.
1.
Air pipe blocked.
2.
Inflation controller failure.
3.
Pressure sensor fault.
Re-measure, otherwise contact
manufacturer for replacement.
Abnormal measurement
Cause Remedy
Abnormal situation
during inflation
Artificial interference and
noise
Low battery
Replace the batteries.
Medium and Large cuff sizes are available.
Over safety pressure
Hardware broken
Remove and re-install the batteries. Measure again.
If the monitor still does not work, return the unit
for repair.
Low voltage or internal
circuit problem
When measuring, the value will increase and be
shown on the LCD.
Counsult with Service center for repair
13

TROUBLESHOOTING
Fault
Remedy
Even though the batteries are
1.
Check and correct the battery polarities.
installed, there is either no
2.
Remove the batteries and wait for one
indication or an incorrect
minute. Then install the batteries or
indication on the LCD.
replace the batteries.
The cuff does not inflate
1.
Check the cuff position, re-fasten the
or the
cuff correctly and measure the
air pressure cannot rise.
pressure again.
2.
Check the cuff connection to
the monitor.
1.
Replace the batteries.
The low battery indication is
2.
shown on the LCD.
The unit cannot take your
1.
Re-fasten the cuff.
blood pressure, and the
2.
Relax yourself and sit down.
LCD shows an error
3.
Keep the cuff and heart at the same
message or a wrong
level during the measurement period.
result.
4.
Keep silent and still during measurement.
5.
If the patient has a severe heart beat
6.
problem, then the blood pressure may
not be read correctly.
Under normal measuring
1.
The variation is due to the different
circumstances a reading
environments.
at home is different from
2.
Your blood pressure is changing
one taken at a clinic or
according to the physiological or
two readings at home have
psychological status of the human body.
different values.
3.
Record your blood pressure each day and
consult with your physician.
If you have taken all of the above countermeasures, and blood pressure
still cannot be read, then the unit should be replaced.
Once BP700W enter sleep mode
(Bluetooth icon disappear), the measurement
you saved in the device will not be vanished if
you replace the batteries in 18 seconds. This
function provide user enough time to install
new batteries.
14

SPECIFICATIONS
Operating temperature / humidity
Storage temperature / humidity
LCD digital display Display
Model
Pressure inflation
Pressure release device
Sensor
Electric power
Automatic pump actuated device
Quick Measuring System Measuring method
Measuring range
Accuracy
Memory capacity
Arm type Circumference 23-33 cm (9"-13")
Yahorng BP-700W Blood Pressure Monitor
Pressure: 40-280 mmHg
Pulse rate: 40-200 pulses/min
Twin 60 sets memories
Automatic solenoid venting valve
10-40 (50-104F) 15-90% R.H.
Semiconductor pressure sensor
DC6V ( 4 type AA 1.5volt alkaline batteries)
[OPTION] 120V / 230V AC adaptor
131(L) x 128(W) x 86(H) mm
Pressure: ± 3 mmHg for pressures of
200mmHg or less,
± 2% of pressures above 200mmHg
Approx. 400 grams (net)
-5-50 (23-122F) 15-90% R.H.
Dimensions
Weight
Pulse rate: ± 5% of reading value
15