YEALINK CP920 HD IP Conference Phone User Manual Yealink CP920 Quick Start Guide V81 1
YEALINK (XIAMEN ) NETWORK TECHNOLOGY CO., LTD. HD IP Conference Phone Yealink CP920 Quick Start Guide V81 1
YEALINK >
T2C-CP920_User Manual_1
CP920
Quick Start Guide (V81.1)
www.yealink.com
IP Conference Phone
English | 简体中文
Applies to firmware version 78.81.254.29 or later.
FCC Caution: Any changes or modifications not expressly approved by the party responsible for compliance could void the user’s authority to operate this
equipment.
FCC Statement
This device is compliant with Part 15 of the FCC Rules. Operation is subject to the following two conditions:
1. This device may not cause harmful interference, and
2. This device must accept any interference received, including interference that may cause undesired operation.
Note: This equipment has been tested and found to comply with the limits for a Class B digital device, pursuant to part 15 of the FCC Rules. These limits are
designed to provide reasonable protection against harmful interference in a residential installation. This equipment generates, uses and can radiate radio
frequency energy and, if not installed and used in accordance with the instructions, may cause harmful interference to radio communications. However, there
is no guarantee that interference will not occur in a particular installation. If this equipment does cause harmful interference to radio or television reception,
which can be determined by turning the equipment off and on, the user is encouraged to try to correct the interference by one or more of the following
measures:
1. Reorient or relocate the receiving antenna.
2. Increase the separation between the equipment and receiver.
3. Connect the equipment into an outlet on a circuit different from that to which the receiver is connected.
4. Consult the dealer or an experienced radio/TV technician for help.
This equipment must be installed and operated in accordance with provided instructions and the antenna(s) used for this transmitter must be installed to
provide a separation distance of at least 20 cm from all persons and must not be co-located or operating in conjunction with any other antenna or transmitter.
End-users and installers must be provided with antenna installation instructions and transmitter operating conditions for satisfying RF exposure compliance.
Canada Statement
This device complies with Industry Canada's licence-exempt RSSs.Operation is subject to the following two conditions:
(1) This device may not cause interference; and (2) This device must accept any interference, including interference that may cause undesired operation of the
device.
Le présent appareil est conforme aux CNR d'Industrie Canada
applicables aux appareils radio exempts de licence. L'exploitation est autorisée aux deux conditions suivantes :
(1) l'appareil ne doit pas produire de brouillage;
(2) l'utilisateur de l'appareil doit accepter tout brouillage radioélectrique subi, même si le brouillage est susceptible d'en compromettre le fonctionnement.
The device meets the exemption from the routine evaluation limits in section 2.5 of RSS 102 and compliance with RSS-102 RF exposure, users
can obtain Canadian information on RF exposure and compliance.
Le dispositif rencontre l'exemption des limites courantes d'évaluation dans la section 2.5 de RSS 102 et la conformité à l'exposition de RSS-102 rf,
utilisateurs peut obtenir l'information canadienne sur l'exposition et la conformité de rf.
This transmitter must not be co-located or operating in conjunction with any other antenna or transmitter. This equipment should be installed and
operated with a minimum distance of 20 centimeters between the radiator and your body.
Cet émetteur ne doit pas être Co-placé ou ne fonctionnant en même temps qu'aucune autre antenne ou émetteur. Cet équipement devrait être installé
et actionné avec une distance minimum de 20 centimètres entre le radiateur et votre corps.
Table of Contents
English ........................................................ 1
简体中文..................................................... 7
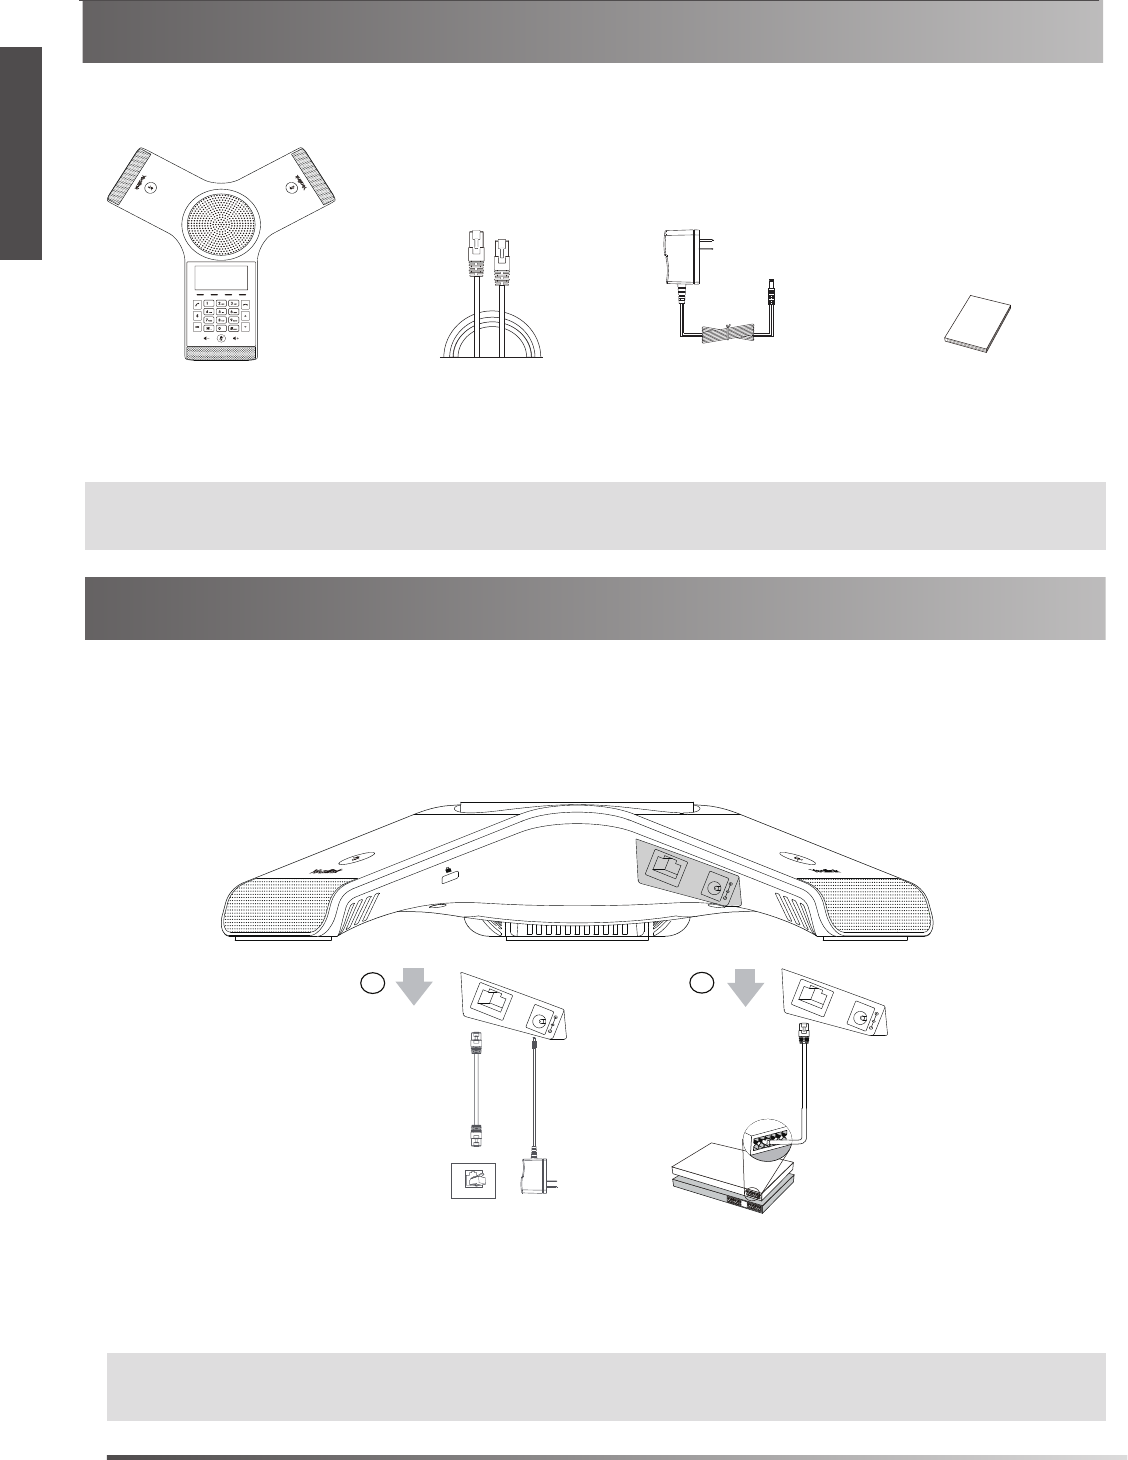
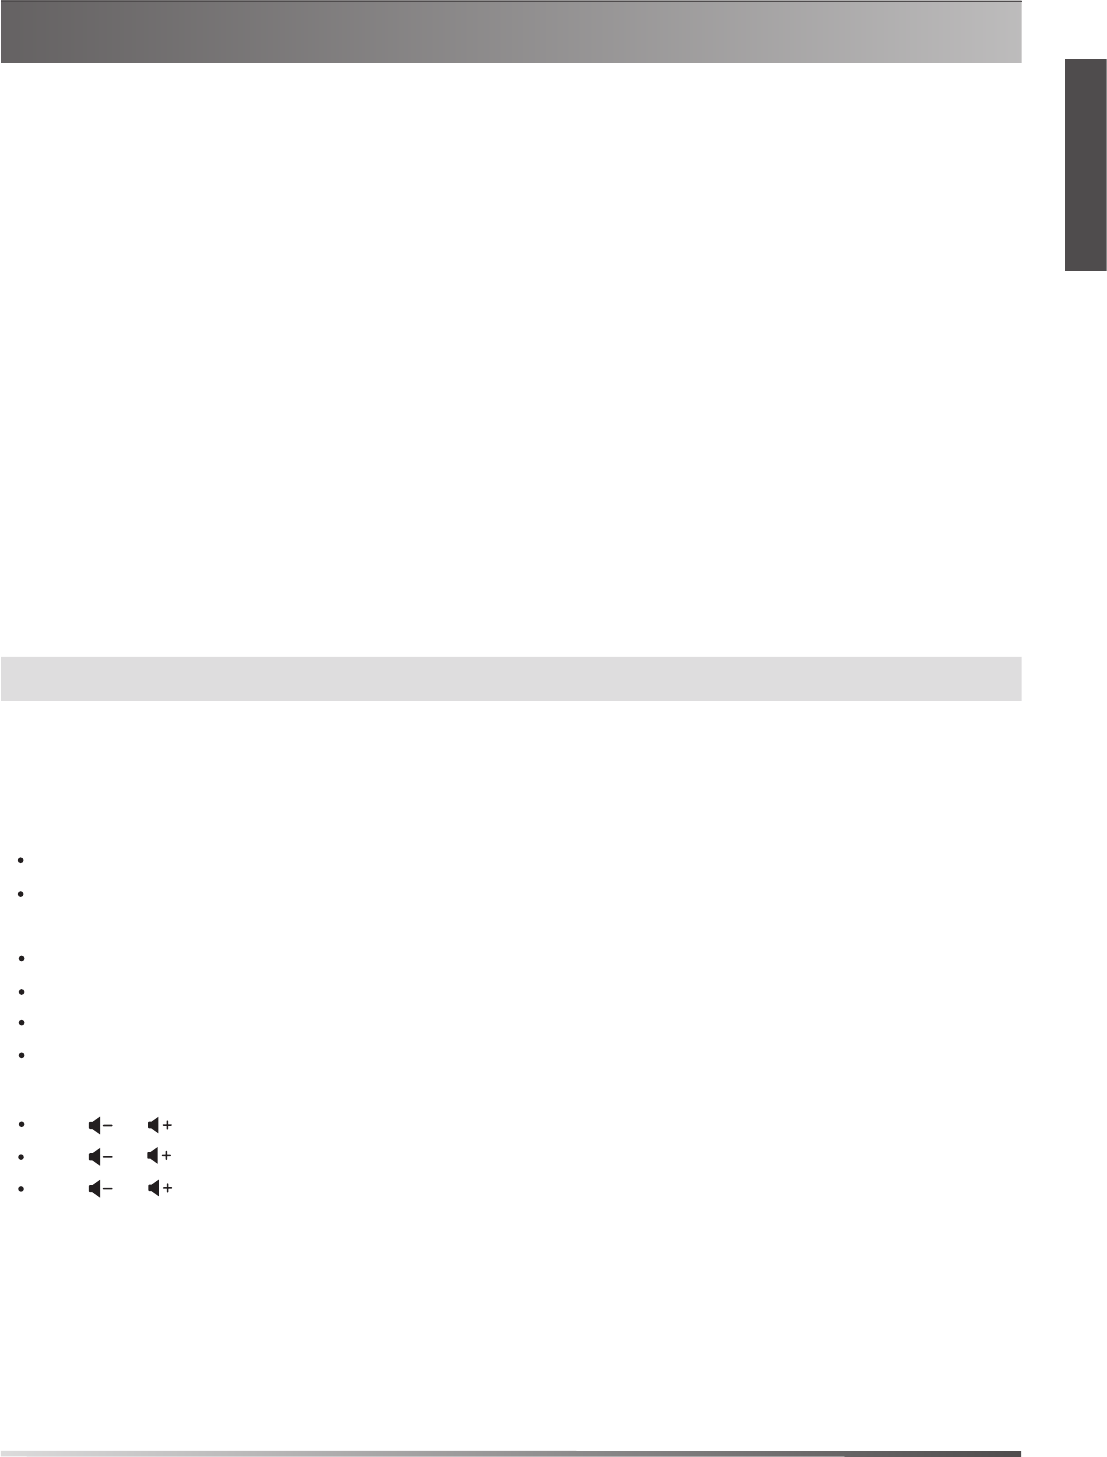
Packaging Contents
Note: We recommend that you use the accessories provided or approved by Yealink. The use of unapproved third-party accessories may
result in reduced performance.
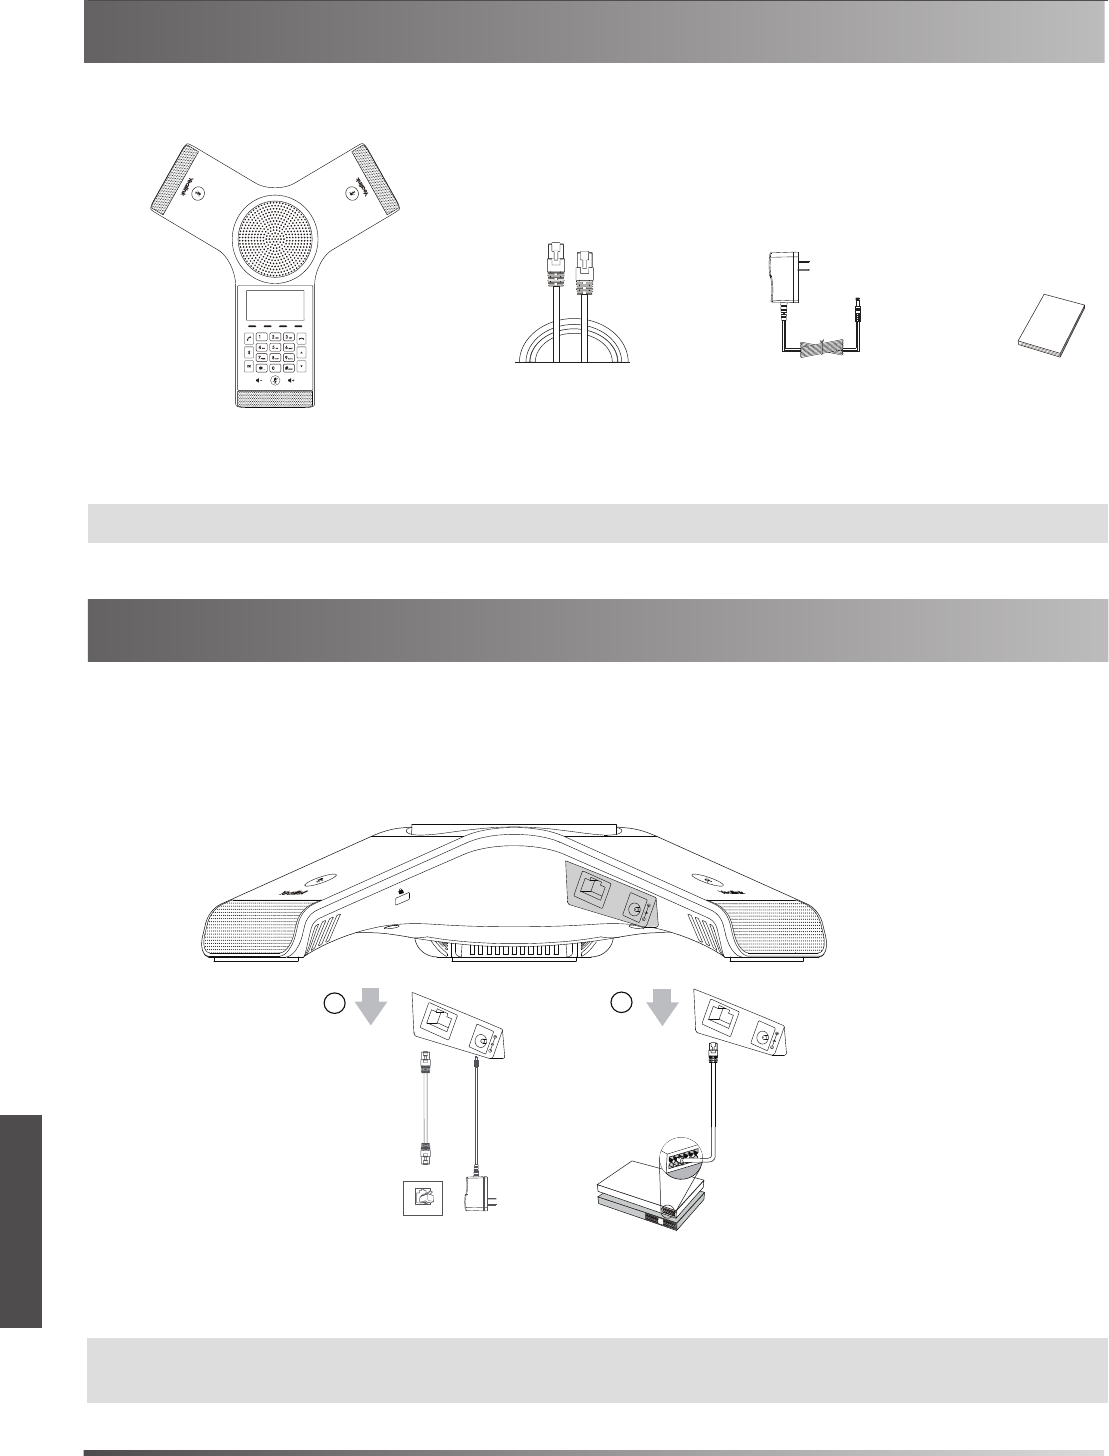
1. Connect the power and wired network.
Assembling the Phone
You can also connect to the wireless network after startup. Refer to Wireless Network Connection mentioned
below in Configuring Your Phone for more information.
Note:
The IP phone should be used with Yealink original power adapter(12V/1A) only. If inline power (PoE) is provided, you don’t need to connect the
power adapter. Make sure the hub/switch is PoE-compliant.
E
N
G
L
I
S
H
IP Phone
7.5m
Ethernet Cable
2.5m
Power Adapter Quick Start Guide
Internet
DC12V
B
PoE
Internet
DC12V
Internet
A
Internet
DC12V
You have two options for network and power connections. Your system administrator will advise you which one to use.
1
AC Power
Startup
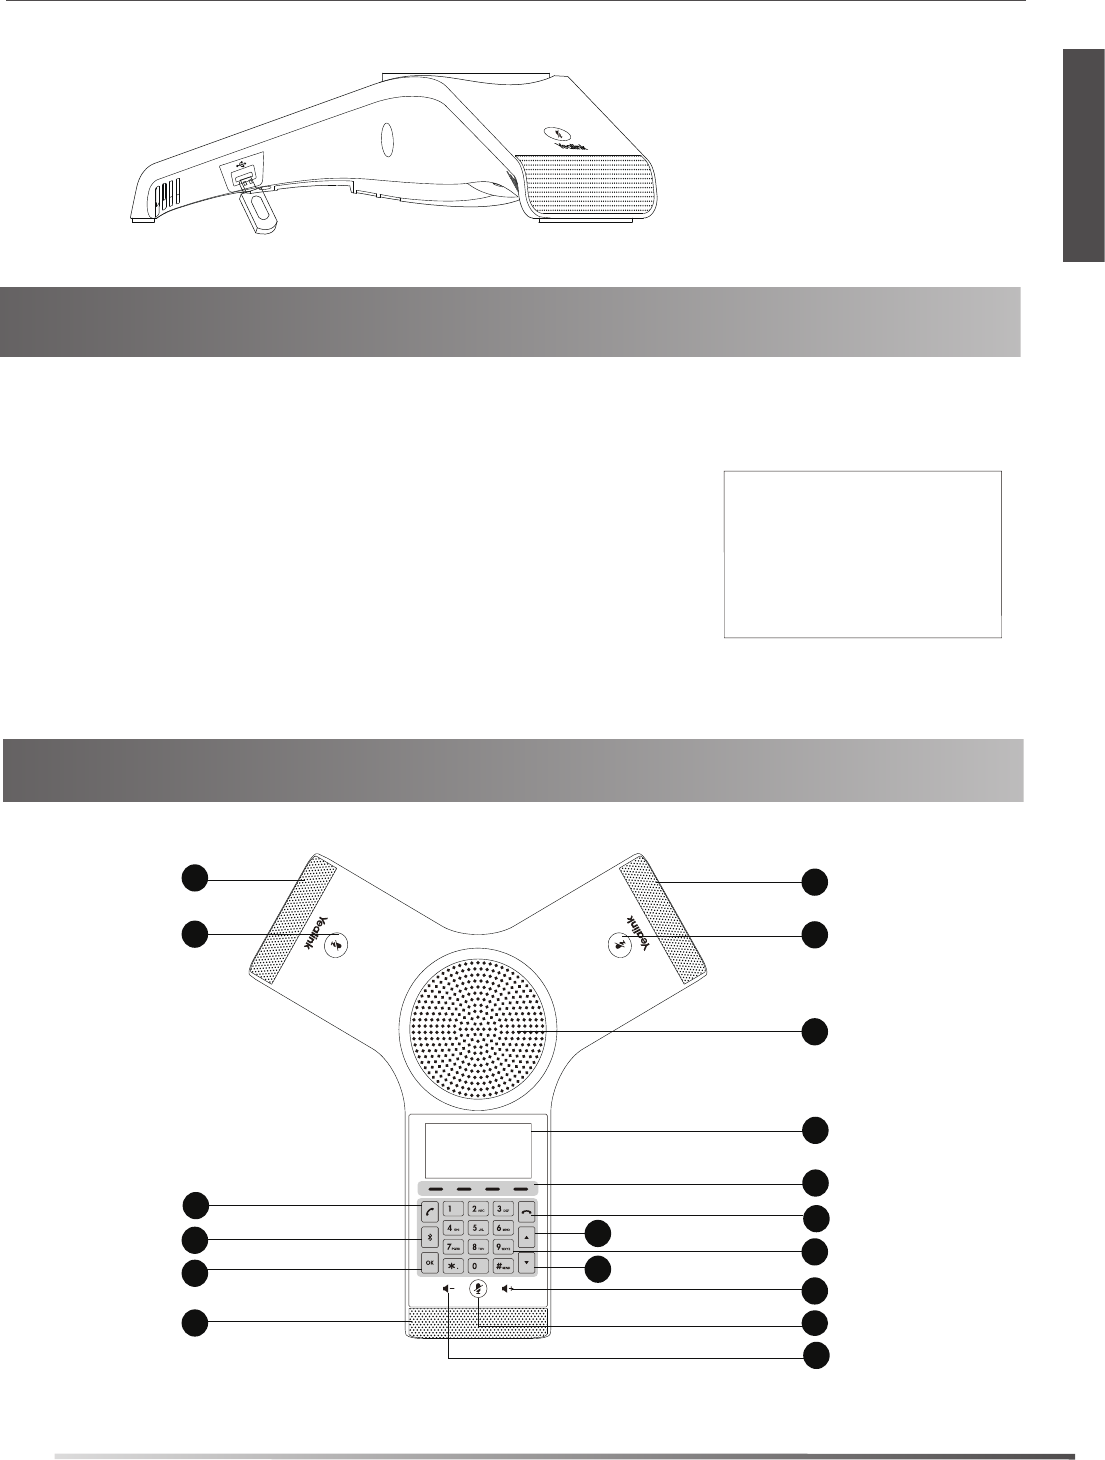
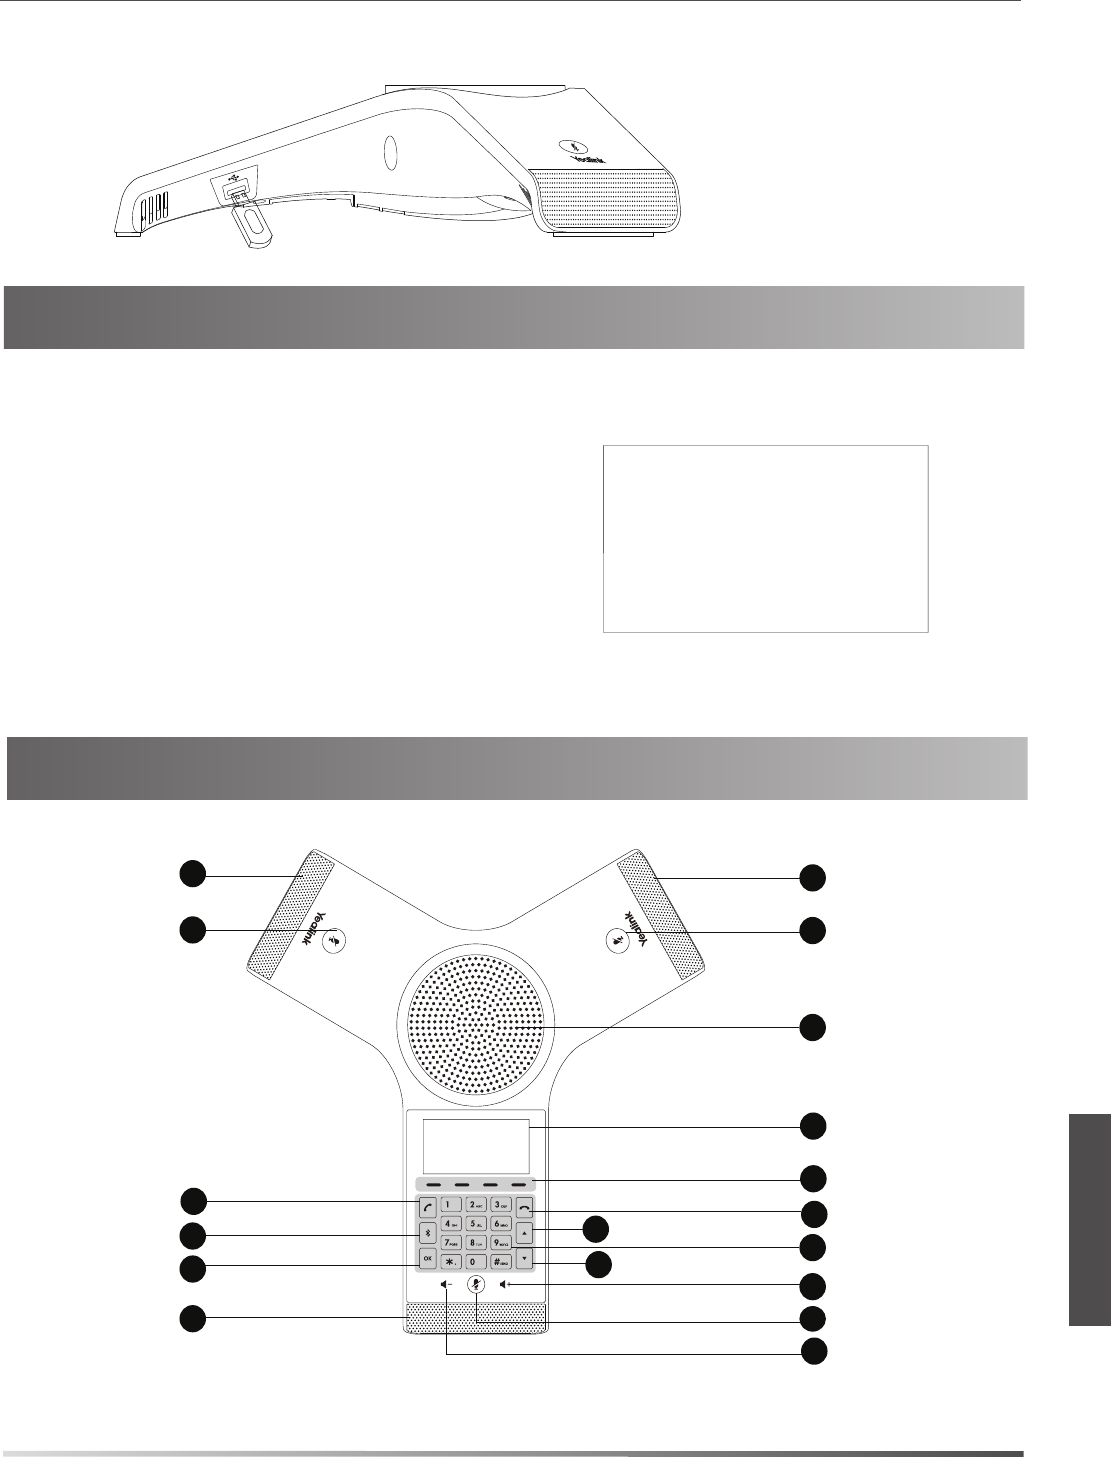
Hardware Component Instructions
Mute Key
Speaker
Touch Keypad
Volume(+) Key
Volume(—) Key
Microphone
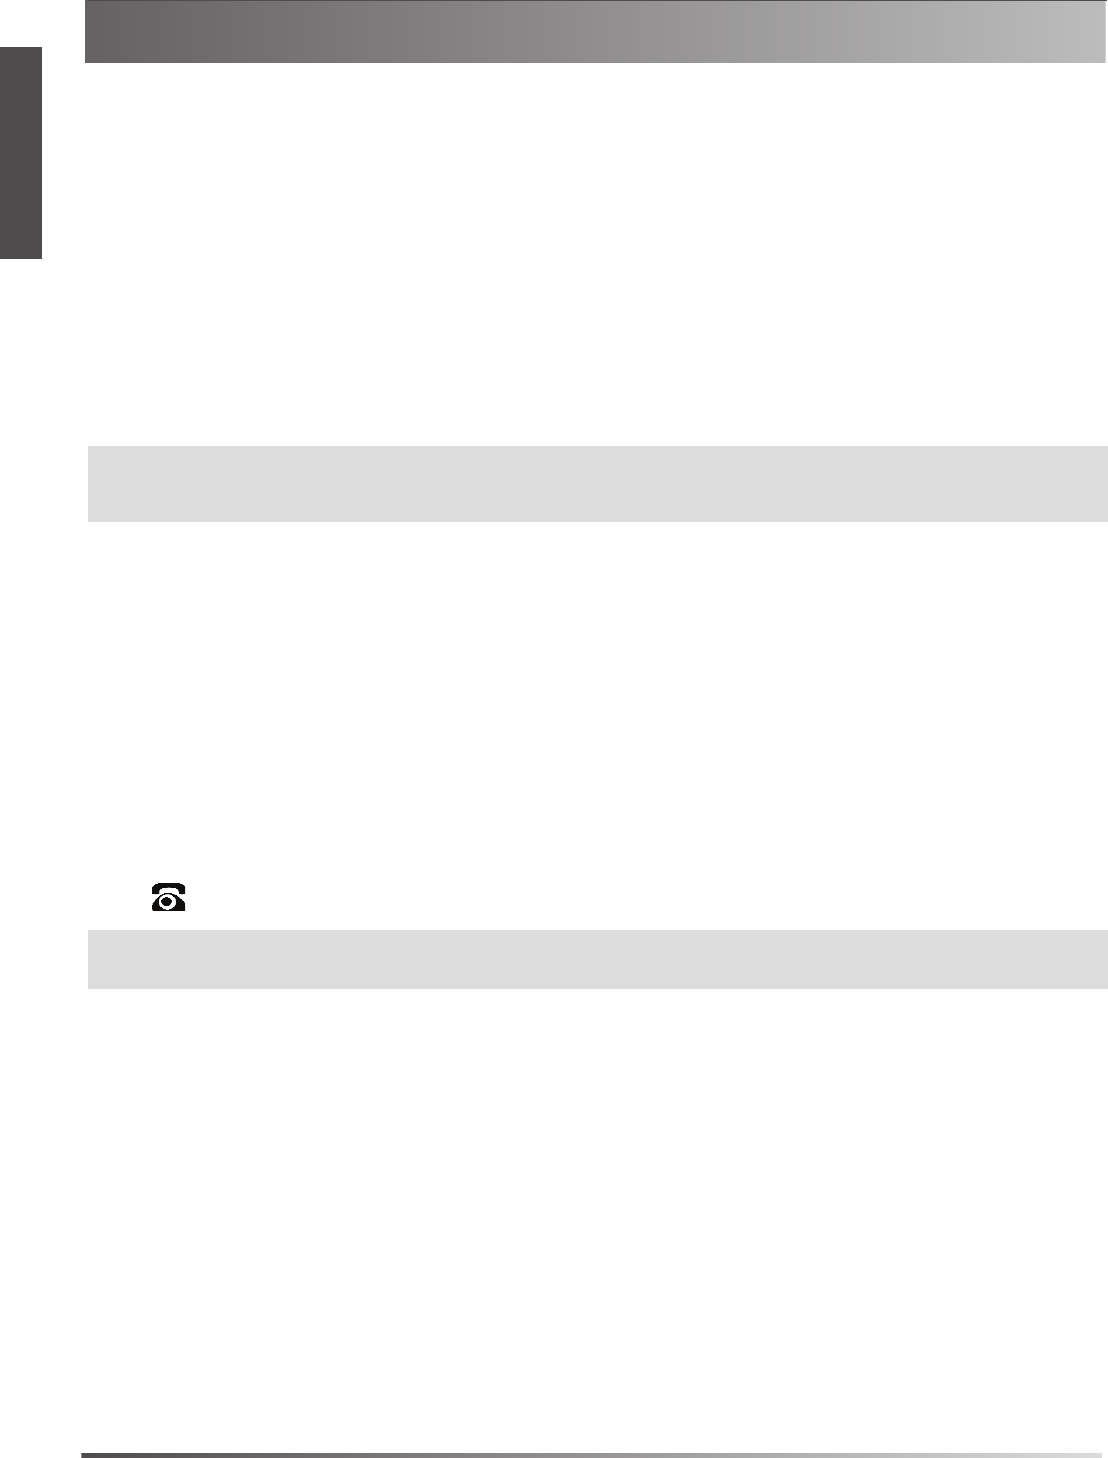
2. Connect the optional
USB flash drive.
2
Welcome
Initializing...Please wait
1
2
3
4
5
7
8
9
LCD Screen
Soft Keys
Welcome
Initializing...Please wait
After the IP phone is connected to the network and supplied with
power, it automatically begins the initialization process. After startup,
the phone is ready for use. You can configure the phone via web user
interface or phone user interface.
E
N
G
L
I
S
H
1
1
2
10
Off-hook Key
2
11
Bluetooth Key
12
OK Key
On-hook Key
6
13
14
Up Navigation Key
Down Navigation Key
Configuring via phone user interface
Network Settings:
1. Tap Menu soft key, select Settings->Advanced Settings(default password: admin) ->Network->WAN
Port/VLAN/Webserver Type/802.1x/VPN/LLDP/CDP/NAT to configure the network.
Wireless Network Connection:
1. Tap the soft keyMenu, select Settings ->Basic Settings .
2
. Select Wi-Fi.
3. Tap the Switch soft key to turn Wi-Fi on.
4. Tap the Save soft key.
The phone will automatically search for available
wireless
networks in your area.
5. Select an available
wireless
network from the list of Available Networks.
6. If the network is secure, enter its password in the Password field.
7. Tap the Connect soft key to connect to the wireless network.
Registered Register Failed(Registering)
3
Note: Check with your system administrator if any error appears during the registration process or a specific configuration is required for your
registration.
E
N
G
L
I
S
H
No Service
Note: The IP phone also supports IPv6, but IPv6 is disabled by default.
The wrong network settings may result in inaccessibility of your phone and may have an impact on the network performance. Contact your
system administrator for more information.
Configuring via web user interface
Accessing the web user interface:
1. Tap OK to obtain the IP address of the phone.
2. Open a web browser on your computer, enter the IP address into the address bar (e.g., "http://192.168.0.10" or
“192.168.0.10”), and then press Enter.
3. Enter the user name (default: admin) and password (default: admin) in the login page and click Confirm.
Network Settings: Click on Network->Basic->IPv4 Config.
You can configure the network settings in the following ways:
DHCP: By default, the phone attempts to contact a DHCP server in your network to obtain its valid
network settings, for example, IP address, subnet mask, gateway address and DNS address.
Static IP Address: If the phone cannot contact a DHCP server for any reason, you need to configure IP.
Configuring Your Phone
Account Settings: Click on Account->Register
.
Parameters of the account:
Register Status:
It shows the register status of the current account.
Line Active:
You can select Enabled/Disabled to enable/disable the account.
Label:
It is shown on the LCD screen to identify the account.
Display Name: It is shown as Caller ID when placing a call.
Register Name: It is an authenticated ID for authentication provided by ITSP (required).
User Name:
It is provided by ITSP for registration (required).
Password:
It is provided by ITSP for registration (required).
Server Host: It is provided by ITSP for registration (required).
Register status icons on the LCD screen:
Basic Call Features
4
E
N
G
L
I
S
H
Account Settings:
Tap Settings->Advanced (default password: admin) ->Accounts to configure the account.
Placing a Call
do one of the following:
-
Tap .
Enter the phone number, and then tap , , or the Send soft key.
-
Enter the phone number.
Tap , , or the Send soft key.
Answering a Call
Tap , or the Answer soft key.
Ending a Call
Tap or the EndCall soft key.
Call Mute and Unmute
To mute a call:
Tap , the mute key LED illuminates solid red.
To unmute a call:
Tap again to unmute the call. The mute key LED illuminates solid green.
Call Hold and Resume
To hold a call:
Tap the Hold soft key during a call.
To resume a call:
Tap the Resume soft key during a call.
Local Conference
You can host a five-way conference with up to four parties.
To initiate a conference:
1. Tap the Conf soft key during a call.
2. Enter the number of the second party, and then tap the Send soft key.
You can also select a contact from Directory to join into a conference.
3. Repeat the step 2 to join more members.
The members are added to the conference after answering.
To manage the individual participant:
Tap or to select desired participant, do the following:
Tap
the
Far Mute soft key to mute the participant. The muted participant can hear everyone, but no one can hear the
muted participant.
Tap the Remove to soft key remove the participant from the conference.
Tap the Split All soft key to split the participants from the conference.
Call Recording
You can record audio calls in the phone itself or onto a USB flash drive (if connected).

5
To record audio calls:
1.
Tap the More soft key, and then tap the Start REC soft key during a call.
2.
Tap
the Pause REC soft key to pause recording,
tap
the Re REC soft key to resume recording.
3. Tap
the Stop REC soft key to stop recording . The record file will be saved
.
If you end a call or conference during recording, the record file will be saved automatically.
Call Forward
You can forward an incoming call to a contact, or forward all incoming calls to a contact.
E
N
G
L
I
S
H
To forward an incoming call to a contact:
1. Tap the Forword soft key from the Incoming Call screen.
2. Enter the number you want to forward to.
You can also
select a contact from Directory .The call is forwarded to the contact directly.
3. Tap the Send soft key.
To forward all incoming calls to a contact:
1. Tap the Menu soft key, select Features.
2. Select Call Forward .
3. Select the desired forwarding type:
Always Forward----Incoming calls are forwarded unconditionally.
Busy Forward----Incoming calls are forwarded when the phone is busy.
No Answer Forward----Incoming calls are forwarded if not answered after a period of time.
4. Turn on the desired forwarding type.
5. Enter the number you want to forward to in the Forward To field.
6. If you select No Answer Forward, select the After Ring Time field to select a desired ring time to wait before
forwarding.
7. Tap the Save soft key to accept the change.
Call Transfer
You can transfer a call in the following ways:
Blind Transfer
1. Tap the Transfer soft key during a call. The call is placed on hold.
2. Enter the number you want to transfer to.
You can also select a contact you want to transfer to from Directory.
3. Tap the Transfer soft key.
Semi-Attended Transfer
1. Tap the Transfer soft key during a call. The call is placed on hold.
2. Enter the number you want to transfer to.
3. Tap
,
or .
4. Tap the Transfer soft key when you hear the ring-back tone.
Note: This feature is not available by default .For more information ,contact your administrator.
Attended Transfer
1. Tap the Transfer soft key during a call. The call is placed on hold.
2. Enter the number you want to transfer to.
3. Tap , or .
4. Tap the Transfer soft key when the second party answer.
Local Directory
To add a contact:
1.Tap the Directory soft key from the Idle screen.
2.Select Local Directory
,
then enter All Contacts.
3.
Tap the Add soft key to add a contact.
4.Enter a unique contact name in the Name field and contact numbers in the corresponding fields.
5.Tap the Save soft key to accept the change.
To edit a contact:
1. Tap the Directory soft key from the Idle screen.
2.
Select Local Directory
,
then enter All Contacts
.
3. Select the desired contact, tap the Option soft key and then select Detail.
4. Edit the contact information.
5. Tap the Save soft key to accept the change.
To delete a contact:
1. Tap the Directory soft key,
then select Local Directory
->
All Contacts
.
2. Select the desired contact, tap the Option soft key and then select Delete.
3. Tap OK when the LCD screen prompts “Delete selected item?”.
Customizing Your Phone
Note: You can add contacts from call history easily. For more information, refer to Call History.
6
E
N
G
L
I
S
H
Call History
1. Tap the History soft key from the idle screen.
2. Enter All Calls, and then select the desired call history entry.
3.
Select an entry from the list, you can do the following:
Tap the Send soft key to call the entry.
Tap the Delete soft key to delete the entry from the list.
If you tap the Option soft key, you can also do the following:
Select Detail to view detailed information about the entry.
Select Add to Contact to add the entry to the local directory.
Select Add to Blacklist to add the entry to the blacklist.
Select Delete All to delete all entries from the list.
Volume Adjustment
.
Tap or during a call to adjust the receiver volume.
Tap or when the phone is idle or ringing to adjust the ringer volume.
Tap or to adjust the media volume in the corresponding screen.
包装清单
IP会议电话
说明:我们推荐使用由Yealink提供或经Yealink认可的配件,使用未经认可的第三方配件可能会导致性能的下降。
1. 连接电源和网线:
安装电话
话机也支持连接到无线网络(Wi-Fi)。想要了解更多信息,请参考配置话机章节中的无线网络连接。
7.5米以太网线 快速入门指南
简
体
中
文
说明:我们要求使用Yealink原装电源(12V/1A),使用第三方电源可能会导致话机损坏。
如果电源线或网线外包表皮出现破损,请立即更换。
2.5m线长电源适配器
Internet
DC12V
B
PoE
Internet
DC12V
AC 电源
Internet
A
Internet
DC12V
话机支持两种供电方式。请实际情况选择以下任意一种方式:
7
2. 连接U盘(可选):
在话机连接上网络和电源后,话机自动启动。
启动完成后,话机能正常使用。你可以通过
Web界或话机界面配置话机。
启动
简
体
中
文
硬件介绍
1010
8
Welcome
Initializing...Please wait
Welcome
Initializing...Please wait
1
2
3
4
5
7
8
9
1
1
2
10
2
11
12
6
13
14
麦克风
静音键
扬声器
LCD显示屏
软键
音量(+)触摸键
音量(-)触摸键
触摸板
挂机键
蓝牙键
拨号键
OK键

注册上
通过Web界面配置话机
访问
Web
界面
:
1.在话机空闲时,按OK查看话机的IP地址。
2.打开电脑上的网页浏览器,在地址栏里输入话机的IP地址。
(例如:http://192.168.0.10或192.168.0.10),按 Enter键。
3.在登录界面的用户名输入框中输入管理员用户名“admin”,密码输入框中输入管理员密码“admin”,
点击提交。
网络配置
:
点击网络配置->基础->
IPv4
配置。
你可以通过以下方式配置网络:
DHCP:话机默认通过DHCP服务器获取网络配置。例如:IP地址、子网掩码、网关和DNS服务器。
静态IP地址:如果话机无法通过DHCP服务器获取网络配置,你需要手动配置IP地址、子网掩码、网关、首选DNS
服务器和备选DNS服务器。
配置话机
9
说明:话机的网络配置也支持IPv6协议,但IPv6默认是关闭的。
错误的网络设置会导致网络不可用,也可能对网络的性能造成影响。请咨询你的系统管理员了解更多信息。
简
体
中
文
说明:如果注册失败,请咨询你的系统管理员。
无账号 注册失败(注册中)
账号配置
:
点击账号->注册。
账号参数
:
注册状态: 显示当前账号的注册状态。
线路激活: 启用/禁用账号。
标签: 显示在显示屏上的账号标签。
显示名称: 呼出号码时,显示在对方话机上的名称。
注册名称: 由网络技术服务提供商提供 (必填)。
用户名称: 由网络技术服务提供商提供 (必填)。
密码: 由网络技术服务提供商提供 (必填)。
SIP服务器: 由网络技术服务提供商提供 (必填)。
话机LCD显示屏显示账号注册状态的图标:
通过话机界面配置话机
网络配置
:
在话机空闲时,按设置->高级设置(默认密码:admin)->网络->WAN端口/VLAN/网络服务器
/802.1x/VPN/LLDP/CDP/NAT。
无线网络连接:
1. 在空闲界面上,按菜单,在设置中选择基础设置。
2
. 选择无线网络。
3. 打开无线网络开关。
话机将自动搜索附近可用的Wi-Fi。
4. 从可用的网络列表中,选择一个Wi-Fi。
5. 如果要连接一个加密的网络,在密码区域中输入密码。
6. 按连接。
账号配置
:
在话机空闲时,按设置->高级设置(默认密码:admin)->账号。
基本功能
10
简
体
中
文
拨打电话
使用下面的任意一种方式拨打:
- 按
。
接听电话
按应答。
结束通话
按挂断。
静音或取消静音
开启通话静音:
在通话中,按触摸屏上的 。静音键的LED灯红色常亮。
取消通话静音:
再次按触摸屏上的 。静音键的LED灯绿色常亮。
通话保持和恢复
通话保持:
在通话中,按保持。
恢复通话:
按恢复。
会议
话机最多支持五方会议。
创建会议:
1. 在通话中,按会议。
2. 输入第二个成员的号码,按发送。
你也可以从话簿中选择联系人加入会议。
4. 重复步骤3,添加更多成员。
成员接听来电后,自动加入会议。
会议成员管理:
按相应成员,可以进行以下操作:
按禁言禁止该成员发言。该成员可以听到会议内容,但是其他成员无法听到该成员的声音。
按移除将该成员移除。
按拆分所有将会议拆分成多路独立的通话。
输入号码,然后按 , , 或发送软键。
- 输入号码。
按 , , 或发送软键。

通话录音
你可以录制音频通话,然后将录音文件保存在话机或U盘上。
录制音频通话:
1. 在通话中,按更多,然后选择开始录音。
2.按暂停录音录音暂停,按恢复录音录音恢复。
3. 按停止录音录音结束,录音文件自动保存。
如果你结束通话,录音将在通话结束时自动保存。
呼叫转移
你可以转移当前来电,或转移所有来电 。
转移当前来电:
1. 在来电界面,按转移。
2.
输入你希望转移到的号码。
你也可以从话簿中选择一个联系人。来电将直接转移到该联系人。
3.按转移。
11
简
体
中
文
转移所有来电:
1. 按菜单软键进入设置。
2. 在功能区域中选择呼叫转移。
3.
选择呼叫转移的类型:
无条件转移----话机的所有来电,将被无条件自动转移到预先指定的号码。
遇忙转移------当话机忙时,来电将被转移到预先指定的号码。
无应答转移----当话机在指定的响铃时间内无应答时,来电将被转移到预先指定的号码。
4. 打开相应的开关。
5. 输入你希望转移到的号码。
6.
如果选择无应答转移,在响铃时长区域选择转移前等待的响铃时间。
7. 按保存保存操作。
通话转接
你可以使用下述三种方式将通话转接到另一方:
盲转
1.
在通话中,按转接。当前的通话被保持。
2.
输入你要转接到的号码。
你也可以从话簿中选择要转接到的联系人。
3. 按转接。
半咨询转
1.
在通话中,按转接。当前的通话被保持。
2.
输入你要转接到的号码。
3. 按发送。
4.
在听到回铃音后,按转接。
咨询转
1.
在通话中,按转接。当前的通话被保持。
2.
输入你要转接到的号码。
3. 按发送。
4.
在对方接听来电并进行咨询后,按转接。

自定义话机
话单
1. 在空闲界面,按话单。
2. 进入所有通话,然后选择相应的通话记录列表。
3.
从所有通话中选择对应的记录,你可以进行如下操作:
按呼叫拨打电话。
按删除
删除选中的条目。
如果你按选项,你可以进行如下操作:
按详情查看记录的具体信息。
按添加到联系人将条目添加到本地通讯录中。
按添加黑名单添加条目到黑名单。
按全部删除删除所有记录。
音量调节
在通话中,按 或 调节接收音量。
在话机空闲或响铃时,按 或 调节响铃的音量。
在媒体播放界面,按 或 调节媒体播放的音量。
删除联系人:
1. 在空闲界面,按话簿,选择本地联系人中的所有联系人。
2. 按联系人后的选项,然后按删除。
3.
显示屏弹出“删除选中条目?”,按确定删除联系人。
12
说明:你可以从话单中添加联系人。了解更多信息,请参考话单章节。
简
体
中
文
联系人
添加联系人:
1. 在空闲界面,按话簿。
2. 按本地联系人进入所有联系人 。
3.按添加添加联系人。
4.
在姓名区域输入联系人姓名,在相应的区域输入联系人号码。
5. 按 保存操作。
编辑联系人:
1. 在空闲界面,按话簿。
2.
按本地联系人进入所有联系人
。
3. 选择需要的联系人,按选项操作进入详情。
4. 编辑联系人信息。
5. 按保存操作。

About Yealink
Technical Support
Visit Yealink WIKI (http://support.yealink.com/) for the latest firmware, guides, FAQ, Product documents, and more. For
better service, we sincerely recommend you to use Yealink Ticketing system (https://ticket.yealink.com) to submit all
your technical issues.
Yealink (Stock Code: 300628) is a global leading unified communication (UC) terminal solution provider that primarily
offers video conferencing systems and voice communication solutions. Founded in 2001, Yealink leverages its
independent research and development and innovation to pursue its core mission: “Easy collaboration, high
productivity.” The company’s high-quality UC terminal solutions enhance the work efficiency and competitive
advantages of its customers in over 100 countries. Yealink is the world’s second-largest SIP phone provider and is
number one in the China market.
YEALINK(XIAMEN) NETWORK TECHNOLOGY CO.,LTD.
Web: www.yealink.com
Addr: 309, 3th Floor, No.16, Yun Ding North Road, Huli
District, Xiamen City, Fujian, P.R. China
Copyright©2017 YEALINK(XIAMEN) NETWORK
TECHNOLOGY CO.,LTD.All rights reserved.
CP 9 2 0 - EN + CN