YLWD Technology MOVIC-F Mobile phone User Manual
Shenzhen YLWD Technology Co.,Ltd Mobile phone
User Manual
User Manual
F4001
Mobile phone
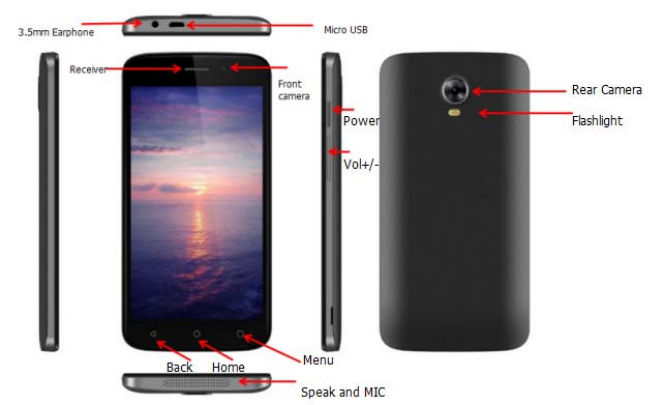
Phone Overview
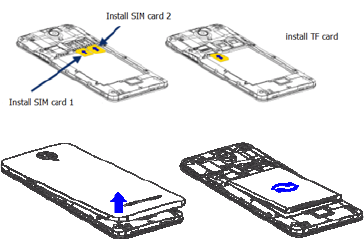
Get Started
Install the USIM/SIM Install the memory card
Remove the back cover Mount/Demount the battery
Basic Operations
Switch on
Touch and hold the Power button until the phone switches on.
Note: If you have enabled USIM/SIM locking in the Settings menu, enter the correct PIN number upon power-on before you use the phone.
Caution: Three consecutive attempts of entering an incorrect PIN will lock the SIM card. If it is locked, use a PUK provided by the operator to unlock
it.
Switch off
Touch and hold the “Power button" until the Phone Options screen displays. Tap " Power off ” to switch off the phone.
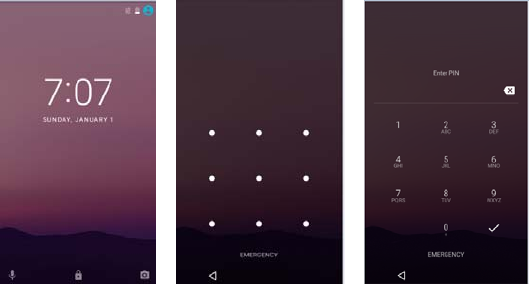
Unlock
You can increase the security of your phone by selecting screen lock .Screen lock settings can be found under “Settings”>“Security”> “Screen lock”.
Touchscreen Usage
Use your fingers to perform operations directly on icons, buttons, and the on-screen keypad.
Tap/Touch/Click
Tap the icon of an App to start it.
Touch & Hold
Touch and hold an item to display a pop-up menu of options. For example, go to Address Book, touch and hold a contact on the Address Book page, and
a menu of options pops up.
Drag
Tap an item on the screen and drag it to another place.
Slide/Sweep
To sweep vertically or horizontally across the screen, you can view apps, pictures, and webpages in a convenient manner.
Scroll
Similar to sweeping, but faster.
Pinch
Put two fingers on the screen to pinch in or out an item, such as a webpage or picture.
Home Screen
1. Status bar: allows you to view status icons and notices, such as signal, battery, current time, USB connection, and data service.
2. Notification bar: On the Home screen, tap the status bar and drag it down to display the notification bar. Tap this bar. Then you can view the notices.
Touch the return button to switch back to the previous page.
3. App icon: Tap an app to open it.
4. Main menu: allows you to enter the app main menu.
Phone Settings
To display the Settings menu, tap the Settings icon directly. On the Home screen, tap the Menu button first, and then touch the Settings icon.
1.USIM/SIM card: In the Settings menu, choose USIM/SIM Card. You can then manage your USIM/SIM cards on the pop-up page.
2. Network: In the Settings menu, select WLAN under Radio Network to configure your radio network; or select Mobile Network under More to configure
data services of your phone.
3. Alert tone and notification: In the Settings menu, choose Alert Tone and Notification. The standard mode allows you to set the volume,
enable/disable vibration during ringing, and select ringtones for incoming calls and messages, as well as enable/disable keypad touch sound effect,
touch alert tone, and screen lock tone.
4. Display: allows you to configure the brightness, wallpaper, automatic device rotation, sleep duration, and font size.
5. Security: In the Settings menu, choose Security. The Security page allows you to set the screen locking mode and USIM/SIM locking mode. App
Permission: allows you to configure certain permissions for an App and monitor their usage. Anti-theft: allows you to remotely lock the phone or clear
all data of it.
6. Manage apps: In the Settings menu, choose Apps. Then you can view or manage your apps.
Note: Disable or unload certain apps if available space is less than 100MB.
7. Message: On the Message page, tap the Menu button and choose Settings. On the Message Settings page, you can enable/disable report sending,
create or select a message template, and configure a message alert tone for each short or multimedia message.
8. Call: To display the Call Settings page, choose Settings on the Call page.
Shortcuts
On the Home screen, lightly drag down the Status bar. On the screen top, a group of shortcuts are displayed, such as Settings, WLAN, Bluetooth,
Brightness, Ringtone Mode, Mobile Data, and Airplane mode. Tap any of them to open it quickly.
Widget
Android5.1 offers multiple ease-of-use widgets on the Home screen.
On this screen, tap the Menu button and then the Widget tab, to display the widget selection page. Tap and hold a desired widget to be put on the Home
screen, drag it left or right to locate it at a proper place, and complete the Widget settings as prompted.
Move/Uninstall apps
1. Access the App main menu from the Home screen. On the ALL App page, tap and hold an app to be put on the Home screen, and drag it left or right to
locate it at a proper place. In this way, a desktop app is created.
2. On the All App page, tap and hold an app, and drag it to Uninstall on the desktop. In this way, the app is removed from the phone.
Note: You are not allowed to uninstall basic apps of the phone.
3. On the All App page, tap and hold an app, and drag it to APP Info. on the desktop. In this way, details about the app is displayed.
Call
This phone allows you to make or answer a call, initiate an emergency call, and launch a multi-party call.
On the bottom left of the Home screen, tap the Dial-up icon. The Dial-up page is displayed. Enter a phone number and choose between card 1 and card
2 to make the call. When you enter the number, the phone will automatically search among all contacts a number that best matches the entered numerals,
to facilitate your operation.
During a call, tap Add a Call, and this call automatically switches to Silent mode. Enter the number of another contact, tap Dial-up, and the previous call
automatically switches to On-hold mode. After the second call is answered, tap Join. In this way, a teleconference is established to achieve a
multi-party talk.
Note: You need to subscribe to this service from your carrier before you use it.
You are also allowed to initiate a call by selecting a phone number from the list of contacts or the Message page.
Contacts
Tap Contacts to open it. The Contacts page offers management functions. It allows you to view the list of contacts and related details, make a call or send
an SMS to a certain contact, and share the contact.
Contact import: On the Contacts page, tap the Menu button, and choose Import/Export to select a mode for importing or exporting a contact.
Add a contact: On the lower right of the Contacts page, tap the Add button to add a contact to your phone or USIM/SIM. Enter the name and number,
and tap Finish. In this way, a contact is created.
Contact list: On the Contacts page, tap the image of a contact. Details about the contact is displayed. This allows you to quickly make a call or send an
SMS to the contact.
Search contact: On the Contacts page, tab Search, and enter related information about a certain contact to search it among the list of contacts.
Message
Tab Message on the desktop. Then you can create and send an SMS or MMS.
New message: Tap the Add icon on the upper right of the Message page. The message creating page is displayed. Enter the name or phone number of
the target contact into the Recipient bar. The phone will automatically search among the list of contacts for one that best matches the entered info. (You
can also select the contact from the list of contacts or groups.)
Input method: Tap the text editing zone to invoke the keypad. Drag down the notification bar, and display Select Input Method. In this way, you can
switch among different input methods.
Send: After an SMS is complete, tap Send and choose between card 1 and card 2 for sending the SMS.
Browser
Tap Browser to open it. The Browser page allows you to access and manage WAP and WWW webpages.
During a browse, tap the Menu button, choose Bookmark to display the Bookmark list. In addition, tapping the Menu button helps save the webpage that

you are viewing to the Bookmark.
Tap the Menu button during a webpage browse: also allows you to share the webpage, search on the webpage, and view history records.
Add a webpage bookmark to desktop: On the Bookmark page, tap and hold a bookmark, and choose “Add shortcut to the Home screen”. In this way, you
can add frequently used webpages to the desktop for future access.
Browser settings: Tap the Menu button and choose Settings. The Browser Settings page allows you to configure the browser as desired, such as
common content settings and privacy & security settings. Advanced settings allows for resetting to default settings.
E-mail
Tap E-mail to open it. The E-mail page is display. On this page, you can send and receive an e-mail via the phone.
For the first time you use this function, enter your e-mail account and password to set up an account. You can also set more accounts for ease of uniform
management of all mails.
Gallery
Gallery saves and manages all pictures obtained via the camera, Internet, and the MMS received.
On the Home screen, tap the Menu button, and then touch Gallery to open it. The Gallery page is displayed. It supports management of all pictures.
Open a picture, tap the Menu button, and touch Share. In this way, the picture is shared via the Bluetooth, message, and mail.
Clock
Tap Clock to open it. The Clock page is displayed.
Set clock: Tap the alarm clock on the upper left. The Alarm Clock page is displayed.
Add clock: On the Alarm clock page, tap “+” on the top to add an alarm. Edit the alarm time and tap Finish. When editing the alarm time, select Hour
before Minute. For example, in the 12-hour format, select 8 as the hour and 0 as the minute, and select a.m.
Multimedia Function
The phone also supports many multimedia functions, such as camera, music, and recorder. Tap any icon of theirs to open any one of them.
Manage File
This function allows you to copy, paste, share and delete a file stored on the SD card or other memory cards.
Search

On the Home screen, Tap Google, and enter keywords. In this way, you can search for a webpage, app, contact, and music. The result will be
displayed below the search bar.
Voice Search
In the network-connected state, tab Voice Search, and speak to the microphone what you want to search, such as weather and other information.
Play Store
This store allows you to download the latest Android apps, games, music, movies, TV programs, books, and magazines to your phone.
Gmail
Gmail is Google’s web-based e-mail. When you set up the phone for the first time, Gmail is configured. Depending on the synchronization settings, Gmail
is automatically synchronized with your Gmail account.
Troubleshooting
To save time and avoid unnecessary cost, please conduct the following checks before contacting our after-sale personnel:
1. Unable to turn on the phone: Check whether you have tapped and hold the Power button for over two seconds. Check whether the battery is in good
contact. If not, remove the battery, reinstall it, and turn on the phone again. Check whether the battery runs out. If yes, charge it.
2. Poor signal: It is possibly because of where you are, for example, on the basement or near a high-rise, that deteriorates the reachability of radio
waves. Please move to someplace with better signal reachability.
3. Echo or noise: The network trunk line of certain carriers may be in poor quality. Please tap the hang-up icon and redial, so that you may switch to
another trunk line with better quality.
4. Unable to charge the battery: Your battery may fail. Please contact the dealer.
5.SIM card error: The metal surface of the SIM card is dirty. Rub the metal contact terminals with a clean dry cloth.
The SIM card is not installed properly. Install it again as specified in the user manual.
The SIM card breaks down. Contact the network service provider.
6. Unable to enter anything into Phone Book: This is possible because that your phone book memory is full. Please delete needless data from
Contacts.
FCC Statement
Changes or modifications not expressly approved by the party responsible for compliance could void the user's authority to operate the equipment.
This equipment has been tested and found to comply with the limits for a Class B digital device, pursuant to Part 15 of the FCC Rules. These limits are
designed to provide reasonable protection against harmful interference in a residential installation. This equipment generates uses and can radiate radio
frequency energy and, if not installed and used in accordance with the
instructions, may cause harmful interference to radio communications. However, there is no guarantee that interference will not occur in a particular
installation. If this equipment does cause harmful interference to radio or television reception, which can be determined by turning the equipment off and
on, the user is encouraged to try to correct the interference by one or more of the following measures:
-- Reorient or relocate the receiving antenna.
-- Increase the separation between the equipment and receiver.
-- Connect the equipment into an outlet on a circuit different from that to which the receiver is connected.
-- Consult the dealer or an experienced radio/TV technician for help
This device complies with part 15 of the FCC rules. Operation is subject to the following two conditions (1)this device may not cause harmful interference,
and (2) this device must accept any interference received, including interference that may cause undesired operation.
SAR Information Statement
Your Mobile phone is a radio transmitter and receiver. It is designed and manufactured not to exceed the emission limits for exposure to radiofrequency
(RF) energy set by the Federal Communications Commission of the U.S. Government. These limits are part of comprehensive guidelines and establish
permitted levels of RF energy for the general population. The guidelines are based on standards that were developed by independent scientific
organizations through periodic and thorough evaluation of scientific studies. The standards include a substantial safety margin designed to assure the
safety of all persons, regardless of age and health. The exposure standard for wireless mobile phones employs a unit of measurement known as the
Specific Absorption Rate, or SAR. The SAR limit set by the FCC is 1.6 W/kg. * Tests for SAR are conducted with the phone transmitting at its highest
certified power level in all tested frequency bands. Although the SAR is determined at the highest certified power level, the actual SAR level of the phone
while operating can be well below the maximum value. This is because the phone is designed to operate at multiple power levels so as to use only the
power required to reach the network. In general, the closer you are to a wireless base station antenna, the lower the power output. Before a phone model
is available for sale to the public, it must be tested and certified to the FCC that it does not exceed the limit established by the government adopted
requirement for safe exposure. The tests are performed in positions and locations (e.g., at the ear and worn on the body) as required by the FCC for each
model. The highest SAR value for this model phone when tested for use at the ear is 0.50W/Kg and when worn on the body, as described in this user
guide, is 0.60 W/Kg (Body-worn measurements differ among phone models, depending upon available accessories and FCC requirements). The
maximum scaled SAR in hotspot mode is 1.15 W/Kg. While there may be differences between the SAR levels of various phones and at various positions,
they all meet the government requirement for safe exposure. The FCC has granted an Equipment Authorization for this model phone with all reported
SAR levels evaluated as in compliance with the FCC RF exposure guidelines. SAR information on this model phone is on file with the FCC and can be
found under the Display Grant section of http://www.fcc.gov/ oet/fccid after searching on
FCC ID: 2AKSAMOVIC-F Additional information on Specific Absorption Rates (SAR) can be found on the Cellular Telecommunications Industry
Association (CTIA) web-site at http://www.wow-com.com. * In the United States and Canada, the SAR limit for mobile phones used by the public is 1.6
watts/kg (W/kg) averaged over one gram of tissue. The standard incorporates a substantial margin of safety to give additional protection for the public
and to account for any variations in measurements.