Yamaha CDC 585 User Manual CD PLAYER Manuals And Guides L0403530
YAMAHA Compact Disc Manual L0403530 YAMAHA Compact Disc Owner's Manual, YAMAHA Compact Disc installation guides
User Manual: Yamaha CDC-585 CDC-585 YAMAHA CD PLAYER - Manuals and Guides View the owners manual for your YAMAHA CD PLAYER #CDC585. Home:Electronics Parts:Yamaha Parts:Yamaha CD PLAYER Manual
Open the PDF directly: View PDF ![]() .
.
Page Count: 28
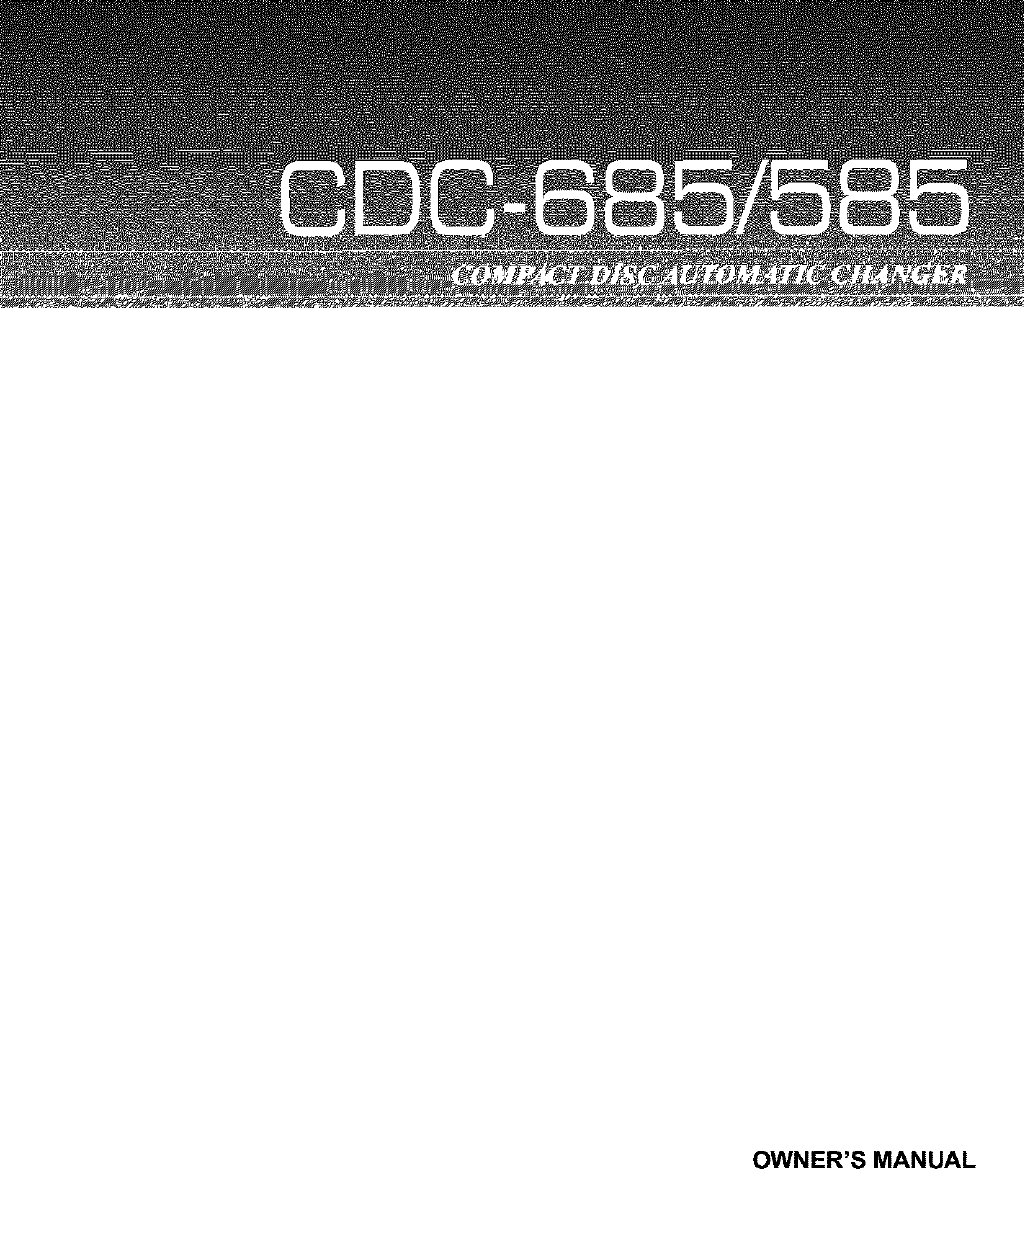
OWNER'S MANUAL
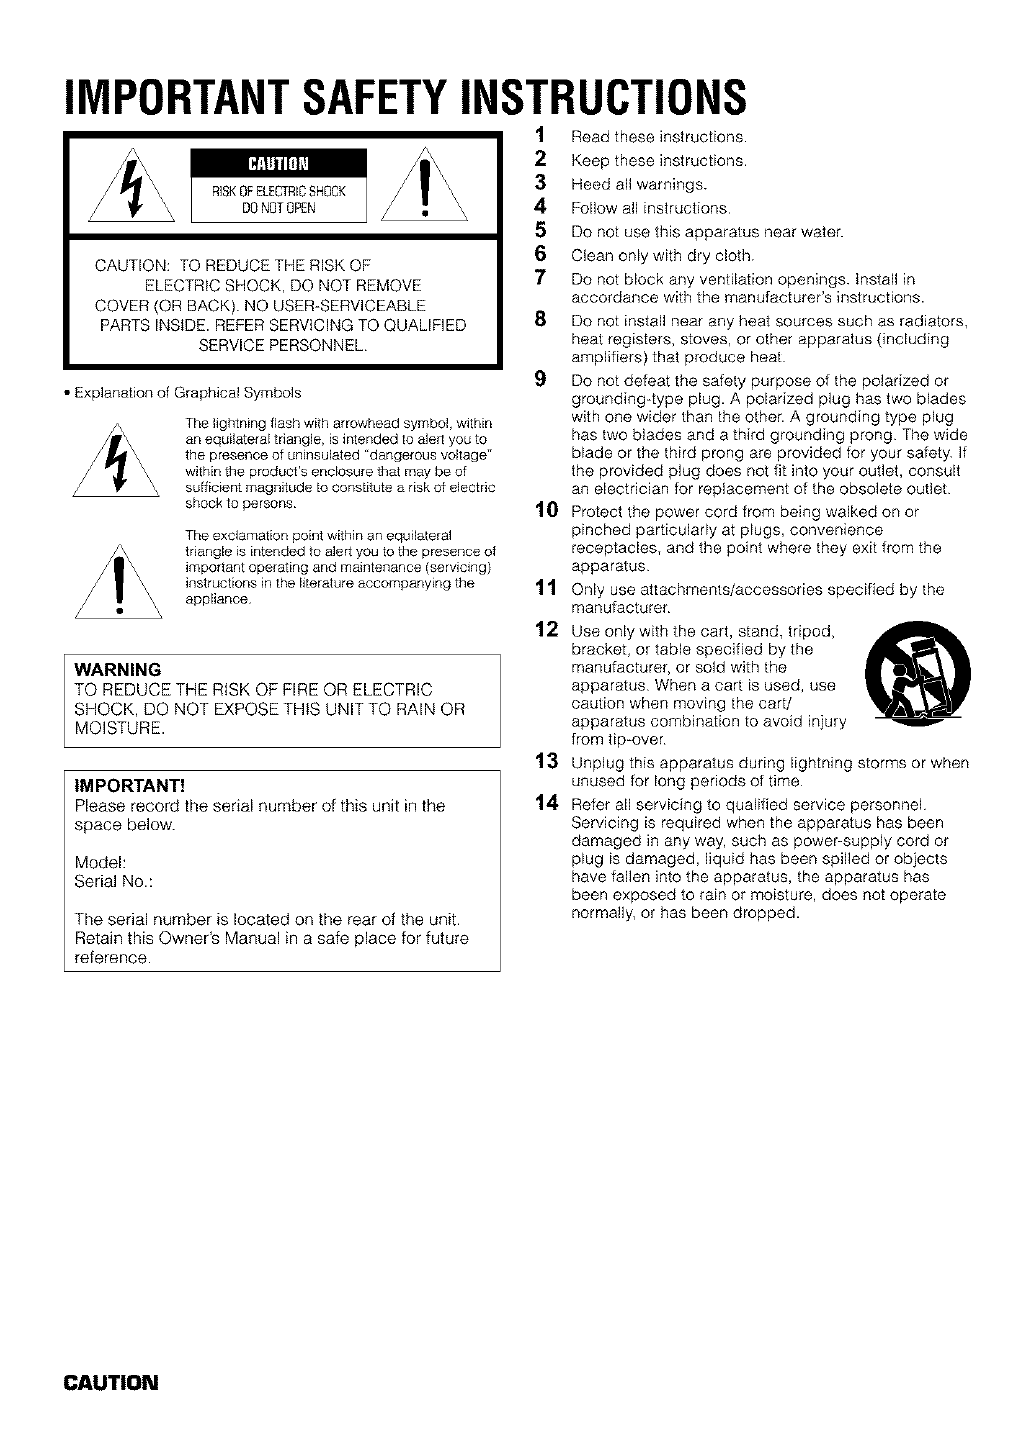
IMPORTANTSAFETYINSTRUCTIONS
[_illtllil_l
RISKOFELECTRICSHOCK
DONOTOPEN Z
CAUTION: TO REDUCE THE RISK OF
ELECTRIC SHOCK, DO NOT REMOVE
COVER (OR BACK). NO USER-SERVICEABLE
PARTS INSIDE. REFER SERVICING TO QUALIFIED
SERVICE PERSONNEL
•Explanation of Graphical Symbols
The lightning flash with arrowhead symbol, within
an equilateral triangle, is intended to alert you to
the presence of uninsulated "dangerous voltage"
within the product's enclosure that may be of
sufficient magnitude to constitute a risk of electric
shock to persons
The exclamation point within an equilateral
triangle is intended to alert you to the presence of
important operating and maintenance (servicing)
instructions in the literature accompanying the
appliance
WARNING
TO REDUCE THE RISK OF FIRE OR ELECTRIC
SHOCK, DO NOT EXPOSE THIS UNIT TO RAIN OR
MOISTURE.
IMPORTANT!
Please record the serial number of this unit in the
space below.
Model:
Serial No.:
The serial number is located on the rear of the unit.
Retain this Owner's Manual in a safe place for future
reference.
1
2
3
4
5
6
7
8
9
10
11
12
13
14
Read these instructions.
Keep these instructions.
Heed all warnings.
Follow all instructions
Do not use this apparatus near water.
Clean only with dry cloth.
Do not block any ventilation openings. Install in
accordance with the manufacturer's instructions.
Do not install near any heat sources such as radiators,
heat registers, stoves, or other apparatus (including
amplifiers) that produce heat
Do not defeat the safety purpose of the polarized or
grounding-type plug. A polarized plug has two blades
with one wider than the other. A grounding type plug
has two blades and a third grounding prong The wide
blade or the third prong are provided far your safety. If
the provided plug does not fit into your outlet, consult
an electrician for replacement of the obsolete outlet
Protect the power cord from being walked on or
pinched particularly at plugs, convenience
receptacles, and the point where they exit from the
apparatus
Only use attachments/accessories specified by the
manufacturer
Use only with the cart, stand, tripod,
bracket, or table specified by the
manufacturer, or sold with the
apparatus When a cart is used, use
caution when moving the cart/
apparatus combination to avoid injury
from tip-over
Unplug this apparatus during lightning storms or when
unused for long periods of time
Refer all servicing to qualified service personnel
Servicing is required when the apparatus has been
damaged in any way, such as power-supply cord or
plug is damaged, liquid has been spilled or objects
have fallen into the apparatus, the apparatus has
been exposed to rain or moisture, does not operate
normally, or has been dropped.
®
CAUTION
FCCINFORMATION(forUScustomersonly)
1. IMPORTANT NOTICE: DO NOT MODIFYTHIS UNIT!
This product, when installed as indicated in the
instructions contained in this manual, meets FCC
requirements Modifications not expressly approved by
Yamaha may void your authority, granted by the FCC, to
use the product
2. IMPORTANT: When connecting this product to
accessories and/or another product use only high quality
shielded cables Cable/s supplied with this product
MUST be used Follow all installation instructions Failure
to follow instructions could void your FCC authorization to
use this product inthe USA
3. NOTE: This product has been tested and found to
comply with the requirements listed in FCC Regulations,
Part 15 for Class "B" digital devices Compliance with
these requirements provides a reasonable level of
assurance that your use of this product in a residential
environment will not result in harmful interference with
other electronic devices
This equipment generates/uses radio frequencies and, if
not installed and used according to the instructions
found inthe users manual, may cause interference
harmful to the operation of other electronic devices
Compliance with FCC regulations does not guarantee that
interference will not occur in all installations If this product is
found to be the source of interference, which can be
determined by turning the unit "OFF" and "ON", please try to
eliminate the problem by using one of the following
measures:
Relocate either this product or the device that is being
affected by the interference
Utilize power outlets that are on different branch (circuit
breaker or fuse) circuits or install AC line filter/s
In the case of radio or TV interference, relocate/reorient the
antenna If the antenna lead-in is 300 ohm ribbon lead,
change the lead-in to coaxial type cable
If these corrective measures do not produce satisfactory
results, please contact the local retailer authorized to
distribute this type of product If you can not locate the
appropriate retailer, please contact Yamaha Electronics
Corp, USA 6660 Orangethorpe Ave, Buena Park, CA
90620
The above statements apply ONLY to those products
distributed by Yamaha Corporation of America or its
subsidiaries
We WantYou Listening For A Lifetime
YAMAHA and the Electronic Industries Association's Consumer Electronics Group want you to get the most
out of your equipment by playing it at a safe level. One that lets the sound come through loud and clear
without annoying blaring or distortion - and, most importantly, without affecting your sensitive hearing.
Since hearing damage from loud sounds is often undetectable until it is too late, YAMAHA and the
Electronic Industries Association's Consumer Electronics Group recommend you to avoid prolonged
exposure from excessive volume levels. tq=_W4lm_
CAUTION
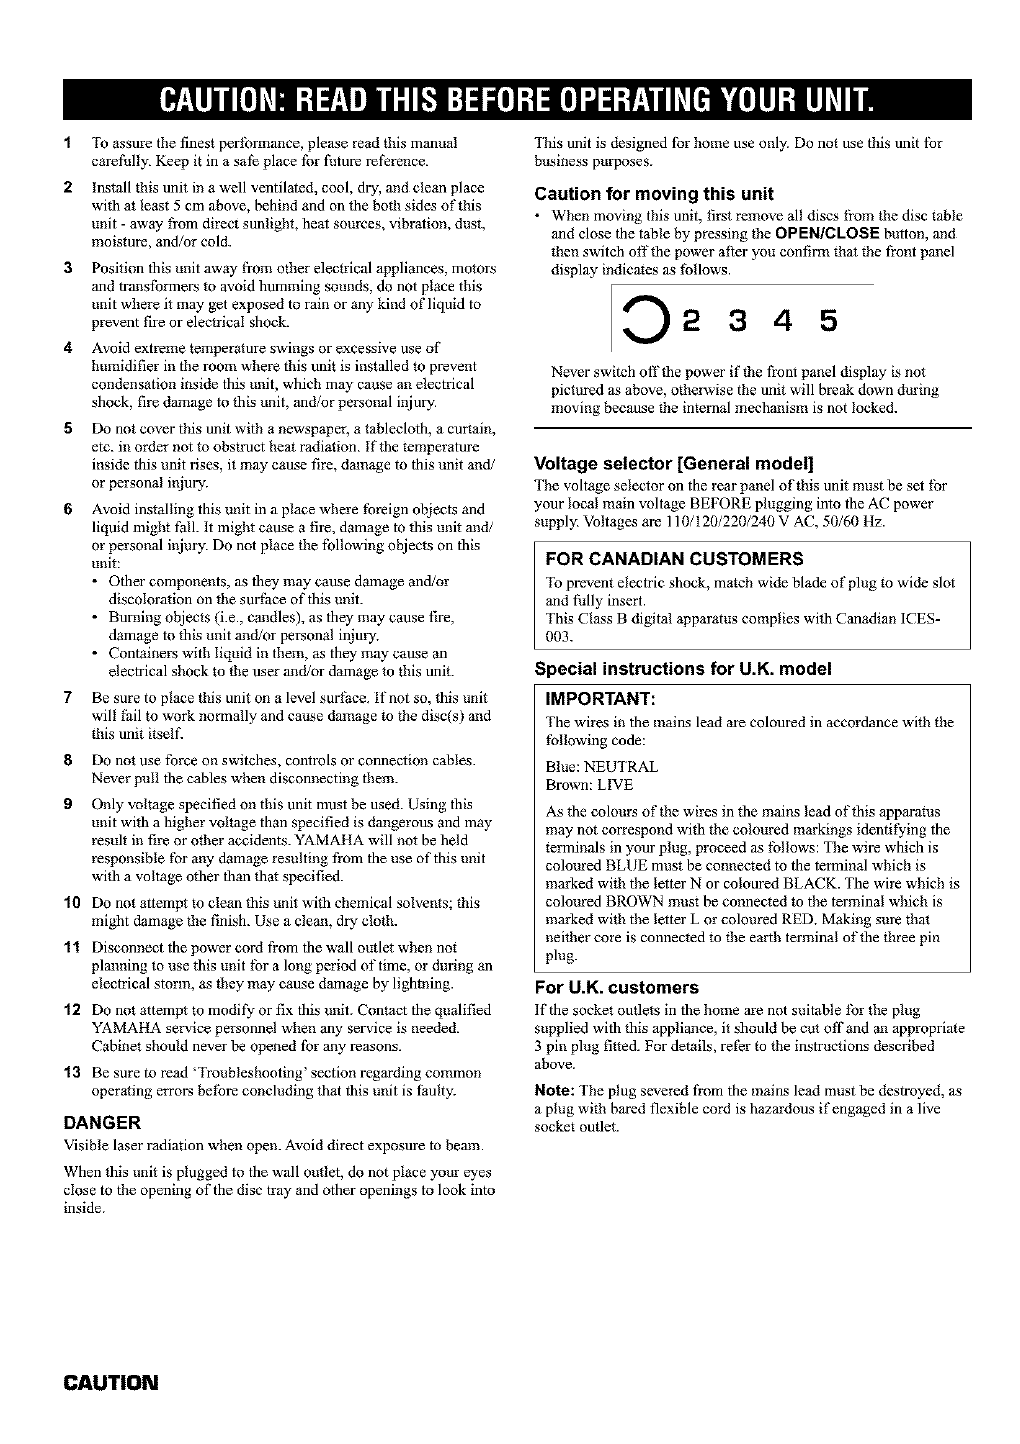
1 To assure the finest performm_ce, please read this manual
carefully. Keep it in a sale place for future reference.
Install this unit in a well ventilated, cool, dry, and clean place
with at least 5 cm above, behind and on the both sides of this
unit - away fi'om direct sunlight, heat sources, vibration, dust,
moisture, and/or cold.
Position this unit away fi'om other electrical appliances, motors
and transformers to avoid humming sounds, do not place this
unit where it may get exposed to rain or any kind of liquid to
prevent fire or electrical shock.
4Avoid extreme temperature swings or excessive use of
humidifier in the morn where this unit is installed to prevent
condensation i_lside this unit, which may cause an electrical
shock, fire damage to this unit, and/or personal injmy.
Do not cover this unit with a newspapeL a tablecloth, a cuitain,
etc. in order not to obstruct heat radiation. If the temperature
inside this unit rises, it may cause fire, damage to this unit and/
or personal it_imT.
6Avoid installing this unit in a place where tbreign objects and
liquid might fall. It might cause a fire, damage to this unit and/
or personal injmy. Do not place the following objects on this
unit:
•Other components, as they may cause damage and/or
discoloration on the surihce of this unit.
• Burning objects (i.e., candles), as they may cause fire,
damage to this unit and/or personal injm_£.
• Containers with liquid in them, as they may cause an
electrical shock to the user and/or damage to this unit.
7Be sure to place this unit on a level surface. If not so, this unit
will fbil to work normally and cause damage to the disc(s) and
this unit itself.
gDo not use force on switches, controls or connection cables.
Never pull the cables when disconnecting them.
9 Only voltage specified on this unit must be used. Using this
unit with a higher voltage than specified is dmlgerous and may
result in fire or other accidents. YAMAHA will not be held
responsible tbr any damage resulting from the use of this unit
with a voltage other than that specified.
10 DOnot attempt to clean this unit with chemical solvents; this
might damage the finish. Use a clean, d_y cloth.
11 Disconnect the power cord from the wall outlet when not
plmming to use this unit for a long period of time, or dining an
electrical storm, as they may cause damage by lighming.
12 Do not attempt to modify or fix this unit. Contact the qualified
YAMAHA service personnel when any service is needed.
Cabinet should never be opened for any reasons.
13 Be sure to read 'Troublesimoting' section regarding common
operating ettoi'_ befbie concluding that this unit is faulty.
DANGER
Visible laser radiation when open. Avoiddirect exposure to bean].
When this unit is plugged to the wall outlet, do not place your eyes
close to the opening of the disc tray and other openings to look into
inside.
This unit is designed for home use only. Do not use this unit for
business purposes.
Caution for moving this unit
•When moving this unit, first remove all discs fi'om the disc table
and close the table by pressing the OPEN/CLOSE button, and
then switch offthe power after you confirm that the front pmlel
display indicates as follows.
02345
Never switch offthe power if the front panel display is not
pictured as above, otherwise the unit will break down during
moving because the internal mechanism is not locked.
Voltage selector [General model]
The voltage selector on the rear panel of this unit must be set Ibr
your local main voltage BEFORE plugging into the AC power
supply. Voltages are 110/120/220/240 V AC, 50/60 Hz.
FOR CANADIAN CUSTOMERS
To prevent electric shock, match wide blade of plug to wide slot
and fully insert.
This Class B digital apparatus complies with Canadian ICES-
003.
Special instructions for U.K. model
IMPORTANT:
The wires in the mains lead are coloured in accordance with the
fbllowing code:
Blue: NEUTRAL
Brown: LIVE
As the colours of the wires in the mains lead of this apparatus
may not correspond with the coloured markings identit)ing the
terminals in your plug, proceed as follows: The wire which is
coloured BLUE midst be connected to the tem]inal which is
marked with the letter N or coloured BLACK. The wire which is
coloured BROWN must be connected to the terminal which is
marked with the letter L or colom-ed RED. Making sm_ethai
neither core is connected to the earth terminal of the three pin
plug.
For U.K. customers
If the socket outlets in the home are not suitable l_r the plug
supplied with this appliance, it should be cut offand an appropriate
3 pin plug fitted. For details, retEr to the instructions described
above.
Note: The plug severed from the mains lead must be destroyed, as
a plug with bared flexible cord is hazardous if engaged in a live
socket outlet.
CAUTION
Thank you for purchasing this YAMAHA product. We hope it will give you many years of trouble-free enjoyment. For the
best perfomlance, read this manual carefully, it will guide you in operating your YAMAHA product.
•5-Discs CarouselAuto-changer
• Full Opening Disc Tray for Changing 5 Discs at a Time
• PLAYXCHANGE; Disc Changing Capability while Playing Another
• Repeat, Random and Progrmn Play
• Remote Control Capability
CD PreventiveCares ....................... 2
Preparations ................................. 3
SuppliedAccessories .......................................... 3
Remote Control Transmitter ................................ 3
Connections........................................................ 4
ControlsandFunctions.................... 5
Front Panel.......................................................... 5
Remote Control Transmitter ................................ 6
Display ................................................................ 7
Scanning Discs ................................................... 9
Skipping Tracks................................................. 10
Searching.......................................................... 10
CDTEXT............................................................ 10
Various Functions.......................... 11
Random SequencePlay .................................... 11
Program Play .................................................... 12
RepeatPlay ....................................................... 14
Index Search ..................................................... 14
Adjusting the Level............................................ 15
Timer Play ......................................................... 15
CDSynchronized Recording .............. 16
Track Programming for Recording ...... 17
AutomaticTapeProgramming...........................17
ManualTapeProgramming...............................18
RandomTapeProgramming.............................20
Automatic Peak Level Searching ........ 21
if!!i
i;_!i!;;ii!i!i!iiiiii!i;;i!iii:!;iiiiii_i_!!ii!!!;_i!!;,i!i
!i!iiii;i;!i_i_iiiiii!!i
|
E-1
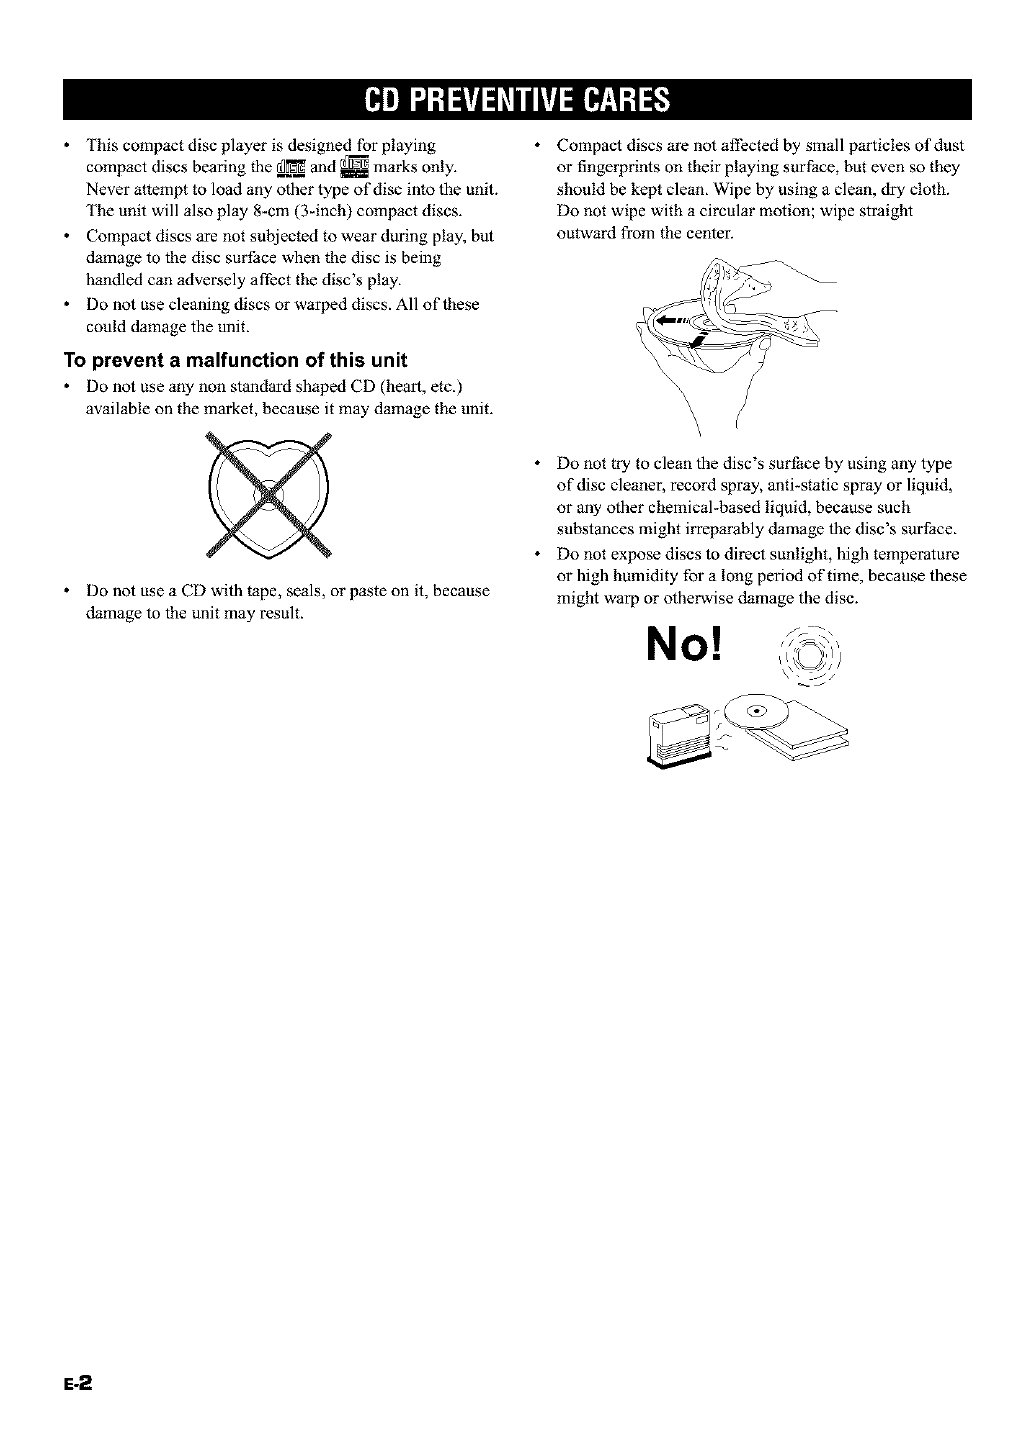
• This compact disc player is designed for playing
compact discs bearing the _ and _ marks only.
Never attempt to load any other type of disc into the unit.
The unit will also play 8-cm (3-inch) compact discs.
Compact discs are not subjected to wear during play, but
damage to the disc surtZace when the disc is being
handled can adversely aftEct the disc's play.
Do not use cleaning discs or warped discs. All of these
could damage the unit.
To prevent a malfunction of this unit
Do not use any non standard shaped CD (heart, etc.)
available on the market, because it may damage the unit.
Do not use a CD with tape, seals, or paste on it, because
damage to the unit may result.
• Compact discs are not affected by smMl particles of dust
or fingerprints on their playing surface, but even so they
should be kept clean. Wipe by using a clean, dry cloth.
Do not wipe with a circular motion; wipe straight
outward from the center.
\\\ C
• Do not try to clean the disc's surface by using any type
of disc cleaner, record spray, anti*static spray or liquid,
or any other chemical*based liquid, because such
substances might irreparably damage the disc's surface.
• Do not expose discs to direct sunlight, high temperature
or high humidity for a long period of time, because these
might warp or otherwise damage the disc.
No!
E-2
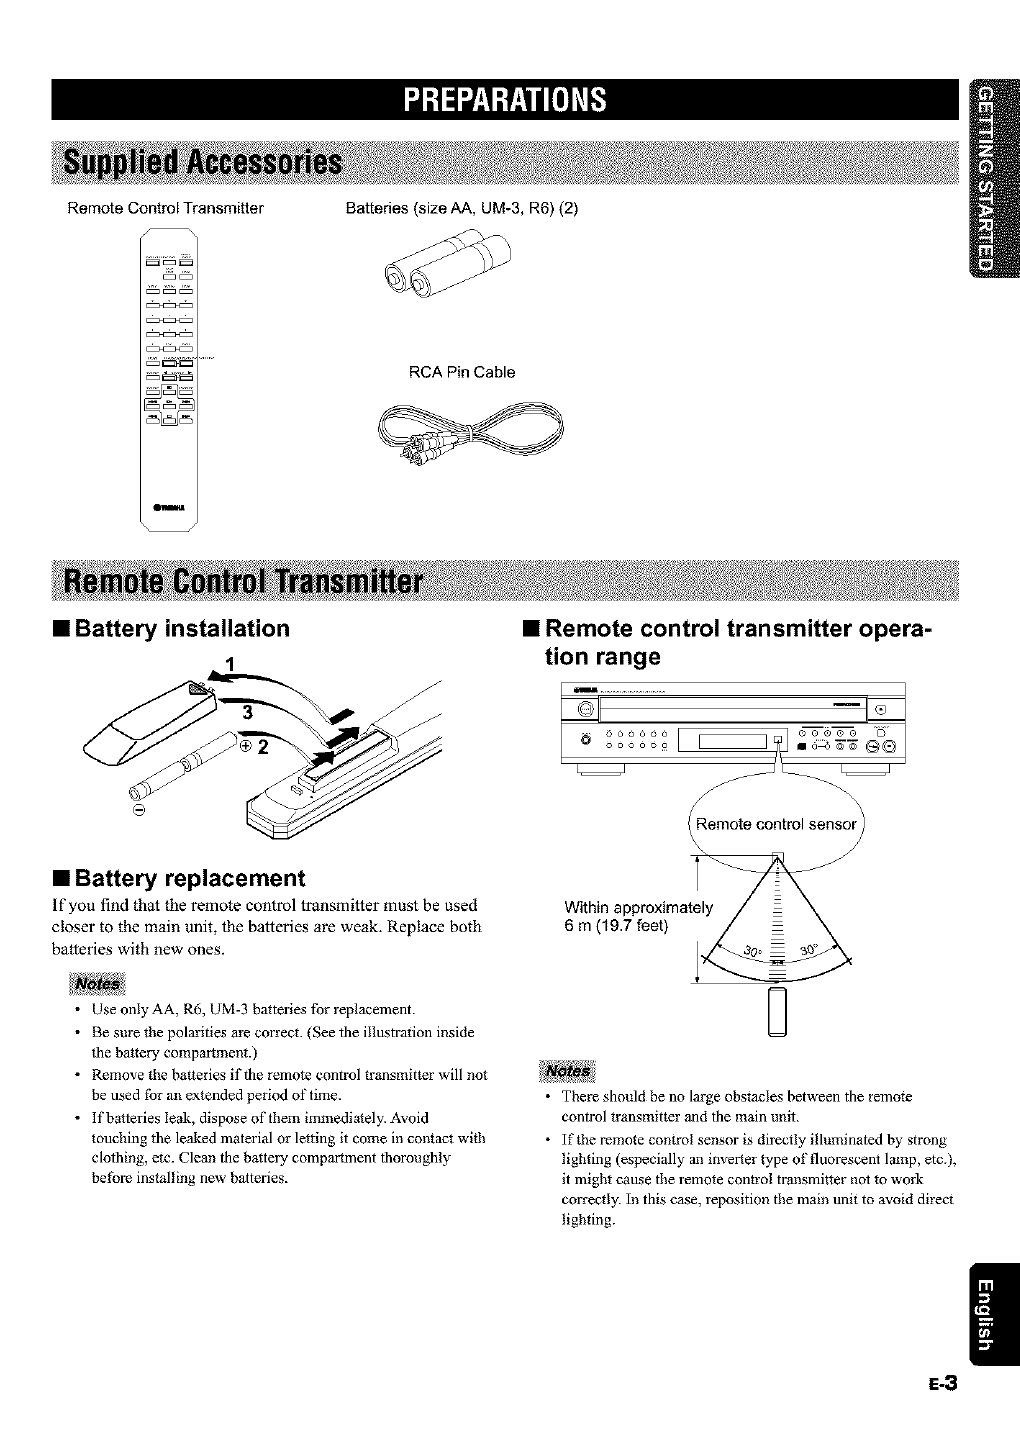
Remote Control Transmitter
@
Battedes (size AA, UM-3, R6) (2)
RCA Pin Cable
•Battery installation
1
•Battery replacement
If you find that the remote control transmitter must be used
closer to the main unit, the batteries are weak. Replace both
batteries with new ones.
•Use only AA, R6, UM-3 batteries for replacement.
• Be sure the polarities are correct. (See the illustration inside
the battery compartment.)
• Remove the batteries if the remote control transmitter will not
be used fbr ml extended period of time.
• If batteries leak, dispose of them immediately. Avoid
touching the leaked material or letting it come in contact with
clothing, etc. Clean the battexy compartment thoroughly
before installing new batteries.
•Remote control transmitter opera-
tion range
L=====J
Remote control sensol'_
Within approximately
6 m (19.7 feet)
8
• There should be no large obstacles between the remote
control transmitter and the main unit.
• If the remote control sensor is directly illuminated by strong
lighting (especially an inverter type of fluorescent lamp, etc.),
it might cause the remote control transmitter not to work
correctly. In this case, reposition the main unit to avoid direct
lighting.
E-3 |
Never plug in this unit and other components until all connections are completed.
Before making any connections, switch OFF the power to the unit and the amplifier or other components.
Connections should be made to the correct input terminals of the amplifier or other components.
if the placement of this unit causes noise in other equipment, such as a tuner, separate them from each other.
@ ©
"[_-- i! AC outlet
VOLTAGE SELECTOR
(General model only)
REMOTE CONTROL
(CDC-685 U.S.A.,
Canada and Australia
models only)
O Pin cable
(included)
0 Optical fiber cable
aPr_cAL
CD DIGITAL IN
ANALDG IN Amplifier
Choose one of the ways listed below to connect this unit to your amplifier.
When the LINE OUT (analog) terminals of this unit are used (O)
Be sure that the left (L) and right (R) LINE OUT terminals are connected to the corresponding (left and right) terminals of
the amplifier or other components.
Connect the LINE OUT terminals to the "CD" (or "AUX") terminals of the amplifier. For additional details concerning
these connections, refer to the operation instructions for the amplifier being used.
• The LINE OUT ternlinals of this unit are numbered _. When connecting this unit with a YAMAHA amplifiar or receiver
whose terminals on the rear panel are numbered as [], _, [_, etc., connect the LINE OUT terminals of this unit to the
input terminals numbered [] on the rear of the amplifier or receive1:
When the DIGITAL AUDIO OUT (OPTICAL) terminal of this unit is used (O)
Before using this terminal, remove the terminal's cover by pulling it.
Make the connection fi'om this terminal to the optical input terminal of an amplifier by using a commercially available
optical fiber cable.
* Be sure to use a high quality optical fiber cable. Other cables might not function correctly.
Be sure to attach the terminal cover when this terminal is not being used in order to protect the terminal from dust.
Set the level of signals output into an amplifier to max. by using the OUTPUT LEVEL -/+ buttons.
For Custom Installeri_*_ll_'lf-*ll[_4Jm,_-_4J[,I-*_r_t_-._-=lJ_,z,_L'41r_i_DZ_.1:£_*_iw|
REMOTE CONTROL (IN, OUT) terminals
These terminals are used for custom installation system. When this unit is connected to the components for custom
installation system, you can operate this unit with the system remote control.
Connect the REMOTE CONTROL IN terminal of this unit to the output terminal of the central controller for custom
installation system.
By connecting the REMOTE CONTROL OUT terminal of this unit to the REMOTE CONTROL IN terminal of the
other component, you can also operate it with the system remote control, in this way, up to 6 components can be con-
nected in series.
E-4
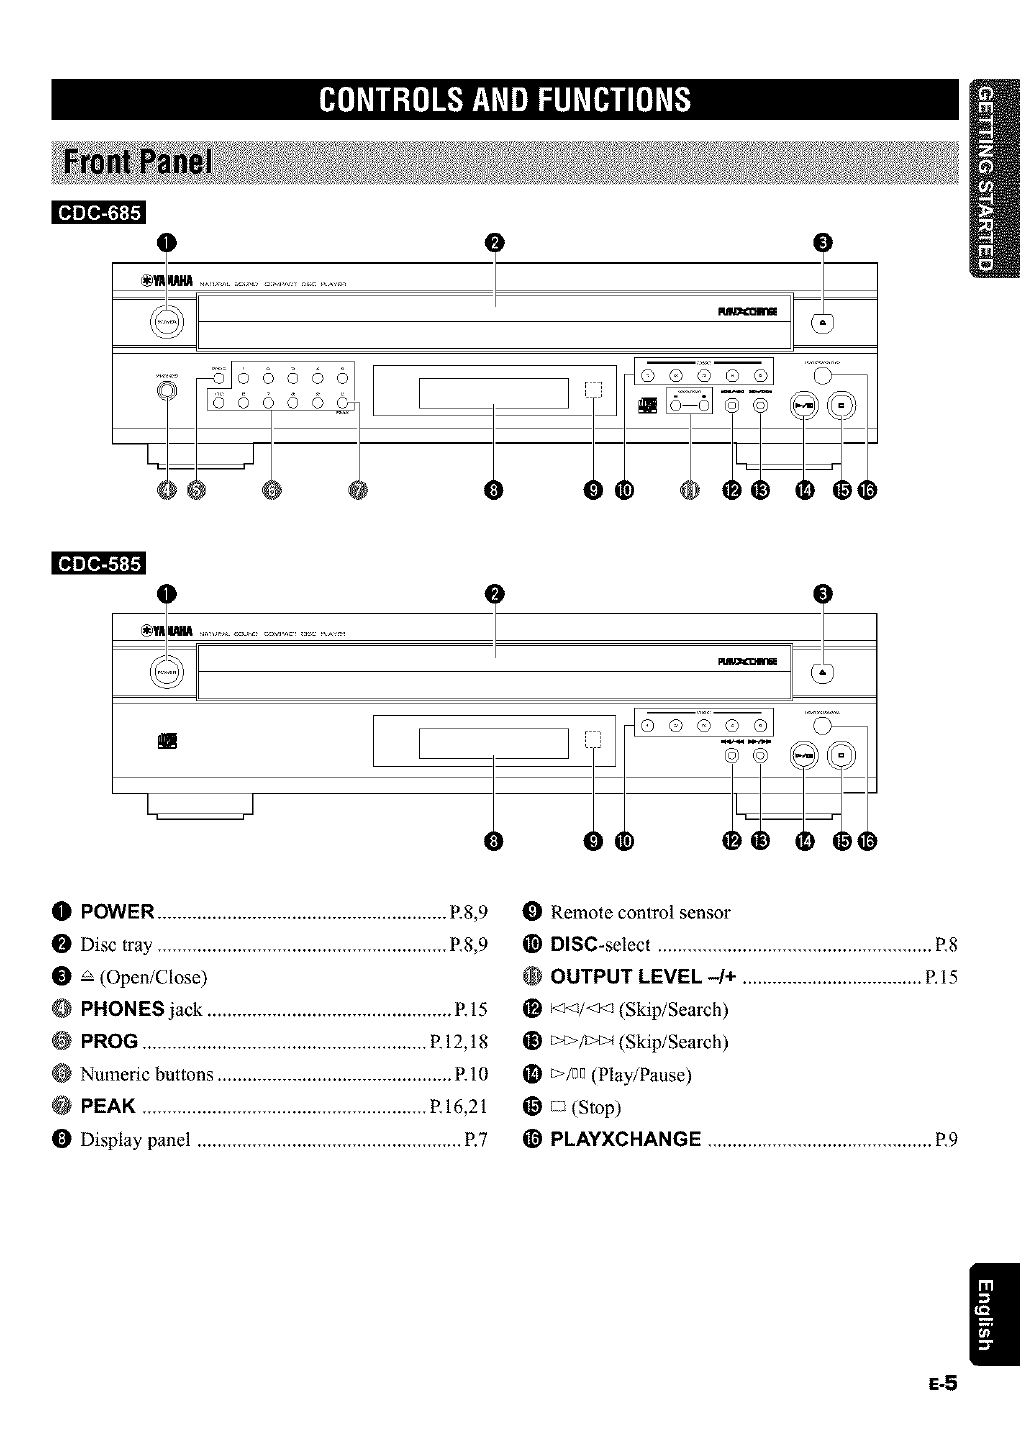
I[qlI_;I.1
_:IN# e e e el
I1
OPOWER .......................................................... R8,9
O Disc tray .......................................................... R8,9
O _ (Open/Close)
OPHONES jack .................................................RI5
PROG .........................................................R12,18
Nmneric buttons ...............................................P.10
PEAK ......................................................... R16,21
Display panel ..................................................... R7
O Remote control sensor
@DISC-select ....................................................... R8
@OUTPUT LEVEL -1+ .................................... R 15
_) _<_/<_ (Skip/Search)
@) _>/_ (Skip/Search)
O_>/_ (Play/Pause)
(_ r_ (Stop)
(_ PLAYXCHANGE ............................................. R9
|
S-5
*LI(I]_I I _(!] I'1--'1 _ll] 1 II _Ill | 11]_ I
Parts in the shaded areas are provided forI_]_l_.
O OPEN/
CLOSE
PE.K
TAPE CLEAR PROG
0
1
4
7
2 3
5 6
8 9
ODIMMER ...........................................................R7
SYNCHRO ......................................................RI6
TEXT/TIME .......................................................P.7
TAPE ...............................................................p.17
Numeric buttons ............................................... P.10
O Disc play MODE-select ..................................... R8
DISC SCAN ..................................................... P.9
O ao(Pause)
OREPEAT .......................................................... P.14
_>(Play)
_<_ (Skip)
li_ r_ (Stop)
O <_ (Search)
I_) OPEN/CLOSE ................................................. P.8
PEAK .............................................................. P.21
PROG .............................................................. P.12
CLEAR ............................................................ P.13
_) INDEX ............................................................. El4
OUTPUT LEVEL -/+ ....................................El5
_) DISC SKIP ....................................................... P.8
I_ RANDOM ......................................................... P.8
@ _>_ (Skip)
!_ _ (Search)
IYAMAHA
\/
E-6
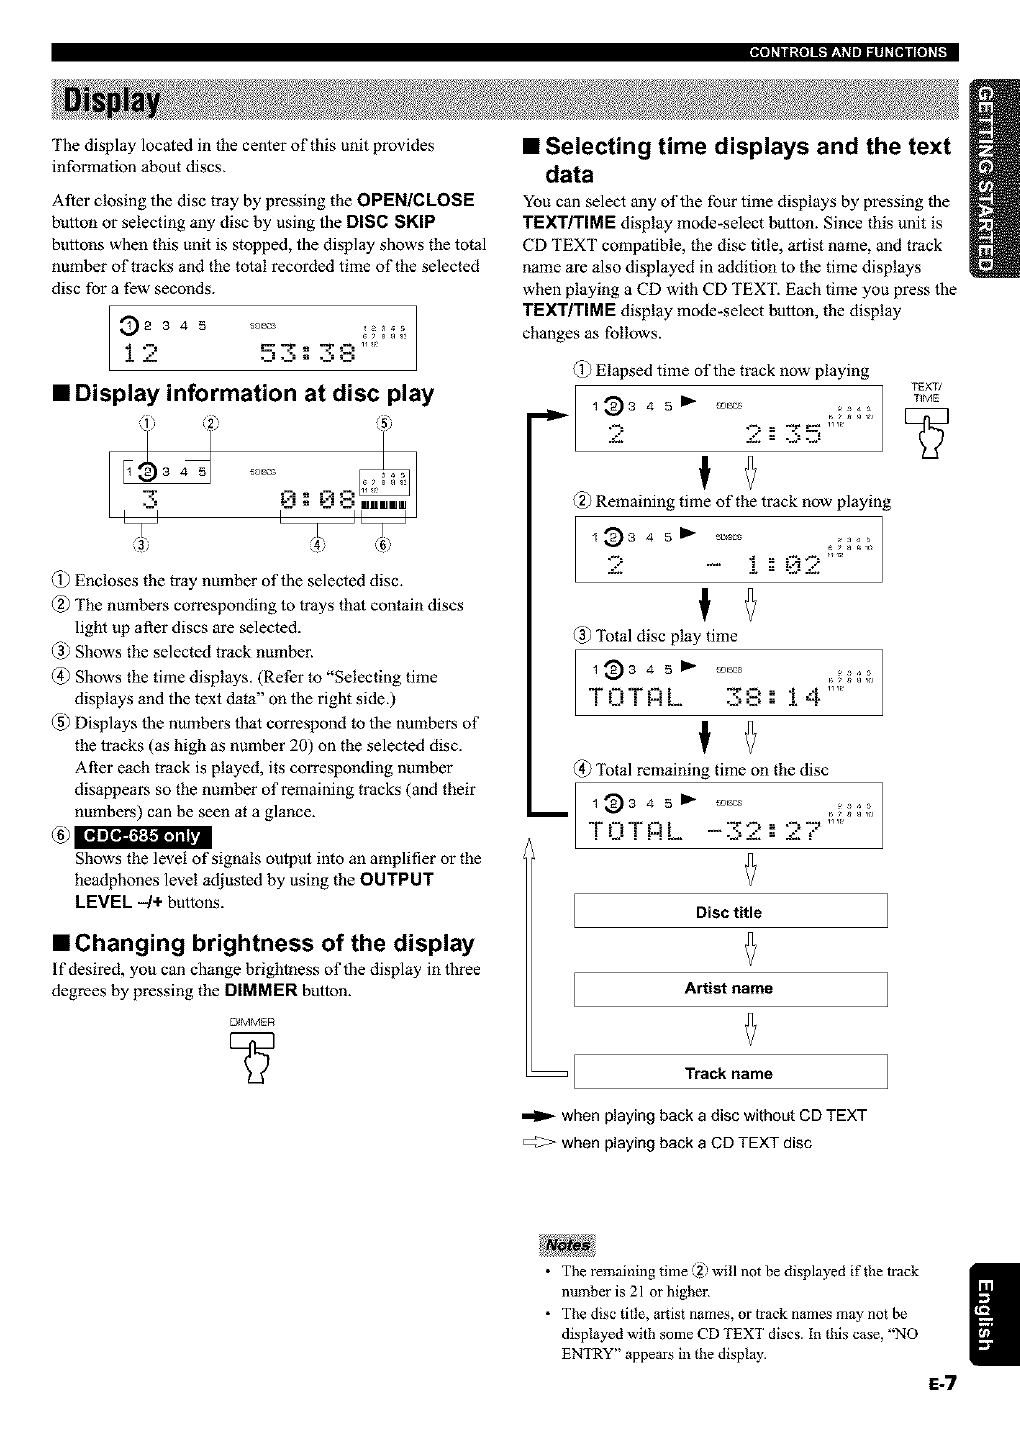
Ittl _I I _,[11l.lJ'_l _III IIII _[111 [11 _1-
The display located in the center of this unit provides
information about discs.
After closing the disc tray by pressing the OPEN/CLOSE
button or selecting any disc by using the DISC SKIP
buttons when this unit is stopped, the display shows the total
number of tracks and the total recorded time of the selected
disc for a few seconds.
345
•_••= = •-'=C=
•Display information at disc play
d;_2
7
@ Encloses the tray number of the selected disc.
@ The numbers corresponding to trays that contain discs
light up after discs are selected.
@ Shows the selected track number.
@ Shows the time displays. (Refer to "Selecting time
displays and the text data" on the right side.)
@ Displays the numbers that correspond to the numbers of
the tracks (as high as number 20) on the selected disc.
After each track is played, its corresponding number
disappears so the number of remaining tracks (and their
numbers) can be seen at a glance.
Shows the level of signals output into an amplifier or the
headphones level adjusted by using the OUTPUT
LEVEL -4+ buttons.
•Changing brightness of the display
If desired, you can change brightness of the display in three
degrees by pressing the DIMMER button.
DMMER
•Selecting time displays and the text
data
You can select any of the four time displays by pressing the
TEXT/TIME display mode-select button. Since this unit is
CD TEXT compatible, the disc title, artist name, and track
name are also displayed in addition to the time displays
when playing a CD with CD TEXT. Each time you press the
TEXT/TIME display mode-select button, the display
changes as follows.
@ Elapsed time of the track now playing
TEXT/
1 3 3 4 5 _'_ _31_ + 4 sTIME
0) Remaining time of the track now playing
@ Total disc play time
f
@ Total remaining time on the disc
1334 5 Jl_ _,s% _s
I -- "'_-_ =="2
Disc title
Artist name
Track name
when playing back a disc without CD TEXT
when playing back a CD TEXT disc
•The remaining time @ will not be displayed if the track
number is 21 or higher.
• The disc title, a_tist names, or track names may not be
displayed with some CD TEXT discs. In this case, "NO
ENTRY" appears in the display. |
E-7

This manual describes how to operate this unit by using the
remote control transmitter.
To operate this unit on the front panel, use the correspond*
ing buttons on the front panel.
5
5
4
[] Turn the power on.
On the front panel
[] Open the disc tray and load discs.
Use the disc guides to align the discs correctly in the
tray. Label side upward .
OPEN/
CLOSE
Disc tray /
To play an 8-cm (3qnch) CD
Place it in the inner recessed area of the disc tray. Do
not put a normal (12-cm/5-inch) CD on top of an 8-cm
CD.
[] Close the disc tray.
OPEN/
CLOSE
•You can also close the disc tray by pressing the _/
button on the front panel, a DISC-select button on
the front panel, a numeric button or the RANDOM
button, or by pressing the front edge of the disc tray
gently, if the tray is closed in these ways, play will
begin automatically, however, the display will not
show the total number of tracks and the total
recorded time of the first selected disc.
"P.J Select a desired disc play mode (1DISC or
5DISCS) confirming it on the display.
MODE
"1 DISC" mode:
II31SC
5DISCS
Shows the selected disc mode.
The unit will play a designated disc
only.
"5DISCS" mode: The unit will play all discs on the
tray in sequence.
[] Start play from the first track of the disc 1.
E::>
* if necessary, select a desired disc by using the DISC
SKIP buttons, or a DISC-select button on the front
panel.
<1 DISC £KLo_-
t
or ©
On the front panel
t
Play will automaticaUy start.
E-8
=inTo stop play temporarily
On the front panel
+ib resume play, press the button again (or press the
button).
* The _/_B button on the front panel can also be used to
stop play temporarily or to resume play.
=inTo stop play completely
On the front panel
inTo turn off the power
Press the POWER switch again.
On the front panel
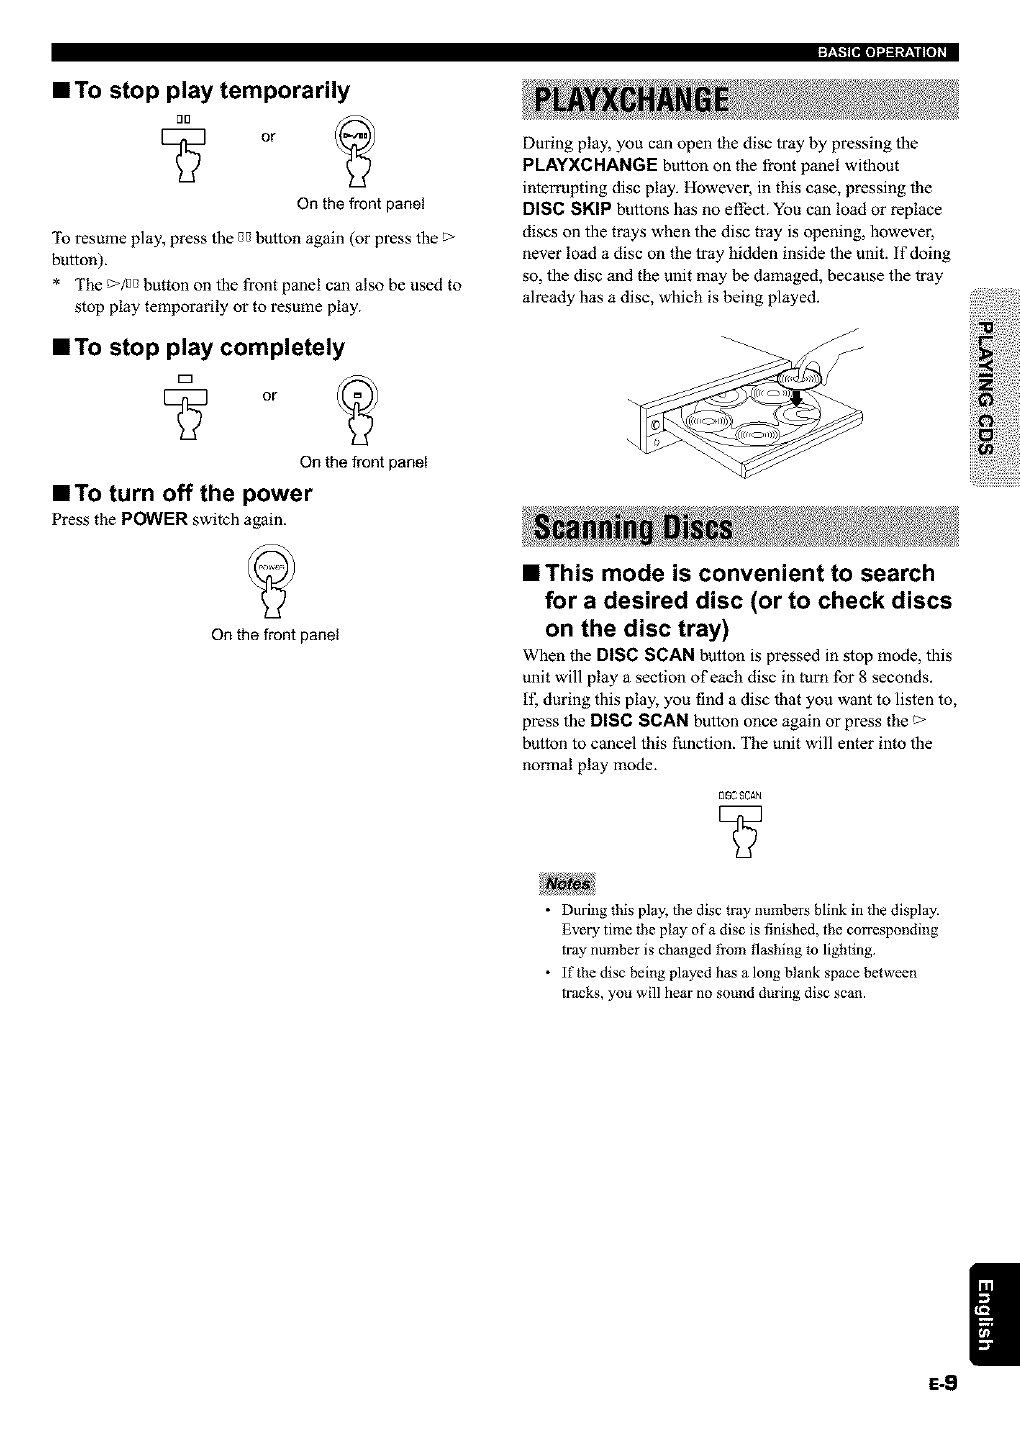
During play, you can open the disc tray by pressing the
PLAYXCHANGE button on the front panel without
interrupting disc play. Howevez, in this case, pressing the
DISC SKIP buttons has no effect. You can load or replace
discs on the trays when the disc tray is opening, however,
never load a disc on the tray hidden inside the unit. if doing
so, the disc and the unit may be damaged, because the tray
already has a disc, which is being played.
==This mode is convenient to search
for a desired disc (or to check discs
on the disc tray)
When the DISC SCAN button is pressed in stop mode, this
unit will play a section of each disc in turn for 8 seconds.
If, during this play, you find a disc that you want to listen to,
press the DISC SCAN button once again or press the
button to cancel this function. The unit will enter into the
normal play mode.
OISC$Cg+_1
• During this play, the disc tray numbers blink in the display.
Every time the play of a disc is finished, the corresponding
tray number is changed +i'omflashing to lighting+
• If the disc being played has a long blank space between
tracks, you will hear no sound during disc scan.
|
E-9
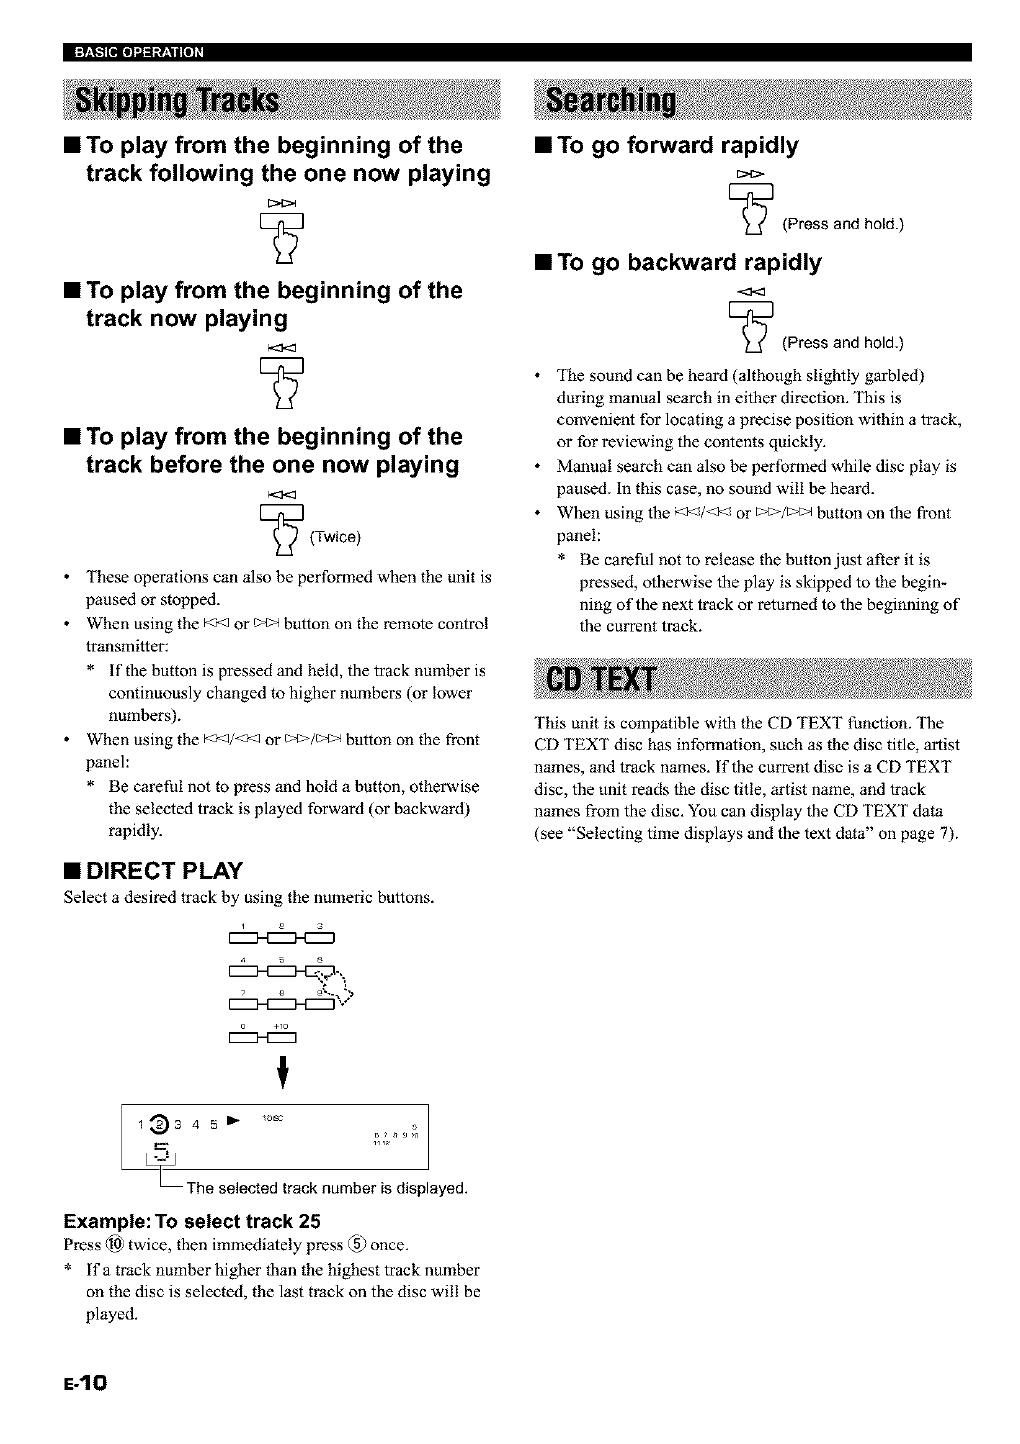
•To play from the beginning of the
track following the one now playing
•To play from the beginning of the
track now playing
•To play from the beginning of the
track before the one now playing
[_ (Twice)
• These operations can also be performed when the unit is
paused or stopped.
When using the _<1 or t>t_ button on the remote control
transmitter:
* If the button is pressed and held, the track number is
continuously changed to higher numbers (or lower
numbers).
When using the K<V<<1 or t>t>/t>t_ button on the front
panel:
* Be careful not to press and hold a button, otherwise
the selected track is played forward (or backward)
rapidly.
•DIRECT PLAY
Select a desired track by using the numeric buttons.
•To go forward rapidly
[_ (Press and hold.)
•To go backward rapidly
[_ (Press and hold,)
• The sound can be heard (although slightly garbled)
during manual search in either direction, This is
convenient for locating a precise position within a track,
or for reviewing the contents quickly,
• Manual search can also be performed while disc play is
paused In this case, no sound will be heard.
• When using the _:_<V<_<_or >_>/_ button on the front
panel:
* Be carethl not to release the button just after it is
pressed, otherwise the play is skipped to the begin-
nthg of the next track or returned to the beginning of
the current track.
This unit is compatible with the CD TEXT function. The
CD TEXT disc has information, such as the disc title, artist
names, and track names, if the current disc is a CD TEXT
disc, the unit reads the disc title, artist name, and track
names from the disc. You can display the CD TEXT data
(see "Selecting time displays and the text data" on page 7).
_xt
_The selected track number is displayed.
Example: To select track 25
Press @ twice, then immediately press @ once.
* if a track number higher than the highest track number
on the disc is selected, the last track on the disc will be
played.
E-IO
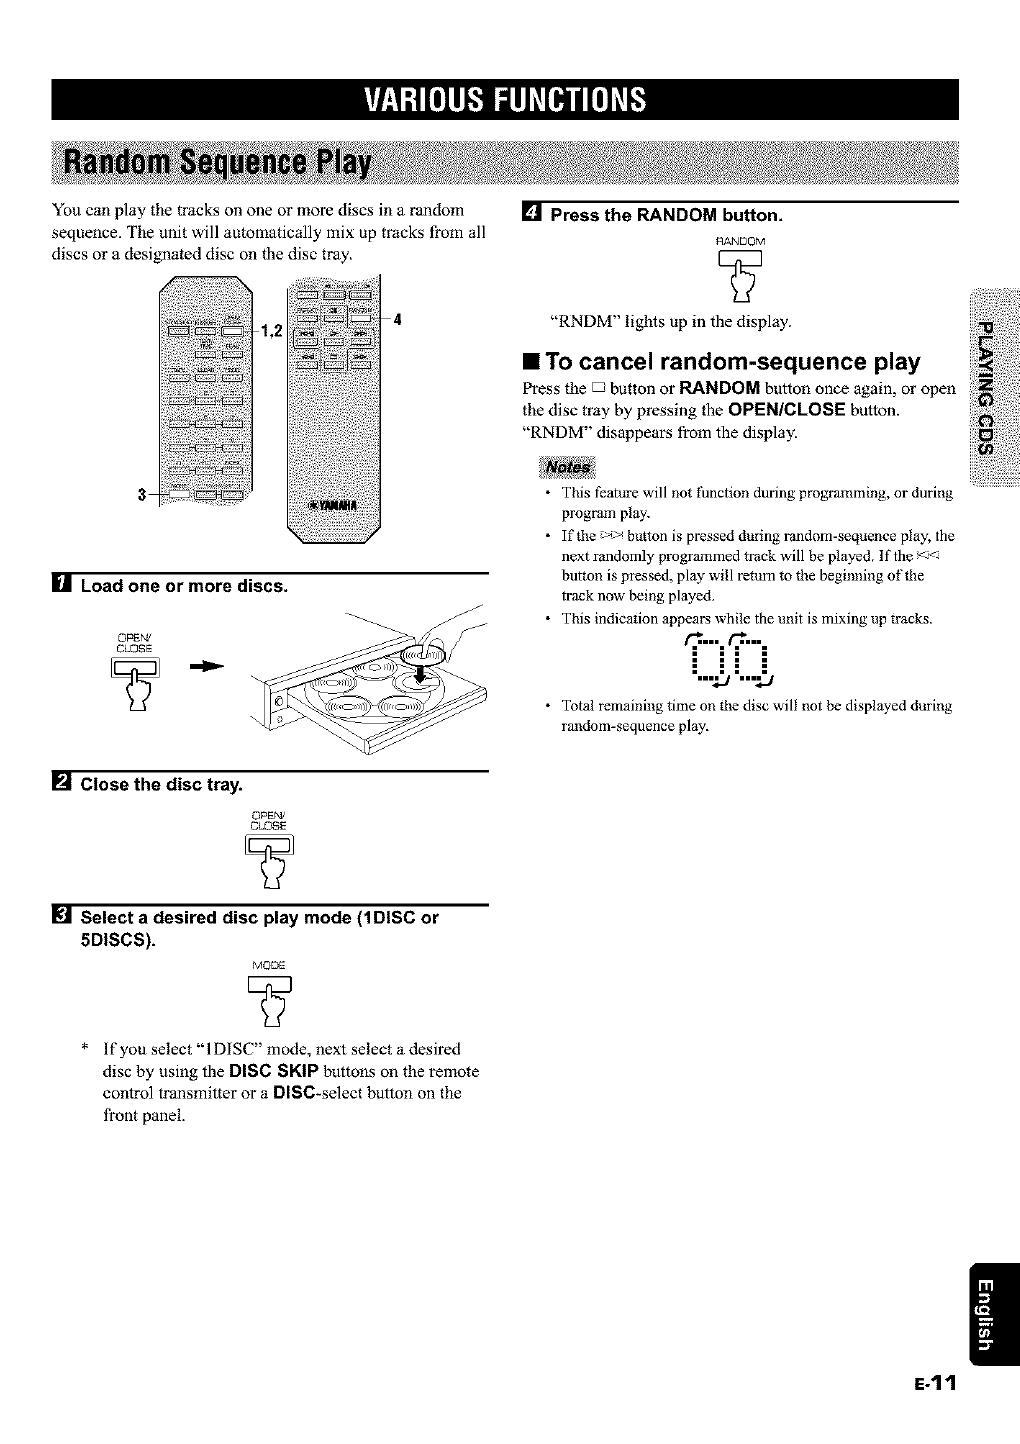
You can play the tracks on one or more discs in a random
sequence. The unit will automatically mix up tracks from all
discs or a designated disc on the disc tray,
_/I Load one or more discs.
OPEN/
CLOSE
[] Press the RANDOM button.
RANDOM
V
"RNDM" lights up in the display'.
==To cancel random-sequence play
Press the _ button or RANDOM button once again, or open
the disc tray by pressing the OPEN/CLOSE button.
"RNDM" disappears from the display.
• This feature will not function during programlning, or during
program play.
• If the _ button is pressed during randonl-sequence play, the
next randomly programmed tz_ck will be played. If the _<_:
buttot_ is pressed, play wire retmn to tile beginning of the
track now being played.
• This indication appears while the unit is mixing up tracks.
q...,q...,
!!!!
"""l.-/••"_..1
• Total remaining time on the disc will not be displayed during
random-Sequence play.
ii!i!ii!!ili!iiii;ii!i!ii!iii i;!
iii!! ii!i!ii! iii!ii i!!i
iiii!i:i
[] Close the disc tray.
OPEN/
CLOSE
Select a desired disc play mode (1DISC or
5DISCS).
MODE
V
* If you select "1 DISC" mode, next select a desired
disc by using the DISC SKIP buttons on the remote
control transmitter or a DISC*select button on the
front panel.
|
E-11
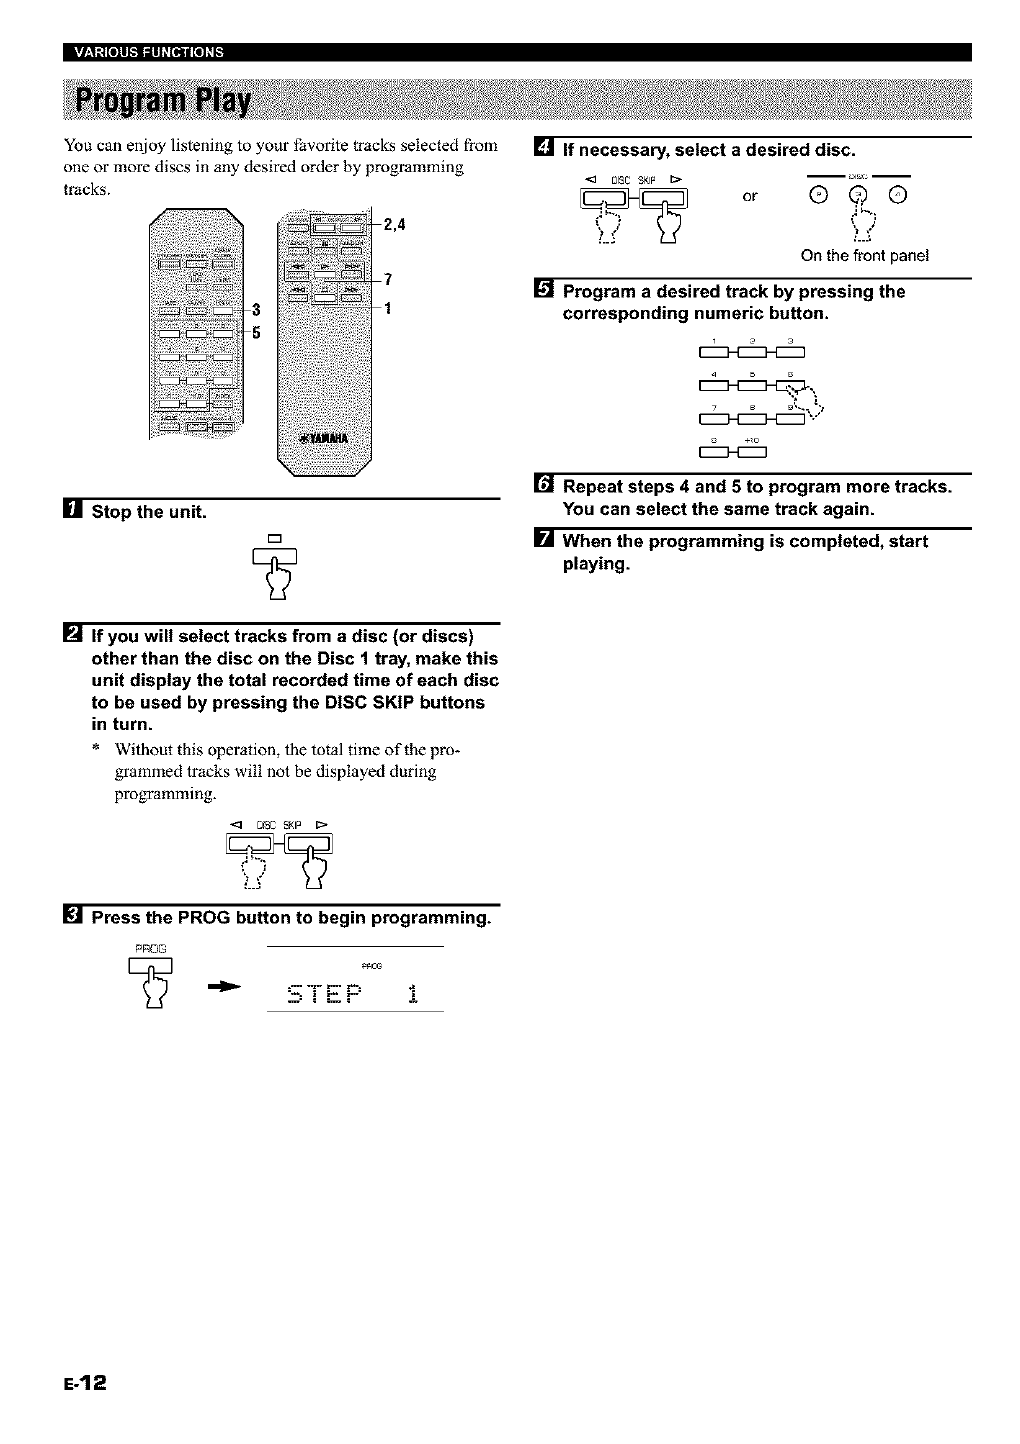
You can enjoy listening to your favorite tracks selected from
one or more discs in any desired order by programming
tracks.
2,4
7
1
[] If necessary, select a desired disc.
<3 O_C _IP I;>
On the front panel
[] Program a desired track by pressing the
corresponding numeric button.
.,s
[] Stop the unit.
D
PJ If you will select tracks from a disc (or discs)
other than the disc on the Disc 1 tray, make this
unit display the total recorded time of each disc
to be used by pressing the DISC SKIP buttons
in turn.
* Without this operation, the total time of the pro*
grammed tracks will not be displayed during
programming.
Press the PROG button to begin programming.
PROG
4
[] Repeat steps 4and 5 to program more tracks.
You can select the same track again.
IrA When the programming is completed, start
playing.
E-12
v.'1t,ltO]l hlilll +[II 111| +I-
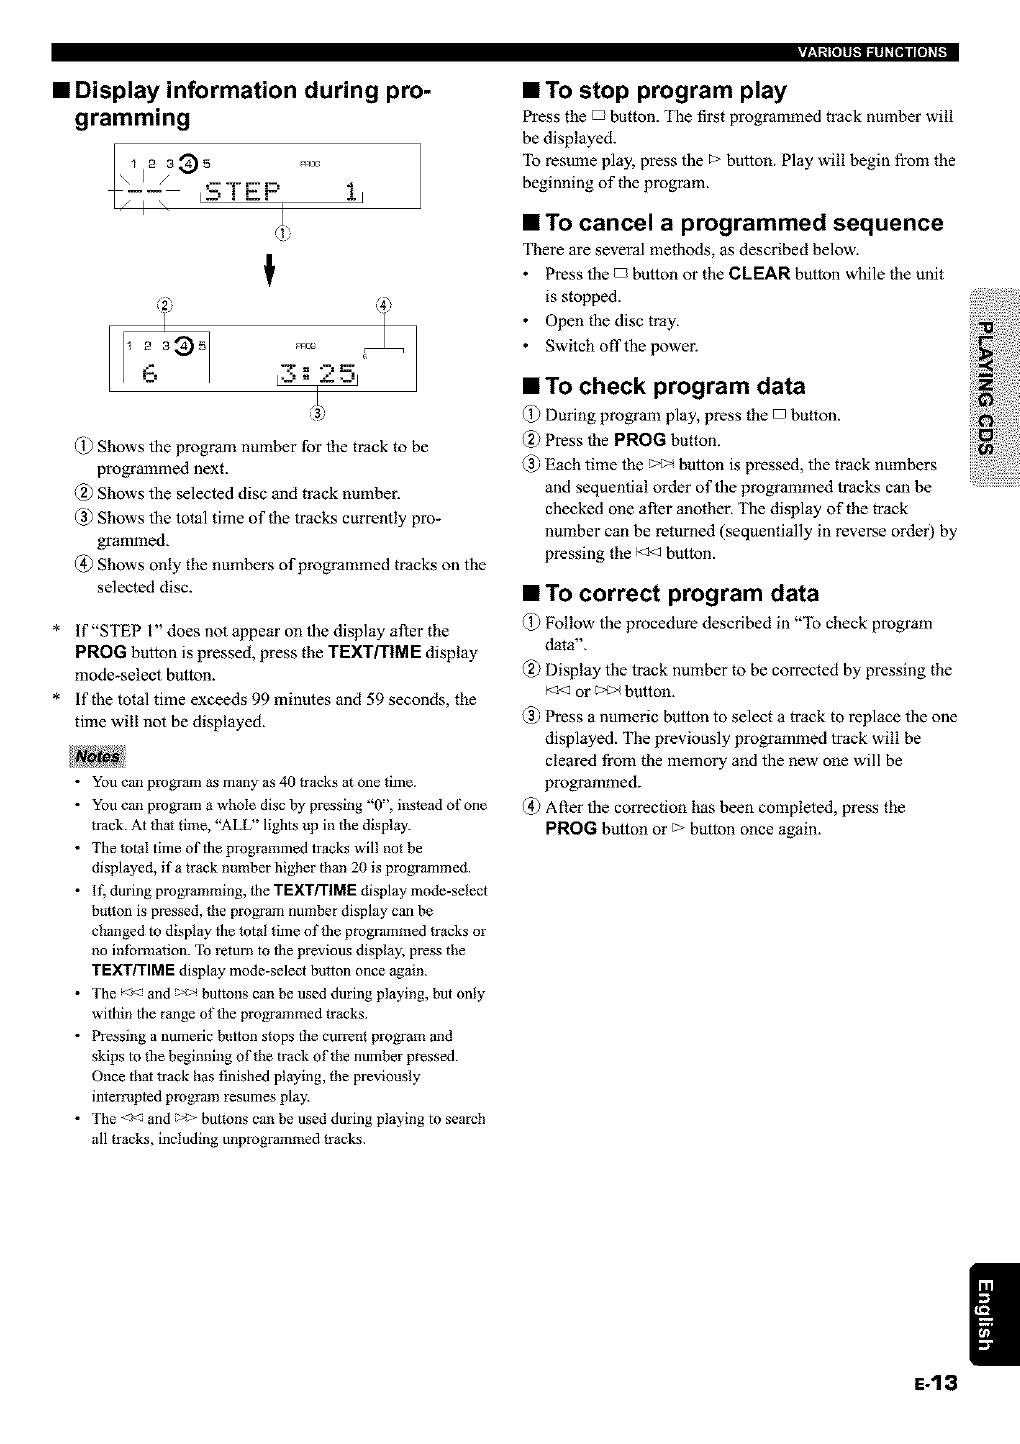
•Display information during pro-
gramming
1 2 a _ 5 _Ro
XJ_/ c:.-r_p
_1 \ I..... !1
!
PR_ L
G
@ Shows the program number for the track to be
programmed next.
@ Shows the selected disc and track number.
@ Shows the total time of the tracks currently pro+
grammed.
@ Shows only the numbers of programmed tracks on the
selected disc.
* If"STEP l" does not appear on the display afler the
PROG button is pressed, press the TEXT/TIME display
mode-select button.
* If the total time exceeds 99 minntes and 59 seconds, the
time will not be displayed.
•You can program as many as 40 tracks at one time.
• You can program a whole disc by pressing "0", instead of one
track. At that time, "ALL" lights up in the display.
• The total time of the programmed tracks will not be
displayed, if a track number higher than 20 is programmed.
• If, during programming, tbe TEXT/TIME display mode-select
button is pressed, the program number display can be
changed to display the total time of the programmed tracks or
no intbrmadon. To return to the previous display, press the
TEXT/TIME display mode-select button once again.
• The -_s<and _ buttons can be used during playing, but only
within the range of the programmed tracks.
• Pressing a numeric button stops the current program and
skips to the beginning of the track of the number pressed.
Once that track has finished playing, the previously
interrupted program resumes play.
• The --_<-and _ buttons can be used during playing to search
all tracks, including unprogrammed tracks.
•To stop program play
Press the D button. The first programmed track number will
be displayed.
To resume play, press the E>button. Play will begin from the
beginning of the program+
•To cancel a programmed sequence
There are several methods, as described below.
• Press the D button or the CLEAN button while the unit
is stopped.
• Open the disc tray.
• Switch off the power.
•To check program data
@ During program play, press the D button.
@ Press the PROG button.
@ Each time the c>_ button is pressed, the track numbers
and sequential order of the programmed tracks can be
checked one after another. The display of the track
number can be returned (sequentially in reverse order) by
pressing the K_ button.
•To correct program data
@ Follow the procedure described in "To check program
data",
@ Display the track number to be corrected by pressing the
K_ or _ button.
@ Press a numeric button to select a track to replace the one
displayed. The previously programmed track will be
cleared from the memory and the new one will be
programmed.
@ After the correction has been completed, press the
PROG button or E>button once again.
|
E-13
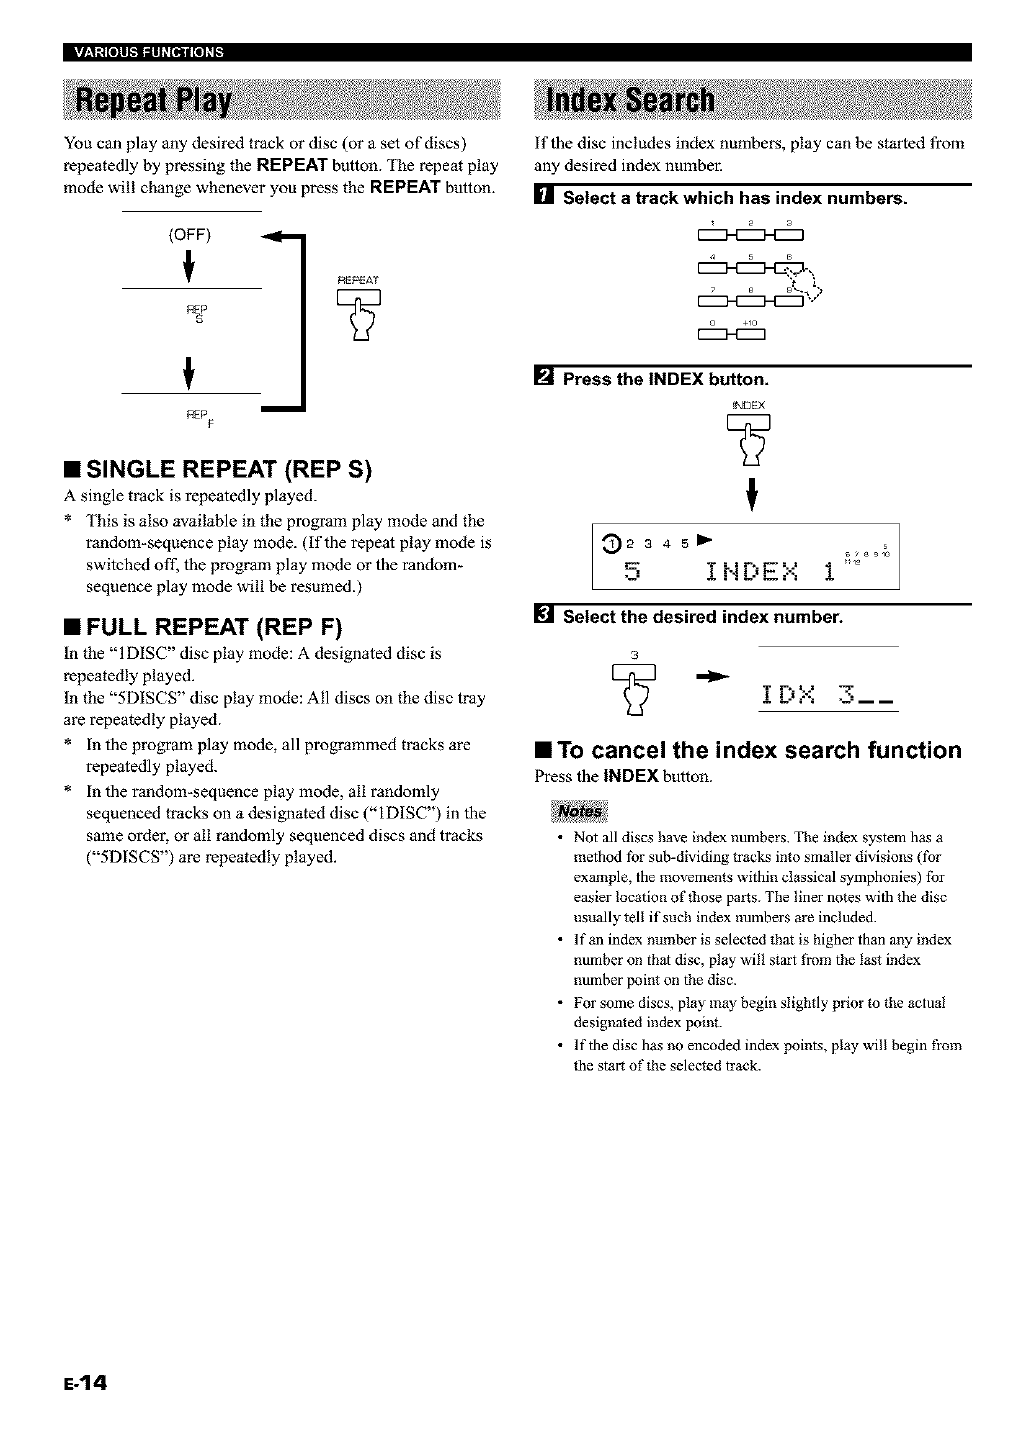
You can play any desired track or disc (or a set of discs)
repeatedly by pressing the REPEAT button. The repeat play
mode will change whenever you press the REPEAT button.
(OFF)
REPEAT
S
REP m
F
•SINGLE REPEAT (REP S)
A single track is repeatedly played.
* This is also available in the program play mode and the
random-sequence play mode. (If the repeat play mode is
switched off. the program play mode or the random-
sequence play mode will be resumed.)
•FULL REPEAT (REP F)
In the "1 DISC" disc play mode: A designated disc is
repeatedly played.
In the "5DISCS" disc play mode: All discs on the disc tray
are repeatedly played.
* in the program play mode, all programmed tracks are
repeatedly played.
* in the random-sequence play mode, all randomly
sequenced tracks on a designated disc ("IDISC") in the
same order, or all randomly sequenced discs and tracks
("5DISCS') are repeatedly played.
if the disc includes index numbers, play can be started from
any desired index numbel:
[] Select a track which has index numbers.
[] Press the INDEX button.
NDEX
V
!
_2 3 4 5 _1_"
I r-a!j_ :-:
ltJ Select the desired index number.
3
__. T_.."
_ L-'=.'= =-'=_ _
•To cancel the index search function
Press the INDEX button.
•Not all discs have index numbers. The index system has a
method for sub-dividing tracks into smaller divisions (for
example, the movements within classical symphonies) for
easier location of those parts. The liner notes with lhe disc
usually tell it"such index numbers are included.
• If an index number is selected that is higher than m_y index
number on that disc, play will start from the last index
number point on the disc.
• For some discs, play may begin slightly prior m the actual
designaled index point.
• If the disc has no encoded index points, play will begin fi'om
lhe start of the selected track.
E-14
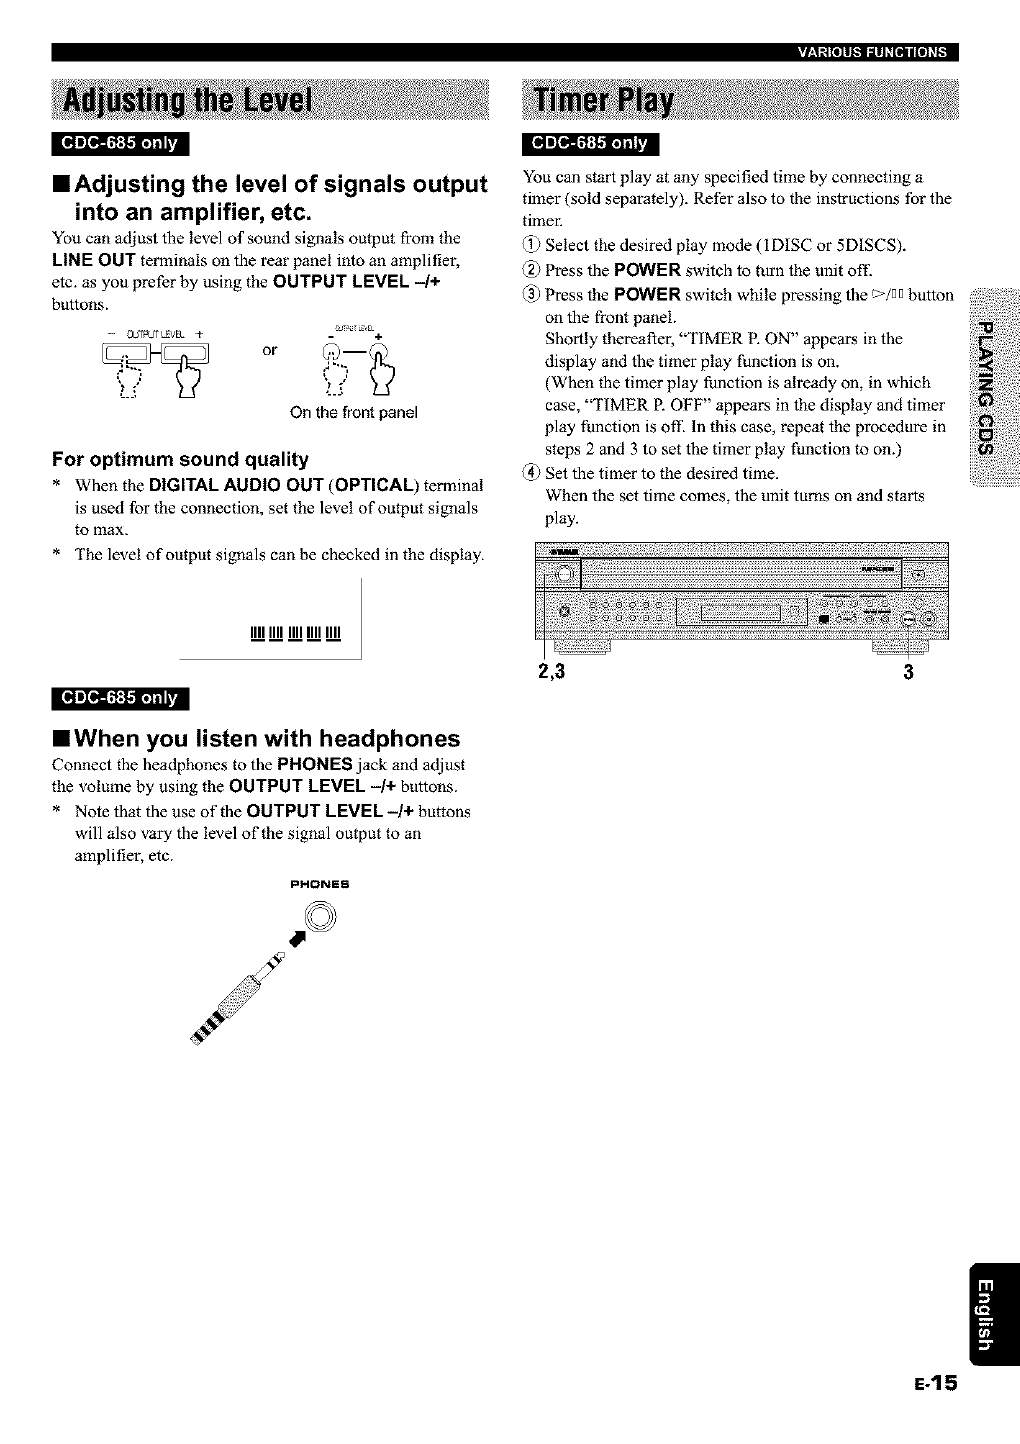
v:It+[O]lhllll+[lll[l]+l-
][e],I_]5,_:MI_ pj l[i] 'Ie]['_:_ '_2
==Adjusting the level of signals output
into an amplifier, etc.
You can adjust the level of sound signals output from the
LINE OUT terminals on the rear panel into an amplifier,
etc. as you prefer by using the OUTPUT LEVEL -/+
buttons.
- OUT_tJ_L_V_L + _+_ aE
or i!+7 _
On the front panel
For optimum sound quality
* When the DIGITAL AUDIO OUT (OPTICAL) terminal
is used for the connection, set the level of output signals
to max,
* The level of output signals can be checked in the display.
You can start play at any specified time by connecting a
timer (sold separately). Refer also to the instructions for the
timen
@ Select the desired play mode (ID[SC or 5DISCS).
@ Press the POWER switch to turn the unit off.
@ Press the POWER switch while pressing the _/00 button
on the front panel.
Shortly thereaftel, "TIMER R ON" appears in the
display and the timer play function is on.
(When the timer play function is already on, in which
case, "TIMER E OFF" appears in the display and timer
play function is off'. In this case, repeat the procedure in
steps 2 and 3 to set the timer play function to on.)
@ Set the timer to the desired time.
When the set time comes, the unit turns on and starts
play.
IIIIIIIIIIIIIIIIIIII
2,3
==When you listen with headphones
Connect the headphones to the PHONES jack and adjust
the volume by using the OUTPUT LEVEL -/+ buttons+
* Note that the use of the OUTPUT LEVEL-/+ buttons
will also vary the level of the signal output to an
amplifier, etc.
pI*It_NES
I
E-15
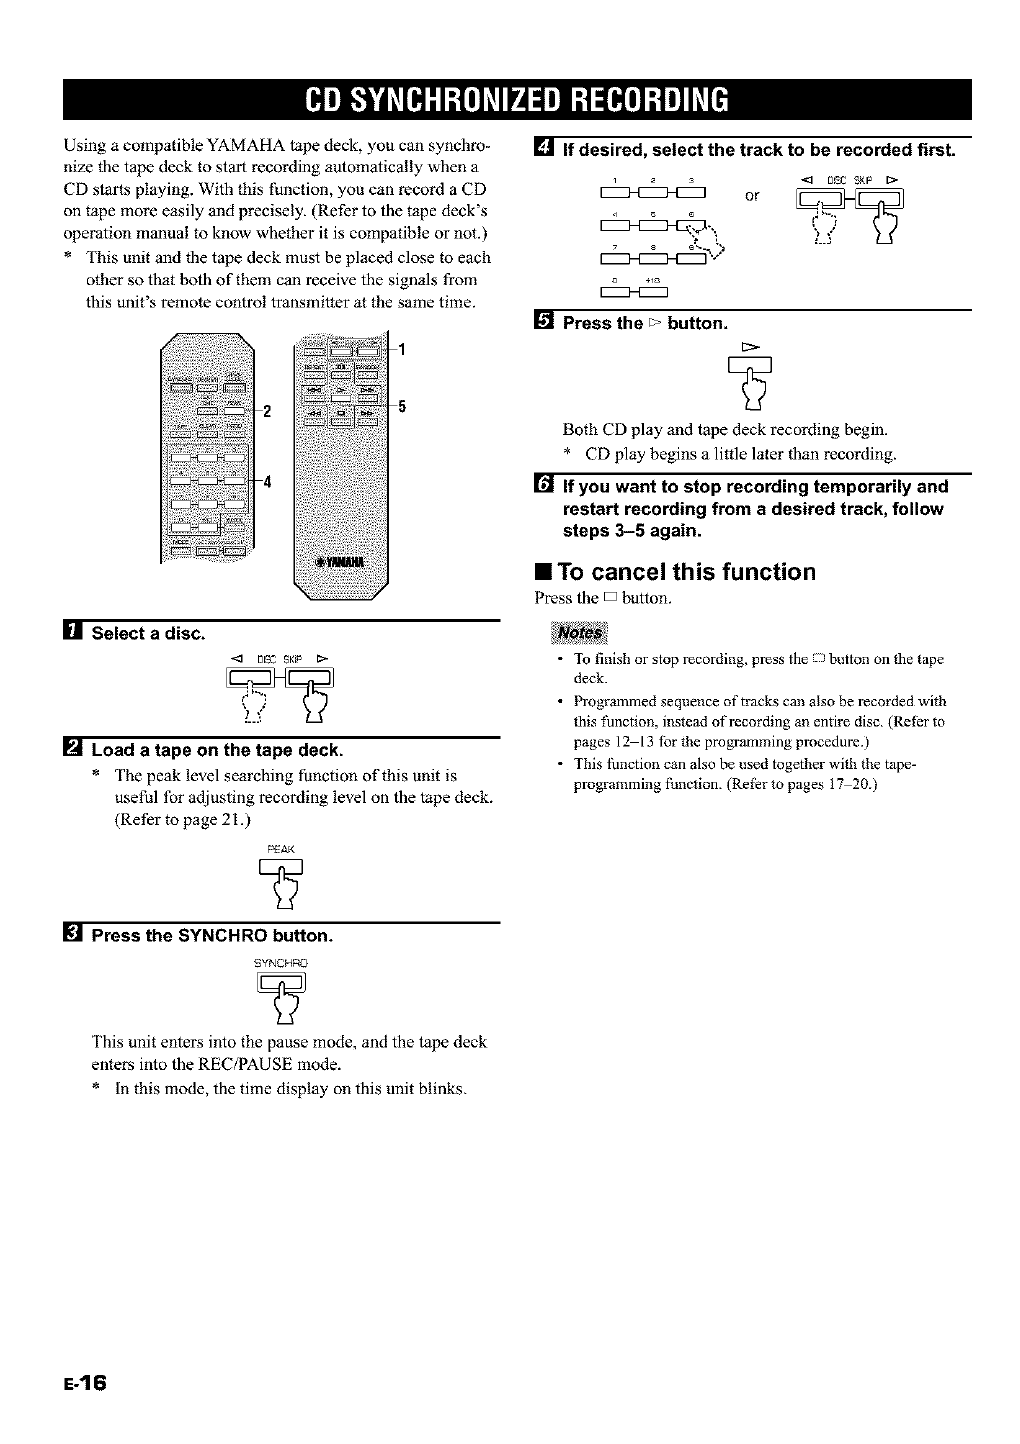
Using a compatible YAMAHA tape deck, you can synchro-
nize the tape deck to start recording automatically when a
CD starts playing. With this function, you can record a CD
on tape more easily and precisely. (Refer to the tape deck's
operation manual to know whether it is compatible or not.)
* This unit and the tape deck must be placed close to each
other so that both of them can receive the signals from
this unit's remote control transmitter at the same time.
1
U Select a disc.
<1 DISC SK_ _-
PJ Load a tape on the tape deck.
* The peak level searchthg function of this unit is
useful for adjusting recording level on the tape deck.
(Refer to page 21.)
PEAK
Press the SYNCHRO button.
SYNCHRO
This unit enters into the pause mode, and the tape deck
enters into the REC_AUSE mode.
* In this mode, the time display on this unit blinks.
[] If desired, select the track to be recorded first.
[] Press the _ button.
[::>
Both CD play and tape deck recording begin.
* CD play begins a little later than recording.
[] If you want to stop recording temporarily and
restart recording from a desired track, follow
steps 3-5 again.
IITo cancel this function
Press the D button.
•]b finish or stop recording, press the button on the tape
deck.
•Programmed sequence of tracks can also be recorded with
this thnction, instead of recording an entire disc. (Refer to
pages 12 13 thr the programming procedure.)
• This thnction can also be used together with the tape-
programming function. (ReI_r to pages 17 20.)
E-16
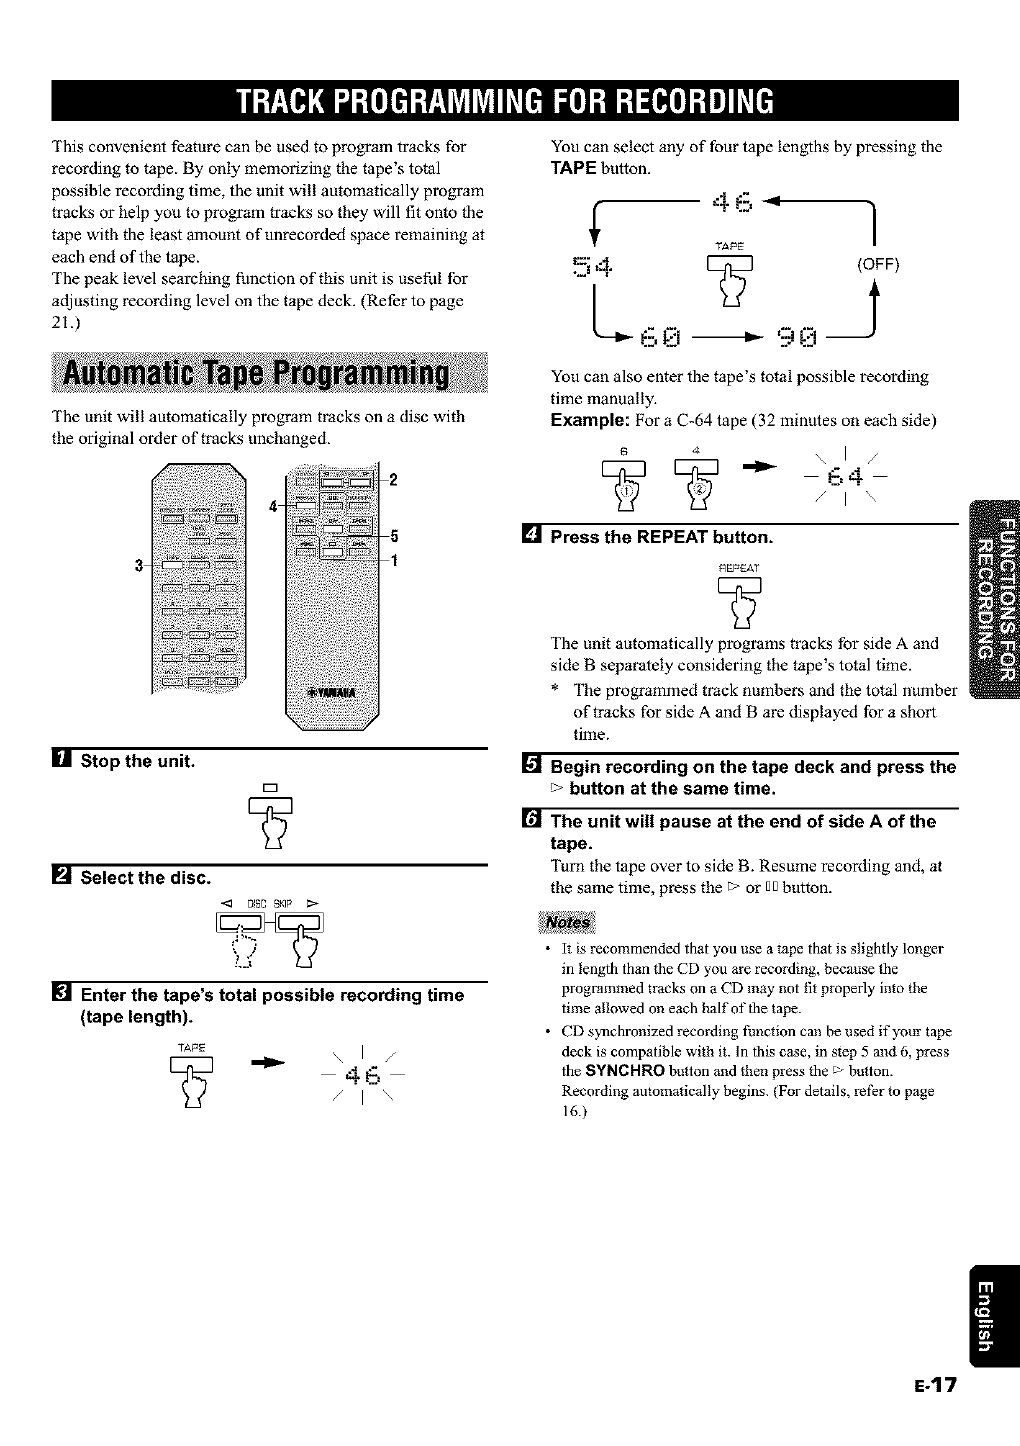
This convenient feature can be used to program tracks for
recording to tape. By only memorizing the tape's total
possible recording time, the unit will automatically program
tracks or help you to program tracks so they will fit onto the
tape with the least amount of unrecorded space remaining at
each end of the tape.
The peak level searching function of this unit is useful for
adjusting recording level on the tape deck. (Refer to page
21.)
The unit will automatically program tracks on a disc with
the original order of tracks unchanged.
4
3
_/I Stop the unit.
E_
PJ Select the disc.
<_ 01SC _IP ;>
[] Enter the tape's total possible recording time
(tape length).
TAPE
[_ _ \ I /
4E,
/I \
You can select any of four tape lengths by pressing the
TAPE button.
4. 6 1
TAPE
_ _. _ 5F)
You can also enter the tape's total possible recording
time manually.
Example: For a C-64 tape (32 minutes on each side)
/i'\
[] Press the REPEAT button.
REPEAT
The unit automatically programs tracks for side A and
side B separately considering the tape's total time.
* The programmed track numbers and the total number
of tracks for side A and B are displayed for a short
time.
[] Begin recording on the tape deck and press the
button at the same time.
[] The unit will pause at the end of side A of the
tape.
Turn the tape over to side B. Resume recording and, at
the same time, press the _ or uubutton.
•It is recommended that you use a tape that is slightly longer
in length than the CD you are recording, because the
programmed tracks on a CD may not fit properly into the
time allowed on each half of the tape.
•CD s?qachronized recording function can be used if your tape
deck is compatible with it. In this ca_e, in step 5 a_d 6, press
the SYNCHNO button and then press the _ button.
Recording automatically begins. (For details, refer to page
16.)
|
E-17
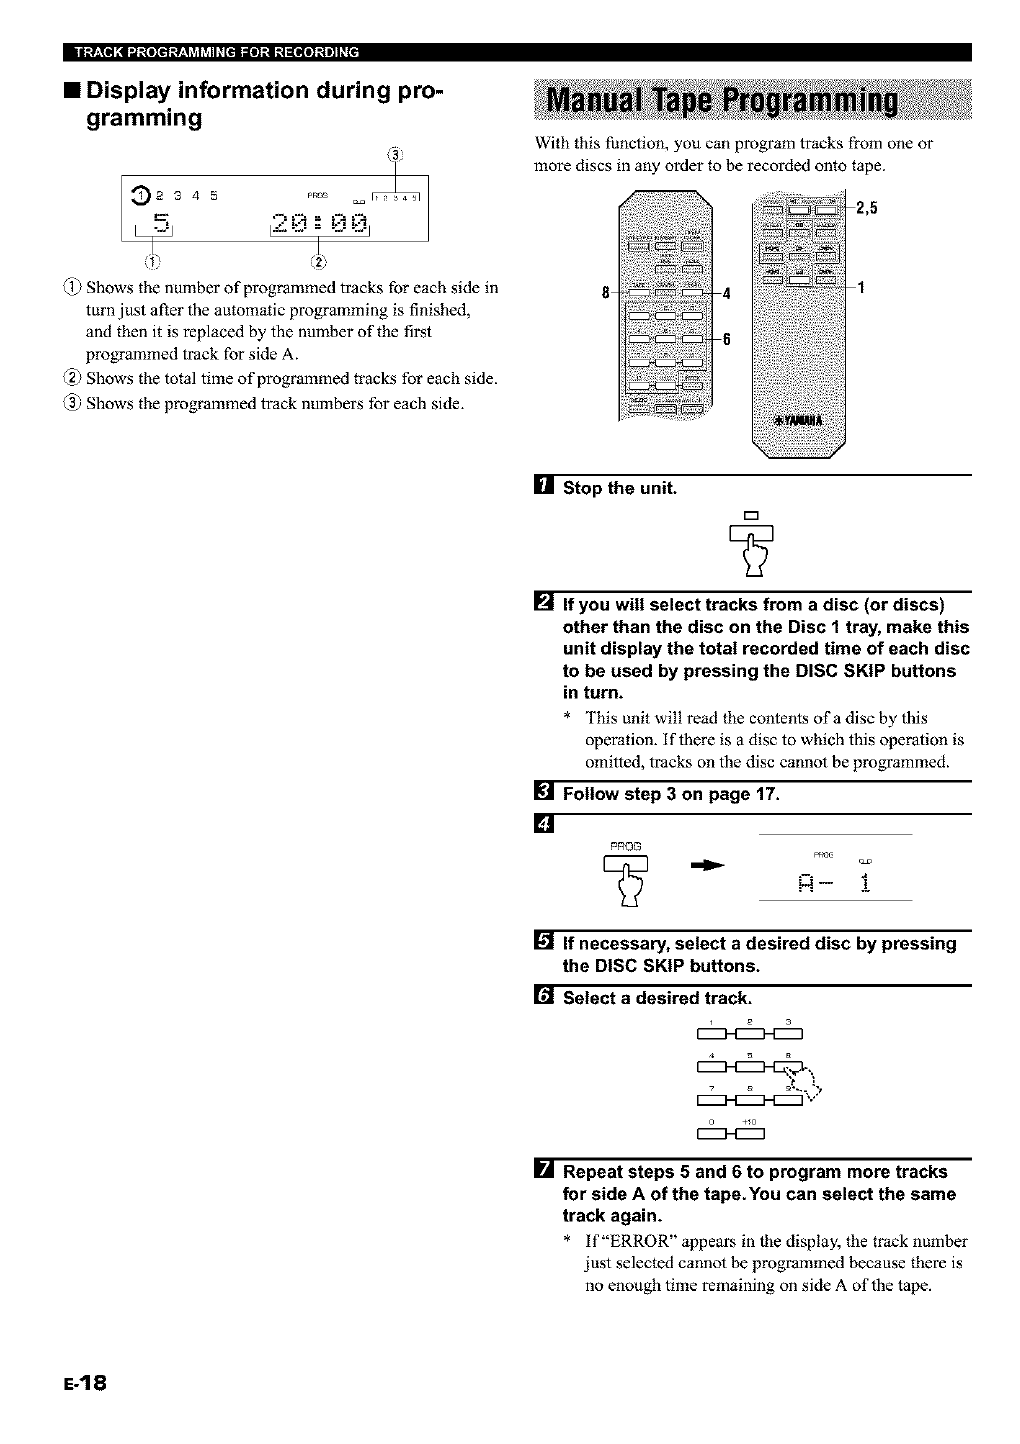
•Display information during pro-
gramming
(3)
345
120 :
@ Shows the number of programmed tracks for each side in
turn just after the automatic programming is finished,
and then it is replaced by the number of the first
programmed track for side A.
0) Shows the total time of programmed tracks for each side.
@ Shows the programmed track numbers for each side.
With this function, you can program tracks from one or
more discs in any order to be recorded onto tape.
2,5
4 t
6
[] Stop the unit.
D
PJ If you will select tracks from a disc (or discs)
other than the disc on the Disc 1 tray, make this
unit display the total recorded time of each disc
to be used by pressing the DISC SKIP buttons
in turn.
* This unit will read the contents of a disc by this
operation, if there is a disc to which this operation is
omitted, tracks on the disc cannot be programmed.
Follow step 3 on page 17.
[]
PROG
.q- 1
_1 If necessary, select a desired disc by pressing
the DISC SKIP buttons.
[,1 Select a desired track.
IrA Repeat steps 5 and 6 to program more tracks
for side A of the tape.You can select the same
track again.
* if "ERROR" appears in the display, the track nunther
just selected cannot be programmed because there is
no enough time remaining on side A of the tape.
E-18
WhenyoufinishtheprogrammingforsideA,
programthepausemodebypressingtheTAPE
button.
TAPE
* "PAUSE" lights up in the display, and after then you
can begin programming for side B.
I_ Repeat steps 5 and 6 to program more tracks
for side B of the tape.
You can select the same track again.
* If "ERROR" appears in the display, the track number
just selected cannot be programmed because there is
no enough time remaining on side B of the tape.
[] Start recording on the tape deck and press the
_> button at the same time.
[] The unit will pause at the end of side A of the
tape.Turn the tape over to side B. Resume
recording and, at the same time, press the _> or
DDbutton.
•In steps 7 and 9, even if "ERROR" appears in the display, you
can program another track of which time is shorter than the
remaining time on the side of the tape. At this time, if any
other track number lighta up in the display, you can program
it.
• CD synchronized recording thncfion can be used if your tape
deck is compatible with it.
In this case, in steps 10 and l l, press the SYNCHRO button
madthen press the > button. Recording automatically begins.
(For details, refbr to page 16.)
Notes on tape programming
Ib check, cancel or correct program data, refer to page
13.
The maximum number of tracks that can be programmed
is 40. if, however, the PAUSE mode is inserted, it is
counted as one track.
This function can be used to program up to track number
20. if the disc has more than 20 tracks, tracks with track
number 21 and higher cannot be programmed.
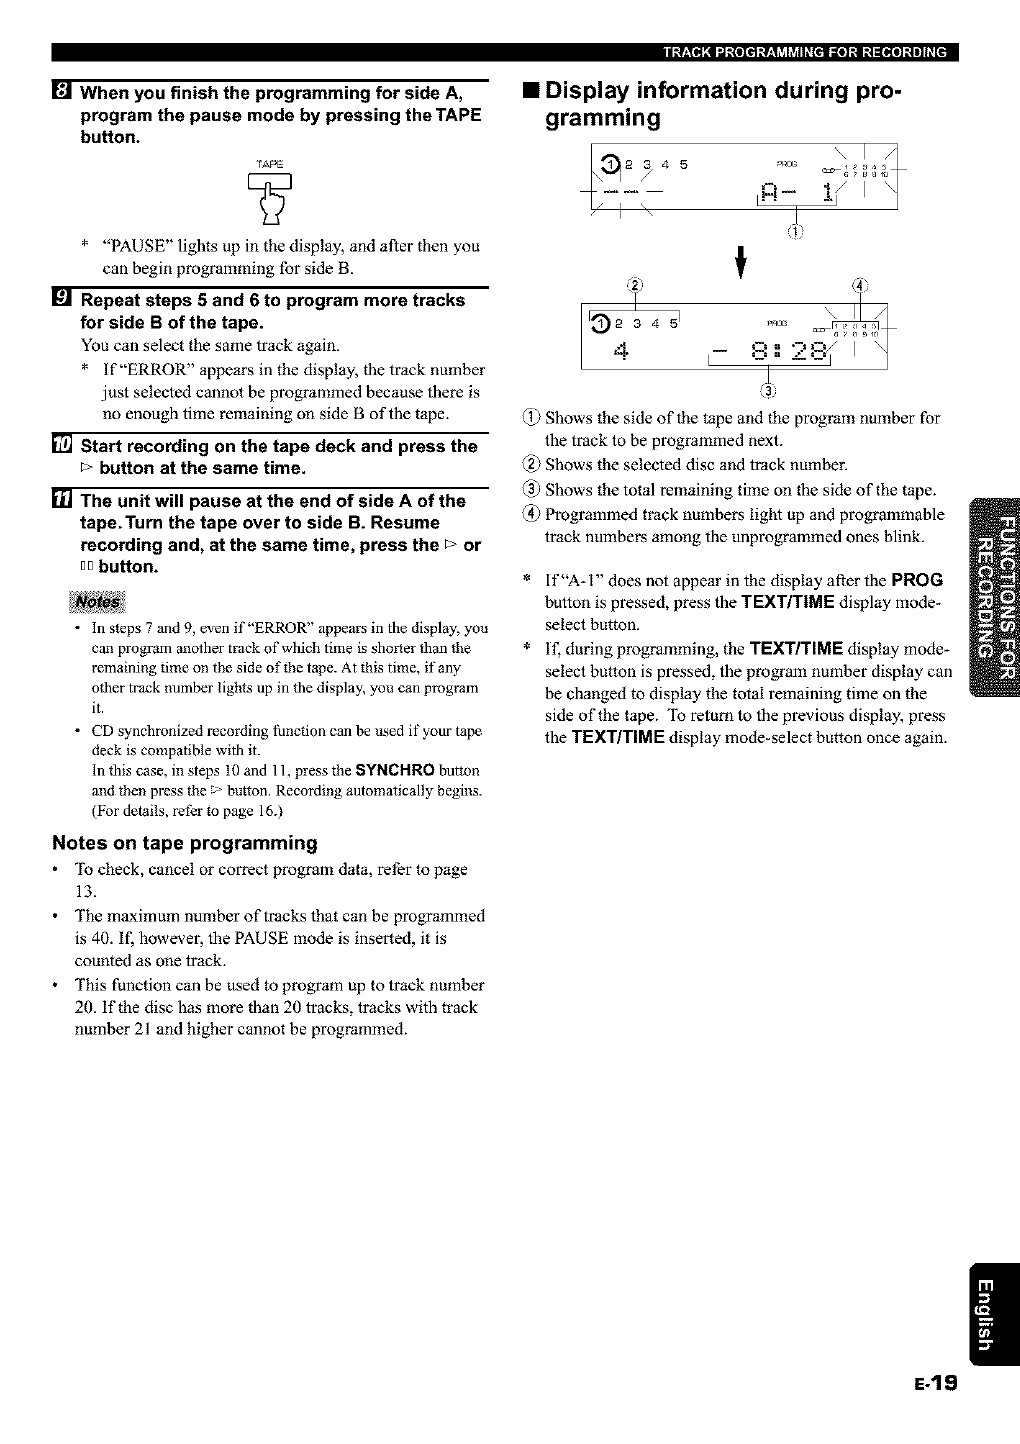
•Display information during pro-
gramming
iwT
@ Shows the side of the tape and the program number for
the track to be programmed next.
@ Shows the selected disc and track number.
@ Shows the total remaining time on the side of the tape.
@ Programmed track numbers light up and programmable
track numbers among the unprogrammed ones blink.
if "A-I" does not appear in the display after the PROG
button is pressed, press the TEXT/TIME display mode-
select button.
if, during programming, the TEXT/TIME display mode-
select button is pressed, the program number display can
be changed to display the total remaining time on the
side of the tape. To return to the previous display, press
the TEXT/TIME display mode-select button once again.
|
E-19
The unit will automatically program tracks on a disc in
random sequential order for recording to tape.
2
3
ill Follow steps 1 - 3 on page 17.
PJ Press the RANDOM button.
RANDOM
V
The unit will automatically program tracks for side A
and side B separately considering the tape's total time.
* The programmed track numbers and the total number
of tracks for side A and B are displayed for a short
time.
[] Start recording on the tape deck and press the
button at the same time.
"P.JThe unit will pause at the end of side A of the
tape.
Turn the tape over to side B. Resume recording and, at
the same time, press the _ or 00 button.
•Because the programmed data changes eve1T time the
RANDOM button is pressed, the amount of time remaining
at the end of the tape also changes accordingly.
• It is recommended that you use a tape that is slightly longer
in length than tile CD you are recording, because the
programmed tracks on a CD may not fit properly into the
time allowed on each half of the tape.
• CD synchronized recording function can be used if your tape
deck is compatible with it.
In this case, in steps 3 and 4, press the SYNCHRO button
mid then press the _ button. Recording automatically begins.
(For details, refer to page 16.)
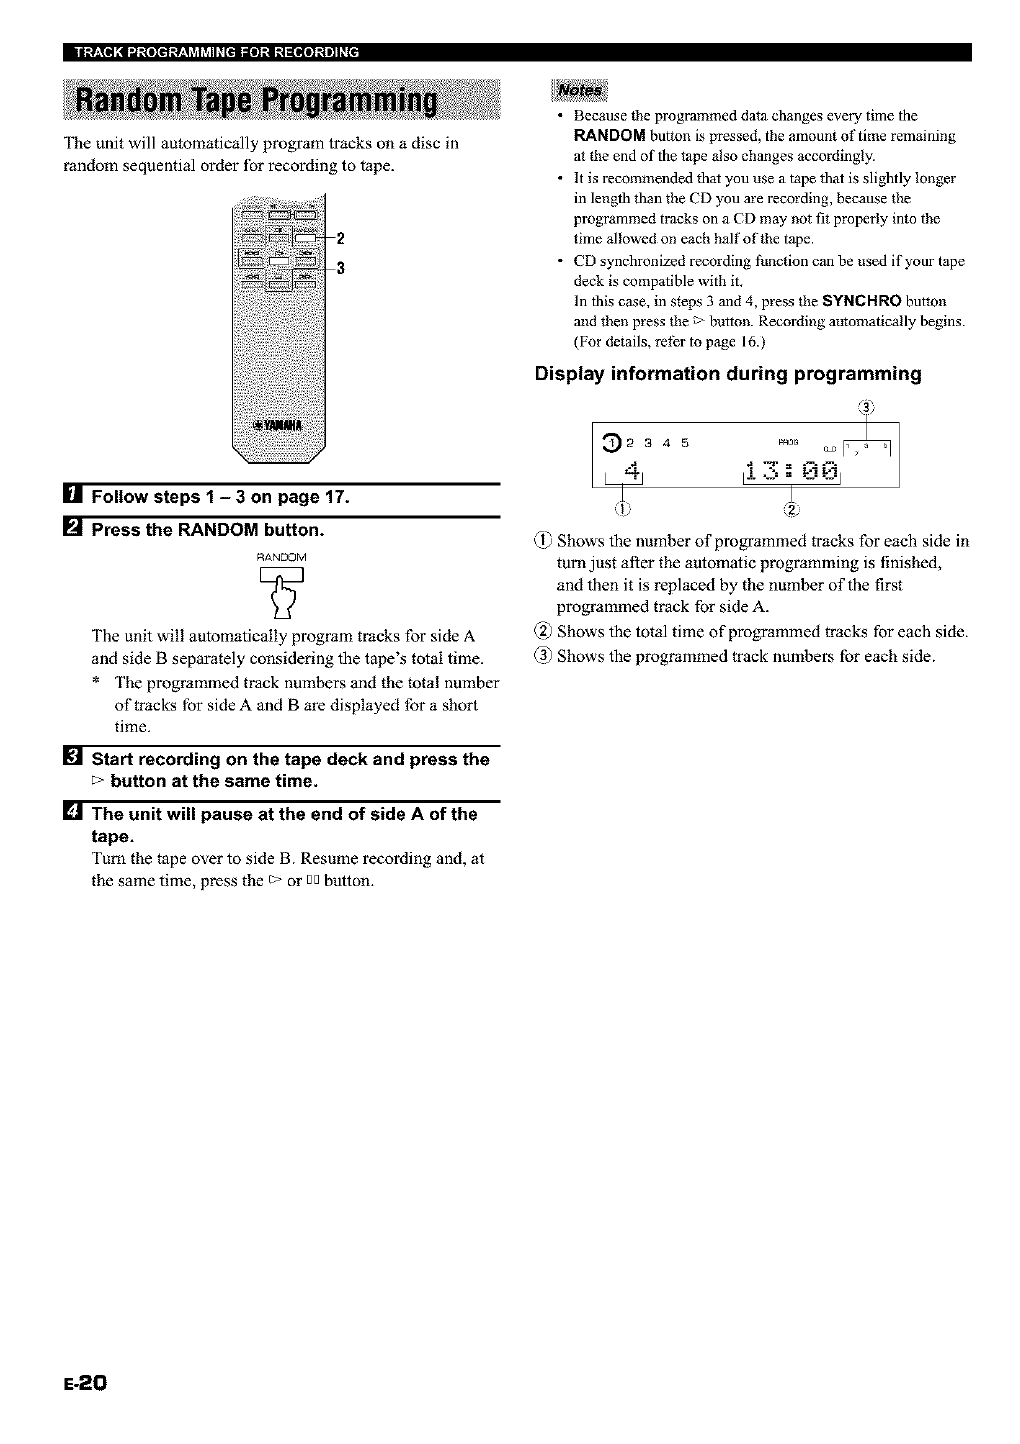
Display information during programming
(I) Shows the number of programmed tracks for each side in
turn just after the automatic programming is finished,
and then it is replaced by the number of the first
programmed track for side A.
@ Shows the total time of programmed tracks for each side.
@ Shows the programmed track numbers for each side.
E-20
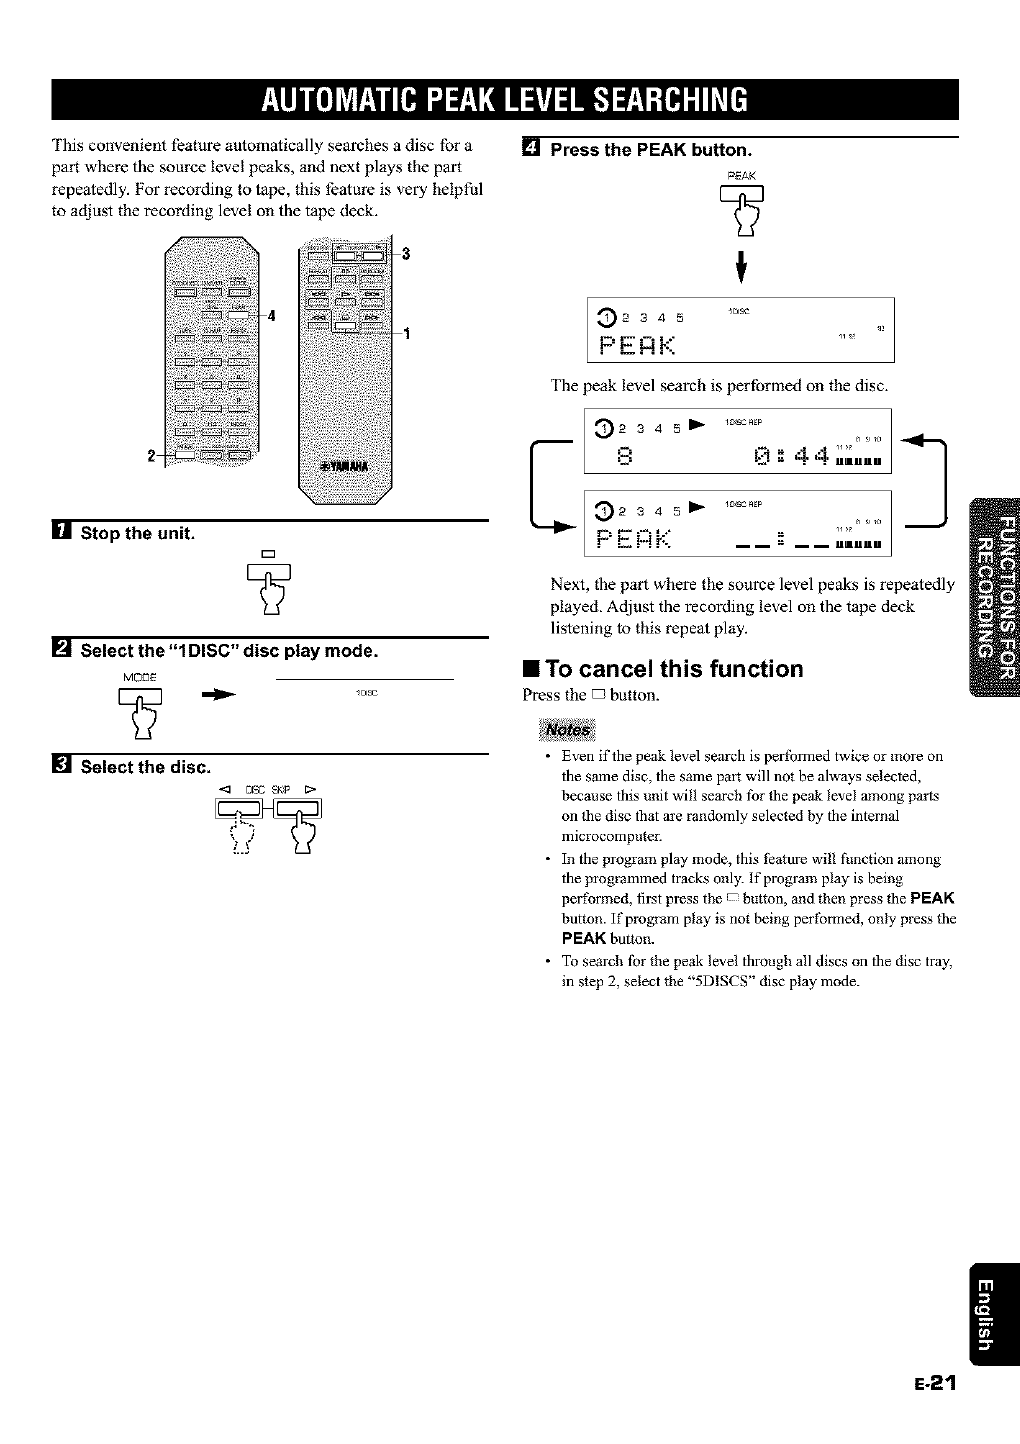
This convenient feature automatically searches a disc for a
part where the source level peaks, aart next plays the part
repeatedly. For recording to tape, this feature is very helpful
to adjust the recording level on the tape deck.
3
2
U Stop the unit.
D
[] Select the "1DISC" disc play mode.
MODE
E_ _ o,_
[] Select the disc.
<I o1% SKP (>
[] Press the PEAK button.
PEAK
t
_2 3 4 5 o,sc
P" L H F-.
The peak level search is performed on the disc.
_2 3 4 5 I_
"LHF-.
/_EP
=_= . . IIIEIIII U
/_ REp
11 [
Next, the part where the source level peaks is repeatedly
played. Adjust the recording level on the tape deck
listening to this repeat play.
IITo cancel this function
Press the _ button.
•Even if the peak level search is pertbimed twice or more on
the same disc, the same pair will not be always selected,
because this unit will search for the peak level among parts
on the disc that are randomly selected by the internal
microcomputer.
• In the program play mode, this feature will function among
the progiammed tracks only. If program play is being
peithrmed, first press the button, and then press the PEAK
button. If pmgiam play is not being pertbimed, only press the
PEAK button.
• To search for the peak level through all discs on the disc tray,
in step 2, select the "5DISCS" disc play mode.
|
E-21
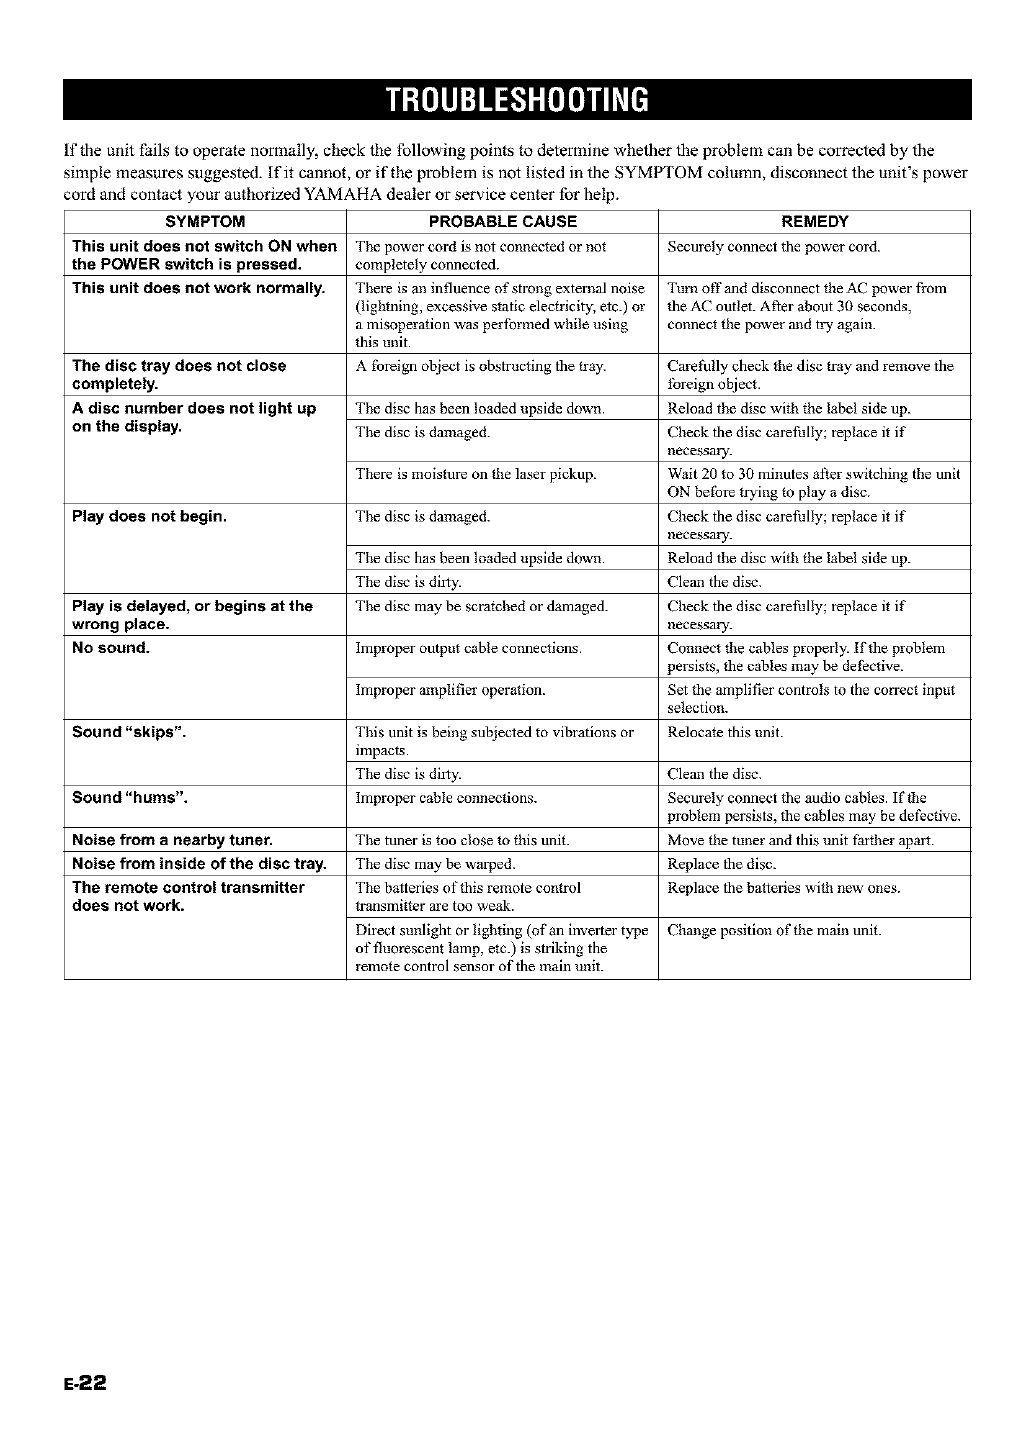
If the unit fails to operate normally, check the following points to determine whether the problem can be corrected by the
simple measures suggested. If it cannot, or if the problem is not listed in the SYMPTOM column, disconnect the unit's power
cord and contact your authorized YAMAHA dealer or service center for help.
SYMPTOM PROBABLE CAUSE REMEDY
This unit does not switch ON when Securely connect the power cord.
the POWER switch is pressed.
This unit does not work normally. Turn off and disconnect tile AC power from
the AC outlet. After about 30 seconds,
connect the power and O2¢again.
The disc tray does not close
completely.
A disc number does not light up
on the display.
Play does not begin.
Play is delayed, or begins at the
wrong place.
No sound.
Sound "skips".
Sound "hums".
Noise from a nearby tuner.
Noise from inside of the disc tray.
The remote control transmitter
does not work.
The power cord is not connected or not
completely connected.
There is an influence of strong external noise
(lightning, excessive static electricity, etc.) or
a misopera{ion was perthrmed while using
this unit.
A tbreign object is obstructing the tray.
The disc has been loaded upside down.
The disc is damaged.
There is moisture on tile laser pickup.
The disc is damaged.
The disc has been loaded upside down.
The disc is dirty.
The disc may be scratched or damaged.
Improper output cable connections.
Improper amplifier operation.
This unit is being subjected to vibrations or
impacts.
The disc is dirty.
Improper cable connections.
The tuner is too close to this unit.
The disc may be warped.
The batteries of this remote control
transmitter are too weak.
Direct sunlight or lighting (of an inverter type
of fluorescent lamp, etc.) is striking the
remote control sensor of the main unit.
Carethlly check tile disc tray and remove the
tbreign object.
Reload the disc with the label side up.
Check the disc carefully; replace it if
necessary.
Wait 20 to 30 minutes alter switching the unit
ON befbre t_ying tn play a disc.
Check the disc carefully; replace it if
necessary.
Reload the disc with the label side up.
Clean the disc.
Check the disc carefully; replace it if
necessary.
Connect the cables properly. If the problem
persists, the cables may be defective.
Set the amplifier controls to the correct input
selection.
Relocate this unit.
Clean the disc.
Securely connect the audio cables. If the
problem persists, the cables may be defective.
Move the tuner and this unit f_er apmt.
Replace the disc.
Replace the batteries with new ones.
Change position of the main unit.
E-22
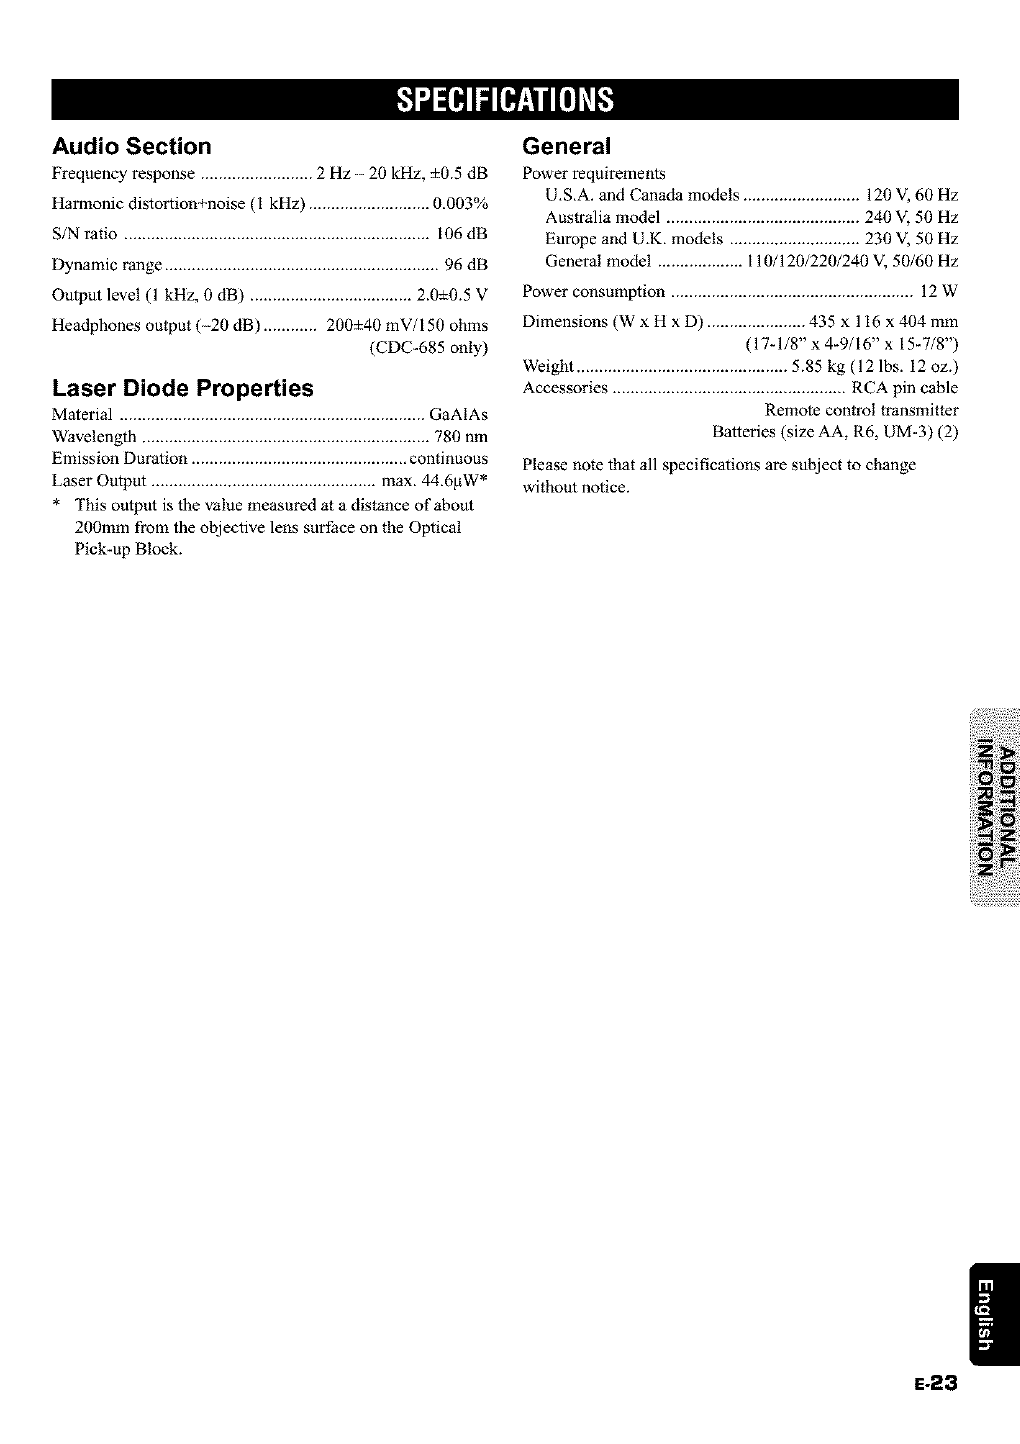
Audio Section
Frequency response ......................... 2 Hz 20 kHz, ±0.5 dB
Harmonic distortion+noise (I kHz) ........................... 0.003%
S/N ratio .................................................................... 106 dB
Dynamic range ............................................................. 96 dB
Output level (1 kHz, 0 dB) .................................... 2.0±0.5 V
Headphones output (-20 dB) ............ 200±40 mV/150 ohms
(CDC-685 only)
Laser Diode Properties
Material .................................................................... GaAIAs
Wavelength ................................................................ 780 nm
Emission Duration ................................................ continuous
Laser Output .................................................. max. 44.6_W*
* This output is the value measured at a distance of about
200mm from the objective lens surface on the Optical
Pick-up Block.
General
Power requirements
U.S.A. and Canada models .......................... 120 V, 60 Hz
Australia model ........................................... 240 V, 50 Hz
Europe and U.K. models ............................. 230 V,50 Hz
General model ................... I 10/120/220/240 V, 50/60 Hz
Power consumption ...................................................... 12 W
Dimensions (W x H x D) ...................... 435 x 116 x 404 mm
(17-1/8" x 4-9116" x 15-7/8")
Weight ............................................... 5.85 kg (12 lbs. 12 oz.)
Accessories .................................................... RCA pin cable
Remote control transmitter
Batteries (size AA, R6, UM-3) (2)
Please note that all specifications are subject to change
without notice.
!i;iiii!{:;i!i!_!i!;;!;{iiii!il;i!:iii!iiiii!i!)i_i:f;!_!
!i!iiii;i;!i_i_iiiiii!!i
|
E-23
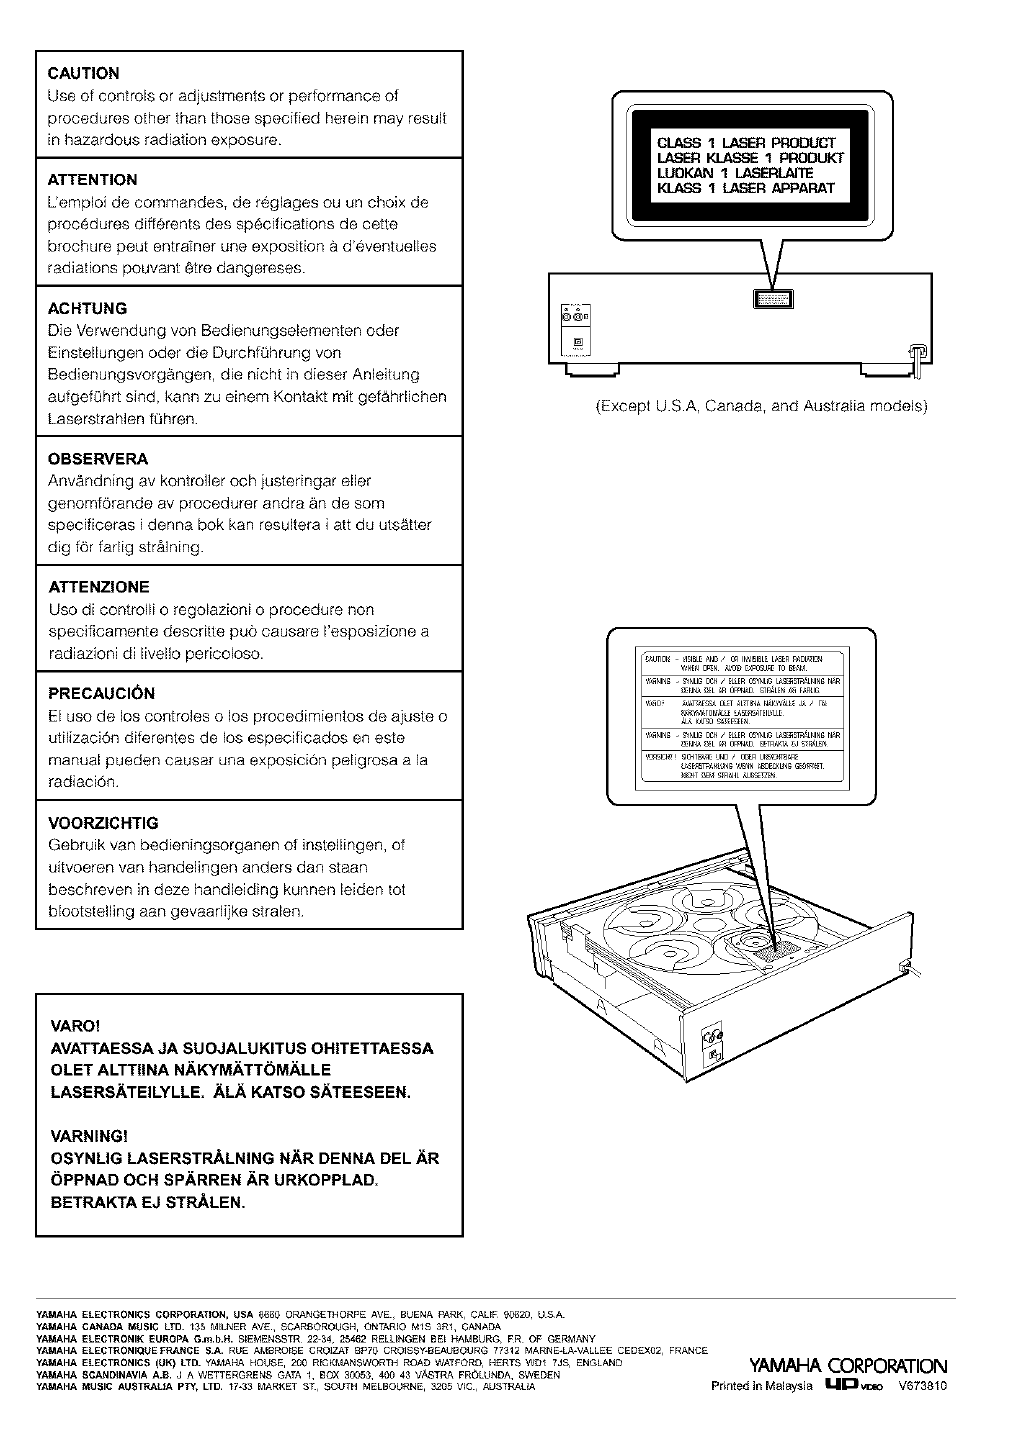
CAUTION
Use of controls or adjustments or performance of
)rocedures other than those specified herein may result
in hazardous radiation exposure
ATTENTION
L'emploi de commandes, de reglages ou un choix de
)roc6dures differents des specifications de cette
brochure peut entrainer une exposition a d'6ventuelles
radiations pouvant ¢tre dangereses.
ACHTUNG
Die Verwendung yon Bedienungselementen oder
Einstellungen oder die DurchfOhrung von
Bedienungsvorg_ngen, die nicht in dieser Anleitung
aufgefOhrt sind, kann zu einem Kontakt mit gefAhdichen
Laserstrahlen fQhren
OBSERVERA
Anv&ndning av kontroller och justeringar eller
genomfOrande av procedurer andra &n de som
specificeras i denna bok kan resultera i att du uts&tter
dig for fadig str&lning.
ATTENZIONE
Uso di controlli o regolazioni o procedure non
specificamente descritte pub causare I'esposizione a
radiazioni di livello pericoloso.
PRECAUCI_)N
El uso de los controles o los procedimientos de ajuste o
utilizaciOn diferentes de los especificados en este
manual pueden causar una exposici6n peligrosa a la
radiaci6n
VOORZICHTIG
Gebruik van bedieningsorganen of instellingen, of
uitvoeren van handelingen anders dan staan
beschreven in deze handleiding kunnen leiden tot
blootstelfing aan gevaarlijke stralen
(Except US.A, Canada, and Australia models)
_rqlN6 _ S_NtlG_:,4 /_ER CSYtqt_ L_,SE_ST_tNIN6N_
_0_ _Ar_% _ _ _tTT_q_N_'q_ _ / _
VARO!
AVATTAESSA JA SUOJALUKITUS OHITETTAESSA
OLET ALTTIINA N_.KYMh.TT_M_*LLE
LASERS.ATEILYLLE..AL_. KATSO S_.TEESEEN.
VARNING?
OSYNMG LASERSTRALNING Nh.R DENNA DEL h.R
OPPNAD OCH SPh.RREN AR URKOPPLAD.
BETRAKTA EJ STRALEN.
YAMAHA ELECTRONICS CORPORATION, USA 6680 ORANGETHORPE AVE, BUENA PARK, CALVE 90620 USA
YAMAHA CANAOA MUSIC LTD. 135 M_LNER AVE, SCARSOROUGH, ONTARIO MIS 3R1, CANADA
YAMAHA ELECTRONIK EUROPA G.m.b.lL S_EMENSSTR 22-34, 25462 RELL_NGEN BE_ HAMBURG_ RR OF GERMANY
YAMAHA ELECTRONIQI}EFRANCE S.A. RUE AMSRO_SE CROIZAT 8P70 CROISS'_BEAUBOURG 77312 MARNE-L_VALLEE CEDEXO2_ FRANCE
YAMAHA ELECTRONICS (UK} ITD" YAMAHA HO_SE' 200 RICKMANSWORTH ROAD WATFORO' H_RTS W_ 7JS' ENGLAND YAMAHACORPORATION
YAMAHA SCANDINAVIA A._. J A WETTERGRENS GATA 1, BOX 30053, 400 43 V,_STP_ FROLUNDA, SWEDEN
YAMAHA MgSIC AU$]RALIA P_f, LTD. 17-33 MARKET S_, SOUTH MELBOURNE, 3205 VIC, AUSTP_LIA Pnnted in Malaysia I IIl"11wceo V673810
