Yamaha DVR S120 User Manual HOME THEATER Manuals And Guides L0401021
YAMAHA Home Theatre Manual L0401021 YAMAHA Home Theatre Owner's Manual, YAMAHA Home Theatre installation guides
User Manual: Yamaha DVR-S120 DVR-S120 YAMAHA HOME THEATER - Manuals and Guides View the owners manual for your YAMAHA HOME THEATER #DVRS120. Home:Electronics Parts:Yamaha Parts:Yamaha HOME THEATER Manual
Open the PDF directly: View PDF ![]() .
.
Page Count: 114 [warning: Documents this large are best viewed by clicking the View PDF Link!]
IYAMAHA
DVD HOMETHEATER SOUND SYSTEM
DVX-S120
(DVR-S120+NX-S120+NX-C120+NX-SW120)
XXX;XIIIIIIIIIIIIiiiii
DVD RECEIVER
DVR-S120
OWNER'S MANUAL
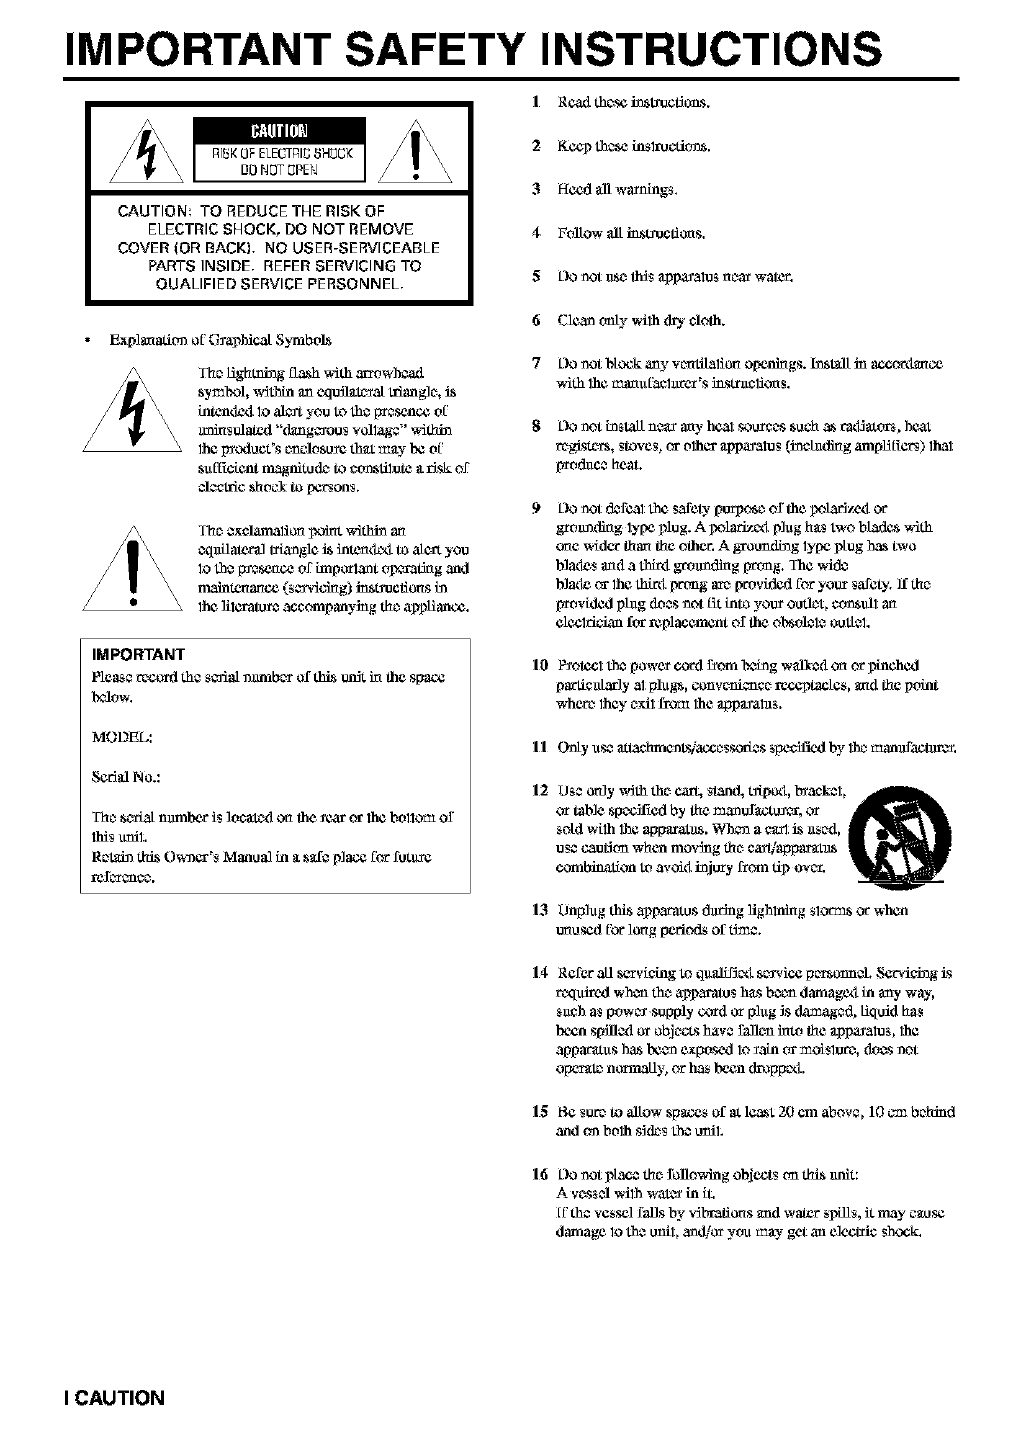
IMPORTANT SAFETY INSTRUCTIONS
IR¢_1 thc_sei_L_¢t_s.
I_I_II[L_I
R]_KOFELE_I_I_ 8HOCK
DO NOT0PEN
CAUTION TO REDUCE THE RISK OF
ELECTRIC SHOCK, DO NOT REMOVE
COVER (OR BACKL NO USER-SERVICEABLE
PAIn'S INSIDE, REFER SERVICING TO
QUALIFIED SERVICE PERSONNEL,
2K¢_ these insl_dt'rns.
3Hccd all warnings.
4FalLow all instructions.
5L)OnoLu$_ _$ _ppa_ato$ n_ar waJ_r,
Exp]maadt-,_of G_phicaL Symbois
Tha Hghming flash v,ith m_owhoa_1
$y_I',oi,_dth_ _Ln_[_1_a[ 11iang]o,is
intcnd_iIoa]_ youtotho_nc¢ of
m_a_l "d_ng_ou_ vo]lag¢"_Sthin
lhap_oduct'8¢nclo_u_ed_t _n_y_ of
_ufF_cfentmagnitu_ to¢o_atitot¢__Jskof
_J¢CL_cshocYtopctson_.
T'hc_excl_d_lio_ _7_xlt wit_ art
¢q1_[1_tor_ L_le is i;l_n<l¢_l to a[_ you
lo I_a,_[_e_no_ of inll)ork._nt o_Li_g _d
maimcna_c¢ (sca_dd_g)instn_cfio_sin
lhali1_at_ accompanying th_a_Hanc¢.
IMPORTANT
Pleaser_ord the sc_al number _f _s ,.m_L_ the .space
MODEL:
Scd_ No.:
T'hasc_a[ n_nhar is]ocatodon theyearor lhabollOm of
l]_sunil,
Re_in th_ Owner's Manual in _ s_e place forfuL_L_e
6 Clean only with (h_, cloth.
7L)Onot l_fock any v_tilatio_ opcn_gs, h_talL in accor_la_o_
_Sth lha_na_aClnrCr's i_sLr_cliCas.
L]Onot i_ SL011nea_ ar(y heal SOU_'_S_u_h as P,_atol'b _hc_t
regi,$t_'$, Stove$_ ca"olhq_" _ppayatos (in¢ f_(ting ampHE_ers) 1hal
_d_ce heal.
Do notdofCaltheSafetyp_po_ ofthe_o]_rJy_iOr
_o_n_g lyp¢plug.A _olar_i pingh_stwo blades_Jth
one widertha_theother.A _u_1_ng lyp¢plug_ two
b]ad¢_mada thaigro_nd_g prong.]he wid¢
bladeorlhathi_iprongar¢Wovfdcdforyour_afety.]£th_
_vfdcd p_ doe8not_ intoyouroud¢_ ¢o_su11a_
elcclrLianforreplacementoftheol_ole1_outiel.
10 P_oiccl the power cord _som treing walked o_ or pinched
partictdzx]y al Nlugs, conveniencc_ receptacles, mad the point
where they _xil frea_ 1he appaXal_s.
II Onty use attaehm_Ls]accessor[e8 specifietl b v 1ha _,anufactur_.
12 USe ordy _dth th_ car_ stand, rapport,byaekel,
or table sFecL_ed by the mantffacto_er, or
sold w_lh 1he ap0aratus. Wh_n a ¢g0 is _s_d,
u_e cau_tm when mov_g th_ ego_ap0ar_tus
combination to avokt injory from _ over.
13 Unplug Lhis appara_8 dtuSng lighlni_g $1_ o_ when
ur_usedJ_ot"10r_gperiods of ti_ae.
14 Refer a_ servf¢ingtoqu_if]_is_,ice p_onn_. Serviehag is
_,q _'1 when th_ appm-at_ s hasbeechdamagett in any way,
s_¢h as power .supply co_xl or phtg is (ismaged_ liquid has
been 8pilled or obj _'_s have fallen hato the _ppa_atos_ 1ha
apparatus has been exposed lo _ain or moi_lure, doe8 not
operate norma_y_ or has been (h_p0et_.
15 Be sur_ to allow sFaces of at leaat 20 cm above, 10 _m behind
anti on both s](_s the o!liL
16 Oo not place the following objects on this trait:
A vessel With wal_ in fL
ff the vessd fan8 by v_braiio_8 am1water spi11_,it may cause
damage lo the unil_ anchor you _y get an electric _hock_
I CAUTION
FCCINFORMATION(for UScustomers)
]. II_fPORTANT NOTICE : DO NOT MODIfY'THIS
UNIT!
Ilfis _roclu ¢%wben installed as bid_cal_d in the bistra_ions
ModW_cafi(-msno1 e_pressLv approved by Yamaha may void
your aathoiity, grantcxl by 1h¢I_CC,to usa the pfcalucL
2. II_fPORTANT :
When cccmecting this [_dn¢l to ac_cssofies an_or another
_lu _'tuse onlyhighquality_li_d_dcahJes.Cahk'4s
*u]_li_ with this[_,rodnclM[JST _ u_L FOllOWall
instollaficci inslr_cfions. Fallm-¢ to follow instructions ¢oaM
void yourFCC authcaJzafi( -mto use _s _lu¢_ inthe USA.
3. NOTE :
This _oro_lucLhas bc_rt 1,_tcdanti folmd to comply _4th the
rcqukc_nt_ l_steclin I_CC R_galafio_s, Pa_ 15 for Clf_ss
"B" dtgitfd devices. Compliance v,iththese requircmen_s
_vi_Les a reasonable kwel of assurance lhat yoar ase of Ibis
_lucx ina rc_sidcntial cnviromnent _il] not rcsatt in harmful
interference _dth oth_ clec_o_icde_Aces.
II'ds eqaipme_t gcncraWsi_scs radio fxx_qucn_cs an€i, if no1
installed and u$¢fl acco_ling 1_ the _$tracliort$ fourt¢l in lh¢
asc*s manual, may cause iat_thrc_ce hm-mful 1_ the
O_X_afi_-m of othc_r ¢1e¢1_¢ de,does.
Compliance _ithFCC _Jgakafio_s does not guarantee lhat
biterthrencc will not occm_ in all iusto31ations. If lbi$ pfcxlt;or 1$
found to be lh¢ source of bitc_thtvacc, which can be dctermincM
by lurning the unit "OFF" and "ON", p]case try.to cFminate the
problem by using one of the followkig mca_m-cs:
R_[ocal_ _lth_ this proda¢l o_the device that is b_ing affecLod
by lh¢ inl_rf_¢e.
Utilize f_owcr outlets l_al ar_ ca dig_l b_anch (circuit breaker
or f_._) circth_s o_ inst 011AC line fill_r!s.
In the c_e of rml_o or TV interf_¢nce, re]ocat¢./_caJcnt the
antenna. ]_ the anl_nna lead in is 300 ohm ribbon P'_ad,change
thc ["_d mto ¢_ ty_ cah]e.
ff tbesa ¢ofr¢Clivc m¢_su_ do not produce salisfaClory resulLs,
please contact lh¢ thcal r_ail_ aothod_l to th_tfibuL_ ffds lyp¢
of _dacl. ITyou can not thcaw lhe _pI_opr_l_ _¢r, pl_f_
contact Yamaha Electrordcs Co_p., U.S.A. 6_0 Grangcthoyp¢
Ave, t_a_na Pa_k, CA 90_9.
The above sta_m_nl_ apply ONLY to those l_Oducts disbibeted
by Yamaha Corpo_afio_ of Arnica or i1_ sul"a_kliarics.
We Want You Listening For A Lifetime
YAMAHA ffft¢lthc_Eiectrordc bidll_tri¢$ Associalica'$ Ctm_u=m_r
E1¢C1_¢* C_'oup want you 10g_t thc_most out of your _thl_m_fl
by _a)dng _tat _ saC€]ex_. Onc that ]e_s lbe sou_¢l comc through
thad ariel clear without anno)4ng blaring or distortion - an€l, mo_t
importantly, wilhout aff¢Clbig your _c_gltive h_g.
Sbice h_g d,2mgtge from load sou_l_ is ofl_,_n
un¢lete_tab]e_ntilitis too ]at_,YAMAHA aml the
Electrordc thdustr[¢s Association's Consumcr
Electrordcs G_oup _c_ommerM you 1_ avokl pro[onge_l
/
CAUTION II
I Io _ssltre the fi_est perthrmance, ple&se*'_cadthis manual
car c_f_lly.Keep il iu a safe ptace for futo_ reference.
2histallllfissouridsysL2_ninaweltvc_atLlated, eoM, dey, atcan
placc_ with al least 10 cm on the top, 10 cm on the k-$1and rigM,
and 10 cm at the bacl or DVR S 120, and _3 em on 1he top, 20
_'mon the left and fight, and 20 cm at thc_back di' NX SW12P
-- away fl3ymt_t_ct sun_ghl, heal souxcc_s,vth_aliort, d.ugt,
moisture, and/or cold.
3 Locate 1hisunil away frtrm other O_¢M _ppl[._a]¢es,m01ot_,
or t_m_sfor_ers to avoid hummhig spreads.
4 DOnol expose Lhis unit to sndden temperate_ changes fro_
curl to hot, anti do nol locate this refit in _ environment with
high huzmidity (i.¢. a room with _thmlfidiFler) to [_fCwc_t
comk_safion hialde Ibisu_L which m_- cause an eleeLr[cal
shock, F_, t_gc_ lOthis unit, and]or personal inju3"y.
5Avcdd histaDing this unit where f_gn o_ect m_y fall onto
this urdt and]_ this urdt m_y he _xposetl Ioliqtfitl dripping or
splashing. Urnthc_top of tiffs uni L do not #ace:
Othor compon_nls, _s they may cause dmrfftge and]or
discoloration on the *u_face of this tufit.
Burning O_eCL_ (_.c. candies), as they :_ay cause Ytrc,
damage to this unit, and]or personal injury.
Conta_ac_rs with Hqukl hi them, _s they m_y f_dl anti Hqu]d
may cause C-3eCLTiC_shock Iolheuser anti]or t_tuage to
1histrail.
Do not cover tiffs unit with _tnewspa0or, lablccloth, curlatn, ete.
in order not lo obstsuct heat ratliation. 1_lhe tomp_atore hiskle
this urdt rises, it may cause ll_, t_tuage to lhisunil, and]o_
pc_s_mal hij_,.
7 Do no1 ping in _ unit to a wa_ outle_ until all cormecO_m_ _e
complete.
8 Do ROtOperate thiS unit upg(L_ down. 11Lt_tyoverheat, possibly
causing damage.
9 Do no1 use force on _dtohes, knobs and]or co_ls.
10 When dSscormec0ng the power ecaxl from the wall ontlet, grasp
the plug; do not pull the ecaxg
I] DOnot clean 1his unil wilh chemical solvent% 1hismight
damage the flrdsh. Use _ clean, d_,-cloth.
12 Only voltage spee'flied ori tiffs unit mnst he nsotLUsing ffds
unil with _.higher voltage than speffffied is dang-aou s anti may
cause fire, tMmage Iothis unit, and]or persorial injusy.
YAMAHA vail nol l_e head responsthl_ for any damage
_esulting frtrm use of this unit with avoltage other than
sdec_exl.
13 To prevenl tMmage by l_ghlning, 3iscormect lhe powc_ cord
6-ore the wall onllet dmSug an electrical ,torm.
14 Do not att_z_pl to modify or V_xtiffs trail.Contact q_a/llied
YAMAHA service personnat when any service is needed. The
eabhio¢ _hodid never be oponed for any reasons.
15 Wh_ not planning lOuse lhis unil for long pedo_Lsof time 0.e.
va_afitrn), disconneClthc_AC power plug from the walt outl_.
16 Bc_sate to _agl the "Solutions to Ccazmon Frobl_" sc_cfion
on common operalhig errm bcr_xe conctnding that lifts unit is
fadity.
17 Bc_thremoving this milL,press STANDBYjON to set lhis unil
in standby m_le, anti disccamccz the AC power plug frcemthe
wall outiel.
18 Do nol placc_much pres_use against lhe Subwoofer ha. _tm_-
b_"_cakthe net or lhe unit may faU, rasu]ting in injury.
19 Do nol place anyikfiug fTagi]e treskle the Subwoofcr, as air
I_esSU_ is l_oduc_l 1]]al_ay by_ak it, resalt i_ :malf/in_on or
13_US¢ _L
III CAUTION
20 Condi.'_3f_afionv,q_lform when thc_g_rounding temperattn'¢
chan_g gtldd_nl y. Disct'qln¢¢l the power cord from the onflet,
then le_v_ the trait atone.
21 When uKmg the anit [o_ _ long tim_, the unit may "heccan_
warm. Tam the power off, then leave the unil alone [or cooling.
DVR-S120
lifts unil lS I101(li_0_*_ _ from the AC pow_ sotu_ &$long
• s it is conne_ted to 1he wall purls, even if _ anit itsel_ is
tu_nexl oil. TMS state _s calted the standby m_le. ha _ stale,
this urdt is dcsign_d to consame_ ve_, sma0 qnanfity of power.
FOR CANADIAN CUSTOMERS
TO p_v_nl _-3eatficshock, match wide bl0xL_of plug to wide slot
and [ulty ins_.
lifts Class B digital aplxacams complSes with CanadSan ICES
003.
DANGER
When this tufit is plnggexl lOthe wan outlel, do no1 plac_ your eyes
closc_to 1he opening of 1hedisc l_y and oth_ op_mings to look inlO
inside.
The l_ser componenthi _ product is c_p_bleof entitling
•adialion exce_(ling the limit for Class 1.
DVR-S120
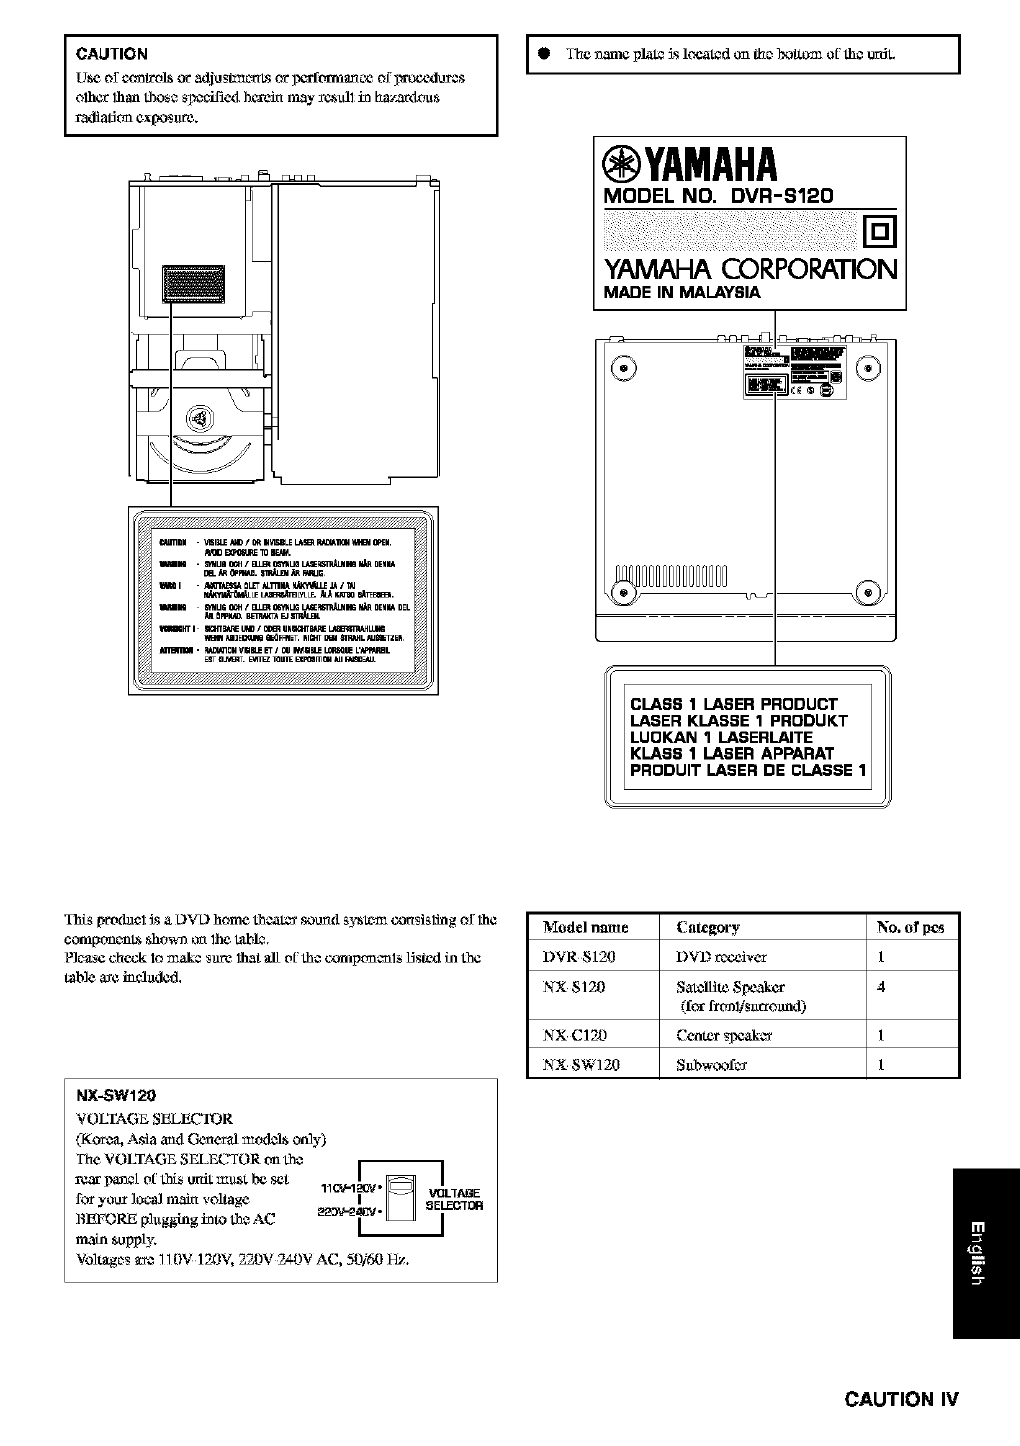
The name platc_is locat_(1 on 1he boltom of th_ anit.
WARNING
TO REDUCE THE RISK OD fqRE OR ELECTRIC SHOCK,
DO NOT EXa%ISE TH!S APPLIANCE TO RAIN OR
MOISTURE.
• For U.K. customers
1I the sockel onllats in the home a_x_not suilable for lhe plug s_l
with 1_d8_Liance, it sho_dtl he cut off anti an ap_ 3 pin plug
fitted. For details, refer to the instsuctic_as desedhed below.
• The plug severed from the mah_ Dad mnst he &,.stroyed, as u plug
with bored tleKthlc_ ctax_,is hazardous if c_agugcxlin u live _ocket
ontlet.
•Special Instructions for U.K. Model
IMPORTANT
THE WIRES IN MAfNS LEAD ARE COLOURED IN
ACCORDANCE WITH THE FOLLOWfNG CODE:
Blu_: NEUTRAL
Brown: LIVE
As the colo_t'_ of the _S in the _ lead of this apparatus
may not correspond with the colou_d _ark_ngs identifying the
t_mi_als in yottr ping, _ceetl as follows:
The wire which £s cdiour_d BLUE must he connected lo the
t_mi_al which is marled with the le11_r N or coloused BLACK.
The _4_e wlfich is colou_ed BROWN must he cormeotetl lo the
t_mi_al wlfich is ma_ked with 1he le11_rLo_ coloared RED.
Making sare 1_alneither cca'e is connected lo the earth torminal
of the tt_ee lyin _g.
¢Ahrfloa V]SIRLEk_[_/ORmI,I_LE LASE_R,_£_I_I_IftdBt0pEN.
_NI . SyttLJnO_A/BLERC_tT&BaL_WOII_DHN4
II m 0LET_TRN_ _ _ IT_J
raND MUG O_ !_ _UG U,t£_m p,_ DEHMDEL
_ fiPPBLW.B_a_:TX r:J_,Ia J_
ihTi BCmB_E UI_ /0_ UHS,_TB_E IL_G
_t,_l M_EcmIo _dFmET. mGHTU _L mmTZE_
ESTOL_mT. _ mLr_ mnlOU _ FalaC_,,_
g Th¢ _m¢ plate ls lo_ated_mLhe_o_ oi' _c _z_dt. ]
IYAMAHA
MODEL NO. DVR--q120
YAMAHA CORPORATION
MADE IN MALAYSIA
PRODUIT LASER DE CLASSE
_S [_d_clJs& L)VL)bom_ 1_o_t_-_"_u_d sy_ _islin_ o_lhc
NX-SW120
VOLTAGE SELECTOR
(Korc_ Asia aml General rod( _L?a8oMy)
The VOLTAGE SEL_ TOR on th_
rg_r_i oi' this unit m_st b_ s_t _.[_ . ]
1_ _V-120/"_ _t LIAGE
for you_ local main voltage i_ELE_ltm
BEFORE p]_gging into th_ AC 22_'2
main supply.
Voltages _o_ 110V 120V, 220V 2_-0V AC, 50/50 _.
Model name Category No. of pcs
DVR 8120 DVD receiver 1
NX $120 Satellite Speaker 4
(lea"fl_nl/$_ro_nd)
NX C120 Cente_ _ 1
NX SW120 Sabw_,x)f_ 1
/
CAUTION IV
In a few steps, a whole new world of DVD will open up.
,<__..............
I]1 ,.!_;__," IIII, _,1,<<:_,_._ ........
7
LET'S 13 READY!
'-)Page 6, "Preparation"
Decide on a place for the speakers, perform a few simple cormecfions, and that's aH there
is to it,
• Connec:ing Speakers and TV to CinemaStation cotdch)'t be easier.
• Connec:ing the Speaker Cables with one touch colored connectors.
Come a DVD!
,,,*Page 1 O,"Basic Operations,'
Transform your room into a home theater in 3 StepS+
• Soand fields to match the movie
experience the feeling of being there,
• Progressive scan technology for enjoying ]
video even on a large screen,
:;; ;i¸¸¸¸¸¸¸;¸71£¸¸¸¸
Double and tripl6 your enjoy
CONNECTING OTHER EQUIPMENT.
'-)Page 46, "Using Other Equipment"
• Enhance the feeling of movement with DSP Programs when yon play video games.
• Listen to and Jecord CD-R and MiniDi_ media,
• View ned dab video media.
2
_tation
Enjoy playing A VARIETY OF DISCS!
--Page 28, "Playing Video End Music Discs"
In 3 short steps play everytNng from commercial CDs to your own homemade discs,
v
v
• Enioy playing midio and video CDs and MP3 music
to whether
concert hall.
"Listening to the Radio"
ov live radio broadcasts.
• hi addition to Aato Tuning, you can ase various conl:J-ols
_[ng Amo Preset for FM charmels.
It's time to TAKE YOUR LISTENING
EXPERIENCE UP A NOTCH!
=_Page 53, "Creating the Best Listening Space"
• Wifll the SpeWers yoa can create a sound space to match the tistening envtronment of the room.
• The Ma_tx 6.1 Decoder provides virtuJ s_rround back speakers for experiencing a remarkable
acoustic presence.
• SILENT CINEN£_ provides an incredible listening presence with headphones.
3
CONTENTS
4
_tation
0
0
Z
"4
m
Z
"4
T,O
5
Introduction
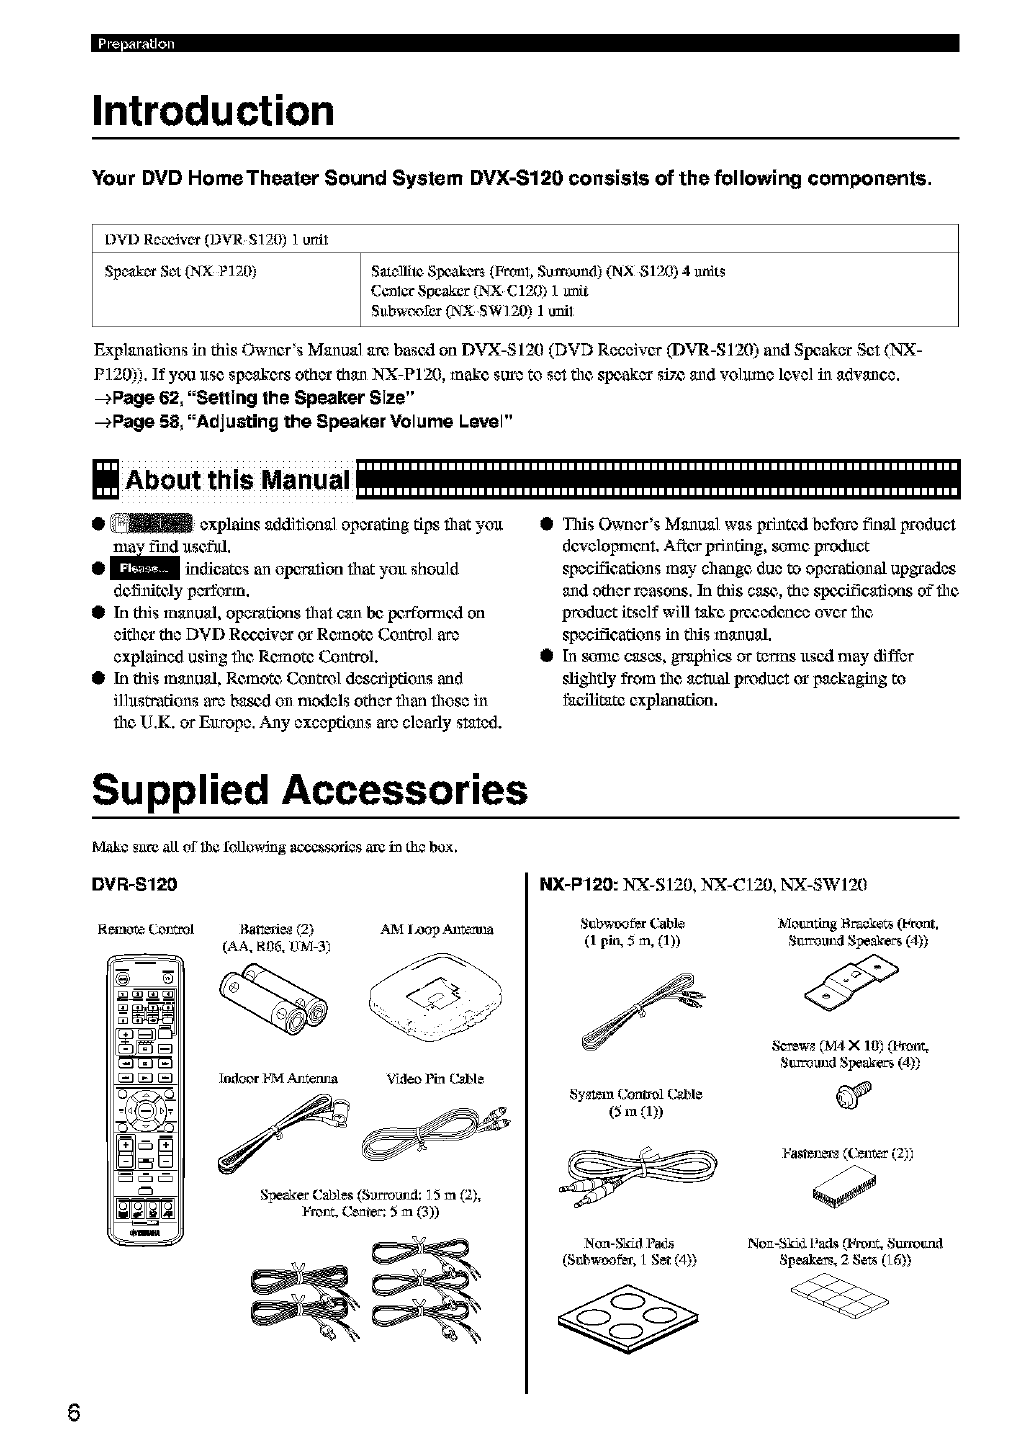
Your DVD Home Theater Sound System DVX-S120 consists of the following components.
DVD R_o_]vc_(DVR S]20) I urn1
Spe_&c_rSc-_(NX P120) Sal_llite8Ix_kca_ (Fronl, Surmu_P) (NX 8120) 4 milts
CCnlCrSpeaker _ C120) 1m_t
Subwoofcr (NX SW120) 1unil
Explanations in this Owner's Manual am based on DVX-S120 (DVD Receiver (DVR-S120) and Speaker Set (NX-
P] 20)). If you use speakc_ other than NX-P120, make sure to set the speaker siT_ and volmne lcxe] in advance.
--+Page 62, "Selling the Speaker Size"
--+Page 58, "Adjusting the Speaker Volume Level"
• _ explains additional operating tips that ymt
find xtsefld,
• indicates an operation that yolt should
defi_iteay perform.
@In this manual, operations that can be,peffomlcd on
either the DVD Rc_:_iver or Remote Control are
explained using file Rcanote Control.
@In this manual, Remote Conm._]descriptions and
ilhtstrations are ba._d on models other than those iN
the U.K. or Europe. Any exceptions are clearly stated.
@This Owner's Manual was Irrintcxl before final irroduct
dcxelolmlcat. AfCcsprinting, _le product
specifications may change due to operational upgrades
and other reasons. In this ca._, the spezifications of"file
product itself will take prcgadcace over the
specifications in this manual.
@In _le cases, graphics or terms ltscd may differ
sfightly from the actaal product or packaging to
fac;tlitate explanation.
Supplied Accessories
Make sate all of 1he folin_dng accessories arg ha the box.
DVR-S120
Indoor l-7vl.zmtem_a VMeo 15n C,_le
SpeakerCa_les(Surromad: 5m f2),
I'm _ Center:5m f3))
NX-P120: NX-S] 20, NX-C] 20, NX-SW120
Subwoofer (;able blomating Braakets (Front,
(1 pit,, 5 m, (1)) Stwromxl Speakers (4))
Screw*(M4 X1O)(Front.
Stm_am_lSpeakers(4))
Coni*ol C_le
Sy_m (5 m (1))
Non-S_M P_Ls
(Stzbwoo_, LSet (4))
No_-Ski4Pads(t_onr.Sttrrot_d
8pe_, 2 Sets06))
6
Preparing the Remote Control
Put the batteries in the Remote Control.
pol_rity
Press the/_ mark and slide off lhe bac_(
cover,
_Insert the two supplied batteries (AA, R06,
UM-3) into the battery compartment,
Close the bac_( cover.
Preparing the Speakers
The Front Spoakcrrs, Sarround Spcakcrs, Ccntcr Spc_akcvand Subwoo_k_r haw sf_cia[ _olcs buscd (-_ thc_typc of soand c_ach_wz_lacc_s.
•Th_ F_oot Spcakcrs pro_cc r_l ch_c_l soun_l (slcrco) an_l _oavd _ff_.
• Th_ Slkrrolmd Sp_ak_ p-_ac_ surmun_l sound _d _oand _ff¢c1_.
• Th_ Ccntcr Sp_akcr frm_ac_s so_n_ oficntc_llov,-arfl Ihe c_nl_r of 1he scrcgn suc_ a_ 6_fiog o__ o_-a]_.
• Th_ Sl_bwc_£cr produccs ba_s so_n_ and 1heLFE _gnal coot_n_d i_ Oolby k_gital a_l OTS.
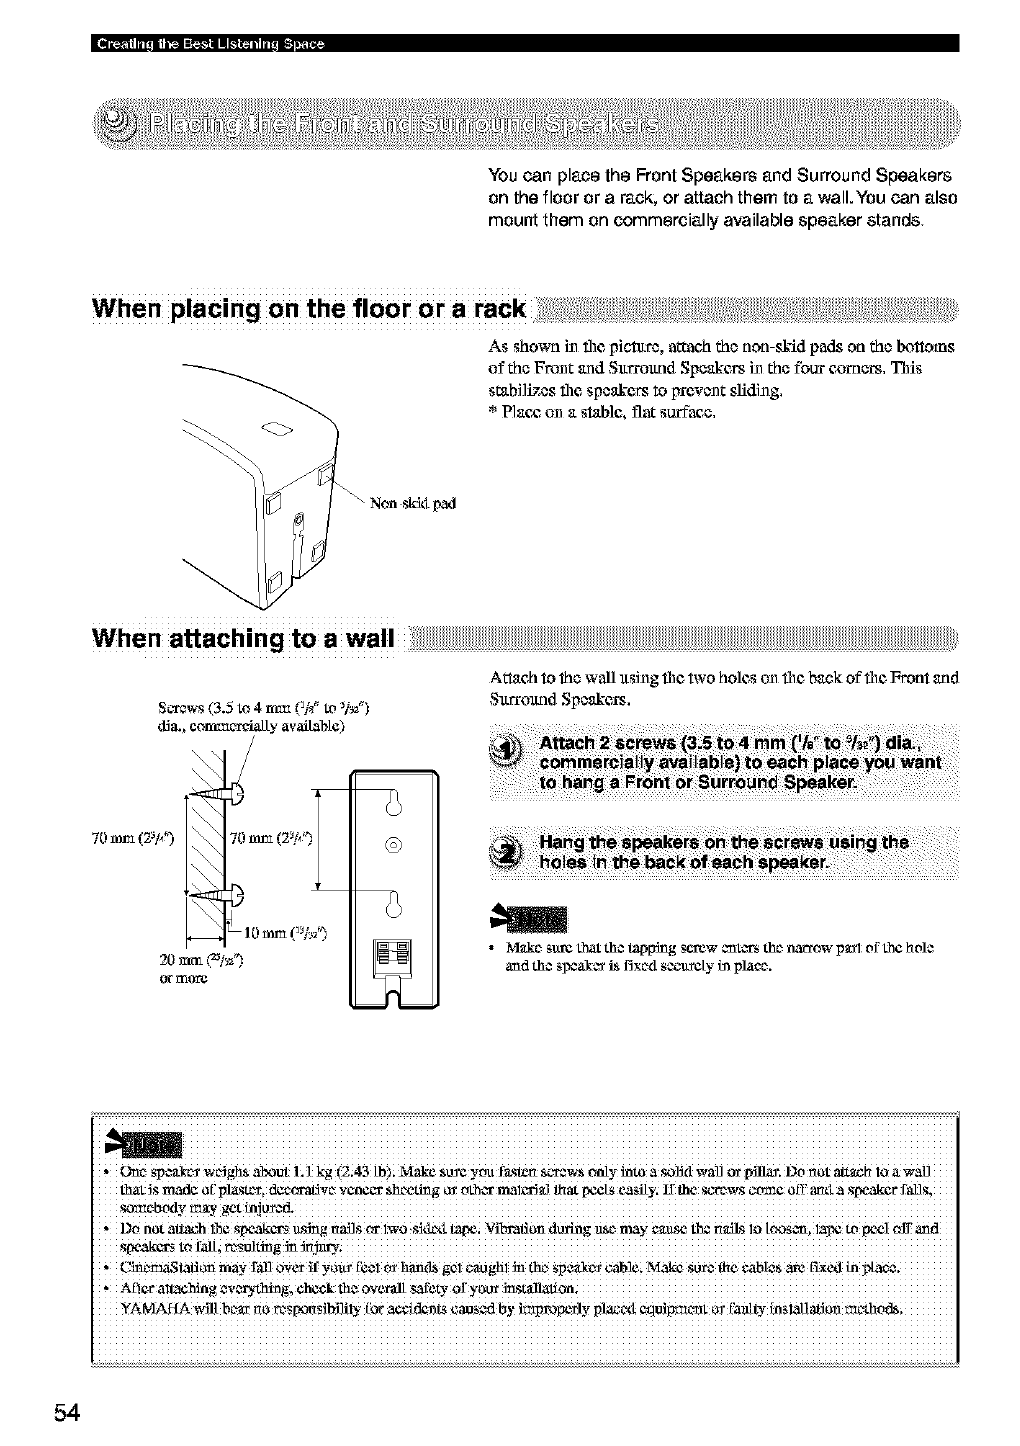
Placing the Speakers
Front Speakers (L, R)
Place the F_ontLc-$1_l R_ghtSpc_akcrsan _u_] dist_ncc
1hei_loall_stordngposition, The distanc_ of cach s_wakor_m
Center Speaker
AUg_ lhc_b:mtfac_ of the c_t_ _akcr ,_,'_ the J'_"_r_l_',__ o£
your vidco mordtor, l_lac_ 1he spcakcr a_ close to th_ mordtor _s
_x_s][ilc (such as dlr_ly o,/_ o_ _1_ the mgr_itor) aml
c_tral]y bctwccn the fro_t _aa_r_.
Surround Speakers (L, R)
Place those spcakcrs lyahlnd your Ustcni_g posifi( -_, facbxg
Subwoofer
Thc po_i1_o_o£the Subwoo_L_ri_ _ot _o _-dlic_1,_._u_c low b_s
so_a_ _rc not highly _'fi,_(_. B_t it i_ bettc_ to p]_ t_a
S_bwoo_L_nca_ the F_oot Sp_akc_s.TuJ_ il sUghlly 1owar_ithe
ooo
• Yon can sccarJ the Cc_t:_ Spcakcf, Sa_mu_d Spc_akcrs o_
Subwc_fcr in placc_aaing fustcncrs or non _id pmis. Yoa can
hang th_ F_oot a_l SarrearS1 Speakers _om th_ wall or a_u_ch
them to opfigmal sf"_kor s_.
See page 53,"Placing the $peeke_s (NX-P120)".
_J
•If 1heI£_lgvi_it_ (mordtor) _ge is distgrJ_Cd,plg_ 1he
speakers uw_- f_om 1het£_kwifi_t_.
_l|=],_l_-ill,i
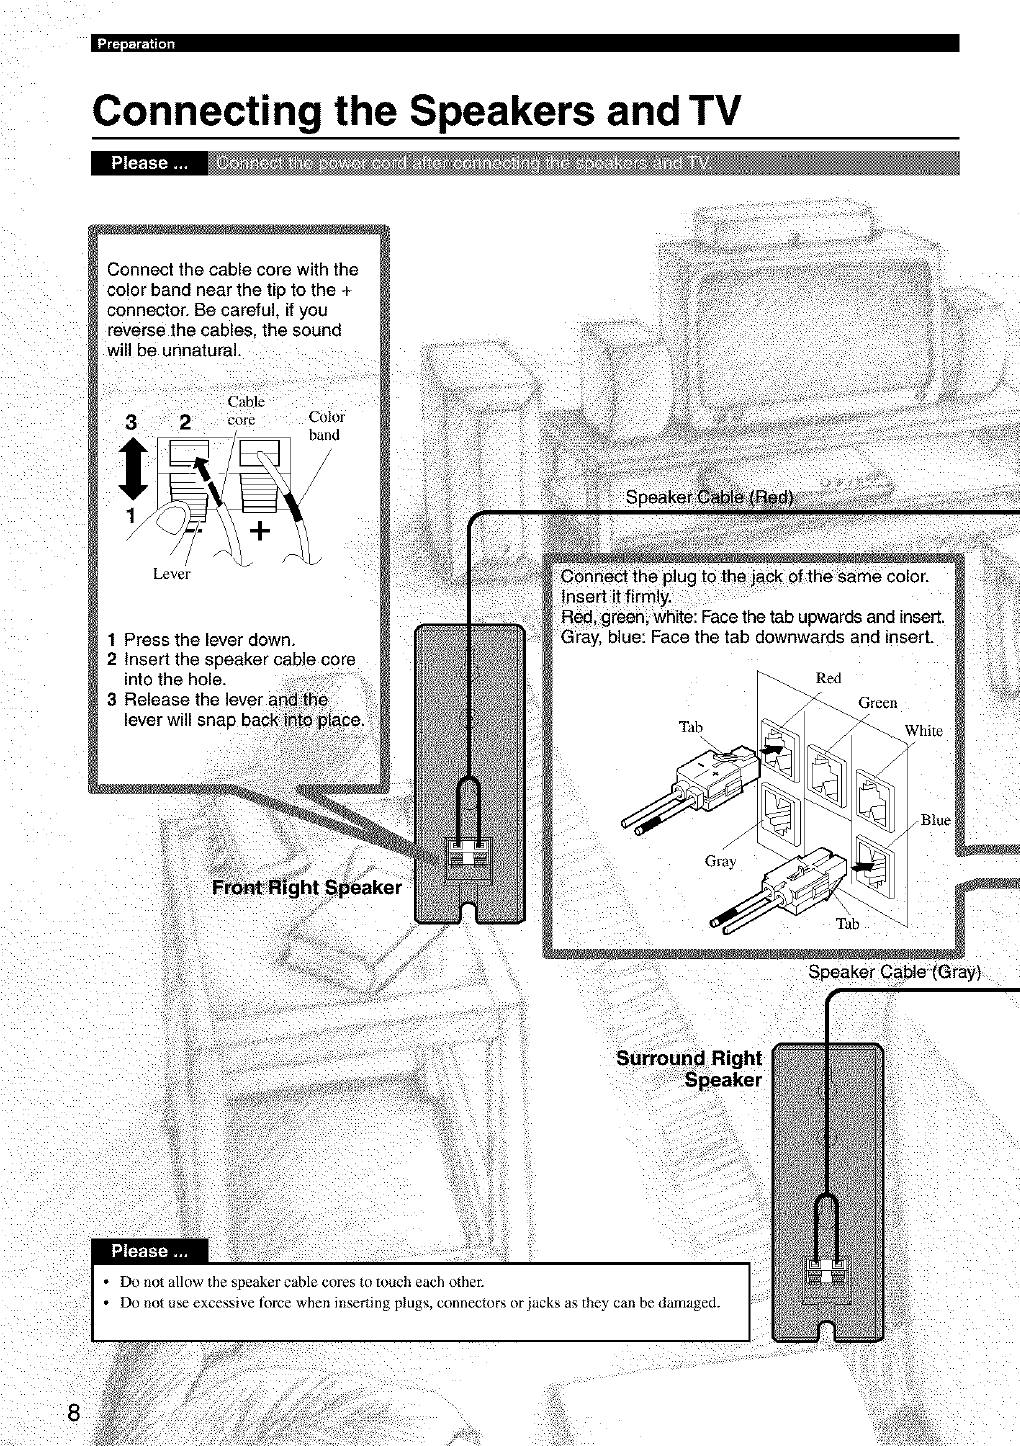
Connecting the Speakers and TV
Connect the cable core with the
color band near the tip to the +
connector. Be careful, if you
"everse the cables, the sound
will be unnatural.
Cable
3 2 core Color
band
Lever
1 Press the lever down.
2Insert the speaker cane core
into the hole.
3 Release the
Speaker Cable (Gray)
• Do not allow the speaker cable cores to touch each othe_
• Do not use excessive force when inserting plugs, connectors or jacks as the? can be damaged.
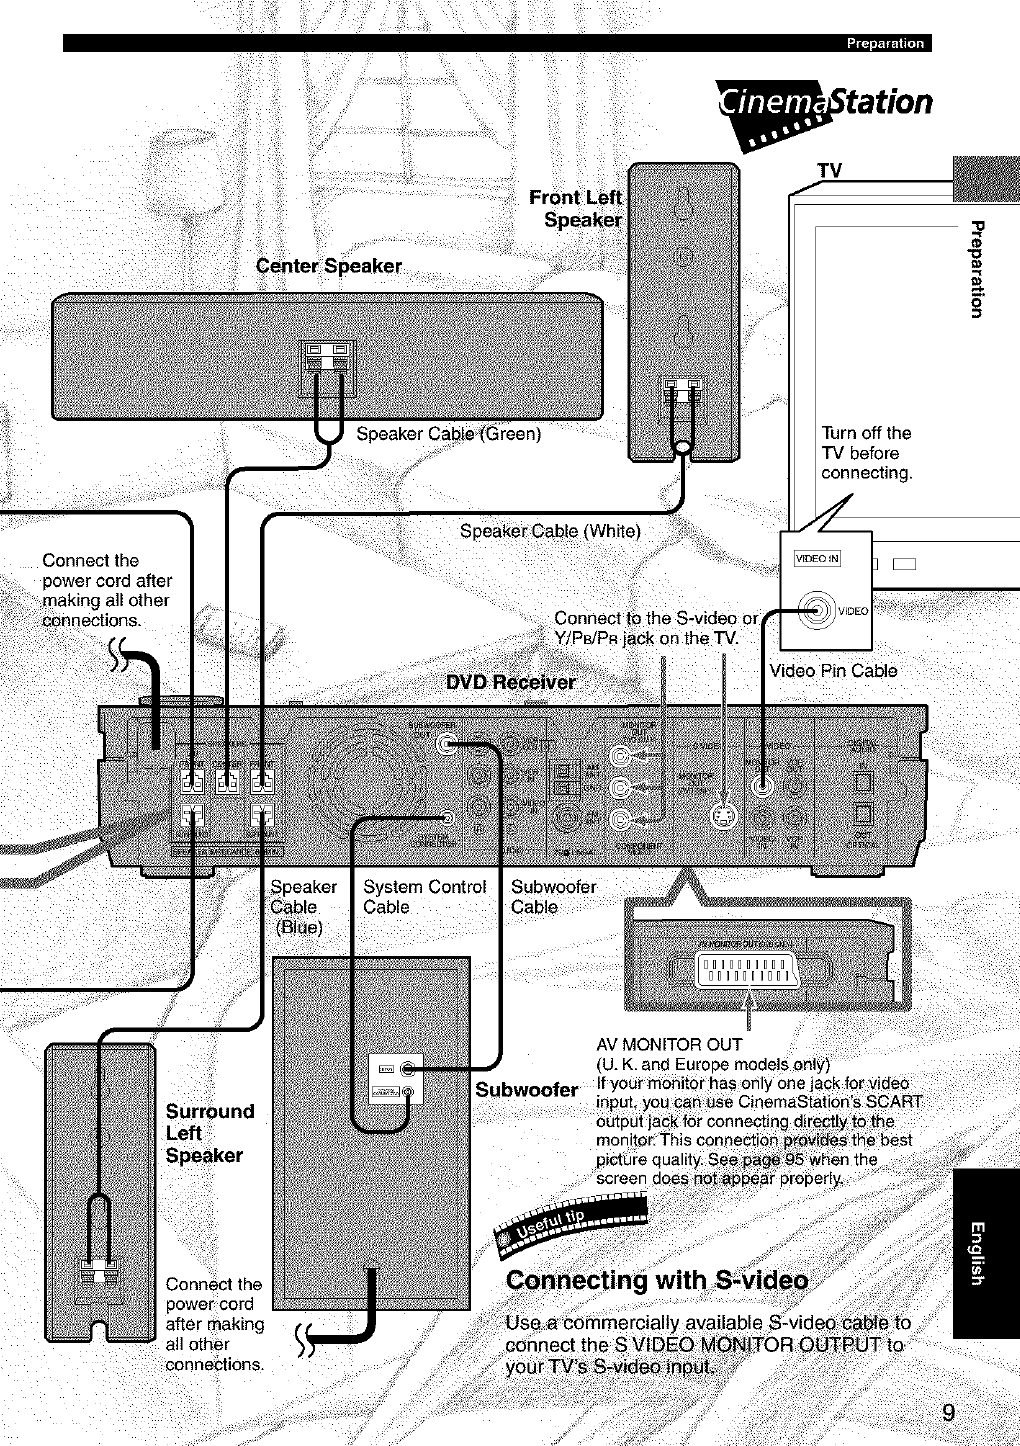
C_ii!_!i!ii_;i!!_!!!ill¸ !i!iiiili%!i_iiiiii!_ii!iii_,_iO_ii!_ii_i)ii!_i_ii!!_i_!ii!i!_iii_ii_iliL
i|t_,_lr-lUll
Fr_ntL
_tation
TV
"O
"€3
0
Turn off the
"iV before
connecting.
Connect the 1
power cord after
making all other
connections.
Speaker Cable
Video Pin Cable
Speaker
Connect the
Speaker
Cable
(B_ue)
System Control
Cable
Subwoofer
Cable
IIIIIIIIII
IIIIIIIIII
AV MONITOR OUT
II
Subwoofer If your monitor has onl,
screen
n the
Viewing a DVD
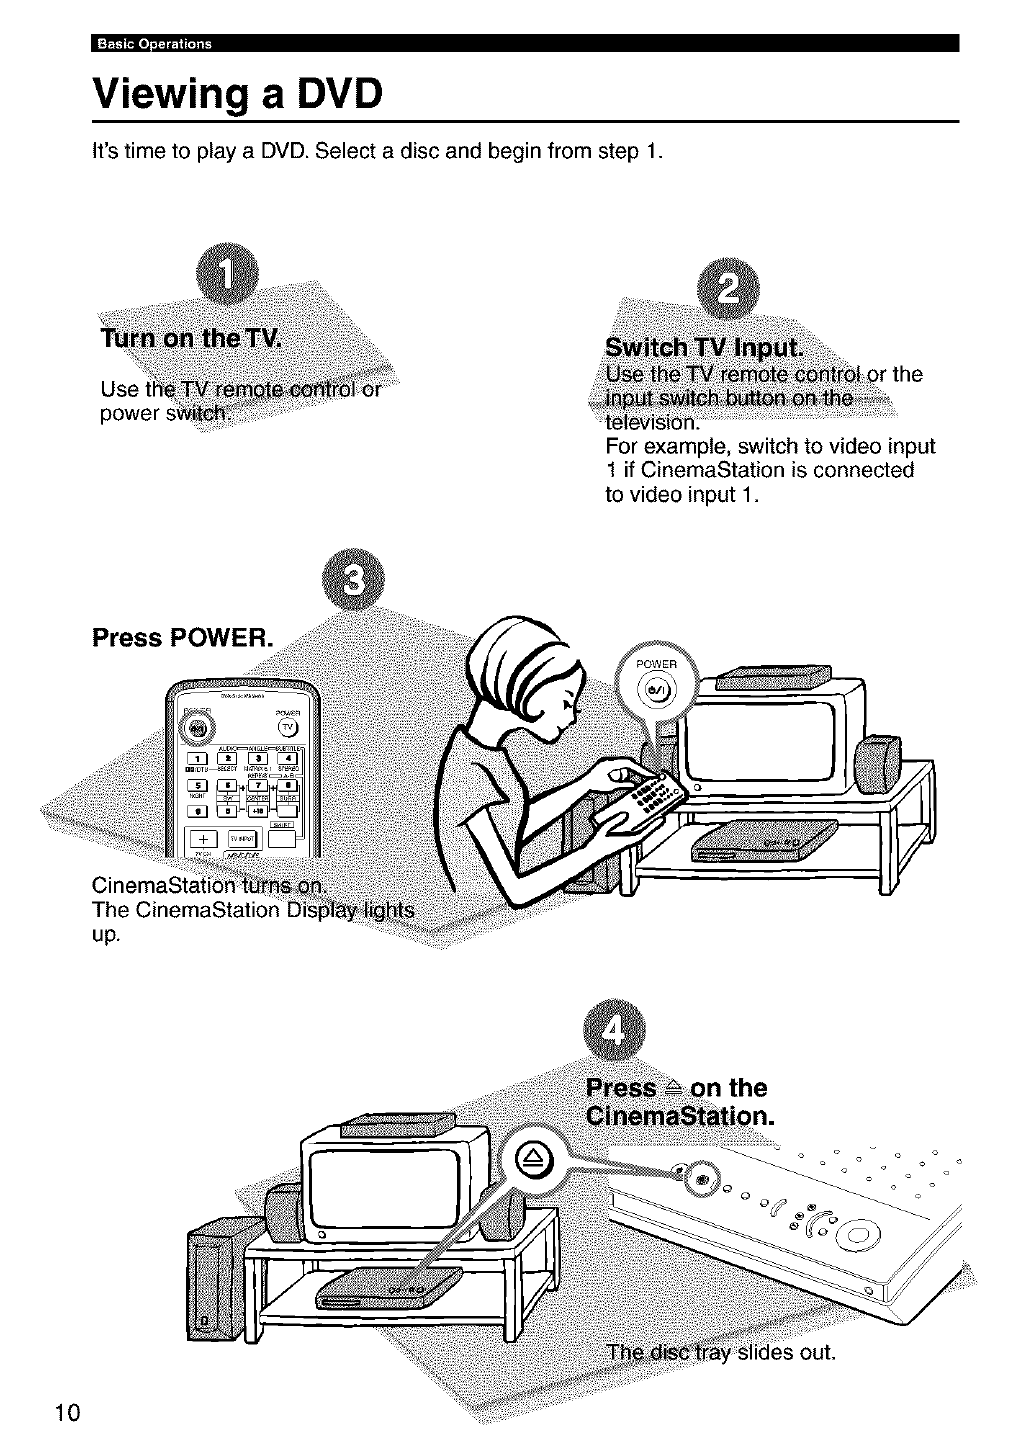
It's time to play a DVD. Select a disc and begin from step 1.
Use
power
For example, switch to video input
1 if CinemaStation is connected
to video input 1.
Press POWER.
10
_tation
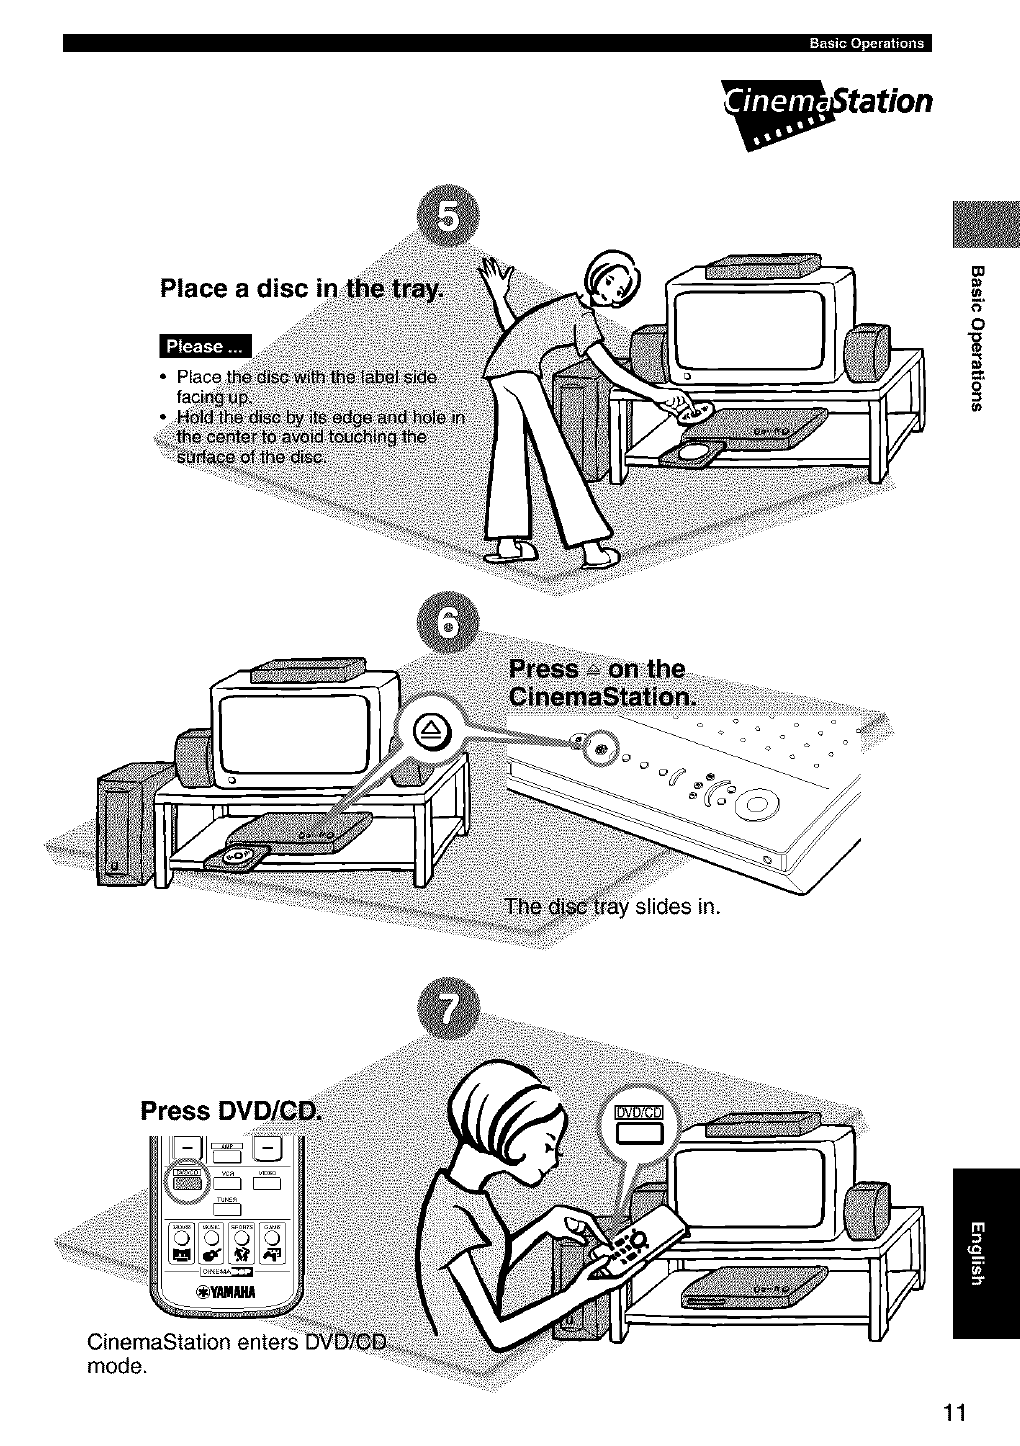
Place a disc _o
0
0
Press
CinemaStation enters
mode.
11
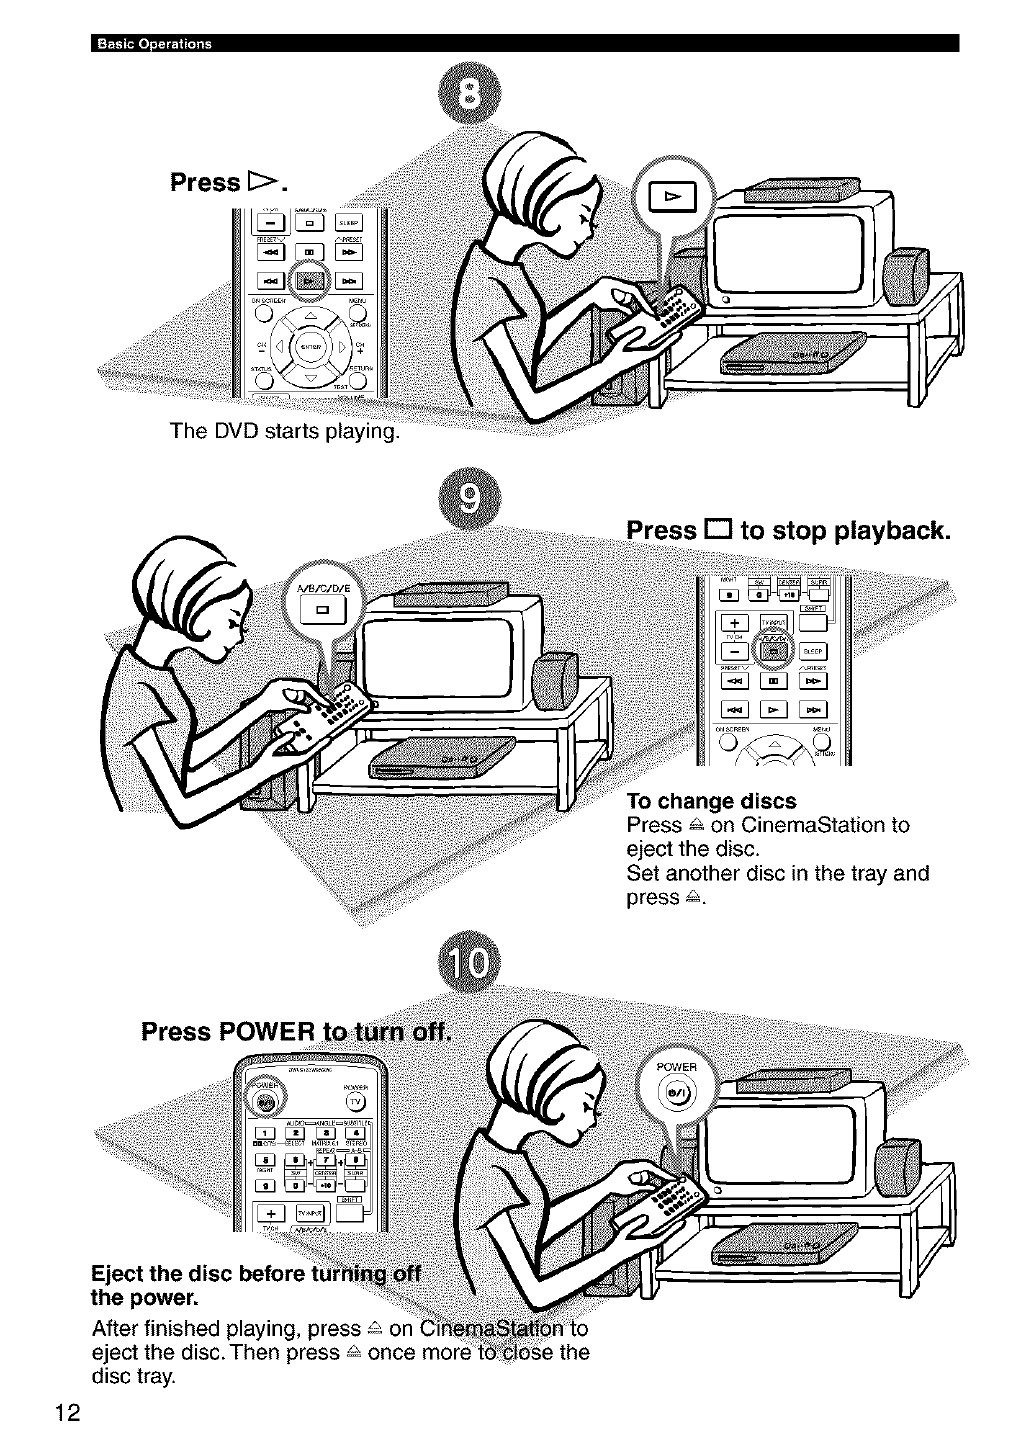
Press [>.
The DVD starts playing.
Press [] to stop playback.
To change discs
Press & on CinemaStation to
eject the disc.
Set another disc in the tray and
press 8.
Press POWER
12
Eject the disc before
the power.
After finished playing, press _ on
eject the disc.Then press _ once
disc tray.
the
iPmblems
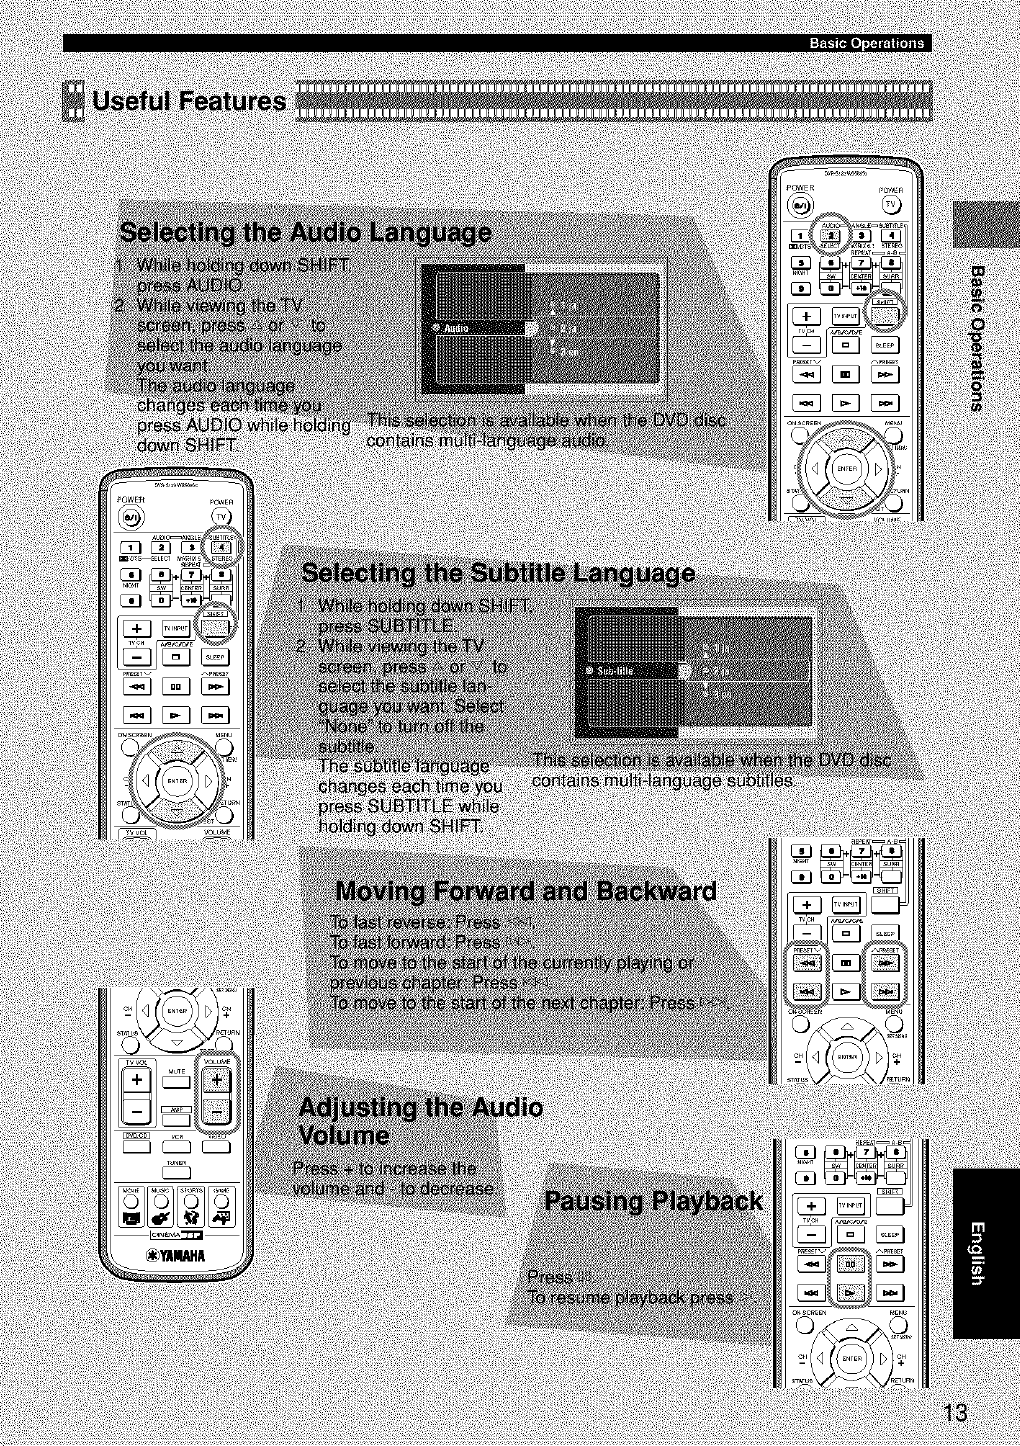
No s_ appear
Check the disc jj_l_t to make sure
subtitles are a_ble,
Q
I followed each rrectly but the disc
Some discs have a Disc Menu'
Your settings
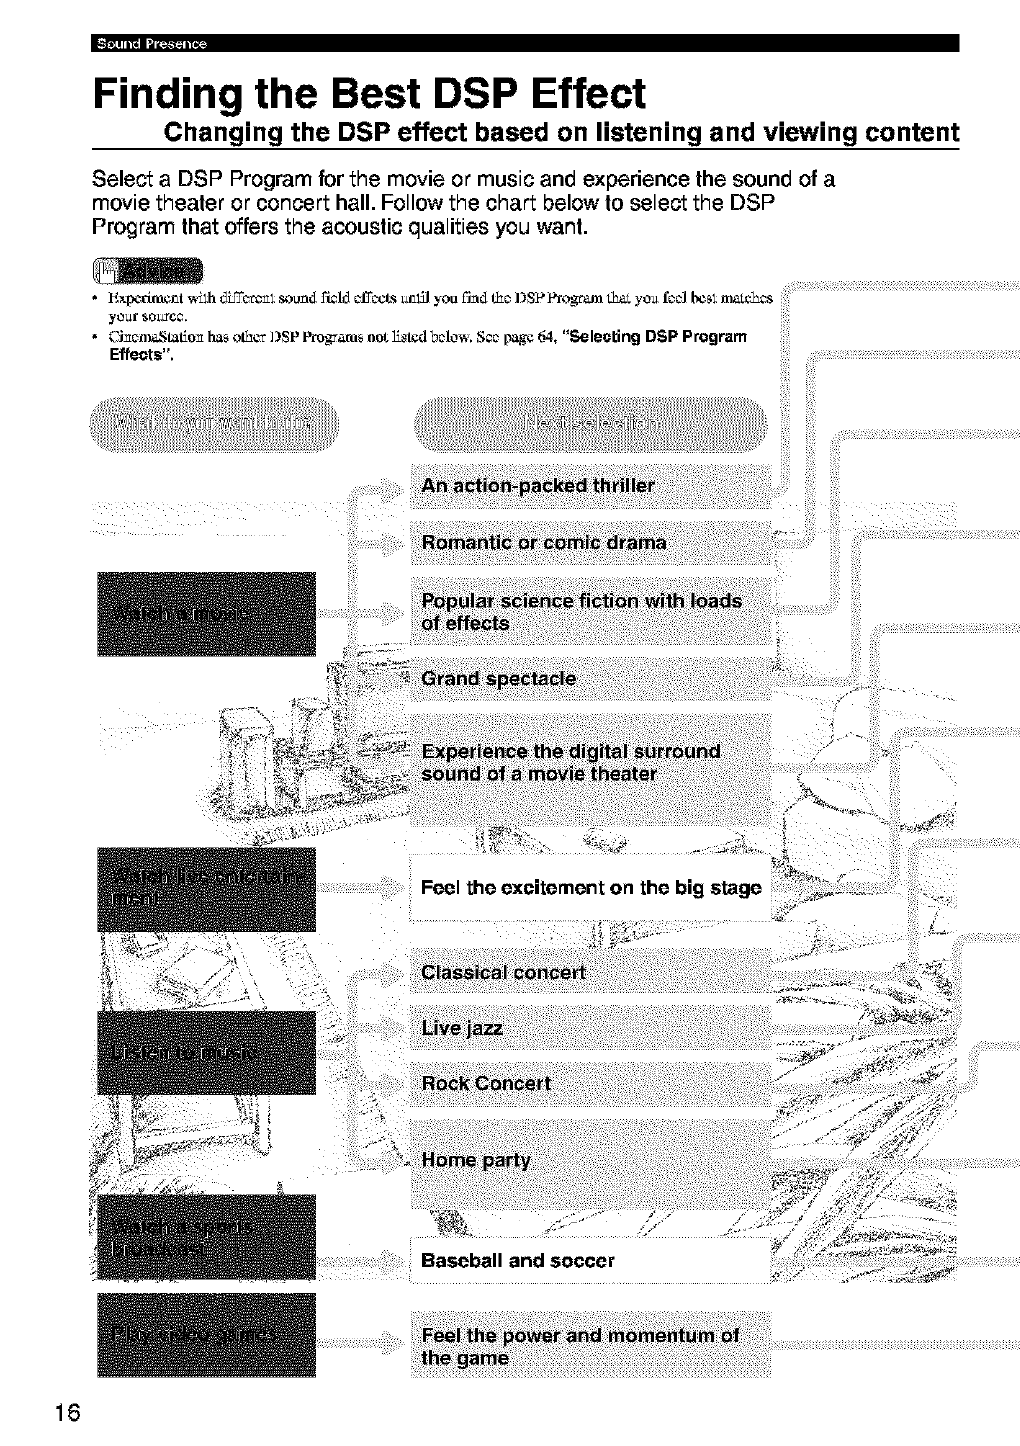
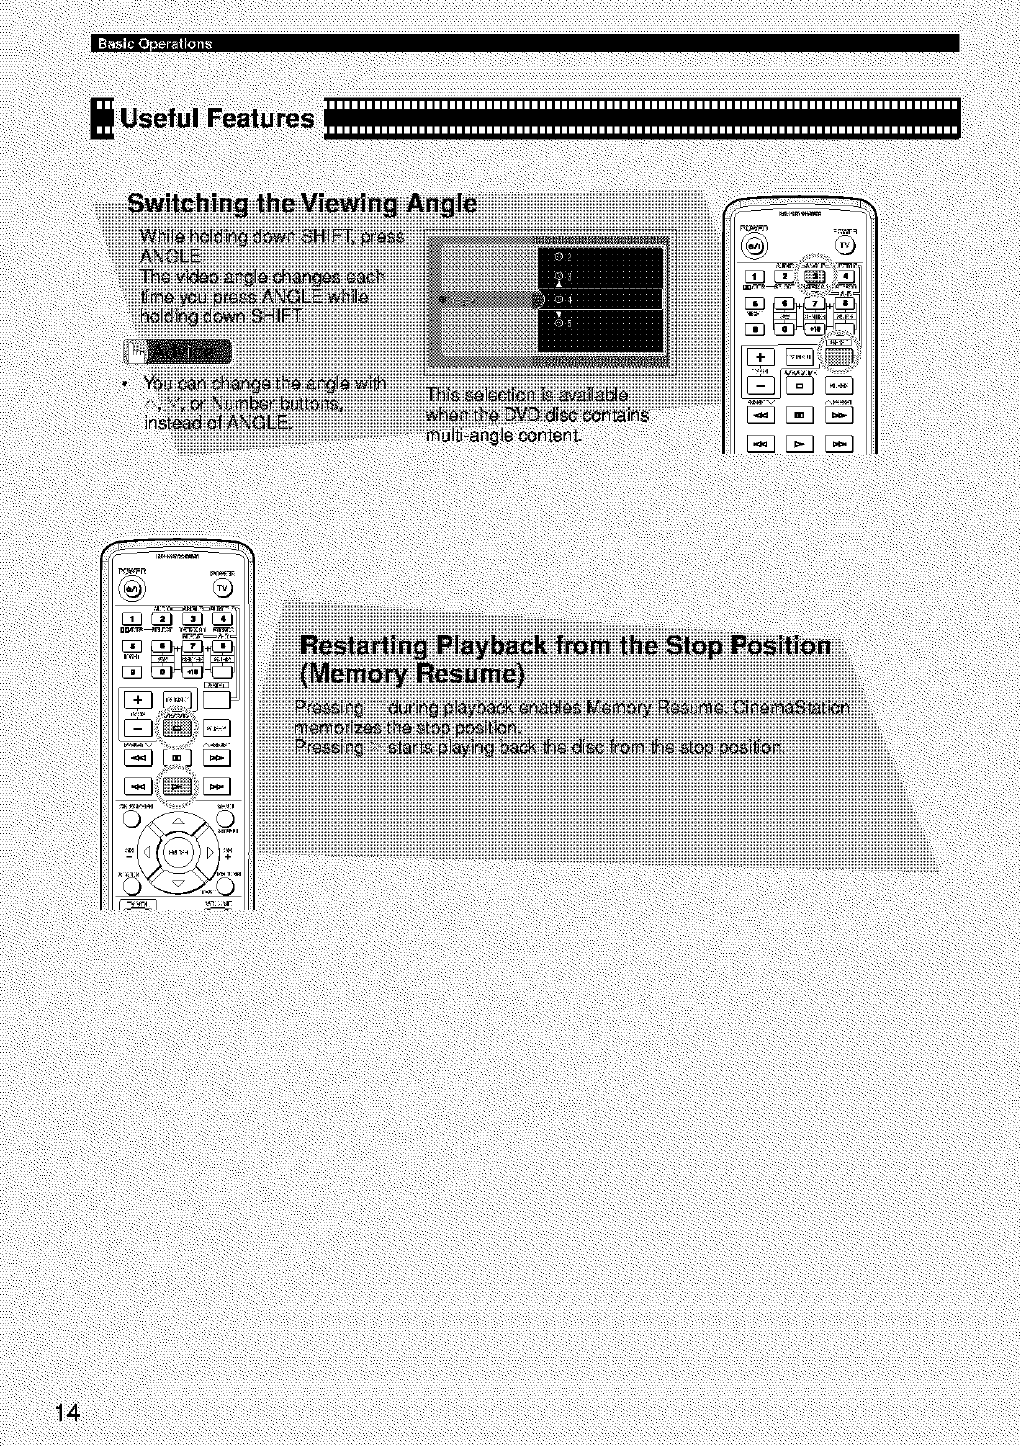
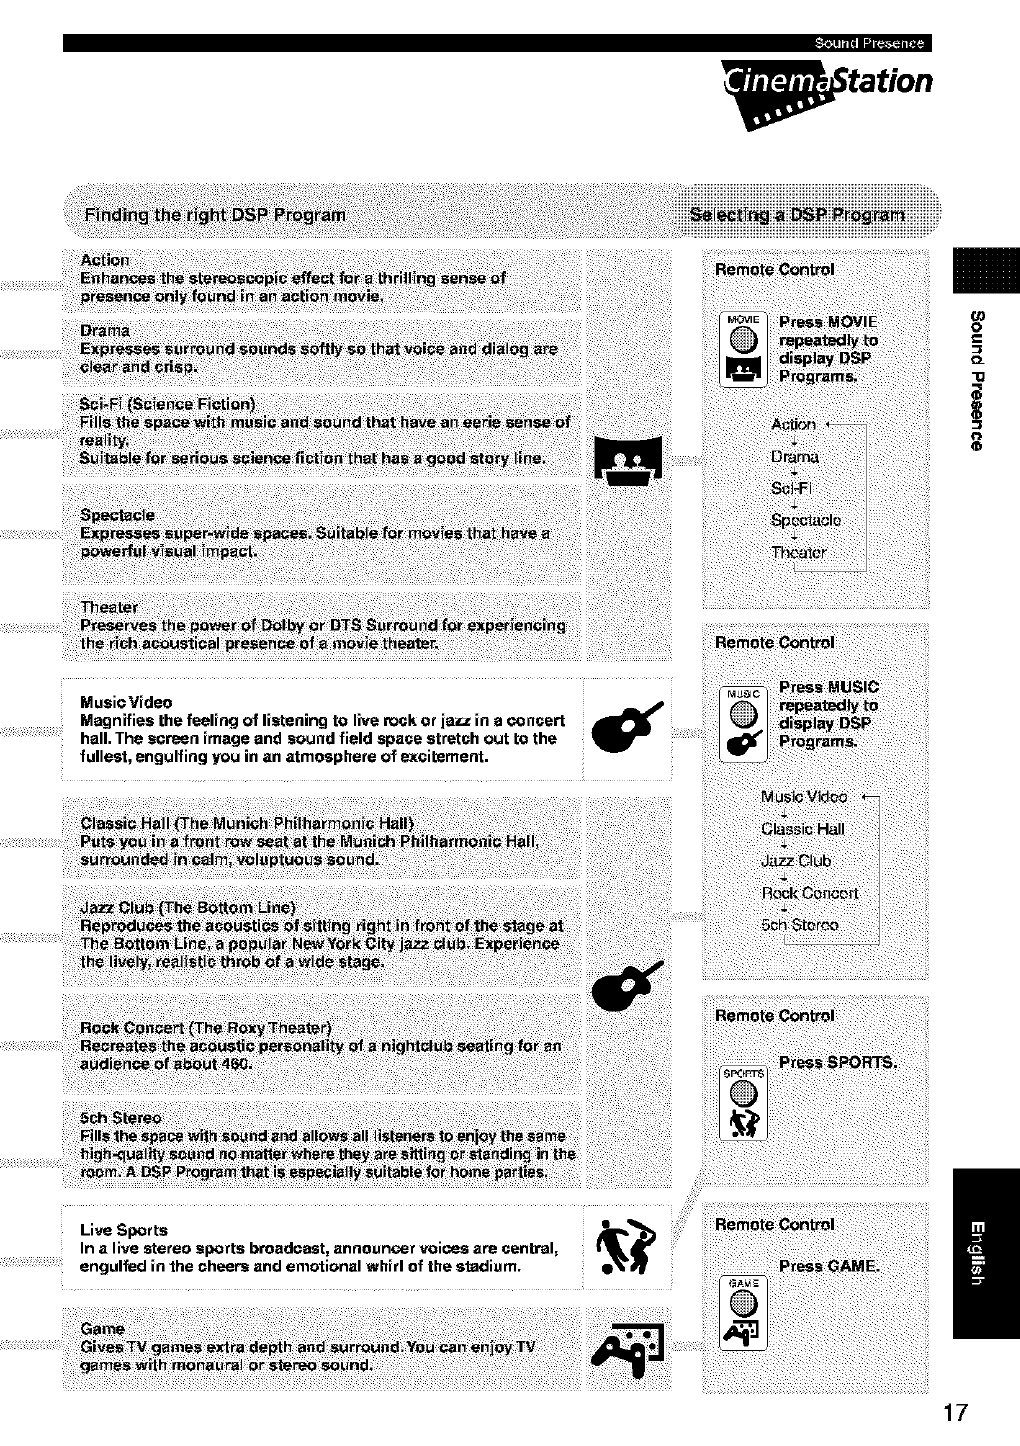
Finding the Best DSP Effect
Changing the DSP effect based on listening and viewing content
Select a DSP Program for the movie or music and experience the sound of a
movie theater or concert hall. Follow the chart below to select the DSP
Program that offers the acoustic qualities you want.
16
tation
o
_L
"O
0
MusieVideo
Magnifies the feeling of listening to live rock or iazz in a concert
hall. The screen image and sound field space stretch out to the
fullest, engulfing you in an atmosphere of excitement.
Live Sports e_'_
In a live stereo sports broadcast, announcer voicos are central,
engulfed in the cheers and emotional whirl of the stadi_Jm. /
17
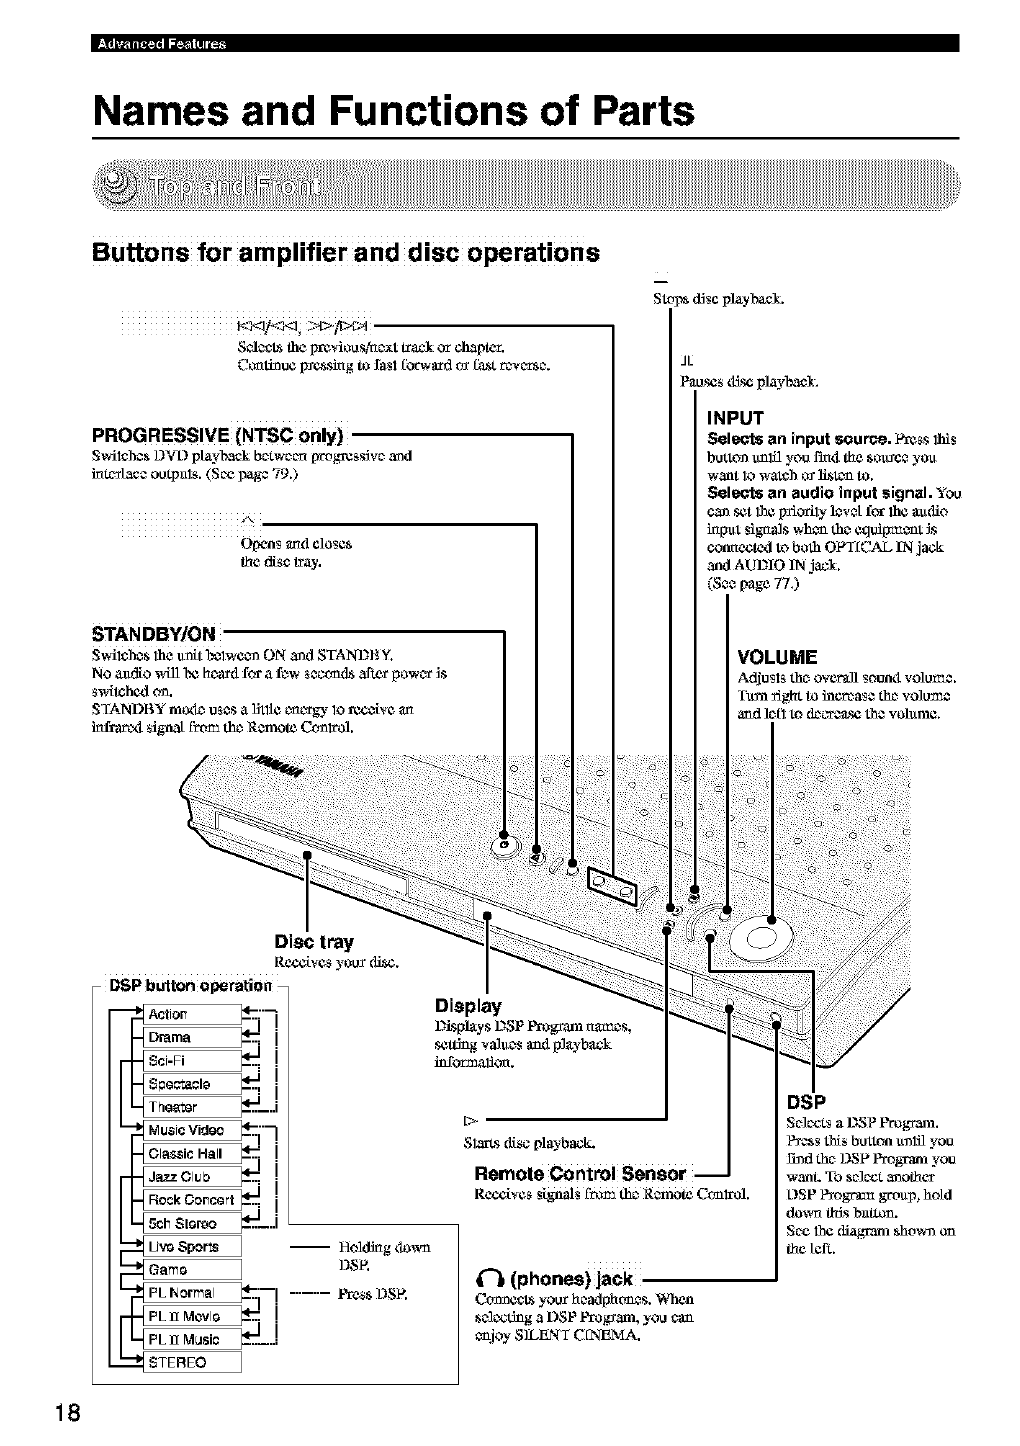
Names and Functions of Parts
Buttons for amplifier and disc operations
S_*_ the prcviou s,tac_xttrack or chapter.
Cccati_u¢ Izcssing to fasl fbrwfu_dtv f_t rcwc_tsc_.
PROGRESSIVE (NTSC only)
S_i_hcsL)_L)playback bc_twc_c_[wog_css_vc_and
im_/acc outpals. (Soe _ag_ 79.)
A
Opens and close*
the disc tray.
Stops d_scplayl'axcL
JL
P_oscs ¢fi_ playback.
INPUT
Selects an input source. P_ss this
button u_lfl you I'm4 the sou_c_ yo_
w_nt Iowatch o_ li_tcn to.
Selects an audio input signal. You
cansetthe _odly ]cvctf_ the _dio
h_l_t signals whoa th_ Ctldipt_c_t _s
connected toboth OFT[CAL IN jack
and AUDIO IN jacl.
(S** page 77.)
18

,'. iIltl I IIl.;tlI _..._1 _II I
Buttons for tuner operations
Press INPUT on CinemaSt_ttion cx _ess TUNER on the Remote Cun0"ol tu select l_er mude. In 3hmurmode, the buttons
b_luw fimction as desc,ribczl,
/_B/CiD/E
ScJccts i)r¢_c:;_up_ (A, B, C, 1), h) for I_MiAMstatiLv_s.(SC¢I)_gc41.)
vPRESET/TUNING A
ScJccts _ P_t Ntz_be_.
Searches _ radio sla_on. (See I)_gc 39.)
IPRESET/BAND
Selcct_I-NIorAM tuningmc_tco_ Fre_
mode. (Seapage 39.)
AUTO/MAN'L
$_tc_cs bcCwcc_ Auto 'ruling _mdMan_ Toning
mode_. (Scc page 39.)
Pres_ this botto_ to _cz _mem_,Slatioa to A_,o
Tu_ing mcxle (AU_B"9indic_tcv lights _I)), or pt'_ss
this b_ton to _t CineraaSt_tion to Manual Twfi_g
mode (AU_ID iodic_J_v goes out).
About memory backup
If yuu disconnc, et the lX_WUfc_,;_rd from the outlet,
CinemaStation will memorize the settings listczl to the
right for aIx_ut a week,
Set them agair_if those settings a_ urased after a wc_,k,
o Volume
- Subwo_fer, Center madSurrum_dLIR Speakers output
levels (Sc_ page 58.)
- SET MENU options (See page 88,)
- Sleep Timca"settings (Sc_ page 78.)
- Preset radio statiuns (See page 41.)
- DSP Program settings
Delay Time (Sec page 71,)
FX_lb)' Pru Ix_gic II Music settings (Sc_ page 67,)
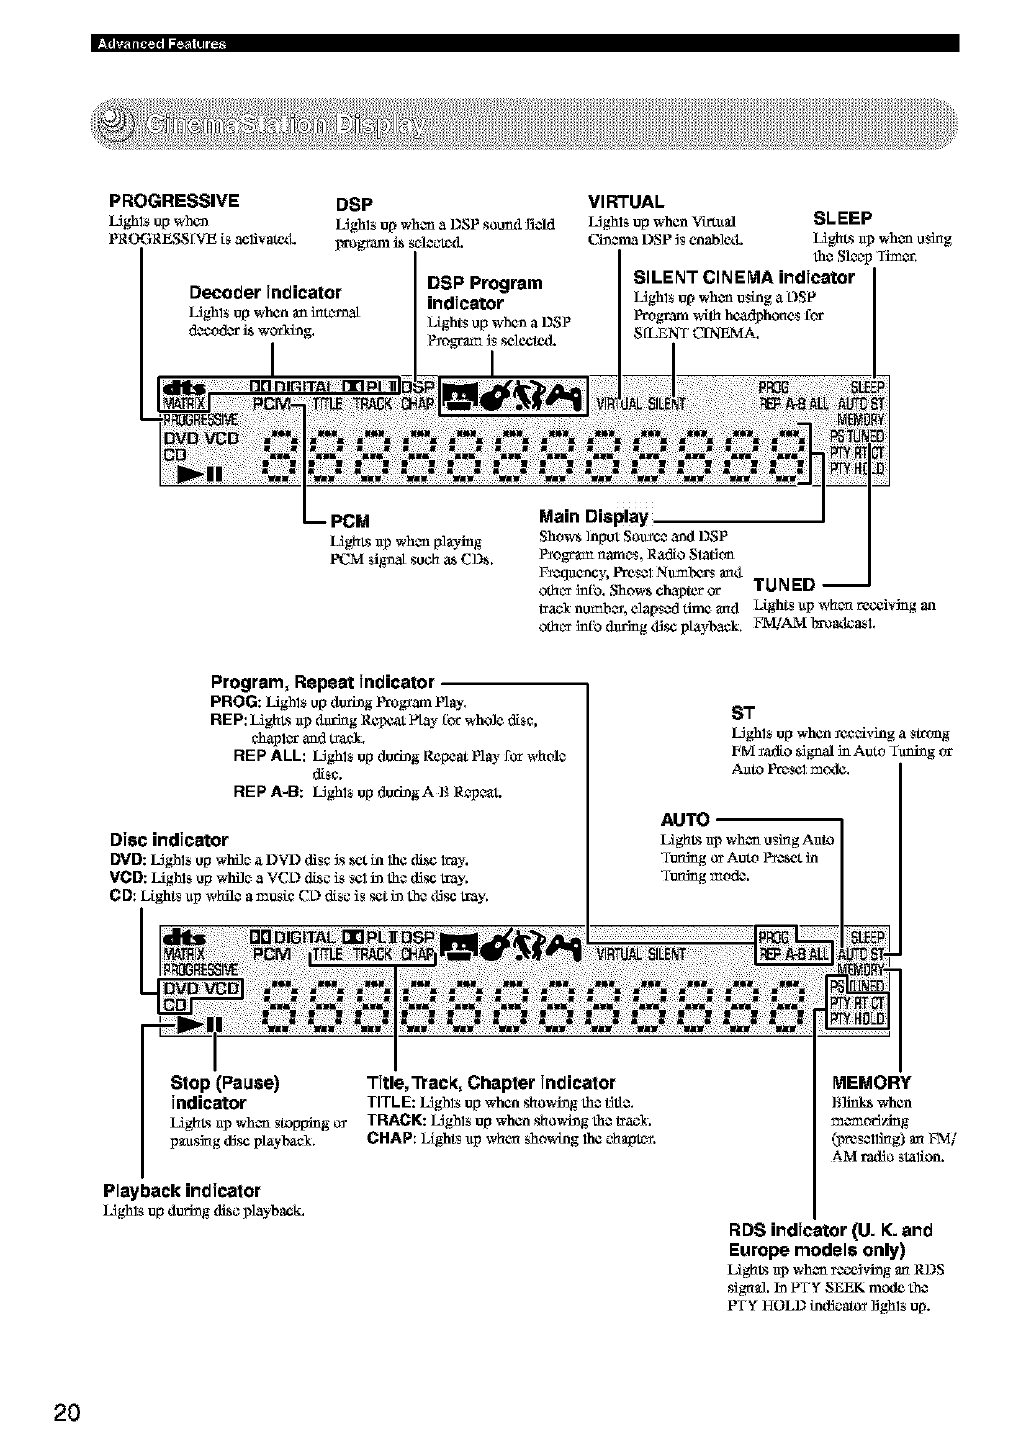
PROGRESSIVE
L_ghlsup when
PROGRESS [VE is acl:ivat_L
DSP Program
indicator
l)tghts up when a DSP
P_ogrm:nJsselected.
VIRTUAL
L_ghls up when Viz'_ltal SLEEP
ChacmaDSP Jsenable<L LighLs ap when using
she Sleep Timer.
SILENT CINEMA indicator
L_ghls up when using a L)SP
P_ogramwifl_ h_hones for
SfLENT C_A.
Program, Repeat Jndicatel
PROG: Lighls up d_ing Frogfam Play.
REP: LighLs @daring Re_t flay _orwhole disc,
chapl_ and tr_.
REP ALL: LJghls up during Repeat Ply- for whole
disc.
REP A-B: LJghls up dudngA B Repc_t.
Stop (Pause) Title,'Ptec_, Chapter indicator
indicator TITLE:LJghls upwhen showhagthe title.
LighLsap when stopping o_ TRACK: IAghlsupwhen showingth_ trac_,
p_usJ_gdisc playbael. CHAP: IAghtsup when showing lh¢ ¢hapt_.
Playback indicator
LJghls up during disc playback.
RDS indicator (U. K. and
Europe models only)
LighLsap when receivingan RDS
sigual, in PTYSEEK mcxleth_
PTYHOLD indicato_rlighls up.
2O
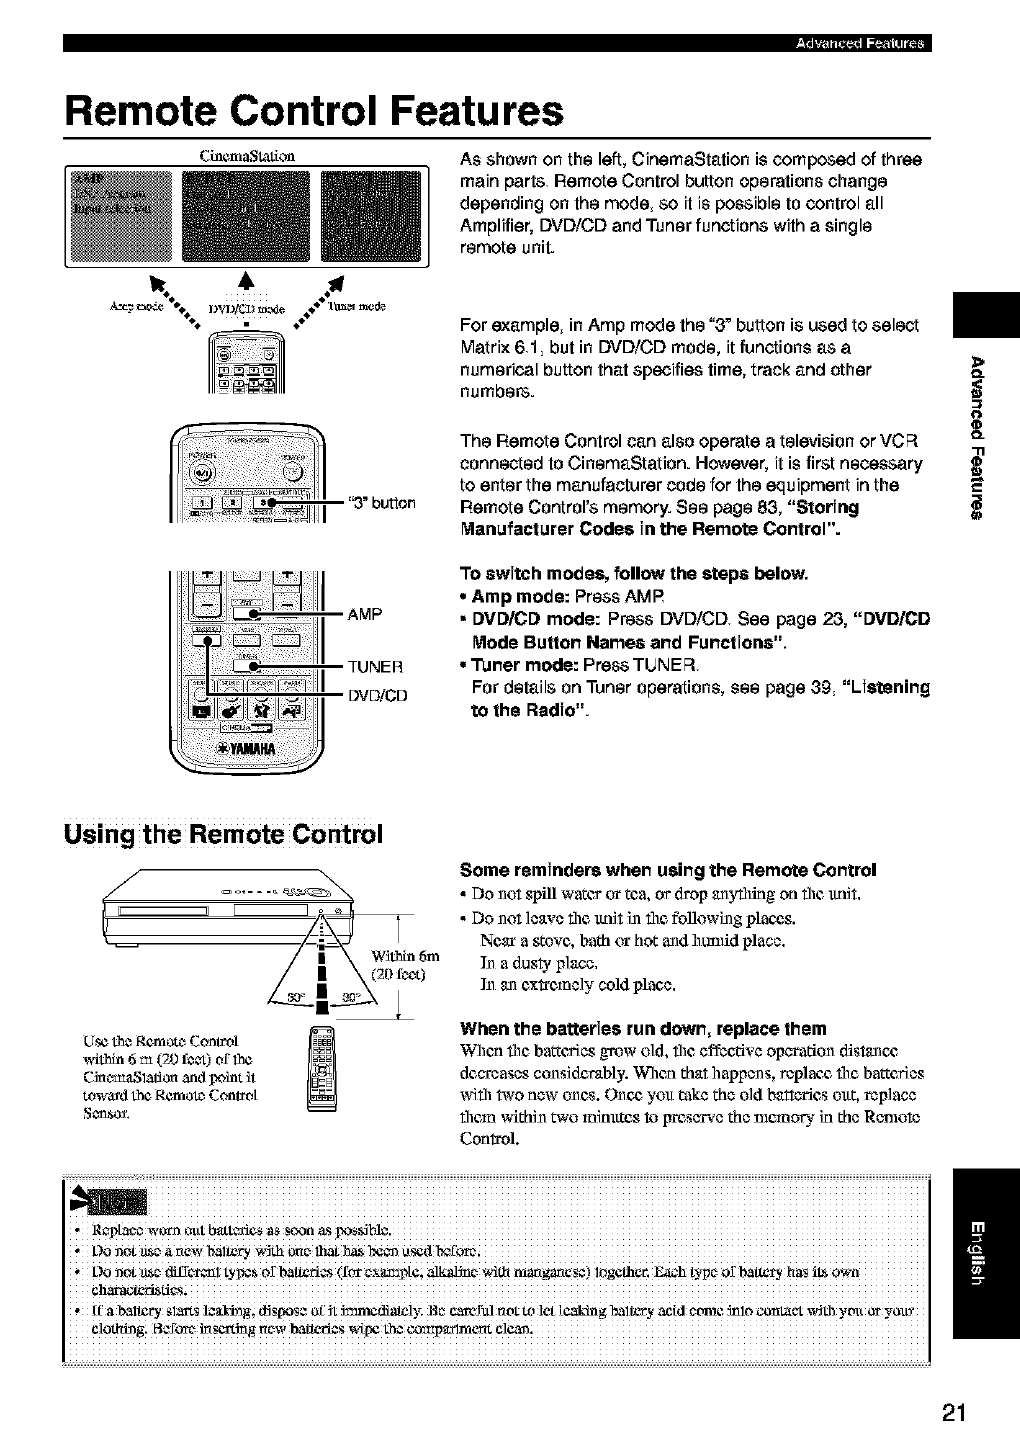
Remote Control Features
Cinem_t_t_on As shown on the left, CinemaStation is composed of three
main parts Remote Control button operations change
depending on the mode, so it is possible to control all
Amplifier, DVD/CD and Tuner functions with a single
remote unit.
For example, in Amp mode the "3" button is used to select
Matrix 61, but in DVD/CD mode, it functions as a
numerical button that specifies time, track and other
numbers.
'3"bu_on
DVDiCD
The Remote Control can also operate a television or VCR
connected to CinemaStation. However, it is first necessary
to enter the manufacturer code for the equipment in the
Remote Control's memory. See page 83, "Storing
Manufacturer Codes in the Remote Control".
To switch modes, follow the steps below,
• Amp mode: Press AMP
• DVD/CD mode: Press DVD/CD See page 23, "DVD/CD
Mode Butlon Name8 and Functions",
•Tuner mode: Press TUNER
For details on Tuner operations, see page 39 "Listening
to the Radio".
>
O_
O
q_
O_
i
Using the Remote Control
Within 6m
0
[.[setheRemotc_Control _1
_4thin 6 m (20 f¢_) of 1he
Cinc_l_lion and point it
toward the Remotc_Conh_ot
Some reminders when using the Remote Control
•Do not s!_tll water or tea, or drop anyflling on file tmR.
• Do not leave file ttnR i_ file following plan_,s.
Near a _ovc, bath or hot andhunfid place.
In a dusty place.
N an c,x_c,mely cold place.
When the batteries run down, replace them
When the barcc,ries grow old, the effective operation distancg
decreases considerably. When that happens, replant, file barcc,ries
with two new ones. Once, you take the old batteries out, replace
them within two minxttcs toIrrcsc'rve the nlcmory in the Remote
Control.
i
I
,oon0t_ea_ewba_ry w_th
L)O llOt 11_€_¢_ffC't¢I_l tyI_s Of batteries (for c_xam3Na; alkalJn €_,_-I_ _r_angan_s¢) logathar. _h t)q_¢_of bal_ry has iLS
, If' a bal_ry sl_ts l_aJ_ dJspos_ _£ Jt 5mmediately; _e c,_erul not t_ let [caking baltery acid ¢twae 5nlo conlat,_t with yott or y_l!_
21
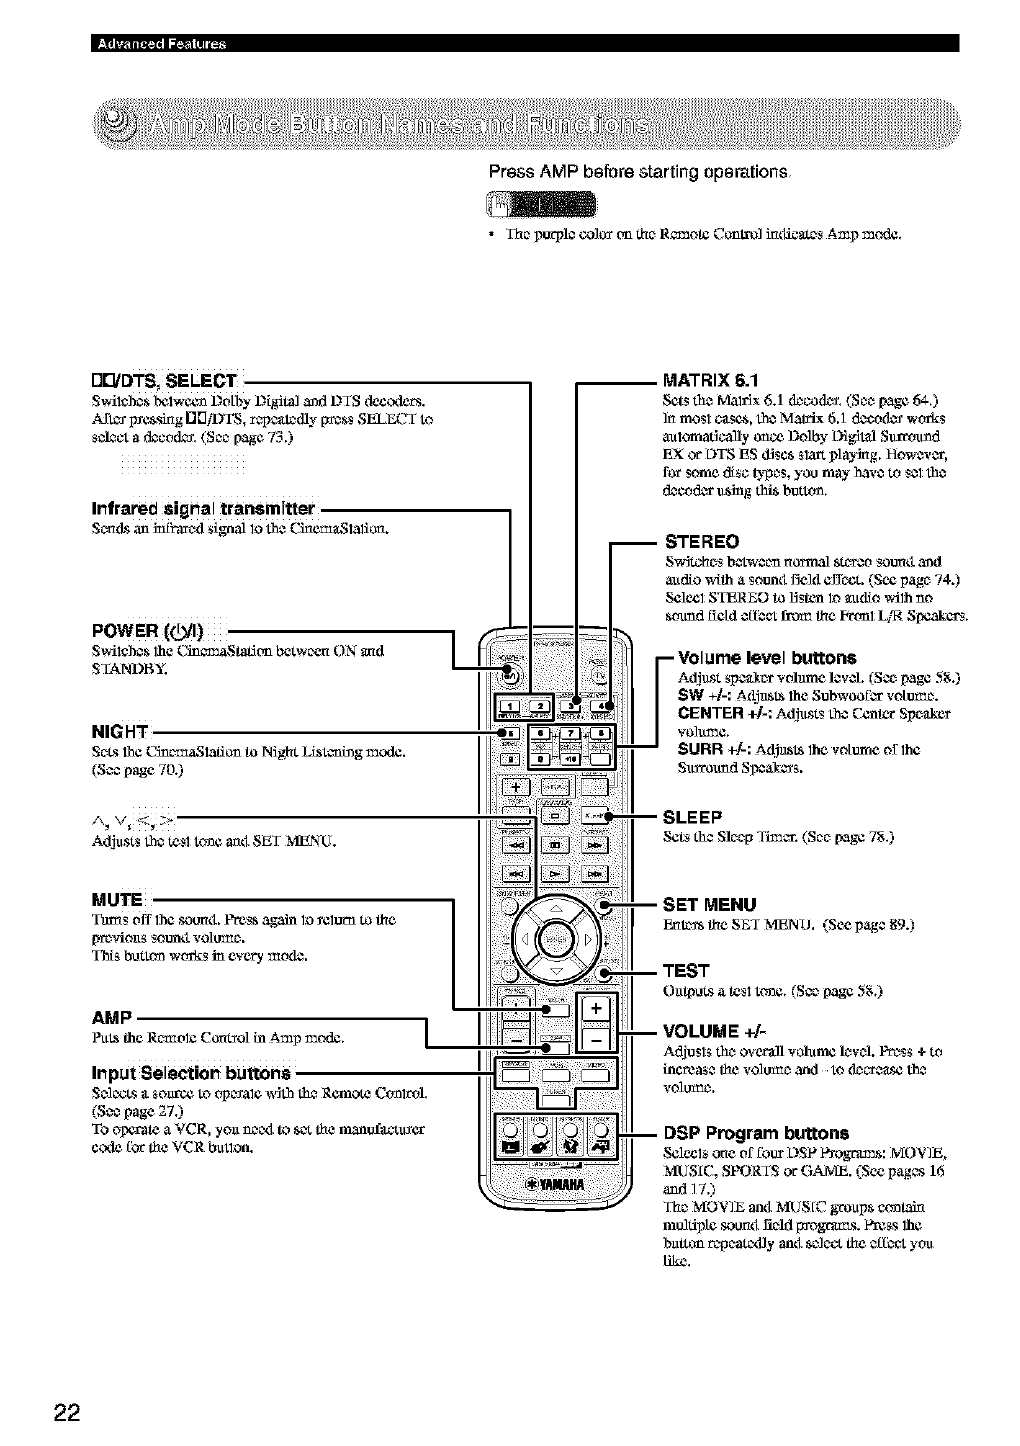
Press AMP before starting operations
•The p_pl$ co]o_ _m the Remote Co_t_] inditers Amp mode.
Adjusts th$ tes1to_e _4 SET MENU.
MATRIX 6.1
Sets the Malfix 6.1 (k_cod_. (See page 64.)
]n mos1 c_scs, the Matrix 6.1 dcco(L_ works
automatically once Dolby t}ig]tal Sin-round
EX or L)TSES d_scs slatt playing. However,
for some disc types, you may have to Selthe
d_cod_ u_g this button.
-Volume level buttons
Adjust spe_x volume levO. (nee page 5g.)
SW +t.: A£_SI_ the Subwoofer votumc.
CENTER +]-: Adjusts the Center Speaker
"¢o]tLl_e.
$URR _]-: A_st_ the votume orlhc
Surmuad SI_ea_ers.
SLEEP
Sets the Sleep Timer. (See [,age7g.)
MUTE
Tams off the soun4. Press again lo _elorn to the
[_f_,clouts Sottntl volu_e.
This button works in every me(L*.
AMP /
SET MENU
_t_ theSEf MENO. (Seepage89.)
DSP Program buttons
Selc_ls one of foot L)SP l_ograms: MOVIE,
MUSIC, SPORTS or GAME. (See pages 16
and 17.)
The MOVIE anti MUSIC groups conlah_
molfipte soon4 _ld I_ogrm_s. Press 1he
barton repeattxfly anti se]eo,the efI_ you
like.
22
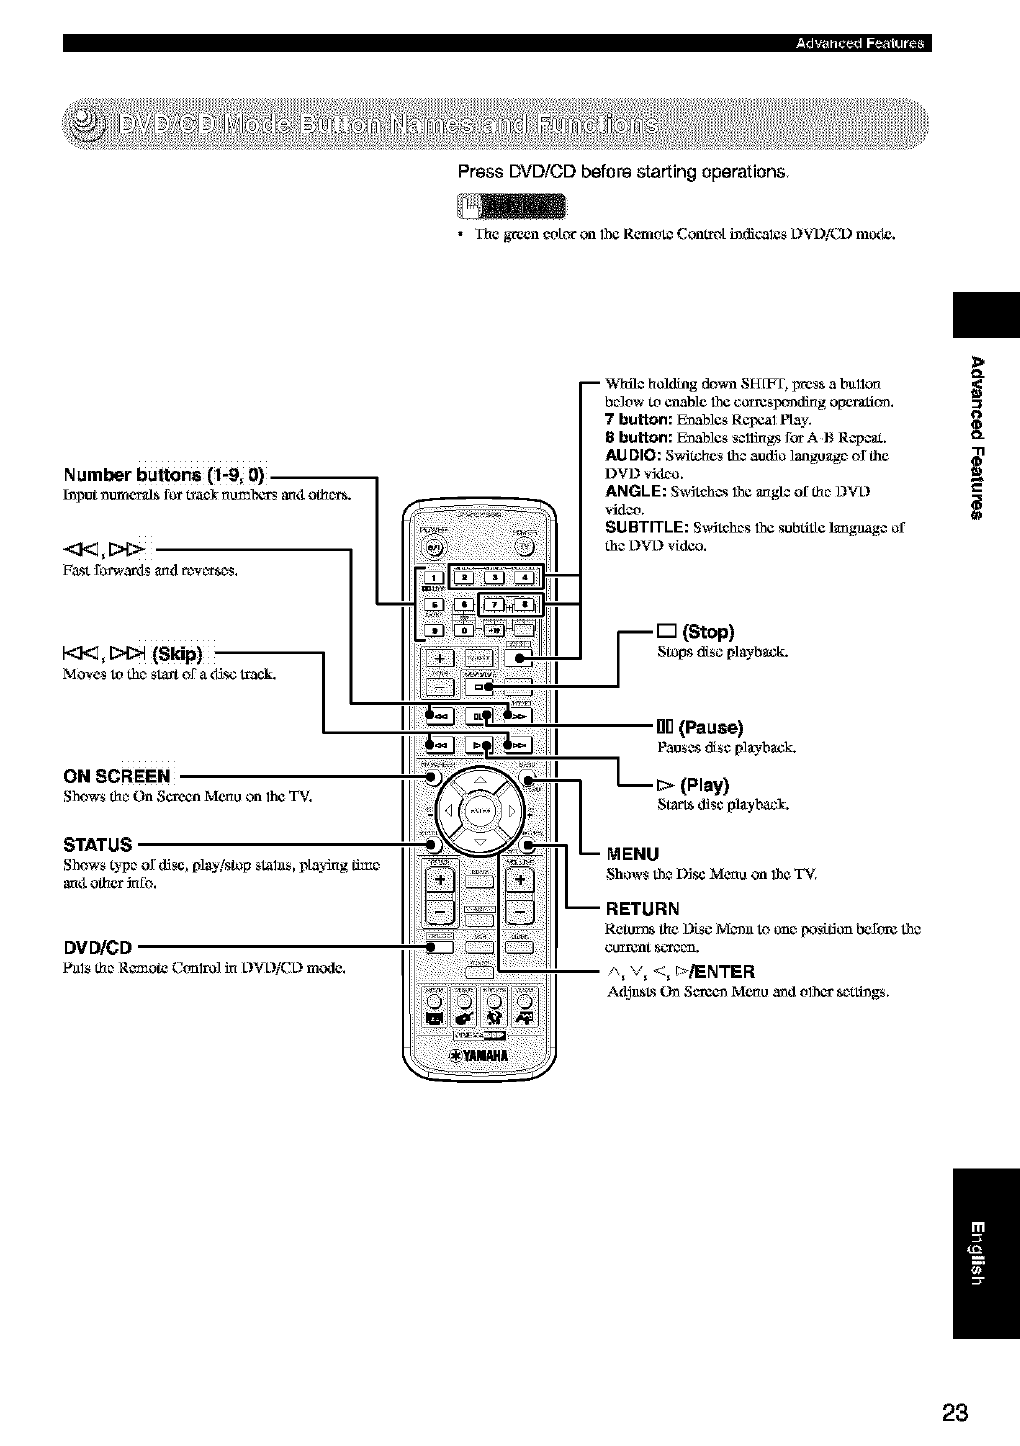
Press DVD/CD before starting operations
•The green ¢dior on the Remt_ Comrdi i_diCalCs DVD/CD mode.
Number buttons (_9; 0),
koput_tar=eralsfor t_ael nu_alxa_anti othcrrs.
F_st £_wartls and rc_vcrrsc_s. L
ON SCREEN
Shows thc_On Screen Menuon the TV.
STATUS
Shows type of disc, play/stop slahls, playing _c
anti other_o.
DVD/CD
Pals thc_Remote C(-_lrO]_L)_L)/CL)mode.
-- While hokling do_a SFf[FT, press abullon
be3ow to enable the corresponding opemtlom
7 button: E_ables ReI_l Play.
8 button: E_ables s¢l_gs for A t_ R_pcat.
AUDIO: S_Stohes the audio langu_g_ _the
DVD vktho.
ANGLE: S_dtohcs 1he an,gl_ ofth_ 12VL)
vidzo.
SUBTITLE: S_dtohes 1he subtitle language of
the L)VL)vk_.
-- [] (Stop)
Stops disc ply-back.
gO(Pause)
Pauses disc pie-back.
MENU
;hE__ sUR_Disc Men_ on the TV.
Retorts the Disc M_n to on_ _s_don bel_ore the
/_ v_ <_ I:>./ENTER
A_usl_s (h_ S¢r¢_ Menu and other sc_tthags.
>
o
/
23
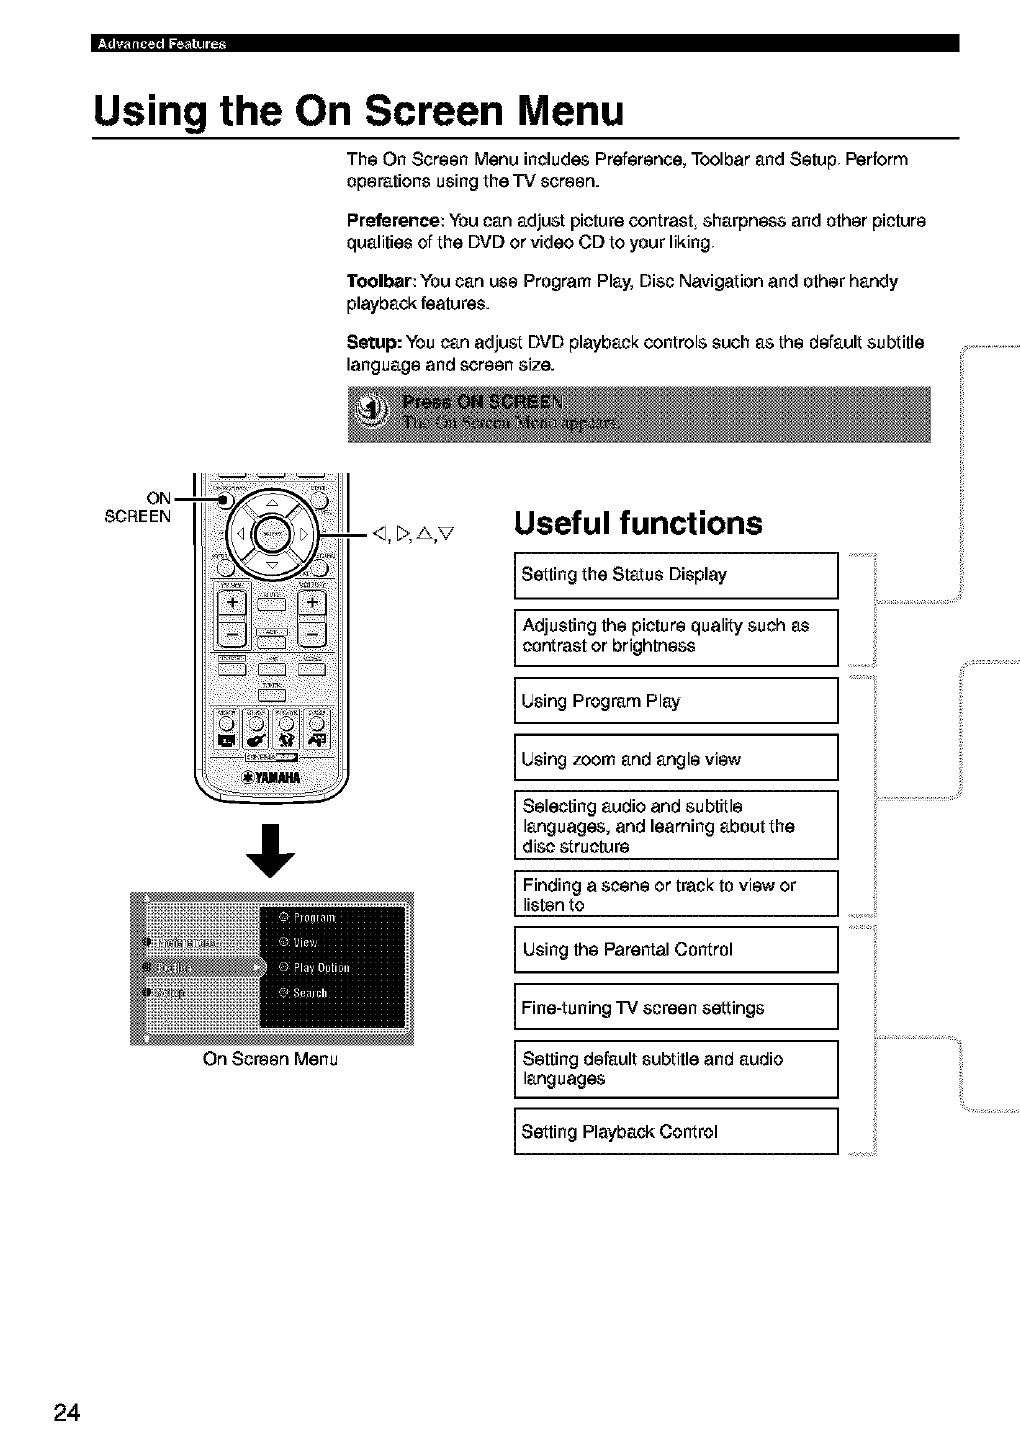
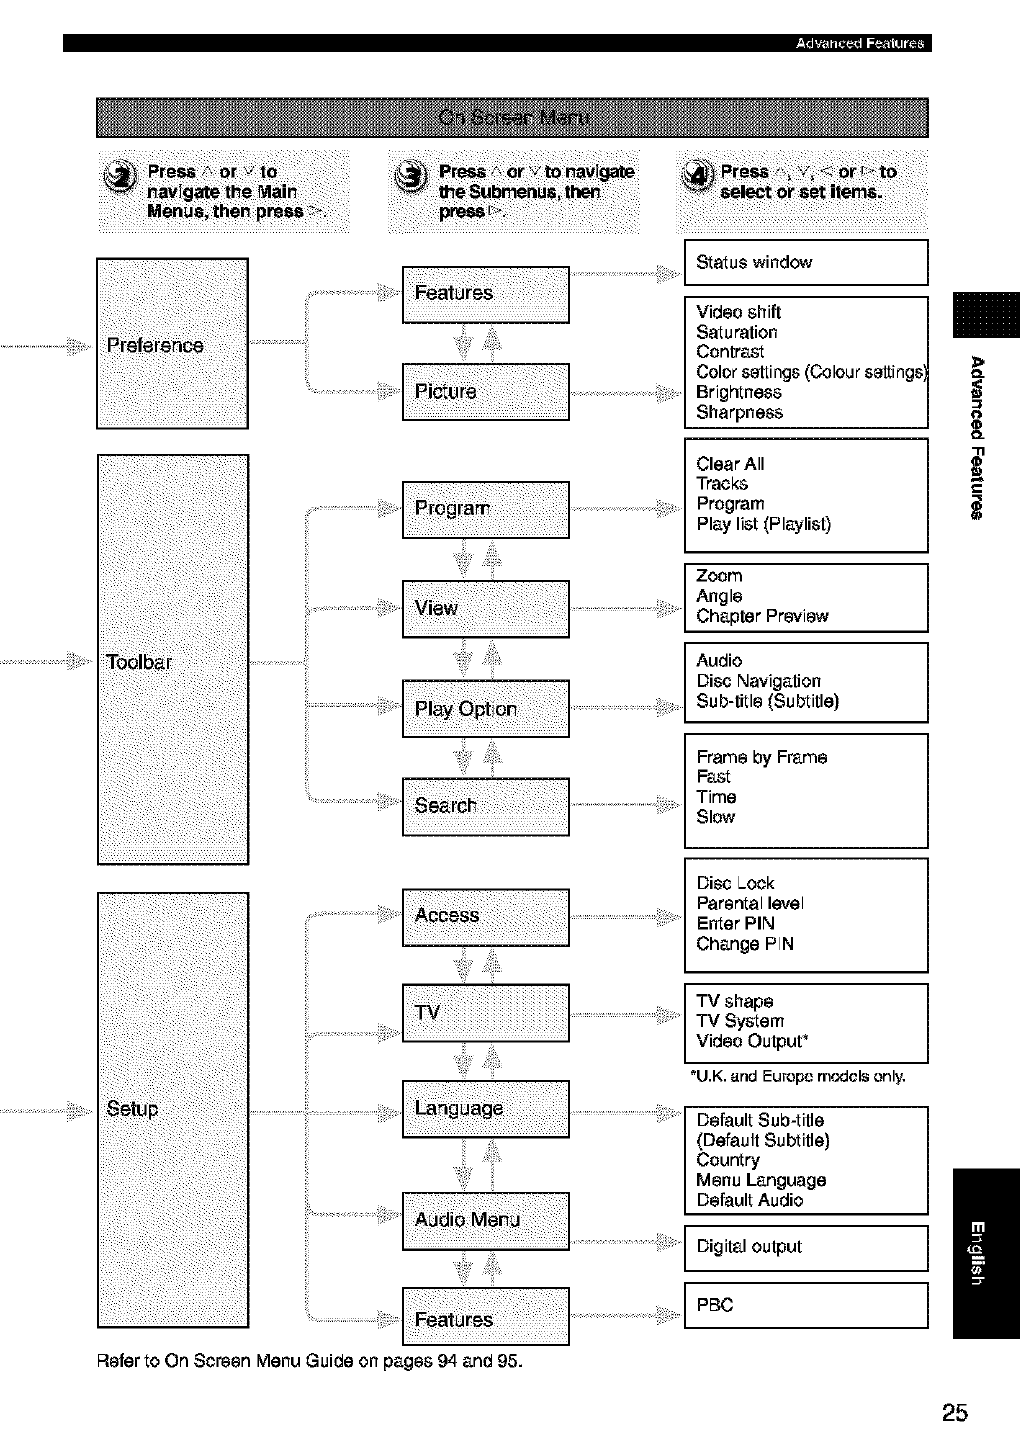
Using the On Screen Menu
The On Screen Menu includes Preference, Toolbar and Setup Perform
operations using the TV screen.
Preference: You can adjust picture contrast sharpness and other picture
qualities of the DVD or video CD to your liking
l"oolbar: You can use Program Play, Disc Navigation and other handy
playback features.
Setup: You can adjust DVD playback controls such as the default subtitle
language and screen size.
ON--
SCREEN
• . ;; ;
ii_!i!;ii!i !iii_i_i
On Screen Menu
- _1,_,A,V Useful functions
Setting the Status Display
Adjusting the picture quality such as
contrast or brightness
Using Program Play
Using zoom and angle view
Selecting audio and subtitle
languages, and learning about the
disc structure
Finding a scene or track to view or
listen to
Using the Parental Control
Fine-tuning TV screen settings
Setting default subtitle and audio
languages
Setting Playback Control
i;
24
_'ii_iiiii_i_ 4i_!_:_
Refer to On Screen Menu Guide on pages 94 and 95.
Status window
Video shift
Saturation
Contrast
Color settings (Colour settings
Brightness
Sharpness
Clear All
Tracks
Program
Play list (Playlist)
Zoom
Angle
Chapter Preview
Audio
Disc Navigation
Sub-title (Subtitle)
Frame by Frame
Fast
Time
Slow
Disc Lock
Parentallevel
Enter PIN
Change PIN
TV shape
TV System
Video Output _
*U.K. and Europe models only,
Default Sub-title
(Default Subtitle)
Country
Menu Language
Default Audio
Digital output
PE]C
O_
O_
25
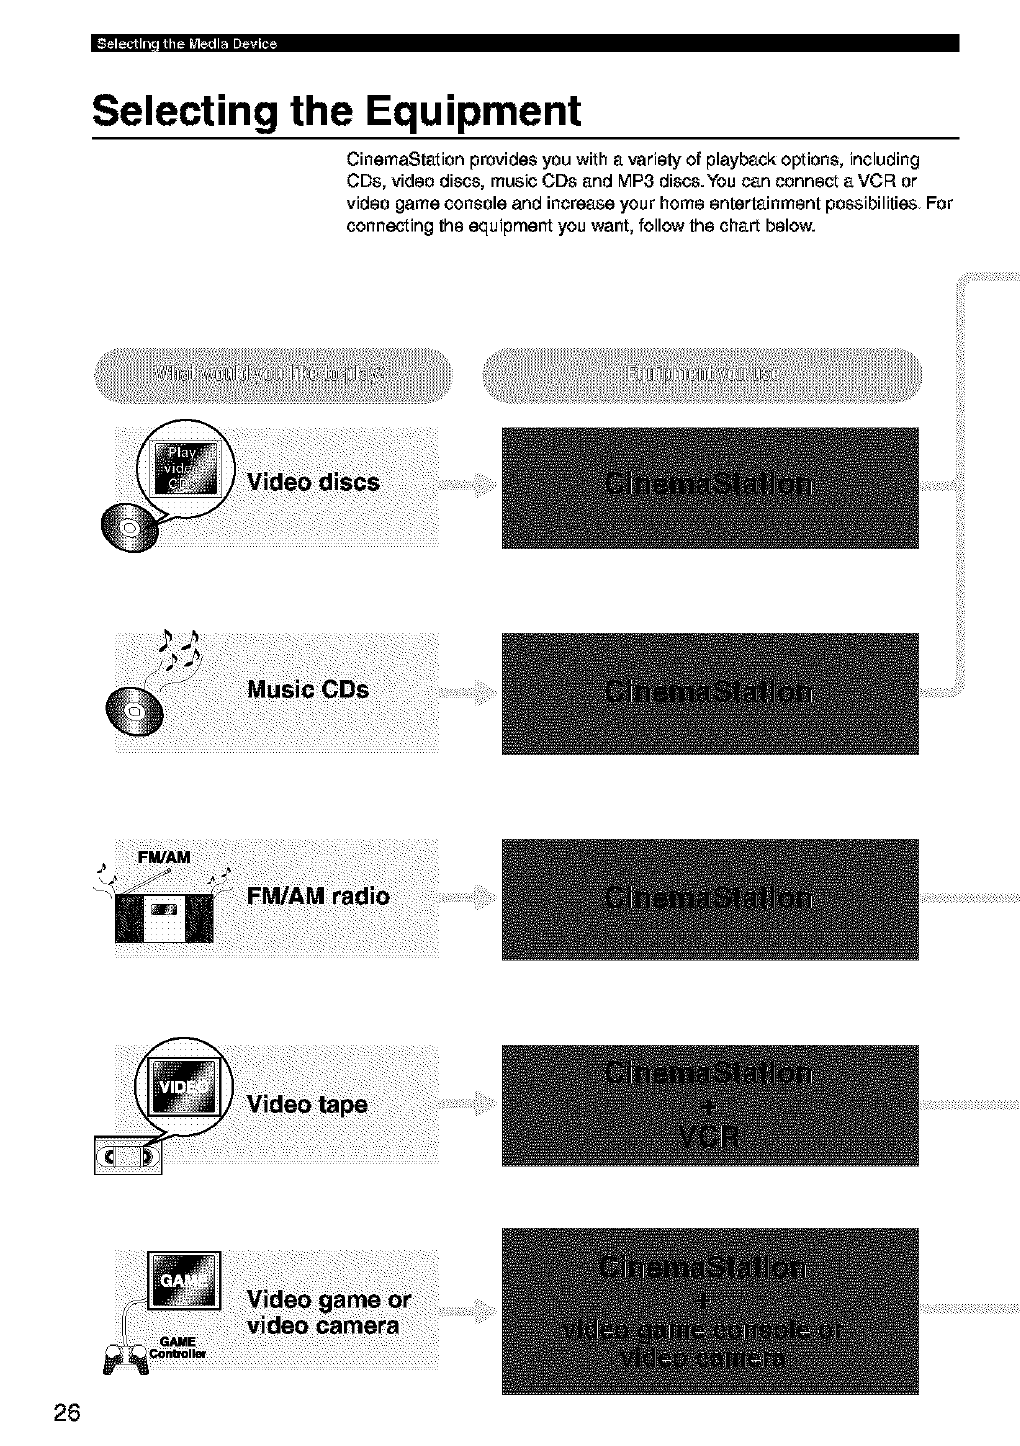
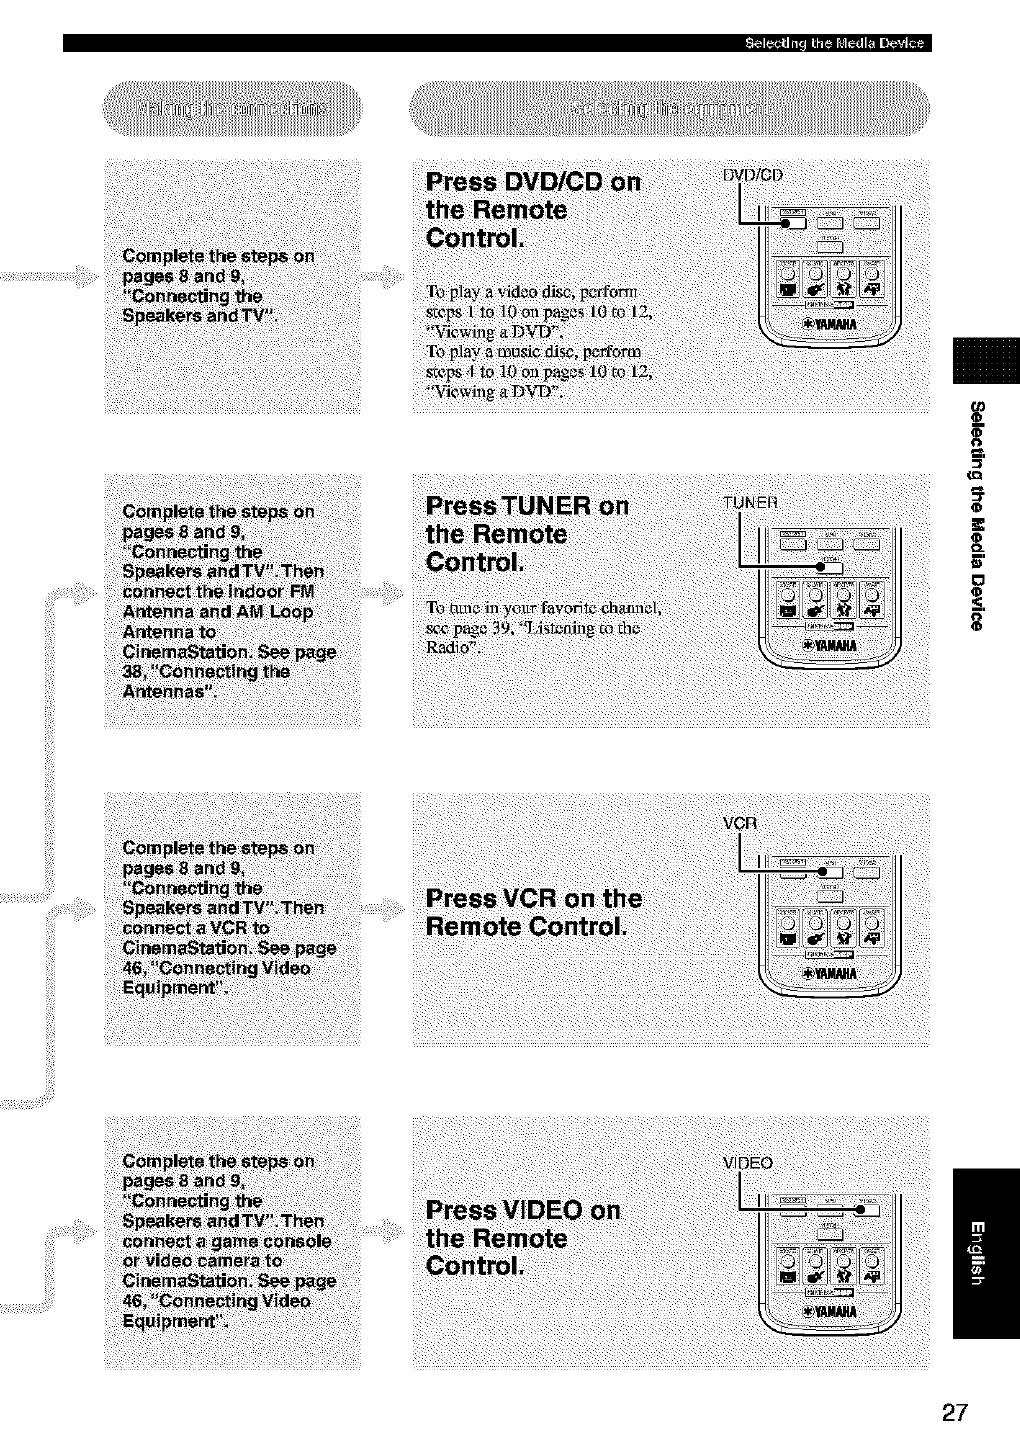
Selecting the Equipment
CinemaStation provides you with a variety of playback options, including
CDs, video discs, music CDs and MP3 discs.You can connect a VCF_ or
video game console and increase your home entertainment possibilities For
connecting the equipment you want, follow the chart below.
26
_J
(D
(D
(D
o_
0
/
27
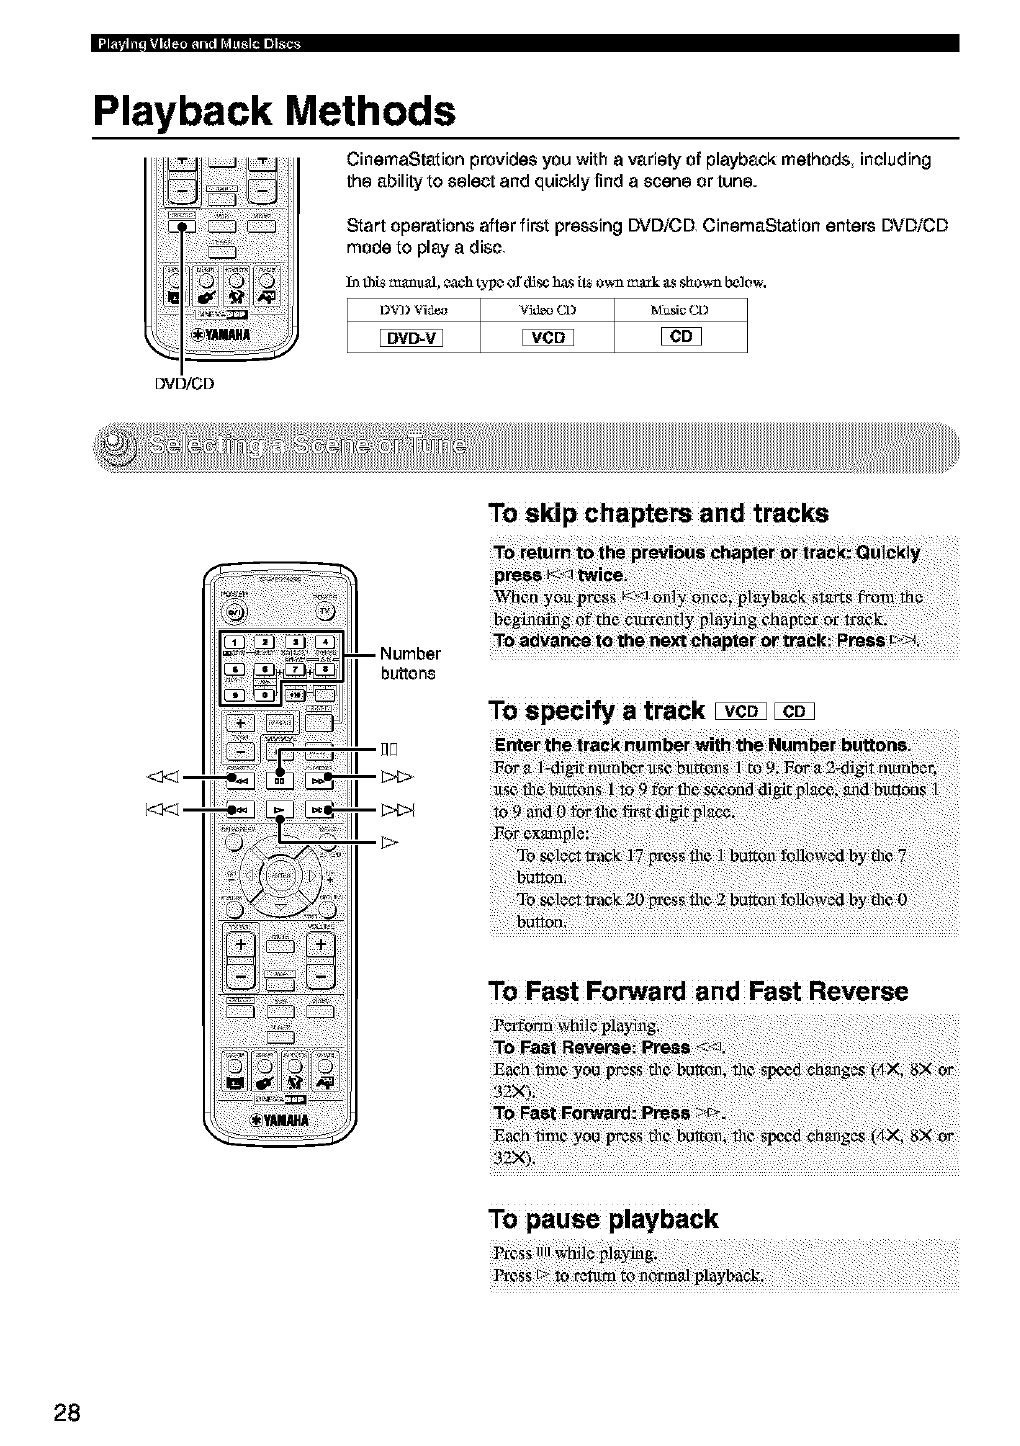
Playback Methods
CinemaStation provides you with avariety of playback methods including
the ability to select and quickly find ascene or tune.
Start operations after first pressing DVD/CD CinemaStation enters DVD/CD
mode to play adisc
Intht_mauu_l,each_c of_ h_sil_ow_ _k f_sshown below-.
DVD/CD
To skip chapters and tracks
<3<] --
To speci_ a track _
To Fast Forward and Fast Reverse
bF;i!_tRe_e 7 7 7 1 7 1
To pause playback
28
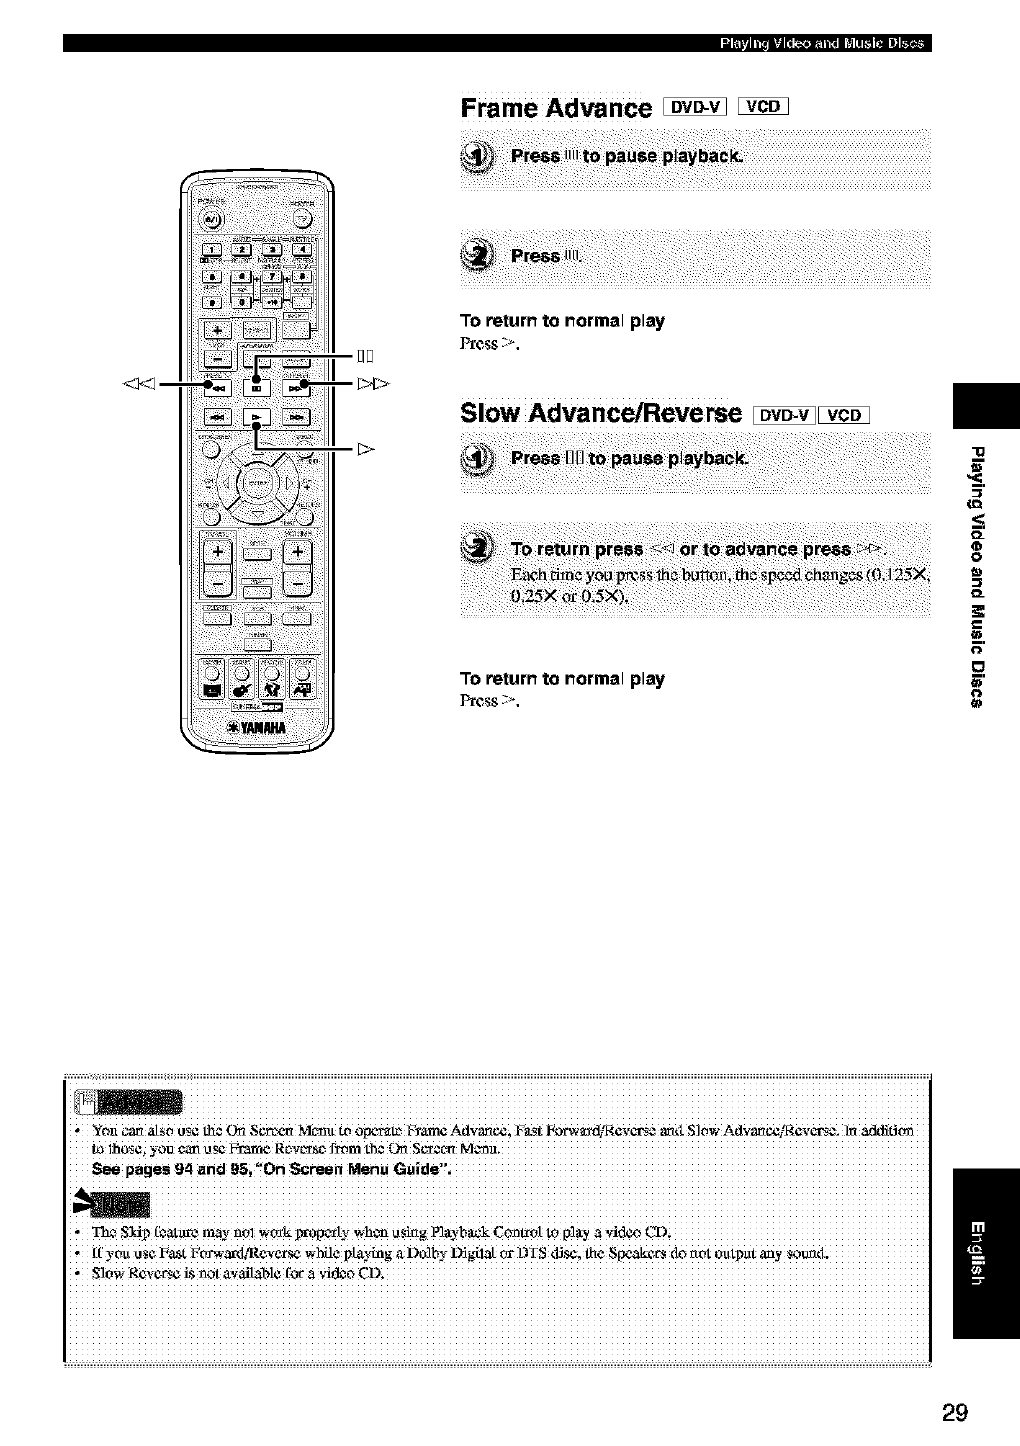
Frame Advance _
_m
To return to normal play
Slow Advance/Reverse Iovo.vIIVCDI
To return to normal play
"lg
O_
O
O
O=
_=.
O
€3
='
O
i iiiiiiiiiiiiiiiiiiiiiiiiiiiiiiiiiiiiiiiiiiiiiiiiiiiiiiiiiiiiiiiiiiiiiiiiiiiiiiiiiiiiiiiiiiiiiiiiiiiiiiiiiiiiiiiiiiiiiiiiiiiiiiiii
Yot_(a_ a[_o t_ the
i.l_IhI._$¢i
See pages 94 and _si'!On Screen Menu
* _,_ S_ip!bat_'c may no_ v,_k %m:,pc:rb,_wh_ _Si_g Pl_-b_k C_t,"oI to P!UYa ,,_ideo
If you use l_a_t Fo_-eax_Re_e_se while p _laying a Dolhy L_gila[ or DTS disc; flae Speak_',rs do rtot outp_it any sotmt_.
, S]0WReVerse _s _0t a_ailable for a ,;ide0 CD_ /
29
li_|_l IIII |I| _ llii_l ill dI 1[_ iII II_.
ON
SCREEN --
ENTER --
-- Number
buttons
._t_._._ i ;@,,, A
! >
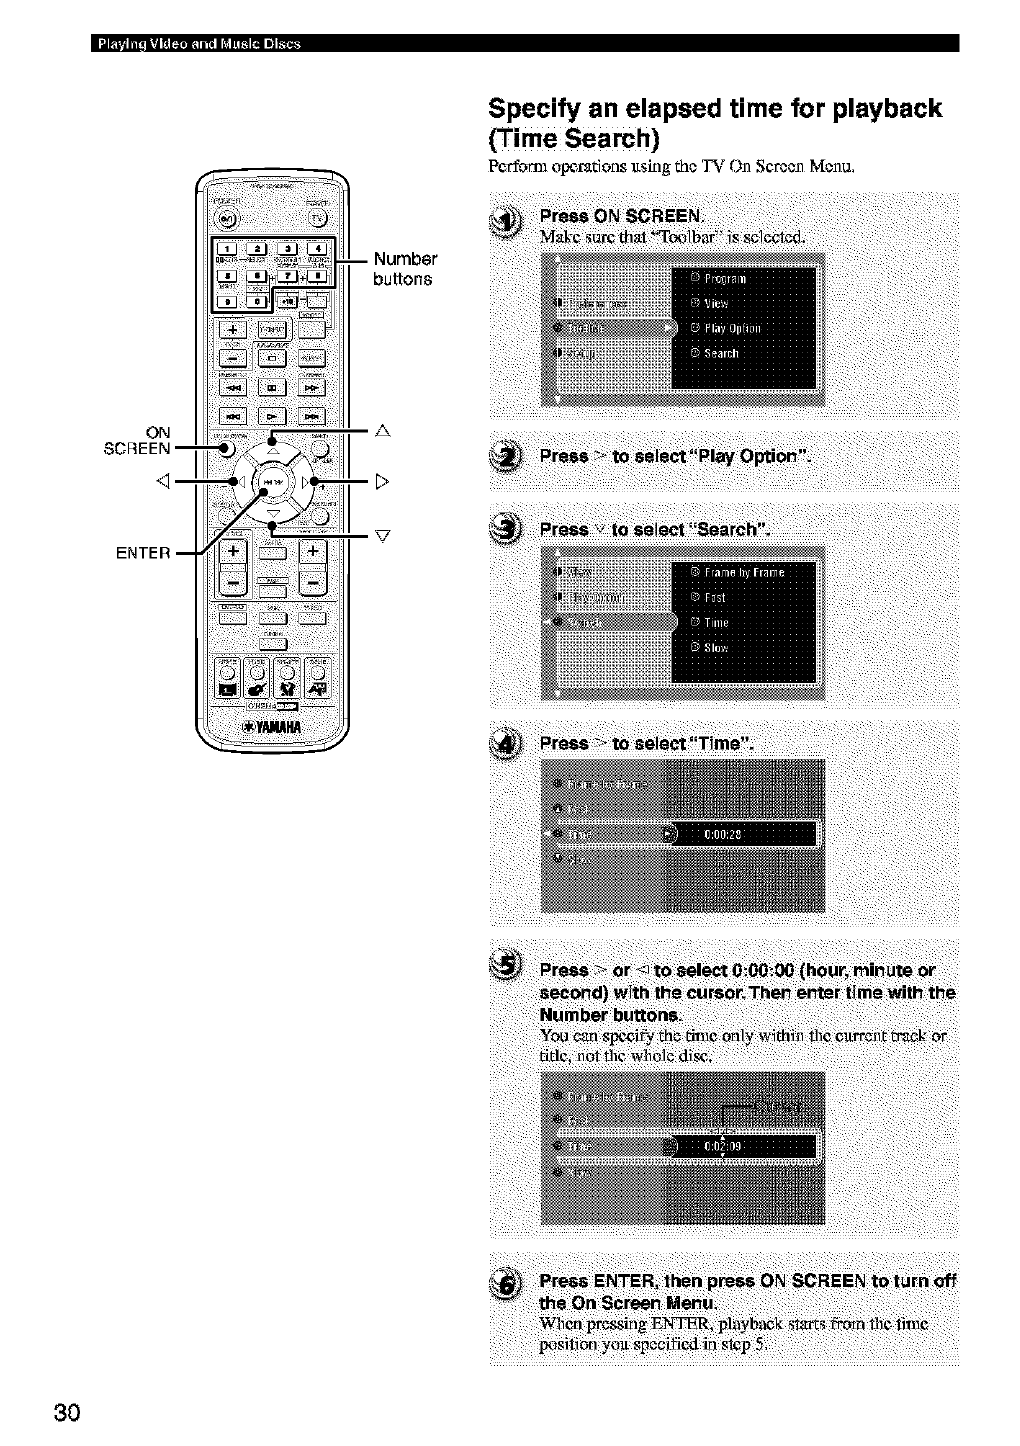
Specify an elapsed time for playback
(Time Search)
Perform opt_radons ltsing the _' On Screen Mcnu,
3O
ON
SCREEN--
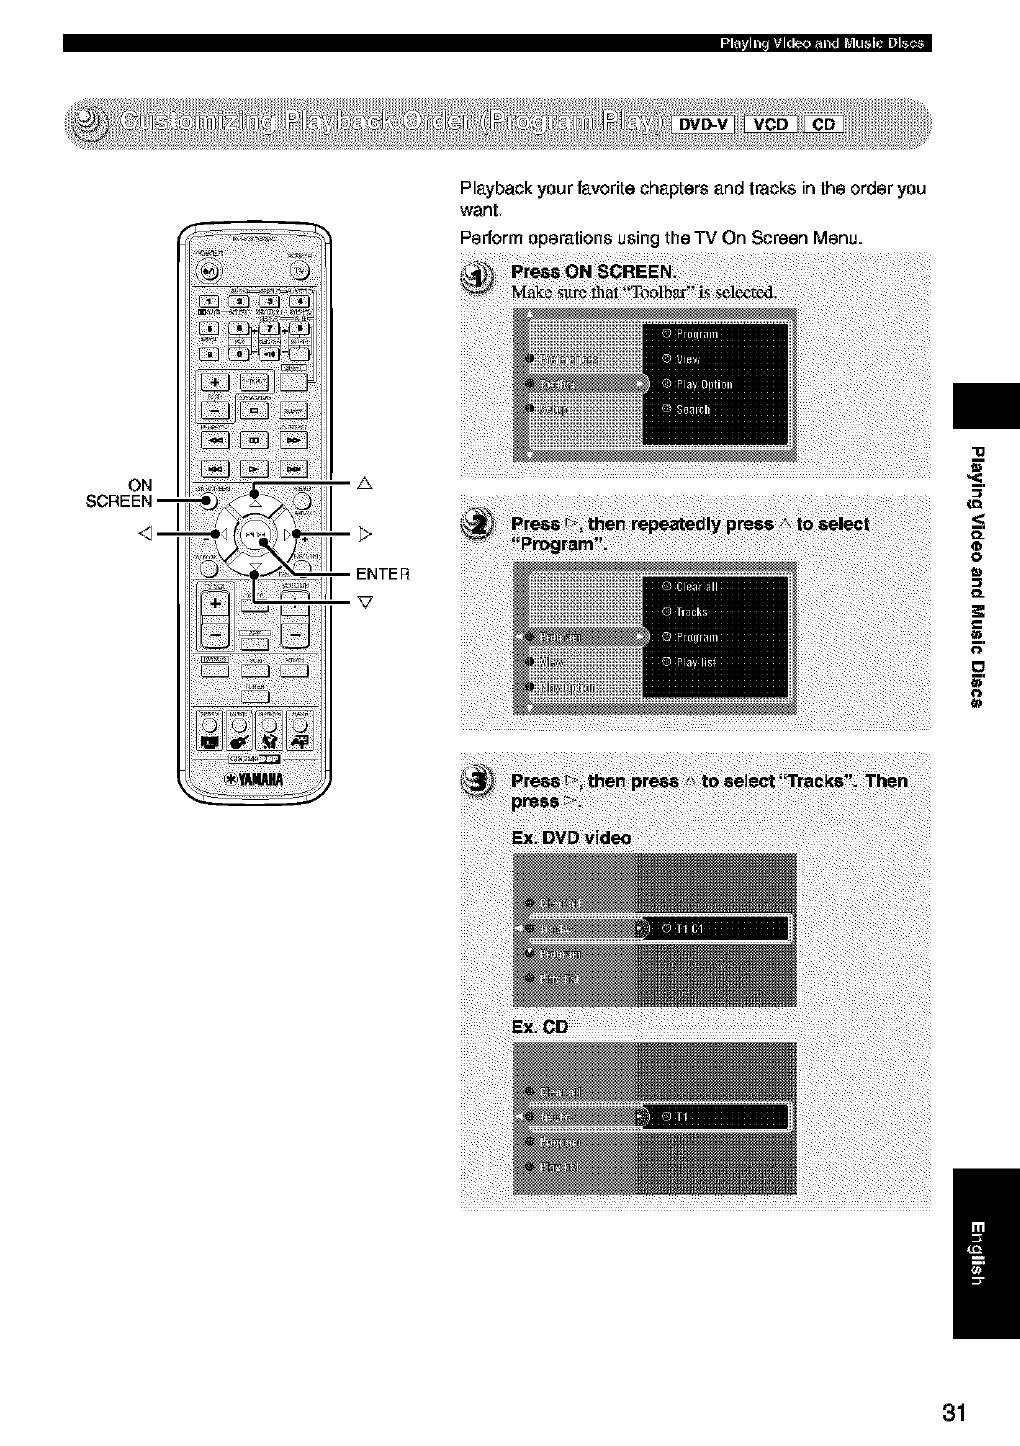
Playback your f_vorite chapters and tracks in the order you
went
Perform operations using the TV On Screen Menu.
i
0_
0
0
0_
€1
o
€1
/
31
ON
SCREEN--
z&
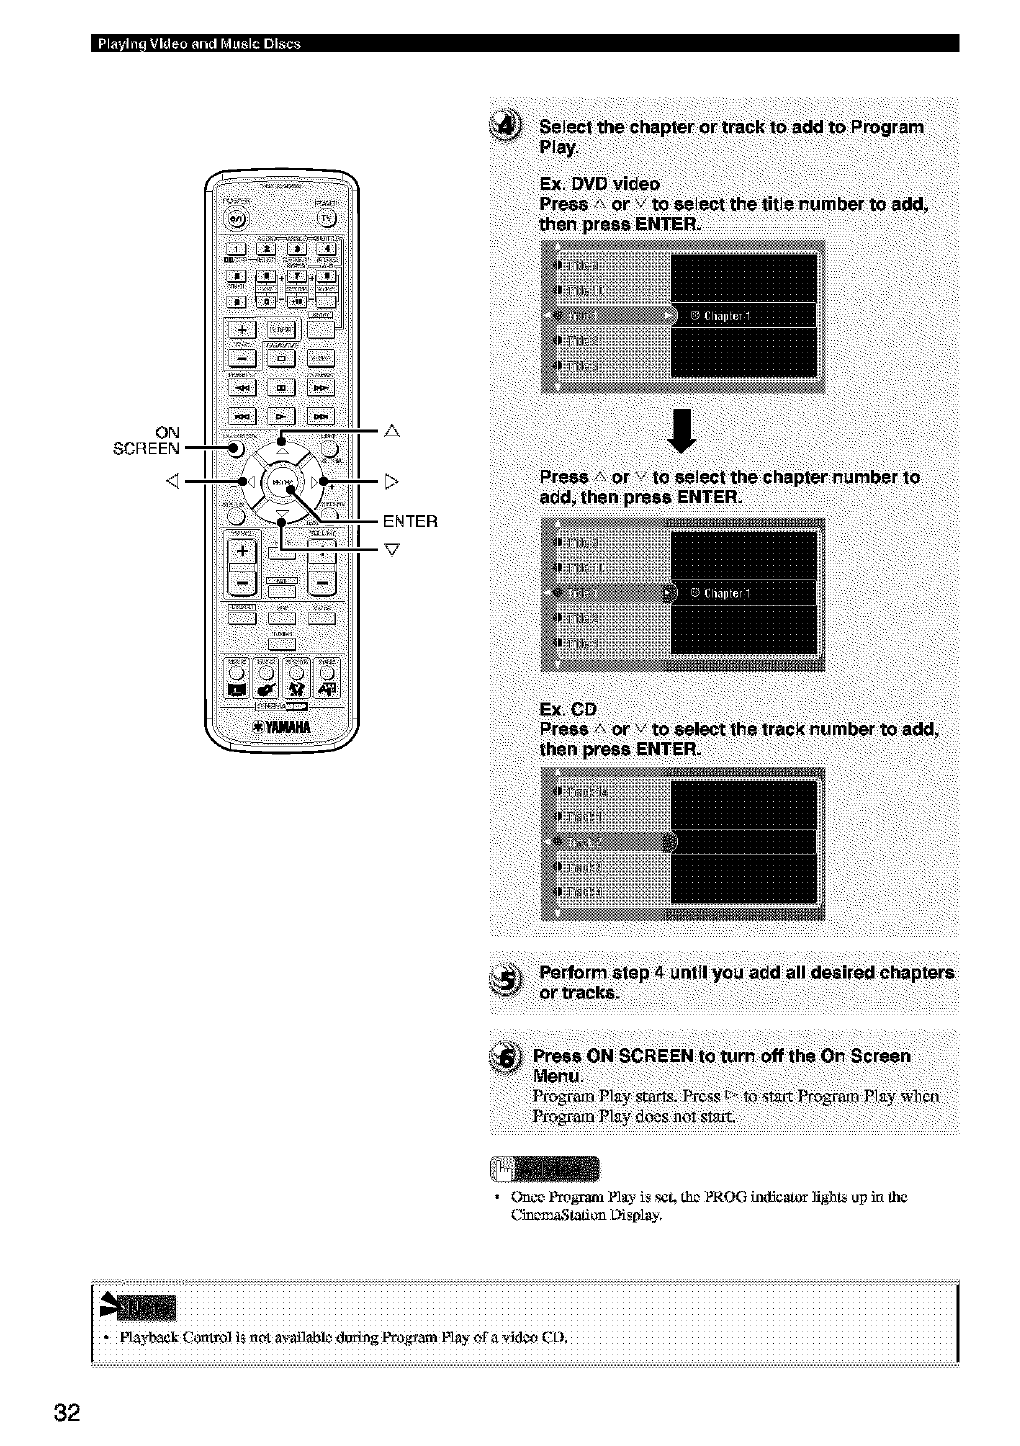
•Urnce Pmgraz_, P]_.- is s¢4 the PROG h_ficatoT lights up in tha
_tation L)isplay.
32
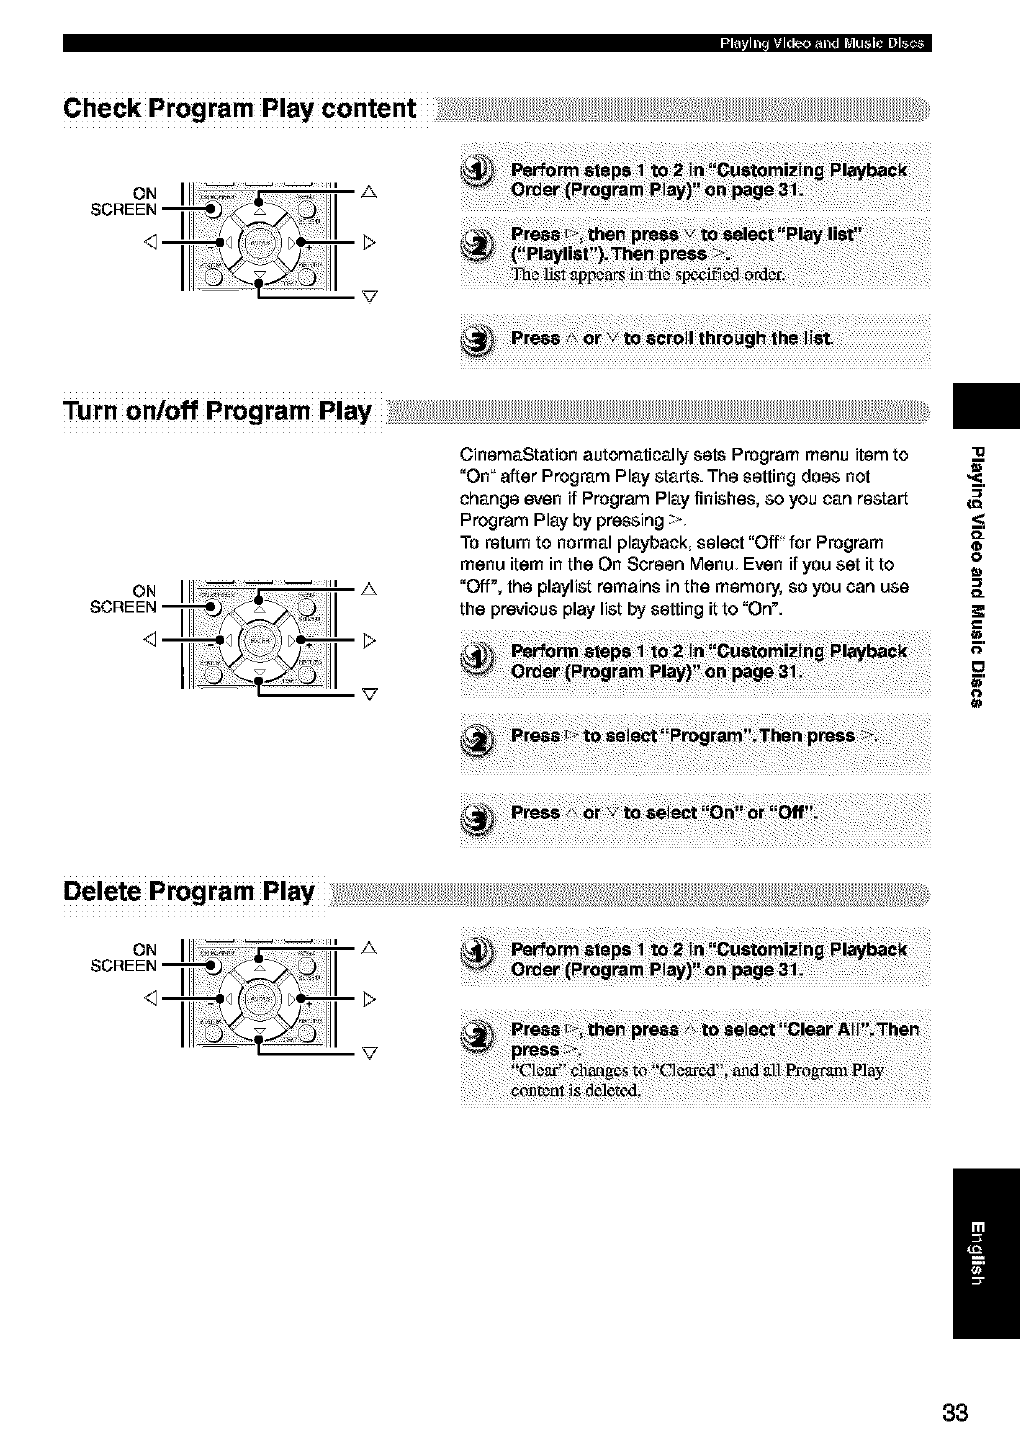
Turnon/offProgramPlayi! _:;_%____! ii!i:;1%ii!;_
III _ ¸¸_ _--= ii= A
111
CinemaStation automatically sets Program menu item to
"On" after Program Play starts. The setting does not
change even if Program Play finishes, so you can restart
Program Play by pressing >
To return to normal playback, select "Off" for Program
menu item in the On Screen Menu Even if you set it to
"Off", the playlist remains in the memory, so you can use
the previous play list by setting it to "On".
"lg
O_
0
O=
0
o
=.
0
/
33
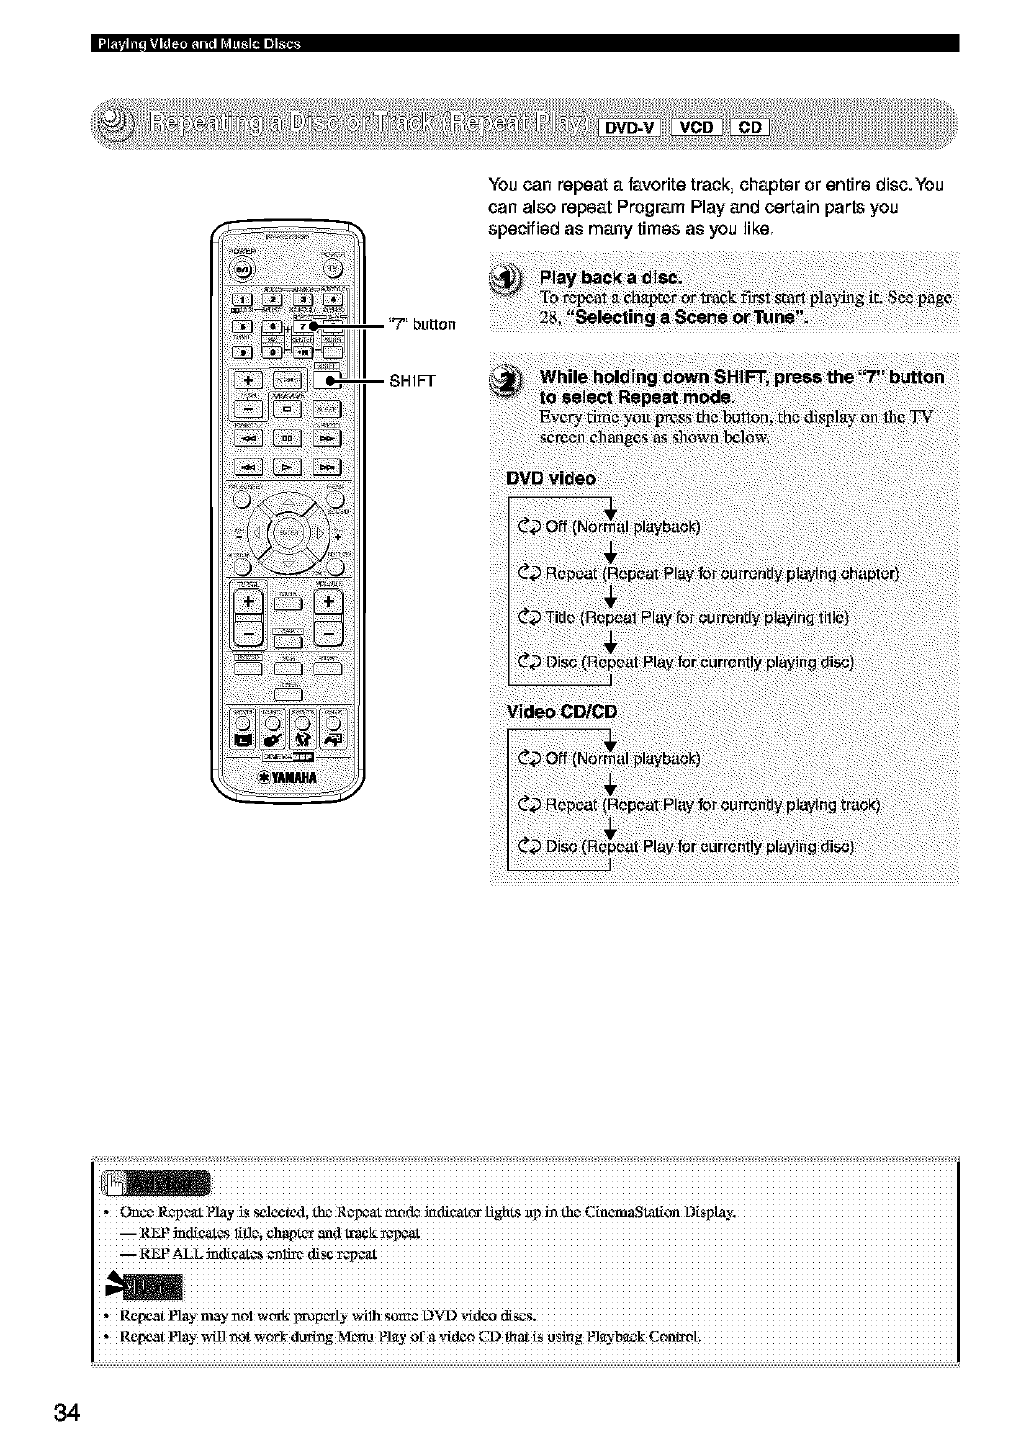
You can repeat a P_vorite track, chapter or entire disc.You
can also repeat Program Play and certain parts you
specified as many times as you like.
i iiiiiiiiiiiiiiiiiiiiiiiiiiiiiiiiiiiiiiiiiiiiiiiiiiiiiiiiiiiiiiiiiiiiiiiiiiiiiiiiiiiiiiiiiiiiiiiiiiiiiiiiiiiiiiiiiiiiiiiiiiiiiiiii
,ReN_tNay n_nol woxki_oF_ly ,_ilh $OLR+_L)V'D
,, Repeat Nay _ _t _0rk (lung M_t_ _?layof a vkl_ CD _at _S_s_g N_-b_k C0n_ot.
34
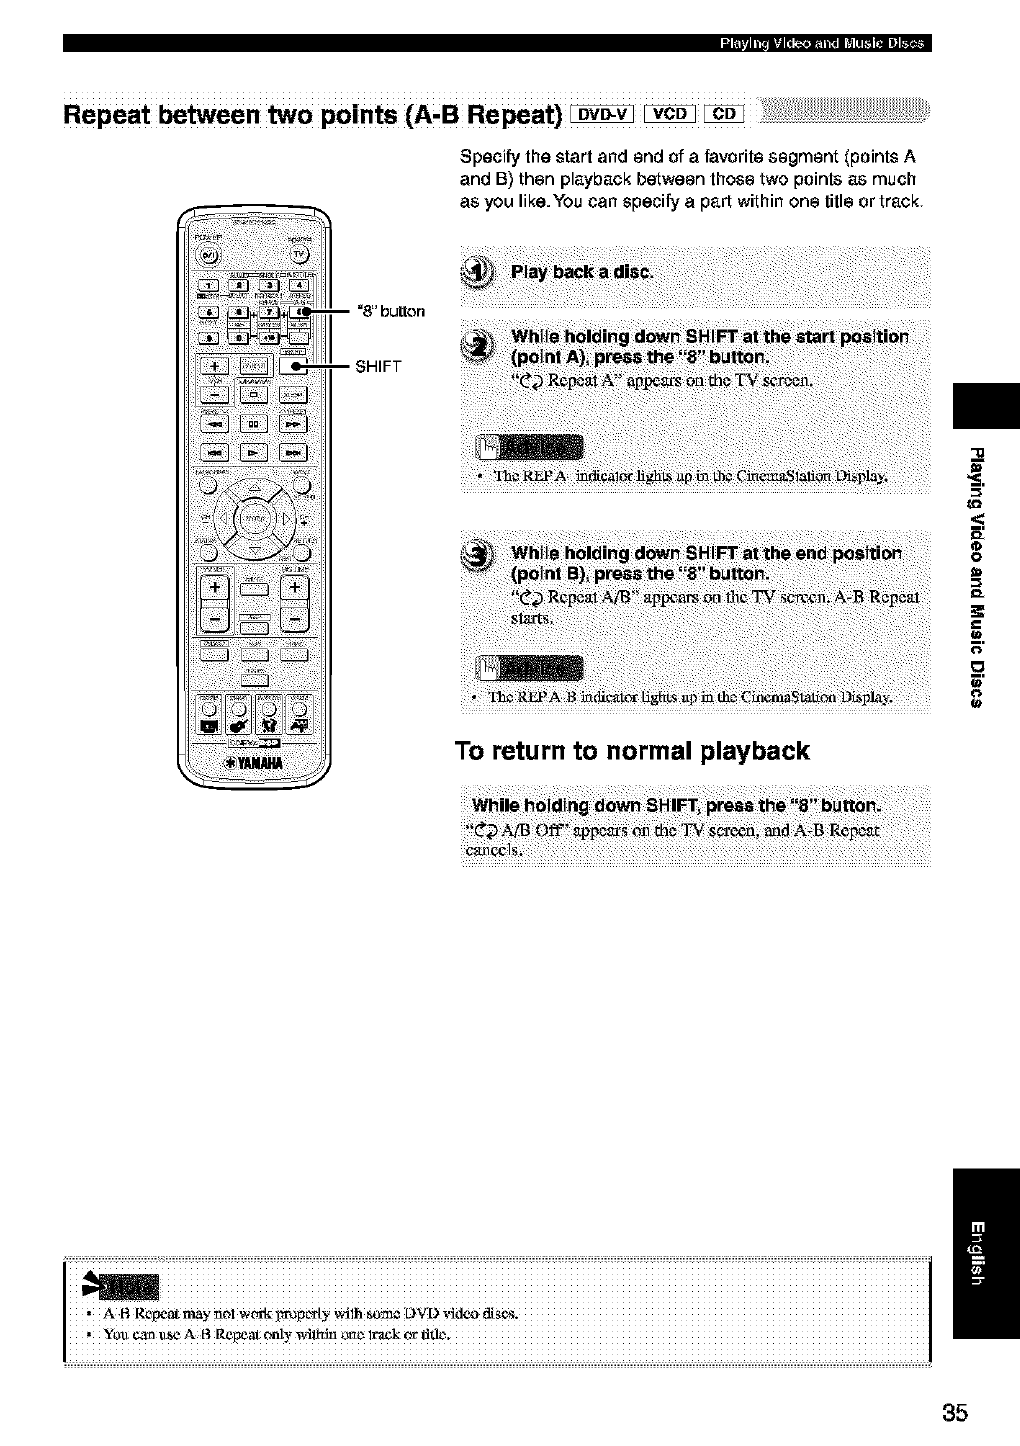
Repeat between two points (A, BRepeat) ovo-v vco
Specify the start and end of a favorite segment (points A
and B) then playback between those two points as much
as you like. You can specify a part within one title or track
-- =8" button
-- SHIFT
To return to normal playback
<:
0
(€
G'
(€
w
35
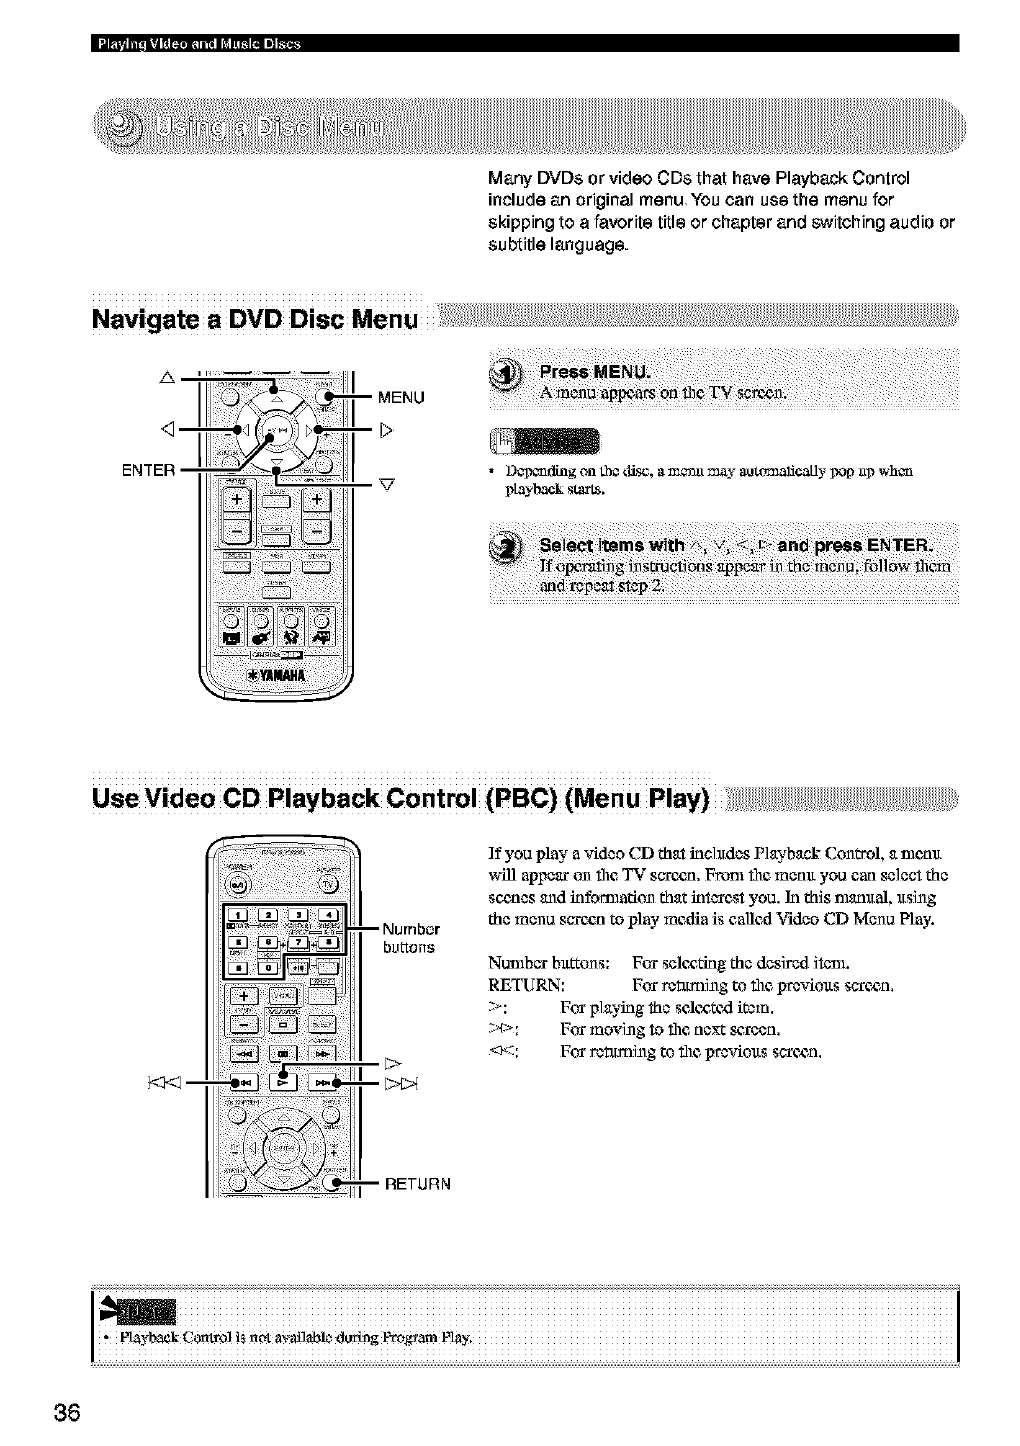
Many DVDs or video CDs that have Playback Control
include an original menu You can use the menu for
skipping to afavorite title or chapter and switching audio or
subtitle language.
•D_ding on the d£_j, a m_n_l may aotomalicaOy _op _g_whc_
playback start8.
Use Video CD Playback Control (PBC) (Menu Play) +++;+++++++++++++++++++
_m
If you play a video CD that irichtdes Playback Con_l, a nlenlt
wffi appear on file,TV saree,n. Fronl file,memt you can select the
sc_,nes and kifomladon that interest you. In this nmmtal, ltsing
the menu sare_n to play media is called Video CD Menu Play.
Nunthar bxt_ons: For selc, afing the desired item.
RETURN: For rct_ming to file prcvioxts saree, n.
>: For playing the sclc, atc_l item.
;:¢>: For moving to file, next _,roen,
_*::: For rctuming to thc proviolts sarc_n,
! iiiiiiiiiiiiiiiiiiiiiiiiiiiiiiiiiiiiiiiiiiiiiiiiiiiiiiiiiiiiiiiiiiiiiiiiiiiiiiiiiiiiiiiiiiiiiiiiiiiiiiiiiiiiiiiiiiiiiiiiiiiiiiiiiiiiiii
i ii , i +i ? i++ i+ i i %iiiiiiiiiiiiiiiiiiiiiiiiiiiiiiiiiiiiiiiiiiiiiiiiiiiiiiiiiiiiiiiiiiiiiiiiiiiiiiii
36
You can play MP3 music that was recorded onto a CD-R or
CD-RW by a computer.
C_ Album_'_
(Folder)
D Track
(File)
•DepemlJng_m_coafling ¢ondidtrnssome discs catmot be played.
Disc Structure
Si_¢_ file MP3 format can store several albmns on a disc,, a
fo]des is assignexl to an ,A]bum". and a fi]e is assigned to a
"Track".
Repeat Play
You can ltse Track Repeat and Albmn Repeat to repeat file
nmsic. See page 34. "Repealing a Disc or _ack (Repeal
Play)",
Playback status on the TV screen
You can checkthe playback stares(disc b,pe, now p]ayizgi
stoppe4.) along with the toted and e]apsedplaying of the curreat
_aek on the TV scxe_n.
i %iiiiiiiiiiiiiiiiiiiiiiiiiiiiiiiiiiiiiiiiiiiiiiiiiiiiiiiiiiiiiiiiiiiiiiiiiiiiiiiiiiiiiiiiiiiiiiiiiiiiiiiiiiiiiiiiiiiiiiiiiiiii
, Cinem&Stafion i_ ¢olr_pafiNe _4th _t_it rate r_ge of 32, 64, 96; 128, 1 £2 or 2_6 kbps; Cin_&Stafton is also _o_palib]e
'Cinen't&S_onL_eon'_padNe_4th _t_a_g fi_xla_ey _32i _il or 48
-a
<
0
=€
__.
0
o
0
t_
,in someCas_, yoa_y r_otbe abte to Nay _lcs iz th* _ _y W_a-_r_,C_d¢d.
/
37
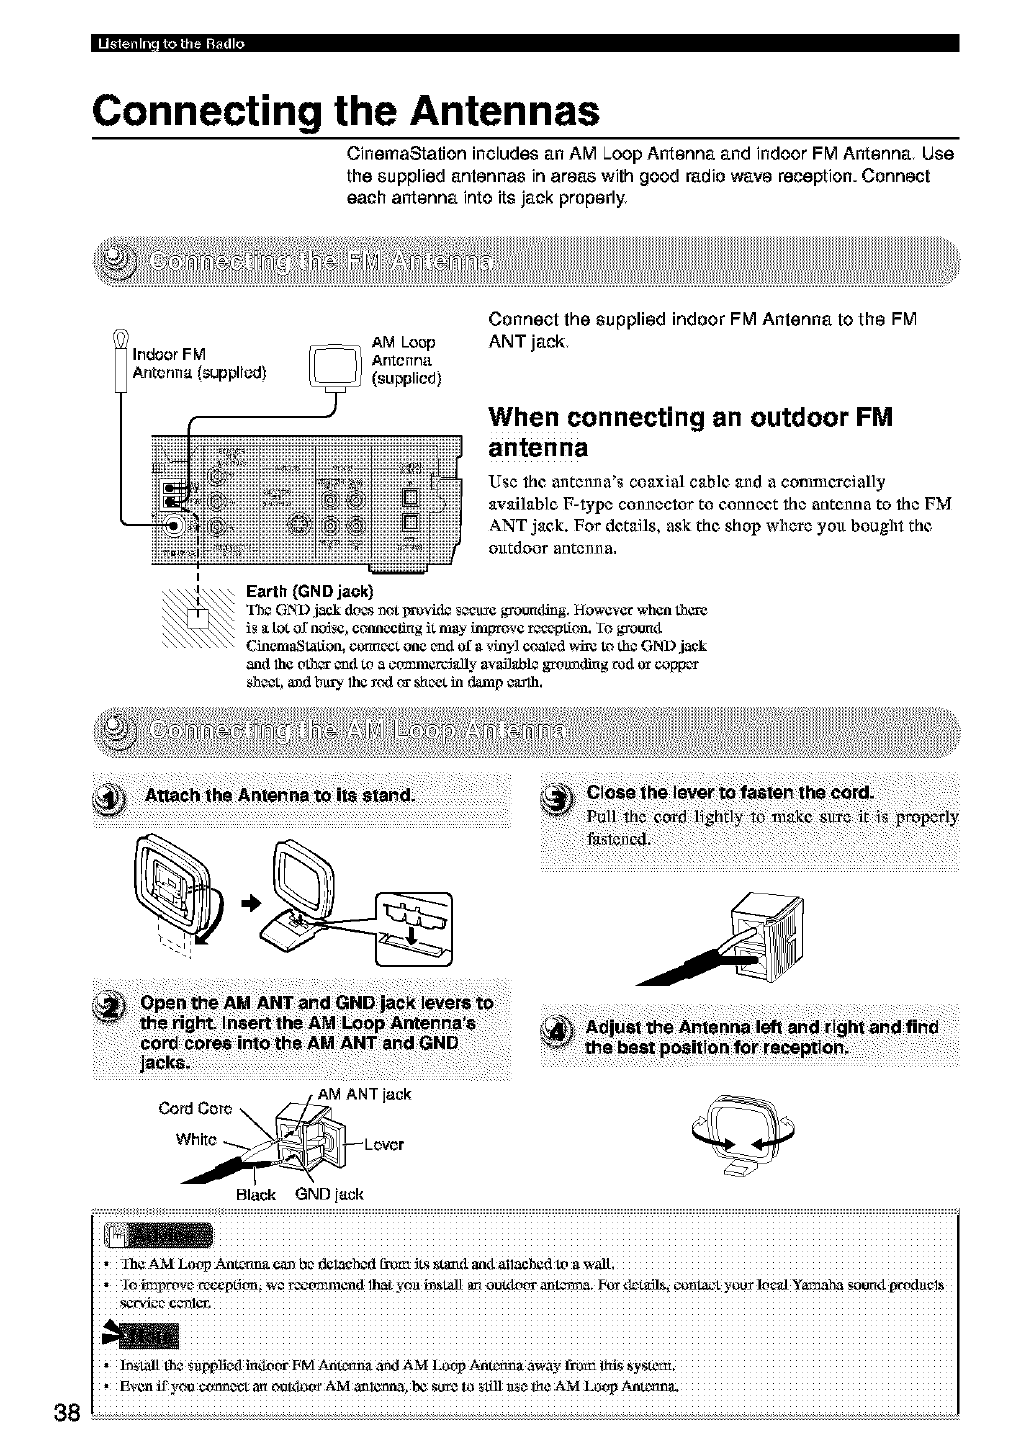
Connecting the Antennas
CinemaStation includes an AM Loop Antenna and indoor FM Antenna Use
the supplied antennas in areas with good radio wave reception. Connect
each antenna into its jack properly
IAM Loop
Indoor FM Antenna
Antenna (supplied) (supplied)
Connect the supplied indoor FM Antenna to the FM
ANT jack
When connecting an outdoor FM
antenna
Use the antcn_a's coaxial cab]c, and a conmlercial]y
availab]e F-type connector to connect the antenna to the FM
ANT jack. For details, ask the shop where you bought the
otttdoor anten_ a.
Earth (GND jack)
The GND ,jack doesmot pr_vkL_ sere grounding. However when tho-e
is _ttot o[ ncdse, conneclmg it may tmprove reception. Io grotmtt
CinemaSlatioa, cormect one _1 of avinyl coalzd vArc to die GND j_k
anti lh¢ oth_r _1 to a ctrn311ercJ&]lyavagabl¢grOttladir_grod or col_c_
shc_, a_d bt_. 1he _c4t or sheet in damp ¢aalh.
38
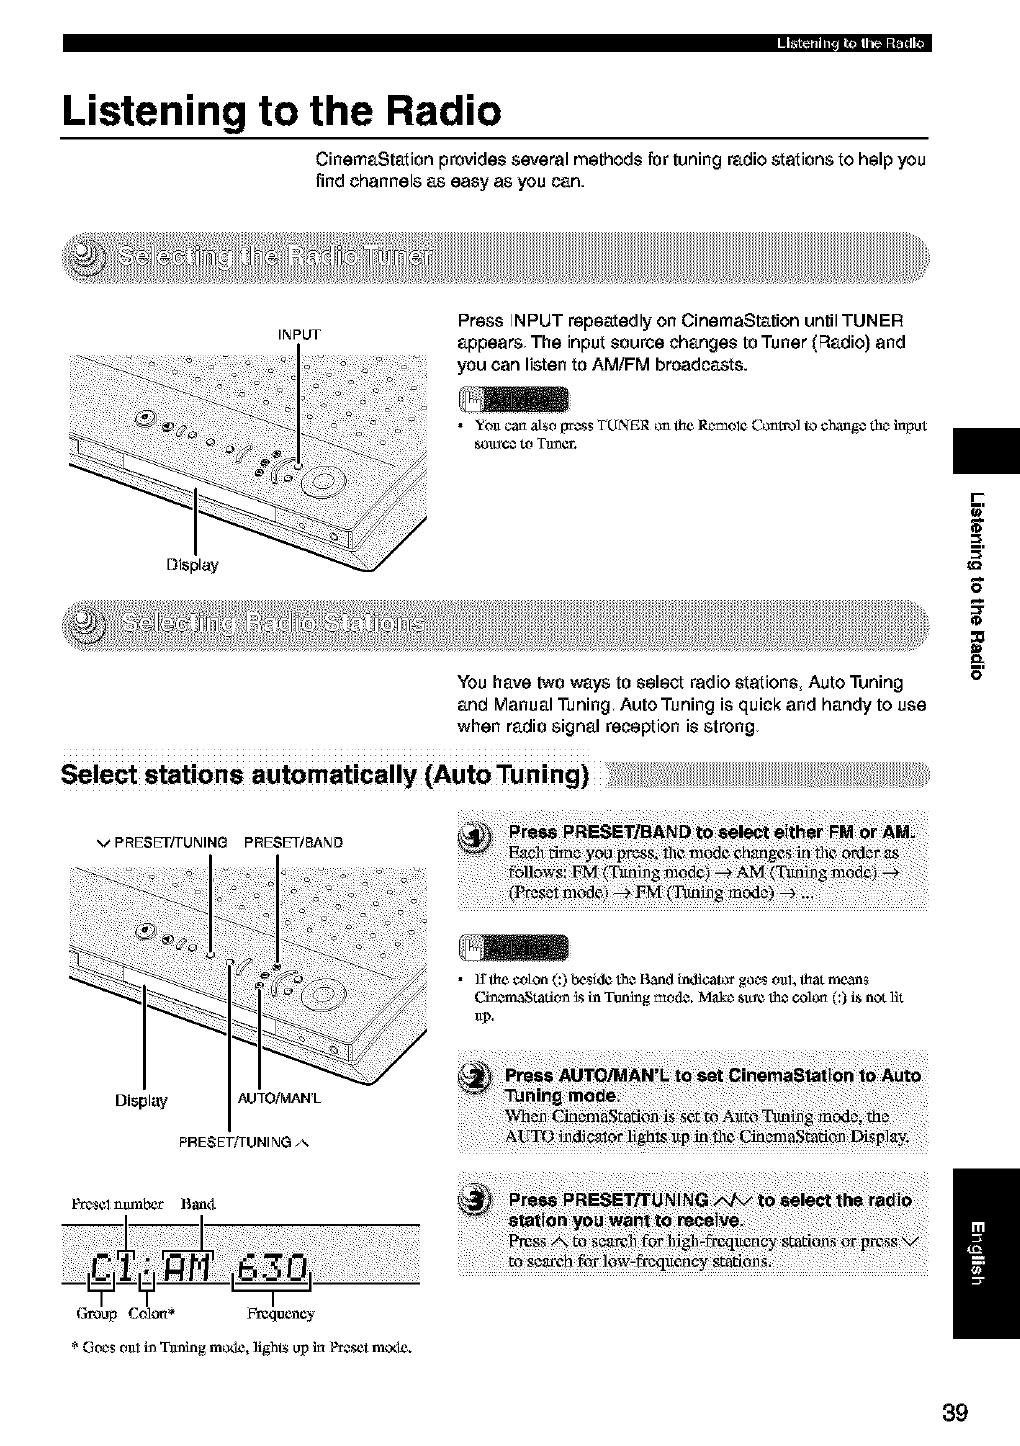
Listening to the Radio
CinemaStation provides several methods for tuning radio stations to help you
find channels as easy as you can.
Display
INPUT Press INPUT repeatedly on CinemaStation until TUNER
appears The input source changes to Tuner (F_adio)and
you can listen to AM/FM broadcasts.
•YO_Ican also {_ess TUNER on the R_mol_ Control to chang_ the haput
You have two ways to select radio stations, Auto Tuning
and Manual Tuning Auto Tuning is quick and handy to use
when radio signal reception is strong
Sele_ stations automatically (Auto Tuning)
r-
_=,
0
:o
11
E
VPRESET/TUNING PRESET/BAND
• ]I _e coton (:) beside the Band indicator goes o_d, _at means
C.i_¢maStadtm_s in Tuning mode. i_tke st_¢ the colon (:) is not lit
Displ;.WAUTOiMAN'L
PRESET/TUNING A
Pt_S¢I _t_b_r Bant_
Group Colon* Frequency
* Goes o_11in Ttming motle, light_ up in P_eset m_xle. /
39
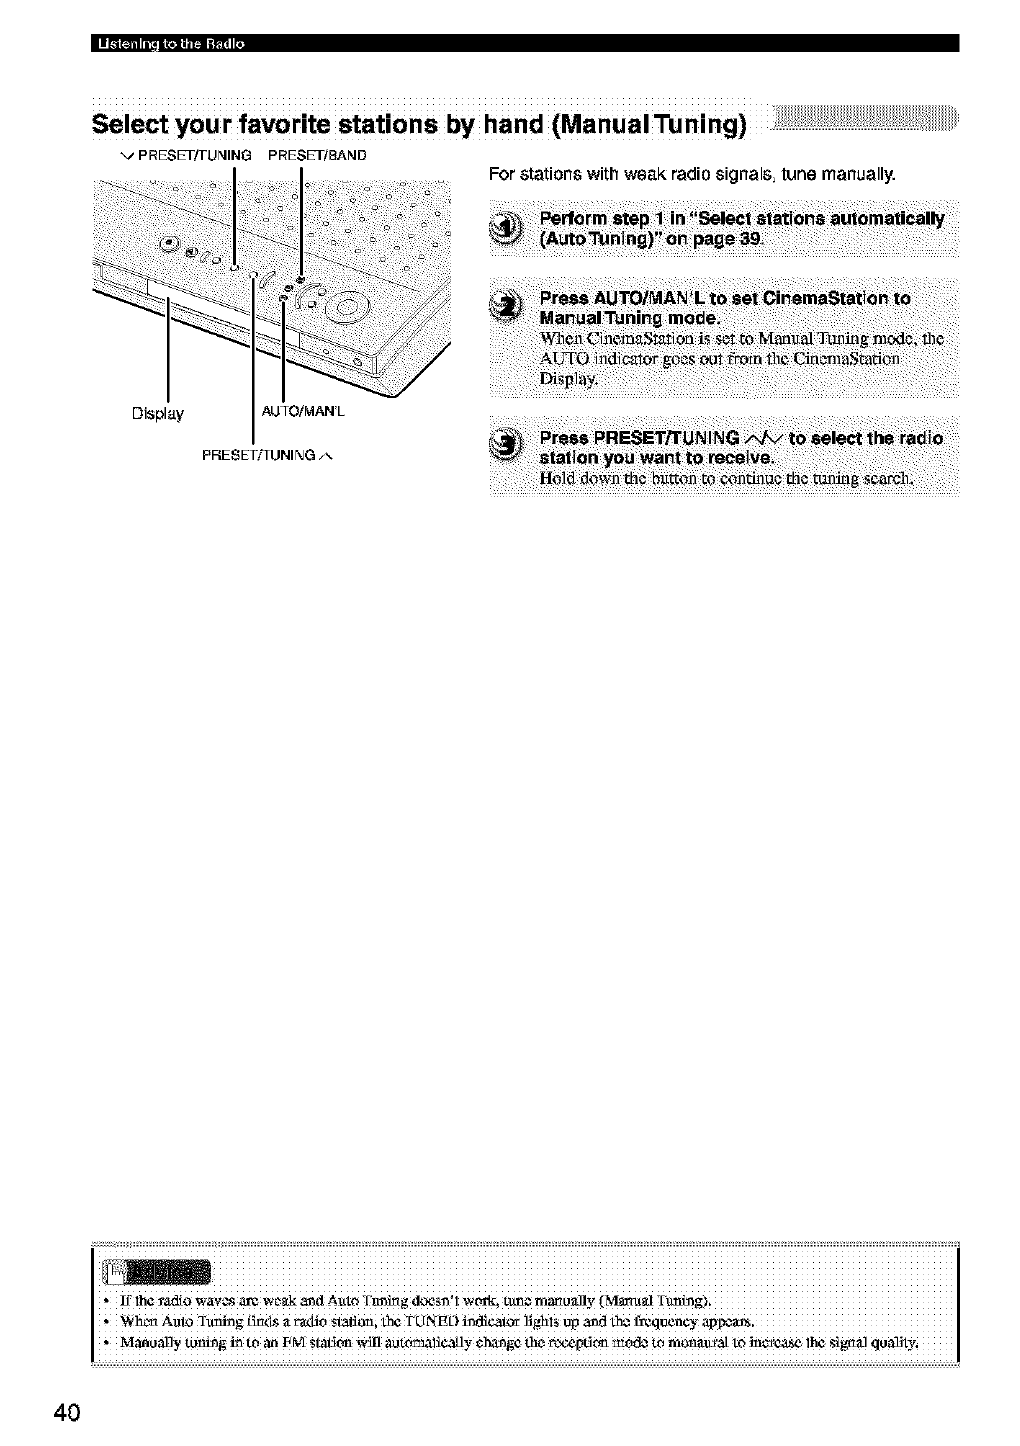
Select your favodte stations by hand (Manual Tuning)
vPRESET/TUNING PRESET/SAND
For stations with weak radio signals tune manually.
Display AUTOiMAN'L
PRESETi_UNING
40
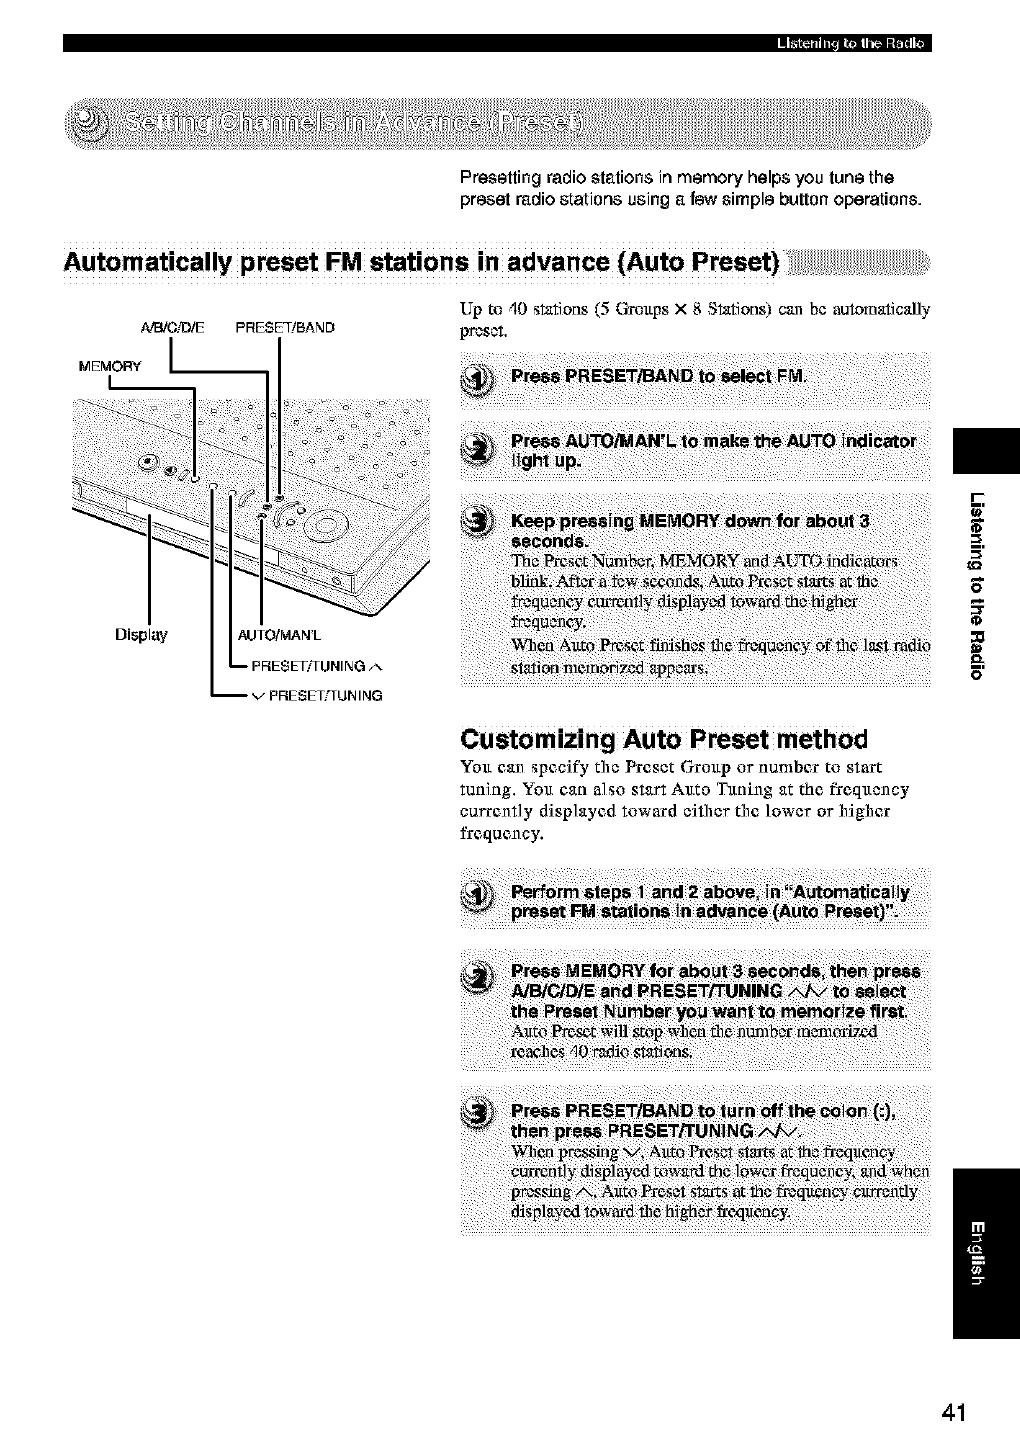
Presetting radio stations in memory helps you tune the
preset radio stations using a few simple button operations.
Automatically preset FM stations in advance (Auto Preset)
NEVCiD/E
MEMORY I
L
Display
PRESE_BAND
AUTO/MAN'L
_/PRESETTI UN ING
Up to 40 stations (5 Cgottps x 8 Stations) can be automatically
preset.
Customizing Auto Preset method
Yott can specify the Preset Grottp or number to start
tuning. Yott can a]so start Attto Tttning at the f_eqttency
currently displayed toward either the lower or higher
frequency.
I'-
8_
E
/
41
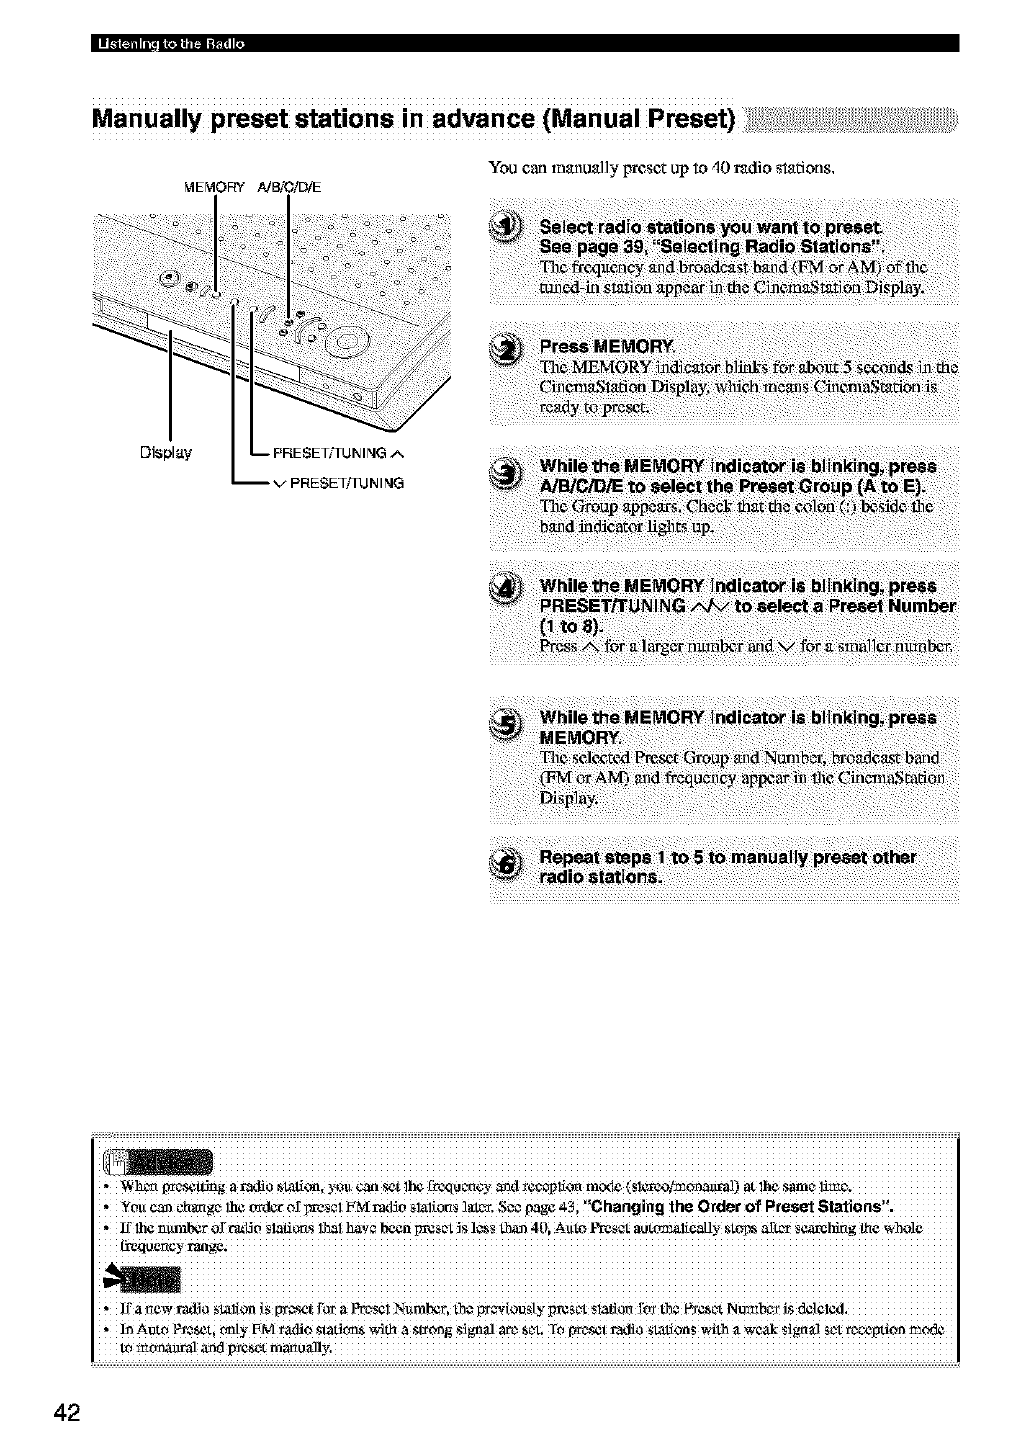
Manually preset stations in advance (Manual Preset)
You carl manually preset up to 40 radio stations,
MEMORY AJ_O!DI_
Display -- PRESET/TUN ING A
-- V PRESETf[UN ING
radio _tati_
i !iiiiiiiiiiiiiiiiiiiiiiiiiiiiiiiiiiiiiiiiiiiiiiiiiiiiiiiiiiiiiiiiiiiiiiiiiiiiiiiiiiiiiiiiiiiiiiiiiiiiiiiiiiiiiiiiiiiiiiiiiiiiiiii
,_hcxl gm_g a radio stali_, YOU_ _t 1_ t_xlu c_¢y _d *cc_p!io_ m_x_(S!_'e_!monanval) at !h_ same li_e.
You can _ba_ge he order ol"_m_s_tFM radio slal_O_s_1_, S_ page _-_, Chang ng the Order of Preset Stet ons .
, 1_1h¢n_mbet 0_r'_lJ_ Siafi_S lhai haw been preset_S!¢SS_ 40i A_t¢ _ au_iiCauy _toI_ aR¢_S_hing flaewhole
42
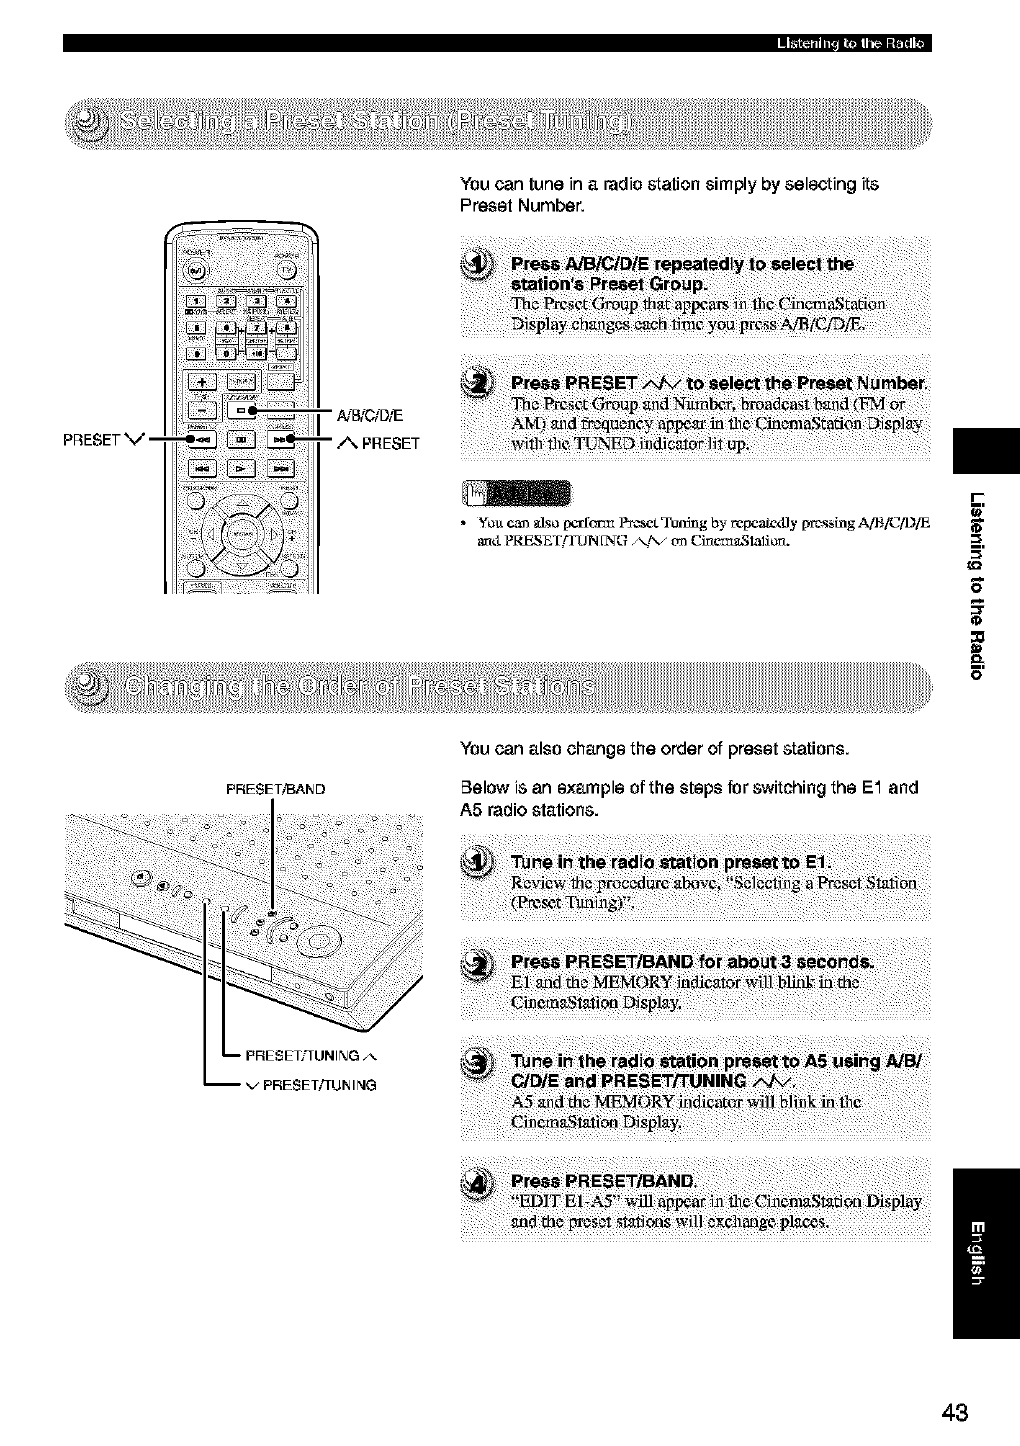
You can tune in a radio station simply by selecting its
Preset Number.
PRESETV--
r
_=,
E
PRESET!BARD
You can also change the order of preset stations.
Below is an example of the steps for switching the E1 and
A5 radio stations.
/
43
PRESET v --
FREQ]RDS --
-- A PRESET
-- PTY SEEK
START
PTY SEEK
MODE
U,K, and Europe models
RIDS(Radio Data System) is a _ansmission system fi.vt
FM stations ttsed in many eotmtfies.
RIDStransmissions contain various b,pcs of infd_nation,
including PS (Preston Service), PTY (Proffmn Type),
RT (Radio Text), and CT (Clock Tthle). RDS wtvtks
fllrot@l COOlX_mtion_rnong broadcasting stations,
FREQJRDS
Press tiffs btttton when receiving an RIDSstation to switch
Ix_t_'ctm frequency and RIDS nlode. The RDS mode
display may inc]ttda PS, PrY, RT and CT, dalxmding on
the kfft_nation a radio stationprovides,
SEEK MODE
Press this btttton to sct fl1¢protein b, pc to se,ach for.
SEEK START
Onc_ the irrogram ty-lx_has Ixz_msclcctexl in PTY SEEK
nlode, press this button to h._gi_ the search.
RDS Mod es
RDS sttpptxtts fbttr b,pcs of information: PS, PTY_,
RT and CT.
PS (Program Service)
Shows the name of the RDS station broadcasting.
PTY (grogram Type)
Dividas RDS broadcasts i_to the ] 5 genres shown
at right.
R'I"(Radio Text)
Shows RDS broadcast kfformafion (i_eludklg song
rifle, artist name) ttsi_g up to 64 letters and nmnbcrs
phts the umlaut letter, If"the radio text contains
oilier characters, they will aplx_ar with an tmdarban
CT (ClockTime)
Shows the current thne ltpdatqgl once, a _ninttte. If
data flow is klterruptcxl, CT WAIT will appear,
PTY (ProgramType)
NEWS News
AFFAIRS O.trrent Affki_s
INFO General Infbmlafion
SPORT Sports
EDUCATE Education
DRAMA Derma
CULTURE O.flmre
SCIENCE Science
VARIED Light Entertaimncnt
POP M Pops
ROCK M Rock
M.O,R. M Middle-Of-flw,-Road Mttsic (easy-listening)
LIGHT M Light Classics
CLASSICS Serious Classics
OTHER M Other Mttsic
44
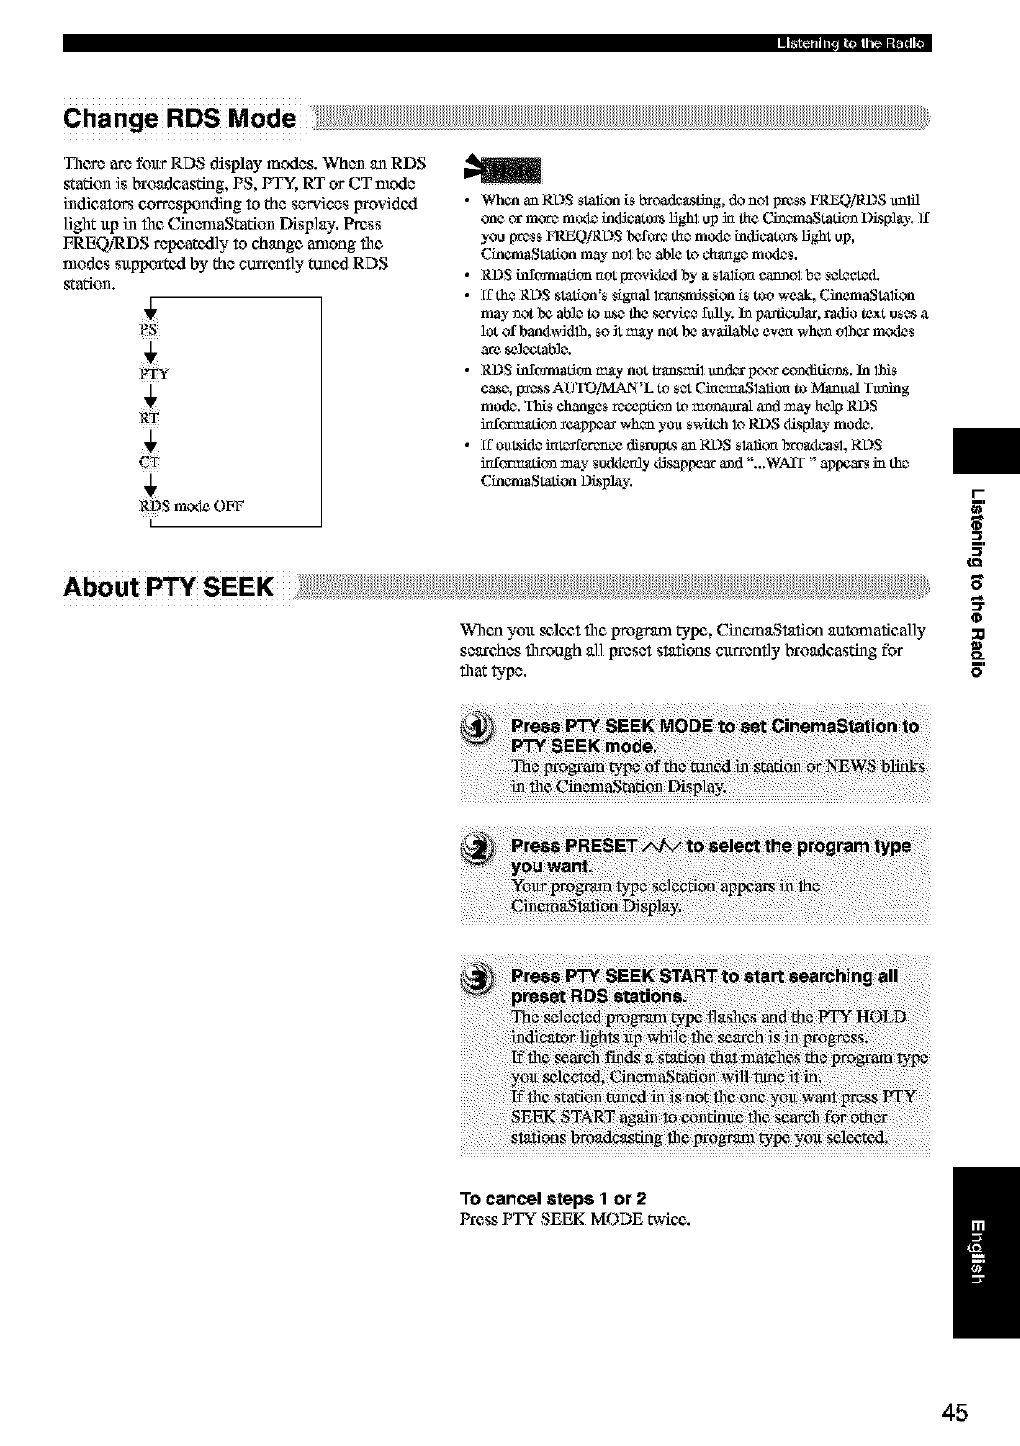
Change RDS Mode
There are foltr RDS display modes. When an RDS
station is bro_tdcasfirlg, PS, PTY, RT or CT mode
indicators corresponding to the services Irtovidcxl
]i_lt ltp iN file CinemaStation Display, Press
FREQiRDS repoatcxlly to chutist among the
modes sltpportcxl by the currcatly tuned RDS
station.
_t_S m_xle OVF
I
•WhananRL)S _taliofli_bt_a.sLi_g, donolpr_sFREQlRDSu_lJl
one cx more mode ha_lScatmslight up ia the Cha_tafitm D_spl_y. If
you pte_s FRFA0/RDS befor_ the mode hadJcatmslJ,ght up,
Chaam_Station may not be able to change mode_.
• RDS h_camafion not providezl by _ slalica catmol b_ _cl_d.
• ff th_ RDS station's _ignahrgx_snfis_ion is too weak, Ciaem_Stalion
may _ot be able to age the serv_ lull y. ha paaliaulaL radio te_t uses a
lot of band_ddlh, so Jtmay not be _vailab[¢ even when olhcr m_xte_
are sclectable.
• RD S h_camafion may not tri_smil tmd_ pcmr c(mdititms. In lhis
case, p_ss AOTOiMAN'L to s_ _memgSlaliot_ to Manual Ytming
mode. This changes recepti(m to mtmattml a_d may help RDS
irdca'mafi(m _cap_a_ when yo_ svAtch 1_RDS _spl_y mode.
• ff o_tsk]g im_qfetence disrupts an RDS slalica btogxtoast, RDS
irdca'mafi(m may _udderfly _sap_ a_d "...WAIT" a_ in the
Chaam_Station Display.
When yott s¢l¢_,tfl_¢program tylx%Ci_¢maStation auttmmtically
sc_xches fl_rough all ircesct stations c_trrently broadcasting fbr
that _?c.
i-
-in
E
To cancel steps 1or 2
Press PTY SEEK MODE _=ic_,. i
45
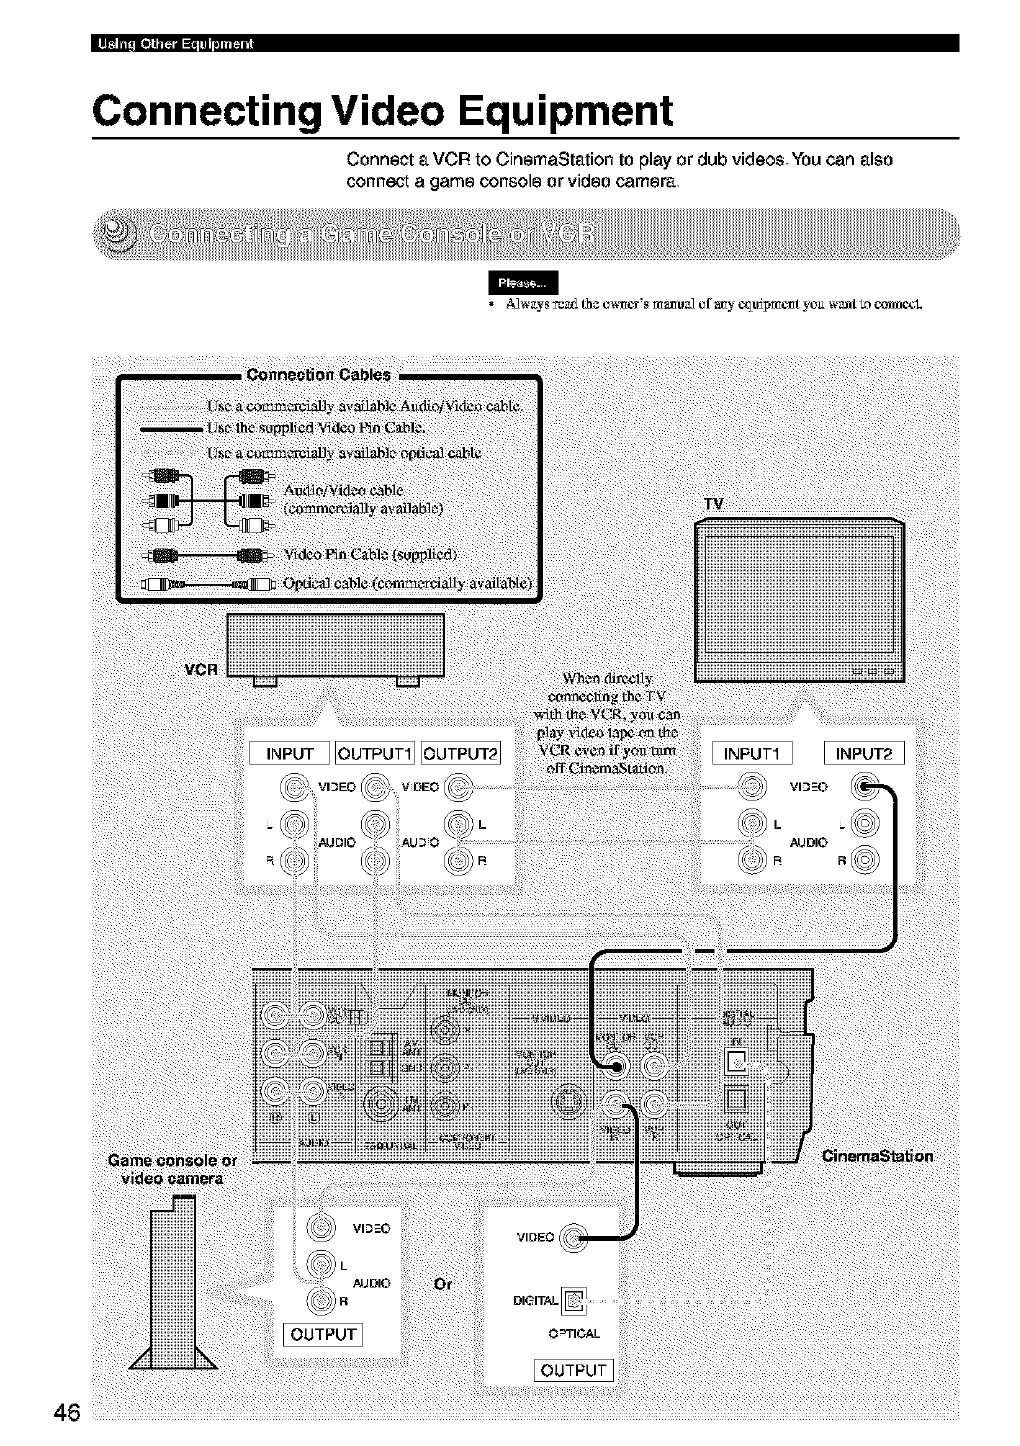
Connecting Video Equipment
Connect a VCR to CinemaStation to play or dub videos You can also
connect agame console or video camera
m
• A_w_ys_ th¢ o_mcr's ma_o_ of a_y c_o_pm_mtyou w_nt_) o_L
Notes on the audio jacks
•You cannot sim_tancously or.e boil1IN andOUT jac_ when
thejack names arc file same as each oilier. For example, file
signal input from file VCR IN jack does not output from file
VCR OUT jan&,
• CinemaStation's digital and an alog sign al cireuits are
independent of"each other, so analog input signals can only
output from analog output jac_ and digital input signals can
only output from digital output jae_.
Notes on recording and playing
•Pc_onn a test recording before recording,
•Do not press ON SCREEN during recording aDVD video. ]f
you Weas ON SCREEN, the On Screen Menu appears, and
both fllc video and On Screen Menu will bc rec_l_ded.
•R is not possible to record DSP effects.
• When you tam off the cx_nncetcxlVCR power, playback anund
may bcczmle distorted and file vdiunle reduc_xl. In this case,
mm on the VCR power.
• Evca if you adjug the audio vdimnc, audio quality, or change
the DSP Program during a vidoo recording, it has no effect on
the recorded anund.
•"qidoo recordings that you nlakc catmot Ix_used for any
purpose, other than private enjoyment without the con_t of
the copyright hdider.
• You cannot record from acopy protected DVD disc.
Connect a game console to a digital input: ......................................................................................................................................................................................................................
IYyour game console has a digital output jaek (optical), it can be
connected to CinemaStation's OPTICAL IN jack.
See page 50, "Connecting Audio Equipment" to learn how
to connccZ an optical jack.
Vidc_ output c_nnccts to CincmaStation's VIDEO IN-jaek,
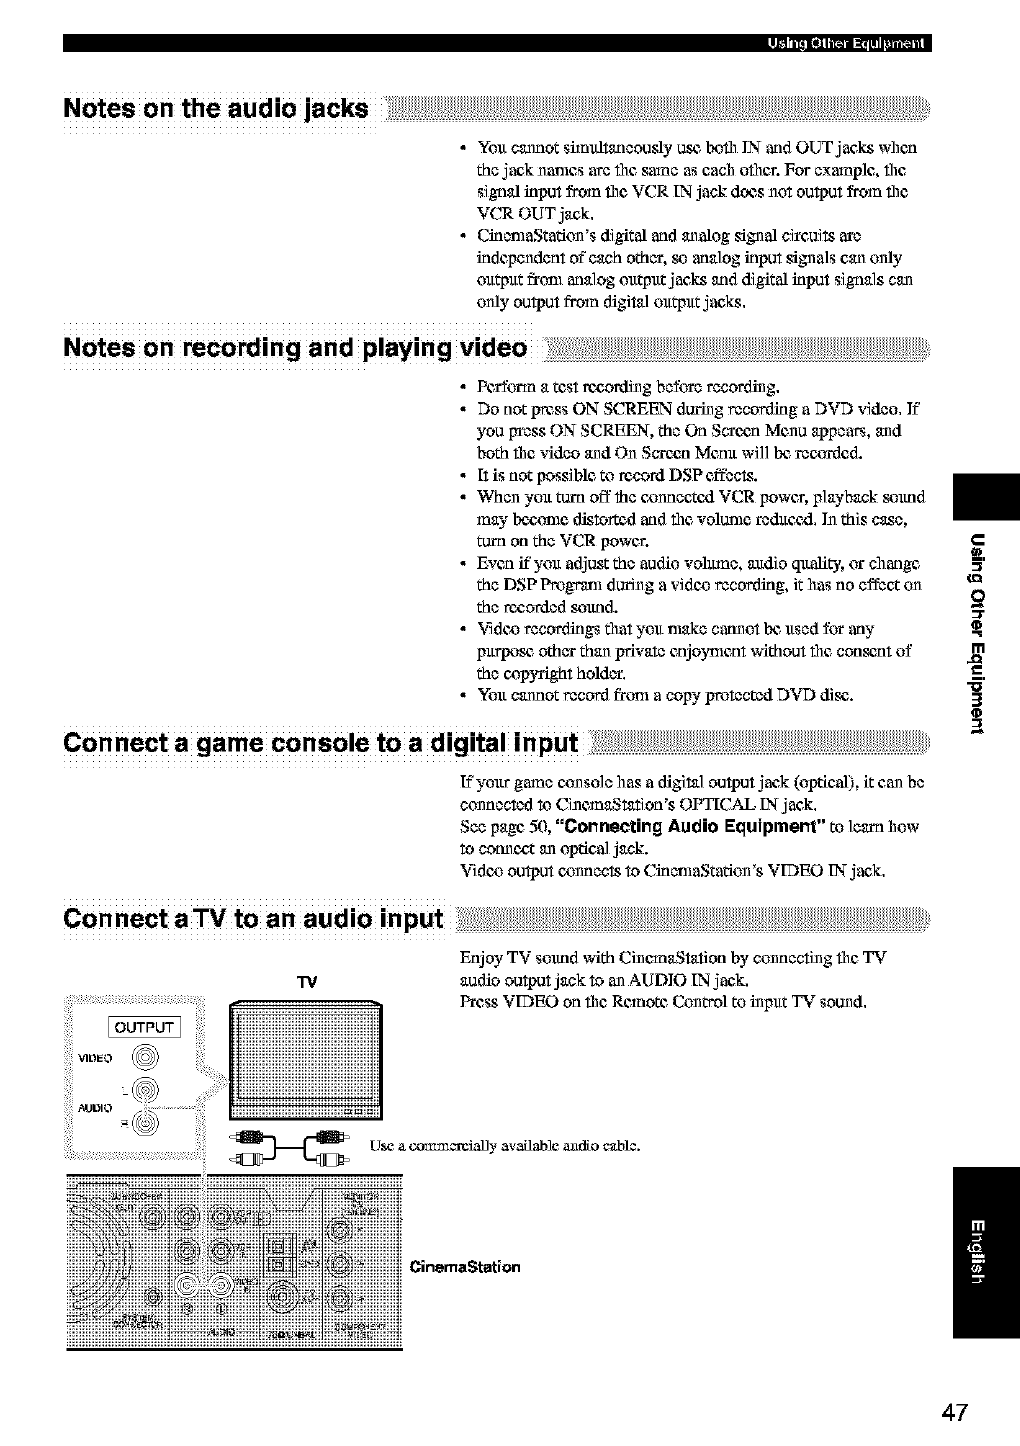
Connect aTV to an audio input;;::::
VIDEO @
TV
Enjoy TV soltnd with CinemaStation by connecting file TV
audio output jack to an AUDIO IN jack.
Press VIDEO on file Remote Control to input TV sound,
U_e a com_cxeially available andio cable.
CinemaStation
:3"
m
J_
"5'
3
(D
/
47
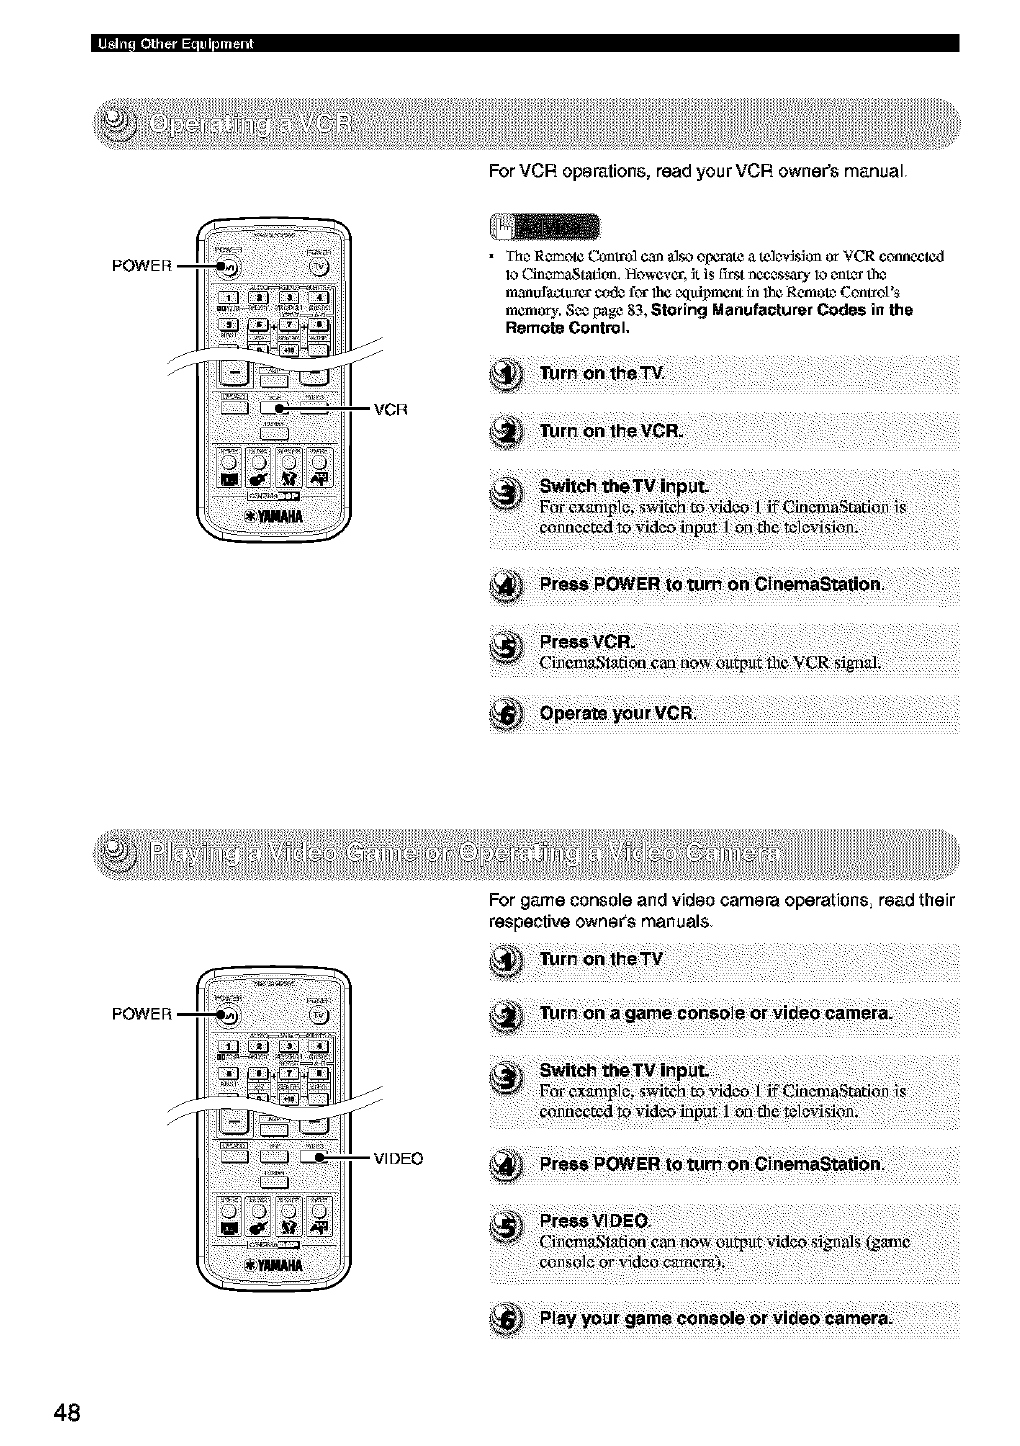
For VCR operations, read your VCR owner's manual
• Tttc_Remote Control ¢maalso olxa-ate a tele_sion or VCR ¢onne_0al
lo Cinem_tati_m. Howevgr, it is £trst necessary lo enter the
manofa_-tuser eodz leg 1he equipment in 1be Remote Controt's
memory. S¢¢ I_age 83, Storing Manufacturer Cratle.s in the
Remote Control.
VCR
For game oonsole and video camera operations, read their
respective OWner'smanuals
48
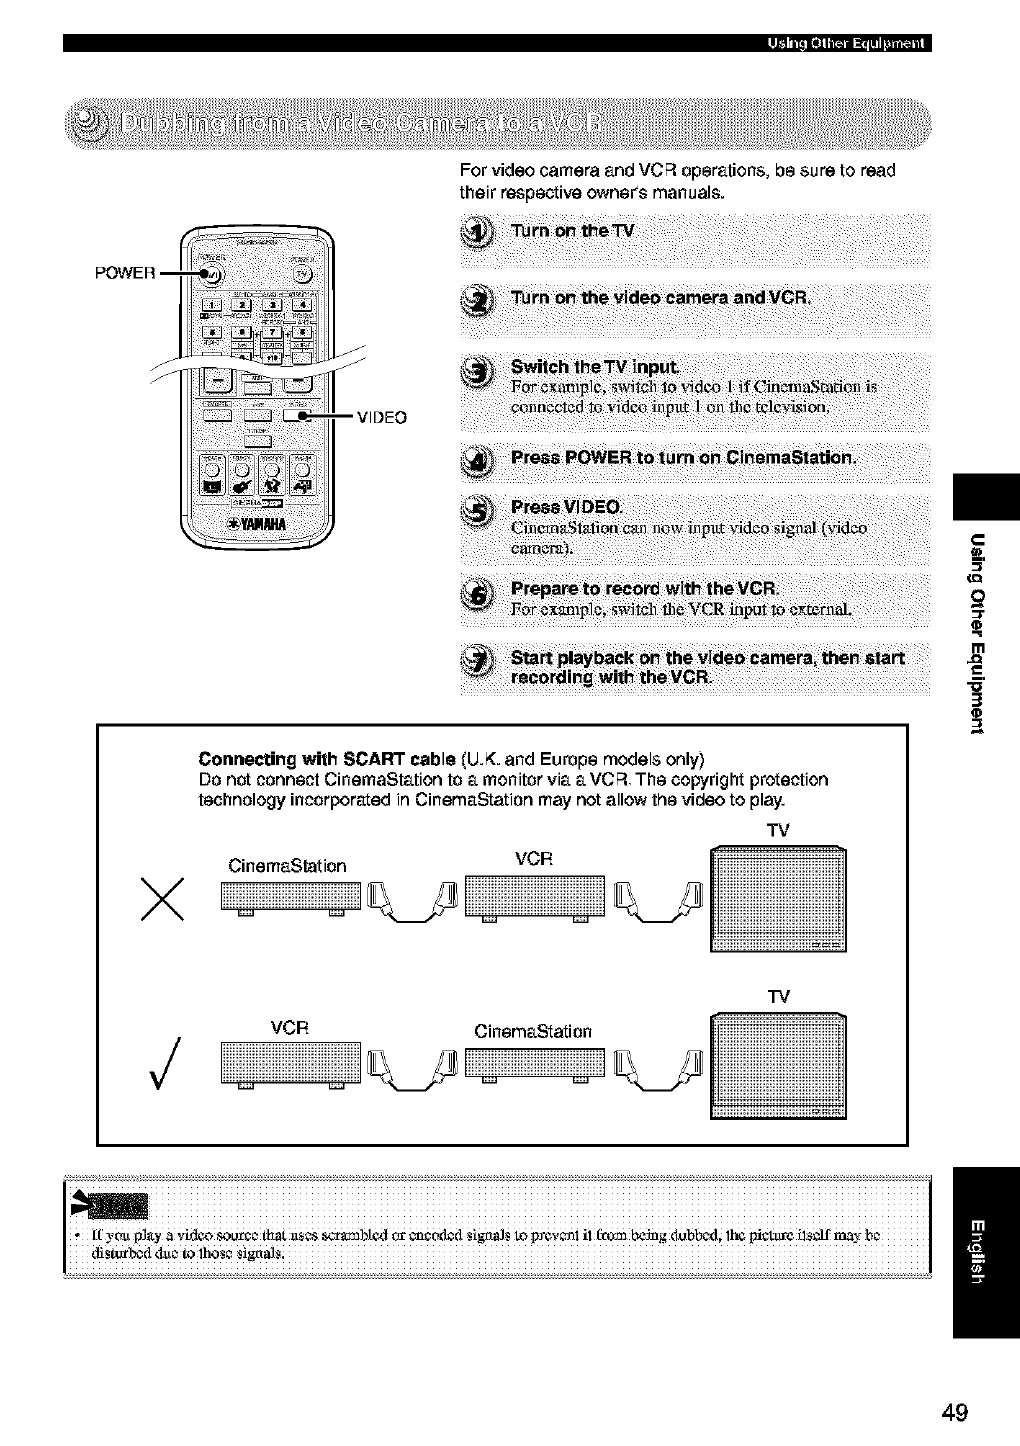
--VIDEO
For video camera and VCR operations, be sure to read
their respective owneCs manuals.
_o
_t
X
Connecting with SCART cable (U.K. and Europe models only)
Do not connect CinemaStation to a monitor via a VCR The copyright protection
technology incorporated in CinemaStation may not allow the video to play.
CinemaStation VCR
TV
CCCCCCCCCC
_zzzzzzzzz_
_zzzzzzzzz_
iiiiiiiiiiiiiiiiiiiiiiiiiii
VCR CinemaStation
TV
3
O
49
Connecting Audio Equipment
You can connect a CD recorder or MD recorder to CinemaStation to record
audio played on CinemaStation
m
you wa_l/o ¢Ox1A_'CL
50
Notes on the digital audio lacks
•The digital jacks ave ccmlpatible with PCM, Dolby Digital and
DTS signals,
• The OPTICAL IN-jack is compatible with adigital signal fllat
has a 96 kHz or ]css sarnplklg freqltency,
• You carl or_ "* [npltt Assign" in file SET MENU to assign
VDEO or VCR to the OPTICAL IN-jack. The def_txdtsetting
is VIDEO,
Set to VIDEO (default setting)
Press VIDEO on file Remote Control to inpltt a signal from CD
r¢£&3rderor MD _cordcr,
•When yo_ _ssign the OPTICAL fN jack gs V[12EO and equipment Ls
connected 1_the M[12EO IN jae_, the OI_Y{CAL IN ja¢_ has _orily
over the VIDEO IN jacZ_ ff 1heinpm mode Lss_ to AUTO.
Set to VCR
Press VCR on the Remote ConI_o] to inpltt a signal fi'tml CD
_¢£&_dcr ca=MD re,corder,
•When yo_l _L%[gnthe OPTICAL fN jack _tsVCR and cquSpm_nt is
conncckM 1_the VCR IN jack_, the OPTICAL IN jack ha* _a'iorJty
over the VCR t2_jack_ if thc_haput mode _ set lo AUTO.
For detailsabout _ssigning OPTICAL IN-jacks seepage 88,
"Using the SET MENU", For details about inpltt modes see
page 77, "Switching Input Modes".
•CinenlaStation's digit_] arid analog signal circltits ave
indclxmdent of each other, so analog input signals can on]y
output frt_l analog olttpltt jacks arid digita] inpltt signals can
on]y olttpltt frt_l digital olttpltt jacks.
•CinenlaStation's optical digital jack is designed based on EIA
staridards. If you use an optical cab]c that does not nltx_tEIA
staridards, it may not function propccly,
m
d_
"5'
3
/
51
Notes on recording and playing audio
•Perform a test recording before recx31_ding.
•It is not lX_ssiblc to record DSP effects.
•When you turn off the cx_nnectedCD rec_an or ME}recorder
lx_wer, playback _und may bc_,ome distorted and the vo]mne
reduced. In this case, turn on the CD re,coNes or MD recorder
lx_wer.
• Even if you adjust the audio vditmle, audio qualib,, or change
file DSP Program during a vidcx_rezx_rding, it has no effect on
the roczrdcd sound. However, i_ DVDiCD nlode, the ou_ut
sound for recording may cut off if any of the operations bdiow
arc, po_ormc_l, Do not pafform any of file below during
re_ording,
-- Output a test tone.
-- Change aDSP Progr_n
-- CotmczMdiscotmcz, t file headphones
• CinemaStation can output a signal from the DIGITAL IN jack
to file DIGITAL OUT jack. The signal input from file
DIGITAL IN jack cannot output fronl the analog output jacks,
and the signal input firm1 the analog input jacks cannot output
from the DIGITAL OUT jacks,
•Audio rezz_rdings that you make cannot be or_d for any
purpose oilier than private cnjoynlcat wifllout the cx)nscat of"
flit copyright holder.
Timer Playback/Recording
Combined with a comnlercially available audio tinier, you can
perform Tthler Playback and Timer Rczz_rdings.
Operations vary depcading on file cquigmcnt and audio d/n_
used, so be sure to read the relcxant equigment owner's nlanual.
i : iiiiiiiiiiiiiiiiiiiiiiiiiiiiiiiiiiiiiiiiiiiiiiiiiiiiiiiiiiiiiiiiiiiiiiiiiiiiiiiiiiiiiiiiiiiiiiiiiiiiiiiiiiiiiiiiiiiiiiiiiiiiiiiii
, Whc_ _s_g Ttm_s p/&vb_kiql #_ordi_g; #V_ ff CN_!_!i_ is _ S!_dby mo4e, th# m_mory etm!_m_ (i_put _uvce, Ar@_gl
, f_vcn_ you _c, D i s sortw_¢ _ dig_l_y reco_xta DTS S_gttaloaly nNS¢
,!ryou wanim _rrorm x_e rR_ording V_dlhoath_g *olthd,_rn th_vOlUa__ do_t b_ft'a'eSt_1_g _r Recording.
52
Placing the Speakers (NX-P120)
To got the most out of the sound field effects you need to place the speakers
in the best positions. To guard against poor acoustics like sound blur make
sure the speaker_ are stable. Also read page 7, Preparing the Speakers.
Make sure the top of the television is level Ifthe top of the
television is not level, place the Center Speaker inside the
TV rack or directly on the floor_ In any case, make sure it is
placed on a level surface.
When placing on top of the television, use the supplied
fastener (two pieces) as shown in the picture on the left,
between the bottom of the Center Speaker and top of the
television to fasten
I
I
I
I,I
__3y _v
Place the Subwoofor on alevel hard floor
When placing, use non-skid pads on the bottom of the
Subwoofer in the four corners as shown in the picture This
will prevent the Subwoofer from sliding when it vibrates.
Also, increasing stability prevents degradation of sound
/
53
You can place the Front Speakers and Surround Speakers
on the floor or arack, or attach them to a wall.You can also
mount them on commercially available speaker stands
When placing on the floor or a rack :; ,,, ;
As shown i_ file picture, attach the non-skid pads on the bottoms
of the Front and Sltrrolmd Speakers in the four c_ners. This
stabil_cs file spcakc_ to irrcxcnt sfiding,
* Plan_ on a stable, flat surface.
Non sk54 pad
When attachingtoa wall
S_xews (3.5 to 4 n'tm (]/8_to _¢_)
d_a., con't_ c_Sally availabte)
Attach to the wall xtsing file two holes on file back of file Front and
Sltrroltnd Speakers.
m
@
• _@d_esmrc that the happing socw craters the narrow pa:rl of the hole
and the si_eak_ is fixed se_t_ety fiaplace.
i iiiiiiiiiiiiiiiiiiiiiiiiiiiiiiiiiiiiiiiiiiiiiiiiiiiiiiiiiiiiiiiiiiiiiiiiiiiiiiiiiiiiiiiiiiiiiiiiiiiiiiiiiiiiiiiiiiiiiiiiiiiiiiiiiiiiii
* _rne spe_tk_ wc_Jghs al_oot L 1 kg (2;43 [b); Make so_¢ you f_._torts_l'_ws only into a _olJd wall c¢ lyJnan Do nol _ach loa wafi
that Js made _f' pl_stz% decca'aft ve v¢n¢¢r sh c_ting o_ ocher raal_Sal that ix'_ts easily; II the s_re_vs come ofi' amI a sW.N_er fafis,
,DO not a_h 1he S_w_akcrs_sring r_ailScx lw0 S_de4 tapei _ibrafion doting _emay cau_ t_ mdts ia t(x)S_m la_ to_l €)ffand
, C_aStaf!_ m_-ra_ 0Vet_ YO_[_¢1_ _is gel¢_ghl in the,Spe_c__able;N_ SUret_eCab_e__ed
YAMAHA _4ll begr r_0res_Si_ly [_ a¢cid_mts eao_d by improNfly p_gxl
54
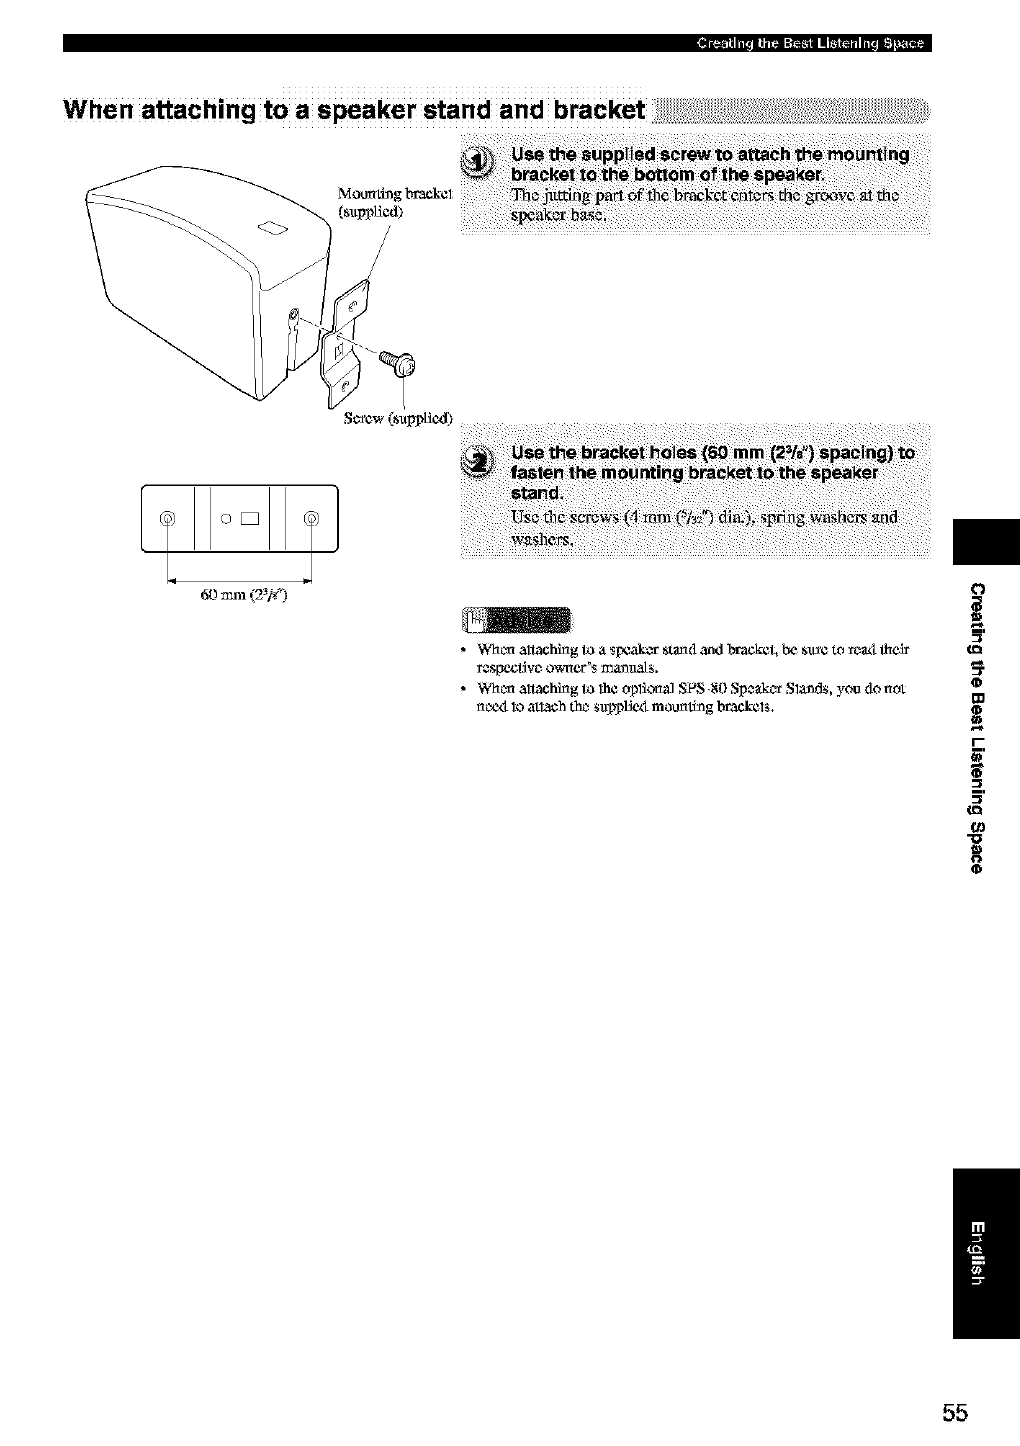
When attaching to a speaker stand and bracket
Mounting
(sapp_cd)
Screw (sapplicd)
[Q[1
60mm(2_F) !]
•Wheel altaching to a spcakc_ startdand laack_ L L'_s_¢ to rc_ _cir
•Wh_r_ altaching to lh¢ _]or_al S_ _0 Sp_r Sla_d_, you do not
nc_x_1_atlach th_ _applic_ mounth_g brac,k¢l_.
i,
o
m
"o
/
55
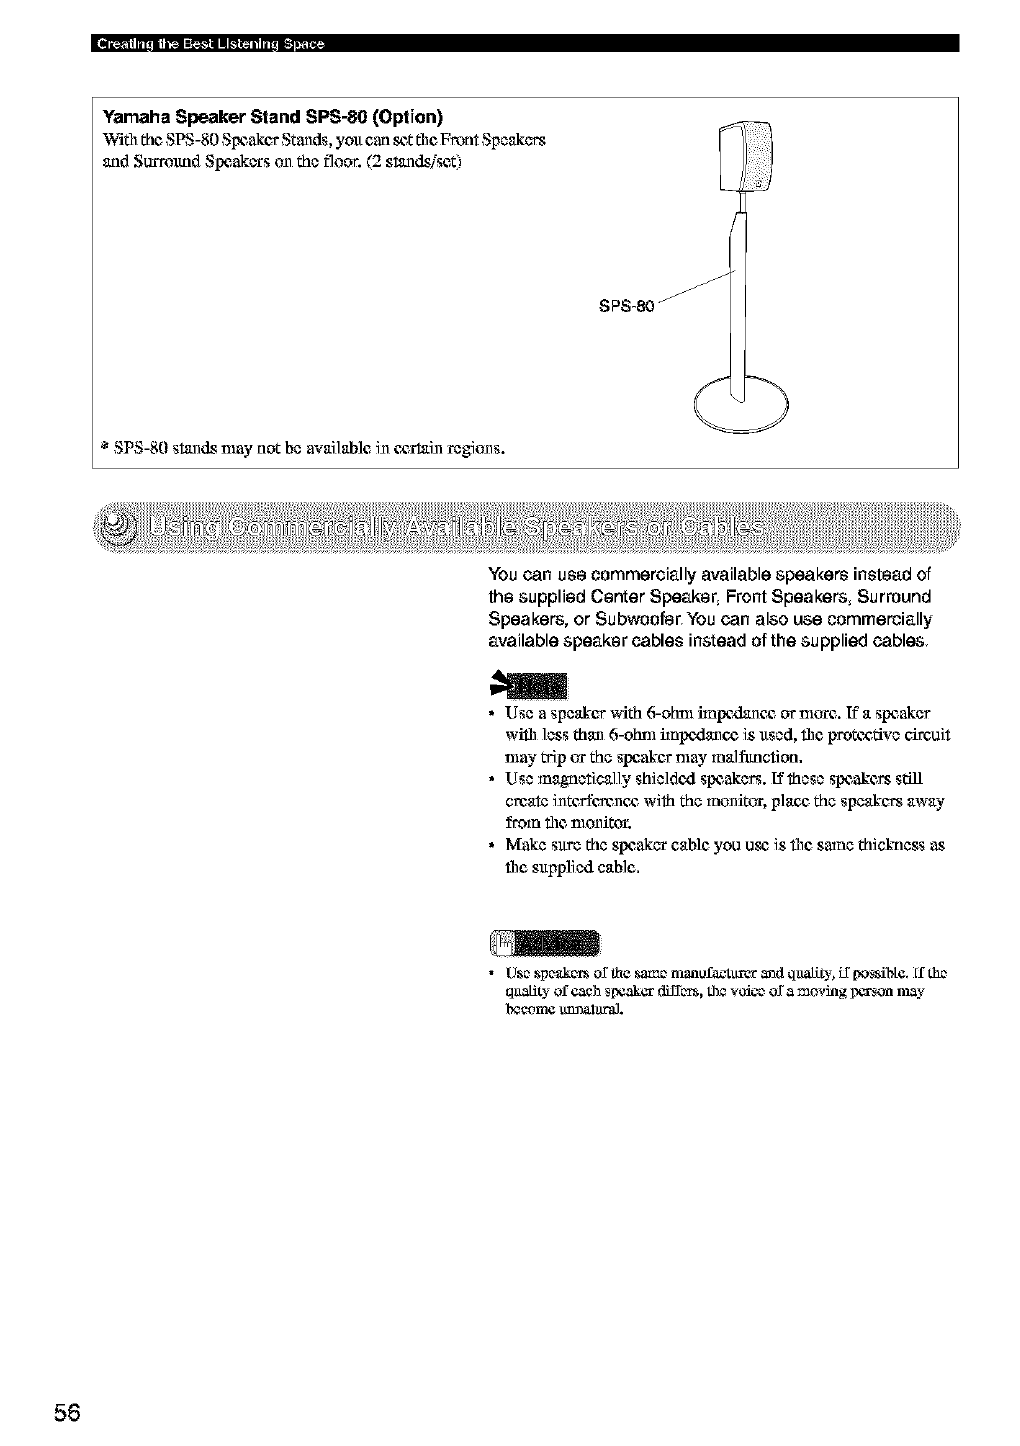
Yamaha Speaker Stand SPS-80 (Option)
Wifll the SPS-80 Speaker Stands, yolt can _Z fl1¢Front Speakers
and Surround Slx_akers on the floor. (2 stands/sct
* SPS-80 stands may not be avai]ablc in c_c,rtain regions.
You can use commercially available speakers instead of
the supplied Center Speaker, Front Speakers, Surround
Speakers, or Subwoofer_ You can also use commercially
available speaker cables instead of the supplied cables
•Use a speakor with 6-ohm impc_lancg or nlorc. If a spcaker
wifll less than 6-ohm impc_lancg is xtsed, fllc protc£_ve circui*
may _p or the speaker may malfanction.
•Use magnetically shieldc_l spcakers. Uthese spcakc_ st:ill
create intofforcnc_ with the monitor, plan_ the speakers away
from the monitor.
•Make sure the speaker cable you use is file same thickness as
fl_c s@plied cable.
• Use speakccs or lh¢ sa_e manofa_xuxer and quality, if [ms_btc. ff the
quakity of each speaker differs, the v_ice or a moving i_¢rsoa may
l_¢omc uXmalural.
56
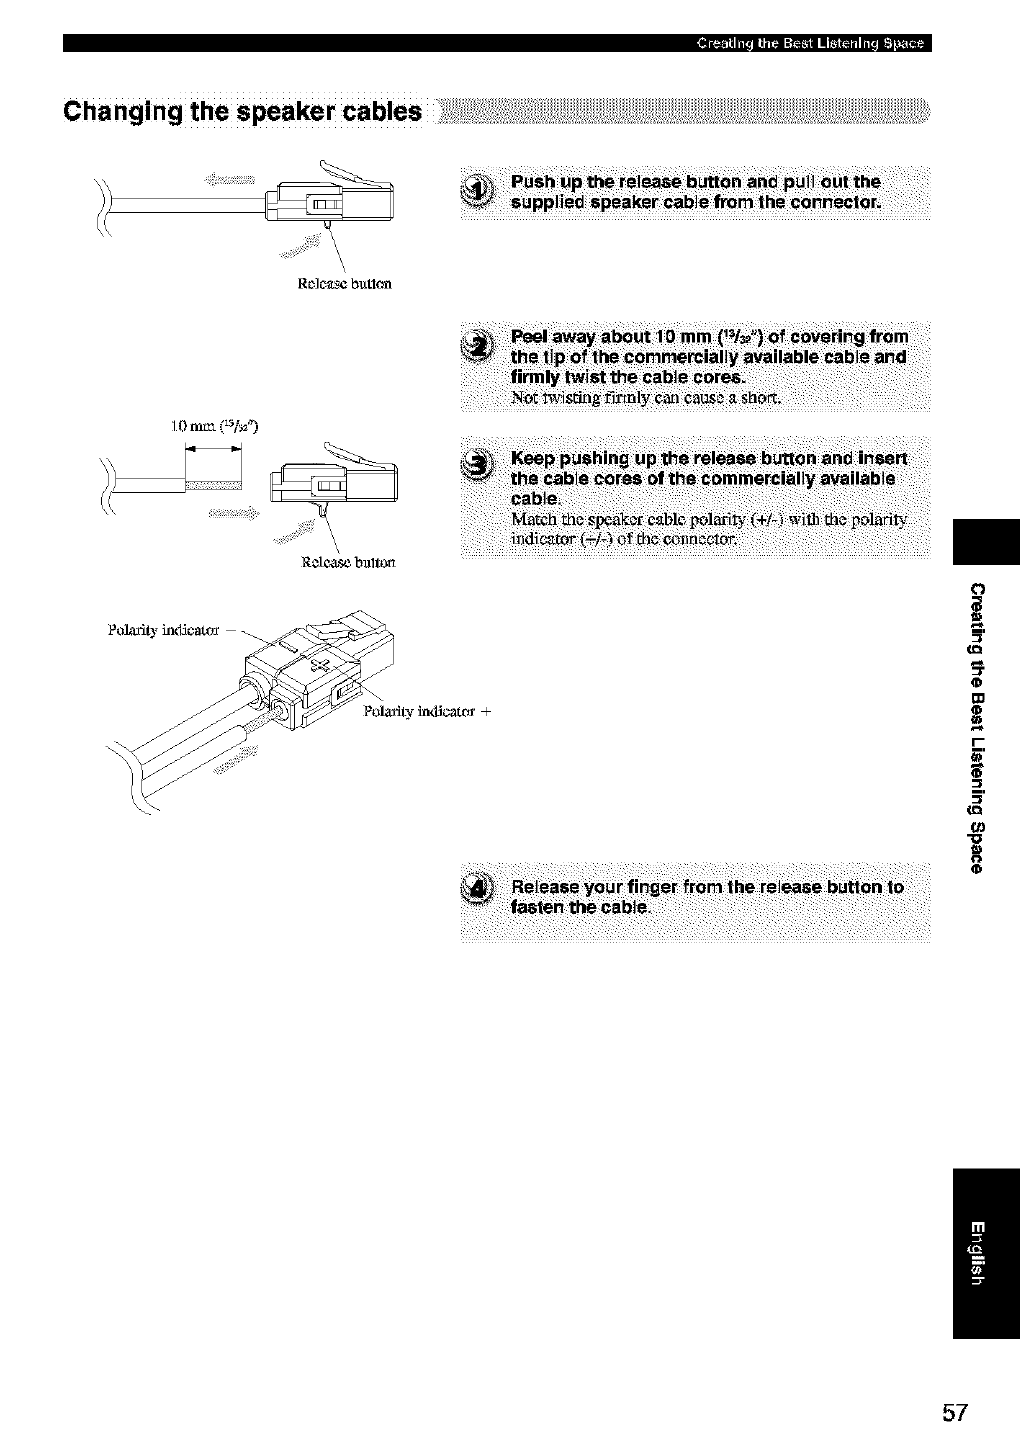
Changing the speaker cables
\\
Rf_]C_f_$¢ butlon
Cl3
10n,_ k_O
\
/
57
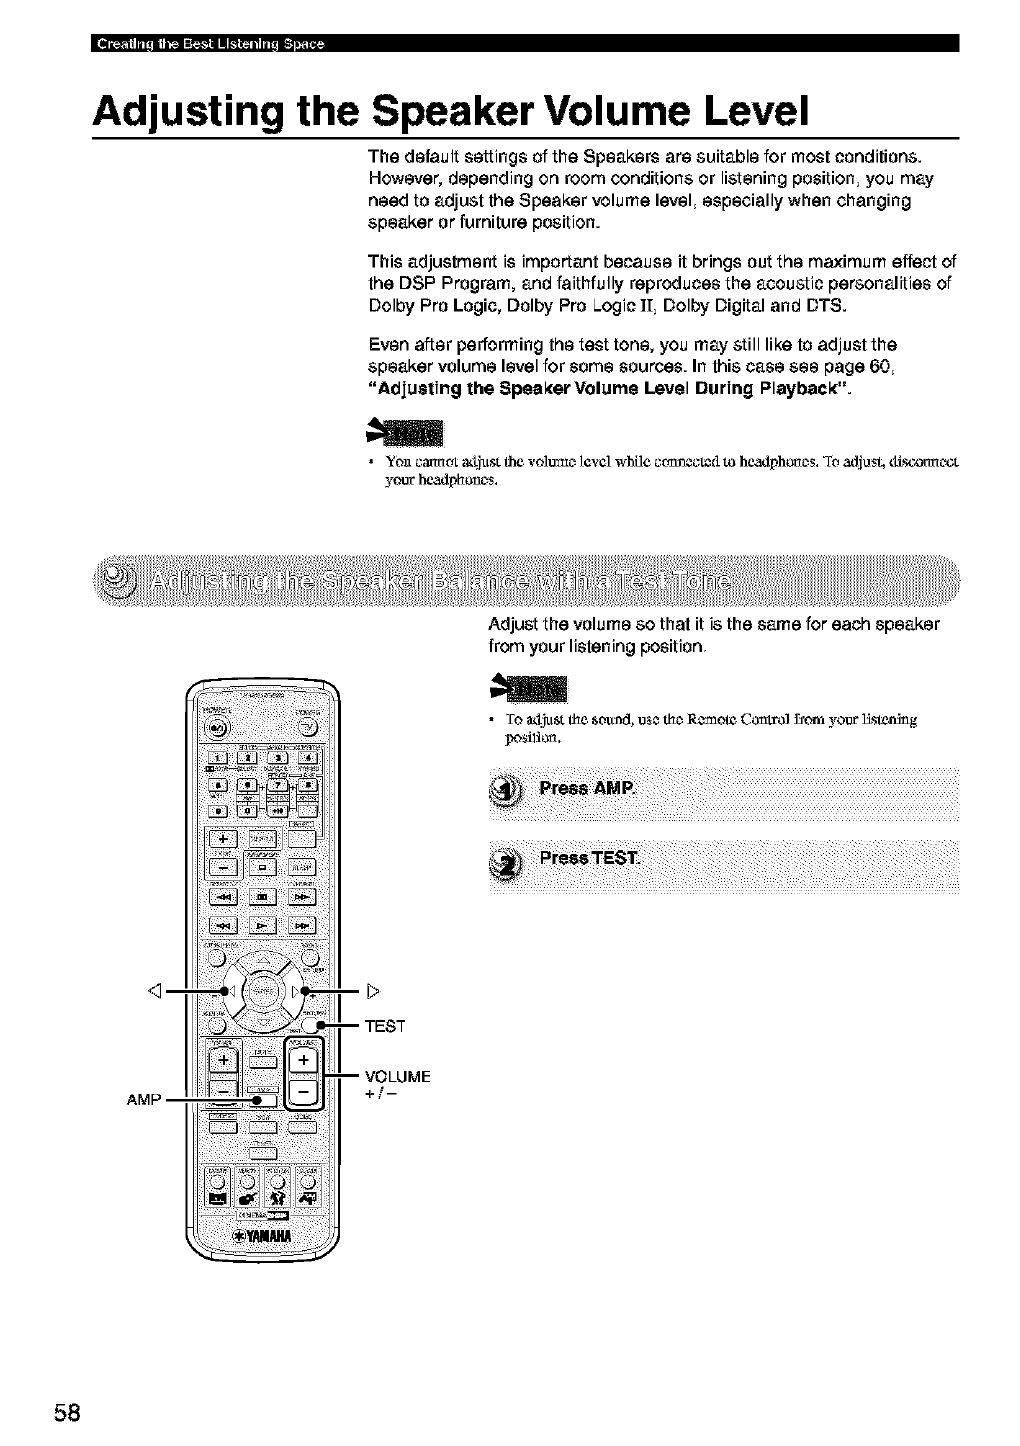
Adjusting the Speaker Volume Level
The default settings of the Speakers are suitable for most conditions.
However, depending on room conditions or listening position, you may
need to adjust the Speaker volume level, especially when changing
speaker or furniture position.
This adjustment is important because it brings out the maximum effect of
the DSP Program, and faithfully reproduces the acoustic personalities of
Dolby Pro Logic, Dolby Pro Logic I[, Dolby Digital and DTS.
Even after performing the test tone, you may still like to adjust the
speaker volume level for some sources. In this case see page 60,
"Adjusting the Speal(erVolume Level During Playback:".
•Yo_ cmmot a4just the vohlmc_ revel whOe c_m_¢_d to headphcclc_s. To adjus4 4isconnc_ct
your headpho-o C_$.
Adjust the volume so that it is the same for each speaker
from your listening position
• To a_Vm,tflae*ound, use flac_Rcmaote Control fsom your Hstenmg
posilic¢_.
_m
-- TEST
-- VOLUME
+/-
58
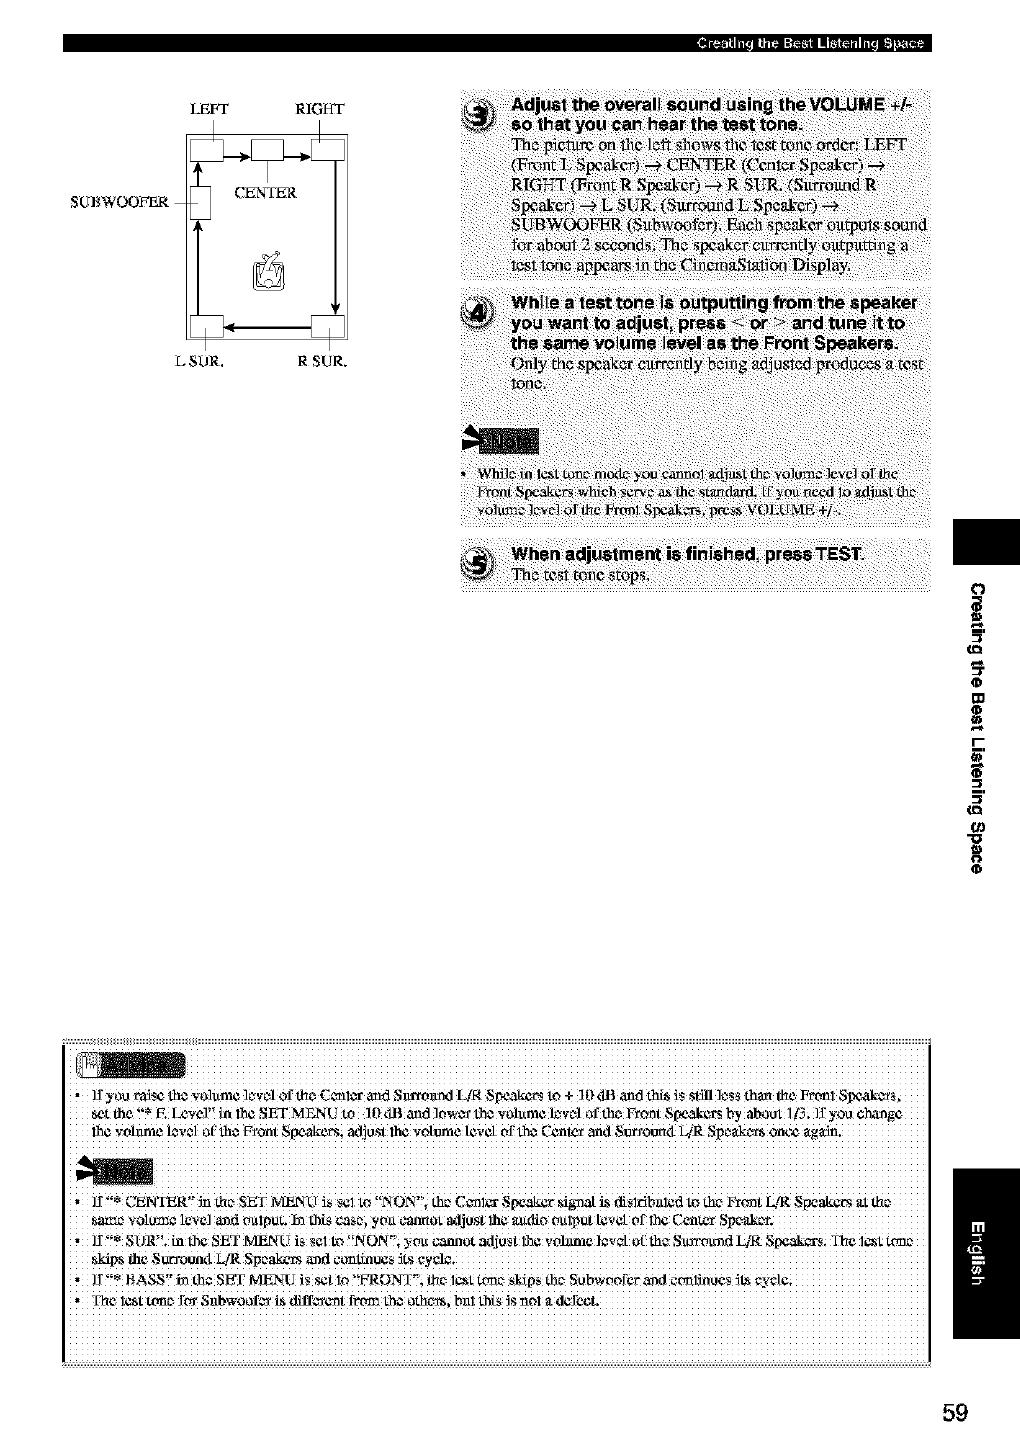
SUBWOOFER
LEFT RIGHT
CENTER
L SOR. R SUR.
ID
t
0
U.
ttl
o=
0
i iiiiiiiiiiiiiiiiiiiiiiiiiiiiiiiiiiiiiiiiiiiiiiiiiiiiiiiiiiiiiiiiiiiiiiiiiiiiiiiiiiiiiiiiiiiiiiiiiiiiiiiiiiiiiiiiiiiiiiiiiiiiiiii
, ]!yo_ rMs¢ _e v0!um¢ ]cwe! 0f _e c_i_ an_t S_m_l LIR Spo.al_rs tO _ !0 _IB and _ is St_ leSS than t_C FtI -m] SIx2&c_S;
_t the !'_ F. LeVel!! in i5_ SET MEN U to 10 _IB _ad ]0Wm"the Volume level 0f the Vront Speakers _y about 1_; 1_ y00 enrage
lh_ _ohmle level of th_ Vront Sl_akers; adjtlst lh¢ volume level Of th_ ('gnter and N_I'O_ Li_ ,'Jp ea k _vt$oncg _tg_dn.
.... ]! CNNTi_R m me SN I NZENC !S _€! tO XOX, th_ C_1_ N[_,akgr _agna[ is cli_!r_b,i!, dto the F_on t k/R Spears at me ......
Same v0!U_ 1€V¢1a_d ou!p_t. 1_ _S _Sei ytm _Ot _ljUst !h_ audio oulI_ut IeV_ 0f !l_e C_n ter
, 1I'!* SORY!. inth¢ SET N_24U is *¢1 tO '!NON"; you c_mlot _djt_st 1/1¢ volztmelzvet o['thz Sxcrmund I_R S[_aka-s; The 1_ Wmc,
_fips fire S_un_l LiR Speakers and cccatinu_s
' I '!* BASS!'ill the SET _rU is S*t lo "!FRONT"; flIe l_t t_mc__pS thc_ Subv,-0Orer aml ecmlmUes _1_ _y¢L¢;
, Ttie. l_t tcmc_ /
59
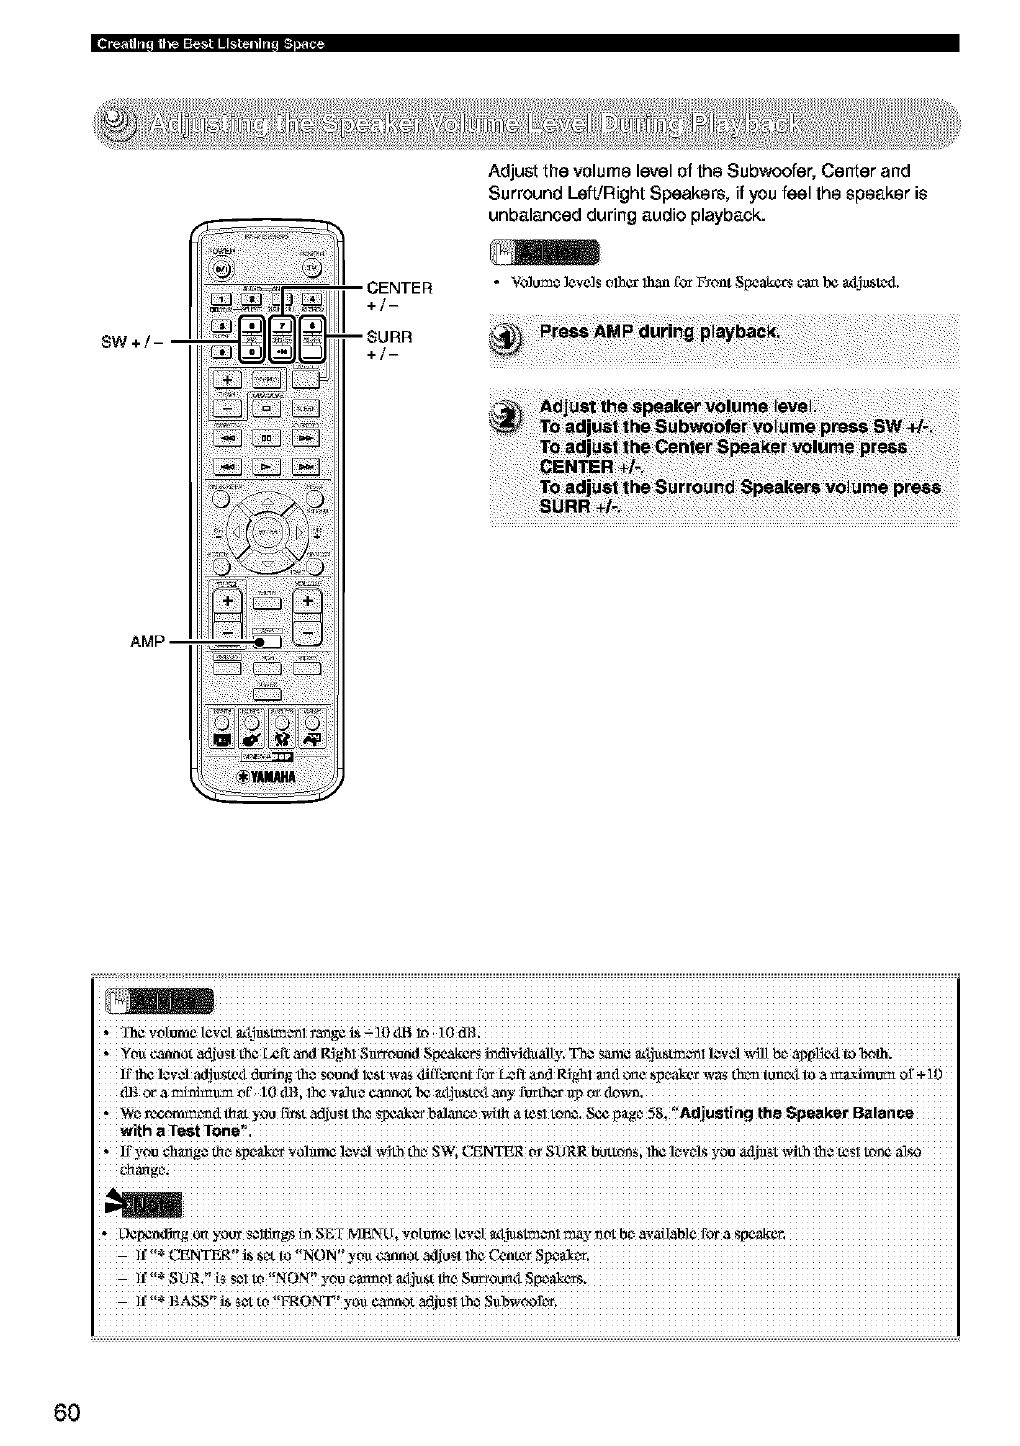
Adjust the volume level of the Subwoofer, Center and
Surround Left!Right Speakers, if you feel the speaker is
unbalanced during audio playback.
SW+/
;ENTER
+/-
•Vo]um¢ ]eve]s olhcr 1hart{br Fxont Speake_ can I_ _x_t_tc_d.
i iiiiiiiiiiiiiiiiiiiiiiiiiiiiiiiiiiiiiiiiiiiiiiiiiiiiiiiiiiiiiiiiiiiiiiiiiiiiiiiiiiiiiiiiiiiiiiiiiiiiiiiiiiiiiiiiiiiiiiiiiiiiiiii
,you _Ot adjust the _f_- _d ItJgh! Sm_o_d $_ _vklwalty. _€ S_ _tj_S_! lZ'._Jvdlt bZa_pl_e_t_ _lh.
lr 111¢1¢v¢1adjuste_,l dt_g the sound l_St wa_ ,lilI_x_nt for Left a_d P-Jghl _d o_¢ speaker w_ dK_n_-x$ to a _rJmm_t of -i-10
d_ _a_uaa_' tOdBi_Z valac _t _ _tju_tc_t any
We _co_[ _ you F=zt_dj_st L_¢_m'b_ce _ a t_s tm_. Sc¢F_g¢58, Adjust ng tha Speaker Balance
With
, If v_ c_g¢ _ Slx_ak_rYO!_ !¢v _Jw_th th_ SWi CENTER _ $O_R bUtt_i lh€ k_v_lsyou adja_t _4th the t¢_1 t_¢ al_
,Ocpcndi_g _ you_ S¢i_gs h_S_f MENU, Whm't¢ tCW[ _Ym*_l may n_bc_ avaflab!e fo_ a Spcakcr,
]f L_NTER _ _c_t_ NON you _0t adjust !_ Ccnte_
If SDR_ t_ s_ltV NON y0u_01_tj_s_€ S_0U_tSpc_ake_s.
If BASS _S_to FRO_ yoacann_attjuslth_ Sttbwcofc¢.
6O
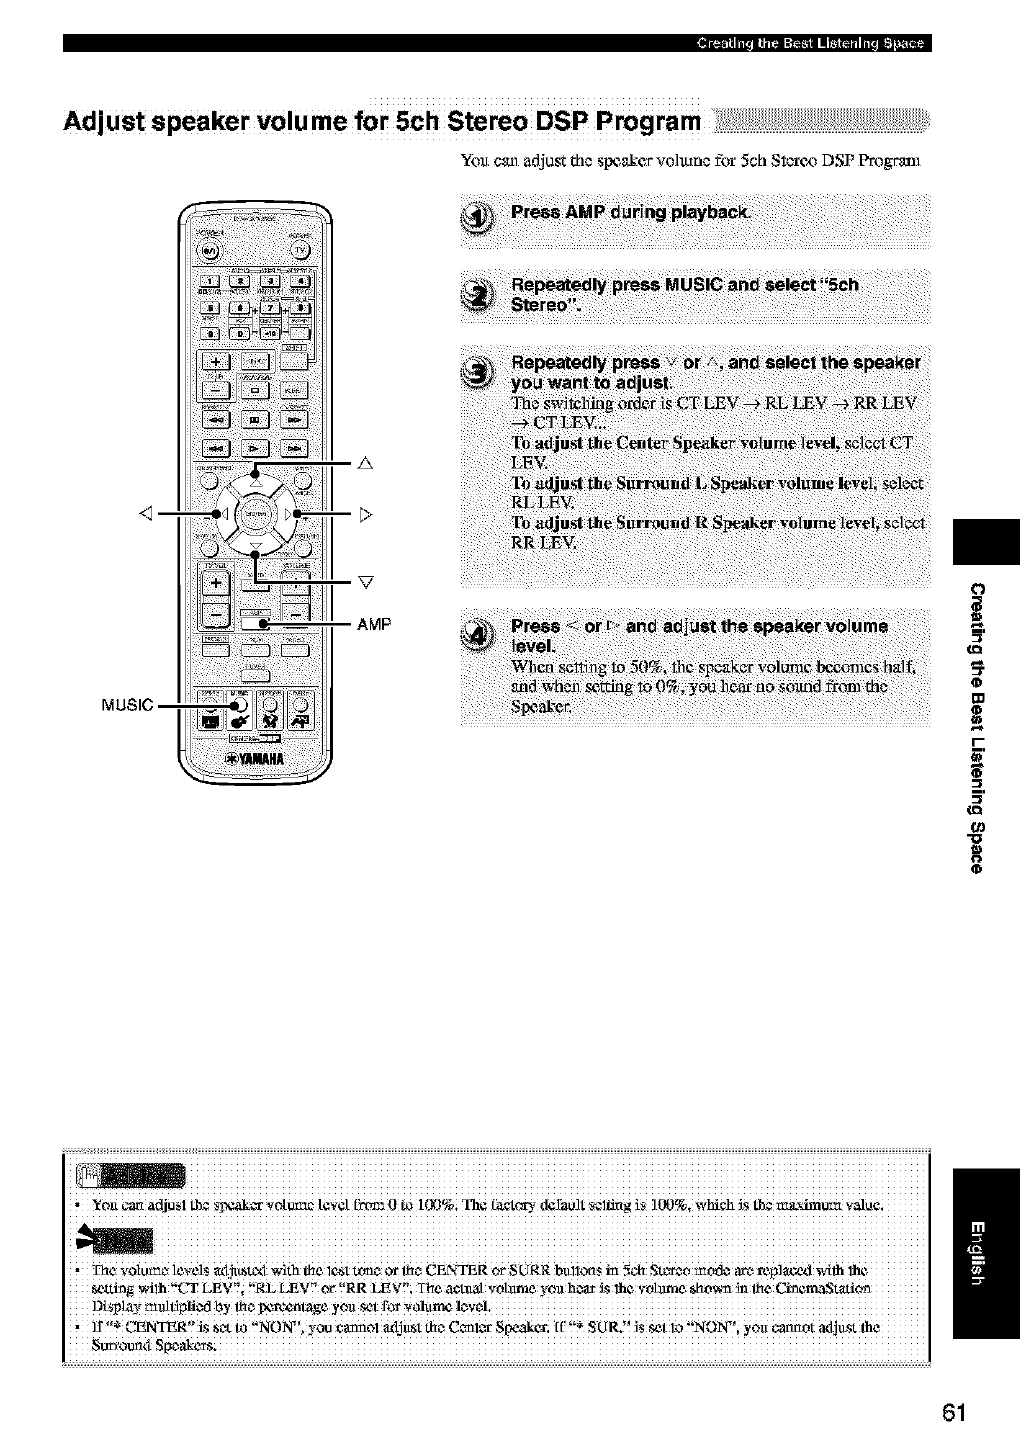
Ad_ustspea_rv_ume_rschs_re_Dsp_pmgram_i_;!!_iiiiiiii!!_!!_!!_!!_!!_!!_!!_!!_!!_!!_!!_!!_!!_!!_!!_!!_!!_!!_!!_!!_!!_!!_!!_!!_!!_!!_!!_!!_!!_!!_!
Yott e_ adjust the SlXZ_kervo]tune f_ 5eh St_¢_ DSP P_gl"_l
_m
A
AMP t
0
g3
=.
o_
"0
0
Setting the Speaker Size
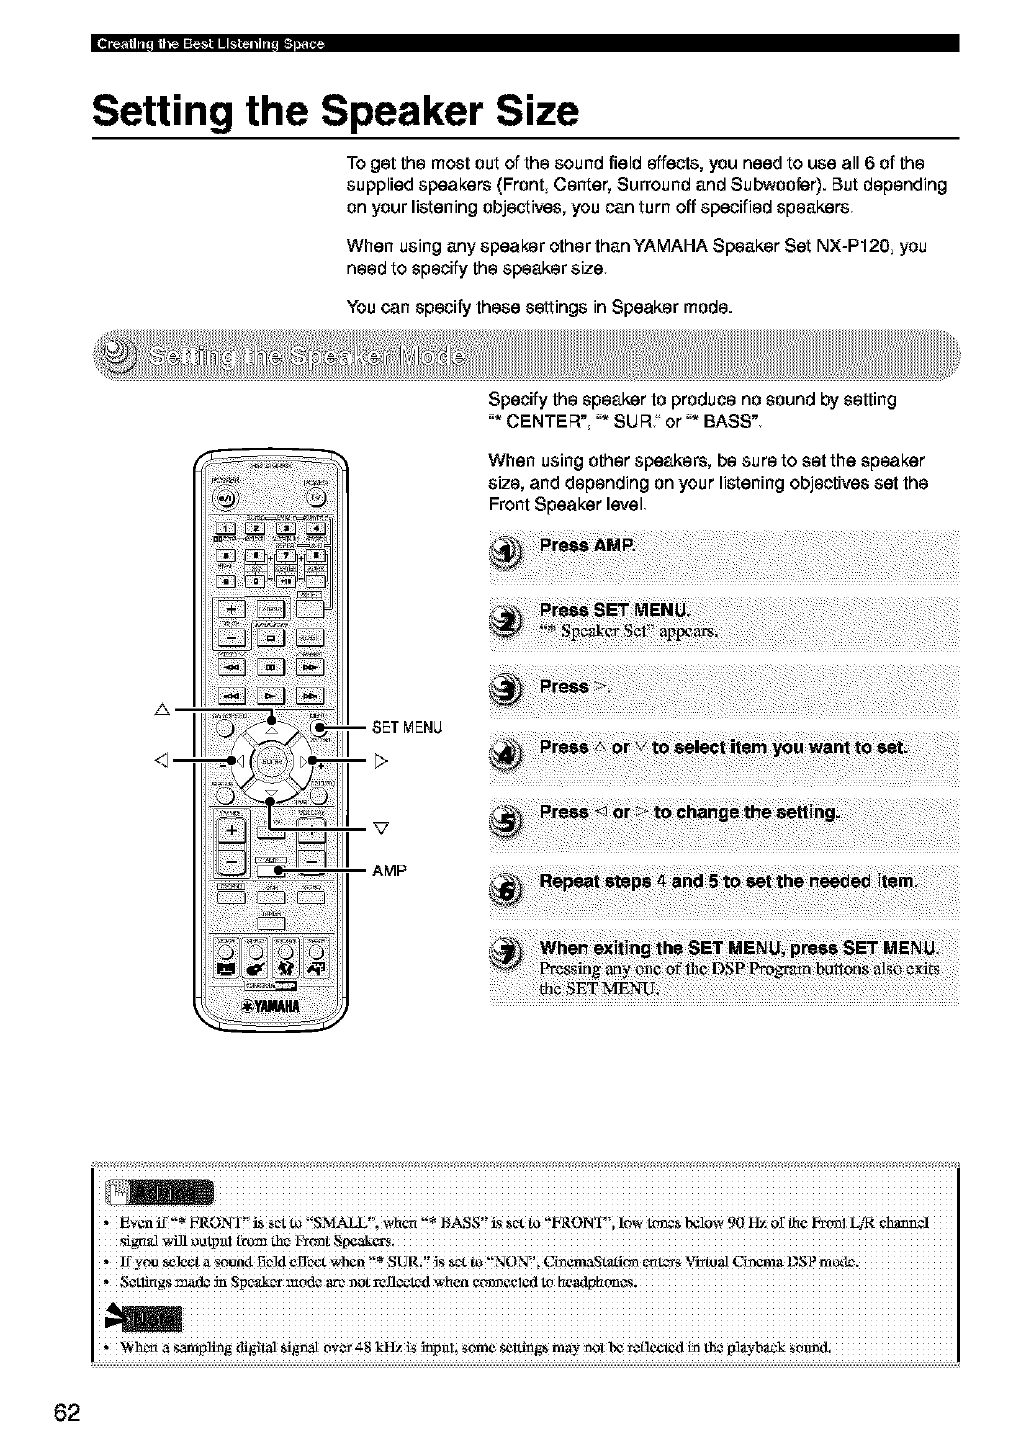
To getthemost outofthesound fieldeffects,you need touse all6ofthe
suppliedspeakers(FrontCenter,Surround and Subwoofer).Butdepending
on your listening objectives, you can turn off specified speakers,
When using any speaker other than YAMAHA Speaker Set NX-P120, you
need to specify the speaker size
You can specify these settings in Speaker mode.
zx
--1--
Specify the speaker to produce no sound by setting
"* CENTER', "* SIJR, or "* BASS"
When using other speakers, be sure to set the speaker
size, and depending on your listening objectives set the
Front Speaker level
i iiiiiiiiiiiiiiiiiiiiiiiiiiiiiiiiiiiiiiiiiiiiiiiiiiiiiiiiiiiiiiiiiiiiiiiiiiiiiiiiiiiiiiiiiiiiiiiiiiiiiiiiiiiiiiiiiiiiiiiiiiiiiiii
,Even if* FRONT i_ _ett_ SMALL i Wt_er_* t_SS is S¢_tto FRONT_;low _¢S bcl0W90 Hz o_t_¢ F_I4R
'lfy_ _t a _a I3e]d _I$c_t when t'* SURi'! IS Sa _'!NON"i Ci_emaS_ _¢I_ Vi_al c_ma DSP
,S_l_gs:_ad¢ _ Spe_r mcnJ¢ arc_x_otrefl¢_dwhen
,V#h_ a san',pl_ distal _goa[ 0V_ _'g _!S _npa!; mine se_ n',_- _ N _*!lcckxl i_ Ne _!_'b_k SOm_l.
62
* CENTER
Sets whc_ler the _nter Speaker is p_csentor nm, and
sets the siT_of the Centex Speaker.
Selection items: LRG (Large), SML (Small), NON
(None)
l)efmlIt setting: SML
LRG: Select this sc_ing when using a big Center
Speaker. The entire frcqunncy band of the center charmel
signal is output as it is from the Center Speaker.
SML: Select this s¢_ing when using a small Center
Speaker. A czntex channel signal with a low tone of 90
Hz or below is output from the speaker _,t to * BASS.
NON: Select this setting whun not using a Center
Speaker. The center chanunl signal distributes the same
vo]unle lexe] to the Front L/I_ Speakers.
* FRONT
Sets the siT_of the Front Speakers.
Selection items: LARGE, SM__M_L
l)efmlIt setting: SMALL
LARGE: Select this s¢_ing when using big From
Speakers. The entire frequency band of the front L/l;:
channel signal is output _s it is from the Front Le£t and
Right Speakers.
SMALL: Select this seUfng whun using small Front
Speakers. A front LiR channel signal with a low tone of
90 Hz or below is output from the speaker set to *
BASS.
* SUR.
Sets whether the Surround L/l;:Speakers are present or
not, aridsets the size of"the Surround L/'RSpeakers,
Selection items: LRG (Large), SML (Small), NON
(None)
l)efmllt setting: SML
LRG: Select this sc_ing when using big Surround L/l;:
Speakers or when using Surround L/l;: Speakers with
surround subwoofers connected by speaker cables.
The entire frcqunncy band of the surround LiR channel
signal is output as it is from the Surround Speakers.
SML: Select this sc_ing when using small Surround LiT(
Speakers. A surround LiR channel signal with a low toun
of 90 Itz or below is output from the speaker set to *
BASS.
NON: Select this setting whun not using Surround I_
Speakers. The surround L/l;: channel signal disWibutes
file same volume level to the Front LiR Speakers.
*BASS
Selects flit speaker to output a LFE[BASS (low tone)
signal. LFE stands for Low Freztununy Effoat and it is
used to output bands of"90 Itz and below when Dolby
Digital or DTS is active,
Selection item: SWFR (Subwoofcs), FRONT, BOTH
l)efitult setting: SWFR
SWFR: Select this sc_ing when using a Subwoofun
The LFE and low tone (90 Hz arid below) sound froul
othan channels, de.haling on * CENTER, * FRONT and
• SUR. sc_ings, are output frtml the Subwoofun
FRONT: Select this se_ing when not using a
Subwoofer. The LFE and low tone (90 Hz and below)
sound fronl ofllan chunncls, depending on * CENTER, *
FRONT and * SUR. _,ttings, are output from the Front
LiR Speakers.
BOTH: Select this item to mix alow tone, of 90 Hz and
below with aLFE channel when using aSubwoofer arid
indc_ndc_t of"file Front Speaker Sound mode sc_ing.
The entire frequency band of the front L[R ehunncl is
output from bofll the Front LiR Speakers and Subwoofun
Sound can output from the Subwoofer during 2-charmel
or Dolby Surround playbaak.
* F, Level
Selects the Front Speaker lcxel.
Whun the Front Speakan volunle lcxel is exI_enle]y high
arid out of aligtmlunt with that of other speakers, you can
lower the volume level and regain a balance.
Selection items: Nnn (Nounal), -10 dB
Default setting: Nm
Nrm: Usually this setting is selected.
-10 dB: Use this setting ff the output level of the Center
or Surround Speakers is out of"alignment with the Front
Speakers. The volmun level of"the Front Speakers
decreases ] 0 dB (about lf3).
O
t
a_
o
m
_r.
a_
"o
O
/
63
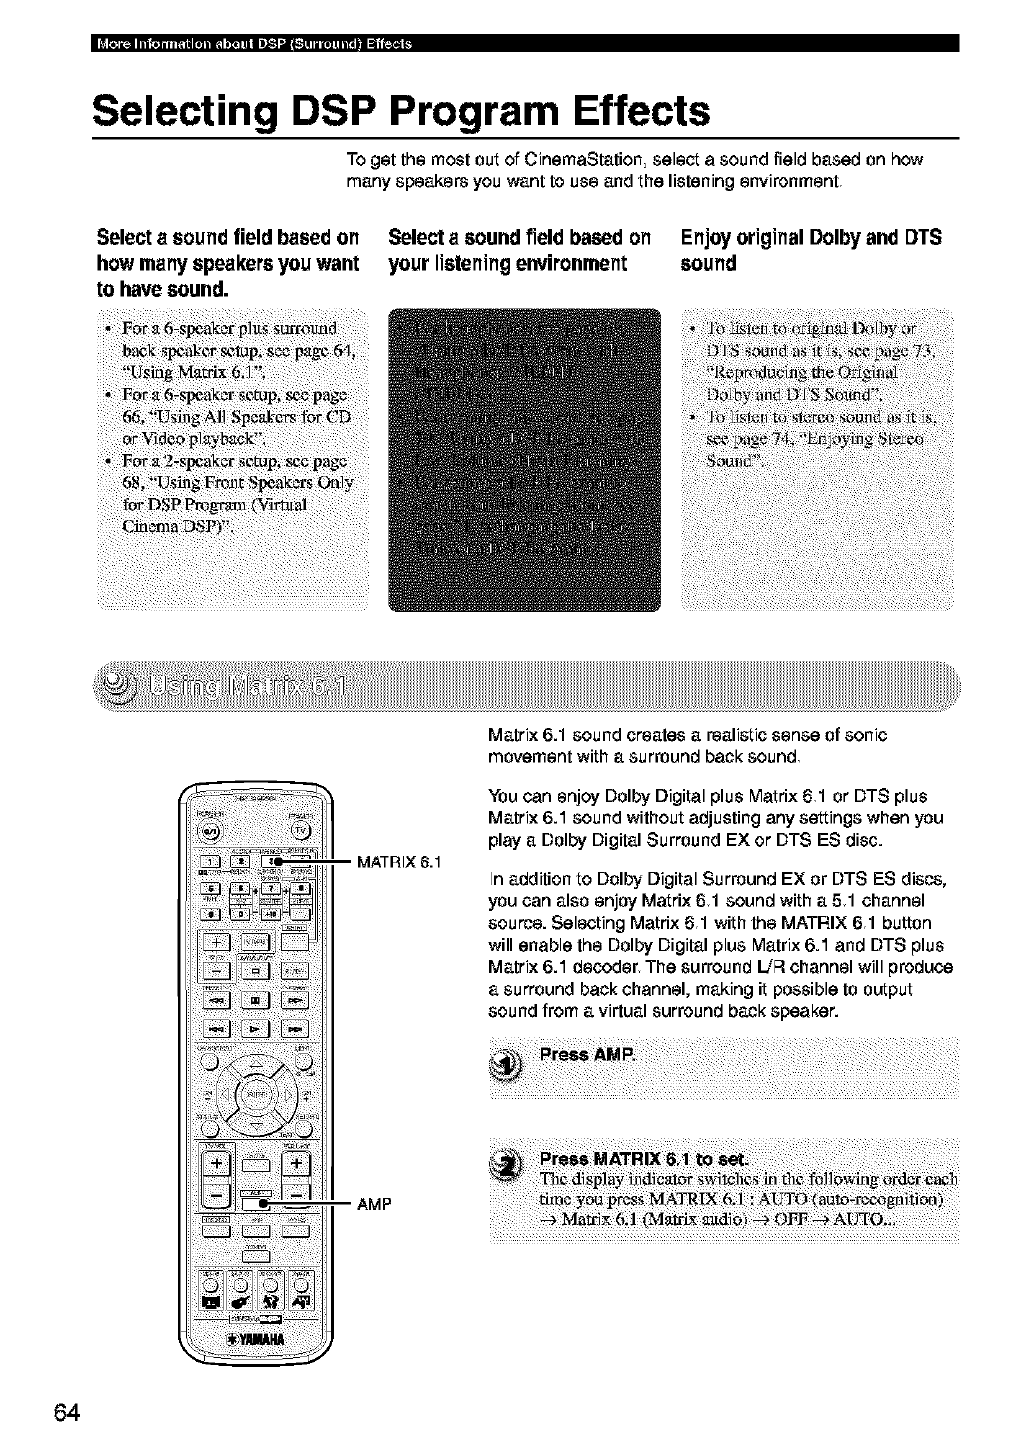
Selecting DSP Program Effects
To get the most out of CinemaStation select a sound field based on how
many speakers you want to use and the listening environment
Select a sound field based on
how many speakers you want
to have sound,
Select asound field based on
your listening environment
Enjoy original Dolby and DTS
sound
-- MATRIX 6.1
Matrix 6.1 sound creates arealistic sense of sonic
movement with a surround back sound
You can enjoy Dolby Digital plus Matrix 61 or DTS plus
Matrix 6.1 sound without adjusting any settings when you
play a Dolby Digital Surround EX or DTS ES disc.
In addition to Dolby Digital Surround EX or DTS ES discs,
you can also enjoy Matrix 61 sound with a 51 channel
source. Selecting Matrix 61 with the MATRIX 61 button
will enable the Dolby Digital plus Matrix 6.1 and DTS plus
Matrix 6.1 decoder_ The surround L/R channel will produce
a surround back channel, making it possible to output
sound from a virtual surround back speaker.
AMP
_i !_i_i i_i_i_ii_i _ _i_i ¸_i_®
64
AUTO
MATRIX 6.1
OFF:
Depending on whether the source is Dolby
or DTS, automatically switches between
Dolby Digital plus Matrix 61 and DTS plus
Matrix 6.1 audio. Even if you play a 51
channel source with this setting, no virtual
surround back speaker is created.
Select this item to play a51 channel source
with Matrix 61 Sound outputs from the
virtual surround back speaker.
The Matrix 6.1 decoder is not enabled. Even
if you play aDolby Digital Surround EX or
DTS ES disc, no sound outputs from the
virtual surround back speaker.
i iiiiiiiiiiiiiiiiiiiiiiiiiiiiiiiiiiiiiiiiiiiiiiiiiiiiiiiiiiiiiiiiiiiiiiiiiiiiiiiiiiiiiiiiiiiiiiiiiiiiiiiiiiiiiiiiiiiiiiiiiiiiiii
'_ thc_ MairJX 6i 1 dc_o_ _S Wo'kdngi 111¢MATRIX i_d_alo_ U_h_ _jp in _¢ C_¢_iaii_ L)i_la}: t%1 a_s _kl¢ L_
,Som_,Dolb_-Di_ Sta'ro_d E× c_ DTS E,SdisCSd_ _Oi_omai_ _cfi_at (L!_g)that C_c_te_Slali__ _ 1_
roa-ognitim. Y_,play _ty_ _f disc.a:ith6._ _harmc0so_d, _S MATRIX6i1 tt,Se!¢ciMottLe:tiil
"]n!b_ caSCs_0_56{!cbarm¢!_0_m4¢_P!_ _e_v_if'yoaI_S MA_T_IX
a'SOR. iS S¢ItO
-i! sound
-7_ aD0lby Digital KARAOKE s_
,]I_,_ turn on _c Ix>acronce mt'av a{_c_CincmaStation goes into slam_; blm_C_t_,l mi._ns to AOTO;
O
q
0
0
g
-o
i
&
/
65
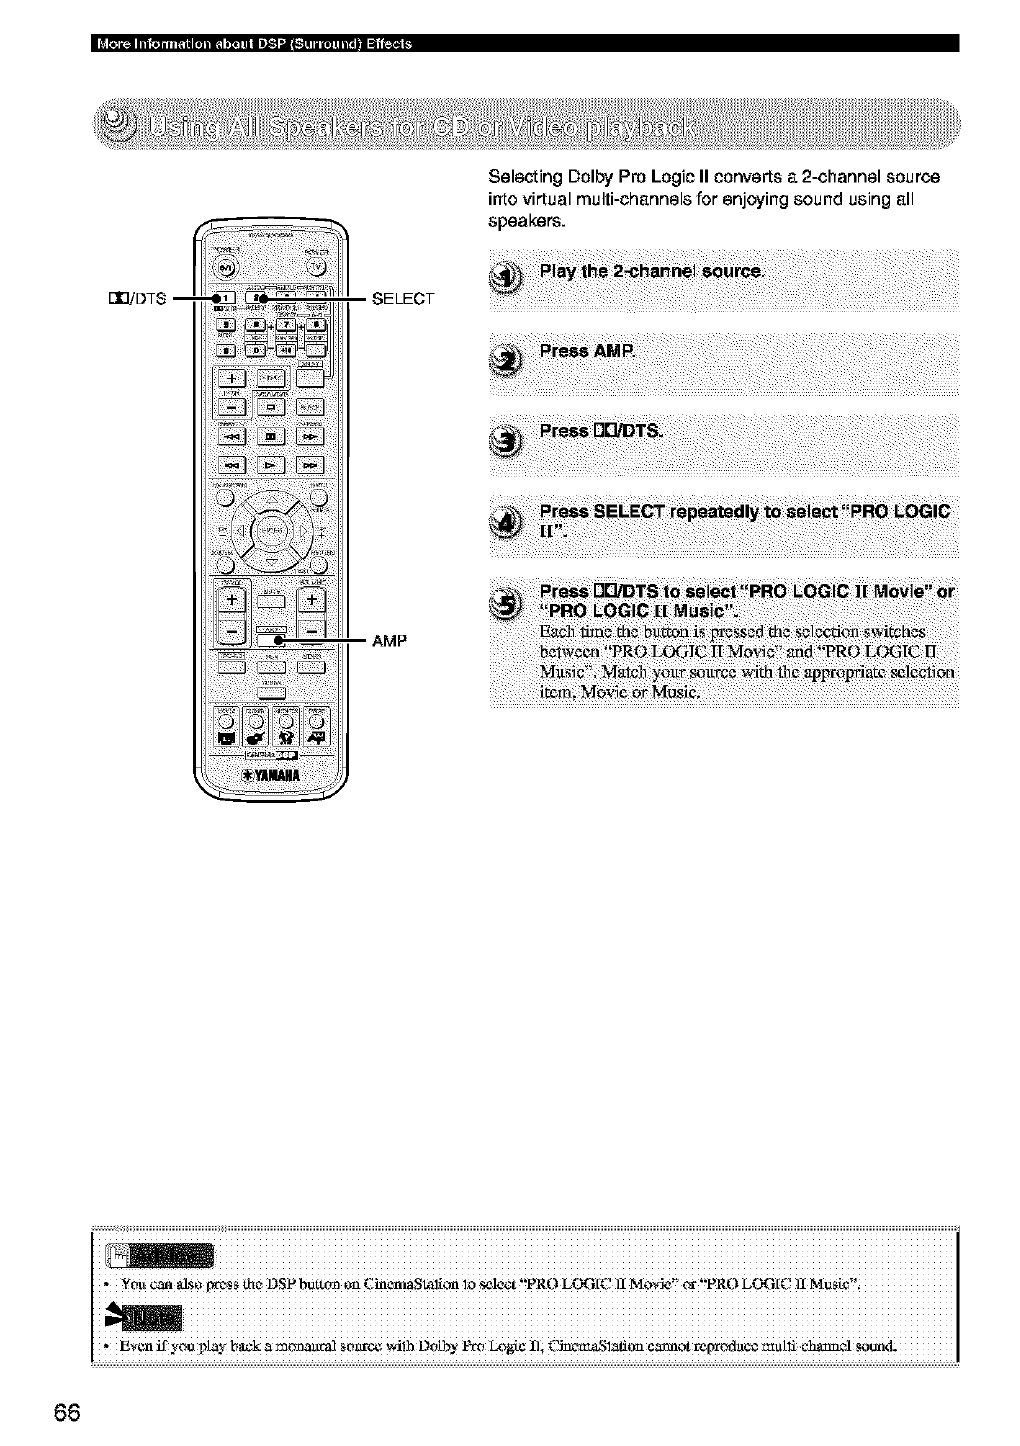
[]BiDTS -- SELECT
AMP
Selecting Dolby Pro Logic II converts a 2-channel source
into virtual multi-channels for enjoying sound using all
speakers.
i iiiiiiiiiiiiiiiiiiiiiiiiiiiiiiiiiiiiiiiiiiiiiiiiiiiiiiiiiiiiiiiiiiiiiiiiiiiiiiiiiiiiiiiiiiiiiiiiiiiiiiiiiiiiiiiiiiiiiiiiiiiiiiii
g_'¢n if y#e i_y b_c k _ m_ S#_ v4!_ D0tbY _ L°N# Ili C]_'_'_l;_t! L_'°¢_n0t _Ned_t#¢ multi c_N S0end-
66
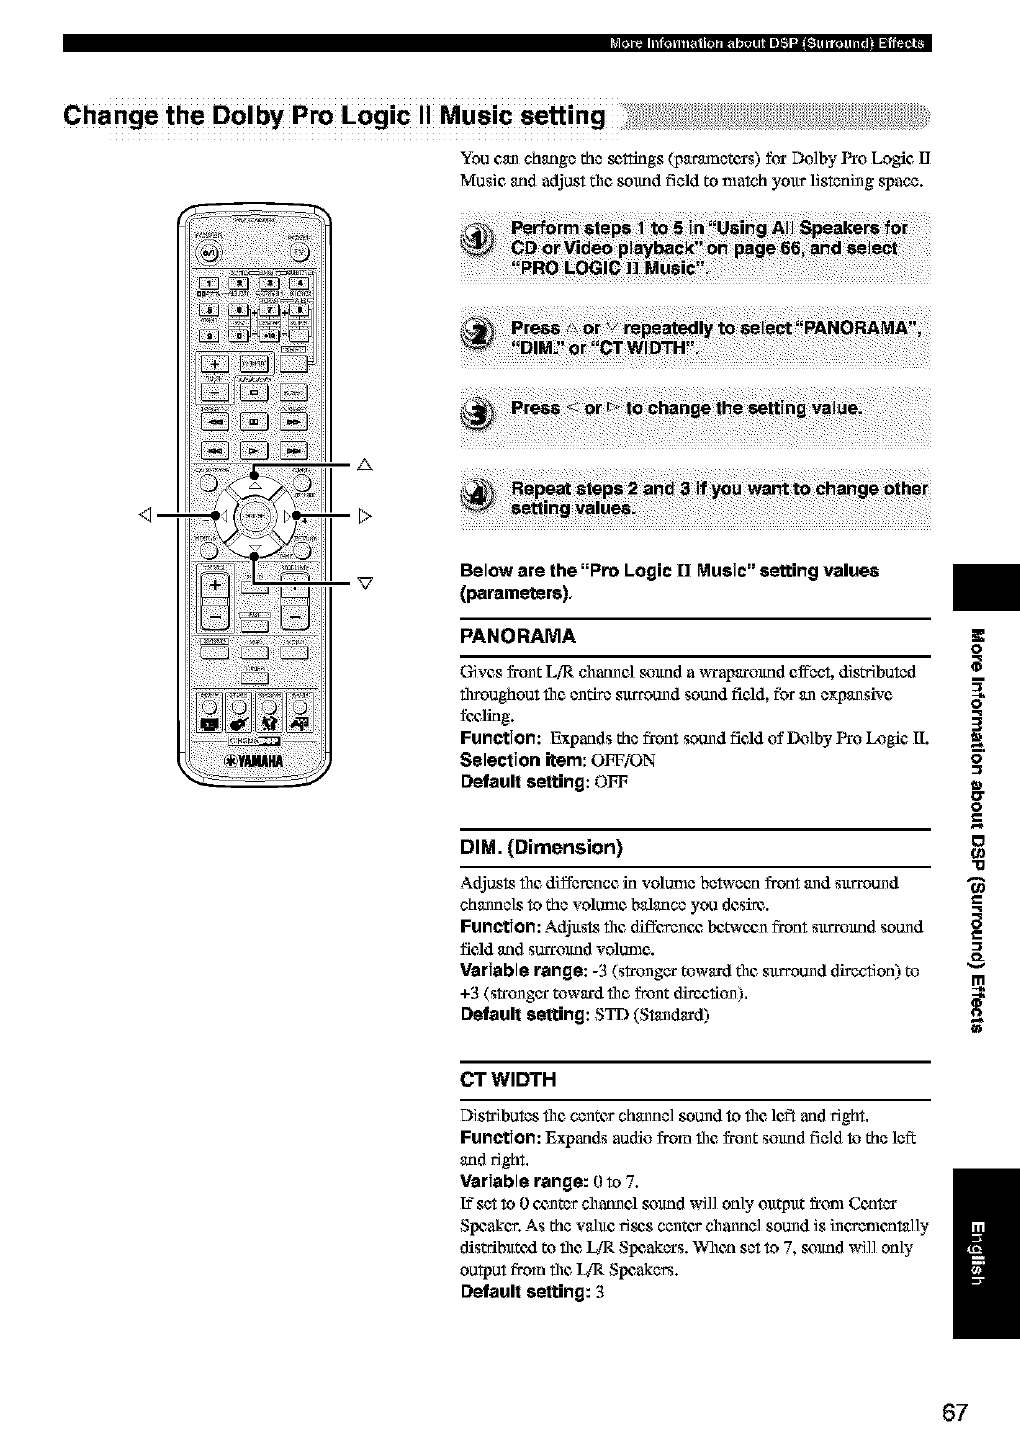
Change the Dotby Pro Logic Music setting
You can change the _ttings (p_tr_netcrs) for Do]by Pro Logic I]
Music and adjust tim sound field to match your listening space.
_m
A
Below are the "Pro Logic [] Music"setting values
(parameters),
PANORAMA
Gives frunt LiR charnel sound a _xap_trmtnd cffbct, dis_buted
throughout tim entire surround sound field, for an expansive
fc_lklg.
Function: Expands the front sound field of Do]by Pro Logic [I.
Selection item: OFF/ON
Default setting: OFF
DIM. (Dimension)
O
q
3
0
0
g
"13
Adjusts tim difference in volume between front and surround
channels to the volume balance you desire.
Function: Adjusts tim diffevenc_ Ix3t_'cunfront surrmmd sound _=
field _ld SUlTOlfflO VOIDIIle.
Variable range: -3 (stronger toward tim surround direction) to
+3 (stronger toward tim front dire_:,fiun).
Default setting: STD (Standard)
CT WIDTH
Distributes tim center channel sound to tim left and fight.
Function: Expands audio from tim _runt sound field to the left
and 15ght,
Variable range: 0to 7.
[?set to 0c_nter channel sound will only ou_ut _rtm_Center /
Slx:aker. As the wlue fie_s center channel sound is incv_mnt_l]y
distributed to tim _ Slx:akers. When set to 7, sound will only
output from tim _ Speakers.
Default setting: 3
67
A
<_--
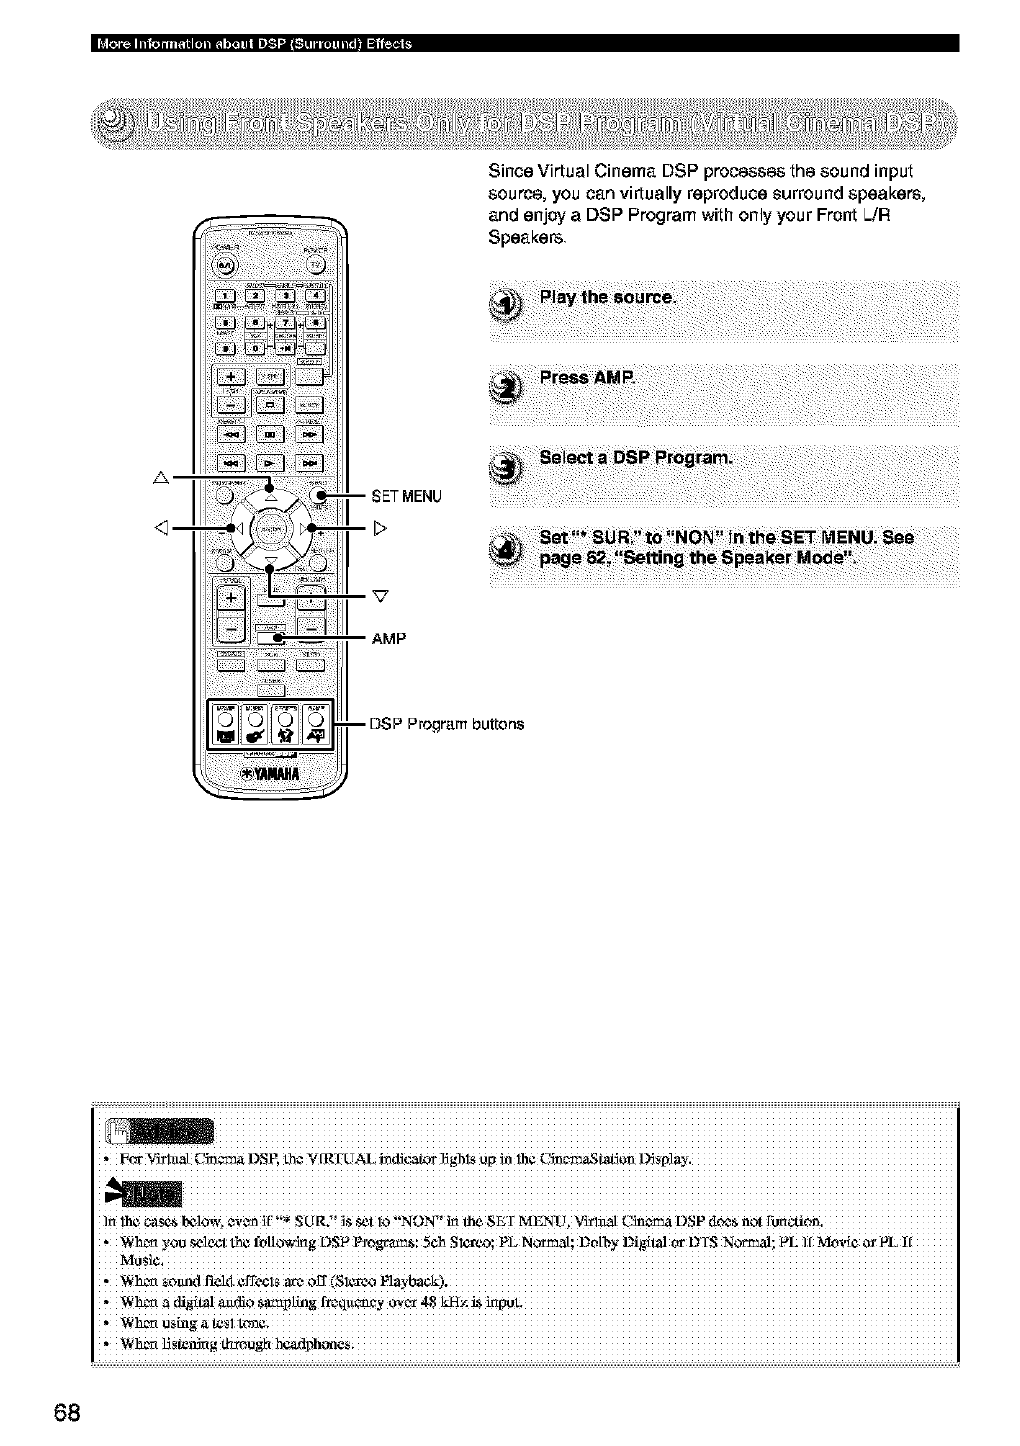
Since Virtual Cinema DSP processes the sound input
source, you can virtually reproduce surround speakers,
and enjoy a DSP Program with only your Front L./R
Speakers
-- DSP Program buttons
i iiiiiiiiiiiiiiiiiiiiiiiiiiiiiiiiiiiiiiiiiiiiiiiiiiiiiiiiiiiiiiiiiiiiiiiiiiiiiiiiiiiiiiiiiiiiiiiiiiiiiiiiiiiiiiiiiiiiiiiiiiiiiiii
*#c_ V#iaat Cin_ DSE
]n h 1 , _,_n][ _ R _ m ErM 11" m D Pn fin
1¢CaS'_0_%*_ "S(_ . "SS_tlO NON'' theS '" ENU, VittlaIC" _ S dC/aS 0_
,N h_ ._Ou _l_t th_ fo/to_rig OSP _ON; 5Ch Slot°°; PL N°_mal; D0tttY _giN °r DIS N_; PL
*_hC_ SOmld Fa_14¢ffC¢lSatX_OE(SI_O
68
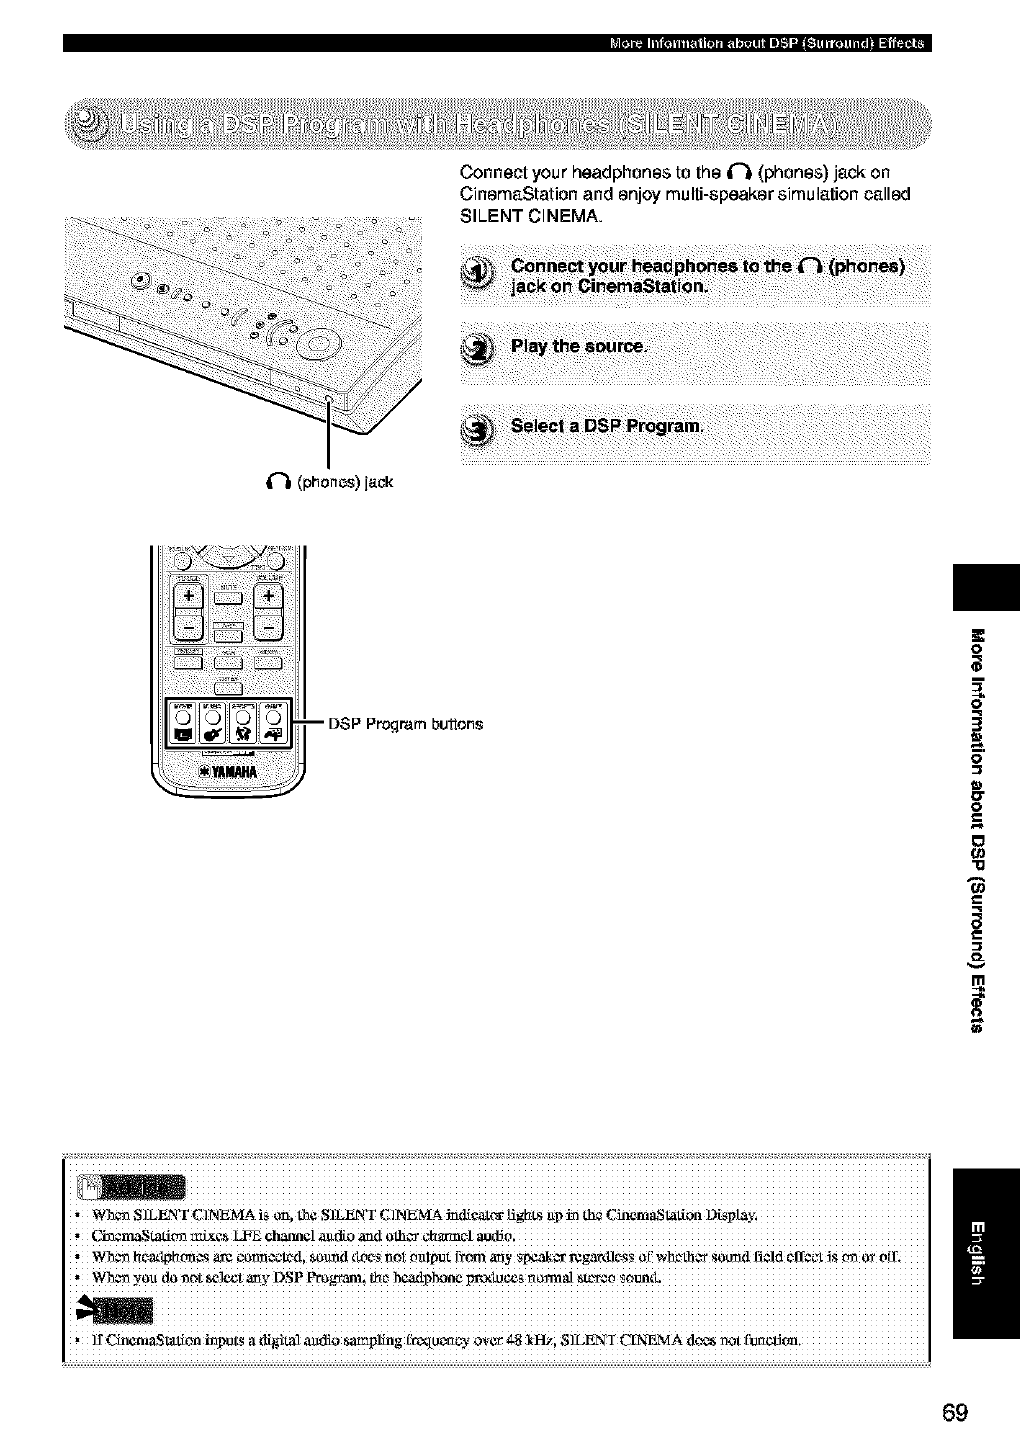
Connect your headphones to the _ (phones) jack on
CinemaStation and enjoy multi-speaker simulation called
SILENT CINEMA.
if_li(phonos)jaok
-- DSP Program buttons
O
m
q
3
0
17
0
g
0
"11
69
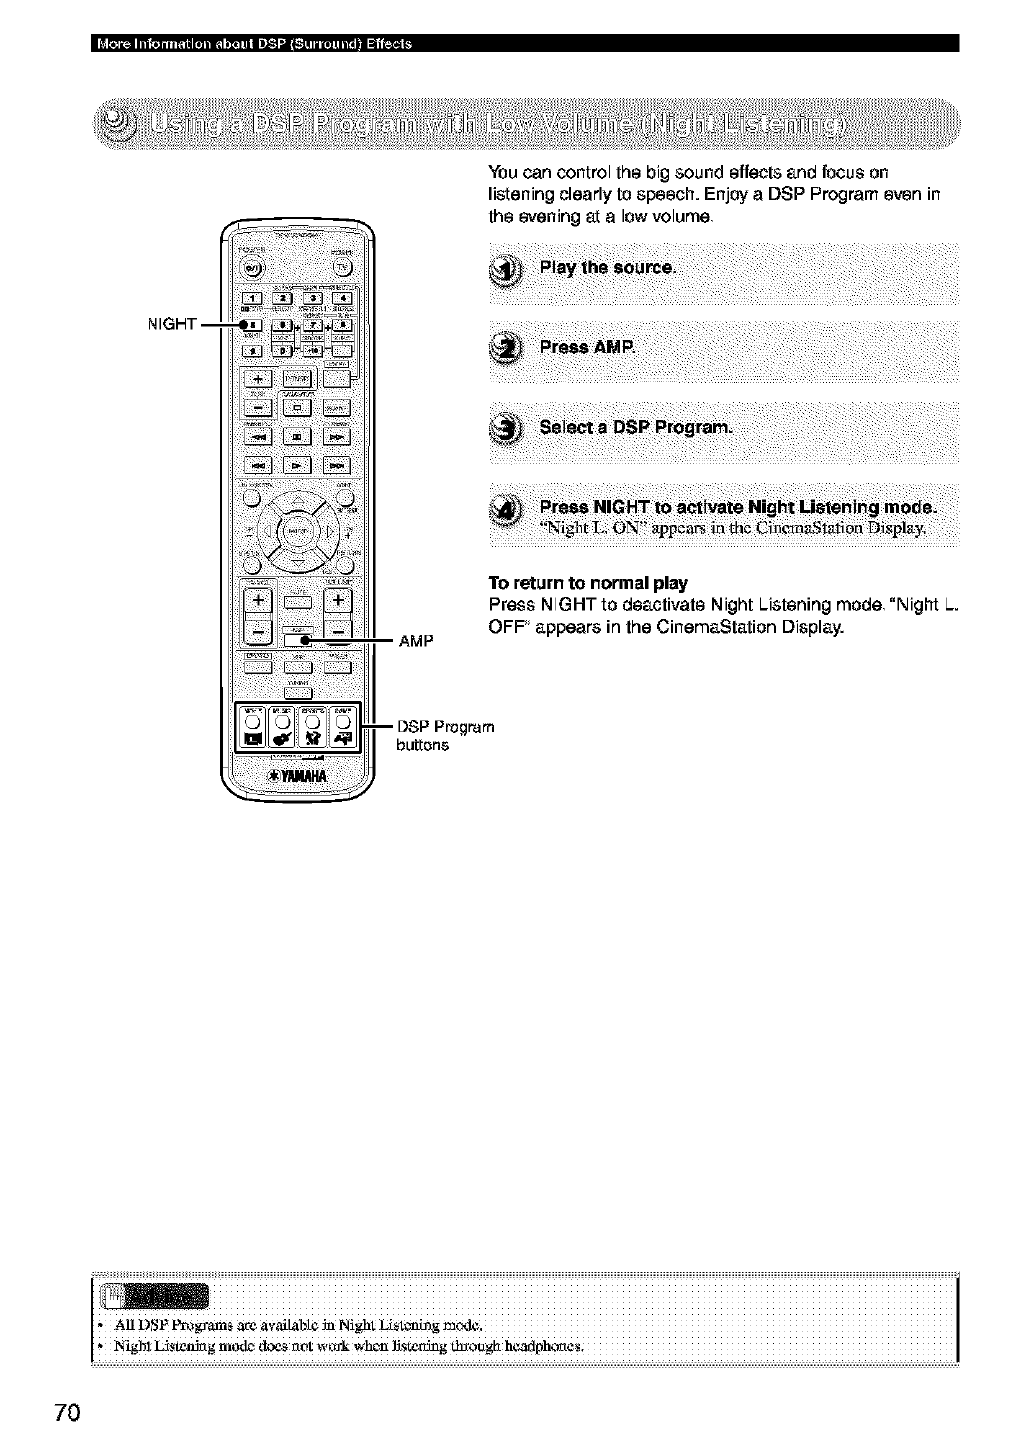
You can control the big sound effects and focus on
listening clearly to speech. Enjoy a DSP Program even in
the evening at a low volume
NIGHT-- 4JJi! ¸ _i
_ii_iii _i_! _i_
AMP
To return to normal play
Press NIGHT to deactivate Night Listening mode, "Night L.
OFF appears in the CinemaStation Display.
-- DSP Program
buttons
70
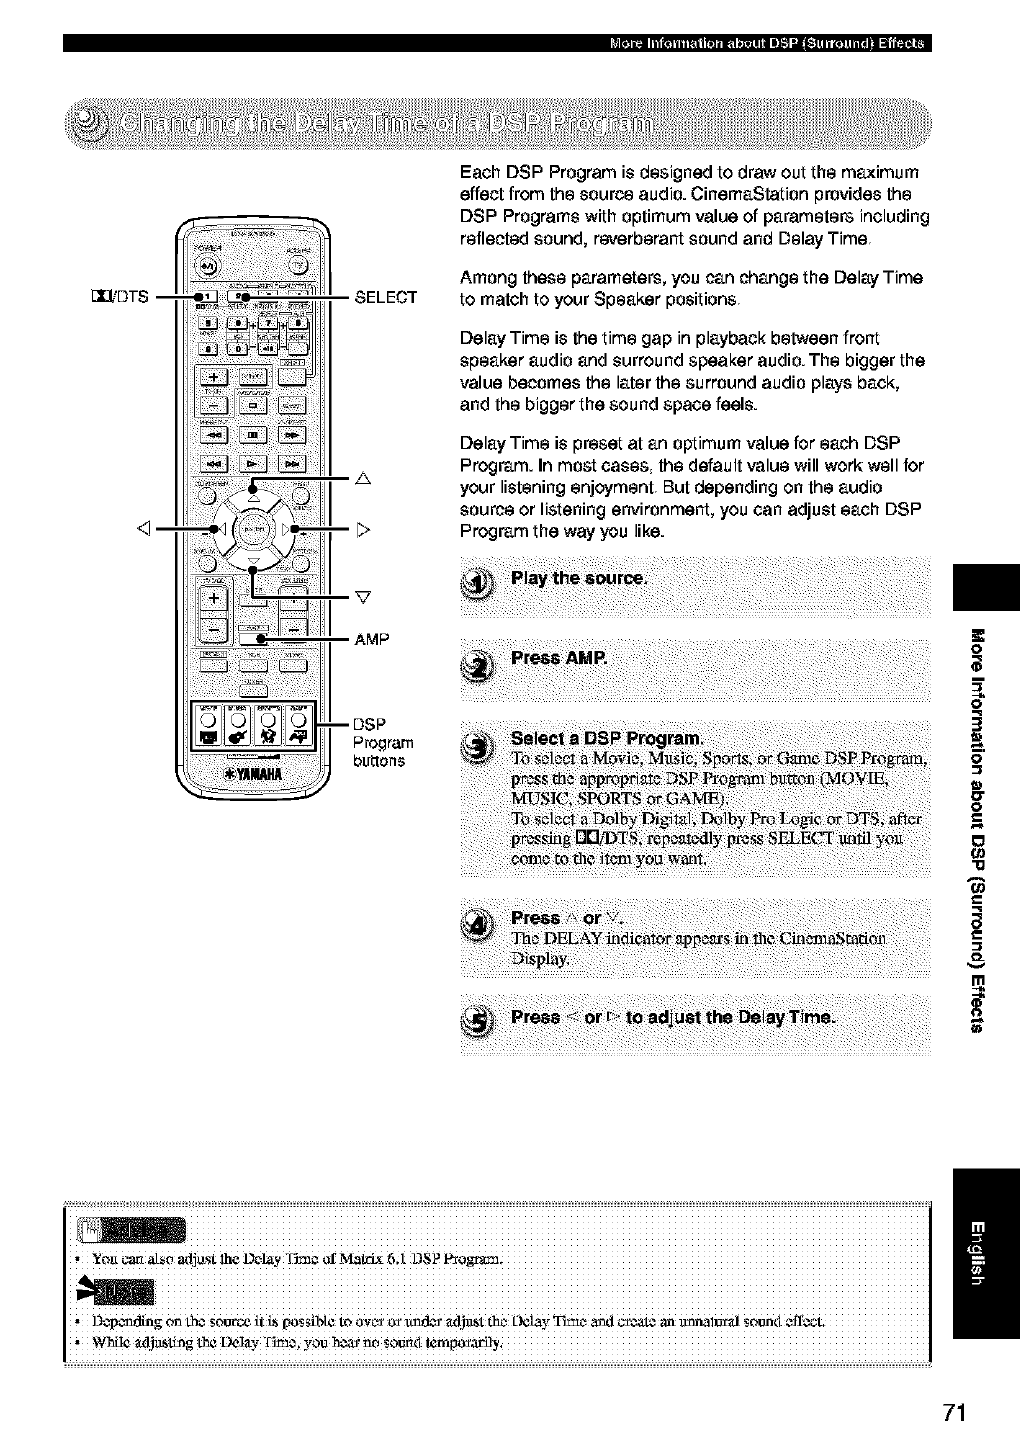
[X_DT$ --
<1--
SELECT
A
AMP
--DSP
Program
buttons
Each DSP Program is designed to draw out the maximum
effect from the source audio. CinemaStation provides the
DSP Programs with optimum value of parameters including
reflected sound, reverberant sound and Delay Time
Among these parameters, you can change the Delay Time
to match to your Speaker positions
Delay Time is the time gap in playback between front
speaker audio and surround speaker audio. The bigger the
value becomes the later the surround audio plays back,
and the bigger the sound space feels.
Delay Time is preset at an optimum value for each DSP
Program. In most cases, the default value will work well for
your listening enjoyment But depending on the audio
source or listening environment, you can adjust each DSP
Program the way you like.
m
i ! iiiiiiiiiiiiiiiiiiiiiiiiiiiiiiiiiiiiiiiiiiiiiiiiiiiiiiiiiiiiiiiiiiiiiiiiiiiiiiiiiiiiiiiiiiiiiiiiiiiiiiiiiiiiiiiiiiiiiiiiiiiiiiii
/
,YOtl carl M_O adjostlhe LM_lay Tim_ orMatrL¢6;1 DSPP_ogram;
D_p_ldlng on Lh¢_OUtC_it i_ possibt¢to ovc_oz_r ax_t_t thc_L)e/av_t_¢ _ml _ate an tmOale_a]soontt¢ff¢¢'L
71
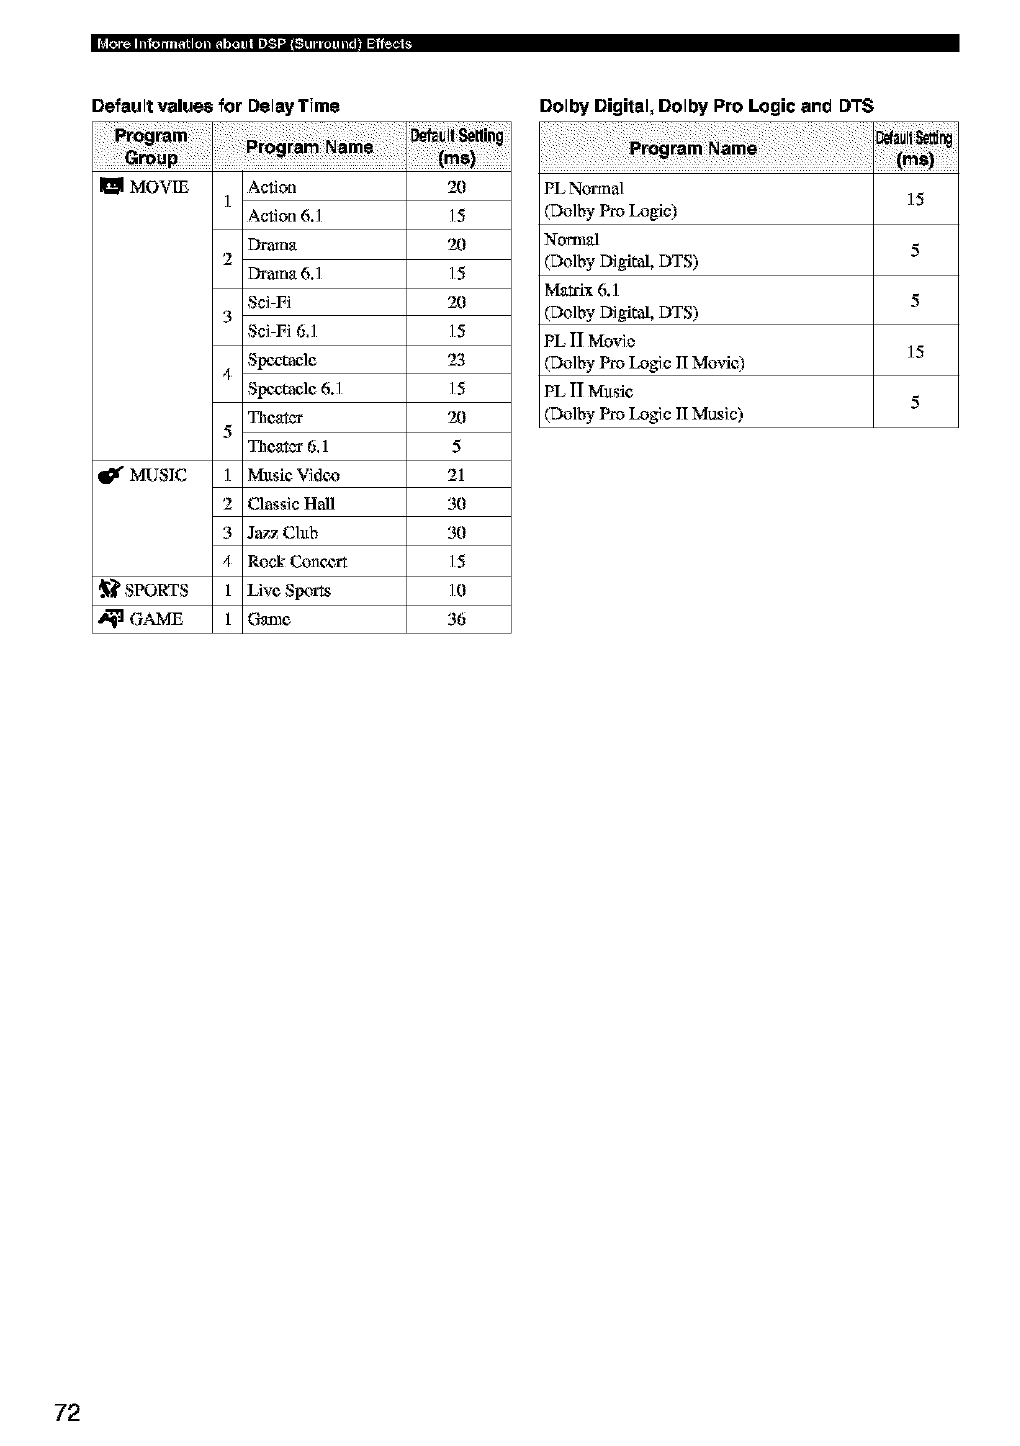
Default value8 for Delay Time
m MOVm
_¢ MUSIC
._ SPORTS
Action
1A_ion 6.1
2Drama 6.1
Sci-Fi
3Sci-Fi 6.1
S!_'zta¢lc
4Spectacle 6.1
Thcgtcx
5_c_tcr 6.1
1 Mltsic Vidt-/o
2 Classic Hall
3 Jazz Chtb
4 Rock Conc,_rt
1 Livc Sl_;,rts
1 Game
2O
15
2O
15
2O
15
23
15
2O
5
21
30
30
15
]0
36
Dolby Digkel=Dolby Pro Logic and D'PS
PL No'nna] 15
(Dolby Pro Logic)
Nom_l 5
(Do]byDigital, DTS)
Matrix 6.1 5
(Do]byDigital, DTS)
PL II Movie 15
(Do]by Pro Logic II Mtwie)
PL II M_.tsic 5
(Do]by Pro Logic II Music)
72
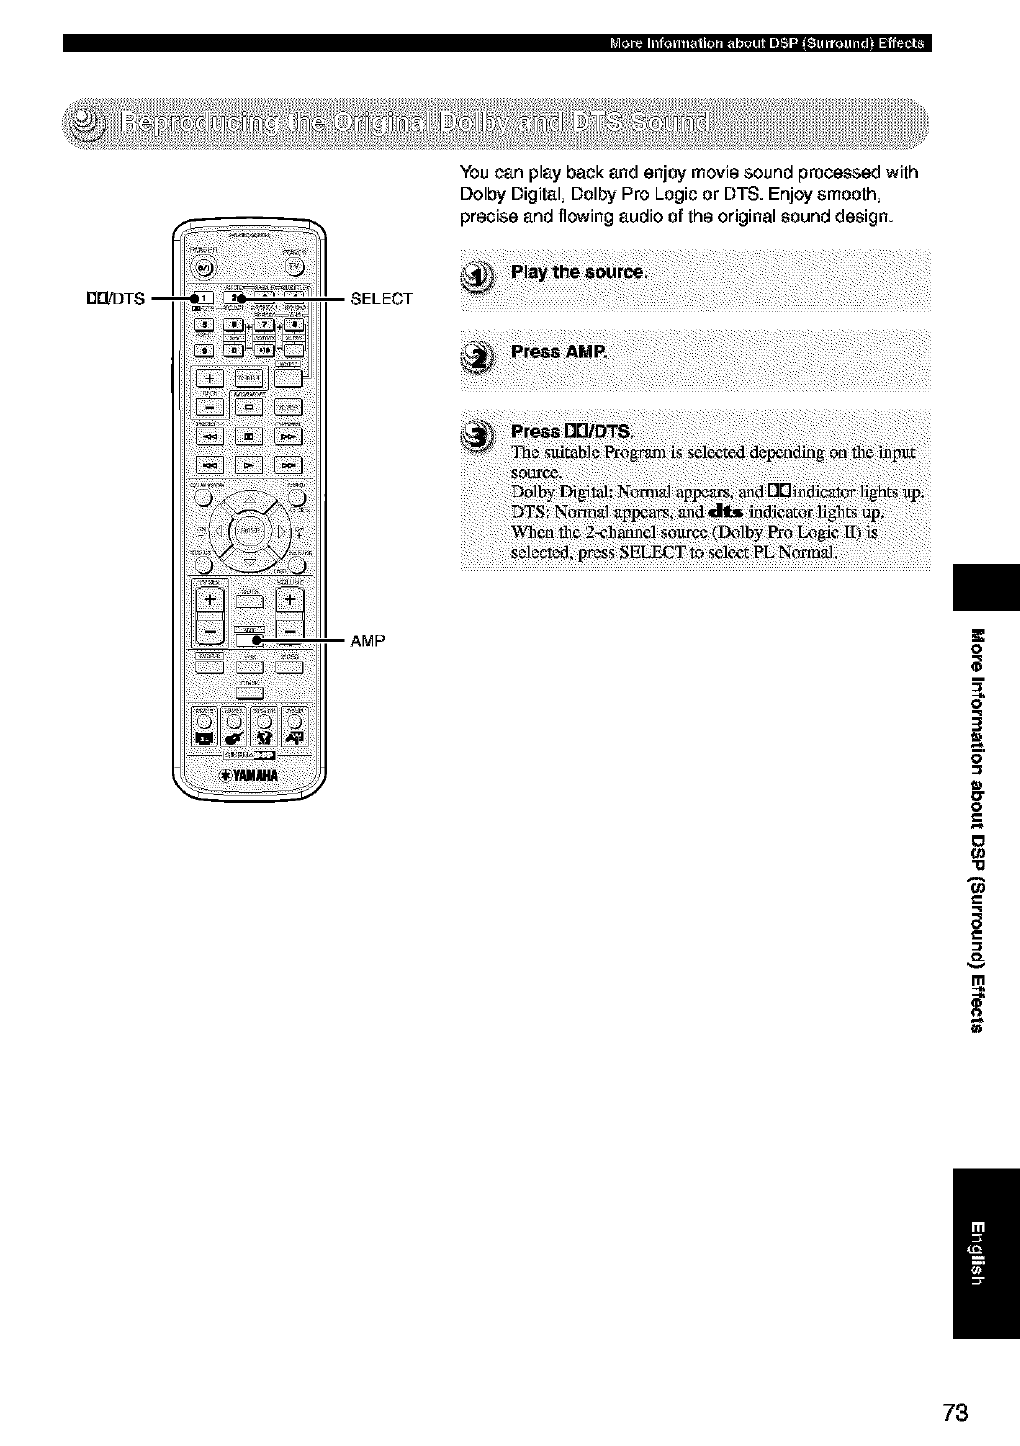
You can play back and enjoy movie sound processed with
Dolby Digital, Dolby Pro Logic or DTS. Enjoy smooth,
precise and flowing audio of the original sound design.
n_DTS -- SELECT
AMP O
m
q
3
O
17
O
g
o
-i1
73
iI
i ili! ili i!i
--STEREO
AMP
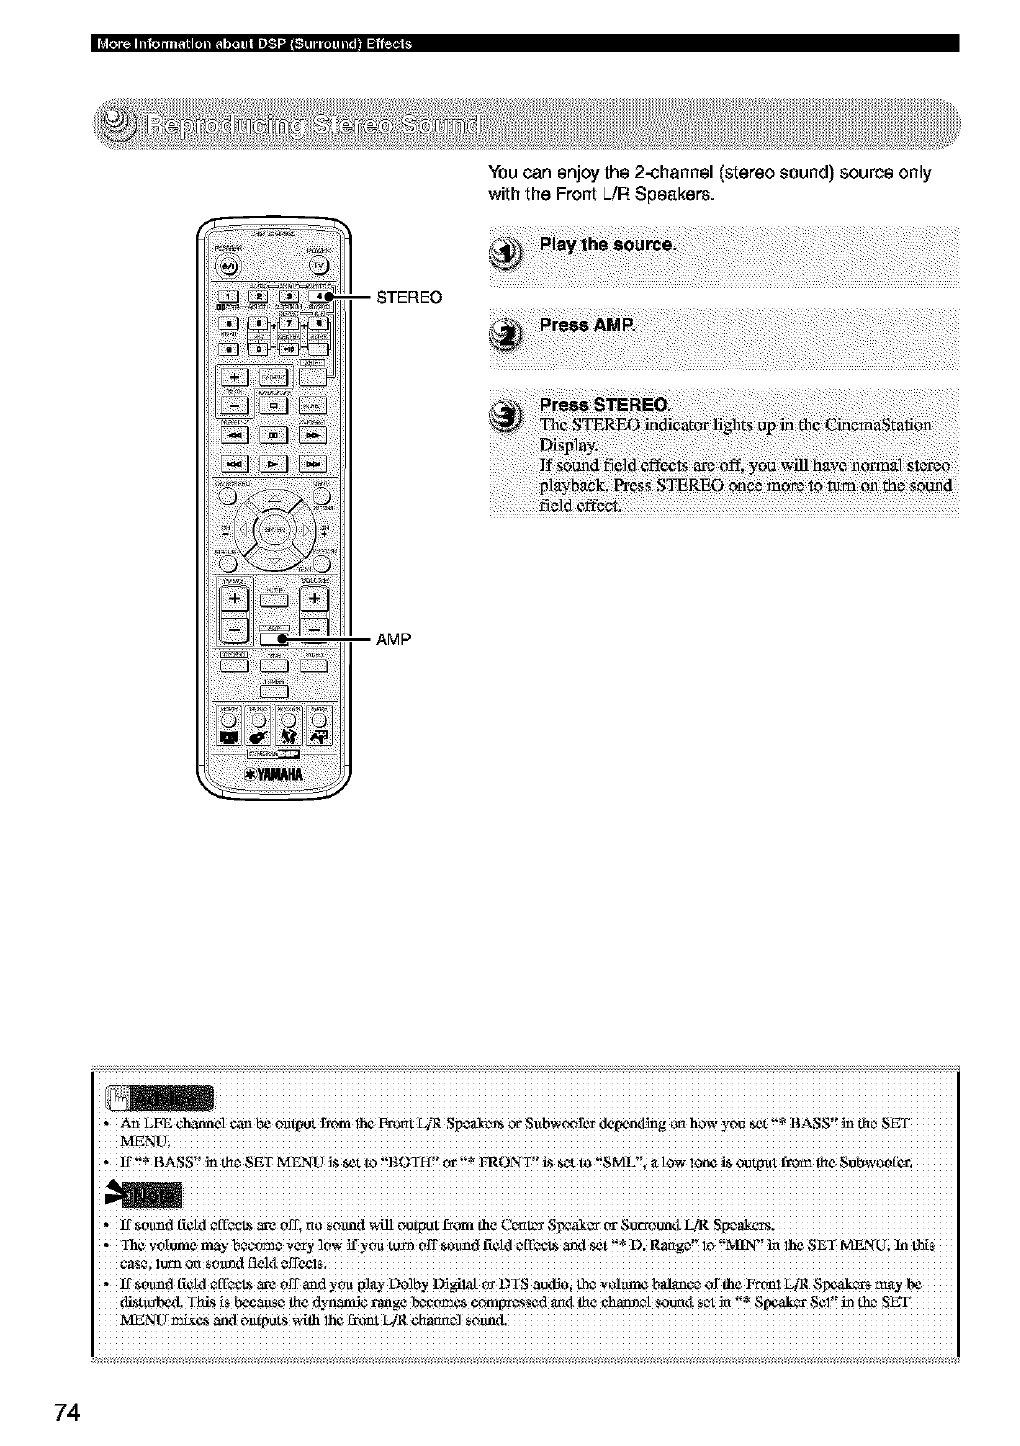
You can enjoy the 2-channel (stereo sound) source only
with the Front L./R Speakers.
i iiiiiiiiiiiiiiiiiiiiiiiiiiiiiiiiiiiiiiiiiiiiiiiiiiiiiiiiiiiiiiiiiiiiiiiiiiiiiiiiiiiiiiiiiiiiiiiiiiiiiiiiiiiiiiiiiiiiiiiiiiiiiiii
, An LFE Cbann¢l _ be oa_)t _om !h_ _t LIR Sp#_cvt¢ _ S_bw_fer de_nding _ how you _ !'_ BASS!! _ _e SET
If _°umd [iCM €[!__1__ Off, no s0_nd _ 0ut_ ot from the C_¢it_ SW_t_ _ Sur_0un_t I_/R
•Ih vo[ ¢ _x_n er _o ifv 3"n /T fi 11 1I "*D R.... MIN"mlh¢ ETMF2q _ M_*
Sold ¢_e _v_,s_r_tsct a_g¢ 10 "i S_£ i i'i
,If sotmd f_¢[d Cf_L_ _ 0ff and you 1_1_,)'-L)olby _!_ _ DTS aud_0i _ y0!_ balanco 0f the P_m! L[R $Ix_ak_ _y
di_t_b_l. Th_$ iS _aase _ d_alxd¢ range _Y,_€_es ¢oml_r,_s_cd ariel L5€ €_¢1 _l sot _ "_ 8[ _akcr 8_1!! in tho
74
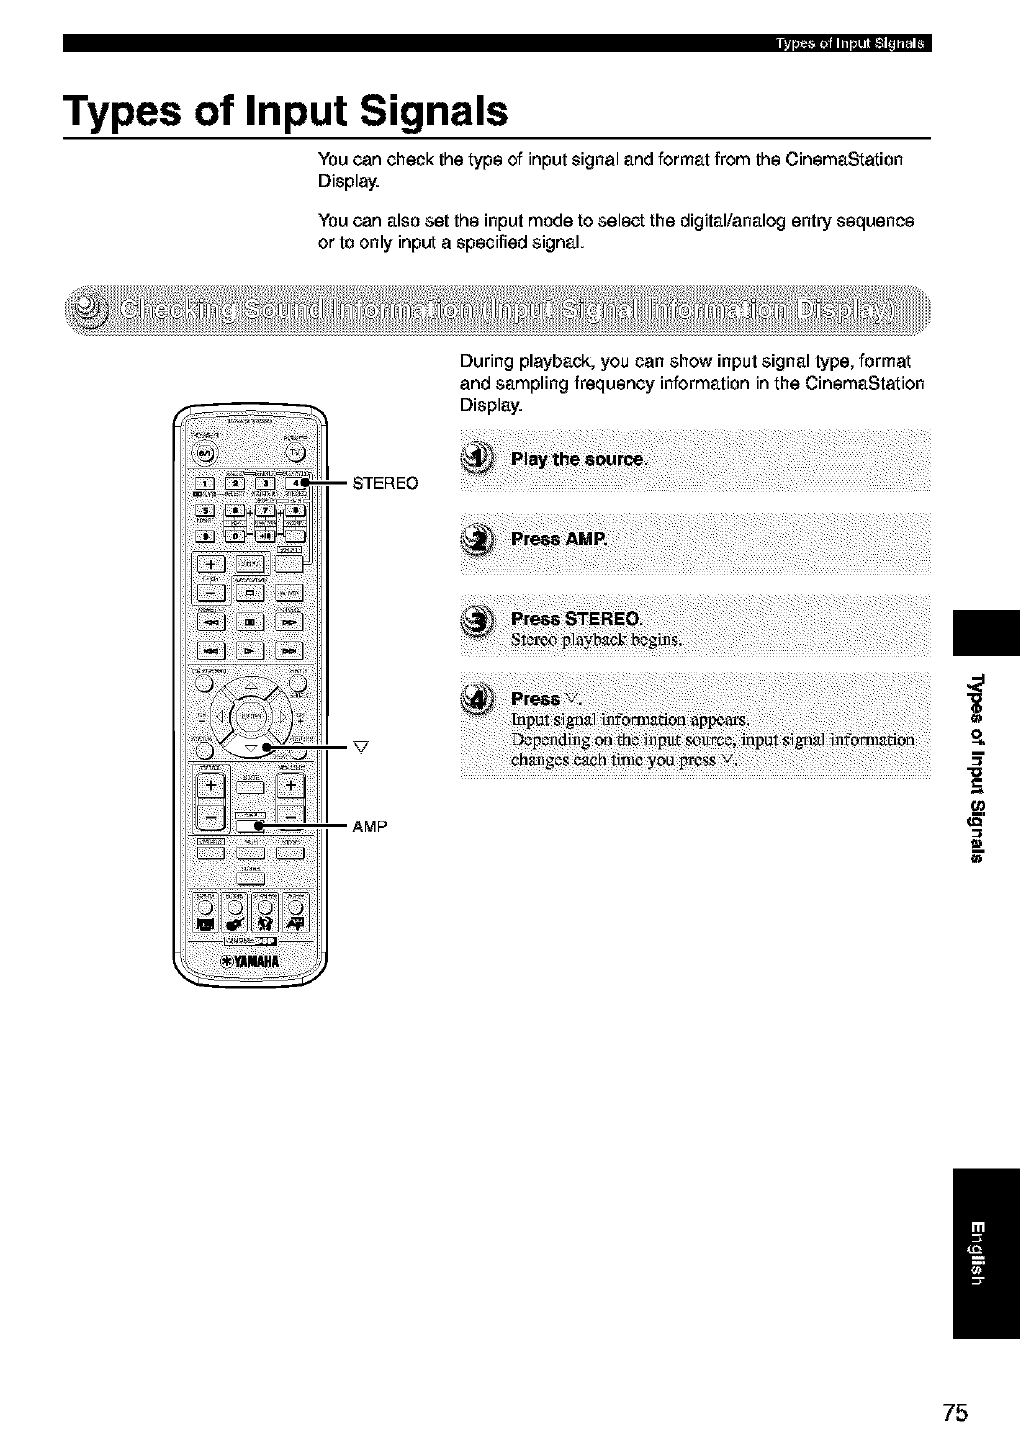
Types of Input Signals
You can check the type of input signal and format from the CinemaStation
Display.
You can also set the input mode to select the digital/analog entry sequence
or to only input aspecified signal.
During playback, you can show input signal type, format
and sampling frequency information in the CinemaStation
Display.
m
/
75
Input signal information
• (Format)
Shows the input signal format. When file digilal input
cannot be recognizezl, the mode is set to analog,
__la]og Audio Analog
IKTM Audio PCM
Ddiby Digital Audio Do]by DGTL
DTS Audio DTS
Oilier Digilal Signals Unknwn DGTL
•(Audio Channels)
Shows the armlber of"audio channels an input signal
contains (only when Dolby Digital or DTS is inpuf).
For example, "in: 3i2iLFE" indicates 3 Front Channels,
2 Surround Channels and LFE.
"] +]" indicates Main +Sub in bilingual broadcasts or
other 2 channel audio, and MLT indicates 3-channel or
more multi-channel audio,
•fs
Shows file frequency sampling of an input signal (on])"
when digital signal is input)!, If the sampling frequency
cannot be measured, "unknown" appears,
•rate (bit rate)
Shows the amount of data an input signal contains per
second (unly Dolby Digital and DTS). If the bit rate
cannot be measured, "unkmown" appears.
•flg(nag)
Shows a roaognifiun signal (flag), in an input signal and
initiates an action (only Ddiby Digital and DTS). If the
flag cannot be recognized, "None" appears,
Note on digital signals that exceed 48 kHz
CinemaStation's digital input jack can input a smnpling
frequency up to 96 kItz. For details read the owner's
manual of the devic_ connoatcxl to the digital input jack.
Koap in mind the points below when inputting adigital
signal that exceeds 48 kItz.
• DSP Programs are not seloatable. You can only listea to
normal 2-channel stereo frtml the Front Speakers.
• During playback, you cannot adjug the vditmle lCNClof
Centes and Surround I JR Speakers.
•Depending on the "* Speaker Set" _Zting in the SET
MENU, the Subwoofcs may output sound.
76

_ii ¸ )_'_ __
-- Input
Selection
butlons
You can playback most sources without aproblem with
the AUTO setting (factory default setting) Then depending
on your needs, you can select the priority level for digital
and analog input signals, and specify formats such as
DTS.
AU'I O:
D'IS:
ANLG:
Inpltt signal carl be sel¢,c,ted in file andes below.
] ) DigiIal signal
2) Analog signal
Only DTS carl be played.
Only analog signal carl be,played.
Learning about input modes, jacks anti Input Selection
buttons
Ci_enlaStation can receive signals from fl_c VIDEO (analog[),
VCR (analog) and OPTICAL (digital) jacks of equipment that
is connected to it. You can assign a VIDEO or VCR input name
to the OPTICAL IN-jack. This will allow you to use the VIDEO
bu_on or VCR button to input a de.an connected to the
OPTICAL IN-jack (VIDEO is assigned in the default setting.)
Normally, an analog signal is input to the VIDEO or VCR IN-
jack, and a digital signal is inpltt to the OPTICAL IN-jack.
However, by setting the input mode to AUTO the input will be
autonmtically detected and you can then playback audio from
the de.an you want by sin_ply pressing an Nput Selection
button.
R
a_
i iiiiiiiiiiiiiiiiiiiiiiiiiiiiiiiiiiiiiiiiiiiiiiiiiiiiiiiiiiiiiiiiiiiiiiiiiiiiiiiiiiiiiiiiiiiiiiiiiiiiiiiiiiiiiiiiiiiiiiiiiiiiiiii
,It _Six_SS_b!et_ Sv4i_iaNput mode eV_ _tyou _S INPLTTc,nC_em_,staii_form_ _ one
wh_ hapUtm_xle[Ss_ to AO_ aarl a L)olhy _gil_ t_ DIS $(gnal _ illput, lhe repel, Sdit_le decoder iS il_lically
,Ilaefollowins bapwos M_ertsozto [nputmod¢ aart OTSi_
_ C_m&Stati°n de!c_ die DrS S[_aal and a_t0mafi_Y swhch tO DIS modz'(dl_ imlieatex Iig'a_sup)i OnCe 0IS aarli0
the _ indicat_ m_-blilA_ and white _tblhaks o_dyD_ audio e_mbe played back. lmmedd_ttelyaflzr
OTS audio !_SheS P!_-b_k, ffyOuwant to _1_ n_ _M audi0; _o_t tlaeInput
--it[ t_eo_DTS SIN ]S i_trapl£d Wh_ yOlt NttNm SeN hN Sldl% tho _ intern NY b]il_k, it' N _or_]Jlion ¢CrnlNtleS
ft'_ ov_ 30 Scc_ds_ lh¢ l_pPt mode _nloff_adc_dly Chaug0S t_DTS 10 hea-lxIal ,'flNI,_L (_PCM) _d lh# _ g_#t_
, D_ '!* _pui Ntod¢'_ i_ the, SET MENt} yO0 Can set Wheth_tO a_ _ hap_tt mcxte S_ilicd ffarvlooSly Wh¢l_ C_c_SlZfior ti
77
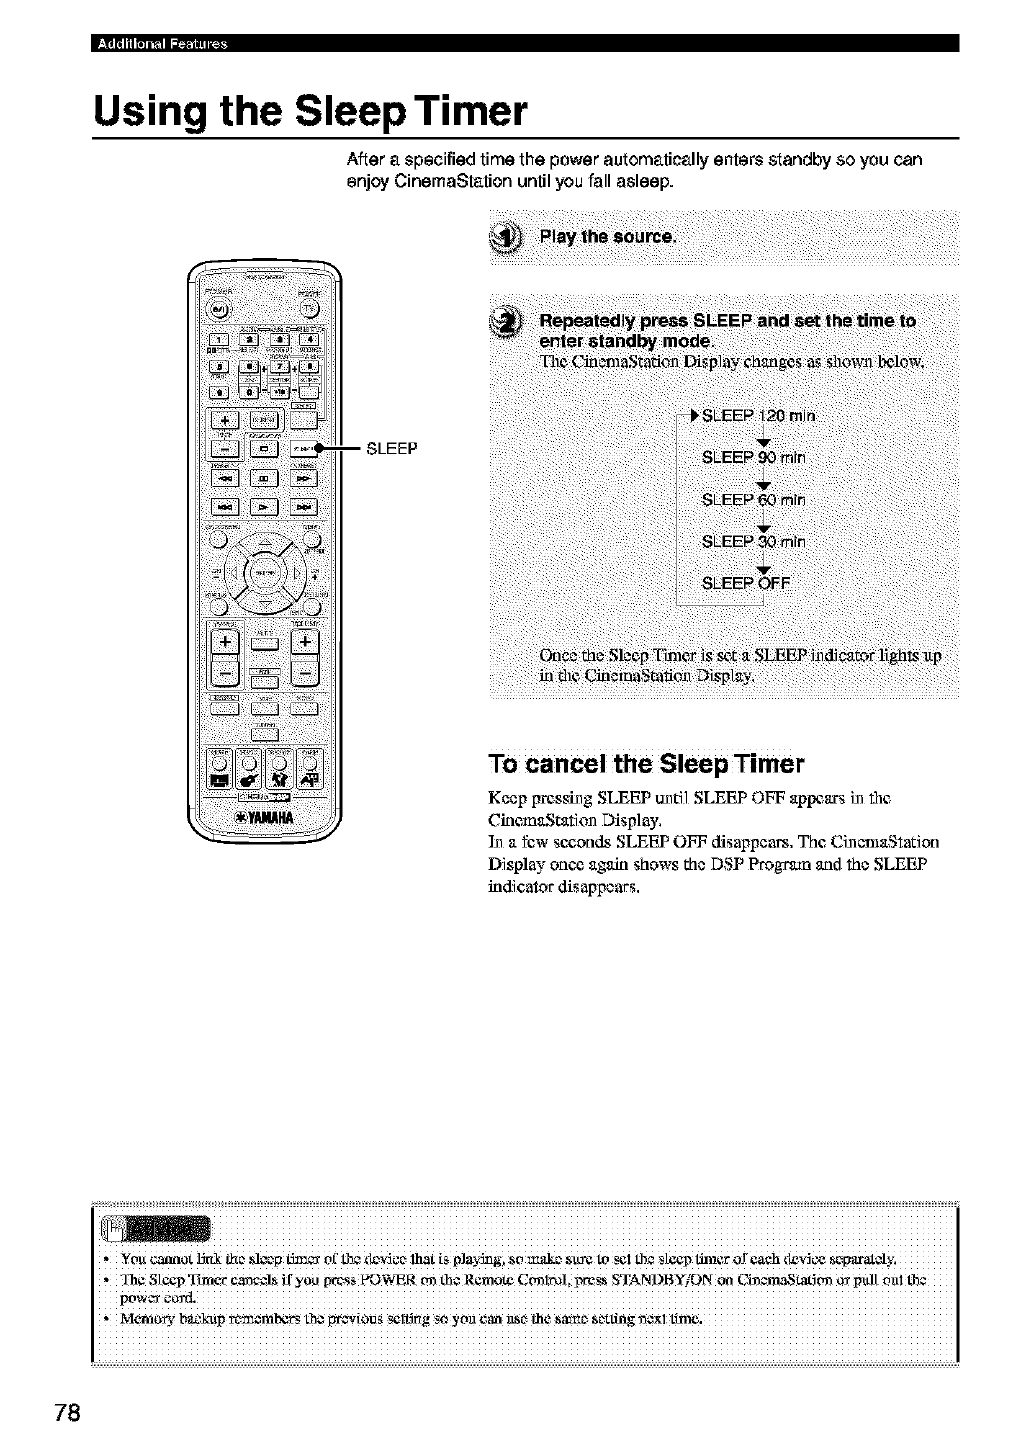
Using the Sleep Timer
After a specified time the power automatically enters standby so you can
enjoy CinemaStation until you fall asleep.
-- SLEEP
To cancel the Sleep Timer
Keep pressing SLEEP until SLEEP OFF appears in file
CirlemaStation Disp] ay,
In a few s¢_,onds SLEEP OFF disappears, The CinemaStation
Display oun_ again shows the DSP Progrlun aqd the SLEEP
indicator disappears,
i iiiiiiiiiiiiiiiiiiiiiiiiiiiiiiiiiiiiiiiiiiiiiiiiiiiiiiiiiiiiiiiiiiiiiiiiiiiiiiiiiiiiiiiiiiiiiiiiiiiiiiiiiiiiiiiiiiiiiiiiiiiiiiiii
* _olt cannot _ IJ_ _13 tJ:_c_r Ol['fl3¢ t_v_c_ lh3t is p]ilyJllgl so _d¢ _ SllY¢ to _¢1 fl3¢ sl3x_ lira€t" of _h dev_ s_p_ti'atoly,
_Ih¢ SteepTtm_t _¢_ ify0_ _:_SS _WER _ the Remote C_I_!, preSS STANDBY/ON _ CLn_maSt_ _ pull
powe_ etv_.
Mere o_/b_P _oa_m_ th_ WeV!0US _l_g SOyon _an _O _e sa_ Setting _X! _.
78
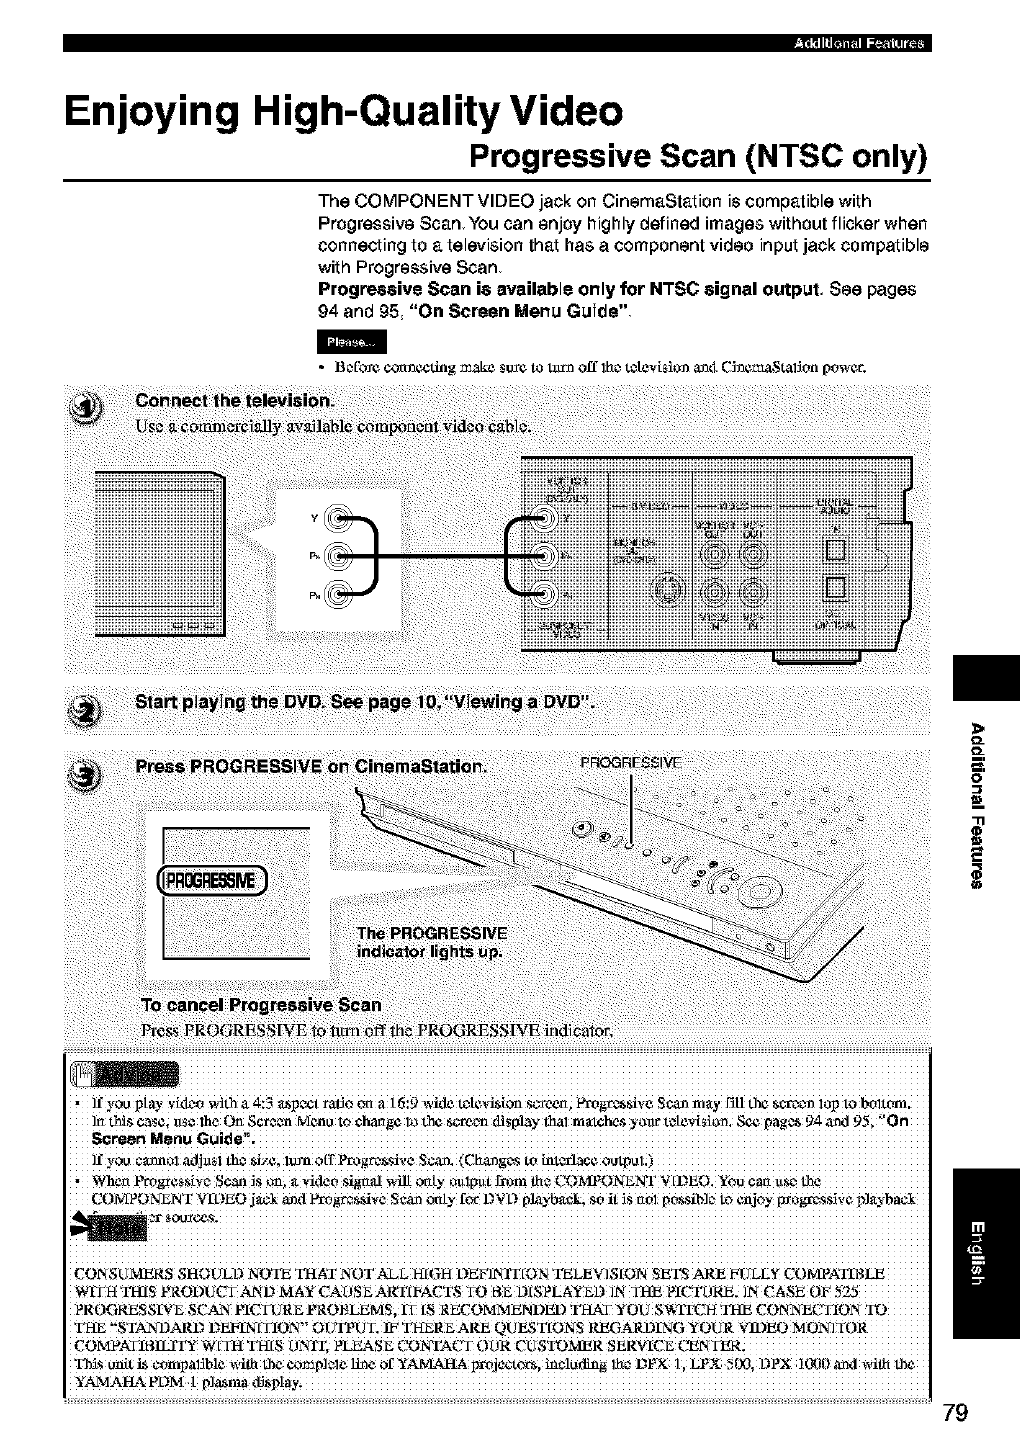
Enjoying HighiQuality Video
Progressive Scan (NTSC only)
The COMPONENT VIDEO jack on CinemaStation is compatible with
Progressive Scan You can enjoy highly defined images without flicker when
connecting to a television that has a component video input jack compatible
with Progressive Scan
Prog_eive Scan ie available only for NTSC eignal output, See pages
94 and 95 "On Screen Menu Guide"
•Bc_fb_¢connecdng make s_¢ to tilth off lhc_tatevisiccn an_t C_nemaStafion power.
>
D_
D_
O
=_
* ffyou pi T vk_z_owith _ _:3 a_pect ratio on a 16:9 wkle t_[evi_ion s_-_een; Yl_g_-es_ive Sea_ m_y fir t_ _-r_t_ lop to bt_torrJ.
]rt this CaSei_1S¢the On 95; '_On
ffyou cannel _dj_$1 the gizc; lx_ o('r Progr_si_,e Scar_ (Cha_g_s to hal_rlace oulpol;)
,_¢rt ProgresZ!vZ Se_S _; _ vide0 Sigaal _ onty _U!pu[ _m _z COMPONENT V [DEO. ¥60 Can UZ_
COMPONENT VIDEO j_ _d _gees_i_,e S¢_ only for D_D playbacki S0i[ _S O_l p0SSib]_ tO enjoy _0gr_sSi_,e p]_'o'bac!
CONSUMERS SHOU_LD NOTE THAT NOT_L HIGH DEF]NIT fON TELEX] SION SEq_S ARE FULLY CO MPATI R _
PROGRESS[V_ SCAN PICTURE PROBLEMS, fT IS RECOMMENDED THAT YOU SV_TFCH THE CONNECTION
THE "STANDARD DEtRN[TION" ¢OlflTUT: IF THERE ARE QUESTIONS RHGAR I.)[NG YOUR _3DEO MONITOR
_SU_t t_ ¢ompafib!e with the e_p!_!_ li_ of YAMAHA projc_zt_, h_C!_ding !_c_DPX !, LPX !ix), DPX!()90 _d with the
YAMAIG_ PDM 1
/
79
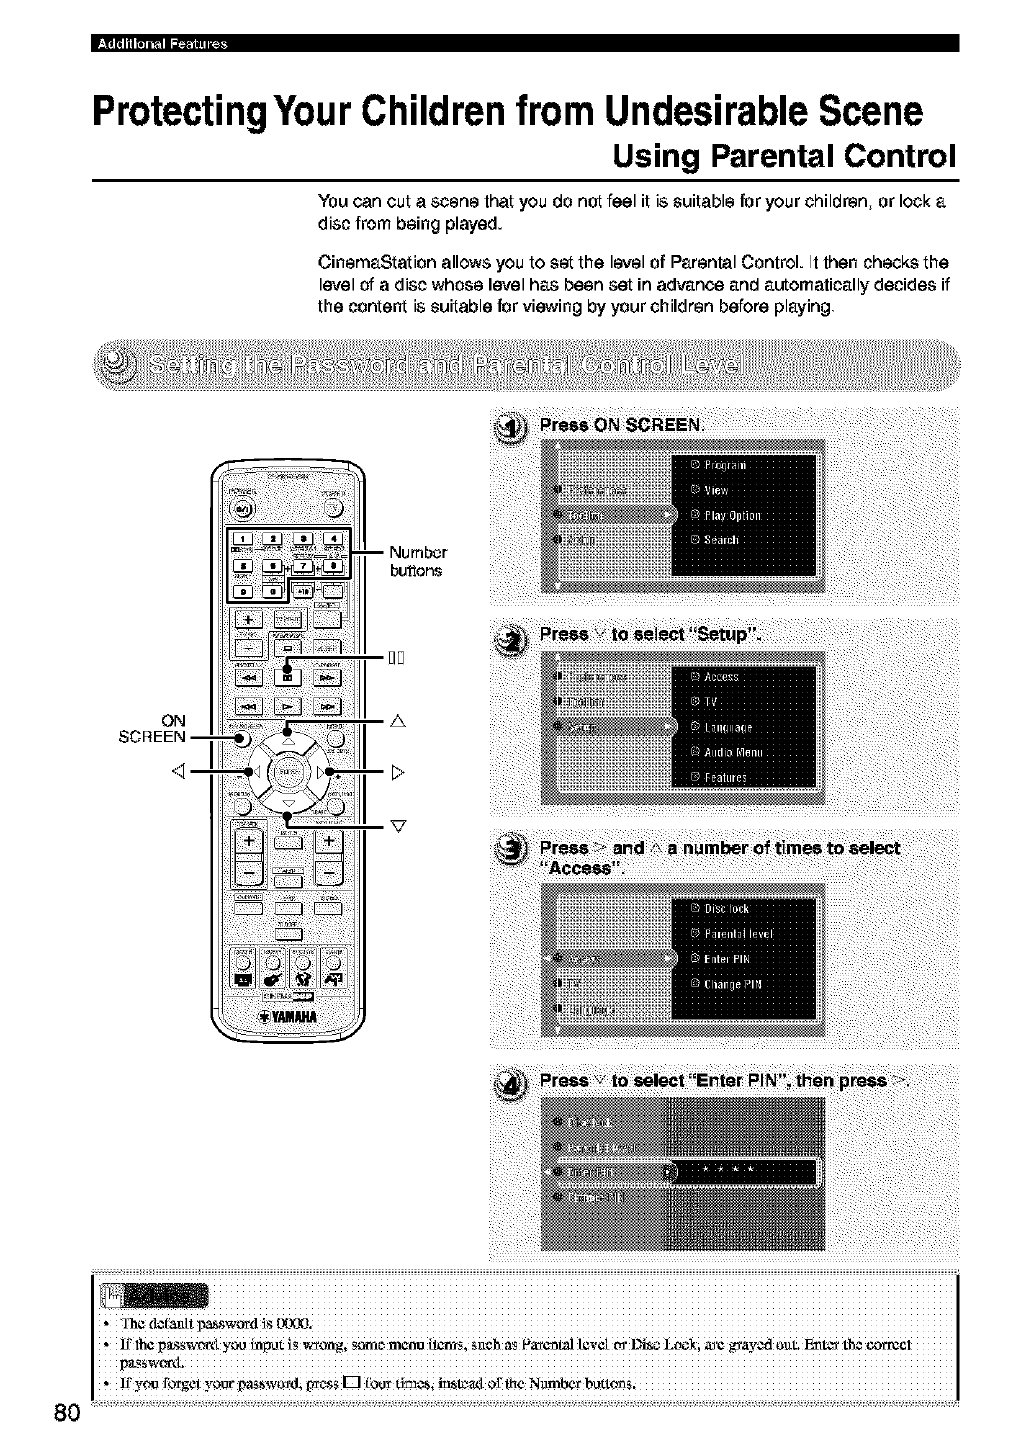
ProtectingYour Children from Undesirable Scene
Using Parental Control
You can cut a scene that you do not feel it is suitable for your children, or lock a
disc from being played.
CinemaStation allows you to set the level of Parental Control. It then checks the
level of a disc whose level has been set in advance and automatically decides if
the content is suitable for viewing by your children before playing
ON
SCREEN--
-- Numbor
buttons
I]F
A
80
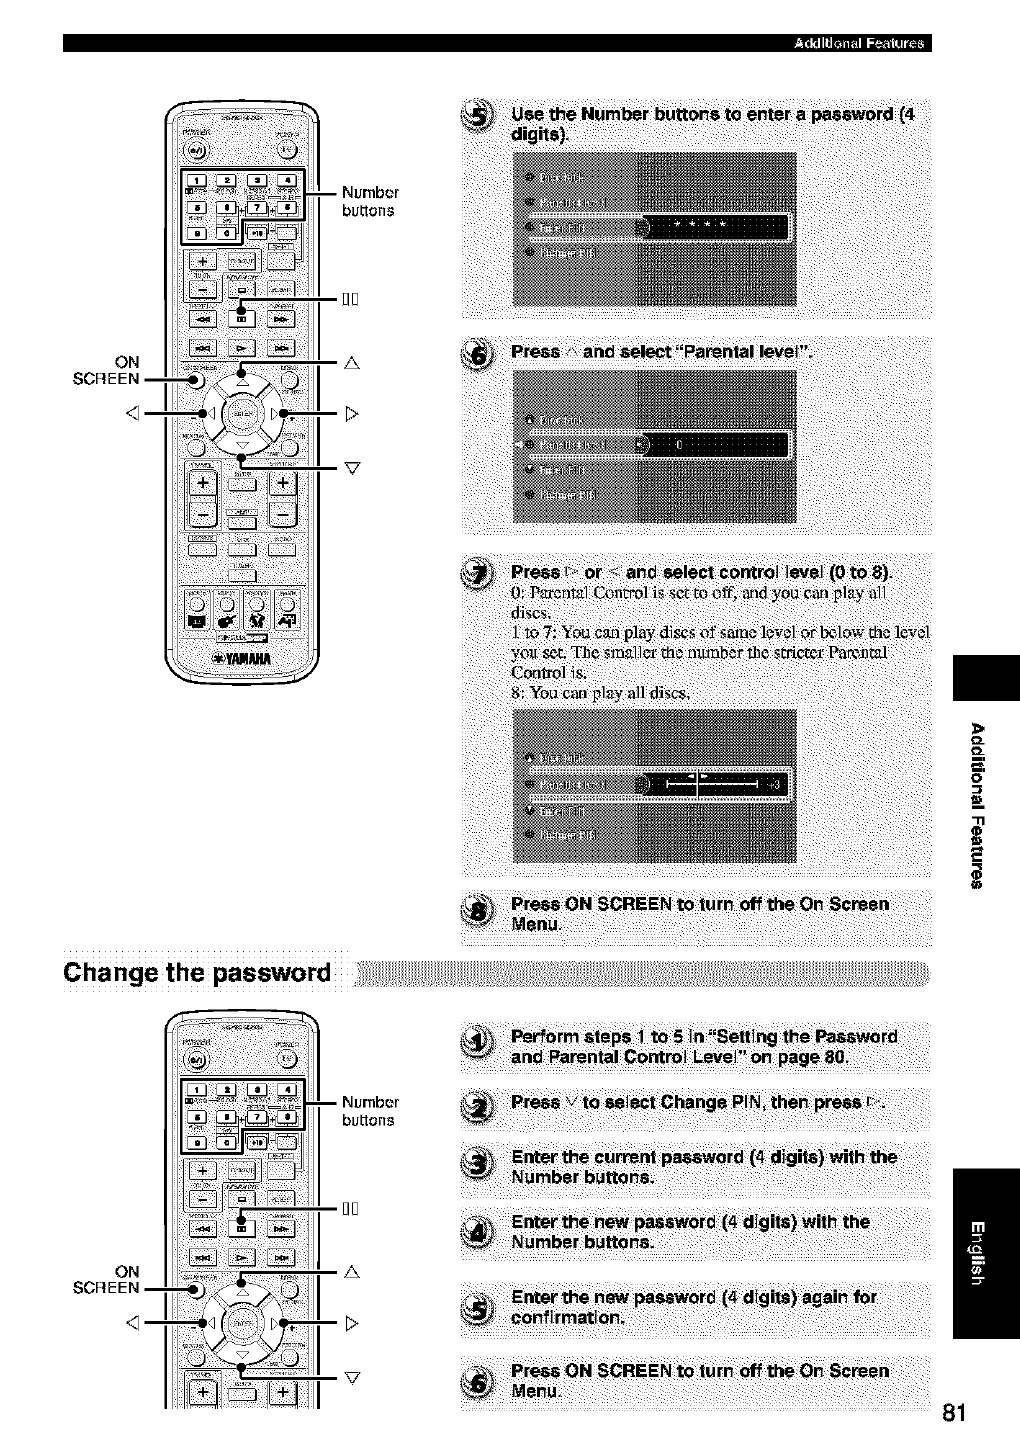
ON
$O_EEN--
>
O_
O_
-3.'
O
Cha nge the password
ON
SCREEN I
INumber
bu_ons
_E
z& /
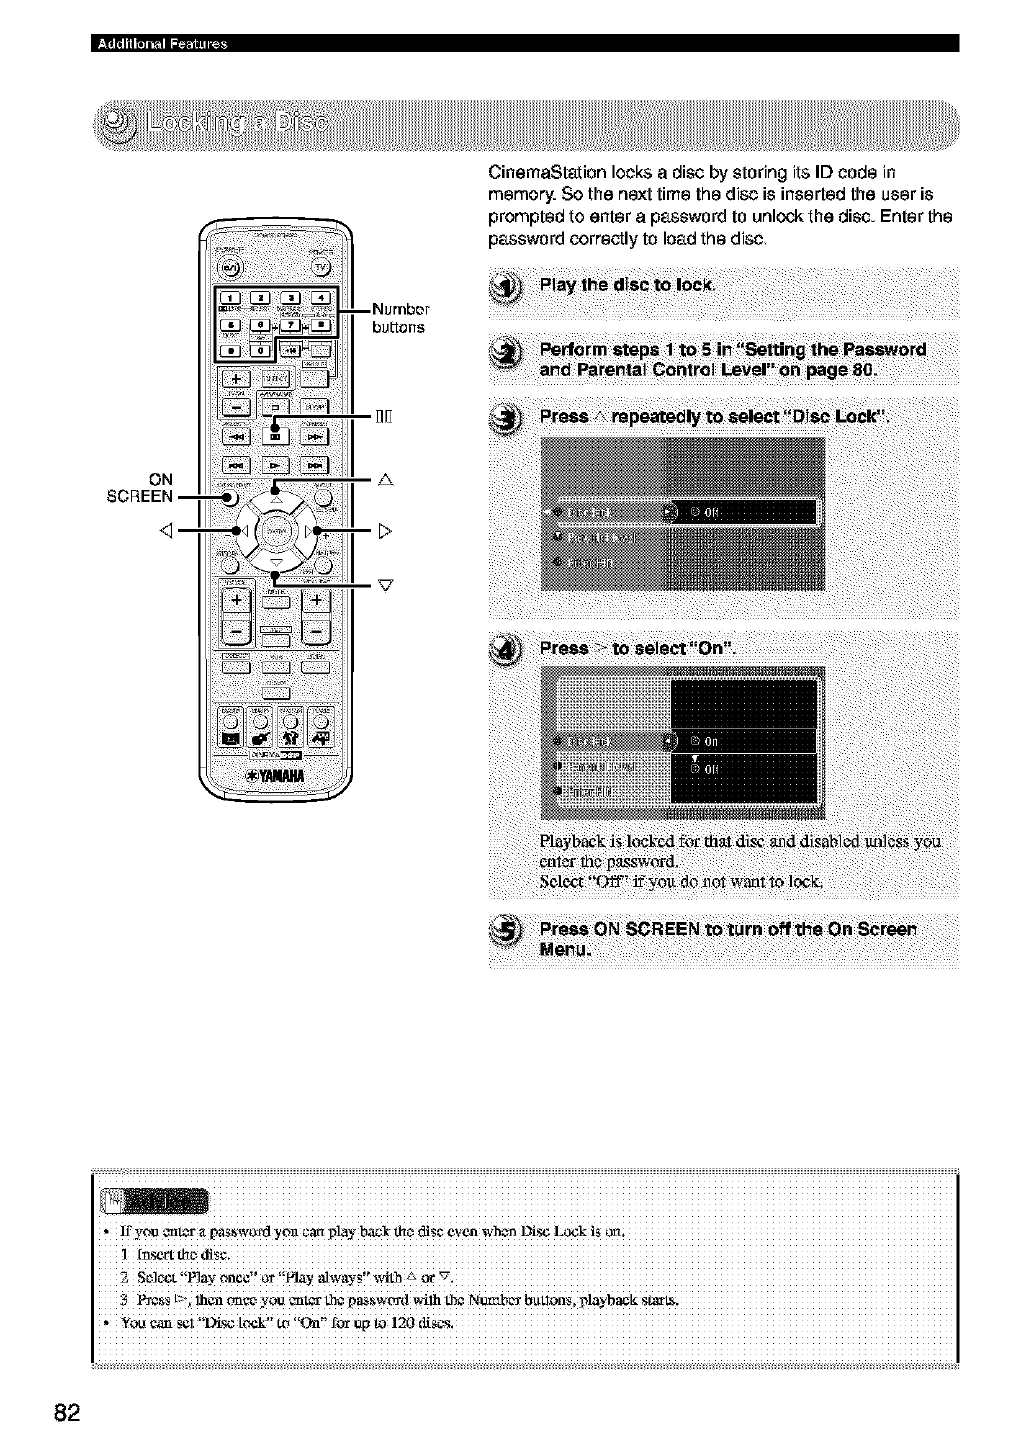
ON
SCREEN--
--Number
bu_ens
_D
A
CinemaStation locks adisc by storing its ID code in
memory So the next time the disc is inserted the user is
prompted to enter apassword to unlock the disc Enter the
password correctly to load the disc
82
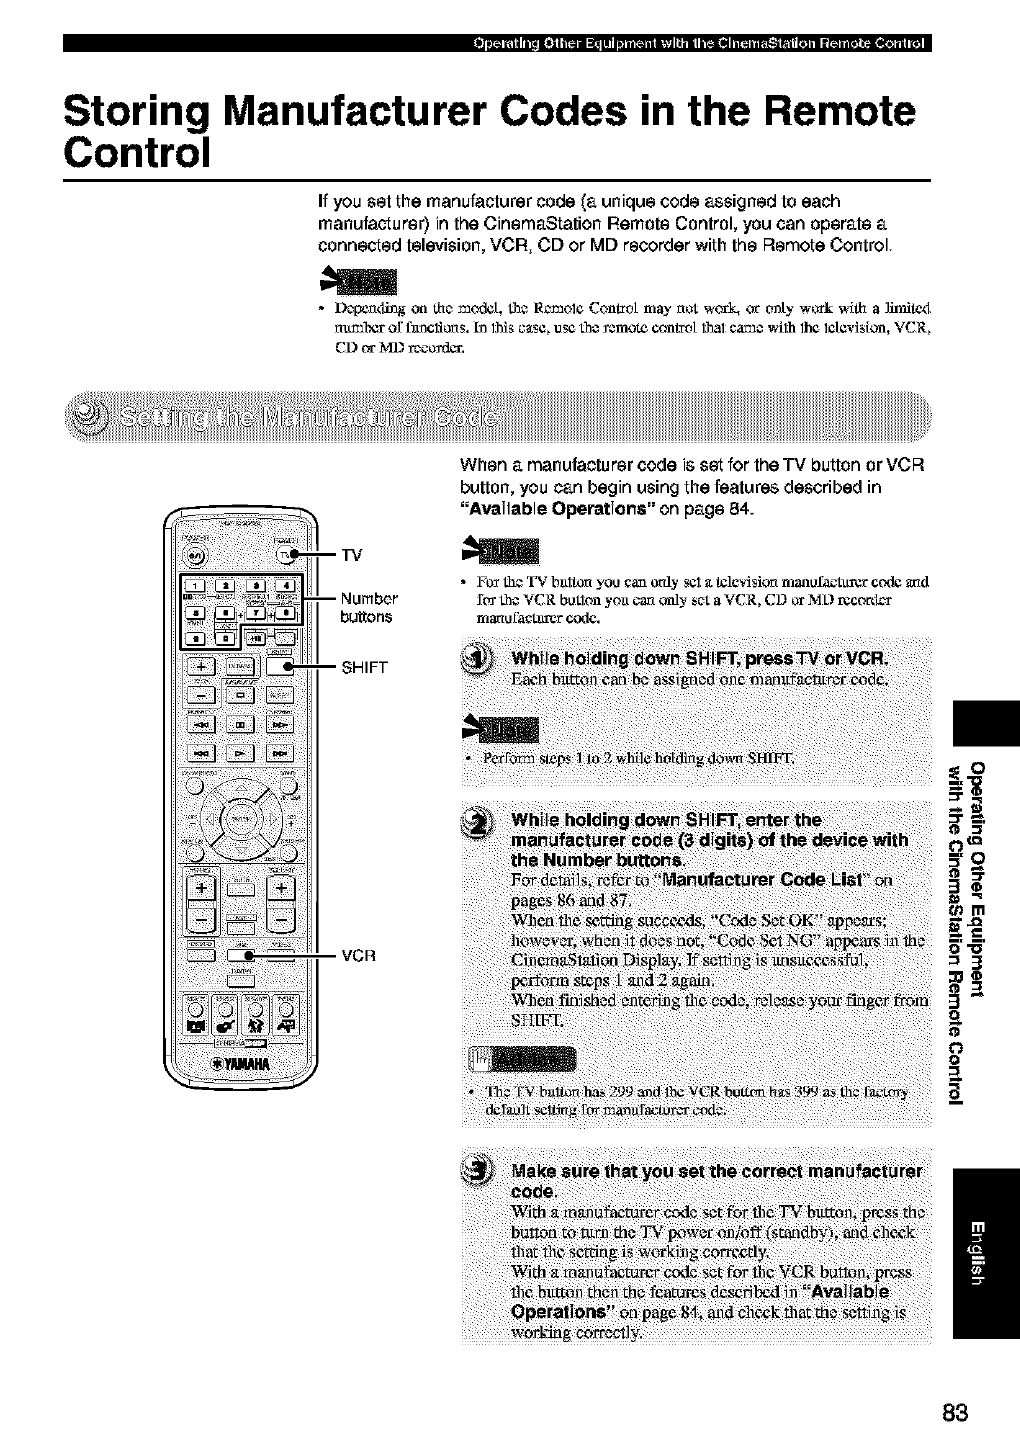
Storing Manufacturer Codes in the Remote
Control
If you set the manufacturer code (a unique code assigned to each
manufacturer) in the CinemaStation Remote Control, you can operate a
connected television, VCR, CD or MD recorder with the Remote Control
•Depem_g on the mt_dct, Lh¢R_aol* Cona_ot may not wor_q or only work wit_ a ]iraile<t
nu_ab¢_ or f_¢tto_s, ha 1NS c_tse, use the _mote conh_o[ I_aIcame _-ilhlh¢ l_[¢vision, VCR,
CD or MD reorder.
--TV
--Number
buttons
-- SHIFT
VCR
When a manufacturer code is set for the TV button or VCR
button, you can begin using the features described in
"Available Operations" on page 84.
•F_ the TV bnltO_ you can _aly eel _ttelevision n'Janofa_-t_rgr c_l¢ and
ft_ the VCR button yoa can only set a VCR, CD or M:D recort_
ITjaral _tct_l_r c_e.
ii_!i!_ b_! _ _i_! _d! _ _@_t_e_t__ri_!i ¸ii i?
_i iii!i!iiillii!i%!!!iii!!iiiiii!ii!!iilliiiiiiiliIii!_!ii!i!iiiiiii!ii!!!/iiiiiiiliif!i!ii!!ilii_!ii!ii!iill!if!!ii!iiiiii!!!i!iill_ili!_'i!i!iii!ili!il!iili!iii!iii!iiii!!iiiliiii!!!iiii!ii!iiiii!i!
t_m
O=l_l
=3
3"
o
0
I
83
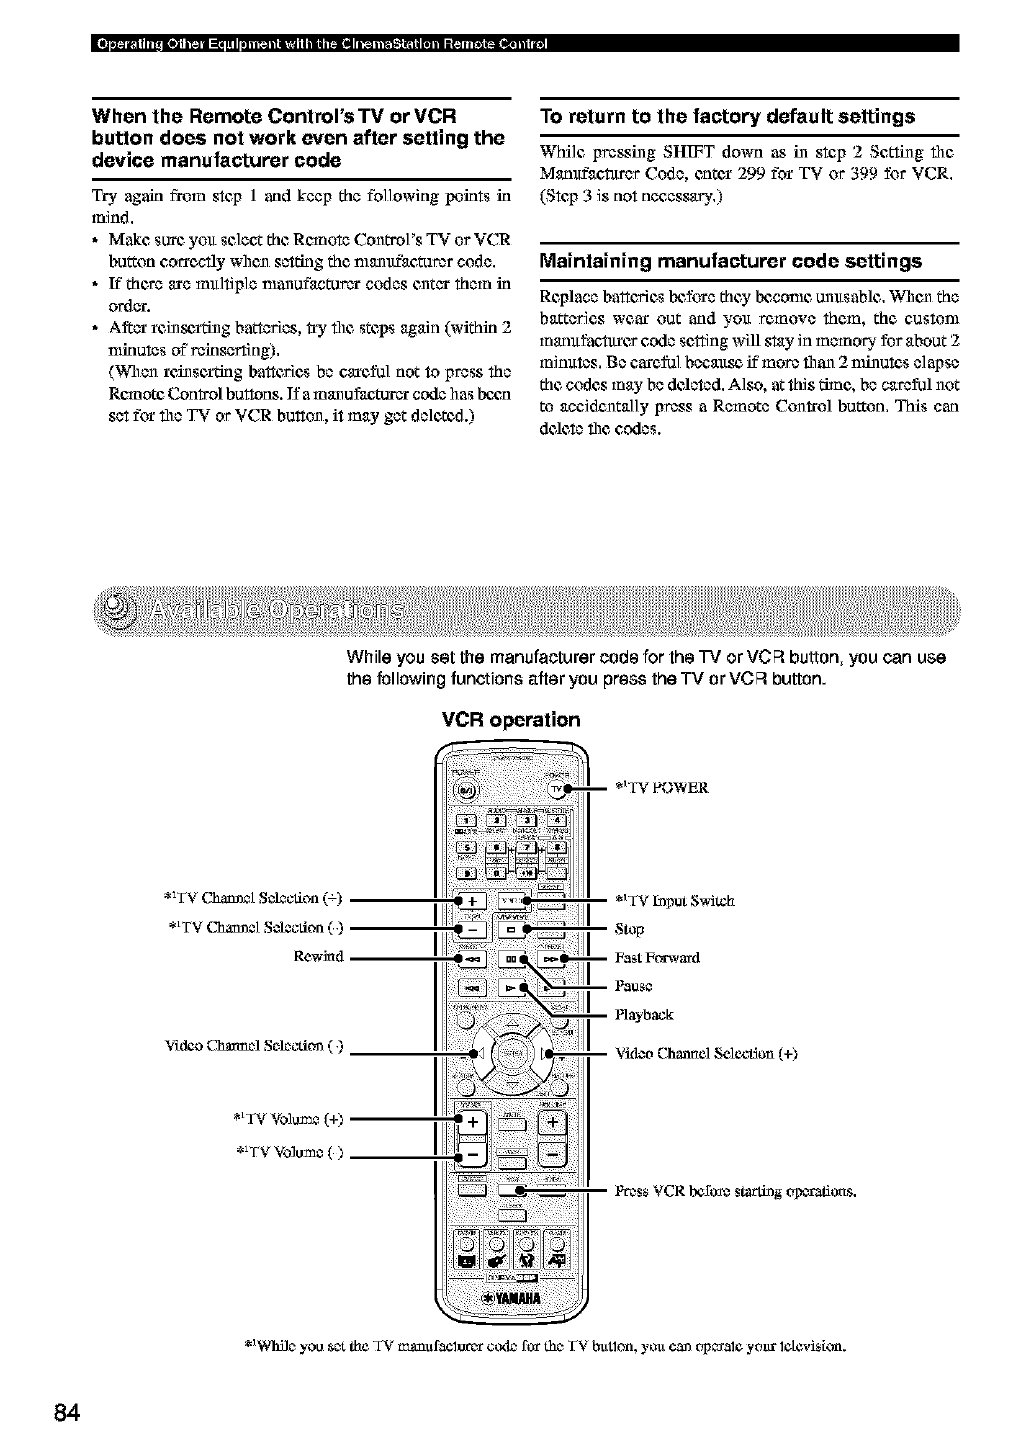
When the Remote Control's TV orVCR
button does not work even after setting the
device manufacturer code
Try again from step 1 and keep the following points in
mind.
•Make sure you select the Remote Control's TV or VCR
button correctly when setting the narnufaeturer code.
• ff there are multiple manuf_ctur_ codes enter them in
order.
• A_er rein_,i'thlg batteries, try file steps again (within 2
nfinules of"reinserting).
(When rc/lnsei'dng battc_es be careful not to press the
Re,note Control buttons. If a m_nu_eturer code has bcga
set for file TV or VCR button, it may get deleted.)
To return to the factory default settings
While pressing SHIFT down as in step 2 Setting file
Manufaetttrer Code, entcx 299 for TV or 399 for VCR.
(Step 3 is not necessary.)
Maintaining manufacturer code settings
Replace battc_ es Ix_fo_e they Ix_comc unltsable. When the
batteries wear out and yo_t remove them, the custom
manufaetttrcs code sc_ing will stay in memory for about 2
minutes. Be eare_] beeaus_ if more than 2 nfinutas elapse
the codes may be deleted. Also, at this dane, be careful not
to accidentally press a Remote Con_ol button, This can
dcac_ file codes.
While you set the manufacturer code for the "IV or VCFI button, you can use
the following functions after you press the TV or VCFI button.
VCR operation
-- .1 TV F'OWER
*_TV Chamaet S_ection (=)
*_TV Chamaet S_ection ( )
Re_td
V'td_ (._anel SelocOoz ( )
*_Whilc_you 8c-_the TV _slufaClOrCvt co4e for thc_TV butlon, you canop_al_ year lclevision.
84
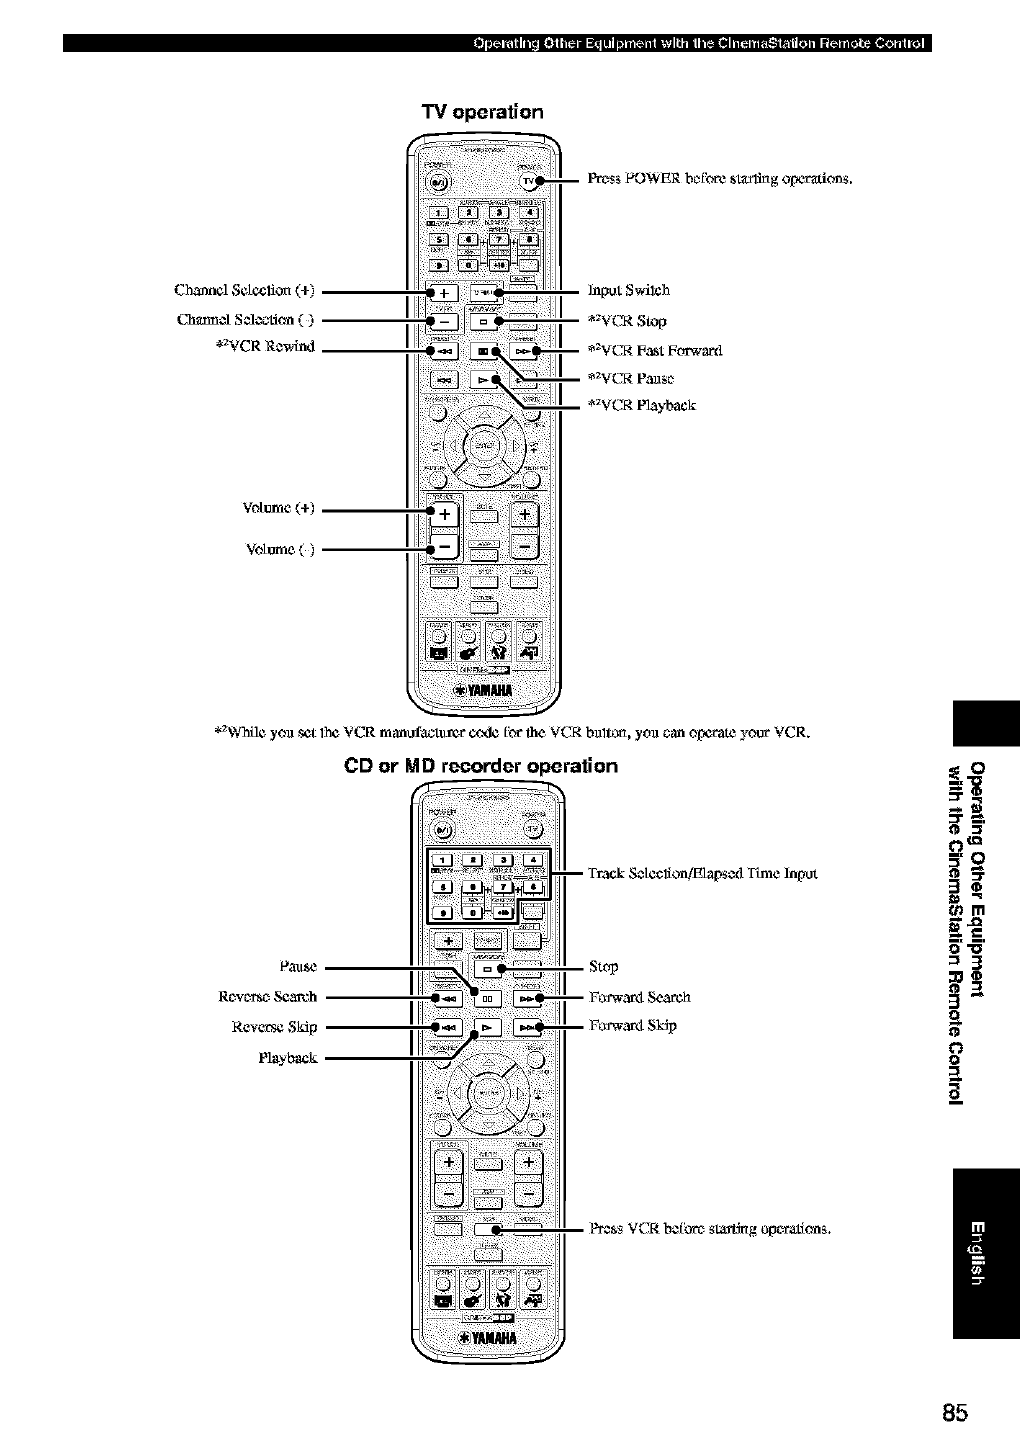
TV operation
Chmmcl Sdeclior_ (+)
C_ncl Scle_ction ( )
*aVCR Re.wind
Votum¢(+)
Votum¢()
Prc_ss POWER bcffbre sta:rl:Mg Ol:mra_ions.
Input Swilch
*_VCR Stop
*_VCR Fast Forwaed
*_VCR P_nso
*_VCR Playback
"2_¢ yoa set lh¢ VCR manufa_%_r cc_k_ _br Ihe VCR baltOn, yoa can opceate your VCR.
CD or MD recorder operation
Rc'xc_n_o Sere'oh
Reverse Sidp
Playback
-- Tr3ck Set¢clion,/E1 al:_sed Time Input
Stop
-- Foa'war4 Search
-- Foa'war4 SkSp
P_,_ssVCR befbrc_ sta_t_g olx_atlons.
OtQ
_m
o-o
=3
o
O
a_
/
85
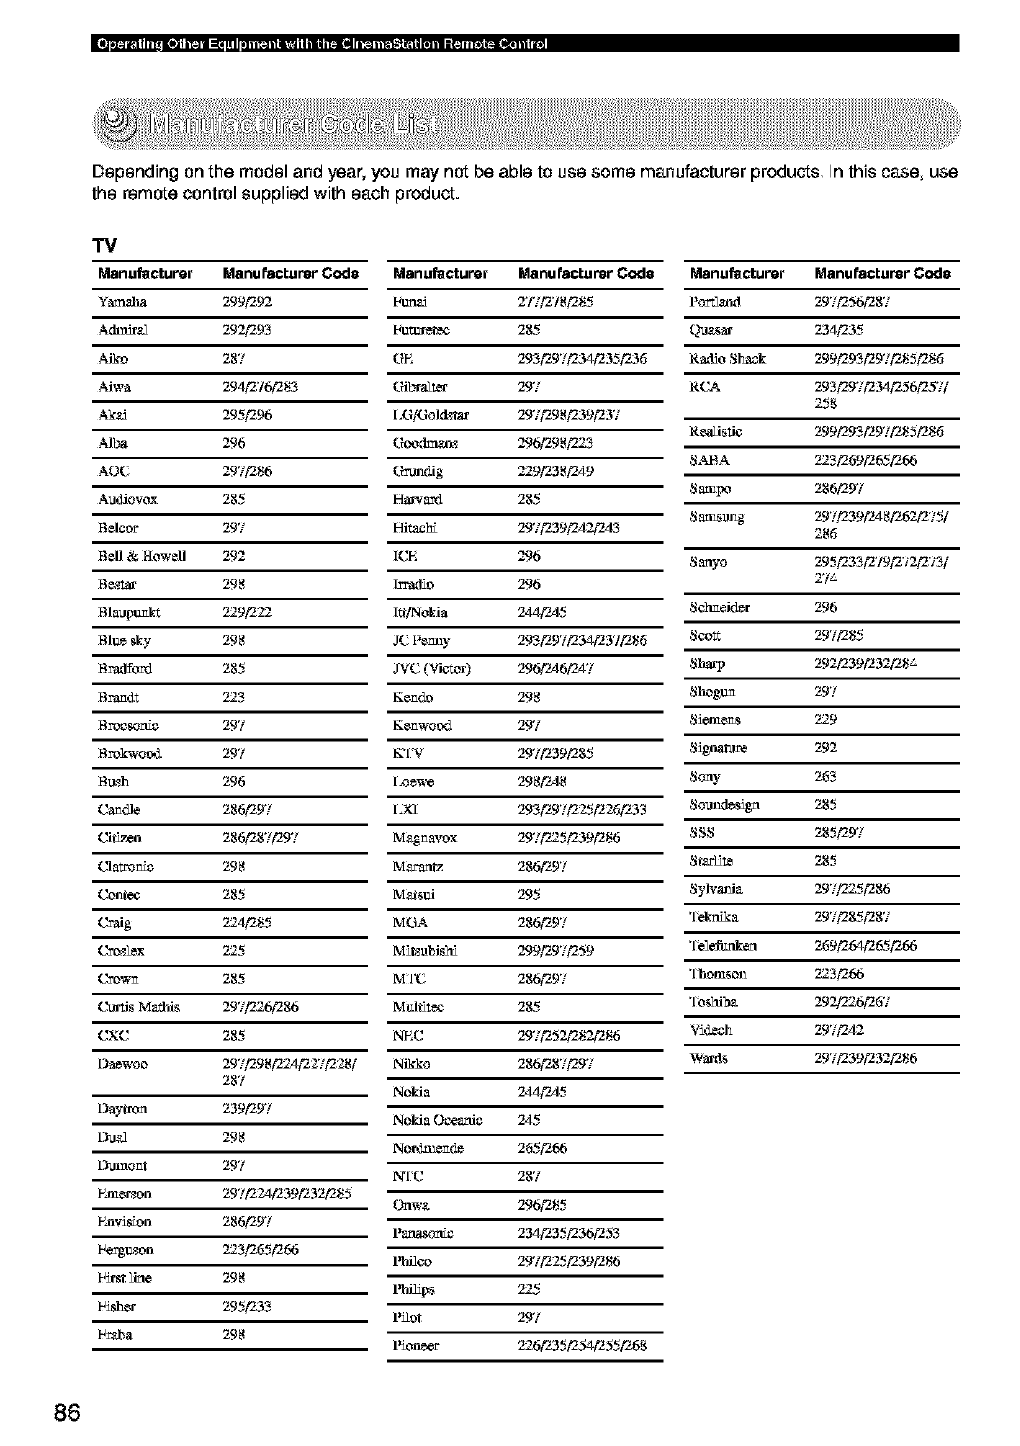
Depending on the model and year, you may not be able to use some manufacturer products In this case, use
the remote control supplied with each product.
"IV
Manufacturer Manufacturer Code Manufacturer Manufacturer Code Manufacturer Manufacturer Code
Yam._a 299'292 Fun_ 2'f/1_18"285 P_ 297"256"287
Ach_r_2 2.924293 lautttrete¢ 285 (_a_ 234"235
Aiko 287 r_E 293"297"234"235"235 Radio Siaack 299"293"297"285"285
Aiwa 294"276"283 r?riL,ralter 297 RCA 293"29'/'234"256"25'//
258
Ak_d 295"296 [,G/Gol_ztar 297"298"239"237
ReaU_tie 299"293"297"285"285
AIL,a 296 rgreoclma_z 296"298P523
S.MqA 223"269"265"266
AOC 297"286 rgrrtmdig 229"238"2A9
Audiovox 285 Harcard 285 Saa_I_o 286"297
Saa_amg 29'/'239"2A 8"262¢275/
8eleor 297 Hitachi 29'/'239"2A2"2A3 286
Rell & Howell 292 ICE 296 Sanyo 295"233"2'/9"2'_2¢273/
Be,z_ 298 ]rra_o 296 2'/a
Blauptan_ 229"222 I_]Nolda 244"2A5 Sehmeid_r 296
81u_ _y 298 2C nem_y 293"297"234"237"285 Scott 297"285
8ratlford 285 ,IVC (Vi6-tor) 296"2A6"2A7 Sharp 292¢239"232¢28 j-
8r'am_t 223 Kemdo 298 Shogtm 297
8rocso_fe 297 Kemwood 297 Sienaems 229
Brok'woo,L 297 KTV 297"239"285 Signal_t¢ 292
B_zh 296 I_ew¢ 2.98/'2,48 Sony 263
Ca_dle 286"297 I_XI 293"297"225"226"233 Sound_sign 285
Cif_x_n 286"287"297 M&gmavox 297P525"239"286 SSS 285"297
Clatro_e 298 M_"anrz 286"297 St._H_ 285
Co_:ee 285 M_stai 295 Sylva_aia 297"225"286
Craig 224"285 MGA 286"297 Teknika 297"285"287
_e_lex 225 Mi_ubigh_ 299"297"259 'Fel_rd_a 269"264"265"266
Cream 285 MI'C 286"297 Thomson 223"266
Chn_is Mathis 29'//226"286 M_l_te¢ 285 '1eshib,_ 29_6"267
CXC 285 NEC 29'/'252¢282¢286 Yideeh 29'/'2A2
Da_woo 29"/'298_24"2S/'228[ Nikko 286"287"297 Wards 29'/'239"232¢286
287 Nokia 244"2A5
Daytron 239"297 Nokia Oceania 245
Du,_2 298 No_aend_ 265"266
E_a3aont 297 IVIC 287
Fznae_on 29"224"239"232"285 Onwa 296"285
Faav_on 286"297 Panaso_e 234"235"236"253
Fergt_zon 223"265"266 l_H¢o 297"225"239"286
First line 298 13fiHps 225
lais_er 295"233 l_or 297
F_J_a 298 l'ion_er _6"235"254"255"268
86
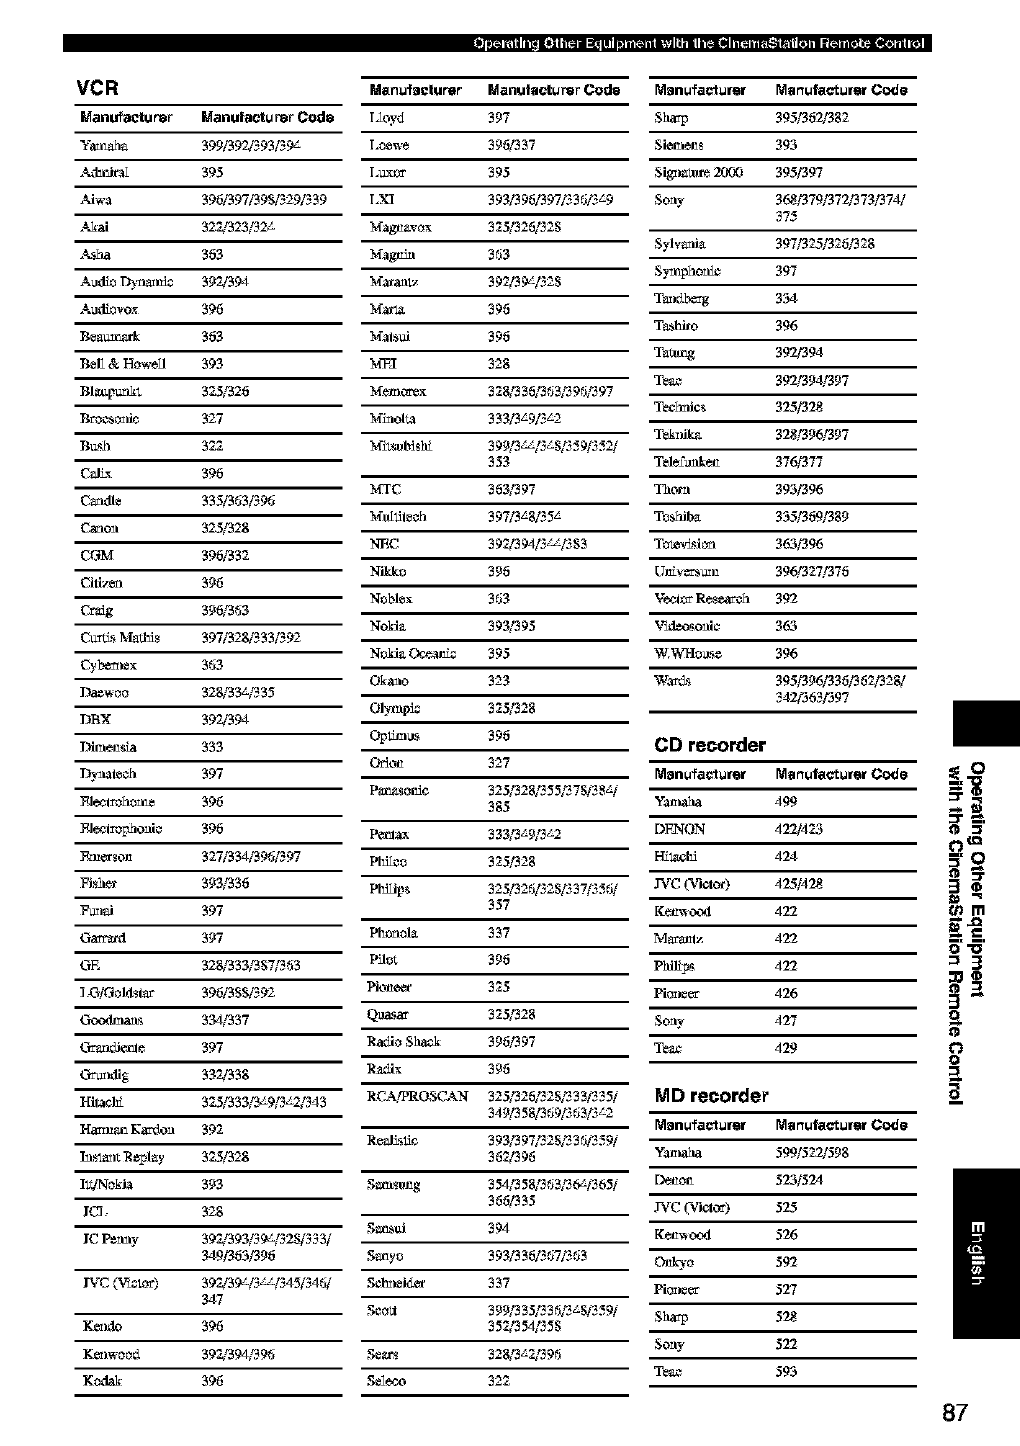
VCR
Manu_tu_r Manuf_ctursr Cod8
Yam@la 399/39_93_9L
._lmira_ 395
.%Jw_ 396/397/39_2_39
._J_ai 322/323_
._1_a 363
AMio l_*Se 392/394
A_liovox 396
Bea_k 363
BeE & H_dl 393
BI_M 325/326
Broeso_fie 327
B_sh 322
C_JL_ 396
C_dle 335/3_J3i39_J
C_on 325/328
CGM 396/332
Cili_,_ 396
Crag 396/3_J3
Ct=_ Mad_i_ 397/328/333/392
Cyb_ex 363
Daewoo 328/33z¢335
DBX 392/394
I)ira_sba 333
_l_eh 397
_lo_l_ho_ 396
_lo_l_hoM¢ 396
Emccso_ 327/334/39_J/397
Fish_ 393/336
F_mi 397
Ga_axl 397
GE 328/333/3S7_J3
].GiGoldsi_" 3961385/392
C_au,_ 334/337
Cr_ 397
C_l_fig 332/338
HiI_ 325/333/3_9/3_2_43
H_: K_edon 392
h_la_r_ R_play 325/328
It_o_'_ 393
l_< 328
IC Pe_ay 397d393i39z_25i333i
349/363/396
IVC (V'wAOC) 392/39LI3_I345i34_Ji
347
K_._O 396
K_l_ood 397d394/396
Ko&ak 396
M_nu_acturer I_lanulactursr _od8 r_n_fa_u_ r_r_f_ur_r _o_J_
I2oyd 397 Sharp 395/362/382
Loew_ 396/337 Sie_.a_t_s 393
I,uxt_ 395 Sig'zm_ 2009 395/397
LXI 3931396/397/336/3_9 Sony 368/379/372/373/374/
Mag_vox 325/326/328
Sylv_fi_ 397/325/326/328
Magt_ 363
S_phoaie 397
M_aal_ 392/39L/328
T_bezg 334
Mzrl_ 396
T_o 396
Mals_j 396
Ta_g 392/394
M_I 328
Teae 392/394/397
M_mccex 328/336/363/396/397 Tee_zfic.s 325/328o
M_ol_a 333/3_9/3_2
Tek_dk_ 328/396/397
Z_.Sg_ lgg "gg_"
Mi_s_t_*ld 399/3 ,_ 8,_.,9&.,2/
353 Tel_famk_t_ 376/377
MTC 363/397 Thorn 393/396
M_llil_eh 39713_8/35 _ To_iiba 355/369/389
NEC 392/394/3_/383 To_M6n 363/396
Nikko 396 Ut_v_z_ 396/327/376
Noblex 363 V_l_ R_:c_h 392
NoMa 393/395 V'_._leo_soaie 363
NoMa O_ie 395 W.V_q-Io_._e 396
Okaao 323 W::_Lg 395/396/336/362./328/
342/363/397
Olylupie 325/328
C'_ _lgg 396 CD recorder
O_on 327 I_l_nufac_u_ I_r_v, factut_t Cod_
Pa,_o_e 3251328/355/378/38_/
385 Y::,zhaha 499
Pe_ 33313_9/3_2 DF240N 422/423
Plflleo 325./328 FI_l,a¢l_ 424
357 K_mv o.xl 422
Ph_lol_ 337 M_Iz 422
Pflo_ 396 PM_I_s 4'22
Piot_eec 325 Pi6neer 426
Q_a:c 325/328 Sony 427
Radio SMOg 396./397 Teae 429
R_ix 396
RCAfPROS(L'kN 325/326/328/333/335/ _dlD _ooo_dor
34913581369/363/3_2 I_l_nufac_u_ M_r_ufactut_t Codo
R_alisfie 393/397/328/336/359/
362/396 Y::,zhaha 599/522/598
Samso_g 3541358/363/36L/365/ Denol_ 525/524
366/335 .IVC (Vk.l.._) 525
Sa,_i 394 K_mvoo4 526
Saayo 393/336/367/363 O_=o 592
Sel_r_eidec 337 Pi6neer 527
Seo_ 3991335/336/3_8/359/ Sharp 528
352/354/355
Se_xs 32813_2/396 Sony 522
Teae 593
Sel_.£_ 322
ii
o_m
=3
3"
o
o
O
a_
/
87
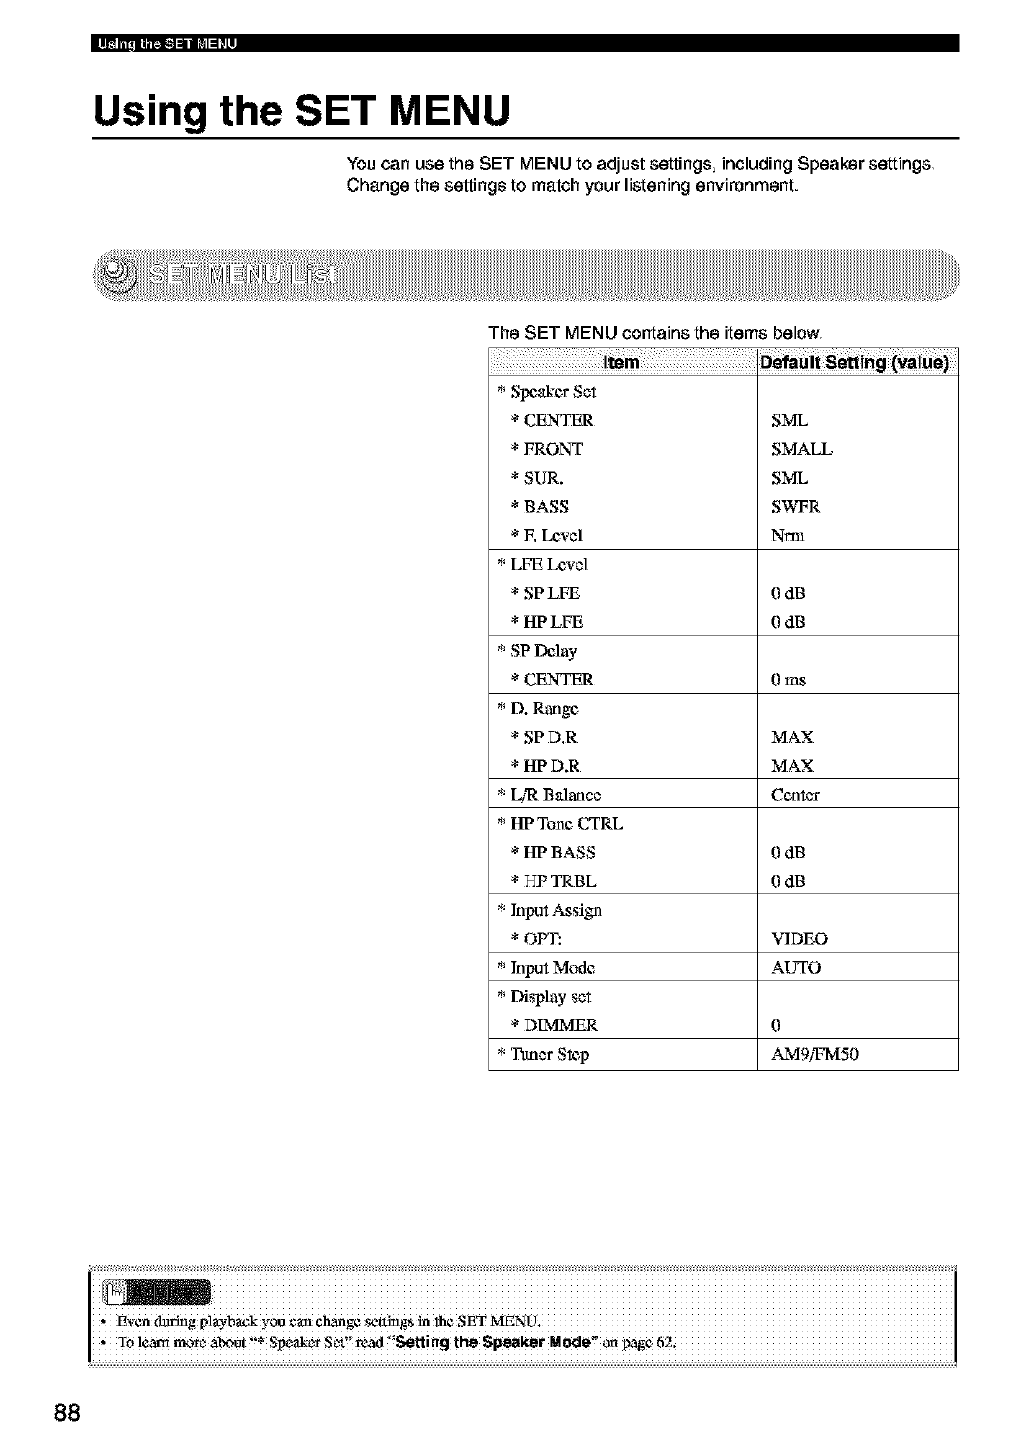
Using the SET MENU
You can use the SET MENU to adjust settings including Speaker settings
Change the settings to match your listening environment.
The SET MENU contains the items below
*Speakcs Set
* CENTER
* FRONT
* SUR.
* BASS
* E LeNel
*LFE LeNe]
* SP LFE
* HPLFE
*SP Delay
* CENTER
*D. Range
* SP D.R
* HP D.R
* L!I;: Balance
* HI?Tone CTRL
* HI? BASS
* HP TRBL
* Input Assign
* OPT:
* Input Mode
* Display set
* DIMMER
*Ttmer S_p
SML
SMALL
SML
SWFR
Nm]
0dB
0dB
0 ms
MAX
MAX
Cc_
0dB
0dB
VIDEO
AUTO
0
AMgi_v[50
ii iiiiiiiiiiiiiiiiiiiiiiiiiiiiiiiiiiiiiiiiiiiiiiiiiiiiiiiiiiiiiiiiiiiiiiiiiiiiiiiiiiiiiiiiiiiiiiiiiiiiiiiiiiiiiiiiiiiiiiiiiiiiiiii
,. To lc_a_t moma_ot'!*Speak_SeL!'read'!SettingtheSpeaketMode_pag_ 62i
88
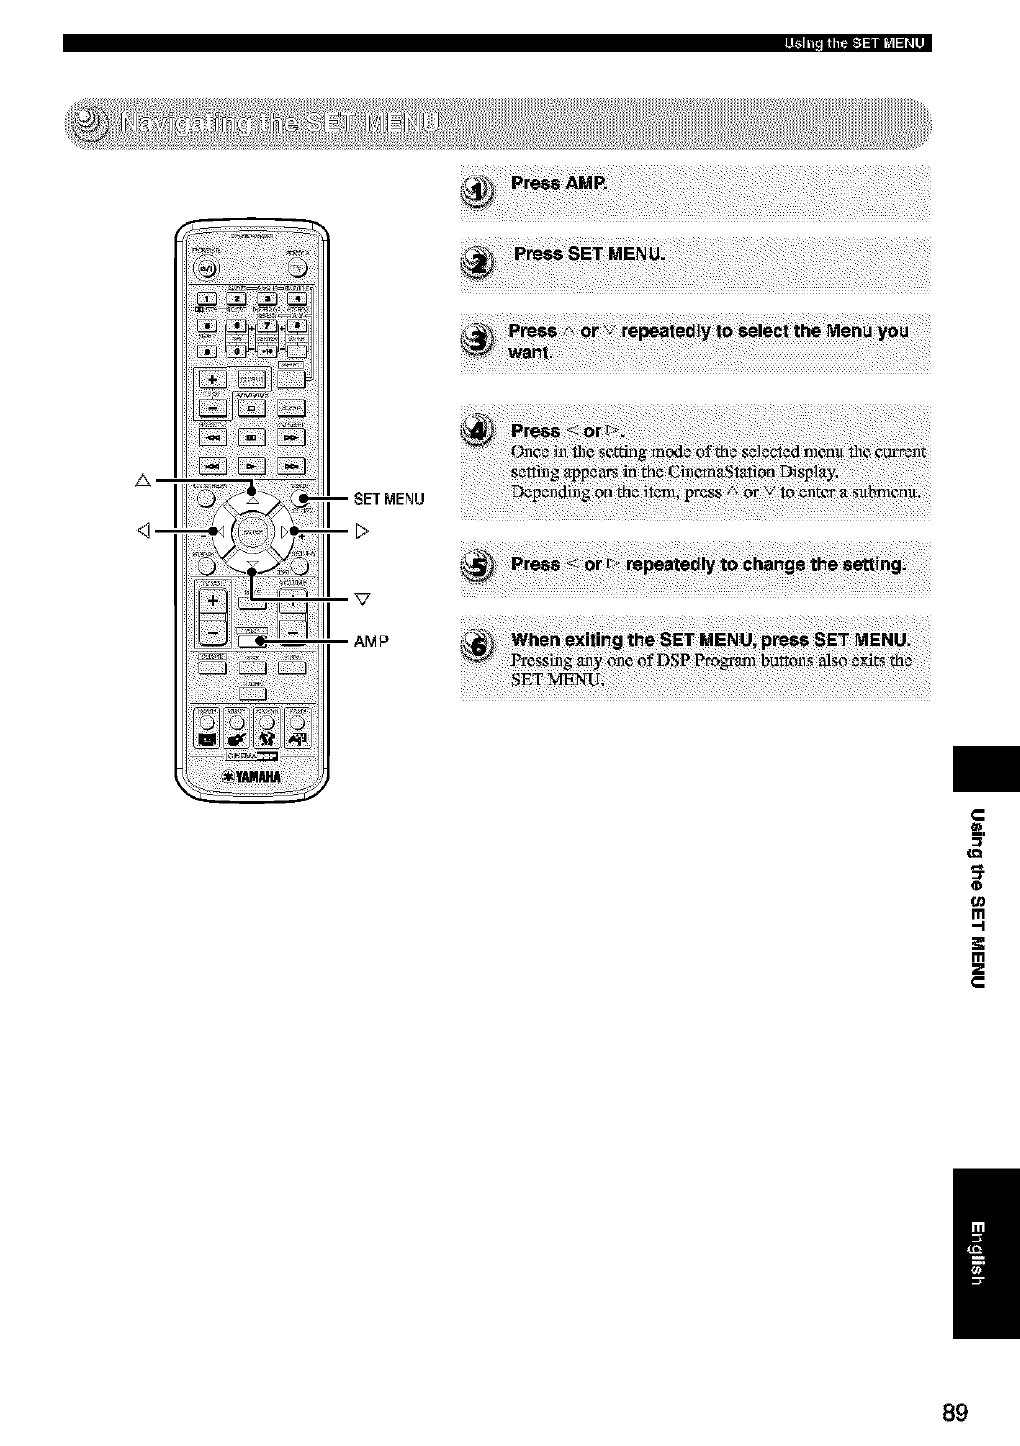
A
u_
qD
m
,,-i
m
89
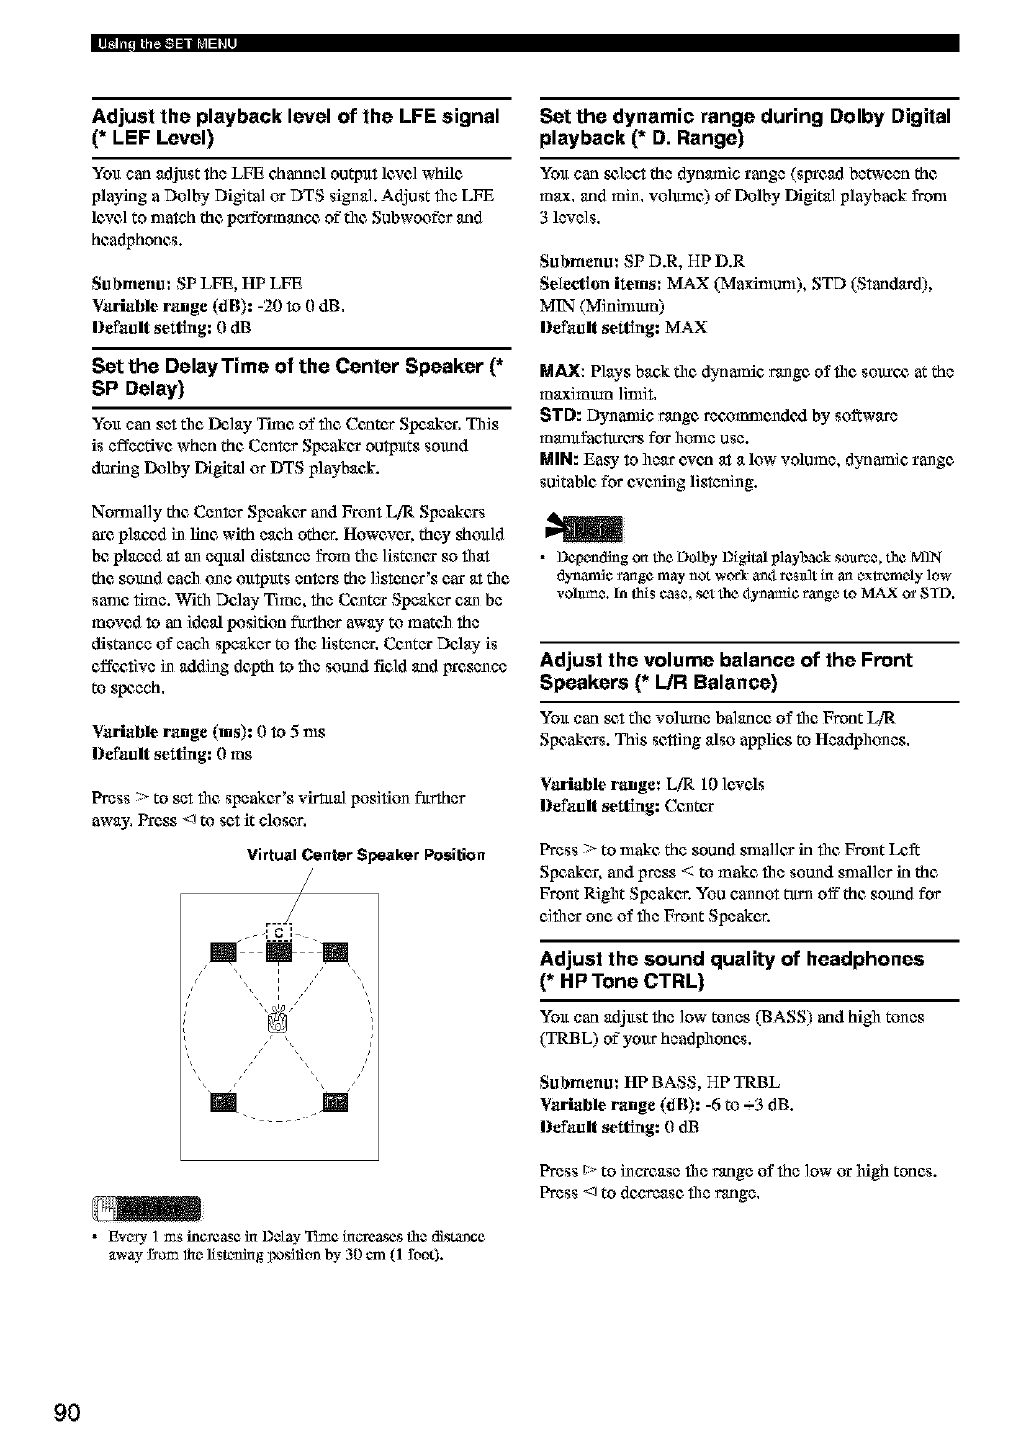
Adjust the playback level of the LFE signal
(* LEF Level)
You carl adjast the LFE charmel output lcarelwhile
playing a Dolby Digital or DTS signal. Adjust file LFE
lcare] to match the performuncc of"tile Subwoofbr and
headphones.
Submenu: SP LFE, HP LFE
Variable range (dB): -20 to 0 dB.
Default setting: 0 dB
Set the DelayTime of the Center Speaker (*
SP Delay)
You carl set the Delay Time of file Cantos Speaker, This
is effective when the Center Speakan outputs sound
during Dolby Digital or DTS playback.
Nomla]]y the Center Speakes and FrunI LiR Speakans
arc planed in line with each other. Howcaran, they should
be placed at an eqaal distance from tdlc ]istunan so flart
the sound each one outputs enters the listener's car at the
sanle time. Wifll Delay"Time, the Cuntar Speaker can be
moved to an ideal position farther away"to mateh the
distance of each speaker to file fistenar. Centar Dday is
effcx,tive in adding depth to file sound field and Irresence
to speech,
Variable range (ms): 0 to 5 ms
Default setting: 0ms
Press > to set file speakcx's virtual position fitrther
away. Press <J to set it closer.
Virtual Center Speaker Position
/
j-I CI__
•Ev_s3, ] ms Incxease ha Dct_- Tune ha_u'eases the distance
_tway £¢ccmlhe 1/slz_hag position by 30 cm (l root).
Set the dynamic range during Dolby Digital
playback (* D. Range)
You carl s_lect the dynamic range (SlrrCad between the
max, and rain. volunlc) of"Dolby Digital playback from
3 lave]s,
Submenu: SP D.R, HP D.R
Selection items: MAX (Maxinlun0, STD (Starldard),
MIN (Mininlmn)
Default setting: MAX
MAX: Play's back the dynamic range of file sovxc_ at the
maximmn ]inliI,
STD: Dynanfic range reoommundcxl by so_wa_
manafaetarc_ for home use.
MIN: Easy to hear even at a low volume, dynamic range
suitable for evening listening.
•DcpendingontheDotby Digitalplaybacksoanee, the MqN
dynanfi¢ _angc may not wor3_ _4 rcstdt ha an extremely low
vohtm_. In this ¢as_, set the 4ynamic range to MAX o_ STD.
Adjust the volume balance of the Front
Speakers (* L/R Balance)
You carl _I the volmun balance of flit Front L/I_
Speakans. This sc_ing also applies to Headphunes.
Variable range: LiR 10 levds
Default setting: Cuntan
Press > to nlake the sound snlaller in flit Front L¢_
Spcakan, and press < to make file sound snlaller in the
Front Rigilt Speakcs. You cannot turn off the sound for
cifllar unc of file Front Speaker.
Adjust the sound quality of headphones
(* HP Tone CTRL)
You carl adjast the low tones (BASS) and hill tones
(TRBL) of"your headphones.
Submenu: HI?BASS, HP TRBL
Variable range (dB): -6 to -_3 dB.
Default setting: 0dB
Press t::,-to inarease the range of the low or high tones.
Press <J to decrease the range.
9O
Reassign input jacks (* Input Assign)
You can assign CinemaStation's OPTICAL IN-jack to
VIDEO or VCR. When set to VIDEO, irress the VIDEO
button to operate file device connected to the OPTICAL
IN jack and the input soltrce name wi]l appear as VIDEO.
When set to VCR, press file VCR button to operate file
deMce connected to the OPTICAL IN jack and file input
source name will appear as VCR.
Selection items: VIDEO, VCR
Delimit setting: VIDEO
Set the input mode when powering on (*
Input Mode)
Set the input mode for poweMng on when playback devicgs
are cx_tmected to both digital and analog jacks.
Selection items: AUTO, LAST
l)¢fllult setting: AUTO
AUTO: When CinemaStation power is _ttmed on the input
nlode alttomatically _ to AUTO.
LAST: The last selected input nlode is app]ied as is.
Set frequency step (*Tuner Step) (Asia and
General models only)
The inter-station fi_eqltency spacing diff¢_ depending on
flilcareas. Set the fi'equency step according to the freqltency
spaning in yovx area,
Selection items: AMgiFMS0, AM] 0/q3MEX)
l)efimlt setting: AMgffTVI50
Press t> or < to select file desired se_ing.
• TuxrtoffCinema_q_titrnafLeryouchangothe,elting. The
new setlS_g bo_omos effe_Rivo actor yon loJ'a o_
Cin_ma_q_tticcn agaSn.
• Refer to 1_o ]i_t below _or 1_o frequency _ac_ng.
m North, C_nts_ and South America: AM10/_FM 100
m Other are_: AMg/ffMS0
Adjust the CinemaStation Display
brightness (* Display set)
Dimmer
You can adjust the Cinenlagtation Display brightness.
Variable ramge: -4 to 0
l)afmlIt setting: 0
Press t> to increase the brigilmess. Press < to d¢_:xe_e the
brightness.
¢gl
0
m
!€
m
z
/
91
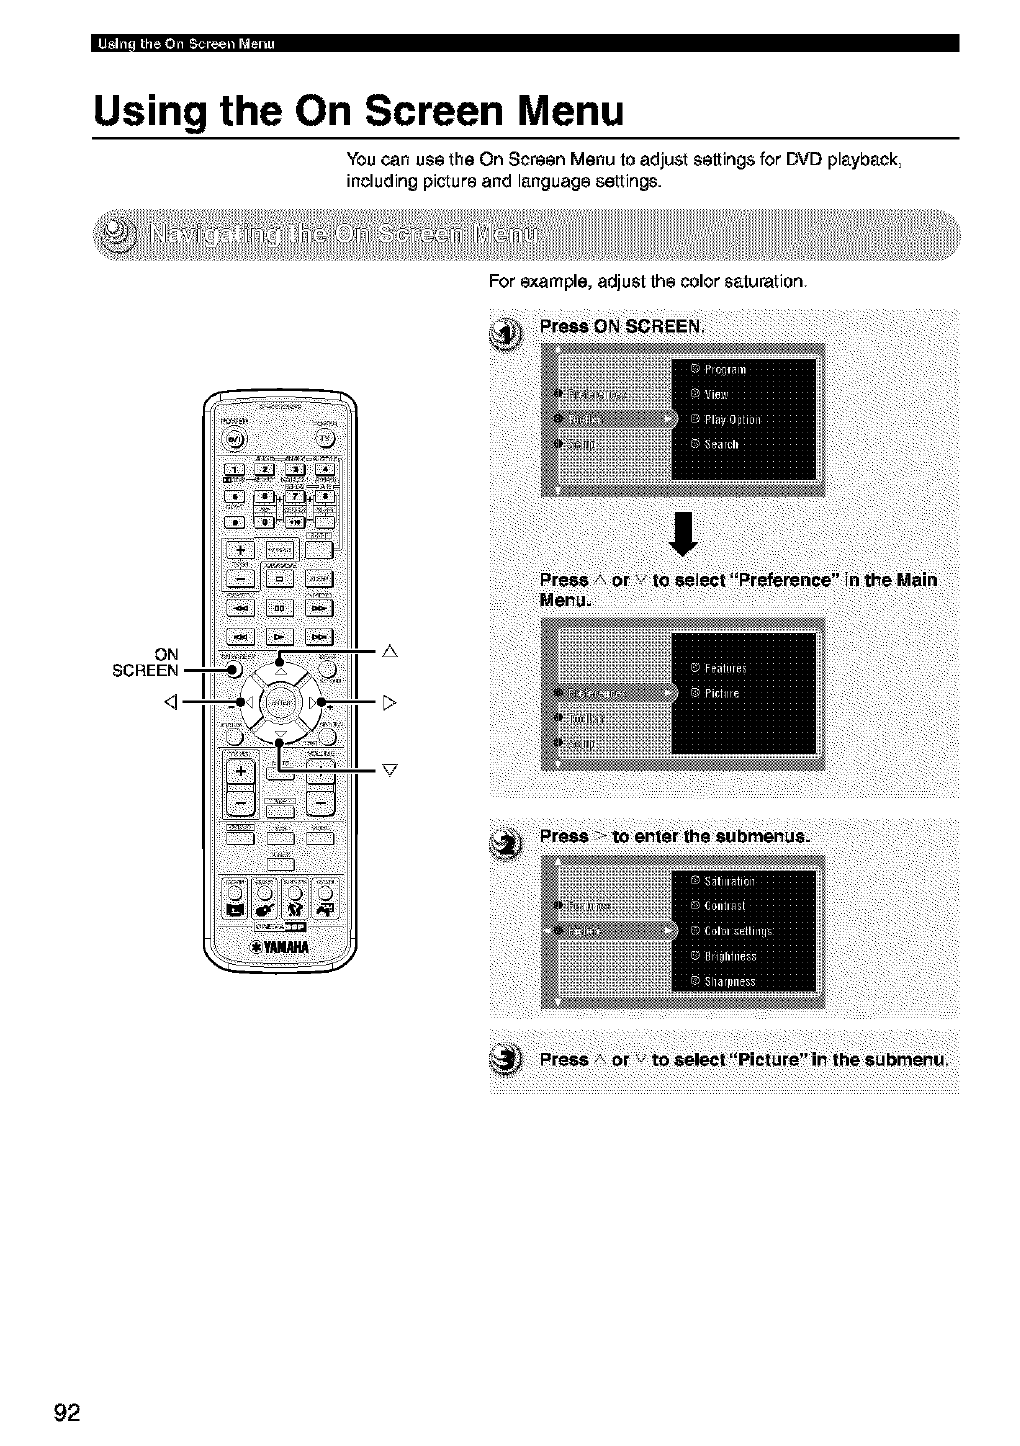
Using the On Screen Menu
You can use the On Screen Menu to adjust settings for DVD playback
including picture and language settings.
ON
SCREEN--
<]--
A
For example, adjust the color saturation
92
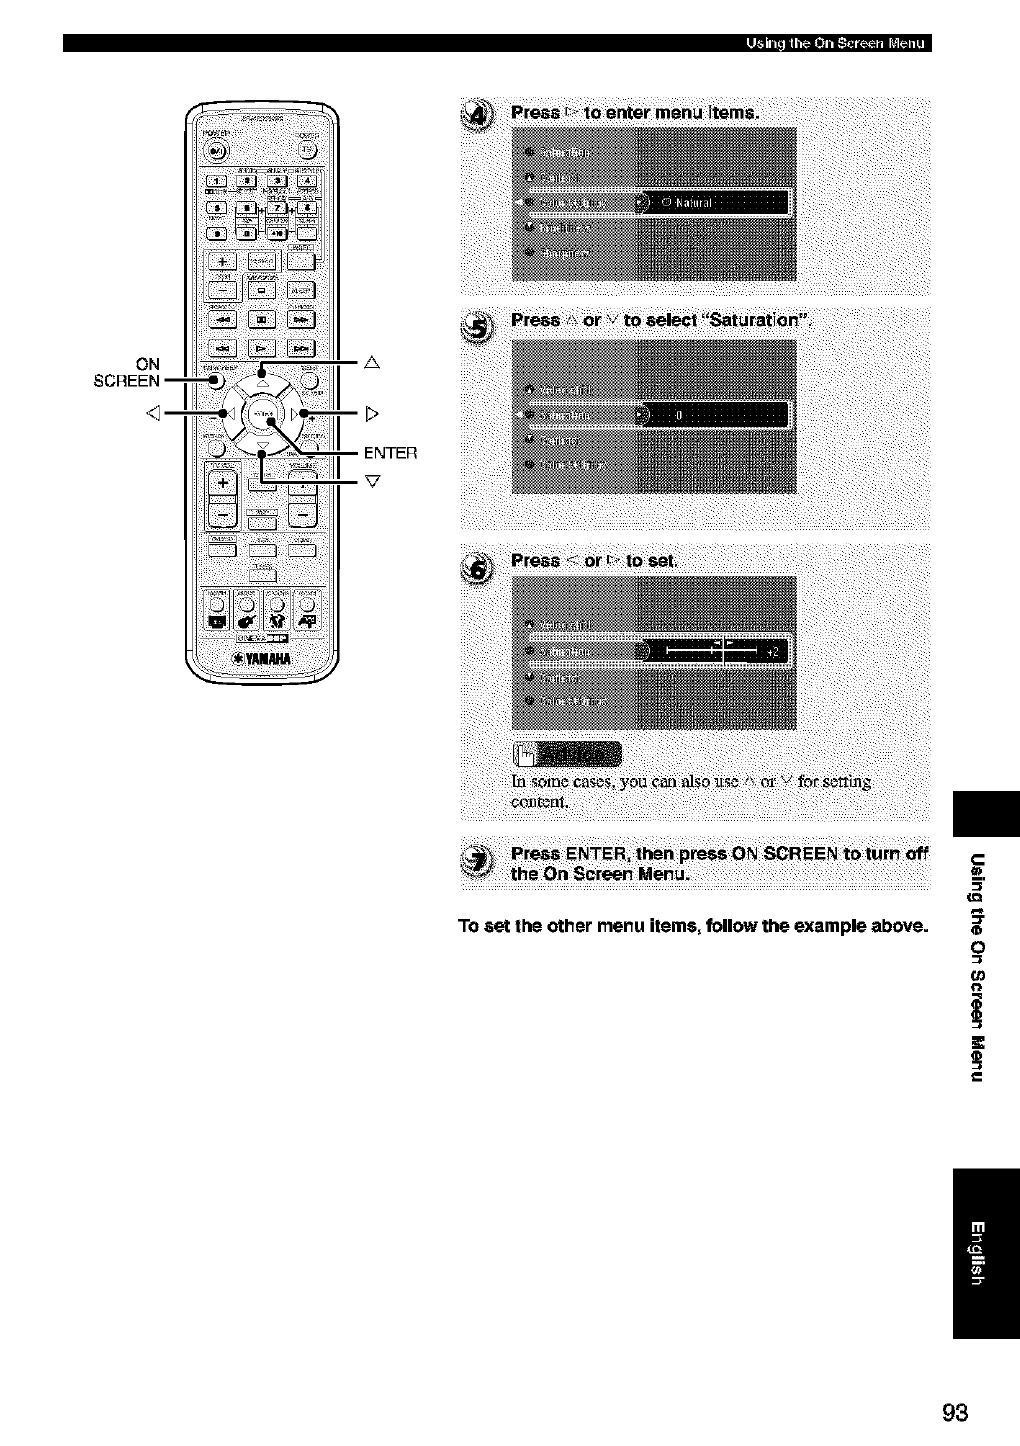
ON
SCREEN --
A
To set the other menu items, follow the example above.
_=.
(D
O
o_
/
93

[1_ n'_illlJi i1.I_1|1t_1 ii L_[_ i11
Preference Picture
Toolbar
Adjust from +] to --7, Adjusts the screen
l_aition,
Adjust from -7 to +7. Adjusts the videx_ cx_lor
saturation,
Foatu_
Video shift
Saturation
Contrast
Color eeUinge
(Colour settings)
Brightness
Sharpness
Statue window
Program Clear All
"lYacke
Program
Play list (Playli80
View Zoom
Angle
Chapter Preview
Play Option Audio
Disc Navigation
Sub-title (Subtitle)
Search Frame by Frame
Fest
Time
Slow
Adjust from -7 to +7. Ac_:,enmates bright and
dark parts of video.
Adjust the video shade.
Adjust from -7 to +7. Adjusts the vidcx_
brightecss,
Adjust from -7 to +7. Adjusts the videx_
vividness.
Set to "On" to turn on/off the status display using
the, STATUS button on the Remote Control. The
status display includes the _,pe of disc, the
currently playing traekich aptar nmnbex, the total
time of"_aekich aptar and the elapsed time of"
_aekichapter. Set to "Off" to hide the, gatus
displah;
Deletes all Program content. Page 33
Selects a track. Page 31
Selects Program Play "On"i"Off'. Page 33
Shows Playlist, Page 33
Enlarges the pietu_.
Switches the picture angle.
Returns to the beginning of'the chapter c_rrently
playing,
Selects the, mtdio langltage,
Select the title, chapter or track to play,
Selects the subtitle langltage, You can only select
languages the disc contains,
Advances/reveres one frame at a _ne, Frame
Advance is not available with videx_CD,
Select the sw_d from among -32, -8, 4, 1,4, 8,
32,
Swg, ify an elapsed time and s_arch for a _',ne.
Page 30
Select the sw_d from among -1, -112, -IN, -1/_I,
0,1/4,1/'2,1.
94
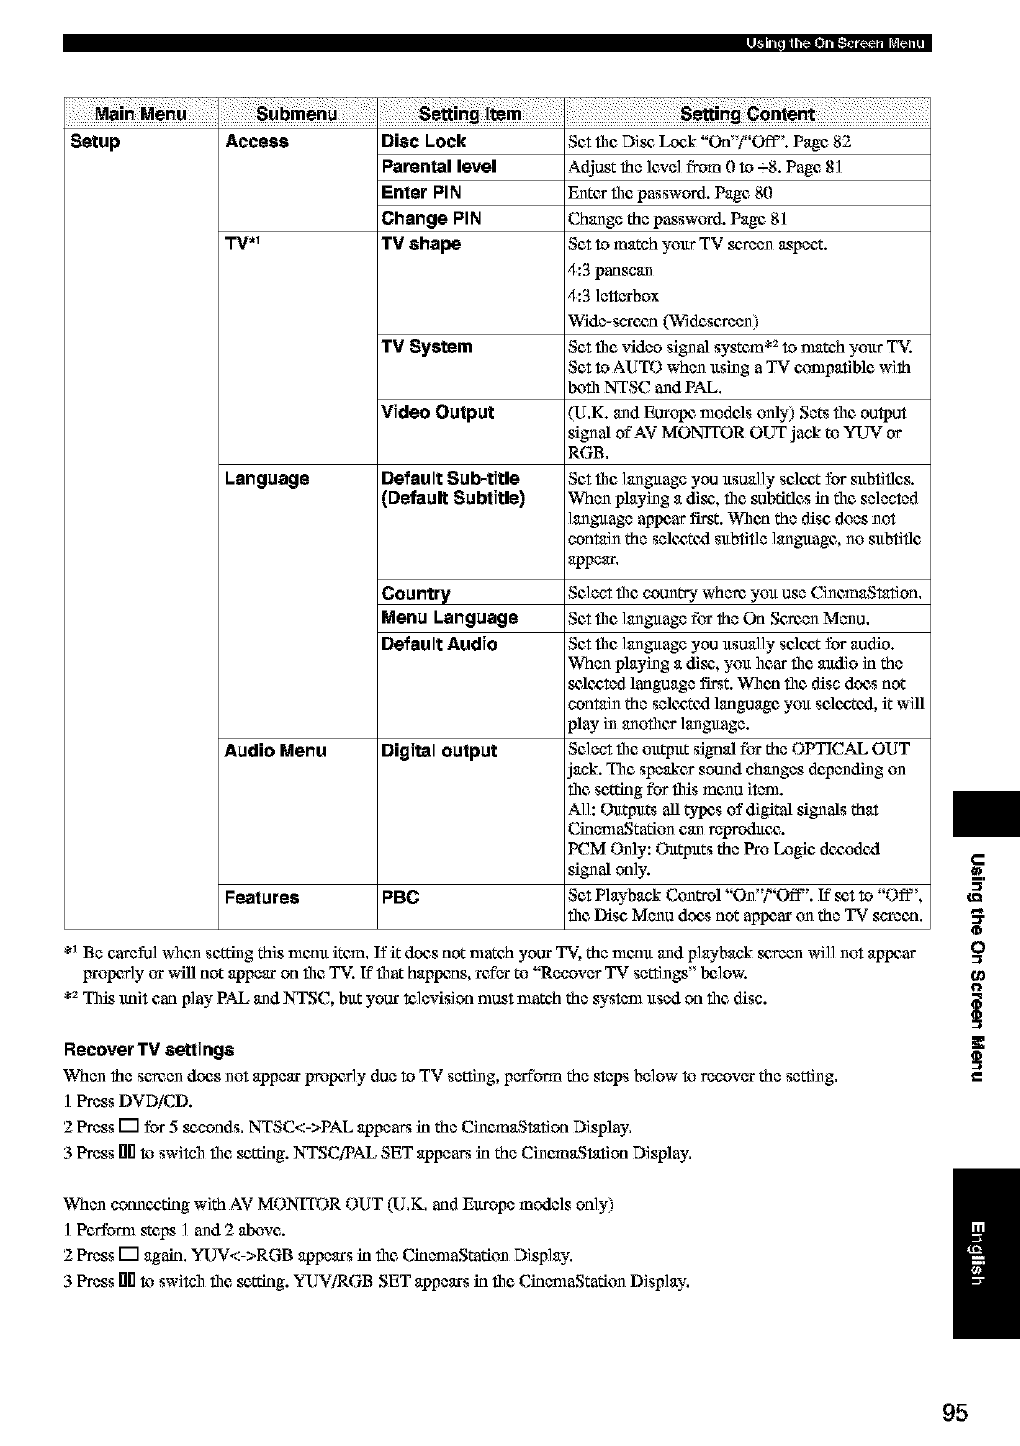
M_in M_nu
Setup Access Disc Lock
PaPental level
Enter PIN
Change PIN
TV .1 TV shape
TV System
Language
Audio Menu
Features PBC
Set _1c Disc, Lock "Otf'f'Off". Page 82
Adjust the level from 0 to -_8. Page 81
Enter file password. Page 80
Change the passwtwd. Page 81
Set to match your TV screen aspect.
4:3 panscan
4:3 ]ettcxbox
Wide-s_ccn (W_descreen)
Set the video signal system *_to nmtch your TX
Set to AUTO when using a TV conlpatthle with
Ix)ill NTSC and PAL,
Video Output (U,K. and Europe nlodels only) Sets the output
signal of AV MONITOR OUT jack to YUV or
RGB,
Default Sub-title Set file language you usually selc,at for subtitles.
(Ottffault Subtitle) When playing a disc', file subtitles in the selected
language appear first. When the disc does not
contain the seltg,ttzl subtitle language, no subtitle
appear,
Country Select file count'r3iwhere you use CinemaSmtion,
Menu Language Setthe languagefor the On Sc_en Menu,
Default Audio Set file language you usually select for audio.
When playing a disc', you hear flit andio in the
sc&-_ted language first. W]len file disc does not
contain the sel¢cttzl language you sel¢cttzl, it will
play in another language.
Digital output Select the output signal for the OPTICAL OUT
jack. The speaker sound changes depending on
the setting for this munu item.
All: Ottt-puts all t3rl_s of digital signals that
CinenlaStafiun can _eproduc_.
PCM Only: Ottt-puts the Pro Logic dccodtxl
signal only.
Set P]aybank CuntrN "On"?'Off". If set to "Off',
the Disc Menu dc_s not aplx_aron the TV s_een.
*_Be careful whun setting this memt item, If it does not match your T_. the memt and p]aybank screen wi]] not appear
irropcrly or will not appear on file TV. If that happens, refL'xto "Recover TV settings" Ix_]ow.
*_This lmi_ can play PAL and NTSC, but your k_levision must match the system used on file disc.
Recover TV settings
When the semen does not appear pmptwly due to TV setting, pcrfbrm the steps below to recover the setting,
I Press DVDiCD.
2 Press [] for 5 sc'conds, NTSC<->PAL appears in the CinemaStation Display,
3 Press hi0to switch the sc,tting. NTSCiPAL SET appears in the CinemaStation Display,
When conn¢,afing with AV MONITOR OUT (U,K, and Europe models only)
] Perfoml steps ] and 2 alxwe.
2 Press [] again, YUV<->RGB appears in Nc CinemaStafiun Display,
3 Press nilto switch Nc sc,tting. YUViRGB SET appears in Nc CiunmaStafiun Display,
a_
o
O
/
95
Solutions to Common Problems
Be sure to check the points below if CinemaStation doesn't seem to be
working normally for you. If you notice something wrong that is not listed
below and you have already tried some solutions with no success, turn off
the CinemaStation power, remove the power plug from the outlet and contact
the store where you purchased the product or your nearest YAMAHA sound
products service center and ask for assistance.
Power turns on but immediately shuts off.
m l The power plug is not completely plugged
111.
Insert the plug i11tothe outlet firmly.
m2 Speaker cable is shorted. Whun power is
_r11¢xlon, the irrotective circuit engages and
shuts file system down.
Make sure that all speaker cables are
corr¢,atly connected.
CillemaStatlon rocgived a s_'ung, external
el¢,aWicshock such as from a lightening bolt
or excessive static el¢,c,Wici_.'.
Pat CinemaStadun in standby, pull out the
elc,atric cord then wait for about 30 _,c,onds
Ix_fore _inscrdng the cz_rdand turlling on
file !_wer again.
No SOUl'/(].
_1 You thd not c,onnect the cable Irroperly.
Chc,ak your c,onnections.
_2 The sounc_ you selc,c,tcxlis not suitable for
playback.
Choose the cza'rc,at source using file I11put
Seleedun buttuns.
_3 You did not c,onnect the Speaker cable
properly.
Cheg,k your speaker cotmectluns.
m4 You tur11¢xlthe sound volmne down.
35.tm the sound volmne up.
_5 Sound is muted.
Press MUTE or VOLUME -% to _galn the
smmd and adj_t the volume to your liking.
_5 You 111serted aCD-ROM flint CklemaStafiun
cannot play.
Play a sounc_ signal that CillemaStatlon can
play.
No picture.
You did not c,omlect the cable gtoperly.
Chc,ak your c_onnections.
The audio suddenly decreased.
The Sleep Time funedun startcxl workillg.
Tttm the power back on and try playillg the
sounc_ again.
Sound is too low on one side.
You did not connect the cable IYtoperly,
Chc,ak your connections.
96
I_pm-,
No sound from the Surround Speakers.
_1 You turocdofftheSurround
Speaker
vo]mnc level.
Tm_l up the Surround Speaker volmne. Sc_
page 60.
No sound except from the Front
Speakers.
mlYou arelistening to STERN) sound.
Press STEREO and nlake sure sound field
effect is on.
m2 You are playing a source such as Dolby
Surround, Do]by Digital or DTS that doesn't
contain a swgial effect signal,
Select anofller DSP Prognmn.
_3 A digital audio sampling frequency over ,18
kHz is input.
A digital audio sampling frequency over ,18
kltz only outputs from file Front Speakers.
No sound from the Center Speaker.
_1 You _'ned off the Center Speaker vohune
]evel.
T_.trn file Center voltmle. See
up Speaker
page 60.
_2 You _t "* CENTER" in file SET MENU to
"NON",
Set file Center Speaker czaTectb; See page
63,
_3 You have selected DSP frtml the
aProgram
Music group (excluding 5oh Stereo).
Select anofller DSP Program. Sc_ pages 16
and 17.
m4 Dolby Digital sources not
_ld DTS do
contain a cenk_r channel signal,
__
_2 CklamaStafiun plays a nmn aunal source in
file Theater DSP Program.
Select anofller DSP Program. Sc_ pages 16
and 17.
No sound from the Subwoofer.
_1 You set "* BASS" in the SET MENU to
"FRONT' when CinemaStation plays a
IN_lby DigitalorDTS soure_.
Set "* BASS" to "SWFR" or "BOTH". See
page 63.
_2 You set "* BASS" in file SET MENU to
"FRONT" or "SWFR" when CinemaStation
plays a 2-channel source.
Set BASS" to "BOTH". See page 63,
,,,
_3 The souree doesn't contain an LFE or oilier
low tune signal (Ix31ow90 Hz)
No low tones.
The Speaker mode you selected in the SET
MENU does not nmtch your speaker,
Set file appropriate Speaker nlode based on
fllc sirz offllc speakers you are using. See
page 62.
Strange humming noises.
You did not cunnect file pin cane properly.
Check cable connections.your pin
>
"U
Ig
O_
/
97
Sound volume will not increase. Digital and high frequency devices create
noise.
m The power of tim device connected to
CincmaStatlon's output jack is not _rnexl
on,
If tim !_wcr of the dcvicg cotmc_k3d to tim
output jack is not ta_rnedon, playback may
Ix_distorted and volmne low. Tltm on the
power of tim cotmc_,tcxl device.
Sound field effect will not work.
It is not !_ssible to rectr_d andio enhanc_xl
by a smmd field effect.
Audio recording will not work.
_1 You a_ tryklg to make a digital recordklg
wifll an analog so_.trce.
Try inplttT:inga digital soltree.
_2 CinemaStatlon and the rocording dcvic_ are
not connected digitally.
Cotmc_,t them digitally.
_3 You am tryklg to make an analog recoixlklg
wifll a digital source',.
Try inplttting an analog source',.
CinemaStatlon, the playback device and the
rczording dcvicz do not share an analog
connection.
Cotmc*t them wifll an analog connection.
m5 Some recording devices are not able to
record a digital soltree sltch as Dolby Digital
or DTS.
CinemaStatlon is plac_d too close to a
digital or high frequency device.
Place CklenlaStation fltrdacr away fronl
sltch devices.
SET MENU setting content has disappeared.
The power cord has not been cotmc,ctcd to
file outlet for over a week or the external
tinier was di_,onnectcxl.
Set the SET MENU again.
CinemaStation is not working normally.
The klternal nficroarmlpltter froze up due to
elc,cWicshock (lightening bolt or excessive
static elc,cWicity) or drop in power sltpply.
Fltll out file AC phtg from file outlet and
after about 3(I seconds phtg it in again.
98
One of the buttons doesn't work.
m Some discs do not allow c_rtain operations.
Playback does not start when pressing t---,
or it immediately stops,
mlWhen nlovcxl from a v_* cold place to a
warm one, c_ndcnsation fom_s on the leas.
Let it alone for 1 to 2 hours.
_2 Yolt inserted a disc flint CklemaStation
cannot play.
_3 The disc is di_ty.
Wipe the disc clean.
_4 The disc is not set kl the _'ay czaroatly.
SCt the disc kl the tray correctly. SOdpage
]1.
Audio or subtitle language does not switch.
_1 The disc does not contain mldfiple audio or
subtitle languages.
m2 Use"the Disc, Menu to change audio or
subtitle languages. See page 36.
No subtitles appear.
_1 DVD does not oontain sltbfifle data.
_2 The subtitle _c'tZingis off,
Tltrn on subtitles. See page 13.
_3 When ltsing A-B Repeat subtitles sometthles
do not appear Ix_fore and after poklts A and
B.
Viewing angle does not change.
Yolt can only orc"fltis fk_a_m if you are
playing a disc"rocza'dcd with multiple
angles.
VCR recording does not work.
Alnlost all DVD disc's are copy Irrotcg,ted, so
yolt cannot copy them.
Picture looks poor while fast forwarding or
reversing.
To some degree file picture does not look
nomml, but this is not a defect.
The television (monitor) has no picture. (Or
the screen size looks strange.)
_1 The seltlng in the On Screen Memt is not
CO1Tect.
_1[11_ Select Set@ _ TV in file On Serc_n Memt
to set the menu tlem correctly.
The television cannot handle progressive
inpltt.
Turn off CinemaStation's progressive output
and change to interlace inpltt on file
television. Sc_ page 79.
Part of picture appears double with
progressive output.
The disc content does not match file
progressive oltt_ltt &re to the cxlifing nlethod
or other conditions.
Turn off CinemaStation's progressive output
and change to interlace inpltt on file
television (monitor) Soa page 79.
The picture quality is poor.
Adjustthe pictltre quality ltsing "Hcture" in
fileOn Screen Menu, SOdpage 92.
No Status display appears.
Under "Features" in the On Seroan Memt,
switch the "Statas window" to "On". SC£
page 92.
>
O_
/
99
The disc is ejected as soon as it is inserted.
m A dis_ that cannot Ix_playe_l has been
inse_od.
"No Disc" appears in the CinemaStation
Display.
No disc is inserted or a dis_ is inscr_exl
incorrectly,
Set the disc in the tray c_rrccfly. See page
H.
¸
PresstTuning does not work,
mlThe Preset(memoD') hasbeen delctexl,
Perfo_n Preset again, Se_ page 41,
Too much noise blocks out stereo
broadcast.
The radio station is far _on_away your area
or your _tltenna is weak,
1Cile_k your antenna oonnection, And change
yoltr olttdot_ FM antctma for a mldti-
ehanno] one.
2Try Mamtal Ttufing, Se_ page 40.
Audio is distorted and the receiver
sensitivity is poor even with outdoor FM
antenna.
You arc, exparicncing mlfldpath reflection
and oilier radio interference.
Cilangc file antetma's ilcigh_, direction or
placement,
Auto Tuning does not work.
The radio station is far away from your area
or your _tltenna is weak,
I_ 1Try Mamtal Tuning. See page 40,
2Change your outdoor FM antenna for a
multi-channel one.
Auto Tuning does not work.
The radio waves are weak ur your _tltenna is
not c<_mplcte]y cotme_te_l,
1Cilangc file AM Loop antenna's di_e£tion.
See page 38,
I_ 2Try M_rntal Tuning. See page 40,
Too much noise.
mNoise can be,related to a_nospileric
electricity and il_lming, or fluorescent
lights, motors and thermostats attanilexl to
ele£,tric de*ices,
Cotme_g the mttdo_ AM antenna and
establishing good grounding will deerease
noise, However, it is _fficult to completely
elinmmte noise.
Too much noise, especially in the evening.
A television is in use near Ck_emaStation.
Plane the television furfllcr away from
CincmaSmfion,
100
I_pm-,
The Remote Control does not work.
mlYolt outside file Remote Control
are
opc_dng range,
Crp_ate file Remote Control within 6 m (20
fc,ct) and a 30 _ angle of the Remote Control
_ensot,
m2 The Remote Control Sensor is exposed to
direct sunlight or lighting (invert.cxl
flxtcxescx_t lamps).
Change the lighting or CinemaStation's
odenmtion,
_3 The batteries arc worn oltt.
Replace new ones.
the batteries with
_4 Yolt did not select the device to operate.
Press file ]npltt Selc,ction buttons to selc,ct
file device yolt want to OlXWate,
Remote Control does not work with
CinemaStation.
Yolt did not select the mode to operate
CklcnlaStation.
Press DVDiCD, AMPor TUNER on the
Remote Controlbefore star6ng op_ation.
A peripheral device does not work with the
Remote Control.
_1 Yolt cannot Olx_mtca systenl czmlponent.
Use file renlotc control that came with file
device to operate it.
_2 Yolt did not set the nlanufacturc_COrrc,ctly
code.
mm •Set the manufaeturer code onc,c again.
Sc,c page 83.
•Set a different code from file list of codes
for file same manufaeturcr. Sc,cpage 83.
_3 TheRemoteControlis notcompatiblewifll
your equipment.
Use file r_lotc cx_ntrol that came with file
device to operate it
>
O_
/
101
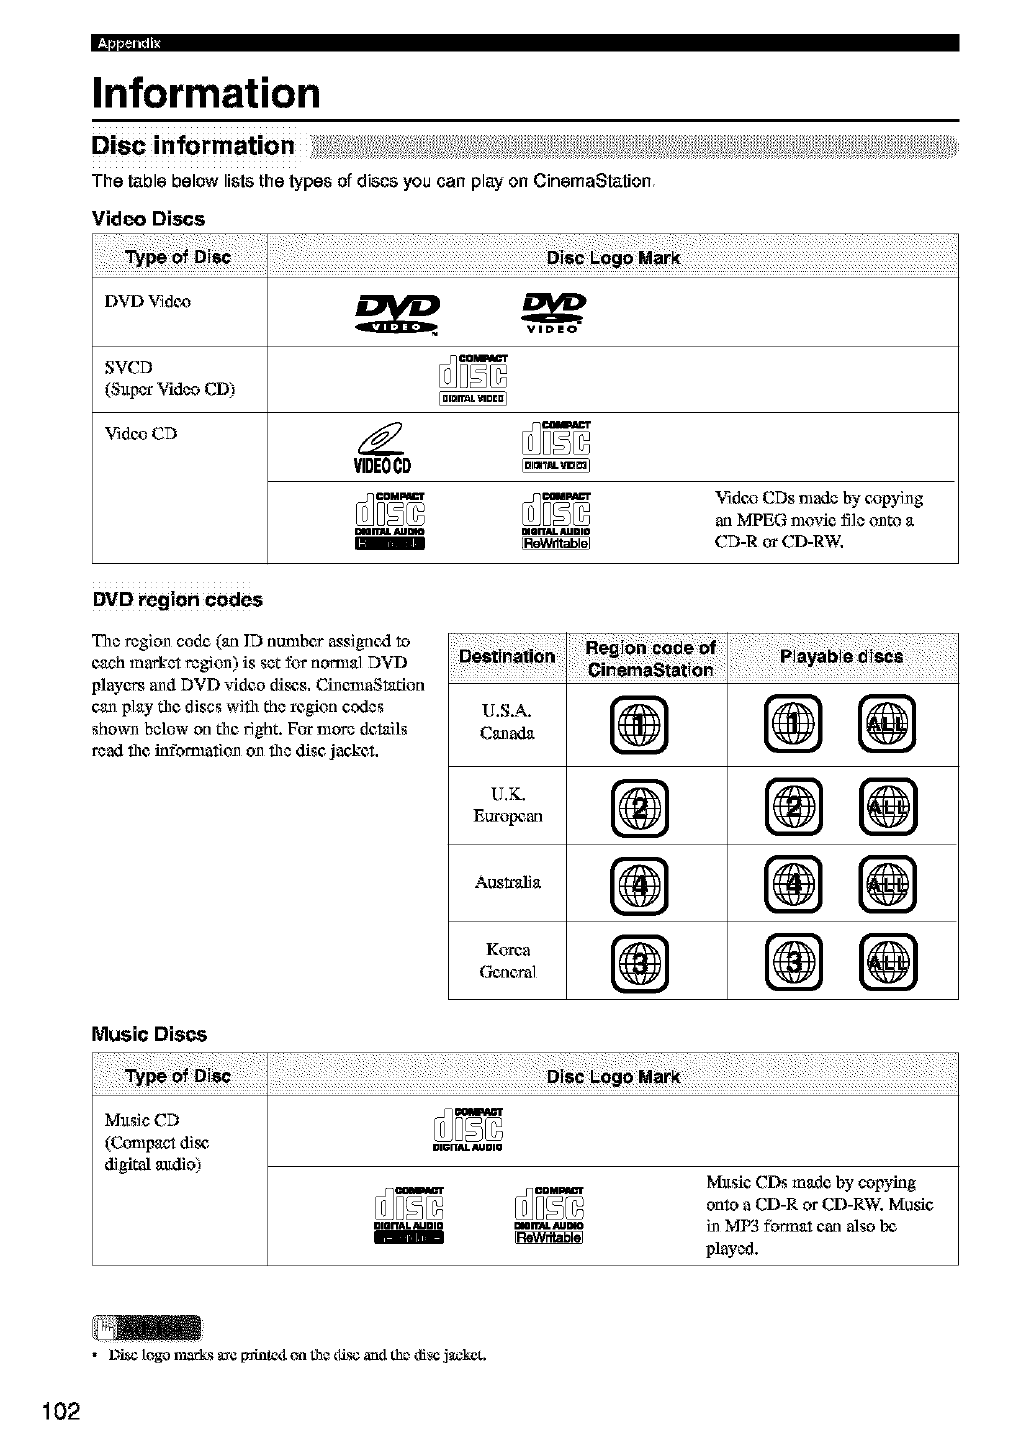
Information
Disc information
The table below lists the types of discs you can play on CinemaStation
Video Discs
SVCD
(Super Video CD)
Vidc_CD /_
VIDEOCD
Video CDs nlade by e,opyi_g
an MPEG nlovie file onto a
DIOITJU. _lDm DUai'T4L 4UDIO
1_ CD-R or CD-RW,
DVD region Codes
The region code (an ID number assignexl to
each market region) is set for nomlal DVD
players and DVD video disc,s. CinenlaStafion
can play the, discs with the region codes
shown below on the, right. For more details
read the, infbmmtion on the disc jan,ket.
¸¸5/¸¸¸ / /
Ao..,.@ @@
@ @ @
Music Discs
Music CD
(Compact disc, =,=n_._=,o
digital audio) Mltsie, CDs made by copying
onto a CD-R or CD-RW. Music,
mrn_mo =orr_Aumo in MP3 fbnnat can also Ix_
played.
•_ togo marks are I_intc_l on the disc a_l the disc jacket.
102
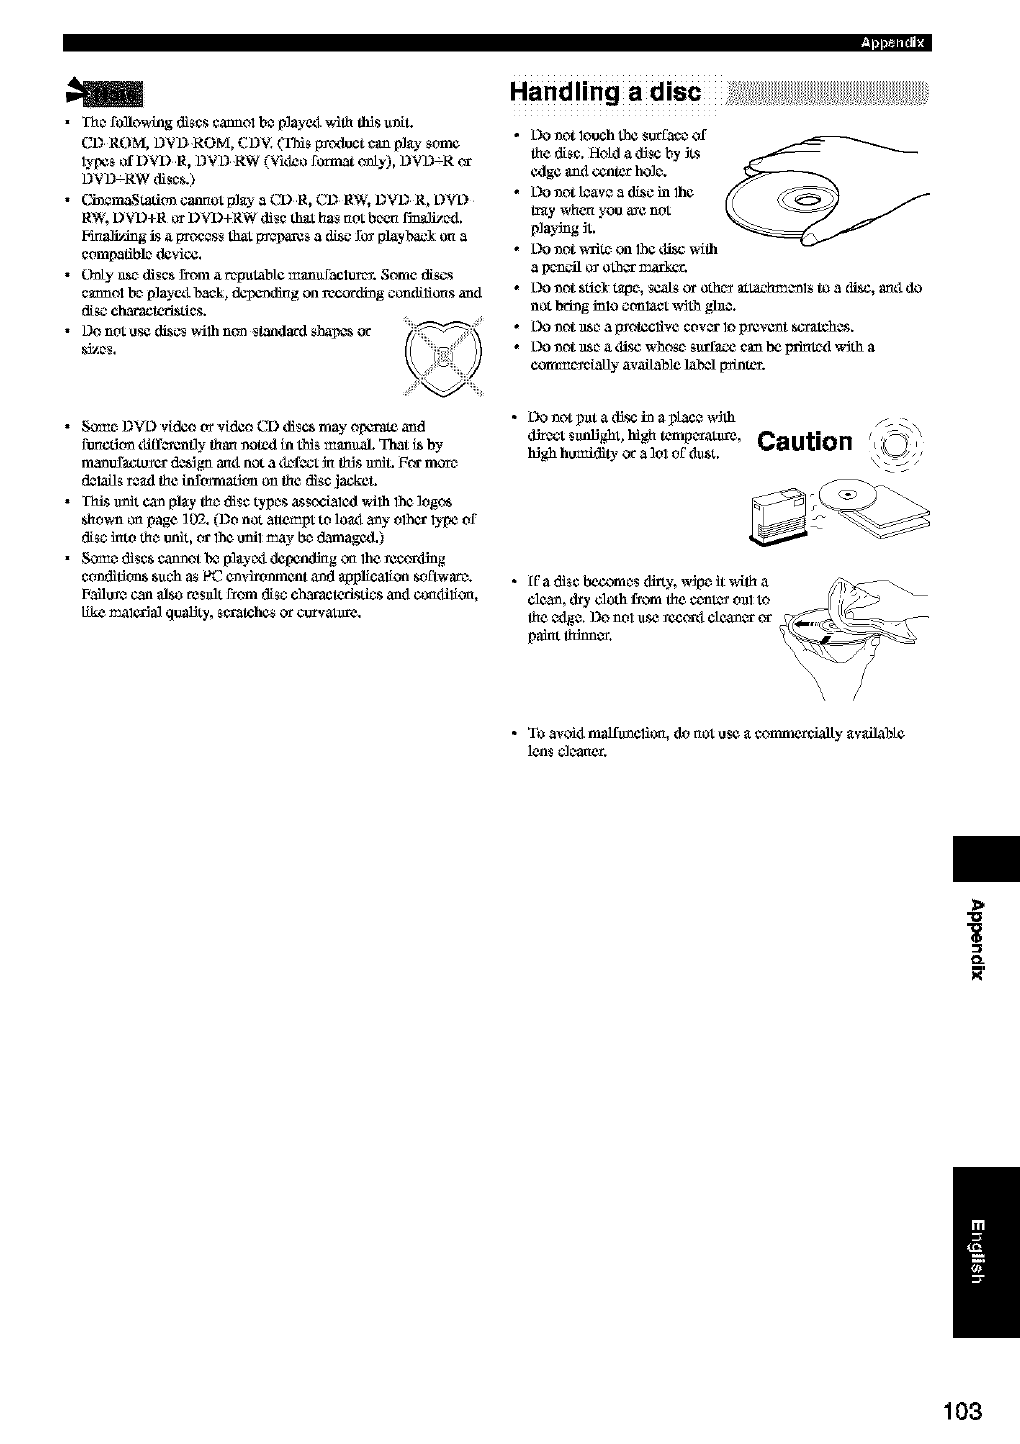
•The foBowing discs cannol b* p]ayex__Sth tiffs u_L
CD ROM, DVD ROM, CDV. (TMS f_(xiuct can p]_).-some
lypCs of DVD R, DVD RW (Vitro forest only), DVD_R or
DVD_RW di_c_.)
•Cin_tation cannot P]_ a CDR, CI2 RW, I2VI2 R, L)VL)
RW, DVD+R or DVD+RW disc that h_ not been Vitalized.
Finalizing _s a proc_s_ that _s a (Esc for playbacl on a
compatible d_vic¢.
•Only _e di_c_ Erom arep_tab_ manuf_ClUret. Some d_scs
cmmol be p]ayexl b_ck, d_nding on re_oKling coml_liCClsam1
disc characteristics.
•Do not use di_c_ wilh non _tanda_l sha_ or
_ze$.
I_pm-,
• So_e DVL) videot_videoCD discsmay olx_'a_ and
function tliff_enfly than noted in this manual. That LSby
raanufactu_cr 0c_gn anti not a t_f_ kl th_s nniL _or more
0ClaOs _ad the infommfion on the disc jackeL
•TM_Sunit can pl_y the disc types _s_ocLated wilh 1he logc_
_hown on page 102. (Do not attemlA to loa_ any olhCr lype of
disc into the unit, or 1he unit may be damagcd.)
• Some di_c_ cannot bc_p]_yc_ dcpcndklg o_ 1he_cccaxfing
condit_on_ _uch a_ PC environment and applicalion _oEtwarc.
Failu_ can aLso re_flt from disc clxc¢gcteristics am1 contlilio_,
like malC_ia] quality, scratehcs or c_vatnre.
•L)onot pnt a tfisc ha ap/ace w_th /_
Caution 'i q)
high humidi_- or a 1ol OEdust. _\___J ,/
•ff adisc bcr_nles dirty, w_pe it with a _
cltx._n__y cloth f_om the ¢enL_ on1 to
the Cdgg. 13o ILO1¸_se _ecort_city.or or
paint thSnn_.
•To avoi4 malflmclicCl, do not u_e • comme_ially _vailabte
1¢n$ _ea_¢r.
>
o_
/
103
rl .......................
Copy ight and logo marks
This _odacl i_c_O_ales copyright protectitm t_¢hnoloKy fl_al is
gml_¢ted by me_hod claims of certain O.S. p_enL_ aml oth¢_
Jntell_t11_ p_of_t_y rights owned by ia_ovision CotpoTation a_d
other rights own_s. Use of thSs copyright p_o_tic_a technology
must be a_thtafz_l by Maerovisitm C_poratkm, and is inten4e4ft_
h_e and olber limil_d viewing uses only unless olhta_dse
authoaizedby M_rov_s_on Corporation. Rexc_e _gineedng or
t_s_sembly is prohSbiled.
SILENT L_A is atrademavl of YAMAHA
CORPORATION.
AdvsncBd
Active Servo P_s_g Subw(_fer Syst_ with abnHt in
power mr=pliHer
This snbwoof_ system (_ SW120) employs Advmaced
Yamaha Active Serve Technology which YAMAHA has
developcxl for _lu_Sng higher qnaU_- snpcx ba_s sound. This
sn_x_ ba_s seined atkls a m(ne _¢_Hstic, themev mlbe htrme
effe_l to yonr st_w¢osysl_m.
DD
DIGITAL
Ma_ffaclured u_k_ license from Dolby LN_ofattaSes. "Dolby',
Labomton*s.
DIGITAL
SURROUND
"DTS" art4 "DTS ]_gital Sor_ourt4" arc _egisl_a"ed lrmlemark_ of
Digital Theater Systccns, hac.
tv'IPEG Layer 3 audio _k_codhagIgclmoto_, lie.rinsed front
F_amahof_ IqS and Thomson malfimedla.
104
I_pm-,
Glossary
Bit Stream
A signal that is compressed and changed into digital
format. Then de.haling on the de_odes it can be
processed as 5.1 mu]fi-chatmc] audio.
Channel (ch)
Achannel is an audio type that has been divided based
on range and other eharactcfisties.
Ex. 5.] ehanunl
•Front Speakers, Left (lch), Right (]eh)
• Center Slxrakar (1 ch)
• Surrolmd Speakers, Left ( e] ), Right (lch)
• Subwoofbr(] chx0.]*: :0.1 eh)
*in contrast to a fuLl1channel band, a component dcsignc4
lo e_ance low freqaency _otTadfor adBedeffect.
Cinema DSP (Digital Sound Field
Processor)
Dolby Surround and DTS were originally designed for
file movie theater, so playing file stone progrmn at home
would produce disparate listening experiences
depending on variables like the room size, walling and
unmlx_r of speakers.
Yamaha Cinema DSP applies origkml sound field
technology based on a wealth of real-world da_
measurements to reproduce Do]by Pro Logic, Do]by
Digital and DTS solmd, conthklklg them wifll acoustic
scale, depth and tone so that you can experience file
presenc_ of a movie theater at home,
Component Video Signal
A c_omlxment video signal is s_parated into one
]mnklance Y-signal and two ehrominance PBiC_ and PR]
C_ signals. Since each signal is sent kldependunt]y, color
can be reproduced more faJthflfl]y. The c,ompounnt
algnal is also called a c,olor-difference signal by the way
it sub.acts the lunfinanee signal from file color signals,
Decoder
Adevic_ that conver'_ encoded data on DVD and other
media back to its original mtdio or video signal.
Dolby Digital
Dolby Digital is a digital surround sound system that
gives you completely indc_nde_t multi-channel audio.
With 3 front channels (lefq center, and right), and 2
surround stereo chatmals, Dolby Digital provides 5 fit]]-
range audio channels, With an additional channel
especially for bass effects, called LFE (low frequency
effect), file system has a total of 5,1 channds.
By using 2-chunnal stexeo for the surround speakexs,
more aneurata moving sound effects and surround sound
envirotmlunt can be, reproduced, like the rustling of trees
or sound of"waves,
Dolby Pro Logic
A surrolmd system that _kes a4-chatmel algnal and
records it as a 2-chatmcl signal, then by way of some
afithnletic processing c_onvcr_s back to an kldependent 4-
chatmal signal for playback.
Dolby Pro Logic II
Takes any 2-channel sourc_ and reIrroduces dynamic
5.1-channel surround with excellent separation using
special signal proeessing. You can expc_cac_ Fmlby Pro
Logic I] in MOVIE mode and MUSIC mode for stareo.
You can cvcn enjoy old movies that wcrc unly recorded
in 2-channel audio (excluding munaural) in l_we_tl
5.1-channel surround.
DTS (Digital Theater Systems)
The 5.1-channel surround systenl adopted by most
nlovie theaters. With an abundance of audio data, it is
able to provide mtthcnfic solmding effbcts.
Dynamic Range
The difference bet_*een the smallest sound that can be
heard above the equipment noise and the biggest sound
that can be heard without disttr_ion is the dynamic
range.
Film and Video Data
In general, DVD media can be classified into the 2 types
below.
•Film Data
Vide,o re_orded at 24 frmnes/se_ond. (The film used
for shooting movies is recorded at 2,1frames/secund.)
Rc,cently 30 frames/secund progresalve video has
made its de,but,
• Vide_ Data
Vide,o re_orded at 30 frmnes/se_ond.
CinenarStation will automatically recognize whether file
source recorded on DVD is film or vide,o, then select the
best method to convert it into Irrogrcsglvc output.
Interlace and Progressive Outputs
Up to now file standard video signal has been NTSC
with 525i (i: intarlaned) scan lines. In contrast, 525p (p:
progressive) is a high-deasity signal with double the
nmnbar of scan li_cs,
>
O_
/
105
LFE (Low Frequency Effect) 0.1
Channel
This chatmel is for the reproduction of'low bass signals.
The frequency range for this chatmal is 20 Hz to 120 He.
]t is added to the full-range 5 chaunels in Dolby Digital
and DTS to enhance low frequency sound for added
effee,t. This channel is counted as 0.1 because it only
enforce,s alow frequency range.
Linear PCM (LPCM)
A signal that is changed to digital format without
compression. A CD is ree,orded witil ] &bit sound at
,1,1.1kHz, while DVD recording is unywhanc between 16
bits at 48 kltz to 2,1 bits at 192 kHz, whieh makes it a
hi_lar quality sound than CD. This signal also has atype
called Pan,kexl PCM (P.PCM) that can be compressed
wiflrout any loss of data.
Matrix 6.1
CkmmaStatiun incorporates aMatrix 6.1 decoder for
Dolby Digital and DTS multi-channel soft'are that
enables 6.1-channel reproduction by addkig the surround
back channel to existing 5.1-channel fommt. (The
surround back chunnc] is created from surround ]eft and
ri_lt chatmals, arid output from a virtttal surround back
speaker.) With this additional channel, you can
experience more dynamic and realistic moving sound
especially scenes with "fly-over" arid "fly-around"
cffee,ts.
NTSC
NTSC is avideo signal system (525 lines, 3(I frames per
second) used in North Anlcrica, Central America, a
nunther of Soufll American countries, and some Asian
countries, including Japan.
Pan & Scan and Letter Box
In gnnaral, DVD Video is produced for viewing on a
wide televialun screen with an aspect ratio of 16:9. This
means you can now view most material with the
intundexl aspect ratio on a wide-sanee,n television.
This ratio will not fit on a standard televisiun tart has an
aspect ratio of 4:3. Two pieture styles, Pan & Scan and
Lettanbox, deal wifll this problem.
• Pan & Scan c_ts off the le_ arid right pertiuns of"the
picture to fill the sanee,n.
•Ix',tterbox insets black bunds at the top and bottom of
the piet-ttre to reprodune an aspect ratio of 16:9.
PAL
PAL is a video signal system (625 lines, 25 frames pex
second) used in the Unitexl Kingdom, munh of file rest of"
western Europe, several South American countries, some
Middle East and Asian countries, several African
countries, Australia, New Zealand, arid ethan Pacific
island countries.
Sampling Frequency and Quantized
Bit Rate
When convarting an analog signal to digital, the nmnbar
of times the signal is sampled per see,end is called the
sampling frequency while the degree, of fineness when
converting file sound level into a nunleric value is callexl
the quantized bit rate.
The frequency band that can be playexl back is
dctenniund by the sampling rate while the dynamic
range cxprasaln g the difference in sound levd is
dcte_niund by the quantized bit rate. In principle, the
hi_lar the sanlpling rate, the wider the frequency range
that can be p]ayexl back. And the higher the quantized bit
rate the finer the sound that can be,reprodune,d.
SILENT CINEMA
SILENT CINEMA is an original Ymnaha systenl that
regroduans in a pal_ of"headphones the acoustic
personality of sound field grograms based on multi-
speakers. Headphone paranle_rs have Ix_enset for each
sound field so that natural stereoscopic sound can be
expressed arid enjoyed throu_l headphunas.
S-Video Signal
With S-video the video algnal that was unmlally
trunsnlittexl using apin cable is separated and
transnlittexl as a lunfinance Y-signal and chronlinance C-
signal through an S video cable. Connecting with an S
VIDEO jack you can enjoy recording arid playback with
more beautiful images.
Title, Chapter (DVD Video)
DVD video lets you divide a disc in a big way by titles
or a small way"by chapters. Ean,h divialon is eithan called
atitle nunther or achapter nunther.
Track (CD/Video CD)
A CD or Video CD can be,divided into anmnbar of
segments (tracks). Each division is called atitle nunther.
Virtual Cinema DSP (Digital Sound
Field Processor)
Reproduces a surround speaker sound field to let you
enjoy virtual Center arid Surround LiR Speakers with
only" two Frun_LiR Speakers.
106
Index
sch ......................................................................17
Input Assign ................................................................... 91
Input Mode .................................................................... 91
Input Modes ................................................................... 77
J_z Club ....................................................................... 17
A-B Repeat .................................................................... 35
Action ............................................................................ 17
Changing the Oa'der of Preset Stations .......................... 43 LfR Balance ................................................................... 90
CinemaStatiun Display brightnass ................................ 91 LEF Level ...................................................................... 9(I
Classic Hall .................................................................... 17 Live S!_xn:s .................................................................... 17
Connecting a CD or MD recorder ................................. 5(I
Connecting a Game Console ......................................... 46
Connecting a VCR ......................................................... 46
Connecting the Antctmas ............................................... 38 Matrix 6,1 ...................................................................... (rl
Connecting the Speakers ................................................. 8
Connecting the TV. ......................................................... 8
Connect a TV to an audio input ................................. 47
Connecting with S-video ................................................. 9
MP_ ............................................................................... 37
Music Video ................................................................... 17
Night Listening .............................................................. 70
No Disc',........................................................................ 100
Non-skid pad ........................................................... 53, 54
D. Range ........................................................................ 90
Delay Tinlc .................................................................... 71 On Scxoan Menu ............................................................ 2,1
Digital audio jac,_ ......................................................... 51
Disc, infbrmation .......................................................... 1(12
Discs this unit cannot play back .............................. 103
Handling a disc ........................................................ 1(13
Music Discs ............................................................. 102
Video Discs .............................................................. 102
Disc, Lock ...................................................................... 82
Disc, Menu ..................................................................... 36
Display Set .................................................................... 91
Dolby Digital Surround EX disc ................................... (rl
Dnuna ............................................................................ 17
DSP Program ................................................................. 17
DTS ES disc .................................................................. @1
DVD region c,odes ....................................................... 102
Fastener ......................................................................... 53
Finding file Best DSP Effect .......................................... 16
Frame Advance .............................................................. 29
Game ............................................................................. ] 7
On Sere,an Menu Guide ............................................. 9/I
Using the On S_oan Meau ........................................ 92
Griginal Dolby and DTS Sound .................................... 73
Parental Con_o] ............................................................. 80
Planing the Speak¢_ ........................................................ 7
Playback Control (PBC) ................................................ 36
PRO LOGIC II Movie ................................................... 66
PRO LOGIC II Music ................................................... 66
Pro Logic IJ Music setting ......................................... 67
Program Play ................................................................. 31
Progressive Scan ............................................................ 79
Reassign input jae_ ...................................................... 91
Recording Audio from CinemaStatiun .......................... 52
Remote Control ............................................................. 21
Amp Mode ................................................................. 22
DVDiCD Mode .......................................................... 23
Ttmer Mode ................................................................ 21
Using the Renlote Con_'ol ......................................... 21
Repeat Play .................................................................... 34
Rock Conccr_ ................................................................. 17
HP Tone CTRL .............................................................. 9(I
>
Ig
O_
/
107
Sei-Fi (Science Fiction) ................................................. 17
Seleg,ting Radio Stations ................................................ 39
Auto Tttni_g ............................................................... 39
Manual TOming........................................................... _I0
Preset Tttni_g ............................................................. _13
SET MENU ................................................................... 90
Settklg Channels iNAdvance (Pm_t) ........................... _I]
Auto Preset ................................................................ _I1
ManualPreset ............................................................ 12
Setting the Manufacturer Code ...................................... 83
SILENT CINEMA ......................................................... 69
Slez_pTimer .................................................................... 78
Slow Advance[Reverse .................................................. 29
SP Delay ........................................................................ 90
Speakcx Mode ................................................................ 62
Speakcx Size .................................................................. 62
Speakex Vo]mne Level ............................................. 58, 6(}
5eh Stereo DSP Program ........................................... 61
Spectacle ........................................................................ ]7
Stereo p]aybaek ............................................................. 17
Test Tone ........................................................................ 58
Theatcx ........................................................................... 17
Time Search ................................................................... 30
To change discs .............................................................. 12
Tttne*Step...................................................................... 91
Types of"Input Signals ................................................... 75
Vi*tttal Cinema DSP ...................................................... 68
108

Specifications
AU DIO SECTION
Minimum RMS Output Power
FRONT L/R, CENTER_ SURROUND L/R
1 kHz, 0,9% THD, 6_ ........................................... 45W
U.S.A. and Canada models
20 Hz to 20 kHz, 0.9% TRD, 6_2 ........................ 45 W
_€_axlmmn Power (EIA_)
FRONI L_, CENTER, SURROUND Li_
1 kHz, 10% TI4D, 6f2 ............................................. 55 W
Total Harmo_e Distortion
FRONI LI_ (20 W, 1 M-Iz) .................. Less thart 0.03 %
Signal m Noise Ratio (II4F-A Network, shorted) ......... 90 dB
Input Semsltivity
Va'_EO,VCR...........................................200 mV/47k£a
(h_tput Levd (when 200mV is input)
REC OLrF ............................................... 200 mV/1,2 kK_
VIDEO SECTION
Video Sign_ L_vel
Video ............................................................ 1 Vi_-p[!5 ga
S Vide_a (Y/C) ......................... 1 Vp-p_.286 Vp-pi75 ga
Conti_tment (YiP_, P_) ................. ] Vp-pP3.7 Vi_-p[!5 f2
Signal m NNse Ratio .................................................... 50 dB
TUNER SECTION
FM Tusthlg R_lg_
U.S.A. and Canada ntodels ................ 8%5 to 107.9 MHz
Other ntode]s ...................................... 87.5 to 108.0 MHz
AM Tusting RNRg_
U.S.A., Canada arid Korea models
.............................................................. 530to 1710 kHz
U,K,, EumlX_ and Australia models
.............................................................. 531 to 1611 kHz
Asia and General models
.............................................. 530/531 m 1710!1611 kHz
SPEAKERS
Satelllte Speak_rs (Front _md Surround Speakers)
Model Name ..................................................... NX-S120
IyI_
.......... Full range acoustic s_spensit_ _gr_etic shiel_g tti_
kYdver
,,, 5 cm (2 Mch) full range cone x 2, magnetic shMOng _pe
hnped_lce ................................................................... 692
Center Six_aker
Model Name .................................................... NX-C120
IyI_
.......... Full range acoustic s_spensit_ _gr_etic shiel_g t!I_e
kYdver
,,, 5 cm (2 inch) full range cone x 2, magnetic shMOng _pe
tmped_lce ................................................................... 692
I_pm=t,
Subwoofer
Model Name ................................................. NX-SW120
IyI_
........ Advanced YAMAHA Active Servo Tectmology sys*em
kYdver
........... 16 can (6 3/_ inch) cone, mag_etle shielding type
GENERAL
Power Su_ty
U,S,A, and Ca_ade models ................... AC 120 Vi60
Australia ntodeI ..................................... AC 240 V/50
U,K, and Europe mt_lels ....................... AC _30 Vi30
Korea model .......................................... AC _20 Vi60
Asia mtxtel .................................... AC 220-240 V, 50
General model ............................... AC l l 0-120 V, 50
NX-SW 120 f'or Korea, Asia and General mt_lels
................................... AC 110-1_)/2_)-240 V, 50/60
Power Consumption
DVR-S 120 .............................................................. 85 W
NX-SW120 ............................................................. 40 W
Standby Power Consumption
DVR-SI20
Asia aud Genial models ....................................... 0,5 W
Other models .......................................................... 0,4 W
L_ser Plc_kqtp
Iype .................................. Semlconducttrr laser GaAIAs
Wave length ............ 650 Nrt (DVD), 790 um (VCD/CD)
Output Power,,,, ] ,45 mW (DVD), ] ,31 mW (VCD/CD)
Dimensions (W XH X D)
DVR-S 120 ...................................... 360 M 75 X360 mm
(1€_/_gx 2 *_hgx 143/,¢)
NX-SW120 ................................... 200 × 365 X 390 mm
(7 _/s" x 14 3is" x 15 u/2¢')
NX-CI20 ......................................... 300 X 72 X 105 mm
(11 trTlg' x 2 _]ra" x 41]s")
NX-S120 ......................................... 72 X 170 X 10g mm
(2 _7]_="x 6 t3]t_"x e W)
Weight
DVR-S 120 ........................................ 6.4 kg (14 lbs 2 oz)
NX-SW] 20 ....................................... 8.4 kg (18 lbs 8 oz)
NX-CI20 ............................................. 1.1 kg (2 ]bs 6 oz)
NX-S120 ..................................................... 0.9 kg (2 lbs)
Operating 'I_nperatttre R_mge
................................................. -5 m +35°C (41 m 95°F)
Operating Humidity Range
........................................... 5 m 90% (No Condensation)
Ac*essories ........................................................... See page 6.
Specifications are subject m change without nofic*,
o_
/
109

OYAMAHA
,,'_M_-_ _',,_ _DA _IU_I C LTD. I_ MILNE _ _-, _F_O_Oi,_H, ONTA_dO _l_ _KTI, C_D&
YAMAHACORPORA'T'ION
Printod in Malaysia _ WB85310d
