Yamaha This Is The Firmware Update Instruction For RX V3900 HTR 6240/6250/6260 VERSION K032 (USA ) Procedure 6240 6260 Ver
User Manual: Yamaha HTR-6240/6250/6260 FIRMWARE UPDATE VERSION K032 (USA )
Open the PDF directly: View PDF ![]() .
.
Page Count: 4

Firmware Update Procedure for HTR-6240/6250/6260
Page.1 of 4
August, 2009
Subject: HTR-6240/6250/6260 Firmware Update Version K032
Yamaha is pleased to offer the following firmware update to ensure the best
possible performance and features for your Yamaha HTR-6240/6250/6260 AV
Receiver. This firmware allows adds optional video assign menu to the input of
AV3, AV4, AUDIO1 and AUDIO 2.
Requirements:
A personal computer capable of burning an audio CD
CD or DVD player* with digital audio connection
(Optical or Coaxial, not HDMI)
*Note:
In some instances a DVD player or a BD player will not work for this
update procedure, so connecting a CD player is preferred
CHECK THE UNIT’S FIRMWARE VERSION PRIOR TO THIS UPDATE
The firmware version consists of a letter followed by three numbers [ex. “K032”].
If the three numbers in the firmware version are 032 or higher, you DO NOT
need to perform this update.
How to check your firmware version:
Press and hold the [STRAIGHT] button on the front panel and keep it pressed
while you press the [STANDBY/ON] button. Once the front panel displays
"Advance Setup", release the [STRAIGHT] button. Then, press and hold the
[TONE CONTROL] button for about 3 seconds until front panel display shows
the version of firmware.
The following pages contain the firmware update instructions for Yamaha AV
receiver HTR-6240/6250/6260/6280. The outline of the update is as follows:
1. Download the firmware and create an update disc (Audio CD)
2. Connect digital audio with CD or DVD player
3. Enter firmware update mode
4. Play the update disc (Reprogramming)
5. Confirm update firmware version
Note: Executing this update will RESET the receiver's setting to factory
default.
< IMPORTANT NOTICE >
Do not attempt to update your Yamaha receiver using any other data file except those provided
directly from the Yamaha website.
Follow the instructions carefully and do not attempt any other procedures not specified in the
instructions provided by Yamaha.
Improperly updated products may cause improper operation, and any parts or service required
to restore proper operation will not be covered under the Yamaha Limited Warranty.
Firmware Update Procedure for HTR-6240/6250/6260
Page.2 of 4
Instructions for Firmware Update:
STEP1 Download from YAMAHA website. Unzip the downloaded content
and burn the WAV file as an Audio-CD. This will be your update disc.
1a) If you need instructions on creating this firmware update CD, see your
Personal Computer ("PC") CD burning software instructions on how to
burn a WAV file as an Audio CD.
Note:
Conventional CD burning software is
recommended. An audio CD burned
by Windows Media Player may not
work.
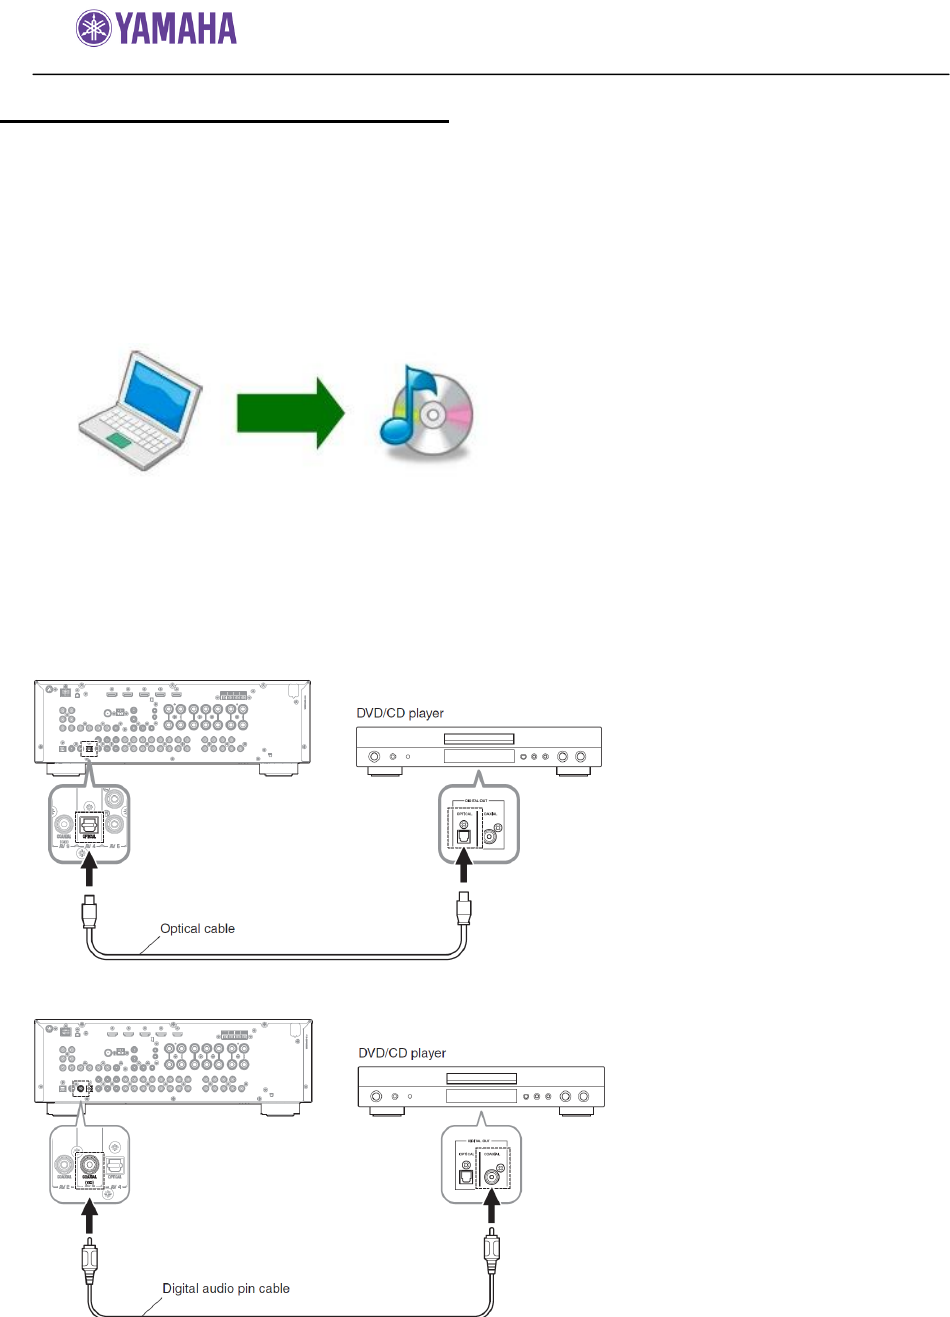
STEP2 Unplug the AC power cable of the receiver and CD/DVD player from
the wall outlet. Then, connect CD or DVD player* using digital
connection (Coaxial or Optical) into any input of your receiver.
*Some DVD players use digital
filters, which affects the output
signal of the devices. The
firmware update will not work
with DVD players the use these
digital filters. CD player usually
does not use these filters so
using CD player is preferred.
Picture shows a sample of the
connection. Depending on your
CD/DVD player's digital output,
connect the receiver with either
optical or coaxial.
Note:
Executing this update will RESET the receiver’s setting to factory
default.
<Connection with OPTICAL cable>
<Connection with COAXIAL cable>

Firmware Update Procedure for HTR-6240/6250/6260
Page.3 of 4
STEP3 Plug the AC power cable of the CD/DVD player to the wall outlet.
Insert the Firmware Update CD (Audio CD) into the CD/DVD player
and close the tray.
If the disc begins to play automatically, press STOP button on the
CD/DVD player.
STEP4 ENTER FIRMWARE UPDATE MODE
While pressing the “STRAIGHT” key on the front panel of the AV
receiver, connect the power cable of this unit to the AC outlet.
The firmware update mode is activated and “CDDA UPGRADER” is
displayed.
STEP5 START FIRMWARE UPDATE
Press the “PLAY” key of the CD/DVD player.
Then, writing of the firmware is started. “Found Header” will appear for
few seconds.
While update is in progress, DO NOT interrupt the AV receiver by
pressing the buttons or switching off the power.
If an unintended failure occurs, you may start the update process
again from the beginning. Or see IN CASE OF ERROR on the last
page to recover.
STEP6 When writing of the firmware is completed, “Update Success”,
“Please...” and “Power off!!” are displayed repeatedly.
STEP7 Stop the DVD/CD player, remove update disc and power off.
STEP8 Turn off the power of AV receiver.
STEP9 CHECK UPDATED VERSION
Press and hold the [STRAIGHT] button on the front panel and keep it
pressed while you press the [STANDBY/ON] button. Once the front
panel displays "Advance Setup", release the [STRAIGHT] button.
Then, press and hold the [TONE CONTROL] button for about 3
seconds until front panel displays “M:K032 8FFD”.
K032: version of firmware
8FFD: checksum
If your firmware version number and checksum don't match, retry from
step 2. Or try the IN CASE OF ERROR method on the last page.
STEP10 Turn off the power of AV receiver.
Congratulations!
You have completed the firmware update. Your AV receiver is ready for normal
use.

Firmware Update Procedure for HTR-6240/6250/6260
Page.4 of 4
IN CASE OF ERROR
Case1 Display on the receiver “CDDA UPGRADER” doesn’t change after
playing the CD/DVD player.
Check digital cable wiring. Only optical or coaxial connection can be
used for this update. HDMI connection will not work.
Check digital out setting. When using DVD players, make sure the
digital out is set to “PCM”. Once update is complete, reset DVD
player to its original settings.
Check update disc. Make sure that your CD-R/RW is finalized and
created as an “AUDIO CD”. (playable on any CD/DVD player)
If all above are cleared, your CD/DVD player may not be suited for
this update. Try another CD/DVD player or contact your local
authorized service center to update the receiver for you.
Case2 other unintended error occurred.
"ERROR" was displayed during the update
Receiver doesn't power up after the update.
Solution: Try the following recovery method
Step PL1. Unplug the AC power cable of the Yamaha receiver from wall
outlet.
Step PL2. On the front panel of the AV receiver, press and hold the
[STRAIGHT] button and keep it pressed, which you plug the
AC power cord of the Yamaha receiver to the wall outlet.
Once the front panel displays "CDDA UPGRADER" release
the [STRAIGHT] button.
Step PL3. Go to Step 5 START FIRMWARE UPDATE.
