Yamaha MLC100 Owner’s Manual
User Manual: Yamaha MLC100 Owner’s Manual
Open the PDF directly: View PDF ![]() .
.
Page Count: 16

OWNER’S MANUAL
YAMAHA
MUSIC
SYSTEM
MLC-100
LABORATORY
EN
MLC-100.book Page 1 Monday, October 17, 2005 7:03 PM
PRECAUTIONS
PLEASE READ CAREFULLY BEFORE PROCEEDING
* Please keep this manual in a safe place for future reference.
WARNING
Always follow the basic
precautions listed below to avoid
the possibility of serious injury or
even death from electrical shock,
short-circuiting, damages, fire or
other hazards. These precautions
include, but are not limited to, the
following:
•Only use the voltage specified as correct for the
instrument. The required voltage is printed on
the name plate of the instrument.
• Use the specified adaptor (PA-6 or an
equivalent recommended by Yamaha) only.
Using the wrong adaptor can result in damage
to the instrument or overheating.
•Check the electric plug periodically and remove
any dirt or dust which may have accumulated
on it.
• Do not place the AC adaptor cord near heat
sources such as heaters or radiators, and do
not excessively bend or otherwise damage the
cord, place heavy objects on it, or place it in a
position where anyone could walk on, trip over,
or roll anything over it.
• Do not open the instrument or attempt to
disassemble the internal parts or modify them
in any way. The instrument contains no user-
serviceable parts. If it should appear to be
malfunctioning, discontinue use immediately
and have it inspected by qualified Yamaha
service personnel.
• Do not expose the instrument to rain, use it
near water or in damp or wet conditions, or
place containers on it containing liquids which
might spill into any openings.
•Never insert or remove an electric plug with wet
hands.
• Do not put burning items, such as candles, on
the unit.
A burning item may fall over and cause a fire.
• If the AC adaptor cord or plug becomes frayed
or damaged, or if there is a sudden loss of
sound during use of the instrument, or if any
unusual smells or smoke should appear to be
caused by it, immediately turn off the power
switch, disconnect the adaptor plug from the
outlet, and have the instrument inspected by
qualified Yamaha service personnel.
CAUTION
Always follow the basic
precautions listed below to avoid
the possibility of physical injury to
you or others, or damage to the
instrument or other property.
These precautions include, but are
not limited to, the following:
• When removing the electric plug from the
instrument or an outlet, always hold the plug
itself and not the cord.
• Unplug the AC power adaptor when not using
the instrument, or during electrical storms.
• Do not connect the instrument to an electrical
outlet using a multiple-connector. Doing so can
result in lower sound quality, or possibly cause
overheating in the outlet.
•Do not expose the instrument to excessive dust
or vibrations, or extreme cold or heat (such as
in direct sunlight, near a heater, or in a car
during the day) to prevent the possibility of
panel disfiguration or damage to the internal
components.
• Do not use the instrument in the vicinity of a
TV, radio, stereo equipment, mobile phone, or
other electric devices. Otherwise, the
instrument, TV, or radio may generate noise.
• Do not place the instrument in an unstable
position where it might accidentally fall over.
• Before moving the instrument, remove all
connected adaptor and other cables.
•When setting up the instrument, make sure that
the AC outlet you are using is easily accessible.
If some trouble or malfunction occurs,
immediately turn off the power switch and
disconnect the plug from the outlet.
• Before connecting the instrument to other
electronic components, turn off the power for
all components. Before turning the power on or
off for all components, set all volume levels to
minimum. Also, be sure to set the volumes of
all components at their minimum levels and
gradually raise the volume controls while
playing the instrument to set the desired
listening level.
• When cleaning the instrument, use a soft, dry
cloth. Do not use paint thinners, solvents,
cleaning fluids, or chemical-impregnated
wiping cloths.
•Do not place vinyl, plastic or rubber objects on
the instrument, since this might discolor the
panel or keyboard.
• Do not rest your weight on, or place heavy
objects on the instrument, and do not use
excessive force on the buttons, switches or
connectors.
•Do not operate the instrument for a long period
of time at a high or uncomfortable volume level,
since this can cause permanent hearing loss. If
you experience any hearing loss or ringing in
the ears, consult a physician.
Yamaha cannot be held responsible for
damage caused by improper use or
modifications to the instrument, or data
that is lost or destroyed.
Always turn the power off when the instrument is
not in use.
Even when the power switch is in the “STANDBY”
position, electricity is still flowing to the
instrument at the minimum level. When you are
not using the instrument for a long time, make
sure you unplug the AC power adaptor from the
wall AC outlet.
Power supply/AC power adaptor
Do not open
Water warning
Fire warning
If you notice any abnormality
Power supply/AC power adaptor
Location
Connections
Maintenance
Handling caution
(3)-9
MLC-100.book Page 2 Monday, October 17, 2005 7:03 PM

1
Table of Contents
Features of the MLC-100 ........................... 1
Panel Controls and Terminals/
Operation Guide ........................................ 2
System Setup............................................. 5
Operating Instructions ............................... 6
Turning On the MLC-100 System ......... 6
Setting the Levels ................................. 6
Setting Up the Console –
Enabling specific Student Stations ....... 6
Pair and Group Play.............................. 7
Assigning Students to Groups .............. 7
Selecting the Teacher’s Monitor –
Teacher’s Instrument or Input............... 7
Monitoring Students.............................. 8
Teacher/Student Communication ......... 8
Student Call .......................................... 9
Automatic Scan..................................... 9
Selecting the Sound Source –
Teacher’s Instrument or Input............. 10
Demo Performance............................. 11
Using Two MLC-100s ......................... 12
Specifications .......................................... 12
Features of the MLC-100
The music laboratory enhances classroom music instruction by providing
the teacher with effective and time-saving individual, pair and group
study techniques.
The Yamaha MLC-100 Music Laboratory System is a highly sophisticated
music laboratory console, yet is exceptionally compact and easy-to-use,
and offers a remarkable range of functions for effective group keyboard
teaching.
Features and functions of the MLC-100 include:
●
True stereo sound.
●
Automatic Scan
, which automatically selects individual students or
groups for monitoring. The order in which students are monitored as
well as the duration of monitoring can be freely set.
●
Compact footprint
, allowing placement of the console on top of the
teacher’s instrument, next to the music stand.
●
Convenient monitoring and communication functions.
The teacher
can listen to and talk with students individually, in pairs, or in groups
quickly and easily. Moreover, group and individual instruction can be
used simultaneously.
●
Flexible student-to-student communication.
Students assigned to
pairs or a group can communicate with each other and hear each
other’s performance.
●
System expandability.
Two MLC-100s can be connected together,
for teaching up to 32 students and still taking advantage of all the
MLC-100’s convenient functions.
MLC-100.book Page 1 Monday, October 17, 2005 7:03 PM
2
Panel Controls and Terminals/Operation Guide
Top Panel 1
INPUT Control
For adjusting the overall input level
received from the INPUT jacks.
2
OUTPUT Control
For adjusting the overall output level
sent to the OUTPUT jacks.
3
T.PHONES (Teacher’s Headphones)
Control
For adjusting the overall level of the
teacher’s headphones.
4
POWER Switch and LED
The LED lights when the power is
turned on.
■
MONITOR Buttons (5
, 6
)
These buttons determine which signals
are to be monitored by the teacher: the
teacher’s instrument or the input received
at the INPUT jacks. Pressing both buttons
allows both to be monitored simulta-
neously. The button lamps are lit when
monitoring is enabled.
5
T.INST (Teacher’s Instrument)
For monitoring the teacher’s instru-
ment. Press the button again to turn
off monitoring.
6
INPUT
For monitoring the signals received at
the INPUT jacks. Press the button
again to turn off monitoring.
8
^
*
9
5
6
7
%
&
213)!@#$4
MLC-100.book Page 2 Monday, October 17, 2005 7:03 PM
3
■
SOURCE Buttons (7
, 8
)
These buttons determine which signals
are output to the students. (Both can be
used simultaneously.)
7
T.INST (Teacher’s Instrument)
For selecting the teacher’s instrument
as the source. Press the switch again
to turn it off.
8
INPUT
For selecting the INPUT input signals
as the source. Press the button again
to turn it off.
■
DEMO (Demonstration) Button (9
, )
)
The Demonstration function allows the
teacher to have the whole class listen to a
performance of a single student or a
group of students that the teacher is cur-
rently monitoring. These buttons deter-
mine whether the sound is heard over the
external speaker system or the head-
phones.
9
OUTPUT
For monitoring the demonstration per-
formance (or any other signal) over
the external speaker system.
)
PHONES
For monitoring the demonstration per-
formance over the headphone system.
■
GROUP Buttons (!
, @
)
These buttons allow the teacher to set the
console for group or pair mode. Putting
students together in a group or a pair
allows them to communicate with each
other and hear a mix of what they play.
Selecting one switch overrides the other.
!
GROUP
Selects group mode. The Group
assignment for each student is made
from the STUDENT GROUP COMMU-
NICATION SELECTORS ^
.
@
PAIR
Selects pair mode. The actual pair-
ings are fixed (student 1 is paired
with student 2, student 3 with student
4, and so on).
■
INSTRUCT Buttons (#
, $
)
These buttons enable the teacher to
determine whether instruction is for either
the entire class, or an individual student
or group of students. The two buttons
cannot be used simultaneously.
#
ALL
Allows the teacher to instruct all stu-
dents in the class.
$
SELECT
Allows the teacher to communicate
with select students in the class,
determined either by group (with the
GROUP MONITOR selectors %
) or by
individual student (with the Individual
Student selectors *
).
%
GROUP MONITOR Selectors
Determines the group for monitoring.
^
STUDENT GROUP COMMUNICA-
TION SELECTORS
These buttons determine which
group a particular student is
assigned to: A, B, C, or D.
&
AUTO SCAN (Automatic Scan)
Button
The Automatic Scan function auto-
matically monitors each student in
order from 1 to 16, for roughly three
seconds.
*
Individual Student Selectors
These are used to select individual
students for monitoring and commu-
nication.
MLC-100.book Page 3 Monday, October 17, 2005 7:03 PM
4
Rear Panel Side Panels
1
DC IN
For connection to the supplied AC
power adaptor.
2
TEACHER Jack
For input of the teacher’s instrument.
3
INPUT Jacks
For input of an auxiliary sound
source, such as a compact disc
player, cassette deck, or second
instrument. Since the signals at these
two sets of inputs are mixed, only one
of the sources should be active at a
time.
4
OUTPUT Jacks
For output of the console sound to an
external amplifier/speaker system or
tape recorder.
5
STUDENTS Terminals
For connection to the MLA-100 Stu-
dent Attachment units at each stu-
dent’s instrument.
6
UNIT EXPAND IN & OUT Terminals
For connection of an additional MLC-
100 unit. Connect the OUT terminals
of the intended master unit (the unit to
be monitored from) with the IN termi-
nals of the slave.
1
MIC Jacks
For input of the teacher’s micro-
phone. Connect to the MIC plug on
the HPE-100M headphone/micro-
phone set.
2
PHONES Jacks
For input of the teacher’s head-
phones. Connect to the PHONES
plug on the HPE-100M headphone/
microphone set.
DC IN 10-12V
IN OUT 11521 21 13 11 9 7 5 3
216 14 12 10 8 6 4
TEACHER INPUT
L
R
L
R
OUTPUT
UNIT EXPAND STUDENTS
65
12 3 4
12 12
Left Right
Note:
Use only one set of these jacks
at a time.
MLC-100.book Page 4 Monday, October 17, 2005 7:03 PM
5
System Setup
Student’s Instrument
Student’s Headphone-Microphone Set (HPE-100M)
Student Attachment (MLA-100)
Attach to student’s instrument using heavy duty
double-sided adhesive tape or screw plate.
Connecting Cable (NB-100A, NB-100B or NB-100C)
Teacher’s Headphone-Microphone Set (HPE-100M)
Teaching Console (MLC-100)
Amp/Speaker System
CD Player
Teacher’s Instrument
Supplied AC Power Adaptor
(to AC Outlet)
CAUTION: To protect your hearing,
avoid listening to the MLC-100 at a high
volume level for long periods of time.
6
Operating Instructions
Turning On the
MLC-100 System
To protect the external speaker system
from possible damage (and to avoid an
annoying “pop” in any connected head-
phones), always set the volume controls
of all equipment to 0 or minimum and turn
on the power of the system components
in the following order:
1) the MLC-100 console
2) all connected instruments
3) any connected source (CD player,
cassette deck, etc.)
4) the external speaker system
Setting the Levels
Before conducting a class with the MLC-
100, always make sure the three level
controls – INPUT, OUTPUT and
T.PHONES – are set to the proper levels.
Have the students listen on their head-
phones while you listen on yours, play
your instrument and/or any other audio
source you will be using, talk into your
microphone, and make sure that you and
all students can hear everything properly.
Also, be sure to first set the T.PHONES
control to a position around 2 or 3 o’clock
before adjusting other levels (such as
that of a compact disc player or the
teacher’s instrument). When the control is
set to this position, the teacher will hear
the sources at roughly the same level as
what the students hear, making it easy to
set the proper levels of those sources.
Before conducting a class, set the MLC-
100 for the number of students in the
class. This is important when using the
Automatic Scan function, If fewer than
sixteen students are in the class yet all
student stations are enabled on the MLC-
100, the Automatic Scan function would
needlessly select empty student stations
for monitoring. Enabling specific stations
here lets you avoid Automatic Scanning
of empty student stations. (When the
MLC-100 is turned on, all sixteen stations
are automatically enabled.)
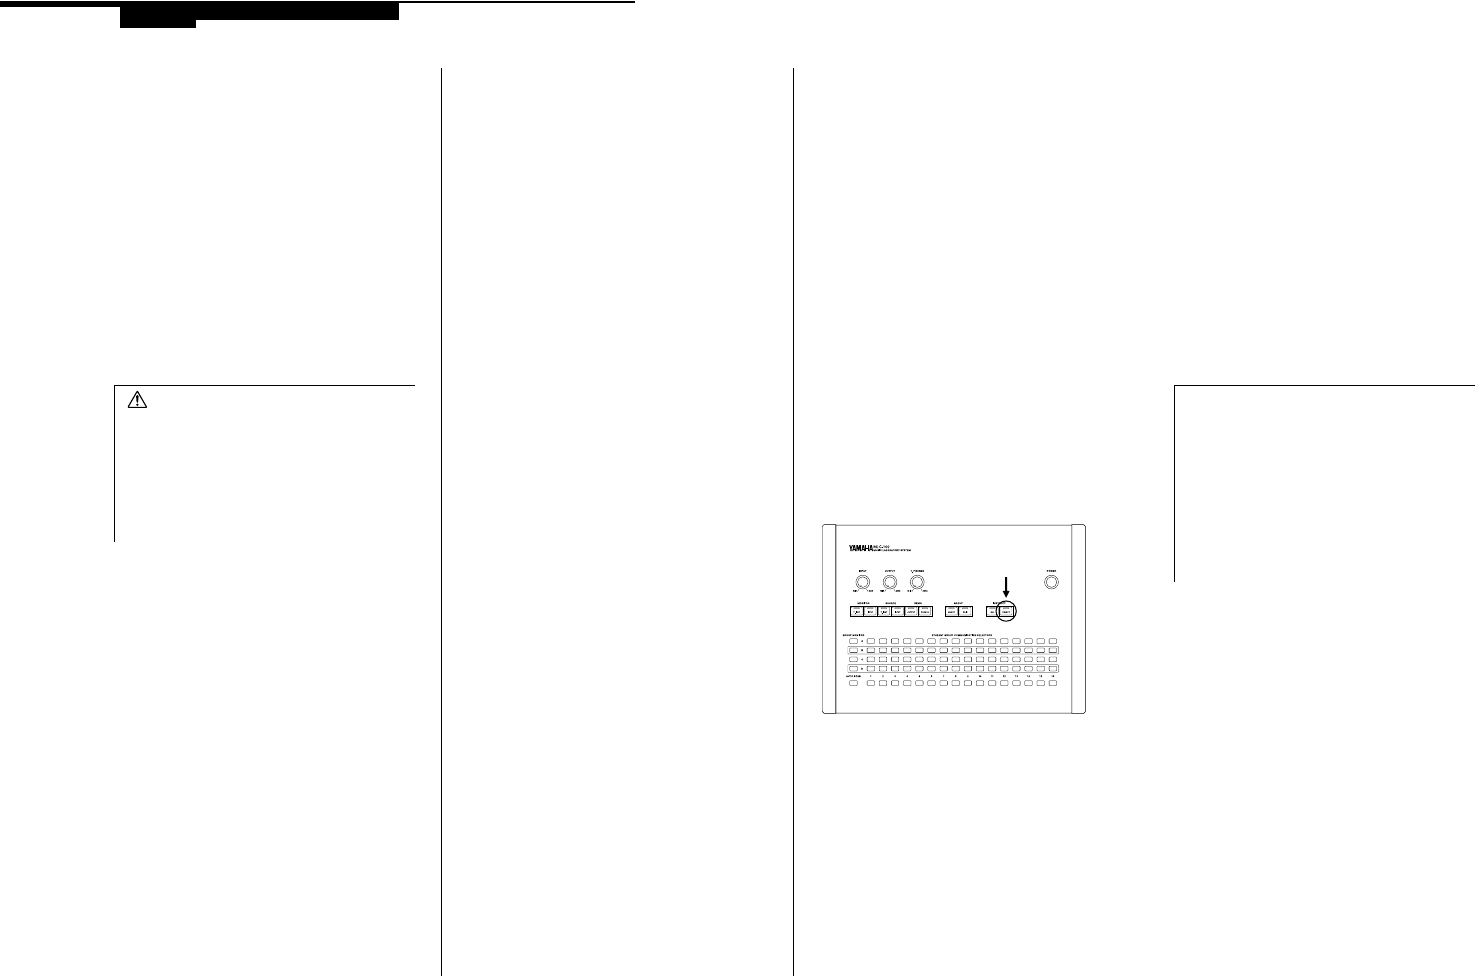
To enable specific student stations:
1.
Press and hold down the
[INSTRUCT] SELECT button for approxi-
mately three seconds. (All enabled Indi-
vidual Student selectors light.)
2.
While holding down the
[INSTRUCT] SELECT button, press those
Individual Student selectors that corre-
spond to the unused student stations. For
example, if student stations 11 and 15 are
empty, press Individual Student selectors
11 and 15.
It is best to have students fill up the lower
numbered stations, if fewer than sixteen
students are present. This not only facili-
tates pair work, but it also lets you use the
following alternate method of enabling
specific empty student stations:
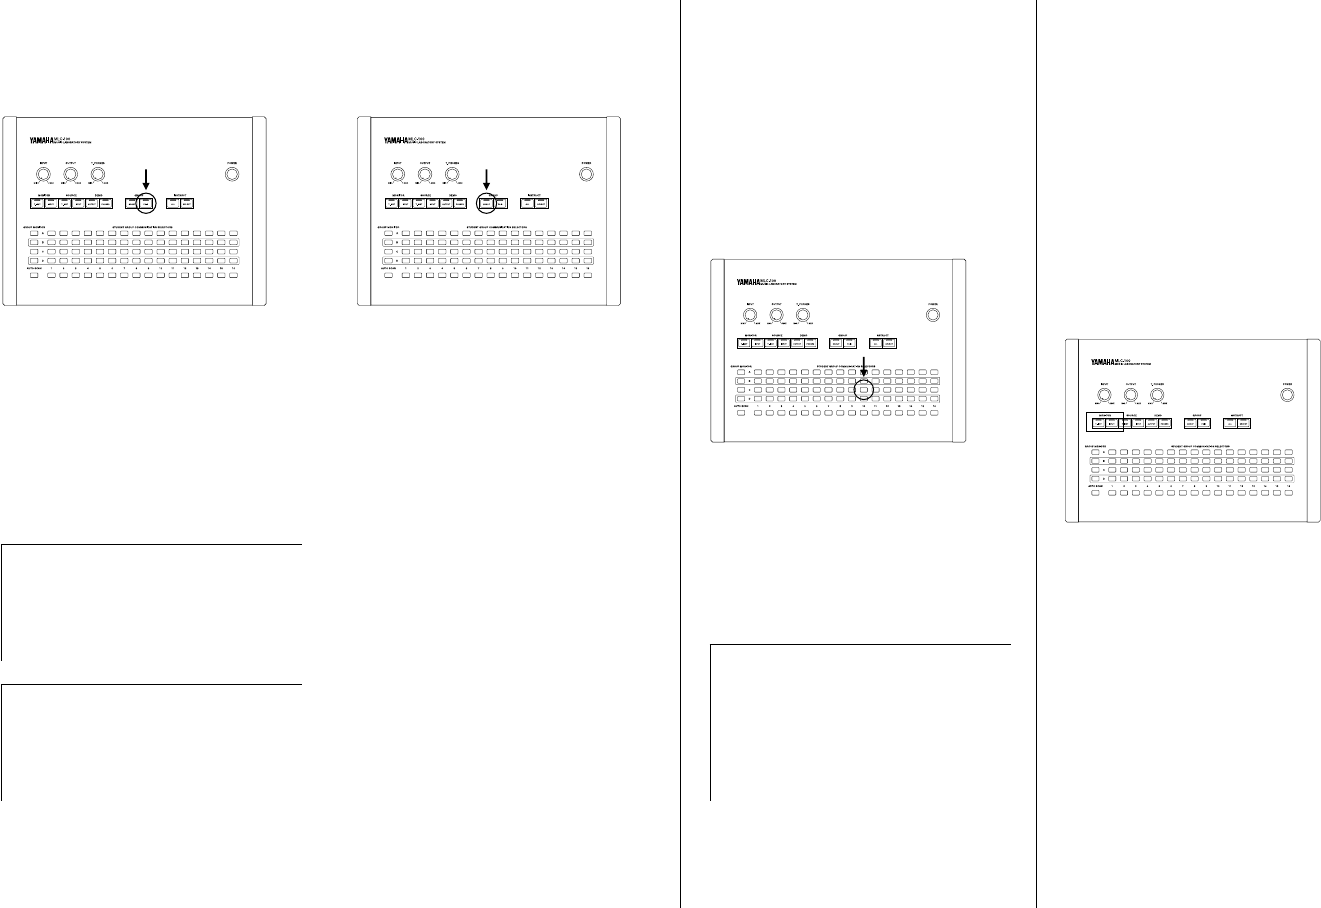
While holding down the [INSTRUCT]
SELECT button, press the STUDENT
GROUP COMMUNICATION SELEC-
TORS in the D row corresponding to the
last occupied student station. All buttons
from station 1 to the station selected light.
CAUTION:
Even when the instru-
ment is turned off, electricity is still
flowing to the instrument at the mini-
mum level. When you are not using the
MLC-100 for a long time, make sure
you unplug the AC power adaptor from
the wall AC outlet.
Setting Up the Console – Enabling
specific Student Stations
Note:
In either of the above methods,
you can hold down the [INSTRUCT]
SELECT button and immediately use
the Individual Student selectors or D
row of STUDENT GROUP COMMUNI-
CATION SELECTORS. All enabled
Individual Student selectors light. Set
them in the same way as described in
step #2 above.
7
Selecting the
Teacher’s Monitor –
Teacher’s Instrument
or Input
Pair and Group Play
To have students play together in pairs:
Press the [GROUP] PAIR button. (The
button lights.)
This automatically pairs all of the students
– student 1 with student 2, student 3 with
student 4, and so on, up to student 15
with student 16. The paired students can
hear each other’s performances and
communicate with each other.
To turn off pair mode, press the PAIR but-
ton again.
To have students play together in groups:
Press the [GROUP] GROUP button. (The
button lights.)
This sets up the system so that the mem-
bers of the currently assigned groups can
hear each other’s performances and
communicate with each other.
(For information on assigning students to
groups, refer to “Assigning Students to
Groups”.)
To turn off group mode, press the GROUP
switch again.
To have all students play together:
Assigning all active students to one
group (group A) can be done in a single
keystroke. To do this, simultaneously
press [GROUP] GROUP and PAIR. (The
GROUP button and all student buttons in
the A row will light.) In this condition, stu-
dents cannot be assigned to any other
group.
To turn off this mode and return to the pre-
vious Group assignment, press the
[GROUP] GROUP button again.
Assigning Students
to Groups
To assign a student to a particular group:
In the appropriate column of STUDENT
GROUP COMMUNICATION SELECTORS,
press the one corresponding to the group
(A, B, C, D) to which you wish to assign
the student. For example, to assign stu-
dent 10 to group C, press the third STU-
DENT GROUP COMMUNICATION
SELECTORS from the top in the row
labeled “10.”
Up to four groups can be made with any
combination of students.
To re-assign a student from one group
to another:
Press the desired group button for the
student.
These Monitor controls let only the
teacher listen to the sources. This would
come in handy, for example, when the
teacher needs to check a CD music
selection before playing it for the stu-
dents, or to run through a part before per-
forming it for the class.
To select the teacher’s instrument or
INPUT signal for teacher monitoring:
Press the appropriate button, [MONITOR]
T.INST (for teacher’s instrument) or
[MONITOR] INPUT (for the INPUT signal),
or both. (The selected button lights.)
The selected sound source is now output
to the teacher’s headphones. Press the
appropriate button again to turn off moni-
toring of the source. The teacher’s instru-
ment monitor is automatically set to on as
a default when the unit is turned on.
Note:
When using Pair mode, make
sure that the students fill up adjacent
numbered stations as much as possi-
ble, to ensure that each student has a
partner.
Note:
If you wish to make nonstan-
dard pair assignments (such as stu-
dent 2 with student 10), use the group
functions to assign the two students to
a group.
Note:
Group settings are memorized
only for as long as the power is on.
When the power is turned off and back
on again, all group settings are can-
celled and the default setting – that of
individual or solo instruction – is
recalled.
MLC-100.book Page 7 Monday, October 17, 2005 7:03 PM
8
Monitoring Students
To monitor an individual student:
Press the appropriate Individual Student
selector. (The button lights.) The selected
student’s voice and performance can be
monitored.
To monitor a group of students:
In the group mode (see page 7), press
the appropriate GROUP MONITOR selec-
tor. (The button lights.) The voices and
performances of the students in the
selected group can then be monitored.
To switch monitoring to an individual stu-
dent of the group, press the appropriate
student’s Individual Student selector. You
can also monitor several different stu-
dents by simultaneously pressing the
appropriate Individual Student selectors.
To turn off monitoring of the selected stu-
dent, press the appropriate Individual
Student selector again. To turn off moni-
toring of the selected group, press the
appropriate GROUP MONITOR selector.
(The lamp will go out.) Alternatively, you
can press one GROUP MONITOR or Indi-
vidual Student selector to switch monitor-
ing to the newly selected group or
student.
Teacher/Student
Communication
To communicate with a student or
group of students:
While a student or group has been
selected for monitoring, press the
[INSTRUCT] SELECT button. (The button
lights.)
In this condition, the teacher can talk to
the selected student or group over the
microphone. To turn off communication,
press the [INSTRUCT] SELECT button
again. You can select another group or
student for communication by pressing
another GROUP MONITOR button or Indi-
vidual Student selector.
In this Instruct condition, pressing the
[MONITOR] T.INST or INPUT buttons
sends the corresponding source
(teacher’s instrument or cassette/com-
pact disk, for example) only to the
selected student or group.
To instruct all students:
Press the [INSTRUCT] ALL button. (The
button lights.)
The students can now hear only the
teacher’s voice.
To turn off instruction for all students,
press the button again. Doing this returns
to the previous console condition or func-
tion, with the exception of the indication
of a student’s call.
Note:
To monitor the students in a
pair, simultaneously press both of the
corresponding Individual Student
selectors.
Note:
To communicate with all present
students, simultaneously hold down
the [INSTRUCT] SELECT button and
press the [INSTRUCT] ALL button.
(The [INSTRUCT] SELECT button and
the corresponding Individual Student
selectors light.)
Note:
While [MONITOR] T.INST and/
or INPUT are on, the teacher’s perfor-
mance and/or input signal can also be
heard.
MLC-100.book Page 8 Monday, October 17, 2005 7:03 PM
9
The [INSTRUCT] ALL button can also be
used for instructing an appropriate group.
To do this, hold down [INSTRUCT] ALL
and press the desired GROUP MONITOR
button. In this condition the members of
the group can hear only the teacher’s
voice.
Student Call
A student can call the teacher by press-
ing the call button on his or her MLA-100
Student Attachment.
The corresponding Individual Student
selector on the console flashes to alert
the teacher as to who is calling.
To answer a student’s call:
Press the flashing Individual Student
selector. The selector will now light con-
tinuously and [INSTRUCT] SELECT will
turn on automatically. The teacher can
then talk with the student.
Automatic Scan
To use the Automatic Scan function:
Press the AUTO SCAN button. (The but-
ton lights.)
Each student is automatically monitored
for three seconds in turn, from 1 to 16.
(Fewer student stations may be moni-
tored if some have been disabled; see
“Setting Up the Console – Enabling spe-
cific Student Stations” on page 6.)
The order and duration of monitoring is
fixed to their default values each time the
power is turned on. However, these can
be changed; instructions are given below.
The Automatic Scan function repeats
indefinitely until the AUTO SCAN button
or one of the DEMO button is pressed.
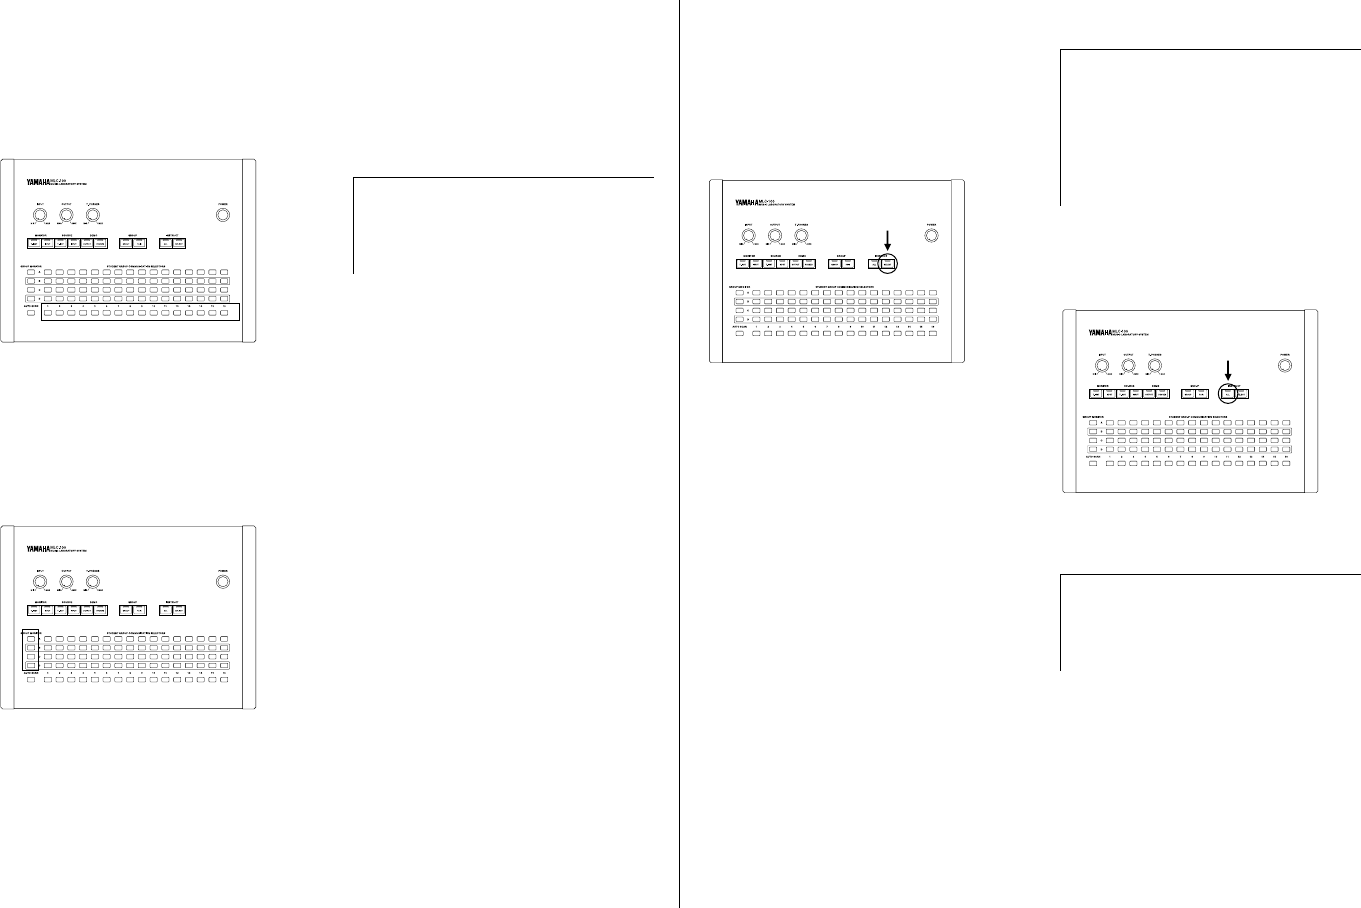
To change the order of Automatic Scan:
While holding down AUTO SCAN (the
button lights), press the GROUP MONI-
TOR selectors or Individual Student
selectors in the order you which to have
them automatically monitored. You can
also select several different students for a
single monitoring scan by simultaneously
pressing the appropriate Individual Stu-
dent selectors.
1) Hold this down...
2) ...and press desired GROUP MONITOR or
Individual Student selectors.
You can also limit the number of students
or groups selected by simply holding
down the AUTO SCAN button and press-
ing the desired button in the D row of the
STUDENT GROUP COMMUNICATION
SELECTORS. For example, by holding
down the AUTO SCAN button and press-
ing STUDENT GROUP COMMUNICA-
TION SELECTOR 5 in the D row, you can
automatically monitor students 1 through
5.
Note:
If the teacher answers a stu-
dent’s call while [INSTRUCT] ALL is
enabled, the entire class will be able to
hear the teacher/student conversation.
Note:
When the [INSTRUCT] ALL but-
ton is lit, all other panel buttons are
disabled (with the exception of the
[MONITOR] T.INST and INPUT but-
tons).
Note:
When several calls are received
at a time, all callers’ selectors flash;
the selector of the earliest student
caller flashes faster than the others.
Press the same student’s button again
to automatically answer the next caller.
Note:
The Automatic Scan function is
interrupted when pressing the follow-
ing buttons:
• An Individual Student selector (for
morning a selected student continu-
ously).
• The [INSTRUCT] SELECT button.
• The [INSTRUCT] ALL button.
MLC-100.book Page 9 Monday, October 17, 2005 7:03 PM

10
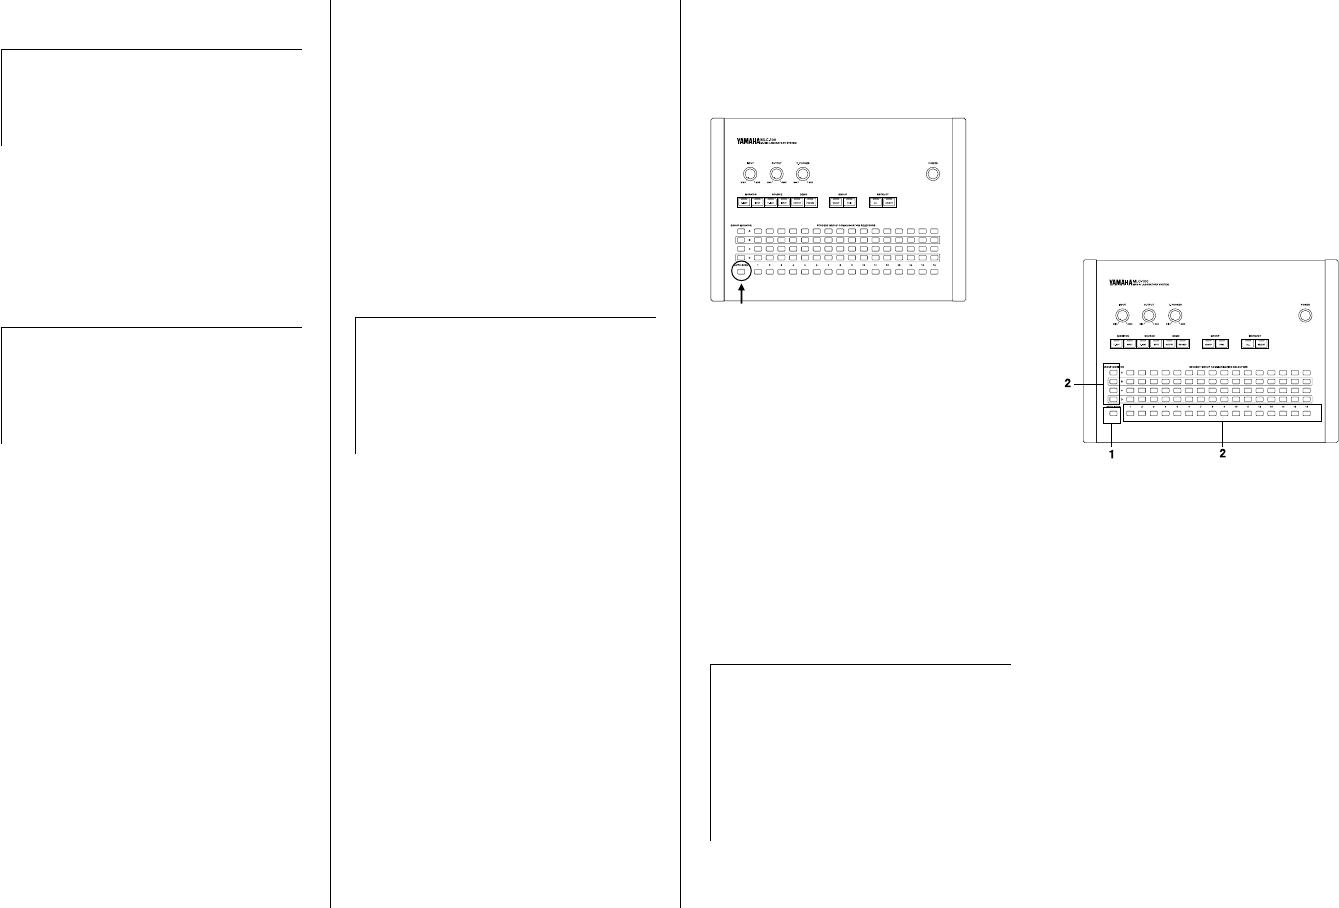
To change the monitoring duration of
Automatic Scan:
Simultaneously hold down the AUTO
SCAN button (the button lights) and
press the STUDENT GROUP COMMUNI-
CATION SELECTORS in the A row corre-
sponding to the amount of seconds you
wish to monitor each student or group.
For example, if you wish to automatically
monitor each successive student for
eight seconds, press of the STUDENT
GROUP COMMUNICATION SELEC-
TORS labeled “8” in the A row.
1) Hold this button... 2) ...and press one of these.
The default duration time of three sec-
onds is automatically set when the unit is
turned on.
To temporarily interrupt Automatic
Scan to instruct an individual student
or group:
1.
While the desired student’s or
group’s indicator is lit, press the
[INSTRUCT] SELECT button. (The button
lights.)
2.
Automatic Scan is interrupted, and
the student being monitored when
SELECT was pressed is selected for
instruction. Only that student can now
hear the teacher’s voice.
3.
To return to the Automatic Scan
function at the point it was interrupted,
press that same student’s Individual Stu-
dent selector. Automatic Scan resumes
from the next student in the order.
Press the same Individual Student selector.
Selecting the Sound
Source – Teacher’s
Instrument or Input
To select the teacher’s instrument or
INPUT signal as the sound source:
Press the appropriate button, [SOURCE]
T.INST (for teacher’s instrument) and/or
[SOURCE] INPUT (for the INPUT signal).
(The selected button lights.)
The selected sound source(s) is now out-
put to all students. Press the appropriate
button again to turn off the source.
You can also direct the sound source to a
particular student or group. To do this,
simultaneously hold down the appropri-
ate SOURCE button (T.INST or INPUT)
and press the GROUP MONITOR or Indi-
vidual Student selector corresponding to
the group or student you wish to have
hear the source.
1) Hold down one of these...
2)...and press the desired GROUP MONITOR or Indi-
vidual Student selector.
Note:
A single student or group can-
not be selected for Automatic Scan. If
you press only one button for the Auto-
matic Scan order (for example, 5 or A),
the MLC-100 automatically returns to
the default Automatic Scan order.
(Remember that this default order also
depends on what student stations
have been enabled; see “Setting Up
the Console – Enabling Specific Stu-
dent Stations” on page 6.) The setting
made is memorized until the unit is
turned off or another setting is made.
Note:
If you change your mind about
the order as you are setting it (while
holding down the AUTO SCAN but-
ton), and press the same Individual
Student selector again to cancel, the
Automatic Scan order returns to the
default setting (1
→
16).
Note:
Note: The setting you make
here is lost when you turn off the
SOURCE button, and the default set-
ting is restored (the source is sent to
all students).
MLC-100.book Page 10 Monday, October 17, 2005 7:03 PM
11
The two different sound sources can be
routed to independent students or
groups.
This means, for example, that you can
have one group hear the teacher’s instru-
ment while another is listening to a music
selection from a CD.
Demo Performance
The Demo function allows all students to
hear an individual or group performance
that the teacher is currently monitoring,
either over their headphones or the room
speakers.
To have all students hear the selected
student or group performance over the
headphones:
1.
First, select monitoring for the indi-
vidual student or group whose perfor-
mance you wish to demonstrate, by
pressing the appropriate GROUP MONI-
TOR or Individual Student selector.
2.
Press the [DEMO] PHONES button.
(The button lights.)
All students can now hear the perfor-
mance of the student or group over their
headphones. To turn off the Demo func-
tion and enable normal teacher-only mon-
itoring, press the [DEMO] PHONES
button again.
Students that are not actually involved in
the performance can play along on their
instrument and hear themselves in a mix
with the performance.
To have all students hear the selected
student or group performance over the
room speakers:
1.
First, select monitoring for the indi-
vidual student or group whose perfor-
mance you wish to demonstrate, by
pressing the appropriate GROUP MONI-
TOR or Individual Student selector.
2.
Press the DEMO OUTPUT button.
(The button lights.)
All students can now hear the perfor-
mance of the student or group over the
room speakers. To turn off the Demo func-
tion, press the [DEMO] OUTPUT button
again.
Note:
The output is cancelled in the
following situations:
• Changing the group assignment the
group mode.
• Selecting pair or group mode from
individual instruction.
• Switching between pair and group
mode.
Note:
You may in the course of a ses-
sion need to check which student or
group is receiving the source sound.
To check which student or group is
receiving the teacher’s instrument, first
hold down [SOURCE] T.INST, then
press [SOURCE] INPUT. To check
which student or group is receiving the
INPUT signal, hold down [SOURCE]
INPUT, then press [SOURCE] T.INST.
The appropriate GROUP MONITOR
and/or Individual Student Selectors
light in indication.
CAUTION:
Answering a student
call in this condition (monitoring over
the headphones) allows all students to
hear the teacher/student conversation.
Note:
All microphones are automati-
cally disabled when [DEMO] OUTPUT
is selected.
Note:
An amplifier must be connected
to the room speakers, since the MLC-
100 cannot power the speakers by
itself.
Note:
In this condition (monitoring
over the room speakers), the
[INSTRUCT] ALL and SELECT buttons
are automatically disabled. Also, the
Student Call function is disabled.
AUTO SCAN 1 2 3
D
C
A
B
MONITOR
INPUT OUTPUT T. PHONES
T. INST
MUSIC LABORATORY SYSTEM
MLC-100
GROUP MONITOR
MAXMINMAXMINMAXMIN
GROUP INSTRUCT
GROUP PAIR
POWER
T. INST
SOURCE DEMO
INPUT PHONESINPUT OUTPUT ALL SELECT
STUDENT GROUP COMMUNICATION SELECTORS
4 5 6 7 8 9 10 11 12 13 14 15 16
12
Using Two MLC-100s
Two MLC-100s can be connected
together in daisy-chain fashion, for
classes exceeding 16 students. Teacher
monitoring, as well as input of the
teacher’s instrument and INPUT signal,
can be done from the master MLC-100
(the first unit in the chain; see connection
illustration below). Though the groups on
each unit are separate (for example, the
A group on one units is separate from the
A group on another), the slave unit can
be monitored from the master. Be sure to
use only NB-100A, NB-100B or NB-100C
cables. The [INSTRUCT] ALL, [DEMO]
OUTPUT and [DEMO] PHONES buttons
on the master also affect the slave instru-
ment as well. Other controls and func-
tions must be executed from each unit.
Specifications
Panel Controls and Terminals
POWER Switch and LED, Level Controls
(INPUT, OUTPUT, T.PHONES), MONITOR
Buttons (T.INST, INPUT), SOURCE But-
tons (T.INST, INPUT), DEMO Buttons
(OUTPUT, PHONES), GROUP Buttons
(GROUP, PAIR), INSTRUCT Buttons (ALL,
SELECT), GROUP MONITOR Selectors
(A, B, C, D), Individual Student Selectors
(1-16), STUDENT GROUP COMMUNICA-
TION SELECTORS (A, B, C, D;
×
16),
AUTO SCAN
Input/Output Jacks
DC IN, TEACHER Instrument, INPUT
×
2,
OUTPUT, STUDENTS Instruments (1-16),
UNIT EXPAND IN, UNIT EXPAND OUT,
Teacher Headset (MIC, PHONES)
Dimensions (W
×
D
×
H)
369
×
260
×
115mm
(14-1/2"
×
10-1/4"
×
4-1/2")
Weight
4.5kg (9 lbs., 15oz.)
Included Accessories
AC Power Adaptor, MLC-100 to Teacher
Instrument Cable (
×
1)
Optional Accessories
MLA-100 Student Attachment, HPE-100M
Headset, Cables: NB-100A (5m), NB-
100B (10m), NB-100C (15m)
* Specifications and descriptions in this owner’s manual are
for information purposes only. Yamaha Corp. reserves the
right to change or modify products or specifications at any
time without prior notice. Since specifications, equipment
or options may not be the same in every locale, please
check with your Yamaha dealer.
UNIT EXPAND
OUT
UNIT EXPAND
IN
NB-100A(100B, 100C)
MASTER
MLC-100
SLAVE
MLC-100
Note: If there is a humming noise in the system, check the cables and
connections. First make sure that all connections are secure and unwind
any cables that have been coiled. If the cable is too long and needs to be
gathered, bundle and tie it. (Do not wind it in a coil.)
MAINTENANCE
■ Location
Do not expose the instrument to the following
conditions to avoid deformation, discoloration, or
more serious damage.
• Direct sunlight (e.g. near a window).
• High temperatures (e.g. near a heat source).
• Excessive humidity.
• Excessive dust.
• Strong vibration.
■ Power Supply
• Use the supplied AC Power Adaptor only. The
use of other adaptors may result in irreparable
damage to both the adaptor and the MLC-100.
•Turn the power switch OFF when the instru-
ment is not in use.
•The power adaptor should be unplugged from
the AC outlet if the instrument is not to be used
for an extended period of time.
• Unplug the power adaptor during electric
storms.
•Avoid plugging the power adaptor into the
same AC outlet as appliances with high power
consumption.
■ Turn Power OFF When Making Connections
•To avoid damage to the instrument and other
devices to which it is connected (a sound sys-
tem, for example), turn the power switches of
all related devices OFF prior to connecting or
disconnecting cables.
■ Handling and Transport
• Never apply excessive force to the controls,
connectors or other parts of the instrument.
• Always unplug cables by gripping the plug
firmly, not by pulling on the cable.
•Disconnect all cables before moving the instru-
ment.
•Physical shocks caused by dropping, bumping,
or placing heavy objects on the instrument can
result in scratches and more serious damage.
■ Cleaning
• Clean the cabinet and panel with a dry soft
cloth.
•A slightly damp cloth may be used to remove
stubborn grime and dirt.
• Never use cleaners such as alcohol or thinner.
•Avoid placing vinyl objects on top of the instru-
ment (vinyl can stick to and discolor the sur-
face).
■ Electrical Interference
• This instrument contains digital circuitry and
may cause interference if placed too close to
radio or television receivers. If this occurs,
move the instrument further away from the
affected equipment.
■ Service and Modification
• The MLC-100 contains no user serviceable
parts. Opening it or tampering with it in anyway
can lead to irreparable damage and possibly
electric shock. Refer all servicing to qualified
YAMAHA personnel.
YAMAHA is not responsible for damage caused by
improper handling or operation.
MLC-100.book Page 12 Monday, October 17, 2005 7:03 PM

The serial number of this product may be found on the bottom of the
unit. You should note this serial number in the space provided below
and retain this manual as a permanent record of your purchase to aid
identification in the event of theft.
Model No.
Serial No.
(bottom)
OBSERVERA!
Apparaten kopplas inte ur växelströmskällan (nätet) så länge som den
ar ansluten till vägguttaget, även om själva apparaten har stängts av.
ADVARSEL:
Netspæendingen til dette apparat er IKKE afbrudt,
sålæenge netledningen siddr i en stikkontakt, som er t endt — også
selvom der or slukket på apparatets afbryder.
VAROITUS:
Laitteen toisiopiiriin kytketty käyttökytkin ei irroita koko
laitetta verkosta.
(standby)
MLC-100.book Page 2 Monday, October 17, 2005 7:03 PM
For details of products, please contact your near-
est Yamaha representative or the authorized dis-
tributor listed below.
Pour plus de détails sur les produits, veuillez-vous
adresser à Yamaha ou au distributeur le plus proche
de vous figurant dans la liste suivante.
Die Einzelheiten zu Produkten sind bei Ihrer
unten aufgeführten
Niederlassung und bei Yamaha Vertragshändlern
in den jeweiligen Bestimmungsländern erhältlich.
Para detalles sobre productos, contacte su tienda
Yamaha más cercana o el distribuidor autorizado
que se lista debajo.
CANADA
Yamaha Canada Music Ltd.
135 Milner Avenue, Scarborough, Ontario,
M1S 3R1, Canada
Tel: 416-298-1311
U.S.A.
Yamaha Corporation of America
6600 Orangethorpe Ave., Buena Park, Calif. 90620,
U.S.A.
Tel: 714-522-9011
MEXICO
Yamaha de México S.A. de C.V.
Calz. Javier Rojo Gómez #1149,
Col. Guadalupe del Moral
C.P. 09300, México, D.F., México
Tel: 55-5804-0600
BRAZIL
Yamaha Musical do Brasil Ltda.
Av. Reboucas 2636-Pinheiros CEP: 05402-400
Sao Paulo-SP. Brasil
Tel: 011-3085-1377
ARGENTINA
Yamaha Music Latin America, S.A.
Sucursal de Argentina
Viamonte 1145 Piso2-B 1053,
Buenos Aires, Argentina
Tel: 1-4371-7021
PANAMA AND OTHER LATIN
AMERICAN COUNTRIES/
CARIBBEAN COUNTRIES
Yamaha Music Latin America, S.A.
Torre Banco General, Piso 7, Urbanización Marbella,
Calle 47 y Aquilino de la Guardia,
Ciudad de Panamá, Panamá
Tel: +507-269-5311
THE UNITED KINGDOM
Yamaha-Kemble Music (U.K.) Ltd.
Sherbourne Drive, Tilbrook, Milton Keynes,
MK7 8BL, England
Tel: 01908-366700
IRELAND
Danfay Ltd.
61D, Sallynoggin Road, Dun Laoghaire, Co. Dublin
Tel: 01-2859177
GERMANY
Yamaha Music Central Europe GmbH
Siemensstraße 22-34, 25462 Rellingen, Germany
Tel: 04101-3030
SWITZERLAND/LIECHTENSTEIN
Yamaha Music Central Europe GmbH,
Branch Switzerland
Seefeldstrasse 94, 8008 Zürich, Switzerland
Tel: 01-383 3990
AUSTRIA
Yamaha Music Central Europe GmbH,
Branch Austria
Schleiergasse 20, A-1100 Wien, Austria
Tel: 01-60203900
CZECH REPUBLIC/SLOVAKIA/
HUNGARY/SLOVENIA
Yamaha Music Central Europe GmbH,
Branch Austria, CEE Department
Schleiergasse 20, A-1100 Wien, Austria
Tel: 01-602039025
POLAND
Yamaha Music Central Europe GmbH
Sp.z. o.o. Oddzial w Polsce
ul. 17 Stycznia 56, PL-02-146 Warszawa, Poland
Tel: 022-868-07-57
THE NETHERLANDS/
BELGIUM/LUXEMBOURG
Yamaha Music Central Europe GmbH, Branch Benelux
Clarissenhof 5-b, 4133 AB Vianen, The Netherlands
Tel: 0347-358 040
FRANCE
Yamaha Musique France
BP 70-77312 Marne-la-Vallée Cedex 2, France
Tel: 01-64-61-4000
ITALY
Yamaha Musica Italia S.P.A.
Viale Italia 88, 20020 Lainate (Milano), Italy
Tel: 02-935-771
SPAIN/PORTUGAL
Yamaha-Hazen Música, S.A.
Ctra. de la Coruna km. 17, 200, 28230
Las Rozas (Madrid), Spain
Tel: 91-639-8888
GREECE
Philippos Nakas S.A. The Music House
147 Skiathou Street, 112-55 Athens, Greece
Tel: 01-228 2160
SWEDEN
Yamaha Scandinavia AB
J. A. Wettergrens Gata 1
Box 30053
S-400 43 Göteborg, Sweden
Tel: 031 89 34 00
DENMARK
YS Copenhagen Liaison Office
Generatorvej 6A
DK-2730 Herlev, Denmark
Tel: 44 92 49 00
FINLAND
F-Musiikki Oy
Kluuvikatu 6, P.O. Box 260,
SF-00101 Helsinki, Finland
Tel: 09 618511
NORWAY
Norsk filial av Yamaha Scandinavia AB
Grini Næringspark 1
N-1345 Østerås, Norway
Tel: 67 16 77 70
ICELAND
Skifan HF
Skeifan 17 P.O. Box 8120
IS-128 Reykjavik, Iceland
Tel: 525 5000
OTHER EUROPEAN COUNTRIES
Yamaha Music Central Europe GmbH
Siemensstraße 22-34, 25462 Rellingen, Germany
Tel: +49-4101-3030
Yamaha Corporation,
Asia-Pacific Music Marketing Group
Nakazawa-cho 10-1, Hamamatsu, Japan 430-8650
Tel: +81-53-460-2312
TURKEY/CYPRUS
Yamaha Music Central Europe GmbH
Siemensstraße 22-34, 25462 Rellingen, Germany
Tel: 04101-3030
OTHER COUNTRIES
Yamaha Music Gulf FZE
LB21-128 Jebel Ali Freezone
P.O.Box 17328, Dubai, U.A.E.
Tel: +971-4-881-5868
THE PEOPLE’S REPUBLIC OF CHINA
Yamaha Music & Electronics (China) Co.,Ltd.
25/F., United Plaza, 1468 Nanjing Road (West),
Jingan, Shanghai, China
Tel: 021-6247-2211
HONG KONG
Tom Lee Music Co., Ltd.
11/F., Silvercord Tower 1, 30 Canton Road,
Tsimshatsui, Kowloon, Hong Kong
Tel: 2737-7688
INDONESIA
PT. Yamaha Music Indonesia (Distributor)
PT. Nusantik
Gedung Yamaha Music Center, Jalan Jend. Gatot
Subroto Kav. 4, Jakarta 12930, Indonesia
Tel: 21-520-2577
KOREA
Yamaha Music Korea Ltd.
Tong-Yang Securities Bldg. 16F 23-8 Yoido-dong,
Youngdungpo-ku, Seoul, Korea
Tel: 02-3770-0660
MALAYSIA
Yamaha Music Malaysia, Sdn., Bhd.
Lot 8, Jalan Perbandaran, 47301 Kelana Jaya,
Petaling Jaya, Selangor, Malaysia
Tel: 3-78030900
PHILIPPINES
Yupangco Music Corporation
339 Gil J. Puyat Avenue, P.O. Box 885 MCPO,
Makati, Metro Manila, Philippines
Tel: 819-7551
SINGAPORE
Yamaha Music Asia Pte., Ltd.
#03-11 A-Z Building
140 Paya Lebor Road, Singapore 409015
Tel: 747-4374
TAIWAN
Yamaha KHS Music Co., Ltd.
3F, #6, Sec.2, Nan Jing E. Rd. Taipei.
Taiwan 104, R.O.C.
Tel: 02-2511-8688
THAILAND
Siam Music Yamaha Co., Ltd.
891/1 Siam Motors Building, 15-16 floor
Rama 1 road, Wangmai, Pathumwan
Bangkok 10330, Thailand
Tel: 02-215-2626
OTHER ASIAN COUNTRIES
Yamaha Corporation,
Asia-Pacific Music Marketing Group
Nakazawa-cho 10-1, Hamamatsu, Japan 430-8650
Tel: +81-53-460-2317
AUSTRALIA
Yamaha Music Australia Pty. Ltd.
Level 1, 99 Queensbridge Street, Southbank,
Victoria 3006, Australia
Tel: 3-9693-5111
NEW ZEALAND
Music Houses of N.Z. Ltd.
146/148 Captain Springs Road, Te Papapa,
Auckland, New Zealand
Tel: 9-634-0099
COUNTRIES AND TRUST
TERRITORIES IN PACIFIC OCEAN
Yamaha Corporation,
Asia-Pacific Music Marketing Group
Nakazawa-cho 10-1, Hamamatsu, Japan 430-8650
Tel: +81-53-460-2312
NORTH AMERICA
CENTRAL & SOUTH AMERICA
EUROPE
AFRICA
MIDDLE EAST
ASIA
OCEANIA
[CL] 37
HEAD OFFICE
Yamaha Corporation, Pro Audio & Digital Musical Instrument Division
Nakazawa-cho 10-1, Hamamatsu, Japan 430-8650
Tel: +81-53-460-3273
U.R.G., Pro Audio & Digital Musical Instrument Division, Yamaha Corporation
©
2001 Yamaha Corporation
******* ********.*-**** Printed in *****
Clavinova Web site (English only)
http://www.yamahaclavinova.com/
Yamaha Manual Library
http://www.yamaha.co.jp/manual/
MLC-100.book Page 1 Monday, October 17, 2005 7:03 PM
