User Manual
AVEEA71102A
Wichtiger Hinweis: Garantie-Information für Kunden in der EWR* und der Schweiz Deutsch
Remarque importante: informations de garantie pour les clients de l’EEE et la Suisse Français
Belangrijke mededeling: Garantie-informatie voor klanten in de EER* en Zwitserland Nederlands
Aviso importante: información sobre la garantía para los clientes del EEE* y Suiza Español
Avviso importante: informazioni sulla garanzia per i clienti residenti nell’EEA* e in Svizzera Italiano
Viktigt: Garantiinformation för kunder i EES-området* och Schweiz Svenska
Für nähere Garantie-Information über dieses Produkt von Yamaha, sowie über den Pan-EWR*- und Schweizer Garantieservice, besuchen Sie bitte entweder die folgend angegebene Internetadresse (eine druckfähige
Version befindet sich auch auf unserer Webseite), oder wenden Sie sich an den für Ihr Land zuständigen Yamaha-Vertrieb. *EWR: Europäischer Wirtschaftsraum
Pour des informations plus détaillées sur la garantie de ce produit Yamaha et sur le service de garantie applicable dans l’ensemble de l’EEE ainsi qu’en Suisse, consultez notre site Web à l’adresse ci-dessous (le
fichier imprimable est disponible sur notre site Web) ou contactez directement Yamaha dans votre pays de résidence. * EEE : Espace Economique Européen
Voor gedetailleerde garantie-informatie over dit Yamaha-product en de garantieservice in heel de EER* en Zwitserland, gaat u naar de onderstaande website (u vind een afdrukbaar bestand op onze website) of neemt
u contact op met de vertegenwoordiging van Yamaha in uw land. * EER: Europese Economische Ruimte
Para una información detallada sobre este producto Yamaha y sobre el soporte de garantía en la zona EEE* y Suiza, visite la dirección web que se incluye más abajo (la version del archivo para imprimir esta disponible
en nuestro sitio web) o póngase en contacto con el representante de Yamaha en su país. * EEE: Espacio Económico Europeo
Per informazioni dettagliate sulla garanzia relativa a questo prodotto Yamaha e l’assistenza in garanzia nei paesi EEA* e in Svizzera, potete consultare il sito Web all’indirizzo riportato di seguito (è disponibile il file in
formato stampabile) oppure contattare l’ufficio di rappresentanza locale della Yamaha. * EEA: Area Economica Europea
För detaljerad information om denna Yamahaprodukt samt garantiservice i hela EES-området* och Schweiz kan du antingen besöka nedanstående webbaddress (en utskriftsvänlig fil finns på webbplatsen) eller
kontakta Yamahas officiella representant i ditt land. * EES: Europeiska Ekonomiska Samarbetsområdet
Important Notice: Guarantee Information for customers in EEA* and Switzerland English
For detailed guarantee information about this Yamaha product, and Pan-EEA* and Switzerland warranty service, please either visit the website address below (Printable file is available at our website) or contact the
Yamaha representative office for your country. * EEA: European Economic Area
English
http://europe.yamaha.com/warranty/
© 2014 Yamaha Corporation Printed in China CQX1A1839Z
350 dpi_NX-B150_cover_G.indd 1350 dpi_NX-B150_cover_G.indd 1 7/4/2014 5:33:33 PM7/4/2014 5:33:33 PM
2 En
To assure the finest performance, please read this manual carefully. Keep it in a safe
place for future reference.
1 Install this unit in a well ventilated, cool, dry, clean place – away from direct
sunlight, heat sources, vibration, dust, moisture, and/or cold.
2 Locate this unit away from other electrical appliances, motors, or transformers to
avoid humming sounds.
3 Do not expose this unit to sudden temperature changes from cold to hot, and do
not locate this unit in an environment with high humidity (i.e. a room with a
humidifier) to prevent condensation inside this unit, which may cause an electrical
shock, fire, damage to this unit, and/or personal injury.
4 Avoid installing this unit where foreign objects may fall onto this unit and/or this
unit may be exposed to liquid dripping or splashing. On the top of this unit, do
NOT place:
– Other components, as they may cause damage and/or discoloration on the
surface of this unit.
– Burning objects (i.e. candles), as they may cause fire, damage to this unit, and/
or personal injury.
– Containers with liquid in them, as they may fall and liquid may cause electrical
shock to the user and/or damage to this unit.
5 Do not cover this unit with a newspaper, tablecloth, curtain, etc. in order not to
obstruct heat radiation. If the temperature inside this unit rises, it may cause fire,
damage to this unit, and/or personal injury.
6 Do not use force on switches, knobs, and/or cords.
7 When disconnecting the power cable from the AC wall outlet, grasp the AC plug;
do not pull the cord.
8 Do not clean this unit with chemical solvents; this might damage the finish. Use a
clean, dry cloth.
9 Only the voltage specified on this unit must be used. Using this unit with a higher
voltage than specified is dangerous and may cause fire, damage to this unit, and/or
personal injury. Yamaha will not be held responsible for any damage resulting
from use of this unit with a voltage other than that specified.
10 Do not attempt to modify or fix this unit. Contact qualified Yamaha service
personnel when any service is needed. The cabinet should never be opened for any
reasons.
11 When not planning to use this unit for long periods of time (i.e. when going on
vacation), disconnect the power cable from the AC wall outlet.
12 Be sure to read the “Troubleshooting” section regarding common operating errors
before concluding that the unit is faulty.
13 Before moving this unit, press p (power) to turn off the power, and then
disconnect the cables.
14 Be sure to use the power cable supplied with this unit. Using a power cable other
than the one provided may cause fire or damage to this unit.
15 Install this unit near the AC wall outlet and where the power cable can be reached
easily.
16 For added protection for this product during a lightning storm, or when it is left
unattended and unused for long periods of time, unplug it from the AC wall outlet.
This will prevent damage to the product due to lightning and power-line surges.
17 Secure placement or installation is the owner’s responsibility. Yamaha is not liable
for accidents caused by improper placement or installation of speakers.
For U.K. customers
If the socket outlets in the home are not suitable for the plug supplied with this
appliance, it should be cut off and an appropriate 3 pin plug fitted. For details, refer to
the instructions described below.
The plug severed from the mains lead must be destroyed, as a plug with bared flexible
cord is hazardous if engaged in a live socket outlet.
Caution: Read this before operating your unit.
WARNING
TO REDUCE THE RISK OF FIRE OR ELECTRIC SHOCK, DO NOT EXPOSE
THIS UNIT TO RAIN OR MOISTURE.
There is a chance that placing this unit too close to a CRT-based (Braun tube) TV
set might impair picture color. Should this happen, move this unit away from the
TV set.
This unit is not disconnected from the AC power source as long as it is connected
to the AC wall outlet, even if this unit itself is turned off. In this state, this unit is
designed to consume a very small quantity of power.
01En_NX-B150_G.book Page 2 Tuesday, July 1, 2014 1:44 PM
4 En
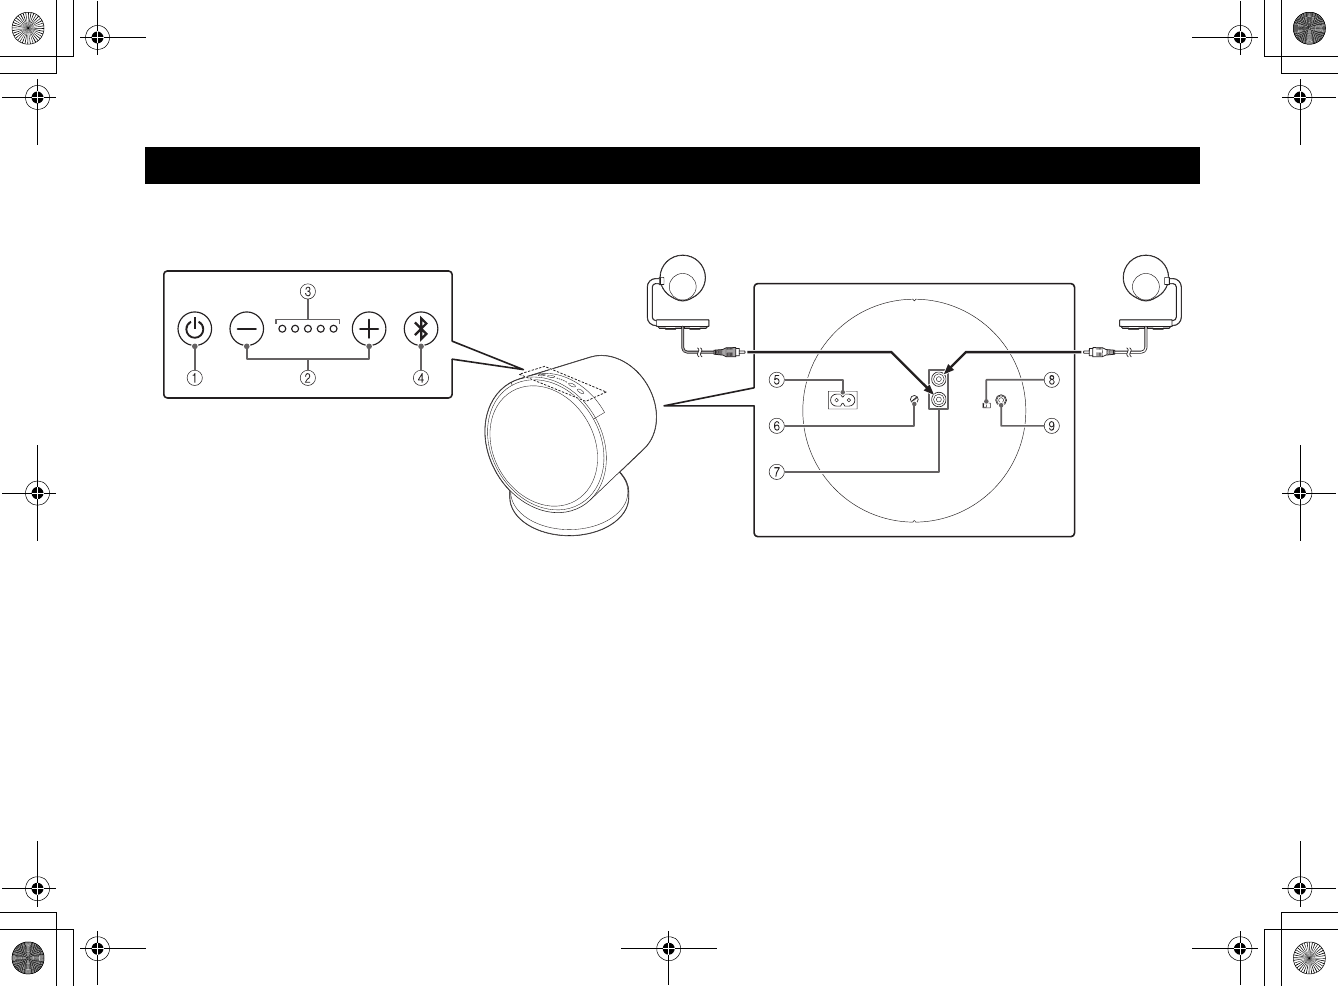
Controls and functions
Satellite speaker
(Right)
(Red) (White)
Bass unit
Satellite speaker
(Left)
Operation panel
Rear panel
01En_NX-B150_G.book Page 4 Tuesday, July 1, 2014 1:44 PM
5 En
English
See the illustration on the left page as well.
■Operation panel
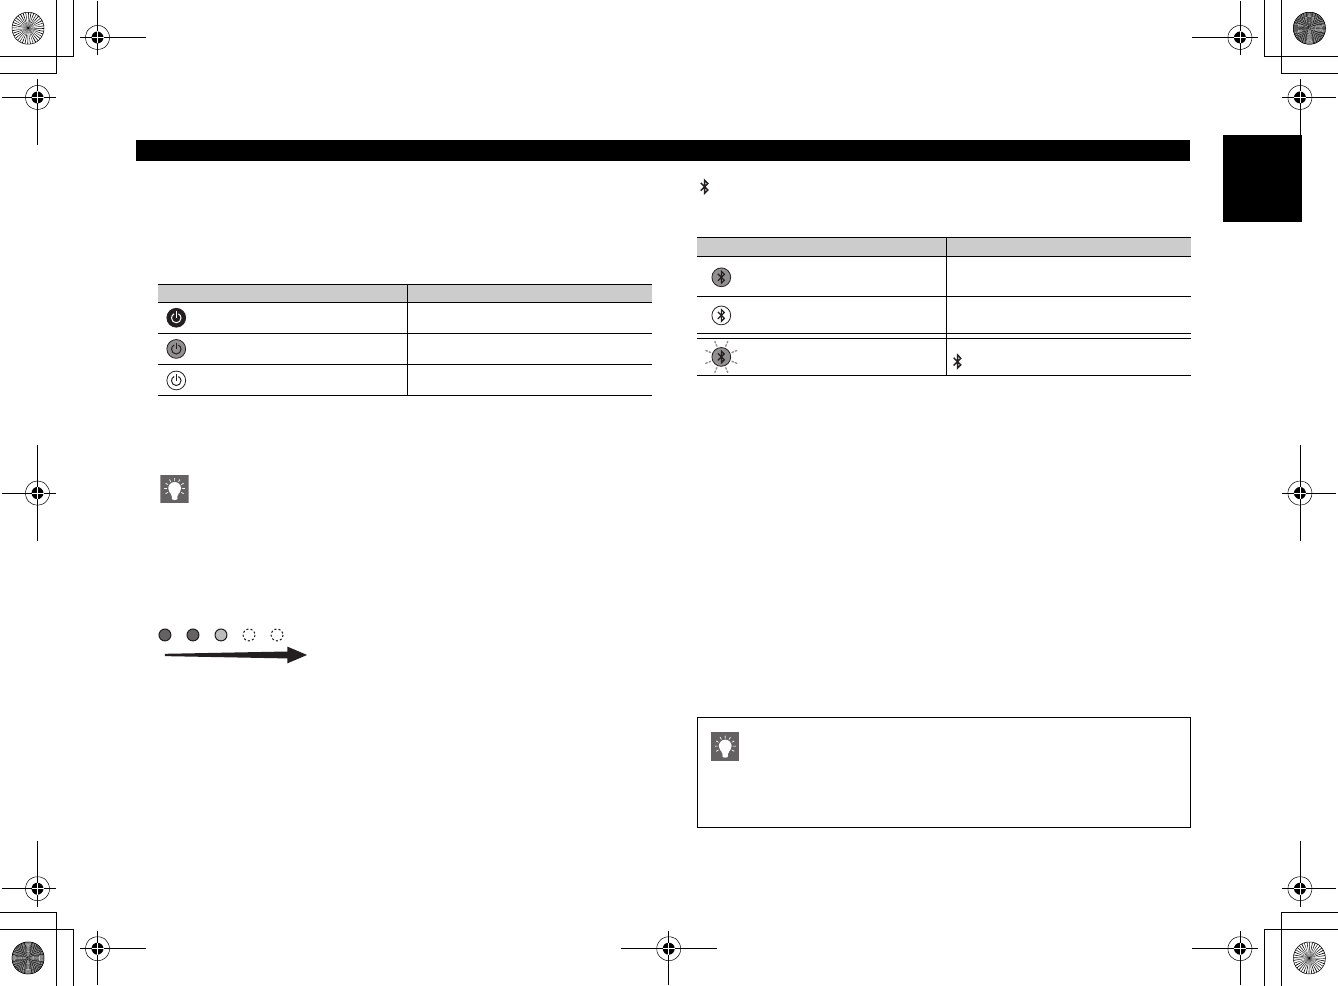
1p (power) button/indicator
When p (power) is pressed, this unit will turn on and the indicator will
light white.
2
–/+ (volume) buttons
Adjusts the volume.
By pressing and holding, the volume changes gradually.
The Loudness control function on the unit compensates bass and high tone sound
which cannot be heard well at a low volume level. You can enjoy music with rich
bass sound even at a low volume level.
3Volume level indicators
Indicate the volume level with brightness.
When sound mutes, the first indicator from the left will flash.
4(Bluetooth) button/indicator
Performs pairing operations and disable a Bluetooth connection.
Indicates the Bluetooth connection status.
■Rear panel
5AC IN jack
Connect the supplied power cable.
6BASS LEVEL (bass level control)
Requires a flathead screwdriver for adjustments.
7TO SPEAKER (speaker jacks)
Connect the speaker cables. (☞page 8)
8AUTO STANDBY switch
•
ON
: Activates the auto-standby function.
(default setting:
ON
☞
page 9)
•
OFF
: Deactivates the auto-standby function. (
☞
page 9)
9AUX (input jack)
Connect to an external device, such as a computer, TV, etc., with the
supplied 3.5 mm stereo mini plug cable.
Controls and functions
Indicator color Power status
(White) On
(Orange) Standby
(Off) Off
Max.
Indicator status Bluetooth connection status
(Blue) Connected
(Off) Not connected
(Flash) Pairing in progress by pressing and holding
(Bluetooth)
Multi-Source Mix
If you play a device connected to AUX and a device connected via a Bluetooth
connection at the same time, the sound will be mixed and output from the
speakers. For example, you can listen to news while playing music.
01En_NX-B150_G.book Page 5 Tuesday, July 1, 2014 1:44 PM
6 En
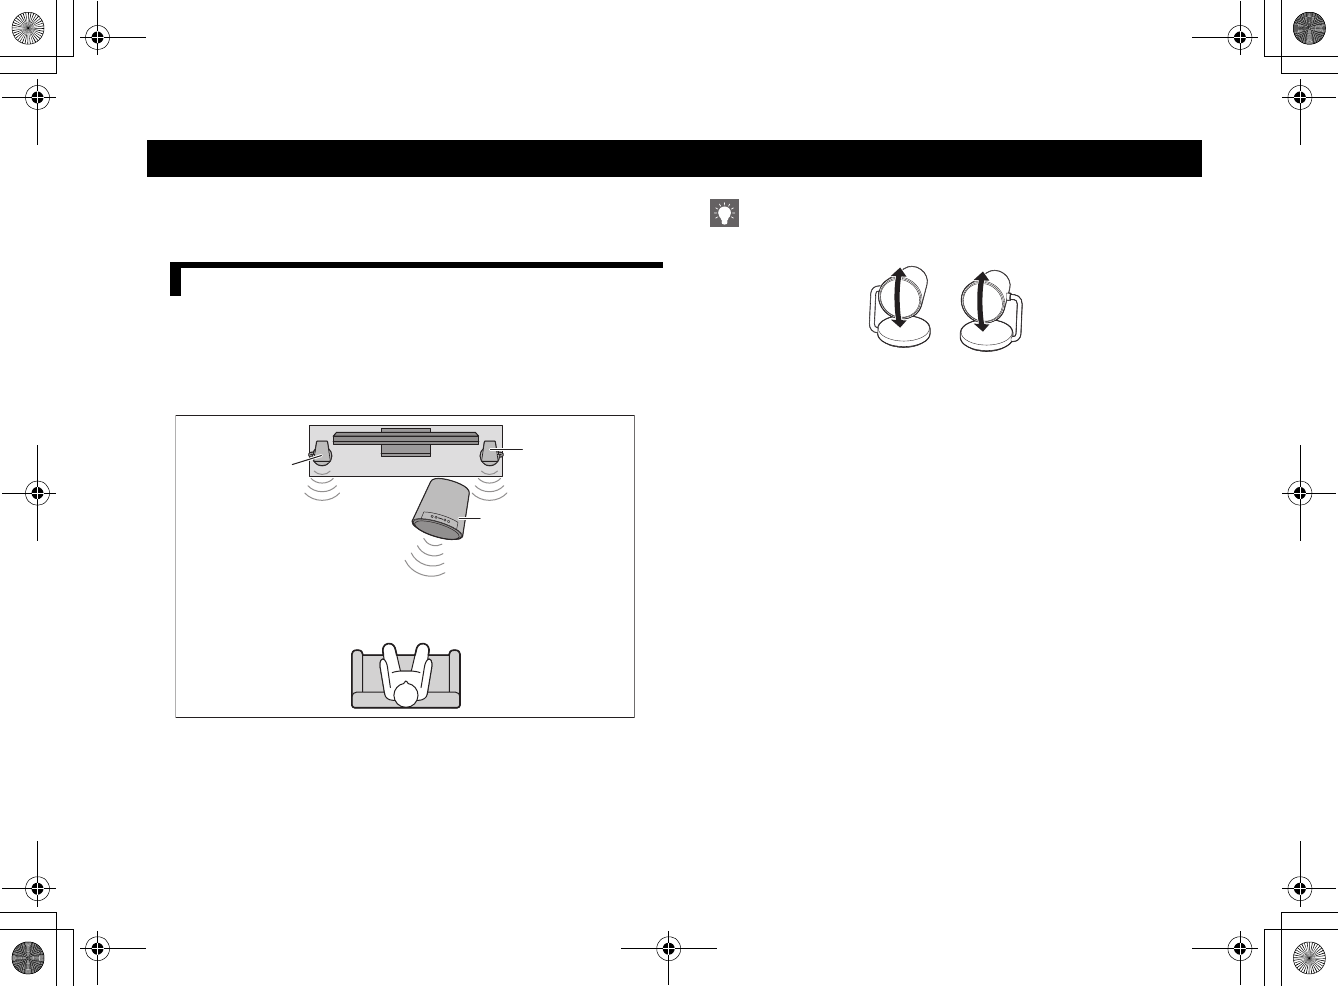
Place all the speakers before connections.
You can also mount satellite speakers on the wall. (
☞
page 7)
Connect speaker cables, and then connect the power cable to a wall outlet.
Place the satellite speaker (Left) on the left side and the satellite speaker
(Right) on the right side correctly as shown below to obtain appropriate
sound at the listening position. The bass unit can be placed at your
desired place.
When outputting TV sound
You can adjust angles of satellite speakers vertically.
Speaker placement/connections
Placing the speakers
Satellite
speaker
(Right)
Satellite
speaker
(Left)
Bass unit
Satellite
speaker
(Left)
Satellite
speaker
(Right)
01En_NX-B150_G.book Page 6 Tuesday, July 1, 2014 1:44 PM
7 En
English
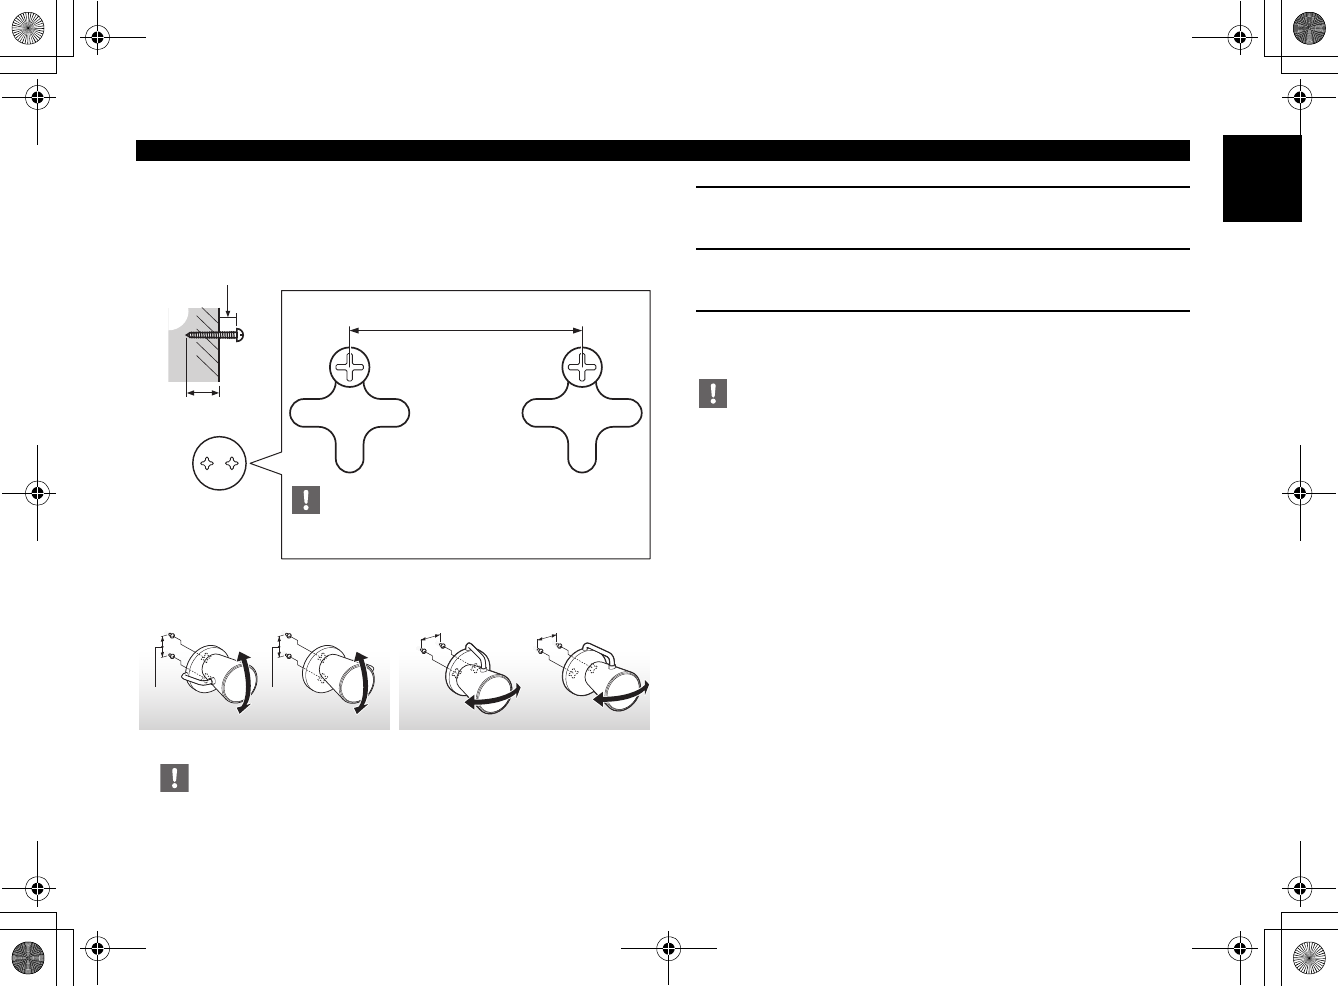
■To mount the satellite speakers on the wall
You can also mount the satellite speakers on the wall as shown below.
Depending on the mounting direction, you can adjust angles of the
satellite speakers vertically or horizontally
To prevent the satellite speakers from falling, place your other hand on the speaker
foot when adjusting angles.
1Prepare 4 commercially available tapping screws 3.5 mm to
4 mm (1/8 in. to 3/16 in.) in diameter.
2 Install 2 screws for the each speaker to a firm wall or wall
support as shown in the illustration on the left.
3 Hang the satellite speakers by their slots onto the
protruding screws.
•Do not mount the satellite speakers on thin plywood or on a wall made of soft
surface material. Otherwise, the screws may pull out of the surface and the
satellite speakers may fall, possibly damaging them or causing personal injury.
•Do not mount the satellite speakers on a wall using nails, adhesives, or unstable
hardware. Long term use and vibration may cause the satellite speakers to fall.
•To avoid accidents resulting from tripping over loose speaker cables, affix the
cables.
•Secure installation is the owner’s responsibility. Yamaha shall not be liable for any
accident caused by improper installation.
•If you are uncertain about the wall strength, please consult an installation
specialist.
Speaker placement/connections
5 mm (13/64 in.)
41 mm (full scale)
(Left) (Right)
To adjust angles vertically
Min. 20 mm
(1-3/16 in.)
41 mm
(1-5/8 in.)
To adjust angles horizontally
Wall/
wall
support
41 mm
(1-5/8 in.) (Left) (Right)
Bottom side of
the satellite
speaker foot Make sure that the screws are securely caught by the narrow
parts of the hole slots.
41 mm
(1-5/8 in.)
41 mm
(1-5/8 in.)
01En_NX-B150_G.book Page 7 Tuesday, July 1, 2014 1:44 PM
8 En
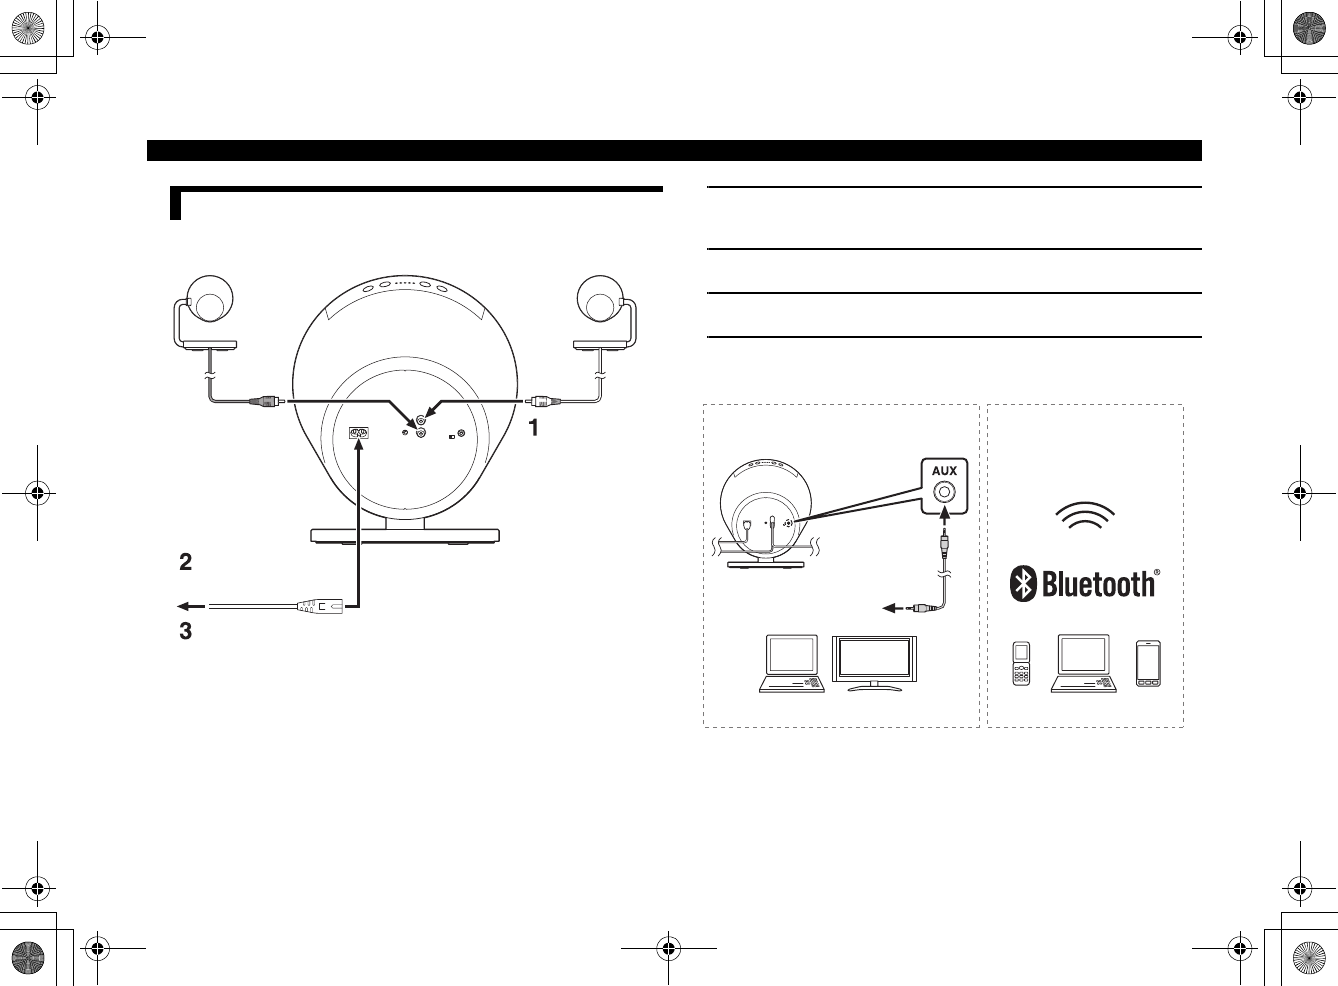
1Connect the speaker cables matching the plug color to the
corresponding jack color.
2Connect the supplied power cable to the AC IN jack.
3Connect the supplied power cable to a wall outlet.
4Connect external devices.
Speaker placement/connections
Connecting the cables
(Right) (Left)
(Red) (White)
Speaker
cable
Power cable
(supplied)
To a wall outlet
Connecting with the supplied cable Using a
Bluetooth
connection
For details on connections, see the owner’s
manual supplied with the external device. See “
Bluetooth
connection and
music playback” (
☞
page 10).
To the output jack of
the connection device
3.5 mm stereo
mini plug
cable
(supplied)
01En_NX-B150_G.book Page 8 Tuesday, July 1, 2014 1:44 PM

9 En
English
Press p (power) to turn on/off the power.
When the power is on, p (power) lights white.
Use the AUTO STANDBY switch to turn on/off the function.
(Default setting: ON)
■Auto-standby function
This unit is equipped with the auto-standby function which
automatically sets this unit to standby mode in 10 minutes if no audio
signal is input from the connection device.
In standby mode, p (power) lights orange.
If playback continues at a very low volume level, this unit will be in standby mode
automatically.
■Auto-power on function
If playback starts on the connection device when this unit is in standby
mode, this unit turns on automatically and outputs sound.
p (power) will change from orange to white.
If the volume from the connection device is too low, this unit may not turn on. In
this case, turn up the volume of the connection device.
Power
Turning on/off the power
Using the AUTO STANDBY switch
On
(white)
Pause Standby
10 minutes
(orange)
Play On
(white)
01En_NX-B150_G.book Page 9 Tuesday, July 1, 2014 1:44 PM
10 En
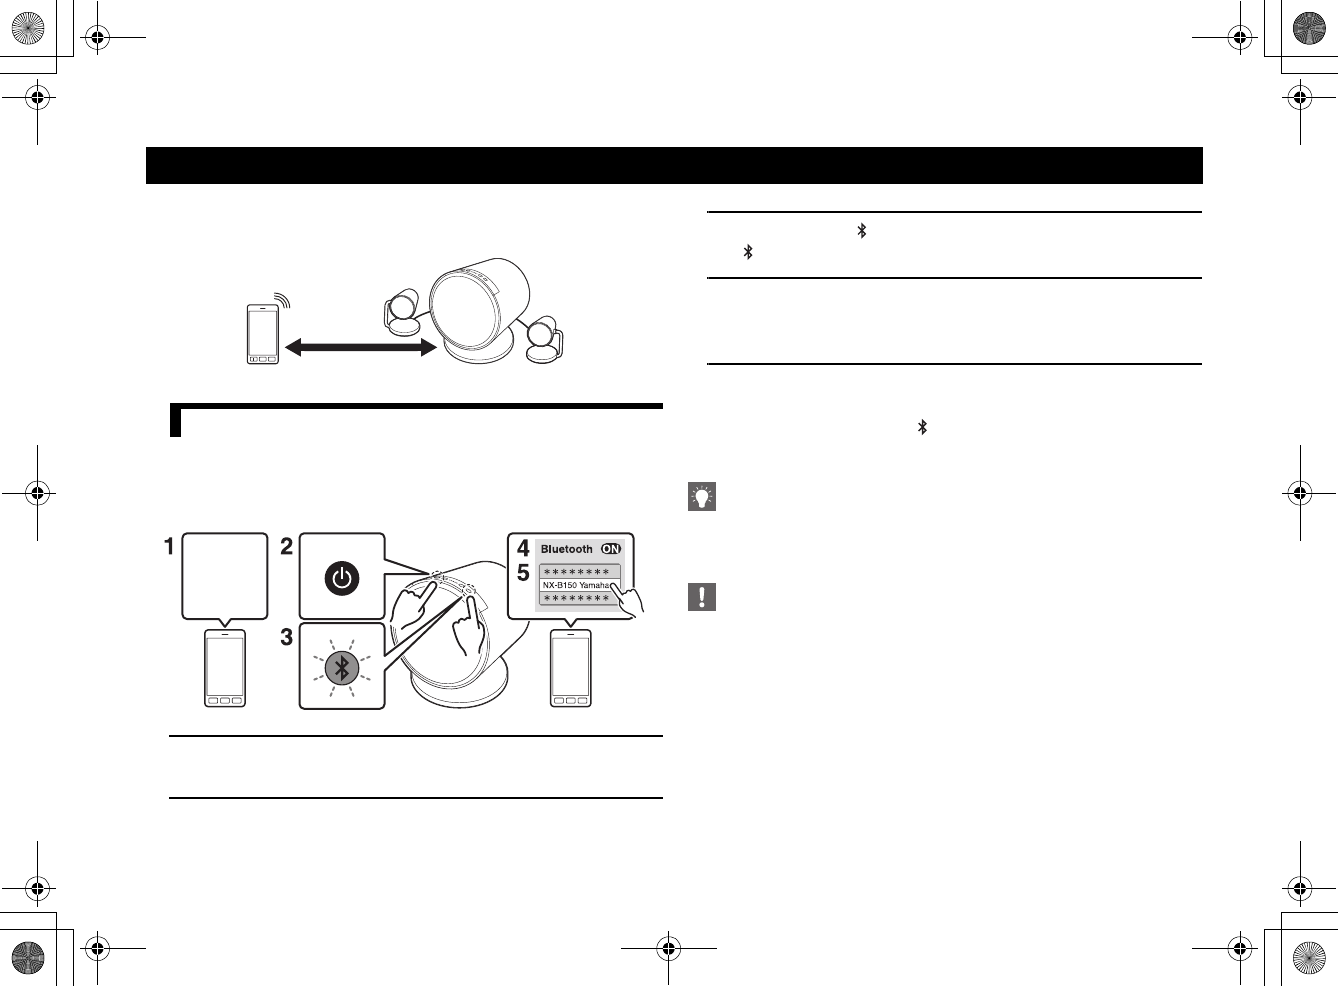
By pairing (registering) and connecting with a Bluetooth device such as a
smartphone, you can enjoy music from this unit wirelessly.
Pairing is an operation to register a device (hereafter referred to as
“connection device”) on this unit for communications. Pairing is
required when making a Bluetooth connection for the first time or
pairing information is deleted.
1Turn on the power of the connection device you want to pair
with.
2Press p (power) to turn on this unit.
3Press and hold (Bluetooth) for a few seconds.
(Bluetooth) will flash and pairing will be in progress.
4Operate the connection device within 5 minutes to enable
the Bluetooth connection.
On the connection device, enable the Bluetooth function.
5On the connection device, select “NX-B150 Yamaha” from the
device list to start pairing.
When pairing completes, (Bluetooth) will stop flashing and light
up.
•If you are prompted to input a passkey, input “0000”.
•For details on connections, see the owner’s manual supplied with the connection
device.
This unit can be paired with up to 8 other devices. When pairing is conducted
successfully with the 9th device, the pairing information of the least recently paired
device will be deleted.
Bluetooth connection and music playback
Pairing (Registering)
Within 10 m (33 ft)
On
Power
on
Within about 5
minutes
(white)
01En_NX-B150_G.book Page 10 Tuesday, July 1, 2014 1:44 PM
11 En
English
1Press p (power) to turn on this unit.
If the most recently connected device is available, it connects to this
unit automatically. In such a case, proceed to step 3.
2Operate the connection device paired with this unit to
establish a Bluetooth connection.
When a Bluetooth connection establishes, (Bluetooth) lights blue.
3Play music on the connection device.
4Adjust the volume using –/+ (volume) on this unit.
Follow one of the procedures below to disable the Bluetooth connection.
(A) Press (Bluetooth) to turn off the indicator.
(B) Press p (power) to turn off this unit.
(C) Disable the Bluetooth function on the connection device.
Only 1 device can connect to this unit at once. Disconnect the current
Bluetooth connection, and then operate the Bluetooth device you want to
connect to this unit to establish a new connection.
This operation deletes all the pairing information from this unit.
1Press p (power) to turn on this unit.
2Press and hold (Bluetooth) for about 10 seconds.
(Bluetooth) will flash quickly and all the pairing information will
be deleted.
Bluetooth connection and music playback
Playing music via a Bluetooth connection
On
Play
(white)
Disabling the Bluetooth connection
Switching the Bluetooth connection
Deleting all the pairing information
01En_NX-B150_G.book Page 11 Tuesday, July 1, 2014 1:44 PM
12 En
Refer to the table below if this unit does not operate properly. If your problem is not listed below, or if the problem persists, turn off this unit, disconnect the
power cable, and contact the nearest authorized Yamaha dealer or service center.
■General
■AUTO STANDBY
Troubleshooting
Problem Cause Solution
No sound is output from
either or both of the
speakers, or the sound is
too quiet.
p (power) is not turned on. Turn on p (power).
When the power is on, p (power) lights white.
The speakers are not connected properly, or this unit and
the connection device are not connected properly. (Or, the
contact is incomplete.)
Make sure the speakers are connected properly. (☞page 8)
Or, reestablish a Bluetooth connection. (☞page 11)
The volume on this unit is too low. Increase the volume by pressing + (volume).
The volume on the connection device is too low. Increase the volume on the connection device.
Problem Cause Solution
The auto-standby
function does not work.
The AUTO STANDBY switch is set to OFF. Set the AUTO STANDBY switch to ON. (☞page 9)
The auto-power on
function does not work.
The volume on the connection device is too low. Increase the volume on the connection device.
01En_NX-B150_G.book Page 12 Tuesday, July 1, 2014 1:44 PM
13 En
English
■Bluetooth
Troubleshooting
Problem Cause Solution
Cannot make this unit
pair with the connection
device, or cannot
establish a connection.
A pairing operation was not done within about 5 minutes
after pressing and holding (Bluetooth).
Perform the pairing operation within about 5 minutes on the
connection device. (☞page 10)
The connection device does not support A2DP. Pair with a device that supports A2DP.
There is a device (microwave oven, wireless LAN, etc.) that
outputs signals in the 2.4 GHz frequency band nearby.
Place this unit apart from such devices.
Another device is already connected to this unit. Disable the current Bluetooth connection. (☞page 11)
The pairing information is stored on the connection device
but has been deleted from this unit.
Delete the pairing information on the connection device,
and then pair with this unit again. (☞page 10)
The Bluetooth function is disabled on the connection device. Enable the Bluetooth function on the connection device.
This unit has not been registered to the Bluetooth device list
on the connection device.
Perform the pairing operation again. (☞page 10)
No sound is produced or
the sound is interrupted
during playback.
The Bluetooth connection of this unit and the connection
device has been disabled.
Reestablish a Bluetooth connection. (☞page 11)
There is a device (microwave oven, wireless LAN, etc.) that
outputs signals in the 2.4 GHz frequency band nearby.
Place this unit apart from such devices.
This unit is not set as an output destination on the
connection device.
Set this unit as an output destination on the connection
device.
01En_NX-B150_G.book Page 13 Tuesday, July 1, 2014 1:44 PM
14 En
■Bluetooth
Bluetooth version ....................................................................................................... Ver. 3.0
Supported profile .......................................................................................................... A2DP
Supported audio codec ......................................................................................... SBC, AAC
RF output power ........................................................................................ Bluetooth Class 2
Maximum communications range .............................. 10 m (33 ft) without interference
■AUX
AUX input jack ............................................................... 3.5 mm (1/8 in) stereo mini jack
■GENERAL
Power voltage/frequency .......................................................... AC 100 to 240 V, 50/60 Hz
Power consumption ......................................................................................................... 7 W
Power consumption when powered off .......................................................... 0.5 W or less
Weight
Bass unit ..................................................................................................... 3.7 kg (8.2 lbs.)
Satellite speakers (including the 4-meter cable) .............................. 0.5 kg (1.0 lbs.) × 2
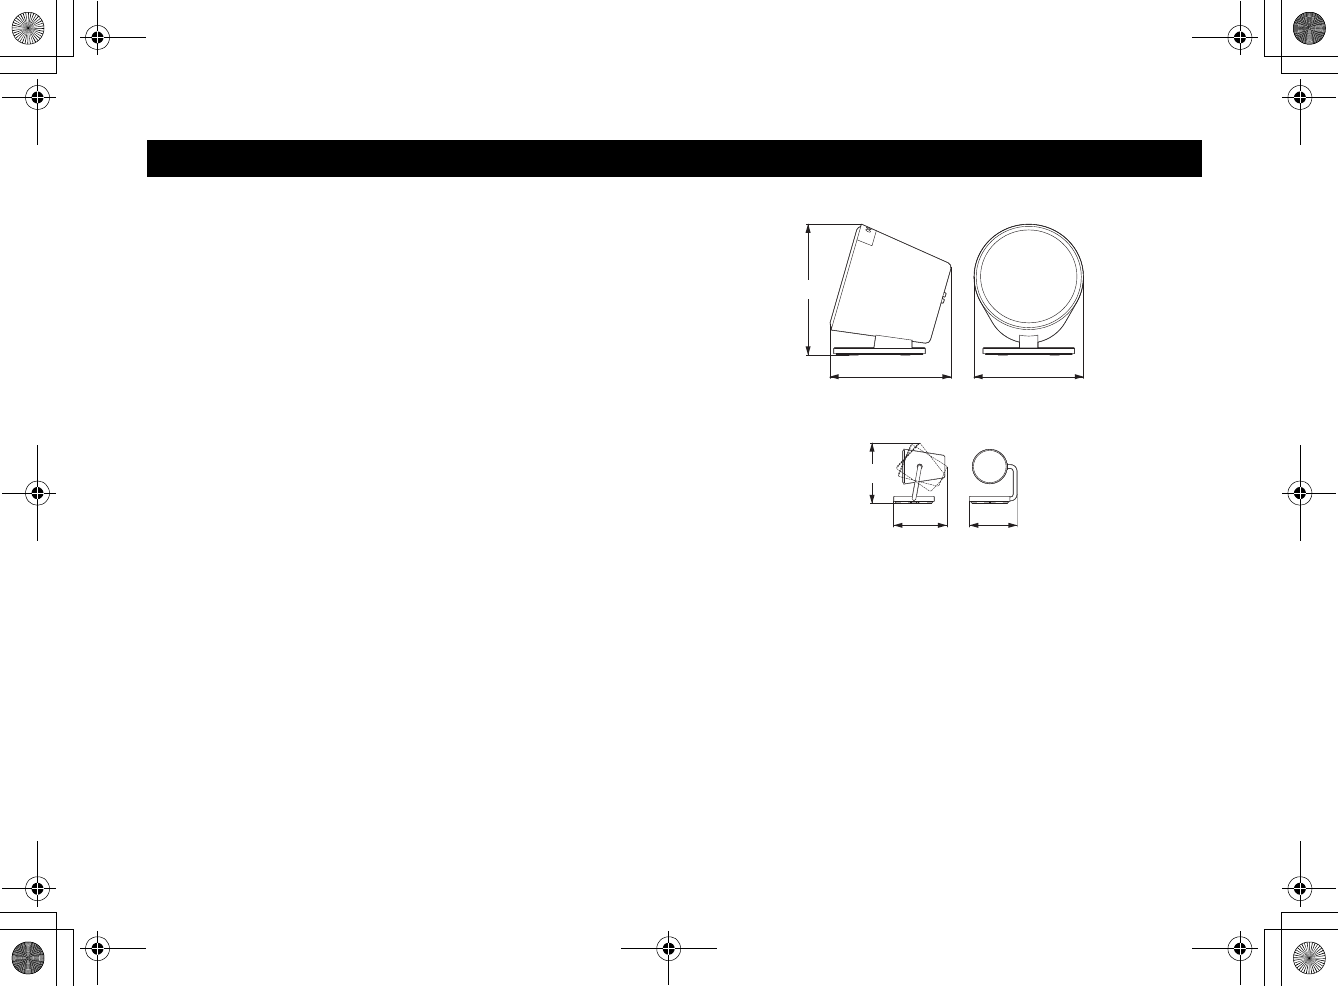
Dimensions
[As of August 2014]
Specifications are subject to change without notice.
Specifications
286 mm (11-1/4 in.)
265 mm
(10-3/8 in.)
240 mm
(9-1/2 in.)
Max. 133 mm (5-1/4 in.)
Max.
116 mm
(4-5/8 in.)
104 mm
(4-1/8 in.)
01En_NX-B150_G.book Page 14 Tuesday, July 1, 2014 1:44 PM
15 En
English
Bluetooth
•Bluetooth is a technology for wireless communication between devices within an
area of about 10 meters (33 ft) employing the 2.4 GHz frequency band, a band
which can be used without a license.
•Bluetooth is a registered trademark of the Bluetooth SIG and is used by Yamaha in
accordance with a license agreement.
Handling Bluetooth communications
• The 2.4 GHz band used by Bluetooth compatible devices is a radio band shared by
many types of equipment.
While Bluetooth compatible devices use a technology minimizing the influence of
other components using the same radio band, such influence may reduce the speed
or distance of communications and in some cases interrupt communications.
• The speed of signal transfer and the distance at which communication is possible
differs according to the distance between the communicating devices, the presence
of obstacles, radio wave conditions and the type of equipment.
• Yamaha does not guarantee all wireless connections between this unit and devices
compatible with Bluetooth function.
Specifications
• Radio waves may affect electro-medical devices.
Do not use this unit near medical devices or inside medical facilities.
• Do not use this unit within 22 cm (9 inches) of persons with a heart pacemaker
implant or defibrillator implant.
The user shall not reverse engineer, decompile, alter, translate or disassemble the
software used in this unit, whether in part or in whole. For corporate users,
employees of the corporation itself as well as its business partners shall observe the
contractual bans stipulated within this clause. If the stipulations of this clause and
this contract cannot be observed, the user shall immediately discontinue using the
software.
We, Yamaha Music Europe GmbH hereby declare that this unit is in compliance with
the essential requirements and other relevant provisions of Directive 1999/5/EC.
Yama h a Music Europe GmbH
Siemensstr. 22-34 25462 Rellingen, Germany
Tel: +49-4101-303-0
Information for Users on Collection and Disposal of Old
Equipment
This symbol on the products, packaging, and/or accompanying
documents means that used electrical and electronic products should
not be mixed with general household waste.
For proper treatment, recovery and recycling of old products, please
take them to applicable collection points, in accordance with your
national legislation and the Directives 2002/96/EC.
By disposing of these products correctly, you will help to save valuable
resources and prevent any potential negative effects on human health and
the environment which could otherwise arise from inappropriate waste
handling.
For more information about collection and recycling of old products,
please contact your local municipality, your waste disposal service or
the point of sale where you purchased the items.
[Information on Disposal in other Countries outside the European
Union]
This symbol is only valid in the European Union. If you wish to
discard these items, please contact your local authorities or dealer and
ask for the correct method of disposal.
01En_NX-B150_G.book Page 15 Tuesday, July 1, 2014 1:44 PM